

Page 1
-
-
STUNT
-
ISLAND
THE STUNT FLYING AND FILMING SIMULATION
-
-
-
HANDBOOK
-
-
-
Page 2
-
-
-
-
-
-
-
-
Introduction
Stunt Island - The Place
In the spring of 1986, one of the movie industry’s most
important deals was being struck. But this deal included no
actors, no screenplay, and no director. Just an island.
Stunt Island was purchased in a joint venture of the major
movie studios, Located off the coast of Southern California,
the island would provide a private place specializing in the
filming of high-risk stunts.
Stunt Island- The Program
Stunt Island, the program, is entertainment software that
recreates the activities of Stunt Island, the place.
You’ll have the opportunity to enter the world of film
production as a stunt pilot, editor, director, and/or set designer
(you can participate in as few or as many of these activities as
you want). No other program has this range of activities set
behind the scenes of Hollywood.
-
-
-
-
-
-
During the past decade, obtaining permits to perform stunts
in public areas became an increasingly difficult task for the
film studios, Because stunts had evolved into sophisticated,
-
extravagant, and incendiary productions
tracks blowing up, airplanes crash-landing in congested areas,
multiple car crashes in crowded streets - the pre-filming
logistics of acquiring a location and acceptable film time were
becoming just as difficult as filming the stunt itself.
Having a private place tailored to handle high-risk activities
would allow the movie studios the opportunity to invest valu-
-
able time
work - into more critical stunt production issues.
otherwise spent on pre-production administrative
entire housing
-
Stunt Island is the worlds first and only stunt haven. If a stunt
needs to be done, the only limitations are talent, imagination,
and physics.
Introduction
Page 3

Table of Contents
Chapter 1: About Stunt Island
Your Career Opportunities
on Stunt Island.. ................................
About This Handbook..
About Your Mouse, Joystick,
or Keyboard
The Movie Production Process .............. .
......................................
Chapter 2: Setting up the Program ......
Equipment You’ll Need
Installing Stunt Island ........................ .12
Changing the Setup
Starting Stunt Island
Exiting Stunt Island.. ........................... .17
The Places on Stunt Island.. ................ .18
Input Devices Used in Stunt Island......2 0
Selecting an
Changing Numbers
Selecting an Item From a List
Joystick Users..
Joystick Calibration Screen ............ .22
Save and Load File Requesters
............................. .14
............................ .14
Onscreen
.................................
Chapter 3: Aircraft
Checkout Procedures..
Aircraft vs. Airplane..
Aircraft Availability
Onscreen Gauges..
Flying Stunt Island Aircraft................
........................... .27
.............................. .28
............................... .28
................
..........................
.11
........................ 11
Option .........20
........................
.21
..........
22
............ .24
......................... .27
..3 0
22
Flight
Controls..
Neutral Position of Control Stick....3
Pitch.. .............................................. .31
.7
.7
7
.8
Roll
................................................... 32
Yaw..
................................................. 32
Using the Rudder
Using the Ailerons
Engine Power Controls..
Taking Off and Landing ...................... .34
Taking Off ....................................... .34
Using Flaps for Takeoff. ................. .34
Landing
Landing on a Runway..
Ending Flight Without Landing......3 6
Autopilot.. ............................................ .36
Crashing or Ejecting.. ........................... 36
Weapons Use
Dropping Bombs..
Aircraft Views
Keyboard Keys Available
During Flight .................................. .38
Tips on Successful Flying.................... .39
Recording During Flying
Preferences Window
........................................... .35
Chapter 4: Stunt Pilot of the
Year Contest..
The Contest
Getting Stunt Assignments..
Payoffs and Penalties
on Stunt Performance..
Camera Crew
............................... 30
............................ .32
........................... 32
...................... .34
.................... 36
....................................... .36
........................... .37
...................................... .38
..................... .39
............................ .40
....................................... .43
.......................................... 43
................ .44
................... .45
....................................... .45
Stunt Island Hall of Fame..................... 46
0
Competitors Leaving Stunt Island ......
The Stunt Assignments..
Stunt Assignment Clues
....................... 47
....................... 57
Chapter 5: Production: Set Creation
and Filming
Creating Sets
Island View Window
and It’s Options
Prop Window and Its Options .............62
How to Select Your Stunt Aircraft........6 6
How to Place a Prop
How to Move a Prop
How to Delete a Prop
Special Prop Controls
The Adjust Window ......................
How to Fine Tune a Prop..................... 73
How to Animate a Prop
Animating a Still Prop .................... .75
Animating a Dynamic Prop
Having More Than One
Stunt Aircraft
How to Set Up Cameras
The Watch (WTCH) Option ................ 79
Adjust Screen
“Programming” Options
Saving and Loading Sets
Creating New Sets
How to Film a Stunt
Leaving the Production Building
Questions and Answers..
............................................ 59
......................................... 60
................................
............................ .67
............................ .68
.......................... .68
-
........................
............. 76
................................... 78
.......................
...............
...................... .82
................................ 82
............................. 83
........
..................... .85
.46
61
..6 8
75
78
..8 0
.84
Table of Contents
Page 4
-
-
-
-
-
-
Special Events
IF
Option .............................................. 89
AND
Qualifier.. .................................... .90
THEN
Option ...................................... .92
Setting and Using Flags
Collision Windows., ...........................
Setting the Recording Features
Auto-Edited Films ............................... .99
Dissecting Stunt Sets for Success..
Chapter 7: Tutorial: Creating Sets
and Events
-
-
-
Contest Scene
Designing the
Setting Up the Cameras..
Parked Vehicles
Collision Windows., .......................... ,112
Animating the Police Car
................................ .87
....................... .95
..........
...........................................
.................................... ,103
Set............................... .103
................... ,104
..................................
.................. ,118
..9 6
..9 7
...
..l0
0
103
107
Chapter 8: Post-Production:
Chapter 6: Setting Up
-
-
-
-
Editing and Special Effects 123
Editing Film Footage 124
Source Deck vs.
Destination Deck
Marking Footage: The
Cornerstone to Editing . . . . . . . . 128
Editing “On The Fly” 129
Recording From the Source Deck to
Destination Deck . . . . . . . . . . . . . . . . . . . . 130
Marking and Copying a
Single Frame . . . . . . . 130
Inserting Footage on the
...........
126
Destination Deck ........ 131
Deleting Footage from the
Destination Deck . . . . . . . . . .
Incorporating Visual Effects . ......... 132
Incorporating Music and
Sound Effects . . . . . . .
Saving Edited Footage 136
Leaving the Editing Room
Maximum Film Values
Incorporating Your
Own Sound Files
Previewing Films to
Other PC Owners . .
Chapter 9: Tutorial: Editing a
Loading the Highway Take
Editing the Footage
Inserting Audio and Visual Effects
Chapter
10:
Industry
............................ 142
History and Insight . .
Stunt Flying History . . . .
The
Film Industry
A Conversation with
Chris Howell, Stunt Coordinator 154
148
......
............
...
.....
.......
137
...........
Film......14 1
............... ,141
...........
.........
132
134
136
136
138
...
,144
147
147
Appendices
Appendix A: Aerodynamic Forces 157
Appendix
Appendix C: Helpful Information and
Appendix D: Disney Software
B:
Stunt Island
Permanent Locations
Troubleshooting Guide
...........
...........
159
160
Customer Service
Appendix E: List of Files Installed
by
Stunt Island 172
Appendix F: Keyboard Keys 176
..........
167
Index 178
Table of Contents
Q
Page 5

-
CHAPTER 1
-
About Stunt Island
-
Your Career Opportunities on Stunt Island
3
1
-
-
-
-
-
-
-
-
-
-
You can do as much or as little as you want on Stunt Island:
+
Be an apprentice stunt pilot. Fly stunts without entering the contest or
doing film work.
+
Prove yourself the hottest stunt pilot by winning the Stunt Pilot of the Year
contest and ha
+
Create films without having to fly. Take pre-shot footage and edit it any way
you like.
+
Design your own sets. You have dozens of locations and hundreds of props
to choose from.
+
Become a stunt coordinator. Plan your own stunts from start to finish.
+
Do it all - design, fly, and film your own stunts.
ve the newly finished airfield named after you.
About This Handbook
Although reading this handbook will give you a clearer understanding of Stunt
Island, you can also learn how to use the program through the time-honored
method of trial and error. Almost all the options are available by moving the pointer
on them and then selecting them. If you want to get into the program and sample it
on your own, read Chapter 2 for details on how to install the program and controls
you can use; then check out the island. If you get stuck, just refer to the index or
the table of contents to look up answers.
Chapter 1
About Stunt Island
0
Page 6

If you prefer a more organized approach, read through this
handbook. You’ll get the complete details on Stunt Island.
This Can Be a Complicated Program.. .
If you try to set up, film, and edit a stunt right after you’ve
loaded this program for the first time, you can make this one
of the hardest programs in the world to understand. The more
advanced stunts just aren’t easy to create. But the more complicated aspects of Stunt Island also provide its depth, making this
program one that’s endlessly playable.
Step 2. When you’re ready to enter the competition for the first
time, go ahead. But we still recommend answering No to doing
your own editing. As a pilot, focus on the competition and leave
the technicalities of editing to the post-production staff.
Step 3. If you’ve done the competition, or have no plans to
enter it, go on to set designing and editing (answer Yes to, “Do
you want to do your own editing?“). Learn to place props and
animate them. Then try flying and filming with the sets that
you’ve made. When that’s done, practice editing the film.
. . .When It Happens to Be a Simple One
If you approach Stunt Island one segment at a time, it’s simple
to learn and master. The outline below is the way we recommend you familiarize yourself with Stunt Island. It will keep you
from being overwhelmed by the many features of the program.
Step 1. When you start the game, you’re asked, “Are you going
to be in the competition.?" Select No. Enter the competition
later, after you’ve put in some flying time. You’ll take away a lot
of the frustration if you can fly without contest pressures and
penalties.
Practice flying. Check out each of the planes and get a feel for
their individual flight characteristics. Learn to read the gauges
and control the points-of-view.
When you’re asked, “Do you want to do your own editing?”
select No. When you select No, your films will be automatically
edited for you.
Chapter 1 About Stunt Island
Step 4. The most complicated thing you can do is create your own
stunts. Stunt Island gives you the tools to become a stunt coordinator, letting you build stunts just like those used in the Stunt
Pilot of the Year contest. These stunts have specific goals that
you outline as “must-do” in order for this stunt to be a success.
Chapters 5 and 6 explain how you can create your own stunts.
About Your Mouse, Joystick, or Keyboard
You can use your mouse, joystick or keyboard to control the
program. Because there are three devices to input information
with, they’re often referred to under the generic term of “input
device” or “control stick.” Wherever you see “input device” or
“control stick” in the handbook, we’re referring to your mouse,
joystick or keyboard
For added reading ease, we use “select
click a mouse or joystick button, or press Enter on the keyboard
to choose an option. Your
-
whichever you’re using.
"
when you need to
onscreen
pointer tturns into cross
Page 7
-
hairs + when it’s positioned on something that can be
-
selected. If the pointer doesn’t turn into cross hairs, the
onscreen
item can’t be selected.
-
-
Check the section called “Input Devices Used in Stunt Island”
in Chapter 2 to learn more about how each input device works
-
-
-
-
-
-
-
-
-
-
-_
-
The Movie Production Process
The movie making process has three important development
phases: 1) pre-production, 2) production, and 3) post-production.
Pre-production involves such aspects as scriptwriting, casting,
director selection, etc.
Pre-production elements and issues need to be determined
before filming can begin.
Production covers the actual movie making process. You select
the plane, props, and camera angles that will be used, and then
you film the stunt sequence.
Post-production includes the work that needs to be done once
all the film has been shot: editing the film, adding special effects,
sound and credits, viewing the edited film in the theatre, etc.
In the Stunt Island program, you’ll mainly focus on production
and post-production work. The only pre-production decision
you’ll need to make is deciding whether you’ll fly, set design,
stunt coordinate, edit, or do any combination of these jobs.
Chapter 1 About Stunt Island
’
e
Page 8

CHAPTER 2
Setting Up The
Program
Equipment You’ll Need
To use the Stunt Island software, you must have:
+
IBM or 100% compatible; 386SX with 16 MHz processor or better required;
386DX with 33 MHz processor or faster strongly recommended
+
640K of total RAM (random access memory); need 570K of free RAM;
additional RAM memory strongly recommended
+ VGA 256-color and color monitor
+ PC-DOS/MS-DOS; supports 3.3 to 5.0
3.5” high density (1.44 MB) or 5.25” high density (1.2 MB) disk drive
+
+
Hard disk drive (requires 13 MB of free disk space)
The following equipment is optional:
Joystick
Mouse with 100% Microsoft compatible driver
The Sound Source, Sound Blaster, Thunder Board, Tandy Sound (DAC) or
PS/1 Audio Card
AdLib or Roland MT32/LAPC-1
Expanded or extended memory (for details on expanded or extended
memory, see Appendix C)
Chapter 2 Setting Up The Program
a
Page 9

Installing Stunt Island
Stunt Island comes with an Install program that guides you
through the install process.
music device and then press Enter to accept. Press Esc to
l0-key
cancel. (If you’re using a
pad, make sure the Num
Lock key is off.)
Stunt Island must be installed onto a hard disk drive. It cannot
be played from floppy disks.
Note: To use a Thunder Board or other Sound Blaster
compatible card, choose the Sound Blaster option.
In the following instructions we refer to your computer’s
floppy disk drive as the A: drive and the hard disk drive as the C:
drive. If your floppy or hard disk drive is something other than
drive A: or C:, substitute A: or C: with the correct drive letter(s).
1.
Insert Stunt Island Disk 1 in drive A:. Change to the A:
drive by typing
A:
and pressing Enter. Type
INSTALL
and
press Enter.
2. A screen stating “This Program installs files onto your hard
disk and lets our program know about your equipment
4. The Drive Letter screen appears. If there are any partitions on
configuration” should appear. Press Enter to continue.
Note: During the install process, you can press Esc to back up
a step or to abort the Install program.
3. The Setup screen appears. You will see that an input device,
a sound device, and a music device have been selected
this is what the Install program automatically detected.
-
Note: The Install program notifies you if your computer does
not have enough hard disk space and/or memory to install or
run Stunt Island. At this point you may want to exit the Install
If you want to change an option, press the up or down
arrow keys to highlight the option and press Enter. Use the
up and down arrow keys to select an input, sound, or
program and make any changes to free up memory or hard
disk drive space. If this screen appears due to lack of hard disk
space, you can go back to the Drive Letter screen and select
If the Install program cannot detect the option you selected, you will see a warning message. If you select the option
anyway, the Stunt Island program may “freeze” when you
start it, requiring you to restart your computer and go
through the setup process explained in the next section.
Once you’ve selected the appropriate options for your
computer’s current configuration, select
above configuration
and press Enter.
Install with the
your hard drive, or if you have more than one hard drive,
the Install program will identify them and ask you to select
the drive on which you want to install Stunt Island. If there
are no partitions on your hard drive, the program will choose
drive C and go directly to the Destination Path screen.
Chapter 2
Setting
Up The Program
Page 10
another driver if you have other partitions. (See Appendix C
for tips on handling memory problems.)
The Destination Path screen appears. The default subdirec-
tory selected for Stunt Island is \STUNTISL. To change
the subdirectory name, press the Delete key to delete
STUNTISL; then type the new subdirectory name you
want to use (up to 8 characters). Be sure to include the
\ (backslash) at the beginning of the subdirectory name.
The other box on the screen, System Information, shows
hard disk space and memory usage. You’re shown the
amount currently used, the amount used by the Stunt
Island program, and what is left of both after installation.
The amount of conventional memory used is only during
the use of Stunt Island.
Press Enter to accept the subdirectory name and begin the
copying process. You will see a Copy Status screen which
visually tracks the copying progress. You will be prompted
to insert new disks when necessary.
The Installation Complete screen appears when the instal-
lation process is finished. Press Enter at this screen and
you’ll go to the directory where you installed the
program; you can then type STUNT to start the program.
(See the section “Starting Stunt Island for complete details.)
Put your original disks in a safe, clean place in case you ever
need to reinstall the program.
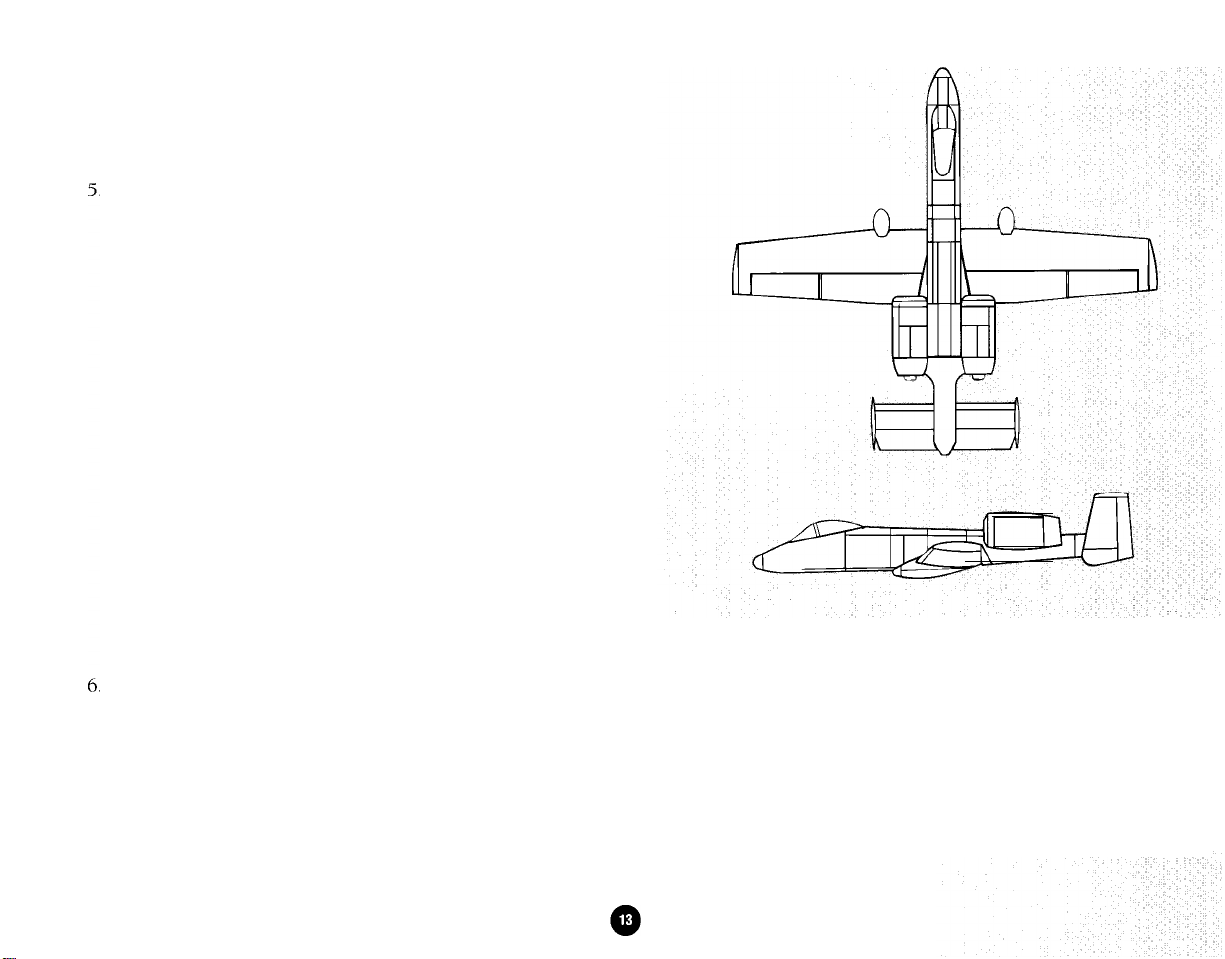
A-lO Thunderbolt
Manufacturer: ........................
Take-off speed:
Stall speed:
Maximum speed:
Maximum altitude:
Flaps:
......................................
Retractable landing gear:
........................
............................
...................
.................
........ Yes
.Grumman Corporation
138 m.p.h.
,115 m.p.h.
.439 m.p.h.
,45,000 feet
Yes
Chapter 2 Setting Up The Program
Page 11
Changing The Setup
Once you’ve performed the initial installation, you can change
the setup at any time. Maybe you’ve just purchased The Sound
Source to use with your computer, or maybe you just want to
make sure the PC speaker sounds are off.
Starting Stunt Island
1. To start the program, go to the Stunt Island subdirectory.
-
-
-
For instance, if you used the default STUNTISL subdirectory
in the Install program, you would type
press Enter.
CD\
STUNTISL
and
-
-
To change the setup, follow these steps:
1. Go to the Stunt Island subdirectory. For instance, if you
accepted the default \STUNTISL subdirectory when you
installed the program, you would type
and press Enter. Then type
You must type the question mark (preceded by a space)
after STUNT or you will not get the screen that lets you
make changes.
2. The Setup screen appears. To change the input, sound, or
music option, press the up or down arrow keys to highlight the option you want and press Enter. Using the up
and down arrow keys, select a different input, sound, or
music option and then press Enter to accept. Press Esc to
cancel. (If you’re using a 10-key pad, make sure the Num
Lock key is off.)
3. Once you’ve made the changes you want, select
with the above configuration
program will save the new configuration. The Setup
process is complete and the game will start with the new
options.
STUNT
and press Enter. The Setup
CD \STUNTISL
? and press Enter.
Install
2. Type STUNT and press Enter.
If your screen goes blank, reboot the computer and run
the Setup program as explained in the previous section,
making sure to select the correct input, sound, and music
options for your computer setup. If you still have problems
with loading the program, please see Appendix C.
3. As the program loads you may see “Caching data
extended [or expanded] memory.” The program is setting
up available extended or expanded memory for use with
Stunt Island. You will only see this screen if you have
extended or expanded memory. Stunt Island works equally
well with both
of (but not both).
4. The Introduction film appears. If you want to bypass this
film, click the mouse or joystick button or press any key.
-
it will use whichever you have the most
xxxK
in
-
-
-
-
-
-
-
-
-
-
-
Chapter 2 Setting Up The Program
Page 12
Welcome to Stunt Island!
When you first arrive at Stunt Island, you’re dropped off in front
of the production building.
Joystick users:
Island and you’re using a joystick, the first thing you see is the
Joystick Calibration screen. Follow the
If you need details on this screen, see page 22.
Next, you may be asked to answer a question about a particular aircraft. Locate the aircraft in this handbook by using the
index. Go to the page indicated to find the answer. Type in the
answer and press Enter. If you answer the question correctly,
the game will begin. If you answer it incorrectly, you’re
returned to the DOS prompt. Type
try again.
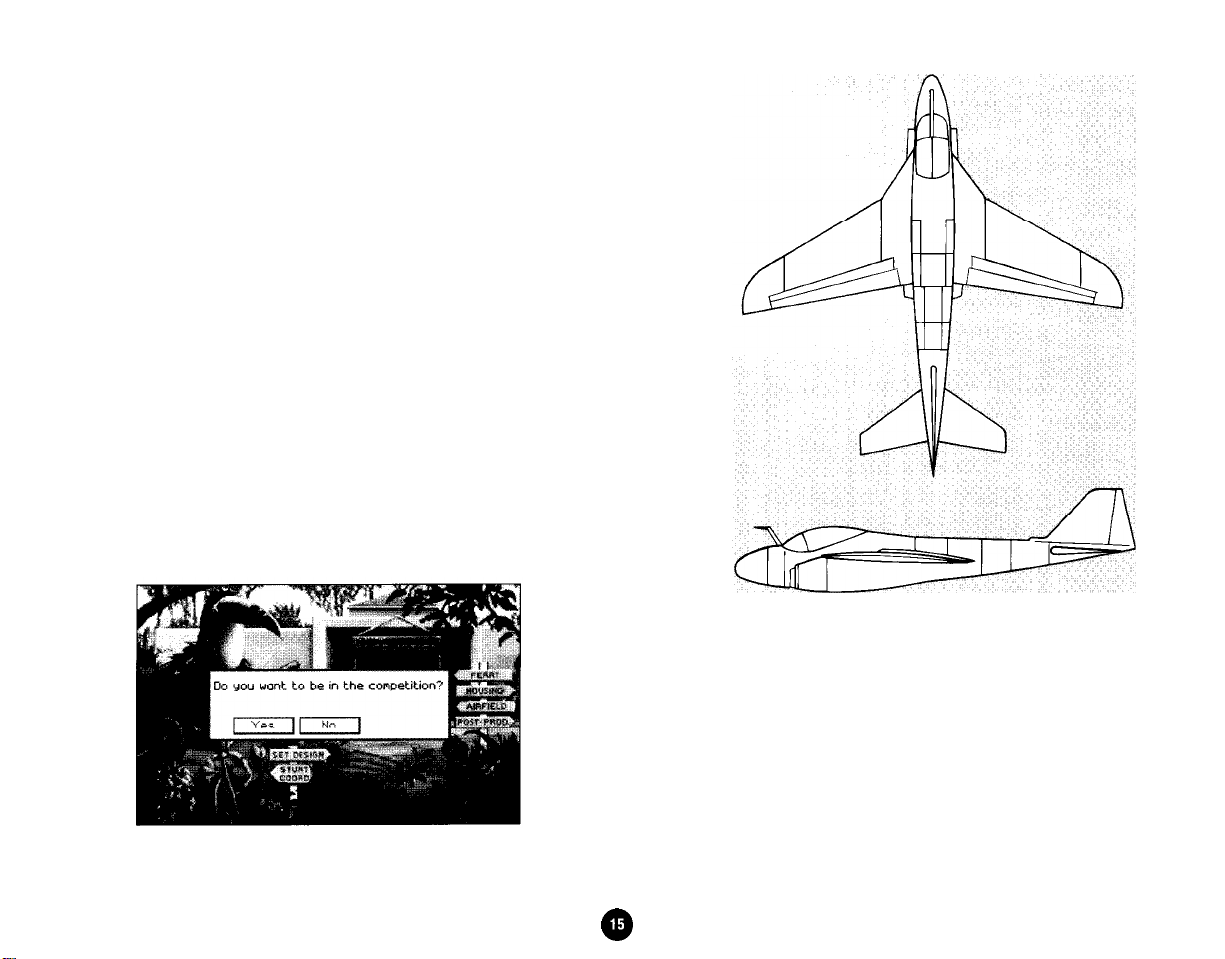
You’re asked, “Do you want to be in the competition?”
NO:
If you select No, a pilot will not be set up for you. Also,
If this is the first time you’ve loaded Stunt
onscreen
STUNT
instructions.
and press Enter to
A-E
lntruder
Manufacturer*
Take-off
Stall speed:
Maximum speed:
Maximum altitude:
Flaps:
. . . . . . . . . .
...... .......
speed:
. . . . . . . . . . . . . . . . . . . . . . . . 136
. . . . . . . . . . . . . . . . . . . . . . . . . . . . . 113
. . . . . . . . . . . . . . . . . . . . 644 m.p.h.
. . . . . . . . . . . . . . . . . . 42,400 feet
. . ........................
Retractable landing gear:
. .
..Grumman Corporation
m.p.h.
m.p.h.
Yes
. . . . . .
..Yes
Chapter 2 Setting Up The Program
Page 13
the competition standing screens will not appear in the game.
YES: Selecting Yes lets you see the competition standings in
the game. All stunts you fly (those offered by the stunt
coordinator) count towards your total pilot score.
-
-
--
-
-
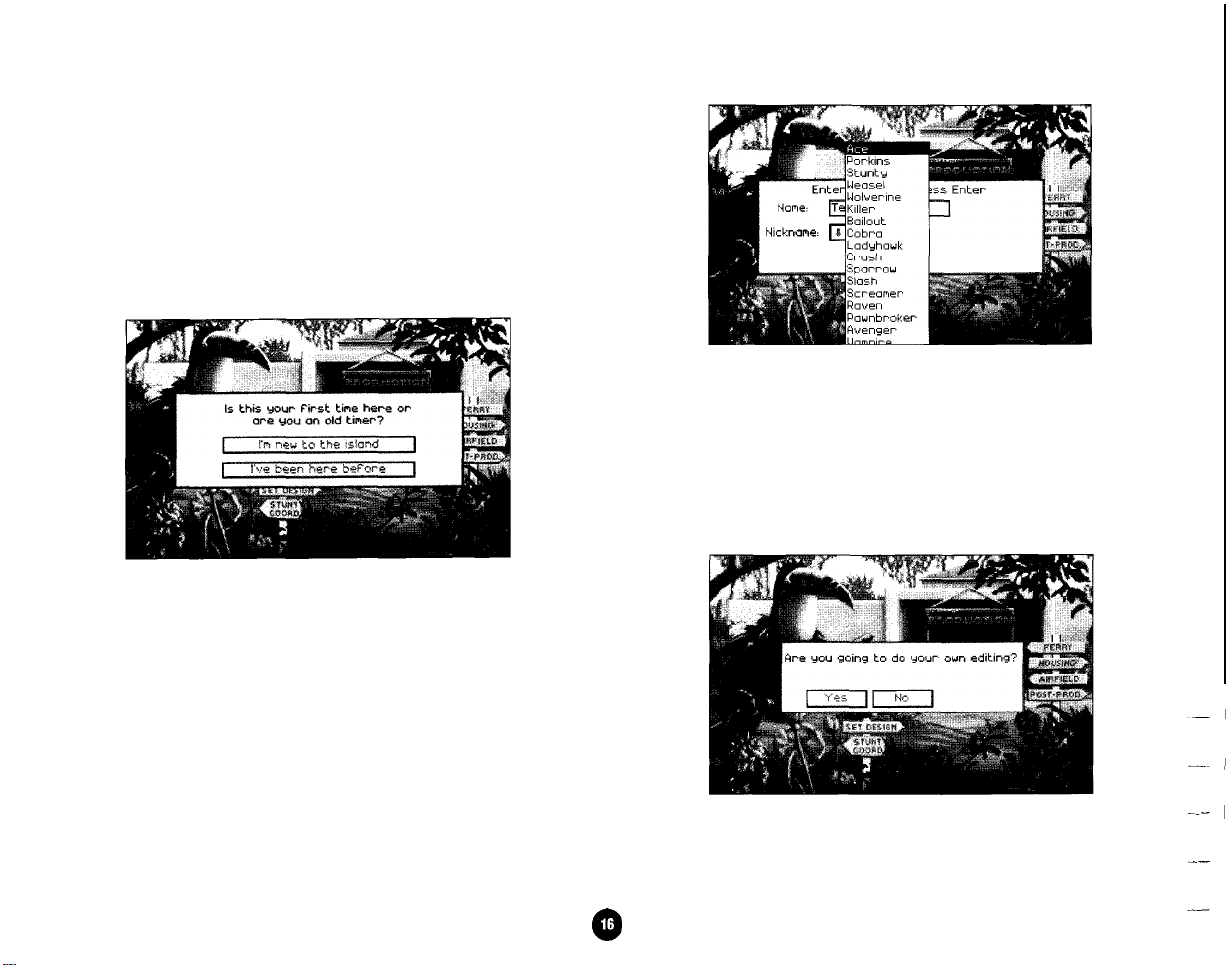
When you select Yes, you’re asked, “Is this your first time here
or are you an old timer?”
+
Next, you’re asked, “Are you going to do your own editing?”
+
If you’re new, use your input device and select “I’m new to
the island.” Type in your name and press Enter. Then
choose a nickname by positioning the cursor on the down
arrow next to Nickname and then clicking the mouse or
joystick button or pressing the Enter key. Highlight a
nickname and then click a button or press the Enter key
to select it.
If the nickname is currently being used, you’re asked if you
want to replace the current pilot, Up to 17 separate characters
can be tracked by the program (one for each nickname).
NO: If you select No, after you complete a stunt you’ll go to
the theatre to view the automatically edited film. If you’re new
to Stunt Island, we recommend you select No so the films will
-
-,-.
If you’re
been here before.” Then select your name from the list and
then select OK. You’re then asked to confirm your nickname.
If your name isn’t on the list, select “I’m Not Listed” so you
can enter your name.
an
old timer, use your input device to select “I’ve
-
-
-
-
-
--
Chapter 2 Setting Up The Program
I
@
Page 14
be edited for you.
Selecting No does not mean you will be barred from the
editing room. The program will just bypass the editing room
after you’ve flown your stunt since the program assumes you
won’t want to edit. You can still go to the editing room if you
want. (You can change this option at any time by bringing up
the Preferences window. See page 40 for details,)
YES: If you select Yes, the films you create will not be auto-
matically edited for you. You can go to the editing room at any
time to put your own films together.
Exiting Stunt Island
To exit the program, select the signs that say Ferry or Leave
On Ferry.
If you’re not in the Stunt Pilot of the Year contest, you can press
Ctrl-Esc at any time to go immediately to DOS. Make sure you
don’t press Ctrl-Esc before you’ve had a chance to save the files
you’re working on (like sets, takes, or films), otherwise you will
lose your current work.
Competitors who entered the Stunt Pilot of the Year contest
should leave on the ferry or else their accomplishments will not
be saved. When you’re leaving on the ferry, you’re asked, “Do
you want to end this game?” Select Yes or No. If you choose
Yes, you’re then asked, “Do you want to save your Pilot?” Be
sure to select Yes so your achievements are recorded. If you
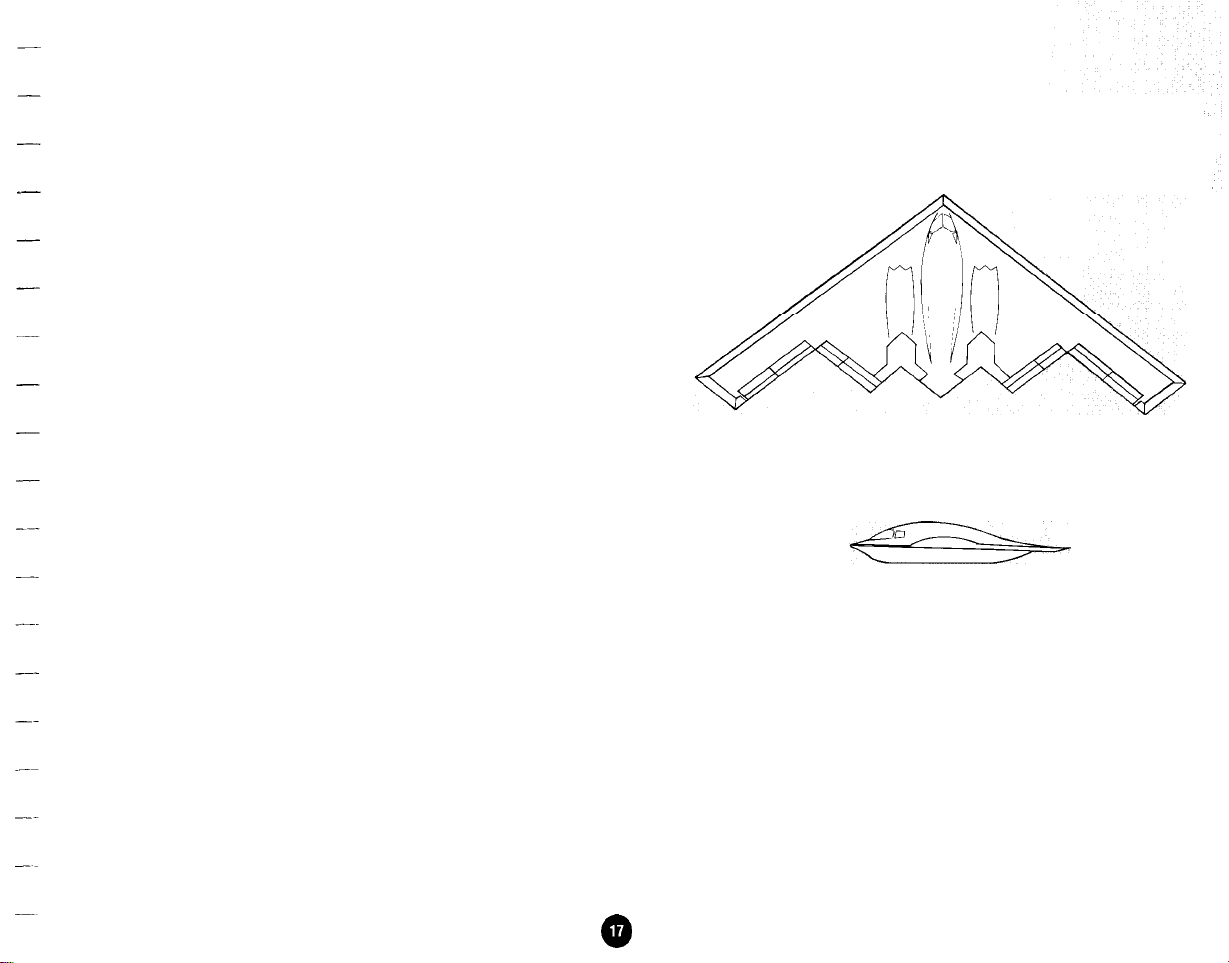
B-2 Stealth Bomber
Manufacturer:
Take-off speed:
Stall speed: ..........................
Maximum speed: ................... ,627 m.p.h.
Maximum altitude: .................
Flaps: ......................................
Retractable landing gear:
. . . . . . . . . . . . . . . . . . . . . . . . . Northrop
. . . . . . . . . . . . . . . . . . . . . . . 140
m.p.h.
...11 7 m.p.h.
.50,290
feet
Yes
........
Yes
Chapter 2 Setting Up The Program
@
Page 15

select No, everything you’ve done in this last session of play will
+
Airfield - All the planes are kept here. You can select the
not be recorded. Finally, you’re asked, “Do you want to start a
new game?” Select Yes to start a new game or No to see the Exit
screens and return to DOS.
-
plane in the hangar to get a list of planes to scout locations
-
with.
If you want to start a new game with a new character, answer Yes
to
“Do
you want to start a new game?” You’ll go to the start of the
program where you can enter a new name and choose a new
nickname.
The Places on Stunt Island
Stunt Island has five important places:
+
Housing or Cabin 273 - This is the place you’ll call home
during your stay. The housing sign takes you to the outside
of your cabin, while the Cabin 273 sign takes you inside.
+
Production Building - This is where you’ll go to get stunt
-
-
assignments, or design sets and create stunts of your own.
--
-
-
-
-
-
Chapter 2
Setting
Up The Program
Page 16
--
-
+
-
-
-
-
-
-
Post-Production Building - This houses all the equipment
needed to edit a film.
-
-_
--
-
-
-
-
-
--
_-
+
Ferry Harbor - This is the departure point for all Stunt
Island guests and employees.
All the Stunt Island locations are clearly marked with the
following signs. Select the sign to go to that location.
Housing or Cabin 273 - Come here to check your ledger,
phone messages, and the daily standings. Select Housing to get
to the outside of your cabin and select Cabin 273 to go inside.
Chapter 2
Setting
Up The Program
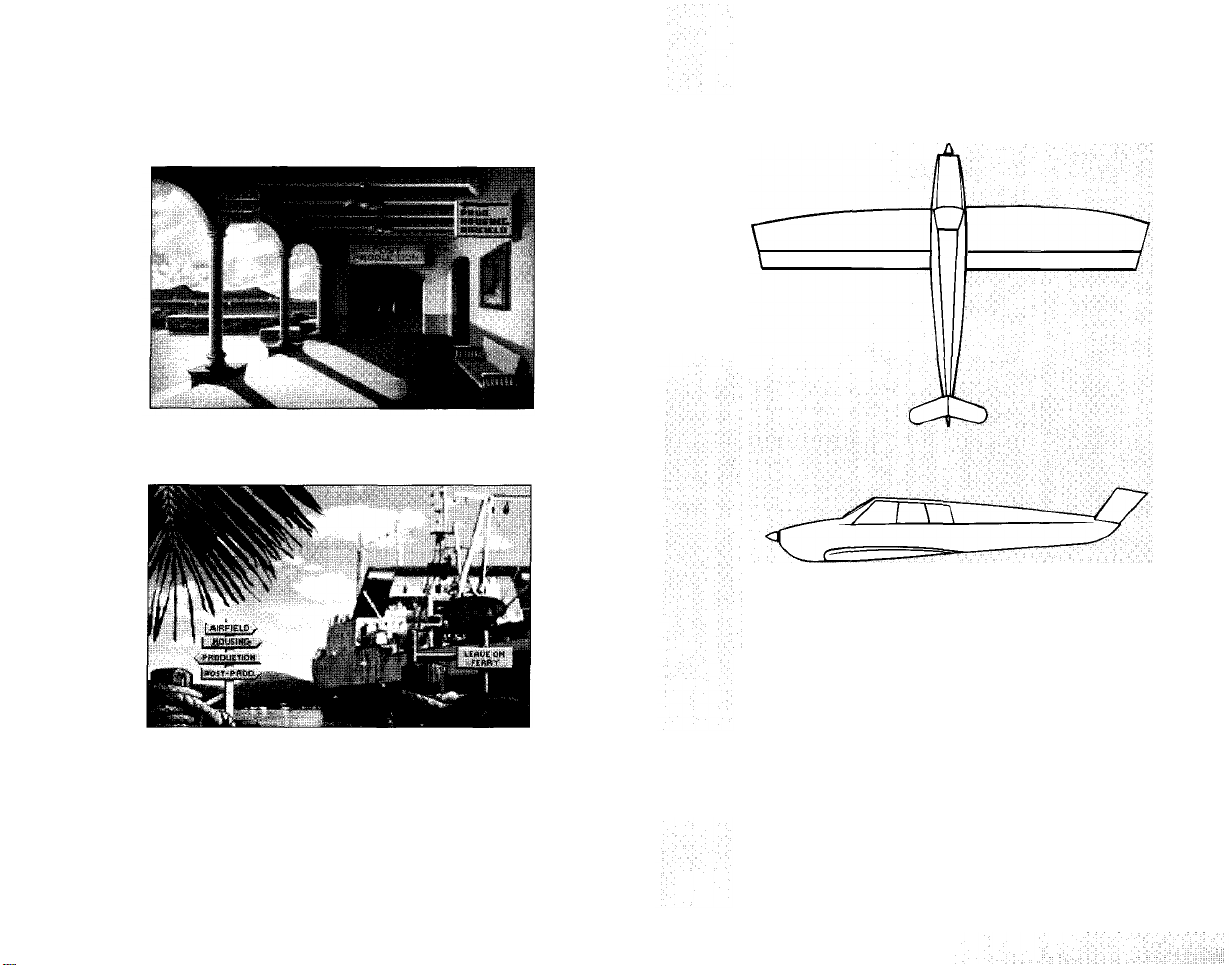
Beechcraft
Bonanza V-35
Manufacturer.. . . . . . . . . . . . . . . . . . . . . . . . . Beech Aircraft Corp.
Take-off
speed:.. . . . . . . . . . . . . . . . . . . . . . . .
Stall speed:
Maximum speed,
Maximum altitude,
Flaps:
. . . . . . . . . . . . . . . . . . . . . . . . . . . . . 75
.
.., . . . . . . . . . . . . . . . . 209 m.p.h.
. . . . . . . . . . . . . . . . . . 17,858 feet
. . . . . . . . . . . . . . . . . . . . . . . . . . . . . . . . .
Retractable landing gear:
90
m.p.h.
m.p.h.
....
Yes
. . . . . . . . Yes
Page 17
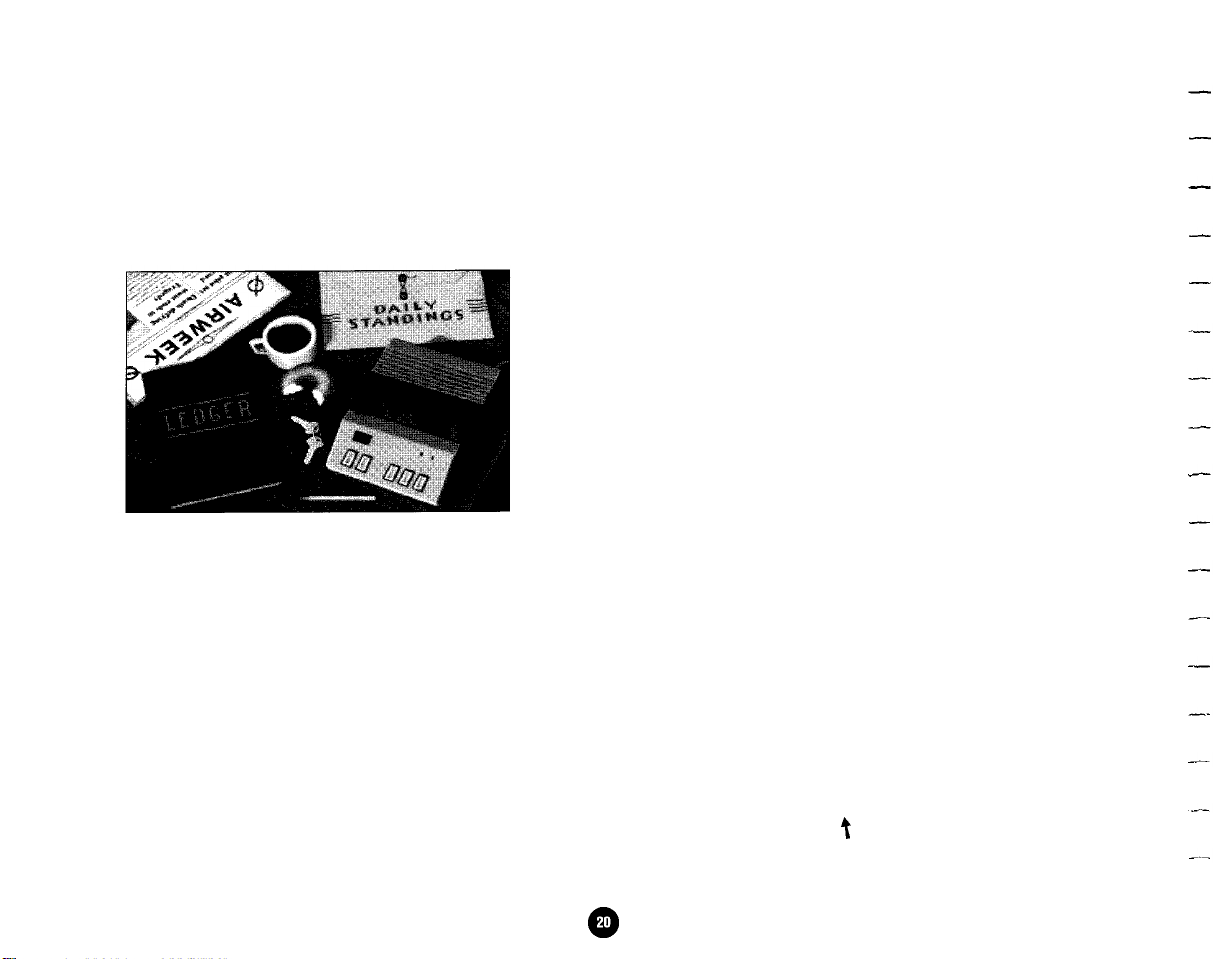
The Ledger and Daily Standings only open if you’ve entered the
Stunt Pilot of the Year contest. The Ledger shows the money you
received for the stunts you’ve done, and how many takes it took
to complete each stunt. The Daily Standing shows the the point
standings of the pilots in the contest. There will also be phone
messages on your answering machine to listen to.
To exit the cabin, select the keys on the desk.
AIRFIELD - Takes you to the airfield where you can fly a
variety of aircraft.
PRODUCTION or PROD - Takes you to the production
building where you can get assignments from the stunt
coordinator or go to Set Design where you can select a film
location and set up props and cameras.
STUNT COORD - Takes you directly to the stunt
coordinator’s office in the production building.
POST-PROD - Takes you to the post-production building
where you can edit and view film footage.
When outside the post-production building, you have
immediate access to these areas:
EDITING - Takes you directly to the editing room in the
post production building.
THEATRE - Takes you directly to the theatre in post
production so you can view film footage.
FERRY
Stunt Island. Select Leave On Ferry to exit. If you entered
the Pilot of the Year competition, you must exit on the
ferry or all that you’ve done in this game play session
will not be saved.
EXIT
room, building, etc.
Input Devices Used in Stunt Island
You can use a mouse, joystick, or the keyboard to control the
game.
-
Takes you back to the ferry so you can leave
-
Select Exit anytime you want to exit a screen,
When outside the production building, you have immediate
access to these offices:
SET DESIGN
the production building.
-
Takes you directly to the set design room in
Chapter 2 Setting Up The Program
Selecting an Onscreen Option
onscreen
Your
it’s positioned on something that can be selected. If the pointer
doesn’t turn into cross hairs, the onscreen item cannot be selected.
pointer tturns into cross hairs + when
--
Page 18
-
-
-
-
To select an option:
Mouse users - Roll the mouse until the pointer is on the option
you want and then click either mouse button to select it.
-
-
-
-
-
-
-
-
-
-
-
-
-
-
Joystick users - Move the joystick until the pointer is on the
option you want and then click either joystick button to select it.
Keyboard users - Press the up, down, left or right arrow keys
until the pointer is on the option you want and then press Enter
to select it.
As you’re reading the instructions throughout the handbook, you’ll
notice that there are many references to
Mouse users - Button 1 is the left button. Button 2 is the right
button.
Keyboard users - Button 1 is the Enter key. Button 2 is the
(forward slash) key.
Joystick users - Because joystick designs vary greatly, we can’t
tell you exactly which button is button 1 and which is button 2.
Some joysticks even have three or four buttons. If you’re a
joystick user, you’ll have to do some testing to determine which
buttons act as button 1 and 2.
Changing Numbers
In options that have values that can be changed, there are two
ways to change the values:
+
You can select the - (minus) or + (plus) button next to
the number to decrease or increase the value. Each
selection with button 1 changes the value by one, while each
button 1
and
button 2.
/
Boeing
Manufacturer... . . . . . . . . . . . . . . . . . . . . . . . . Boeing
727
Commercial
Airplane Group
Take-off speed:
Stall speed:
Maximum speed:
Maximum altitude:
Flaps:
. . . . . . . . . . . . . . . . . . . . . . . . . . . . . . . . . . . . . . Yes
.............
,............................
. . . . . . . . . . . . . . . . . . . . 599 m.p.h.
. . . . . . . . . . . . . . . . . . 45,000 feet
Retractable landing gear:
150 m.p.h.
125 m.p.h.
. . . . . . . . Yes
-.
Chapter 2
Setting
Up The Program
Page 19
selection with button 2 changes the value in larger increments of 5 or 30.
You can also press any letter to jump to that letter in the list. If
nothing in the list starts with that letter, nothing will happen.
You can select the value itself and then enter a new number. Use the Backspace or Delete key to delete the current
value. Mouse users can highlight the entire field and then
type a number to replace the highlighted number.
Selecting an Item From a List
A requester (a window you can interact with) appears when
you need to select an item from a list. To choose an item from
a requester:
-
Mouse users
Roll the mouse up or down to position the
Joystick Users
Your joystick will be active if it was detected and selected in
the Install or Setup program. (Simulated flight yokes like the
Flight Yoke 2000 will be treated like a joystick.) If a joystick is
detected by the program, you must use it as the flight input
device
flight. To use an input device other than a joystick, be sure to
select a different input device option through the Install or
Setup program.
cross hair on an item, click either mouse button to highlight it,
and then click on OK. You can also double-click on an option
to select it.
Joystick users
-
Push the joystick forward or pull the joystick
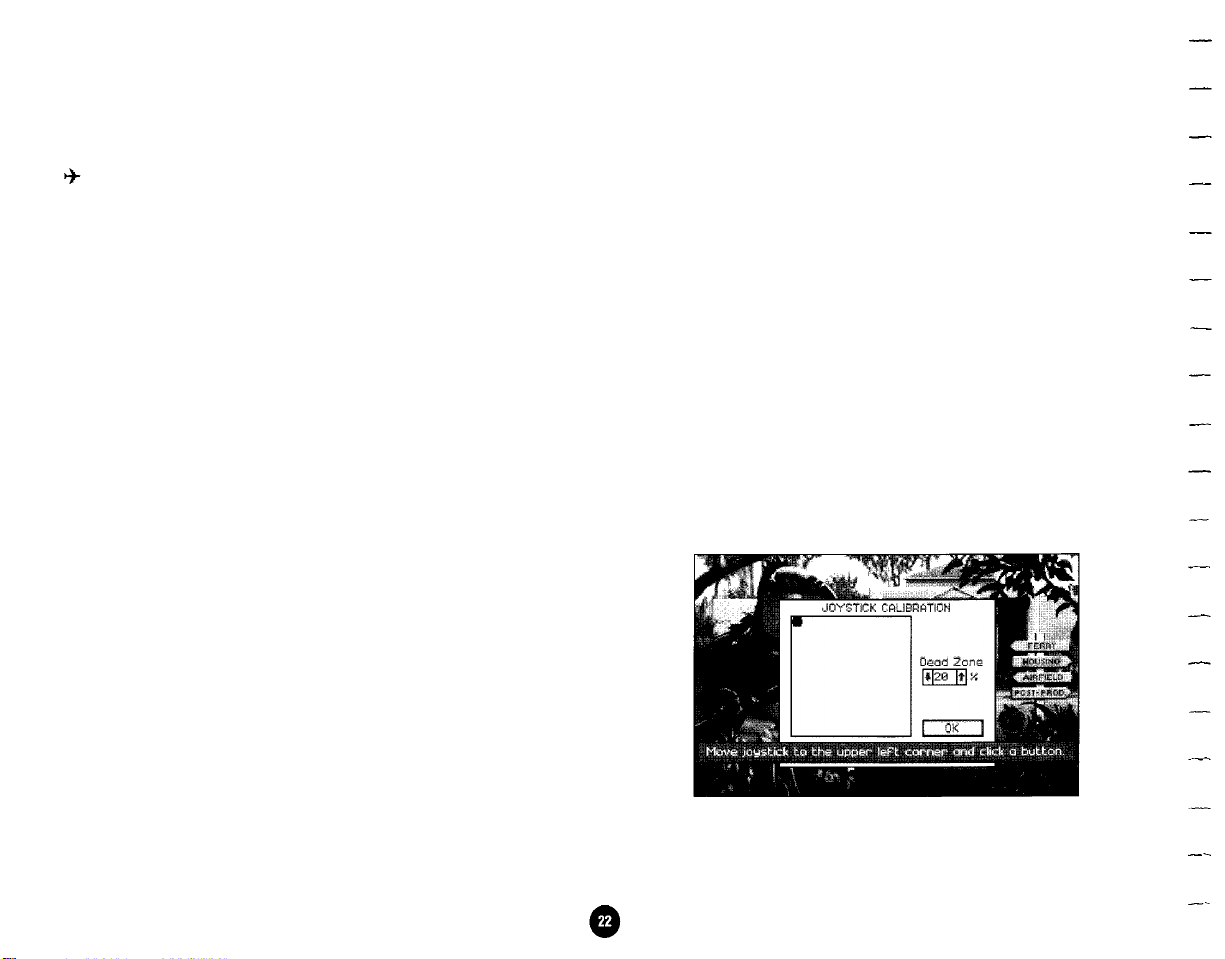
Joystick Calibration Screen
The Joystick Calibration screen automatically appears the first
time you load the program if a joystick is detected.
back to position the cross hair on an item and then click either
joystick button to highlight it. Click on OK to select the high-
lighted option. You can also double-click on an option to select it.
-
Keyboard users
Press the up or down arrow keys to highlight the option you want and then press Enter to highlight it.
Move the cursor to OK and then press Enter to accept the
option. Or you can position the cursor on an option and then
quickly press Enter twice to select it.
-
you will not be able to use the keyboard to control
Shortcuts for Selecting Items
The Pg Up and Pg Dn keys move up and down a list one
screenful at a time.
Chapter 2
Setting
Up The Program
When you see the black dot in the upper left corner of the
Joystick Calibration screen, hold the joystick in the upper left
Page 20

position and then click a button. When the dot is in the center,
leave your joystick in neutral position (by not touching it) and
then click a button. Finally, when the dot is in the lower right
corner, hold the joystick in the lower right position and click a
button. The joystick should now be calibrated.
The dead zone is an area in the center of the joystick that
indicates your joystick’s sensitivity. The lower the number, the
more sensitive the joystick control will be. For instance, at the
default value of 20%, the cursor will move pretty much in direct
response to your joystick movement. If you changed the value
to 75%, your joystick will probably have the room to move
quite a bit before the onscreen cursor moves in response. You
can change the number by clicking on the up or down arrow.
After the joystick is calibrated, move the joystick around to
see if the cursor on the screen responds to the joystick’s
movement. If it doesn’t, press C to recalibrate the joystick.
You can press Alt-J to open the Joystick Calibration screen at
any time to recalibrate your joystick.
II
-
\
//
Keyboard Users
If you need to regain control of your cursor (e.g., the cursor is
“trapped” in a text field) press the Tab key.
Chapter 2 Setting Up The Program
e
Boeing 737
Manufacturer...... .....
. . . . . . . . . Boeing
Group
Take-off speed:
Stall speed...........
Maximum speed:
Maximum altitude:
Flaps:
. . . . . . . . . . . . . . . . . . . . . . . . . . . . . Yes
Retractable landing gear:
................
. . . .
..........
............
......... I ......
145
m.p.h.
125 m.p.h.
532
m.p.h.
45,000 feet
. . . . . Yes
Commerci
al Airplane
Page 21
Save and load File Requesters
You’ll see Save and Load requesters throughout your work.
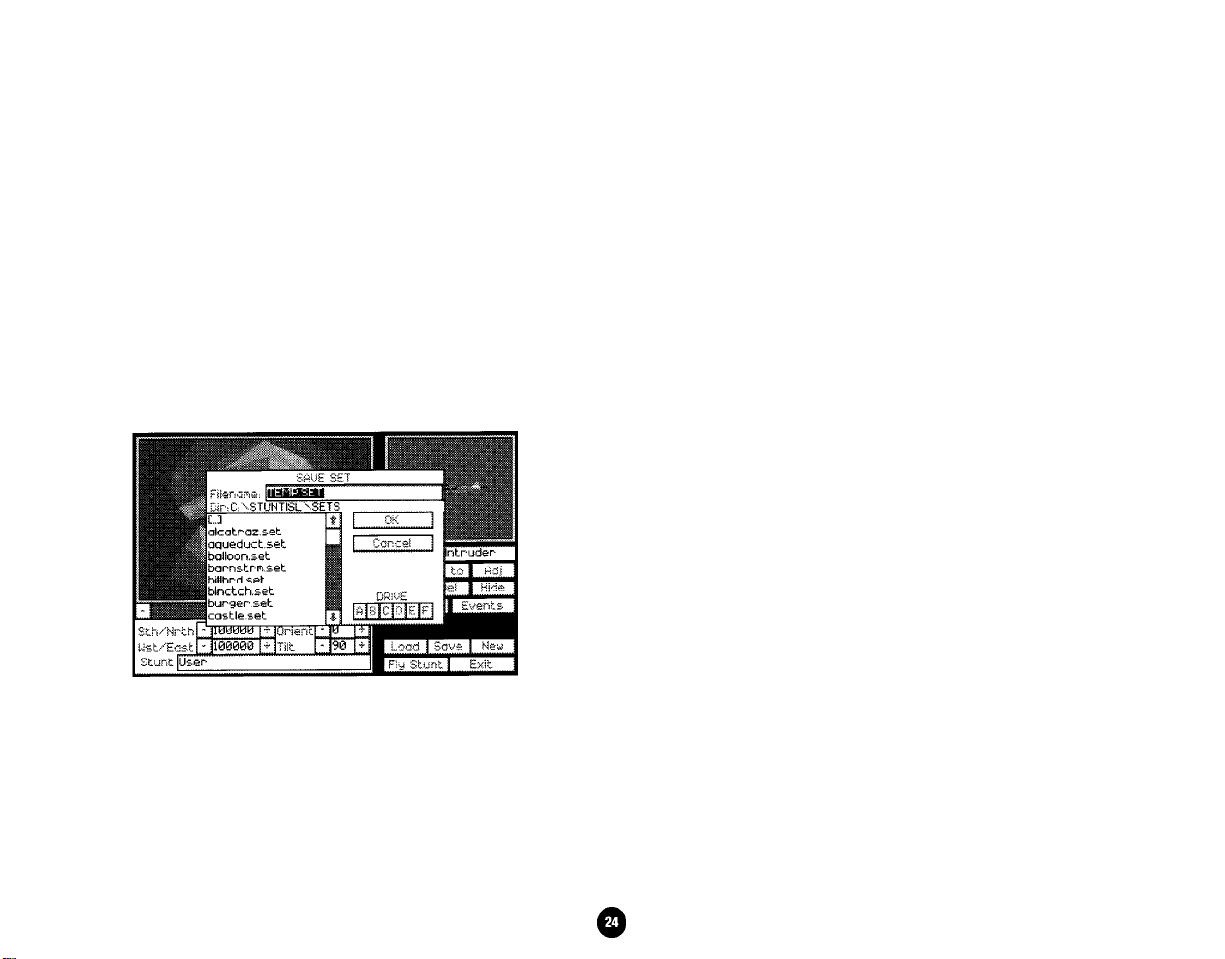
Save File Requesters
Save requesters lets you enter names for your work to be saved
under and determine where you want to save them.
The default locations for saving files are in the \STUNTISL
subdirectories. You can select [ ..] to “back out” of the current
subdirectory. Subdirectories have brackets [ ] around them.
The name of the current directory is shown after DIR (e.g.,
Dir:C:\STUNTISL\SETS).
To access drives greater than F:, type that driver letter in the
Filename field and then press Enter. The subdirectories and
files in that drive should appear. For example, if you want to
access the J: drive, type
To save a file, select the field after Filename. Use the Backspace
or Delete key to erase any characters in the field and then type
in a name. You have a limit of 8 characters in a name (not
including the file extension). Invalid characters such as
hyphens or slashes will not be accepted in the Filename field.
All Stunt Island files have file extensions that help identify the
type of file. For instance, all files that are sets have the file
extension of .SET. All films have the file extension of .FLM.
Here’s a list of all the file extensions you’ll want to know:
J:
and press Enter.
-
-
-
-
-
-
-
-
-
-
You’re not required to enter a file extension when you save a
The program uses the drive that you loaded Stunt Island onto
as the default drive, although it is capable of recognizing drives
A: through F:. If you want to load from or save to a different
drive, select that drive letter. Drives that you can’t select are
“ghosted” (in a lighter color). You can also type in the drive
letter before the filename to access the file (e.g.,
Chapter 2
B:FLYlNG).
Setting
Up The Program
file
when you select Save to save a set, you’ll see the default name
of TEMP.SET (which represents “Temporary Set”). You could
delete TEMP.SET and enter a new name like GUNBOAT. The
file will be saved as GUNBOAT.SET.
@
.FLM
.SET
.TKE
.voc
-
the program automatically does it for you. For example,
Films
Sets
Takes
Sound Files (only applicable to Sound
Blaster and Thunder Board owners)
-
-
-
--
-
-
-
-.
Page 22

Load File Requesters
The Load requesters basically have the same options as the
Save requesters.
Notice that when you load a file, you always see an asterisk followed by a file extension name in the field after Filename. The
asterisk is a “wild card” that represents everything, while the file
extension is specific to the type of file. This tells the program to
show all filenames that end with that specific extension.
For example, if you were loading takes in the editing room,
you’d see *.TKE after Filename. This tells the program to show
all files that end with .TKE. If you want to load a take that you
didn’t save with the .TKE extension, you won’t see it in this
*.
list. You’d have to enter *.* or
[and the extension you used]
after Filename to tell the program to show you other files.
You’ll find using extensions is a good way to keep common
files grouped together, making them easy to locate.
To open a file or subdirectory, highlight the name and then
select OK. You can also double-click on a filename to open it.
Chapter 2
Setting
Up The Program
Page 23
CHAPTER 3
Aircraft Checkout Procedures
Most stunt production veterans know how hard it is to get planes for high risk
-
stunt scenes
probably be easier. But because you come to Stunt Island with high recommendations from others in the industry, and because your flight experience
-
has been exceptional, we wanted to create an atmosphere where your hard
work is rewarded. Specifically, we want to make it easy for you to fly whenever
you get the urge to practice your talent.
I
Aircraft vs. Airplane
-
-
Aircraft is the term for a structure or machine that travels through the air,
regardless of whether the object is lighter or heavier than air and regardless of
whether it’s propelled by an engine or not. A balloon is just as much an aircraft
as a Boeing 747.
An airplane is more specific in definition. Airplanes are fixed-wing aircrafts
that are heavier than air. Airplanes are held aloft by the aerodynamic forces of
air as it is driven forward by propeller(s) or jet propulsion.
“borrowing” a B-2 Stealth Bomber from the government would
Because the things you can fly in Stunt Island are not necessarily airplanes
like the duck, pterodactyl, hang glider, and paraglider
used in this handbook.
Chapter 3
Aircraft Checkout Procedures
-
the term aircraft is
@
-
Page 24
-
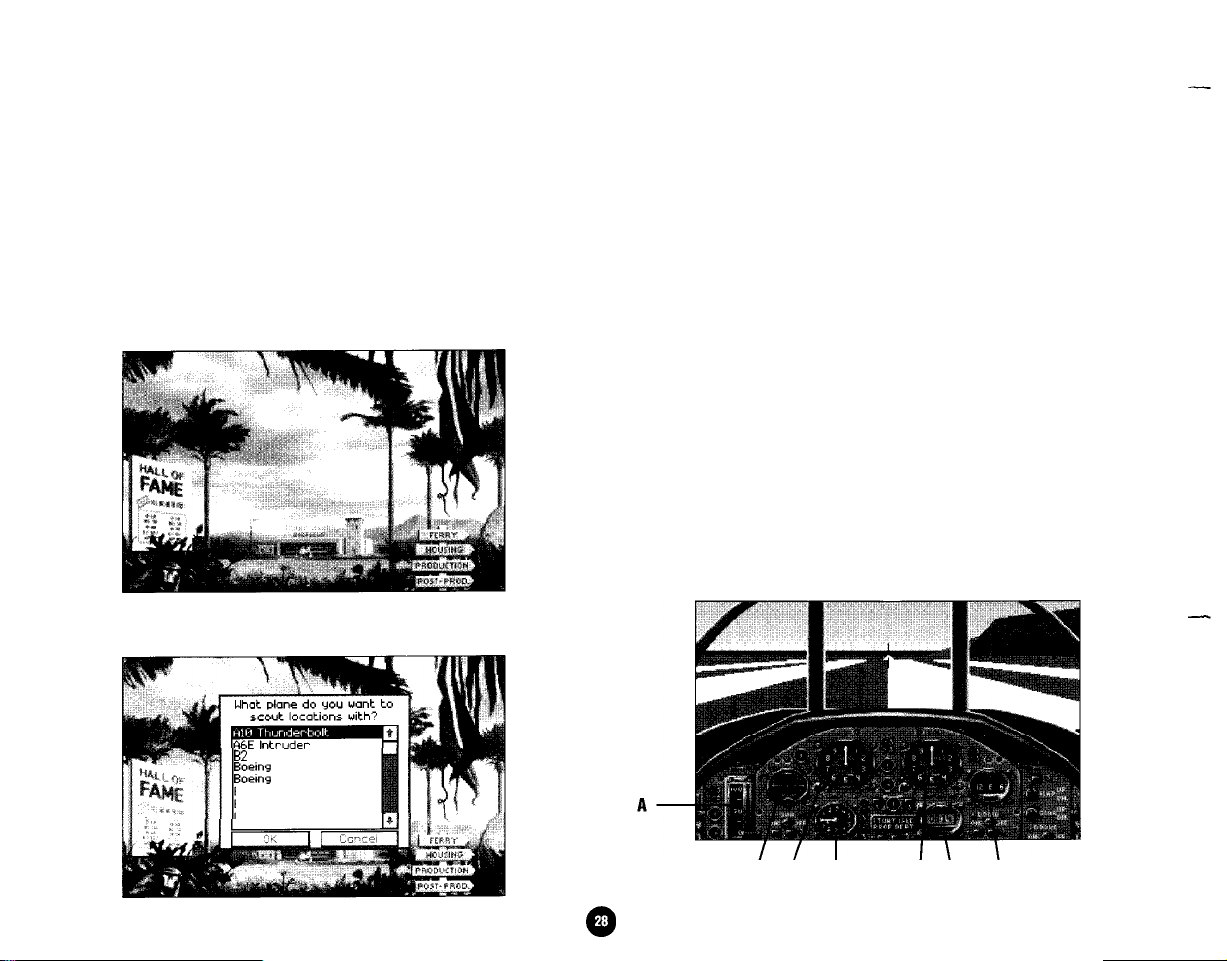
Aircraft Availability
All of the aircraft are available for use by Stunt Island pilots.
You are not required to be working on a film project to check
out an aircraft. To check out an aircraft for flight
practice, follow these procedures:
+
Go to the airfield by selecting Airfield.
+
Select the hangar (building) to view the inventory of
available aircraft.
+
You’ll see a list of the aircraft you can fly:
Select an aircraft and then select OK. The names of all the aircraft available will not be visible in the window at the same
time. You can scroll through the aircraft inventory by selecting
the down arrow to the right of the window, by selecting an area
on the scroll bar (vertical bar), or by selecting the button in the
scroll bar and dragging it down until the name of the desired
aircraft appears.
-
-
-
When you select an aircraft, you start in the forward view
through the cockpit. You can press the F1 through F7 keys to
change the pilot’s view. When you’re in the forward view
(Fl),
-
you can press the F9 key to toggle the cockpit on or off.
Onscreen Gauges
When Forward view is selected (press
Fl),
you see your air-
-
craft’s gauges laid out in the cockpit (if you don’t see the cock-
pit, press F9 after pressing
Fl).
There are five different types of
-
cockpits. Below is one example with the gauges highlighted.
-
B2
Stealth Bomber
Boemg
727
Boemg
737
Boeing 747
Bristol
Bulldog
Cessna 172
Chapter 3
Aircraft
Checkout Procedures
B C
-
-
D
EF G
Page 25
-
A - Engine power: The position of the throttle lever
-
-
sponds to the engine power you selected by pressing keys 1
through 0 on the main keyboard. If your joystick has a throttle, use that to control engine power.
corre-
-
-
-
-
-
-
-
-
-
-
-
-
-
-
B - Horizon gauge: Shows the artificial horizon. Notice that
when you bank or pitch, the artificial horizon line changes to
represent that movement.
C - Speed indicator: This indicates the speed at which you
are traveling.
D - Vertical climb indicator: This gauge shows the change in
feet per minute. Each number represents 100 feet. When the
needle is in the upper half of the gauge, the aircraft is climb-
ing. When the needle is in the lower half of the gauge, the
aircraft is descending.
E - Altimeter: The altimeter shows the aircraft’s altitude.
Each revolution of the small hand represents one thousand
feet. Each revolution of the large hand represents one
hundred feet.
F - Clock: This is the time elapsed since you got into your
aircraft.
G - Compass: This shows your north, south, east, and west
direction heading.
If the cockpit view is off, or if you are in any other view, you’ll
Bristol Bulldog (Mk IIA)
Manufacturer: .........................
Take-off speed:
Stall speed:
Maximum speed:
Maximum altitude:
Flaps:
.......................
............................
....................
.................
......................................
Retractable landing gear:
Bristol Aeroplane
.65 m.p.h.
.55 m.p.h.
135 m.p.h.
.25,000 feet
No
........
No
Co.
-
Chapter 3 Aircraft Checkout Procedures
Page 26
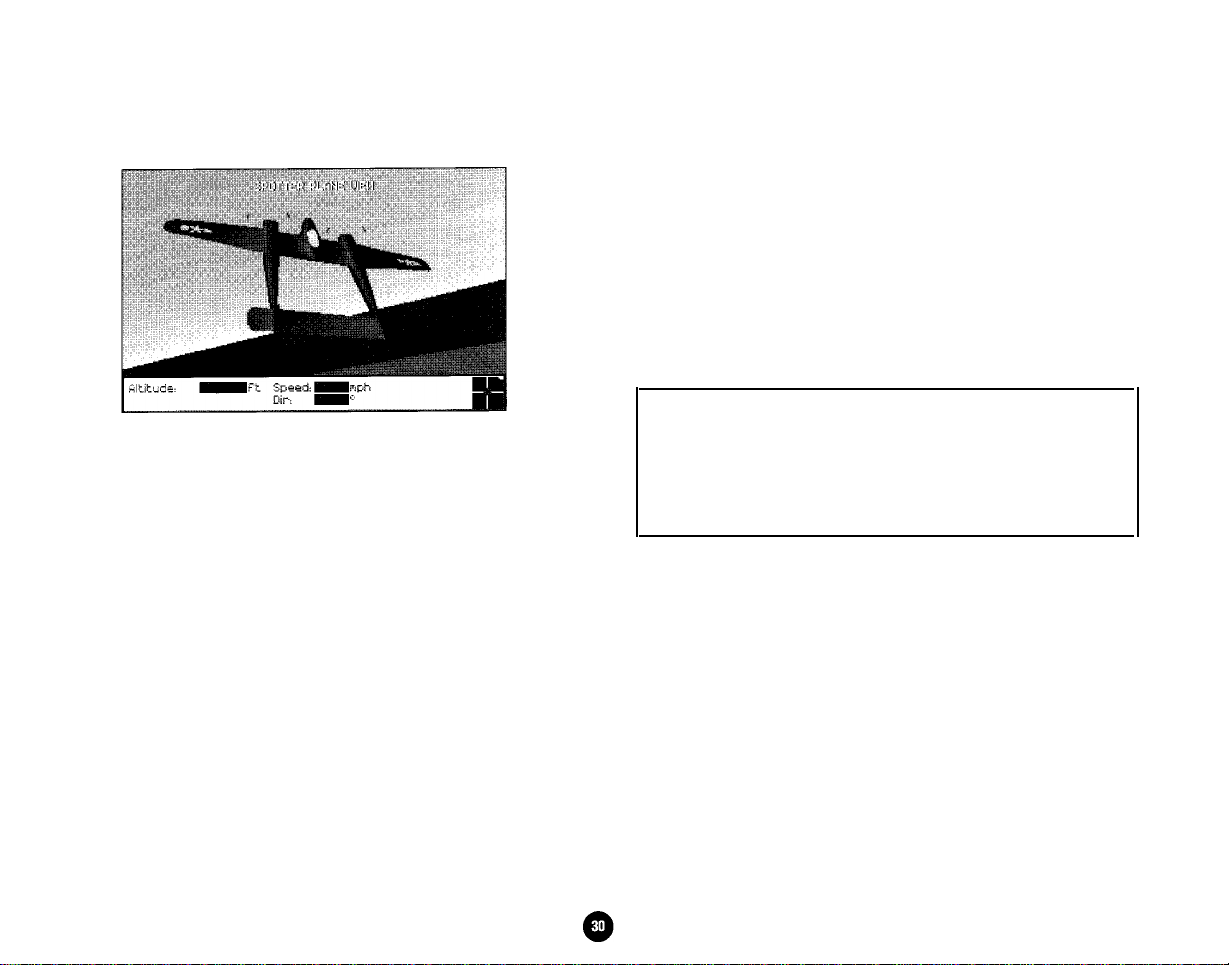
see the necessary in-flight readouts along the bottom of the
screen.
ALTITUDE: The altitude of the aircraft above sea level,
expressed in feet.
SPEED: The speed of the aircraft expressed in miles per hour.
DIR: The direction the aircraft is flying measured in degrees.
Due north is 0 degrees, due east 90, due south 180, and due
west 270.
The red dot on the stick schematic indicates the position of
your flight control stick. (See “Flight Controls” for details on
how the stick schematic feature works.)
The white dot along the right side of the stick schematic
indicates engine power setting.
Chapter 3
Aircraft
Checkout Procedures
-
-
Flying Stunt Island Aircraft
Some of you more advanced pilots may get into our aircraft and
-
get fidgety
automated many of the controls that the pilot normally would
adjust because as a stunt pilot, your primary concern is to Suc-
cessfully execute a high risk stunt.
not enough controls for you to manipulate. We’ve
-
-
-
-
Although not necessary, pilots who really want to can work on
their aileron and rudder skills. The use of independent rudder
control is explained in “Using the Rudder.”
-
-
This section does not go into the aerodynamic forces
that affect flying, nor does it cover the dynamics of
stalling, which is referred to. If you know little about
flying and would like to learn more about the technical
details, please see Appendix A.
-
-
-
-
Flight Controls
Stunt Island planes can be controlled using a keyboard, a
mouse, or a joystick. As the pilot, you control the aircraft’s
pitch, roll, and yaw.
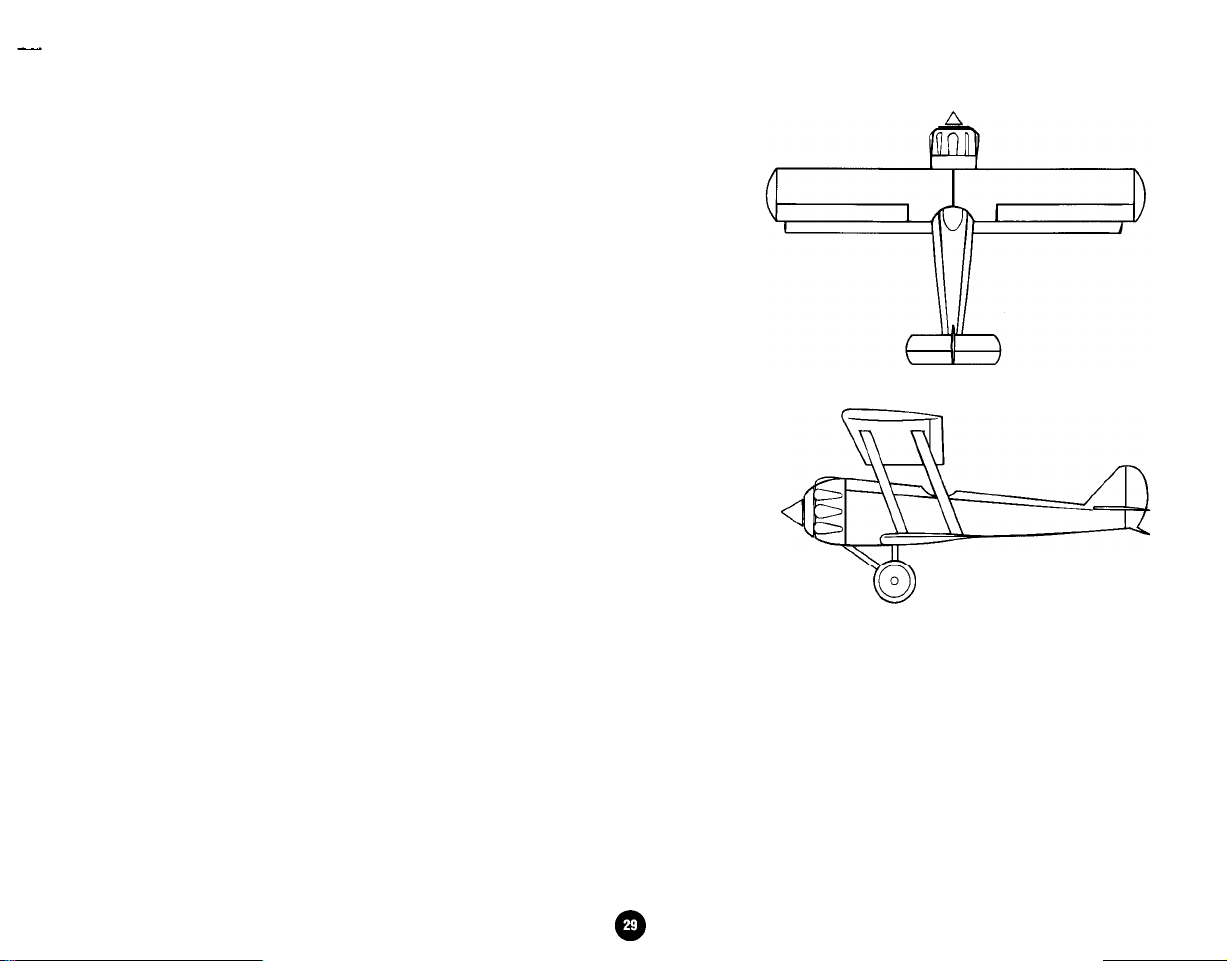
A control stick schematic is always displayed on the lower right
corner of the information display bar, except in the cockpit
view (Fl). When the dot is in the center of the schematic, your
control stick is in the “neutral position.”
Neutral Position of Control Stick
If
you were in the real cockpit of an aircraft, you would be con-
-
-
-
-
-
-
-
Page 27

-
-
-
-
trolling the aircraft by using a “yoke” or a “flight stick.” The
yoke (shaped somewhat like a bull’s horns) and the flight stick
move three dimensionally. Both controls have a ‘neutral posi-
tion,” which is a point of rest the control will return to when
you let go of it.
Joysticks also have neutral positions. If you’re using a joystick,
notice how it always returns to the upright position when you
let go of it. The dot in the stick schematic represents the position of your stick. When you release your joystick, the dot
always returns to the center of the schematic.
-
--
-
-
-
-
Although there’s no “stick” on a mouse or keyboard, you can
treat it as if it had one because of the Control Centering option.
When Control Centering is on, the mouse or keyboard behaves
like a yoke or flight stick and automatically returns to the
neutral position when you stop moving it. This allows you to
make subtle adjustments during flight.
Control Centering’s default setting is On. To turn it off, press
Alt-P to open the Preferences window and select Off.
Pitch
Moving the aircraft along its lateral axis results in a change in
pitch. When pitch changes, the nose of the aircraft rises or
falls. To change the pitch of an aircraft, move your control
device forward or backward.
Cessna Model 172 (Skyhawk)
Manufacturer: .........................
Take-off speed:
Stall speed:
Maximum speed:
Maximum altitude:
Flaps:
...................................... Yes
Retractable landing gear:
.......................
............................ .45
...................
.................
Cessna Aircraft Co.
.55 m.p.h.
m.p.h.
,138 m.p.h.
.12,000 feet
........
No
c >
Chapter 3 Aircraft Checkout Procedures
Page 28
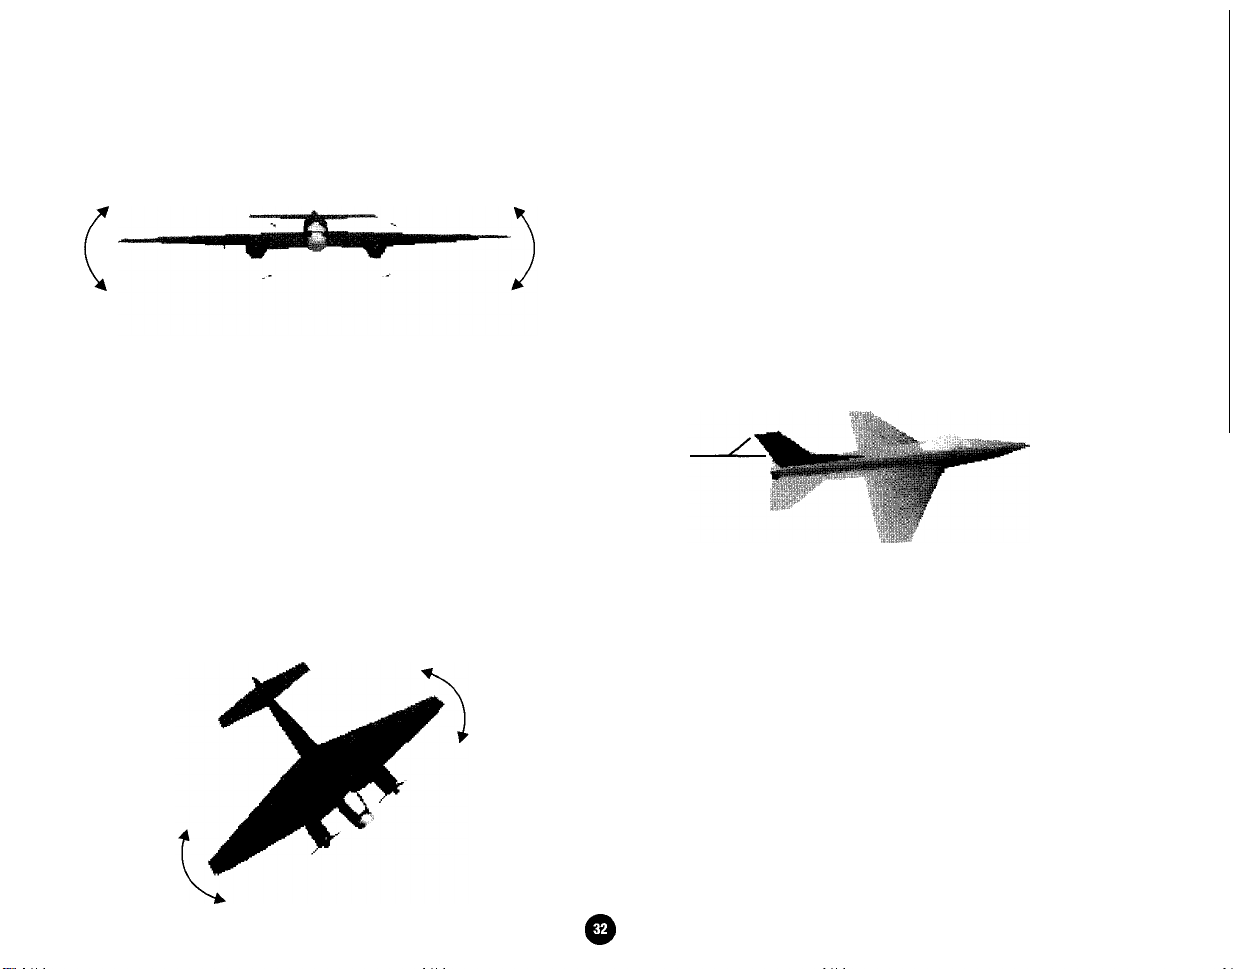
Roll
Moving the aircraft along its longitudinal axis results in roll.
To roll an aircraft, move the control device left or right.
-
-
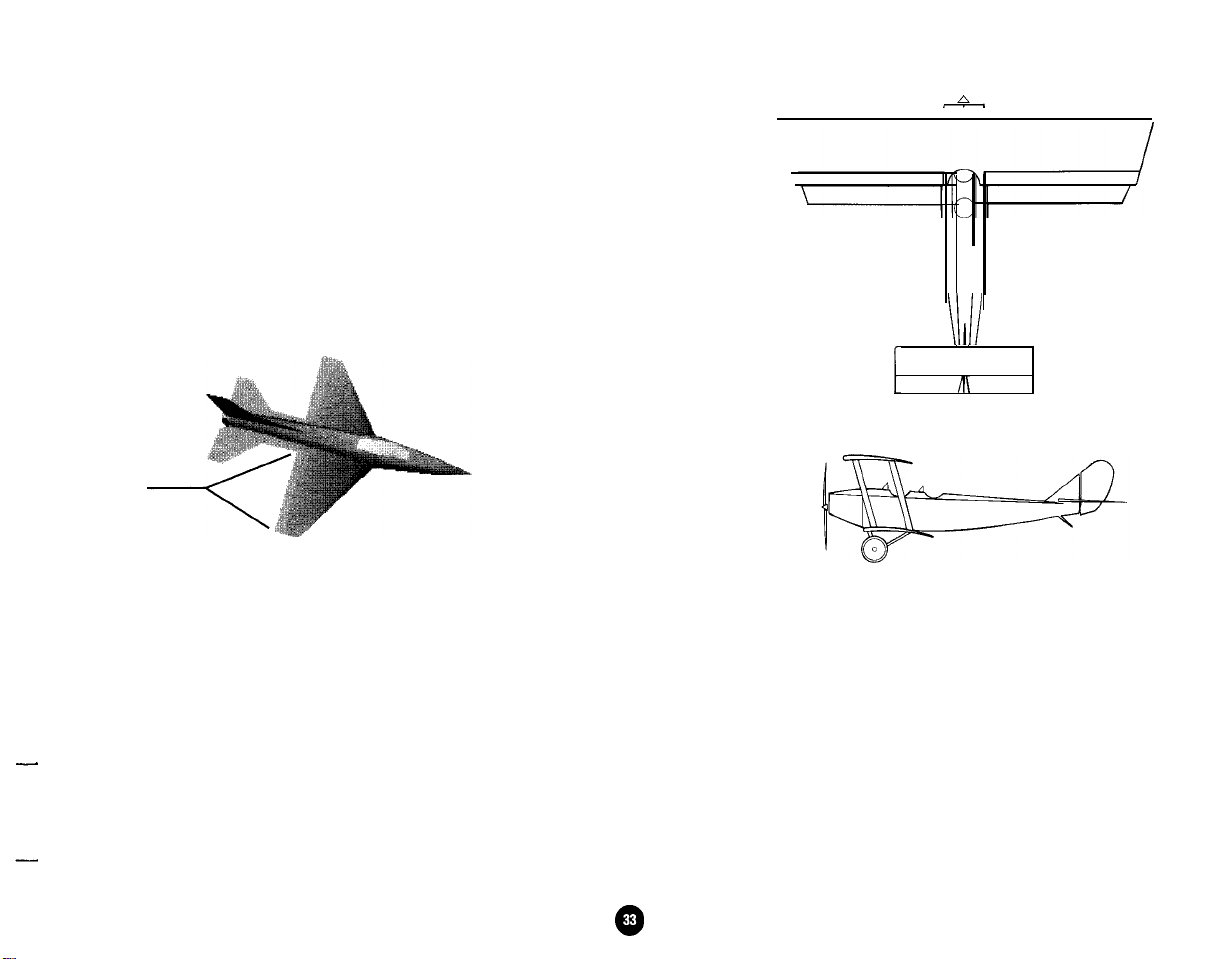
Using the Rudder
You can use button 2 to actuate the rudder. When button 2 is
pressed and the control device is moved to either the left or
right, the aircraft will yaw in that direction without rolling.
-
-
The rudder, located on the back edge of the aircraft’s vertical
c
Yaw
Moving the aircraft along its vertical axis results in yaw.
Imagine putting your foot on the ground and grinding it.
The toe of your shoe, as it moves left and right, illustrates
the movement of yaw.
Yaw occurs in two ways: 1) It’s a natural by-product of
working the pitch and roll, or 2) You can induce yaw by
specifically using the rudder.
Yaw will be at its greatest influence when the control device is
moved diagonally. (Keyboard users need to alternate up or
down arrow keys with left or right arrow keys to achieve yaw.)
tail, controls the aircraft’s yaw. When the rudder is to the right,
airflow will react against it and push the tail of the aircraft to the
left causing the nose to yaw to the right, When the rudder is to
the left, the opposite will occur, and the nose will yaw to the left.
Rudder
area
The Independent Rudder option is available in the Preferences
window by pressing Alt-P. The default option is On.
Using the Ailerons
The Independent Aileron control option is available in the
Preferences window by pressing Alt-P and selecting Off next to
Independent Rudder control. when you have
control, you do not have independent rudder control; you must
choose one or the other.
-
-
-
-
-
-
-
-
-
-
-
independent aileron
-
-
Chapter
3 Aircraft Checkout Procedures
You can use button 2 to actuate the ailerons. When button 2 is
pressed and the control device is moved to either the left or
-
-
Page 29
-
-
-
-
-
-
-
right, the aircraft will roll in that direction without yawing.
The ailerons, located on the back edge of the aircraft’s wings,
help control the aircraft’s roll. When the right aileron is up and
the left is down (button 2 is pressed and the control stick is
moved to the right), airflow will react against the ailerons
causing the aircraft to roll to the right. When the left aileron is
up and the right is down (button 2 is pressed and the control
stick is moved to the left), the aircraft will roll to the left.
-
n
III
r
n\
-
-
Aileron
-
-
-
-
-
area
Using the ailerons lets you keep yaw to a minimum as you roll
the aircraft. This is particularly useful if you need to fly sideways through a narrow corridor like a canyon or between
buildings.
Curtiss JN “Jenny”
Manufacturer,.. . . . . . Curtiss Aeroplane and
Motors Corp.
Take-off speed:
Stall speed: 30 m.p.h.
. . . . . . . . . . . . . . . . . . . . . . . . 54 m.p.h.
Maximum speed: 75m.p.h.
Maximum altitude: . . . . . . 14,000 feet
Flaps: . . . . . . . . . . . . . . . No
-
Retractable landing gear: . . No
Note: The other Jenny airplanes are simply color
variations of this one.
-
Chapter 3 Aircraft Checkout Procedures
@
Page 30

Engine Power Controls
The keyboard controls the power settings for the aircraft’s
engine(s). Press a key from 1 to 0 on the main keyboard (not
the keypad) to select a power setting. The (+) and
allow you to gradually adjust the power.
Key
1
2
3
4
5
6
7
8
9
0
Backspace
If you are flying with the cockpit view on, the aircraft’s power
setting will be displayed on the cockpit panel by the position
of the throttle lever. The higher up the throttle lever, the more
engine power you have.
For those of you flying with the cockpit view off, the white
dot along the right side of the stick schematic will indicate
the aircraft’s power setting. When the dot is at the top of the
cross hair, the aircraft is at full throttle. The lower the white
dot is on the stick schematic, the lower the engine power.
10% of available engine power
20% of available engine power
30% of available engine power
40% of available engine power
50% of available engine power
60% of available engine power
70% of available engine power
80% of available engine power
90% of available engine power
100% of available engine power
Increase engine power by 2%
Decrease engine power by 2%
Cut engine power to 0%
Function
(-)
keys
Taking Off and landing
Taking Off
Press 0 to open the engine to full throttle and start the aircraft
rolling down the runway. The miles per hour will increase on
the airspeed indicator. When the aircraft reaches its take off
speed, pull back on the control stick to lift the aircraft into the
air. Remember the type of aircraft you are flying; modern jet
aircrafts can take off and climb at greater angles, while older
aircrafts and propeller aircraft will stall if you pull back too far
on the stick.
If you’re flying with Control Centering on, you need to keep
rolling the mouse back or keep pressing the down arrow key
on the keyboard to simulate pulling back on the flight stick;
otherwise, the stick moves back to the neutral position when
you stop rolling the mouse.
Once you are established in a stabilized climb (not descending
or turning) press G to raise your landing gear (if applicable).
Flying with your landing gear down increases drag, which
slows the aircraft.
After you level off at the desired altitude, be sure to reduce
engine power to somewhere between 60% and 70% for jets
and 80% to 90% for propeller aircrafts. Flying at full throttle
makes the aircraft much more responsive to the slightest stick
movement, which may make it seem harder to control.
Using Flaps for Takeoff
If you want to get your aircraft airborne quickly or if you need
Chapter 3
Aircraft
Checkout Procedures
Page 31

to take off in a very short distance, you can do so by using
flaps if your aircraft has them.
Press F to lower the flaps before take off. Press 0 to open the
engine to full throttle, The miles per hour will increase on the
airspeed indicator. Instead of waiting for take off speed to pull
back on the control stick, hold the control stick back during
the entire take off process.
Once the aircraft lifts off, allow the airspeed to build well
beyond the take-off speed (about 20% above it) before pressing
F to retract the flaps and G to retract the landing gear.
Please note that not all planes have flaps.
Landing
To land, reduce power to about 30% in the jets and about 50%
in propeller aircrafts. As the aircraft slows down, it comes closer to stalling so you must remember to pitch the nose down to
maintain flying speed as well as to keep the aircraft descending.
Press F to lower the flaps (if available). Flaps lower the stall
speed and help slow the aircraft. Press G to lower the landing
gear (if applicable) before touching down.
When you’re about 75 feet above the ground, reduce the
power again to about 10%, pitch the aircraft to a level flight
attitude and let it continue to descend (“attitude” is the
positioning of the aircraft).
Chapter 3 AIrcraft Checkout Procedures
Page 32

At about 15 feet above the ground, gently pull back on the
control stick to bleed off any excess airspeed.
Once the aircraft has touched down, press the Backspace key
to cut the throttle to 0% thrust and then press B to actuate the
brakes.
Landing on a Runway
The altitudes and speeds suggested previously are for landings
in general. To land on a runway requires a touch more skill.
You need to learn to judge the distance to the runway and how
fast this particular aircraft will cover that distance. A good rule
of thumb is to descend to approximately 1,000 to 1,500 feet
above the ground at a distance of one to one and one-half
miles from the end of the runway.
Ending Flight Without Landing
If you don’t need or want to land the aircraft, press Esc at any
time to end the flight.
Autopilot
Press the A key to fly in autopilot mode. The autopilot is a
two-axis gyroscopic type that only maintains altitude and
heading. The autopilot is not computerized, and will not
automatically fly the aircraft during stunt assignments
that’s your job!
-
Crashing or Ejecting
During flight practice at the airfield, you can crash an aircraft
without penalty (for those of you entered in the Stunt Pilot of
the Year competition). Only when you accept assignments
through the stunt coordinator during competition will you be
penalized for crashing. In the more spectacular crashes, you
will awaken in the hospital and find yourself groggily peering
up the nostrils of the island surgeon. Note: If you don’t want
to go to the hospital after a crash, select Alt-P to open the
Preferences window; then select Off for the Hospital option.
Press E to eject. When you eject, you change to the parachutist’s point of view (you no longer have a view from the
aircraft you were flying).
There is no problem with ejecting unless you’re in the Stunt
Pilot of the Year contest. If you’re in the contest, it will cost
you a “take” to eject. The goal in the contest is to successfully
complete stunts in as few takes as possible. Too many unsuccessful takes can get you fired. If this is your first take in a
stunt, ejecting guarantees that you’ll miss out on the bonus for
completing a stunt in the first take.
Weapons Use
In order to fire a weapon, you must first select that weapon.
Press W to toggle through the available weapons (guns,
missiles, or bombs). To fire the selected weapon, click button
1 or press the Enter key.
Chapter 3 Aircraft Checkout Procedures
Page 33

-
-
Not all aircrafts are originally equipped with guns, missiles,
-
-
and/or bombs. The available weapon(s) will appear on the
aircraft’s cockpit, You can “cheat” and have an aircraft fire a
weapon by selecting it through the Global option on the Set
Design screen in production.
-
-
-
-
-
Dropping Bombs
If you are dropping a bomb, you can press the F7 key to get
the bomb target view. The cross hairs in this view help you
line up with your target on the ground. Once the cross hair is
over the ground target, press a button or the spacebar and the
bomb will fall on the target. The bomb target view is automati-
cally recalculated based on speed and altitude so that the cross
hair will be accurate.
-
-
-
-
-
To drop a bomb, you must select Bomb as the weapon.
However, use of the Bomb view is not required. In some cases
where you’re flying in a tight area, like through a canyon, you
may not want to risk shifting from your forward view to the
bomb view. Bombing is a bit more tricky this way, but if you
stay low and perform a shallow dive toward your target, the
bomb should hit.
-
-
--
-
-
Chapter 3 Aircraft Checkout Procedures
Page 34

Aircraft Views
The following are keyboard keys for all the possible vantage
points during flight:
Key
Fl
F2
F3
F4
F5
F6
F7
F9
View
Pilot’s cockpit view, looking out the front window
Pilot’s view, looking out the left window
Pilot’s view, looking out the right window
View looking out the rear of the aircraft
Spotter plane view
Adjust spotter plane view. By pressing the arrow
keys, moving the joystick, or rolling the mouse,
you can adjust the view used in F5 (the spotter
plane’s perspective on the stunt aircraft). Mouse
or joystick users: Button 1 changes the distance
from the aircraft while button 2 changes the
camera zoom level. You can also press both
buttons simultaneously.
Bomb target view
Toggle cockpit display on/off; this key is only
applicable when used with the Fl key (forward
view).
Keyboard Keys Available During Flight
In addition to the Fl through F9 aircraft views listed
previously, the following keyboard keys are available to you
when you take off from the airfield:
Key
A
B
E
F
G
P
R
T
w
X
Tab
These keys are always available:
ALT-D Opens the Delete file screen
ALT-J
ALT-P
CTRL-Esc Exits the program (Quick Exit in the Preferences
Function
Toggles the Autopilot on and off
Toggles the Brakes on and off
Ejects the pilot from the aircraft
Raises and lowers the Flaps
Raises and lowers the landing Gear
Pauses the game; select OK to continue
Starts and stops Recording
Calls up option to change the Time of day
Toggles through the available Weapons (Guns,
Bombs, or Missiles)
Sets off an explosion special effect
Centers the control device (useful if the Control
Centering option is turned off)
Opens the Joystick calibration screen
Opens the Preferences window
window must be on)
Chapter 3
Aircraft
Checkout Procedures
a
Page 35

-
-
-
-
-
-
-
-
Tips on Successful Flying
+
If you’re trying to fly level with the cockpit view off, keep
the red dot toward the center of the cross hair. (If you have
Control Centering on, this should automatically occur.)
+
If you’re trying to fly level in the cockpit view, keep the
middle of the cross hair (near the center of the screen)
just below the horizon.
+
Use slow movements with your controls, especially at high
speeds. Jerky movements with the input device translates
into jerky movements of the aircraft, and a tendency to
over-control the aircraft.
+
After take off, reduce power to avoid flying at abnormally
high speeds. Higher speeds make the aircraft more sensitive to the input device.
+
Use flaps in conjunction with power when trying to slow
the aircraft in shorter distances.
-
Recording During Flight
-
-
-
The R key lets you record your flight at the airfield. While
flying, press the R key and an
corner of the screen to indicate that the program is recording.
The
“R”
will remain on the screen until you press the R key
again or end the flight and return to the airfield.
"R"
will appear in the upper left
Curtiss June Bug
Manufacturer:
Take-off speed: 48 m.p.h.
Stall speed: . . . . . . . . . . 25 m.p.h.
. . . . Curtiss Aeroplane and
Motors Corp.
Maximum speed: 65 m.p.h.
-
When you return to the airfield, a Save Take requester appears.
Name your file and select OK. The file is automatically saved
with the .TKE extension to the \STUNTISL\VAULT
Maximum altitude: . . . . . 14,000 feet
Flaps:
. . . . . . . . . . . . . . . . . . . . . . . . . . . . . . . . . . . . . . No
Retractable landing gear:
,.,,,,..
No
Chapter 3
Aircraft
Checkout Procedures
Page 36

subdirectory. After you’ve saved the file, you return to the
hangar. If you choose to go to the editing room in post-production, the file will automatically be loaded into the Source deck.
say you were buzzing a field of corn. You would see fewer
stalks of corn in the horizon if the detail setting were 50%
instead of 100%. The detail of the corn would still be the same,
but when they would appear would be different.
If you record more than one flight at the airfield, the last take
saved will be the one loaded into the Source deck. When you
go to the editing room, decks 1 and 2 will be loaded. Deck 1
will show the pilot’s view and deck 2 will show the spotter
plane view; these are the two views that are always recorded.
(For complete details on editing, see Chapters 8 and 9.)
GOURAUD SHADING
appears on the aircraft (not the shadow below the aircraft). You
can choose to turn it off, turn it on, or select dithered (DITH)
for the most detailed effect. Gouraud Shading involves a lot of
computing; having it on or dithered will slow down most
machines, some with little effect, others more radically.
-
Gouraud Shading is the shading that
Preferences Window
The Preferences window can be opened at almost any time by
pressing Alt-P. The Preferences window contains game
options that you might want to adjust during play.
BETWEEN SCREEN FADING -When you move from one
screen to another, the screen fades to create a smooth visual
transition. If you want to jump from screen to screen more
quickly, turn this off.
QUICK EXIT
press Ctrl-Esc to exit the program and return to DOS. If you’re
in the Stunt Pilot of the Year contest and you press Ctrl-Esc to
exit, the results from the stunts you’ve done in this session of
Independent rudder
Automatic
theatre
Sound
effects
zoom
play will not be incorporated into your standings. With Quick
Exit off, you must exit the program by leaving on the ferry,
which saves your standing in the contests.
FILM EDITING
DETAIL - The more detail you have on the screen, the slower it may make your machine run. The Detail option does not
affect the rendering of any actual objects on the screen, but
how much of the art appears on the screen. For example, let’s
Chapter 3
Aircraft
Checkout Procedures
asked if you wanted to do your own editing. If you selected
Yes, this option will be on. When it’s on, after you film a stunt
and save it you automatically go to the editing room. When it’s
off, you automatically go to the theatre. (Chapter 6 contains a
-
This disables the option that allows you to
-
When you loaded the program, you were
Page 37

section on how the Film Editing option affects recording.)
-
-
HOSPITAL -When you have especially bad crashes, you’re sent
to the hospital. To expedite play you can turn this option off so
you don’t have to visit the hospital screen. Turning off this option
does not prevent you from getting penalized for excessive crashes.
-
INDEPENDENT RUDDER-When this is on, you have the
option of independently controlling the aircraft’s rudder.
When it’s off, you can independently control the aircraft’s
-
-
-
aileron. (For details on controlling the rudder or aileron, see
page 32.) You cannot have independent control over the rudder
and aileron simultaneously.
AUTOMATIC THEATRE ZOOM - When you’re at the theatre
viewing a film, the theatre screen eventually fills the full frame
of the monitor. If you want to keep the theatre at its original
size with the viewers in the foreground, turn this off. Having
this option off is good for slower machines.
-
SOUND EFFECTS - Select off to turn off sound effects that are
-
-.
-
-
sent to the internal PC speaker.
CONTROL CENTERING - Although there’s no “stick” on a
mouse or keyboard, you can treat it as if it had one by using
the Control Centering option. When Control Centering is on,
the mouse or keyboard behaves like a “flight stick” and
automatically returns to the neutral position when you stop
moving the mouse or pressing an arrow key. This allows you to
make subtle adjustments during flight.
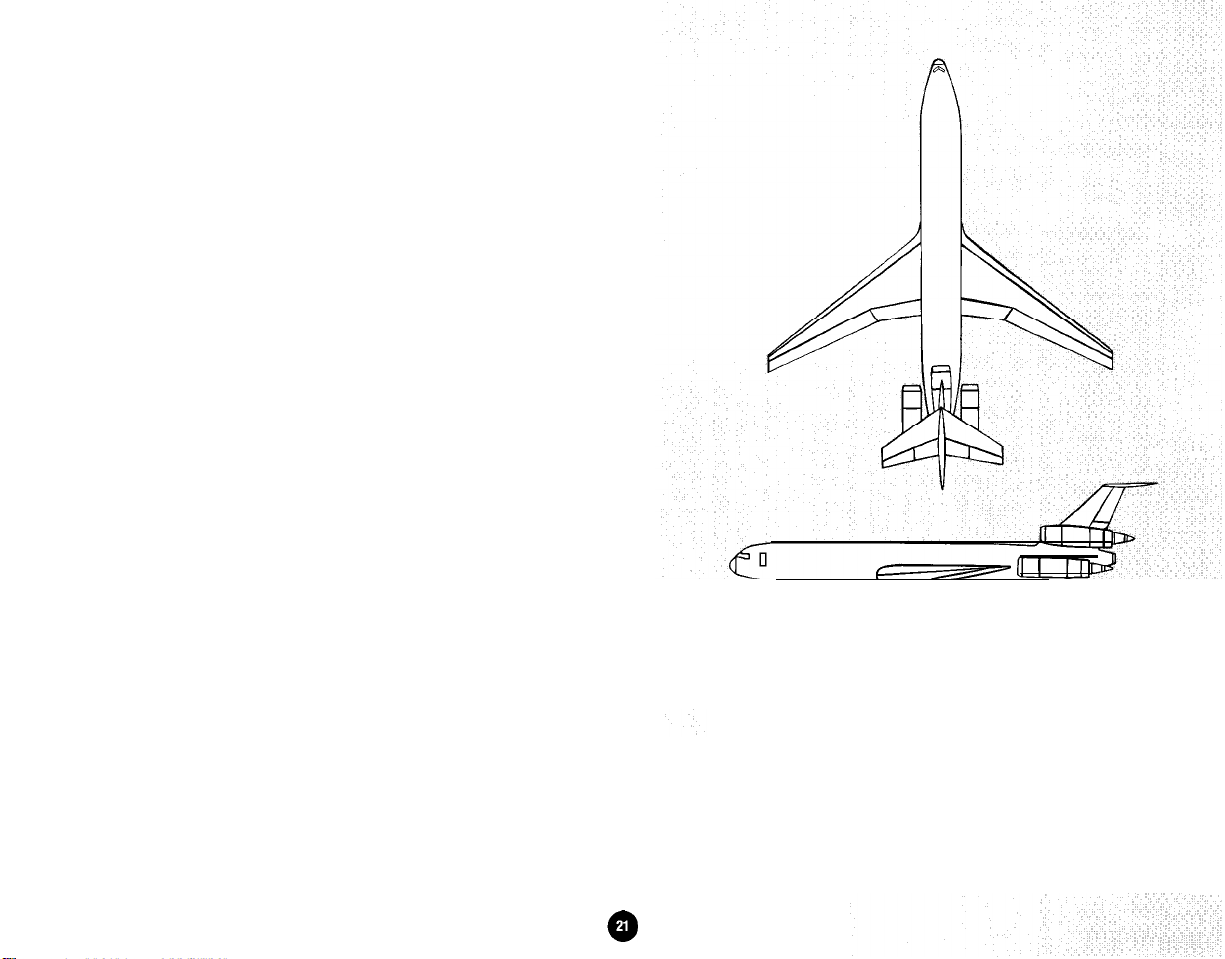
Douglas DC-10
Manufacturer.
Take-off speed:
Stall speed:
Maximum speed:
Maximum altitude:
Flaps:
Retractable landing gear:
.......................... Douglas Aircraft Co.
.......................
............................
...................
..................
...................................... Yes
........
,155 m.p.h.
,130 m.p.h.
,564 m.p.h.
50,000 feet
Yes
Chapter 3 Aircraft Checkout Procedures
Page 38

-
CHAPTER 4
Stunt Pilot of the Year Contest
-
The Stunt Pilot of the Year competition is open to those who answered Yes to “Do you
want to be in the competition?” (asked right after the program loads).
You will find a complete description of each stunt assignment at the end of
-
this chapter.
The Contest
The Stunt Pilot of the Year contest offers 32 different stunts that you can fly.
These are the stunts assigned to you by the stunt coordinator from his office in the
-
production building. You must complete at least 26 stunts successfully
excessive takes - to be able to win the contest.
without
-
-
Your performance in these assignments will affect your standing in the Stunt Pilot
of the Year contest. The winner of this contest will have the new airfield named
after him or her at Stunt Island’s first anniversary party.
Chapter
4 Stunt Pilot of the Year Contest
Page 39

Because you’re paid for each successful execution of a stunt, with
bonuses for completing the stunt on the first take, your success
is measured by how much money you’re earning. Each dollar
you earn equals one point in the standings. You will need to
earn an average of $2,300 per stunt to win the contest.
You can check the standings of the contest at any time by selecting Contest Standings in your cabin, or by selecting
Competition Standings in the production building.
To check the amount of money you’ve earned from your
completed stunt assignments and the number of takes you’ve
attempted, select the Ledger on the table in your cabin.
Getting Stunt Assignments
All stunts are overseen by the stunt coordinator.
You do not have to be entered in the contest to fly these stunts.
If you’re not in the contest, no scores will be kept for you.
SCENE #: Select
job. (You only get this option if you’re not entered in the compe-
tition.)
You only get the following three options (Previous, Next, and
Risk) if you’re entered in the competition.
PREVIOUS
NEXT - Select this to see the next assignment.
RISK - CAUTION: Don’t select this unless you want a
mandatory assignment!
standings and want to try to catch up quickly. When you select
Risk, you’re automatically assigned a high-risk assignment that
you must accept.
ACCEPT
choose this option, you’ll go to the Camera Crew screen. Select
Action-Take to fly the stunt.
DECLINE - Select this to decline the assignment and close the
stunt assignment box.
(-)
to see the previous job or
-
Select this to see the previous assignment.
Select this if you’re behind in the
-
Select this to accept the assignment. When you
(+)
to see the next
Chapter 4 Stunt Pilot of the Year Contest
The difference between being in the contest and not being in the
contest is the assignments you’re allowed to see. If you’re not in
the contest, the Job option lets you scroll through all the assignments that are available. If you’re in the contest, you’re only
allowed to see certain assignments. As your skills improve,
you’re offered more difficult assignments.
Page 40

-
You can get updates of the standings in the contest in your
-
-
cabin or in the production building.
-
--
-
-
-
-
-
-
Payoffs and Penalties on Stunt Performance
Each stunt has a base pay that you can earn. You can also get
a bonus by successfully completing the stunt on the first take.
Each additional take will incur a cash penalty that’s deducted
from your pay after you successfully perform the stunt. The
bonus pay, crash penalty, and take penalty for each stunt are
listed with each assignment at the end of this chapter.
If you crash when you’re not supposed to, you will awaken at
the Island hospital under the care of the eccentric physician.
It will also cost you points in your contest standings. The
Hospital option can be turned off to expedite play. To do this,
press Alt-P to open the Preferences window; then turn the
Hospital option off. Turning off the Hospital option will not
cause you to be exempt from any hospital penalties; you will
still incur hospital costs.
If you exceed the number of takes allowed on a filming, you’re
fired from that particular stunt. Choose another stunt to fly.
Camera Crew
After you accept a stunt assignment by selecting Accept from
the stunt assignment window in the stunt coordinator’s office,
you meet the camera crew on location.
Duck
Take-off speed:
Stall speed:
Maximum speed:
Maximum altitude:
Flaps:
......................................
Retractable landing gear:
........................
.............................
....................
..................
........
Low
Low
Low
Low
No
Yes
-
Chapter 4 Stunt Pilot of the Year Contest
Page 41

When you successfully complete a stunt, select That’s A Wrap
to save the footage. You can then select Stunt Coord to return
to the stunt coordinator’s office for a new stunt assignment, or
select any of the other options if you want to take a break from
filming.
Stunt Island Hall of Fame
Just outside the hangar at the airport is the Stunt Island Hall
of Fame board. It contains the names of the all-time highest
Select Action-Take to start filming. If you fail to execute the
stunt, press Esc to return to the Camera Crew screen. Select
Action-Take again; notice that instead of Take 1, this time it’s
Take 2. The number of takes are tracked on the Camera Crew
screen. Before you go to the next take, you’re asked if you
want to print the last take. If you select Yes to save it, you’ll
see the Save Take requester. If you select No, you’ll begin
shooting.
Not saving a take won’t fool the program into thinking that
you haven’t tried a stunt. The program notes each time you’ve
done a take. Whether or not you save the footage from a take
is entirely unrelated to the outcome of the contest.
Keep selecting the Action-Take option until you get it right.
If you crash, you may wake up in the hospital. If you crash too
many times or exceed the allowed number of takes, you may
-
be fired. If you’re fired, you cannot retry that stunt
another one.
go to
scoring pilots (pilots created by the program are not recorded
here; only you and your friends are tracked). Select the board
to see the names close-up.
Competitors leaving Stunt Island
Competitors who entered the contest must leave on the Ferry
(by selecting Ferry and then Leave On Ferry) or else their
accomplishments will not be saved. When you’re leaving on
the ferry, you’re asked, “Do you want to save your pilot?” Be
sure to select Yes so your achievements are recorded.
If you’ve had an especially bad day on the set, you may not
want to save your day’s worth of piloting work; in this case
you can select No when you see “Do you want to save your
pilot?” The next time you return to Stunt Island, your disas-
trous day on the set will be only a memory. Then again, victory
is only sweeter if you can overcome a bad day in the cockpit to
steal the whole show.
-
Chapter 4 Stunt
Pilot
of the Year Contest
Page 42

-
-
-
-
-
-
-
The Stunt Assignments
These stunts are available through the stunt coordinator. You
do not have to be in the contest to fly them. If you are registered to be in the contest, each attempt at a stunt will count
towards your standing. The figures for bonus pay, crash
penalty, take penalty and maximum takes allowed only apply
to those in the contest.
The set’s filename is also listed so you can load the set at the
Set Design screen to study or modify it. The sets you can load
are duplicates of the sets used in the contest. Modifying these
sets will not affect the ones used in the contest.
-
-
-
If you’re stuck on an assignment, see the section called
“Dissecting Stunt Sets for Success” in Chapter 6. Once you
understand how sets and events are created, you’ll be able to
figure out what it takes to successfully complete each stunt.
-
Scene 1. Take off and shoot a Zero.
This is the final scene in the World War II epic. Taking off
from the runway in your P-38 Lightning, you need to pull up
-
-
-
before you hit the burning Zero on the runway. Then, without
going over 200 feet, you need to shoot down another Zero
that’s bombing the Allies’ hangars. You have a shot limit of 40.
Set filename: TAKEOFF.SET
First take bonus: 220
Crash penalty: 180
Take penalty: 90
Maximum takes allowed: 10
E3
AWACS
Manufacturer:
. . . . . . . . Boeing Aerospace and
Electronics
Take-off speed: . . . . . . . . . . . . 168 m.p.h.
Stall speed: . . . . . . . . . . . 140 m.p.h.
Maximum speed: .
........
530 m.p.h.
Maximum altitude: . . . . . . . 30,000 feet
Flaps: . . . . . . . . . . . . . Yes
Retractable landing gear:
.....
Yes
Chapter 4 Stunt
Pilot
of the Year Contest
Page 43

Scene 2. Land on the Golden Gate.
This stunt’s for a drama that takes place in the “City by the
Bay.” In a tense moment, you’re forced to land your Cessna
172 on the Golden Gate Bridge without hitting any cars. You
should be heading north when you perform this stunt.
Set filename: LNDBRDGE.SET
First take bonus: 150
ground. You must execute the pickup at a minimum of
110 m.p.h.
Set filename:
First take bonus: 150
Crash penalty: 360
Take penalty: 210
Maximum takes allowed: 6
Crash penalty: 270
Take penalty: 150
Maximum takes allowed: 4
Scene 5. Catch a balloon.
There’s political trouble afloat in the hot air balloon festival.
The red and white balloon is carrying an explosive cargo that
Scene 3. Barnstorm.
This is a classic barnstormer. You have to guide your Fokker
Triplane through the open doors of a barn. The added challenge
is dodging the three combines passing in front of the barn as
you make your entrance. Touching the ground is out, so don’t
think about landing and then driving through.
is slated to be dropped when it drifts over the governor’s mansion. A group of hot air balloons loosely dot the sky. Your job
is to snag the red and white balloon with your P-38 Lightning
while avoiding all other balloons. Have any part of your aircraft touch the hot air balloon by the basket only; if you hit the
balloon, it will cause an explosion and end the stunt.
ALCATRAZ..SET
Set filename: BARNSTRM.SET
First take bonus: 600
Crash penalty: 390
Take penalty: 240
Maximum takes allowed: 8
Scene 4. Pick up a convict on Alcatraz.
This assignment takes you to The Rock. You need to pluck a
convict who’s trying to escape off a tower. The convict is
holding a hook that will latch onto the wheels of your
Sopwith
Camel. Fly too high and you’ll miss him; fly too low and he’ll
Once you’ve safely secured the hot air balloon, you need to tow
it over the abandoned castle, at which point it will become
detached from your aircraft and slowly start to rise. You need to
come back around and shoot the balloon down before it rises
above 3.250 feet.
Set filename: BLNCTCH.SET
First take bonus: 150
Crash penalty: 210
Take penalty: 150
Maximum takes allowed: 6
be forced to duck, Your “package” is about 180 feet off the
Chapter 4 Stunt Pilot of the Year Contest
Page 44

-
-
Scene 6. Castlestonn.
-
-
-
In this medieval farce, you’ll start the scene positioned at the
backside of a castle in your hang glider. You need to glide
around to the front of the castle and go in through the castle’s
entrance. Once inside, land with your feet on the catapult.
You’re catapulted back out so be sure to hang on tight.
-
-
-
-
-
-
-
-
--
-
Set filename: CASTLE.SET
First take bonus: 150
Crash penalty: 300
Take penalty: 90
Maximum takes allowed: 6
Scene 7. Park at the hamburger stand.
In an incredible lapse of vegetarianism, the lead character gets
a pathological desire for a grilled cheeseburger. As the vexed
pilot, you’re going to land your Piper Cherokee on a quiet
country road, taxiing it on the road until you hit a roadblock of
two police cars. Just before you hit the roadblock, you’re going
to make a hard left turn down another road, where you’ll soon
see a parking lot to your left. Pull into the first series of parking
spaces and put the nose of your aircraft in the second row, stall
3 (it doesn’t matter how the aircraft is positioned as long as the
nose is in the right stall). When you park, be sure to put on
your brakes or cut your engine so you’re stopped. Bon appetit.
Set filename: BURGER.SET
First take bonus: 150
Crash penalty: 420
Take penalty: 270
Maximum takes allowed: 6
F-4E
Phantom
Manufacturer: .........................
Take-off speed:
Stall speed:
Maximum speed:
Maximum altitude:
Flaps:
......................................
Retractable landing gear:
.......................
............................
...................
.................
........
McDonnell Douglas Corp.
,168 m.p.h.
,140
m.p.h.
.1,484 m.p.h.
.62,250 feet
Yes
Yes
Chapter 4 Stunt Pilot of the Year Contest
Page 45

Scene 8. Shoot planes in formation.
This director loves a tense chase scene. Your allies are being
pursued by the enemy. You need to hit the five enemy planes
without striking your two allies who are in the lead. You’ll be
positioned behind all the planes in your P-51D Mustang when
the action starts. There’s a time limit of 3 minutes or a shot
limit of 100. whichever occurs first.
Set filename: FORMATN.SET
First take bonus: 600
Crash penalty: 390
Take penalty: 180
crash this specially-made meteor into the hotel that sits at the
confluence (or
expensive and time-consuming to make, only a few were
created. The director and stunt coordinator are counting on
first-take success. If you don’t succeed, you might consider
finding a real meteor to crawl under.
Set filename: METEOR.SET
First take bonus: 600
Crash penalty: 1,260
Take penalty: 600
Maximum takes allowed: 3
Maximum takes allowed: 7
Scene 11. Blast a jeep.
Scene 9. Crash into a 747’s engine.
In this mid-air collision footage, your troubled F4U Corsair is
making an emergency landing at the airport. As you’re coming
in, a Boeing 747 is just taking off. You need to strike the right
outermost engine of the 747, avoiding the rest of the 747. The
right wing and engine are specially reinforced for this stunt, so
it’s imperative you hit the 747 in that spot.
Set filename: MIDAIRSET
This is the scene where the lead character finally tracks down
-
and finishes off - his nemesis. In this one-pass stunt,
you’ll chase down and shoot the escaping jeep in your Zero.
Set filename: STOPJEEP.SET
First take bonus: 600
Crash penalty: 330
Take penalty: 240
Maximum takes allowed: 6
First take bonus: 450
Crash penalty: 480
Take penalty: 150
Maximum takes allowed: 9
Scene 12. Bomber duck.
In this documentary based on the shocking 1992 research
revealing the criminal proclivity of birds, you reenact the
events of the famous “Egg Blotter” incident. As a duck, you’ll
fly over the town in search of the police car containing the
Scene 10. Crash into a hotel.
Here’s your first science fiction assignment. You’re going to
officers who supposedly chased off your flock from the town
square’s water fountain. You’ll bomb the police car with your
“Y”)
of the river. Because these meteors were
Chapter 4 Stunt
Pilot
of the Year Contest
Page 46

Grade A Jumbos. The eggs must hit right in front of or directly
on the police car for success.
Set filename: DUCK.SET
First take bonus: 300
Crash penalty: 270
Take penalty: 330
Maximum takes allowed: 6
Scene 13. Land on the blue building.
You’ll wish you had a helicopter for this one. Land your Pitt
Special on the roof of the blue building. You must come to a
complete stop without any part of the plane hanging over the
edge of the building.
Set filename: LANDBLD.SET
First take bonus: 300
Crash penalty: 390
Take penalty: 180
Maximum takes allowed: 8
Scene 14. Save the U.N.
The international establishment known for its attempts to
make world peace is about to have its own shattered unless
F4U
you succeed in your role. From your
Corsair, you must
shoot at and hit the two leading Humvees in the convoy headed
toward the United Nations building. After you’ve struck your
targets, you need to shake off the Zeros by cutting a hard right
around the United Nations building.
Set filename: SAVEUN.SET
First take bonus: 450
Chapter 4 Stunt
Pilot
of the Year Contest
Page 47

Crash penalty: 300
Take penalty: 210
Maximum takes allowed: 10
First take bonus: 410
Crash penalty: 360
Take penalty: 180
Maximum takes allowed: 6
Scene 15. Hit the renegade caterer.
The catering truck, having just stripped the gas station of all
its lottery tickets, is racing to get out of town. The hero, who
looks forward to his weekly stab at being a millionaire, grows
incensed when he picks up the crime on his shortwave radio.
He heads for the catering truck in his
Sopwith
Camel and
intends to clip the fleeing truck with his plane (you must hit
the right side of the catering truck). You’ve got to pull off this
stunt before the catering truck passes the Stop ‘N’ Rob and
goes out of view.
Set filename: HIGHWAY.SET
First take bonus: 300
Crash penalty: 390
Take penalty: 180
Scene 17. Land before the armored truck.
This stunt opens the upcoming film on the autobiography of
Tex S. Cooper, the World War II veteran pilot and volunteer
sheriff who would chase down criminals in his plane. In this
re-creation, you’re going to stop the hijacked armored truck by
landing your Pitts Special in front of it without hitting any
other vehicles. You must intercept the armored truck between
the two freeway overpasses.
Set filename: STOPARMR.SET
First take bonus: 270
Crash penalty: 360
Take penalty: 270
Maximum takes allowed: 10
Maximum takes allowed: 6
Scene 18. Fly down an aqueduct.
Scene 16. Fly over a train in a tunnel.
Here’s one that’11 test your nerves. You need to fly your
Sopwith
Camel through a tunnel as a train passes through in
the opposite direction. You’ve got a very narrow flight corridor,
but you wouldn’t be assigned this stunt if it couldn’t be done.
Don’t drop below 4 feet, and watch your speed or you may
find yourself exiting the tunnel before the train even gets there
-
that’s a “no go”!
Set filename: TRAINTNL.SET
An aqueduct that runs between the ocean and a dam is flanked
intermittently by towers. The towers will be to the left, to the
right, or on both sides of the aqueduct near overcrossings. Your
goal is to fly your Pitts Special beneath any overcrossings that
are flanked by a tower. Here’s the catch: The crossroads that
traverse the aqueduct are each held up by two supports, dividing the flight space beneath the overcrossing into three parts.
You must fly through the section that the tower is next to. If
two towers flank an overcrossing, you must fly between
supports (basically, through the center of the aqueduct).
both
Chapter 4 Stunt Pilot of the Year Contest
Page 48

-
-
-
Set filename: AQUEDUCTSET
First take bonus: 750
Crash penalty: 450
Take penalty: 270
Maximum takes allowed: 6
Scene 19. Crash through a billboard.
Zig zag your way through six big rigs and then crash through
a billboard that’s beyond the line of big rigs. You must keep
your Piper Cherokee within 20 feet of each truck and fly no
higher than 50 feet. Start the stunt by flying to the right of the
trailing truck in the convoy.
-
Set filename: BILLBRD.SET
First take bonus: 370
Crash penalty: 240
-
Take penalty: 90
Maximum takes allowed: 7
-
-
-
Scene 20. Fly inverted past a Jenny.
This movie involves two old fighter pilots with something to
prove. In this particular scene, two Jennys will fly inverted to
one another. You’ll approach the other Jenny from the opposite
direction and as you pass each other, you must be inverted and
above the other Jenny at no greater than the distance of 10 feet.
Set filename:
First take bonus: 750
Crash penalty: 480
Take penalty: 360
Maximum takes allowed: 7
JENNYFB.SET
F4U
Corsair
Manufacturer: . . .
.
. . . . . . The United Aircraft Corp.,
Chance Vought Aircraft Div.
Take-off speed:
Stall speed:
. . . . . . . . . . . . . . . . . . . . . . . . 95
. . . . . . . . . . . . . . . . . . . . . . . 77
m.p.h.
m.p.h.
Maximum speed: . . . . . . . . . . . . 550 m.p.h.
Maximum altitude,,
Flaps:
. . . . . . . . . . . . . . . . . . . . . . . . . . . . . . . . . . . . . . Yes
.
. . . . . . . . . . . . . . . 40,000 feet
Retractable landing gear: . . . . Yes
-
Chapter 4 Stunt
Pilot
of the Year Contest
e
Page 49

Scene 21. Land on the goalpost.
The San Jose Silverbacks have just won the Superbowl and in
the most flamboyant exhibition of football fanaticism, the lead
character
a diehard fan with a flair for the outrageous
-
lands his paraglider right on the goalpost. Your job is to land
right in the center of the goalpost nearest to you at less than 8
miles per hour. Don’t hit those uprights!
Set filename: GOALPOSTSET
First take bonus: 750
Crash penalty: 180
you must land the
particularly, on the train car that immediately precedes the
caboose. The train will be traveling at 64 m.p.h. and you can’t
be traveling at more than 70 m.p.h. when you land on the
train car.
Set filename: TRAIN.SET
First take bonus: 900
Crash penalty: 450
Take penalty: 270
Maximum takes allowed: 8
Take penalty: 120
Maximum takes allowed: 8
Scene 24. Escape from the U.N.
In this role, you’re a terrorist positioned on the roof of the
Scene 22. Hit the bullseye with your wing.
In this small town scene, you’re going to approach a tower
with a bullseye at the top. Fly your Jenny inverted and then hit
the bullseye with your reinforced right wing. Your target is
about 350 feet off the ground.
Set filename: TOWERBLL.SET
First take bonus: 750
Crash penalty: 420
Take penalty: 300
Maximum takes allowed: 5
United Nations building. You need to make a bold escape in a
parachute. Jump from the top of the building and drift down
to a boat that awaits you on the river. Don’t land around the
edge of the boat
more than 16 m.p.h. unless you have a lot of free time to
rehabilitate two broken legs.
Set filename: UN.SET
First take bonus: 750
Crash penalty: 150
Take penalty: 270
Maximum takes allowed: 6
Scene 23. Land on a moving train.
The spy, casually dipping into caviar and enjoying the
company of a lovely frauline, thinks he’s safely on his way
out of the country. You’re the only thing that stands between
him and even more caviar. In your last chance to capture him,
Scene 25. Bomb the SAM site.
In this war scene, you’re going to fly over a large “X” on the
ground which will signal the ground-to-air missiles to be
launched. You need to dodge these missiles and head for the
Sopwith
-
nail it dead center - and don’t hit it at
Triplane on the moving train
-
--
-.
Chapter 4 Stunt
Pilot
of the Year Contest
--
Page 50

-
-
-
SAM radar station. When you’re in position, you must drop a
bomb and take out the radar station. This is a one-pass stunt.
-
-
-
-
-
-
-
-
Set filename: JUNGLE.SET
First take bonus: 750
Crash penalty: 210
Take penalty: 70
Maximum takes allowed: 10
Scene 26. Land on the top of a balloon.
A wedding is taking place in a hot air balloon that the bride’s
father is paying your character to stop. You must land a
paraglider on the top of a hot air balloon, touching down at a
maximum of 13 m.p.h. If you touch the hot air balloon at any
point other than at the top, it will cost you a take.
Set filename: BALLOON.SET
First take bonus: 600
Crash penalty: 150
Take penalty: 300
Maximum takes allowed: 6
F-l 5C Eagle
-
-
-
Scene 27. Recover from a stall.
The pilot starts out the day eating drug-laced pancakes made
by a vengeful roommate. After breakfast, the pilot is out enjoying a leisurely flight when suddenly the drug takes effect and
the pilot becomes severely disoriented. In this particular scene,
-
the Spitfire will be flying straight up
from the inevitable stall. Hitting the ground is obviously out,
but so is any type of contact with the trees in the forest.
you’ll have to recover
Manufacturer: .........................
Take-off speed:
Stall speed:
Maximum speed:
Maximum altitude:
Flaps:
......................................
Retractable landing gear:
.......................
............................
...................
.................
........
McDonnell
,168 m.p.h.
,130 m.p.h.
.1,868 m.p.h.
.60,000 feet
Yes
Yes
Douglas Corp.
Set filename: STALL.SET
Chapter 4 Stunt Pilot of the Year Contest
Page 51

First take bonus: 1,050
Crash penalty: 450
Take penalty: 300
Maximum takes allowed: 4
Scene 28. Slalom through the towers.
Here’s a chance to show your touch in a Bristol Bulldog. You’re
going to slalom between six towers, staying as close as possible
to each. Enter the slalom to the right of the first tower.
Set filename: OBSTACLE.SET
First take bonus: 900
Crash penalty: 1,050
Take penalty: 1,200
Maximum takes allowed: 10
one pass in your A-6E Intruder
Set filename: CITYRDAR.SET
First take bonus: 900
Crash penalty: 1,050
Take penalty: 1,200
Maximum takes allowed: 6
Scene 31. Pull out of a dive.
You start this stunt in a Pitts Special that’s pointed straight
towards the earth. You must begin to pull out of the dive at
no greater than 400 feet, yet you cannot rise above the
altitude of 50 feet once you begin to pull out. When you’ve
pulled out of the dive, head straight and then make a hard
right bank around the United Nations building. Remember,
stay below that 50-foot ceiling at all times.
Scene 29. Fly under two bridges.
No twists or turns to this one. Fly your F16-C Falcon beneath
the two bridges at a speed of no less than 1,000 miles per
hour. Hint: Don’t blink.
Set filename: FASTBRDG.SET
Set filename: PULLOUT.SET
First take bonus: 1,130
Crash penalty: 450
Take penalty: 360
Maximum takes allowed: 8
First take bonus: 1,500
Crash penalty: 2,400
Take penalty: 1,500
Maximum takes allowed: 4
Scene 32. Fly between sky scrapers.
This one-plane Russian parade is about to take downtown
Duluth by surprise. Race the MiG-29 Fulcrum down the street
that splits the highrises at a minimum of 1,000 miles per hour.
Bomb
Scene 30.
the three radar sites.
This assignment takes place in the recreation of a busy Middle
Eastern city. Your job is to bomb three rotating enemy radars
without hitting any surrounding civilian structures. You get
The trick is that you’ll be starting perpendicular to the “urban
canyon” so you’ll have to cut hard to get into position.
Set filename: FASTTURN.SET
First take bonus: 1,500
Chapter 4 Stunt
PIlot
of the Year Contest
Page 52

-
Crash penalty: 2,400
Take penalty: 1,500
Maximum takes allowed: 8
-
Stunt Assignment “Clues”
-
-
-
-
If you can’t seem to succeed on a stunt, you can get details on
that stunt by loading a copy of it in the Set Design room and
studying it. Take a look at where the collision windows are
positioned and check the events list to see what exactly the
pilot is allowed to do.
Chapters 5 and 6 go into detail about collision windows, the
Events option, and all the other components that go into
making a stunt. After you read those chapters, you should be
able to dissect each of the stunts in the contest. You’ll know
what triggers success and what triggers failure.
F-l 6C Falcon
-
Take-off speed: . . . . . . . . . . . . 168 m.p.h.
Stall speed:
Maximum speed:
Manufacturer:
-
Maximum altitude: . . . . . . . . . 60,000 feet
Flaps:
................
Retractable landing gear:
-
Note: The Silver Falcon is a color variation of the
F-l 6C Falcon.
. . . . . . . . . . . . . . . . . . . . . . . . . General
............
Dynamics Corp.
130 m.p.h.
. . . . . . . . . . . . . . . . . . . . 1,500 m.p.h.
Yes
. . . . . . . . Yes
Chapter 4
Stunt Pilot
of the Year Contest
Q)
Page 53

-
-
-
-
--
-
-
-
-
CHAPTER 5
Production: Set Creation
and Filming
The set is every bit as important as the actor when it comes to setting the proper
mood for the movie. A good set will aid the viewers’ ability to “suspend their
disbelief”; that is, make the viewers forget they’re watching a movie and draw them
into the
Shattering the movie illusion is simple. You could easily destroy period authenticity
in an outdoor 1940s period piece by having a mercury street light with a square
head in the background - something not invented until much later. You could
wind up with a doubtful location by putting a telephone booth on the outskirts of
a jungle. Or maybe you’ll go all out and absolutely tax the viewer’s ability to
suspend disbelief by putting a pen of horses in the shadow of the Eiffel tower.
Unless the director is shooting a scene that represents someone’s imagination,
rewrites history, or presents a visionary slice of the future, creating a believable
set is important. that is, except in Stunt Island. You can create your sets however
you like. Your audience will be you and your friends. If you want the Golden Gate
Bridge to span the Washington Monument and a hay barn, you’re the director!
onscreen
world, accepting it as a real time in a real place.
-
Select the Production sign to enter the production building. You can also select the
Set Design or Stunt Coord(inator) signs to go straight to those offices.
Chapter 5
Production Set Creation and Filming
Page 54

-
STUNT COORDINATOR - Select this to receive film flying
assignments from the stunt coordinator. You must complete
26 of the 32 assignments within a certain number of attempts
to qualify for Stunt Pilot of the Year. (Complete details on the
Stunt Pilot of the Year contest are in Chapter 4.)
-
The production building is where you can go to:
+
Choose the film location
+
Place props in the location
+
Select the aircraft used for the stunt
+
Position the aircraft for the stunt
+
Fly an assignment from the stunt coordinator
+
Check the competition standings
Inside the building you’ll see these signs:
SET DESIGN - Click on this to go to the Set Design screen,
where sets are created and film is shot.
STUNT PILOT COMPETITION STANDINGS - Click on
this to find out the standings in the Stunt Pilot of the Year
contest. This option is only available if you’ve entered the
contest; otherwise, nothing will happen when you select this
option.
EXIT - Click on this to leave the production building.
Creating Sets
To create sets, select the Set Design option. You’ll see the
following screen:
-
-
-
-
-
-
-
-
-
-
-
-
Chapter 5 Production Set Creation and I
-
-
Page 55

-
-
Island View Window and Its Options
-
-
-
-
-
-
-
-
-
On the left side of the screen is an overhead view of Stunt
Island. The position of the Sth/Nrth-Wst/East axis determines
those values in the lower left corner; whatever point on the
island is directly beneath the intersection of the
Wst/East
location where set work will take place.
axis (the center of the crosshairs) is the default
Sth/Nrth-
-
To move the islands position on the screen, move the cursor
-
-
-
-
-
-
onto the Island View window, hold down a button and then roll
the mouse or move the joystick. Keyboard users can move the
cursor into the island window, hold down the Enter key and
then press any of the arrow keys to move the island. Joystick
and mouse users can hold down the left and right buttons to
simultaneously change the orientation and tilt of the island.
The horizontal bar directly under the Island View window lets
you zoom in and out on the island. Select the - (minus) button
to zoom in or select the + (plus) button to zoom out. You can
also slide the box along the scroll bar to zoom in or out.
F/A-18AHornet
Manufacturer:
Take-off speed:
Stall speed:
Maximum speed:
Maximum altitude:
Flaps:
Retractable landing gear:
.........................
.......................
............................
...................
..................
......................................
McDonnell Douglas Corp.
,168 m.p.h.
,130 m.p.h.
.1,345 m.p.h.
50,000 feet
Yes
........
Yes
-
Chapter 5
Production
Set Creation and Filming
Page 56

The Sth/Nrth and Wst/East axis values go from 0 to 200,000 and
represent distance in feet. The Sth/Nrth-Wst/East value of O-O is
in the lower left comer of the screen. The center of the screen
has the Sth/Nrth-Wst/East value of 100,000-100,000. The upper
right comer of the screen has the value of
STH/NRTH - This represents the south/north axis. To
change this, select the - (minus) or + (plus) buttons. Because
the southernmost value is 0 and the northernmost value is
200,000, you will always select - (minus) to decrease the
number, or move south. You will always select + (plus) to
increase the value, or move north. You can also highlight the
Sth/Nrth field and enter a new number.
-
WST/EAST
-
(minus) or + (plus) buttons. Because the westernmost
the
value is 0 and the easternmost value is 200,000, you will always
-
(minus) to decrease the number, or move west. You will
select
always select + (plus) to increase the value, or move east. You
can also highlight the Wst/East field and enter a new number.
An editing tip..
In options that have values that can be changed, there are
two ways to change the values:
+
You can click on the - (minus) or + (plus) button to
decrease or increase the value. Each click with the left
mouse button changes the value by one, while each
click with the right mouse button changes the value by 30.
+
You can click on the value itself and then enter a new
number. Use the Backspace key or Delete key to delete
the current value.
This is the west/east axis. To change this, select
200,000-200,000.
ORIENT (Orientation) - This changes the orientation of the
map. Select the - (minus) button to rotate the overhead view
of the island clockwise. Select the + (plus) button to rotate the
island counterclockwise. Changing the orientation will not
affect the Sth/Nrth and Wst/East values. The range of values
is 0 to 359.
TILT
view to a side-on view, and vice versa. The range of value is 1
to 90.
STUNT - This is a descriptive name for the loaded set.
Because the filenames can only be eight characters long, the
Stunt field gives you the chance to give the stunt a longer,
more descriptive name. This description also appears when
you highlight the filename on the Load screen.
USER - The default stunt name is “User.” To change this,
select the User field and enter a new stunt description of up to
approximately 25 characters. Press Enter to accept the
description.
Prop Windows and Its Options
The top right object window shows the currently selected prop.
A prop can be the aircraft you’re flying, the cameras used to
record the action, or any number of moving or stationary
objects.
-
This adjusts the view of the island from an overhead
-
-
-
-
-
-
-
-
-
-
-_
-
Chapter 5
Production
Set Creation and
Filming
a
Page 57

-
Exit
-
-
-
-
-
-
-
-
--
-
-
-
The bar beneath the window shows the name of the aircraft
or prop in the window. Select the up or down arrows to scroll
through the objects. You have up to 40 slots for props,
aircrafts, and cameras:
+
Slot 1 is always reserved for the object that you control
+
Slot 2 is always reserved for the spotter plane.
+
Slots 3 through 8 are for any objects. These objects will be
given recording capabilities, no matter what they are.
+
Slots 9 through 40 are for any props.
PLACE - (Before you can use Place, you need to use the Add
option to select an object.) Select this to place the selected
object at the location where the crosshair is positioned in the
Island View window. Select Place again if you want to “pick
up” the object to place elsewhere. When the object is picked
up, you can make adjustments to the Sth/Nrth-Wst/East settings and then select Place again to place the object.
Chapter 5 Production. Set
Creation
and
Filming
F-88 Sabre
Manufacturer: .........................
Take-off speed:
Stall speed:
Maximum speed:
Maximum altitude:
Flaps:
......................................
Retractable landing gear:
.......................
............................
...................
.................
........
North American Aviation, Inc,
,122 m.p.h.
,110 m.p.h.
.617 m.p.h.
.50,800 feet
Yes
Yes
Page 58

CAUTION:
values for the object, they will be reset to 0 when you
“unplace” and replace the
any values you want to use again.
c
GO TO - This takes you to the location of the currently
selected prop (the one displayed in the upper right window).
For props 3 through 8, you can also click in the actual object
window to see that prop’s point-of-view.
ADJ (Adjust)
plane or prop. Complete details on the ADJ option buttons are
under “Special Prop Controls
page 68.
ADD - Select this to add a prop. The props are organized by
type. Select a prop category and a list of objects appears.
Highlight an object from the list. Use the scroll bar to the right
of the object window to scroll the list up or down. Select OK
to select the highlighted prop.
DEL (Delete)
slot and shown in the window. “Free” appears in the name slot
to indicate that the item has been deleted and that the slot is
now unoccupied. Deleting an object from a slot does not affect
the numbering of any subsequent props.
You cannot delete an object that has been locked by the Lock
button on the ADJ screen. You must select ADJ and then select
Lock to unlock it; then you can delete it. Lock is used to keep
If you’ve entered any roll, pitch, or yaw
obJect.
Be sure to write down
-
This option lets you adjust the location of any
-
The Adjust Window,” on
-
Select this to remove the object listed in the
you from accidentally deleting or modifying a prop.
-
HIDE
(the
you’re adjusting
GLOBAL
Ret
gram will start recording when the stunt begins (when you
select Action-Take from the Camera Crew screen). If you turn
REC off, you will need to use the Events option to tell
the program exactly when to start filming (complete details
on the Events option are in Chapter 6). If REC is set to Auto,
it only begins recording when you select Action -Take if Film
Editing on the Preferences screen is off.
In the more advanced stunts that you create, you won’t always
want to immediately start filming when you select
Take. Some stunts require time to get into position - time
that you will not need to capture on film. For example, you
might be filming a scene where you want to land on the top of
a highrise. You could set it up so that the program only starts
to record when the plane is within 20 feet of the rooftop of the
highrise.
Hides all the objects whose visibility
VIS
button is not pressed in). The exception is the object
-
it’s always available.
-
Global contains a variety of settings, as follows:
To change any of the numbers in the fields on the screen,
select the number, press Delete or Backspace to delete the
number, type in a new number, and then press Enter.
(Record) -With REC on (the default setting), the pro-
(VIS)
is not on
Action-
-
-
-
-
-
-
-.
-
Chapter 5 Production. Set Creation and Filming
-
Page 59

-
-
-
-
-
Time - You can create a set that represents any hour of the day.
Stunt Island operates on a 24 hour clock.
night, 1:00 to 11:00 are the morning (a.m.) hours, 12:00 is
noon, and 13:00 to 23:00 represent the afternoon/evening (p.m.)
hours. To change the time of day, click on the arrows above the
hours or minutes.
-
View
flight. The forward view during flight is the default camera shot.
View lets you select the pilot’s initial view during
0:00
represents mid-
-
-
-
-
Pilot CP
Pilot no CP
Left side Looking out left side of aircraft
Right side Looking out right side of aircraft
Rear Looking out rear of aircraft
Bomb Looking through bottom of aircraft
Spotter
Looking out front of aircraft with cockpit;
this is the default option
Looking out front of aircraft without the
cockpit
Looking through spotter plane’s point-of-view
-
1st Take - Dollar bonus for successful first take
-
-
Crash - Dollar penalty for crash
-
-
Take Penalty - Dollar penalty for each take you require after
the first one
Max Takes
the stunt successfully. Exceeding this value will get you fired.
-
The maximum number of takes allowed to perform
Chapter 5
Production
Set Creation and
Filming
F-l 17A Stealth (Fighter)
Manufacturer:,.. . . . . . . . . Lockheed Corp.
Take-off speed: . . . . . . . . . . . . . . 190 m.p.h.
Stall speed:
Maximum speed: . . . . . . . . . . 673 m.p.h.
Maximum altitude: . . . . . . . . 60,000 feet
Flaps:
Retractable landing gear:
. . . . . . . . . . . . . . . . . . . . . . . . . . . . . 158 m.p.h.
. . . . . . . . . . . . . . . . . . . . . . . . . . . . . . . . . . . . . . Yes
. . . . . . . . Yes
Page 60

Camera - This is the initial camera for auto-edited films. It’s
the camera that you would like to use to establish your initial
How to Select Your Stunt Aircraft
+
shot. Prop slots 1 through 8 are slots that record film. You can
set up a camera in any of these slots and have the initial camera be one of them. For those editing their own films, the ini-
+
+
tial camera is irrelevant since you will be determining exactly
what segments of film get edited into the final order.
-
Gear
Determines initial position for landing gear (up or
down) on the aircraft in prop slot 1. Some aircraft do not have
retractable landing gear.
Flaps - Determines initial position for flaps (up or down) on
the aircraft in prop slot 1. Some aircraft do not have
moveable
flaps.
-
Brakes
Determines initial setting for brakes on the aircraft
in prop slot 1.
Go to slot 1 in the prop field below the Prop window.
Select ADD.
A window opens which shows all the prop categories.
Highlight Planes (at the bottom of the list) and select Open.
A list of aircraft appear.
Highlight the one you want to fly and then select OK.
Weapon - Lets you choose the initial weapon
bomb, or no weapon (None) - for the aircraft in prop slot 1.
During flight, you can press the W key to toggle through the
weapons. Some aircrafts do not have weapons; however, you can
“cheat” and use this Weapon option to engage a weapon that
this aircraft would not have under normal conditions. The aircraft will have the weapon engaged when you go to fly the stunt.
EVENTS- The EVENTS option is an option that lets
you create stunt assignments for you or others to do.
Because this is an option that teaches you advanced techniques, it’s covered in a separate chapter (Chapter 6).
Chapter 5
Production
-
gun, missile,
Set Creation and
Filming
+
Choose the location where you want the aircraft placed by
positioning the intersection of the
hair in the Island View window over that location.
+
Select Place. The aircraft is placed wherever the
Wst/East is located on the map, facing due north. Be sure to
select Place to place the aircraft; otherwise when you select
Fly Stunt, you’ll be told, “Prop 1 needs to be placed before
the stunt can be flown.” If you want to see your aircraft,
select
island, or slide the button on the bar to the left.
Sth/Nrth-Wst/East
cross
Sth/Nrth-
(-)
below the Island View window to zoom in on the
Page 61

-
-
To move the aircraft’s starting location at any time, see “How
to Move a Prop.”
-
-
-
-
-
-
-
-
-
-
-
-
-
-
-
You can only select one aircraft to directly control with your
mouse, joystick, or keyboard. This aircraft must be placed in
slot 1 in order for you to be able to control it. If you put your
aircraft in slot 3, you will not be able to fly it.
Any object placed in prop 1 can be flown. However, unless it’s
an object that comes from the Planes category, the object will
be flown with generic flight characteristics. The aircraft in the
Planes category have specific flight characteristics.
How to Place A Prop
+
Select a prop slot number. Slots 3 through 8 give the object
recording capabilities. Objects in slots 9 through 40 do not
record.
+
Select ADD.
+
Highlight a prop category and select Open.
+
A list of objects in that category appears. Highlight an
object and then select OK to accept it. To switch to another
category, select Close. To exit the window, select Cancel.
+
Select Place. The prop is placed wherever the
Wst/East crosshair is located on the map. If a prop has not
been placed when the set is saved, the prop will be placed
at the location of the current crosshair.
Sth/Nrth -
Fokker Dr.1 (Triplane)
Manufacturer: .........................
Take-off speed:
Stall speed:
Maximum speed:
Maximum altitude:
Flaps:
......................................
Retractable landing gear:
.......................
............................
...................
..................
........
.60 m.p.h.
.50 m.p.h.
,103 m.p.h.
Fokker Flugzeugwerke
20,000 feet
No
No
-
Chapter 5
Production
Set Creation and
Filming
Page 62

How to Move a Prop
+
Go to the slot number that the prop is in. This prop should
appear in the upper right window.
+
Select Place to “pick up” the prop. This removes the prop
from the Island View window. Be careful when you
“unplace”
and roll values that you may have entered.
+
Change the position of the Sth/Nrth-Wst/East crosshair in
the island window; move the intersection of the crosshair
to the prop’s new location.
+
Select Place again to place the prop in its new location.
an option because it will zero out all yaw, pitch,
window. Now you can select DEL to delete the prop.
Special Prop Controls - The Adjust Window
The most important thing to determine is what type of prop
you want this to be (in the Adjust window). Knowing what
type of prop this is establishes which of the other settings in
the Adjust window you’ll be able to use. Props must be
categorized as one of the following:
FACE
SEEK
FOLLOW
FREE
SPOT
ATTACH
Another way to move a prop is to select that prop and then
select ADJ to open the Adjust window.
are the props in slot 1 and 2. Slot 1, reserved for the aircraft
you fly, has the Face setting. Slot 2, reserved for the spotter
plane, has the Spot setting.
On the right side of the screen you’ll see the Position options.
All props have the default setting of Free. The two exceptions
Select the - (minus) or + (plus) button to increase or decrease
the Sth/Nrth or Wst/East values. You can also highlight either
field, enter a new number, and then press Enter.
The other options and values that you see in the Adjust window
(Position, Facing, Heading, Anim, Wtch, etc.) relate to a prop’s
position and animation values (optional). These options are
covered in “How to Fine Tune Props” and “How To Animate
Props,” later in this chapter.
How To Delete A Prop
To delete a prop, select it (it should appear in the Prop
window in the upper right corner of the screen). Select the
DEL option to remove it.
If the DEL option does not work, the Lock feature is on. To
turn off the Lock feature, select ADJ to open the Adjust win-
dow. Select Lock to turn it off and then select OK to close this
Chapter 5
Production
Set
Creation
and Filming
Face Props
This causes an object to move in the direction it’s facing.
Prop 1, reserved for the aircraft you control, has a permanent
setting of Face. Whatever direction your aircraft’s facing, it will
Page 63

-
fly in that direction. This restricts you from being able to fly
-
your aircraft sideways or backwards
-
-
-
-
-
-
If you turn WTCH (Watch) on for any of the camera slots
(l-8), the Watch feature will override the Face feature. This
object will watch whatever object you assign to it. Complete
details on Watch are on page 79.
You can adjust any of the following options when you select Face:
T
-
-
-
-
-
FREE props are those that do not respond to other props. You
place the prop where you want, how you want. If you want to
animate this prop, you can. Free is the default setting for all
props, except props 1 (the aircraft you control) and 2 (the
spotter plane).
The Free and Face categories work exactly the same for
inanimate objects. If you’re placing a building or a boulder or
something else that won’t be moving, it really doesn’t matter
Free Props
Hang Glider
Take-off speed:
Stall speed:
Maximum speed:
Maximum altitude:
Flaps:
.......................................
Retractable landing gear:
........................
..............................
.....................
...................
.........
Low
Low
Medium
Low
No
No
Chapter 5
Production
Set
Creation
and
Filming
I ’
0
Page 64

whether you select Free or Face (although Free will be the
default setting in props 3 and
up).
For example, you could have a car positioned at one end of the
island and you could have it seek a building at the other end of
the island. You set the speed and the car will travel towards the
The crucial difference between Free and Face arises if the object
must move. Face objects can only move in the direction they’re
facing. Free objects, on the other hand, can be facing in one
building until it reaches it. Once the prop reaches the designated object, it will continue to revolve around the object in a
tight circle.
direction and move in another. Let’s say you have a house
-
perched on a hill and you want it to slide down the hill
Free
allows you to send the house off the hill in any direction.
If the house had the setting of Face, it could only slide down the
hill in the direction it’s facing (in this case, it’s in the direction of
the front door).
You can adjust any of the following options when you select
Free:
In order to avoid having this object keep revolving around the
other object once it has reached its target, you need to either
have it explode so it disappears, or use the Events option to
remove the object or change its heading once it reaches its
destination.
When you have an object seek another object, the Heading
values of Pitch and Yaw become unavailable. An object always
seeks another object in a straight line, so that imaginary
straight line between the two objects determines the values
for Heading Pitch and Yaw.
-
-
-
-
-
-
-
-
You can adjust any of the following options when you select
Seek:
Seek Props
Select Seek if you want this prop to seek out another prop at
the speed you set. The object that this prop will seek out must
be entered in the slot after Seek.
Chapter 5 Production Set
Creation
and
Filming
-
Page 65

-
-
-
-
Spot Props
Spot is best suited for use in any of the camera slots (3 through
8). Spot lets the camera follow the prop you define, auto-acljusting for the best viewing angle. Spot is best utilized for a camera
that’s “tracking” a moving object because of its auto-adjusting
capabilities.
The slot number of the prop that’s being spotted must be
entered in the box next to Spot.
-
-
-
-
-
-
You can have a non-camera prop (in
Spot setting, but keep in mind that an object without recording capabilities will not be able to take advantage of the Spot’s
key feature - the auto-adjusting capability.
You can adjust any of the following options when you select
spot:
slots
9 or higher) use the
Hawk
Manufacturer:
. . . . . . . . . . British Aerospace Ltd.,
Military Aircraft Div.
Take-off speed: . . . . . . . . . . . . 145 m.p.h.
Stall speed: 122 m.p.h.
Maximum speed: . . . . . . . . . 621
m.p.
h.
Maximum altitude: 50,000 feet
Flaps: . . . . . . . . . . . . . . . . . . . . Yes
Follow Props
This option forces this prop to match another’s roll, pitch, yaw,
Chapter 5 Production Set
Creation
and Filming
Retractable landing gear:
Note: The Red Hawk is a color variation of the Hawk.
......
Yes
Page 66

altitude, and speed values. The slot number of the prop that is
other must face in the same direction
being followed must be entered in the box next to Follow.
Here’s an example of a use for Attach: You could attach a
Although the Follow option is most appropriate for aircrafts
flying in formation, you can use it for a flock of birds, fleet of
vehicles, group of missiles, and so on. For example, you could
animate one UFO to slowly ascend, spinning as it rises. Then
you could add four more UFOs to the set, having all of them
follow - in essence, mimic - the first UFO’s actions.
camera below an aircraft and catch the action of bombs being
dropped. No matter how the aircraft moves, the camera will
always capture the view from directly below the aircraft. You
could also do “non-camera” things like attaching a wing
walker to an aircraft’s wing or attaching a covered wagon to
the back of a moving horse.
The Offset Position screen lets you establish where this prop is
in relation to the prop it’s following. If you leave the values at
zero, this prop will be placed directly on top of the other prop.
Although they sound alike in function, Follow and Attach
behave very differently. Follow causes one prop to mimic
another’s values, while Attach causes one prop to stay in a
fixed position in relation to another prop.
The following options are available when you select Follow:
In the example below, notice how the aircrafts start out in the
same positions. But when the initial prop banks, the Follow
and Attach props behave differently.
Attach Props
This causes an object to remain attached to another object.
The number of the prop that this prop is being attached to
must be entered after Attach. Props that are attached to each
Chapter 5 Production Set
Crealion
and
Filming
Rolling left; what happens Rolling left; what happens
when Follow is selected and
plane A rolls left and plane A rolls left
n
A B
Original starting position
I
B
0
+
A
0
B
A
+
when Attach is selected
Page 67

As with the Follow option, the Attach option requires you to
enter Offset Position values to determine where it should be in
relation to the main prop. If you don’t enter offset positions,
this prop will be placed right on top of the other prop.
The following Adjust options are available when you select
Attach:
Before you begin working in depth with these prop types,
select each of them to become acquainted with their possible
settings. Notice how the options in the Adjust window change
depending on which one you selected.
How to Fine Tune a Prop
Whether stationary or animated, your prop is positioned a
certain way when the cameras start rolling. If you’re content
with how the prop looks when you placed it, you don’t need
to make any of the following adjustments. But if you want to
do something like tilt a prop, elevate it, turn it sideways, etc.,
do the following:
Chapter 5 Production: Set Creation and
Filming
Page 68

+
Go to the prop slot for that object. The prop should appear
in the upper right window.
+
Select ADJ to open the Adjust window.
For objects assigned FACE, FREE, and SEEK:
+
Under the Position section, select an altitude at
This is your prop’s point-of-view, which is what it will see
when recording starts. As you make adjustments to the
previous settings, the prop’s point-of-view should change
accordingly. For example, if you change yaw, the point-ofview should move sideways. If you change pitch, the point-of-
view should move up or down.
which this prop will start and a speed at which
this prop will travel. The
Sth/Nrth
settings don’t need to be adjusted unless you want
this prop moved to a new location.
+
Under the Facing section you can adjust the Roll,
Pitch, or Yaw, if desired. These properties are the
same as those of an aircraft.
For objects assigned SPOT, FOLLOW, or ATTACH:
+
Select the Offset Positions for Pitch, Yaw, and
and
Wst/East
You can get the point-of-view for props in slot 2 through 8
simply by clicking on it when it’s in the Prop window. This
saves you from having to open the Adjust window just to
check the prop’s point-of-view.
Spotter plane note: You can change the spotter plane’s prop
type to something other than Spot, but this may cause erratic
results. You should leave the spotter plane setting on Spot
since the spotter plane was designed to be used with this setting.
Dist(ance). This positions this object in a specific
spot from the defined object.
Starting Altitude and Speed
A starting altitude and speed can be given to Face and Free
When you’re adjusting props 2 through 8, you’ll see a view that
objects through the Adjust window.
has brackets around the corners and a cross hair in the center.
ALTITUDE
of the object to the ground. Even if an object is resting on the
ground, unless it’s perfectly flat, it will have an altitude. The
object will maintain this altitude unless you change it.
-
An object’s altitude is measured from the center
Chapter 5 Production Set
Creation
and
SPEED -This lets you establish a starting speed for this object.
The object will maintain this speed unless you change it.
Filming
Page 69

How to Animate a Prop
Except for your aircraft in prop slot 1, every object in the Stunt
Island inventory can be animated. It doesn’t matter what it is
-
automobile, building, cactus, billboard, etc.
There are two types of animated props: still and dynamic. A
still prop that’s animated simply goes from one point to another, like a missile. The missile itself does not have animated
characteristics like spinning.
A dynamic prop is one that not only travels from point A to
point B, but also moves along its vertical, lateral, and/or longi-
tudinal axis (its yaw, roll, and/or pitch is changing). For
example, let’s study a car that’s spinning out of control down a
stretch of road. As the car spins, it moves along its vertical axis
-
its yaw is constantly changing as the car spins. It’s also
-
traveling down the road
as it’s spinning. This is a dynamic prop. If the car wasn’t
spinning, but pointing in one fixed direction while going
from A to B, it would be a still prop instead of a dynamic one.
Please keep in mind that this program doesn’t animate in the
classic sense: legs don’t move, wheels don’t spin, wings don’t
flap. Animate is about moving objects from A to B, and
whether those objects as a whole pitch, roll, or yaw.
Animating a Still Prop
+
Place a prop, as outlined in “How to Place a Prop.”
+
Go to the slot the prop occupies
+
Select the ADJ option.
going from point A to point B
-
a
Junkers Ju 87D Stuka
Manufacturer:
Take-off speed: . . . . . . . . . . . . 90
Stall speed:
Maximum speed:
Maximum altitude: . . . . . . . . 24,000 feet
Flaps: . . . . . . . . . . . . . . . . . . . . Yes
Retractable landing gear:
. . .
. . . . . . . . . . . . Junkers
Motorenwerke
m.p.h.
. . . . . . . . . . . . . . . . . . . . . . . . . . . . . . 75 m.p.h.
. . . . . . . . . . 255 m.p.h.
. . . . . . . . . Yes
Flugzeug
Und
Chapter 5 Production, Set Creation and
Filming
@
Page 70

Under the Position section, select an altitude at which this
prop will start and a speed at which this prop will travel.
The Sth/Nrth and Wst/East settings don’t need to be adjust-
ed unless you want this prop moved to a new location.
Under the Facing section you can adjust the Roll, Pitch, or
Yaw, if desired. You do not need to enter new settings for
this prop unless you want the prop’s current roll, pitch or
yaw to be different.
Free props: Under the Heading section, select the Pitch and
Yaw. Pitch determines the angle at which the prop will travel while Yaw determines which direction on the compass
the prop will head. A negative pitch value causes the prop
to go down, while a positive pitch value causes it to rise.
This is all you need to do to animate a still prop. You
should not have selected the
ANIM(ate)
button on the
screen. The Anim button is reserved for dynamic props.
When you film the stunt, the prop will move according to
the Speed, Pitch, and Yaw settings that you entered. The
prop will continue on its path indefinitely. You can stop
an animated prop by having it eventually collide and
explode with something or by having it disappear or
change by using the Events option (details in Chapter 6).
Animating a Dynamic Prop
+
Place a prop, as outlined in “How to Place a Prop.”
+
Go to the slot the prop occupies.
+
Select the ADJ option.
+
Under the Position section, select an altitude at which this
prop will start and a speed at which this prop will travel.
The Sth/Nrth and Wst/East settings don’t need to be adjusted unless you want this prop moved to a new location.
+
Under the Facing section you can adjust the Roll, Pitch, or
Yaw, if desired. You do not need to enter new settings for
this prop unless you want the prop’s starting roll, pitch or
yaw to be different.
+
Under the Heading section, select the Pitch and Yaw. Pitch
determines the angle at which the prop will move while
Yaw determines which direction on the compass the prop
will head. A negative pitch value causes the prop to go
down, while a positive pitch value causes it to rise.
+
Next, click on Anim. Notice how the numbers reset to 0.
That’s so you can now enter values for how much the prop
will move for its Roll, Pitch, and/or Yaw. The higher the
value, the faster it will roll, pitch, or yaw. If the value is 0
for roll, the object will not roll. If the value is 0 for pitch,
the object will not change its pitch. If the value for yaw is
0, the object will not yaw.
For example, if you want to make a car “spin out” you
would enter a value like 360 for Yaw. This tells the car to
move 360 degrees per second. If you wanted a man to flip
head over heels, you could enter a Pitch value of 180. This
tells the man to pitch forward, 180 degrees per seconds.
+
The options under the Heading section let you program the
prop to move. The prop can travel along at a certain pitch
and in a certain direction.
Chapter 5
Poroduction
Set
Creation
and
Filming
Page 71

-
Anim Heading Pitch - The object, if given speed, will
-
-
-
-
-
-
move in a North/South circular pitch. A positive value
will cause the object to move clockwise. A negative
value will cause the object to move counter clockwise.
If you do not enter a speed, the object will not move.
Anim Heading Yaw - The object, if given speed, will
move in an East/West circular pattern. A positive value
will cause the object to move clockwise. A negative
value will cause the object to move counter clockwise.
If there is no speed, the object will not move.
Note: When using the Anim Heading Yaw or Pitch options,
the prop may drift slightly.
-
+
When you go to film the stunt, the prop will move according to the various settings you established.
-
-
-
--
-
The prop will continue moving along its path indefinitely.
If you want to designate a specific stopping point for a prop,
or if you want to “program” specific things to happen with
an animated prop, you’ll need to use the Events option.
(Complete details on the Events option are in Chapter 6.)
Note: If you set a speed and/or altitude for a still animated prop
and then set a different speed for a dynamic animated prop, the
larger of the two speed and/or altitude values will be used.
Chapter 5 Production: Set Creation and Filming
@
Junkers Ju 88A
Manufacturer: ...........................
Take-off speed:
Stall speed:
Maximum speed:
Maximum altitude:
Flaps:
.......................................
Retractable landing gear:
.......................
.............................
....................
..................
.........
Junkers Flugzeug
Motorenwerke
,114 m.p.h.
.95 m.p.h.
.295 m.p.h.
.25,000
feet
Yes
No
Und
Page 72

Having More Than One Stunt Aircraft
You can only control one aircraft at a time with your mouse,
joystick, or keyboard. However, you can make other aircraft
this category are “collision windows” and are explained in
Chapter
cosmetic. They behave the same when it comes to filming.
fly in formation with the aircraft you’re controlling through
the Follow option.
Cameras don’t have to he cameras.
have Camera 1 or Camera 2 in slots 3 through 8 to
capture action
How to Set Up Cameras
The directory of photography (also referred to as the cinema-
record action. You could put a water fountain in one of
these slots and it
tographer) works with the director to translate the screenplay
into moving photographic images. The director of photography
doesn’t physically operate the camera and lights; that work is
carried out by the DP’s support staff consisting of people like the
camera operator, the gaffer, and the key grip. In your role as DP,
you’ll decide where you want the cameras positioned to capture
the action.
Setting up a camera in Stunt Island follows the same procedures as setting up a prop. You choose the camera you want to
use, place it in a specific location, and make fine adjustments
When you select a prop for the camera slots, be sure to choose
a Face, Free, Seek, Spot, Follow, or Attach option to determine
what this camera should do. Except in the case of Face or Free
cameras, be sure to enter a prop’s slot number after the prop
type (e.g., Attach 4 tells the camera to stay attached to the
prop in slot 4).
FACE
camera will not track an object unless you select WTCH and
turn it on.
on its positioning.
FREE - The camera will remain stationary at the location it’s
There is a total of 8 possible camera shots: one from the stunt
aircraft (prop slot
l),
one from the spotter plane (prop slot 2),
placed; the camera will not track an object unless you select
WTCH and turn it on.
and six from other positions that you can select (prop slots 3
through 8). The stunt and spotter plane shots are always
SEEK
automatically shot. The remaining cameras are optional.
SPOT
-
The two types of cameras
Camera 1 and Camera 2 - are
the object centered in its frame.
located in the Production Tools category (the other props in
6).
The only difference between these cameras is
It’s
not necessary to
-
any prop placed in these slots will
will
have recording capabilities.
-
The camera will face in the direction you set it; the
-
The camera will seek out a defined object
-
The camera will stay with a defined object and keep
Chapter 5
Production
Set
Creation
and Filming
Page 73

FOLLOW - The camera will mimic the moves of the defined
object.
ATTACH - The camera will be attached to the defined object,
filming the action from a fixed point in relation to the defined
object.
If you choose the Spot, Follow, or Attach option, use the ADJ
option to set the Offset Positions of pitch, yaw, and distance. This
establishes the position of the camera in relation to the object.
The cameras automatically start rolling when you select
Take as long as REC in the Global option is not turned off. If
you don’t want the filming to begin right when you select
Action-Take, turn REC off and then use the Events option to
determine when filming should start (the Events option is
covered in Chapter 6)
After you’re done filming, you can go to the post-production
building to load and edit any of the footage you’ve shot.
During filming, you can press Ctrl and any of the
F8
keys to switch among the camera views.
Action-
Fl
through
The Watch (WTCH) Option
The Watch (WTCH) option lets you make one prop watch
another prop with a specific zoom (magnification) setting.
No matter where the defined object moves, this object will
change its angle to “watch” the defined object, Watch has
Chapter 5 Production. Set Creation and Filming
Page 74

priority over all other settings.
from 0.2 to 7.99. The higher the value, the more powerful the
zoom. (See the, next option, for “Auto” details on using this
The Watch option is a key feature for those props in slots 1
number.)
through 8, since these are the “camera” slots. The camera slots
take advantage of the zoom (magnification) capabilities of the
Watch option since these slots can record the action.
AUTO - This is associated with the Zoom value. If you select
Auto, the camera will shift the Zoom value in order to keep
the object at a constant size. The size will be determined by
If you select the Watch option for prop slots 9 or higher, you
will not have the zoom options; you will only be able to enter a
the level of zoom set before Autozoom is activated (the default
Zoom value is 1
number for this prop to watch. This is useful for props that you
want to film watching other props. For example, you could
capture ground missiles tracking a plane that’s passing over-
head. Or, you could film people watching a drag race, with their
If the Auto option is not selected, should the object that the
camera is focused on get closer than the Zoom value, the Zoom
will not pull back to adjust.
bodies turning to follow the action as it goes down the road.
When you select WTCH (Watch), the following options are
available:
Adjust Screen “Programming” Options
The options at the bottom of the Adjust window let you
control certain details on how this prop should be treated by
the program.
.O).
-
-
-
-
-
-
-
-
-
-
-.
-
1.0 (Zoom) - The initial zoom value for this camera (only
applicable to props 1 through 8). The acceptable values range
Chapter 5 Production. Set
Creation
and
Filming
VIS (Visible) - This option is always automatically selected.
-
-
Page 75

When selected, it keeps this object visible during filming. You
may not want certain objects, like cameras or collision windows, to be visible during filming.
COLL (Collision) - If Collision is selected, then this object is
deemed as one that can be “hit.” If this isn’t selected, then this
-
object is “transparent”
object strikes it. For example, you probably won’t want a cloud
to have the Collision option on since clouds can be flown
through. Or maybe you want to pretend a building is a hologram that can be flown through. Without Collision selected,
the program ignores these as “strikable” objects; you can hit
them without anything occurring. An object that has Collision
on does not mean it will explode whenever something hits it;
in order for an object to explode when it’s struck, you must
also select EXP (Explosion).
All objects used on the permanent Stunt Island locations have
Collision on.
it won’t register a collision if another
EXP (Explosion) - EXP tells this object to explode (stock
explosion footage is used) whenever any other object hits it.
For example, if the current prop is a car, you can select EXP to
-
have the car explode whenever anything
-
beachball or cornstalk
work, Collision must also be on; otherwise, this object will not
be recognized as something that can be hit.
SHD (Shadow)
shadow will be cast by the prop.
-
When the Shadow option is selected, a
strikes it. In order for Explode to
If
the object is airborne, a
Chapter 5 Production Set Creation and Filming
be it missile, man,
Learjet 60
Manufacturer: ........................... Learjet,
Take-off speed:
Stall speed:
Maximum speed:
Maximum altitude:
Flaps:
.......................................
Retractable landing gear:
.......................
.............................
.....................
..................
......... Yes
,146 m.p.h.
,122 m.p.h.
548 m.p.h.
.51,000
Yes
Inc.
feet
Page 76

shadow will only appear when it’s close enough to the ground
to cast a shadow. Objects with shadows take longer to process.
LOAD SET - Select this to load a previously saved set. Select
a name and then select OK to load the set.
If you’re using a slower machine, you should consider leaving
the Shadow option off.
SAVE SET - Select this to save this set. Type in a name and
select OK. You can overwrite any of the original sets, but we
OK - Select OK to accept the changes made.
recommend you save any modified sets under a new name.
LOCK
-
Select this to “lock” the screen so changes can’t
inadvertently be made. You must select Lock again to unlock
You can find complete details on Load and Save File requesters
in Chapter 2.
the screen before you can make any modifications. Lock also
keeps you from accidentally deleting a prop through the DEL
option. If you’ve made changes to a prop and then realize it’s
locked, you can select Lock twice; this unlocks it, accepts the
changes you’ve made, and then relocks it.
Creating New Sets
You can clear the current set by selecting the New option. If
you haven’t saved the current set when you select New, you’re
given the chance to save it before it’s cleared away. The New
-
CANCEL
Cancels any changes made.
option only clears the set; it doesn’t change your location.
Tips on Designing a Set
Saving and loading Sets
There are several dozen pre-built sets. All sets have the file
extension of SET. You can personalize a pre-built set by
adding or removing props. When you save a pre-built set that
There are dozens of permanent locations on Stunt Island.
Objects cannot be removed from a permanent set, but they
can be added. (You’ll find a complete listing of permanent
locations in Appendix B.)
you’ve modified, you can save it under its current name or give
it a new name. We recommend you give it a new name so you
always have the original set intact.
There are also 32 pre-built sets. These sets are exact duplicates
of the ones used in the Stunt Pilot of the Year competition.
These pre-built sets have the cameras placed, the props set up,
Changing the pre-built sets will not affect the stunts used in
and the aircraft you control ready to go.
the contest. The contest sets use different files that you do not
have access to. The sets that you do have access to are replicas
of the contest sets.
You can personalize a pre-built set by loading it and making
any modifications you want. When you save a pre-built set
Chapter 5
Production:
Set
Creation
and
Filming
Page 77

-
that you’ve modified, you should save it under a new name so
the original name remains intact for future use. (You’ll find a
complete list of set names under the stunt assignment descriptions at the end of Chapter 4.)
-
-
If you’re building an elaborate set from scratch, you should
group set types together. For instance, let’s say you’re creating
a set near a shore. Rather than simply adding props consecu-
tively, you could reserve slots 10 through 20 for boats, 20
through 30 for buildings along the shoreline, and slots 30 to
40 for people. It’s easier to edit a set when you don’t have to
scroll through your entire inventory to find one prop.
-
How To Film A Stunt
-
You’re ready to film a stunt after you do one of the following:
+
See the stunt coordinator for an assignment. When you
accept an assignment, you’ll join the camera crew on
location.
+
Go to the Set Design office and choose a location to fly.
You can create a new set or load an existing set. Select Fly
Stunt at the Set Design screen and you’ll join the camera
crew on location. A new set can be as simple as having one
aircraft placed anywhere on the Island View screen.
Lockheed
TR-1
Manufacturer: ..........................
Take-off speed:
Stall speed:
Maximum speed:
Maximum altitude:
Flaps:
.......................................
Retractable landing gear:
.......................
.............................
....................
..................
......... Yes
Lockheed Corp.
.168 m.p.h.
.140 m.p.h.
.428 m.p.h.
.80,000 feet
Yes
-
Chapter 5
Production
Set Creation and
Filming
Page 78

When you’re with the camera crew on location, your options
are:
ACTION-TAKE: Select this to begin filming. Press Esc during
filming when you’re done or when you want to cut the action
and return to the camera crew. The number after “Take” keeps
track of what take this is.
Note: If your computer setup has speech capabilities, you will
hear the director say, “Quiet on the set.. Speed. Action!”
e
(“Speed” instructs th
THAT’S A WRAP: If you select That’s A Wrap immediately
after you finish a take, you’re asked if you want to save the
take. If you select Yes, you’re shown the Save Take requester.
After you save the take, you can edit it in the post-production
editing room.
If you chose not to edit, you’ll go to the theatre to view the take.
camera person to start the film rolling.)
PRINT FILM: This prints (or saves) the film footage. Type in
a name and then select OK to print the film or Cancel
to cancel this selection.
STUNT COORD: Takes you to the stunt coordinator’s office.
SET DESIGN: This returns you to the Set Design screen. If
you’ve recorded any footage that you want to save, you need
to save it before returning to the Set Design screen.
“Disk Full” Issues
If you run out of hard disk space, a requester saying “Disk
Full” appears. If this appears, select OK to acknowledge the
message. All data from the current flight will be lost and all
cameras will shut down. At this point, you should exit to DOS
and free up some room on your hard disk drive.
If the footage you recorded does not equal the actual time you
invested in flying, that means you passed a one megabyte
recording limit for the SPOOL.$$$ file. At the one megabyte
limit, cameras will shut down and stop filming, although you
can keep flying around. There is no way to get around this
since the one megabyte limit is fixed.
leaving the Production Building
Select Exit to exit the production office and/or the production
building.
Chapter 5 Production: Set Creation and Filming
Q
:I
--
Page 79

Questions and Answers
Q. I placed two props but only see one. Why?
A. You may have placed the two props in the same location.
Select DEL to remove the second prop and see if the first
prop appears.
Q.
I know I placed a prop, but I can’t see it. What happened?
A. Try increasing or decreasing the zoom level. You may be
too far or too close to the object.
Q, All my prop settings of Yaw, Pitch and Roll have 0 as a
value, yet it moves. Why?
A. You have a speed entered. 0 is a valid setting for Yaw, Pitch
-
and Roll
-
is due north. For Pitch and Roll, 0 is level. Be sure to check
that the speed is zero when the ANIM button is pressed
and unpressed (animation on and off).
Q, I made my own set and then chose Fly Stunt. I had been
flying around for a long time when the message DISK
FULL appeared. What happened?
You ran out of disk space. When you chose Fly Stunt, the
A.
program started filming (unless you turned REC off). The
longest a flying segment can be is about 20 minutes or 1
megabyte in size, whichever occurs first. To delete this file,
exit to DOS. Type
SPOOL.$$$ to delete the file that caused your disk to
become full. SPOOL.$$$ is a temporary name the file
responsible for filling up the disk will be saved under.
0 does not mean nothing is entered. For yaw, 0
CD\STUNTISL\VAULT.
Then type DEL
Lockheed U-2 (Spy Plane)
Manufacturer: ..........................
Take-off speed:
Stall speed:
Maximum speed:
Maximum altitude:
Flaps:
.......................................
.......................
.............................
....................
..................
Retractable landing gear:
Lockheed Corp.
.168
,140 m.p.h.
,428 m.p.h.
.80,000
Yes
.........
Yes
m.p.h.
feet
Chapter 5
Production
Set Creation and
Filming
Page 80

-
-
-
3
-
CHAPTER 6
Setting Up Special Events
The Events option, located on the Set Design screen, lets you set up the parameters
-
-
-
-
-
for a stunt.
Events option
-
-
-
-
Here are some examples of things that can be done with the Events option:
If an aircraft ever gets within a certain radius of the toxic drum, have the drum
explode.
If an aircraft fires a weapon that lands within 5 feet of a car, have that car spin out.
-
Don’t start filming unless the aircraft is within 50 feet of the barn.
If a pilot successfully lands his hang glider in the center of the sports stadium,
-
-
have cheering sounds and then award the pilot 100 points.
If a bomb hits Alcatraz Island instead of the intended boat target 15 feet offshore,
stop the stunt and report “missed marked.”
-
Chapter 6 Setting Up Special Events
Page 81

+
If the pilot doesn’t snatch the wingwalker off another aircraft within a certain amount of time, have that
wing-
walker disappear and turn the other aircraft into a UFO
rewarded 100 points. If the pilot doesn’t crash through the
billboard, the remaining commands are not executed - no
music and no points.
that rises off into space.
The Events options are as follows:
Events can be simple or involved, but in either case, they’re easy
to create with the Events’ menus. You don’t need to do any programming. Except for entering an occasional number, there’s
nothing to do but select the objects and actions.
All the assignments that are used in the Stunt Pilot of the Year
contest were created through the Events option. You have the
same opportunity to create comparable stunts for your own
contest. The only difference is that you won’t be able to load
your stunts through the stunt coordinator’s office. To fly
that you set up, you must load it at the Set Designscreen.
stunts
EVENT - This is the Event number. Select the - (minus)
button to go to the previous event or the + (plus) button to
You can modify any of the sets used in the competition.
go to the next event.
Actually, you won’t be modifying the original sets, but copies
of them. We recommend that you save any original sets you’ve
modified under a new name so you always have them intact.
ONE SHOT - Select this if this event can only be done once.
For example, an event that checks for the aircraft to crash is
one that you’ll want as a one shot event.
With the Events option, you can create your own contest with
up to 64 different assignments. When it comes time to fly, just
load this set at the Set Design screen and then select Fly Stunt.
The Events option functions in an “If - Then” manner. It first
checks to see if certain requirements are met. If they are, then
the command(s) are executed. For example, you could program a stunt in which the pilot must crash through a billboard. If successfully done, then music plays and the pilot is
COPY
The Copy option is helpful if you have events that are alike.
You can copy one event, move to a blank event slot, and then
select Paste to copy the event into the new slot. You can then
make any necessary modifications to the event.
PASTE
with the Copy button.
-
Select this to copy all the contents of this screen.
-
Select this to paste the contents of what was copied
Chapter 6
Setting
Up Special Events
Page 82

-
CLEAR - Select this to clear all the lines in the current Events list.
-
-
-
You can also use the Del key to delete a line or the Ins key to insert
a line on the Events list. To delete a line, place the cursor over
the line you want deleted and press Del. To insert a line, place
the cursor on the line that you want to insert above and press Ins.
-
-
-
If Option
The IF statement sets up this stunt. In order for the remaining
statements to be executed, the IF statement must first be satisfied.
-
do nothing
1
do nothing
I do
nothing
and do
nothing
-
-
-
-
-
-
If - Never: This is the default option that acts as a placeholder.
Nothing is executed by this command line if Never is selected.
If - Collision: This checks for a collision between two objects.
When you select this option, you’re prompted to select the two
objects that must collide. There are two special options that precede prop slot I: Any Weapon and Any Object.
For example, you could set it up so that if your plane hits
d
Any
Messerschmitt
Manufacturer.Manufacturer.
..
Take-off speed:Take-off speed:
Stall speed:Stall speed:
. . . . . . . . .,......,...,......... 80 m.p.h.. . . . . . . + 80 m.p.h.
Maximum speed:
MaximumMaximum altitude:altitude:
Flaps:Flaps:
. . . . . . . . . . . . . . . . . . . . . . . . . . . . . . . . . . . . . . . Yes. . . . . . . . . . . . . . . . . . . . . . . . . . . . . . . . . . . . . . . Yes
Retractable landing gear:
Bf 109G
. . . . . . . . . . . . . . . . . . . . . . . . . . Messerschmitt. . . . . . . . . . . . . . . . . . . . . . . . . . Messerschmitt
. . . . . . . . . . . . . . . . . . 96. . . . . . . . . . . . . . . . . . 96
.....
...........
. . . . . . . . . . . . . . . . . . . 35,000 feet. . . . . . . . . . . . . . . . . . . 35,000 feet
........
428 m.p.h.Maximum speed:
428 m.p.h.
YesRetractable landing gear: Yes
G.m.b.H,G.m.b.H,
m.p.h.m.p.h.
FlugzegbaFlugzegba
u,
Chapter 6
Setting
Up Special Events
Page 83

Object, the next statement is executed. Or, you could be much
more specific and require the aircraft to collide into prop slot
15’s
cactus in order to execute the next statement. Both objects
must have COLL (Collision) on under their Adjust windows in
objects
order for the
to be able to collide. (For details on the
Collision option, see page 81.)
If
-
Crash: This checks to see if something crashes. If it
does, then the next statement is executed. Crashing occurs
when anything with COLL (Collision on the Adjust window) turned on crashes into any permanent sets like water,
canyon, cities, mountains, the ground - anything that can’t
be removed from the island.
If - Time: This checks to see if a certain amount of time
has passed. If it has, then the next statement is executed.
The maximum value for time is 655 seconds.
If-Weapon Count: This checks to see how many times a
weapon has been fired.
And Qualifier
The two AND qualifiers that follow IF let you build on the
requirements that must be met before the remaining statements
(starting with THEN) can be executed.
And - Nothing: “Nothing” is the default setting which tells
this statement not to do anything.
And - After Time: This checks for a minimum time requirement. Enter the time in seconds and then select OK. You can
enter fractions of a second;( e.g.,
2.3,10.5,438.5,
etc.)
And - Before Time: This checks for a maximum time limit.
Enter the time in seconds and then select OK. You can enter
fractions of a second.
And - Event: This checks to see if an Event has been triggered. Enter the event number and select OK.
And - Flag = : Enter a flag number and then the value that
you want this flag to equal. Flags are useful for keeping
track of whether things have happened or not. See page
95
for an explanation of flags.
Chapter 6
Setting
Up
Special
Events0’
And - Flag t : Enter a flag number and then the value that
1
Page 84

-
this flag should not equal. (See page 95 for an explanation
on flags.
)
-
-
And - No Event: This checks to make sure that a specific
Event has not been triggered. Enter the event number and
select OK.
-
Speed > : This checks to see if a prop’s speed is
And
greater than a certain value when this event is triggered.
You’re asked to select the prop and the minimum speed
And - Speed < : This checks to see if a prop’s speed drops
below a certain value when this event is triggered. You’re
asked to select the prop and the maximum speed.
-
Here’s a simple events list that does not use the AND command:
IF [ 500 seconds have elapsed]
-
-
-
THEN [award 500 dollars]
Here’s the same events list using AND. Notice how more
qualifications must be met before the THEN statement can be
executed:
IF [ 500 seconds have elapsed]
AND [the plane’s speed does not exceed 500 m.p.h.]
AND [event 4 has not occurred]
THEN [award 500 dollars]
The above example is more specific about what must happen
before the remaining statement can be executed than if only
the IF command were used.
Messerschmitt Bf 110Messerschmitt Bf 110
Manufacturer: .Manufacturer: .. .. . . . . . . . . Messerschmitt. . . . . . . . . . Messerschmitt Flugzegbau,Flugzegbau,
G.m.b.h.
Take-off speed:Take-off speed:
Stall speed:Stall speed: . . . .. . . .. . . . . . . . . . . . 88. . . . . . . . . . . . 88 m.p.h.m.p.h.
Maximum speed,
Maximum altitude:
Flaps:
........................................
Retractable landing gear:
. . . . . . . . . . . . . . . . . . . . . . . . . 105 m.p.h.. . . . . . . . . . . . . . . . . . . . . . . . . 105 m.p.h.
.....................
..................
.340 m.p.h.
.35,000
feet
Yes
......... Yes
Chapter 6
Setting
Up Special Events ’
CD
Page 85

The first statement is as simple as: “If you eat your meat, then
you can have your pudding.” That’s the simple If
-
Then statement. Compare that to “If you eat your meat and wash behind
your ears and do them both within 50 seconds, then you can
have your pudding.” The second statement has a few more
requirements before you get the pudding payoff.
Then Option
THEN provides the details on what happens if the above
requirements are satisfied. THEN has a number of options so
you can tailor your event.
Then - Nothing: Do Nothing. “Nothing” is useful as a
place holder. For instance, maybe you’ve built a fairly elab-
.”
orate event that you just want to take one “Then..
out of. Rather than rewriting the entire event, you can
select Nothing. Or you can use Nothing simply as a spacer
between a couple of executable options.
Then -Auto Stop
Rec:
This lets you stop the recording if
you’ve selected auto-editing.
option
Then - Award $: Enter the number of dollars the pilot
will be awarded.
Then - Change: Changes an object. When you select
Change, the object window opens so you can choose the
object you want to change. A wide variety of ways to
change this object is presented:
Shape. The Prop window opens. Select the prop you want
this one to change into.
WE position. Changes the west-east position.
Altitude. Changes the altitude.
SN position. Changes the south-north position.
Roll. Assigns a new Roll value. A negative number sets a
new Roll position to the left; a positive number sets the
new Roll position to the right, This sets the object to a new
Roll value; there is no motion involved.
Pitch. Assigns a new Pitch value. A negative number
decreases Pitch; a positive number increases pitch. This sets
the object to a new Pitch value; there is no motion involved.
Yaw. Assigns a new Yaw value. A negative number sets the
object Yaw counterclockwise; a positive number sets it
clockwise. This sets the object to a new Yaw value; there is
no motion involved.
Chapter 6 Setting Up
Special
Events
Page 86

Roll Anim. Adjusts the speed of rolling. The higher the
number, the faster the rate of roll. (Does not apply to prop
1.) This actually rolls the object along its longitudinal axis;
motion is involved. A negative number makes the object
roll counterclockwise; a positive number makes it roll
clockwise.
-
-
--
-
-
Pitch Anim. Adjusts the speed of change in Pitch. The
higher the number, the faster the change in pitch. (Does
not apply to prop 1.) This actually changes the position of
the object along its lateral axis; motion is involved.
Yaw Anim. Adjusts the speed of change in yaw. The higher
the number, the faster the change in yaw. (Does not apply
to prop 1.) This actually changes the position of the object
along its vertical axis; motion is involved.
Heading Pitch. Adjusts the direction of pitch in which this
object is moving. This prop must already have an initial
speed in order for this function to work.
Heading Yaw. Adjusts the direction of yaw in which this
object is moving. This prop must already have an initial
speed in order for this function to work.
Heading Pitch Anim. Heading Pitch Anim makes the
object travel in a circular pattern. Think of a chair on a
ferris wheel. Heading Pitch Anim lets you set the same
type of motion pattern for an object as the chair on a ferris
wheel. The chair itself will not move along its lateral,
vertical, or horizontal axis unless you specially use the
MiG-15(UT) Midget
Manufacturer:
Take-off speed: ............. ...123
Stall speed:
Maximum speed:
Maximum altitude:
Flaps: ....................................... Yes
Retractable landing gear:
. . . . . . . . . . . . . . . . . . . . . . . . . . Mi koyan
. . . . . . . . . . . . . . . . . . . . . . 112
. . . . . . . . . . . . . . . . . . . . . 668
...........
51,000 feet
.........
Yes
Guryevitch
m.p.h.
m.p.h.
m.p.h.
Chapter 6
Setting
Up
Special
Events
Page 87

Pitch Anim, Roll Anim, or Yaw Anim options.
Collideability is explained on page 81.
Heading Yaw Anim. Heading Yaw Anim makes the object
travel in a circular pattern. Think of a roulette wheel with a
ball in a slot. The object will have the same motion
pattern as the ball that’s going around and around. The ball
itself isn’t moving unless you specially instruct it to.
Speed. Changes the speed. A negative value causes the object
to go in reverse; a positive value causes it to go forward.
Acceleration. Changes the rate of acceleration. The amount
you enter will be gradually added to the current speed (add a
negative number to reduce speed).
Zoom. Changes the level of zoom. This only applies to
objects in prop slots 2 through 8.
Watch Obj. Changes the object that this object is watching.
You can set this to 0 (zero) to disable the Watch option.
Method. Lets you select a new type of method for this object
(Face, Free, Seek, Spot, Follow, or Attach.)
Method Obj. Lets you choose a new object for the method.
Visibility. You can set this at 0 for off or 1 for on. An object
that is on can be seen on the screen.
Auto zoom. This turns the auto zoom feature under Watch
on or off. 0 equals off while 1 equals on. This feature only
applies to prop slots 3 through 8.
Then - Cut To: Cut to another camera or object. If the
object being cut to is not a camera, nothing will happen.
Then
Then - Fade: Lets you fade the screen. The Fade percent
requester appears. Enter the value that you want this screen to
fade by; the higher the number, the darker the screen gets.
Then - Finish: Ends the stunt and shows a message stating
why the stunt is over. A list appears that lets you choose the
appropriate message. In the case of success, choose the Success
option. In the case of failure, choose any of the other options.
Then
don’t need a certain object anymore. If the program does not need
to keep track of it, it can free up room for another object. The
object window opens; select the object that you want “killed.”
Then - Set Flag: This lets you choose a flag number and set
it to any value ranging from -128 to 127. For an explanation
on setting up and using flags, see page 95.
-
Explode: Explodes the prop that you choose.
-
Kill: Makes an object disappear. This is useful if you
-
-
-
-
-
-
-
-
Collideability. You can set this at 0 for off or 1 for on.
Chapter 6 Setting Up Special EventsQ’ 1
Then - Set Time: This lets you set the time of day. Click on
Page 88

the up or down arrows to adjust the time.
Then
-
Start Rec: Starts recording. This option is required
when REC on the Global screen is turned off. If REC is turned
off and you don’t use Start Rec, recording will never occur. Use
-
this to tell the program to start recording when the IF
AND
requirements are met. All cameras record at the same time;
cameras cannot be instructed to individually turn on or off.
Then - Start Sound: This lets you select a piece of music or
sound effect. The Select Score window appears; select the
sound you want. (Details on the Select Score window are in
Chapter 8.)
Then - Stop Rec: Stops recording. Use this to end the Start
Rec option, If you don’t include a Stop Rec statement in the
Events list, the recording will stop when the pilot presses Esc
to return to the Camera Crew screen. All cameras record at
the same time; cameras cannot be instructed to individually
turn on or off.
Then -Wait: You’re prompted to enter the number of
seconds to wait before the remaining actions on the Events list
are executed. Wait does not affect your flying; you can still fly
even though the Event list is waiting to finish executing.
Setting and Using Flags
Flags take on any value that you assign it. The Flag value can
-128
range from
to 127.
Chapter 6 Setting Up
Special
Events
Page 89

Let’s say your goal in a stunt is to land on a particular spot on a
bridge. First, you could set up Event 1 to check if you crashed.
If you did, then set flag #I to 1. Now you can use flag #l in any
other event as the indicator for whether or not you crashed. You
could set up Event 2 to check if you successfully landed on the
bridge (represented by the collision window 00010x00010) and
-
to make sure that flag #l does not equal 1
which you set up
as representing a crash. The events could look something like:
Event 1
IF Piper Cherokee (1) crashes
THEN set flag #l to 1
Event 2
IF Piper Cherokee (1) hits 00010x00010
AND
flag#l # l
THEN finish - success
It’s important that you keep in mind that flag values have no
relation to each other, like time or speed or altitude does. You
know that with speed, the higher the number the faster you’re
going. Or with time, the greater the number the more time has
elapsed. Flags don’t have such a relative value. It’s merely a
number. In the above example, you could easily replace flag
#l with flag #12. Or change the flag value from 1 to 4. The
only thing that matters with flags is what numbers and what
-
values you assign them
and that you remember what these
values represent when you use them in another event.
Collision Windows
Under the Production Tool category in the props are “collision
windows.”
Collision windows are simply outlines of rectangles or solid
spheres. They work as “space indicators” that let you define an
area. Once you place collision windows, you can then use the
Event option and define these collision windows as areas
where something should or should not happen.
For example, let’s say you have a stunt where you have to fly
between two highrises, with the requirement being that the
aircraft pass through the highrises at an altitude no higher
than the fifth floor. You could specify this requirement by setting a collision window that covers the ground up to the fifth
floor. The aircraft must past through this collision window or
the stunt will not be acknowledged as successful.
In another stunt, you might want a parachutist to land in the
center of a stadium. You could lay down a horizontal collision
window that defines the specific area in which the parachutist
must touch down in to call it a successful stunt. You would in
effect be laying down a transparent mat that the parachutist
must land on in the previous two examples, the collision win-
Chapter
6 Setting Up Special Events
Page 90

-
-
-
dows are rectangular and two-dimensional. There’s another type
of collision window that comes in the shape of a sphere. The
sphere, unlike the rectangular collision windows, defines a
three-dimensional airspace. A sphere is useful when defining
an airspace that doesn’t matter what direction you approach it
from when you “collide.” For example, let’s say you wanted a car
to start driving off if an aircraft came within 50 feet of it. You
could put a sphere around the car that extends out 50 feet.
When an aircraft hits this collision window, or “collision
sphere,” the car will drive off. Keep in mind that in order for
the car to respond like this, you must use the Event option to
“program” this action.
-
-
-
-
Vertical windows range from 00010 x 00002 to 36000 x 36000.
Horizontal windows range from 0010 x 0002 to 6000 x 6000.
These measurements are in feet. Spheres range from 00001 to
15000; these are radius measurements in feet (radius is the mea-
surement from the center of the sphere to the edge).
After you place a collision window, you should turn Collision
(COLL) on so it registers when hit. You will probably also want
to take Visibility (VIS) off so you can’t see the outline of the col-
lision window when you film the stunt.
Chapter 7 contains examples of how collision windows are used.
MiG-25 Foxbat
Manufacturer:
Take-off speed:
Stall speed:
. . . . . . . . . . . . . Mikoyan Guryevitch
. . . . . . . . . . . . . . . . . . . . . . . . 162 m.p.h.
. . . . . . . . . . . . . . . . . . . . . . . . . . . . . . 135 m.p.h.
Maximum speed: . . . . . . . . . 668 m.p.h.
Setting The Recording Features
There are three different settings that determine whether or
-
not recording will occur:
1) the Global-Ret option on the Set Design screen, 2) the Events
Chapter 6
Setting
Up
Special
Events ’
e
Maximum altitude:
Flaps.. . . . . . . . . . . . . . . . . . . . . .
Retractable landing gear:
. . . . . . . . . . . . . . . . . . . 75,450 feet
Yes
......
Yes
Page 91

option on the Set Design screen, and 3) the Film Editing
option on the Preferences screen.
The following chart shows how the above three options in
combination affect recording:
FILM EDITING
GLOBAL ON
ON
AUTO
Recording Recording
Recording* Not Recording
OFF Not Recording
OFF
Not Recording
Events -Start Rec and Stop Rec override ALL of the above
options.
*
Only Auto Stop Rec stops this recording mode
is off, cameras stay off unless triggered by an Event.
The Preferences Screen
On the Preferences screen is the option Film Editing. This
option is set to on or off depending on how you answered the
question “Do you want to do your own editing?” that appears
when you first start the game.
-
Film Editing is set to on if you answered Yes to “Are
ON
you going to do your own editing?” When you’re done filming,
the program automatically goes to the editing room and loads
the footage from each camera angle used onto the Source
decks. You can either stay in the editing room and work on
your film or exit and do something else. You are not required
to stay here and edit.
The Global Option
The Global-Ret option is available at the Set Design screen.
Select the Global option and the Global Information screen
appears. In the upper left corner is the Rec option with the
default setting of on. Select the down arrow next to
Rec
and
the options of Off, Auto, and On appear.
OFF
going to do your own editing?” When you’re done filming, you’ll
go directly to the theatre to view the footage you’ve just recorded.
Although the Film Editing option is off, you can still go to the
editing room at any time to edit this footage. You are not
-
Cameras automatically start recording at the beginning
ON
of a take.
barred from the editing room just because Film Editing is off
-
you just won’t automatically be taken to the editing room
when you’re done.
OFF - Cameras stay off. They will only start rolling if you
give specific instructions through the events list.
Recording Through the Events Option
The Events option is “recording king.” It doesn’t matter what
-
AUTO
If Film Editing on the Preferences screen is on, cam-
eras start recording right when the action starts. If Film Editing
Chapter 6 Setting Up Special Events
any other recording setting is
Rec,
-
Film Editing is set to off if you answered No to “Are you
-
if an Event has the line Start
recording will
always
start if that Event is triggered.
Page 92

The Events option is available on the Set Design screen. Select
the Events option and the Events list appears. All the following
options are available through the THEN option on the Events list:
AUTO STOP REC - Stops all recording if Auto was selected
under the Global-Ret option and Film Editing is off. This will
not
stop recording if Film Editing is on; you must use Stop
if the Film Editing option is on.
START REC - Starts recording when this event is triggered. It
does not matter what any other setting is.
STOP REC - Stops recording when this event is triggered. It
does not matter what any other setting is.
Rec
Auto-Edited Films
If you go to the Set Design screen, build a set from scratch, and
-
then fly it
an auto-edited film, but the auto-edited film will only be made
up of your pilot’s camera view.
True auto-editing, where different footage from different cameras
is spliced together, occurs when camera cuts have been programmed in through the Events option. All the pre-built sets have
camera cuts built in for auto-editing.
If you load any of the pre-built sets and look through the Events
list, you’ll see the option “cut to [prop name]” on some of the
Events. The “cut to” command tells the program what cameras to
without using the Events option - you can get
MiG-29 FulcrumMiG-29 Fulcrum
Manufacturer:Manufacturer: ....................................................
Take-off speed:Take-off speed:
StallStall speed:speed:
Maximum speed:Maximum speed:
Maximum altitude:Maximum altitude:
Flaps:Flaps:
............................................................................ .Yes.Yes
RetractableRetractable
..............................................
..........................................................
..........................................
......................................
landinglanding
gear:gear: ..................
MikoyanMikoyan GuryevitchGuryevitch
.168m.p.h..168m.p.h.
.140m.p.h..140m.p.h.
1,530 m.p.h.1,530 m.p.h.
60,700 feet60,700 feet
YesYes
Chapter 6
Setting
Up
Special
Events
Page 93

take footage from to create the auto-edited films. If you choose
to do your own editing, the “cut to” command is not impor-
-
tant to you
doing your own editing, auto-editing still occurs - you just
won’t be automatically taken to the theatre to view it.
Take a look at the BURGER.SET. Events 22 and 23 have “cut
to” commands in them. Notice that they’re used in conjunction with collision windows. That’s the best way to set up camera cuts. Set up collision windows in the area of the camera.
Then when the aircraft hits the collision window, the camera
will know that the aircraft is in view and cut to that camera.
To understand cuts, study the Event lists in the pre-built sets.
See what collision windows are tied to which cameras. See
what order the cuts occur. See how the collision windows and
cameras are placed on the set. If you’ve successfully flown any
of the stunts, watch the film and see how the cuts relate to
how they were set up on the Events list.
What Editing Options You Should Choose
If you just want to fly and don’t want to view any films, make
sure Film Editing (under Alt-P) is off. No footage will be
recorded, which keeps your computer’s memory and hard
drive use to a minimum.
If you’re flying a pre-built set and would like to see an edited
film without doing any editing work, make sure Film Editing
(under Alt-P) is off and Global-Ret is on Auto.
you won’t be seeing its effects. But even if you’re
Remember that if you’re not flying a pre-built set or a set that
has cuts built into the Events, the auto-edited footage will only
consist of the pilot’s view.
If you want the editing to be done by the program (you don’t
want to do it in the editing room) on a set you created, you
must be sure to program the “cut to” options in the Events list.
Turn Global-Ret off so the cameras don’t immediately start
rolling with the action. Then use the Events option to start and
stop recording, and to establish the camera cuts. Keep in mind
that all the pre-built sets have cuts already built into them. It’s
the sets that you build and want auto-edited that require you
to use the cut options in the Events list.
If you’re heavy into doing your own editing in the editing
room, make sure Film Editing and Global-Ret are on. You’ll
capture all footage from beginning to end. You can then go to
the editing room to put it together the way you want.
Dissecting Stunt Sets for Success
Now that you’ve learned all there is to know about objects,
collision windows, and Events lists, you have the key to interpreting all the stunts used in the Stunt Pilot of the Year contest.
If you can’t seem to succeed on a stunt, load it in the Set
Design room and study it. (The names of the sets used for
each stunt are listed at the end of Chapter 4.)
Take a look at where the collision windows are positioned and
check the Events lists to see what exactly the pilot is allowed
-
-
-
-
-
-
-
-
-
Chapter 6
Setting
Up
Special
Events
Page 94

to do. This should help you determine what triggers success
and what triggers failure.
You can also modify a stunt to make it easier to do, giving you
the opportunity to complete it. For example, in BURGERSET,
you’ll see in Event 3 that if 100 seconds have elapsed, then
you’ve failed because you took too long. If you want to extend
the time limit, you could just change the first line in that event
to
If - 655
Event 1 in BURGER.SET checks to see if the Piper Cherokee
crashes. If it crashes, the stunt ends. You could alter this by
changing the first line to
program no longer looks for the Piper Cherokee to crash. It
looks for the crate truck to crash, which should never occur.
seconds have occurred.
If - crate truck (20) crashes.
This extends the time limit.
The
The sets that you can load at the Set Design screen are
of the ones used in the contest. So even if you’ve successfully
flown all the stunts loaded from the Set Design office, you can’t
win the contest because these stunts aren’t the ones being
tracked by the contest. You must see the stunt coordinator to
receive assignments that count towards the contest.
There’s no way to have the aircraft automatically flown for you
in the contest, so keep up the sharp piloting.
Chapter 6 Setting Up Special Events
copies
Mirage 2000Mirage 2000
Manufacturer:
Take off speed:
Maximum speed:
Maximum altitude:
Flaps:
Retractable landing gear:
...................................
.................................
.....................................
.............................
........................... 59,000 feet
...............................................
.................
Dassault Aviation
138 m.p.h.
m.p.h.Stall speed:
.114
m.p.h.
1,645 m.p.h.
Yes
Yes
Page 95

CHAPTER
7
Tutorial: Creating Sets and Events
In this chapter you’ll learn how to create a set for a stunt, and then use the Events
option to set up the requirements for that stunt.
Contest Scene 7
The stunt you’ll be setting up is one that’s used in the Stunt Pilot of the Year
-
contest
do the following:
1.
2.
3.
Scene 7: Park at the hamburger stand. That’s the one where you have to
Land your Piper Cherokee on the country road.
Taxi down the road. When you get to the police road block, make a left hand
turn to avoid them.
The hamburger joint is to the left. Pull into the parking lot and put the nose of
your plane in the second row, third stall in.
-
-
This stunt needs to be performed in less than 100 seconds (a little over one and a
half minutes) and the plane cannot crash or hit any of the vehicles.
Designing The Set
All work takes place at the Set Design screen in the production building.
Chapter 7 Tutorial Creating Sets and Events
Page 96

Here’s a rough layout of how your set should look when you’re
done:
This stunt takes place in a pre-built set of a small town. The
approximate coordinates of the location is Sth/Nrth 175,963
and Wst/East 60,503. Go to this location on the island view
screen.
-
I
Overhead
view
N
w
,T
.:,
Police
cars
Park
here
N
:i;
Now that the location is established, you’re going to work on
placing the props, Below is a list of all the props you need to
place with their exact locations and Adjust option settings.
E
_
-
Setting Up The Cameras
Props 1 through 8 have filming capabilities. You will only
record with props 1 through 4 in this stunt.
Prop 1. Piper Cherokee
The Piper Cherokee is the stunt plane you’ll be flying. The
plane starts out in mid-air with a specific altitude and speed
setting.
J
E
PROP TYPE Free
ANIM.
WTCH
POSITION
FACING ........ Roll ................ 0
......
No settings
.....
No settings
......
Sth/Nrth
Wst/East
Altitude . . . . ......... 430
Speed . . . . . . . . . . ........ 120
Pitch . . . . . . . . . . . ........... 0
Yaw . . . . . . . . . . . . .
.........
........
............
169000
60970
0
-
-
-
-.~
-
-
--
Chapter 7 Tutorial Creating
-
Sets and Events
Page 97

-
Prop 2. Spotter Plane
-
-
-
-
The spotter plane is set slightly below (pitch -14), behind (yaw
100), and 70 feet away (dist 70) from the Piper Cherokee.
Because Watch is on and the
will maintain a fixed zoom power of 1 on the Piper Cherokee.
The Spot option instructs the spotter plane to auto-adjust for
the best camera angles.
autozoom
is off, the spotter plane
PROP TYPE
ANIM
WTCH _________
OFFSET
POSITION Pitch -14
-
-
-
-
-
-
Prop 3. Camera
This camera is filming towards the direction that the plane will
be coming from. It’s set to watch the Piper Cherokee with the
automatic zoom on.
PROP TYPE
ANIM
WTCH Watch ON
.......
Spot
...........
No settings
No settings
...
Watch
Object ............. 1
Zoom . .............. 1
Autozoom OFF
Yaw ................... 100
Dist . . . ................. 70
#l
....
. ..Free
Object ................. 1
Zoom . . . . ............... 1.4
Autozoom.. ON
..... .......
.ON
Mitsubishi A6M Zero-Sen
Manufacturer:
Take-off speed:
Stall speed:
Maximum speed:
Maximum altitude:
Flaps:
Retractable landing
.........................
Mitsubishi Jukogyo
Kabushiki Kaisha
.......................
............................
...................
.................
.90 m.p.h.
.75 m.p.h.
,340 m.p.h.
.24,000
...................................... Yes
gear: ........ Yes
feet
-
Chapter 7
Tutorial Creating
Sets and Events
Page 98

POSITION
HEADING . . .
..Sth/Nrth
................. 175981
Wst/East.. ................. 60720
Altitude
Speed
..Pitc h..
Yaw.
......................... .64
................................ 0
...............................
..................................
0
0
Prop 11 contains the 10x10 foot collision window that detects
if the nose of the plane is parked properly in the stall.
PROP TYPE..
ANIM
WTCH ................
POSITION ...........
Prop 4. Camera
#l
This camera is set up in the parking lot to film the Piper
Cherokee as it tries to maneuver into the parking space.
FACING
PROP TYPE
ANIM
WTCH
.........Free
................
................
..N o settings
.........................
Watch
OFF
HEADING
Object.. ............................ .l
Zoom..
POSITION
FACING
...........
..............
..............................
Autozoom
Sth/Nrth..
Wst/East
Altitude
Speed
Roll
................... OFF
.............. .175922
.................. .60497
......................... .17
...............................
..................................
Pitch.. ............................ -10
Yaw..
...............................
.O
.O
16
1
Prop 12. Sphere 00006r
The sphere is attached to the nose of the plane and is used to
determine if the plane is properly parked in the stall at the end
of the stunt. The sphere must touch the 10x10 foot collision
window (prop 11) placed in the stall.
PROP TYPE
ANIM
WTCH ................
Prop 11.00010x00010
Prop slots 5 through 10 are not used. Because you don’t need
OFFSET
POSITION ...........Pitch .................................
to set up any more cameras, we had you jump to prop slot 11
to start the next series of items. This is just a simple way of
keeping track of items.
.......Free
..................
No settings
No settings
.............
Sth/Nrth
Wst/East
Altitude
Speed
.Roll
................. 176006
.................. .60539
...........................
................................
..................................
Pitch ................................. 0
Yaw..
...............................
...........Pitch ................................. .
Yaw..
................................
......... Attach
..................
No settings
No settings
Yaw
...............................
Dist ..................................
.6
0
.O
90
.O
0
180
.6
Chapter 7
Tutorial Creating
Sets and Events
Page 99

-
-
-
-
-
-
-
-
Parked Vehicles
The next 11 props, starting with the monster truck, are the
vehicles parked outside of the hamburger stand. The Collision
must be toggle on (it will look pushed in when on) in order
for these planes to be “collideable.”
You could place all these props and run into them with the
Piper Cherokee without penalty if all their COLL options were
toggled off.
Props
13
through 19 have a FACING yaw of 90 because the
front of these vehicles point due east.
-
-
-
-
-
-
-
Prop 13. Monster Truck #2
PROP TYPE
ANIM
WTCH ................
POSITION ..........
.........Free
..................
No settings
No settings
.Sth/Nrth
Wst/East
Altitude
Speed
...............................
FACING
HEADING
.............
.Roll
..................................
Pitch ................................
Yaw
................................. 90
...........Pitch ................................. .
Yaw..
................................. 0
................ .176018
.................. .6049
............................ .
1
.O
.O
.O
-
-
Chapter 7 Tutorial Creating Sets and E
Page 100

Prop 14. Limousine #2
PROP TYPE
ANIM
WTCH ................
POSITION ...........
........ .Free
..................
No settings
No settings
Sth/Nrth
Wst/East
Altitude
Speed
FACING ............
..Roll
Pitch
Yaw..
HEADING ..........
.Pitch
Yaw
................. 175999
.................. .6049
............................ .
...............................
..................................
................................. 0
............................... 90
................................. .
...................................
1
.O
.O
0
Prop 16. WWII Motorcycle
PROP TYPE..
ANIM
WTCH ................
POSITION ...........
...... .Free
..................
No settings
No settings
Sth/Nrth
Wst/East
Altitude
Speed
................. 175977
.................. .60497
............................
...............................
FACING ..............Roll.. ................................. 0
Pitch
.................................
Yaw..
HEADING ...........
...............................
Pitch
.................................
................................
Yaw..
90
2
.O
0
0
.O
-
-
-
-
-
Prop 15. WWII Motorcycle
PROP TYPE
ANIM
WTCH ................
POSITION ...........
FACING ..............
HEADING ...........
........ .Free
..................
No settings
No settings
Sth/Nrth..
Wst/East
Altitude
Speed
Roll
Pitch
Yaw.
Pitch
Yaw.
............... 175984
................... 60497
...........................
...............................
..................................
................................. .
............................... .90
................................
..................................
.2
.O
.O
.O
0
Chapter 7 Tutorial Creating Sets and Events
Prop 17. WWII Motorcycle
PROP TYPE..
ANIM
WTCH ................
POSITION
FACING ............
HEADING ...........
....... Free
..................
...........
No settings
No settings
Sth/Nrth
Wst/East
Altitude
Speed
..Roll
Pitch
Yaw.
Pitch
Yaw..
................. 175969
.................. .60498
............................
................................
...................................
................................. 0
............
.................................
................................
.90
2
.
0
.
.O
-
-
-_
-
-
-
 Loading...