

Page 1
1
Page 2
Players Manual v5.0
Manual v.5
© 2001 by Matrix Games. All Rights Reserved.
Protected under copyright and international treaties. No portion of this manual may be reproduced without written
© 2001 by Matrix Games. All Rights Reserved.
permission from Matrix Games.
Page 3

Players Manual v5.0
Contents
Contents
ContentsContents
Contents ............................................................................................................................................i
Introduction ...................................................................................................................................... 1
Welcome to Steel Panthers: World at War...................................................................................... 1
What Comes with This Game?..................................................................................................... 1
How to Read This Manual ............................................................................................................ 1
Copy Protection ............................................................................................................................ 1
Operating System and Hardware Requirements ......................................................................... 1
Screen Resolution ........................................................................................................................ 2
Scale............................................................................................................................................. 2
Running SP: WAW ....................................................................................................................... 2
Languages.................................................................................................................................... 2
Installing the game ....................................................................................................................... 2
Tutorial For Steel Panthers: World at War ...................................................................................... 3
Getting Started................................................................................................................................. 3
The Selection Screen ................................................................................................................... 3
The Preferences Screen .............................................................................................................. 6
Unit Information Screen................................................................................................................ 7
The Buttons .................................................................................................................................. 9
Let the Battle Begin ....................................................................................................................... 10
Follow Me! .................................................................................................................................. 11
Fire! ............................................................................................................................................ 11
Experienced Players Guide ........................................................................................................... 14
General Changes........................................................................................................................... 14
Unit Scales ................................................................................................................................. 14
Load and Save Games............................................................................................................... 14
Map Changes ............................................................................................................................. 14
Internet Play .............................................................................................................................. 14
Play-by-Email ............................................................................................................................. 15
Head-to-Head versus PBEM ...................................................................................................... 15
Floating Pop-out Boxes and Info/Chat Area............................................................................... 15
Combat Sounds and Music ........................................................................................................ 16
Game Changes .......................................................................................................................... 16
Preferences Screen.................................................................................................................... 21
Changes to Game Play.................................................................................................................. 27
Reinforcement Request.............................................................................................................. 28
Movement................................................................................................................................... 28
Weather ...................................................................................................................................... 29
Spotting ...................................................................................................................................... 29
General Combat ......................................................................................................................... 29
Campaigns ................................................................................................................................. 36
Changes to the Armor Combat System......................................................................................... 37
Armor Penetration ...................................................................................................................... 37
Ammunition Effectiveness .......................................................................................................... 37
Armored Skirts............................................................................................................................ 38
Vehicle Damage ......................................................................................................................... 38
National Characteristics................................................................................................................. 38
New Unit Classes .......................................................................................................................... 39
Gliders and Transport Aircraft ....................................................................................................... 39
Commandos and Partisans ........................................................................................................... 40
New Terrain Types ........................................................................................................................ 40
Jungle Terrain............................................................................................................................. 41
Rough Terrain............................................................................................................................. 41
© 2001 by Matrix Games. All Rights Reserved
i
Page 4
Players Manual v5.0
Hilltop Placement ....................................................................................................................... 41
New Battlefield and Obstacle Effects ............................................................................................42
Caves ......................................................................................................................................... 42
Fires............................................................................................................................................ 42
Mines .......................................................................................................................................... 42
Fording ....................................................................................................................................... 42
Breakdowns................................................................................................................................ 42
Buildings ..................................................................................................................................... 42
Long World War II Campaign ........................................................................................................ 43
New Countries ............................................................................................................................... 43
Editor Changes .............................................................................................................................. 43
Date ............................................................................................................................................ 43
Length of battle........................................................................................................................... 43
Visibility....................................................................................................................................... 43
Weather ...................................................................................................................................... 43
Weather Values: ......................................................................................................................... 44
Terrain ........................................................................................................................................ 44
Encyclopedia Changes .................................................................................................................. 45
Detailed Player Guide.................................................................................................................... 46
The Selection Screen .................................................................................................................... 46
Choosing Scenarios and Campaigns ......................................................................................... 46
Playing a Scenario ..................................................................................................................... 47
Playing a Campaign ................................................................................................................... 49
Playing a Battle........................................................................................................................... 49
The Game Editor ........................................................................................................................ 49
Load and Save Games............................................................................................................... 49
Preferences Screen................................................................................................................... 49
The Battle Map Toolbar .............................................................................................................. 50
What the Numbers Mean............................................................................................................... 52
Movement ...................................................................................................................................... 55
Moving Entire Formations .......................................................................................................... 55
Waypoints and Objectives.......................................................................................................... 56
Limited Intelligence..................................................................................................................... 60
Recon Special Ability.................................................................................................................. 60
Combat .......................................................................................................................................... 60
Accuracy..................................................................................................................................... 61
Opportunity Fire (OpFire) ........................................................................................................... 63
Terrain Effects on Movement and Combat ................................................................................ 66
Combat Results ............................................................................................................................. 67
Armor Damage ........................................................................................................................... 69
Indirect Fire.................................................................................................................................... 70
Indirect Fire Missions..................................................................................................................... 71
Selecting a Target ...................................................................................................................... 71
Spotting ...................................................................................................................................... 72
Pre-registered Targets ............................................................................................................... 72
Air Support..................................................................................................................................... 73
Aircraft Entry, Exit Spaces and Target Hexes ............................................................................ 73
Gliders and Paratroops .............................................................................................................. 74
Special Forces and Guerrillas .................................................................................................... 75
Command Control and Orders ......................................................................................................75
Entrenchment ................................................................................................................................ 79
Entrenchment vs. ”In – Cover” ...................................................................................................79
Ammunition.................................................................................................................................... 79
Tutorial Section.............................................................................................................................. 81
Tutorial on “Flanking” Maneuver” in SPWAW ........................................................................... 82
Artillery Tutorial........................................................................................................................... 84
© 2001 by Matrix Games. All Rights Reserved
ii
Page 5

Players Manual v5.0
Tutorial - Mine and Obstacle Removal ...................................................................................... 89
Tutorial - Assaulting a Bunker .................................................................................................... 92
Assaulting mines and bunkers under fire ................................................................................... 94
The Tiger I tank – an overview................................................................................................. 101
Order of Battle Editor ................................................................................................................... 105
The Basics................................................................................................................................ 105
Playing Scenarios and Campaigns.............................................................................................. 111
The Purchase System .............................................................................................................. 111
Battle Generator ....................................................................................................................... 113
Deploy Units ............................................................................................................................. 115
Unit Configuration..................................................................................................................... 117
How to Setup Play By Email Game ............................................................................................. 118
PBEM – Automatic Program........................................................................................................ 124
Mega Campaign .......................................................................................................................... 126
Scenario Editor ............................................................................................................................ 133
Map Controls ............................................................................................................................ 135
Editor Deploy Screen ............................................................................................................... 136
Build a Map............................................................................................................................... 138
Multihex Industrial Buildings..................................................................................................... 150
Tutorial: Designing Your Own Scenarios ................................................................................. 154
Step 1 – Choosing a Battle....................................................................................................... 154
Step II – Making a Map ............................................................................................................ 155
Step III – Choosing Your Units ................................................................................................. 159
Step IV – Placing Your Units .................................................................................................... 160
Step V – Placing Objectives and Units..................................................................................... 161
Step VI - Final Touches ............................................................................................................ 163
Working with Waypoints ........................................................................................................... 165
Using Beach Assault & River Crossing Scenario Maps in SPWAW generated battles. ............. 166
How to Convert SP1 Scenarios into SPWAW Scenarios ............................................................ 168
Tools......................................................................................................................................... 168
Step by Step Instructions ......................................................................................................... 168
DESIGN YOUR OWN CAMPAIGN ............................................................................................. 172
By Paul Vebber............................................................................................................................ 172
User Campaign Editor .............................................................................................................. 174
FAQ ............................................................................................................................................. 177
Questions about playing the game........................................................................................... 177
Questions about scenario designing ........................................................................................ 185
Design notes................................................................................................................................ 190
The Armor Combat System ...................................................................................................... 190
Online Play with Combat Net....................................................................................................... 193
Using the Game Lobby............................................................................................................. 194
Abbreviations ............................................................................................................................... 200
Glossary....................................................................................................................................... 201
Hotkeys........................................................................................................................................ 202
Deploy Screen Keyboard Equivalents:..................................................................................... 202
Hot Key Only On Deploy Screen:............................................................................................. 202
Battle Map Screen Keyboard Equivalents................................................................................ 202
Map Editor Keyboard Equivalents: ........................................................................................... 203
Hot Key Only on Map Editor Screen ........................................................................................ 204
SPWaW Game Editor-WaWEd ................................................................................................... 205
Steel Panthers World at War Map Editor..................................................................................... 214
Printing Maps From SPWaW. ..................................................................................................... 226
Credits ......................................................................................................................................... 229
© 2001 by Matrix Games. All Rights Reserved
iii
Page 6

Players Manual v5.0
© 2001 by Matrix Games. All Rights Reserved
iv
Page 7
Players Manual v5.0
Introduction
Welcome to Steel Panthers: World at War
Steel Panthers: World at War adds a new chapter to the popular Steel Panthers series from
designer Gary Grigsby and published by Strategic Simulations Inc. Though SP: WAW is based
largely on Steel Panthers game system, it is far more than a sequel. It transforms a classic DOS
game into a Windows format that can be easily played on most computers. It richens the tapestry
of combat with enhancements to armor, infantry and artillery, and more faithfully representing
WW2 combined arms warfare than previous versions. The sound and graphic enhancements add
a whole new dimension of immersion into the game.
So, climb into the turret and take command. You make the decisions
as you command individual tanks, guns and squads of infantry. Your
battlefield is the era of World War II, from the Japanese invasion of
China in 1930 to the hair-trigger standoff between Communism and
the Free World in 1949. Choose from the forces of twenty-seven
nations as you maneuver over a wide range of terrain, from the
steppes of Russia to the island jungles of the Pacific.
SPWAW comes with more than 175 scenarios as well as several
long campaigns and a sample Mega campaign. Players may also create their own battles using
the game’s powerful Editor. Games may be played against the computer, face-to-face, by E-mail
and over the Internet.
What Comes with This Game?
SP: WAW is a stand-alone game. You don’t need any prior versions of Steel Panthers. The game
is available as a download from Matrix Games or on the SPWaW Mega Campaign CD’s.. Also
included included is the New Military Gamer “Combat Net” online play software, and a set of
utilities from Fred Chlanda for editing scenarios and maps, converting scenarios from earlier
game versions and for editing the game graphics. Updates are available through our web site at
http://www.matrixgames.com. Check there to ensure you have the most up to date version of the
game!
How to Read This Manual
If you are new to the Steel Panthers experence, proceed step-by-step through the Tutorial section
of the manual. It will familiarize you with the basic controls and concepts of SPWAW. If you have
mastered the Tutorial or are already a battle hardened fan of Steel Panthers, you can start with
the Experenced Player Guide. If you are an experienced Steel Panthers player but want a
refresher on the rules, take a look at the Detailed Player Guide. A glossary at the end of this
manual defines commonly used terms in the game, while the latest updates will be reflected in
the Readme.txt file.
Copy Protection
There is no copy protection for SPWAW.
Operating System and Hardware Requirements
SPWAW is now a native Windows program that uses Direct Draw and Direct Sound. It will play
on all Windows O/S including ME Millenium, Windows 2000 and NT. Players must have Direct X
6.1 or better installed on their computers. The program has been tested on systems with as little
as 32 MB of RAM. But it was developed on a system with 64 MB, so we recommend at least that
much RAM. No hardware graphics acceleration was programmed and on some systems best
© 2001 by Matrix Games. All Rights Reserved.
1
Page 8

Players Manual v5.0
results are obtained turning hardware acceleration off, but 3D sound card enhancement is
recognized and utilized. The game does require a sound card to function.
Screen Resolution
The screen resolution of the game has been changed from 640x480 to 800x600. This increase in
screen space allows for more controls, buttons and better spacing. It also makes icons appear
sharper and allows users to a larger slice of the map in the Battle Map. The game automatically
sets this screen resolution. You should not need to change screen resolution prior to playing the
game.
Scale
Each terrain tile in the game (called a hex) is 50 meters or about 50 yards across, and each turn
represents a few minutes. The scale can be changed from hexes to meters to yards by using the
@ key. All movement rates, sighting routines, command and control ranges, communications
ranges, weapon ranges and unit frontages have been adjusted accordingly. Units are individual
vehicles and heavy guns, small groups of light mortars, and teams or squads of infantry and
heavy weapons from 2-20 men strong. Shots by units typically represent individual rounds or
small shot groups for tanks and artillery, and bursts of 5-10 rounds for small arms and automatic
heavy weapons.
Running SP: WAW
To start the game either double-click on spwaw.exe or use the Steel Panthers: World at War icon
found under the Windows Start and Program buttons.
Languages
SP: WAW is available in English, Finnish, Polish, French, German, Spanish, Italian and Danish.
Other languages will be included in the future.
Installing the game
SP: WAW version 5.0 is available as a very large (400 MB) dowload from the Internet or from the
Mega campaign CD’s. To install, click on the setup file and Setup will begin. This method requires
about 800MB free on your computer to install. If you have the setup file itself on a CD (through a
game magazine or some other CD distribution method), then you need about 600 MB to install.
Updates are available through our web site at http://www.matrixgames.com.
© 2001 by Matrix Games. All Rights Reserved.
2
Page 9
Players Manual v5.0
Tutorial For Steel Panthers: World at
Tutorial For Steel Panthers: World at
Tutorial For Steel Panthers: World atTutorial For Steel Panthers: World at
War
War
WarWar
by “Wild Bill” Wilder
Getting Started
To start the game either double-click on spwaw.exe or use the Steel Panthers:
World at War item under the Windows Start and Program buttons.
The first screen you see after the intro is a screen allowing you to continue or exit. “Online Play”
is for playing multiplayer online, while “Timed Play” is for playing vs the AI or Hotseat under time
pressure (your turn ends after a preset time period and is automatically saved). Go ahead and
click on “Solitaire Play.”
The Selection Screen
This is where we begin. This
screen is the Selection or main
screen of the game. It’s like a
crossroads, where you can branch
off in various directions. If you
look on the right side of the
screen, you’ll see a list of
scenarios and long campaigns.
Other buttons allow you to create
your own scenarios and even
peruse through an encyclopedia
that offers data on the weapons in
SPWAW.
For now, click on the “Scenario”
button. You’ll see a long list of the
scenarios – each an individual
battle. Click on the Tutorial
scenario in the first slot. Now
you’ll see a body of text in the center of the screen. This briefs you about the background of the
battle, the countries involved, how long the battle lasts and other details. Once you have finished
reading the background text, click on “Start.”
© 2001 by Matrix Games. All Rights Reserved.
3
Page 10
Players Manual v5.0
Player Control Screen
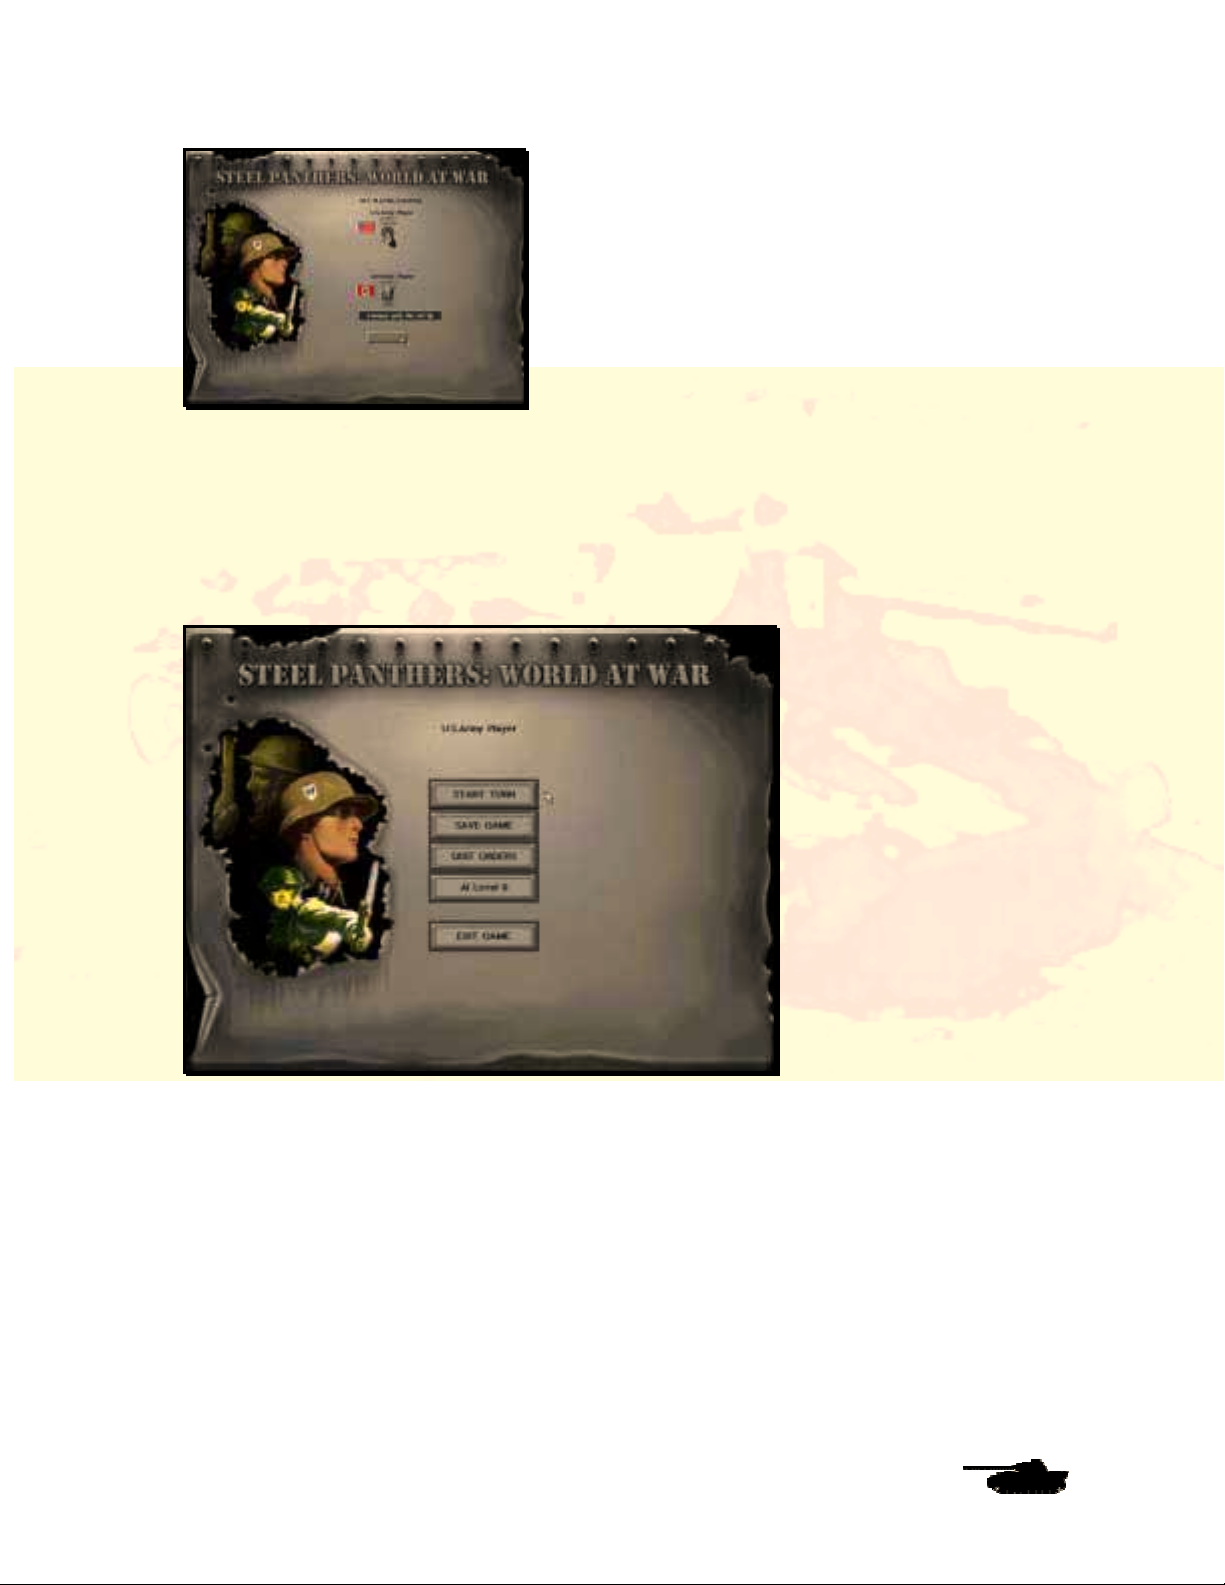
Now there’s a new screen with two toggle switches that determine which sides are played by
human or computer opponents. For now, leave the buttons as they are. In this tutorial, you will
command a U.S. Army tank and infantry force, while the computer opponent will command the
German forces. Click on “Continue.”
The US Army Screen
The Set-Up Screen for the U.S. forces – your forces – is now displayed. You have several
choices, including starting the game, saving it to be played later, Quitting Orders (which skips
your turn and lets your opponent move), adjusting the advantage given to the computer AI
(Artificial Intelligence) or exiting the battle completely. If you want to continue, just click on “Start
Turn.” Changing the AI level give the AI increased experience and morale benefits that make it a
tougher opponent. It does not change how the AI plays its game.
© 2001 by Matrix Games. All Rights Reserved.
4
Page 11
Players Manual v5.0
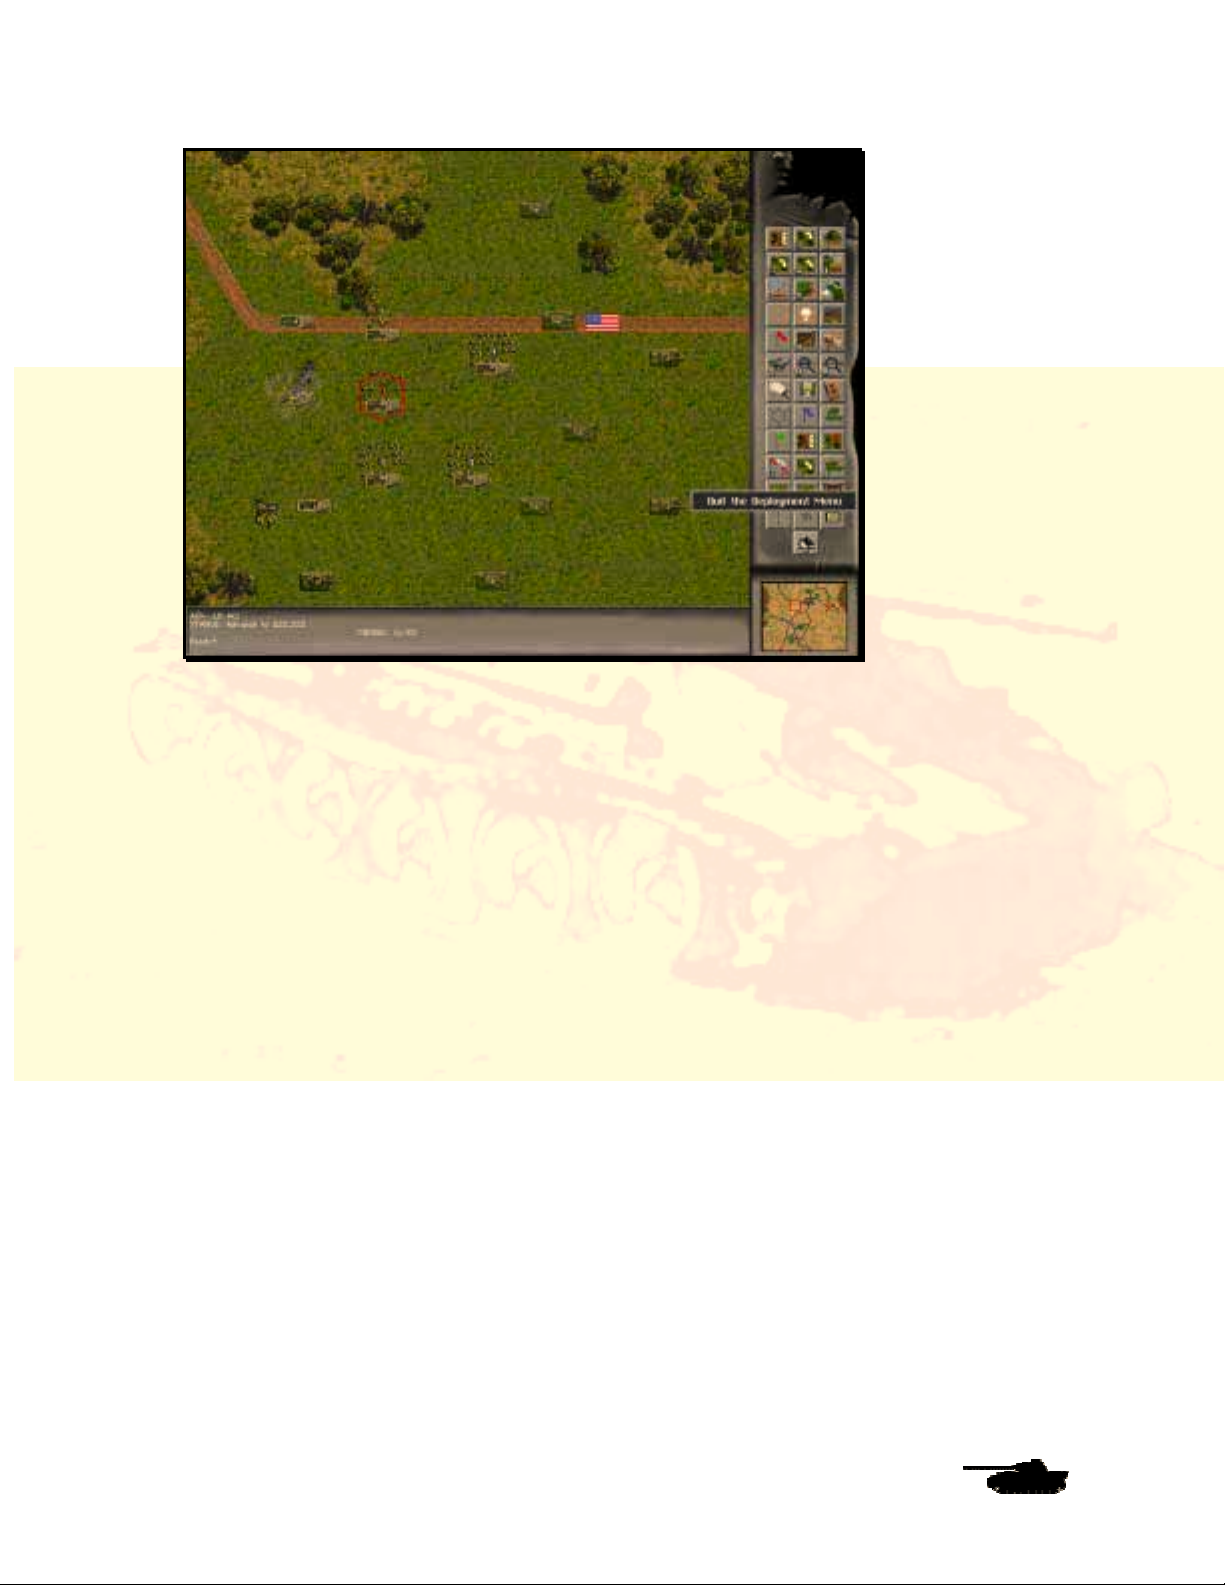
The Battle Map
The Battle Map is where most of the action will occur. It gives you a top-down view of the
battlefield, as if you were in an airplane overlooking the fighting. You can see your troops, the
enemy forces and the terrain you’ll be fighting over.
Take a second to look around the map. Move the cursor towards any map edge, and the screen
will scroll in that direction. Your battlefield here is a section of French countryside during July
1944, a few weeks after the Allied armies splashed ashore at D-Day. You’ll find farms, a small
town, and hills on either end of the map, a small stream to the left and an open valley in the
center of the map. Notice that some spots (the ones marked with an American, German or “V”
flag) are labeled as Objectives. Those are the locations you must capture to win the game. Hover
the mouse over them and you will note that they award points at game’s end. There are other
ways victory hexes can award points, they are described further on in the manual.
You can zoom in or out using the two buttons marked like magnifying glasses, or use the plus
and minus keys on your keyboard. The + button or key will zoom in for a close-up view, while the
minus will zoom back out. There are four zoom levels in the game.
A quick way to move about the main map is to use the mini-map in the bottom right corner. Your
troops are displayed as white dots, the enemy (when you spot them) will appear as red dots and
the victory objectives (which you must capture to win) are shown as green dots. Click anywhere
on the mini-map, and that spot will appear in the center of the main map. Note the small
rectangular buttons on the top and bottom of the mini-map. Sometimes the Battle Map is too large
to display in a single mini-map. In that case, the top left and bottom buttons will be green. Clicking
on them will scroll the mini-map. If those buttons are red, then only a single mini-map is used. In
either case, the top right button will center the mini-map on the current selected unit. In the top
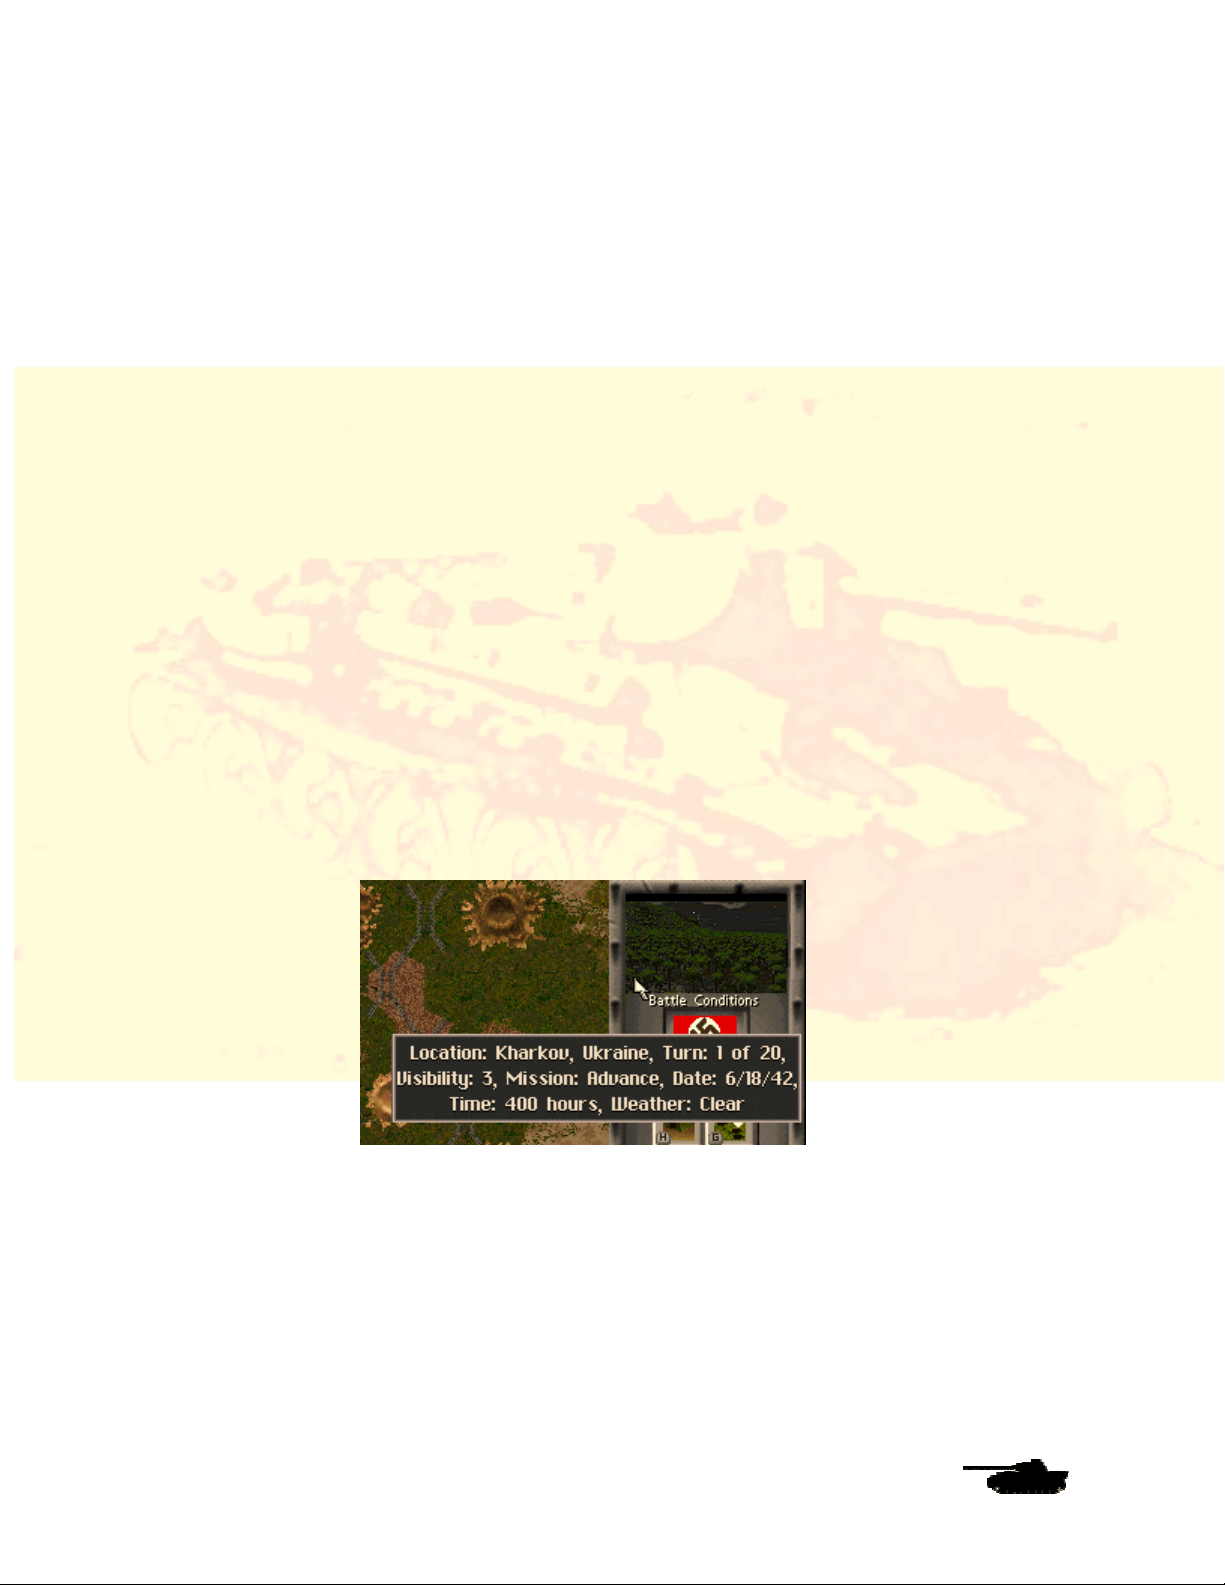
right corner of the main map, you’ll see a box, labeled “Battle Conditions,” with a picture of some
trees in it, which indicates clear weather. In bad weather you will see rain, fog or snow. Put the
cursor on it and you’ll see that you’re in the first turn of the game, and that you have about 15
turns before the game ends. You’ll also see the visibility, your mission (Advance on a crucial
objective), the date and the weather.
© 2001 by Matrix Games. All Rights Reserved.
5
Page 12
Players Manual v5.0
To the right of the screen is the rectangular menu bar with a series of buttons. This is where you
issue orders to your forces. Placing the cursor over each button will display a text box describing
the function of the button. Note the two arrow buttons at the bottom of the menu bar. The top one
gives you the option to exit the current game and return to the Selection screen, where you can
restart or exit SPWAW. The bottom button ends your turn. You’ll always be given a “yes” or “no”
option to end the turn or game. If you want to pause the game at any time, hit ALT and TAB
together and windows will minimize SPWAW and take you to another application or the desktop.
Sometimes you will have to hit ALT-TAB a couple of times before the screen switches. To return
to the game, click on the SPWAW button on the task bar.
Now click on a narrow bar, below all the buttons, called Preferences.
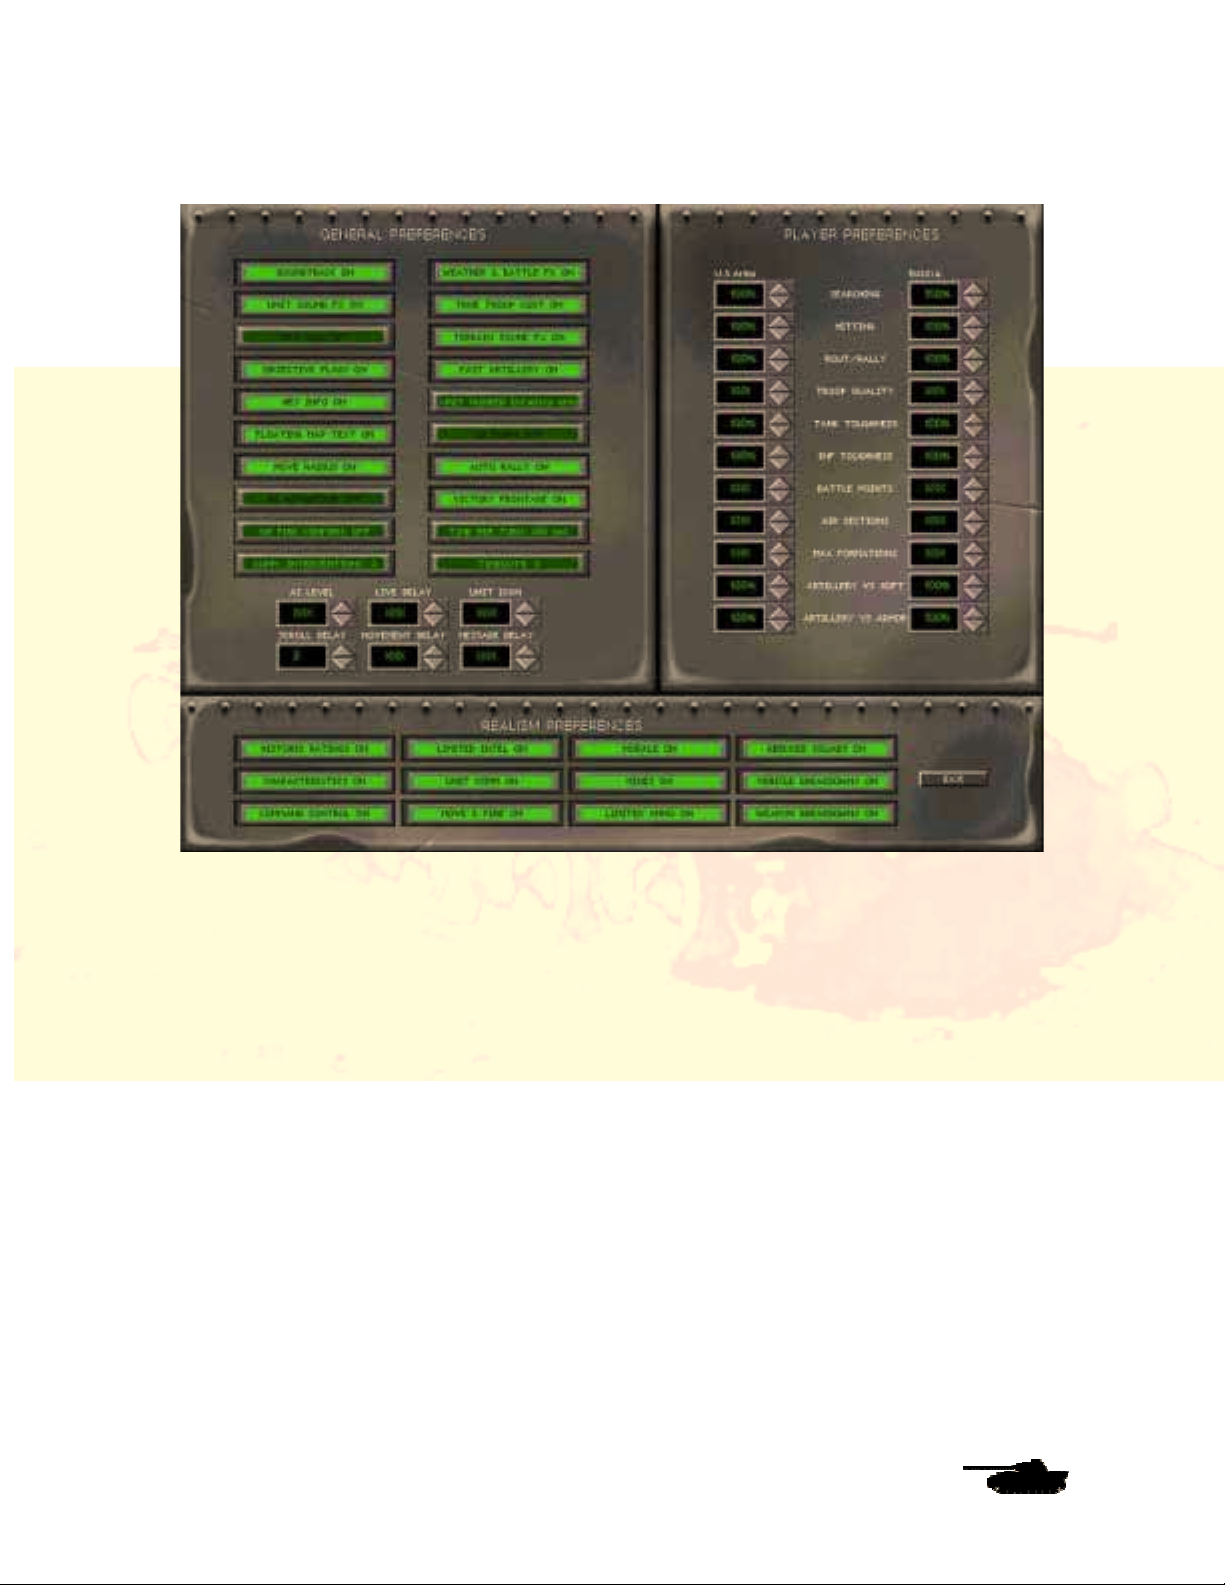
The Preferences Screen
Now you’ve entered the nerve center of the game, where you can customize SPWAW to play just
the way you wish. All of these features are explained in more detail later in the SPWAW manual.
One button that will definitely affect play is the green “Command Control” button. Look for it under
“Realism Preferences.” Clicking this button to “on” will recreate some of the problems that real
commanders faced in controlling their forces. Another is “OpFire Confirm” This will allow you
choose whether to take advantage of an Opfire Opportunity or not. For now leave this off and let
the computer decide.
For the tutorial, make sure “Command Control” and “OpFire Confirm” clicked off. Then click on
“Exit” to return to the Battle Map.
© 2001 by Matrix Games. All Rights Reserved.
6
Page 13
Players Manual v5.0
Unit Information Screen
Now that you’ve learned something about the game controls, it’s time to meet the troops you’ll be
commanding. On the Battle Map, you’ll see a unit of six tiny infantrymen outlined by a red
hexagon outline. That’s the A0 unit – the headquarters for your entire force (the “A” indicates it
belongs to Formation A, while the “0” shows that it’s a headquarters unit). In a sense, YOU are
the A0 unit, in command of every American unit on the map. But you also have an on-map
headquarters unit. When a scenario begins, the cursor automatically flashes on your A0 unit.
Take care of him – he’s very important.
If you are not centered on the A0, don’t worry. We’ll get back to him.
At the bottom of the Battle Map, you’ll see some brief information on the highlighted unit, such as
stance, number of shots it can fire, and how far it can move. For now, right-click on the AO, or
any other unit. This takes you to the Unit Information Screen.
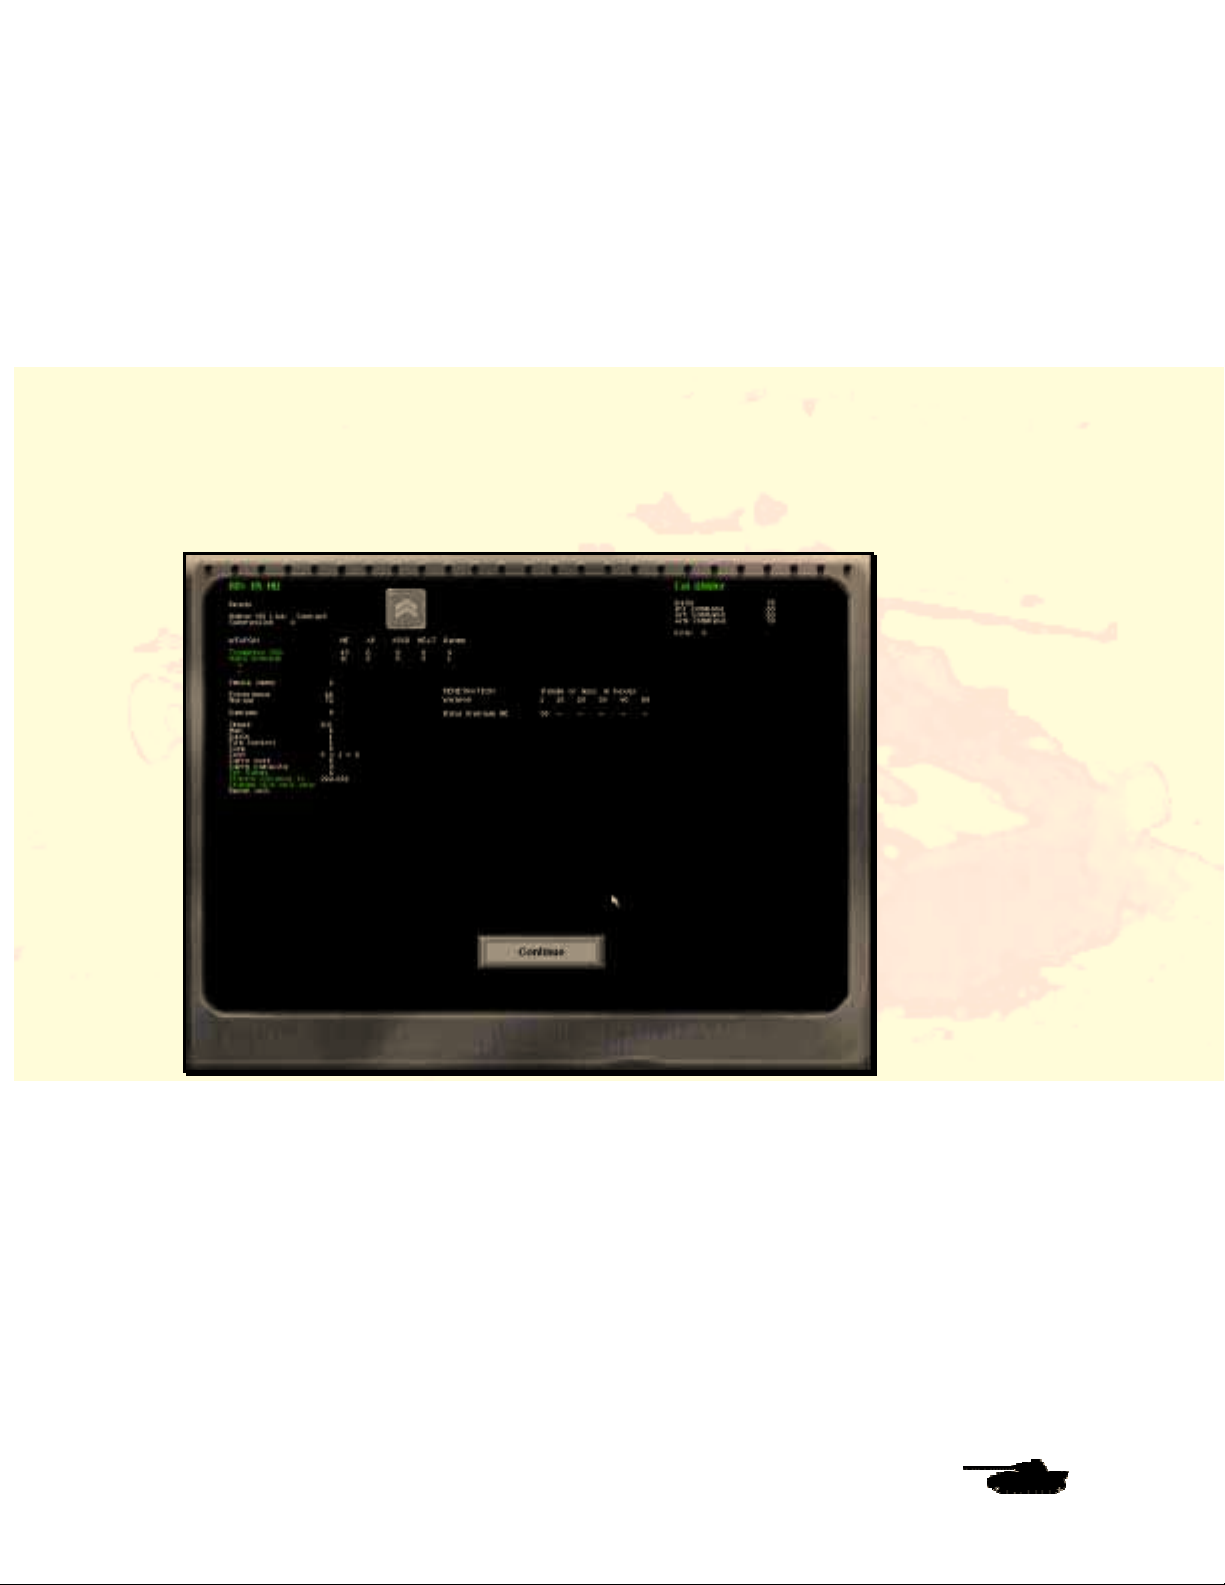
There’s a lot of important information here. This screen gives you very specific data about a unit,
such as the types of weapons it carries, the ammunition and whether it is equipped with a radio.
Equally important, it displays the morale and experience of the unit as well as the skills of the
leader commanding it. The higher these numbers are, the better the unit will perform in battle.
Note that while vehicles will display different information than personnel units. Foot soldiers aren’t
armor-plated.
Your Forces
© 2001 by Matrix Games. All Rights Reserved.
7
Page 14

Players Manual v5.0
But just what units do you have? Click on the notepad button in the center of the buttons on the
right. This is the Unit Menu, which gives you a quick way to check the status of your forces, their
current movement and combat capabilities, and other vital data. Note that a M3A1 half-track –
unit A1 – is listed as destroyed. Don’t worry about it or the wrecked and burning half-track on the
Battle Map – they’re there for show.
The letter/number label helps determine what formation a unit is part of. Units with the same
letter are in the same platoon. With the Command and Control turned off option, keeping
formations together can help, but is not crucial to success. With Command and Control turned on,
keeping formations together is critical. If the unit name and number are green, then the unit is in
communication with its formation leader and can be rallied. If it is in red, it is out of
communications.
Click on any of the gray buttons on the left of the screen – it will take you to the Battle Map and
highlight in red whatever unit you’ve selected. You’ll notice that at the bottom of the screen are
listed a battery of 105-millimeter howitzers and two P-47D fighter-bombers. Although you decide
what targets they shoot at, you can’t move them (they’re located in the rear, off the map). They
are assigned targets using the artillery menu. Only formation leaders (those ending in “0”) and
Forward Observers can call in artillery.
Now use the Unit Menu to go back to unit A0.
© 2001 by Matrix Games. All Rights Reserved.
8
Page 15
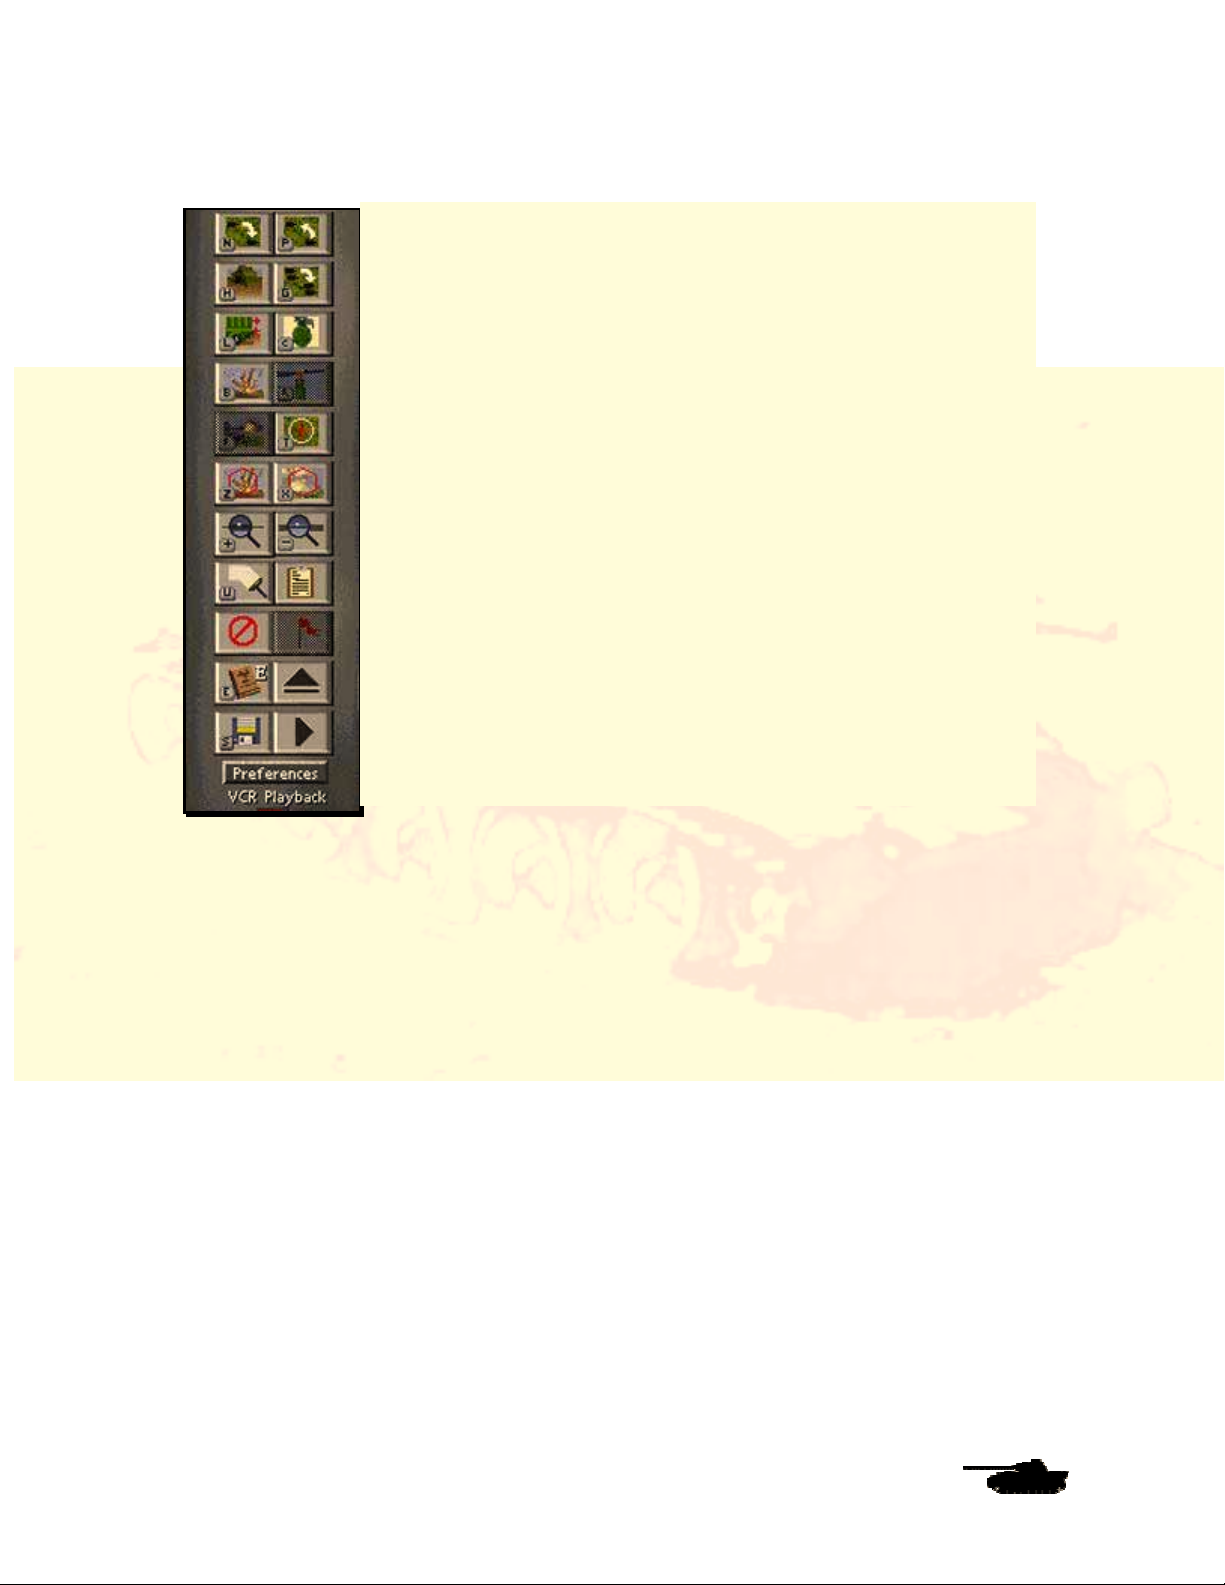
The Buttons
Players Manual v5.0
Most of the commands you’ll issue throughout the game, from moving
units to calling in artillery and air strikes, will be given through the buttons
on the Menu Bar to the right of the Battle Map. You’ll notice two things
about the menu. First, hovering the mouse cursor over a button will
display a small text box that tells you what the button does. Second,
most of the buttons are marked with a small letter that corresponds to a
keyboard command. To cycle between units, for example, you can click
on the top left button or hit the “N” key. If a button is totally gray, then the
unit can’t perform that action.
Getting Ready to Fight
What are you trying to accomplish in this battle? In SP: WAW, you have
two goals. The first is to destroy the enemy before he destroys you.
Every enemy unit you kill gives you victory points equal to its point cost.
Every unit you lose gives points to your enemy.
The second goal of every battle is to capture (or keep, if you already own
them) various objective areas. There several new ways victory hexes
award points; in this case they are awarded to the side to occupy them at
the end of the game. Go to the Preferences Screen and click on the
green bar, in the upper left column, marked “Hex-Grid On.” When you
exit back to the Battle Map, you’ll see that the map now has an overlay of
hexagons. Each space on the SPWAW map is a hexagon (“hex” for
short) representing about 50 yards of ground.
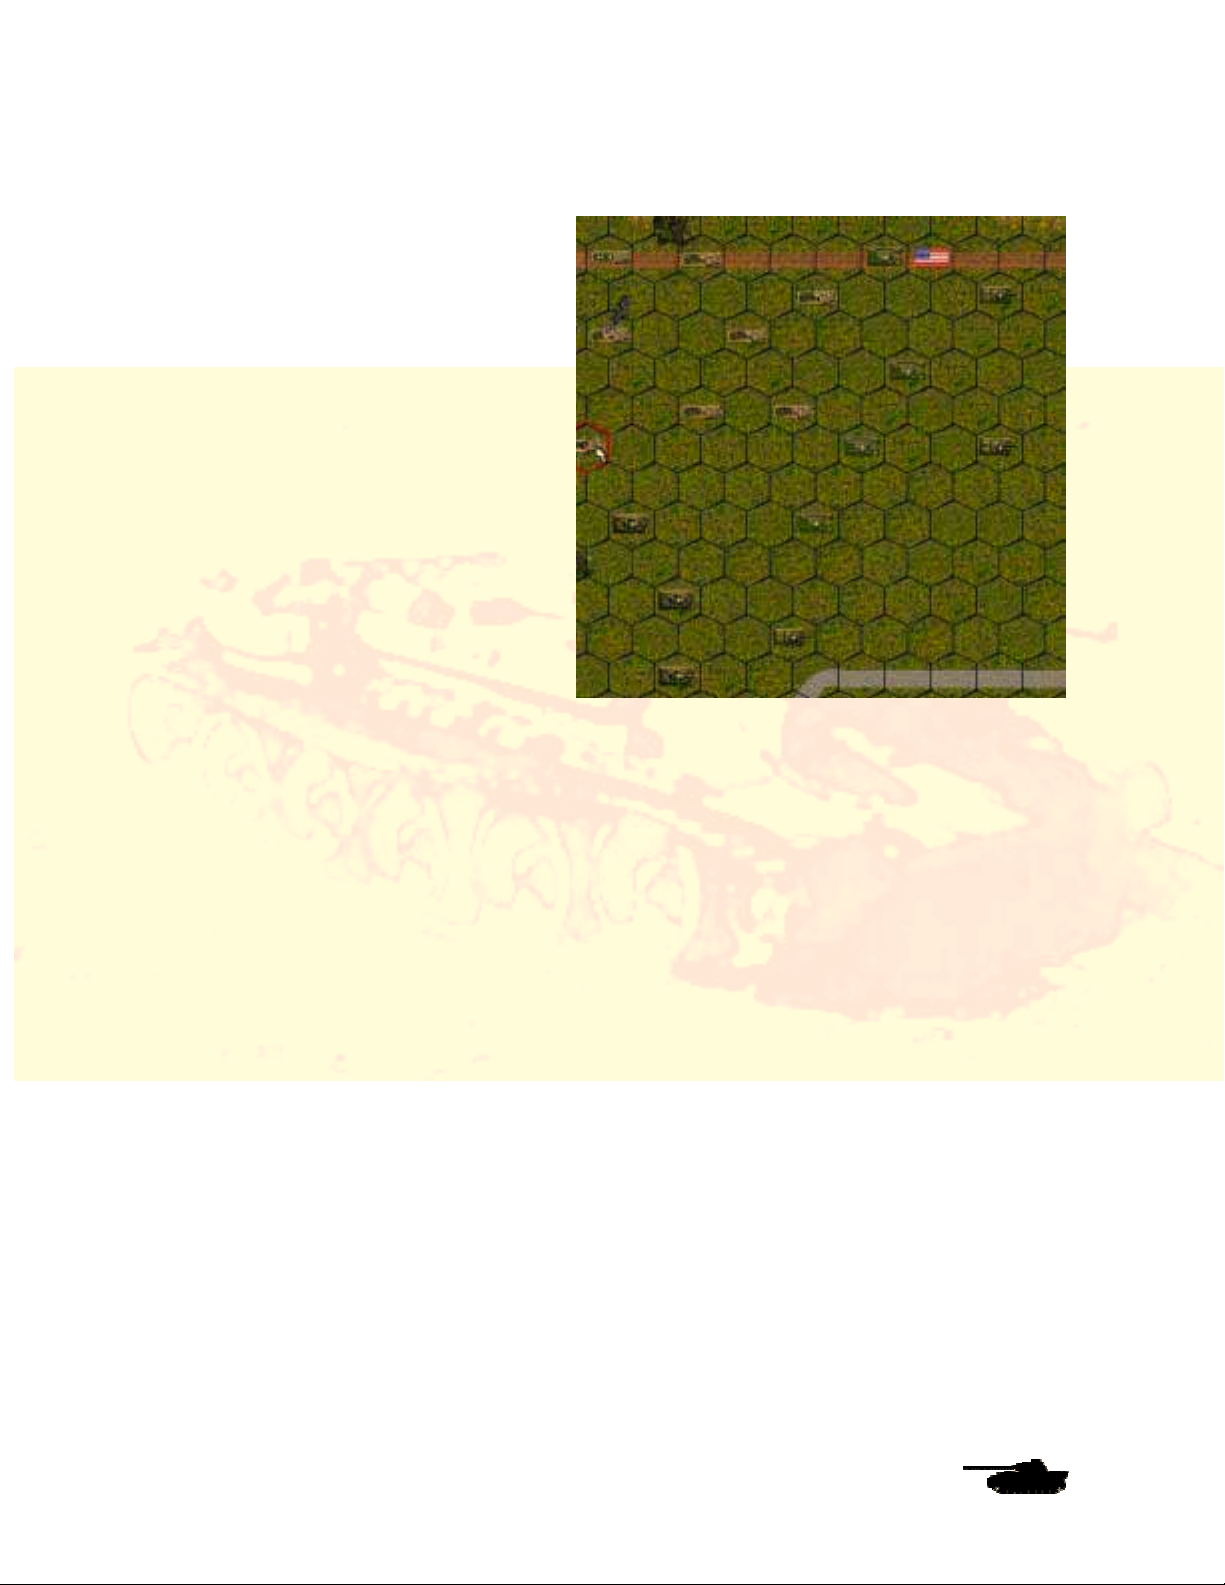
In this scenario, the map measures 100 hexes from side to side and 80 hexes top to bottom, or 5
kilometers by 4 kilometers. You can turn the hexagons off again if you want a more aesthetic view
of the map.
The locations you’ll need to capture in this battle are several vital crossroads around the village of
St. Lunaire. In this battle you’ll find Objective One at hex 41, 24 on the map (those numbers are
the vertical and horizontal coordinates, just like you see on a road map). The U.S. flag on the
objective hex shows that you already control it. On the other hand, the German flag at Objective
Four at hex 71,22 shows that your opponent already controls that location.
However, the objectives at hexes 62, 6, 56, 24 and 51,33 have white boxes marked with a “V.”
This means they are neutral hexes that aren’t controlled by other side. To win the game, you’ll
have to capture the neutral and German-controlled objectives while retaining control of the one
you start with. Be warned that your computer opponent will be trying to do the same thing to you.
How much are the objectives worth? Run the cursor over each one and you’ll discover that the
three neutral hexes in the middle of the map are worth 900 points apiece, while the other two are
worth 250 points. That tells you right away what your priorities should be as commander.
You take control of an objective that is not yours by moving through it with one of your units.
When you do this, the flag will immediately change to reflect that it is yours. And since it is yours,
its points belong to you as long as it remains yours till the end of the game. If, however, the
enemy retakes it, then those points are his unless you take the hex back.
© 2001 by Matrix Games. All Rights Reserved.
9
Page 16
Let the Battle Begin
Now it’s time to issue orders to your
troops. First, we’ll load your foot soldiers
into transport vehicles. In this tutorial, the
first thing you want to do is to load your
infantry onto the transport provided for
them. First move your cursor to the hex
where your A0 leader unit is. If you have a
hard time finding it, go to the “Unit Menu”
button, open it, and click on AO. That will
take you to hex 36,26.
You’ll want your headquarters to climb
aboard half-track unit J0, which is in the
hex to the right. But wait a minute. Your
half-track can’t give the foot soldiers a lift
unless they both occupy the same hex. To
order a unit to occupy a hex that already
has a friendly unit, hold down the shift key
while clicking on the destination.
Players Manual v5.0
Click on the A0 unit. It should be
highlighted with a red cursor. Now hold
down the Shift key and left click on hex 37,26, where the half-track is. You’ll see and hear the HQ
unit move there.
Be sure that the A0 unit is still highlighted, and not the half-track. You can verify that because the
A0 unit’s information should be displayed at the bottom of the Battle Map. Or, information on the
A0 will pop up when you hover the cursor over the hex.
Now click on the Load button or press the “L” key, and then click on the half-track in the hex. The
A0 should disappear. Now it’s loaded on the half-track. Click on the Half-track and the last unit
loaded will appear in the information window.
The rest of your infantry – the ones that show several little soldiers – should also be loaded on to
the nearest half-tracks. Once you have finished, load the bazooka, mortar and machinegun units.
Units F3 and F4 (a mortar and a machinegun unit) will both climb aboard half-track F11.
Remember that your half-tracks have limited space, so you can’t cram all your troops aboard one
vehicle. If a unit is too large to fit on a given transport, a dialogue will ask if you want them to load
anyway. If you say yes, the excess will be lost and considered destroyed.
You also have an anti-tank gun in hex 33, 29. The half-track that will carry it is in hex 34.29. Antitank guns can’t move by themselves, so this time you’ll have to move half-track F8 to the gun’s
hex. Then highlight the gun and load it. Transports are rated for the size gun they can tow. If the
carry value is 1xx, it can tow a 1xx-weight (lt. or medium) gun. If 2xx, then it can carry a 2xx
weight (heavy) gun.
But the half-track now has its rear pointed to the enemy, exposing its thin rear armor. You should
always try to keep the front of your units facing toward the enemy. To change the direction of the
half-track, put the cursor over it, left-click to select it, then move the cursor to a spot away from
the unit, in the direction you want it to face, and right click on an empty hex. Now it’s pointed in
the same direction as your other units.
When you right clicked to redirect your half-track, a swath of hexes may have been highlighted.
© 2001 by Matrix Games. All Rights Reserved.
10
Page 17
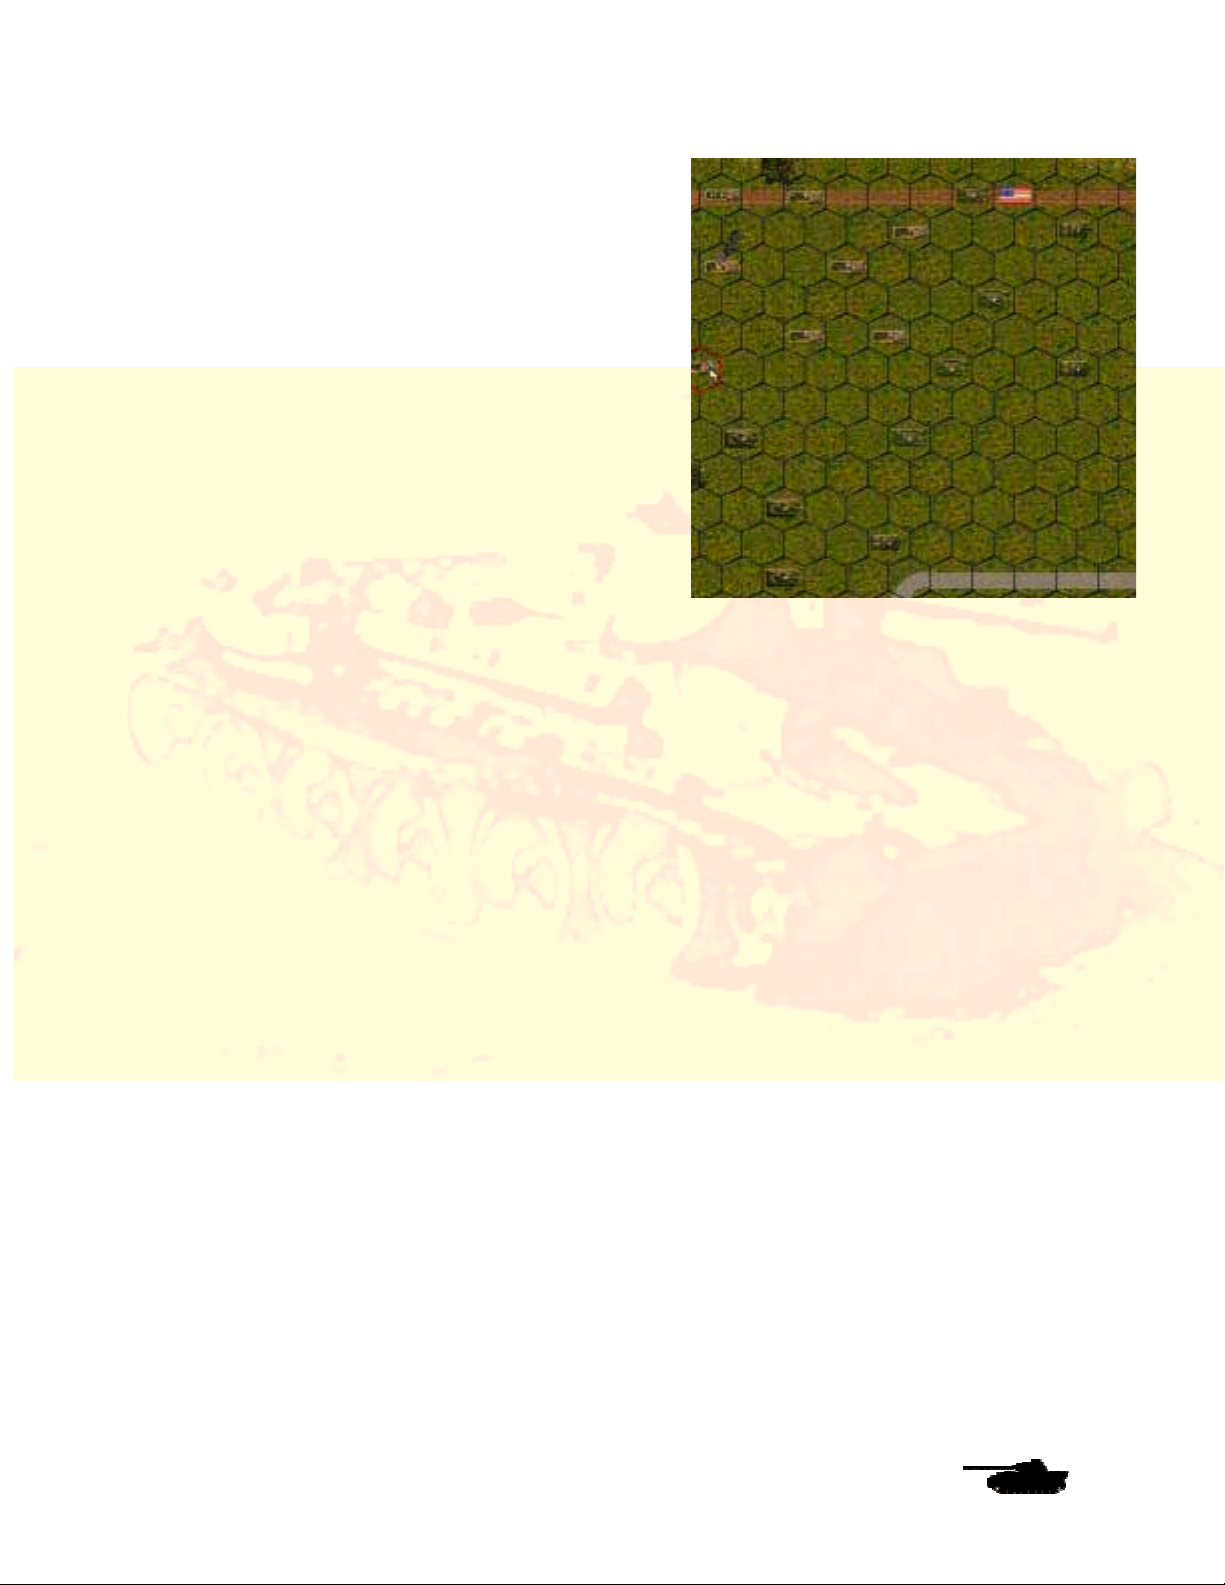
The highlighted area is showing you the line of sight for
the half-track – in other words, the hexes that it can see
and shoot into. You can clear the darkened area by
clicking on the paintbrush button on the Menu Bar, or
hitting the “u” key.
If you loaded everyone properly, your screen should
now look like this. Notice that the hex grid still is on.
Turn if off from the Preferences Screen if you’d like.
Follow Me!
Your troops are aboard their vehicles, the engines are
idling, the men are tense and it’s time to move out. But
where is the enemy? You don’t see him on the map,
and there’s a good reason why. SPWAW recreates the
uncertainty of battle by using a Fog of War system. You
don’t know where the enemy is unless you spot him,
and your chances of spotting him depend on factors
such as experience, terrain and weather. Just
remember that your enemy doesn’t know where you
are either.
Players Manual v5.0
This tutorial is a Meeting Engagement, in which both sides basically are headed for the same
objectives. Your paths will cross. There will be fighting. But you can give yourself an edge by
anticipating the enemy’s plans and cleverly moving your troops. Recon troops are especially
important to scouting out enemy positions. Select an armored car and right click or press the
space bar. You will notice a note near the bottom of the first column that indicates the armored
car is a Recon unit. So what do you do? Do you move your entire force together toward one
objective hex? Do you split up your group into smaller sections and head for all of them at once?
Decisions, decisions! But that is your job as commander.
Fire!
Here’s a quick lesson in the movement and combat systems of SPWAW. First, left click on tank
B1 in hex 40, 24, and highlight the vehicle. Who commands this tank? What kind of leader is he?
Simply right click on the tank and you’ll see Sgt. Lopez commands it. He seems to have courage
(his morale is relatively high), but he is a little low on experience.
You’re going to order this tank to move straight down the road to hex 45, 24 (six hexes away). To
move the tank, you don’t have to click on each hex in that row. Simply left-click on tank B1, then
left-click on hex 45.24. Now watch it move. What happened when it got to the hex? Some
Germans hidden in those trees next to the road took a potshot at it. It is likely that one shot did
not give your troops enough information to spot from which the enemy is firing. You have to be
careful moving a unit a long distance in a single “click” as enemies in your path will tend to get the
jump on you. Moving the units of a formation in small “bounds”, rather than the full extent of their
movement at once, will pay off when moving into enemy territory.
Right click on the tank to see its status. The display at the bottom of the screen tells you that it
has a Suppression Level of 1, but is otherwise undamaged. Suppression is a measure of how
shaken your men are by combat. Units get bonuses to their hit chances when at 0 suppression.
Units accumulate suppression points for a wide variety of reasons, from thinking the enemy is
nearby, to being shot at or seeing a friendly unit get wiped out. Suppression can go as high as 99
and each time a leader successfully rallies, it is cut in half. Suppression reduces your hit chances,
and can cause your troops to become pinned, retreat or rout as suppression becomes larger
relative to the unit’s morale.
© 2001 by Matrix Games. All Rights Reserved.
11
Page 18

But what about the
enemy? You can’t see
him, but you know he is
in that patch of woods.
Are there other enemy
units with him? Do you
move closer or wait to
bring up help? Should
you deal with this threat,
or continue on to the
objective hexes? Again
you are faced with
tactical command
decisions.
First, turn tank B1
toward the enemy.
Right-click on one of the
forest hexes from which
the shot originated. Your
tank will turn in that
direction. It was a pretty
big “bang” so it must
have been an antitank
weapon (SPWAW has
different sounds for
different weapons,
which helps you identify
what’s shooting at you).
Players Manual v5.0
Well, we know the enemy is there, and we don’t want him continuing to fire, so we had better take
care of him. Let’s move an armored car - - the M8 Greyhound D0 in hex 42, 25 -- to hex 45, 25.
No fire. Okay, we’ll bait the enemy a bit by moving closer. One vehicle will move while the other
watches and provides cover fire. There is a chance that enemy units will fire at moving troops
(“opportunity fire”), depending on their experience, weapons and the type of target they
encounter. At the bottom of the Battle Map, you will notice that the currently selected unit will
have a * or # beneath the information on their headquarters link (the same symbols also appear
on the list of units in the Unit Menu). A * indicates your unit has been spotted by the enemy. They
may not know exactly where the enemy is, but they’ve heard voices, or perhaps a tank engine
revving, so they know their opponents are nearby. If you think the enemy is in a specific hex, but
can’t actually see them, you can take a blind shot by using the “Z” key. However, your fire won’t
be as effective.
Move tank B1 from hex 45, 24 to hex 45, 23. The enemy fires again, but we still can’t see him.
Notice that he fired with both anti-tank and rifle fire (many units are armed with multiple
weapons). The problem is that it’s hard to spot small units such as snipers, recon squads and
anti-tank teams. We’ll now move Greyhound D0 from 45, 25 to the hex where the Sherman was,
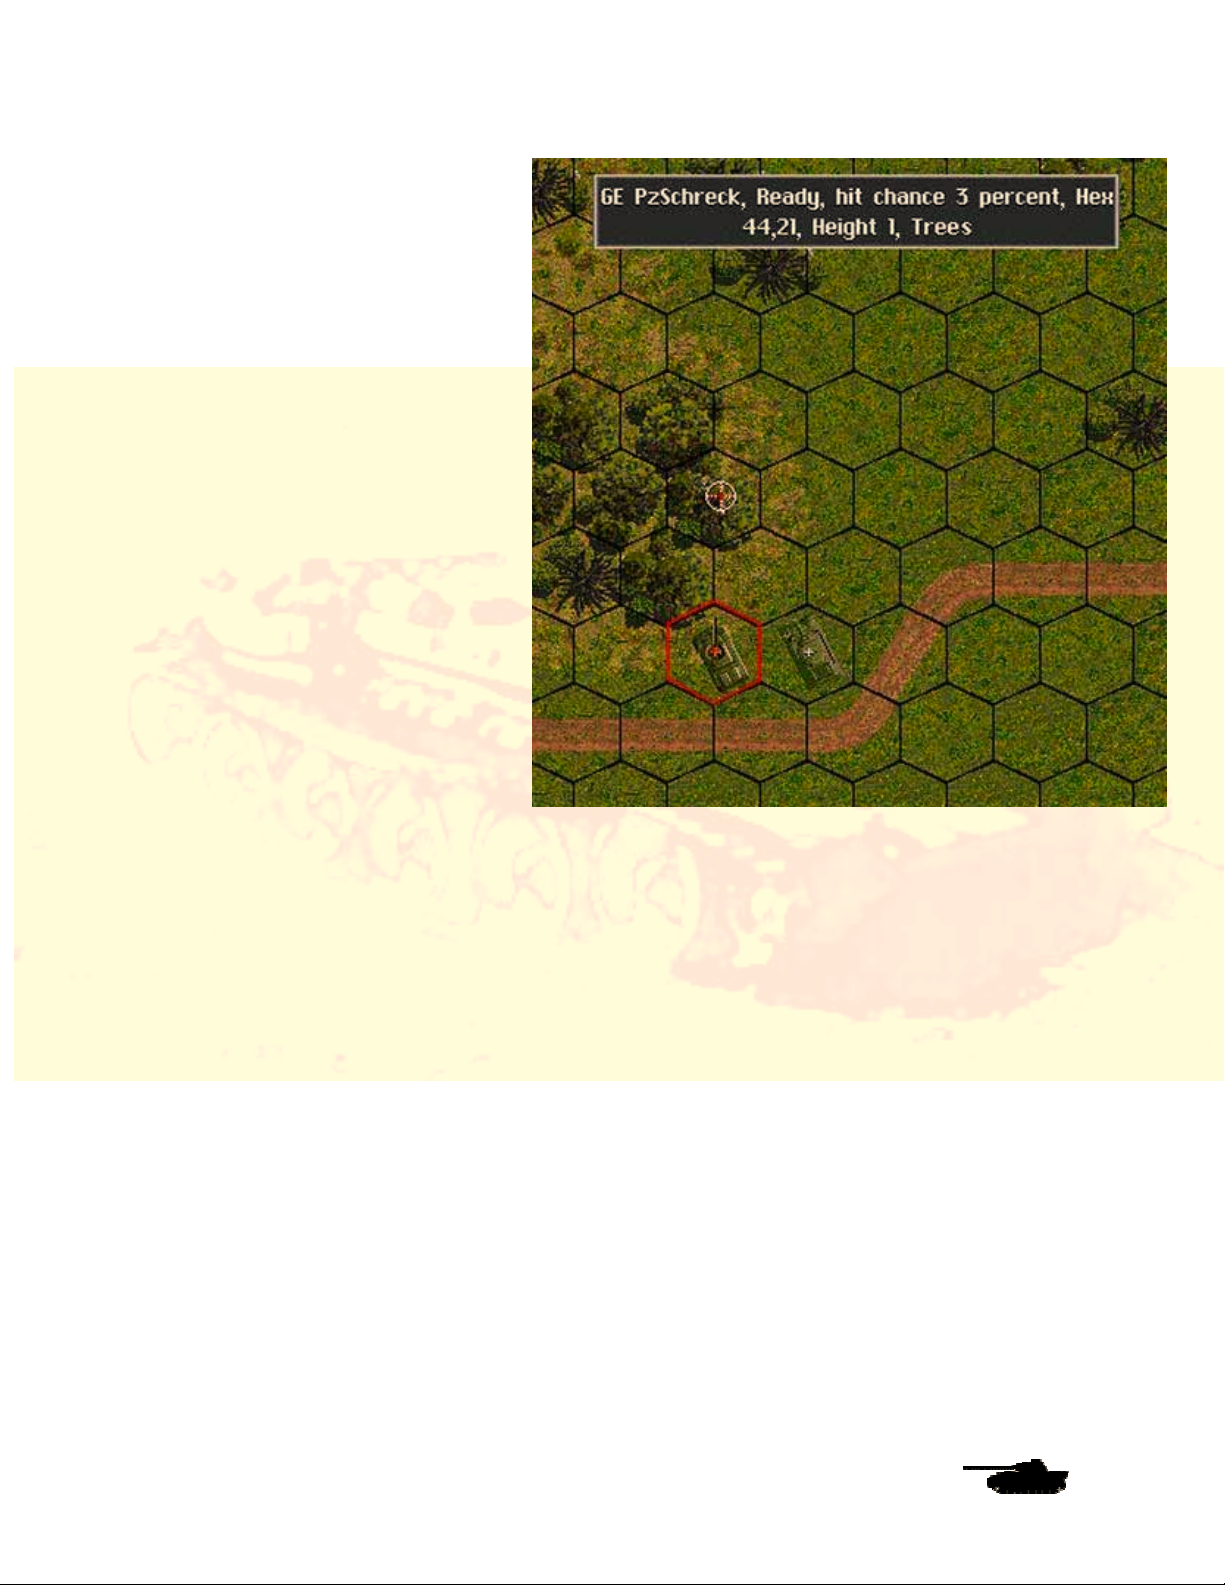
hex 45, 24. Nothing. Move again to hex 44, 23. Wham! He fires again. Your armored car may or
may not survive – as in real life, combat is unpredictable -- but now at least you are likely to have
seen see your foe. He is in the trees in hex 44,21. Move the cursor over him and right you find it
is a Panzerschreck team armed with anti-tank rockets. These weapons are deadly to armor but
little danger to infantry.
So what do you do? Again, you’ll make those choices that will determine victory or defeat. Should
you move infantry in to do the job? Should you bring them inside the half-track and dismount
© 2001 by Matrix Games. All Rights Reserved.
12
Page 19
Players Manual v5.0
nearby (thereby exposing the halftrack), or dismount the infantry now
and wait while they move on foot to
the battle site? Should you simply
blaze away with your tank and
armored car? Let’s try that. First we
will fire with the B1 tank. Left click on
the tank, then left click on hex 44, 21.
The tank will fire its main gun and its
machine gun at the sighted enemy. If
you look at the bottom of the screen
you’ll see how many times the tank
can fire its weapons in this turn.
The four numbers labeled “Shots”
indicates how many shots it can fire
from each of its weapons. It probably
has two shots it can fire from its
cannon, and five shots from each of
its three machine guns. Let’s fire on
him again. Use the same procedure.
We’ll continue to fire all weapons until
we use up all of B1’s shots for this
turn. Note that not all the weapons
may fire every time. How many
weapons the unit can coordinate in
one “fire order” depends on the
experience of the unit. That should
pin the enemy down and prevent him
from firing at you. If B1 doesn’t eliminate him or force him to retreat, then bring up your armored
car and other troops to finish the job. Remember that using all your shots in your turn will leave
you fewer opportunity fire shots during your opponent’s move. You get some shots returned at
the end of your turn, and can be awarded “special” shots in some circumstances even if you have
none, but the more you have the more responsive your units will be during the enemy turn.
Always moving at high speed around the battlefield and shooting every chance you get can lead
to breakdowns.
Move the rest of your units cautiously. When you’re done with your turn, click the “sideways”
arrow button at the bottom of the Menu Bar. The enemy will then move, and you’ll hear the
sounds of movement. You might even spot the enemy on the map (they’ll also appear as red dots
on the mini-map).
We’ll stop the tutorial here. You’ve learned the basics of SPWAW. You’ll have many more
questions, but you’ll find the answers in the remainder of this manual.
© 2001 by Matrix Games. All Rights Reserved.
13
Page 20

Players Manual v5.0
Experienced Players Guide
Experienced Players Guide
Experienced Players GuideExperienced Players Guide
If you are already an experienced player of the Steel Panther series, then the rules that follow will
help you jump into the game quickly.
General Changes
Unit Scales
Though SP: WAW is based on the Steel Panthers III game system, its unit scale is closer to Steel
Panthers I. Units represent individual vehicles, guns and squads or teams of infantry and infantry
heavy weapons. Unlike Steel Panthers III, vehicles and guns have a "+" symbol over the turret
instead of the number of vehicles, thus not obscuring the vehicle icon. Infantry, however, still
have their strength displayed over the unit, as long as the unit is not routed. The size of icons can
be adjusted, with “XXX” (the default setting) being the largest.
Load and Save Games
Players may now save up to 1000 scenarios or saved games, compared to 200 in SP3. They
may also have up to 32 user-defined campaigns at one time, rather than 14.
Map Changes
Players may now add description files to their custom maps. Custom maps may now be chosen
for compter generated battles. Maps can be up to 100 x 240 hexes in size. Maps are now stored
in a new Maps directory. Map editor allows selective placement of buildings. Custom user
graphics can be added with the map editor.
Internet Play
Multi-player TCP/IP Internet play is now enabled! Anywhere from 2 to 6 players can battle against
each other over the Internet, or a LAN. Gang up in a 5 on 1 fight or 3 against 3. Gamers can set a
“Gamer Timer” this will be the amount of time each player has to finish his turn. Once the time is
up the turn automatically moves to the next player’s turn. There are several other features
described below to help control INTERNET play. To play TCP/IP select the “Online Play” button
on the intro screen, it will prompt you to create or join and display your IP address. If you are
running the game choose create, otherwise choose join and enter the IP address of the game you
are joining. When all players have joined, the games creator will start. Creating a game is
covered below.
Auto-Save - When Playing the game will auto save after each turn to slot 0 or 1.
Military Gamer “Combat Net” Network [COMBAT NET] - The release of SPWaW v5.0
will also be the grand opening of our
finding opponents online 24 hours a day. This new software add-on is client software that will
connect you to the MGN network. It will auto start your game and find out your current ping rate
and IP number. When you start your game it will pass the IP information to the game as well.
Military Gamer “Combat Net” Network. Aiding players in
Military Gamer “Combat Command” - League Play the way Mars intended it to be. Players
can now play fast and hard to win cash and prizes. If you think you’re the best then play with the
rest.
© 2001 by Matrix Games. All Rights Reserved.
14
Page 21

Players Manual v5.0
Play-by-Email
You have a choice of playing head-to-head, playing an unsecured Play-by-Email (PBEM) game,
or of playing a password-protected PBEM game. Password-protected games are saved in a
separate Email directory for convenience and are fully encrypted. Three files, a “.dat”, ”.aux”, and
a ”.cmt” file - are required to be exchanged. Follow the instructions that appear when you start or
end a game. Note that in a scenario, both players must enter passwords before any play
commences.
Secure PBEM games are now possible with battle generator games as well as scenarios. The
number of secure PBEM games has been increased to 10.
The security alerts players to most types of cheating, but allows you to continue anyway, so
innocent file mishandling does not ruin an exciting game. You can see how many times your
opponent started and ended his turns by hitting the “1” key. You can also use the hot key ctrl-L to
activate combat logging, this creates a file of all combat activity during a turn that can be
exchanged as a record of what happened in the turn. The timestamp on the file should be before
the game file save time. While not a sure fire way to prevent cheating, exchanging these files can
help complicate the cheaters job of covering his tracks. If the number of starts and ends is
different, then your opponent has had some sort of crash, either accidentally or deliberately. This
does not mean he is cheating, but you should note it.
An uncanny knack for avoiding your minefields and ambushes, and a perpetual difference in
loads and starts with no explanation, may be grounds to look for other opponents. On the other
hand, equal numbers of loads and starts doesn’t guarantee honest play. The Internet play in
version 5.0 will provide the most secure venue for play. Secure play files can grow quite large, but
zip very well, so for “normal” PBEM against trusted adversaries, you can save complication by not
entering a password when prompted and simply hitting “enter”. This saves the file as a “regular”
save game in the save folder.
Head-to-Head versus PBEM
For head-to-head games and non-secure PBEM games, toggle both player control switches to
human control, then click on “Continue.” A screen will appear prompting the first player to create
a password. If you want to play head-to-head, click on “Password” and then hit “Enter,” without
creating a password. You’ll then be taken to the “Start Turn” menu. If you create a password, a
PBEM game will be created and you’ll be prompted to save the game (password-protected PBEM
games must be saved into one of the save-game slots numbered 3-12). The game will inform you
which files to email to your opponent, who will in turn choose his own password. Players who
trust one another, or just don’t feel like using passwords, can opt to click “Exit” instead of saving
the game. In this case, the games will be saved in the “Save” rather than “Email” directories, and
no .aux files will be created. However, that means there’s nothing to keep the unscrupulous from
peeking at their opponent’s deployment, replaying turns that didn’t go their way, etc.
Floating Pop-out Boxes and Info/Chat Area
The floating pop-out boxes that show unit and map data, as well as combat results, now appear
at the top of the screen if the “Floating map text” button is turned off in Preferences. The default
setting is off. These boxes will no longer obscure units on the Battle Map. The area that used to
contain ads, now contains the more important messages such as combat results. Not all text is
repeated here, because of problems displaying numbers based on random draws, but you can
now keep the text boxes off to speed play and still be informed as to important combat results
and the taunts of your online opponents. The F5 key will brig up the last 50 or lines of combat
text/chat. The tab key activates and deactivates this area.
The new hotkey ctrl-L will cause a pop-up box with the message “combat text 1” or “combat text
0” for combat information logging on of off. It will also be added to the F5 hotkey message buffer.
© 2001 by Matrix Games. All Rights Reserved.
15
Page 22
Players Manual v5.0
When combat loggin is on, all combat related pop-up box messages are printed to a file in the
main SP:WaW directory called “combat.txt”. This can be used for scenario testing, pbem, etc.
Combat Sounds and Music
In many cases, you will now hear very realistic sounds for the weapons the units are firing. You
may use the new Order of Battle (OOB) Editor to change sounds and to assign a specific sound
to a specific unit. It’s a handy way to allow players to identify what’s firing at them by the sounds
they hear. Artillery with a smaller warhead will now make a smaller explosion sound. Roger Wilco
and Battlecom voice support has been added allowing players on the Internet to talk to each
other during game play.
Game Changes
• Maximum map sizes in the battle generator and the scenario editor have been increased
to 100 hexes wide x 240 hexes high. In the scenario editor, you may choose a very large
map by selecting “Custom” map size. You will be prompted for a size between 1 and 10.
Selecting 0 to 2 produces the standard map sizes. Selecting 3 to 10 produces a map of
greater height than normal, in increments of 20 hexes. In the battle generator, clicking
the “Large” map button toggles through the various map sizes, from “Small” to “100x240”.
For very large maps, during deployment and game play, clicking the little green button at
the bottom of the thumbnail will cause the map to scroll down 80 hexes and clicking the
upper left button will cause the map to scroll up 80 hexes. If the map is displaying the
very top part or bottom part of the map, the button will not be lit, indicating there are not
80 hexes left to scroll in that direction. During game play, there will be a green light on
the upper right of the mini-map. Clicking it will center the map on the currently selected
hex. Moving the mouse to the top or bottom of the screen will also cause the thumbnail
to scroll, when the red rectangle on the thumbnail reaches the top or bottom of the visible
portion of the map.
• A landscape display is now featured in the upper right corner of the Battle Map. Hovering
the mouse over it creates a pop-up box that indicates the battle location, current date,
time (which changes each turn), weather, visibility, battle type, number of turns in the
scenario and the number of turns left before the game ends. Weather sounds associated
with the current weather should be playing, as long as the “Soundtrack” and “Weather
and Combat FX” options are on. Once the first shots erupt in the scenario, you’ll hear
general combat sounds (the rumble of gunfire in the distance). Other display changes
include:
• The degree of armor slope for armored vehicles. This is in the Unit Information Screen,
© 2001 by Matrix Games. All Rights Reserved.
16
Page 23

Players Manual v5.0
which appears when you right-click on a unit. Penetration tables for armor-piercing
weapons. These also are displayed in the Unit Information Screen. The tables show, for
each weapon, the maximum penetration in millimeters at various ranges and using
various types of ammunition. Note that these figures are based on a flat, perpendicular
shot for a T/D ratio ~1 (in other words, an ideal shot) and various factors will affect actual
results). Ammunition with chemical or fragmentation warheads, such as HEAT (High
Explosive Anti-Tank) and HE (High Explosive), will not have their effectiveness vary with
range. However, small-caliber weapons, such as 12.7-millimeter machine guns and 20millimeter anti-tank guns, are assumed to be firing a combination of HE and AP and are
treated as firing HE against soft targets and AP against hard targets, despite the fact the
are allotted only HE ammunition.
• The hot key for the “Select all units in formation” command has been changed to “A”,”
while the button has been removed from the display. The hot key to “fire a specific
weapon” has been changed to “C” and a button provided. To use this command, the
firing unit must already have a target selected.
• Units ID tags have been added to help find where friendly and enemy units are located.
• “Command” has been changed in several places to “Com” to save space.
• Players can now also review the battlefield once a scenario is complete.
• Players when purchasing units will now be able to see remaining aircraft flights and
mines. When purchasing units the top of the screen will show formations special code
values and descriptions. You will also see the unit based Experience, Morale, Rally and
Leader modifiers. The bottom of the screen will now show the units Maximum Penetration
value and percentage chance of it having a radio.
• Reduced all default delays to none & make default maps small maps.
• The list of unique battle locations has been increased to 665.
• The artillery barrage message delay has been reduced to one half the message delay set
in the Preferences. This should speed up artillery barrages. Also, remember that if you
hold down the “f” key during the barrage for a bit, the fast artillery option will turn on.
• In the map editor the name of the terrain shape file set and the file icon are displayed
when placing buildings. Buildings and terrain can be selectively selected using the Shift-!
Command.
• The “PAUSE” button (the one labeled “pause/break” next to the Scroll lock button, will
pause the game. The Print screen button still has problems though, so a third party
screen capture program is required.
• HQ units now have their + sign in parentheses - ie (+) OR for infantry - (6). So players
can more easily spot them for C2 purposes.
• In Internet play the player number owning a unit appears at the 11 o’clock position
relative to the unit. Players are numbered 1 through 6 in small yellow numbers with a “P”
before them.
• When a player feels his situation is hopeless he can surrender by using the F9 key. If the
opponent accepts, the game will then be scored as though it ended that turn. Some may
view it more a cease fire than a surrender as victory hexes remain in the hands of the
© 2001 by Matrix Games. All Rights Reserved.
17
Page 24

Players Manual v5.0
current owner, but abandoned vehicles of the player with the fewer victory hexes will be
counted destroyed for the opponent. The end of battle victory objectives and the
remaining points of a points per turn victory objective are not counted.
• When Vehicle moves in dry weather in desert scenarios they now leave a dust trail.
• Help screens have been added to the game. They can be brought up by the “Help” button
or by using hot keys. The Terrain Effects charts are brought up with the “I” key.
• Preferences can be selected on the opening screen.
• Two new battle types have been added to Desert, Summer and Winter. The new ones
are Jungle and Rough. Jungle is for Pacific Theater battles and Rough is used for
Balkans and Italy battle locations.
• A new system of experience and morale for purchasing units has been created in the
OOB’s. Players and designers will be given a choice of troop types::
a. 0 = Normal troopsb. 1 = Recon troops
c. 2 = Dedicated artillery
d. 10 = Elite troops +10 experience/morale
e. 11 = Elite Recon troops
f. 12 = Elite Dedicated artillery
g. 20 = Second line troops – 10 experience/morale
h. 21 = Second line Recon troops
i. 22 = Second line Dedicated artillery
nd
• When selecting units for purchase, the type of unit, elite, normal or 2
line, will be shown
at the top of the unit OOB description box underneath the unit description and unit points.
The Historic ratings feature does not affect this.
• Computer opponent has been reprogrammed to use reserve forces more aggressively.
Also, it should now commit these reserves earlier than it did in previous versions of the
game.
• Fortifications are now treated as armored targets for bombardment purposes. This
means they will receive the benefit of armor ratings and will no longer take casualties
from rounds that do not hit the fortification
• Units that are abandoned or destroyed before the battle starts no longer count as killed at
the end of the battle. This includes destroyed units placed by scenario designers and
campaign forces that were destroyed and not repaired before the next battle..
• Daytime battles and night battles can be displayed differently. In daytime battles a unit’s
movement radius can be seen as dark hexes against the light map. Night battles reverse
this. The “Move Radius” button in Preferences toggles this feature on or off. The F8 key
is the hot key for this.
.
• Pressing the F7 key can check a unit’s vision. This allows the player to see what is visible
for the unit.
© 2001 by Matrix Games. All Rights Reserved.
18
Page 25

Players Manual v5.0
• All new graphics for single hex and multihex buildings have been added that allow
European style rowhouses and city blocks to be constructed. Look at the map Editor
section for more details
• Added a toggle for the asterisk “*” display in the unit information section. Pressing the
asterisk key will enable/disable the asterisk for knowing your unit has been spotted by
your opponent.
• The @ key changes the range from yards to meters to hexes. The ranges on the unit
information screen is in hexes only.
• “Tank Panic” has been added. Now an infantry unit without anti tank weapons may panic
and run when a tank enters the hex. The presence of a friendly AFV or AT unit with in 3
hexes greatly reduces the chance of tank panic.
• A “Battle Difficulty” button has bee added for Generated and Long campaigns to adjust
the numbers of points given to the AI.
• Waypoints and unit objective are no longer cancelled by purchasing additional units in
scenario design.
• Added a “Save” prompt when exiting the scenario editor.
• Added a yes/no prompt when pressing the “Load All” button.
• Added the all new Mega Campaign. Mega Campaigns will be available for purchase from
Matrix Games. A very small Mega Campaign demo is included with the game.
• Purchase point values for computer opponent (which start out equal to your base force
normal points plus all support points, whether or not you use them) were reduced from
x1 for defend, x1 for delay, x1 for meeting, x4 for advance, x7 for assault to x.50 for
defend, x.66 for delay, x1 for meeting, x1.5 for advance and x2 for assault.
• The computer opponent, when playing early war Belgium, Holland or France will now
purchase substantially fewer tanks. Combined with less artillery, expect a lot of infantry.
• The weather routines were rewritten. In all types of battles, the visibility should now
reflect the conditions better than before. Bad weather now reduces visibility severely, as
does darkness.
• Added to the list of unit classes which lose primary weapon shots after moving (which
were MG, mortar, heavy mortar, and heavy MG) are AT Gun, Flak, howitzer, artillery,
and infantry guns.
• Made some changes in the armor penetration model. There will also be a substantial
upgrade to the armor combat model in 5.0 APCR performance has been greatly
enhanced, depicting its performance much more accurately. T/D effects have been
revised based on better curve fitting and a couple new data sets from Combat Leader
research. A new ricochet tweak improves the depiction of the "critical angle" so ricochet
probability will be low below critical angle and ramp up quickly. All this assumes lots of
things, but less things are generalized than before! You should get fewer "945,395mm
armor" results now and small T/D ratios will now ricochet much less often (so 88 hitting
at grazing angles will act like an iceberg on the Titanic more than a stone on the water)
HE and HEAT penetration have been redone, HE now has an element that decreases
with range to reflect the kinetic energy component of an HE rounds penetration. IT can
© 2001 by Matrix Games. All Rights Reserved.
19
Page 26

Players Manual v5.0
now vary for 67 to 133% of the listed number, vice 50-100% as before. IT will only go
over 100 due to the kinetic energy component at shorter ranges. HEAT rounds
penetration is distributed much less randomly, and will be closer to the maximum unless
it tumbles in flight otherwise strikes at a poor orientation to the armor. There is 15%
chance a HEAT round will tumble and a 10% chance an HE round will shatter on impact
and fail to explode (or be a dud).
• Added hex coordinates for units on HQ screen. This will make it easier for you to find a
unit using the new alt-J feature.
© 2001 by Matrix Games. All Rights Reserved.
20
Page 27
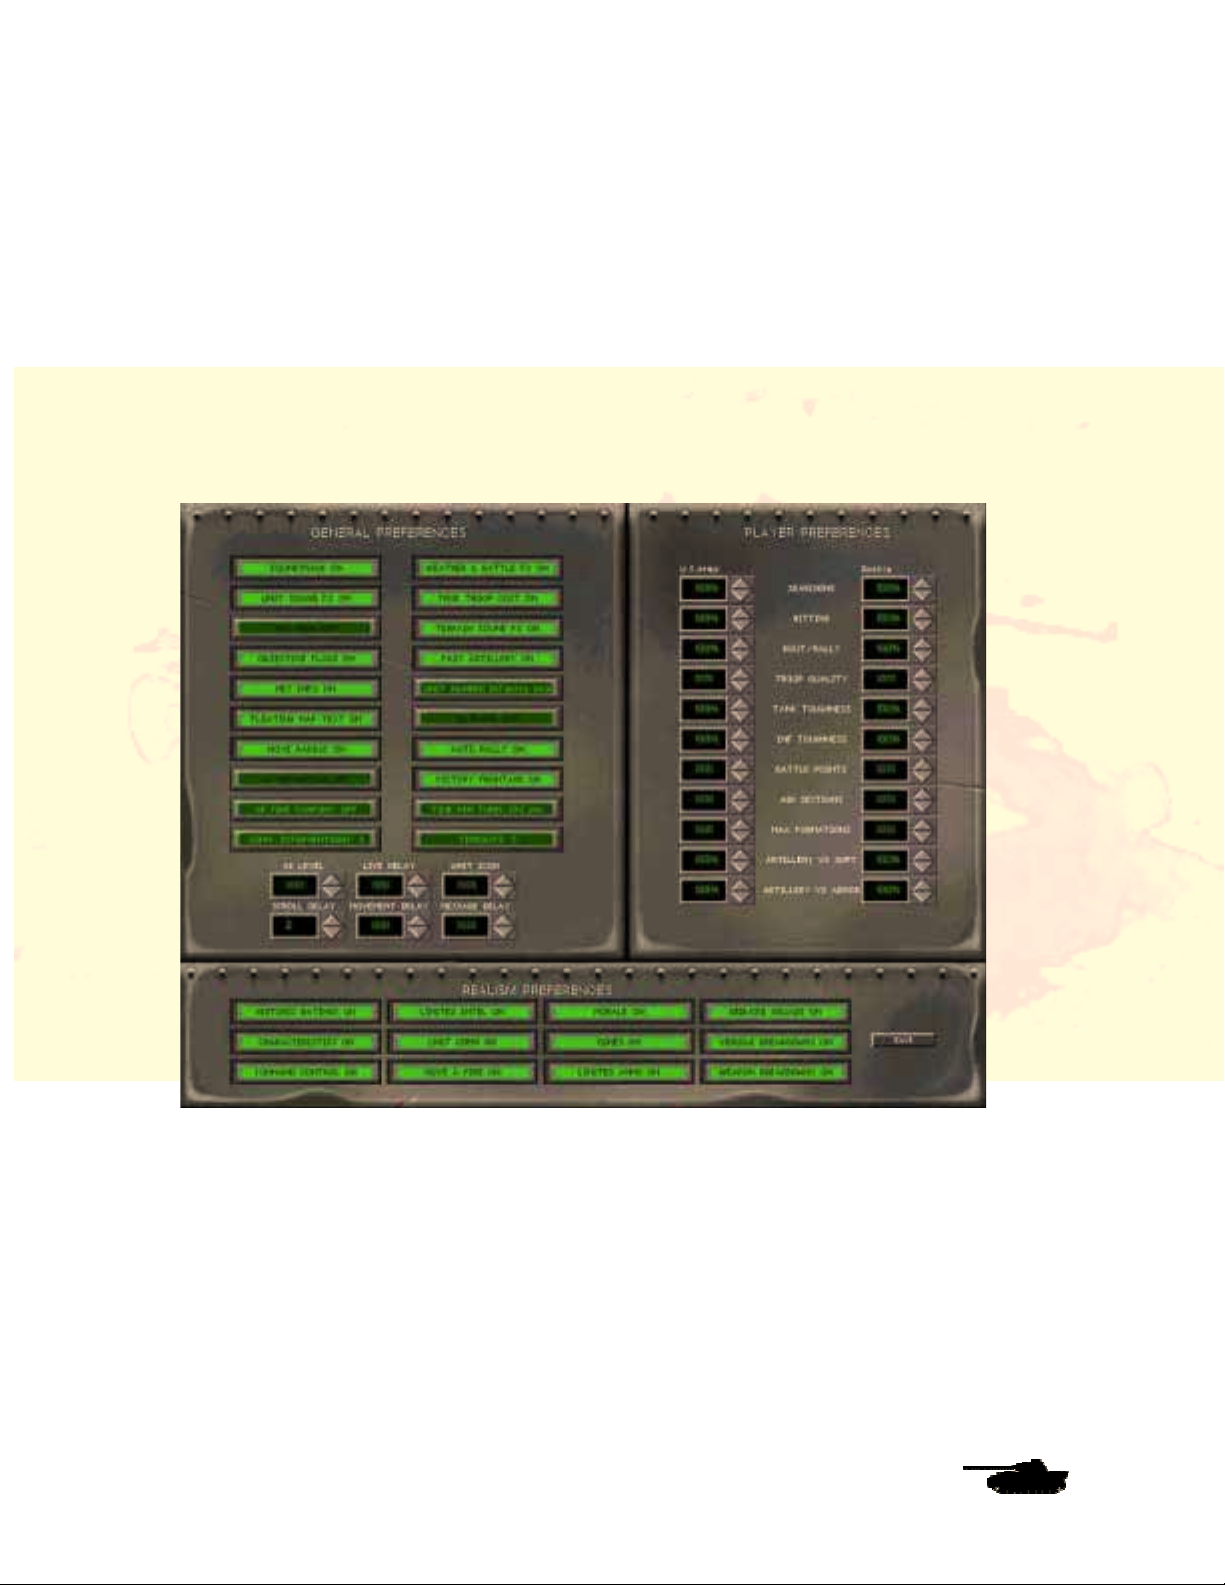
Preferences Screen
Players Manual v5.0
Below is an explanation of the preferences buttons. For convenience sake, all buttons are listed,
even though not all have been changed.
• Soundtrack – “On” means players will hear music on all screens, except in the combat
screen, where instead they will hear the weather and battle sound tracks if they are also
turned on. “Off” means no music will be played.
• Weather and Battle FX – “On” means the weather sound track will be played in the
combat screen, as long as the “Soundtrack” button also is on. After combat ensues, a
second sound track will play random battle noises.
• Unit Sound FX – Enables unit movement and gunfire sounds.
• Terrain Sound FX – “On” means that when the mouse is moved over some hexes, a
sound will be played. The only sounds currently available are for burning vehicles and
water. Future updates may add sounds for railroads, buildings and others.
• Hex Grid – Controls the hex grid overlaying the map.
• Objective Hexes – “On” means that little flags appear in victory hexes. These can be
turned off if players want to see the underlying terrain in the hex.
• Fast Artillery – Vastly speeds up the artillery bombardment animations. This is
© 2001 by Matrix Games. All Rights Reserved.
21
Page 28

Players Manual v5.0
recommended to speed up play. Artillery does not show up on the VCR replay at all
when Fast Artillery is on.
• Hex Info – “On” means that as the mouse is moved around the map, terrain and unit data
appear in a small pop-out box.
• Floating Map Text – “On” means that the pop-up boxes, enabled by the “Hex Info”
button, will appear wherever the mouse hovers over the screen. “Off” means that these
boxes will appear at the top of the screen. Note that boxes displaying combat results
never float.
• Live Delay – This value determines how long the mouse must be left over a unit or hex,
before the Hex Info box is displayed.
• Unit Number – This button has four settings. “Off” means no numbers appear on top of
the units. “Your Infantry” will display the number of men remaining in infantry units. “Your
Units” will display numbers for infantry and place a small “+” sign over vehicles. “+”
signs will glow orange for all the units in a formation when any of the formation’s units are
selected. This enables formations to be kept together for command purposes. “All Units”
displays unit numbers on enemy infantry, and cannot be modified once a PBEM game or
online game starts.
• Time per Turn –This setting determines how much time a player is given to make his
move, before his turn ends and the other player moves in “Online” and “Timed play”
modes.
• Move Radius – This button is a 3-way toggle. “A” means that all the hexes that the
currently selected unit can reach will be highlighted. ”B” shows darkened hexes in
daytime and highlighted hexes during nighttime “Off’ turns the feature off. Note that with
the Command and Control on, a unit will not have a movement radius highlighted if its
formation has not been assigned an objective. With Command and Control on, non-recon
units are restricted to moving in the general direction of their objective unless command
points are spend to direct them to do otherwise (see Command and Control below)
• Unit Icon – This value determines the size of the unit icon that appears on the screen.
There are four values, with setting 1 displaying the smallest icons and setting XXX the
largest.
• True Troop Cost/Rarity -The "True Troop Cost/Rarity" toggle button can now be found
on the Preferences Screen. When on, this button will cause troop costs to be generated,
using the unit's experience as a factor. Before now, this only occurred when "Country
Training" option was off. The option is useful if two players want an even battle with
balanced points. This option replaces the old "Hide Fort" option, which is now considered
to always be off.
Rarity Ratings - When "True Troop Cost" is on units rarity ratings now come into play.
Units that were rare or out of production will have a greater chance of not being available
to the player. A unit's rarity affects their chances of being available on the purchase
menus. Units currently unavailable will now show up in red on the purchase screen. Units
that are out of production show up in yellow. Units Rarity Ratings are rechecked after you
purchase each one of them. Note: if you delete a formation that is rechecked and is now
no longer available, you cannot buy them back, so be careful! This button is a 3 way
toggle – True troop cost and Rarity off, True troop cost only on and both True troop cost
and rarity on. When “rarity” is on…” then continue from right after “When “True Troop
cost” as is.
© 2001 by Matrix Games. All Rights Reserved.
22
Page 29
Players Manual v5.0
• Movement Delay – This value determines how long a pause occurs between frames of
animation in movement. This means that a high value will cause units to appear to move
slowly from hex to hex, while a low value sends them zipping along the map. If you prefer
the brief delays that were common in Steel Panthers I or II, then reduce this value. XXX
is the fastest speed possible, limited only by your CPU speed and graphics card
capability.
• Message Delay – This value determines how long messages, such as combat results,
remain on the screen. An XXX setting will display no messages at all. This speeds up the
game, but you won’t be notified of the damage you inflict and receive. Note that the VCR
replay uses the selection you chose. If you turn messages off, your opponent will not see
them at either, and if you set a long time delay, your opponent will be spending a lot of
time watching messages.
• Limited Ammo/Reduced Ammo Limited Ammo On - The unit receives the ammunition
listed in the purchase screen and the ammunition is reduced when the unit fires.
Reduced Ammo On - The unit receives 50% to 99% of the ammunition listed in the
purchase and the ammunition is reduced when the unit fires.
Limited Ammo Off - The unit receives the ammunition listed in the purchase screen and
the ammunition is NOT reduced when the unit fires.
• Characteristics– This is to turn on or off the National characteristics of the different
countries, such as Italians retreating quickly or Soviets defending fanatically.
• Unit Comm – The unit communications button controls whether units suffer from
command control paralysis if they are too far from their headquarters. “On” means that if
a unit is farther than 3 hexes from the headquarters unit of the formation, it must have a
radio and make a radio experience check to be in communication. “Off” means that all
units are always in full communication with all other units.
• Command Control – Enables the SP: WAW command control system. “On” means that
headquarters units generate command points (orders) and must expend them to change
the formation objective, change a unit stance, call in artillery strikes or move away from
the formation objective. “Off” means that units do not generate or need orders. Note that
even if command control is enabled, some headquarters and recon units do not have to
expend orders to move away from the formation objective (See Command and Control
below).
• Morale – “On means that normal rules for morale are in effect with units suffering a
readiness penalty from reduced morale. “Off” means that units do not check morale or
suffer a readiness penalty. They stay in good order until destroyed.
• Move and Fire – “Off” means that units are not assessed penalties for moving and
shooting. If “On,” units lose movement points for shooting depending on their abilities.
• Mines – “Off” means mines are ignored and are harmless. However, even if harmless,
mines still will appear on the map, and units will tend to avoid them.
• Historic Ratings – “On” means that when units are generated, their experience levels
are created using historically derived tables (so that German paratroopers will tend to
have to have higher experience ratings than the poor old Italian infantry). “Off” means
that the player may manually set the experience level using the Troop Quality setting.
• Limited Intel – Enabling this setting will make enemy units harder to spot as well as
© 2001 by Matrix Games. All Rights Reserved.
23
Page 30

Players Manual v5.0
make them less likely to remain spotted. The number of men in an enemy squad will not
be displayed. A recon unit that spots an enemy artillery unit and moves away, for
example, will find that the enemy battery may become hidden again depending on the
cover it is in. This may happen immediately or after a few turns. Infantry and support
weapons that are seen moving may also disappear in a few turns after they stop moving.
Perhaps most important, units will not be automatically spotted if they fire, which makes
snipers and pillboxes particularly effective. The chances of spotting, and of spotted units
disappearing, depend on the relative experience levels of the units involved, their skill of
their leaders, the weather, the visibility and the terrain. Please note that infantry and
other leg type units are much harder to spot in general than they were in Steel Panthers
III, especially at ranges greater than 10 hexes. Occasionally, units that leave LOS remain
spotted for a turn. This typically happens when units crest a hill and then go back into
defilade (behind the crest).
• Searching – This value is a multiple in the spotting calculations, with 100% being 1.0.
Increasing this number will boost the range at which you tend to spot an opposing unit.
Lowering it will reduce the chances, and lower the range at which units will be spotted.
• Hitting – This value is a multiple in the to hit calculations, with 100% being 1.0. Higher
values equal more hits. This affects all direct fire attacks. Note that experience and
suppression also play big roles in determining hit chances.
• Rout/Rally – This value is a multiple in the rally calculations, with 100% being 1.0. Higher
values increase the chance of units rallying and increase the threshold at which they
degrade to pinned, retreated or routed status.
• Troop Quality – This value is the base experience, when units are being created. A
XXX setting will use historical values. The lowest value is 30 and represents the freshest
of conscripts. At the high end, values above 110 or 120 are not recommended unless
“Hollywood heroism” is desired for that side. Historic Ratings must be off for this to
function.
• Tank Toughness – Base vehicle armor values are multiplied by this value before
adjusting for slope or aspect, with 100% being 1.0. Increasing this value creates tougher
tanks.
• Infantry Toughness – Infantry casualties are divided by this value, with 100% being 1.0.
Really boost this value, and you can have whole companies of Rambos.
• Artillery Vs Hard Targets – The chance of an artillery shot hitting a vehicle is increased
or decreased by the selected percentage.
• Artillery Vs Soft Targets – The chance of an artillery round killing infantry is increased
or decreased by this amount.
• Battle Points – If this value is XXX, Random values are used. If not, the player can
manually set the base number of points that each side may spend to purchase units. The
higher the value, the more units that the player – and the computer opponent – can
purchase.
• Air Sections – If this value is XXX, historical values are used. If, the player can manually
set the maximum number of air section each side can have in a battle.
• Max Formations – This allows the player to limit the number of formations each side can
have in a battle. The game supports 100 per side with 400 units per side maximum. This
© 2001 by Matrix Games. All Rights Reserved.
24
Page 31

Players Manual v5.0
includes crews, so leave open slots for crews in very large scenarios or the crews just
won’t appear.
• Victory Frontage – If "Victory Frontage" is on, the random map generator creates five
victory objective locations instead of three.
• Computer Advantage – If "Computer Advantage" is on, the computer opponent will
receive some free units, to make the game more challenging. In small battles, this can
unbalance the game.
• Op Fire Confirm - Players can now decide if they want to take advantage of Opportunity
Fire when it is triggered and how long they have to decide. Whenever your unit has an
option to Op Fire you will be shown what unit and weapon you will be firing and the target
unit. You now press (y)es or (n)o or hit the space bar or left click with the mouse to fire.
Before you start a battle you can set how many seconds the display is shown before the
Op Fire is cancelled. Op Fire can be used in all game play except PBEM. If you do not
want to use the feature it can also be turned off by setting to “0”. If a unit is given a
Special Op Fire it will now state that it is Special Op Fire on the screen. Both Op Fire
options will show you your unit firing, type of weapon be fired, the range from your unit to
the target and the target unit. In online play the latency inherent in the internet can cause
problems in synchronization between the two games. If your “ping” latency is greater than
about 300ms then its advisable not to use Opfire confirm or you increase the instances of
the two games ‘diverging’ a bit and units thinking enemies are places they aren’t and
opfiring at old targets. Special Opfire messeges now appear AFTER the shot is taken
(but before the result).
• Time Out - During an Online game the gamers can decide how many “Time Outs” each
side is to get. During your turn you may choose to use a Time Out. This will pause the
game and stop your clock from running. Time Out time is decided by doubling your
current setting on the turn timer. Hitting the “pause” key without using a timeout (to get
some refreshment, or take the effects of previous refreshment, etc) requires the opponant
to confirm.
• Command Intervention - During an Online game gamers can set how many “Command
Intervention” points are giving per player. Because each turn time is set before the game
starts this option will allow you double whatever time you have left at the time you press
the Command Intervention hot key. So if you have 2 minutes left pressing the Command
Intervention hot key would give you 4 minutes. This will allow you in the critical parts of
the battle to extend your time when you really need it. But decide to use it early as
doubling 15 secs to 30 is usually not worth it!
• Vehicle Reliability – Vehicles that travel at high speeds or over rough terrain have a
chance of that unit breaking down.
• Weapon Reliability – Unit weapons may breakdown when being used. If a player uses a
lot of Op Fire this can increase the chance of their weapons breaking down. Some
weapons can be repaired during the game. All breakdowns are also affected by a country
equipment modifier that can increase or decrease the chance of breakdown. A Unit's
experience can also improve repair time of a damaged weapon.
• Reduced Squads – If on, this simulates men on leave, runner duty, previous casualties
and so forth. The effect is some of the men are not present for the battle. The number of
men missing depends on the number in a full unit and may run up to one third the
maximum men. This setting has no effect on predesigned scenarios or campaigns
© 2001 by Matrix Games. All Rights Reserved.
25
Page 32

Players Manual v5.0
• Historic Ratings - This sets the different countries morale and experience levels to their
approximate historical levels based on the year
..
© 2001 by Matrix Games. All Rights Reserved.
26
Page 33

Players Manual v5.0
Changes to Game Play
Although SPWAW is based on the Steel Panthers game system, many if not most of the game
system has been completely rewritten. Here’s a basic list of the changes:
New Victory Conditions
Players will now have five victory hex types, four of them are new. There is also an option to
make any type “hidden” until discovered, or a specific turn is reached. Players should note that
the AI will not go after any victory hex that is 19 points or less in value. Players can mix more than
one victory type in a scenario. Only one victory type can be in a hex. Players can also now offer
to surrender. If accepted by the opponent, the game is scored as if the game ended that turn.
Victory hexes remain in the possession of their current owner.
End of Game Victory - This is the standard victory option currently in the game. The player that
controls the hex when the game ends gets its victory points.
Control Victory: When using this option the player receives victory points for the turns the player
controls the victory hex. If the Control Victory hex is set at 25 points per turn and player 1 held the
Control Victory hex for 3 turns and player 2 for 5 turns of an 8 turn game then player 1 would get
75 Victory Points and player 2 150 victory points at the end of the game.
Exit Victory - When using this option the player will receive victory points for each of the units
that is able to exit off of the map. If there are any Exit Victory hexes in a scenario, the other side
gets ½ the escaping side’s starting force value as victory points immediately. Units exited through
the Exit Victory hexes now score 3x their (and their passengers’) value as victory points.
Strategic Victory - When using this option the player will have Strategic Victory hexes. Strategic
Victory hexes have a set victory point value and once captured can not be recaptured during the
game. These make perfect types of victory hexes that have things like a HQ tent on them
Reactive Victory - When using this option the scenario designer can place a Reactive Victory hex
on the map and it will be set at 19 victory points by default. The victory hex will not be visible to
the human player at all and the AI will ignore it since it is less than 20 victory points. When the
© 2001 by Matrix Games. All Rights Reserved.
27
Page 34

Players Manual v5.0
human player moves over the Reactive Victory hex +5 is added to the victory level. This will now
make the victory hex worth 24 points and now the AI will attempt to go after it. This is a great way
to get the AI to react to human players and spice up a scenario. None of the victory points assign
to these hexes are counted at the end of the game.
Hidden Option: When using this option the scenario designer can place any of the Victory type
hexes listed above and start them unseen and inactive at the beginning of a scenario. Neither the
AI or a human player will know the turn its to become active. Once the turn that has been set
begins the victory hex is shown on the map and as long as the value is higher then 19 the AI will
attempt to capture these new victory hexes as well.
Reinforcement Request
Players can now purchase reinforcements based on 20% of the points spent to make up their
initial force. These reinforcements will show up 1-4 turns later on one of the reinforcement hex #1.
This reinforcement hex is now started on a road hex on the player’s side of the map if possible. If
you use this option during Online play you must have a Time Out still available. 25% of the victory
point’s award for destroying your reinforcement pool is automatically added to your opponent’s
victory points.
A player can request reinforcements every turn as long the player has not spent total of 20% in
points over the initial force and when playing Online play also have a time out available.
Reinforcements Requests can only be made if you have Timeouts available.
Movement
• Units being loaded into a vehicle must now be in the same hex with the transport.
• Vehicles may now only tow one gun at a time. Landing craft and ships may still carry
multiple guns.
• Machine guns, mortars, anti-tank guns, flak guns, howitzers, rockets launchers, infantry
guns, light mortars, heavy machine guns and heavy mortars may not fire their primary
weapon on the turn they unload from a vehicle or move.
• Units controlled by the computer that are within the line of sight of a human-controlled
unit now are visible and make movement sounds if they move during the computer’s turn.
• Computer controlled vehicles should no longer plow through every building they come
across. The path finding code has been rewritten. They will now avoid entering
buildings, unless the building has a victory objective.
• Remember that movement rates in SPWAW are subject to “combat friction.” If you are
spotted by an enemy you will see an * symbol and lose movement points. If fired upon,
you will see a “#” and lose even more points. This can cause units to fail to reach hexes
that the move radius showed reachable at the start of the turn. Occasionally units may be
able to move an additional hex. Movement points can be a bit uncertain, so plan
accordingly and be careful if your plans revolve around taking a specific hex with a unit
that just barely thinks it can reach it.
• Wooden bridges will block all vehicle traffic if a wreck or any unit is on a span which
covers a water, stream, gully or trench hex. Stone bridges will block all vehicle traffic if a
wreck and a unit or two units are on a span that covers a water, stream, gully or trench
hex. Stone bridges cannot be blocked by 2 or more wrecks because the game does not
© 2001 by Matrix Games. All Rights Reserved.
28
Page 35

Players Manual v5.0
track how many wrecks are in a hex. Units on a bridge do not block leg type units. Nor do
boats and barges. All leg and vehicle units that traverse a bridge hex with any units or
wrecks present, but not enough to block movement, pay an extra cost.
• Pressing the F7 key can quickly check the radius of a unit’s movement.
Weather
• A new weather system has been added. Units have less chance of sighting and move
more slowly due to fog, haze, rain, snow and dust storms. Units traveling on paved roads,
in the rain, suffer less of a movement penalty than before. Weather will vary with battle
location, time of year and in some cases time of day.
• The current battlefield conditions are displayed when the mouse is pointed on the upper
right corner of the combat screen. Appropriate sound effects for the weather are played if
that option is enabled in the Preferences Menu. The same applies to the background
battle noises soundtrack, which begins randomly between turn one and four, or when the
first weapon is fired.
• A help key (F1) with weather info can be invoked from the battle setup and editor
screens.
Spotting
• The spotting system has been modified. Spotting ability has been reduced for turreted
vehicles, and slashed even more for non-turreted vehicles such as trucks. Note that
snipers are now very, very hard to spot.
General Combat
• All sighting, hit probabilities and damage routines
have been rewritten. These have been adjusted in the
various patches based on user suggestions. We have
tried through the preferences to make the game
customizable to virtually any taste. Don’t be afraid to
experiment with them.
• Players can now decide if they want to selectively use
Opportunity Fire. Whenever your unit has an option to
Op Fire you will be shown what unit and weapon you will be firing and the target unit. You
now press (y)es to fire, right click or press the spacebar or (n)o to pass up the chance if
the time runs out. The default is to not fire. Before you start a battle you can set how
many seconds the display is shown before the Op Fire is cancelled. Op Fire can be used
in all game play except PBEM. If you do not want to use the feature it can also be turned
off in Preferences. If a unit is given a Special Op Fire it will now state that it is Special Op
Fire in the info/chat area. Both Op Fire options will show you your unit firing, type of
weapon be fired, the range from your unit to the target and the target unit.
• The AI routines have been enhanced. The computer will never be as wily or
unpredictable as a human opponent, but it will use somewhat more sensible tactics than
in previous Steel Panthers versions. It is still limited, so it tends to rely on speed and
numbers to overwhelm. It will use the flanks and sometimes it will keep a reserve, so
watch out. The new “AI atrractor” hidden victory hexes add a new degree of designer
control over how the AI reacts to player movement.
© 2001 by Matrix Games. All Rights Reserved.
29
Page 36

Players Manual v5.0
• Units that shoot will lose movement points similar to the way that moving units lose shots.
• Units that fire and move will lose target acquisition. Without target acquisition, fire suffers
a 40 percent penalty on the first shot and 20 percent on the second. Range finders will
help mitigate this.
• Units may no longer be set to auto-fire (automatically firing all their available shots),
because playtesting has shown this feature unbalances play by allowing one side all its
shots before the target can fire back with opportunity fire.
• Terrain cover has been expanded. Streams and canals now offer cover for all units as do
trenches and gullies. In addition, wrecks and holes now offer cover for leg units.
• The game will no longer randomly add extra turns to the length of the game, making
scenario design more predictable.
• The “Force Broken” status has been revised. IF 2/3 of your units are dead, routed, or
reduced to 50% strength or less, their force morale can be “broken”. This also requires
the AO to fail a morale check (Die(120> morale). Any turn in which theses conditions
apply and the AO fails this check, and one side has the preponderance of victory hexes,
the game can end before the allotted. Scenario designers can mitigate this by giving the
A0 120 morale and the player protecting it. In addition to the possible early end of the
game, he effect of Force Morale breaking is to add suppression to every unit in the force
at the end of each turn.
• The computer purchase advantage can now be toggled. If this is turned off, the AI will get
some free units. Note that this can unbalance small scenarios.
• The Preference menu allows units to either start with full loads of ammunition, or up to 50
percent less.
• Heavy guns and bombs will now affect units up to 2 hexes away with suppression, and
may kill men in adjacent hexes. Collateral damage to units in a hex hit by bombardment
is now linked more to experience.
• If a unit has fired all of its shots during opportunity fire and an enemy unit moves close to
it or fires at it, the unit may now, with a special experience check, gain extra shots. This
will prevent players from trying to use up all the opportunity fire for a unit and then charge
up to it and fire. Since this requires a special experience check, it is never certain how
many opportunity fire shots the defending unit will have. Special opfire comes in three
varieties, Regular is triggered by units moving, Return is triggered by unit firing or moving
after it has fired, Point blank is triggered by moving in close proximity (adjacent if in
advance stance, with in 3 hexes if in defend stance) Special Opfire will add suppression
to a unit if it fails a morale check when it fires.
• Units in the hex with a target now receive a special experience check against collateral
damage from small arms and machine guns. This gives a squad a better chance to get
behind or away from the tank or away from the other squad, as needed, if the other unit is
being fired at. Experienced units in the same hex with a tank can no longer be engaged
effectively by shooting at the tank. This may still work against lower quality troops that
tend to bunch up near armored vehicles
• Experience plays a larger role in general. The number of men firing "primary infantry"
class weapons is determined by an experience check. The total number of men killed is
now adjusted by experience checks.
© 2001 by Matrix Games. All Rights Reserved.
30
Page 37

Players Manual v5.0
• Anti-tank mines and Molotov cocktails, satchel charges and flame throwers may now be
used against units in adjacent hexes, by selecting the target and then using the “c” key to
choose that specific weapon. Anti-tank mines and Molotov cocktails still may not be used
against non-vehicular units.
• Some players felt that abandoned vehicles and guns should generate victory points.
Now, any units abandoned are considered destroyed,for victory point purposes, if that
side does not control the battlefield. Control of the battlefield goes to the side with the
most victory objective points. Abandoned vehicles can be destroyed by moving a unit into
the same hex and remaining for the full turn. If the unit passes an experience check, they
will destroy the abandoned unit at the end of the turn. The unit and leader spiking will
receive experience for the kill, although the leader will not receive a kill credit.
• When selecting and firing at a target using the “Target” (“t” )button, the targeting window
now closes before the shot takes place. The same occurs with the "Target Indirect Fire"
(“z”) and the "Fire Smoke with Direct Fire" (“x”) button.
• Units firing at other units in the same hex were automatically facing to the right of the
screen, which sometimes made the rear of the unit face the enemy force, even when the
enemy was firing from the left. They will now retain the facing they had before they fired.
• Vehicles and guns that have been abandoned no longer have the "+" drawn on them.
This should make it easier to see, at a glance, if the unit is active. Enemy units that are
retreated or routed are no longer highlighted with their number or "+" either.
• The mouse cursor now becomes an hourglass while the human players unit is moving
and during bombardments, so he will know he cannot choose another unit.
Added melee and overrun combat to the game.
Smoke
• Smoke is now a hindrance to spotting and not a protective “shield.” Heavy smoke
screens over 2-3 hexes will block line-of-sight, but the more common effect of smoke is to
make it more difficult for the enemy to spot you in the first place. “Popping smoke” and
remaining where you are already spotted will not be as effective as using it before
movement to screen your withdrawal.
• The smoke allowance for howitzers, artillery, mortars and heavy mortars has been
increased. Light mortars receive no smoke.
• Smoke will drift downwind, creating several partial smoke hexes after a couple of turns.
Sighting through several of these partial smoke hexes will be obscured.
• Infantry can now only throw smoke one hex away.
• Fires may now spread to adjacent flammable hexes. They will generally spread
downwind. The wind may shift, changing the direction of smoke and the primary direction
of spreading fire. Fires may burn out after a while. Fires and the associated smoke will
cause suppression to any units in the hex, including vehicles. The weather is now a
major factor in how long a fire burns and how rapidly it spreads.
© 2001 by Matrix Games. All Rights Reserved.
31
Page 38

Players Manual v5.0
Armor
• Players may order crews to voluntarily bail out (to save an experienced crew in a bad
situation) by pressing the “9” key. This works for crewed guns as well. The “secondary
weapon” of most guns have been removed. The crew must “bail” from manning the gun if
they want to engage close threats with their crew weapons.
• Crews now check morale when serious damage is done to their vehicle, or if they think
their vehicle has been badly damaged. If they fail, they bail out immediately. Note that
this means a crew will occasionally bail out of a perfectly good vehicle! Bailed-out vehicle
crews, or gun crews who abandon their artillery pieces, may rejoin them once their
morale improves.
• HE and HEAT penetration has been substantially revised to take range dependant effects
into account and better represent adverse conditions that can greatly affect both types of
rounds.
• Infantry small arms fire will now inflict much less suppression on armored vehicles.
However, concentrated small arms fire can still affect a vehicle crew’s morale.
• Calculations have been altered to allow smaller caliber guns to do more internal damage
against lightly armored vehicles. Kill chances per shot in general have been somewhat
increased.
• Low T/D (thickness of armor/diameter of shell) resolution has been enhanced, T/D ratios
as low as 1/6 have more appropriate effects, greatly reducing the chances that medium
and heavy AT guns will richochet off lightly armored vehicles. It can still happen, there
are many places where structural componnats can affect a near paralel shot, but in the
low cases chances have been reduced from 8-12 to 3-5% over normal ranges of
obliquity.
Infantry
Infantry moving only a single hex are much less vulnerable to fire. Units
moving in the open are very vulnerable to the initial shot, but if
experienced, will “hit the deck” quickly. Very experienced troops can
sometimes “anticipate” a shot and hit the deck before it strikes.
Suppression has been reworked to increase more quickly, but decrease
more quickly. “Bonus” suppression removal over and above normal
leader rally based on proximity to friendly units (especially the special HQ
units) and whether they’re hidden.
• A leader’s Rally rating now is more significant, particularly for
platoon and company commanders. Scenario designers should
pay close attention to this characteristic, as a formation’s ability
to advance under fire will be closely related to this attribute.
• Infantry may now only throw smoke grenades one hex.
• Machine guns are now more lethal, particularly to men moving more than 1 hex
• The minimum chance for close assault of hard targets has been increased from a base of
2%, to a formula that uses the number of men assaulting. So, for example, a 10-man
squad has a base 10% chance. The effects of experience on infantry combat have been
enhanced. Experience more directly affects the men killed in a target unit.
© 2001 by Matrix Games. All Rights Reserved.
32
Page 39

Players Manual v5.0
• Small arms now cause more suppression, but fewer casualties. This makes infantry tend
to retreat more often when fired upon.
Artillery
• Indirect fire delays have been changed . Players that
want their artillery to arrive quickly will need Forward
Observers who can call in fast-response artillery or
need to set up pre-registered targets. This affects offboard artillery more than onboard artillery, which is
assumed to be directly attached to the unit and is
more responsive. Players will still find their batteries
are out of contact about 25-33% of the time. Note that
Light Mortar class units are linked exclusively to their
platoon commander, who is the sole spotter that can be used to call their fire. The
platoon CO must be with in 3 hexes to have a comms link in this case as such mortars
don’t have radios.
• Onboard artillery units that are hit will not only lose men, but ammo as well.
• Artillery units as well as a few others receive double allocations of smoke.
• All light mortars are coded as dedicated artillery, which means they can be used for
indirect fire. However, when attached to a platoon, only the platoon headquarters can call
for and adjust their fire.
• Off-board artillery and rockets now always start with full ammunition, even if the “full
ammo” option is not chosen.
• Terrain will crater more rapidly than before. Note: There is a limit on how many craters
can be put on a map (it is large!) but some scenario designers have reached it.
• Direct or indirect fire from large caliber ordinance will now create breaches in stone walls
and hedges. Rounds of at least about 105mm are needed and the breach may require
several shots.
• Rounds are assumed to land in a more spread-out fashion in a hex. This means units in
hexes adjacent to impact hexes can now take suppression or even casualties from large
caliber ordinance.
• Suppression code was rewritten, so that high explosive bombardment via direct fire
causes much more suppression against infantry and armor, while indirect fire has more
effect in the target hex and adjacent hexes. Artillery will now suppress units over the
entire "beaten zone,” not just the specific hexes impacted. Entrenched units will tend to
recover faster, however, so they must be engaged quickly after the barrage is lifted.
• The balance between the effects of direct and indirect fire have been adjusted. Direct fire
is still more likely to cause casualties than indirect fire, and indirect fire will cause more
suppression. The effect is wider for units in cover and wider still if entrenched. Direct fire
will cause random suppression related to its warhead size, rather than a set amount,
sometimes the result is 0, indicating the round “missed” completely. Indirect fire generally
does about twice as much suppression over a much wider area, but has a greatly
reduced chance to kill. An analysis per round” of casualties will show heavy caliber
© 2001 by Matrix Games. All Rights Reserved.
33
Page 40

Players Manual v5.0
rounds not killing as many troops as one might expect. We have done this deliberately
because the game player has much finer control (and typically more common availability)
of these assets than their wartime counterparts, and we feel this “scaling” of effect keeps
the relationship between combat arms correct over the course of a game.
• Vehicles are now hit more often than before by bombardment. This can be changed by
changing the new Artillery vs. Hard Target preference. They also take suppression from
rounds that land nearby.
• Some players felt off board artillery was out of command too much. It has been made
easier to contact and stay in contact. Players will still find their batteries are out of contact
about 25-33% of the time. Communications and commitment of assets was not always
foolproof. Commanders influence was often used to redirect assets that had been
“earmarked” for other units. If you lose contact in the middle of a barrage, you can often
succesfully shift the fire despite losing contact and keep the shells falling in the general
vicinity. This assumes a case where you lose contact, but the battery takes it upon itself
to continue the miossion anyway, it just isn’t sure exactly the position, so the play is
forced to shift it a bit. This provides a mechanism to continue a barrage in progress,
when communications are spotty.
• The frequency of counterbattery fire has been adjusted.
• Artillery with smaller warheads now make smaller explosion sounds.
• The artillery barrage message delay has been reduced to one half the message delay set
in the Preferences. This should speed up artillery barrages. Also, remember that if you
hold down the “F” key during the barrage for a bit, the fast artillery option will turn on.
Fortifications and Enhanced Defenses
• Entrenched units now have enhanced sighting and opportunity fire capabilities.
Entrenched and in-cover units have had their vulnerability to fire decreased as well.
• Units in Defend stance are about 33% more likely to receive “Special Opfire” when they
have expended all their shots. The triggers for “Special Opfire” are moving within 2 hexes
of the unit, shooting at the unit, and expending a great deal of time in the LOS of the unit.
(i.e. running straight at it in clear LOS).
• The “Dug-in” entrenchment state has been renamed “in cover,” to better describe the
state achieved by units in “defend” stance that deploy to best defensive advantage in a
hex. View the “defend” stance as the order to look in the hex for the best defensive
positions and fields of fire. It may take a couple turns to successfully complete, as an
experience check is required to accomplish attaining “in-cover status. In Delay or Defend
scenarios, engineers will speed this process.
• Morale for fortifications units has been increased. Units that are in cover or entrenched
now have a greater chance of success when close assaulting vehicles.
• Leg engineers may now place mines during the battle.
• HQ "tents" (renamed “Command Posts”) now help stiffen defenses by bonus suppression
removal.
© 2001 by Matrix Games. All Rights Reserved.
34
Page 41

Players Manual v5.0
Special Weapons
• Flame-thrower range has been extended to a maximum of two hexes for vehicle types.
• Leg engineering units may now remove obstacles such as dragon’s teeth. The
procedure is similar to removing mines. If mines and obstacles are both present in the
target hex, the mines will be removed first, for safety reasons.
• Leg engineering units, or any one with a satchel charge, may now blow a breach through
hedges and stone walls. The procedure is the same as blowing a bridge. Move adjacent
to the wall or hedge and attack the hex using the “z” direct fire key. Please note that
when blowing a bridge, the engineering unit should move off the bridge first.
Air Power
• Fighters and bombers can no longer effectively spot enemy units, so air power is no
longer a miracle recon asset.
• The blast power of even small bombs, and the disruption an air attack has on nearby
troops, had been greatly enhanced.
• Level bombers now behave more like artillery and must be designated to attack a certain
area on a specific turn. The can not be assigned missions once the game starts.
© 2001 by Matrix Games. All Rights Reserved.
35
Page 42

Players Manual v5.0
Campaigns
We completely revised the User Generated Campaigns. Players can now have over 1,000
campaigns. The new campaigns can branch to different scenarios depending on what the out
come of the battle. The condition you start your next battle will now greatly depend on how you
ended your last one. Designers can now determine final victory by points or victory hexes and
even exiting units off the map board. Designers can write their own campaign texts for each battle
land scenario results and associate sound files with each new battle start. In addition to support
points available at the start of a battle, the number of points of reinforcements that can be called
for during the battle can be set by the campaign designer.
In campaign generator and the long WW II campaign, some users wanted to be able to set the
points before starting the campaign, instead of using the points generated by the campaign code.
Either campaign will now use the default calculated starting points unless the player has changed
the starting Battle Points value in the preferences to a value other than "XXXX" for Player 1. If he
has set this value, the game will use this value.
In campaigns, the number of turns for a battle was randomly determined each time the battle was
loaded. It is now determined when the battle is generated and saved with the game.
Some players felt units should be exchangeable for units not of the same type, such as replacing
armor for infantry, while in a campaign. A unit now can be exchanged for any type of unit. This
exchange is, however, a hardware exchange. The officer and men remain the same, with the
same skills and experience, minus the experience penalty generated by the exchange.
Some players wanted to be able to continue the long WW II campaign after a defeat. They now
can. A defeat generates no victory points, however.
Beach assaults are now generated in the long WW II campaign. The US Army, British Army and
early war Japanese Army will occasionally be assigned beach assaults. The U.S.M.C. will
receive them fairly regularly. In campaigns, beach landing can now occur in places like Luzon,
Salerno and Omaha Beach.
The map size in campaign generator and long WW II campaign battles is now randomly chosen
and will range from 40 to 80 hexes high.
© 2001 by Matrix Games. All Rights Reserved.
36
Page 43

Players Manual v5.0
Changes to the Armor Combat System
Armor Penetration
This is perhaps the most significant – and the most complex –
change from previous versions of Steel Panthers. Instead of
using abstract armor ratings, penetration is now calculated on
the basis of the actual millimeters that a round can potentially
penetrate, as well as the degree to which the target’s armor is
sloped. This allows for a more realistic effective armor
calculation to be made, one that accounts for the combined
effect of vertical and horizontal armor angles, and the ratio of
basic armor thickness to shell diameter (expressed by the
formula “T divided by D”).
The new system also includes an increasing chance of
ricochet with increasing compound angles and T/D (thickness
of armor/diameter of shell), so small rounds at glancing
angles bounce very often while large rounds that hit at slight angles from the perpendicular do
not. In other words, the flatter and more direct the trajectory the less chance there is of a ricochet.
The T/D effects have been enhanced, improving the portrayal of low T/D situations that arise
when medium and heavy AT round impact lightly armored vehicles. The chances of ricochet have
been greatly reduced in such circumstances (from the order of 8-12% to 3-5 %, though 15-20 %
can still be had at VERY steep angles >75 degrees). 88s should not ricochet off half-tracks very
often – but there is always that small chance of interacting with structural members or other
things that can cause a strange occurrence.
Remember that vehicles may be in motion and not in the exact center of a map hex, so SP: WAW
determines the horizontal and vertical angle between the firing unit and target at the moment the
shot is taken. This technique, together with a small (less than 10 percent) variation in penetration
power from shot to shot, attempts to get away from widely variable combat results that confused
players of the older SP games.
Ammunition Effectiveness
HE is now tested against the basic armor thickness of hard targets, HEAT ammo against the
"geometric thickness," and AP and HVAP are tested against a T/D-dependant "ballistic thickness"
to determine the chance of penetration. The combat results pop-up box now displays the
penetration of the round and the effective armor of the target at the location where the round hit.
Note that because of the geometry involved, the effective thickness of a targets armor can be
multiplied – in extreme cases, by 6 or 8 times! These “extreme angle” shots are usually
ricochets, but there is always a small chance that shells will “bite” and a small chance they will
bounce or shatter on impact. Overmatch is more properly accounted for and things like 88 rounds
ricocheting off Halftracks are still possible in extreme cases, they are FAR less common than
before.
APCR performance has been greatly enhanced, depicting its performance much more accurately.
T/D effects have been revised based on better curve fitting and a couple new data sets from
Combat Leader research. A new ricochet routine improves the depiction of the "critical angle" so
ricochet probability will be low below critical angle and ramp up quickly. All this assumes lots of
things, but less things are generalized than before! You should get fewer "945,395mm armor"
results from APCR hits now and small T/D ratios will now ricochet much less often
© 2001 by Matrix Games. All Rights Reserved.
37
Page 44

Players Manual v5.0
Armored Skirts
Armored skirts are now handled differently. They add to the base armor after slope has been
calculated. The amount they add ranges from 100 percent to 300 percent of the skirt thickness,
depending on the type of ammunition striking it. In addition, although the display screen for
engineering tanks displays only their inherent armor, the effects of the rollers, blades and other
external accessories are factored into the penetration model.
Vehicle Damage
The combat system tracks the locations where penetrating hits can occur, such as the gun and
tracks. When penetration occurs, each system is checked for damage. The calculations consider
the type and size of the penetrating round, the location of the hit, the kinetic force left in the round
after it has traveled to the target, the amount of armor thrown inward during the penetration and
other factors. It is possible for the round to go all the way through the target and not damage any
systems of the (lucky) vehicle.
The least amount of damage should occur when a small caliber APCR projectile barely
penetrates a very large vehicle with thin armor, a small crew and a large "survival" characteristic.
Damage that penetrating rounds do may be revealed to the firing player or not, depending on if
the firing unit is in a position to see the effects.
Non-penetrating critical hits have been added. Vulnerable systems include the toolbox, radio
mast, main-gun, coaxial-gun, main gun optics, range finder, infrared sensors and turret ring.
Vehicles also are susceptible to general crew shock from very large non-penetrating hits. Hitting
these locations should be difficult, with HE ammunition generally having a better chance. In fact,
the greatest chance of damage should occur when a large HE projectile hits the turret of an AFV
with many external systems. The round may not punch a hole in the armor, but there will be one
tank in less than mint condition.
Trucks are now treated like other vehicles, and may now be immobilized and have their
suspension and other systems damaged.
Vehicles can be hit on the belly (which is weakly armored – assumed ¼ the side value and at 0
slope) if a special experience check is made by the firing unit and the range is less than 3, the hit
is in on the front of the target, and the ground level of the target is 5 meters higher than that of the
firing unit. This prevents reverse slope firing positions from being impervious, and solves inherent
problems in the line-of-sight and angular armor thickness computations.
National Characteristics
The forces of the major combatants now had unique characteristics that add to the historical
flavor of the game. American troops tend to retreat more rapidly than the other major powers, but
also rally more quickly. American artillery gets a .1 to .2 reduction in delay time to its artillery fire.
British troops, known for their steadiness under fire, receive less of a penalty from suppression
when under fire from small arms. German troops benefit from outstanding training by receiving
less suppression from fire until the last year of the war, when their training historically dropped
off.
Japanese troops and US Marines almost never surrender and Japanese troops seldom retreat.
Marines can dish out firepower at close range. Expect very bloody, desperate close combat
between these two. Poorly equipped and lead, Italians will sometimes surrender, even if not
surrounded, throughout the desert war. The Soviet army, known for tenacious defense, will
sometimes spontaneously recover and ignore current suppression levels if their current mission is
defend or delay, and they’re heavy fire but under adequate cover. Players can remove these
characteristics by turning them off in the Preference screen
© 2001 by Matrix Games. All Rights Reserved.
38
Page 45

Players Manual v5.0
USA - Troops tend to retreat more quickly than other major nations. They also receive a bonus to
rally.
USMC - Troops receive a +10% bonus to hit, when firing rifles. They very seldom surrender. They
also receive reduced ammunition and their ammunition trucks reload more slowly.
British - Troops receive less of a penalty from suppression. They also receive a small penalty to
rally.
Canadian - Troops receive less of a penalty from suppression, when firing. They also
have a higher breakdown rate, when using British vehicles before 1943, than do the
British.
ANZAC - Troops receive less of a penalty from suppression, when firing. They also have
a higher breakdown rate, when using weapons vehicles before 1943, than do the
British.
France - Troops receive more ammunition and their ammunition trucks reload faster until
1943. They also suffer a greater chance to be out of contact by radio.
Soviets - Until 1944, when on the defense in good terrain, during a delay or defend
mission, if they take enough suppression to retreat or route away, they will, if they fail
a morale special check, become tenacious defenders and all suppression will be
removed. They also suffer a substantial chance to be out of contact by radio before
1942. As the war progresses, this chance declines and by 1944, they have the same
chance of being out of radio contact as other countries.
Germans - Troops take less suppression from fire. They also suffer a small penalty when trying to
rally.
Italy - Troops will sometimes surrender, even if not surrounded, in the Western desert, before
1943. During 1943, if in Italy, they have a greater chance to opportunity fire at enemy troops
than normal.
Japan - Troops very, very seldom retreat, route or surrender. In melee they make Banzai charges
They also suffer a reduction in ammunition after 1941 and this reduction increases each year
of the World War II. Their ammunition trucks suffer a similar penalty to that of the USMC.
New Unit Classes
Forty four new unit classes have been added. These include Platoon HQ, Airborne, Elite,
Wagon, Horse Team, Bicycle, Heavy Machine Gun, Light Mortar, Leg Forward Observer, Heavy
Mortar, Rocket Launcher and SP Rocket Launcher, Special and Guerrilla Forces, Armored
Forward Observer Vehicle, Glider, Cargo Plane and Turreted Tank Destroyers. The Light
Armored Car, Heavy Armored Car and Recon Tank all behave like armored cars. The "Heavy
APC" can be used for units like the "Stuart Recce", that can carry protected troops, but are not
normal APCs. The "Medium Tank", "Lend Lease Tank", "Captured Tank", "Captured SP Gun",
"Special Tank" and "Very Heavy Tank" allow for greater granularity in armored formations. The
"Armed Halftrack" protects infantry like a halftrack, but has limited carry capacity. The "Prime
Mover" behaves like a halftrack, but usually has little or no armor. "Armored Infantry", "Armored
Engineers", "Marines", "Second Line Infantry", "Medium Infantry", "Motorized Infantry", "Motorized
Engineers" and "Conscripts" allow for greater granularity in infantry formations. The "Recon
Halftrack" protects infantry and behaves like an armored car
Note that the Turreted Tank Destroyer class fixes a bug in the game that treats U.S. tank
destroyers as having no turret. Turreted Tank Destroyers function as normal tank destroyers in all
respects, except the computer will recognize that they have traversable turrets.
Gliders and Transport Aircraft
Two new unit classes, gliders and transport aircraft, are now loaded and assigned targets and
© 2001 by Matrix Games. All Rights Reserved.
39
Page 46

Players Manual v5.0
turn to arrive during deployment. After any preliminary bombardment during the designated turn,
these make their way across the map to deposit their troops as close as possible to the assigned
locations. However, anti-aircraft fire, bad weather and bad luck can disperse the troops widely.
When assigning transport and gliders objectives during deployment, the player may select the
turn in which these units arrive. The hot key, ‘t’ in the assignment screen will evoke a query, in
which the player will type in the turn number. Each unit may be assigned a separate turn in which
to arrive.
Commandos and Partisans
Commando and partisan units can be assigned targets behind enemy lines during pre-game
deployment. During the game they may show up at the assigned locations as reinforcements.
Exactly when the arrive will depend on a number of factors, including experience, how far the
assigned location was from the starting lines and where enemy forces are located. They will often
get delayed or redirected, so while they can be great assets, they only succeed in getting to their
objective about 60-70% of the time.
New Terrain Types
Many new terrain types have been added, including:
• Field/Polders/Graveyard. When choosing the yellow crops button, it now evokes a pop-out
box that offers the scenario author three choices for the type of terrain. Choose between
fields, polders and graveyards. Polders are flooded fields that cost slightly (+1 MP) more to
move through and are poor defensive terrain. Like fields, they may be placed on hill top and
like fields may not be placed on slopes. Graveyard provides fair defense and does not hinder
movement
• Mud. The game effects are similar to swamp, except that the ground is not sunken, as it is in
a swamp. Units may become stuck in mud, although tracked vehicles will fare much better.
This is not very good defensive terrain. In the desert, mud is a sand depression. In the Editor,
click the mud icon to place mud hexes.
• Orchard. A good defensive terrain that functions like trees, although the lack of undergrowth
means that they are less likely to block sighting. Click on the Orchard button to create this
terrain in the Editor.
• Vineyard. Similar to cropland except that it’s more likely to obscure sighting. There is a
vineyard icon in the Editor.
• Stream/Gully/Trench. The “Stream” button in the editor now evokes a pop-out box that
offers the scenario author three choices for the type of terrain. The first is stream the second
gully and the third trench. The stream and gully work the way they always have and are now
both –2 elevation. The trench is –1 elevation, but may not be traversed by vehicles. The AI
know about these changes and should be able to find its way around a trench using a routine
similar to that used to circumnavigate buildings. Note that vehicles may not enter a trench,
even if it has a victory objective in it. Placing dragon’s teeth inside a gully creates an Anti-tank
Ditch.
• Stone Wall. Stone walls are assumed to be between 3 and 6 feet tall and will cause strange-
looking blind spots. Only tracked vehicles can cross them, and only at the risk of throwing a
track. However, a tracked vehicle may actually breach the wall. In desert, stone wall is a
sandstone wall. To create stone walls in the Editor, click the stone wall icon and place as you
would a road by clicking on two hexes. The computer will lay a wall between them.
• Hedge. As with roads, only tracked vehicles may cross or breach them. Click the hedge icon
to place. Place as you would a road, click two hexes and the program will create a wall
between the two.
• Bocage. Superb defensive terrain. A one-hex-long, straight hedge actually represents 50
yards of an old and buried stone wall, covered with high hedges, bushes and small trees
found along the way. It is assumed to be between 12 and 18 feet tall, so tracked vehicles
crossing them are assumed to be exposing their bellies as they crest the top. This weakness
only applies across the target’s front arc and only on turns when the vehicle moves. This
© 2001 by Matrix Games. All Rights Reserved.
40
Page 47

Players Manual v5.0
penalty does not apply to the U.S. Sherman Dozer, which can breach bocage. Bocage is
placed in the Editor similar to stone walls and hedges. Click the bocage icon to place. Place
as you would a road, click on two hexes and the program will create a wall between them.
• Water Depth. Water may now be depth 0 (coral reef), 1 (shallow), 2 (normal depth) and 3
(deep water. Obstacles called “Asparagus” may be placed in water, beach, swamp and other
hexes. They function like dragon’s teeth.
• Cliffs/Rocks/Boulders - This button evokes a query, where the user chooses which type of
terrain to apply. Rocks are excellent defensive terrain and impassable to wheeled vehicles.
Boulders are good defensive terrain and are impassable to all vehicles, except aircraft. A
road will negate the extra movement costs. Cliffs may only be placed on slopes and are
impassable to all units, except units of the “Special Forces” class and it will take all
movement points of the unit to enter, which must begin movement adjacent to the cliff. A road
will not negate the movement limitations of a cliff. A cliff is very bad defensive terrain. Rocks,
cliffs and boulders are generally treated as very rough terrain. For instance, the chance for
vehicular breakdown is increased for rocks and cliffs are a very bad place to try to land a
glider.
• Swamp/Marsh - A new terrain type, called Marsh can now be evoked in the editor, by
selecting swamp. This terrain is derivative, and therefore similar to swamp. Marsh may be
placed on hill tops.
• Crops/Plowed – A new terrain type, Plowed fields, is brought up by using the Green Crops
button that will give a choice between crops and plowed fields
• Beach – when choosing beach, user is queried for sand beach or volcanic(black sand)
beach.
• Sandstone wall - In desert, stone wall is a sandstone wall.
• Scrub Trees - In desert, some trees are scrub trees.
• Sand Depsression - In the desert, mud is a sand depression.
• Dunes and Snow Banks - If in the desert, high grass is dunes, if in the winter, snow banks
• Rice Paddies – In jungle, crops are rice paddies.
• Jungle – In this terrain, clear terrain and hills are a light brown/green with darker green
edges.
• Rough – In this terrain clear terrain and hills are a dark brownish green
Jungle Terrain
The new jungle tile set will now automatically be used in battles where the terrain is jungle. This
includes all terrain locations in Asia and the Pacific theater that are classified as jungle by the
tables for the long WW II campaign and the battle generator. In generated campaigns, the jungle
tile set will be used if Jungle is chosen as the terrain type.
Rough Terrain
The new rough tile set will now automatically be used in battles where the terrain is rough. This
includes some locations in southern Europe, the Balkans and in the Mediterranean theater and
are used by the long WW II campaign and the battle generator. In generated campaigns, the
rough tile set will be used if Rough is chosen as the terrain type. In winter battles, the snow tile
set will be used instead of the rough tile set.
Hilltop Placement
Some terrain types that could previously not be placed on hills now can be located on hilltops,
though not hillsides Eligible terrain includes Hedges, Orchards, Vineyards, Rice Paddies, Crops,
Wheat Fields, Swamp, Marsh. Mud and High Grass. An icon lock has been added to help repeat
a desired terrain icon
© 2001 by Matrix Games. All Rights Reserved.
41
Page 48

Players Manual v5.0
New Battlefield and Obstacle Effects
Caves
A new – and particularly nasty – fortification class. They cannot be hit by indirect or direct fire,
except through the front entrance. However, flame-throwers will be more effective against Caves
and Bunkers.
Fires
Fires may persist through several turns and may even spread downwind. The longer a fire burns,
the more smoke that will linger over the battlefield.
Mines
Minefields are now much harder to spot. Engineers may now remove, ignore or even place new
mines during the battle. Mines can also now be placed in shallow water hexes. Also, the number
of mines left in a hex will no longer revealed to the opposing player.
Fording
Units may now ford shallow water.
Breakdowns
Vehicles may break down when trying to ford shallow water, move through mud or swamp hexes
or crash through buildings. The can also break down if they spend a lot of time moving around at
greater than half speed or in difficult terrain. If they do break down, they can occasionally be
repaired. Using all your shots in a turn, or shooting to many “special opfire” shots can lead to
weapons breakdowns. These can be repaired as well
Buildings
Units in buildings have their spotting range increased. Vehicles may try to crash through
buildings.
© 2001 by Matrix Games. All Rights Reserved.
42
Page 49

Players Manual v5.0
Long World War II Campaign
Long World War II Campaign
Long World War II CampaignLong World War II Campaign
No one can guarantee success in war, but only deserve it. --Winston Churchill
Players who loved the long World War II campaigns in Steel Panthers I are in for a treat. That
option has been added to SP: WAW, along with the normal campaign generator and the userdefined campaign editor. The Long Campaign allows players to pick one of six armies, and use it
in scenarios that begin when that nation first entered the war (1941 for the U.S., for example) and
continue until the end of the war. As with the normal campaign, players choose a core force that
is upgraded throughout the campaign. At the beginning of each scenario, players decide which
theater of war they want to fight in (Europe versus Pacific for Americans, for example), so forces
may shift back and forth between theaters throughout the campaign. Units may now be
exchanged in the editor or upgraded in campaigns to the new unit types in SP: WAW, such as
paratroopers or elite infantry.
New Countries
Six new countries were added to the game. These are Communist China,
Nationalist China, Republican Spain, Nationalist Spain, the Philippines
and the ANZAC (Australia and New Zealand) forces. These nations all
have the proper terrain types, leadership and battle locations built into the
game engine.
Editor Changes
Date
The precise day of the battle can now be selected for historical purposes, though it has no effect
on game play. The hour of the battle can now be chosen in both the battle and campaign game
generator. Otherwise the computer chooses day and hour based on the theater and armies in the
scenario (some armies prefer to fight in the daytime). Visibility is strongly affected by the hour.
Length of battle
Adjusted by a button in the editor menu. Length can range from 1 to 60 turns, though in the battle
generator, random battles will now run 22 to 40 turns.
Visibility
Maximum visibility can be up to 99 hexes
Weather
Weather can be selected. Weather values range from 1 to 6, with higher numbers indicating
worse weather. Note that bad weather varies with the season – in Russia, level 6 indicates a
blizzard, in the jungle a monsoon and in the desert a sandstorm. A value of 1 to 3 means
relatively clear weather, although a 2 or 3 can mean fog, haze or light snowfall. A 4 or 5 will most
likely create rain, light snow or possibly a windstorm.
© 2001 by Matrix Games. All Rights Reserved.
43
Page 50

Players Manual v5.0
Weather Values:
Weather Values:
Temperate Desert Winter
1) Clear 1) Clear 1) Clear
2) Hazy 2) Clear 2) Clear
3) Foggy 3) Clear 3) Clear
4) Rain 4) Dusty 4) Light Snow
5) Heavy Rain 5) Dust Storm 5) Snowy Windstorm
6) Thunderstorm 6) Heavy Dust Storm 6) Heavy Snow
Recommended Visibility:
Good weather Bad weather
No Moon 2 No Moon 2
Half Moon 6 Half Moon 2
Full Moon 15 Full Moon 2
Dawn/Dusk 28 Dawn/Dusk 8
Noon 45 Noon 20
Terrain
The number of building and tree icons has been increased substantially. The terrain palette
includes buttons for terrain such as gullies, stone walls, hedges, bocage, cliffs, orchards,
vineyards, trails, mud, marsh, polders, rice paddies, multi-hex buildings and even graveyards.
Multi-hex Buildings
New and expanded multi-hex buildings have been added. Click on the multi-hex icon to place
multi-hex buildings. The program will query the building type, from 0 to 2. This number will
determine the palette from which the program will randomly pick a building. The building selected
can be locked in for multiple placement with the “Z” key. Multi-hex buildings may not be placed
too close to other terrain and if the user attempts to place them there, nothing will happen. This
was done in an effort to prevent “invisible buildings” hexes, which have been a problem in past
versions of Steel Panthers. There are still some possible instances where rubble will appear
inappropriately. We apologize for this and will continue to pursue a solution.
When the user clicks on the pavement icon, a query as to choice – 0 to 5 -- of pavement icon will
occur. A “0” indicates no pavement, while other numbers reflect dirt, gravel, cobblestone, cement
or sandstone. The current pavement choice will appear at the bottom of the screen. The
pavement choice determines what pavement appears on the screen if the pavement icon is
currently selected, or what pavement appears beneath buildings if the wooden building, stone
building or multi-hex building icon is chosen.
Wheeled vehicles can no longer enter hexes with buildings, and the number of building damage
icons has increased. Buildings that have been damaged should now have a greater variety in
appearance.
Selective Placement of Map Icons
Selective placement allows the user to specify any icon for placement. In order to do this, the
user must know the icon
number of the graphic he wishes to place. This number can be found in the appendix of this
guide, or on a special Icon Guide
that can actually be placed on the editor map for your reference.
To selectively place graphics
1. Click on one of the three building buttons
2.
Type in the number of the building type you want to place, and press
Enter
© 2001 by Matrix Games. All Rights Reserved.
44
Page 51

Players Manual v5.0
3. Press Shift ! to open the building number requester
4. Enter the number of the icon you want (see appendix or place special Icon Guide - icon 99)
and press Enter
5. Left click on the map to begin placing the selected icon
Note that when you select a specific icon number, the editor locks that icon for continuous
placement. Press
contain a special Icon Guide (icon #99) to assist with the selection of specific icons. This handy
guide can be placed on the map for reference, then erased when you’re done designing your
map. Note that not all files have an icon guide (see appendix).
To place an Icon Guide on the map
1. While a graphic file is open, press
2. Enter 99, press Enter , and left click in an open space to place the guide
To delete an Icon Guide from the map
1. Select the Clear Terrain button in the editor
2. Left click in the target hex of the guide
Z to unlock, or Shift ! to specify another icon number. Many of the graphic files
Shift ! to open the building number requester
Lock Key In Editor
Scenario designers can now use a lock option to lock certain graphic images when making maps.
You can lock a building with the Z key and then unlock it by pressing the Z key again.
Terrain Effects Chart
A terrain effects chart can be brought up during map editing by using the “I” key.
River Crossing Hot Key
A hot key “N” is now available in the map editor screen, which sets the mission to a river crossing.
This will allow the infantry to be equipped with rubber boats.
Encyclopedia Changes
Armor slopes for armored vehicles are now displayed, as well as whether vehicles are equipped
with armored skirts. Text about each unit can now be displayed on the lower half of the screen.
The program looks for a text file with the appropriate name, which should be listed in the ENC
sub-directory of the OOB file. If the side view of the unit cannot be found, a new picture that says
“Picture not Available” is displayed instead. In addition to the icon (.sym) file, the text file (txt),
side view (.pic) and sound file (.snd) are now displayed. Fortifications, naval fortifications and
caves now also appear in the Encyclopedia. Range Finder value will now appear also.
© 2001 by Matrix Games. All Rights Reserved.
45
Page 52

Detailed Player Guide
Detailed Player Guide
Detailed Player GuideDetailed Player Guide
Players Manual v5.0
The Selection Screen
After the opening cinematic, you’ll see seven buttons marked “Mega Campaign for access to the
mega campaigns, “Solitaire Play,” which takes you into the game,, “Online Play” takes you to the
start screen for online play. “Timed Play” allows you to practice vs the AI with the timer active, but
without going online. “Hotseat Play” which allows 2 people to play at one computer. “Play By E
Mail” which sets up e mail play “Preferences” allows you to chage how the game plays and “Quit,”
which takes you back to Windows
Clicking on “Solitaire Play” brings you to the Selection Screen, which is the central menu of the
game. From it, you can play scenarios, battles and campaign games, create and edit your own
scenarios and campaigns, and peruse an encyclopedia that details the weapons in SPWAW.
Clicking on “Online Play” allows you to choose “Create” or “Join” If you wish to join a game
another play has set up, click on join and enter a nickname and the IP of the game you wish to
join. IF you wish to create a game, you can choose a scenario, or a Battle. A scenario must be
edited to assign units to each player before it can be played online. Selecting the units and
pressing F1 to F6 for player one to six accomplishes this. A battle will query each player to buy
units (up to an appropriate fraction of the total points. Key differences from the regular battle
generator are selecting the number of players per side, and the buttons that set unit purchase
and deployment to the computer or human – human is recommended.
Choosing Scenarios and Campaigns
SP: WAW allows you to choose from a multitude of scenarios, each of which is a stand-alone
© 2001 by Matrix Games. All Rights Reserved.
46
Page 53

Players Manual v5.0
battle. In addition, the game comes with several pre-designed campaigns, each of which is a
series of linked scenarios. And if that wasn’t enough, SP: WAW features a campaign generator
system, that allows you fight campaigns that stretch from the opening salvoes of World War II
until the conflict’s bloody end. If a quick game is what you are after, use the battle generator to
construct a quick game. Remember that scenarios must be edited to assign units to the desired
sides before it can be played online.
Playing a Scenario
From the Selection Screen, click on the “Scenario” button. Up to 1,000 scenarios can be listed.
Left-click on the one you want to play. Remember that while SP:WAW comes with many
prepackaged scenarios, many more are available from the Matrix Games Website at
www.matrixgames.com
When you select a scenario, the “Start” button at the top of the Selection Screen will become
active. Click on it, and you’ll see a Control Screen with two toggle switches. These determine
which sides are controlled by human or computer players. The default setting is for Player 1 to be
human-controlled. If you are playing with another human player, instead of the AI, ,you will be
prompted to enter a password. If you do nothing and hit enter you will play in hoseat mode and
the game will be saved in the Save folder and will not be protected by any security. The file will
compress substantially. If you enter a password, then your turn will end immediately and prompt
you to send the game to your opponent for password entry. This makes the game a “secure”
game saved in the E-mail folder and subject to security to prevent most forms of cheating.
Click on “Continue” and you will see the Player Screen, which allows you to begin your move,
skip your turn and allow your opponent to move, adjust the AI skill level if you’re playing the
© 2001 by Matrix Games. All Rights Reserved.
47
Page 54

computer, or exit the game.
Players Manual v5.0
© 2001 by Matrix Games. All Rights Reserved.
48
Page 55

Players Manual v5.0
Playing a Campaign
Left-click on the “Campaign” button. SP: WAW offers
three types of campaigns. One is a pregenerated
campaign of linked scenarios, such as the “Preparing
the Way” campaign. The second is the Long World
War II campaign, which allows you to play one of six
major combatants in a series of random scenarios
between between 1939 and 1945. The third is the
campaign generator, which allows you to play one of
27 possible combatants between 1931 and 1949.
The exciting feature of the campaign system is that
you’re given an allotment of build points (similar to
money) to choose what forces you’ll command. You
can recreate historical formations, or mix and match
different vehicles, foot soldiers and weapons. For
detailed information on playing campaigns, see the
Campaign section below.
Playing a Battle
SP: WAW Battle scenarios are stand-alone battles, as in the regular scenarios. However, you can
quickly customize the battlefield as well as use build points to pick whatever units you’d like to
command.
The Game Editor
SP: WAW comes with an Editor that allows you to design your own scenarios and campaigns, or
modify existing ones. For more information, see the Game Editor section
Load and Save Games
SP: WAW allows up to 1,000 scenarios, as well as up to 1,000 saved games and up to 1000
pregenerated campaigns.
Preferences Screen
This screen is opened by clicking on the “Preferences” button in the Opening or Selection Screen.
The various buttons are described earlier.
© 2001 by Matrix Games. All Rights Reserved.
49
Page 56

Players Manual v5.0
The Battle Map Toolbar
You control your units through the Battle Map Toolbar, which is on the right side of the Battle
Map. The buttons on the Menu are marked:
“N” – This cycles you to the next unit.
“P” – Cycles to the previous unit.
“H” – Displays the Headquarters Screen.
“G” – Cycles to the next formation.
“L” – Loads a unit onto a transport vehicle.
“C” – Orders the unit to fire a single weapon, rather than all its weapons.
“B” – Calls in indirect fire (an artillery mission) or an air strike.
“R” – Rallies a friendly unit.
“F” – Orders a unit to fire all its weapons.
“T” – Cycles among all enemy units that a friendly unit can shoot at.
“Z” – Orders a unit to fire into a hex, rather than at an enemy unit.
“X” – Commands a unit to lay smoke.
“+” – Zooms in the view.
“-“ – Zooms out the view.
“U” – Removes smoke from the display, so players can see the
battlefield.
“Clipboard” – Displays the Unit Roster.
“Undo (the red circle”)” – takes back a unit’s move.
“Red Flag” – Sets a unit’s objective.
“E” – Displays the Encyclopedia.
“Upward arrow” – Ends the game.
“S” – Saves the game.
“>” – Ends the turn.
“Preferences Bar” – Displays the Preferences Screen.
“Help” bring up the help screen layover
Battle Map Controls
• Go To Next Unit – This button cycles you through each individual unit in your forces
• Go To Previous Unit – This button takes you backwards through the roster
• Go To the Headquarters Screen – This button take you to the unit roster, whre you can set
waypoints and reaction turns
• Go to Next Formation HQ Unit - Cycles to the next formation
• Load Unit – This button loads or unloads infantry or artillery on to trucks, barges, HT’s or
other carrying vehicles
• Fire Specific Weapon at Current Target - – Orders the unit to fire a single weapon, rather
than all its weapons
• Attack Hex with Indirect Fire – This button brings up the Indirect Fire screen where you can
plan artliiery barrages and airstrikes
• Rally – This button allows the player to rally the selected unit
• Fire Weapons at Target of Current Unit – This button fire all of the unit’s weapons at the
selected target.
• Select Direct Fire Target - This button cycles the player through all of the targets within the
active unit’s Line- of- Sight with the target description and the percentage of hitting. The
player can choose to fire or simply acquire the target for later attack
• Attack a Hex with Direct Fire - This button targets a hex for direct fire. Useful for attacking
hexes where the enemy is possibly hiding to suppress them or used for engineer units to
blow holes in wall or bridges.
• Create Smoke in a Hex with Direct Fire- Allows the active unit to fire smoke in the target
© 2001 by Matrix Games. All Rights Reserved.
50
Page 57

Players Manual v5.0
hex
• Zoom In – Magnifies the map. There are 4 zoom levels
• Zoom Out – Reduces the map magnification
• Clear Dark Hexes – Clears the battle map of any shaded or smoke filled hexes for better
viewing.
• Go To the Unit Menu – Take you to the Unit Screen, where you can find out information of
the condition of your units such as damage, shots remaining and kills
• Undo the Last Move – Allws you to undo your lst move if you have not spotted, been
spooted or fired on by the enemy.
• Set Formation Objective – This sets the objective for the active unit’s parent formation (B0,
C0). This control can be combined with waypoints for computer control of the formation.
• Go To Weapons Encyclopedia – Opens the Encyclopedia.
• Quit Game – Ends the current game. You will be queried about if you are sure.
• Save Game – Saves the current game. Left click a slot on the save menu and the turn
number and sides are entered automatically.
• End Turn – End the current turn. You will be queried about if you are sure.
• Preferences – Brings up the Preferences screen
• Help- Brings up the help menu overlay with the Button and Hotkey descriptions
Hot keys available while playing on the battle map:
Period Stops video playback (hold key
Q End turn
down)
; Set objective for selected unit R Rally selected unit
@ Change range display S Save game
- Zoom out T Target unit
+ Zoom in U Clear darkened hexes and smoke
A All formation toggle V View recording of last player turn
B Bombard with artillery X Direct fire smoke
C Fire individual weapons Y - Range
D Smoke discharger Z - Direct fire bombardment
E Encyclopedia Space - Show unit data
Enter Unit moves (chat in Internet Play) Tab - Show chat buffer
F Fire selected unit at it's current
F1 - Help Screen
target
G Go to next formation F2 - Time Out
H Headquarters list F3 - Command Intervention
I Terrain effects screen F4 - Reinforcement Request
Alt J Jump to hex F5 - Chat and Message Review
L Load selected unit F5 - Color Choices Up (when entering chat)
Alt L Log combat results to combat.txt F6 - Color Choices Down (when entering
chat)
M Toggle stance F7 - Unit View Radius: What the unit can
see from that hex
Alt M Melee with enemy in hex F8 - Unit Movement Radius: Where the unit
can move to from that hex
N Next unit F9 - Surrender
Alt O Overrun enemy in hex F10 - Used by Roger Wilco for Internet voice
chatting
P Previous unit ? - Toggle ID Flags
pause/break – pauses game
© 2001 by Matrix Games. All Rights Reserved.
51
Page 58

What the Numbers Mean
"Nuts!"-- American General A.C. McAullife
The key to winning in SPWAW is using your forces wisely. And to use your forces
wisely, you must understand the capabilities of your forces. This is best
explained by describing the Unit Information Screen, which is accessed during
battles by right clicking on units.
Players Manual v5.0
Leader Data
In the upper right corner of the screen is information on the leader commanding the unit. Leaders
are rated for their abilities to rally friendly units’ fire, as well as their skill in directing the fire of
friendly infantry, artillery and armor. High numbers are best. Rally rating is the base percentages
chance that a leader will pass a rally check and reduce a subordinate unit’s suppression by one
half. The Skill ratings for armor, infantry and artillery are used when the leader checks to see how
successful the unit is at a variety of tasks like spotting for artillery, assaulting tanks, using antitank weapons, hitting targets and avoiding being spotted.
Current Status
In the upper left corner is displayed the unit’s speed, if it’s moving. Moving infantry only one hex
confers considerable benefits to defense and spotting. Moving more than one hex makes it much
more vulnerable to spotting and fire. Vehicles are incrementally more likely to be spotted and
incrementally less likely to be hit for each hex they move. Also shown is the type of command
link that it has with its headquarters (or whether it’s even in contact), and its current level of
suppression (reflecting disruption from enemy fire). Its firing accuracy will be cut by a percentage
© 2001 by Matrix Games. All Rights Reserved.
52
Page 59

Players Manual v5.0
equal to one-half the current suppression level. Units with zero suppression are given a 33%
accuracy bonus for not being in action yet A unit can get a suppression point or two at random
once the shooting starts as it can think the enemy is closer than it may be. A unit with
suppression can have is status changed form “ready” to “pinned” (“buttoned” for vehicles),
retreated, or routed. As the suppression becomes a bigger fraction of a unit’s morale, its status
worsens. Pinned units can’t move and buttoned vehicles do not spot the enemy very well and are
much more vulnerable to infantry assault. Retreated units will move under computer control
toward their “retreat hex” where they will leave the map if not rallied.
Retreated and routed units will not suffer as much fire (the firepower of those shooting at them is
halved). Retreated units will often return fire if fired upon and, if doggedly pursued, can go to
pinned status. Routed units are running head long for the rear and will only occasionally defend
themselves, but can decide to put up a fight if continually fired upon.
Weapons
Each unit’s weapons are listed, along with the types of ammunition carried and the maximum
range (in hexes) of the weapons. In addition, the number of smoke rounds carried is listed, as is
whether the unit (usually a vehicle) is equipped with smoke dischargers that project a quick
smokescreen in the 3 hexes to the front of the unit.
Experience
Higher experience numbers indicate a unit that will shoot better, be tougher on defense, and
degrade in status more slowly under enemy fire. Experienced units are less susceptible to
suppression, have a better chance to hit enemy units, spot enemy units better, are harder to spot
themselves, and close assault tanks better. There are four basic experience levels: Green (30-
49), Average (50-79), Veteran (80-99), and Elite (100+). Units gain experience at the end of each
mission if you are playing a campaign game. Unit experience does not change during a game.
The range is 30 to 140 experience points. Elite units, for example, are units that have over 100
experience points.
Morale
Higher numbers indicate the unit will take more suppression before it becomes pinned, retreated,
or routed. The morale value is used in some circumstances to see if a unit takes certain action,
like withdraw under fire, or assault a tank. When a unit has sustaining greater than 60%
casualties, a morale check may result in the unit “surrendering or dispersing”
Damage
For infantry units, this indicates how many men have become casualties. For artillery pieces, this
reflects casualties among the crew. For vehicles, damage indicates how many systems have
been damaged and/or crew casualties have been taken.
Speed
The current rate at which the unit can move in movement points. Units pay varying amounts of
movement points to enter a hex based on their movement class and the terrain in the hex.
Men
The number of men in the unit. If “Reduced Squads” is on, the number of men in a squad will
very randomly representing previously sustained casualties. The number of men who pass an
experience check will fire primary Infantry class weapons in slot one. When a unit has sustaining
greater than 60% casualties, a morale check may result in the unit “surrendering or dispersing”
Radio
This line indicates whether the unit is equipped with a radio. Radios enable leaders to exert better
control over their units. A unit loses contact with its formation HQ if it is not within 3 hexes of it,
© 2001 by Matrix Games. All Rights Reserved.
53
Page 60

Players Manual v5.0
unless it is equipped with a radio, in which case it attempts to maintain radio contact. In campaign
play damaged radios are repaired with a probability equal to twice the availability for that unit.
Radio repair does not cost any campaign repair points.
Fire Control and Range Finder
The Fire Control and Range Finder ratings can provide a substantial bonus to a unit’s ability to hit
by improving its accuracy. The Fire Control rating is multiplied by five and added directly to the
accuracy rating for the unit in question. The range, speed of the firing unit, the speed of the target
and terrain it is in, the unit’s experience, suppression, and the leader’s command rating for that
kind of unit then modify this number. This value with one added, times 6, times 8, times 10, and
times 12 is used to define “range bands” that impose penalties of “x times 0.67”, “x times 0.5”, “x
times 0.33” and “x times 0.25” to the hit chance. For example a unit with a Range Finder value of
2 has a normal hit chance out to (3*6) 18 hexes (900yrds), from 900-1200 its multiplied by .67,
1200 – 1500, by 5, 1500-1800, by .33 and beyond 1800, by .25. Fire control and range finder
damage is automatically repaired between campaign battles.
Size
Large units are easier to spot and hit. Personnel are generally a 1, while heavy tanks can exceed
5. The larger the unit, the higher the chance it will be hit by artillery. Size also affects the damage
potential of shots that penetrate its armor.
Cost
The value of the unit. This figure is used when players purchase units in campaigns and Battle
scenarios, and also in calculating victory points.
Carry Cost and Carry Capacity
Units are rated on how difficult they are to carry (the Carry Cost) as well as their ability to
transport other units (Carry Capacity). A one- or two-digit number is the number of men the unit
can carry. A preceding 1 indicates it can also tow a small or medium gun. A 2 indicates it can tow
a heavy gun. Thus a 106 code indicates that the vehicle can carry a medium gun and up tot six
men (usually the gun’s crew). A 212 means it can carry 12 men and tow a heavy gun. Units carry
cost is the converse. It requires a vehicle with a carry capacity of at least 104 to carry a small gun
with a four-man crew.
Set Range
This is the maximum range at which a unit may engage the enemy during the other player’s
movement phase. For example, when set to 7, enemy units within seven hexes may be fired
upon if there are shots available and suppression is not too high. Clicking on this number
enables players to adjust the range.
Stance
Clicking on this line changes a unit’s stance from “Advance” (an offensive mode) to “Defend.”
Hex coordinates are also listed, indicating a unit’s objective. This information is only relevant
when Command Control is enabled in the Preferences Screen. The difference is that units in
“advance” stance can move, while units in “defend” stance will find cover in the hex they are in
and stay there. Units must pass an experience check to find cover in a hex. Units in defend
stance receive “special Opfire” about 33% more often than when in advance stance.
Change This Unit / Whole formation
This only applies to headquarters units (those whose ID numbers end in 0). Changes can be
applied to the entire formation the HQ commands.
Armor Diagram and Penetration Table
This is a very important part of SP: WAW. The Armor Diagram the numbers around the small
© 2001 by Matrix Games. All Rights Reserved.
54
Page 61

Players Manual v5.0
image of the vehicle’s hull and the numbers around the turret) indicate how strong a vehicle’s
armor is in those areas. Note that tanks are most strongly armored in the front, and possess
weaker armor on the sides and rear. There are separate values for a vehicle’s hull and turret.
Above the Armor Diagram is a table that lists the slope of the vehicle’s armor. This is more for
those who are strongly into the minutiae of tank design, but suffice it to say that the better the
slope of a vehicle’s armor, the greater the chance that enemy rounds will ricochet. Some
vehicles, such as American tank destroyers, had no armor on top of their turrets. These units
have their turret armor values marked in red.
Below the Armor Diagram is the Penetration Table. This lists the penetration (in millimeters) of a
given shell at a given range. The formulas are complex. But take an American Stuart light tank
(with a 37-millimeter gun that fires an armor-piercing round with a penetration of 63 at a range of
10 hexes) that suddenly comes upon a German Tiger heavy tank with a frontal armor of 100.
What is the correct tactic for the Americans? Run fast or pray hard.
Special Ability
This indicates any special ability a unit has such as such as engineer, recon, or fast response
artillery.
Movement
Designer’s Note: Traveling from your home to the grocery store is
easy. Traveling across a battlefield, into the teeth of enemy fire, is not.
This was especially true in World War II, which marked a new type of
warfare. Before 1939, most soldiers either marched on foot or rode
horses into battle, while today many armies are fully mechanized. But
mass-production of vehicles was relatively new at the time of the
Second World War, which meant that some nations (particularly the
U.S.) had plenty of vehicles for everyone, while others (such as the
Germans and Russians) only had enough to fully equip a minority of
divisions.
Remember that the race is not always won by the swiftest. Players in SP: WAW will find
themselves coordinating vastly different units, from fast-moving tanks and mechanized infantry in
half-track personnel carriers, to cavalry and good old foot infantry. Those who think tanks can
blitz through any terrain will find that woods, swamps and jungle are ruled by infantry.
Movement in SP: WAW is simple. Go to the main map, left-click on the unit you wish to move and
then left-click on the destination hex. You don’t have to click hex-by-hex to get to a distant spot.
Pick your destination, and the computer will move the chosen unit until it reaches there or until
the unit runs out of movement points. Combat friction can cause you to lose movement points
during your turn if you are spotted by the enemy, or shot at.
How fast a unit can move is expressed by its Speed (number of movement points), which
measures how far it can move in a single turn. Infantry speeds tend to be 9 or less, while vehicles
have speeds up to 36. However, vehicles spend more of their movement points to move through
certain types of terrain (such as swamps), so they don’t always travel further than foot units.
Infantry pay 2 for most “regular” terrain. Vehicles (depending on class) can go the full distance
only on a paved road. See the Terrain Movement Cost Chart.
Moving Entire Formations
A quick way to move an entire formation (all the units with similar letter designations, such as B1,
© 2001 by Matrix Games. All Rights Reserved.
55
Page 62

Players Manual v5.0
B2, B3, etc.) is to use the “All Formation” command. There are some tricks to it as outlined below.
Unfortunately, they will also arrive in a jumble, so this is not a good option if you like neat
formations. Also, it’s an easy way to march an entire formation into an ambush.
1. Be sure Command-Control and Move Radius are turned on in the preferences menu.
2. Type a semi-colon or use the blue flag icon to assign an objective. Then click on the hex
where you want the formation to go. A blue flag will appear.
3. Click on 0 (leader) of the formation you want to move. The move radius of that leader will be
highlighted. Depress the "a" key.
4. Click on a hex within that move radius where you want the formation to go.
5. You will see the entire formation go toward that hex.
A word of caution. Units may end up in mud or marsh hexes. They may not choose a path you
would have chosen for them individually.
Another way if units are behind your lines is to use the “h” key and at the headquarters menu
place the unit under computer control and give it waypoints to follow. Units will follow the
waypoints until they reach the end, or are fired upon by enemy units. Note that this is not the
same as assigning a unit an objective under the Command and Control rules. It’s just a handy
way to get reinforcements to a particular place, especially in big scenarios on very large maps.
This can be especially useful in online games with a severe time constraint. The computercontrolled troops will always move before your turn is saved.
Waypoints and Objectives
Scenario designers may assign waypoints to computer-controlled formations, or players may
assign them to forces that they are allowing the computer to run. The AI will follow these way
points, moving and fighting as needed, until the waypoints are all reached or until turn 25. To
activate waypoints for formations that a human player has ordered the computer to take over, go
to the Headquarters Screen and click on the icon of a human next to the appropriate formation. A
computer icon will then appear. Next, click on the waypoint (the far left) button, which will take
you to the map and allow you to click on waypoint hexes.
The player must still set objectives for the formations under human control, if the command and
control options are on. Reinforcements will now activate properly and may be assigned
waypoints so that when they arrive they move to where the scenario designer wanted.
The scenario designer may now also designate certain formations to become active on a certain
turn. They will not move until the designated turn unless fired upon.
The scenario designer can now place a Reactive Victory hex on the map and it will be set at 19
victory points by default. The victory hex will not be visible to the human player at all and the AI
will ignore it since it is less than 20 victory points. When the human player moves over the
Reactive Victory hex +5 is added to the victory level. This will now make the victory hex worth 24
points and now the AI will attempt to go after it. This is a great way to get the AI to react to human
© 2001 by Matrix Games. All Rights Reserved.
56
Page 63

Players Manual v5.0
players and spice up a scenario. None of the victory points assigned to these hexes are counted
at the end of the game.
Cautious Movement
Infantry units gain a defensive bonus if they only move one hex in a turn that they are fired on.
They also are less likely to be spotted if they move slowly. Such units are 25% as vulnerable as
units moving at a normal speed. Stationary units are 20% as vulnerable.
Fire and Movement
Moving units will have their move interrupted by enemy fire
(called opportunity fire). If they survive, they can continue
moving.
On the other hand, it was harder to hit moving targets,
particularly before fire control computers were invented.
Moving units receive a defensive bonus that makes them
harder to hit. Infantry units however are five times more
vulnerable to the fire if it does hit them when moving.
Transport and Towing
Vehicles such as trucks and tanks must tow heavy weapons, particularly artillery pieces.
Personnel units can climb aboard trucks, half-tracks and jeeps. In addition, tanks may also carry
infantry. If the personnel units are small enough, sometimes you can carry more than one in a
vehicle. If you try to load a unit larger than the unit can carry, you will be prompted if you want the
unit to load anyway and leave the stragglers behind. If you say yes the excess men will be
counted as destroyed for VP purposes.
Remember that in order to load a unit, the transport vehicle must be in the same hex as the
cargo. Put them in the same hex, highlight the unit to be towed and then hit the Load button or “L”
hotkey.
Routed or retreating units must be rallied before they can be loaded. Pinned units can be loaded,
although they will assume the suppression level of the carrying vehicles.
Machine guns, mortars, anti-tank guns, flak guns, howitzers, rockets launchers, infantry guns,
light mortars, heavy machine guns and heavy mortars may not fire their primary weapon on the
turn they unload from a vehicle or move.
Combat Friction Movement Limitations
Soldiers have a tendency to slow down and become more cautious when they are being shot at
or when they know enemy troops are in the vicinity. To reflect this, the movement points a unit is
given in a turn is often less than its maximum speed.
• Unit has been fired upon within the past two turns (# next to name in unit info display):
Infantry - 50% of Speed, Vehicles – 67%
• Unit is seen by enemy units but has not been fired upon (* next to name on unit uinfo
display): Infantry – 67%, Vehicles 100%
• Unit sees no enemy units and has not been fired upon (no symbol):
Infantry - 100%, Vehicles 100%
Note that this is dynamic during a turn, so a hex that is in the units highlighted movement radius,
may suddenly not be reachable if it is spotted or shot at.
© 2001 by Matrix Games. All Rights Reserved.
57
Page 64

Players Manual v5.0
Weather and Movement
"Ice was causing a lot of trouble since the calks for the tank tracks had
not yet arrived. The cold made the telescopic sights useless. In order to
start the engines of the tanks fires had to be lit beneath them. Fuel was
freezing on occasions and the oil became viscous”
-- General Heinz Guderian
Units have less chance of sighting and move more slowly due to fog, haze, rain,
snow and dust storms. Units traveling on paved roads, in the rain, suffer less of
a movement penalty than before.
Why Units Won’t Move
Units may not move for several reasons. The most likely reason is that Command & Control is
turned on, which is the default preference. Artillery pieces and other heavy weapons may only
move if they are towed. Units that are routed or are retreating from enemy fire may not move
voluntarily (the computer will control them as they head to safety in the rear at the end of each
turn). But if you can rally them, they can move.
Also note that if you’re using the optional command control rules, units set to “Defend” (as
compared to “Advance”) will not be able to move unless their headquarters expends command
points. Also units that are not assigned an objective and are not in communications to receive a
new one won’t move. Pinned units won’t move until rallied. Vehicles won’t move if immobilized by
terrain or combat results.
Stacking
More than one unit may enter and remain in a hex. To order a friendly unit to enter a hex already
containing another friendly unit, hold down on the shift key while clicking on the destination hex.
Units may move into hexes containing any number of friendly, enemy or wrecked units as long as
they have the movement points to do so. Entering a hex already occupied costs one movement
point per additional friendly, enemy or wreck unit. Thus moving into a hex with 3 friendly units, 2
enemy units and a wrecked vehicle would cost 6 additional movement points, in addition to the
normal cost of entering the terrain.
Unit Status
A unit’s movement and combat abilities are affected by its current status, which is displayed at
the bottom of the Battle Map. Units may be in one of several modes:
• Ready: Ready for action. Your units have a much higher chance of hitting targets and of
spotting enemy units if they haven’t moved.
• Entrenched: In a prepared position. Dug-in units look as if sandbags surround them. Units
are difficult to hit when entrenched, or in protective cover such as under trees or inside
© 2001 by Matrix Games. All Rights Reserved.
58
Page 65

Players Manual v5.0
buildings. Units may start entrenched when they are the defenders in an Assault scenario.
• In-Cover: The unit has scouted out what cover it can find in the hex, and perhaps scooped
some hasty foxholes. Though its defense bonus is not as high as an entrenched unit. Units
in-cover are symbolized by a series of little foxholes around in the hex.
• Moving: Moving units do not spot enemy units as well as positioned units and have a
reduced chance to hit units they shoot at.
• Buttoned: Applies only to vehicles. Enemy fire will cause the crew to close the hatches,
reducing their spotting ability.
• Pinned: A state caused by heavy enemy fire. Pinned units may not move, and their
effectiveness at shooting and spotting is reduced.
• Routed: Hit with enough fire, units will rout. They will run away from the battle until rallied or
until they leave the map. The computer, rather than players, controls these units. Routed
units only rarely defend themselves, but if pursued doggedly, can decide to go down fighting
and revert to pinned status. Combatants did not fire as intensely on units obviously breaking
off and not a threat, so firepower against them is halved.
• Retreating: Enemy fire is causing the unit to fall back from an untenable position. The
computer, rather than players control these units. They will halt to rally rather than leaving the
map. They are also more likely to revert to pinned status and, in general, return fire more
voluminously than routed units. As with routed units, they are not seen as a great threat, so
firepower against them is halved.
A unit may have additional symbols displayed after its status:
* — An asterisk appearing after the unit’s status indicates that the unit has been spotted by at
least one enemy unit. This may seem incongruous that a unit “knows” it is being watched by
unseen eyes, but accounts of combat are full of tales of troops who sensed they were under
observation. Most likely they detected subliminal cues of sound, smell and environment. The
intent of the rule is to reflect the fact that troops became more cautious when they thought the
enemy was in the immediate vicinity.
# — A “pound sign” appearing after the unit’s status indicates that the unit has been fired upon in
either the current turn or the previous turn. This means that firing on a unit, even if using small
arms fire on a tank, will let the target know you know they are there. It will often pay dividends,
reducing enemy movement and hit chances. Troops able to deploy and engage completely
unmolested have decided advantages in freedom of maneuver and hit chances.
Spotting
Units can’t really shoot at what they can’t see (although SP: WAW allows blind fire into hexes
suspected of harboring enemy units, it isn’t terribly effective unless using an assault gun). A
unit’s chance of spotting varies with such factors as whether it’s a buttoned vehicle, the type of
enemy (infantry in a woods or building is hard to spot) and whether the unit is suppressed.
Spotting ability is reduced for turreted vehicles, and slashed even more for non-turreted vehicles
such as trucks. Note that snipers are very, very hard to spot.
The game determines a “score” for the spotting unit and the target, and then adds a random
number to decide whether the unit is within spotting range under the circumstances. If in range, it
is detected. If out of range, it is not. If the Limited Intelligence option is on, units will have their
spotting range recomputed (with a new random number) so units “on the bubble” may come in
and out of detection range without moving, as the environment (especially smoke on the
© 2001 by Matrix Games. All Rights Reserved.
59
Page 66

Players Manual v5.0
battlefield) changes.
Version 1.0 had a toggle for hidden forts. This button has been removed, and the option is
considered off by default.
Limited Intelligence
"With amazement and disappointment, we discovered in late October and early
November that the beaten Russians seemed quite unaware that as a military
force they had almost ceased to exist." -- General Blumentritt
When playing with the Limited Intel preference off, your units spot adjacent units
automatically if those units have fired at your unit. Don’t forget that if a vehicle drives right next to
one of your infantry units in a building or woods and you don’t fire at them, there is a chance that
your unit may go undetected by the enemy. The probability depends on the current Visibility level,
whether the enemy vehicle is carrying infantry, and the experience level of the enemy vehicle.
Infantry are normally able to see adjacent units.
When playing with the Hidden Fire preference on, there is a chance your unit may not spot
enemy units adjacent to them, even if that unit fired at them. This makes for more realistic game
play as this allows infantry to sneak up on vehicles in rough terrain, but it is more difficult to play
at this level.
The size of the hidden unit will greatly affect its chances of being spotted. Units with a size value
of zero can shoot several times without being detected.
Recon Special Ability
Some infantry and vehicular units have the Recon special ability. This gives recon infantry a 25%
spotting bonus, while recon vehicles do not suffer the normal 50 percent spotting penalty for
vehicles. This is a bonus given to a formation using the “1” special flag in the Order of Battle
editor.
Combat
"No bastard ever won a war by dying for his country. He won it by making
the other poor dumb bastard die for his country" -- General George S.
Patton, Jr.
Designer’s Note: “What can be seen can be destroyed.” That old saying has
been true ever since gunpowder was invented. Yet players accustomed to the
one shot – one kill technology of today will have to get used to a different way of
war. Fire control on Second World War tanks was relatively primitive, so that hitting a target with
the first shot was difficult unless the range was point-blank.
As in real-life, players will have to use combined arms. Some tasks are suitable for tanks, other
for infantry, while a well-placed artillery barrage will decide many a battle. Even the most
awesome weapons are vulnerable if used improperly. Stories are legion about heavily armored
German Tiger tanks that survived numerous hits from Allied tanks. Yet (very brave) infantrymen
who stalked them with a simple bazooka occasionally knocked out even those steel monsters.
Infantry need tanks to knock machine gun nests, pillboxes and enemy armor, while tanks need
© 2001 by Matrix Games. All Rights Reserved.
60
Page 67

Players Manual v5.0
friendly infantry to root out enemy foot soldiers waiting in ambush with their anti-tank rockets.
Commanders who understand the strengths and weaknesses of the units and weapons under
their command will win the game.
Combat uses the same point-and-click system as movement. Choose the firing unit and left-click
on the target. Your unit will fire all of its weapons. Or, use the Target button (the “T” hotkey) to
cycle among all the enemy units that are visible to the firing unit. Each type of weapon carried by
a unit (say, a cannon and various machine guns carried by a tank) gets a variable amount of
shots. When unloading any unit from transport, the unloaded unit loses one shot for that turn.
Remember that shots are the number of times that a unit can fire during its turn. This varies
according to unit type (big guns take longer to load), number of men in the unit (if an anti-tank gun
loses one or two of its crew members, then they are unable to load the gun as quickly), status of
the unit (pinned units get less shots), experience level of the crew and the leadership value of the
unit leader. Elite units can actually receive more shots than inexperienced units. You usually
receive at least one or two shots per turn unless the unit is in bad shape.
You may make individual weapons inactive by clicking on them in the Unit Status Screen, and
then clicking on the name of the weapon. If the weapon is listed in green, it is on. If in red, it is off.
This can be used if you absolutely do not want the weapon to be used, even if the unit is fired
upon. The AI can override the Opportunity fire range restriction if the unit is fired upon.
Hitting the “C” key allows a player to choose one weapon from a firing unit. When playing with the
optional limited ammunition rule, this allows, say, a friendly tank to conserve its cannon
ammunition while using the plentiful ammo of its machine guns.
Accuracy
When you move the cursor over an enemy unit that’s within range of friendly forces, or use the
Target key to cycle through enemy units, a pop-up box will display the percentage chance of a hit.
At long range, weapons will tend to have poor accuracy (no fire control computers in 1939), with
hit probabilities of 2 percent or so. If you’re playing with limited ammunition rules, you can take a
lot of low-odds shots and run out of ammo quickly. Close-range shots mean letting the enemy
come dangerously close, but hit probabilities can exceed 90 percent. There is always a 1%
chance to hit or miss in any shot.
A unit’s experience and the skill of its leader a unit’s leader are crucial. Those numbers are
© 2001 by Matrix Games. All Rights Reserved.
61
Page 68

Players Manual v5.0
checked every time a unit fires. If the firer passes both the experience check and the leader skill
check, it gets a big bonus to its accuracy. If it passes the experience check but fails the
leadership skill check, its hit probability is normal, while failing the leader skill check results in a
penalty. Thus fire from veteran troops is deadly, while green units will be much less effective.
The hit probabilities shown are very rough. Range, suppression, movement, terrain, and weather
will all affect the final number. For example, against entrenched infantry, hit probabilities won’t be
much higher than 30% unless the firing units are elite. In general, a unit’s accuracy is based on its
accuracy rating. This represents the range at which the unit has a 50% chance to hit. This is
adjusted based on the range of the target, the maximum range of the weapon and whether it is
small arms fire or not. Other modifiers include
• Target size. This affects hit probablities, with larger targets more like likely to be hit.
Terrain offers protection by reducing the effective size of a target. Target size modifers
range from 240 for a big size 5 target, to an adjusted size of –4 for a small target. The
formula is modifers/100, multiplied by base accuracy.
• Suppression. Accuracy is affected by the suppression level of the firing unit. Accuracy is
reduced by Suppression/2.
• Movement. A firing unit that has previously moved will be much less accurate, while a
target that is moving is harder to hit. The modifier for moving targets is hexes moved
times 3, added to 3 times the firing unit’s fire control rating, and then subtracted from a
base of 70. For a firing unit, it’s 6 times the number of hexes it has moved, added to 8
times its targeting (formerly stabilizer) rating, and then subtracted from a base of 66. Put
simply, a good fire control rating is needed to hit moving targets, while the ability to
coordinate movement, turret traverse and crew activities (and an actual gun stabilizer rare in World War II) are essential for accurate shooting when the firing unit is moving.
Note that in the "several minutes" a turn represents, it is rare for units to actually be
shooting while travelling forward at any great speed. The assumption is that for most part
units are shooting form the "short halt". Russians tended to be poor at this and are
typically penalized one targeting rating because of this.
These are the targeting ratings in the game (they use the OOB editor "stab"
characteristic)
Stab 0 = SP AT guns like Archer and Marder that were not very good at shooting from
the "march".
Stab 1 = SP guns and tanks with slow 2 man turrets or 1 man turrets
Stab 2 = tanks with 2 man turrets or slow turrets
Stab 3 = "normal" tanks with 3 man turret crews.
Stab 4 = a very few late war weapons
• Experience. Hit probability is multiplied by experience/65.
• Rangefinders. A high rangefinder value is vital for long-range shots. This value +1 is
multiplied times 6, 8, 10 and 12 for a series of “range bands” where a penalty of times
.67, .5, .33 and .25 kick in. For instance a tank with a rangefinder value of 2 (effectively 3)
has a normal hit chance out to 18 hexes (900yrds). At 900-1200 yards, it’s times .67, at
1200 – 1500 times .5, at 1500-1800 times .33 and beyond 1800 yards, .25. If the
© 2001 by Matrix Games. All Rights Reserved.
62
Page 69

Players Manual v5.0
rangefinder value is greater than 12, it actually improves the accuracy of the first shot (or
rather mitigates the penalty against initial shots).
Target Acquisition
Accuracy will vary greatly because of a multitude of factors, such as whether the firing unit or
target is moving. But repeated fire at a target improves the chances of a hit. The first shot that a
unit fires at a target suffers a 40% penalty on the percentage chance to hit. The second shot
receives a 20% penalty, while the hit probability is normal for the third shot. Infantry weapons
“range in” faster, so the 1
st
shot penalty is 80% if a “primary infantry” weapon.
Movement and Shooting
A unit that moves will lose shots, and any shots it does fire will be much less accurate. Similarly,
a unit that fires loses movement points. Having a stabilizer on a gun will keep it from losing as
many shots when moving.
Opportunity Fire (OpFire)
An IGO-UGO system has the problem of “turns” that do not exist on a real battlefield. Games tend
to two extremes. Plotted movement with simultaneous execution is at one extreme assuming
near perfect synchronization of forces in time and space – all units moving proportionally
according to speed to the stroke of a master metronome. IGO-UGO goes to the other extreme of
perfectly asynchronous movement, each unit moves in series, often completing its turn before
any other units move. Reality is in the middle and both systems have their troubles. To deal with
the problem of the enemy being “frozen” when its not their turn, IGO_UGO systems usually use
the concept of opportunity fire, or allowing certain trigger actions to allow the “frozen” player’s
units to shoot when its not their turn. In SP:WaW these triggers are:
• Moving in the LOS of the enemy
• Shooting at him
• Moving within 2 hexes of the enemy
When these events occur there is a chance based on experience, ROF and range that an
Opportunity fire will be triggered. We have broken down Op-Fire to three levels.
Point Blank Op-Fire is triggered when ever a moving unit moves moves next. If the unit is in a
defense stance it will be triggered from 1 - 3 hexes away.
Special Op-Fire: It will now considered the units suppression level and will also add a small
amount of suppression every time you Special Op-Fire. So the more you shoot the more
suppression the unit receives.
Return OP-Fire will happen when one of your units gets shot at. There is a chance it will fire back
even if it has used all of its shots.
Now the concept of “shots” regulating the number of times the player can fire compounds this
problem of “asynchronization” because enemy units can “sucker” a defender into expending all
their shots early in the turn, leaving it defenseless. Now in SP:WaW we assume that even if a unit
completes its turn and causes an enemy to expend all its opfire shots additional friendly actions
often “should have” occurred very closely in time with it. So we have put “special opfire” into the
game. Special OpFire is opfire triggered when an enemy has no shots remaining – in effect
“bonus fire”. Since each turn represents several minutes, even heavy tanks with rates of fire of 6
or 8 rounds per minute are capable of 12 or 18 shots in a turn if the enemy provides a “target rich
environment”.
So if you are in a situation where you bump into the enemy close up, the game assumes some
simultaneity where you are not necessarily "really" moving your units one at a time. So just
becasue the first unit moves up and makes the defender opfire his "wad", that doesn't mean that
© 2001 by Matrix Games. All Rights Reserved.
63
Page 70

Players Manual v5.0
you are free to waltze all his platoon mates up and do the defender in! Since the defender doesn't
get a chance to rally during the turn, the key is to shoot a lot to suppress him and make those
opfire shoots a nuisance (and waste of his ammo). It also forces better combined arms
interaction. Couple this with the Opfire Confirm option and both players will find themselves fully
engaged throughout both halves of the turn!
The idea is that you are likely to get shot at, at least as often as you shoot if you close with the
enemy at short range. If you have supporting troops (direct fire HE or MGs in particular)
softening up the position before you assault, you will do much better becasue those opfire shots
will be quite poor (half the units suppression/100 is mutiplied time the hit chance).
Close Assault
Vehicles that move adjacent to infantry may be close assaulted by the foot soldiers (who are
climbing on top of the tank, dropping grenades down its hatches, etc.) The minimum chance for
close assault uses a formula that uses the number of men assaulting. So, for example, a 10-man
squad has a base 10% chance. If infantry are riding on a vehicle when it is close assaulted by
enemy infantry, the infantry may absorb or abort the assault. You’ll lose infantry, but this will keep
your tanks alive.
If the close assault works, the assaulting infantry will suffer a small amount of suppression, and
the target will be immobilized or destroyed. If the infantry assaults, but the vehicle successfully
defends itself, the infantry unit will be left suppressed and may take casualties. If the assaulting
units fail their experience check the vehicle is considered to have repulsed the attack right off,
and the infantry will suffer a huge amount of suppression. Assaulting tanks is not for the faint of
heart.
Units with anti-tank weapons, flame-throwers, satchel charges or Molotov cocktails will have a
much better chance of close assaulting. Units in cover or entrenched have their assault chances
increased by 33%, while units that moved or have unloaded have their chances halved.
Melee and Overrun
Melee is for infantry units and is engaged by pressing Atl-M on the keyboard. Overrun is for
vehicles and is engaged by pressing Alt-O on the keyboard – if occupying a hex with an enemy
unit the attacker takes a "Morale/suppression check" to initiate melee/overrun. If the attacker
fails, the defender gets a "free opfire" and the attacker gets suppresed - the attacker cowers back
to his "corner" of the hex. If really unlucky and/or depleted, it can even surrender. If the attacker
passes the Morale/suppression check, the defender takes a Morale/suppression check - if it fails
the attacker gets a free melee whack at it and the defender responds with survivors and at 2/3
strength. If the defender is pasted too bad, it can surrender. If both pass, then hand-to hand
combat ensues. There is a chance that attackers will "go berserk" (especially if Japanese or
Russian) and get an "extra chance" to pass the gut check if they fail the first time, and a bonus kill
chance. Same with an occasional "stubborn defense" if defending. Each attacking man gets an
"attack chance" figured and each sucess is an enemy casualty. You get a bonus for grenades,
satchel charges and flamethrowers. High experience and leadership values will help you.
Overrun attack factor is figured as a function of vehicle size, MGs, and Main gun HE - plus
experience and leadership. This attack factor attacks each defender, but they get a chance to
"save" based on their experience. In both cases 20-40% casualties will typically result, with
surrender at the end a distinct possibilty. The routine was set up so 3 "rounds" should eliminate
an enemy, whether one squad fighting 3 seperate turns, or 3 squads piling on 1 guy, but luck
plays a big part. You have to be "normal" i.e. not pinned, retreated or routed) to intiate melee. If a
vehicle overruns a gun there is a special chance that it will destroy the gun itself, but if it does so
there is a slight chance it can get immobilized in the process.
Each man has an attack factor computed (nominally between 10 and 40% based on a host of
factors) and each man is given a roll of the dice, and successes cause enemy casualties. Both
© 2001 by Matrix Games. All Rights Reserved.
64
Page 71

Players Manual v5.0
are applied at the end of the round Multiple squads melee the survivors of the first squads’
attack. In general, 3 melees are assumed to be the average to prove conclusive (defined as
surrender or elimination of all one sides’ troops). That is, either 3 turns of the units occupying the
hex (ie 5-10 minutes of fighting time at 1:1) or a 3:1 advantage in a single turn (3 enemy squads
occupying the hex with the defender and all meleeing sequentially). If you want to storm
entrenched of fortified units rather than take pot shots at them all day, it is one way to do it, but
you better have a numerical advatage in squads or a really big morale/experience advantage!
Tank Machine guns
Though tanks were usually equipped with machine guns, they tended to use those weapons only
at close ranges. Therefore vehicle crews must pass an experience check to fire their machine
guns farther than six hexes, unless the vehicle is tank with a main gun that is damaged or has
been rendered inactive to save ammunition. This also represents the difficulty in having
crewmembers load the main gun while firing the coaxial machine guns and coordinating the fire of
the bow gunner. The result is sometimes all the MGS on a tank will fire, other times only the main
gun will. This is not a bug, just the fact that it is a difficult fire coordination problem.
Pulling Back
Sometimes when infantry is under fire they will retreat. If so, the message “Pulling Back” is
displayed. If infantry have smoke grenades, they will fire it automatically in an attempt to cover
their retreat. Transport vehicles (trucks and half-tracks) will often withdraw if armored vehicles
approach. Tank panic - infantry may run from tanks as they move
Hull-down
Designer’s Note: A Top Ten rule for a tank to survive on the battlefield is to be hull-down. This
means that the hull is protected (behind a stone wall, the crest of a hill, etc.) while the turret is
free to fire. A hull-down position allows a tank to shoot while making itself a much smaller and
less exposed target. Hull Down status is a bit abstracted, as it should be based on the direction
the fire is coming, not just where the front is pointed. Nonetheless, the following rule captures the
flavor of tanks being in “improved positions”.
Vehicles that are hull-down are harder to hit and can only be hit on their turrets.
Vehicles are considered hull-down if they are aren’t stationary and are in:
• A Rough or Stone Building hex or,
• “In-Cover” or,
• A hex that is higher in elevation than the hex containing the unit firing at them, or
• In an entrenchment hex and are being fired on from the front.
Vehicles that are hull-down have their size divided by 4 for hit chance purposes, and can only
be hit in the turret.
© 2001 by Matrix Games. All Rights Reserved.
65
Page 72

Terrain Effects on Movement and Combat
Players Manual v5.0
Terrain Type Foot
Movement
Clear 2 3 2 2 Poor
Pavement 2 3 2 2 Poor
Gravel 2 3 2 2 Poor
Dirt 2322Poor
Cobblestone 2 3 2 2 Poor
Sand 2 3 2 2 Poor
Mud 3 8 6 4 Very Poor Break down roll
Swamp 3 12 9 6 Very Poor Break down roll
Paved Road 2 1 1 1 Very Poor Break down roll
Dirt Road 2 2 1 1 Poor Break down roll
Trail 2 3 2 2 Poor Break down roll
Rough 3 15 12 9 Excellent
High Grass 2 3 2 2 Poor
Slopes 2 4 3 2 Good
Cliffs 14 NA NA NA Very, Very Poor Special Forces
Rocks 3 NA NA 12 Excellent
Boulders 3 NA NA NA Very Good
Streams 6 12 9 6 Good Break down roll
Canals 3 12 9 6 Good Break down roll
Rivers NA NA 1 1 Poor Amphib/boats only
Coral Reef 3 8 6 4 Poor Break down roll
Shallow water 3 8 6 4 Poor Break down roll
Water NA NA 1 1 Poor Amphib/boats only
Deep Water NA NA 1 1 Poor Amphib/boats only
Snow/Rain/Sandstorm (+1) (+1) (+1) (+1) Poor
Bocage 9 NA NA 18 Good Bottom hits
Sandstone walls 3 NA NA 6 Good Break down roll
Stone walls 3 NA NA 6 Good Break down roll
Trees (+1) (+1) (+1) (+1) Good
Wood Buildings 2 NA NA 8 Very Good Break down roll
Stone Buildings 2 NA NA 12 Excellent Break down roll
Multi hex buildings 2 NA NA 12 Excellent Break down roll
Trenches 3 12 9 6 Very Good Break down roll
Gullies 3 12 9 6 Very Good Break down roll
Crops 2 4 2 2 Fair
Plowed Fields 2 4 2 2 Fair
Vineyards 2 4 2 2 Fair
Orchards 2 3 2 2 Good
Wood Bridges 2 1 1 1 Poor Stacking limit
Stone Bridges 2 1 1 1 Very Poor Stacking limit
Rice paddies 2 4 2 2 Poor Break down roll
Polders 3 12 9 6 Poor Break down roll
Graveyards 2 3 2 2 Fair
Marsh 3 12 9 6 Very Poor Break down roll
Wheel
Movement
4 Wheel
Movement
Track
Movement
Defense Notes
only
possible
© 2001 by Matrix Games. All Rights Reserved.
66
Page 73

Players Manual v5.0
Vehicles also are harder to hit with direct fire if they are in a building or rubble hex, wall, bocage
or a hex with trees.
Infantry and guns are harder to hit if they are:
• Entrenched or in a stone buildings or rough hex (this is the best cover)
• “In-Cover”
• In a building or a hex with trees.
• In a shell hole (least amount of cover).
• Pinned (they’re taking cover).
Indirect fire at units in stone buildings or rough hexes inflicts 50% of the normal casualties.
Movement Effects on Combat
Vehicles that are moving are harder to hit and the faster they are moving the harder it is to hit
them. Generally it is much harder for a moving unit to score a hit on a stationary target than it is
for a stationary unit to hit a moving target. Infantry that are stationary are considered prone.
Infantry that have moved only one hex in a turn are considered to be moving cautiously and are
only slightly easier to hit than prone infantry. Infantry that moves more than one hex in a turn is
much easier to hit.
The effect on accuracy of moving depends on whether you are the target or shooter. In both
cases the effect increases with the amount of movement. The modifier for the target is based on
hexes moved times three, then subtracted from a base of 70 and 6* hexes moved subtracted
from a base of 66 for firing unit movement. 3 times the fire control rating is added to the former
and 8 times the targeting rating added to the latter.
Infantry Facing
Note that while facing affects a vehicle’s ability to fire (turret less vehicles can only shoot from the
front) and which part of their armor is hit, facing does not affect infantry as much. Infantry see
better in the direction they’re facing, while engineers must face a hex to remove obstacles or
plant mines in it.
Combat Results
"Strength lies not in defense but in attack." -- Adolf Hitler
Hits on vehicles can destroy them outright, though sometimes all or some of their
crews will escape. Vehicles can also suffer damage to a variety of their
components, such as their tracks and suspension (which either halves movement
or immobilizes the vehicle) and guns. Infantry casualties are tracked individually.
Note that personnel casualties don’t just reflect wounded men, but also soldiers who have been
so dazed or confused that they are useless for the rest of the battle. Thus a unit showing 3 men
effective may have more present, they just aren’t effectively contributing to the fighting.
Enemy fire – even if it inflicts no damage – will inflict suppression points. Once suppression
reaches a high enough level in relation to morale,) units will be pinned, or will retreat or rout. Even
if the unit maintains its morale, accuracy will be reduced by suppression divided by 2.Moral of the
story: keeping the enemy’s head down will limit the amount of fire headed your way.
Suppression is removed by rallying. Each successful rally reduces your suppression by one half.
© 2001 by Matrix Games. All Rights Reserved.
67
Page 74

Players Manual v5.0
So if a unit has 99 suppression, its first rally will reduce it to 48, the next to 24, the third to 12 and
then 6, 3 and 1. Suppression is also given or removed at the end of the turn, depending on the
proximity of friendly units, headquarters, hidden status and proximity of enemies.
Buttoned-up
Even if incoming fire doesn’t damage a tank, it may force the crew to button-up (close the
hatches). The crew then can only see a narrow slice of the world through the vehicle’s
periscopes, which means that their sighting and accuracy abilities go down. Many vehicles are
equipped with anti-aircraft machine guns, which can only be used if the vehicle is unbuttoned.
Bailout
Vehicle crews now check morale when serious damage is done to their vehicle, or they think
serious damage has been done. If they fail, they bail out immediately. Bailed-out vehicle crews,
or gun crews who abandon their artillery pieces, may rejoin them once their morale improves and
they occupy the same hex. Hold the shift key down when you click on a hex to move into it.
In addition, players may order crews to voluntarily bail out (to save an experienced crew in a bad
situation) by pressing the “9” key.
Rally
Units which suffer suppression, or which retreat or rout, can be rallied by
friendly leaders. Each successful rally reduces suppression by half. A
leader may continue to rally a unit until he fails. The process starts with the
lowest-ranking leader. Once he fails to rally a unit, then the leader above
him gets a chanceYou may never attempt to rally if the suppression is less
than 2.
There are four types of ranked leaders:
• The Overall Commander — Can rally any unit as long as he is in
contact (by radio or physically within 3 hexes)
• The Company Commander — Can rally any unit as long as he is in contact (by radio or within
3 hexes).
• The Formation Leader — Can rally a unit in his formation as long as he is in contact (by
radio or within 3 hexes) Formation leaders are in the ‘0’ unit of the formation, such as A0, B0,
and so on.
• The Unit Leader — Can attempt to rally the men in his single unit.
If units have radios, then leaders may assist via radio. If units don’t have radios, they must be
within 3 hexes in order for that leader to assist in rallying the troops.
Note: Units automatically attempt to rally at the end of each turn. You may still want to Rally units
during your turn in order to have them see, move, and shoot more effectively if they are suffering
from suppression. When manually rallying your troops, don’t forget to keep clicking on the Rally
button until you get the message stating that Unit X is unable to be rallied. At that point, the Rally
button should turn gray. Units which have spotted enemy units will recieve zero, 1, or 2
suppression points at the end of each turn, or can have up to 3 points removed. If they are
hidden, or near an HQ tent, even more suppression will be removed over and above that
removed for rallying. These end of turn adjustments ar the only way a unit can return to zero
suppression and enjoy the benefit ot accuracy that unsuppressed units enjoy.
© 2001 by Matrix Games. All Rights Reserved.
68
Page 75

Players Manual v5.0
Armor Damage
Designer’s Note: Since the invention of the tank, there’s been a race between the irresistible
power of the cannon shell and the immovable hardness of armor plate. Even today, who wins
depends on many things. A small armor-piercing round might just barely penetrate an armored
hull, and then send a hot splinter into the ammo storage. Then again, it could rattle around the
hull and do nothing. On the other hand, a large AP round hitting a very soft target – such as a
truck – might punch its way in and punch its way out without exploding (it actually happened).
Modern man has turned war into a science – but he will never totally eliminate luck.
SPWAW uses a sophisticated model to determine whether shells fired at armored targets, such
as tanks, actually penetrate and damage the target. First, if a round hits a target, the game
checks to see whether the round ricochets. If it does ricochet, then it is considered a nonpenetrating hit. This could still damage the target if the shell is big enough.
If it doesn’t ricochet, then the penetration value of the shell is compared to the target’s effective
armor rating, which is a combination of the thickness and the slope of its armor (sloped armor is
better defensively). If the penetration value is less, the round is non-penetrating. If it’s greater,
then it inflicts damage on the vehicle depending on how much greater the penetration is versus
the target’s armor rating.
Even if there is penetration, the damage, if any, will depend on several factors such as the size of
the shell, as well as the size and the survivability rating of the target vehicle. This data is used to
create a damage check that is assessed against every system and crewman on the vehicle.
© 2001 by Matrix Games. All Rights Reserved.
69
Page 76

Players Manual v5.0
Indirect Fire
Artillery is the god of war – Stalin
Designer’s Notes – What inflicted the bulk of the battlefield casualties in World
War II? Armor and infantry might consider themselves the premier combat
arms, but it was the artillery that caused the most damage. A wise SPWAW
commander will ensure that his force is equipped with plenty of artillery.
However, the big guns in SP: WAW are frequently off the map, and need to
have their fire called in by radio-equipped spotters. This takes time, and those
who would win their battles must carefully ensure that the shells land where they’re supposed to
and when they’re supposed to. But as with the best laid plans…sometimes “you know what”
happens.
Artillery effects in SPWAW 5.0 have been greatly enhanced by making it possible for rounds to
casue suppression and casualties in adjacent hexes. Artillery is now much more an “area effect”
weapon that will blanket an area with a good amount of suppression and distribute casualties
throughout, not just in the specific hexes the rounds land in. Bombs from aircraft work in a similar
fashion and can cause suppression up to 2 hexes away. Artillery will also suppress vehicles, so
tanks, while difficult to destroy with artillery, can suffer enough confusion and loss of command
control that a formation of tanks will not be able to function effectively while artillery “fires for
effect” amongst its units.
Two new preference adjustments, Artillery vs Hard and vs Soft targets, will increase or decrease
the casualties suffered by the different target types.. Note that casualties to troops in forts is
adjusted by the “vs Soft” selection, while the chance of hitting the fort itself is adjusted with “vs
Hard”. Also. the setting affects the artillery of the side whose dial you change, so lowering Player
1’s arty vs Soft to 60 will make Player 2’s infantry more survivable in artillery barrages.
Suppression caused by artillery is not affected. If you think too much suppression is done, you
can adjust the “rout/Rally” dial.
As effective as they can be, artillery is a difficult thing to coordinate, and often either do to
communications failures, legitimate reassingments or legendary “SNAFUs” artillery won’t be
available exactly when you want it. The spotter must be in cmmunications with the battery and
have a valid “battery access” to call for fire. Note the if you lose contact do to battery access
failure, you will not be able to call in a new fire mission, but can adjust one that is in progress,
despite the button being greyed out. Try the “shift fire” button when in doubt.
© 2001 by Matrix Games. All Rights Reserved.
70
Page 77

Indirect Fire Missions
When you left-click on the Indirect Fire Menu button, or press the
“B” key, the Indirect Fire menu appears. Every unit that can be
assigned to perform an Indirect Fire mission is listed here alphanumerically. Left clicking on the unit name shifts the view on the
Map Screen to the currently targeted hex of that unit. If the unit has
no target selected, the view does not change. The availability of off
board units is random. Radio communication was somewhat
unreliable in the Second World War, and batteries often responded
to calls for fire from a number of “customers. Batteries onboard are
assumed to be dedicated to your command and will respond quicker.
Selecting a Target
Selecting a hex to be bombarded is a simple two-step
process. Left-click on the hex to be attacked; the
standard red hex outline appears. Now, left-click on the
button for the type of ordnance you wish to use, HE or
smoke.
Players Manual v5.0
The hex changes to show the “Targeted” icon. The
number at the right end of the line of buttons indicates
how many turns before the fire arrives. Following each
unit’s listing are six buttons that control that unit.
• View Unit: Left-clicking this button displays the Unit
Command screen for the unit.
• High Explosive: This button orders a barrage of
High Explosive rounds on the target hex.
• Smoke: This button orders Smoke rounds to be fired
at the target hex.
• Cancel: Left-clicking this button cancels the unit’s
current fire mission.
• Shift: This button allows a fire mission that has not
yet been delivered, or that is arriving on multiple
turns to be shifted. Left-clicking this button displays the target hex outlined in red, and a
larger red circle. Left clicking in any hex wholly within the circle causes the unit to change
© 2001 by Matrix Games. All Rights Reserved.
71
Page 78

Players Manual v5.0
targeting to that hex. To cancel, click on the Shift button again. Id you have lost battery
access, but are still in communications, you will be able to shift an existing fire mission
despite the HE button being grayed out.
• Time on Target: This indicates the delay before the barrage or aircraft arrives. The delay
length is the number of turns it takes the artillery to get a fix on the target, fire the shells, and
for the shells to strike. For example, a 0 means the unit can fire at the end of the current turn,
and a 1 means the unit cannot fire until the end of the next turn and so on. A barrage arrives
in the vicinity of the target at the end of your turn, from 0 to several turns later, depending on
the type of Indirect Fire requested and quality of the crew in question. Frequently, the arrival
time is expressed as a number plus some decimal fraction, for example, 1.3. This means that
the Indirect Fire is going to arrive over two turns, with three quarters arriving one phase and
the other quarter arriving in the next. A delay of 0.2 or less will arrive in the current turn, 0.3to
.5 will fall in the next and 1.0 or higher a whole turn (two fire phases) later.
You can change the arrival time of the initial bombardment or
airstrike by canceling the fire mission and then typing the
letter “T” to change the ETA. A popup box will ask for turn to
enter or fire. Type this in and reassign the fire mission.
Spotting
The accuracy of indirect fire will depend greatly on the Artillery skill rating of the unit calling in the
bombardment, as well as whether the spotter can actually see the target hex. Unobserved fire will
tend to scatter outside the target hex and will be less effective in general. Forward Observer units
usually are the best for calling in fire. Note that if the target is unobserved, even if the rounds
appear to be landing in the correct hex, you don’t know exactly where they are landing. So even if
the fire appears accurate, it may not be doing any real damage.
Pressing the “F” key or left-clicking on the Current/Spotter Unit button jumps the view to the
unit acting as a spotter. You can also zoom the view with the Zoom buttons, and return to the
Tactical Screen with the Exit button. Note that with Command and Control on, a Forward
Observer can only direct the fire of a number of units equal to his remaining orders.
Pre-registered Targets
In many situations that seemed desperate, the artillery has been a most
vital factor.
Gen Douglas MacArthur
Using fast response artillery (i.e. mortars and light guns onboard) will reduce the
delay before a bombardment hits. But in general, the best way to get a barrage in
quickly is to pre-register targets before the game begins. During the initial set-up,
click on the Bombardment button. You’ll see a bar marked “Target.” under the words “Priority
Target Hex” Click on a hex, and then click the “Target” button. You’ll then see a number appear in
the hex shown in the Indirect Fire Menu. The hex is now pre-registered, which means virtually no
delay for a barrage on those coordinates. The number of pre-registered targets will vary with the
type of scenario, with Assault scenarios allowing the most targets. The number of pre-registered
targets you can set varies with the type of scenario.
Light Mortars
All light mortars are coded as dedicated artillery, which means they can be used for indirect fire.
© 2001 by Matrix Games. All Rights Reserved.
72
Page 79

Players Manual v5.0
However, when attached to a platoon, only the platoon headquarters can call for and adjust their
fire. It is advisable to attach these mortars directly to the line infantry platoon they will be
supporting, so they can be used most flexibly
Shell Holes
Use enough artillery, and the map begins to resemble the surface of the moon. Heavier shells are
more likely to dig shell holes. . These can be used for cover by infantry units.
Spotters and Unspotted Indirect Fire
Any unit with a radio may attempt to call in an indirect fire (bombardment) mission if it has a
Higher HQ Command Link or if it is in Command Link with its HQ that has a Higher HQ Command
Link. An artillery unit must have a Higher HQ Command Link, or a Command Link with its HQ that
has a Higher HQ Command Link in order to be available to fire a bombardment mission. In
addition, when using the command control rules, spotters must have available orders to expend
to plot a bombardment mission
Indirect fire plotted on a hex that is not visible to the observer unit that requested the
bombardment mission at the time the mission arrives can scatter several hexes from the intended
target. In addition, casualties from unobserved indirect fire are reduced to 50%.
Spotting Off-map Artillery and Counter-battery Fire
There is a chance, varying with each nationality, that unspotted enemy artillery will be detected
using flash-and-sound techniques. There is also a chance that friendly off-board artillery will
automatically fire at enemy off-board batteries. Leaving batteries unassigned will greatly improve
the chance that they will counter-battery fire.
Air Support
"If, in spite of enemy's air superiority, we succeed in getting a large part of
our mobile force into action in the threatened coast defense sectors in the
first hours, I am convinced that the enemy attack on the coast will collapse
completely on its first day."
-- Field Marshall Erwin Rommel
Calling for air strikes is handled much the same way as an artillery fire mission.
except that aircraft must enter and leave the map at specific places. These entry and exit
positions must be assigned before targets are chosen. Bombs are now fearsome weapons that
are difficult to land on a target, but will cause a great
amount of suppression to a troop concentration.
Aircraft Entry, Exit Spaces and
Target Hexes
Left-click on the Indirect Fire Menu button, or press “B”
on the keyboard, and the Indirect Fire screen appears.
Next to the Strategic Map are four standard buttons,
Zoom In, Zoom Out, Find Spotter and Exit. There is
also a button next to the legend “Air Unit Entry and
Exit” which reads Hidden. Left-click on this button to
change it to read Displayed. This changes the Overall
map to show six pairs of arrows pointing onto and off of
the map. These denote the entry and exit spaces for air
support. Left-click on an inward pointing arrow button, to assign an entry space, then left-click on
© 2001 by Matrix Games. All Rights Reserved.
73
Page 80

Players Manual v5.0
an outward pointing arrow to select an exit space. Select a target hex by left clicking on it, and
then left-click on the HE button. The hex changes to show the “Targeted” icon. The number at the
right end of the unit row indicates how many turns before the aircraft arrives.
Aircraft
Aircraft may return to base and become unavailable during a game for several reasons.
Whenever a plane is damaged, it returns to base. Otherwise, aircraft always continue to fly until
they use up their heavy ordinance (bombs and rockets). When aircraft use up their entire heavy
ordinance there is a chance they will return to base. If the plane is not a designated Ground
Support Specialist, it must also pass a morale check in order for the plane not to return to base.
The following planes are Ground Support Specialists and do not need to pass a morale check to
continue flying are the Ju-87g, Hs-129, IL-2 Shturmovik, P-39 Airacobra, B-25h Mitchell, IL-10
Shturmovik. These units are indicated by a “1” armor rating the in the Top Armor category.
Level bombers are now offboard as they are considered high altitude aircraft. They are used just
like offboard artillery and Naval guns and may be set to arrive on the first turn of the scenario or
battle.
Note that if you use your planes to attack enemy positions when there is a lot of smoke in the air
or too close to your own units, your aircraft may attack friendly troops.
Flak, if armed with an anti-aircraft type weapon, has advantages firing at aircraft.
Gliders and Paratroops
Gliders will enter like attack aircraft and land on the map. Cargo
aircraft will drop paratroops
Paratroops and Gliders unit may be assigned landing hexes during
deployment. Click the Paratroop or Glider assignment button. This
will evoke a pop-out screen that has a list of all eligible units, similar
to the artillery assignment screen. Select the desired unit click on
the map, at the desired location. Enter the turn number for arrival.
The hot key, ‘t’ in the assignment screen will evoke a query, in which
the player will type in the turn number. Each unit may be assigned a
separate turn in which to arrive. During the game, the unit will arrive at that location much as
would a reinforcement.
© 2001 by Matrix Games. All Rights Reserved.
74
Page 81

Players Manual v5.0
Special Forces and Guerrillas
Special forces and guerrillas have the ability to infiltrate.
They may be assigned hexes that they will appear near
later (if at all) in a game. The time is based on the
distance from the start line, the enemy forces in the area
and some luck. Be warned that sometimes they don’t
make it (about 60-70%of the time they do).
Special Forces and Guerilla unit may be assigned
infiltration hexes during deployment. Click the Infiltration
button. This will evoke a pop-out screen that has a list of
all eligible units, similar to the artillery assignment screen.
Select the desired unit click on the map, at the desired location. During the game, the unit will
arrive at that location much as would a reinforcement.
Since the location may be behind enemy lines, the turn
upon which it arrives will be unpredictable. Generally, the
further from the friendly start lines, the longer it will take for
the units to arrive. The experience level and leadership
skills of the unit leader will reduce this length of time.
There is a chance that the unit will be totally unable to
infiltrate and will not appear during the battle. In campaign
games, these lost units will once again be available in the next battle.
Command Control and Orders
"The history of war does not know of an undertaking
comparable to it for breadth of conception, grandeur of scale,
and mastery of execution." --Joseph Stalin
Designer’s Note: Napoleon said that morale is three times more
important than numbers. Of course, only a moron- or a Napoleon-
sized ego - would believe that it’s good to be outnumbered. But
Napoleon’s point was that a smaller army with better morale could trounce a larger force with
poor morale.
Similarly, a well-organized force can defeat a larger but clumsier opponent. The Germans didn’t
have better tanks than their opponents at the beginning of World War II. But their tanks were
equipped with radios, and their commanders were top-notch, which allowed them to make better
use of what they had. The Allies suffered defeat after defeat until they, too, learned. Players will
find that high quality, veteran troops will have the flexibility to carry out their missions even when
events don’t go according to plan on the battlefield.
The SPWAW Command and Control system is not intended to be a realistic simulation of
command in the Second World War, but it is intended to force a player to do three things:
1. Think ahead. You have to think through a plan about where you what your troops to be at
least a couple of turns in advance. If you change your mind in the middle of a battle, you may
find your troops unable to comply with your new orders.
2. Maneuver by platoon. You are typically a battalion or regimental commander, commanding
several companies whose basic maneuver element is the platoon. SP: WAW units may be
© 2001 by Matrix Games. All Rights Reserved.
75
Page 82

Players Manual v5.0
squads and individual vehicles, but players need to think in terms of maneuvering platoons.
3. Pay attention to stance. Troops can be either advancing or defensively seeking cover.
Alternating platoons from supporting positions “in cover” with those carefully advancing will
greatly reduce casualties.
Certain actions performed by units in the game require the use of “orders.” In general, orders are
needed to call in artillery and to order friendly units to deviate from pre-assigned objectives. Key
to this are the formation commanders or “HQ” units. These are identified easily by the
parentheses (i.e. (+) or (8) around the unit formation pip, or troop indicator). As the formation
takes casualties, the new HQ unit will be identified in this way, making it easier to determine who
are the important command units.
Command and control is easy to use if you remember the three things outlined above:
• Have a scheme of maneuver – this is implemented using objectives. The most common
mistake is “just moving the troops” without assigning an objective. You will always be
running out of orders and get very frustrated!
• Keep you platoons together, if possible all within 3 hexes of the HQ. That will maximize
unit cohesion advantages to morale and suppression recovery and ensure they remain in
contact with the HQ. When moving always move the HQ LAST so you don’t leave a unit
out of command and control
• Use stance appropriately. Advance in bounds by formation with one formation coving the
advance of another from a defend stance. This will maximize OpFire opportunities and
give defending units the opportunity to get “in cover”.
Orders
Orders are the “currency” of C2 in the game. They are “spent” to assign objectives, move units
independently, change stance, and call for fire. Each formation leader has a certain number of
orders that a unit in its formation may use if the unit is in contact with its leader. A unit may also
use the orders from a higher HQ if it has contact with the higher HQ either directly or through
indirect contact through its formation HQ. The Orders available to a unit are listed next to
“Orders” on the unit data area of the screen along with the unit currently commanding the unit. If
the letter is the unit’s formation letter, then the unit is currently using its own formations orders. If
all those orders are used, it then requests orders form the next higher HQ it is in contact with.
Always be aware of what HQ a formation is currently receiving orders from, or you may find your
senior leaders out of orders for calling for fire, or other necessities! Also be aware that if you don’t
have sufficient orders to pay for an expensive task (like issue a new formation objective) you can
perform a cheaper action that gets you down to 0 and then you will access the A0’s orders.
For example, assume there is a battalion formation with B0 as the Command unit and units C0,
C1, C2 and C3 as a company formation belonging to B0’s battalion. Unit C1 could use the orders
of unit C0 if it is in contact with C0. If it is in contact with B0, or if it has contact with C0 and C0
has contact with B0 and has expended its orders, it could use the orders of B0. If it is in contact
with A0, or if it is in contact with C0 that is in contact with A0 either directly or indirectly through
B0, then it may use the orders of A0 if both B0 and C0 are tapped out.
When a unit is active, it determines which HQ it thinks it should obtain its orders from at that
moment, and that HQ’s letter designation and the number of orders the HQ has available is
displayed in parenthesis next to the word “ORDERS” at the bottom of the screen in the unit data
area. If a unit has multiple HQ’s it can draw orders from, the selected HQ can change during the
turn as orders are expended. Thus, if unit B2 wants to request an artillery barrage, but its
© 2001 by Matrix Games. All Rights Reserved.
76
Page 83

Players Manual v5.0
headquarters B0 has no orders left it might still expend orders from the next-highest headquarters
(A0).
At the beginning of each turn each leader has a chance to gain new orders. Some unused orders
may also be carried over from the previous turn, based on the leader's rank.
Note that reconnaissance units do not use orders for movement. However, they are affected
normally by their stance setting, when the Control option is “On.” Clicking again on recon units
with a “sector” movement arc, will expand it to 360 degrees (this costs no orders and is just a
quirk)
Gaining Orders
At the start of each turn leaders may receive new orders. The number of new orders a leader
receives ranges from 1 to 10. Every leader receives a minimum of one new order per turn. The
number of orders allotted is based on the leader’s command rating and the nationality’s command
rating based on the formula:
(Command Rating + (A Random Number From 0 To 9) -40 + Nationality Command Rating) /10
Leaders may also retain unused orders from the previous turn and add them to the newly
received orders. The maximum number of unused orders a leader may retain is determined by
the leader's rank:
Private 0 Corporal 0
Sergeant 1 2nd Lt. 1
1st Lt. 1 Captain 2
Major 2 Lt. Col. 2
Co 3 General 3
The total number of orders a leader may have available at the start of a turn is equal to his
retained orders plus his newly received orders.
Adverse Morale States
After the number of available orders has been calculated this number may be reduced if the
leader’s unit is in an adverse morale state:
Buttoned Orders halved
Pinned Orders halved
Retreating Orders reduced to zero
Routed Orders reduced to zero
Unit Stance
Each unit in the game may be assigned either an Advance or Defend stance. Units assigned an
Advance stance that are not suffering from one of the adverse morale states listed previously,
may be moved or fired by the owning player. Units assigned a Defend stance may fire but may
not move except as a result of combat. They will attempt to find cover in the hex they are in if
they are infantry, infantry weapons teams, or vehicles (gun units cannot dig in), and they do not
fire during the turn. Turn a units weapon off if want to ensure it makes a check to get in cover.
If a unit with a Defend stance is forced to retreat, it changes its stance to Advance. The number of
turns it takes to find cover is based on the experience of the unit and its suppression level and
© 2001 by Matrix Games. All Rights Reserved.
77
Page 84

Players Manual v5.0
can be sped up by adjacent engineer units. It usually takes several turns to reach a dug-in state.
Units in Defend stance are now 33% or so more likely than advancing units to receive “special
Opfire” when they are otherwise out of shots. "Special" OpFire works on 3 triggers: general
movement - spend lots of timein the guys LOS and you will have a good chance of a "special
opfire shot" even at significant range; firefights - if you shoot at an enemy, there is a good chance
it will shoot back; close approach - if you close inside of 2 hexes there is a good chance the
enemy will take a pot shot.
Formation Movement Objectives
Formations should always be assigned movement objectives. Whenever a new objective is
selected for a formation, units then in contact (physically or by radio) with the formation HQ are
given the new objective. Units not then in contact are not given the new objective but will receive
the new objective whenever they begin a turn in contact with their HQ. Objectives can not only be
given for the entire formation, but units within a formation may have different objectives
depending on whether they are in contact with their HQ as new objectives are selected.
To give a formation a movement order, click on the formation HQ, or another unit in the formation
that is “in contact” and then the “red flag”. The screen will shift to assign objective mode and you
can click where you want the formation objective. Be careful with units that are “out of contact” as
they can sometimes link to the Company HQ or A0 and get a movement objective “out of synch”
with the rest of the formation. This is good if you want to send the unit out on an “independent”
mission, but can lead to confusion if you think you are setting an objective for a formation and
aren’t!
Units with an Advance stance may move toward their formation’s movement objective without
their leader expending any orders. Only hexes the unit can reach without expending orders are
highlighted, although the unit may be able to move to other non-highlighted hexes by expending
orders as long as the player is not in all-formation mode. A unit that attempts to move in a
direction that is not toward its formation objective requires a leader in the chain of command to
spend one or more orders. If a unit does not have access to any orders, it can only move to
highlighted hexes. Units with a Defend stance may be given movement objectives, but may not
move until they have changed their stance to Advance.
Unit Actions That Require A Leader to Spend Orders
Certain unit actions require a leader in the chain of command that is in physical or radio contact
with the unit, to expend one or more orders. If none of the leaders in the chain have the required
orders then those actions may not be performed. Listed below are the orders costs for each type
of action:
• Single unit movement - not toward objective – 1 point if in physical contact with HQ, 2 points
if in radio contact
• Request an indirect fire bombardment (per artillery unit) – 1 point
• Change formation movement objective - 3 points
• Change mission - single unit - 1 point if in physical contact with HQ, 2 points if in radio
contact
• Change mission - all units in formation - 3 points
© 2001 by Matrix Games. All Rights Reserved.
78
Page 85

Players Manual v5.0
Entrenchment
Entrenchment vs. ”In – Cover”
All units gain defensive benefits from sandbag and foxhole
entrenchments that are placed at the beginning of a game.
Entrenchments are never removed from the map and can provide
cover for any unit that remains stationary in the hex.
If the Command Control option is turned on, units in “Defend” stance will attempt to get in-cover if
stationary, unsuppressed, and not fired on. When playing with the command control option off, all
units that do not move in a turn attempt to get in-cover and build a temporary improved position.
Engineer units speed up this process for units they are adjacent to. Once a unit is in-cover, the
unit gains a defensive benefit for as long as the unit remains in the hex. Once the unit moves, the
in-cover marker on the hex is removed from the map. An in-cover symbol only benefits the unit
that “built” it. A vehicle unit that is in cover only derives a defensive benefit against fire directed at
its front.
Mines
Mines may attack enemy and friendly units. The chance of an attack depends on the number of
the mines placed in the hex. Note that mines aren’t automatically triggered every time a unit
enters a hex, so it’s possible that a friendly unit may safely traverse a hex, only to have a followup unit suffer an attack.
Only infantry, mine clearing tanks, and combat engineers can remove mines. Engineers may be
in an adjacent hex and facing the mined hex to do so, while Infantry must be in the mine hex to
clear it. Mine removal is automatic at the end of the turn.
Dragons Teeth
Engineers have the ability to clear dragon teeth. They must be in the hex containing the obstacle
or facing the obstacle from an adjacent hex and wait for a turn or more in order to remove them.
Dragon teeth in a hex prevent vehicles from moving through the hex until engineers have
removed them.
Mine-clearing tanks can clear mines. Engineer tanks can breach dragon’s teeth (as can leg
engineers with a satchel charge).
Barbed Wire
Barbed wire is treated like mines, except that it slows movement and does not cause casualties.
Note that you may place mines, barbed wire and dragon teeth in the same hex. Placing barbed
wire in the same hex with mines makes it a “known minefield,” revealing the presence of mines to
the opposing player.
New Minefields
Leg engineers (not engineering vehicles) may lay new minefields during a battle. They must be
facing the hex they to lay mines in, and the unit status display must be set to “lay mines in front
of unit”
Ammunition
Guns will make us powerful, butter will only make us fat. -- Hermann
Goering
If you play with the “Limited Ammo” option in the Preferences Screen turned on,
units will carry a limited number of rounds. Generally, infantry will carry enough
rifle ammo to last a scenario, but heavy infantry weapons such as bazookas will
© 2001 by Matrix Games. All Rights Reserved.
79
Page 86

Players Manual v5.0
only come with a few rounds. As for tanks, those big guns carried by some heavy vehicles will
seriously dent any metal or human targets they hit. Unfortunately, the bigger they are the less
ammo they’re likely to carry, and a tank without ammo becomes just another large target.
Players may receive ammo trucks and dumps in scenarios, or they may purchase them in
campaign game. These units provide ammunition resupply to units that are adjacent and not
overly suppressed. The larger the caliber of the weapon on the unit being supplied, the slower the
rate of resupply.
Ammo dumps are immobile units that can never move or be carried whose primary function is to
resupply units in the hex with it. A unit in the same hex as the ammo dump that neither moves nor
shoots for a turn and is not too suppressed is supplied with twice the amount of ammunition
provided by an ammo truck.
HQ units can provide a morale benefit for all friendly units within five hexes. This automatically
reduces some suppression at the end of a turn for units in range.
© 2001 by Matrix Games. All Rights Reserved.
80
Page 87

Players Manual v5.0
Tutorial Section
On the following pages are a series of articles that accompany the tutorials prepared by Don
Llewellyn and a team of dedicated Steel Panther World at War players for the purpose of
teaching the intricacies of combat in the game. The tutorials cover many subjects such as using
engineers, clearing mines, attacking bunkers and caves, and other subjects. Each tutorial gives
step by step instructions and the articles cover each step in detail.
© 2001 by Matrix Games. All Rights Reserved.
81
Page 88

Players Manual v5.0
Tutorial on “Flanking” Maneuver” in SPWAW
By Don Llewellyn
In this tutorial you will learn why it’s a good idea to use flanking techniques. It works for armor and
ground troops – in this scenario we will use armor. You will use Soviet armor against German
tanks, and see how difficult it is to defeat these tanks head-on.
The first thing to do is start the scenario - if you don’t know how to install a downloaded scenario,
see the document “How to install SPWAW user made scenarios”.
Before you start this scenario, go to “Preferences” and set the Soviet side “Tank Toughness” to
150%, and Rout/Rally to 150%. Leave the German numbers at 100%. Then go back to the start
screen and start the scenario.
After you hit “Start Turn”, you’ll be in the
game and it’ll be your turn. You’re the
Russians, and you’re going to try and
take those victory hexes away from the
Germans.
In turn 1, advance your tanks slowly
forward – you may want to move one
hex at a time. Use the valleys for cover
like this:
At some point, you will get fired at by a
German tank. That’s ok, fire back! There
are alot of valleys and ridges on this
map, so don’t be afraid to pop up on the
ridge, fire a few times and then return
down where you were like this:
then,
Okay. Now I want you to try and advance, and try and take out those German tanks. Be careful your tanks are not invulnerable! There’s no reason to lose tanks when you know you have help
coming, so move slowly. Play until you use your 3rd turn, then check back here.
How did you do? Take out any German tanks? I’ll bet the shells were bouncing of your tanks like
tennis balls, weren’t they?
-
© 2001 by Matrix Games. All Rights Reserved.
82
Page 89

Players Manual v5.0
The point of those first 3 turns were to illustrate just how hard it is to take out armor when you are
hitting them where the armor is the thickest
Now, start your 4
th
turn. You will see that you had reinforcements come in on the top and bottom
of the map. Take the tanks you had already, and take a normal turn with them. Then, at the top of
the map, move your reinforcement IS-1’s to the South-East, until they are somewhere around hex
30,8. Move your southern ISU-22’s North-East, to around 35,30. Now hit “End Turn”.
Now’s when the fun starts. You want the tanks you had in turns 1-4 to all have tanks in their
sights, and now move your reinforcements like this: Move the north IS-1’s to around 32,11, and
you will have 1 or 2 German tanks to shoot at. If they turn towards you, fire with the tanks you had
before (at their rear), and if they don’t turn toward you just blast them with your IS-1’s. Either way,
these German tanks are toast now. With the weakest armor in the sides and rear, they cannot
protect themselves from both sides. Here’s what I have now around the northern victory hexes:
Now move your southern reinforcements up to
take on the tanks there and repeat what you did
up north. What ever side they point their front to,
hit them from the other side. Here’s what I have
around the southern victory hexes:
Now there’s only one more German tank
and it’ll be easy to kill him.
How did you do? Practice coordinating the
attack between your initial forces and the reinforcements – you don’t want to get stuck attacking
from only one side!
When you get better at this, start lowering your preference numbers until they are at 100%. When
you can beat it then you have graduated from this lesson!
Have fun,
Don Llewellyn
egcwman@mindspring.com
© 2001 by Matrix Games. All Rights Reserved.
83
Page 90

Players Manual v5.0
Artillery Tutorial
Author: Byron Inglesh
Map by Wild Bill Wilder
Down through the ages artillery has fascinated military professionals and civilians alike:
“Boom!Boom! The big nine pounders go!! ….” [Gilbert and Sullivan, HMS Pinafore]. Josef Stalin is
supposed to have said something along the lines of “Artillery is the God of war”, though in view of
artillery usage during World War One on a scale unknown before and since, it is difficult to
classify Stalin’s comment as original.
The problem with artillery has always been the same: Getting it to do what the field commanders
want it to do. SPWAW whether by accident or design simulates this state of affairs. A typical
player’s comment is “I can’t get any of my artillery shots to land even close to where I want!”
The short answer to this in real life battle as well as our game is: You don’t have to. Close counts,
same as horse shoes and hand grenades. Stop thinking of your artillery assets as AFV or AT
armament. They weren’t meant to do that job. Artillery is meant to suppress and to deny space to
the enemy– ground or water and in the case of antiaircraft artillery (which is not covered here) air
space.
You can’t pop a few rounds in the general direction of a tank and expect it to have much effect.
What you can do is stop enemy infantry dead in their tracks. You can rout entire tank formations
provided the barrage density is sufficient. You can drive Ivan truly crazy, squads will stagger out
of the smoke and destruction totally unfit for further combat within the timeframe of our scenarios.
We’ll cover all this and more in these two Artillery tutorials. This first installment is meant to
introduce the player to the concepts of Fire Control, via the Forward Observer (FO). Other types
of units can spot, but they won’t do nearly as well as an officially designated FO. When you are
designing a scenario or choosing units in a battle or campaign always plan on including at least
one.
We will cover “asset management”, a contemporary euphemism for doing the best with whatever
we have been given in the way of onboard and offboard artillery, as well as CAS (Close Air
Support).
Weapons types in Arty I Tutorial scenario include onboard heavy mortars, two flavors of offboard
howitzers and air strike capability in the form of rocket-bearing Typhoons, which the Brits have
graciously furnished for the afternoon tea with Jerry.
You as the US player will use an unarmed FO Jeep, a couple of M3 Command Cars and your
artillery to stop the AI German, who wants the town you are defending. The enemy has
committed a platoon of Panzergrenadiers (mechanized infantry loaded on halftracks) to do the
job. One of the German halftracks (Spw 251/23) sports a rapid fire 20mm gun, it is an excellent
idea not to be within his effective range.
Your onboard artillery complement is two platoons of 4.2” mortars – eight in all.
DivArty (Divisional Artillery) has smiled upon you this day: Your offboard complement is 2 x
105mm howitzer batteries and 2 x 155mm howitzer batteries.
2 x Typhoon RP are on call. You need to be careful using CAS. Attacks upon friendly units (you)
are not unknown. We’ll provide a few tips to reduce the likelihood of this happening.
Let’s move it out, trooper. Start SPWAW and find Arty I Tutorial wherever you installed it in the
Scenario Directory. Follow the directions regarding Preferences settings, the scenario will not
© 2001 by Matrix Games. All Rights Reserved.
84
Page 91

Players Manual v5.0
play correctly if you fail to do this.
Of the percentage settings available in the upper right section of the Preferences screen, change
only US Searching, to 200%. The other percentage settings will not be changed.
In the event you have printed this out, and want a reference to the other settings, they are:
Turned OFF: Fast Artillery (important), Move & Fire (also important), C&C, OpFire Conf, Comm
Intel, Timeouts, Limited Intel, Unit Comm, Limited Ammo (no Reduced Ammo), Unit comm, AI
Advantage, Vehicle and Weapons Breakdowns.
Start the scenario. A beautiful spring day in Germany. You will see US HQ in a stone building in
the town, leave it there, you have enough to worry about without bouncing the desk jockeys
around the landscape.
Turn 1: Just west of town you will see your heavy mortars. Each platoon has an ammunition
truck next to it, this is strictly for show. Click on the FO Jeep, move it to hex 45,19. Have the pair
of M3 Command Cars follow it, on the same road.
Now comes the time to clear the dust out of the tubes, to fire our settling rounds so to speak. We
will be conducting FFE (Fire For Effect) and disclosure, though we have a narrow chance of
revealing an enemy unit solely by means of artillery fire. This is done via a combination of
observation and fire, as will shortly be seen.
Click on the FO Jeep, then either click on the Bombardment button on the upper right taskbar, or
push “b” on the keyboard. We are going to lay a pattern of fire which is generally circular in
nature. We can’t expect the enemy to accommodate us by moving along the open paved primary
road, certainly not in broad daylight, absolutely not at this stage of the European war. Allied air
would spot them within minutes.
First click on the bar pertaining to the unit you wish to assign a target hex. The procedure is to
click on the weapon bar, then click on the target hex, then assign the type of fire. We’ll go top
down, per the following chart:
D0 - 98,24 G0 - 97,22
D1 - 93,24 H0 - 94,26
E0 - 95,21 I0 - 94,22
E1 - 95,27 J0 - 97,26
When you are done, the pattern should resemble the image at left. Run
EOT (End Of Turn) and enjoy the racket! When the shooting stops you
will have an altered landscape.
The idea here is coverage – concentrating your artillery within the
impact area so that you are reasonably certain all the ground or a very
high percentage of the ground, has been covered. Later, we will discuss
the benefits which accrue with this approach to gun laying. For now, just
remember to make the pattern comprehensive and reasonably tight; it
all depends naturally on the tubes you can bring to bear.
You won’t see the enemy, not yet. He is probably moving through the woods.
Turn 2: Move the FO Jeep to 66,17. If you move the Jeep farther east along the road, you will be
in the open. A Jeep is a soft-skinned vehicle, this one is unarmed. The object here is to observe,
not have your one and only FO killed on the second turn. A prudent man wouldn’t go out there.
© 2001 by Matrix Games. All Rights Reserved.
85
Page 92

Players Manual v5.0
Move the first M3 in line to 56,25 – then to 70,24. You’re in the open here, however the M3 isn’t
as critically valuable as the FO Jeep. You need to be here to establish a good field of view of the
woods just east of town. Move the second M3 to 56,11. Then to 56,8 for a looksee north – no
enemy there, move to 66,13.
Note that you have now scooped up the victory hexes in town. Only the one east of town on the
main road and the German VH at the east edge of the map are not yours. Right now you are
winning. Don’t take it for granted. Your next fire mission, a continuation really, is also in the nature
of an FFE. Right now, you don’t know where the enemy is, though if you have played the game
before you have probably guessed he will be going for the VH just east of town.
Click on the FO Jeep, click on the Bombardment button. Unless today is your birthday and you
are extremely lucky, one of the OBA batteries will be grayed out. Get used to this condition – you
will be seeing it in every scenario you play that involves offboard artillery. The ratio of unavailable
OBA units is average in this scenario: After the first turn, one of four is unavailable, not always the
same unit. N/A units will rotate, after a few turns you may get all of the OBA back. If the fighting
gets fierce, particularly if your OBA is taking counter battery fire, you will sometimes lose all or
almost all of the OBA. For a time period you can’t predict either.
[This is an important element of SPWAW play: If you want absolutely, positively dependable
artillery, make it onboard. When the scenario designer does otherwise, makes all of whatever arty
furnished OBA, you will have to live with it. In a campaign or generated battle you can make your
choice. We’ll get into details of this issue in Arty II Tutorial. For now, the choice has been made
for you, use the artillery you have to the best advantage, or hands’em upsom, life in a German
POW camp. ]
You can lay a pattern similar to the first turn, since you are not certain if the German is north or
south of the main road, the recommendation is to move the pattern west. Say starting with the
mortar at 88,24 – then follow through with the pattern as best you can, the idea is to cover the
ground with fire. Run EOT and keep your eye on the scrolling text at the bottom of the screen. No
guarantees, but you might get lucky and put one on an enemy halftrack.
Sometime during the firing – the game engine likes to fire part of the mission, move the enemy,
then resume firing – we should have a Bingo! We have company. They are not friendly. You will
probably see three German halftracks in the woods east of the “unoccupied” victory hex and north
of the impacted area.
Turn 3: Move the southern-most M3 (probably B0) to 76,22, the M3 will very likely come under
fire from the 251/23 20mm gun; head for the trees and then to the final destination. The situation
is tense but not impossible: You cannot afford to lose the FO Jeep, if you lose one of the M3’s
you will have a difficult time getting a DV (decisive victory). Lose both M3’s – see above.
Move the other M3 to 76,14. Now you have established a crossfire; you will need it during the
action about to begin. Move the FO Jeep out of harm’s way, or if you like a more exciting time of
it leave it where it is and try to get to safety beginning next turn. We make a strong suggestion
you turn up the side street, then follow the trail to the rear area. Direct LOS to the target area
helps somewhat in accurate placement of the spotted rounds. This is more the case, however,
with units other than FO Jeeps and FO leg units.
Click the FO Jeep, click the Bombardment button. Again, you will be out of contact, probably one
of the 155 batteries. Suggested placement:
© 2001 by Matrix Games. All Rights Reserved.
86
Page 93

Players Manual v5.0
D0 - Lead 251/1G0 - 83,17
D1 - 251/23 H0 - 81,17
E0 - 81,18 I0 - E1 - 83,18
J0 - One of these two will
be N/A, spot the other at 79,17.
Open the Air Entry screen, select
entry at lower right and exit at
upper left.
Note: To ensure each aircraft
enters and exits where you want
them to, you should repeat this
procedure for each aircraft you will
assign a target.
Assign K0 to the 251/23 and K1 to
one of the 251/1 halftracks. Your
targeting should look like this:
After bombardment, German advance and exchange of fire, second bombardment and Typhoons
every German squad should be in a state of Rout or Retreat. With any luck at all, the Typhoons
will have taken out two of the halftracks. You have passed the critical stage. The initiative is now
yours. There will be more fighting, but you should be able to control the outcome. We will call on
artillery to do even more:
Turn 4: Artillery will now be coming in uncomfortably close, so you should move the M3’s back in
the woods. Two hexes each will be sufficient, this will also reduce the possibility of a Typhoon
mistaking them for the enemy. Click on the FO Jeep, call up the artillery screen.
Targeting:
4.2” mortars – German squads plus the HMG plus HQ. Do your best to make the plot fit into a
pattern such as last turn, the generally rectangular shape, that way you will get better coverage.
105’s – Slightly below, to left of western most squads.
155’s - Centered to make best use of the computer directed "I"-bracket. This will be next to what
used to be or still is the 251/23.
You may have noticed by now that the game engine drops artillery rounds in a fairly regular
pattern; with the larger caliber field guns very often you will get a couple rounds off to the left,
then a few “overs” - above the target hex, then in or around the target hex. You can use this
“spread” to your advantage. Keeping the “Fast” artillery option OFF and observing just how the
computer does this is highly recommended.
Open Air Entry screen, repeat above. Target remaining 251 HT's. If you didn't get two destroyed
previous turn, you should this turn. Run EOT and watch how the artillery takes care of enemy
units which might have ideas.
Turn 5: Go after crewmen with M3’s - by now all of the Germans ought to be in a state of rout or
nearly so and won't initiate fire. They may not fire at all after the pounding from the artillery. Be
sure to move M3's out of impact area after their work is done.
Target: Remaining squads, HMG. 105 and 155 make use of the "I"-bracket. If functioning HT's
remain, target them with Typhoons.
© 2001 by Matrix Games. All Rights Reserved.
87
Page 94

Players Manual v5.0
Turn 6: Mop up remaining crewmen. Drive rifle squads back. Take VH @ 79,17, Take German
VH @ 98,24. Be sure to cancel artillery fires, or they will continue from the OBA and quite likely
fall on your M3’s. Run EOT and you should have a decisive victory. If the Germans are stubborn,
or move a little slower than above a DV may require one or at most two more turns.
There you have it, “Artillery for fun and profit”. The lessons we hoped to pass along are first and
foremost concentration of fire, without this field artillery is not serving its primary function. We
hope you will also keep artillery fire on the slow option, so that you may observe the “fall of shot”.
You can learn a lot this way.
Finally and certainly important, always use an FO to direct your artillery fire. If you lack an FO,
survey the units and try to choose the one with the highest Arty rating, also it becomes more
important for non-FO units to establish LOS to the target. You will also experience longer
response times – the time it takes your arty to start firing. Generally, non-FO units will add a turn
to initial response times, in addition it will not be as easy to change target hexes. We’ll cover that
in the next installment.
Until then, lets hear those big guns roar!
Byron Inglesh
Bing2@avci.net
© 2001 by Matrix Games. All Rights Reserved.
88
Page 95

Players Manual v5.0
Tutorial - Mine and Obstacle Removal
By: William Rusco
In this Tutorial you will learn how to, and which troops are the best for removing Mines and
obstacles. Obstacles are Anti-Tank (Dragons teeth) and barbed wire obstacles. It is
recommended that you have a good understanding of Artillery. I would suggest that you first play
the Artillery Tutorial.
We will also re-inforce combined arms doctrine using Infantry, Armor, Artillery and introduce you
to Engineers.
Start your Tutorial. You will be the US Army against the Germans. You have at your disposal 1
Infantry Plt., 1 Engineer Plt., 1 FO., 1 Light Tank, and 1 Med Mortar Plt.
Ready, Lets begin. Your primary mission is to clear the road of all obstacles to allow the passage
of you M-5 Light Tank to support your Infantry taking of the Victory Hexes.
When you start notice the placement of the units. The Infantry is the top line of troops and the
Engineers are the bottom.
Lets start Turn 1. First, find you FO unit (the 2-man unit) as you need to order a fire mission.
( See: Artillery Tutorial) You will need to lay a smoke screen to cover the advance of your
Infantry and Engineers. Later you can use your Artillery fire to suppress the enemy troops.
Lets start moving troops around a little. Place your cursor over the first line of obstacles. Notice
what the screen readout says.It will give you the type of obstacle and the # of obstacles in the
hex.
Now move as many of the Infantry into the hex with the Dragons Teeth. Do the same with the
Engineers. End Turn.
© 2001 by Matrix Games. All Rights Reserved.
89
Page 96

Players Manual v5.0
Notice that the Infantry CANNOT remove Dragons Teeth. Place your cursor over the Engineers to
see how many Dragons teeth are left. Now move all your Engineers into the hex with the Dragons
Teeth. The more Engineers in or facing a hex with obstacles in, the faster the obstacles get
cleared (Note: engineers must be set to “clear mines in front of unit”. See Engineer tutorial for
more info). Notice that the Infantry can remove Barbed Wire Obstacles, though at a slower rate
than the Engineers. Now, check your smoke screen and make sure it is still blocking the enemy's
view of what you are trying to do. Add more smoke if needed. Keep your Engineers working on
clearing a lane, while your Infantry keeps them covered. Once through the barbed wire, move
your Engineers forward, SLOWLY, While moving your Infantry behind them to provide cover fire.
Ok, so far, so good. You have found the Minefield. Now, face your Engineers towards the mine,
or on them, and they will remove them in time. You can also “stack” more than one engineer
squad on one hex to clear the mines faster. Don't hurry now, you want to keep the suppression
levels low for your Engineers.They work much faster that way.
Now you have a path through the mines. Move your Infantry through the Engineers and advance
toward the Victory Hex. You may need to have the Mortars fire in the area around the Victory Hex
© 2001 by Matrix Games. All Rights Reserved.
90
Page 97

Players Manual v5.0
to suppress the Enemy troops that may be there.
Keep moving your Infantry and the Light Tank forward until you have reached the Victory Hex.
Congratulations, you have learned how to use Engineers to remove Obstacles and Mines. A
quick review. Engineer units can remove any man made obstacles in their path. They are also
trained to find Mines better than Regular Infantry. Infantry cannot remove Dragons Teeth, but
they can remove Mines and Barbed wire, although slower than engineers.
We have also reinforced the concept of combined arms and the use of Artillery (Mortars).
Good luck and many hours of enjoyment in playing SP World at War.
William Rusco
williamrusco@cs.com
© 2001 by Matrix Games. All Rights Reserved.
91
Page 98

Players Manual v5.0
Tutorial - Assaulting a Bunker
By: William Rusco
In this Tutorial you will learn how to assault an Enemy Bunker. There are times when you will
have to assault a Bunker to eliminate it so as to allow your other units to continue their advance. I
suggest that you complete the Artillery Tutorial first.
Let's get started. You will be the US Marine Corps vs. the Japanese. At you disposal will be 1 Sec
of Marine Engineers with Flame Throwers., 1 Sec of Marine Engineers with Demolition Charges,
1 Forward Observer and 2 81mm Mortar Sec's.
On your first turn you will need to find your
Forward Observer and order a smoke screen
to cover the advance of your Engineers. Look
for the x's on the map to help plot your Fire
Mission. Move your Engineers ahead slowly.
Now you have found the Japanese Troops
protecting the Bunker. (Tip: When fighting
Japanese troops, you must wipe them all out.).
Keep firing on the troops until they are wiped out
completely.
© 2001 by Matrix Games. All Rights Reserved.
92
Page 99

Ok, Now that you have destroyed the
Japanese troops, move your Engineers
SLOWLY forward to find the Bunker. You
found it, Great. Now surround the bunker
from the sides and rear. Remove as much
suppression from your Engineers as
possible. End the turn and assault the
Bunker on the next turn.
Now, turn one of your Engineer units towards the Bunker and
attack. This should automatically set up an Assault Chance.
Good, you have destroyed the Bunker. Now, move to the
Victory Hex. You should encounter the Japanese HQ Unit.
Have some fun and destroy the HQ also.
Players Manual v5.0
Congratulations, you have learned how to assault a Bunker.
Good luck and many happy hours of playing SP World at War.
William Rusco
williamrusco@cs.com
© 2001 by Matrix Games. All Rights Reserved.
93
Page 100

Players Manual v5.0
Assaulting mines and bunkers under fire
By: Don Llewellyn
In the two previous tutorials you learned how to use your engineers to clear a path through a
minefield, and how to use them to blow up bunkers. In this lesson you will do both, but will be
under fire from troops, tanks and bunkers. Don’t worry – you’ve been given plenty of weapons to
do the job!
First, start the scenario. This is set up like many campaign games in which the AI is defending –
you will approach a ridge and face many entrenched units. Now look right above the east-west
road, and you will see the letters “A” and “B”.
This is the most likely location for the minefield, and you want to be able to find it and clear it
without being under fire, so we will lay down a smokescreen. You’ve been given a lot of artillery,
so use your FO and lay a smokescreen from north to south somewhere in between “A” and “B”.
Once that is done, send your 4-man recon teams forward until they find mines, the enemy or
both. Here my recon unit found both!
Follow the recon teams with your engineers, and keep the tanks and rifle teams close behind
them for covering fire should the smokescreen not prove sufficient.
© 2001 by Matrix Games. All Rights Reserved.
94
 Loading...