

Page 1
LUCASA RTS ENTERTAINMENT C OMPANY PRESENTS
™
™
™
BY L AWRENCE H OLLAND
INSTRUCTION MANUAL
INSTRUCTION MANUAL
Page 2
TABLE OF CONTENTS
LOADING I NSTRUCTIONS 6
IF YOU HAVE T ROUBLE INSTALLING 8
RUNNING THE GAME 8
QUICK S TART 9
FAMILY T RANSPORT 10
MISSION B RIEFING 11
HANGAR 12
HOW TO FLY 12
THROTTLE C ONTROLS 12
VIEW C ONTROLS 13
COCKPITS AND HUD 13
SENSORS 13
ENERGY L EVELS 14
MULTIFUNCTION D ISPLAY (MFD) 16
COMBAT MULTIVIEW DISPLAY (CMD) 17
TARGETING C RAFT 18
IDENTIFYING C RAFT AND CARGO 19
CANNONS AND WARHEADS 19
FIRING G UN TURRETS 20
TYPES OF BEAM WEAPONS 21
TYPES OF COUNTERMEASURES 21
SHIELDS 21
DOCKING AND PICKING UP OBJECTS 22
IN -FLIGHT COMMUNICATION 22
IN -FLIGHT MAP 24
ENDING Y OUR MISSION 25
AWARDS AND PROMOTIONS 26
THE C ONCOURSE 26
TECH L IBRARY 26
PILOT P ROVING GROUND 27
KEYBOARD C OMMANDS 29
GENERAL O PTIONS 34
VIDEO O PTIONS 35
SOUND O PTIONS 37
GAME C ONTROLLER OPTIONS 38
COMBAT S IMULATOR 39
QUICK S KIRMISH 41
TIPS F OR SUCCESS 45
MULTIPLAYER S PACE COMBAT 48
CUSTOMER S UPPORT 65
PRODUCT L ICENSE AGREEMENT 65
CREDITS 68
Page 3
Star Wars: X-Wing Alliance
2
INTRODUCTION
Star Wars: X-Wing Alliance
3
ITH THE REBELLION SPREADING
W
THROUGHOUT THE GALAXY
, THE
EMPIRE HAS BEGUN TO REGROUP IN A
DETERMINED EFFORT TO QUASH IT
MORE PLANETS AND CIVILISATIONS ARE BEING
PULLED INTO THE BLOODY CONFLICT BETWEEN
THESE TWO OPPOSING FORCES
AND BUSINESSES
CANNOT ESCAPE THE TURMOIL. AMONG THESE
, BOTH SMALL AND LARGE,
. MORE AND
. EVEN FAMILIES
FAMILIES ARE THE AZZAMEENS, THE OWNERS
OF A SMALL BUT THRIVING SHIPPING AND
STORAGE COMPANY
, THE AZZAMEENS HAVE FACED AN
BUSINESS
UPHILL BATTLE AGAINST THE STRONG
TACTICS OF RIVAL FAMILIES
, AND CROOKED IMPERIAL-BACKED
CRIME
CONGLOMERATES
WHERE BRIBERY
. TO BUILD THEIR
-ARM
, ORGANISED
. THEIRS IS A WORLD
, CORRUPTION, DECEIT AND
THIEVERY ARE SIMPLY
,” AND FAMILY HONOUR MUST
USUAL
PREVAIL ABOVE ALL ELSE
N X-WING ALLIANCE, YOU’LL BE
I
FLYING A SERIES OF COMMERCIAL
SMUGGLING, AND ESPIONAGE MISSIONS AS
“BUSINESS AS
.
“ACE,” THE YOUNGEST AZZAMEEN SON.
OU’LL DO YOUR PART TO SAVE THE
Y
COMPANY AND THE FAMILY FROM HOSTILE
TAKEOVER ATTEMPTS BY THEIR RIVALS
VIRAXO. HEADED BY PATRIARCH K’ARMYN
VIRAXO, THIS FAMILY HAS ALWAYS SEEN THE
AZZAMEENS AS ENCROACHING ON THEIR TURF,
,
AND COULD ESCALATE THE RIVALRY INTO
SOMETHING MUCH MORE DEADLY
OOD LUCK, ACE... YOU’LL NEED IT.
G
, THE
.
Page 4
Star Wars: X-Wing Alliance
4
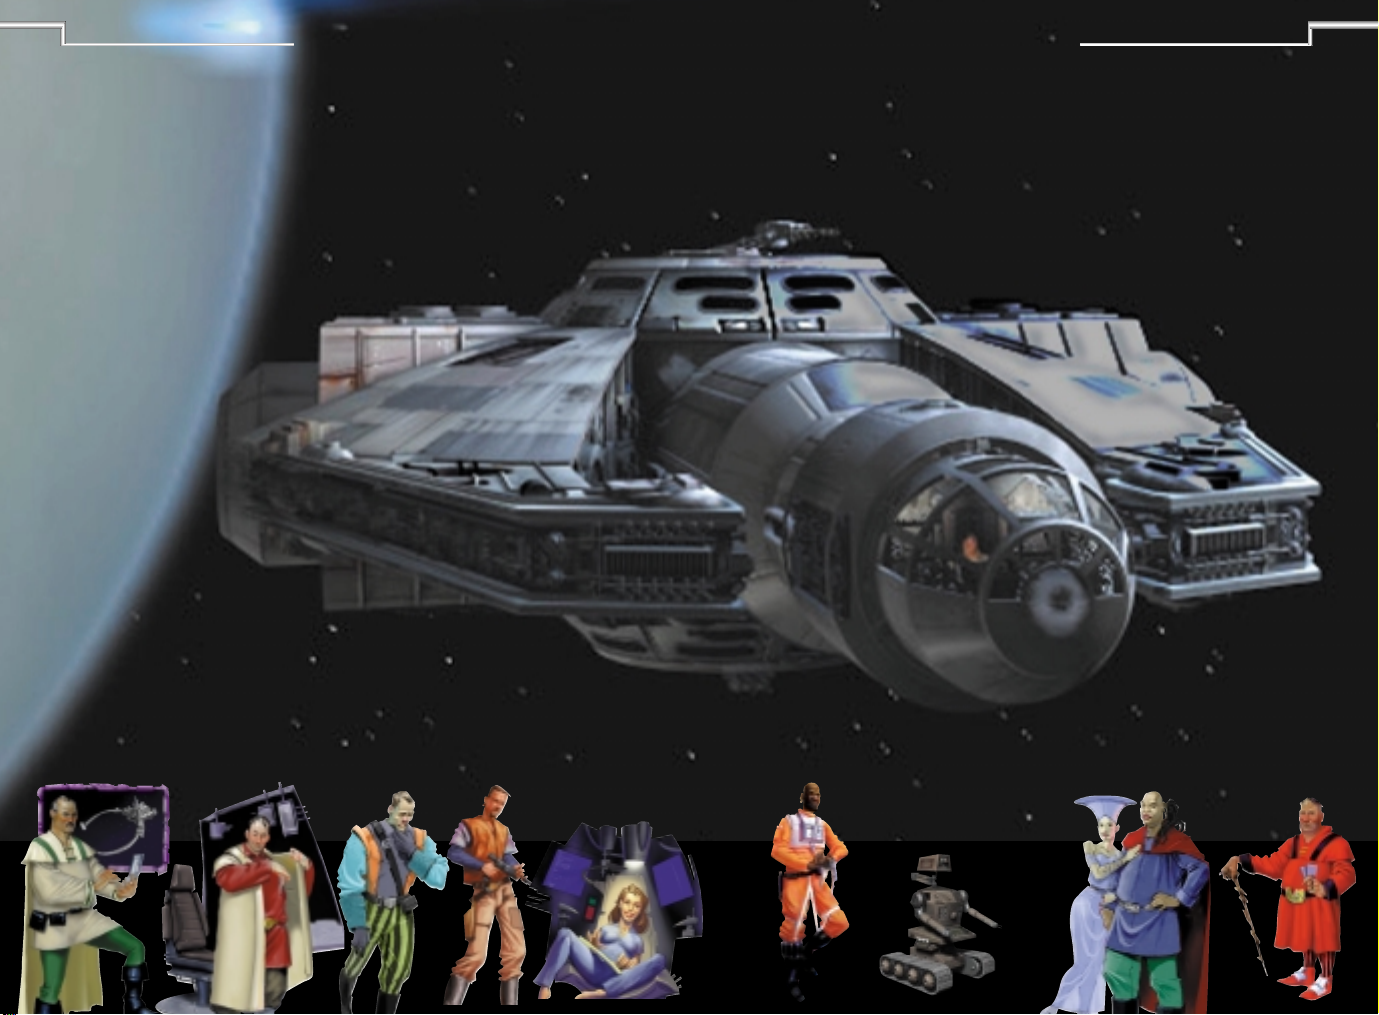
Your Family
Members
Tomaas Azzameen Your father has
been the head of the family shipping
company, Twin Suns Transport
Services, since its inception, as well as
leader of the family. His decisions are
usually derived from calm, but
calculated, reflection. His success at
making the family business grow has
caused a rivalry with Viraxo Industries,
a less-than-honest shipping business
with ties to the Empire.
Antan Azzameen Your uncle
cofounded the family cargo company
with your father. He tries his best to
keep the family neutral and avoid
possible reprisals from the Empire,
especially after the narrow escape
from Hoth. “My first and foremost
concern is the Azzameen Family,” he
once stated. “It is not healthy to
become involved in the struggle
between the Empire and the Rebels.
Our only enemies are the Viraxo.”
Galin Azzameen Your oldest brother
and, appropriately, first in line to
inherit the family business. Having
always been the quiet, brilliant sibling,
Galin is destined to follow Tomaas’
footsteps. Like Tomaas, his strong
beliefs in the distinction between right
and wrong have inspired a natural
sympathy to the Rebel cause just short
of allegiance.
Emon Azzameen Your middle brother
and second in line to inherit the family
business. He’s a skilled pilot whose hot
temper sometimes affects his better
judgment. If there’s a fight nearby,
Emon is probably involved. Aeron once
said, “Trouble clings to Emon like iron
filings to a magnet, and he wouldn’t
want it any other way.”
Aeron Azzameen Your older sister is
well- known as an ingenious computer
hacker and systems slicing expert.
She’s open to new ideas and opinions,
but can be strong-willed once her mind
is made up. Olin Garn is the only
person outside of blood relatives to
experience her sensitive and caring
nature. You, though, have always been
her favourite in the family.
Family Friends
Olin Garn Prior to joining the
Rebellion, Olin was an experienced
freighter pilot and freelance bounty
hunter. While contracting with the
Azzameens, he became a very close
and trusted friend of Aeron. It wasn’t
long before the entire Azzameen family
adopted him as one of their own.
Emkay He is a heavily modified Kalibac
Industries MK-09 Maintenance Droid. He
has had many internal modifications
that allow him to repair, pilot and
copilot most light to medium vessels,
including starfighters. He is extremely
jealous of other droids and itching for
combat. In fact, his enthusiasm for
action is so pronounced, there have
been discussions about tweaking his
aggression circuits.
Dunari A close friend and prior
business partner of your father, Dunari
now is sole proprietor of one of the
most notorious casinos in the galaxy.
Although he often deals in questionable
goods, his loyalty and friendship with
the Azzameens is beyond doubt.
Star Wars: X-Wing Alliance
Family Enemy
K’Armyn Viraxo He’s patriarch of the
Viraxo family and head of the shipping
conglomerate, Viraxo Industries. Viraxo
is a formidable enemy, and the
Azzameens are not in Viraxo’s favour.
The Viraxo have dominated the local
shipping lanes for years, mostly due to
their coercive tactics and close ties with
the Empire. With the growth of Twin
Suns Transport Services, the Viraxo
family is not likely to give up their
position without a fight.
For the Azzameens, every day is a
battle for survival in the world of
commerce. And with the war between
the Rebel Alliance and the Empire
looming in the background, the fate of
your entire family depends on your
success.
5
TOMAAS AZZAMEEN
ANTAN AZZAMEEN
GALIN AZZAMEEN
EMON AZZAMEEN
AERON AZZAMEEN
DUNARI
OLIN GARN
K’ARMYN VIRAXO
EMKAY
Page 5
Star Wars: X-Wing Alliance
6
Loading Instructions
To install X-Wing Alliance on your PC:
1 Close all open windows on your desktop and
quit all other applications.
2 Put the X-Wing Alliance Disc 1 in your CD-
ROM drive.
3 The X-Wing Alliance Installer will appear.
If Autoplay is disabled and the game’s
Installer does not appear when you insert the
CD-ROM in the drive, you’ll need to open the
Installer manually. To do this, double-click the
My Computer icon, then double-click the CD-ROM
icon in the window that opens. Double-click the
Alliance.exe file to open the Installer. It has these options:
• Install X-Wing Alliance Installs the game on your hard drive.
• Readme & Troubleshooting These
documents give you the most up-to-date game information, and we strongly
suggest you read them. See the Troubleshooting Guide for detailed installation and
troubleshooting tips. You can also view the Software License Agreement or install
DirectX 6.
• Analyse Your Computer Checks your
system to see if it meets game requirements.
• Exit to Windows Returns you to your desktop.
INSTALLER SCREEN
Star Wars: X-Wing Alliance
4 To install, click the Install X-Wing Alliance button. Follow the onscreen
instructions.
5 Choose an installation size, either minimum or complete. (You must do the
complete install to play multiplayer.)
6 Next, choose the destination for X-Wing Alliance installation. The default
directory is: C:\Program Files\LucasArts\XWingAlliance. If you wish to install
elsewhere, specify
a different drive or directory name.
7 You’ll be given the option to create a series of shortcuts in your Start menu.
Creating a shortcut will make it easier for you to launch the game. Click the
tickboxes to deselect any shortcuts you don’t want.
8 Setup will create an X-Wing Alliance Program Folder for the program icons.
Click Next to choose the default (Start Menu\
Programs\LucasArts\XWingAlliance),
or create a new folder or select an existing folder, and then click Next.
9 You’ll be prompted to create a shortcut for your desktop. You’ll also have
another opportunity to view the Readme.
10 You’ll be prompted to calibrate your joystick before playing.
11 A Setup Complete screen will now appear if the program successfully installed.
12 After installing the program, you’ll be prompted to install DirectX 6.0, which is
necessary to run the program. If DirectX 6.0 (or a later version) is detected on
your system, the tickbox to install it will remain empty, and you won’t need to
install DirectX. Click Finish to complete the Setup.
7
Page 6
Star Wars: X-Wing Alliance
8
13 You’ll be prompted to register
electronically. (You’ll need to be
connected to your Internet Service
Provider.)
14 You are now ready to play X-Wing
Alliance.
If You Have
Trouble Installing
See the Troubleshooting Guide for more
detailed installation instructions and
troubleshooting tips. To access the
Troubleshooting Guide:
1 Insert an X-Wing Alliance disc,
then double-click the My Computer
icon.
2 In the window that opens, doubleclick the icon for your CD-ROM drive.
This opens the Installer. You may also
need to double-click the Alliance.exe
file to open the Installer.
3 From the Installer, click Readme &
Trouble- shooting, then Troubleshooting
Guide.
Running the
Game
1 To run the game, insert the X-Wing
Alliance Disc 1 into your CD-ROM drive.
The game’s Launcher will appear
automatically if Autoplay is active.
2 If Autoplay is disabled, find the X-
Wing Alliance directory on your hard
drive. Double-click the X-Wing Alliance
application icon (Alliance.exe), or
double-click the CD-ROM icon on My
Computer, then double-click
Alliance.exe file.
This Launcher appears whenever
you insert a game disc, when you
double-click the CD-ROM icon, when you
select the X-Wing Alliance shortcut
from your Start menu, and when you
double-click the Alliance.exe file.
3 If you have not done so before, select
Pilot Options in the Launcher to create
a pilot.
4 Select Play X-Wing Alliance in the
Launcher to play the game.
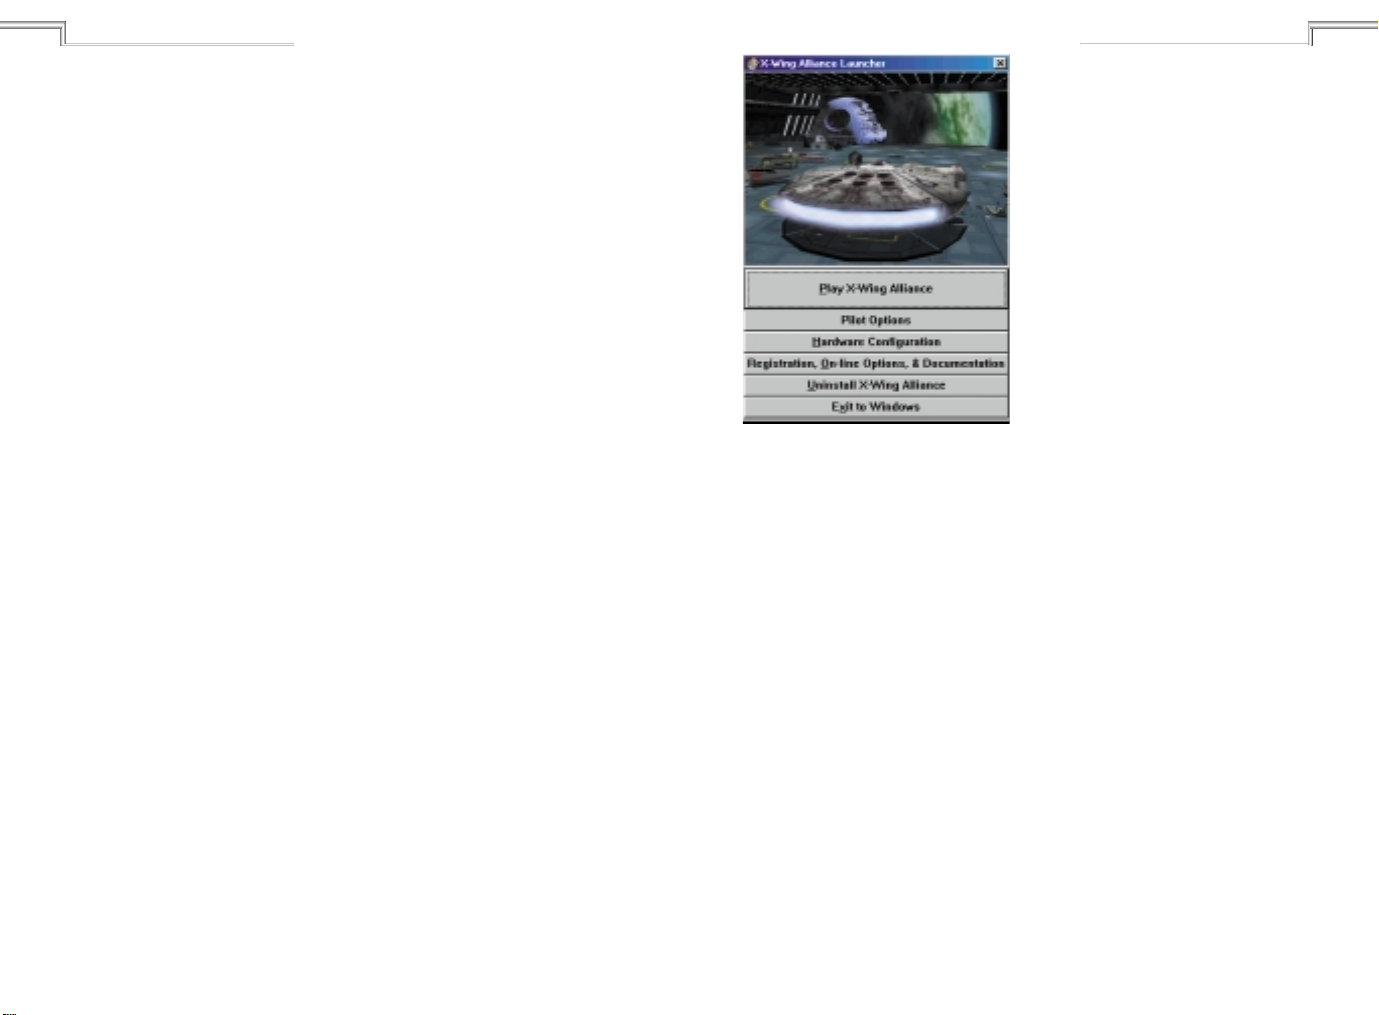
THE LAUNCHER
The X-Wing Alliance Launcher
displays
the following options:
• Play X-Wing Alliance This launches
the game.
• Pilot Options Use this option to
create, delete, or load a pilot. To create
a pilot, press Create New Player, then
enter a name and click OK. To load a
pilot, select a name from the list of
pilots you have created, then click the
Load Player button. To delete a pilot,
select the name from the list, then
click Delete Player. Click Done when
you are finished.
• Hardware Configuration This
option lets
you analyse your computer to see if it
meets system requirements, install
DirectX and calibrate your joystick.
• Registration, On-line Options and
Documentation Here, you can view
the Readme document, or see the
Troubleshooting Guide for detailed
installation and trouble- shooting tips.
You can also join the LucasArts
ExpressClub or go to the LucasArts Web
site if you have Internet access.
LAUNCHER SCREEN
• Uninstall X-Wing Alliance Click
here to remove the game from your
system.
• Exit to Windows Returns you to
your desktop.
Getting Started
NAVIGATING
You use your mouse to move through
the front end screens, and press your
mouse button to select options. You’ll
use a joystick when it’s time to fly
your missions.
Star Wars: X-Wing Alliance
QUICK START
To start flying X-Wing Alliance’s first
mission right away:
1 Create your pilot, then run the game,
as described above.
2 After the cinematic intro, you’ll start
in the Family Transport. Click on Emkay,
your droid companion, to see your first
mission briefing.
3 After watching the briefing, click on
the To Hangar button in the lower right
corner of the screen.
4 You’ll find yourself at the helm of
the
Corellian YT-1300 Light Transport Sabra.
Press the SPACEBAR to exit the Hangar.
Take a moment to familiarise yourself
with the
joystick controls. (For details, see How
to Fly on page 12.)
5 Use these basic throttle keys to
control your speed:
\
[
]
∫
6 In the mission it is best to follow
Aeron and Emkay’s instructions
precisely. Target (T key) and pick up
Full Stop
One-Third Throttle (This will
allow you to turn the fastest.)
Two-Thirds Throttle (This will
allow you to turn faster than
at full throttle, but not as fast
as at one-third.)
Full Throttle
9
Page 7
Star Wars: X-Wing Alliance
10
cargo canister Xi 1, (not Xi 2.) You will
need to be within 0.2 km of Xi 1 when
you press SHIFT+P. Now follow Aeron to
the hyperbuoy to Harlequin Station.
Press SPACEBAR when you are within
0.5 km to initiate your hyperdrive.
7 Once you arrive, follow CORT Selu
and watch Aeron deliver her cargo,
then deliver yours. Target the station,
then press SHIFT+D to initiate the
autodocking procedure. You must be
within 1.0 km.
8 Once both canisters are delivered, a
pair of Viraxo ships appear to attack
Harlequin Station. You must move to
intercept them. As you come within
range, they will turn their attack
against you. All you have to do to get
them to leave is attack each of them.
Don’t bother trying to destroy them
because they will hyper out the
moment they are attacked.
9 Once the Viraxo have departed, it is
time to go back and get the supplies
you came for. Aeron will pick up Chi 2
(the container with the coolant.) You
need to pick up Pi 3, (the container
with the fuel cells.) Then hyperspace
home and deliver your cargo to your
home base. Once again, it is best to let
Aeron deliver her cargo first.
10 After both cargo containers have
been delivered, your mission is a
success and you may enter the Hangar.
Since you’ve just delivered your cargo
out on the Hangar Platform, simply
press the SPACEBAR to initiate the
automatic landing procedure.
Family Transport
After you’ve launched the game, and
moved through the opening screens,
you’ll find yourself in a room with
Emkay in the foreground.
Combat Simulator
You’re inside the Azzameen Family
Transport. Moving the glove cursor
around the room brings up the
following choices:
• Play Mission This sends you off on
the first of a series of missions you can
fly as a member of the Azzameen
family (see below).
• Combat Simulator This lets you
take part in missions you’ve already
flown, play a multiplayer game, or
create a Quick Skirmish to fly.
• Pilot Statistics Click on this to see
the records for each pilot. You can also
read e-mail messages through the
Alliance.reb network. Move your cursor
over these arrow keys in the lower lefthand corner, and click on one to make
your selection.
• Tour of Duty Record Displays the
combat record while you’ve flown for
the Alliance. This includes total score,
number of kills, assists, and craft
losses, and indicates how close a pilot
Medal Case
Play Mission
is to achieving a rating promotion.
• Azzameen Mission Record Displays
your combat record in missions flown
for your family.
• Combat Simulator Record This
indicates how a pilot has performed in
simulated missions. Only missions
you’ve successfully completed can be
flown in the Combat Chamber.
• Check E-Mail This is where you’ll
receive messages about Azzameen
family business, as well as information
from around the galaxy. Move the
cursor over the message’s title or
author, then click on it to read the
message.
• Souvenirs Click on any of the
various souvenirs hanging inside the
room to get an up-close view of them.
• Uniform Once you’ve joined the
Alliance, click on your uniform to see
your rank.
• Medal Case Displays the awards
your pilot has won from the Rebel
Alliance.
After you’ve joined the Rebellion, a
new option in the Family Transport will
replace the Combat Simulator option.
You’ll see:
• Back to Calamari Cruiser This
sends you to the Calamari Cruiser
Concourse, a “command central”
where you’ll be able to access most of
the features of the game.
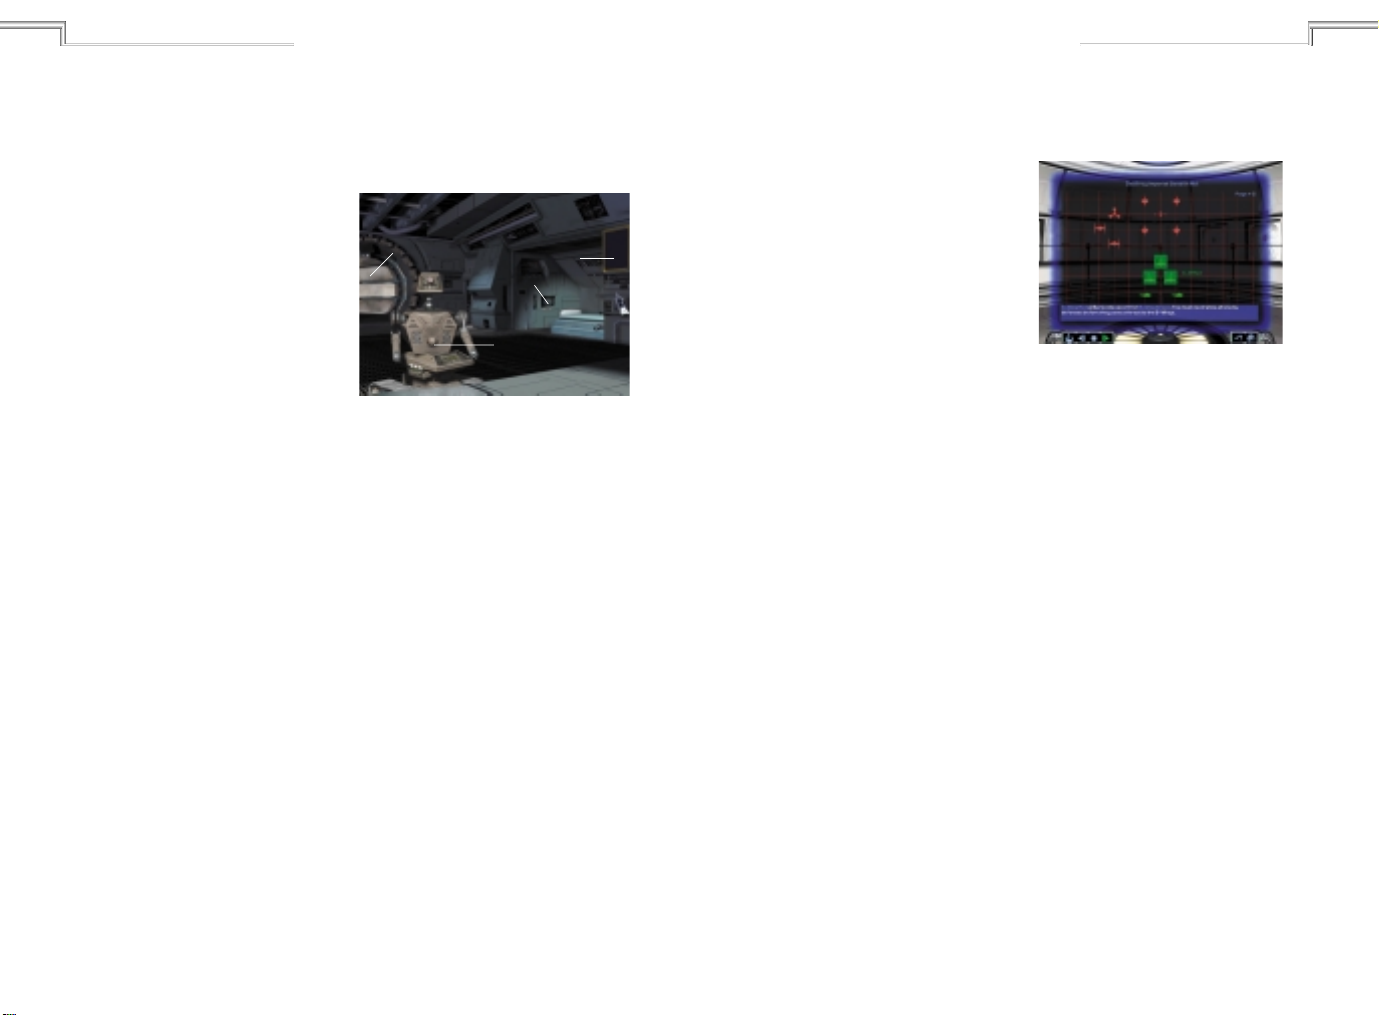
Mission Briefing
Selecting Play Mission from the Family
Transport brings up a brief text
description of your mission, under the
heading Mission Overview. This
Star Wars: X-Wing Alliance
description will be replaced by a more
detailed mission briefing given by
Emkay, your droid, complete with
diagrams and step-by-step
MISSION BRIEFING SCREEN
instructions. (Later, when you’re flying
Rebel Alliance missions, these briefings
will be given by your Ship Commander
and Briefing Officer.) You’ll also see a
row of buttons in the lower left-hand
corner, labelled:
• Mission Overview Brings back the text
description of the mission you saw earlier.
If you select this, click on the View
Briefing Map button in the lower left-hand
corner to return to the detailed briefing.
• Rewind Starts the mission briefing over.
• Stop Pauses the mission briefing.
• Play Unpauses the mission briefing.
• Forward Skips current page.
When your mission briefing has
finished, click on one of these two
buttons in the lower right-hand corner:
• Back To Family Transport Returns
you to the Azzameen ship if you don’t
want to fly the mission. (Later, after
you’ve flown several family missions,
this will say Back to Concourse.)
• To Hangar Sends you to the screen
where you can launch your mission.
11
Page 8
Star Wars: X-Wing Alliance
12
Star Wars: X-Wing Alliance
13
Hangar
After you’ve chosen Go to Craft Selection
or To Hangar from one of the earlier
Mission Briefing screens, you’ll find
yourself inside the cockpit of the default
craft, with a view of it in the lower
middle of the screen. Here’s where
you’ll start your mission, or change
craft and weapons if you want. Move
your mouse in different directions to
look all around the Hangar. You can
view the Hangar from different angles
with the I-O keys. Click the left mouse
button to centre view.
FAMILY BASE HANGAR
In the left- and right-hand corners,
you’ll see two menus. Press the LEFT
ARROW key to activate the left menu,
labelled Hangar Menu. Press the RIGHT
ARROW key to activate the right
menu. The border around each menu
title will change colour when you’ve
selected it. Press the UP and DOWN
ARROW keys to scroll within each
active menu. Your selection will be
highlighted. Press SPACEBAR to exit
the hangar.
How to Fly
Move your joystick up, down, left, or
right to control the direction of your
craft. Pressing the second joystick
button while moving left or right will
roll the craft left or right. You can also
adjust your joystick settings by
pressing the ESC key to go to the
Options menu. Keep in mind that no
two craft handle exactly the same way.
Throttle Controls
These increase or decrease your craft’s
current speed. Throttle is measured on
a scale from zero (no throttle) to 100
percent (full throttle). Use:
for one-third throttle,
[
for two-thirds throttle,
]
for full throttle,
∫
for a full stop.
\
For fine control of any setting you
want, pressing the = key will increase
your throttle, and pressing the - key
will decrease it. If you have a craft
targeted (see Targeting Craft
on page 18 for a more detailed
description), you can press the ENTER
key to match that craft’s current
speed.
View Controls
You begin your mission in forward
cockpit view. Press your keypad
directional keys
(2, 4, 6, 8) to look at the different
views around your craft. Use the / key
to switch to external camera mode,
then press the * key to look all around
your craft, using your joystick. See
Multifunction Display (MFD) and Combat
Multiview Display (CMD), starting on
page 17, for a more detailed
description of your craft’s cockpit
instruments.
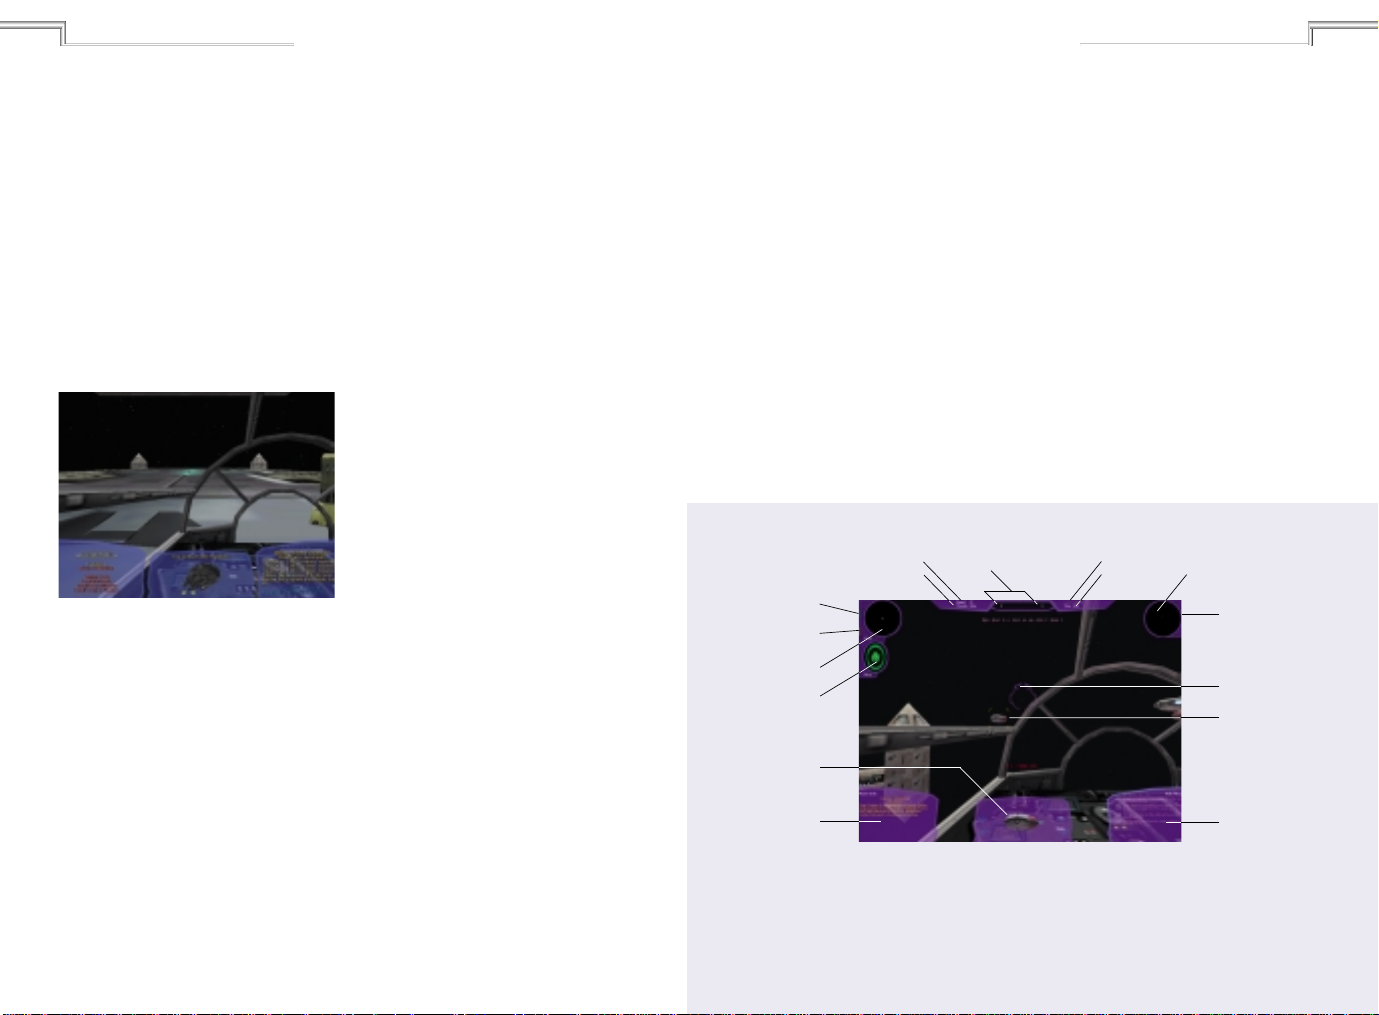
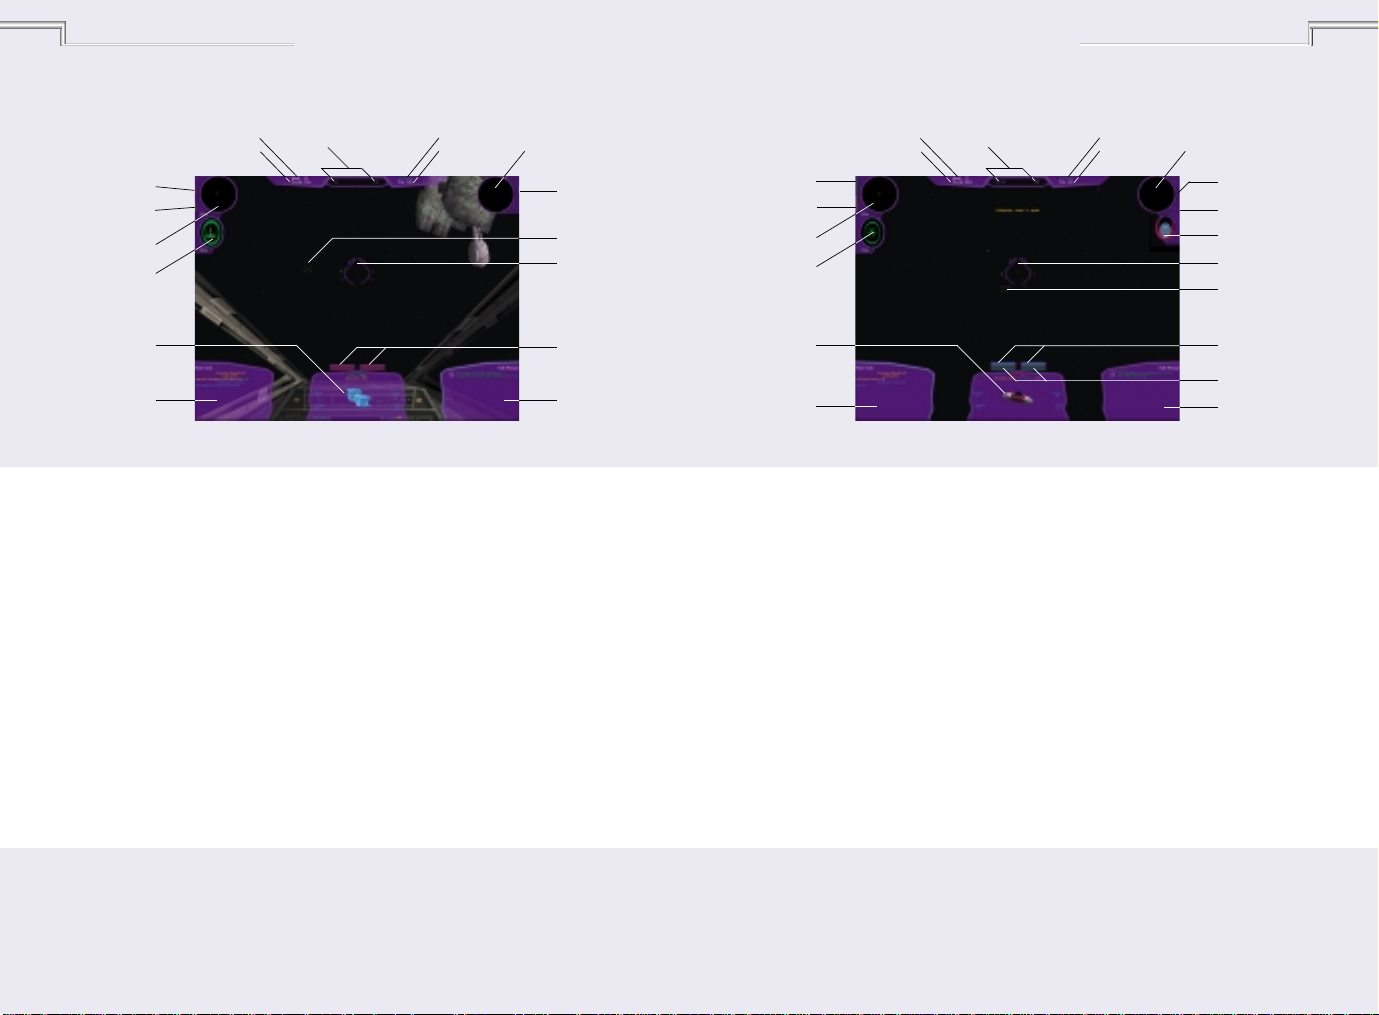
Cockpits and HUD
Speed
Available
CORELLIAN TRANSPORT COCKPIT
Laser Cannon
Recharge level
Shield Recharge
Level
Forward Sensor
Shield/Hull
Strength Indicator
Combat Multiview
Display (CMD)
Left Multifunction
Display (MFD)
Engine Thrust
Percentage
Sensors
In the upper left- and right-hand
corners of each cockpit, you’ll see two
round sensors. These indicate the
friendly and enemy craft and objects in
your vicinity, which are shown as dots
within each circle. The display on the
left shows the craft and objects in
front of you, while the display on the
right shows the craft and objects
behind you. A brighter dot indicates a
craft that is near you, while a dimmer
dot represents a craft that is farther
away. When you target a craft (see
Targeting Craft on page 18), a square
will appear around a dot on one of the
displays, indicating the location of the
targeted craft.
Ship I.D.Warheads
Mission Clock
Rear Sensor
Engine Power
Level
Targeting Sight
Targeted Ship
Right Multifunction
Display (MFD)
Page 9
Star Wars: X-Wing Alliance
14
Star Wars: X-Wing Alliance
15
Speed
Available
Laser Cannon
Recharge level
Shield Recharge
Level
Forward Sensor
Shield/Hull
Strength Indicator
Combat Multiview
Display (CMD)
Left Multifunction
Display (MFD)
Engine Thrust
Percentage
Each dot is colour coded, to let you
know whether they are friendly,
hostile, or neutral. The colours you’ll
see are:
• Green Rebel craft
• Red Imperial craft
• Purple Family craft
• Yellow Unknown or neutral craft,
presumed hostile
• White Mines
• Blue Neutral craft, presumed
friendly
• Flashing Yellow/Red Warheads
Ship I.D.Warheads
Mission Clock
X-WING COCKPIT
Rear Sensor
Energy Levels
Each craft has Energy Level Indicators
for weapons, shields, and engines
displayed as coloured vertical bars. The
Weapons and Shields Energy Level
Indicators are located left of the left
Sensor Display. The Engines Energy
Level Indicator is located right of the
right Sensor Display. If your craft is
armed with a beam weapon, its Energy
Level Indicator will be located below
the Engines Energy Level Indicator. (See
the HUD diagram above.)
You can redirect power to the
different systems from your engines.
Engine Power
Level
Targeted Ship
Targeting Sight
Laser Cannon
Charge
Right
Multifunction
Display (MFD)
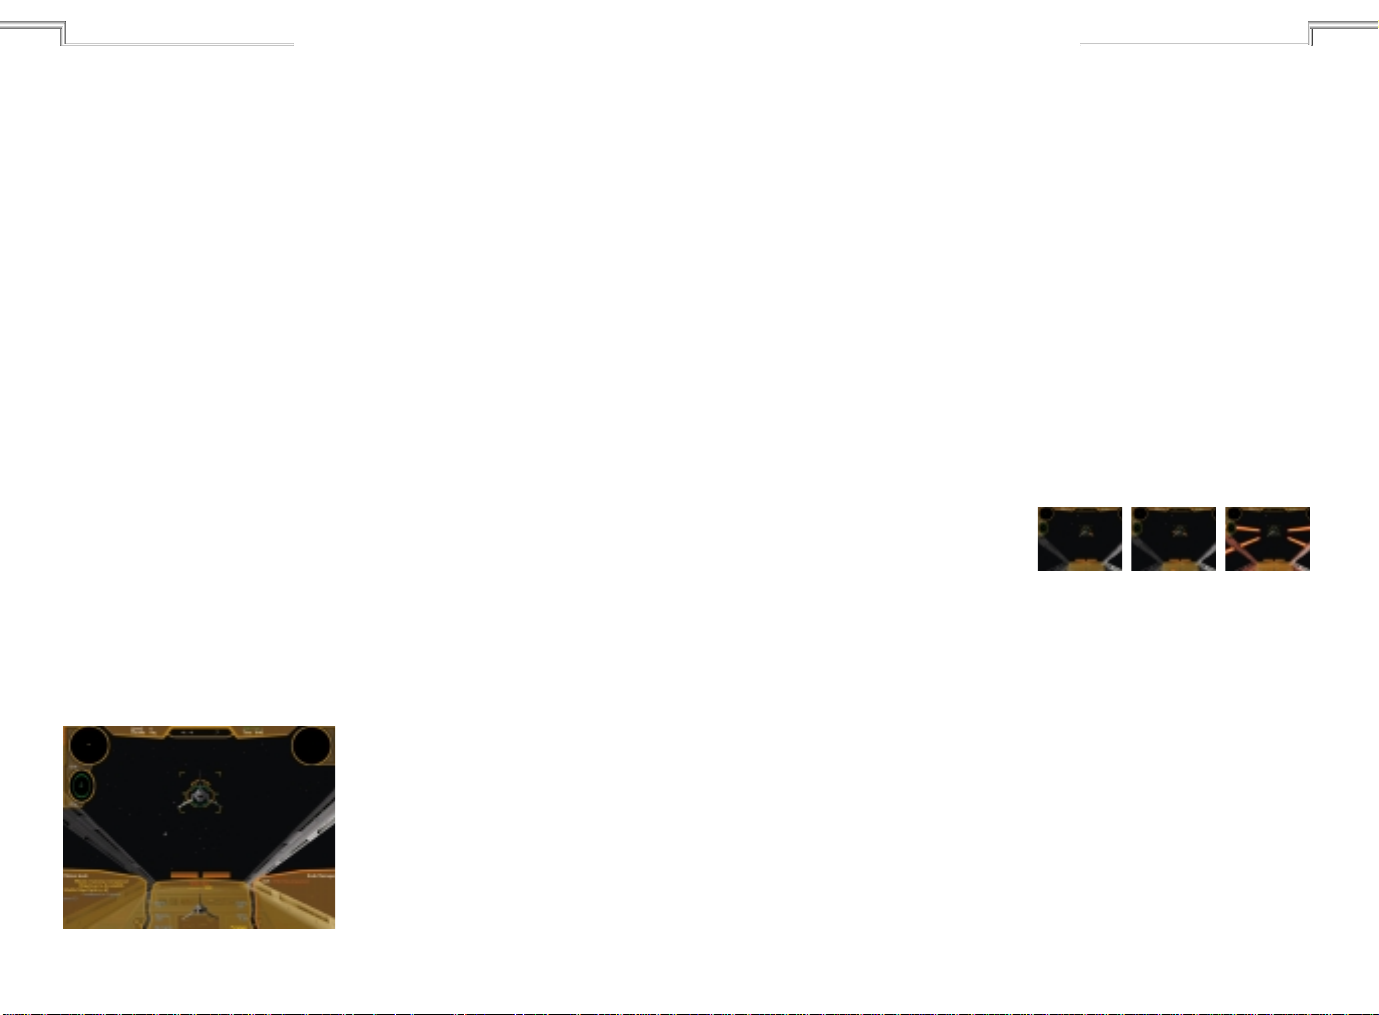
Speed
Available
TIE WITH BEAM WEAPON HUD
Laser Cannon
Recharge level
Shield Recharge
Level
Forward Sensor
Shield/Hull
Strength
Indicator
Combat Multiview
Display (CMD)
Left
Multifunction
Display (MFD)
Engine Thrust
Percentage
Press the F9 key repeatedly to cycle
through the different possible recharge
rates of your primary weapons. Press
the F10 key repeatedly to
do the same for your shields. If your
craft has beam weapons, press the F8
key for beam recharge rates. You can
also transfer energy from your
weapons to your shields by using the ‘
(apostrophe) and “ (quote) keys, and
transfer energy from your shields to
your weapons by using the ;
(semicolon) key.
This interplay between energy, shields
and lasers, called the Energy Array, is
Ship I.D.Warheads
Mission Clock
Rear Sensor
Engine Power
Level
Beam Weapon
Recharge Level
Beam Weapon
Indicator
Targeting Sight
Targeted Ship
Ion Cannon Charge
(blue)
Laser Cannon
Charge (green)
Right
Multifunction
Display (MFD)
the most crucial aspect of your
starfighter. It allows you to control the
power output to each of your systems,
allocating as much or as little power as
needed. Think of it as a central battery
that all systems draw from. When all
systems are charging at maintenance
rates, shields and lasers will decrease
as damaged or used. To recharge one
of your systems, you must take power
away from the engines to redirect it to
the system that needs recharging.
Page 10

Star Wars: X-Wing Alliance
16
For example, if your ship’s shields have
taken damage, you must recharge the
shields. When you increase the shield
charge rate, your ship draws the power
from the engines. Therefore, even
though your ship remains at the same
throttle rate, it will travel at a
decreased speed with less
manoeuverability. Conversely, if you
need to get somewhere in the shortest
amount of time, redirect all power to
the engines by dropping the laser and
shield charge rates to minimum.
• Engines Engines are controlled by
thrust. You do not have direct charging
control of engine power. When power is
redirected to or from lasers, shields or
the beam weapon, it is the engine level
that increases or decreases. You may be
at 100 percent throttle, but if another
system is drawing power from the
engines, you may not travel at full speed.
• Lasers When your laser recharge rate
is at mid-level, laser cannons recharge
at maintenance level. As laser cannon
shots are fired, laser power will dissipate
until it is recharged. If the display is
below the mid-level line, laser cannons
are charging at a decreased rate, and
your ship will lose laser power even if
you are not firing them. When the
display shows above mid-level, your laser
cannons are recharging and will
continue to recharge until they are at
full capacity. You can quickly transfer
energy to your lasers from your shield
system, if your craft is equipped with
one. Increase your laser recharge rate
once you get into heavy combat.
• Shields If your ship is equipped with
shields, they will have two levels. You
may double charge your shields by
increasing your shield recharge rate
until both of the first and second tiers
are full. If the shield level display is
below mid-level, your shields will lose
power, even if your ship is not being
damaged. Like your laser system, you
can alternatively transfer energy to
your shields from your lasers. Recharge
your shields if you’ve taken a lot of hits.
Multifunction
Display (MFD)
These two displays, located in the two
lower corners of the cockpit, give you
important mission information.
Pressing the DELETE key brings up the
left MFD, and the PAGE DOWN key
brings up the right MFD. The display
that has the brighter border is the active
MFD. Press the inactive MFD key (either
DELETE or PAGE DOWN) to make it the
active MFD. Press this key again to turn
the MFD off. Press the LEFT and RIGHT
ARROW keys to cycle through these
display modes within the active MFD:
• Flight Commands This MFD mode
contains the interface for giving orders
to your wingmates and support craft.
(See the In-Flight
Communication/Wingmates Commands
section on page 22 for detailed
information and instructions.)
• Friendly Craft List Displays a list of
friendly craft in the area, along with
information about shield and hull
damage they’ve
sustained, and their targets. If the list is
long, press the UP and DOWN ARROW
keys to see all the craft.
• Enemy Craft List Displays a list of
hostile craft in the area, along with
information about shield and hull
damage they’ve sustained, their
targets, and their orders. If
you have a long list, press the UP and
DOWN ARROW keys to see all the craft.
Craft names will appear as Unknown
until the craft have been identified.
• Damage Assessment Displays the
condition of your craft’s systems. If they
are damaged, it gives you the time
remaining until they are repaired.
• Radio Messages Displays all radio
communications you’ve received since
the start of the mission. If the list is long,
press the UP and DOWN ARROW keys to
read all the messages.
• Mission Goals Displays the mission
objectives you must achieve (in yellow
text), the objectives that have been
achieved (in green text), the goals to
prevent (in blue text), and the
objectives you failed to accomplish (in
red text). Some missions will have a
number in parenthesis next to a goal.
This is displayed when the objective of
a mission is to protect or destroy a
percentage of craft, and will be
updated during your mission. As the
mission progresses, new mission
objectives will be displayed. You’ll also
see the mission outcome, which will
either be unresolved, victory or loss.
• Mission Score Displays your name,
score, and number of kills you’ve
achieved in your current mission. During
the races in the Pilot Proving Ground, the
score lists the players according to their
places in the current contest.
Star Wars: X-Wing Alliance
Combat Multiview
Display (CMD)
In the lower middle section of your
cockpit, you’ll see the Combat
Multiview Display, or CMD. It will show
the image of any friendly or enemy
craft, station, buoy, or mine you’ve
targeted, its name, what activity it’s
doing, along with the following
information once you have identified
the target:
• SHD% Shows the strength of the
targeted craft’s shields.
COMBAT MULTIVIEW DISPLAY SCREEN
• HULL% Shows the percentage of the
targeted craft’s hull that is intact. If
you’ve destroyed your target’s shields,
you’ll begin decreasing its hull integrity.
When the percentage reaches 0, your
target will be destroyed.
• SYS% Shows the percentage of the
targeted craft’s systems that are
functioning properly. Damage to these
systems can only be inflicted with ion
weapons.
• Distance Shows the distance from
the targeted craft to your craft, in
kilometres.
17
Page 11
Star Wars: X-Wing Alliance
18
• Craft Cargo Displays contents of
craft’s cargo bay. Enemy craft (and
most neutral craft) must be inspected
to reveal their cargo.
• Targeted Component: Displays the
component of the vessel currently
targeted.
Targeting Craft
In space combat, you’ll have numerous
targeting options, which you’ll want to use
depending on your situation in a mission.
To cycle through all the available
targets, press the T key repeatedly.
Press the Y key repeatedly to cycle
backwards through these targets. Press
the N key to target the nearest nav
buoy that locates a hyperspace jump
point. To locate and target nearest
enemy craft, mine or weapon, press
the R key. Press the E key repeatedly to
cycle through the enemy craft that are
targeting your craft. Press the I key to
target the nearest warhead that is
targeting your craft. If you aren’t
being targeted by a warhead, pressing
this key will target the nearest enemy
warhead. Press the U key to target the
most recent craft to arrive in the
combat area.
TARGETED CRAFT
If Imperial craft are attacking a target
you want to defend, press the A key to
target the nearest attacking craft.
Since you have a mission to perform,
the O key is useful, as it targets the
nearest mission objective. You can
even target individual components of a
craft by pressing the , (comma) key.
These will be displayed in the lowerright corner of the CMD.
You can also target a craft by
pointing your Targeting Reticule at it (see
below), then pressing your second
joystick button.
YOUR TARGETING
RETICULE
This round sight above the CMD is used
as a targeting device for your primary
weapons, your cannons, as well as
your secondary weapons and your
warheads. As you’re flying in combat,
try to line up a target inside the
reticule. When you’re firing laser
cannons at a target, the reticule will be
illuminated green and you’ll hear a
beeping noise when you have a shot
lined up with the targeted craft.
If your craft is carrying warheads,
the number available will be displayed
below the reticule. When you have
these weapons armed, yellow brackets
will appear within the reticule when
you aim it at a targeted craft in range.
The brackets will turn red when you’ve
locked in on a target, and you should
fire your weapon. You’ll also hear a
solid tone. Press the first button on
your joystick to fire your weapons.
The curved bar above the reticule has
four different indicator lights to alert
you to possible attacks by enemy craft
and weapons. If the left light on the
bar comes on, your craft is being
attacked by an enemy fighter. If the
middle-left light is illuminated, your
craft is being targeted by a laser turret
on a starship. The middle-right light
warns you that a beam weapon is
being used on your craft. The right
light will flash yellow if an enemy craft
is trying to lock a warhead onto your
craft, and will turn red if this lock has
been achieved.
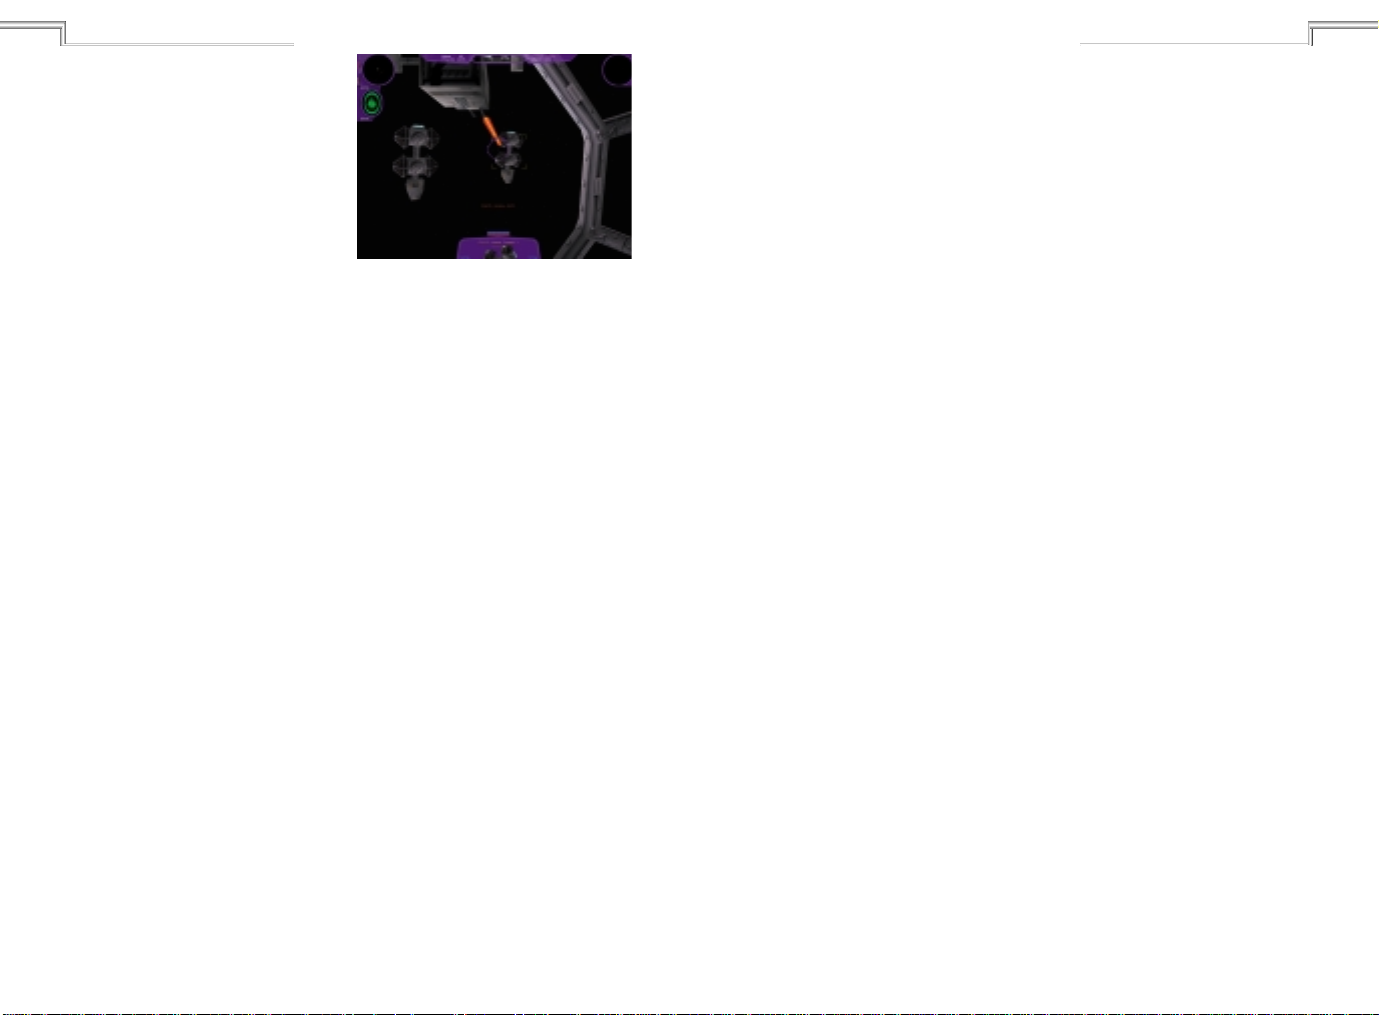
Identifying and
Inspecting Craft
and Cargo
During some missions, you’ll need to
identify unknown craft and see what
they’re carrying. To identify a craft,
target it, then fly close to it (the
distance varies from craft to craft).
You’ll then see the craft’s name, along
with other important statistics,
displayed on your CMD. To inspect a
craft, target it, then fly within about
0.5-0.2 km of it. A description of the
ship’s contents will appear on your CMD.
Selecting and
Firing Cannons
and Warheads
Depending on the craft you’ve chosen,
and the way you’ve configured it,
you’ll have a variety of cannons and
warheads to fire at a target. Press the
W key repeatedly to cycle through the
different available weapons for your
Star Wars: X-Wing Alliance
craft. If your craft has more than one
of the same type of weapon, such as
laser cannons, you can press the X key
to link their fire, so they’ll all fire at the
same time. However, doing this will
slow down your rate of fire. On certain
craft, you can even link lasers and ion
cannons together using the X key.
Press the Z key for gun harmonisation.
(Gun Harmonisation determines the
distance at which your lasers will
converge to a single point. Most craft
default to automatic, which means that
lasers will automatically converge at
the distance of the currently targeted
craft. The harmonisation can also be
manually changed. Some older craft,
like the Z-95 Headhunter, do not have
automatic harmonisation, so they must
always be adjusted manually.)
FIRING LINKED AND UNLINKED WEAPONS
TYPES OF CANNONS
• Laser Cannons The galaxy’s most
commonly used weapon, these fire
bolts of coherent light that inflict
significant damage.
• Ion Cannons These weapons are
useful for disabling craft. Its drawback
is that it has a shorter range than a
laser cannon.
• Turbolasers Advanced laser
cannons typically found only on
starships, these awesome weapons
cause much more damage than a laser
cannon and can also go farther.
19
Page 12
Star Wars: X-Wing Alliance
20
TYPES OF WARHEADS
• Concussion Missiles Best used
when dogfighting with slower craft,
these weapons can be avoided by a
quick, last-second turn.
• Advanced Concussion Missiles
Swift and deadly, these powerful
weapons are difficult to avoid.
• Proton Torpedoes The most
commonly used warhead in the galaxy,
these weapons are too slow to use
against fighters, but devastating
against much larger capital ships.
• Advanced Proton Torpedoes Fast
and powerful enough to be used
against fighters and larger ships alike.
• Heavy Rockets These slow
weapons can be easily shot down, but
if they hit a ship or installation, they
can inflict significant damage.
• Space Bombs They are more
powerful than heavy rockets and are
much harder to shoot down. Their
minimal guidance systems make them
most useful for destroying stationary
or slow moving, heavily armed targets.
• Mag Pulse Warheads While one of
these weapons won’t damage a craft’s
shields or hull, it can knock out its
weapons systems for 30 seconds.
• Ion Pulse Warheads The latest in
warhead technology, these weapons
act like proton torpedoes to damage
shields, and act like ion cannons to
disable a craft once its shields are
down.
GUN TURRET
Firing Gun
Turrets
If you’re flying in a craft equipped with
laser gun turrets, such as the
Millennium Falcon, you can operate its
gun turrets yourself. Press the G key to
move to the turret. Your craft will
continue to fly in a straight line, but
you can press the F key to have Emkay,
your droid copilot, follow your target
and keep it in range.
When you’re inside the gun turret,
move your joystick up, down, left, and
right to look all around. Your laser
cannons are mounted in the upper
section of the turret. You’ll see a round
targeting reticule in the upper-middle
of the screen. Press your first joystick
button to fire at the target.
To cycle through multiple turrets (if
the craft has them) or return to the
cockpit, press the G key again. You can
fire your gun turret lasers from the
cockpit by linking them with your
forward lasers. Press the X key to do this.
You can also have your gun turret laser
automatically track and fire at your
current target by pressing the F key.
Types of Beam
Weapons
These defensive weapons can paralyse
and hinder enemy craft, to give you an
advantage in space combat. There are
three types of beam weapons:
• Tractor Beam Use these to keep
another craft from turning.
• Jamming Beam These prevent
another craft from firing weapons at
your craft. Large targets may require
more than one beam to be fully
neutralised.
• Decoy Beam With this stealth
device, your craft won’t show up on
enemy radar screens, and can’t be
targeted.
To activate a beam weapon, press
the B key. The decoy beam works
automatically, but you’ll need to aim
the tractor and jamming beams at a
targeted craft. If your craft is equipped
with a beam weapon, you’ll see a
Beam Weapon Charge Indicator below
your right sensor.
Types of
Countermeasures
These weapons help you defend your
craft against enemy warheads. The
two kinds of countermeasures are:
• Chaff This electromagnetic energy
shoots out from behind your craft to
deflect warheads and beam weapons.
• Flare When fired, this miniature
warhead will go after the nearest
enemy warhead that is bearing down
on you. If no warhead has been
launched, it will target the nearest
enemy craft.
Star Wars: X-Wing Alliance
To use either of these
countermeasures, press the C key when
a warhead is fired at you. If you’re
firing flares, it’s best to wait until the
warhead is within 0.5 km before
activating your countermeasure system.
Shields
When your craft is hit, its shields deflect
much of the harmful energy to prevent
your craft from being damaged or
destroyed. As your shields weaken,
however, your craft will be more likely
to sustain damage. Your Shield Charge
Indicator, located on the left side of the
screen below the Forward Sensor
Display, will show you how your front
and rear shields are holding up.
The ship outline icon displays the
integrity of your craft’s hull. If the icon
is green, your craft is undamaged; if
it’s yellow, your craft is damaged; if
it’s red, your craft is in serious danger.
The oval surrounding that icon shows
the integrity of your craft’s shields, and
are also green if undamaged, yellow if
damaged, and red if critical. If your
shields go down, your craft’s hull will
begin to weaken. To recharge your
shields, press the ‘ (apostrophe) or
SHIFT+F9 keys to transfer laser energy
to shields. Press the SHIFT+ ‘
(apostrophe) to transfer all laser
energy to shields.
If your shields have been
damaged, and you need to retreat
from battle or defend against frontal
attack, press the S key to cycle through
the shield settings, and move your
shield energy to the front, rear, or
wherever you need it most.
21
Page 13

Star Wars: X-Wing Alliance
22
Docking and
Picking
Up Objects
Occasionally, during the course of a
mission, you’ll need to dock with
another craft or pick up a floating
object in deep space. To dock, first
target the craft you want to dock with.
When you’re within 1 km of the craft,
press SHIFT+D. This initiates the
docking sequence. It’s also used for
delivering an object already being
carried. To pick up an object, target it,
then press SHIFT+P when your craft is
within .2 km of the object. Press
SHIFT+R to release the object.
In-Flight
Communication/
Wingmates
Commands
Pressing the TAB key defaults to the
Flight Commands menu in your left MFD.
You will see a list of the first six ships in
your squadron, as well as options to
select your whole squadron, access the
Support Craft sub-menu, and request
reinforcements. Press the
corresponding number key to select
FLIGHT COMMANDS MFD
the craft or option you want. This will
take you to a series of sub-menus,
detailed below. The 0 key always takes
you to the first menu.
TACTICAL SUB-MENU
1 Attack my target.
This tells the selected craft to attack
the craft you currently have targeted.
2 Attack target component.
This tells the selected craft to attack an
individual part of the craft you have
targeted, indicated in the lower-right
corner of the CMD.
3 Attack target type.
This tells the selected craft to attack all
targets of the same type as the craft
you currently have targeted. Thus, if
you have a TIE bomber targeted, you
are asking the selected craft to attack
all enemy TIE bombers.
4 Disable target.
This tells the selected craft to use ion
cannons or ion pulse warheads to
disable the craft you have targeted. If
the selected craft is not equipped with
these weapons, it will attack the target
until its shields are down. Be careful in
this situation, because the selected
craft will continue to monitor the
target until it is disabled.
5 Inspect target type.
This tells the selected craft to inspect
all craft of the same type as the craft
you currently have targeted. Thus, if
you have a bulk freighter targeted, the
selected craft will inspect all enemy
bulk freighters.
6 Wait for orders.
This tells the selected craft to stop
moving and wait until you give the goahead. Be very careful with this order,
because it makes your wingmates very
vulnerable.
7 Proceed with mission.
Tells selected craft that are waiting for
orders to resume flying the mission.
DEFENSIVE SUB-MENU
1 Defend my target.
This tells the selected craft to attack
anything that attacks your current
target.
2 Watch my six.
This tells the selected craft to attack
anything that attacks you.
3 Help me out.
This tells the selected craft to attack the
nearest craft currently attacking you.
This is different from the Watch My Six
command in that it only applies when
something is currently attacking you.
4 Evasive manoeuver.
This tells the selected craft to fly a
pattern designed to avoid enemy fire.
FORMATION SUB-MENU
1 Rejoin formation.
This tells the selected craft to stop what
it’s doing and fly in formation with
you, using the default formation for
the current mission or the last
formation you selected. Each of the
commands in this menu includes this
command.
2 Line abreast.
In this formation, each craft flies sideby-side with the next, forming a line.
Star Wars: X-Wing Alliance
3 Line up.
In this formation, each craft flies
directly below the next, forming a line.
4 Vic.
In this formation, craft arrange
themselves in a V shape.
5 Finger four.
In this formation, each craft flies
above, forward, and to the left of the
next craft.
6 Star.
In this formation, craft arrange
themselves as if they were the points
of a star, with the centre craft in the
middle.
7 Tighten formation.
This command causes all craft
currently flying in formation to fly
closer together.
8 Loosen formation.
Causes all craft currently flying in
formation to fly further apart.
STATUS SUB-MENU
1 Report in.
This tells the selected craft to tell you
its current orders.
PLAYER SUB-MENU
If the player craft is selected from the
Flight Commands main menu, these
orders will become available. Options 15 are only available in a transport.
1 Dock with target or deliver a
carried object.
This initiates a docking sequence with
the craft you currently have targeted.
You can only dock if you are within 1.0
km of the targeted craft. This can also
be achieved by pressing SHIFT+D.
23
Page 14

Star Wars: X-Wing Alliance
24
2 Pick up target.
This initiates a docking sequence with
the craft you currently have targeted,
and picks it up. You can only dock if
you are within 0.2 km of the targeted
craft. This can also be achieved by
pressing SHIFT+P.
3 Release carried object.
This causes the object you are
currently carrying to be released. This
can also be achieved by pressing
SHIFT+R.
4 Gunner Autofire.
If your craft is equipped with cannon
turrets, this tells your gunner to fire at
the craft you currently have targeted.
This can also be achieved by pressing the
F key when you are in the pilot’s seat.
5 Autopilot.
If you are in the gun turret, this tells
your copilot to keep your current
target in your sights. This can also be
achieved by pressing the F key when
you are in the gun turret.
6 Eject!
This will activate you craft’s autoejection sequence, destroying it in the
process. This can also be achieved by
pressing ALT+E.
In-Flight Map
Pressing the M key brings up your InFlight Map. Note that while you’re viewing
this map, you cannot control your craft,
and it will fly in a straight line.
The In-Flight Map is a large grid
that gives you a tactical overview of
the combat area.
It displays your craft, along with other
craft, stations, buoys, and mines. This
map can be viewed in either 2D or 3D
IN-FLIGHT MAP
modes. Move your joystick up, down,
left, and right to view the entire grid
in 2D mode. When you’re in 3D
mode, you can rotate and pivot the
camera around the targeted craft or
look around freely. The coloured lines
that are attached to craft on the map
will show the craft’s altitude, along
with its target, if it has one. A mark at
the bottom will indicate the craft’s
heading and speed.
The Map Help display in the lower
left-hand corner shows the following
list of keyboard commands you can
use to track your target on the map:
Brings up Help screen
h
and
/
and
+
Follows target on map
*
on/off
Turns target
tracking on map
-
on/off
z
Zooms in on
target on map
Exits map, returns you to cockpit
m
Puts target in centre in 2D map
c
π
the same information displayed on
your active MFD. Press the LEFT and
RIGHT ARROW keys to cycle through
the information displays. (See
Multifunction Display on page 16 for a
description of the screens.)
map, press M to return to your mission.
Ending Your
Mission
Your mission can end several different
ways. You can complete your mission
goals and safely return to the Hangar,
you can be shot down, the amount of
time allotted for a mission can be used
up, or you can end your mission by
pressing the Q then SPACEBAR.
then SPACEBAR after you have won a
mission, your victory may turn into a
failure. This will happen if you get shot
down near hostile craft or you press Q
then SPACEBAR in a hostile region. To
make sure you secure your victory, pay
attention to the Mission Ending
Warning message when you press the
viewing mode
Toggles between 2D
and 3D map viewing
mode
In the right-hand corner, you’ll see
When you’ve finished viewing the
If you get shot down or press Q
Star Wars: X-Wing Alliance
Q key. If your mission is lost, you can
quickly restart a mission by pressing H
then SPACEBAR.
MISSION DEBRIEFING SCREEN
When your mission ends, you’ll
move back to the Hangar and can go
on to the Mission Debriefing screen. At
the top of the screen, you’ll see the
name of your mission, along with a
text description of how you performed
in that mission.
Click the buttons in the lower lefthand corner to see your different
mission evaluations. From left to right,
they are:
• Mission Debriefing Displays a
written evaluation of your performance.
• Player Statistics Shows kills, assists,
and craft losses for your pilot in that
mission.
• Mission Hints Gives suggestions for
how to do better the next time you fly
that mission.
Once you’ve read your evaluation,
and learned the hard lessons, choose
one of the two keys in the lower righthand corner:
• Back to Family Transport (or, later,
Back to Concourse) This returns you to
the Azzameen ship or the Calamari
Cruiser.
• Fly Again This sends you back for
another try at the mission you’ve just
completed.
25
Page 15

Star Wars: X-Wing Alliance
26
Awards and
Promotions
During your career with the Alliance,
you will have many opportunities to
distinguish yourself in the eyes of your
commanders and fellow pilots. Your
achievements will be recognised
through promotions and awards. As
you progress through your tour of
duty, promotions will be granted on
the basis of accumulated total mission
score. During each mission, a score is
recorded that represents all the craft
you have destroyed. The more valuable
and dangerous the craft, the higher
point value earned. The possible ranks
in order of importance are:
• Recruit
• Flight Cadet
• Flight Officer
• Lieutenant Junior Grade
• Lieutenant
• Captain
• Lieutenant Commander
• Commander
• General
In addition to being promoted, you
may be awarded the famed Kalidor
Crescent.
This medal is awarded for mission
exploits that are above and beyond the
call of duty. During a mission you will
win bonus points for completing
special mission objectives. When you
have accumulated enough bonus
points, you will enter into an elite
cadre of pilots who have received this
medal. Further success will earn you
added embellishments to this medal.
The Calamari
Cruiser Concourse
Once you’ve joined the Rebellion and
selected the Back to Calamari Cruiser
option from the Family Transport, you’ll
go to the Concourse inside the Calamari
Cruiser.
Moving the cursor around the
Concourse from left to right brings up
the following choices:
• Combat Simulator
• Family Transport
• Briefing Room
• Tech Library
• Pilot Proving Ground
Click the door to any of these
rooms to move inside them. The pair of
large doors in the middle of the screen
is a passageway that will take you to
missions you can fly for the Rebel
Alliance. However, these Briefing Room
doors won’t open when family mission
obligations are your top priority. To fly
family missions, return to the Family
Transport where Emkay will have
mission-related information for you.
Once you complete the family missions,
the doors will open.
THE CONCOURSE
Tech Library
Clicking on this moves you to a room
where you’ll be able to view technical
specifications for all known Imperial,
neutral and Rebel craft in X-Wing
Alliance. A revolving image of each
craft appears in the middle of the
room. To view the craft from any angle
you want, move the cursor over the
craft, press and hold your mouse
button, then move your mouse around.
Statistics will be displayed above
and below each rotating craft. These
will indicate what type of craft it is, its
top speed, acceleration, weaponry, and
other performance statistics.
To view all craft, and change the
way you view them, use the five
buttons in the lower left-hand corner.
From left to right, they are:
• Cycle by Type Click on this
repeatedly to cycle through all the
categories for the craft in X-Wing
Alliance, including starfighters,
transports, freighters, and more. This is
useful for skipping the types of craft
you aren’t interested in.
• Cycle Craft Click on this repeatedly to
cycle through each of the craft in each
of the categories, in alphabetical order.
TECH LIBRARY
Star Wars: X-Wing Alliance
• Zoom This lets you view the craft
from closer up or farther away. Rightclick your mouse button repeatedly to
zoom in, and left-click it repeatedly to
zoom out.
• Rotation Click on this to turn the
craft rotation off or on.
• Change Lighting Click on this to
change the angle of the light source
relative to the craft.
To leave the Tech Library, click on
Back to Concourse in the lower righthand corner.
Pilot Proving
Ground
If you want to enjoy success while
flying your X-Wing Alliance
missions, practice in the Pilot Proving
Ground. It is located at a salvage yard
used to recycle metals by the Alliance.
Flying the salvage yard has been a
tradition with Rebel pilots since its
construction. Although not condoned by
Alliance High Command, there is no
organised effort to stop pilots from
using the extremely dangerous yard to
test their skills and burn off energy.
PILOT PROVING GROUND HANGAR
27
Page 16

Star Wars: X-Wing Alliance
28
Clicking on Pilot Proving Ground
from the Concourse will send you to
the Hangar Deck. You’ll be sitting in the
cockpit of the default craft for your
mission, with three displays in front of
you. The middle display shows the type
of craft you’ll be flying, along
with the title of the mission, and the
Hall of Fame of best times. Press the
LEFT ARROW key to highlight the left
display. Press the
UP or DOWN ARROW keys to move up
and down the lists on the left display.
The text in the right display will
change depending on what you’re
viewing in the left display. You can use
the arrow keys to move between the
left and right menus. Press the ENTER
key to make your selection.
The left display, labelled Proving
Ground, has the following choices:
• Launch Sends you off to the salvage
yard.
• Return to Concourse Sends you
back to the Calamari Cruiser.
• Select Challenge Brings up a list of
the missions you can fly in the right
display. Press the RIGHT ARROW key,
then the UP or DOWN ARROW keys to
select a challenge, then press the
ENTER key.
• Instructions Brings up a text
briefing
for the currently selected challenge in
the right display.
• Select Craft Brings up a list of the
craft you can fly in the right display.
Press the RIGHT ARROW key, then the
UP or DOWN ARROW keys to select a
craft, then press the ENTER key.
Pressing Launch sends you to the
Pilot Proving Ground to begin your
session.
In-Flight Controls
KEYBOARD COMMANDS
ESSENTIAL CONTROLS
These are the basic keys you’ll need to use if
you want to start flying right away:
Target nearest enemy fighter
r
Target nearest craft targeting you
e
Cycle forward through targets
t
Target nearest objective
o
Nearest Hyperspace Nav Buoy
n
∫
[
w
x
ª
º
’
Propulsion Controls
=
\
[
]
∆
∫
Full Throttle
1/3 Throttle (You turn faster when
you’re flying at this speed.)
Switch weapon systems
Fire-Link weapons
Adjust cannon recharge rate
Adjust shield recharge rate
Transfer laser energy to shields
Increase throttle
Decrease throttle
Full Stop
1/3 Throttle
2/3 Throttle
Match targeted craft’s speed
Full Throttle
Star Wars: X-Wing Alliance
Propulsion Controls
Increase throttle
=
Decrease throttle
-
Full Stop
\
1/3 Throttle
[
2/3 Throttle
]
∆
∫
π
v
Pilot Safety Controls
j
å+e
Match targeted craft’s speed
Full Throttle
Engage Hyperspace (You must
be within .5 km of a hyper buoy
and and then confirm a jump
into hyperspace by pressing
SPACEBAR.)
Toggle S-Foil (X-wing and
B-wing only)
Jump to new craft if available
(only in Quick Skirmish mode).
Eject
29
Page 17

Star Wars: X-Wing Alliance
30
Energy Management Controls
Adjust beam weapon
•
recharge rate.
Adjust laser cannon recharge
ª
rate
Adjust shields recharge rate
º
’
or
ß+ª
ß+ ’
Transfer laser energy to shields
Transfer all lasers to shields
;
or
ß+ º
⁄
¤
Shield System Controls
s
Transfer shield energy to lasers
Throttle/Energy Level Preset #1
(Switch to throttle and energy
levels set for Preset #1
defined in General Options.)
Throttle/Energy Level Preset #2
(Switch to throttle and energy
levels set for Preset #2
defined in General Options.)
Cycle shield settings
Weapons System Controls
Switch weapons
w
Switch firing-linking modes
x
Toggle beam weapon on/off
b
Fire countermeasure
c
å+ 2
z
Targeting and CMD System Controls
r
e
t
y
u
i
o
a
p
Fire weapon
Cycles through Gun
Harmonisation modes
Target nearest starfighter
Craft nearest craft
targeting you
Targets next target
Targets previous target
Target newest craft
Target nearest incoming
warhead
Target nearest objective craft
Target attacker of target
Target nearest player craft
Select target Preset #1
∞
as target
Select target Preset #2 as
§
target
Select target Preset #3 as
¶
target
ß+ ∞
ß+ §
ß+ ¶
,
<
Save target in target Preset #1
Save target in target Preset #2
Save target in target Preset #3
Cycle through your target’s
components
Reverse cycle through your
target’s components
Star Wars: X-Wing Alliance
Gun Turret Controls
Switch to/from gunner
g
position
Cycle gunner or pilot AI
f
settings
Communications Controls
ß+ †
ç
†
π
ß+ 1
ß+ 2
ß+ 3
ß+ 4
Toggle chat line to other players
Cancel chat line to other
players
Cycle chat between team/
enemy/all
Confirm critical orders
Custom Message #1
Custom Message #2
Custom Message #3
Custom Message #4
31
Cycle through Nav Buoys
n
Target forward to next
¡
friendly craft
ß+ ¡
Target forward to next
™
neutral craft
ß+ ™
Target forward to next
£
enemy craft
ß+ £
Target backwards to
previous friendly craft
Target backwards to
previous neutral craft
Target backward to
previous enemy craft
Page 18

Star Wars: X-Wing Alliance
32
In-Flight Map Controls
View/leave map (AI will not
m
take over craft)
HUD Pop-Ups Controls
∂
∑
“
æ
‘
…
©
¬
å+ .
Brings up/highlights/removes
Left Multifunction Display.
Brings up/highlights/removes
Right Multifunction Display
Brings up/removes CMD
Scroll up through MFD
Scroll down through MFD
Scroll forward through MFD
Scroll backwards through MFD
Toggles Forward Sensor/
Shield Indicator off/on
Toggles middle HUD panel
off/on
Toggles Rear Sensor off/on
+ Toggles HUD off/on
Simple HUD Mode
Commands/Communications to
Your Wingmates
ß+ a
ß+ i
ß+ c
ß+ w
ß+ g
ß+ b
ß+ e
ß+ h
ß+ r
Wingmate Commands MFD
†
thru
1
0
Attack my target
Ignore my target
Cover me
Wait for orders
Go ahead
Board to reload
Evade
Head home
Report in
Wingmate MFD
View Controls (Keypad Only)
Roll Left (rudder)
1
Look down in cockpit view
2
Roll Right (rudder)
3
Look Left
4
Centre view in cockpit
5
Look Right
6
Look up in cockpit view
8
Toggle cockpit on/off
.
Switch to/from external
/
camera mode
Free Look (when in external
*
camera mode). Allows you to
look around your ship using
the joystick. Use Button 1 to
zoom in, and Button 2 to
zoom out
Star Wars: X-Wing Alliance
Other View Keys
å+ j
å+ u
å+ n
Game Controls
q
h
å+ p
å+ d
å+ s
å+ v
Flyby Camera (only works in
external view)
Target Camera
Warhead Camera
Allows you to look around the
virtual cockpit using the
mouse—click mouse to
centre view
THEN
π
THEN
π
Pauses game—any key
unpauses it
Cycle graphics detail settings
Toggle system message
display on/off
Displays game version
33
Quit mission
Restart mission
Cockpit Controls
Turns cockpit off/on
.
Padlock (switches your view
l
from reticule to targeted object)
Docking and Pick-Up Controls
ß+ d
ß+ p
ß+ r
Dock with targeted object
Pick up targeted object
Release targeted object
Page 19

Star Wars: X-Wing Alliance
34
Options Menu
Pressing the ESC key brings up a Main
Menu of game options, which you can
use to set all the configurations in X-
Wing Alliance. You’ll see the
following options displayed:
MAIN MENU SCREEN
GENERAL OPTIONS
Click on this to adjust basic game settings
that affect Tour of Duty flight, not
missions reflown in the Combat Simulator.
GENERAL OPTIONS SCREEN
• Difficulty Cycles through Easy,
Medium, and Hard skill levels for
single-player missions. Changing this
will affect your score.
• Craft Collisions Turns collisions
between starfighters on or off for singleplayer missions.
• Invulnerable Turns indestructible
mode for your craft on or off for
single-player missions.
• Unlimited Ammo Toggles
continually charged laser mode and
endless weapons mode on or off for
single-player missions. If you turn
Indestructible Mode or Unlimited
Ammo on, you will not receive bonus
points and your combat score will be
greatly reduced.
• Message #1 Lets you create a
custom text message to send to all
players in a multiplayer game. Click on
this, then type in your message, and
press ENTER. To send the message,
press SHIFT+1.
• Message #2 Same as Message #1,
except press SHIFT and the 2 key to
send taunt.
• Message #3 Same as Message #1,
except press SHIFT and the 3 key to
send message.
• Message #4 Same as Message #1,
except press SHIFT and the 4 key to
send message.
• Preset #1 Throttle Lets you set a
specific throttle level for your craft,
which is indicated by the number
displayed. Click either of the two
arrows to increase or decrease your
throttle setting.
• Preset #1 Laser Level Click the
space between zero and full to set a
specific level for your laser power
settings.
• Preset #1 Shield Level Click the
space between zero and full to set a
specific level for your shield power
settings.
• Preset #1 Beam Level Click the
space between zero and full to adjust
your beam weapons power settings.
(In flight, you’ll activate your Preset #1
configuration by pressing the F11 key.)
• Preset #2 Throttle Lets you set a
specific throttle level for your craft, which
is indicated by the number displayed.
Click the two arrows to increase or
decrease your throttle setting.
• Preset #2 Laser Level Click the space
between zero and full to set a specific
level for your laser power settings.
• Preset #2 Shield Level Click the space
between zero and full to set a specific
level for your shield power settings.
• Preset #2 Beam Level Click the
space between zero and full to adjust
your beam weapons power settings.
(In flight, you’ll activate your Preset #2
configuration by pressing the F12 key.)
• Use the F11 and F12 keys to switch
your throttle and energy levels to
Preset #1 and Preset #2 respectively.
• Restore Defaults Lets you revert to
the original settings.
• Back Returns you to Main Options
menu.
GENERAL PERFORMANCE
TUNING
Choose between three general levels of
performance settings that
automatically adjust your other detailed
video and sound options depending on
your computer’s capabilities.
Star Wars: X-Wing Alliance
VIDEO OPTIONS SCREEN
VIDEO OPTIONS
Use this to adjust your display settings.
SINGLE-PLAYER VIDEO OPTIONS
This sets the following configurations
for solo players:
• Video Display Driver Cycles
through your available display drivers,
so you can select one.
• 3D Hardware Turns 3D board on or
off. Select Yes if your machine has a 3D
accelerator card.
• Screen Resolution Cycles through
the various screen resolutions available
for your computer.
• Brightness Click the space between
Dim and Bright to adjust the brightness
level.
• Space Debris Turns flying bits of
rubble in deep space on or off.
• Explosion Chunks (Single-player
only) This slider determines how much
debris is generated by a starship
explosion. Reduce debris to improve
game performance.
35
Page 20

Star Wars: X-Wing Alliance
36
SINGLE-PLAYER VIDEO OPTIONS SCREEN
• Backdrop Turns planets and
background visuals on/off. Off
improves performance.
• Starfield Density Cycles between
Low, Medium, and High density, which
affects the number of stars in the
background. Choose low to enhance
performance.
• Use Low Detail Models Click the
space between Near and Far to set the
distance at
which high-poly models appear in the
game. To increase performance,
choose Near to
keep the models in low detail.
• Texture Resolution Cycles between
high, low, and medium resolution
textures. Use lower settings to speed
up the game if you have a slow or
erratic frame rate.
• Explosion Resolution Sets texture
resolutions for explosions, not craft.
Setting this lower could improve frame
rate.
• Local Light Source Determines how
often a local light source, like lasers,
will generate light. Lower settings to
improve frame rate.
• Diffuse Lighting Toggles global
light sources on or off.
HARDWARE ONLY VIDEO OPTIONS
• Use Multiplayer Settings Use same
video settings as the multiplayer video
settings.
• Restore Defaults Revert to original
settings.
• Back Returns you to the previous
screen.
HARDWARE ONLY VIDEO
OPTIONS
• Hardware MIP Mapping Allows
your 3D card to determine the distance
at which higher resolution textures
become visible. Turn off to let the
software determine the distance.
Turning it on may improve frame rate.
• Palettized Textures Lets your 3D
card generate texture colours using its
internal palette. This makes textures
use less RAM, and turning it on can
substantially increase performance on
those cards that support palettized
textures.
• Bilinear Filtering Turns texture
smoothing on or off. Turn off to
improve performance.
• Hit Effects Turns glowing shields,
laser impact blasts, and other attack
visuals on or off. Turn off to improve
performance.
• Particle Effects Turns sparks and
smoke from hits on and off.
• Missile Trails Turns long tail for
missiles on or off. Turn off to improve
performance.
• Engine Glow Turns propulsion
system colours on or off. Turning this
off means less polygons are drawn,
which could improve the frame rate.
• Lens Flare Turns light source
graphic effects on or off.
• HUD Colour Cycles through colour
settings for cockpit display. These will
be displayed on the small cockpit icon
to the right.
SOUND OPTIONS
Lets you change the music and sound
effects settings in the game.
• Concourse Music Click the space
between Off and Max to adjust the
music volume levels inside the
Calamari Cruiser and the Family
Transport.
• Concourse SFX Click the space
between Off and Max to adjust the
sound effects volume levels inside the
Calamari Cruiser and the Family
Transport.
• Flight Engine Music Click the space
between Off and Max to adjust the inflight music volume levels.
• 3D Sound Enabled Turn option on if
you have a compatible 3D sound card.
Turning 3D sound on if you do not have
a sound card that supports it will result
in decreased performance.
• Number of Channels Lets you set
the maximum number of sound effects
that can play concurrently. Reducing
the number of sound effects played at
Star Wars: X-Wing Alliance
SOUND OPTIONS
one time may improve game
performance.
• Sound Effects Quality This
determines the resolution of your inflight sound effects. Normal resolution
sounds take much less memory (and
thus can improve performance), but
don’t sound as good as high resolution
sounds.
• Flight Engine Exterior SFX Click the
space between Off and Max to adjust
the general sound effects settings in
flight.
• Cockpit Interior SFX Click the space
between Off and Max to adjust the
sound effects volume levels for your
cockpit instruments.
• Engine Sound Click the space
between Off and Max to adjust the
volume levels for your propulsion
system.
• Pilot Messages Your wingmates
will talk to you in flight. Use this to
cycle between hearing all of their
messages, hearing no messages, or
hearing some messages.
• Tactical Officer Messages Cycles
between hearing all messages, hearing
no messages, or hearing some
autogenerated messages about the
37
Page 21

Star Wars: X-Wing Alliance
38
status of important craft.
• Special Mission Messages Choose
how many mission-specific radio
messages to hear.
• Voice Volume Click the space
between Off and Max to adjust the
volume of anyone talking to you.
• Restore Defaults Lets you revert to
the original settings.
• Back Returns you to the Main Options
menu.
GAME CONTROLLER
OPTIONS
With this, you can adjust the settings
of your joystick or other controller.
• Rudder Enabled If you have rudder
pedals or a joystick that has a rudder
feature, this activates those controllers.
Rudder control rolls your craft around its
line of flight. (You can also press and
hold your second joystick button while
turning left or right.)
• Invert Rudder Switches the
direction in which your ship rotates.
• Force Feedback Activates Force
Feedback if your joystick supports it.
• Force Feedback Strength Click the
space between Weak and Strong to adjust
the intensity of Force Feedback effects.
GAME CONTROLLER OPTIONS
• Force Feedback Centering Click
the space between Weak and Strong to
adjust the overall tension of your Force
Feedback joystick.
• Invert Joystick Y-Axis Reverses the
pitch settings on craft so that the nose
goes up when you push the joystick
forward, and goes down when you pull
the joystick back.
• Remap Joystick Buttons Maps
keyboard commands to joystick
buttons. Choosing this will bring up a
list of your joystick buttons and their
current functions. Press the joystick
button or the UP or DOWN ARROWS
to highlight the button you want to
reassign. Clicking on the current
function for that button or pressing
ENTER brings up a list of available
functions. Use the arrow keys or the
slider bar to scroll through the list, and
click on the function you want.
You can also press a key while the list
is up to assign that key to the chosen
joystick button. Choose Restore Defaults
to go back to the original settings, and
choose Back to return to the previous
screen.
• Restore Defaults Lets you revert to
the original settings.
• Back Returns you to Main Options
menu.
NETWORK OPTIONS
Once you are connected to a game
session, only the host can change these
options.
• Password Required Specifies
whether or not a password is required
to join a multiplayer game.
• Password Specifies the password for
a multiplayer game.
• Internet Specifies whether a
multiplayer game is being played over
the Internet.
• Update Rate Use this setting to
control the frequency in which game
data is sent across the network.
VIEW CREDITS
This rolls the names of the people who
contributed to the creation of X-Wing
Alliance. Press the ENTER, ESC, or
SPACEBAR keys or your mouse button
to stop the credits.
VIEW CUTSCENES
This lets you view animation of
important scenes in the game. Clicking
on this brings up several thumbnail
images from cutscenes. Cutscenes will
unlock as the player progresses
through the campaign missions. Click
on one of these thumbnails to view.
RETURN TO GAME
Sends you back to the place in the
game where you chose to enter the
Options menu.
EXIT TO WINDOWS
Returns you to your desktop.
Star Wars: X-Wing Alliance
COMBAT SIMULATOR
Combat Simulator
Here’s where you’ll be able to re-fly
missions you’ve already completed, fly
missions with or against live
opponents, and create your own
missions. When you play the game for
the first time, you’ll only be able to get
to the Combat Simulator from the
Family Transport. However, once you
complete the family missions and join
the Rebellion, the Calamari Cruiser
Concourse is open and you won’t be
able to get back to the Combat
Simulator through the Family Transport.
When you click on Combat
Simulator, you’ll move to a screen
depicting a simulator. Click on SinglePlayer to move to a mode where you’re
flying solo. Click on Multiplayer to take
on other players over the Internet or
other network. (See Multiplayer Space
Combat on page 46 for more
information.)
Clicking on Single-Player sends you
to a Mission Selection screen. You’ll see
the name of the battle at the top of the
screen, with the names of the missions
you can fly within that battle at the
bottom. To switch battles, click on
39
Page 22

Star Wars: X-Wing Alliance
40
MISSION SELECTION SCREEN
either of the large blinking arrows on
either side of the screen. (You
can only change to a different battle if
you have already flown a mission
within that battle.) Click on the smaller
blinking arrows to scroll through
available missions within
a battle. (These arrows will only appear
if there are more than five missions
within a given battle.) You’ll also see
two buttons in the lower left-hand
corner labelled:
• Tour of Duty Lets you fly a
previously completed mission in the
Combat Simulator.
• Quick Skirmish Lets you create and
fly a customised mission, or load a
previously created mission, then take
part in it. (See Quick Skirmish on page
41 for a description.)
In the lower right-hand corner,
you’ll see:
• Return to Family Transport (or,
later, Back to Concourse): Sends you
back to the Azzameen family ship or
the Calamari Cruiser Concourse.
MISSION DESCRIPTION SCREEN
Clicking on the mission icon
brings up a Mission Description screen,
where you’ll read a brief overview of
your mission. You’ll also see Mission
Statistics displayed for your Tour of
Duty and Combat Simulator missions,
including the number of times you’ve
flown that mission, your best score,
best bonus score and best time.
You can adjust the settings for a
mission by clicking on the Settings
icons in the lower part of the screen:
• Difficulty Cycles through Normal,
Challenging, and Hard difficulty levels.
• Collisions Turns collisions between
your craft and other starfighters on or
off.
• Invulnerable Turns indestructible
mode for your craft on or off.
• Unlimited Ammo Turns endless
ammunition mode for your craft on or
off. If you turn Indestructible Mode or
Unlimited Ammo on, you will not
receive bonus points and your combat
score will be greatly reduced.
To begin flying your mission, or to
select a different one, click on these
buttons in the right-hand corner:
• Return to Select Battle Sends you
back to the previous screen.
• Return to Family Transport (or,
later, Back to Concourse): Sends you
back to the Azzameen family ship or
the Calamari Cruiser Concourse.
• Quick Start Skips the Mission
Briefing screen, and sends you to the
Hangar Deck to begin your mission.
(See Hangar on page 12 for more
information.)
• Go to Briefing Sends you to the
Mission Briefing screen, where you’ll get
more detailed information about your
mission. (See Mission Briefing on page 11
for a detailed description.)
Go to the Hangar to start your
mission (See Hangar on page 12 for
details). In the Hangar, you’ll have the
following choices:
• Launch Sends you off on your
mission.
• Return to Concourse Sends you
back to your briefing.
• Switch Craft To fly a different
spacecraft, highlight this, then press
the RIGHT ARROW key. Press the UP
and DOWN ARROW keys to scroll
through the different craft choices,
then press ENTER to select one.
• Load Warheads To change the
weaponry on your craft, highlight this,
then press the RIGHT ARROW key.
Press the UP and DOWN ARROW keys
to scroll through the different weapon
choices, then press ENTER to add or
change new warheads.
• Install Beam Weapon To configure
your craft with this neutralising
weapon, highlight this, then press the
RIGHT ARROW key. Press the UP and
DOWN ARROW keys to scroll through the
various beam weapon choices, then
Star Wars: X-Wing Alliance
press ENTER to add the one you want.
NOTE: These weapons are not available
on all craft.
• Install Countermeasures To
change your craft’s defensive
weaponry, highlight this, then press
the RIGHT ARROW key. Press the UP
and DOWN ARROW keys to scroll
through the countermeasures choices,
then press ENTER to add one. NOTE:
These are not available on all craft.
When you’ve finished making your
selections, press the SPACEBAR or
select Launch to begin your mission.
Quick Skirmish
In Quick Skirmish mode, you can
customise missions any way you want,
within the limits of the game. You’ll
even be able to fly a variety of craft
that can’t be flown in other
X-Wing Alliance missions, including
Imperial craft. NOTE: Skirmish mode
was designed to be as flexible as
possible, but some setting
combinations a player creates may
cause performance problems.
Clicking on the Quick Skirmish
button
in the Combat Chamber brings up a
Quick Skirmish Setup screen. In
building a mission, you’ll activate and
configure teams and flight groups, and
give them a mission goal. A flight
group contains one to six craft of the
same type that fly together as a unit.
At the bottom of the screen, you’ll
see a row of icons, which you can click
on to configure your mission. These
are labelled:
41
Page 23

Star Wars: X-Wing Alliance
42
QUICK SKIRMISH SETUP SCREEN GOALS SCREEN
• # of Teams Cycles between two,
four, and eight teams.
• Setting Cycles through the various
environments in space where your
mission will take place. The choices are
deep space, mine field or asteroid
field.
• Start Distance Lets you set the
distance your teams will be from one
another when the mission begins.
• Collisions Turns collisions between
starfighters on or off.
• Time Limit Sets the time limit for
melee type skirmishes.
Once you’ve made your
configuration choices, the number of
teams you’ve chosen will be displayed
on the Quick Skirmish Setup screen. To
give each team an objective for that
mission, click on Goals button in the
upper part of the screen.
On the Goals Screen, you’ll see the
number of teams you’ve selected with a
goal next to each team and the Skirmish
Mission Goal Type. Choose Melee or Combat
Engagement. For Melee skirmishes, the
goal is always to destroy more of your
opponent’s craft in the allotted time than
the other teams. Highest score wins. For
Combat Engagement skirmishes, teams
can be given different goals. The first
team to complete its goals wins. To
change goals for a team, click on the
goals next to the team’s name. Click on
the Flight Group Assignment button at the
top of the Goals screen to leave it.
FLIGHT GROUP
CONFIGURATION
SCREEN
Below is a description of all the options
on the screen. See the Flight Group
Assignment section on page 44 to go
through the steps for using it.
• Piloted By Cycles through the
various Artificial Intelligence levels for
each flight group. If you assign
yourself to this flight group, this setting
applies to your wingmates and your
turret gunner.
FLIGHT GROUP CONFIGURATION SCREEN
• Craft Use this setting to change the
craft piloted by the selected flight
group. Click on the word Inactive to
bring up a list of types of craft. Click on
a type of craft to bring up all available
craft of that type. If the list is long,
click the UP and DOWN ARROWS or
drag the slider bar to see all the craft.
Click on a craft to select it. Click on
Cancel to return to the Flight Group
Configuration screen.
• # Craft Per Wave Lets you choose
from one to six craft in each wave.
• Number of Waves Lets you choose
from one to nine waves. Once all the
craft in a wave have been shot down,
the next wave will appear.
• Warheads Cycles between the
available projectile weapons for the
craft you’ve chosen. (See Types of
Warheads on page 20 for more
information.)
• Beam Weapon (Starfighters only)
Cycles through the different beam
weapons available for your craft. (See
Types of Beam Weapons on page 21 for
more information.)
Star Wars: X-Wing Alliance
• Countermeasures (Starfighters
only) Cycles through the available
defenses for your craft. (See Types of
Countermeasures on page 21 for more
information.)
• Primary FG This determines
whether a flight group is considered a
primary target for the purpose of goal
resolution. For example, if you assign
the goal “Destroy Primary Targets” to
your team, and your opponent has a
Star Destroyer and a corvette designated
as primary flight groups, then your
goal is to destroy the Star Destroyer
and the corvette. If set to Yes, a red
exclamation point appears next to the
flight group.
• Duty Cycles through the different
duty assignments you want to give to
this flight group:
• Superiority Attack fighters, then
primary flight groups.
• Strike Attack primary flight
groups, then fighters.
• Escort Protect primary flight
groups.
• Disable Disable primary flight
groups.
• Capture Disable and capture
primary flight groups.
• Recon Inspect (determine cargo
of) primary flight groups.
• No Duty Craft is stationary.
Once you’ve finished configuring
the mission and flight groups, you can
click on the LEFT ARROW in the upper
middle of the screen to scroll through
flight group information, armaments
and orders. Click on the RIGHT ARROW
to see how these craft are armed.
43
Page 24

Star Wars: X-Wing Alliance
44
You’ll see a row of buttons in the
lower left-hand corner, labelled:
• Tour of Duty Exits Skirmish mode,
returns you to Family Mission screen
before you join the Rebellion or the
Battle Selection screen after you join.
• Load Loads a saved skirmish or clears
and begins a new skirmish. Clicking this
brings up a list of skirmish templates.
Click on the one you want to play, or
press Cancel to return to the previous
screen. If you select New Skirmish
Mission, all flight groups and goals will
be cleared. Skirmish templates are
saved in the Skirmish folder in your X-
Wing Alliance directory.
• Save Click on this, then type in the
name of the skirmish you want to save.
To play it again later, click on Load.
• New Skirmish Mission This option
clears all skirmish settings, including
the flight groups and goals.
FLIGHT GROUP ASSIGNMENT
You’ll need to activate and assign as many
flight groups as you want. To do this:
1 Drag a player name to an empty slot
at the Quick Skirmish Setup screen.
2 Click the word Inactive next to a
pilot’s name in a slot.
3 Select a craft from the list that shows
all craft the player is allowed to fly.
4 At the Flight Group Configuration
screen, you’ll have a series of choices
to fill out.
5 Rename your group if you desire at
the flashing cursor.
6 Select a Wingman Skill. This affects
the AI of wingmen in the flight group.
This is the level of your AI when you go
to the map with AI. This is the level of
your AI turret gunner.
7 From Craft, change craft if you want
a different craft other than the one
selected.
8 Select number of craft per wave.
This is the number of wingmates you’ll
have, including yourself.
9 Select the number of waves.
10 Select the beam weapons you want.
11 Select the counter measures you
want.
12 Select Yes or No for a primary flight
group. (If it’s set to Yes, a red
exclamation point will appear next to
flight group.)
13 Select from a variety of duties.
14 Using the buttons along the bottom,
you can copy and paste your selections
into other flight groups.
15 Click Done to go to a Quick Skirmish
Setup screen. Assign AI flight groups to
fly with and against you in your
mission. To assign an AI flight group:
1 Click Inactive next to an empty slot.
2 Select a craft from the list. (This is a
list of all craft in the game.) You’ll also
see the point value of that flight group,
along with the total point value of its
team. (In multiplayer games, it is
important to have these points equally
balanced. The host sets the maximum
point value for each team, and each
player gets to spend those points.)
3 Select Piloted By. (This is the skill
level of the AI.)
4 Follow from step 6 above.
Star Wars: X-Wing Alliance
FLY A SKIRMISH
To fly a skirmish, first load or create
one. Once you’ve dragged your pilot’s
name to a flight group, a Begin button
will appear in the lower right of your
screen. Click on this to start flying.
the player statistics for that mission.
These include the mission result, the
mission score, any awards you’ve
earned, the number of craft you’ve
downed, and the number of craft
you’ve lost.
When your mission is over, you’ll move
to a Debriefing screen, which displays
TIPS FOR SUCCESS
• P
RESET YOUR POWER AND THROTTLE SETTINGS
O
PTIONS OR WITH
YOUR THROTTLE AND REDIRECTS BY PRESSING
T
HIS CAN BE USEFUL IF YOU WANT TO GET YOUR SHIP READY FOR SITUATIONS
SUCH AS DOGFIGHTS, WHEN YOU WANT LOTS OF ENGINE AND WEAPON POWER
• I
F YOUR SHIP HAS GUN TURRETS, FIRE THEM AT CRAFT THAT ARE
CHASING YOU OR ARE BEHIND YOU BY USING THEF KEY WHILE IN
THE COCKPIT
TARGET THAT YOU DON’T WANT TO GET TOO CLOSE TO
• T
O DODGE MISSILES, TRY FLYING
MEGALIGHTS PER HOUR OR FASTER
• T
O TURN FASTER, TRY FLYING AT
• W
HEN IN A DOGFIGHT, WOBBLE YOUR CRAFT TO MAKE IT
MORE DIFFICULT FOR ENEMY WEAPONS TO HIT
DO THIS WHILE SHOOTING YOUR OWN WEAPONS ACCURATELY
YOU
’
LL BE A REAL THORN IN YOUR OPPONENT’S SIDE
• DON’
T GET CLOSER THAN
CAN HELP IT
GETTING ANY CLOSER PUTS YOU AT RISK FOR PROXIMITY DAMAGE FROM
FRIENDLY WARHEADS
• DON’
T SHOOT WARHEADS AT POINT-BLANK RANGE
GET CAUGHT IN YOUR OWN BLAST
SHIFT+F11
. Y
OU CAN ALSO USE THEM FOR ATTACKING A LARGE
AND
90
.
1/3
.8
KM TO CAPITAL SHIPS IF YOU
. T
HEY CAN HIT YOU FAIRLY EASILY AT THAT RANGE, AND
.
.
. D
SHIFT+F12
F11
THROTTLE
. I
O THIS IN THE DATAPAD UNDERGENERAL
KEYS
. T
HEN USE THESE PRESETS TO CHANGE
AND
F12.
.
.
.
F YOU CAN
,
!
. Y
OU MIGHT
45
Page 25

Star Wars: X-Wing Alliance
46
MULTIPLAYER SPACE COMBAT
Star Wars: X-Wing Alliance
47
Page 26

Star Wars: X-Wing Alliance
48
Multiplayer Space
Combat
Once you’ve honed your piloting skills in
the single-player missions, take your
favourite Rebel or Imperial starfighter
into combat against other live
opponents for a different kind of a thrill.
MULTIPLAYER MODE
FEATURES
• Play Up to Eight Players Up to
eight players are supported on a LAN,
four players over the Internet, and two
players over serial or modem
connection, using Microsoft DirectPlay.
• Play over the Internet on MSN
Gaming Zone Access free Internet
play on the MSN Gaming Zone, the
popular and easy-to-use Internet
gaming Web site, using your Web
browser. (Internet Explorer or Netscape
Navigator and an account with an
Internet Service Provider are required.)
• Starfighter Racing Modes Compete
in series of starfighter races through
the rings of the Pilot Proving Ground.
• Multiplayer Quick Skirmish Set up
your own mission parameters or load
one of the ready-made missions and fly
with friends.
• Fly Imperial or Rebel Starfighters
Pilot 28 different craft in multiplayer
combat. These include all of the
superiority fighters used by the Rebel
Alliance, as well as all of the various TIE
fighters, gunboats and missile boats in
service for the Galactic Empire. You can
also pilot a number of civilian and
pirate craft in combat, including the
Millennium Falcon itself!
SIMULATOR PODS
MULTIPLAYER SETUP SCREEN
How to Play a
Multiplayer Game
To play a multiplayer game from the
Family Transport or Concourse, click on
the Combat Simulator door to enter the
Simulator room. Click on the large
group of simulator pods to go to the
Multiplayer Setup Screen. NOTE: You can
set multiplayer video settings, just as
you can for single-player games. You
may wish to use different multiplayer
video settings to improve performance.
See page 35 for details on Video Options.
Select whether you wish to Host
Game, Join Game, or connect to the
MSN Gaming Zone. (For more
information about playing on the Zone,
see MSN Gaming Zone on page 57.)
Hosting a Game
The host must choose mission settings,
assign players (including himself) to
flight groups, and become the server
for the game session. As the host, you
must set the following options to start
the network game before clicking the
Connect button:
SERVICE PROVIDER
Choose the type of connection for the
game. Just click the icon for the
service provider you wish to use for
the game session.
IPX Choose this service provider to
host a game on an IPX LAN. Click Begin
to start the multiplayer session once
you are ready.
Select Service
Provider
HOST-CONNECTION SETUP SCREEN
Star Wars: X-Wing Alliance
TCP/IP
Choose this
service
provider to
play over
the Internet or
TCP/IP
LAN. As the
host, you
must give
your IP
address to
each client
so they can
connect to your game. For information
on finding your IP address, refer to the
IP Configuration Viewer section on
page 59. Click Begin to start the game
session once you are ready.
IPX
TCP/IP
Currently Selected
Service Provider
Game Name
Password
Internet Yes/No
Update Rate
Back
Connect
(Start Game)
49
Page 27

Star Wars: X-Wing Alliance
50
DIRECT MODEM Choose this to play a
two-player game with a friend using
your modem. If there are multiple
devices listed under Available Modems
in the list on the right, you must make
sure that your modem is selected by
clicking on it. Once you are ready, click
Begin to start the game session.
DIRECT MODEM
Direct Serial
Choose Direct
Serial to play a
two-player
game between
two PCs
connected via a
DIRECT SERIAL
null modem cable. You must have each
end of a null modem cable connected
to a free serial port on the back of
each PC. Then you must set the COM
port to match the port that the cable is
plugged into (usually 1 or 2 on most
computers). It is recommended that
you leave Baud Rate, Stop Bits, Parity,
and Flow Control settings at their
defaults. If you have changed any of
the other settings or experience any
problems, click the Restore Defaults
button. Once you are ready, click Begin
to start the game session.
GAME NAME
Default is YourPilotname’s Game. You
can change it to anything you wish,
just click in the field below Game
Name and type in the new name,
followed by ENTER.
PASSWORD
Allows you to password-protect your
game, allowing only the players to
whom you have given the password to
join your game. Click Yes or No to
enable/disable password protection.
Click in the field below Password to set
the password.
INTERNET YES/NO
This setting affects they way in which
network communication is handled by
X-Wing Alliance. Choosing Yes
enables optimisations for Internet play.
Click on the word Yes or No to toggle
between the two settings. Default is Yes
for TCP/IP games and No for all other
Service Providers. If you are hosting a
TCP/IP LAN game, you should turn this
off for the best performance.
UPDATE RATE
Use this setting to control the
frequency in which game data is sent
across the network. Click on Low or
High to toggle between the two
settings. The High setting reduces the
amount of warping in-flight, and is the
recommended setting. Use Low only if
you are experiencing performance
problems.
Joining a Game
After clicking Join Game you must
select one of the following service
providers. (For definitions, see the
Glossary on page 62.)
IPX Choose
this service
provider to
join a game
on an IPX
LAN. Click
Connect to go
the LAN Game Join Screen.
Select Service
Provider
TCP/IP Choose this service provider to
play over the Internet or TCP/IP LAN. If
you are joining a game, you must type
in the host’s IP address to find the
game on the Internet or LAN. Click
Connect to start the game session once
IPX
JOIN-CONNECTION SETUP SCREEN
you are ready. (For more information
on TCP/IP, see page 64.)
Star Wars: X-Wing Alliance
TCP/IP
Currently Selected
Service Provider
Back
Connect (Look for
Host’s Game)
51
Page 28

Star Wars: X-Wing Alliance
52
Choose Game to
Join from List
Query All Games
DIRECT MODEM Choose this to join a
two-player game with a friend using
your modems. Enter the host’s phone
number. If there are multiple devices
listed under Available Modems in the
list on the right, you must make sure
that your modem is selected by
clicking on it. Once you are ready, click
Connect to start dialling and attempt to
connect to the host’s modem.
DIRECT MODEM
IPX LAN JOIN GAME SCREEN
DIRECT SERIAL Choose Direct Serial to
join a two-player game between two
PCs connected via a null modem cable.
You must have each end of a null
modem cable connected to a free
serial port on the back of each PC. Then
you must set the COM port to match
the port that the cable is plugged into
(usually 1 or 2 on most computers). It
is recommended that you leave Baud
Rate, Stop Bits, Parity, and Flow Control
settings at their defaults. If you have
changed any of the other settings or
experience any problems, click the
Restore Defaults button. Once you are
ready, click Connect to start the game
session.
Selected Game
Back
Join Selected Game
Racing Missions
This mode lets you compete in racing
events against live players in the
Salvage Yard. (See Pilot Proving Ground
on page 27 for details.) The courses
consist of a sequence of rings, some of
which have weapons aimed at any
craft. Shooting the small yellow boxes
on these rings will disable the
weapons. The rules for the particular
course will be displayed when the
mission loads.
CHAT
Type a message any time the Chat
Interface is visible at the top of the
screen. Press ENTER to send the
message. Click the T key to send to
only players on your team, and click
the A key to send to all players. Click
the DOWN ARROW on the right of the
Chat Interface to enlarge the Chat Box,
click it again to shrink the Chat Box.
Player’s Craft
Player Slots
Cycle Through
Courses
Star Wars: X-Wing Alliance
PLAYER ASSIGNMENT
Players will be automatically assigned
start positions and crafts as they join
the game. The host can eject an unruly
player from the game. Do this by
dragging the player name to the Boot
Player icon.
Chat Interface
53
DIRECT SERIAL
Cycle Game
Race Options
Switch to Quick
Skirmish Mode
Boot Player
Back
Ready Button
RACING MISSIONS
Page 29

Star Wars: X-Wing Alliance
54
RACING MISSION
OPTIONS
Only the host can modify these
settings. Clients can view the host’s
current settings.
• Laps To change the length of a race,
modify the number of laps from one to
10. This setting only applies to Ringer 1,
Ringer 2 and the Crazy Eight race
courses.
• Craft Selection Selecting Off means
craft cannot be changed from the
default. Allows players to choose their
own craft and its settings by choosing
On. Selecting Host Only allows only the
host modify the craft settings.
• Finish Time Limit Sets the time
limit for when the game ends after the
first player finishes the course.
• Locate Players Choose Automatic to
allow all players to see other pilots’
craft info in the CMD without having to
Player Slots
Team Point
Total
Cycle Skirmish
Options
Quick Skirmish
Racing
Missions Mode
MULTIPLAYER QUICK SKIRMISH SCREEN
first identify them. With this turned off,
human pilots cannot be distinguished
from computer pilots without first
identifying their craft.
• Password Select Open so no
password is required to join this game.
If a password was entered by the host
at the Host Connection Setup Screen,
turning Required on will enable the
password protection.
• Collisions Turns collisions between
starfighters on or off.
Multiplayer Quick
Skirmish
Multiplayer Quick Skirmish, like in
single-player, allows you to create your
own missions from scratch or you can
load one of the ready- made missions.
Multiplayer Quick Skirmish mode
operates much the same way as it
does in single-player mode with a few
Chat Interface
Unassigned
Player List
Boot Player
Load Skirmish
Save Skirmish
Clear
Start
additional multiplayer-specific options.
This section describes only the
multiplayer aspects of Quick Skirmish.
For more information, see the Quick
Skirmish section on page 41.
NOTE: For best success, we recommend
you load a pre-made Skirmish template.
“Simple” templates are recommended
for playing on the Internet or for lowend machines. “Complex” templates
are designed for LAN use.
CHAT
Type a message any time the Chat
Interface is visible at the top of the
screen. Press ENTER to send the
message. Click the T key
to only send to players on your team,
and click the A key to send to all
players. Click the DOWN ARROW on
the right of the Chat Interface to
enlarge the Chat Box, click it again to
shrink the Chat Box.
PLAYER ASSIGNMENT
The host must drag player names from
the Unassigned Player list to one of the
available team slots. If you load a
ready-made Skirmish mission, you must
assign to a slot next to a flyable craft,
replacing the computer pilot. The host
can eject an unruly player by dragging
the player’s name to the Boot Player
icon. All players must be assigned to
team slots before the Ready button will
appear for the host.
Star Wars: X-Wing Alliance
QUICK SKIRMISH
OPTIONS
Only the host can modify these
settings. Clients can view the host’s
current settings.
• Craft Selection Select On to let
players choose their own craft and its
settings. Select Host Only so the host
can modify the craft settings and
armaments.
• Number of Teams Cycles between
two, four, and eight teams.
• Setting Cycles through the various
environments in space where your
mission will take place.
• MaxTeamPts Shows the maximum
number of points available to any team
for Craft Selection and Armament. Every
craft setting has a point cost and this
tally is designed to keep teams balanced.
The host can set this from 500 to 10,000,
or Unlimited. If a team’s point total
exceeds the maximum Team Points
value, the Team Points will flash red.
Your team point total must be under the
maximum point total set by the host or
the Ready button will not appear.
• Finish Time Limit Sets the amount
of time before the mission ends, either
to when a team has completed its
mission goal or when only one team
has players left in it.
• Start Distance Lets you set the
distance your teams will be from one
another when the mission begins.
• Locate Players Automatic allows
all players to see other pilots craft info
in the CMD without having to first
identify them. With this turned off,
human pilots cannot be distinguished
from computer pilots without first
55
Page 30

Star Wars: X-Wing Alliance
56
identifying their craft.
• Collisions Turns collisions between
starfighters on or off.
• Password The Open setting means no
password is required to join this game.
Select Required if a password was
entered by the host at the Host
Connection Setup screen. Turning this
on will enable the password protection.
Type Chat Here
(SHIFT+TAB)
In-Flight
Multiplayer Options
IN-FLIGHT MESSAGING
ß+ †
†
∆
p
MULTIPLAYER SKIRMISH
Brings up Chat
Console.
Type your message, then
hit ENTER
Cycles through send to
Team/Enemy/All
Aborts message and
returns keyboard control
Sends message
Target nearest player
craft
Incoming Chat and
Radio Messages
Player Name
ENDING A MISSION
If you lose all of the craft assigned to
you and your flight group, or you quit
using Q then SPACEBAR, the mission
will end for you and you will be taken
to the Map until the mission is over.
The rest of the players will continue to
play in the mission until they have lost
their craft, the mission ends due to
completion of goals or due to mission
time-out. If you don’t want to wait,
you can press ALT+Q, then SPACEBAR
to disconnect from the game. To view
the final scores, you should remain
connected until the mission ends. If
you are a client and disconnect from
the game before it’s over, you won’t
see your final score. If the host
disconnects from the game, all clients
will be disconnected too.
MSN Gaming Zone
The Zone is a free gaming service that
allows you to play challenging games
on the Internet. Here, you can compete
against some of the best players on the
Internet or just meet new people over
a casual game. It’s also a place to go
to get the latest game tips and news
about X-Wing Alliance.
To play on the Zone, you will need
either Internet Explorer (version 3.2 or
later) or Netscape Navigator (version
4.0 or later).
MSN GAMING ZONE
QUICK START
INSTRUCTIONS
1 Launch X-Wing Alliance.
2 Click Combat Simulator.
3 Click Multiplayer.
Star Wars: X-Wing Alliance
4 Click MSN Gaming Zone. The game
will close down and attempt to
connect to the X-Wing Alliance game
lobby on the MSN Gaming Zone Web
site at msn.zone.com. If you are not
already connected to the Internet, you
may be prompted by Windows to
connect to your Internet Service
Provider. If your computer is not
configured to connect to the Internet
automatically, you should connect
manually, then go back to Step 1.
5 The Zone Help section of the MSN
Gaming Zone will help you create a
new UserID and password, or help you
log in using an existing account.
6 Once you are logged in, you can meet
other X-Wing Alliance players and set
up games in the game lobbies. Once
you have joined a lobby and the host
hits the Launch button, X-Wing
Alliance will start and players will be
connected to the game automatically.
GET A FREE
MEMBERSHIP
ON THE ZONE
NOTE: If you already have a Zone account
and the software installed, you can skip
these steps. Go directly to the section
Playing X-Wing Alliance on the Zone.
1 Connect to your Internet Service
Provider.
2 Launch either Internet Explorer or
Netscape Navigator.
3 Type msn.zone.com and press
ENTER. This will bring you to the Zone
Web site.
4 At the Zone Web site, click New
Zone Users: Signup to Play Games if you
are not a member of the Zone.
57
Page 31

Star Wars: X-Wing Alliance
58
Complete the form and click Submit to
register on the Zone.
5 In the “Sign In was successful!”
window, click Zone Software to install
the software on your computer system.
6 Click Complete Install and type an
install directory.
7 Once the Zone software is installed,
you are ready to begin.
PLAYING X-WING
ALLIANCE
ON THE ZONE
1 Make sure both the X-Wing
Alliance and Zone software are
installed on your computer system.
2 Place your X-Wing Alliance Disc 1
or Disc 2 in the CD-ROM drive. If the
game Launcher appears, do not start
the game; instead, exit from it.
3 Connect to your Internet Service
Provider and launch either Internet
Explorer or Netscape Navigator.
4 Type msn.zone.com and press
ENTER.
5 At the Zone Web site, click Games
List and an entire list of games will
appear.
6 Find X-Wing Alliance in the Games
List and click it.
7 Type your Member ID and password
in the Sign In window. Click OK and the
Zone X-Wing Alliance page will
appear.
8 Begin playing by clicking one of the
X-Wing Alliance rooms listed in the
game room window.
9 A list of game tables will appear.
Move your mouse over any one of
them. If a table is unoccupied, a host
icon will appear. To host a game, click
the Host icon and wait for other players
to join. Use the chat feature to recruit
other players. When all players are
logged on and ready to go, click
Launch to begin. NOTE: If you are
hosting a game and decide to quit, the
first player who joined your game will
become the host.
10 You can also join a game hosted by
another player. Move your mouse over
a table and click Join to add your name
to the game, and wait for the host to
launch it. Next to each player’s name is
a latency indicator. The latency
indicator shows how fast your current
connection is to each player. If you are
joining a game, it is recommended that
you connect to a host with a green
latency indicator.
11 If you have any problems, see the
Help page for more details.
Playing X-Wing
Alliance on the
Internet
X-Wing Alliance uses DirectPlay, the
multiplayer component of DirectX 6.0.
DirectPlay has support for TCP/IP, the
network protocol used on the Internet.
This means that you can challenge a
friend to a X-Wing Alliance game
anytime, provided you have access to
the Internet via an Internet Service
Provider (ISP).
GETTING STARTED
We’ve provided some useful
information to help you play X-Wing
Alliance directly over the Internet
without the MSN Gaming Zone in case
you want to set up your own game.
You’ll find a Glossary of Internet-Related
Terms on page 62. If you are not
familiar with a term or acronym used
in this manual, refer to the Glossary.
HOSTING YOUR OWN
INTERNET GAME
This section helps you host and join
Internet games without a matchmaking
service such as the MSN Gaming Zone.
Setting up your own Internet
games can be somewhat difficult for
less experienced Internet users. If you
have trouble, try playing X-Wing
Alliance on the MSN Gaming Zone. It
really simplifies the connection process
and provides a place to meet other
players.
Advanced users will probably be
able to find players in an X-Wing
Alliance room using an IRC Chat
program, or a pop-up Chat program. In
an IRC Chat room, you can arrange a
game and exchange the IP Address, as
mentioned in Step 3 below. Please
consult the Glossary on page 62 for
more information on IRC.
SUGGESTED STEPS FOR HOSTING
AN INTERNET GAME
1 Connect to the Internet.
2 Determine your IP Address. This
number is usually different each time
you connect. You can use the IP
Configuration Viewer (included with
Windows 95 or 98) to determine your
IP Address. See the section entitled
Useful Internet Utilities Included with
Windows 95 or 98 below for details.
3 You will need to give your current IP
Address to anyone interested in joining
Star Wars: X-Wing Alliance
your game. If you are playing with a
friend, you could e-mail them this
number or call them (if you have
access to a phone that isn’t tied up by
your connection to the Internet).
4 Launch X-Wing Alliance and
choose to host a TCP/IP multiplayer
game by following the Hosting a Game
instructions on page 49.
5 Once the game is active and you are
waiting in the Multiplayer Options
screen, your opponent will be able to
join using the IP Address you gave
them. Just wait until they show up in
the game.
JOINING AN INTERNET GAME
1 You will need to obtain the IP Address
of the computer hosting the game. You
could arrange the game online through
an IRC Chat program or obtain the
address via e-mail or other means. This
number will usually change every time
the host connects to the Internet, so you
need to obtain the host’s current IP
Address before joining a game.
2 Launch X-Wing Alliance and
choose to join a TCP/IP multiplayer
game by following the Joining a Game
instructions on page 51.
3 Select the TCP/IP protocol as your
service provider.
4 Enter the IP Address when prompted
and click OK. Be sure to enter the
number exactly and include periods to
separate the numbers. A valid number
will look something like this:
199.3.89.200
5 Once you have entered a valid IP
Address and clicked OK, X-Wing
Alliance will search for the game. If
the game isn’t found, click the LEFT
ARROW button to go back and try
59
Page 32

Star Wars: X-Wing Alliance
60
again. Carefully reenter the IP Address.
6 When the game is found, click the
game name, then click the RIGHT
ARROW button to connect and proceed
to the Multiplayer Options screen.
Useful Internet
Utilities Included
with Windows
95/98
IP CONFIGURATION
VIEWER
This utility allows you to view your
TCP/IP settings, such as your IP address.
To join an Internet game, you will need
to know the IP Address of the computer
hosting the game. The host can use the
IP Configuration Viewer to identify his
IP address and give this number to you
so that you can find his game on the
Internet. To obtain your IP Address:
1 Connect to your ISP.
2 Click the Start button.
3 Then click Run.
4 Type WINIPCFG, and press ENTER to
display the IP Configuration Viewer.
5 Click the arrow to the right of the
drop-down box and select PPP Adapter
from the list (if necessary).
6 Make note of the number in the IP
Address window. This is your current
Internet IP Address. You will need to give
this number to others who wish to join
your Internet game. This address will
usually change every time you disconnect
and re-connect to your ISP. You can now
minimise the viewer and your IP address
will be displayed on the taskbar.
PING
You can use the DOS-based PING
command to determine latency
between you and the host. To use the
PING command:
1 Click on the Start menu, then choose
Programs.
2 Click MS-DOS Prompt to open a DOS
window.
3 At the MS-DOS Prompt, type PING
followed by the IP address of the host and
then press ENTER.
For example:
C:\Windows>ping 199.3.89.200 <Enter>
You will then see something like this:
Pinging 199.3.89.200 with 32 bytes of
data:
Reply from 199.3.89.200: bytes=32
time=296ms TTL=128
Reply from 199.3.89.200: bytes=32
time=302ms TTL=128
Reply from 199.3.89.200: bytes=32
time=331ms TTL=128
Reply from 199.3.89.200: bytes=32
time=290ms TTL=128
The PING command will “ping” the host
four times and return the above
information. The number following
time=
latency of 500 ms (milliseconds) or less
is generally acceptable for playing
X-Wing Alliance, but the lower this
number the better your game
experience will be. A “Ping time” of
300 ms or less (average) is optimal for
playing X-Wing Alliance.
NOTE: If you get Request timed out one or
more times while pinging a host, you will
likely experience poor performance while
playing with that host. Try reconnecting
to your ISP and pinging again to see if
your connection improves.
is your latency. An average
Internet
Performance Tips
for X-Wing
Alliance
YOU NEED A QUALITY
CONNECTION TO THE INTERNET.
The Internet is always changing and is
unpredictable by nature. If you have
performance problems while playing
online, you might want to disconnect
from your ISP and reconnect to attempt
to get a better connection. You may also
have a better experience by playing at
other times of the day or night, when
the Internet is less congested. Some
commercial membership online services
that offer Internet access may not
perform adequately. An independent or
Star Wars: X-Wing Alliance
local Internet Service Provider will
generally offer the best performance.
CONNECT TO THE INTERNET USING
YOUR MODEM’S HIGHEST SPEED
POSSIBLE.
When you connect to your ISP, you will
see a message Connected at 28800 bps
or something similar. This is especially
important if you are the host for an
Internet game.
IT IS IMPORTANT TO HAVE A
LOW LATENCY CONNECTION.
A latency of 500 ms (milliseconds) or
less between players is acceptable; it is
recommended that you have an average
latency of 300 ms or less. Refer to the
PING command in the Useful Internet
Utilities Included with Windows 95/98
61
Page 33

Star Wars: X-Wing Alliance
62
section on page 59 for more
information. Some online membership
services that offer access to the Internet
(through their proprietary dial-up
services) have high latency and may not
perform well with X-Wing Alliance.
THE HOST SHOULD BE THE
FASTEST MACHINE IN THE GAME.
It is always a good idea to have the fastest
machine in a multiplayer game be the
host. If you are on the Zone and don’t have
a really fast machine, you should join
games hosted by other people on faster
machines, rather than hosting yourself.
The basic rule of thumb is the faster the
frame rate on the host machine, the better
the game will be for all players. A fast
machine running too high of a resolution
that yields a less than optimal frame rate
will result in poor performance overall.
Glossary of
Internet-Related
Terms
BANDWIDTH
The amount of data that can be
transmitted or received in a given
amount of time. For example, a 28.8
modem can send and receive at 28.8 kbps
(kilobits per second) and an ISDN card
can transmit at speeds ranging from 56
Kps (Kilobytes per second) to 128 Kps.
CLIENT (also see Host)
In multiplayer gaming, a client refers to
a person who is joining a network
game that has been created by another
player. The player that creates the game
is referred to as the host (or server).
DIRECTX
DirectX is the API (Applications
Programming Interface) that X-Wing
Alliance uses to access your computer’s
hardware. DirectX has been developed by
Microsoft to integrate into the Windows
95/98 operating system and provides
games with a standard method of direct
access to the advanced features of your
computer’s hardware, without having to
develop specifically for that hardware.
DirectX is made up of five components:
Direct- Draw for 2D display capabilities,
Direct3D for 3D display, DirectSound for
sound capabilities, DirectPlay for
multiplayer capabilities, and DirectInput
for input devices such as mice, keyboards
and joysticks.
HOST (also see Client)
The host is the computer that creates
the multiplayer game for others to join.
The host’s computer also handles a lot
of the chores associated with
communication between participants
in a multiplayer game.
INTERNET
The Internet is an internetwork, or
network of smaller networks that
spans the entire globe. Since its
inception in the 1970s, the Internet has
grown to epic proportions and, in
essence, has become a public network.
IPADDRESS (Internet Protocol
Address)
This is a number, commonly referred to
as an IP Address, that is assigned to all
computers on a TCP/IP network. Your
ISP assigns one of these to you
whenever you connect to the Internet.
You should use the IP Configuration
Viewer to obtain this number if you
are hosting an Internet game. Refer to
the IP Configuration Viewer in the
Useful Internet Utilities Included with
Windows 95/98 section on page 59 for
more information.
IPX (Internetwork Packet
Exchange)
Network protocol used in Novell
Netware-compatible networks. Most
commonly used protocol for LANs.
Some commercial gaming services
such as Kali and MSN Gaming Zone’s
ZoneLAN are designed to allow IPX
games to be played over the Internet
using custom software. This software
converts IPX packets to TCP packets for
transmission over the Internet. X-
Wing Alliance is supported directly
by the MSN Gaming Zone so there is no
need to play it using ZoneLAN.
IRC (Internet Relay Chat)
Using an IRC program (not included
with X-Wing Alliance, but available as
shareware from many sources on the
Internet), you can connect to chat
rooms across the country. It is likely that
you can find chat rooms dedicated to
Internet gaming or specifically, X-
Wing Alliance, in which you can
exchange IP Addresses and arrange
Internet games.
ISP (Internet Service
Provider)
A company or service that provides
local dial-up access to the Internet
using your modem, usually for a
Star Wars: X-Wing Alliance
monthly fee. Some online services offer
Internet access as part of a number of
services. These types of ISPs may not
be adequate for online gaming due to
the inherent latency caused by the
overhead of their proprietary services.
LAN (Local Area Network)
Two or more computers connected
together with network adapter cards and
network cable.
LATENCY
Latency, or Internet lag as it is
commonly referred to, is a measure (in
milliseconds) of the amount of time that
it takes for data to travel from one
computer to another and back, over a
network or the Internet. This lag time
can be measured using the PING
command. (See the Useful Utilities
section on page 59 for more
information on the PING command and
latency). Latency is usually not an issue
on a Local Area Network, but on the
Internet, excessive latency can cause
game performance to degrade
substantially. Therefore, when playing any
game over the Internet, it is important to
have a low latency connection. High
latency can cause poor multiplayer
performance and can decrease stability.
NETWORK PROTOCOL
The method, or language, that
computers use to communicate with
each other over a network or the
Internet. For computers to be able to
communicate over a network, they
must share a common protocol. It is
common for Windows 95/98 computers
to use more than one protocol at the
63
Page 34

Star Wars: X-Wing Alliance
64
same time for compatibility with
various networks. Common protocols
are IPX, NetBEUI, and TCP/IP.
NULL MODEM CABLE
A null modem cable is a serial cable
with the send and receive wires
reversed. Direct serial play requires a
null modem cable to be connected to
an available serial port on each
computer. This can be a special cable
acquired from your local computer
store, or you can attach a null modem
adapter to a standard serial cable to
make a null modem cable. Serial
cables (without a null modem adapter)
and parallel cables are not supported
by X-Wing Alliance.
PACKET
A single unit of data sent over a network
or the Internet. When computers
communicate with each other, they
group their data into a form called a
packet. Each packet of information is
then addressed so that it can find its way
to the intended recipient. Games work
best if each packet sent by the game is
received intact and in a timely manner.
A problem that can happen on
overcrowded networks and especially the
Internet is that packets can get lost or
dropped. In this case, the packet is
resent, requiring extra work for the
sending computer and creating more
data that needs to be sent through your
modem. Excessive dropped packets can
cause performance problems during
gameplay, and strange phenomena can
occur. Try playing at different times to
avoid prime-time congestion of the
Internet and you will most likely see
better performance.
PING
This is a DOS command line program
(included with Windows 95/98) that
allows you to measure latency between
your computer and another computer
on a TCP/IP network or the Internet. It
sends a small amount of data to an IP
Address you specify and awaits a
response. When it gets a response from
the other computer, it will display (in
milliseconds) how long it takes for the
data to make the trip over the network.
This is called “pinging” the host.
PPP (Point-to-Point Protocol)
You must have a PPP account with an
Internet Service Provider (ISP) to play
X-Wing Alliance on the Internet. If
you can browse the Web, you most
likely have this type of account.
TCP/IP
This is a network protocol used on LANs
and the Internet. You need this protocol
loaded and configured properly to play
TCP/IP games on the Internet. If you are
connected via modem, you should have
this protocol configured for use with a
Dial-Up adapter. We recommend that
you use Microsoft’s TCP/IP protocol that
is supplied with Windows 95/98. Third
party TCP/IP software has not been
fully tested with X-Wing Alliance.
For support via the web please visit
http://support.lucasarts.com
CUSTOMER AND
TECHNICAL SUPPORT IN
EUROPE
For Customer Support you can contact
Activision in the UK on 0990 143 525
between the hours of 8.00am and
7.00pm
PRODUCT LICENSE
AGREEMENT
IMPORTANT - READ CAREFULLY
OF THIS PRODUCT IS SUBJECT TO THE
SOFTWARE LICENSE TERMS SET FORTH
BELOW. "PRODUCT" INCLUDES THE
SOFTWARE INCLUDED WITH THIS
AGREEMENT, THE ASSOCIATED MEDIA, ANY
PRINTED MATERIALS, AND ANY ON-LINE OR
ELECTRONIC DOCUMENTATION, AND ANY
AND ALL COPIES AND DERIVATIVE WORKS
OF SUCH SOFTWARE AND MATERIALS. BY
OPENING THIS PACKAGE, AND/OR USING THE
PRODUCT, YOU ACCEPT THE TERMS OF THIS
LICENSE WITH ACTIVISION, INC.
("ACTIVISION").
LIMITED USE LICENSE
you the non-exclusive, nontransferable, limited right and license
to use one copy of this Product solely
and exclusively for your personal use.
All rights not specifically granted
under this Agreement are reserved by
Activision. This Product is licensed, not
sold. Your license confers no title or
ownership in this Product and should
not be construed as a sale of any
rights in this Product.
. Activision grants
: USE
Star Wars: X-Wing Alliance
OWNERSHIP. All title, ownership rights
and intellectual property rights in and
to this Product and any and all copies
thereof (including but not limited to
any titles, computer code, themes,
objects, characters, character names,
stories, dialog, catch phrases, locations,
concepts, artwork, animation, sounds,
musical compositions, audio-visual
effects, methods of operation, moral
rights, and any related documentation,
incorporated into this Product) are
owned by Activision or its licensors.
This Product is protected by the
copyright laws of the United States,
international copyright treaties and
conventions and other laws. This
Product contains certain licensed
materials and Activision's licensors
may protect their rights in the event of
any violation of this Agreement.
YOU SHALL NOT:
• Exploit this Program or any of its
parts commercially, including but
not limited to use at a cyber cafe,
computer gaming centre or any
other location-based site. Activision
may offer a separate Site License
Agreement to permit you to make
this Product available for commercial
use; see the contact information
below.
• Sell, rent, lease, license, distribute or
otherwise transfer this Product, or
any copies of this Product, without
the express prior written consent of
Activision.
• Reverse engineer, derive source code,
modify, decompile, disassemble, or
create derivative works of this
Product, in whole or in part.
65
Page 35

Star Wars: X-Wing Alliance
66
• Remove, disable or circumvent any
proprietary notices or labels
contained on or within the Product.
• Export or re-export this Product or
any copy or adaptation in violation of
any applicable laws or regulations.
LIMITED WARRANTY.
Activision
warrants to the original consumer
purchaser of this Product that the
recording medium on which the
product is recorded will be free from
defects in material and workmanship
for 90 days from the date of purchase.
If the recording medium is found
defective within 90 days of original
purchase, Activision agrees to replace,
free of charge, any product discovered
to be defective within such period
upon its receipt of the Product,
postage paid, with proof of the date of
purchase, as long as the Product is still
being manufactured by Activision. In
the event that the Product is no longer
available, Activision retains the right to
substitute a similar product of equal or
greater value.
This warranty is limited to the
recording medium containing the
Product as originally provided by
Activision and is not applicable to
normal wear and tear. This warranty
shall not be applicable and shall be
void if the defect has arisen through
abuse, mistreatment, or neglect. Any
implied warranties prescribed by
statute are expressly limited to the 90day period described above.
EXCEPT AS SET FORTH ABOVE, THIS WARRANTY
IS IN LIEU OF ALL OTHER WARRANTIES,
WHETHER ORAL OR WRITTEN, EXPRESS OR
IMPLIED, INCLUDING ANY WARRANTY OF
MERCHANTABILITY, FITNESS FOR A PARTICULAR
PURPOSE OR NON-INFRINGEMENT, AND NO
OTHER REPRESENTATIONS OR CLAIMS OF ANY
KIND SHALL BE BINDING ON OR OBLIGATE
ACTIVISION.
When returning the Program for
warranty replacement please send the
original product discs only in protective
packaging and include: (1) a photocopy
of your dated sales receipt; (2) your
name and return address typed or
clearly printed; (3) a brief note
describing the defect, the problem(s)
you encountered and the system on
which you are running the product (4)
if you are returning the product after
the 90-day warranty period, but within
one year after the date of purchase,
please include cheque or money order
for £20.00 sterling or AUD $20 per disc
replacement.
Note:
Certified mail is recommended.
In Europe send to:
WARRANTY REPLACEMENTS
ACTIVISION (UK) Ltd., Parliament House,
St Laurence Way, Slough, Berkshire,
SL1 2BW, United Kingdom
Disc Replacement: + 44 (0) 990 143 525
LIMITATION ON DAMAGES.
IN NO EVENT
WILL ACTIVISION BE LIABLE FOR SPECIAL,
INCIDENTAL OR CONSEQUENTIAL DAMAGES
RESULTING FROM POSSESSION, USE OR
MALFUNCTION OF THE PRODUCT, INCLUDING
DAMAGES TO PROPERTY, LOSS OF
GOODWILL, COMPUTER FAILURE OR
MALFUNCTION AND, TO THE EXTENT
PERMITTED BY LAW, DAMAGES FOR
PERSONAL INJURIES, EVEN IF ACTIVISION
HAS BEEN ADVISED OF THE POSSIBILITY OF
SUCH DAMAGES. ACTIVISION'S LIABILITY
SHALL NOT EXCEED THE ACTUAL PRICE PAID
FOR THE LICENSE TO USE THIS PRODUCT.
SOME STATES/COUNTRIES DO NOT ALLOW
LIMITATIONS ON HOW LONG AN IMPLIED
WARRANTY LASTS AND/OR THE EXCLUSION
OR LIMITATION OF INCIDENTAL OR
CONSEQUENTIAL DAMAGES, SO THE ABOVE
LIMITATIONS AND/OR EXCLUSION OR
LIMITATION OF LIABILITY MAY NOT APPLY
TO YOU. THIS WARRANTY GIVES YOU
SPECIFIC LEGAL RIGHTS, AND YOU MAY
HAVE OTHER RIGHTS WHICH VARY FROM
JURISDICTION TO JURISDICTION.
TERMINATION.
Without prejudice to
any other rights of Activision, this
Agreement will terminate
automatically if you fail to comply with
its terms and conditions. In such event,
you must destroy all copies of this
Product and all of its component parts.
INJUNCTION.
Because Activision would
be irreparably damaged if the terms of
this Agreement were not specifically
enforced, you agree that Activision
shall be entitled, without bond, other
security or proof of damages, to
appropriate equitable remedies with
respect to breaches of this Agreement,
in addition to such other remedies as
Activision may otherwise have under
applicable laws.
INDEMNITY. You agree to indemnify,
defend and hold Activision, its
partners, affiliates, contractors,
officers, directors, employees and
agents harmless from all damages,
losses and expenses arising directly or
indirectly from your acts and
omissions to act in using the Product
pursuant to the terms of this
Agreement
Star Wars: X-Wing Alliance
MISCELLANEOUS.
This Agreement
represents the complete agreement
concerning this license between the
parties and supersedes all prior
agreements and representations
between them. It may be amended
only by a writing executed by both
parties. If any provision of this
Agreement is held to be unenforceable
for any reason, such provision shall be
reformed only to the extent necessary
to make it enforceable and the
remaining provisions of this
Agreement shall not be affected.
This Agreement shall be construed
under California law as such law is
applied to agreements between
California residents entered into and to
be performed within California, except
as governed by federal law and you
consent to the exclusive jurisdiction of
the state and federal courts in Los
Angeles, California.
If you have any questions concerning
this license, you may contact Activision
at 3100 Ocean Park Boulevard, Santa
Monica, California 90405,
+ 1 (310) 255-2000, Attn. Business and
Legal Affairs, legal@activision.com.
© LucasArts Entertainment Company
LLC. © Lucasfilm Ltd. & TM. All rights
reserved. Used under authorisation.
67
Page 36

Star Wars: X-Wing Alliance
68
Credits
PROJECT LEADER/
EXECUTIVE DIRECTOR
Lawrence Holland
TECHNICAL LEAD
David Litwin
ART LEADS
Jim McLeod
Armand Cabrera
MISSION AND STORY
LEAD
David Wessman
PROGRAMMERS
Albert Mack
Michael Zyracki
David Litwin
Lawrence Holland
Alberto Fonseca
Timothy Ramsay
Kevin Deus
MISSION DESIGNERS
Bill Morrison
Morgan Gray
David Wessman
ARTISTS
Richard Green
Armand Cabrera
Jim McLeod
Steve Moore
Thomas Denmark
Stephen Greek
Chan Ho Lee
Corey Keller
Mark Wilson
William Eaken
Mondo Media
PRODUCTION MANAGER
Dan Connors
LEAD TESTER/
ADDITIONAL DESIGN
John Drake
ASSISTANT LEAD
TESTERS
John “Buzz”
Buzolich
Todd Stritter
TESTERS
Jesse Moore
Marcus Gaines
Darren Koepp
Brent Jay Andaya
Jalipa II
Philip Berry
Erik Ellicock
Julio Torres
Torii Swader
Jeffrey Day
Jeff Sanders
COMPATIBILITY TESTING
Darren Brown
Jim Davison
Lynn Taylor
Charlie Smith
Jason Lauborough
NETWORK
COMPATIBILITY
TESTING
Doyle Gilstrap
Scott Tingley
COMPATIBILITY
SUPERVISOR
Chip Hinnenberg
QUALITY ASSURANCE
SUPERVISOR
Dan Pettit
QUALITY ASSURANCE
MANAGER
Mark Cartwright
SCRIPT EDITING
Doug Barnett
ADDITIONAL GAME
PROGRAMMING
Peter Lincroft
Sam Fortiner
3D TOOLS
PROGRAMMING
Wade Lady
Danny Gorlin
LAUNCHER/INSTALLER
PROGRAMMING
Nolan Erck
INTERNATIONAL
PROGRAMMING
Judith Lucero
INTERNATIONAL
COORDINATORS
Theresa O’Connor
Adam Pasztory
INTERNATIONAL TESTER
Dana Fong
INSANE VIDEO
COMPRESSION
Vince Lee
Andre Bremer
LEAD ART TECHNICIAN
Josef Richardson
ART TECHNICIANS
Evan Birkby
Chris Tomera
Chris Doyle
Paul Murphy
Richard Larm
VOICE
PRODUCER/DIRECTOR
Darragh O’ Farrell
VOICE EDITORS
Will Beckman
Cindy Wong
VOICE PRODUCTION
COORDINATOR
Peggy Bartlett
VOICE DEPARTMENT
MANAGER
Tamlynn Niglio
LEAD SOUND DESIGNER
Julian Kwasneski
MUSIC EDITORS
Michael Land
Clint Bajakian
iMUSE MUSIC SYSTEM
Michael McMahon
Peter McConnell
Michael Land
SOUND DEPARTMENT
MANAGER
Michael Land
SOUND DEPARTMENT
COORDINATOR
Kristen Becht
PRODUCT MARKETING
MANAGER
Joel Dreskin
MANUAL WRITERS
Victor Cross
Mollie Boero
Doyle Gilstrap
John Drake
Doug Barnett
MANUAL DESIGNER
Patty Hill
PACKAGE DESIGN
Soo Hoo Design
PACKAGE COVER ART
Richard Green
TECHNICAL WRITERS
Lynn Taylor
Chip Hinnenberg
PUBLISHER LIAISON
Robin Holland
IS SUPPORT AND
MARKETING LIAISON
Peter Leahy
DEVELOPMENT SUPPORT
Noelle Pellowski
PRODUCT SUPPORT
MANAGER
Dan Gossett
PRODUCT SUPPORT
SUPERVISOR
Dave Harris
VERY SPECIAL THANKS
George Lucas
© Lucasfilm Ltd. & TM. All rights
reserved. Used under authorization.
Totally Games is
a registered trademark of Totally
Games.
This is a work of fiction. All of the
characters and events portrayed in this
game are fictional. Any resemblance to
real persons, living or dead, or actual
events, is purely coincidental.
MUSIC CREDITS
ALL MUSIC COMPOSED AND CONDUCTED BY
John Williams
FROM THE “STAR WARS: A NEW
HOPE” ORIGINAL MOTION PICTURE
SOUNDTRACK ©1977
Imperial Attack
FROM THE “EMPIRE STRIKES BACK” MOTION
PICTURE SOUNDTRACK” ©1980
Main Title
FROM THE “STAR WARS TRILOGY”
BOX SET ©1993
T
RILOGYSETDISCONE
Star Wars
Main Title
The Return Home
Inner City
Mouse Robot/Blasting Off
Rescue of the Princess
The Walls Converge
Ben’s Death/TIE Fighter Attack
The Last Battle
The Throne Room/End Titles
T
RILOGYSETDISCTWO
The Empire Strikes Back
Luke’s Escape
The Imperial March (Darth Vader’s
Theme)
:
:
Star Wars: X-Wing Alliance
Luke’s First Crash
The Rebels Escape Again
The Asteroid Field
Han Solo and the Princess
City in the Clouds
The Duel
Hyperspace
Finale/End Credits
T
RILOGYSETDISCTHREE
Return of the Jedi
Main Title/Approaching the Death Star
Han Solo Returns (At the Court of Jabba
the Hutt)
Fight in the Dungeon
The Return of the Jedi
The Death of Yoda
Luke and Leia
The Emperor Confronts Luke
Into the Trap
The Forest Battle
Final Duel/Into the Death Star
The Emperor’s Death
Through the Flames
Trilogy Set Disc Four: Outtakes
Heroic Ewok/The Fleet Goes Into
Hyperspace (c)
Drawing the Battle Lines/Leia’s
Instructions (b)
The Ewok Battle (c)
Attack Position (b)
Standing By (a)
Leia is Wounded/Luke and Vader Duel
(c) Carbon Freeze/Luke Pursues the
Captives/Departure of Boba Fett (b)
The Return of the Jedi
(alternate)/Funeral Pyre for a Jedi (film
version) (c)
Ewok Celebration (film version) (c)/End
Credits (film version) (b)
:
69
Page 37

™
™
WWW.LUCASARTS.COM
THE OFFICIAL STAR WARS WEB SITE
WWW.STARWARS.COM
™
Developed in Conjunction with
TOTALLY GAMES,
a Lawrence Holland Company
TOTAL INVOLVEMENT
COMPUTER GAMES
41083.260.UK
© LucasArts Enter tainment Company LLC. © Lucasfilm Ltd. & TM.
Åll rights reserved. Used under authorisation.
 Loading...