

Page 1

™
®
®
™
LUCASARTS AND THE LUCASARTS LOGO ARE REGISTERED TRADEMARKS OF LUCASFILM LTD. STAR WARS REPUBLIC COMMANDO IS A TRADEMARK
OF LUCASFILM ENTERTAINMENT COMPANY LTD. © 2004 LUCASFILM ENTERTAINMENT COMPANY LTD. OR LUCASFILM LTD. & ® OR TM AS INDI
CATED. ALL RIGHTS RESERVED. MICROSOFT, XBOX, XBOX LIVE, THE LIVE LOGOS AND THE XBOX LOGO ARE EITHER REGISTERED TRADEMARKS OR
TRADEMARKS OF MICROSOFT CORPORATION IN THE U.S. AND/OR OTHER COUNTRIES AND ARE USED UNDER LICENSE FROM MICROSOFT.
LucasArts and the LucasArts logo are registered trademarks of Lucasfilm Ltd. © 2004 Lucasfilm Entertainment Company Ltd. or Lucasfilm
Ltd. & ® or TM as indicated. All r ights reserved.
-
3267502
Page 2

SAFETY WARNING CONTENTS
PLEASE READ BEFORE
INSTALLING OR USING SOFTWARE
PHOTOSENSITIVE SEIZURES
A very small percentage of people may possibly experience
a seizure when exposed to certain light patterns, flashing
lights or other visual images that appear in computer software
games. If you, or anyone in your family, have an epileptic condi-
tion, consult your physician before installing or using the software.
Even people who have no history of seizures or epilepsy may have an
undiagnosed condition that can possibly cause a seizure while viewing
a computer software game. Reported seizures may have a variety of
symptoms, including lightheadedness, altered vision, eye or face twitching, nausea, headaches, jerking or shaking of arms and legs, disorientation, confusion, or any involuntary movement or convulsions.
If you experience any of these symptoms, IMMEDIATELY STOP PLAYING
AND CONSULT A DOCTOR. Parents or guardians should watch for or ask
their children if they are having any of the above symptoms—children
and teenagers are reportedly more likely than adults to experience
seizures from viewing computer software games.
PUBLIC ACCESS AVAILABLE> VERBAL
COMMANDS ENABLED> READY FOR INQUIRY>
Introduction........................................................................................3
Introduction........................................................................................3
Installation..........................................................................................3
Installation..........................................................................................3
Default Controls ................................................................................4
Default Controls ................................................................................4
Main Menu ........................................................................................6
Main Menu ........................................................................................6
Game Screen ....................................................................................7
Game Screen ....................................................................................7
In-Game Menus ................................................................................7
In-Game Menus ................................................................................7
Character Generation ....................................................................12
Character Generation ....................................................................12
Rules..................................................................................................17
Rules..................................................................................................17
Playing the Game ............................................................................18
Playing the Game ............................................................................18
Dialog ................................................................................................22
Dialog ................................................................................................22
Prestige Classes..............................................................................23
Prestige Classes..............................................................................23
Forms ................................................................................................24
Forms ................................................................................................24
Force Powers ..................................................................................24
Force Powers ..................................................................................24
Equipment ........................................................................................25
Equipment ........................................................................................25
Upgrading Weapons/Armor ..........................................................27
Upgrading Weapons/Armor ..........................................................27
Creating/Breaking Down Items ....................................................28
Creating/Breaking Down Items ....................................................28
Mini Games ......................................................................................29
Mini Games ......................................................................................29
Credits ..............................................................................................32
Credits ..............................................................................................32
Software License/Limited Warranty............................................36
Software License/Limited Warranty............................................36
How To Contact LucasArts ............................................................42
How To Contact LucasArts ............................................................42
Equip ..............................................................................9
Equip ..............................................................................9
Party Inventory ..........................................................10
Party Inventory ..........................................................10
Character Info ............................................................11
Character Info ............................................................11
Abilities .......................................................................10
Abilities .......................................................................10
Party.............................................................................10
Party.............................................................................10
Journal ........................................................................11
Journal ........................................................................11
Messages. ..................................................................11
Messages. ..................................................................11
Map..............................................................................11
Map..............................................................................11
Options.........................................................................12
Options.........................................................................12
Character Classes ....................................................12
Character Classes ....................................................12
Character Portrait......................................................13
Character Portrait......................................................13
Attributes ....................................................................13
Attributes ....................................................................13
Skills ............................................................................14
Skills ............................................................................14
Feats ............................................................................16
Feats ............................................................................16
Character Name ........................................................16
Character Name ........................................................16
Weapons ....................................................................25
Weapons ....................................................................25
Armor ..........................................................................25
Armor ..........................................................................25
Implants and Shields ................................................26
Implants and Shields ................................................26
Pazaak ........................................................................29
Pazaak ........................................................................29
Turret Encounters. ....................................................30
Turret Encounters. ....................................................30
Swoop Racing ............................................................30
Swoop Racing ............................................................30
1
Page 3
INTRODUCTION
IT IS A PERILOUS TIME FOR
THE GALAXY...
A brutal civil war has all but destroyed the Jedi Order,
leaving the ailing Republic on the verge of collapse. Amid
the turmoil, the evil Sith have spread across the galaxy, hunting down and destroying the remaining Jedi knights. Narrowly
escaping a deadly Sith ambush, the last known Jedi clings to life
aboard a battered freighter near the ravaged world of Peragus...
INSTALLATION
To install Star Wars®Knights of the Old Republic®II: The Sith Lords™,
insert the Install Disc into your CD-ROM drive. If you have Autorun
enabled, the game’s Launcher will appear. Click the Install button to install
the game onto your computer. If your computer does not have Autorun
enabled, open My Computer from your Windows desktop and double-click
on the CD-ROM drive showing the
II: The Sith Lords
the program. Once started, a series of onscreen instructions will guide you
through the rest of the installation procedure. If you experience problems
with the installation, click Help on the game’s launcher screen, and then
click View Troubleshooting Guide. NOTE: We recommend turning off all
background applications and virus scanners before beginning installation.
icon. Doubleclick on the program icon to start installing
Star Wars Knights of the Old Republic
2
3
Page 4
DEFAULT CONTROLS
CHARACTER AND CAMERA MOVEMENT
Move Forward...................................................................W
Moved Backward..................................................................S
Move Left ...................................................................................Z
Move Right....................................................................................C
Rotate Camera Left ........................................................................A
Rotate Camera Right.........................................................................D
Toggle Free Look ................................................................CAPS LOCK
Look About ............................................Hold CTRL or MOUSE Button 2
INTERACTING WITH THE ENVIRONMENT
Pause.................................................................SPACEBAR or PAUSE/BREAK
Cycle Targets to the Left ..................................................................................Q
Cycle Targets to the Right ................................................................................E
Select Object ..........................................................................MOUSE Button 1
Default Action on Target ..............................................R or MOUSE Button 1
TARGET ACTION MENU HOT KEYS
Leftmost Action ..................................................................................................1
Center Action......................................................................................................2
Rightmost Action.............................................................................................. 3
ACTION MENU HOT KEYS
Use Current Friendly Force Power .................................................................4
Use Current Medical/Repair Item ...................................................................5
Use Current Miscellaneous Item ....................................................................6
Use Current Mine...............................................................................................7
Behavior Stance.................................................................................................8
Lightsaber Form..................................................................................................9
QUICK MENU SCREEN ACCESS
Messages and Feedback .................................................................................J
Map and Party Management .........................................................................M
Quests ..................................................................................................................L
Skills/Feats/Force Powers ...............................................................................K
Options ...............................................................................................................O
Player Record Sheet ..................................................................................P
Party Inventory........................................................................................I
4 5
Equip Character ...............................................................................U
LEADER COMMANDS
Cancel Combat ......................................................................F
Change Leader.....................................................................TA B
Solo Mode.....................................................................................V
Stealth Mode...................................................................................G
Flourish Weapon.................................................................................X
Switch Weapon.....................................................................................H
GAMEPLAY
Show Tool Tips...................................................................................................T
Game Menu ..................................................................................................ESC
Quick Save........................................................................................................F4
Quick Load........................................................................................................F5
MINI GAME COMMANDS
Steer Swoop/Aim Turret..................................................MOUSE Movement
Move Up............................................................................................................W
Move Down........................................................................................................S
Move Left ...........................................................................................................A
Move Right.........................................................................................................D
Shift Gears or Fire Turret...................................ENTER or MOUSE Button 1
Jump Swoop ....................................................................................SPACEBAR
Pause Mini Game................................................ESC or PAUSE/BREAK or P
Forfeit Race ........................................................................................................F
Page 5
GAME SCREENMAIN MENU
NEW GAME
Starts a new game of Star Wars®Knights of the
Old Republic
®
II: The Sith Lords™.
LOAD GAME
Loads a previously saved game. Click on the appropriate file,
then click Load to start from that saved game. If more than one
character has been created, click on Switch Characters to access
other characters’ saves. If all saved files for a character have been
deleted, that character will no longer be available.
1. ACTION MENU
This is how you access your character’s items and
friendly Force powers. You can activate one of them by
clicking on them, or by pressing one of the Action menu hot
keys. You can also change the indicated icon by clicking the
arrows above and below it.
4
5
2
1
7
6
3
2. TARGET ACTION MENU
When a door, mine, container, friendly character or enemy is selected in
the world, a Target Action menu will appear above the object showing its
MOVIES
Watch movies previously seen in the game.
MUSIC
Allows you to play music from the game.
OPTIONS
Adjust sound, controls, and other preferences. See Options on page 10.
NOTE:
Star Wars: Knights of the Old Republic supports Creative's EAX
ADVANCED HD Environmental Audio technology to accurately simu-
6 7
late sonic effects such as Multi-Environment™, Environmental
Panning™, occlusion, obstruction, and advanced reverberation
in real time.
QUIT
Quit to desktop.
name and vitality bar if applicable. A blue target box indicates friendly
creatures, as well as objects or doors. A red target box indicates a hostile creature. There are two types of menus that can appear over a
selected target:
A. TARGETED HOSTILE: This is how you access your character’s
feats, items, and Force powers that are directed against an enemy. You
can activate one of them by clicking on them, or by pressing one of the
Action menu hot keys. You can also change the indicated icon by clicking the arrows above and below it. Clicking on the enemy without using
the menu options will do a default attack.
B.TARGETED OBJECT: Some objects in the world will have their
own context sensitive menus such as mines, doors, containers
and friendly characters. The choices on these types of objects
are limited to Open, Security or Bash for doors; Disarm or
Recover for mines and Start Conversation for friendly
characters.
Page 6
IN-GAME MENUS
3. CHARACTER PORTRAITS
There is one portrait for each member of your current
party. The large portrait is the party leader (the one
you’re currently controlling). To control a different party
member, click their portrait. Click the party leader’s portrait
to go to the equip screen for that character. If your character
is ready to level-up, a yellow “L” will flash over the portrait, and
clicking on the portrait while they are the party leader will take
you to the level-up screen.
Press the hot keys or the menu icons during your
adventure to access the various in-game menus. Move
the mouse over the icons at the bottom of the screen and
left click to go directly to that menu.
5
1
4. MINI-MAP
A small map that shows your immediate surroundings and the camera’s
orientation.
4
3
2
5. MENU BUTTONS
You can use these menu buttons to go straight to particular menu
screens.
6. COMBAT QUEUE
When you enter combat, this indicator will display the combat actions
you’ve chosen for that character. Clicking the queue will remove actions
from it.
7. MODE BUTTONS
These three buttons allow the player to make changes to specific states
in the game world that can be toggled on and off.
PAUSE: This button will pause the game. The game will remain paused
8 9
until the player presses this button again.
SOLO MODE: This button allows the currently con-
trolled character to move about in the world without
having the party NPCs following. Solo mode will remain
active until the character
clicks on this button again.
STEALTH MODE: Allows characters to enter
Stealth mode if they have spent points to gain
ranks in the skill. Note that activating Stealth
mode automatically activates Solo mode as
well. The character will remain in Stealth mode
until they attack an enemy, turn off Solo mode
or turn off Stealth mode.
SWITCH WEAPON: Switch to the weapon(s)
equipped in the secondary slot.
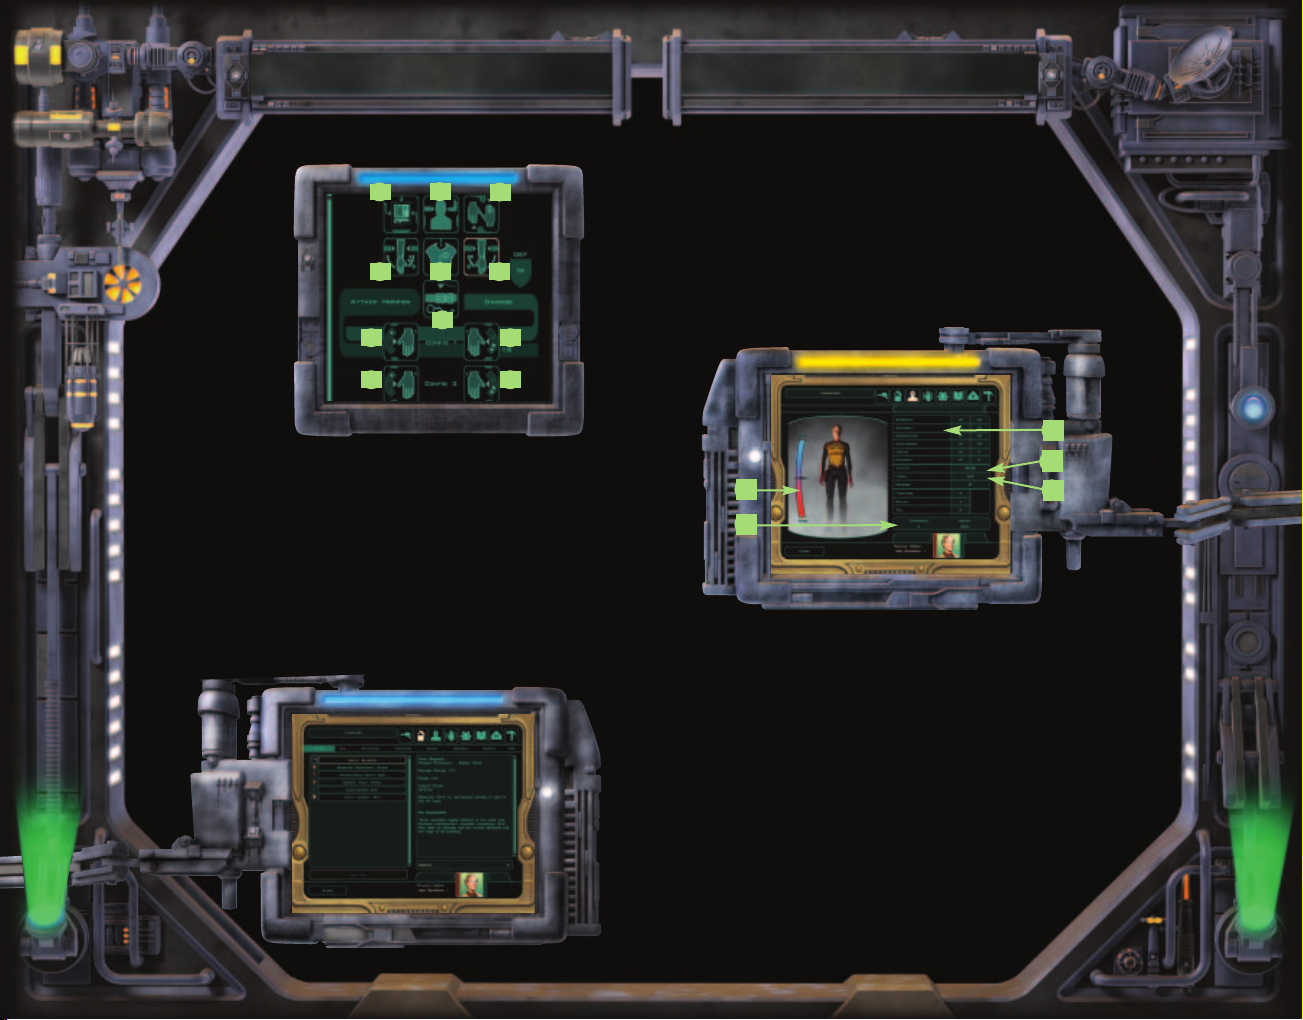
EQUIP
1. DEFENSE: How well the character is protected. The higher a char-
acter’s Defense, the less likely they are to be hit by enemies.
2. ATTACK BONUS/LEFT AND RIGHT (MAIN)HANDS: The
attack bonus for each hand.
3. DAMAGE/LEFT AND RIGHT (MAIN) HANDS: The damage
caused by the weapon equipped in each hand.
4. AVAILABLE EQUIPMENT: Equipment that can be equipped to the
highlighted slot.
5. ARMOR AND WEAPONS SLOTS: Characters can equip various
armor, weapons or items to each of these slots. Each slot displays the
currently selected equipment.
Any equipment usable in a particular slot is displayed on the left-hand
side of the screen. To equip an item, click on the slot location and
then click on the item to read its description. Click on OK to equip
the item.
NOTE: Equipment is restricted to a specific location on a character’s body. Also, droids and humanoids have slightly
different equipment slots.
Page 7
1
0
A
D E F
G
J K
Here are the various slot locations on each character:
A. UTILITY/IMPLANT G. LEFT WEAPON
B. SENSOR/HEADGEAR H. SHIELD/BELT
C. UTILITY/GLOVES I. RIGHT WEAPON
D. SPECIAL WEAPON/SHIELD J. ALTERNATE LEFT WEAPON
E. PLATING/ARMOR K. ALTERNATE RIGHT WEAPON
F. SPECIAL WEAPON/SHIELD
NOTE: There are two available configurations for Right and Left Weapons.
Click on Switch Weapons to switch between configurations on this screen.
B
C
H
I
PARTY INVENTORY
The Party Inventory screen shows all items owned by
the party.
FILTERING ITEMS: Click on the FILTER (1) button to select
filters in the Inventory list and show only certain types of
items.
READING ITEMS:To read a description about a certain item,
including its use and other statistics, move the cursor over the item
to highlight it. Left click on the scroll bars to scroll the
text description UP or DOWN.
1
2
5
3
4
CHARACTER INFO
1. ATTRIBUTES: The current scores for each of the six attributes.
2. VITALITY POINTS (VP): The character’s current and maximum
vitality points. When VP reaches 0, the character is unconscious.
3. FORCE POINTS (FP): The character’s current affinity for the
Force. Whenever a Force Power is used, some FP are expended. Force
points regenerate naturally. During combat, FP regeneration occurs at a
greatly reduced rate.
4. EXPERIENCE (XP): The character’s current experience point
total and the number of experience points needed to achieve the
next level.
5. ALIGNMENT: The meter, along with background color,
facial
expression, and stance, show a character’s alignment to
the light
or dark sides of the Force. Some actions taken
throughout the
1
1
Page 8
game have a subtle effect on a character’s alignment.
character portrait and click on ADD or REMOVE to
switch the in or out of the party. Click OK to confirm the
changes you have made to your party.
NOTE: Up to two companions may accompany you at one
time. While in hostile regions, you will be unable to change
1
2
ABILITIES
Click on Skills, Powers, or Feats to switch between types of abilities.
Click on an ability to see its description.
NOTE: The Force Powers menu is only available to Jedi classes.
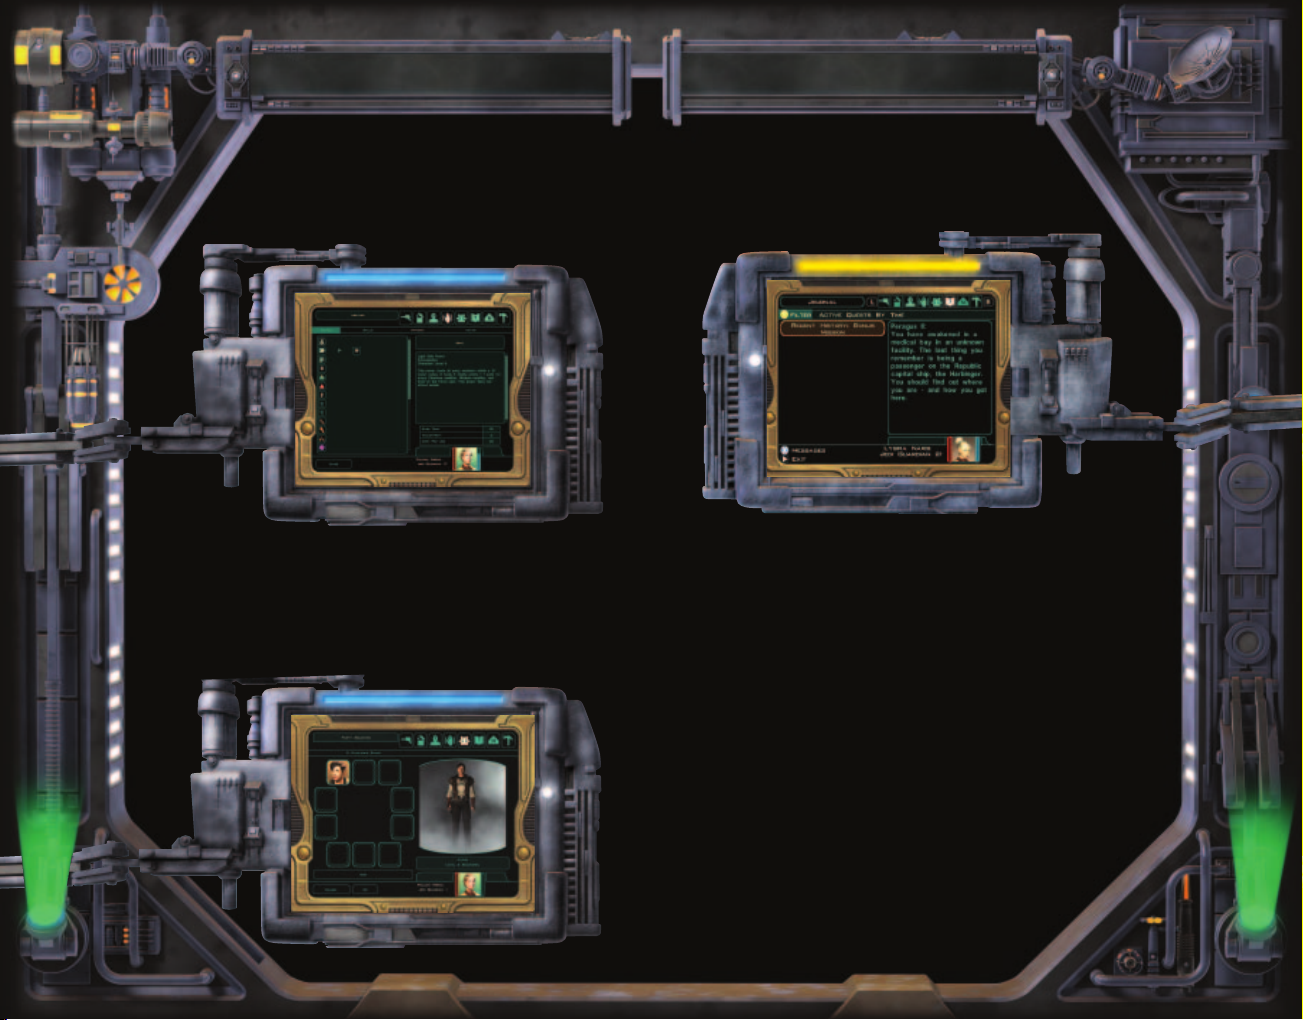
PARTY
Click a
your party.
JOURNAL
Click on TIME, NAME, PRIORITY, or PLANET to sort quests according to
these categories. Click on a quest and view the current information on it.
Active Quests are those that you have not yet completed.
MESSAGES
Click on MESSAGES on the Journal screen to access messages; the
screen keeps a log of the most recent critical information for the current
area. Click on DIALOG, FEEDBACK, COMBAT and EFFECTS to view each
type of message.
MAP
The Map screen shows your location on the current level. Important
locations are marked with map notes. To select a different map note,
click on it or click on one of the arrows to either side of the note’s
description. Exploring reveals more of the map.
RETURNING TO THE EBON HAWK OR HOME BASE:
o instantly return to the Ebon Hawk or a particular home
T
base, click on TRANSIT.
NOTE: Returning to the Ebon Hawk can only be used
when the party is in a safe situation. This option
1
3
Page 9

character, which automatically assigns stats recommended for the class, or you can customize many
details about the character.
CHARACTER CLASSES
There are three character classes to choose from at the start
of the game, each with male and female versions. Click on a
character to select your class and gender.
Jedi Class Basic Stats
JEDI CLASS VITALITY POINTS/ FORCE POINTS/ SKILL FEAT FORCE POWER
Jedi Guardian 10 4 Slow Fast Average
Jedi Consular 6 8 Slow Slow Fast
Jedi Sentinel 8 6 Average Average Average
LEVEL
LEVEL PROGRESSION PROGRESSION PROGRESSION
1
4
cannot be used during combat, and in some areas of the game this
option is completely disabled.
OPTIONS
LOAD GAME: To load a game, click on a saved game file, and then click
on Load. To delete a game, click DELETE and click OK to confirm.
SAVE GAME: Click an empty slot or previously saved game and click
SAVE. To switch between different characters’ save games click on
SWITCH CHARACTERS. Only one Auto-save slot is available. Each character does not get an Auto-save slot.
GAMEPLAY: Adjust various gameplay settings, including difficulty level.
FEEDBACK: Toggle the various Feedback options.
AUTO-PAUSE: Choose the conditions under which the game will auto-
matically pause.
GRAPHICS: Adjust various graphics settings.
SOUND: Adjust various sound settings.
QUIT: Ends current game and returns you to the main menu.
CHARACTER GENERATION
When starting a new game you must first create a
character. You have the option of creating a quick
CHARACTER PORTRAIT
Click on the arrows to cycle through different heads for the main character. To select a portrait, click on OK.
ATTRIBUTES
Attributes affect your character’s ability to use Force Powers, fight in
combat, and employ skills. For all attributes a value of 10 is considered
average. You begin with 30 points to spend. Click on the + or – buttons to
add or remove points or by pressing the right or left arrow keys. An
attribute may not have a value less than 8, and the point cost increases
as the value gets higher, up to a max of 18. Throughout the course of the
game you will find items that will improve your attributes.
STRENGTH (STR): A high Strength improves your abilities in melee
combat by increasing both your chance to hit and the damage you inflict.
DEXTERITY (DEX): A high Dexterity improves your chance to hit with
ranged weapons and also increases your Defense.
CONSTITUTION (CON): A high Constitution increases your character’s
vitality points. Constitution also determines what types of implants the
character can equip.
INTELLIGENCE (INT): A high Intelligence increases the number
of points a character has to spend on skills, and it can affect
some conversation options.
WISDOM (WIS): A high Wisdom increases a Jedi’s
Force Points and Force Power saving throws. The
Force Powers of a Jedi with high Wisdom are also
1
5
Page 10
1
6
harder to resist. Additional conversation options also
become available with a high Wisdom.
CHARISMA (CHA): A high Charisma adds modifiers to
Force-related feats and powers that are very important to
all the Jedi classes. It is also central to any persuasive talker.
It also reduces the penalty when using Force Powers of an
opposing alignment (a light side character with a high Charisma
can use dark side powers with less of a penalty), and a high
Charisma also improves your companions’ chance to hit.
SKILLS
Skills primarily relate to non-combat situations, and in some cases will
allow the party to avoid combat altogether. Each skill relies on a particular attribute.
COMPUTER USE: Related to Intelligence. Used with computer spikes
to access computer terminals. Harder tasks require more spikes. This
skill reduces the number of spikes needed by 1 for every 4 points total.
Computer use also allows the creation of items that involve fine electri-
cal work, such as some advanced weapons upgrades.
DEMOLITIONS: Related to Intelligence. Used to set or disable mines
of low (DC15 to set), medium (DC20 to set), or high difficulty
(DC25 to set). Disarming adds +5 to the DC. Recovery adds
+10. Cannot be used untrained. Demolitions aids in the cre-
ation of items that are explosive in nature, such as
mines and grenades.
STEALTH: Related to Dexterity. Enables the use of
stealth field generators and Stealth mode (see page 18).
Combat cancels Stealth mode. Cannot be used untrained.
Stealth is used in the creation of items involving sound or
camouflage.
AWARENESS: Related to Wisdom. Helps spot hidden objects or
enemies and also allows you to sense the motives of others in
conversation. This skill is checked against an enemy’s Stealth skill
or the DC of a mine. If successful, the enemy or object becomes visible. Awareness is always active, but running imparts a -5 penalty.
Awareness also affects what types of scopes and lenses you can create.
PERSUADE: Related to Charisma. Persuade dialogue options use friend-
ly coercion to press for sensitive information or avoid conflict. Higher
skill allows for more extreme requests. Only available to the main playercreated character.
REPAIR: Related to Intelligence. Used with disposable parts to fix dis-
abled droids. More difficult repair jobs require more parts. This skill
reduces the number of parts required by 1 for every 4 points total. Also
modifies vitality points recovered when used by party member droids to
repair combat damage. Repair also determines how many components
are obtained when breaking down items at a workbench and is a key
skill when creating many types of items.
SECURITY: Related to Intelligence. Used
to open electronic locks. Appears as an
option on targeted locked objects. Security
tunnelers in Inventory will also appear as a
default option and add to the skill if selected. Cannot be used untrained. Security
also aids in the creation of several
types of
items, including those involving ions.
TREAT INJURY: Related to Wisdom.
This skill is added to the vitality points
healed by medpacs. Higher quality
packs apply multipliers to further
increase the amount healed. Treat Injury
also affects ones ability to create an assortment of items and determines how many
chemicals are obtained when items are
oken down at a lab station.
br
1
7
Page 11

1
8
FEATS
Feats are primarily combat-focused abilities that allow a character to
use specific weapons, armor or items. They can also grant special
attacks or give bonuses to skills and abilities. Characters are given certain feats during character creation, depending on class. As characters
increase in level, they gain new feats. Each Character Class will gain
certain feats automatically as they advance in levels. Click
on a feat to see its description. Click on ADD FEAT to
learn it.
NOTE: You must acquire lower-level feats before
you can progress to higher-level feats.
CHARACTER NAME
Create your own name, or use one of the ran-
dom default names (click on RANDOM
NAME repeatedly to generate names). In
many areas of the game, only the first
name will be used, so keep this in
mind when using spaces. The first
name is considered any characters
before the first space.
RULES
CORE MECHANIC
When you attack an enemy, use a skill, or make a saving
throw, a random number between 1 and 20 is generated
(1d20). Your character’s attack bonus, skill, rank, or attribute
modifier is added to this random number to determine success.
COMBAT AND DEFENSE
Defense is a measure of how difficult a character is to hit in combat.
Defense is base 10 plus the modifiers for armor and Dexterity. Whenever you attack an opponent, the Core Mechanic is applied like this:
[1d20 + attack bonus] versus Defense of the target.
Example: You have a total attack bonus of +4. You target an enemy with a
Defense of 16. You would hit on a 12 or higher [12 + 4 (attack bonus) =16].
DIFFICULTY CLASS
The Difficulty Class (DC) represents the relative difficulty of a task. DC
applies to skill use and saving throw attempts.
SKILLS AND DC
If you have a skill that is usable on a target, it will be selectable in the
Default Action list. The Core Mechanic is applied like this: [1d20 + skill
rank + attribute modifiers] versus the DC of the task.
Example: You have 3 skill ranks in Demolitions and an Intelligence modifier of +2. You attempt to disarm a simple mine (DC15). If the skill check is
10 or higher [10 + 3 (skill rank) +2 (Int modifier) = 15] you disarm the mine.
SAVING THROWS AND DC
Saving throws represent resistance to certain attacks, effects or powers. The Core Mechanic is applied like this: [1d20 + base save by level +
attribute modifier] versus the DC of the saving throw. The three types of
saving throws and their linked attributes are Reflex (Dex), Fortitude (Con)
and Will (Wis).
Example: You have a base Reflex save of 7 and a Dex modifier of +4. You
are hit with an adhesive grenade (DC25). If your saving throw is 14 or
higher [14 + 7 (Reflex save) + 4 (Dex modifier) = 25] you would avoid getting stuck.
CRITICAL HITS: When a character attacks, and the randomly gener-
ated number is a 20 (out of the possible range of 1-20), there is a
chance that they have scored a critical hit. This is called scoring a “threat.” Another number is generated, and if that number equals a hit, then a “critical hit” is scored and double
damage is inflicted upon the target. Some weapons or
feats increase the “threat range,” meaning you can
score a threat on a lower number.
1
9
Page 12

PLAYING THE GAME
2
0
COMBAT DISPLAY
The Combat Display contains important information
about each character, including character portraits of
party members, remaining Vitality and Force Points, and the
Action icon.
NOTE: The Combat Display is visible only during combat.
8
6
4
5
2
3
7
1
10
9
1. Character Portrait
2. Character Health (Vitality Points)
3. Force Power (if applicable)
4. Enemy
5. Targeted Enemy
6. Target Action Menu
7. Action Menu
8. Targeted Enemy Info
9. Current Action Box
10. Current Action
CHARACTER PORTRAIT: The bottom portrait is the currently selected
character. If there are multiple party members, the other portraits can be
seen to the right of the selected character’s portrait. To select a differ-
ent character, click on a portrait.
VITALITY POINTS (VP): The red bar represents a charac-
ter’s Vitality Points. Vitality Points decrease when a charac-
ter takes damage from an attack or other effect. If the
total reaches zero, the character falls unconscious
and cannot move or fight until healed. As long as
one character in the party remains conscious to
guard the others, the game will continue. Vitality Points
regenerate slowly over time. Medpacs will boost Vitality
Points quickly, as will the Force Heal series of Force Powers.
Repair Kits will restore Vitality Points of Droid characters.
FORCE POINTS: The blue bar represents a character’s Force
Points. Each Force Power uses Force Points when activated.
A power can’t be used if not enough points remain. Force Points
regenerate faster out of combat, although it depends on the area and
your Force Focus feats.
NOTE: Force Powers are only available to the Jedi classes.
REAL-TIME TURN-BASED COMBAT: When a hostile creature is tar-
geted, the game will pause (this feature can be adjusted in Options). The
player can left click to engage the enemy and bring up the Target Action
menu. The Target Action menu will show what Force powers, feats or
items can be used against that creature. Left-clicking on the creature
after it has been engaged will result in a default attack being done. Once
the player has engaged the enemy the game will go into Combat mode.
Left clicking on one of the buttons in the Action menu will place that
action (represented as an icon) in the action box. When the current
action finishes, the icon in the Action Queue moves to the action box.
The character will now perform this action. To disengage from combat,
press the F key.
QUEUING ACTIONS: If a player enters more than one command for a
particular character the
subsequent actions will be stored in the action queue for later use. Once
the commands are entered, the character will attempt to follow each
command in the list in the order they were selected. For example, a
character could be directed to use a medpac, use a Force power to heal
the group, and then resume attacking an enemy.
FIGHTING USING A PARTY: By default, party members will automati-
cally enter combat in response to the player engaging hostile creatures.
You can change what Behavior they use (see Behaviors, page 18, for
more information), or give commands by controlling them directly. Left
click on the different character portraits or press the TAB key to
switch between the different active party characters.
COMBAT PAUSE: Press the pause button or hit the SPACE-
to pause or un-pause the game. Y
BAR
ters commands while combat is paused. While combat
is paused, two different types of commands can be
given to characters. Commands selected from the
ou can give charac-
2
1
Page 13

Action menu are resolved as soon as the game
becomes un-paused. If more than one command is
selected before the game is un-paused, they will be
added to the action queue.
STEALTH MODE: Stealth mode covers the character in a
camouflage field. Enemies must make an Awareness check ver-
sus the character’s Stealth skill to see them. This ability is only
useable by characters that have spent points in the Stealth skill
and are equipped with stealth field generators (Exception: Force
Camouflage allows a character to use Stealth even without a stealth
field generator equipped). Combat cancels Stealth mode, but mundane
tasks do not.
USING A COMPUTER OR DROID: To use a computer or a disabled
droid, press the
Interface screen comes up. Sometimes you will have the option to use
computer spikes or parts to manipulate the computer or the droid. The
number of spikes or parts needed is determined by skill in computer use
or repair.
EXPERIENCE POINTS AND GAINING LEVELS: Victory in combat and
completing quests garner Experience points (XP). Many encounters
reward the use of the Persuade skill to avoid conflict. Generally, the
harder the task, the more XP earned. Periodically a character will earn
enough XP increase in level, improving their Vitality Points, skills, and
Force Points and Powers (if a Jedi) At some levels, basic attributes will
improve and new feats can be selected. An “L” will appear on the character portrait to indicate that enough XP have been earned. On the
Character in-game menu select the Level Up option to customize these
improvements. To skip this process, select
Auto Level Up. This option automatically applies any changes to the
most common abilities associated with the character’s class.
R Key or left click while targeting it. The Terminal
within range using their currently equipped weapon.
DEFENSIVE: This Behavior is similar to Aggressive,
except the character will move back to the controlled
character if they have moved more than 5m away. Use this
Behavior when you want to prevent characters from chasing
down distant enemies. This behavior is the default.
STATIONARY: The character will attack any enemy within range,
but will not move from their current position. This Behavior can be
useful if there are many mines nearby.
RANGED: The character will provide ranged support. They will
switch to a melee weapon (if available in their secondary Weapon
Configuration*) to defend themselves from any melee attacker, but
will resume ranged support after any nearby threats have been
eliminated. Characters using this Behavior will attempt to stay
within 10m of the selected character.
*
Characters will fight unarmed if no
melee weapon has been
equipped to the alternate slot.
JEDI SUPPORT: Like Ranged, but
will also use Jedi Powers.
(Jedi Only)
GRENADIER: Like Ranged,
but will also throw
grenades
unless a party member
might be hit by
the blast (non-Jedi
Only).
2
2
BEHAVIORS
Set up simple commands for party members when they’re not under
direct control. The far left icon in the Action Menu shows which
Behavior is currently being employed. To change the selected charac-
ter’s Behavior, scroll up or down with the mouse wheel while hover-
ing over the Behavior icon, or click on the arrows above and
below the icon, until the desired Behavior is shown and then
click the icon. The character’s Behavior is not changed
until the icon is clicked.
AGGRESSIVE: The character will attack any enemy
2
3
Page 14

DIALOG PRESTIGE CLASSES
2
1
3
4
1. CHARACTER IN THE CONVERSATION
2. THE LAST LINE OF THE CONVERSATION
3. AVAILABLE RESPONSES
4. ARROW INDICATING ADDITIONAL RESPONSE AVAILABLE
Many non-player characters (NPCs) can be dealt with through conversation instead of combat. To begin a conversation, target an NPC and
press left click. The main character created by the player initiates and
begins speaking regardless of which party member is controlled. In conversation, left click on the UP or DOWN arrows to scroll through the
available responses. Highlight the text and left click to select a
response. Left clicking will skip through dialog quickly. The option to use
the Persuade skill may appear, and careful dialogue can sometimes circumvent dangerous situations. Force Persuade options also appear for
Jedi characters with the Affect Mind or Dominate Mind powers.
Sometimes other options may become available depending upon your
skills and attributes. For example, if you have a high Repair skill, you
may realize that a merchant is lying to you about the value of a droid he
is selling. Also, your companions might provide advice or comments dur-
ing conversation, depending upon their particular areas of expertise.
At a pivotal moment in the game, the main character
will be able to gain a new rank in his or her respective
Jedi class. The new Prestige Class is based upon the
character’s alignment. In addition to increased stats, each
Prestige Class also gains a unique Force Power.
PRESTIGE CLASS BASIC STATS
JEDI CLASS VITALITY POINTS/ FORCE POINTS/ SKILL FEAT FORCE POWER
Jedi Weapon 10 6 Slow Fast Average
Master
Jedi Master 6 10 Slow Slow Fast
Jedi Watchman 8 8 Average Average Fast
Sith Marauder 10 6 Slow Fast Average
Sith Lord 6 10 Slow Slow Fast
Sith Assassin 8 8 Average Average Fast
LEVEL LEVEL PROGRESSION PROGRESSION PROGRESSION
2
4
2
5
Page 15

EQUIPMENT
2
6
FORMS
As a Jedi becomes more powerful, different styles, or
Forms, are developed. After a certain amount of experi-
ence is gained, a Jedi acquires an initial Form, which must
be used until further Forms are learned. Forms may be
switched at any time through the action menu. To change the
selected character’s Form, scroll up or down with the mouse
with the mouse wheel while hovering over the Form icon, or click
on the arrows above and below the icon until the desired Form is
shown and then left click the icon. Each Form provides both bonuses
and penalties to certain stats, so the key to using them effectively is
choose the Form most appropriate for the situation.
Table 1: Lightsaber Forms vs. Various Combat Situations
COMBAT LIGHTSABER FORM
SITUATION SHII-CHO MAKASHI SORESU ATAR U SHIEN NIMAN JUYO
Single Enemy Fair Fair Good Excellent Poor Good Very Good
Many Enemies Very Good Fair Poor Poor Good Good Good
Opponent- Fair Very Good Poor Fair Good Good Very Good
Lightsaber
Opponent- Good Poor Excellent Poor Excellent Good Fair
Blaster
Force Fair Good Fair Fair Fair Good Poor
FORCE POWERS
Only a Jedi may use Force Powers. These abilities are attained through
level advancement. There are three types of powers: Universal, Light,
and Dark. Light and Dark Side powers receive bonuses and penalties
in relation to alignment. If a character leans toward one side, powers
aligned with that side require fewer Force Points to use, while opposing
Force Powers become more costly. Universal powers are unaffected by
alignment. To view the powers and their descriptions, access the Force
Powers menu through the Abilities menu. Secret powers can be
acquired through special events in the game.
WEAPONS
Most weapons fall into five basic types, though more
exotic weapons have been rumored to exist.
MELEE WEAPONS: This category includes all non-
ranged weapons other than lightsabers.
BLASTER PISTOLS: This category includes all small
side arms.
BLASTER RIFLES: This category includes two-handed blaster
weapons, delivering more power than pistols.
LIGHTSABERS: Only Jedi have the skill to use these weapons.
Any other users would be more likely to injure themselves than
their opponents.
GRENADES: Characters do not require a weapon proficiency to
use grenades. These hand-launched explosives affect anyone
(friend or foe) caught in the blast radius around a central target.
ARMOR
Heavier armor encumbers by restricting dexterity modifiers. For example,
a character with Dex 18 normally receives a +4 Defense bonus. A heavy
battle suit might provide a Defense of 9, but restricts the maximum
allowed DEX bonus to +1, for a total Defense increase of 10. Characters
with exceptionally high DEX may be better off relying on a combination of
their unrestricted modifier and lighter armor, or even no armor at all. Note
that many Force Powers cannot be used by Jedi wearing armor. Robes
and some special types of armor do not have this restriction.
ROBES: Jedi and other Force sensitive cultures often wear
robes. They do not restrict the use of Force Powers, though the
protection they provide tends to be limited. Many robes can pro-
vide Jedi with other benefits, however.
LIGHT ARMOR: Armor of this type offers good protection
without hampering movement. Best suited for characters
with a high DEX bonus.
MEDIUM ARMOR: This type of armor gives solid
protection with moderate encumbrance. It is
good for characters that see frequent com-
bat. Light Armor is prerequisite.
2
7
Page 16

UPGRADING WEAPONS/ARMOR
HEAVY ARMOR: Heavy and complicated,
this armor type appeals to characters willing
to trade mobility for the best protection pos-
sible. Medium Armor is prerequisite.
IMPLANTS
IMPLANTS: Implants are items which when equipped,
can affect various stats like Attributes and Skills. Hardier
characters, with a higher Constitution, are able to with-
stand the stress of equipping more powerful implants. Once equipped
in the Equip screen, they take effect.
SHIELDS
SHIELDS: Shields increase resistance to certain types of dam-
age. A shield’s power lasts for a brief amount of time, or until
enough damage is absorbed to deactivate it. Shields must first
be equipped in the Equip screen, and then activated in-game via the
items column in the Action Menu (the fifth column from the left).
Upgrading weapons and armor can be
done at any Workbench in the game. Only
certain types of weapons and armor can
be upgraded. The Inventory screen shows
whether a given weapon or armor can be
upgraded in the item description. Using a
workbench, choose what class of item to
upgrade (melee weapon, armor, lightsaber,
or blaster), by clicking on the category at
the top of the menu. Click on an item in the
list to the left to select a specific weapon
or armor within the class.
Armor has two slots available for upgrading: the underlay and overlay. Melee
weapons have 3 slots available for upgrading: the grip, the energy cell, and the edge.
Ranged weapons have 3 slots available for
upgrading: scope, firing chamber, and
power pack. Light sabers have 6 slots
available for upgrading: 2 power crystals,
the color, the lens, the emitter, and the
energy cell.
Click UPGRADE ITEM to begin upgrading.
Click on a slot to select it, and then a list of
available upgrades for the slot appears. Click on an upgrade and then
click on ASSEMBLE to put it in the slot. The process can be repeated for
different slots if desired. When finished upgrading specific slots, click
OK to finish upgrading the particular weapon or armor.
WORKBENCH
2
8
2
9
Page 17

CREATING/BREAKING DOWN ITEMS
MINI GAMES
3
0
LAB STATION
Creating and breaking down items can be done from
Lab stations (for medical items and grenades) and
Workbenches (for upgrades) throughout the game. In the
lab station/workbench menu, switch between breaking
down items and creating items by clicking VIEW CREATABLE
ITEMS or VIEW BREAKDOWN ITEMS at the
top of the page.
In a lab station you break down medical items
into chemicals, which can be made into new
medical items. In a workbench you break
down all other items into components, which
can be made into new upgrades.
When breaking down items, the list (lab station) or lists (workbench), shows all the items
in your inventory that can be broken down
into chemicals (lab station) or components
(workbench). In a workbench, click on the dif-
ferent categories at the top of the menu to
switch between types of items that can be
broken down. Click on BREAKDOWN ITEM to
confirm that you want to break down the
item.
When creating items, click on the type of
item you would like to create. Click on CREATE ITEM to confirm that you want to create
the item.
Items which you have the skill required to
create show up blue. Items which you cannot
create because you lack the skill show up gray.
PAZAAK
When challenging another player to a
game of pazaak, the first order of business is to make a wager on the match.
Use the mouse and keyboard to change
the amount wagered, and then left click
on the
ACCEPT button to begin the
match. A match consists of multiple sets.
The first player to win 3 sets will win the
match and the wager.
Next select the side deck from the currently available cards. The side deck
must consist of 10 cards. Use the mouse
to highlight a card and left click to add it to the side deck. Cards can be
removed from the side deck by highlighting the card to be removed and
left clicking. Click
side deck.
The object of the game is to have the face up cards total higher than the
opponent's hand without exceeding a total of 20. If a player's total is
greater than 20 at the end of a turn (a 'BUST'), the opponent wins the
set. A player must win three sets to win the match. When the match
begins, four of the cards from the side deck will be randomly drawn to
form the player's HAND during the match.
The first card is automatically drawn from the main deck and placed
face up. After each card is played, an additional card can be played from
the HAND by dragging the card up into the area where the currently
played cards are displayed. Playing a HAND card is optional. Also, you
can only play one HAND card per turn. The player can also click END
TURN to end the turn, OR click STAND to stay with the current total. This
continues until one player wins the set. Ties do not count.
Cards from the player's hand can only be used once, so the four cards
must last the entire match.
Special gold cards can be found throughout the game that increase
your odds of winning dramatically.
Tip: If the total is over 20 after the draw and there is a negative
card in the side deck, you can play it to bring your total back
under 20.
ACCEPT to start the game once 10 cards are in the
3
1
Page 18

3
2
TURRET ENCOUNTERS
Sometimes you will need to man a turret
in order to survive an onslaught of enemy
fighters or troops.
Aim the turret’s targeting reticle with the
mouse. Fire the cannons by
pressing ENTER or MOUSE Button 1.
SWOOP RACING
Swoop racing has established itself as the
premier form of entertainment on many
Republic worlds. The devotion of the fans
is unmatched in other sports, and the bets
fly on not only who will win, but also who
2
4
3
1
you to clear some obstacles. To forfeit a race, pause the game and press
the F key.
NOTE: Activating initial thrusters too soon, failing to shift at the optimal
times or hitting obstacles on the course will all cause speed to drop. If a
swoop bike is too badly damaged, it will cease to operate and the race
will end.
1. SHIFT INDICATOR
2. TIMER
3. SWOOP BIKE
4. ACCELERATION PAD
5. MINE
will go down in the fieriest crash.
Press ENTER or MOUSE Button 1 once to
activate thrusters, and move side-to-side
5
using the A and D keys. Steer over the
acceleration pads to receive speed
boosts, and each time the shift indicator
tops out, press the ENTER or MOUSE
Button 1 again to shift to more powerful
thrusters. The latest addition to the swoop
bike is the repulsor boost. Press the
SPACEBAR to induce a “jump” that allows
3
3
Page 19

CREDITS
3
4
DEVELOPED BY
OBSIDIAN ENTERTAINMENT,
INC. IN ASSOCIATION
WITH LUCASARTS
OBSIDIAN
ENTERTAINMENT,
INC.
CEO and Executive
Producer
FEARGUS URQUHART
Producer
CHRIS PARKER
Lead Designer
CHRIS AVELLONE
DDEESSIIGGNN TTEEAAM
FERRET BAUDOIN
MICHAEL CHU
TONY EVANS
SCOTT EVERTS
JOHN MORGAN
KEVIN SAUNDERS
DAVID MALDONADO
Lead Artist
AARON MEYERS
AARRTT TTEEAAM
AARON BROWN
TRENT CAMPBELL
DOUG COPE
TIM COX
DAVID ESPINOZA
MUSTAZAR ESSA
LUCAS FELD
WILLIAM HARPER
ED LACABANNE
BRIAN MENZE
DENNIS PRESNELL
GLENN PRICE
Additional
Concept Art
TJ FRAME
CHRIS APPELHANS
Additional Modeling and
Texturing
ROBERT GIAMPA
Lead Programmer
CHRIS JONES
M
M
PPRROOGGRRAAMMMMIINNG
M
TTEEAAM
ADAM BRENNECKE
ANTHONY DAVIS
JAY FONG
FRANK KOWALKOWSKI
BEN “TOBEN” MA
DAN SPITZLEY
RICHARD TAYLOR
Chief Technology Officer
DARREN MONAHAN
Office Manager and
Information Technology
CHRIS “HICK” BENSON
SSPPEECCIIAALLTTHHAANNKKS
Bioware
MARGO URQUHART
JENNIFER HENDRIX
JEFFREY ROSE
CINDY WONG
MICHAEL STEMMLE
AARON ALLSTON
JUSTIN LAMBROS
RYAN KAUFMAN
NIKO LINGAD AT A-1
PHONE SYSTEMS
KEITH GALOCY AT NVIDIA
MARK GRIFFIN AND
THE ATG FOLKS AT
MICROSOFT
ELECTRICIAN GUY
JOHN AND SUSAN
BRENNECKE
SONJA CONTIN
MEGAN AND MADISON
SUMMERS
SIN CARIAGA EVANS AND
K.L. WOYS
ALICE BAUDOIN
SUNSHINE SAINT-ONGE
ZACHARY SIMON AND
TINA PARKER
JINA YOON
LUCASARTS,
A DIVISION OF
LUCASFILM LTD.
Producers
MICHAEL GALLO
RACHEL BRYANT
Assistant Producer
CORRINE WONG
G
S
Y
QQUUAALLIITTY
AASSSSUURRAANNCCE
Xbox Lead Tester
KIP BUNYEA
PC Lead Tester
DAVID FELTON
Assistant Lead Testers
SONY GREEN
NICK DENGLER
JEFF SANDERS
QA Testers
ADAM GOODWIN
AHMAD ABBOTT
ANNE BERGER
CHRIS CURRY
CHRISTINE FRAZIER
CLAY NORMAN
COREY KAPELLAS
CRAIG DENNING
DAN TAMBINI
DERRIC EADY
ED HYLAND
ERIC GOOD
ERIK GENC
GREG QUINONES
HARRY MACK
HEATH SUTHERLAND
JAMES MORRIS
JEFF HUSGES
JENNIFER EMSLEY
JULIAN JAMES
KEVIN UTSCHIG
LEIF YOUNGQUIST
LEV STRIDER
MATT WOODS
MIKE MEEKER
PATRICK BRATTON
RANDY IGNACIO
RYAN FONG
RYAN NELSON
SETH BENTON
SHANE PETERSON
Additional Testers
GREG FRANK
KEN BEWLEY
RACHEL ADCOCK
RICKY BORBA
TONY CHRISTOPHER
WELBON SALAAM
QA Compliance Lead
DAVID CHAPMAN
E
QA Compliance
Assistant Lead
IAN WOLFARD
QA Compliance Testers
CHRIS NAVARRO
DAVEY LEI
JOHN LOWENTHAL
PATRICK BRATTON
SARAH CHERLIN
SHINICHIRO OHYAMA
ZAK HUNTWORK
Compatibility Supervisor
and Lead Technical Writer
LYNN TAYLOR
Senior Compatibility
Technician
DAN MARTINEZ
Lead Network
Compatibility Technician
DARRYL COBB
Compatibility Technicians
BRAY COLEMAN
BRIAN G. DEKSNYS
DAVID FLEMING
KIM JARDIN
KRISTIE LAUBOROUGH
JOHN SHIELDS
KOUROSH SHOKOUHI-
RAZI
LESTER SIAT
ISAIAH WEBB
THAD YOUNGQUIST
Additional Compatibility
Testing
ERIC KNUDSON
JASON LEE
JASON SMITH
SCOTT TAYLOR
QS Computer Technician
JOHN CARSEY
D
SSOOUUNND
Lead Sound Design
JULIAN KWASNESKI
Additional Sound Design
and Audio Implementation
NATHAN SMITH
Creature Sound Design
. CHILDS IV
G.W
Star Wars
Original
Sound Effects
BEN BURTT
C
MMUUSSIIC
Composer
MARK GRISKEY
Orchestrator And
Conductor
JEFF MARSH
Recording Engineer
JOHN KURLANDER
Concert Master
and Contracting
SIMON JAMES
Score Preparation
ROBERT PUFF
Music Performed By
THE NORTHWEST
SINFONIA
Music Mixed At
SKYWALKER SOUND
Mixing Engineer
DANN THOMPSON
Assistant Engineer
JUDY KIRSCHNER
Music Editing
for Cinematics
JARAD EMERSON-
JOHNSON
Additional Music
JEREMY SOULE
Star Wars Music
Original
Composed By
JOHN WILLIAMS
LUCASFILM LTD. & TM.
ALL RIGHTS RESERVED.
USED UNDER AUTHORIZATION. PUBLISHED BY
BANTHA MUSIC (BMI).
ADMINISTERED AND/OR
CO-PUBLISHED WITH
P
& ©Ω
WARNER-TAMERLANE
MUSIC PUBLISHING
CORP.
E
VVOOIICCE
Voice Department Manager
DARRAGH O’FARRELL
VO Directors
WILL BECKMAN
DARRAGH O’FARRELL
Voice Casting
WILL BECKMAN
DARRAGH O’FARRELL
Senior Voice Editor
CINDY WONG
Voice Editors
G.W. CHILDS IV
HARRISON DEUTSCH
BRIAN CHUMNEY
MAC SMITH
Voice and International
Department Coordinator
JENNIFER SLOAN
T
CCAASST
Kreia
SARA KESTELMAN
Atton Rand
NICKY KATT
Bao Dur
ROGER G. SMITH
Visas Marr
KELLY HU
G0-T0
DARAN NORRIS
Handmaiden
GREY DELISLE
Hk47/Hk50
KRISTOFFER TABORI
Mira
EMILY BERRY
Sion
LOUIS MELLIS
3
5
Page 20

3
6
Disciple
GREG ELLIS
Atris
ELIZABETH RIDER
Mandalore
JOHN CYGAN
and ED ASNER as
Master Vrook
Additional Voices
Provided by
ANDRE SOGLIUZZO
ANDREW CHAIKIN
ANDY SECOMBE
ANTHONY MAY
BILLY BROWN
BRIAN DEACON
CAROLYN SEYMOUR
CHARLES DENNIS
CHRIS COX
COREY BURTON
CRYSTAL WRIGHT
DARAN NORRIS
DARREN WHITE
DAVID COLLINS
DAVID ROBB
DAVID WEATHERLY
ELIZABETH CONBOY
INGRID LACEY
JAMES HORAN
JAMIE GLOVER
JENNIFER HALE
JOHN CALLEN
JONATHAN MORRIS
KATH SOUCIE
LEX LANG
LORRI HOLT
LOUIS MELLIS
MICHAEL GOUGH
NICK CHILVERS
NICK JAMESON
PAUL VENABLES
PHIL LAMARR
RAFAEL FERRER
RAPHAEL SBARGE
ROBIN ATKIN DOWNES
ROGER L. JACKSON
SEETA INDRANI
STEVE BLUM
TIM OMUNDSON
TISH HICKS
TOM KANE
VANESSA MARSHALL
Recording Studios
MARGARIT
THE SOUND COMPANY,
TEQUILA MOCKINGBIRD,
Recording Engineers
TOR KINGDON
TOBY GILL
LES COOPER
LUCASARTS
DEVELOPMENT STAFF
Technical Director
NICK PAVIS
AARRT
Lead Artists
DMITRI ELLINGSON
JIM RICE
Artists
CHRIS VOY
DEREK SAKAI
FRANCIS HSU
JAMES ZHANG
KEVIN EVANS
MATT OMERNICK
MOLLY MENDOZA
PETER CARISI-DE LAPPE
PETER WHITESIDE
REBECCA PEREZ
RYAN WIEBER
IINNTTEERRNNAATTIIOONNAAL
LLOOCCAALLIIZZAATTIIOON
International Producer
MARIANNE MONAGHAN
QA International Lead
MATT CHANG
QA International
Assistant Lead
JASON PIMENTEL
QA International Testers
ERIK LAMPI
GABRIEL BOOTZ
JOE ACEDILLO
Manual Editor
MA
YWOOD, CA
HOLL
LONDON
AUSTIN TX
T
TT KEAST
A MIX,
L
N
MMAARRKKEETTIINNGG AANND
PPUUBBLLIICC RREELLAATTIIOONNS
Product Marketing
Manager
VID ZEMKE
DA
LOGAN PARR
Marketing Coordinator
GREG ROSENFELD
Marketing Operations
Manager
COLLEEN WERNER
Manual Designer
PATTY HILL
Director of Public Relations
ANNE MARIE STEIN
Public Relations Manager
HEATHER PHILLIPS
Public Relations Specialist
ALEXIS MERVIN
Internet Manager
JIM PASSALACQUA
Web Technical Lead
PAUL WARNER
SSAALLEESS AANND
OOPPEERRAATTIIOONNS
Director of Sales
MEREDITH CAHILL
Senior Manager,
International Sales
TERRI DOME
Sr. Manager, Partners and
Channel Marketing
TIM MOORE
Associate Channel
Marketing Manager
KATY WALDEN
Sales Analyst
GREG ROBLES
International Sales
Analyst
GEMMA BAIOCCHI
D
D
S
Retail Account
Representative
S
MIKE MAGUIRE
Director of Sales
Operations
JASON HORSTMAN
Global Materials and
Manufacturing Manager
EVELYNE FIDONE-
BOLLING
Materials and
Manufacturing Planner
SCOTT FRY
Logistics and Customer
Service Manager
JASON PERIERA
QQUUAALLIITTYY SSEERRVVIICCEES
Manager of
Quality Services
PAUL PURDY
BBUUSSIINNEESSS
AAFFFFAAIIRRS
MARY CARTER
MARK BARBOLAK
JOHN GARRETT
ANNE MARIE HAWKINS
JANNETT SHIRLEY-PAUL
SETH STEINBERG
Manager of
Quality Services
PAUL PURDY
Quality Assurance
Supervisor
CHUCK MCFADDEN
Product Support
Supervisor
JAY GERACI
Hint Line Specialist
TABITHA TOSTI
Product Support
ERIC KNUDSON
ERIC RAUCH
JASON LEE
JASON SMITH
Uses Bink Technology. Copyright © 1997-2004 by RAD Game Tools, Inc. Uses Miles Sound
System. Copyright © 1991-2004 by RAD Game Tools, Inc.
S
S
JAY TYE
KRISTIE GARBER
TT BERAZ
MA
SCOTT TAYLOR
Mastering Lab Specialist
WENDY KAPLAN
Mastering Lab
Assistants On-Call
ERIC RAUCH
JAY TYE
SCOTT TAYLOR
Hardware Technician
JOHN CARSEY
Quality Services Assistant
KELLIE WALKER
S
Lucas Licensing
CHRIS GOLLAHER
HOWARD ROFFMAN
KRISTI KAUFMAN
LELAND CHEE
STACY ARNOLD
STACY CHEREGOTIS
IT Services
BRENDAN LLOYD
BRIAN CARLSON
CHAD J. WILLIAMS
DARYLL JACOBSON
GREG MILLIES
JIM CARPENTER
JOE SHUM
JOHN DOAK
JOHN HANNON
JOHN VON EICHHORN
MELANIE JACOBSON
RICHARD QUINONES
VICTOR TANCREDI-
BALLUGERA
Facilities
CATHERINE DURAND
CLEOPATRA BOXHILL-
CLARK
GABRIEL MCDONALD
JOHN KNOWLES
KEVIN SONG
PAUL JENNINGS
SANDI MANESIS
VICTOR FAJARDO
Special Thanks
ANDY ALAMANO
CAMELA MCLANAHAN
CASEY HUDSON
CHARLES BRAHMAWONG
CHARLIE SKILBECK
CHRIS CORRY
CHRIS HOCKABOUT
CHRIS ROSS
DAN PETTIT
DENISE GOLLAHER
ELIZABETH THEO FELTON
GRAHAM MCDERMOTT
GREG ZESCHUK
HADEN BLACKMAN
HAMILTON FELTMAN
ISA STAMOS
JAMES OHLEN
JIM TSO
JIM WARD
JOHN GEOGHEGAN
JOHN STAFFORD
JULIO TORRES
JUSTIN LAMBROS
K.C. COLEMAN
KAREN PETERSEN
KEVIN BOYLE
KOLTO
LYNNE GURA
MARY BIHR
MATT URBAN
MICHELLE HINNERS
MICHELLE LESLEY
MIKE MALAKOV
PAUL EDMONDSON
PETER HIRSCHMANN
RACHEL HARDWICK
RANDY STEVENSON
RAY MUZYKA
RICH DAVIS
RJ BERG
RYAN KAUFMAN
SGT ANGRY
SHARA MILLER
SIMON JEFFERY
TIM LONGO
TODD DAVIES
TWENTYSEVEN
Very Special Thanks
GEORGE LUCAS
3
7
Page 21

SOFTWARE LICENSE
LIMITED WARRANTY
3
8
PLEASE READ THIS LICENSE CAREFULLY BEFORE
INSTALLING OR OTHERWISE USING THE SOFTWARE.
BY INSTALLING OR OTHERWISE USING THE SOFTWARE,
YOU ARE AGREEING TO BE BOUND BY THE TERMS OF
THIS LICENSE. IF YOU DO NOT AGREE TO THE TERMS OF
THIS LICENSE, DO NOT INSTALL OR USE THE SOFTWARE,
DELETE THE SOFTWARE AND ALL RELATED FILES FROM YOUR
COMPUTER, AND PROMPTLY RETURN THIS PACKAGE AND ITS
CONTENTS TO THE PLACE OF PURCHASE FOR A REFUND OR
EXCHANGE SUBJECT TO THE RETURN POLICY OF THE RETAILER.
The computer program, artwork, music, printed materials, on-line or
electronic documentation, and other components included in this product and all copies of such materials as such as may be modified or
updated (collectively referred to as the "Software"), are the copyrighted
property of LucasArts, a division of Lucasfilm Entertainment Company
Ltd. and/or its affiliated entities or divisions, and its licensors (collectively referred to as "LucasArts"). The Software is non-exclusively licensed
(not sold) to you, and LucasArts owns and/or controls all copyright, trade
secret, patent and other proprietary rights in the Software. LucasArts
may make improvements or updates to the Software at any time and
with or without notice to you, which may be made available to you as
LucasArts may determine. Such updates or improvements may change
the game play associated with the Software.
Subject to the terms and conditions of this Agreement, you may use the
Software, solely for your personal use, by installing the Software on a
single computer and using the Software in accordance with its documentation. You may not circumvent or attempt to circumvent any technological measures in the Software or the media designed to prevent
copying or unauthorized access.
All rights not specifically granted under this Agreement are reserved by
LucasArts and, as applicable, their licensors. You may not: (1) except in
connection with the installation of and game play associated with the
Software, copy the Software in its entirety onto a hard drive or other
storage device and you must run the Software from the included CD-
ROM; (2) distribute, rent, lease or sublicense all or any portion of the
Software; (3) modify or prepare derivative works of the Software,
except as otherwise may be allowed herein; (4) transmit the
Software over a network, by telephone, or electronically using
any means, or permit use of the Software, in a network,
multi-user arrangement or remote access arrangement
except in the course of your network multiplayer play
of the Software over authorized networks in accor-
dance with its documentation; (5) engage in matchmaking for multi-player play over unauthorized networks; (6) design or distribute unauthorized levels; (7)
reverse engineer the Software, derive source code, or otherwise attempt to reconstruct or discover any underlying
source code, ideas, algorithms, file formats, programming or
interoperability interfaces of the Software by any means whatsoever, except to the extent expressly permitted by law despite a
contractual provision to the contrary, and then only after you have
notified LucasArts in writing of your intended activities; (8) remove,
disable, or circumvent any proprietary notices or labels contained on or
within the Software; (9) export or re-export the Software or any copy or
adaptation thereof in violation of any applicable laws or regulations; or
(10) commercially exploit the Software, specifically at any cyber café,
computer gaming center or any other public site without first obtaining a
separate license from LucasArts (which it may or may not issue in its
sole discretion) for such use, and LucasArts may charge a fee for any
such separate license.
You may transfer the Software, but only if the recipient agrees to accept
and be bound by the terms and conditions of this Agreement. If you
transfer the Software, you must transfer all components and documentation and erase any copies residing on computer equipment. Your rights
in and to this license are automatically terminated if and when you
transfer the Software.
LucasArts warrants to the original consumer purchaser only that the
media furnished in this Software will be free from defects in materials
and workmanship under normal use for a period of ninety (90) days from
the date of purchase (as evidenced by your receipt). If the media furnished in this Software proves to be defective, and provided that the
original consumer purchaser returns the media to LucasArts in accordance with the instructions in this paragraph, LucasArts will replace the
defective media: (a) free of charge to the original consumer purchaser,
if the media proves to be defective within the ninety (90) day period following the date of purchase, or (b) for a fee of $5.00 (all references herein are to United States dollars) per Compact Disc (“CD”), if the media
proves to be defective after the expiration of the ninety (90) day warranty period, provided that the request is made within a reasonable
time from purchase, and LucasArts continues to distribute the
CD commercially. To obtain a replacement CD, please return
the defective CD only, postage prepaid, to LucasArts, a
division of Lucasfilm Entertainment Company Ltd., P.O.
Box 10307, San Rafael, CA 94912, accompanied by
proof of date of purchase, a description of the
3
9
Page 22

4
0
defect, and your name and return address, as well as
a check for $5.00 made payable to LucasArts per CD if
after expiration of the warranty period. LucasArts will
mail a replacement to you. In the event that the Software
is no longer available, LucasArts retains the right to substi-
tute a similar product of equal or greater value. This warranty
is not applicable and shall be void if the defect has arisen
through abuse, mistreatment, neglect, or from normal wear and
tear. LucasArts has no obligation to provide support, maintenance,
upgrades, modifications or new releases under this Agreement.
You expressly acknowledge and agree that use of the Software is at
your sole risk. Except for the limited ninety (90) day warranty on the
media set forth above, the Software and any related documentation or
materials are provided "AS IS" and without warranty of any kind.
LUCASARTS EXPRESSLY DISCLAIMS ALL WARRANTIES, EXPRESS AND
IMPLIED, INCLUDING, BUT NOT LIMITED TO, THE IMPLIED WARRANTIES OF MERCHANTABILITY, FITNESS FOR A PARTICULAR PURPOSE AND NONINFRINGEMENT. LUCASARTS DOES NOT WARRANT
THAT THE FUNCTIONS CONTAINED IN THE SOFTWARE WILL MEET
YOUR REQUIREMENTS, THAT THE OPERATION OF THE SOFTWARE WILL
BE UNINTERRUPTED OR ERROR-FREE, OR THAT DEFECTS IN THE SOFTWARE WILL BE CORRECTED. THE ENTIRE RISK AS TO THE RESULTS
AND PERFORMANCE OF THE SOFTWARE IS ASSUMED BY YOU, AND
YOU (AND NOT LUCASARTS) ASSUME THE ENTIRE COST OF ALL SERVICING, REPAIR AND/OR CORRECTION. LUCASARTS SHALL ALSO NOT
BE LIABLE FOR ANY DELAYS, SYSTEM FAILURES OR SYSTEM OUTAGES
WHICH MAY, FROM TIME TO TIME, AFFECT ONLINE GAME PLAY IF
APPLICABLE OR ACCESS THERETO. SOME JURISDICTIONS DO NOT
ALLOW THE EXCLUSION OF IMPLIED WARRANTIES, SO THE ABOVE
EXCLUSION MAY NOT APPLY TO YOU.
UNDER NO CIRCUMSTANCES INCLUDING NEGLIGENCE, SHALL
LUCASARTS, OR ITS DIRECTORS, OFFICERS, EMPLOYEES, LICENSORS,
LICENSEES OR AGENTS, BE LIABLE TO YOU FOR ANY INCIDENTAL,
INDIRECT, SPECIAL OR CONSEQUENTIAL DAMAGES (INCLUDING DAMAGES FOR LOSS OF BUSINESS PROFITS, BUSINESS INTERRUPTION,
LOST DATA, LOSS OF BUSINESS INFORMATION, AND THE LIKE) ARIS-
ING OUT OF THE POSSESSION, USE, OR MALFUNCTION OF THIS
PRODUCT, INCLUDING WITHOUT LIMITATION, DAMAGE TO
PROPERTY AND, TO THE EXTENT PERMITTED BY LAW, DAM-
AGES FOR PERSONAL INJURY, EVEN IF LUCASARTS OR A
LUCASARTS AUTHORIZED REPRESENTATIVE HAS BEEN
ADVISED OF THE POSSIBILITY OF SUCH DAMAGES
OR LOSS. SOME JURISDICTIONS DO NOT ALLOW
THE LIMITATION OR EXCLUSION OF LIABILITY FOR
INCIDENTAL OR CONSEQUENTIAL DAMAGES, SO THE
ABOVE LIMITATION OR EXCLUSION MAY NOT APPLY TO
YOU.
YOU AGREE THAT THE LIABILITY OF LUCASARTS ARISING
OUT OF ANY KIND OF LEGAL CLAIM (WHETHER IN CONTRACT,
TORT, OR OTHERWISE) WILL NOT EXCEED THE AMOUNT YOU
ORIGINALLY PAID FOR THE USE OF THE SOFTWARE. YOU AGREE
TO WAIVE ANY RIGHT TO EQUITABLE RELIEF, INCLUDING, WITHOUT
LIMITATION, ANY INJUNCTIVE RELIEF, TO ENFORCE THE TERMS HEREOF. THE PARTIES ACKNOWLEDGE THAT THE LIMITATIONS OF LIABILITY
IN THIS AND OTHER PROVISIONS OF THIS AGREEMENT AND THE
ALLOCATION OF RISK HEREIN ARE AN ESSENTIAL ELEMENT OF THE
BARGAIN BETWEEN THE PARTIES, WITHOUT WHICH LUCASARTS
WOULD NOT HAVE ENTERED INTO THIS AGREEMENT. LUCASARTS’
PRICING REFLECTS THIS ALLOCATION OF RISK AND THE LIMITATION OF
LIABILITY SPECIFIED HEREIN.
THIS WARRANTY GIVES YOU SPECIFIC LEGAL RIGHTS, AND YOU MAY
HAVE OTHER RIGHTS DEPENDING ON THE LAWS IN YOUR STATE.
This Agreement is governed in all respects by the laws of the State of
California as such laws are applied to agreements entered into and to be
performed entirely within California between California residents, and
you hereby consent to personal jurisdiction in California. This
Agreement will not be governed by the United Nations Convention on
Contracts for the International Sale of Goods, the application of which is
expressly excluded. You and LucasArts each agree that any claim or
controversy arising out of this Agreement or the Software shall be settled by expedited binding arbitration in accordance with the rules of the
American Arbitration Association. Such arbitration shall take place in
Marin County, California, and you waive any claim that such forum is
inconvenient. Any such claim or controversy shall be arbitrated solely
on an individual basis and shall not be consolidated with a claim of any
other party. The arbitrator may not change the terms of this Agreement.
The arbitrator may award injunctive or other equitable relief to enforce
the terms hereof; provided, however, that no injunctive or equitable
relief may be awarded that would enjoin or impair LucasArts’ rights
or ability to distribute or otherwise market, advertise, promote or
exploit the Software. If it is judicially determined that any
claim or controversy arising out of or related to this
Agreement or the Software cannot be settled by expedited binding arbitration as noted above, then you agree
that any such claims or controversies shall be
4
1
Page 23

4
2
brought and maintained in the state courts located
within the County of Marin, State of California or the
federal courts of the Northern District of California, and
you waive any claim that either such forum is inconven-
ient. The foregoing shall not preclude LucasArts from seek-
ing any injunctive or other relief for protection of LucasArts'
intellectual property rights or similar rights in any court of com-
petent jurisdiction. Because LucasArts would be irreparably
damaged if the terms of this Agreement were not specifically
enforced, you agree that LucasArts shall be entitled, without bond,
other security or proof of damages, to appropriate equitable remedies
with respect to breaches of this Agreement, in addition to such other
remedies as LucasArts may otherwise have under applicable laws. The
prevailing party in any action to enforce this Agreement shall be entitled
to recover costs and expenses including, without limitation, reasonable
attorney’s fees. LucasArts shall have the right, but not the obligation, to
defend or settle, at its option, any action or proceeding arising from a
claim that your permitted use of the Software infringes or misappropriates any patent, copyright, or other ownership of a third party. You
agree to provide LucasArts with written notice of any such claim within
ten (10) business days of your first knowledge thereof and to provide
reasonable assistance in the defense of such claim. LucasArts shall
have sole discretion and control over the defense or settlement of such
claim, unless it declines to defend or settle such claim, in which case
you are free to pursue such course of action as you reasonably determine. LucasArts is under no obligation hereunder to indemnify or hold
you harmless with respect to any actions, proceedings or claims. In the
event of such a claim, or if LucasArts believes such a claim is likely,
LucasArts may: (i) procure for you the right to continue using the
Software; (ii) modify the Software so that it becomes non-infringing; or,
(iii) terminate this Agreement. You agree to comply with any court judgment or other conditions imposed on you or LucasArts as a result of an
allegation of patent or copyright infringement (whether by court order,
agreement or otherwise), whether or not such judgment or conditions
contradict the conditions of this Agreement, including without limitation,
ceasing use of the Software.
If any provision of this Agreement is held to be invalid or unenforce-
able, such provision shall be struck and the validity and enforce-
ability of the remainder of this Agreement shall in no way be
affected or impaired thereby and such provision shall be
ced to the maximum extent possible so as to ef
enfor
the intent of the parties and shall be reformed without
further action by the parties to the extent necessary
to make such provision valid and enforceable.
fect
LucasArts’ failure to act with respect to a breach by
you or others does not waive LucasArts’ right to act
with respect to subsequent or similar breaches, nor will
any single or partial exercise of any right hereunder preclude further exercise of any other right hereunder. This
Agreement sets forth the entire understanding and agreement
between you and LucasArts with respect to the subject matter
hereof. Except as provided herein, this Agreement may not be
amended except in a writing signed by both parties; provided, however, that LucasArts has the right, without notice and/or without a
writing signed by both parties, to amend this Agreement in connection
with any modifications or updates to the Software.
The license term shall commence as of the date you install or otherwise
use the Software. You may terminate this license by disposing of the
Software and erasing any components residing on computer equipment.
Without prejudice to any other rights of LucasArts, this Agreement will
terminate automatically if you fail to comply with its terms and conditions. In such event, you must destroy all copies of the Software and all
its component parts. Your disposal or destruction of the Software and
any component parts must be done in accordance with applicable law.
Except for the license granted herein and as expressly provided herein,
the terms of this Agreement will survive termination.
If the Software is acquired under agreement with the U.S. government or
any agency or instrumentality thereof, it is acquired as “commercial
computer software” subject to the provisions hereof, as specified in 48
CFR 12.212 of the FAR and, if acquired for Department of Defense (DoD)
units, 48 CFR 227-7202 of the DoD FAR Supplement, or sections succeeding thereto.
LucasArts and the LucasArts logo are registered trademarks of
Lucasfilm Ltd. © 2004 Lucasfilm Entertainment Company Ltd. or
Lucasfilm Ltd. & ® or TM as indicated. All rights reserved.
This game and manual are each a work of fiction. All of the characters,
events, locations, logos, and entities portrayed in this game are fictional.
Any resemblance to real persons, living or dead, or actual events, is
purely coincidental.
LucasArts, a division of
Lucasfilm Entertainment Company Ltd.
P.O. Box 10307
San Rafael, CA 94912
4
3
Page 24

HOW TO CONTACT US
4
4
HINT LINE
LucasArts has set up a variety of services to provide
you with information about our latest games, hint and
gameplay assistance, and technical support.
U. S.
If you need a hint, you may call our automated Hint Line. This
service costs $1.99 per minute, requires a touch-tone phone, and
you must be at least 18 years old or have a parent's permission to
call. The number is 1-900-329-JEDI (1-900-329-5334). The option to
speak with a live Hint Operator is also available from this number. Hint
line operators are available during regular business hours, MondayFriday, 9:00 a.m. to 6:00 p.m. (Pacific Standard Time). (Average call length
is three minutes.)
CANADA
Our Hint Line is also available to our Canadian customers. This service
costs $1.99 (U.S.) per minute, requires a touch tone phone, and you must
be at least 18 years old or have a parent's permission to call. The number is 1-900-451-JEDI (900-451-5334). Hint line operators are available
during regular business hours, Monday-Friday, 9:00 a.m. to 6:00 p.m.
(Pacific Standard Time). (Average call length is three minutes.)
LUCASARTS RESERVES THE RIGHT TO DISCONTINUE THE HINT LINE
AT ANY TIME AND WITHOUT NOTICE.
WHERE TO FIND US ONLINE
Visit the LucasArts Technical Support Web site at support.lucasarts.com
where you can receive online technical support through Yoda’s Help
Desk, browse technical documents, or leave a message for an on-line
representative.
YODA’S HELP DESK
Yoda’s Help Desk, an interactive knowledge base, is available in the Technical Support section of the LucasArts Web site at support.lucasarts.com.
Yoda’s Help Desk offers solutions to technical issues based on information
you provide. You can receive technical support 24 hours a day, seven days
a week. If Yoda’s Help Desk is unable to provide a solution to your prob-
lem, you can send an e-mail message to an online representative.
TECHNICAL SUPPORT
PHONE NUMBER
This number is for technical assistance only. Hints will not
be given out over the Technical Support line. You can reach
our Technical Support department by calling 1-415-507-4545.
We are available to help you Monday-Friday, 9:00 a.m.- 6:00 p.m.
(Pacific Standard Time).
TECHNICAL SUPPORT FAX
We also offer the option of faxing us with your questions at: 1-415-507-
0300. When sending a fax, include your name, fax number with area
code, and a voice phone number to contact you in case we experience
problems faxing you back.
TECHNICAL SUPPORT MAILING ADDRESS
You can also mail us directly at: LucasArts, a division of Lucasfilm
Entertainment Company Ltd. , P.O. Box 10307, San Rafael, CA 94912,
Attn.: Product Support.
LUCASARTS COMPANY STORE
Safe, quick, convenient shopping is just a click away. Visit our secure
online store at store.lucasarts.com for great deals on games and unique
items you won't find anywhere else-hats, T-shirts and much more. Order
online or call toll-free at 1-888-LEC-GAMES.
available on this line.)
(Technical support is not
STAR WARS KNIGHTS OF THE OLD
REPUBLIC: THE SITH LORDS
0-23272-32675-3
4
5
 Loading...