

Page 1
STARS!
The Premiere Space Strategy Game
PLAYER’S GUIDE
http://www.webmap.com/stars!
rec.games.computer.stars
Page 2

II
COPYRIGHT AND CREDITS
Design and Programming Jeff McBride and Jeff Johnson
Addtional Programming Jeffery Krauss
Producer Brian Walker
Graphics Eric Chang, Michael Miller, Michael Reichmann,
Music Emil Herceg at Arte Wisdom
Sound Effects Mahendra Sampath
Intro Minds Eye
Documentation Kurt Kremer, Brett Kremer
Technical Advice David Pugh
Playtesting Bill Bolosky, Dave Buchtal, Kent Cedota,
Emblazon Multimedia
Daniel Chenault, Paul Enfield, Michael Grier,
William Herlan, Peter Henriksen, Peter Horodan,
Brent Jensen, Mark Kenworthy, Stu Klingman, Steve Kruy,
Robert Lamb, Jim Lane, John LeVee, Hilton Lange,
Chris McBride, Jeff McCashland, Beth Moursund,
Chris Noon, Tony Pacheco, Chris Peltz, Tony Reynolds,
Jenifer Schlickbernd, Eric Snapper, Andrew Sterian,
Jeff Stone, Richard Sun, David Thiel, Brad Thompson,
Thomas Voigt, Ross Youngs
Special Thanks To... Sam Belcher, Peter Celella
Packaging Design and Artwork Sharon O’Neill
Production Antony Bond, Gary Lucken
© 1996 Entertainment International (UK) Ltd. All Rights Reserved.
Published by Empire Interactive
Page 3

CONTENTS
Welcome 1-1
GETTING STARTED
Single Player Setup 2-1
Playing the Tutorial 2-1
Starting a Single Player Game 2-2
Setting and Viewing Winning Conditions 2-3
Multi-Player Setup 3-1
Setting Up a Single Computer, Multi-Player (Hot Seat) Game 3-1
Setting Up Network-based Multi-Player Games 3-4
Setting Up Modem, FTP, and Play by E-mail Games 3-7
Setting and Viewing Winning Conditions 3-9
Adding Expansion Players 3-10
Being Absent from Play 3-11
Finding Multi-Player Games on the Internet 3-12
Passwords 3-12
Using a Timer Application? 3-12
Creating a Universe from the Command Line 3-13
Things Every Stars! Player Should Know 4-1
Tuning Stars! to Your Display Resolution 4-1
Replaying a Previous Turn 4-2
Saving Your Game -- What It Means 4-2
Page 4

IV C O N T E N T S
Exiting the Game 4-4
Options for Launching Stars! 4-5
Copy Protection 4-7
THE STARS! SCREEN
The Stars! Screen 5-1
Screen Layout 5-1
Command Pane 5-2
Messages Pane 5-11
Scanner Pane 5-12
Selection Summary Pane 5-17
PLAYING STARS!
Planets 6-1
Your Home World and Other Inhabited Planets 6-1
Population 6-2
Minerals 6-4
Mines 6-5
Factories 6-5
Building Planetary Defenses 6-5
Planet-based Scanners 6-6
Starbases 6-7
Stargates 6-10
Mass Driver Basics 6-11
Terraforming 6-14
Planet Reports 6-21
Production 7-1
How Production Works 7-1
Adding an Item to the Production Queue 7-2
Removing an Item from the Production Queue 7-3
Production Templates 7-3
Clearing the Production Queue 7-7
Page 5

Adding Auto-Build Items to the Queue 7-9
Changing the Order of Planets in the Production Dialog 7-10
Conditions that Affect Production 7-11
Research 8-1
Fields of Study 8-1
Browsing Stars! Technology 8-2
Allocating Resources for Research 8-4
Cost of Research 8-5
Ship and Starbase Design 9-1
How to Approach Hull Design 9-1
Designing a New Hull from Scratch 9-2
Editing an Existing Hull Design 9-3
Deleting an Existing Hull Design 9-5
Counting the Humber of Hull Designs 9-6
Adding Ship-based Scanners 9-7
Adding Cloaking Devices 9-8
Engines 9-8
Learning About Other Players’ Hull Designs 9-9
Trading Ship Designs 9-9
C O N T E N T S V
Managing Fleets 10-1
Assembling Fleets 10-1
Warp Speed 10-1
Finding a Specific Fleet 10-3
Switching Between Fleets 10-4
Naming Fleets 10-4
Using Fuel 10-5
Routing Fleets 10-7
Rendezvousing Fleets 10-8
Splitting Fleets 10-9
Merging Fleets 10-9
Scrapping Fleets 10-10
Report for Your Fleets 10-11
Page 6

VI C O N T E N T S
Navigation 11-1
Adding Fleet Waypoints and Tasks 11-1
Notes and Tips on Waypoints and the Scanner 11-2
Deleting Fleet Waypoints 11-3
Stargate Navigation 11-3
Wormhole Navigation 11-5
Colonization 12-1
Choosing Planets to Colonize 12-1
Colonizing an Uninhabited Planet 12-2
Shuttling Colonists with Freighters 12-3
Hey, that Planet’sAlready Inhabited! 12-4
Mining 13-1
Mining Colonized Worlds 13-1
Calculating the Rate of Decrease in Mineral Concentration 13-2
Mineral Concentration and Mining Efficiency 13-3
Remote Mining 13-3
Transporting Freight 14-1
Shipping Freight 14-1
Transferring Fuel and Cargo to Other Fleets 14-2
Jettisoning Cargo 14-2
Creating a Custom Transport Zip Order 14-3
Flinging Mineral Packets 14-4
The Basics of Combat 15-1
Fleet-to-Fleet Combat 15-1
Bombing Planets 15-4
Mineral Packet Bombardment 15-5
Ground Combat 15-6
Minefields 15-6
Starbase Combat 15-9
Claim Adjusters and Terraforming as a Weapon 15-10
Declaring Enemies and Friends 15-10
Page 7

Battle Plans 15-11
Battle Report 15-16
Viewing Opponent Fleets in the Summary Pane 15-17
Viewing Enemy Ship Designs 15-17
Fleet Report on Enemies and Other Players 15-18
Patrolling 16-1
Assigning Patrol Orders 16-1
Patrol Targets Enemies Only 16-2
Patrol and Battle Plans 16-3
Scanning and Cloaking 17-1
Scanner Technology 17-1
Selecting Fleets in the Scanner Pane 17-2
Scanning Planets 17-3
Cloaking, or Hiding From Opponents’ Scanners 17-4
Detecting Opponents’Fleets 17-4
Pirating Using Stealth-based Scanners 17-6
C O N T E N T S VII
Reports 18-1
Keyboard Shortcuts 18-2
Sorting Report Fields 18-2
How the Sort Order Affects the Display Order of Planets and Fleets 18-2
Printing a Map of the Universe 18-3
Dumping Information to a Text File 18-3
Diplomacy and Trade 19-1
Player Relationships 19-1
Trading Fuel and Minerals 19-1
Trading Technology 19-2
Trading Ships 19-2
Trading with Transdimensional Beings 19-2
Joint Mining Ventures 19-2
Claim Adjusters and Orbital Terraforming 19-3
Page 8

VIII C O N T E N T S
RACE CREATION
Designing Custom Races 20-1
Opening the Wizard 20-1
Advantage Points 20-1
Step 1: Basic Race Definition 20-2
Step 2: Primary Trait 20-3
Step 3: Lesser Traits 20-11
Step 4: Population Growth Factors 20-13
Step 5: Population Efficiency 20-16
Step 6: Research Costs 20-17
Finish 20-17
Predefined Races 21-1
Alternate Reality Races 22-1
THE GUTS OF STARS!
The Guts of Combat 23-1
About the Battle Board 23-1
Armor, Shields and Damage 23-2
Weapons and Battle Devices 23-3
Damage Repair 23-7
Movement, Initiative and Firing in Battle 22-8
The Guts of Cloaking 24-1
Cloaking when the Ship is Empty 24-1
Cloaking for a Fleet with More than One Ship 24-3
The Effect of Multiple Tachyon Detectors 24-3
The Appendix of Cloaking 24-3
The Guts of Mass Drivers 25-1
Damage Potential of Mass Packets 25-1
Packet Decay Rate 25-1
Speed and Distance 25-1
Page 9

Damage and Recovery Formulas and Calculation 25-2
The Guts of Mine Fields 26-1
Types of Mines 26-1
Detecting Mine Fields 26-2
Ship Cloak Effectiveness and Mine Fields 26-2
Race Traits and Mine Fields 26-2
BACK OF THE BOOK
Keyboard Shortcuts A-1
Technology Tables B-1
Armor B-2
Beam Weapons B-3
Bombs B-4
Electrical B-5
Engines B-6
Hulls B-7
Mechanical B-8
Mines B-8
Mining B-9
Orbital B-9
Planetary B-10
Scanners B-11
Shields B-11
Starbase Hulls B-12
Terraforming B-12
Torpedoes B-13
C O N T E N T S IX
Files Used in Stars! C-1
Frequently Asked Questions D-1
Glossary Gl-1
Index In-1
Page 10

X C O N T E N T S
Page 11

INTRODUCTION
Some leaders are forged in battle. Others prefer formal training with less
bloodshed. With Stars!, your training ground is the tutorial. Use it, and you’ll
massively reduce the chances of getting your butt kicked early by the
computer or other more experienced players. The ancient races responsible
for the formation of the Stars! universe didn’t play the tutorial. Read what
happened to them.
Page 12
Page 13

1 WELCOME TO THE
STARS! UNIVERSE
IT’S A RELATIVELY SMALL UNIVERSE, AFTER ALL
Somewhere out on the edge of the Universe, two great races (the Sznip, a
race of crustaceans, and the Fermis, a race of nuclear plasmatoids) have
destroyed themselves and the chance for all remaining sentient races to
evolve and expand into (nearly) infinite space. Once upon a time there was a
theory that said the Universe was made up of interconnected bubbles of
space/time. The Sznip and the Fermi War proved it. The detonation that
destroyed both these super races also caused these bubbles of real space to
pop (actually a simultaneous replacement of real space with null). All the
bubbles that is, but one. This bubble of space/time, your bubble, is all that
remains. And it’s small (too small) and full (too full) of sentient species, each
on the verge of colonizing other planets and traveling between the stars. Each
race is hungry to control the little bit that’s left.
There’s bound to be trouble.
WHAT YOU’RE DOING HERE
Fortunately, the destructive element found in the terrible weapons of the
Sznips and Fermis does not exist in the Universal Remnant. So there is a limit
to the trouble you and your opponents can cause. During your first year,
you’ll be ready to build your first simple space ships. Eventually you’ll build
interstellar cruisers and planet bombers, freighters the size of small moons,
and weapons that will make your opponents tremble or shrug, depending on
their confidence level. You’ll colonize world after world as quickly as only
your race can. You may get lucky, and find artifacts left by those ancient races
that catalyze your research efforts, or encounter transdimensional beings
offering you knowledge that only they possess, and at low, low prices. By the
time the space dust settles, 100, 200, perhaps 500 or more years will have
passed, and either you or one of your undeserving opponents will be calling
the shots. Or, shot up, war-scarred, and with too few resources to continue,
you’ll call a halt, shake hands and all settle down for a foot stomping game of
Fizbin.
Page 14

1-2 I N T R O D U C T I O N
It’s the 2400th year of the Planetary Era. Your world is resource rich and
bustling with technological development. Your political leaders are giddy and,
with much fanfare, have just declared this as the first year of the Galactic Era.
Your people are looking for a real leader.
YOU ARE THE MASTER STRATEGIST
Use the Stars! control panels to command your capitol worlds and fleets, to
seek out strange new worlds and new civilizations, to boldly help your
neighbors understand their role in the doctrine of Manifest Destiny.
Stars! may seem complicated at first glance. Lots of tiles and windows, lots of
text, lots of colors. These things require a little explaining. Only a very little.
But not here. You won’t need to pay more than cursory attention to most of
the information on the screen, most of the time. It’s there when you need it.
You can even temporarily collapse some pieces if you find them distracting.
To orient yourself, before you go nose to beak with the other spacially
challenged races, PLAY THE TUTORIAL GAME. Just click on New Game in
the opening screen, then click on Tutorial in the New Game dialog.
To get help during play, LEFT-CLICK the mouse when you see this cursor:
Also consider clicking on Help buttons in the dialogs and choosing the Help
commands in the main menu.
Now get going. The universe is waiting, along with up to 15 other star-hungry
races.
WHAT YOU’LL FIND IN THIS PLAYER’S GUIDE
Use this guide to help you set up any type of single or multi-player game, to
familiarize yourself with the playing screen, and to learn both the high points
and the details of creating and running the universe. For quick reference,
everything in this paper guide is duplicated in the Stars! online help.
WE’D LIKE TO HEAR FROM YOU
Stars! was designed by strategy game fanatics for strategy gamers of all levels.
Many features in the game have appeared at the request of the Stars! players
community. So talk to us. Tell us what you think and what you want (keeping
in mind that Stars! is turn-based, not live action).
Multi-player games
You can challenge
other beings on a
single computer or
across a local area
network, or by
transferring turn
files using ftp,
modems, email,
computer bulletin
boards, or any
other file transfer
mechanism you can
think of. There’s
room for up to 16
of you in the Stars!
universe, with any
mix of human and
computer
opponents.
Page 15

To contact us with your ideas and reactions, send e-mail to
stars@webmap.com.
To learn more about the Stars! universe outside your computer, visit our
official Web site, Waypoint Zero, at www.webmap.com/stars!, and our
publisher’s handsome Web site at www.empire.co.uk.
To trade information and converse with other Stars! players, visit the Stars!
Usenet news group, rec.games.computer.stars.
W E L C O M E 1-3
Page 16

1-4 I N T R O D U C T I O N
Page 17
GETTING STARTED
Welcome to Universe University—a short course in creating the universe,
hosting games, and operating Stars! within the confines of your computer .
Here are the administrative nuts and bolts every leader needs to know. Stay
awake. You’ll probably use only 10% of what you learn here, but you never
know which 10% it’s going to be.
Page 18
Page 19

2 SINGLE PLAYER SETUP
PLAYING THE TUTORIAL
Stars! contains an intelligent, online tutorial that, in the course of one short
(and very real) game, introduces you to a variety of basic strategies and
familiarizes you with all the player tools. If you’ve never played Stars! before,
we highly recommend that you play the tutorial first.
The current instruction is
always highlighted.
¯ Just click on New Game in the opening screen, then on Begin Tutorial in
the New Game dialog. You can quit the tutorial at any time, saving your
place to begin again later.
Page 20

2-2 G E T T I N G S T A R T E D
¯ To start the tutorial where you left off, or to start over, click on New Game
and Begin Tutorial, or use the Help (Tutorial) menu item.
STARTING A SINGLE PLAYER GAME
Like we said, if you’ve never played Stars! or a game like Stars! before, we
recommend that you play the tutorial before you strike out on your own.
To start a new single player game:
1. Click on New Game on the opening screen or on File (New) from the
Stars! main menu.
2. In the New Game dialog, select the universe size, difficulty level and race
to play. To learn about or modify the attributes of your race, click on
Customize Race. The Custom Race wizard appears.
3. When you’re done selecting game settings, OK the New Game dialog.
You’ll be prompted to enter a file name under which to save the game.
4. Enter any name up to eight characters long (don’t worry about typing an
extension). Stars! creates a set of files containing data for that game and
for each human and computer player in the game. You can save the game
wherever you wish. By default, game files are saved in the Stars! install
directory.
The game begins, with your home world displayed on the screen and in
the Command pane, Scanner pane and Selection Summary pane. For the
first turn, the Messages pane contains tips that help you get started.
5. Use this turn to investigate your home planet, start basic production and
research, and send your scouts out to learn about the nearby worlds.
6. Once you finish the turn, select the Turn (Generate) menu item or press
the F9 key. Your next turn generates immediately.
7. To quit, select File (Exit) or File (Close). If you’ve made changes since the
start of the turn, Stars! prompts you to save. If you don’t save, you’ll start
the same turn over the next time you open the game.
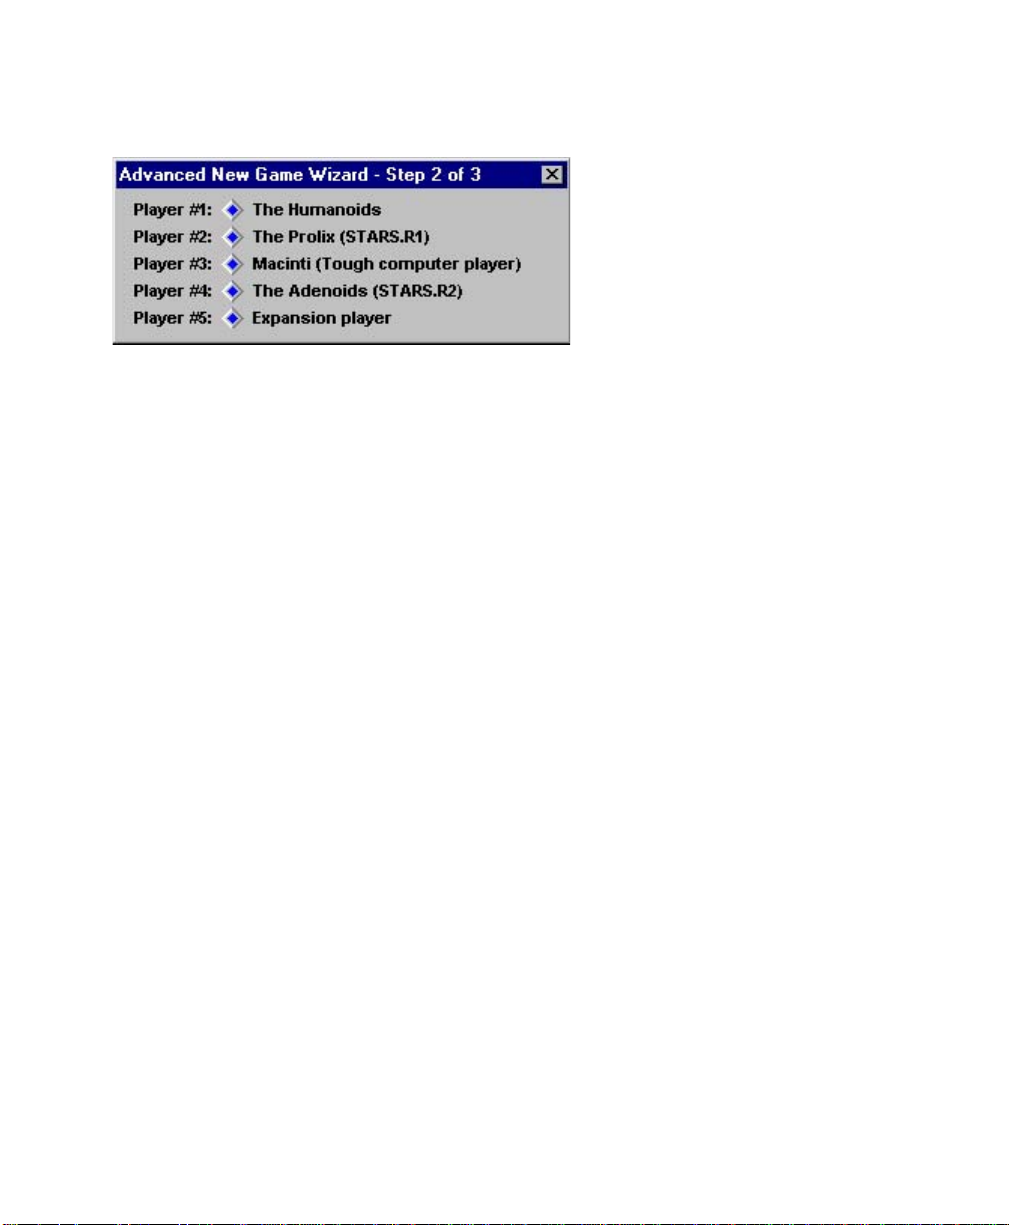
8. When you wish to continue the game where you left off, click on
Continue Game on the opening screen. You can also click on Open
Game, selecting gamename.m1 from the playing directory.
You can learn about
defining a race in
chapter 20,
Designing Custom
Races.
You can click on
Advanced Game in
the New Game
dialog to specify
the number of AI
(computer) players
and the conditions
for victory.
IMPORTANT: The
first time you play
Stars!, exit using the
File (Exit)
command. This
writes the stars.ini
file to the Windows
directory, saving
game options and
helping to prevent
that pesky serial
number dialog from
appearing again.
Page 21
S I N G L E P L A Y E R S E T U P 2-3
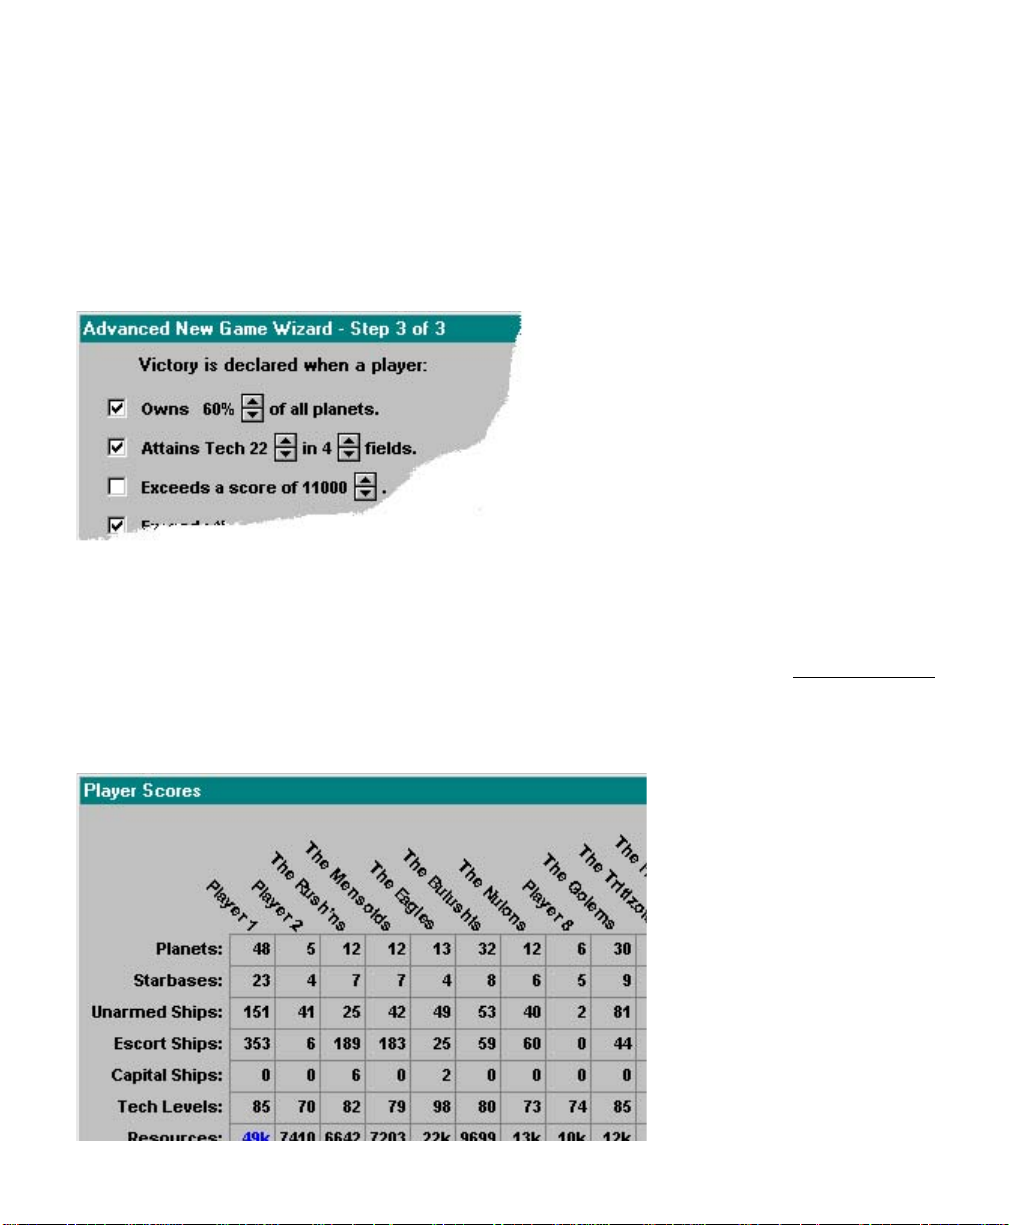
SETTING AND VIEWING WINNING CONDITIONS
You can specify one or more winning conditions in step 3 of the Advanced
New Game wizard. You can also accept the default conditions provided by
Stars!. To view the winning conditions once the game has begun, choose the
View (Race) menu item, then turn to page 3 of the View Game Parameters
dialog that appears.
Because you can control the variety and combination of winning conditions,
more than one player can be declared the winner. All players are notified in a
message when someone wins. You can continue to play past this point, or end
the game.
Track the score using Reports (Score) menu item (or by pressing F10). The
Score sheet shows your score and current ranking, and a history of scores
since the game began.
If Public Player
Scores is selected in
the game setup, all
player’s scores and
rankings appear in
the Score sheet.
Page 22

2-4 G E T T I N G S T A R T E D
Page 23

3 MULTI-PLAYER SETUP
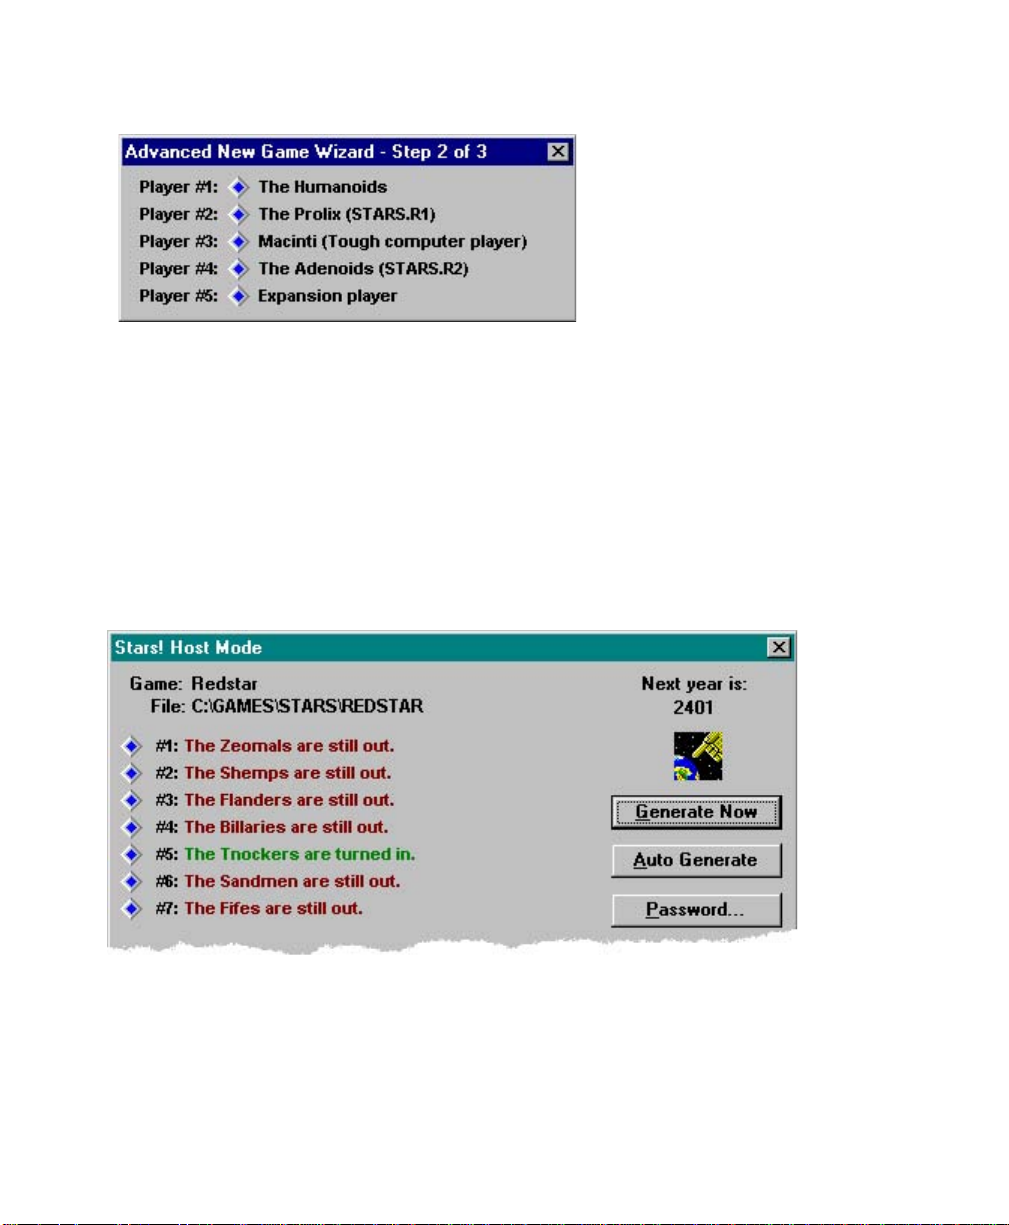
SETTING UP A SINGLE COMPUTER, MULTI-PLAYER (HOT SEAT) GAME
In a multi-player game, designate one person as the host. This person is in
charge of generating turns and generally administering the game. A player can
also act as host.
What the Host Needs to Do (Hot Seat Play)
Before you begin setup, have your players design their races and give you the
race files for loading into the game. Alternately, you can customize a race for
any player who wishes it.
To set up a multi-player hot seat game:
1. Click on New Game on the opening screen or on File (New) from the
Stars! main menu. The New Game dialog appears.
2. Click on Advanced Options, then specify options such as the universe
size, difficulty level, relative starting positions, accelerated play for BBS
games, number and type of players (Human or AI), and the victory
conditions. Be sure to load any custom race files provided by the players.
Create player positions for latecomers if you think it’s necessary.
3. The order of players listed in Step 2 of the Advanced New Game dialog
becomes part of the turn file name for each player.
Learn about
creating a race in
chapter 20,
Designing Custom
Races.
Learn about
Winning
Conditions, p 3-9
Page 24
3-2 G E T T I N G S T A R T E D
Player #1’s file is
gamename.m1 (for
example, redstar.m1).
4. Tell each player their number. They’ll need it to open the correct file at
the start of their turn.
5. You’ll be prompted for a game name. Enter any name up to eight
characters long (don’t worry about typing an extension). Stars! creates a
set of files containing data for that game and each player in the game.
You can save the game wherever you wish. By default, Stars! will save the
game files in the Stars! install directory.
6. The Stars! Host Mode dialog appears. Create a password, if you want to
prevent other players from opening the game file. Click on Auto Generate
to start the game.
7. Help the players understand what they need to do using the instructions
in What Each Player Needs to Do. If you’re playing as well as hosting,
you’ll probably find it easier to start a second instance of Stars!, playing
from one and using the other to handle host duties.
¯ To quit the game, click on Close in the Host dialog.
Page 25
M U L T I - P L A Y E R S E T U P 3-3
¯ To restart the host, start Stars!, click on Open Game, and choose the
gamename.hst file.
What Each Player Needs to Do (Hot Seat Play)
If you’ve never played Stars! or a game like Stars! before, we recommend that
you play the tutorial before you strike out on your own. That said:
¯ (Optional) Before the host creates a game, use Stars! Custom Race wizard
to create a customized race, then give the race file to the host. Open the
Custom Race wizard using the File (Custom Race wizard) menu item.
Once the host creates the game, do the following:
1. Start Stars! and click on Open Game from the opening screen. Open your
player file, gamename.mN. The Host needs to provide you with the
gamename.
Your game begins, with your home world displayed on the screen and in
the Command, Scanner and Selection Summary panes. For the first turn,
the Message pane contains tips that help you get started. Investigate your
home planet, start basic production and research, and send your scouts
out to learn about the nearby worlds.
2. Place your game files in the same directory each turn. The directory
location is your choice—we recommend creating a play directory within
the Stars! directory to keep things simple.
3. Once you finish the turn, select the menu command Turn (Wait for New).
Stars! will minimize, waiting for a new turn. When the new turn is ready,
it will beep once and flash, while displaying Turn Available.
Learn about
creating a race in
chapter 20,
Designing Custom
Races.
Screen Layout
To change the basic
layout of the Stars!
screen use the View
(Window Layout)
menu item. You can
also rearrange and
open and close
tiles, and resize
individual panes by
clicking on their
edges and dragging.
For details, read the
start of chapter 5,
The Stars! Screen.
Page 26

3-4 G E T T I N G S T A R T E D
If you wish, you can exit the game before or after you finish the turn. You can
save your changes or start the turn again if you don’t like the way things are
going. Read Exiting the Game on page 4-4 for more information.
If you plan to be absent for two or more turns, follow the instructions in Being
Absent from Play on page 3-10.
SETTING UP NETWORK-BASED MULTI-PLAYER GAMES
In a multi-player game, designate one person as the host. This person is in
charge of generating turns and generally administering the game. A player can
also act as host.
What the Host Needs to Do (Network Play)
You will need to set up the game in a shared directory (sharepoint) accessible
to all players. This sharepoint is the place that will contain all the game files,
and where the players will go to open their games. The sharepoint can exist
on a local area network, or via a modem connection (if you are using
Windows 95 Dial-up Networking capabilities—just connect to the server
machine or to another Win95 machine with the Plus Pack installed). You can
also create network connections using PC-NFS or any other software that
allows you to attach directories on the remote server as if they were local.
Before you begin setup, have your players design their races and give you the
race files for loading into the game. Alternately, you can customize a race for
any player who wishes it.
To set up a network game:
1. Create the sharepoint that will contain all the game files. We recommend
keeping it simple—no more than one play directory per game, for all
players in the game. You can create this directory within the directory
containing the stars!.exe program, or anywhere else you wish.
2. Click on New Game on the opening screen or on File (New) from the
Stars! main menu. The New Game dialog appears.
3. Click on Advanced Options, then specify options such as the universe
size, difficulty level, relative starting positions, accelerated play for BBS
games, number and type of players (real or AI), and the winning
conditions. Be sure to load any custom race files provided by the players.
Create player positions for latecomers if you wish.
Learn about
creating a race in
chapter 20,
Designing Custom
Races.
Learn about
Winning
Conditions, p 3-9
Page 27
M U L T I - P L A Y E R S E T U P 3-5
Player #1’s file is
gamename.m1 (for
example, redstar.m1).
The order of players listed in Step 2 of the Advanced New Game dialog
becomes part of the turn filename for each player.
4. Tell each player their number. They’ll need it to open the correct turn file.
5. You’ll be prompted for a game name. Enter any name up to eight
characters long (don’t worry about typing an extension). Stars! creates a
set of files containing data for that game and each player in the game.
Save the game in the shared directory.
6. Select Auto Generate in the Host dialog. The dialog will minimize,
waiting for all players to submit their turns. Stars! automatically submits
any turn into the shared directory. Once that’s done, Stars! automatically
generates a new turn, then returns to wait mode.
7. If you want to force a new turn to be generated, double-click on the Stars!
host icon, then select Generate Now from the Host dialog. To cause Stars!
to auto-generate turns again, select Auto Generate again. The dialog will
minimize and wait for players as before. Stars! will continue to follow any
existing orders for players who didn’t submit their turns on time. All
messages and data for the missed turns, such as planets discovered or
battles fought, will be present when they load the new turn.
8. Help the players understand what they need to do using the following
instructions in What Each Player Needs to Do (Network Play). If you’re
playing as well as hosting, you’ll probably find it easier to start a second
instance of Stars!, playing from one and using the other to handle host
duties.
¯ To quit the game, click on Close in the Host dialog.
¯ To restart the host, start Stars!, click on Open Game, and choose the
gamename.hst file.
Page 28

3-6 G E T T I N G S T A R T E D
What Each Player Needs to Do (Network Play)
If you’ve never played Stars! or a game like Stars! before, we recommend that
you play the tutorial before you strike out on your own. That said:
¯ (Optional) Before the host creates a game, use Stars! Custom Race wizard
to create a customized race, then give the race file to the host. Open the
Custom Race wizard using the File (Custom Race wizard) menu item.
Once the host creates the game, do the following on the machine where
you’ll play:
1. Start Stars! and click on Open Game from the opening screen. Open your
player file, gamename.mN. This file should be located in the shared play
directory (sharepoint) set up by the host. The host is also responsible for
supplying you with the gamename.
Your game begins, with your home world displayed on the screen and in
the Command, Scanner and Selection Summary panes. For the first turn,
the Message pane contains tips that help you get started. Investigate your
home planet, start basic production and research, and send your scouts
out to learn about the nearby worlds.
2. Once you finish the turn, select the menu command Turn (Wait for New).
Stars! will minimize, waiting for a new turn.
When the new turn is ready, the Stars! icon will beep once and flash,
while displaying Turn Available. If you wish, you can exit the game before
or after you finish the turn. You can save your changes or start the turn
again if you don’t like the way things are going. Read Exiting The Game
on page 4-4 for more information.
Learn about
creating a race in
chapter 20,
Designing Custom
Races.
If you plan to be absent for two or more turns, follow the instructions in Being
Absent from Play on page 3-10.
Page 29
M U L T I - P L A Y E R S E T U P 3-7
SETTING UP MODEM, FTP, AND PLAY BY E-MAIL GAMES
All multi-player games need one person to act as the host. This person is in
charge of generating turns and generally administering the game. A player can
also host a game.
What the Host Needs to Do (Modem/FTP/E-mail Play)
Stars is turn-based, not real-time. This means modems can be used to transfer
turn files once they are generated. You can do this through a BBS, e-mail,
upload/download from an FTP site, or using any other method you wish to
transfer files from the host to player systems. There aren’t any special transfer
protocols for modem users—you’re just uploading or downloading files.
Before you begin setup, have your players design their races and give you the
race files for loading into the game. Alternately, you can customize a race for
any player who wishes it.
To set up a modem or email-based game:
1. Click on New Game on the opening screen or on File (New) from the
Stars! main menu. The New Game dialog appears.
2. Click on Advanced Options, then specify options such as the universe
size, difficulty level, relative starting positions, accelerated play for BBS
games, the number and type of players (real or AI), and the winning
conditions. Create player positions for latecomers if you wish.
Player #1’s file is
gamename.m1 (for
example, redstar.m1).
Tip: Notice the
Accelerated BBS
Play option in the
Advanced Game
setup. You may
wish to check this
option during setup
to jump-start the
game.
Learn about
creating a race in
chapter 20,
Designing Custom
Races.
Learn about
Winning
Conditions, p 3-9
The order of players listed in step 2 of the New Game dialog becomes
part of the turn filename for each player.
3. Save the game using any name up to eight characters long. Stars! creates
a set of files containing data for that game and each player in the game.
You can save the game wherever you wish. By default, Stars! will save the
game files in the Stars! install directory.
Page 30

3-8 G E T T I N G S T A R T E D
4. The Stars! Host dialog appears. Click on Close to stop the game until all
players have submitted their turns. If you’d like to leave Stars! running,
click on Auto Generate.
5. Before the first turn each player needs to download the universe file,
gamename.xy, and their player file, gamename.mN (where N is the player
number), for the newly created game. Alternately, you can upload or emailgamename.xy and gamename.mN to each player. These files will be
located in the same directory in which you saved the game.
6. Help the players understand what they need to do using the instructions
in the following section on What Each Player Needs to Do
(Modem/FTP/E-mail Play). If you’re playing as well as hosting, you’ll
probably find it easier to start a second instance of Stars!, playing from
one and using the other to handle host duties.
After each player has sent you their turn (in the form of the log file,
gamename.xN) do the following:
1. Place each player’s submitted log file in the directory where you set up
the game.
2. Start Stars! (if it’s not already running), click on Open Game, and open
the host file, gamename.hst.
3. If the Stars! host is set to auto-generate mode, it will automatically
generate the new turn as soon as you move the player log files into the
game directory. If you’re generating turns manually, then select Generate
Now from the Host dialog. Stars! will continue to follow any existing
orders for players who didn’t submit their turns on time. All messages and
data for the missed turns, such as planets discovered or battles fought,
will be present when they load the new turn.
4. Once the turn is generated, notify the players that the new turn is
available. You can e-mail or upload each newly updated gamename.mN
file or allow each player to download it themselves.
What Each Player Needs to Do (Modem/FTP/E-mail Play)
(Optional) Before the host creates a game, use Stars! Custom Race wizard to
create a customized race, then give the race file to the host.
Once the host creates the game, do the following on the machine where
you’ll play:
Page 31

M U L T I - P L A Y E R S E T U P 3-9
1. Obtain the gamename.xy and gamename.mN files from your host, where
gamename is the name entered by the host in the File Save dialog and N
is your player number; for example, nonstop.m1.
Place these files in a playing directory you’ve created on your own
system. Use the same directory for each turn. You can create a unique
play directory for each game, or put all games into one directory.
Whatever your strategy, we recommend that you keep it simple.
2. Start Stars! and click on Open Game from the opening screen. Open your
player file, gamename.mN.
Your game begins, with your home world displayed on the screen and in
the Command, Scanner and Selection Summary panes. For the first turn,
the Message pane contains tips that help you get started. Investigate your
home planet, start basic production and research, and send your scouts
out to learn about the nearby worlds.
3. Select File (Save and Submit), then File (Exit). Or, if you’re trading turns
quickly or leave your computer on for long periods of time, you can also
use Turn (Wait for New)—a much simpler scenario.
If you wish, you can exit the game before or after you finish the turn. You
can save your changes or start the turn again if you don’t like the way
things are going. Read Exiting the Game on page 4-4 for more
information.
4. Upload or e-mail only your log file, gamename.xN file to the host system.
If you plan to be absent for more than a few turns, follow the instructions in
Being Absent from Play on page 3-10.
SETTING AND VIEWING WINNING CONDITIONS
You can specify one or more winning conditions in step 3 of the Advanced
New Game wizard. You can also accept the default conditions provided by
Stars!. To view the winning conditions once the game has begun, choose the
View (Race) menu item, then turn to page 3 of the View Game Parameters
dialog that appears.
Page 32

3-10 G E T T I N G S T A R T E D
Because you can control the variety and combination of winning conditions,
more than one player can be declared the winner. All players are notified in a
message when someone wins. You can continue to play past this point, or end
the game.
Track the score using Reports (Score) menu item (or by pressing F10). The
Score sheet shows your score and current ranking, and a history of scores
since the game began.
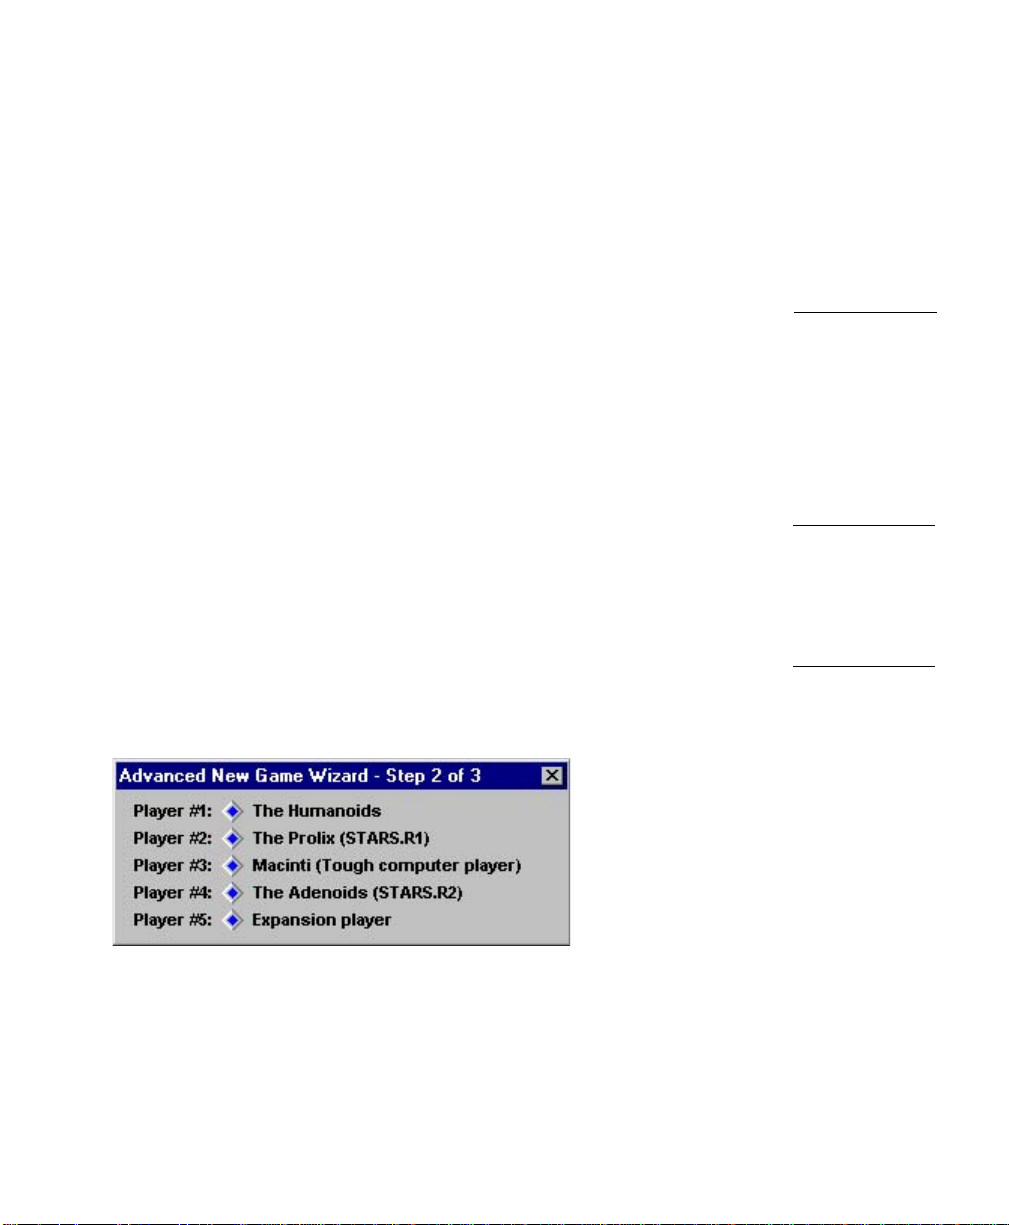
ADDING EXPANSION PLAYERS
If you think there’ll be other players joining later in the game, add an
Expansion Player for each missing person. Stars! will assign a housekeeper AI
to run things for those players until they actually join the action. This AI will
keep planets and fleets active, making sure the production queues are busy,
etc. It does not develop any strategy.
Page 33

M U L T I - P L A Y E R S E T U P 3-11
When the player joins, right click in the Host dialog on the diamond next to
their name and change the type to Human Controlled. Then, give the
latecomer a break by asking the other players to leave them alone for N years.
BEING ABSENT FROM PLAY
When you miss a turn, Stars! will continue to follow your existing orders. All
messages and data for the missed turns, such as planets discovered or battles
fought, will be present the next time you load a turn.
Alternately, if you plan on missing more than a few turns, you can ask the
host to substitute a housekeeper AI to keep your planets and fleets active. This
AI does not develop any strategy for you.
Hot-seat and network players:
¯ Just tell the host you’re going inactive and ask them to substitute the AI in
your place.
Modem, e-mail or BBS players only:
1. Give your host a copy of your history file, gamename.hN. This will allow
the host to update the universe for you while you’re gone.
2. Be sure that your host returns the history file and new turn file to you
before you open your game. You won’t be able to open your turn until
this time.
What the host needs to do:
1. Open the Host dialog, if it’s not open yet. Use File (Open), selecting
gamename.hst.
2. Right-click on the blue diamond next to the name of the player who’s
absent. Choose Human (Currently inactive ).
3. When the player returns, right-click on the diamond and select Human
Controlled. You’ll have to do this before the player can open their player
file, gamename.mN.
4. If you’re running the game over a modem, e-mailor BBS, return the
updated history file, gamename.hN, and player file, gamename.mN, to
the player.
Page 34

3-12 G E T T I N G S T A R T E D
FINDING MULTI-PLAYER GAMES ON THE INTERNET
If you want to join a multi-player game, or start your own, but can’t find other
players, visit the Stars! Web site, Waypoint Zero, at www.webmap.com/stars!.
Read the web pages on Player Resources for a list of host sites (growing
weekly) and other host and player information.
PASSWORDS
Create or change a password for the current game using the Commands
(Change Password) menu item.
You can create a default game password using the following option in the
[Misc] section of stars.ini file:
DefaultPassword=<password>
<password> is the password you wish to use. If you are sure that your
opponents will not have access to your stars.ini file you can set this to your
password. Whenever you open a game file that is protected by this password
you will not be prompted to enter it. If DefaultPassword is not present in
stars.ini, type it in under the [Misc] heading.
The stars.ini file is written into your Windows directory the first time you save
a Stars! game. It doesn’t exist before that time.
Don’t Forget Your Password
If you forget or lose your password, there is nothing you can do to open the
password-protected game. We hope you’re not reading this because you’ve
forgotten. Don’t worry, empires come, empires go.
Inactive Players and Passwords
There is no valid password for inactive players. When the player becomes
active again, they get their old password back.
USING A TIMER APPLICATION?
If you use a timer application to launch Stars! on the host system, take a look
at the variety of command line options on page 4-5. These options will do
such things as start Windows and Stars!, generate the new turn and exit both
programs.
Page 35

M U L T I - P L A Y E R S E T U P 3-13
CREATING A UNIVERSE FROM THE COMMAND LINE
For experienced hosts only
Use the following command to create a new game/universe without using
Stars! setup dialogs:
stars!.exe -a game.def
game.def has the following format:
Game Name
Universe Size (0-4) Density (0-3) Starting Distance (0-3)
Maximum Minerals (0/1) Slow Tech (0/1) BBS Play (0/1) .... (other boxes)
Number of Players, only humans allowed (1-16)
Pathnames to race files
VC # of planets (0/1) Percent of planets (20-100)
VC Tech (0/1) Level (8-26) Fields (2-6)
VC Score (0/1) Score (1000-20000)
VC Exceeds nearest (0/1) (Percent (20-300)
VC Production (0/1) Capacity (10-500)
VC Capital Ships (0/1) Number (10-300)
VC Turns (0/1) Years (30-900)
VC Must Meet (0-7) Minimum Years (30-500)
New universe file name
The following is a sample game.def file:
Tour of Duty
3 2 2
0 0 0 0 1 1 1
4
c:\stars\play\game.r1
c:\stars\play\game.r2
c:\stars\play\game.r3
c:\stars\play\game.r4
1 60
1 26 4
0
1 150
0
1 100
0
2 150
c:\stars\play\game.xy
Page 36

3-14 G E T T I N G S T A R T E D
Page 37

4 THINGS EVERY STARS!
PLAYER SHOULD KNOW
TUNING STARS! TO YOUR DISPLAY RESOLUTION
The higher your screen resolution, the better Stars! will look. However, it will
run on any color VGA display.
1024 by 768 (or better)
For maximum playing pleasure.
¯ Use this menu command: View (Window Layout > Large).
¯ If you use large fonts, you may need to specify View (Window Layout >
Medium).
800 by 600
This is the minimum recommended resolution.
1. Choose the menu item, View (Window Layout > Medium). If you’re using
large fonts, you may find that the small window layout works better for
you.
2. Resize each of the windows to optimize the information you need to see
at a glance.
3. If the screen still seems too cramped try hiding the Toolbar using the
menu item, View (Toolbar). Most of the Toolbar functions are available
using shortcut keystrokes.
Page 38

4-2 G E T T I N G S T A R T E D
640 by 480 (VGA)
This is the minimum required resolution.
1. Use this menu command: View (Window Layout > Small).
2. Resize each of the windows to optimize the information you need to see
at a glance.
3. Collapse tiles in the Command pane, expanding them when needed.
4. If the screen still seems too cramped try hiding the Toolbar using the
menu item View (Toolbar). Most of the Toolbar functions are available
using shortcut keystrokes.
REPLAYING A PREVIOUS TURN
Stars! allows you to save previous turns in case you need to resubmit a turn to
the host or replay the current turn. You can specify saving up to 999 turns
using the Backups option in the stars.ini file. If you don’t specify the number
of turns to backup, Stars! backs up only the previous turn. Once you save and
submit, Stars! saves the current turn as the most recent backup copy.
To start a turn using data from a previous turn (for example, the last turn
played):
1. Copy all files for the current game from the backup directory into the
playing directory. For example, if you originally saved the game under the
name of Nonstop, copy all files with Nonstop as the prefix. To ensure that
you are choosing the correct files, check the date/time stamp on the
backup directory.
2. Choose Open Game or File (Open). Select the player log file player turn
file (for example, nonstop.m1), and click OK. You should be back where
you started, although the universe will reflect the current positions of
other players.
SAVING YOUR GAME—WHAT IT MEANS
Default Save Behavior
By default, saving a game saves only the current state of the current turn. The
previous turn’s data is saved in a directory called Backup, under the directory
in which you’re saving the game. Stars! creates the Backup directory
Page 39

T H I N G S E V E R Y P L A Y E R S H O U L D K N O W 4-3
automatically. Each time you generate a turn, the old data in the Backup
directory is overwritten with the previous turn’s data.
Saving the Current State of Your Game
Use the File (Save) menu item to save the current state of your game. This is
useful if you need to exit the game before you finish your turn. When you
restart Stars! just click on Continue Game to resume where you left off.
If you close the game before saving you will see this alert, you’ll be asked if
you wish to save before exiting.
Saving More than One Previous Turn
If you’d like to save more than one previous turn for review or any other
purpose, do the following:
1. Open the stars.ini file for editing. It’s a plain text file located in your
Windows directory.
2. Under the [MISC] section, set the Backups option to a number of turns,
between 1 and 999. If the Backups option isn’t present, go ahead and
type it in; for example:
Backups=50
Backup directories will be named Backup1 to BackupN. Old game files will
be stored in the backup directory according to the turn number. For example
when Backups=4 then the first turn would be backed up to the directory
backup1, the second to backup2, the third to backup3, the fourth to backup4,
the fifth to backup1 and so on.
The stars.ini file is written into your Windows directory the first time you save
a Stars! game. It doesn’t exist before that time.
Save and Submit
Multi-player Games Only
Use the File (Save and Submit) command to save the current state of your
game and submit your turn. In multi-player games, this marks your turn as
finished so the host can auto-generate; Save does not.
Page 40

4-4 G E T T I N G S T A R T E D
If you close the game before saving you’ll be asked if you wish to save and
submit your turn before exiting.
EXITING THE GAME
Select File (Exit) or File (Close). If you’ve made changes since the beginning of
the turn, Stars! will prompt you to save or, if you’re in a multi-player game, to
save and submit your turn.
Exiting Stars! the First Time
IMPORTANT: The first time you play Stars!, exit using the File (Exit) menu
item. This writes the stars.ini file to the Windows directory, saving game
options and helping to prevent that pesky serial number dialog from
appearing again.
Exiting Stars! to Erase Changes
If you want to erase the changes you’ve made that turn, before you submit, do
the following:
1. Choose File (Close), without saving.
2. Select Open Game from the opening screen, then choose your player log
file from the Open File dialog. You’ll be back at the start of the turn you
just left.
Save vs. Save and Submit
Multi-player Games Only
Use the File (Save and Submit) command to save the current state of your
game and submit your turn. In multi-player games, this marks your turn as
finished so the host can auto-generate; Save does not.
If you close the game before saving you’ll be asked if you wish to save and
submit your turn before exiting.
Page 41

T H I N G S E V E R Y P L A Y E R S H O U L D K N O W 4-5
OPTIONS FOR LAUNCHING STARS!
Stars! can be launched from a DOS or Windows command line, using the
Stars! command only or with a variety of options. When using an option, you
must also supply either a player or host file name as an argument. You can
also supply only the player or host file name without any other options.
With or without options, supplying the file name causes Stars! to start without
displaying the splash screen (startup bitmap).
-s – start with battle sound effects turned off
-m – start with game music turned off
-t – try, then exit. If you specify a player file, this opens the newly generated
turn. If the turn hasn’t been generated yet, then Stars! exits. If you specify a
host file, this checks to see if all players have submitted their changes for the
turn. If they have, Stars! generates the new turn and exits. Otherwise, it just
exits.
-w –wait. If you specify a host file, this auto-generates the new turn as soon as
all players have submitted their changes. If you specify a player file, this waits
for the new turn to be generated. This option does not cause Stars! to exit.
-g –generate and exit. Specify a host file only. This forces the turn to generate
regardless of whether all players have submitted changes, then exits. You can’t
load a player file when you use this option.
-p password –supplies the password on the command line. You can use this
with a host file or a password-protected player file.
-x –Exit Windows when Stars! exits. This is a good match with the -b option if
you wish to create a script that automatically starts Windows, generates the
new turn, then exits Windows.
-b gamelist_file –Generate turns for each game listed in the supplied file
name.
-a game.def – Create a new game/universe based on the contents of game.def.
This allows you to create new games from the command line. See Creating a
Universe from the Command Line on page 3-13 for more information.
-h – Causes Stars! to alway ask you for a password when you open a turn file.
This helps keep the wimps who can’t play without cheating out of your turn
files. This is especially useful for hot seat play.
The -x flag is for
16-bit Windows
only (3.1 or 3.11).
Behavior of the -x
option on OS/2,
Windows NT, or
Windows 95 is
undefined and
probably not what
you want.
Page 42

4-6 G E T T I N G S T A R T E D
Examples
stars! Filename Load a player or host file, starting the game without
loading the splash screen.
stars! -w gamename.hst Load the host file and enter Auto Generate mode.
stars! -w gamename.mN Load the specified player file and wait for the host to
generate a new turn.
stars! -t gamename.mN Load the specified player file; quit if the host has not yet
generated a new turn.
stars! -g gamename.hst Load the host file, force a new turn and quit.
stars! -w -g gamename.hst Load the host file, wait for all players to submit turns,
generate and quit.
stars! -t -g gamename.hst Load the host file, generate a new turn only if all players
have submitted turns, then quit. If it generates the turn the
return value is 1; if the turn is not generated the value is 0.
stars! -t -b gamelist_file Conditionally generate turns for a list of games.
stars! -x -b gamelist_file Generate turns for each game listed in the supplied file
name, then exit Windows. Useful for BBS play
For example if your BBS is OS/2, NT or Windows-based you can launch Stars!
with the -b gamelist_file parameter to batch generate turns for multiple
games. Stars! will automatically exit when the last turn has been generated.
The file listing the games must contain one game name per line including the
full path:
c:\games\stars!\play\frenzy.hst
c:\games\stars!\play\game.hst
c:\user\jeff\stars!\killer.hst
You can name this games list file anything you want. If you are running a
DOS-based BBS but have Windows installed on the machine, you can launch
Windows and Stars! from a nightly maintenance script similar to this:
win c:\games\stars!\stars!.exe -x -b c:\games\stars!\gamelist.txt
This will launch Windows and Stars!, generate a turn for each game listed in
gamelist.txt, then exit Stars! and Windows. This method is optimal for
Windows 3.1.
Page 43

T H I N G S E V E R Y P L A Y E R S H O U L D K N O W 4-7
If you have Windows for Workgroups installed (Windows 3.11) you may want
ato use the win /n option:
win /n c:\games\stars!\stars!.exe -x -b c:\games\stars!\gamelist.txt
This will prevent Windows from loading any of its network drivers and
suppress its login prompt. If you only need to generate a turn for a single
game you can still use the -g gamename.hst parameter with or without -x (use
-x with Windows 3.1 or 3.11only).
COPY PROTECTION
Save Your Serial Number
The first time you run Stars!, you will be asked to enter your unique serial
number. The number is printed on 2 labels enclosed in the pack.
It is very important that you keep the serial number where you can find it
later.
Stars! may ask for the number again if :
• You re-install Stars!
• You change your computer’s configuration.
• You install a Stars! upgrade.
One Computer - One Serial Number
Each computer running Stars! must use a unique serial number. Given this,
the copy protection activates ONLY in the following situations:
• When you cancel the serial number dialog.
• When players using the same serial number submit turns created on two
different computers . This includes submitting turns from networked
computers sharing a serial number. If you want to submit turns from
different machines on a network, each of those machines must have a
copy of Stars! installed with a unique serial number.
• One person submits turns for two or more player positions from
different computers that share the same Stars! serial number .
Page 44

4-8 G E T T I N G S T A R T E D
In every case, Stars! will give you a chance to enter a unique serial number
and continue play normally.
How the Copy Protection Works
Stars! is played by submitting player log files to the host (either a human or
the game itself). Each log file is tagged with the serial number for the copy of
Stars! used to generate the file, and a fingerprint of the computer on which
the game was installed. If the Stars! host receives two or more log files with
different computer fingerprints and the same serial number it assumes that all
the players associated with those log files are guilty of software piracy, and
activates the copy protection for those players (honest players are unaffected).
The copy protection makes the game unplayable for the guilty parties, until
each player enters a unique serial number. As soon as each player submits
turns with a unique serial number, the copy protection deactivates.
The Host Doesn’t Need a Serial Number
A host can use the same serial number as one other player without affecting
the host or the player. This allows you to host and play from the same copy of
Stars!
Computers Running More than One Version of Windows
If you are running some combination of Windows 95, NT or 3.x on a single
computer you will be asked for a serial number the first time you run Stars!
under each version of Windows. After that, you should only be bothered for
the number if you change your system configuration or delete the stars.ini file
from the Windows directory. Each version of Windows will have its own
directory containing Windows system software. By default, this directory is
named Windows. You may have named it something different on your system.
Page 45

THE STARS! SCREEN
You can’t manage an empire with a stick and whistle.
Page 46

Page 47

5 THE STARS!-SCREEN
The Stars! playing screen is divided into four panes:
Command
This is where you give detailed orders to
your fleets and planets. Collapsible tiles
display data and controls for the planet or
fleet under your command.
Messages
This is where you receive yearly reports
from far-flung fleets and planets and
messages from other players. Build
alliances or deceive enemies with your
crafty replies.
This is your view of the universe. Use the
scanner toolbar to select filters and
overlays. Manipulate fleet routes and
track opponents who ignore your ‘no
trespassing’ signs.
This area shows details about the object
selected in the Scanner pane.
Scanner
Selection Summary
Changing the Layout
From the main menu, select View (Window Layout). Select Small Screen, Medium Screen or Large
Screen. Choose the screen layout that works best with your video resolution.
Shrinking and Growing Panes
Change the size of each of the four panes by simply clicking on and dragging the pane borders.
Page 48

5-2 T H E S T A R S ! S C R E E N
COMMAND PANE
The Command pane is where you give orders to a planet or fleet that you own. Select one of your
planets to command and controls for giving orders to that planet appear on tiles. Select one of
your fleets to command and controls for giving orders to that fleet appear.
Moving and Collapsing Tiles
You can individually move and collapse the command pane tiles.
To move a tile, click on the
title bar and drag to a new
location.
Tiles Seen When Commanding a Planet
Planet tile
This tile displays the planet currently under your command.
Click on Prev and Next to scroll through your planets in the
order they are listed in the Planet Summary Report. Hold
down on the SHIFT key while clicking on Prev or Next to
scroll between planets that have a starbase.
Minerals on Hand tile
The upper half of this tile lists the amount of each mineral
available for immediate use. The lower half tells you how
many mines and factories are in operation out of the total
number the population can operate.
Click here to
collapse a
Left-click on items in the tile
for more information.
Page 49

Status tile
Left-click on items in the tile
for more information.
Fleets in Orbit tile
Small screen layout: click on the
Cargo button to display the cargo list.
THE STARS! SCREEN 5-3
This tile displays planetary population, scanner and defense
statistics.
Resources/Year – The tile displays the number of resources, or
units of work, available for use by the planet out of the total
number of resources generated by the planet annually. The
difference, if any, is the number allocated to research.
Defenses — Number of defenses deployed out of the
maximum your population can operate.
Defense Type — Current defense technologyy
Defense Coverage – Estimated percentage of bombs, troops
and mineral packet bombardments that can be stopped with
current defenses.
The fleet dropdown lists all fleets and other objects in orbit.
Fleets you own are listed in black. Fleets belonging to other
players are listed in red.
Click on Cargo to transfer cargo between your fleets and the
planet.
Click on Goto to bring the specified fleet under command.
Starbase tile
Left-click on items in the tile for
more information.
This tile describes the local starbase, if any, and its mass
driver.
To target the mass driver, click on Set Dest and then click on
the destination in the scanner.
Left-click and drag in the gauge to set the packet speed. The
warp specified is the maximum safe speed. The gauge color is
purple as long as the speed is safe, changes to yellow when
the speed is over the limit, and then to red when the
maximum decay rate is reached.
Page 50

5-4 T H E S T A R S ! S C R E E N
Production tile
This tile displays the planet’s production queue. Colors in the
queue show completion status:
Green: all will be completed this turn
Blue: at least one will be completed this turn
Black: at least one more turn before even one is finished
Red: mineral concentration is so low that the time to
Gray: will be skipped this year
Auto build items display in italics.
Click on Change to alter production orders.
Click on Clear to remove everything from your production
queue.
Click on Route, then click on a planet in the scanner to send
all newly built ships to that planet. Alternately, CTRL-click in
the Scanner on the destination planet.
Tiles Seen When Commanding a Fleet
completion exceeds 100 years
Fleet tile
Location tile
This tile shows the fleet currently under your command. A
fleet may contain several types of ships. The picture displays
the most significant type of ship in the fleet. A small plus (+)
sign represents each additional ship type (up to four).
Click on Prev and Next to scroll through your fleets in the
order they are listed in the Fleet Summary Report.
Click on Rename to rename the fleet.
This tile displays the location of the fleet under command.
Selecting Goto switches to commanding the planet you’re
orbiting. You can’t do this if you don’t own the planet.
Click Xfer to transfer cargo between the fleet and planet.
For fleets in deep space, cargo transfer is replaced by cargo
jettison.
Click on Jettison to dump some or all of your cargo.
Page 51

Fuel and Cargo tile
Small screen layout: click in the
Cargo gauge to see the cargo list.
Fleet Composition tile
THE STARS! SCREEN 5-5
Fuel — The Fuel gauge shows the current and maximum fuel
level of the fleet under command.
Cargo — The Cargo gauge shows the amounts of cargo loaded
and the total capacity of the fleet.
Left-click in the cargo gauge to transfer or jettison cargo, or
pick up available salvage.
This list shows the name and number of each type of ship in
the fleet. The extent of damage, if any, is shown by the red bar
over the name. Left-click on the name to see more details.
To change the battle plan for the fleet under command,
choose a new plan from the dropdown list. To view, create or
edit a battle plan, select Battle Plans… from the dropdown
list.
Click on Split to divide the fleet in two. Click on Split All to
break up the fleet into separate fleets of a single ship type.
Click Merge to merge the fleet with other fleets in the same
location.
Left-click on a ship name to
see design details and specs.
Other Fleets Here tile
Small screen layout: click on the
Cargo button to display fuel and
cargo amounts.
This tile lists all other fleets and mineral packets in the same
location as the fleet under command.
Click and drag in the Fuel gauge to transfer fuel between the
fleet under command and the fleet specified in the tile.
To bring another fleet here under command, choose one from
the dropdown list, then click Goto.
Click on Merge to transfer ships between the fleet under
command and the fleet shown in the tile.
Click on Cargo to transfer cargo between the fleet under
command and the fleet or object specified in the tile.
Page 52

5-6 T H E S T A R S ! S C R E E N
Fleet Waypoints tile
The Fleet Waypoints tile lists all the waypoints assigned the
fleet under command. The first waypoint listed is the current
location. If the fleet are in transit between waypoints, the
location is given as coordinates in deep space.
Right-click on the blue diamond to display a list of items at the
same location as the selected waypoint. Select an alternate
item to change the exact waypoint target.
Warp Factor: By default, Stars! chooses the ideal speed for
reaching the next waypoint with the fuel available. To
manually set the speed select the waypoint from the list, then
left-click and drag in the Warp gauge.
To use a stargate, drag the bar all the way to the right. If you’re
not at a stargate, the travel time will display Never.
Fuel Usage: This tells you exactly how much fuel the fleet will
use to reach the waypoint at its current speed. The number
turns red if you can’t reach the waypoint given the current
speed and fuel supply.
Repeat Orders: Repeats the total set of orders you assigned
using the Waypoints Task tile. Assigning repeat orders works
best when the first waypoint in the list is repeated as the last.
Waypoint Task tile
This tile shows the task the fleet must perform at that waypoint
selected in the Fleet Waypoints tile. Click on the dropdown to
assign a task.
Page 53

THE STARS! SCREEN 5-7
Transport tasks
Use this task to load or unload minerals, fuel or colonists.
The middle dropdown lists methods of loading and unloading.
When you assign a load/unload action, the cargo name turns
from black to green. Some load/unload actions allow you to
specify exact amounts.
Zip Orders: To quickly load fuel, minerals and colonists, right-click on the blue diamond and choose a
pre-defined order from the list. If a Zip Order doesn’t quite meet your needs, you can create your own or
modify the existing order.
Load / Unload Actions:
(no action) No transport task for the specified cargo.
Load All Available Load as much of the specified cargo as the fleet can hold.
Unload All Unload all the specified cargo at the waypoint.
Load Exactly... Load the amount specified only if there is room in the hold.
Unload Exactly... Unload the amount specified only if the fleet is carrying that amount.
Fill up to %... Loads up to the specified portion of the cargo hold subject to amount available at
waypoint and room left in hold.
Wait for %... Remain at the waypoint until exactly X % of the hold is filled.
Load Optimal (fuel only) Load or unload fuel until the fleet carries only the exact amount needed to
reach the next waypoint. You can use this task to send a fleet loaded with fuel to
rescue a stranded fleet. The rescue fleet will transfer only the amount of fuel it can
spare without stranding itself.
Load Dunnage (minerals and colonists only) This command waits until all other loads and unloads are
complete, then loads as many colonists or amount of a mineral as will fit in the
remaining space. For example, setting Load All Germanium, Load Dunnage Ironium,
will load all the Germanium that is available, then as much Ironium as possible. If
more than one dunnage cargo is specified, they are loaded in the order of Ironium,
Boranium, Germanium, and Colonists.
Set Amount to... Load or unload the cargo until the amount on board is the amount specified. If less
than the specified cargo is available, the fleet will not move on.
Set Waypoint to... Load or unload the cargo until the amount at the waypoint is the amount specified.
This order is always carried out to the best of the fleet’s ability that turn but does not
prevent the fleet from moving on.
Page 54

5-8 T H E S T A R S ! S C R E E N
Colonize
Remote Mining
Merge with Fleet
Use this task to transport colonists to an unpopulated planet.
The fleet must contain a ship with a colonization module, and
must be loaded with colonists. Once the colony is established
you can use freighters to transport additional colonists.
Use this task to mine an uninhabited planet. The fleet must
have robot miners. The quantity of each mineral the fleet can
mine annually is shown by tonnage and color.
Blue: Ironiumm
Green: Boraniumm
Yellow: Germanium
Use this task to merge the fleet under command with a fleet at
the waypoint. The fleet given this task will be assimilated into
the target fleet and assume its orders.
To pick from multiple fleets at the waypoint, right-click on the
blue diamond in the Fleet Waypoints tile. Otherwise, Stars!
will pick the most dormant fleet with similar ships.
Scrap Fleet
Use this task to salvage a portion of the minerals in the hulls
of outdated or unrecoverable ships. Players can also trade
technological knowledge by scrapping ships at each other’s
planets.
The minerals are deposited on the planet where the fleet is
scrapped. The percentage of minerals recovered varies
depending on the situation.
Page 55

Lay Mine Fields
Patrol
Route
THE STARS! SCREEN 5-9
Use this task to lay mines at the waypoint. Fleets given this
task must have mine layers. The tile notes how many mines
the fleet will lay for each year it performs the task.
Use this task to intercept incoming enemy fleets. Set the
detection range to specify how far away the patrol ship will
look for interlopers. Manually select an intercept speed, or use
the default of Automatic intercept in the shortest possible time
using the least amount of fuel.
Use the Route task to automatically send fleets from one
planet to another. If the waypoint planet has a routing
destination, the fleet assigned this task will automatically set
that destination as its next waypoint.
Transfer Fleet
Route destinations are set using the Production tile.
Use this task to place one of your fleets under the command
of another player, and to give that player knowledge of the
design of all ships in that fleet.
This task will fail if the receiving player does not have enough
free ship design slots.
Page 56

5-10 T H E S T A R S ! S C R E E N
Bringing a Fleet or Planet into the Command pane
Stars! provides more than one way to command a planet or fleet. Use the method that suits your
needs.
To command the planet you are orbiting, click on Goto in the
Location tile. (The planet must already belong to you.)
From the Command pane, you can select one of your fleets in
the same location using the Fleets in Orbit tile. Just choose a
fleet from the dropdown list and click on Goto.
You can also use the Scanner pane to bring either a planet or fleet into the Command pane. If the
object you wish to command is the only thing at that location, just double-click on it in the
Scanner.
When more than one object is in the same location, do one of the following:
¯ Right-click on the location, then click on the name of the object from the pop-up list.
¯ Left-click on the location till the object you wish to command appears in the Command pane.
When clicking on a location to cycle through your planet and fleets, other player’s fleets are
skipped. Even though you’d like to, you can’t display these fleets in the Command pane. Other
player’s fleets, if present, are listed in the pop-up: selecting one will display what you know about
that fleet in the Selection Summary pane.
Page 57

THE STARS! SCREEN 5-11
MESSAGES PANE
Each year you receive reports about conditions in the universe and the progress of your empire. As
your empire expands, you’ll find that some types of messages become routine and distracting, and
can be filtered.
Click to filter this
type of message
Filtered Messages
Click to unfilter this
type of message
The asterik tells you that
you’ve made changes since
the last save
Click to display (+) or hide (-)
filtered messages
Click to draft and send mail
(multi-player games only)
SHIFT-click to read the first
message
Click to focus your commands
and scanner on the subject of
the message
SHIFT-click to read the final
message
Select an addressee from the list
Click to exit mail mode
Page 58

5-12 T H E S T A R S ! S C R E E N
Mail Form
Scanner
Status bar
SCANNER PANE
The Scanner pane is your window on the universe. All players see the same map but not the same
details.
Command Keyboard/Mouse Action
Set Waypoints SHIFT+ left-click on the waypoint
Route Fleets CTRL + left-click on the destination planet
List Objects at Waypoint Right-click on the waypoint
Measure Distance Hold down SHIFT, then right-click and drag
Show your current location Press V
Choosing Your View of the Universe
There are six exclusive scanner views, which you can use with one or more overlays. Use the
toolbar above the scanner to select views and overlays. Display or hide the toolbar with the View
(Toolbar) menu item.
Normal view
This default scanner view displays the essentials, such as planets, fleets
positions, orbital devices, salvage sites, wormholes.
Page 59

Surface Minerals
Mineral Concentration
THE STARS! SCREEN 5-13
This view displays the quantity of minerals under the surface at each
planet you own or have scanned. The mineral colors and scale
matches the display in the Summary pane’s mineral content graph.
Rescaling that graph rescales the bars in this view.
This view displays the concentration of minerals under the surface at
each planet you own or have scanned. The mineral colors and scale
matches the display in the Summary pane’s mineral content graph.
Rescaling that graph rescales the bars in this view.
Planet Value
Population
This view uses color and size to display which planets are best suited
to your race. Blue flags mark your planets, yellow flags mark your
friends’ planets and red flags mark planets of neutrals and enemies.
Planets without flags are uninhabited.
Green: habitable. The larger the circle, the more hospitable the
planet.
Yellow: habitable after terraforming. Larger circles indicate faster
minimal terraforming and better results.
Red: uninhabitable. The larger the circle, the harsher the planet.
This view displays population levels. The wider the circle, the larger
the population. Planets are sorted by color:
Green: your colonized planets
Yellow: friends
Red: enemies and neutrals
Uncolonized planets that you’ve visited are small and grey.
Page 60

5-14 T H E S T A R S ! S C R E E N
No Player Information
This view hides all traces of planet ownership. Just a thousand dim points of light.
Add Waypoints Mode
You can add waypoints for the fleet under command using just the mouse. This mode is primarily
for beginning players, or anyone who wants to eat and play at the same time.
Scanner Coverage overlay
This overlay displays the effectiveness of radar coverage at the
percentage selected in the dropdown. Reducing the displayed
coverage does not change the actual coverage—it only gives you an
idea of what your coverage would be in relation to the cloaking ability
of opponents’ ships. For example, select 75% to show how close a
fleet with 25% cloaking will need to be before you can detect it.
Mine Fields overlay
Fleet Paths overlay
This overlay displays minefields as colored grids. Your minefields are
blue, friends are yellow, and enemies and neutrals are red.
You can see both the center and radius of another player’s minefield
only if either the center of the mine field is in range of your
penetrating scanner, or you have hit the minefield at least once and
the center is in range of your normal scanners or you are currently in
the minefield.
This overlay displays the assigned paths of all your fleets.
Page 61

Planet Names overlay
Ship Count overlay
THE STARS! SCREEN 5-15
This overlay displays planet names in the scanner. If the names are too
crowded, increase the scanner zoom factor to place more distance
between planets. If Player Colors is activated, planet names appear in
the color assigned to that player. Your planet names always appear in
white.
This overlay displays the number of ships at a location. Active Ship
Design and Enemy Ship Class filters will limit the count to ships
specified in those filters. For example, if you have a filter that displays
only enemy warships, the number above enemy fleets and planets will
be the count of only warships.
If Player Colors are turned on, numbers appear in the color assigned
to that player. Your fleet numbers always appear in white.
Idle Fleets filter
Idle fleets are fleets with no movement orders. This overlay displays only your idle fleets and any
active enemy fleets. Only those planets with idle fleets in orbit will show orbit rings. Fleets that
have run out of fuel are still considered active, and won’t appear if you’re using only this overlay.
Exception: Claim Adjuster fleets that are terraforming from orbit are not considered idle.
Ship Design filter
This overlay displays only those fleets that contain a specific ship design. Only those planets
orbited by the selected ships will have orbit rings.
Enemy Ship Class filter
This overlay displays opponent fleets containing a specific selected ship class. Opponents’fleets
appears as red triangles. Only opponents’ planets orbited by the selected ships will have orbit
rings.
Page 62

5-16 T H E S T A R S ! S C R E E N
Status Bar
Planets
ID#, coordinates and name of planet selected in the Scanner
Fleets, Mineral Packets and Wormholes
Coordinates and name of selected fleet or other object
Planet or fleet in Command pane
When you select a fleet orbiting a planet, only the planet’s information is displayed in the status
bar. If the scanner is too narrow to display all the status bar information, left-click in the upper bar
to display a pop-up summary. To get information on the fleet, right-click on the planet and select
the fleet from the pop-up list.
Zooming
To zoom in or out of the Scanner, you can either use the View (Zoom) menu item, click on
the magnifying glass in the toolbar, or use the + and - keys on the numeric keypad.
Player Colors
Stars! assigns each player a color when a game is created. Use the Reports (Score) to open the
Score sheet, then switch to the history graph to see which player has which color.
Select the View (Player Colors) menu item to activate player colors in the Scanner. When the Ship
Count and Planet Names overlays are on, fleet numbers and planet names for other players appear
in their color. Your planets remain white.
Page 63

THE STARS! SCREEN 5-17
SELECTION SUMMARY PANE
The selection summary pane displays what you know about an object you select in the scanner.
Planet Summary
The planet summary displays information only for planets you’ve visited or scanned.
Habitability Value
Age of information
Environment Graph
Original value
Current value
Mineral Content Graph
Lighter portion is the quantity on
the surface. Left-click to see the
exact amounts.
Bright yellow indicates other objects at this location. Leftclick to scroll through their summaries. Right-click to select
Starbase in orbit.
Left-click to see
design details.
Left-click to see maximum
pop and growth next year.
Left-click to see
exact range
Best value possible applying
current terraforming technology
Darker portion projects the
quantity mined next year.
Left-click on the scale to increase
or decrease the increments
Position of diamond indicates mineral
concentration under surface:
width of graph = 100. A + indicates the
concentration exceeds the scale.
Page 64

5-18 T H E S T A R S ! S C R E E N
Fleet Summary
The more significant type of ship in the fleet. Left-click
to see other ship types. Right-click to see hull designs.
A plus sign represents a ship
type not shown.
If you scan opponents with a Robber Baron or Pick
Pocket scanner, you also see fuel and cargo levels
Left-click here to display the race
name and player number.
Page 65

PLAYING STARS!
The essence of Stars! is resource management. To win, learn what it takes to
smoothly and effectively grow and manage your empire’s industrial
infrastructure. Learn when to colonize, when to move people and other
resources so that your empire becomes stronger and more balanced with
each passing year. Learn how to make resource management more expensive
for your opponents than it is for you. When you attack, look for targets
where the cost to your opponent is greater than your investment in the
offense. (This is especially true in a solo game.)
Page 66

Page 67

6 PLANETS
Planets are the gold nuggets of the Stars! universe: everybody
wants them, and hardly anyone wants to share. ‘Green’worlds
give your people a place to grow, learn and produce. The
minerals in each planet provide the building blocks for all the
technology you create, including planetary installations such as
defenses and scanners, and starbases with stargates that act as navigational
shortcuts and mass drivers that fling minerals between systems.
When you click on a planet in the Scanner, you’re actually selecting a star
system. The planet that appears on your screen is the most desirable planet in
that system. (There may be lesser rocks in the system, too, but you won’t want
them.) If you colonize a planet, it becomes your capitol world in that system,
the local center of government and industry. If the planet is dangerous to your
people, you can mine it from orbit, and ship its valuable minerals to other
parts of your empire. If the planet is inhabited by another player, you can try
to take it away. If the owner is another human, you can also try to establish
trade relations.
No matter how you play, you need to give your people room to grow. That
growth rate will vary on any given planet, depending on the levels of gravity,
temperature, and radiation. You can create a race that is immune to one or
more of these environmental factors—a very expensive advantage. You can
also make a planet’s environment more hospitable by terraforming.
YOUR HOME WORLD AND OTHER INHABITED PLANETS
You start the game on your home world, a place with optimal environmental
conditions where you have a small but thriving population, basic industry in
the form of factories and mines, fundamental technology, and a short range,
planet-based scanner. In orbit, you have a starbase capable of building ships
and providing a small amount of planetary defense. Each player’s home
Page 68

6-2 P L A Y I N G S T A R S !
world, whether it belongs to a computer-generated AI or a human, starts out
with these same items. When you colonize another planet, you can build
these and other items as your resources and knowledge of technology allow.
All planets contain minerals. All home worlds start with the same surface
mineral content — adjusted to even out any advantages or disadvantages
provided by racial attributes. If your home planet has a serious lack of a
specific mineral on its surface then your opponents are initially faced with the
same problem.
All the information about a planet you own and the controls you use to give
orders to that planet are available in Command pane. The Selection Summary
shows the gravity, temperature and radiation levels of a planet, as well as the
rate at which your population will grow. Environmental conditions on your
home world are optimal for your species.
Abandoning a Planet
When you abandon a planet, the starbase and all installations on that planet
are destroyed automatically.
POPULATION
People, along with factories, create the resources you need to build your
empire. The more people you have, the more resources you have, and the
faster you’ll get things done.
Your maximum population on a planet is based on the planet’s Habitability
Value. When you select a planet in the Scanner its value, along with other
information, appears in the Selection Summary:
The first number is the current value. The number in
parentheses is the value after terraforming.
Resources are units
of work created by
people and
factories. They
represent the effort
involved in
performing a task or
producing an item.
To learn about the
Command pane
and other parts of
the Stars! screen,
look at chapter 2,
The Stars! Screen.
To see how many
colonists it takes to
produce one
resource per year,
use the View (Race)
menu item then
turn to page 5 of
the View Race
dialog.
The higher the percentage, the more people the planet will support. A
negative value tells you the percentage of population the planet will kill if you
colonize under the current environmental conditions. For example, a planet
Page 69

P L A N E T S 6-3
with the optimal value of 100% may fully support 1,000,000 people. A planet
with a value of 50% can support only 500,000 people. A planet with a value
of -9% will kill 0.9% of the colonists on that planet each year.
All planets with a positive value of less than 5% are treated as 5% planets in
determining the maximum supportable population.
Growth Rate
The habitability value also determines your population’s annual growth rate.
Left-click on the value to display the current growth rate, as well the total
number of people the planet will support based on current environmental
conditions. The growth rate is shown as “up to n%” because the rate slows as
the population approaches the maximum. Population growth begins to
plateau after the planet reaches 25% capacity.
Maximum Population
The maximum population on an optimal planet, for all races but two, is
1,000,000.
Hyper-Expansion races grow fast but are limited to one-half the typical
maximum population: 500,000 on an optimal world. The ingenuity of Jack-ofAll-Trades races grants them a maximum population that is 20% greater than
normal: under optimal conditions a Jack-of-All-Trades world supports up to
1,200,000 people.
Annual Growth
Rate
This rate is
calculated by
multiplying the
habitability value
by the Maximum
Colonist Growth
Rate Per Year found
on page 4 of the
View Race dialog.
For races with the
Hyper-Expansion
trait the actual
maximum colonists
growth rate is twice
that displayed.
Alternate Reality
Races and
Population
Since Alternate
Reality races live
on starbases, they
use a different
population model.
Read more about
them in chapter 22.
Races who possess the Only Basic Remote Mining trait also receive an
additional 10% increase beyond their normal limit. For example, the
maximum population for a Jack-of-All-Trades race with Only Basic Remote
Mining is 1,320,000 (under optimal conditions).
Overcrowding
The number of people between 100% and 300% population capacity work
at 50% efficiency. Any population in excess of 300% capacity can perform no
useful work whatsoever.
Deaths from overcrowding reach an annual maximum of 12% at 400%
capacity.
Page 70

6-4 P L A Y I N G S T A R S !
Killer Planets
Planets with negative habitability values kill colonists. The annual death rate
is calculated as:
Habitability Value / 10 of the colonists on the planet each year
For example, a planet with a habitability value of -10% inhabited by 2000
colonists will kill 1% or 20 colonists per year.
If you terraform the planet after colonizing, your people will begin to die until
environmental conditions become favorable (the value becomes 0% or a
positive number).
MINERALS
All planets contain three important raw minerals: ironium, boranium and
germanium. These provide the building blocks for almost everything your race
produces. Minerals exist both on and under the planet’s surface. Minerals
found on the surface can be used immediately in production. Those under the
surface must be mined to become available for use. Minerals can be
transported to other planets where they’re needed using freighters and mass
drivers. Minerals can also be created through a production-based recycling
effort called Mineral Alchemy. You also receive minerals when you initially
colonize a world, automatically scrap a colonizing vessel, and when you
scrap a ship at a planet you own.
The Selection Summary pane shows the surface mineral supply, the
concentration of minerals under the surface, and the mining rate for the
selected planet. Each mineral is represented by a colored bar. The bright
colored bar shows how much of the mineral is on the surface and ready to
use; the dark colored bar shows the amount that will be mined next year.
The diamond shows the current mineral concentration, measured from 0 to
200 units. The width of the graph is 100, with a plus sign (+) appearing
if the concentration exceeds the current scale. If you are scanning the
planet but donít own it, you see only the mineral concentration. You see
all mineral information as soon as you colonize the planet.
Claim Adjuster
Races and Negative
Planets
If your race has the
Claim Adjuster trait,
your colonists
automatically
terraform your new
planet to the best of
their abilities the
first year it is
colonized.
If your race
possesses the
Mineral Alchemy
trait, you can
transform existing
resources into
minerals four times
faster than races
without this
advantage.
You can also obtain
mineral information
from the Minerals
on Hand tile when
you are
commanding the
planet.
Left-click on a bar to
display the exact
quantity, concentration,
and mining rate for that
mineral.
Page 71

P L A N E T S 6-5
The mineral concentration on your home, or starting world never drops below
30. This world always retains this advantage, regardless of who occupies it
during the course of play.
MINES
Mines extract minerals from the planet. As you mine, you decrease the
concentration of minerals under the surface, adding them to the supply on the
surface and making them available for immediate use. You never run out of
minerals on a planet, you just decrease the concentration until it reaches 1%,
when it becomes difficult to extract more than tiny amounts from each mine
each year.
You can build mines on any planet you inhabit or use robot miners on
uninhabited planets.
FACTORIES
Factories, along with people, create resources used to build items such as
ships, mines, defenses and more factories. Resources are also required to
research new technologies. In general, any task that requires mental or
physical effort requires resources.
You do not need factories in order to build things. Factories only increase the
total number of resources you receive each year. For a typical race, you can
double the number of resources generated per year by building factories.
Think of factories as virtual colonists. Once built they produce work and
consume nothing. Nothing is wasted—factory resources not used for
production are directed into research efforts.
Factories cost 4 kT of germanium to build or, if you selected Factories Cost 1
kT Less when defining your race, factories cost 3 kT of germanium. No
minerals other than germanium are used.
BUILDING PLANETARY DEFENSES
Defenses partially protect a planet from bombs, incoming mass
packets and invasion. Unless you are playing an Alternate Reality
race, you should always build defenses, especially in a single
player game. AIs love to bomb planets. While you can’t build a
perfect planetary defense system you can significantly reduce the number of
bombs, mass packets and invading colonists that make it to the surface.
Learn more about
Mining, p 13-1
Auto-build, p 7-9
Flinging Mass
Packets, p 6-12
Colonizing, p 12-1
Scrapping Fleets,
p 10-10
The Minerals on
Hand tile shows
you the current
number of mines
and factories
operating on a
planet, and the
maximum number
of mines and
factories the current
population can
operate.
Alternate Reality
Races and Factories
Alternate Reality
races cannot build
factories or any
other planetary
installation.
To learn how many
resources a factory
will produce for
your race, and the
cost of building a
factory, select the
View (Race) menu
item, and turn to
page 5 of the View
Race dialog.
Page 72

6-6 P L A Y I N G S T A R S !
Whether you build defenses in a multi-player game depends on how much
you can trust other players to leave your worlds in peace (there’s room
enough for all in the Stars! universe—isn’t there?)
While you can build as many defenses as you wish, you can only operate as
many as your population has resources to handle. When commanding a
planet, look at the Status tile to see both the current and maximum number of
defenses, the type of defenses deployed and the percentage of bombs and
invading colonists that can be stopped.
As a game progresses, you can increase the number of defenses and upgrade
the technology (and the efficiency) of existing defenses:
Adding defenses increases the number of existing defenses of the type you’re
currently employing. For example, if you’re using Missile Batteries, then
adding Defenses to the production queue causes more Missile Batteries to be
built. This increases the percentage of coverage.
Upgrading defenses happens automatically. Whenever you learn new
technology that applies to defense, all defenses on all your planets upgrade
automatically and at no cost.
PLANET-BASED SCANNERS
Alternate Reality
Races and
Planetary Defenses
Alternate Reality
races cannot build
planetary defenses
or any other
planetary
installation.
To learn about
defense technology,
open the
Technology
Browser (press F2),
choose Planetary
from the drop-down
menu, then click
Next until the
Browser displays
defense technology.
Each type of
defense is described
with a graph
summarizing its
effectiveness.
For more
information on how
planetary defenses
help protect you
from mineral
packet attacks read
chapter 25, The
Guts of Mass
Drivers.
A scanner is the inhabited planet’s radar, giving you information
about all objects within scanner range. There are several types of
planet-based scanners, with different ranges for detecting fleets,
mass packets, mine fields and wormholes, and different ranges for
detecting the environment and mineral content of other planets. You start the
game with a basic scanner on your home planet.
The cost of building a scanner is fixed. Once you build a scanner, it will
automatically be upgraded when your research allows you to build a better
scanner.
Page 73

A planet’s scanner type and range appear in the Status tile.
P L A N E T S 6-7
Planet-based scanners are useful for detecting opponent’s fleets that pass near
or enter your empire. Only fleets that are cloaked have a chance of escaping
detection. You can reduce the chances of fleets sneaking past if you place
scanners on all your planets. When you select an enemy fleet, the scanner
will also show the estimated path of the fleet.
To view the area covered by your scanners, select the Scanner pane’s Radar
overlay. Your basic radar coverage appears in red. Planet-penetrating radar
coverage appears in yellow. You can also adjust the displayed effective
coverage to different percentages, showing your vulnerability to cloaked
fleets. Changing the displayed coverage does not actually decrease the actual
effectiveness of your scanners. It merely shows you how effective your
scanners would be versus other player’s cloaks. For example, if you have
reason to believe that your enemy is using 80% cloaked ships it would be
informative to set your displayed scanner coverage to 20%. The areas not in
red are vulnerable. Knowing that you have a hole in your coverage is the first
step in filling it.
STARBASES
A starbase can be an orbiting shipyard, fuel depot, defensive
station, and a platform for a stargate and mass drivers. Before a
planet can build ships, it must have a starbase with a space
dock. Starbases stand in the way of attacks against the planet—
your fleet must destroy the starbase before bombing can
commence. Starbases with weapons always strike back and can initiate
attacks against enemies in orbit.
A starbase can also carry cloaks, and thus can partially cloak itself from
remote scans. Cloaking a starbase does not cloak the planet.
Alternate Reality
Races and
Planetary Scanners
Alternate Reality
races cannot build
planetary
installations. Turn to
chapter 22 to read
more about how
these orbit-loving
nuts perform
scanning.
Learn more about
Scanning and
Cloaking, p 17-1
The Guts of
Cloaking, p 24-1
You can find details
on a specific
starbase hull design
in the Technology
Browser. Just press
F2, click on the
dropdown list and
choose the Starbase
Hulls category.
Page 74

6-8 P L A Y I N G S T A R S !
Your starbase is your primary defense against bombing and invasion by enemy
fleets. Your planet can not be bombed or invaded as long as your starbase still
exists. Defend it well.
In the Scanner pane, a starbase appears as a yellow dot in orbit if a spacedock
is present or blue dot, if no space dock is present. The Starbase tile describes
a starbase belonging to the planet you’re commanding.
Building a Starbase
Build a starbase by adding it to the production queue. Like a ship, cost
depends on the type and number of items attached to the hull. You’ll find that
a starbase hull is very expensive, so you’ll need to plan how to afford it. You’ll
also find that hull parts attached to a starbase are 50% cheaper than the same
parts attached to ship hulls, helping balance out the cost and making the
replacement or addition of components easier to handle.
A planet can have only one starbase at a time. An existing starbase can be
upgraded or replaced, with credit given for the recycled materials.
You’ll have access to additional starbase hulls if you have the Improved
Starbases trait.
Starbase Design
Alternate Reality
Races and
Starbases
Alternate Reality
races live in orbit
on starbases. This
means that the
starbase also
determines a
planet’s maximum
population, and
gives Alternate
Reality races greater
incentive to protect
their orbiting
homes. Read more
about these unusual
Stars! denizens in
chapter 22.
There are five starbase hulls, with slots for weapons, armor and other items:
Orbital Fort — No ship building or refueling capacity. These don’t count as
starbases in the score.
Space Dock — Ship building capacity: 200kT or smaller ships. This hull
requires the Improved Starbases trait.
Space Station — Unlimited ship building capacity.
Ultra Station — Unlimited ship building capacity, with more slots for
weapons, shields and other components. This hull requires the Improved
Starbases trait.
Death Star – Top of the line orbital habitat for Alternate Reality races.
Page 75

Upgrading a Starbase
You can upgrade a starbase by changing the hull or by adding or changing
items in the hull slots. You receive full credit for the existing installation,
paying only the difference between the old and new hulls. The upgrade
appears in the production inventory, ready for you to add to the production
queue when you wish.
Here’s how the cost is determined:
If the hull changes:
• You receive a 50% credit for minerals and resources used in the original
starbase.
If the hull does not change:
• Slots where the components don’t change are free.
• Slots where only the count of the component increases cost only the
component price multiplied by the number of additional items.
• Slots where the component type changes to a similar component are
discounted in cost; the discount based on the closeness of the part types.
P L A N E T S 6-9
• Slots where the component type changes dramatically cost the full price
of the new component. You will receive some minerals back if the old
components are recycled.
Sorting Starbases for Easy Upgrades
1. Press F3 to open the Planet Summary Report, then maximize the report
window.
2. Click on the top of the Starbase column and select the Starbase sort order.
3. Find the first planet with a starbase design you want to upgrade.
4. Click on the Production column for that planet. The Production dialog
opens, showing the queue for that planet.
5. In the Production dialog, double click on the new design listed in the
production inventory (left-hand list).
6. Click on Next. Notice that the Next and Prev buttons follow the sort
order of the report.
Learn about
Ship and Starbase
Design, p 9-1
Adding Items to the
Production Queue,
p 7-2
Page 76

6-10 P L A Y I N G S T A R S !
7. Keep adding upgrades for each planet until you’ve upgraded all your
starbases.
8. Close the Production dialog and the report.
STARGATES
Stargates are starbase installations that provide cargo-less ships
with fuel-free, single year transport between your planets. This is
the optimum way to move scouts and warships when you’re in a
hurry, or any other ship that isn’t carrying anything but Fuel.
In the Scanner pane, the stargate appears as a green dot orbiting the planet.
Interstellar
Travelers and
Stargates
For Interstellar
Traveler races,
starbases with
stargates scan any
planet in range that
also has a stargate.
Interstellar Traveler
stargates are also
able to move ships
full of cargo.
Building a Stargate
A stargate occupies an Orbital slot in a starbase hull. You can add a stargate
by upgrading an existing starbase hull or building a new hull.
To upgrade a hull and add the gate:
1. Choose the Commands (Ship Design) menu item, opening the Ship and
Starbase Designer.
2. Under Design, click on Starbase.
3. Select the design you wish to upgrade from the dropdown.
4. Click on Copy Selected Design. The dialog changes, offering the design
and a component list.
5. Select a hull picture (using the arrows under the picture) and type in a
new name, or use the defaults shown in the dialog.
6. Drag the stargate from the component list to an Orbital slot in the design.
Subtract and add any other components as you wish.
Hyper Expansion
Races with the
Hyper Expansion
trait cannot build
stargates.
All stargates require
research into
Construction and
Propulsion. The
Orbital section of
the Technology
Browser describes
capabilities for each
stargate.
Learn about
Ship and Starbase
Design, p 9-1
Adding Items to the
Production Queue,
p 7-2
Navigating Using
Stargates, p 11-3
7. Click on OK. Then click on Done to close the dialog.
8. Click on Change in the Production tile, and add the new starbase to the
planet’s Production queue.
Page 77

MASS DRIVER BASICS
Mass drivers provide a fuel-free method of transporting mineral
cargo packets between planets, and, secondarily, can act as an
effective long range weapon. Mineral packets are bundles of
ironium, germanium and boranium. Mass drivers fling mineral
packets at high rates of acceleration. This prevents you from flinging Fuel,
which would explode, or colonists, who would, well, also explode.
In the Scanner pane, a mass driver appears as a purple dot orbiting the planet.
Building a Mass Driver
A mass driver occupies the Orbital slot in a starbase hull. You’ll have to
research Energy—the requirement for each type of driver is listed in the
Orbital section of the Technology Browser.
Once you complete your research, upgrade your starbase hull design to hold
the driver (or design a new starbase hull that includes the driver). To upgrade
a hull and add the driver:
1. Choose the Commands (Ship Design...) menu item, opening the Ship and
Starbase Designer.
P L A N E T S 6-11
2. Under Design, click on Starbase.
3. Select the design you wish to upgrade from the dropdown.
4. Click on Copy Selected Design. The dialog changes, offering the design
and a component list.
5. Select a hull picture and type in a new name, or use the defaults shown
in the dialog.
6. Drag the driver from the component list to an Orbital slot in the design.
Subtract and add any other components as you wish.
7. Click on OK. Then click on Done to close the dialog.
8. Click on Change in the Production tile, and add the new starbase to the
planet’s Production queue.
Learn about
Adding Items to the
Queue, p 12-2
Page 78

6-12 P L A Y I N G S T A R S !
Building and Flinging Packets
Mineral packets are built and flung as a function of the Production queue. The
Production inventory will list a packet for each mineral and a mixed packet
that contains all three minerals. When you click on a packet type in the
inventory the numbers below the inventory show how many kT of each
mineral the packet contains.
Once a packet is built, the driver automatically flings them at the destination
you’ve set. If you don’t set a destination, the packet disintegrates.
¯ Target a mass driver by clicking on Set Dest in the Starbase tile, then
clicking on the destination in the Scanner.
The Scanner pane
shows mass packets
within your scanner
ranges, regardless
of who the packets
belong to (unless
you are a Packet
Physics race).
Interstellar Traveler
Races
Interstellar Traveler
mass drivers are
only half as
effective at catching
minerals as their
rating, are less
efficient at flinging
minerals, and all
mineral packets
flung decay,
regardless of speed.
For the packet to arrive safely, the target must also have a driver of equal or
greater capacity. If the planet has a lesser mass driver, or no driver at all, the
packet destroys colonists and installations on the planet surface.
The gauge in the Starbase tile allows you to control the speed at which
packets are flung. You can purposefully fling packets at a slower speed if your
receiving planet isn’t equipped with an accelerator that’s high tech enough to
catch the packet at full speed.
You can also target
a mass driver by
SHIFT-clicking on
the destination.
Page 79

You may fling packets at speeds up to three Warp levels above the rated
speed. Packets flung above the rated speed become unstable, decaying at
10% per year for one warp level above the rated speed, 20% for two warp
levels, and 50% for three warp levels. Packets decay in the year they are
launched and in the year they arrive at a planet proportional to the distance
they travel in those years.
During a packet’s first year out, it travels only half the normal distance, then
the normal distance in any following years of travel. Since production
happens all year long, the packets could be launched at any point. Stars!
simplifies this by averaging it out to a half-year’s travel.
Packets as Scanners
For Packet Physics races the mineral packets have the added feature of
behaving like a planet-penetrating scanner. The radius of the scan is equal to
the square of the packet’s warp speed.
Packets Perform Terraforming
P L A N E T S 6-13
Planet-penetrating
Scanners
These scanners can
detect fleets in orbit
around a planet.
They also can tell
you planetary stats
from a distance.
Packet Physics mineral packets only do 1/3 the normal damage when hitting a
planet, but have a 50% chance per 100kT of minerals to terraform the planet’s
environment toward the player’s ideal value.
You Can’t Attack Packets
You can’t attack mineral packets. You can only intercept them and transfer
their contents to your fleet, as described below in Stealing Mineral Packets.
Stealing Mineral Packets
If you can intercept a mineral packet in flight you can steal from it. When a
packet is at the same location as your selected fleet, it appears in the Other
Fleets Here tile. Use the Cargo button and the Cargo Transfer dialog that
appears to transfer minerals from the packet to your fleet.
Building Two Mass Drivers on a Starbase
You can build up to two identical mass drivers on the same starbase
(assuming you haven’t used an Orbital slot with a stargate already). This has
two advantages: 1) you can catch incoming packets at one warp speed greater
Packet Physics
For Packet Physics
races, mineral
packet decay rates
are half the normal
level.
Page 80

6-14 P L A Y I N G S T A R S !
than the driver’s nominal rating; and 2) packets flung at a speed higher than
the recommended maximum from dual drive starbases decay as if they were
flung at one warp speed lower.
Packets as Weapons
Packets flung at planets with a lesser mass driver or no mass driver damage
the planet and kill inhabitants. A warp 13 mineral packet is about as close as
Stars! comes to a doomsday weapon.
TERRAFORMING
Terraforming is the ability to change a planet’s environment to make it more
habitable for your race. If you are immune to environmental conditions, you
don’t need to terraform.
You won’t know if you need to terraform or can terraform a planet unless you
can scan it, gathering information about the planet’s environment. To see all
terraformable planets you’ve found use the Scanner pane’s Planet Value view.
You possess the technology to terraform Yellow planets, making them
habitable. Most green planets can also be terraformed to improve them. The
larger the yellow dot, the better the planet will be once you terraform it.
Click on a planet in the Scanner pane, then look in the Selection Summary
pane. The habitability value shows the current value of the planet followed in
parentheses by the value the planet would be after terraforming (given the
limits of your current technology).
Read more about
Mineral Packet
Bombardment,
p 15-5
The Guts of Mass
Drivers, p 25-1
To see your race’s
habitability range,
choose the View
(Race) menu item,
then turn to page 4
of the View Race
dialog.
The environment graph shows how much you can modify the planet’s
environment, given your level of terraforming technology. The following
graph shows that the player possesses Gravity and Radiation terraforming
technology, and that Radiation must be terraformed to make the planet
habitable. Gravity is currently well within this race’s habitable range, and may
be terraformed to the optimum level.
Page 81

Habitable range
P L A N E T S 6-15
Left-click to see
the exact range
Original Current value
Best value possible applying
current terraforming technology
You don’t have to worry about the order in which the different factors are
terraformed. The terraforming task that appears in the production dialog
always works on the factor that is the furthest out of range. If you can improve
Gravity by 3%, Temperature by 5% and Radiation by 2% the Production
dialog will let you add 10% Terraforming to the queue. Each 1% Terraforming
task executed will modify one of the environmental factors by 1%, which will
improve the overall habitability value by at least 1% and probably more.
Find out which factor should be terraformed to maximize the planet’s
habitability value by clicking in the environment graph of the Summary pane.
A pop-up will tell you the potential increase in habitability value if you
modify that factor to the limits of your current level of technology.
There are two basic ways to terraform a planet. The first and easiest is to add
auto-build terraforming tasks to the production queue. Min and Max
Terraforming are auto-build tasks which remain in the queue and operate only
when both necessary and possible. These can be added manually or using a
production template. The second method is to manually add the Terraform
Environment task to the production queue.
Page 82

6-16 P L A Y I N G S T A R S !
Terraforming tasks can use only the terraforming technology you possess. So,
if you have only Radiation and Temperature Terraforming, you can modify
only radiation and temperature levels, but not gravity. The terraforming will
automatically act first on the environmental attribute which when modified
will most improve the planet’s habitability.
Colonists Die if Minimum Terraforming Lasts More than One Year
If it takes longer than one year after colonizing to bring the planet to a
habitability value of 0% or better, your colonists will start to die. If you can
bring it within range the first year, they’ll be fine. This is the best reason for
creating a production template that contains auto-build terraforming tasks. An
Auto-build task already in place happens the same year as colonization.
Terraforming added manually must wait until the following year.
Terraforming with Auto-build Tasks
1. Bring the planet you wish to terraform under command.
2. Click on Change in the Production tile. The Production dialog opens.
3. In the production inventory, click on either the Min Terraform or Max
Terraform auto-build tasks. Then click on Add to raise the limit to which
the task will terraform.
Minimal (Min) terraforming changes only those environmental factors that
have a negative value and that you have the technology to change, up to the
percentage you specify in the task. Terraforming will continue only until the
habitability value reaches zero. To go beyond the point of minimal
terraforming, you must manually add Terraform Environment or the Max
Terraforming auto-build task. Minimal Terraforming will activate and terraform
only when there are resources available and not doing so would cause people
to die on the planet (from negative environment values or overcrowding).
Claim Adjusters
Claim Adjusters
automatically
terraform a planet
as soon as they
land.
Page 83

Max Terraforming changes any environmental attributes that you have the
technology to change, up to the percentage you specify in the task.
As each terraforming task completes, an environmental factor is improved by
1%.
Terraforming as a Default Action
P L A N E T S 6-17
You implement default terraforming by defining a default production template
that includes auto-build terraforming tasks. This is done through the
production dialog.
1. Make sure the auto-build terraforming items in the production queue are
arranged in the sequence you want them to appear in the template.
2. Make sure the Contribute Only Leftover Resources to Research checkbox
is set the way you want it to be reflected in the template. An unchecked
box specifies Contribute Resources to Research before spending resources
for production. A checked box indicates Don’t Contribute to Research
before spending resources on production.
3. Right-click on the blue diamond next to Apply or Define... and select
<Customize> from the pop-up menu.
4. Select <Default> in the Customize Production Template dialog.
Auto-build items do
not need to be
listed consecutively
in the production
queue nor do they
need to appear at
the top of the
queue to be
produced.
Page 84

6-18 P L A Y I N G S T A R S !
5. Click on Import to copy in the auto-build items from the production
queue, then OK both the Customize… and Production dialogs.
That’s it. The default production orders will take affect on every planet taken
over or newly colonized. It does not affect any planets where colonists have
already landed.
Adding Terraforming to the Queue Manually
1. Double-click on the planet you wish to terraform, placing it in the
Command pane.
2. Click on Change in the Production tile.
3. In the production inventory, click on the Terraform Environment task.
Then click on Add to add the desired number of this task to perform.
Each Terraform Environment task you add to the production queue improves
an environment factor by 1%. The number of tasks you may add to the queue
is limited by the current level of your terraforming technology. When you
have successfully completed all the tasks you can add to the queue, the
Terraform Environment task disappears from the production inventory. It will
reappear once you achieve a higher level of technology that allows you to
terraform further.
Page 85

Types of Terraforming Technology
Each of a planet’s three environmental factors has a matching type of
terraforming technology: Temperature Terraforming, Gravity Terraforming, and
Radiation Terraforming. Each requires a different combination of research:
P L A N E T S 6-19
• Temperature terraforming requires research into Biotechnology and
Energy.
• Gravity terraforming requires research into Biotechnology and Propulsion.
• Radiation terraforming requires research into Biotechnology and
Weapons.
Each technology allows you to improve a specific factor a minimum of 3%
from its initial value and a maximum (without Total Terraforming) of 15%.
The percentage of improvement does not always indicate how much the
value of the planet will increase. Often only one or two environmental factors
will be negative, while the remaining factors look pretty attractive. In this case
improving the negative factors can improve the planet’s overall value to a
much higher percentage than that indicated by the technology.
As you upgrade your terraforming technology, you’ll see the amount you can
improve the planet increase. You may also see that some planets that were
previously not terraformable (red in Planet Value view) become terraformable
(yellow in Planet Value view).
To learn more about the individual types of terraforming technology and their
research requirements, open the Technology Browser (Press F2) and select
Terraforming from the dropdown list.
The Total
Terraforming trait
requires that you
research only
Biotechnology to
learn terraforming
technology
Total Terraforming
Total Terraforming is a race trait, not a type of technology. Races
with Total Terraforming begin the game with the ability to
improve temperature, gravity and radiation levels up to 3%.
Terraforming requires 30% less resources and you can research
terraforming technologies that improve factors up to 30% instead
Page 86

6-20 P L A Y I N G S T A R S !
of just 15% normally. Terraforming requires research into only Biotechnology,
instead of Biotechnology and three different additional fields.
Claim Adjusters and Automatic Terraforming of Colonies
Races based on the Claim Adjuster trait automatically terraform new colonies
upon landing. This terraforming action is both instantaneous and temporary—
as soon as the planet is deserted or taken over, the environmental conditions
revert to their original values.
As the race learns more about terraforming all its planets are automatically
and instantaneously terraformed to the limits of the technology.
Claim Adjusters and Terraforming Other Players’ Planets from Orbit
Races based on the Claim Adjuster trait can terraform other player’s planets
from orbit. This creates unique opportunities for diplomacy or war. If the
owner is your Friend, you automatically perform positive terraforming
(adjusting planetary conditions toward the inhabitants’ optimal conditions). If
the owner is your Enemy, you perform negative terraforming.
Terraforming from orbit requires a fleet outfitted with Orbital Adjusters. These
are described in the Mining Robots section of the Technology Browser. Every
race with the Claim Adjuster trait starts out with one ship outfitted with
Orbital Adjusters.
Terraforming from orbit is a great vehicle for diplomacy: in return for other
technology, an alliance, or just a plain thank you, you can help your friends
make their planets a better place to live. Only offer this assistance to friends
who have lesser terraforming capabilities than yourself. Terraforming is not
additive—you can’t combine your orbital terraforming abilities with those of
the inhabitants to super terraform the planet. The planet will only be
terraformed to the limits of whoever possesses the superior technology. For
example, if the inhabitants have 3% terraforming and you possess 5%
terraforming, the planet can be improved up to 5% from its original
conditions (not exceeding optimal conditions for the inhabitants).
To determine if
your race has Total
Terraforming,
choose the View
(Race) menu item
then turn to page 3
of the View Race
dialog.
Orbital Adjuster
Specify Friends,
Enemies and
Neutrals using the
Player Relations
dialog (press F7).
Terraforming from orbit can also be used as a weapon: just orbit the planet
and start to terraform it under your opponent’s feet. This allows you to prepare
more favorable conditions for a planetary invasion. You must destroy any
existing starbase before you can launch this type of attack. Depending on
your opponent’s level of terraforming technology, using terraforming as an
Page 87

P L A N E T S 6-21
attack could turn into a shoving match if they begin terraforming operations of
their own.
Terraforming from orbit happens automatically as soon as your fleet arrives.
Just set the destination planet as the fleet waypoint. No waypoint task is
necessary.
PLANET REPORTS
The Planet Report displays the same information displayed by the Command
pane, but for all your planets. You can use the report to change the order in
which planets appear in the Planet tile and the Production dialog according to
any category in the report.
A planet report contains the following information:
Planet name – the color of the dot, if present, indicates the type of starbase,
and whether a mass driver and stargate are present. In the report, the name of
the planet currently in the Command pane is highlighted.
Retro Bomb
Claim Adjusters also
can gain the Retro
bomb, a type of
terraforming
weapon used to
return the planet to
its original
conditions.
Yellow dot — starbase has a space dock (can build ships)
Blue dot — starbase without a space dock
Purple dot — mass driver
green dot — stargate
Starbase – Click to display the starbase design.
Population – Current population. Click to display details.
Cap – Percentage of planetary population capacity.
Value – Shows the maximum population percentage relative to maximum
growth under optimal conditions (100%). A second number is the value after
terraforming using your current technology. Click to display details.
Page 88

6-22 P L A Y I N G S T A R S !
Production – the item at the top that planet’s production queue. Click to
access the queue.
Mine – Number of mines in existence. Click for details.
Fact – Number of factories in existence. Click for details.
Defense – Type of planetary defenses.
Minerals – Number in kT of each type of Mineral on the planet surface. Click
on each number for details about that mineral.
Mining Rate – Mining rate of each mineral in kT/year. Click for details.
Min Conc – Mineral concentration for each type of mineral. Click for details.
Resources – Resources available for use by the planet, followed by total
resources generated by the planet. Click for details, including the number of
resources dedicated to research.
Driver Dest – Destination of mineral packets flung from that mass driver.
Routing Dest – Destination planet for ships routed from production.
Learn more about
Changing the Order
of Planets in the
Production dialog,
p 7-10
Sorting Starbases for
Easy Upgrades, p 6-9
Page 89

7 PRODUCTION
In Stars! you produce ships, mines, factories and defenses, and assign tasks,
such as terraforming. The Production dialog lists all the things you can build
or tasks you can perform on a specific planet, commands that allow you to
add these items to the queue, information showing how much each item will
cost and when or if it will be completed given your available resources.
HOW PRODUCTION WORKS
You have one production queue per planet. The queue is essentially a work
list. Items are produced in the order shown in the queue, from top to bottom.
Items waiting production
Resources are units
of work created by
people and
factories. They
represent the effort
required to perform
a task or produce
an item.
Minerals and resources required to build
the selected item in the specified quantity
Completion status of selected item
You can add, delete or move items at any time, anywhere in the queue. The
percentage complete is shown for the selected item. If you add an item to the
top of the queue in front of something that is partially complete, your people
will not work to complete the original item until the new item you placed in
the queue is complete or has been deleted. Production of items that require
minerals is halted if the planet runs out of minerals. Auto-build items that
require only resources will continue to be produced.
Page 90

7-2 P L A Y I N G S T A R S !
The production inventory lists all the things you know how to build or tasks
you can currently perform on that planet.
Inventory of everything the planet
can build. Like items are displayed
in the same color.
Amount of each mineral and
number of resources required to
produce one of whatever is
selected in the inventory.
Unique Items
When a planet can only use one of an item, such as a planet-based scanner
or starbase, the item appears only once in the inventory. When this kind of
item is added to the queue, it disappears from the inventory.
Upgrades of Existing Items
Upgrades of existing items, such as stargates and starbase hulls, will replace
any older versions in the inventory list. When you upgrade a item, it is
labeled in the inventory as an upgrade. Since upgrades enhance rather than
replace an item, they only require enough minerals to create the
enhancements.
ADDING AN ITEM TO THE PRODUCTION QUEUE
You can add an item at any time to any spot in the production queue. The
procedure is slightly different depending on whether you want to do the
following:
Add an Item to the Top of the Queue
1. Click on — Top of the Queue —.
2. Click on an item in the inventory, then click on Add or double-click on
the item in the inventory list.
Page 91

P R O D U C T I O N 7-3
Add an Item to the Middle of the Queue
1. Click on the item in the queue under which you want the new item to
appear.
2. Click on an item in the inventory list, then click the Add button, or
double click on the item in the inventory list.
Add an Item to the Bottom of the Queue
¯ Click on the last item in the queue, then on an item in the inventory list.
Then click the Add button, or double click on the item in the inventory
list.
Move an Item in the Queue
1. Click on the item in the queue that you want to move.
2. Click on the Item Up or Item Down buttons.
REMOVING AN ITEM FROM THE PRODUCTION QUEUE
Do one of the following:
¯ Select an item in the queue, then click the Remove button or double-click
on the item in the queue.
¯ Keep clicking the Remove button or double-clicking on the item name to
remove additional units.
PRODUCTION TEMPLATES
A production template is a sequence of auto-build items imported from a
production queue and saved for later use. Use production templates to
automate auto-build production strategies you plan to use more than once.
The default production template is automatically applied on any planet taken
over or newly colonized by your people. The other three templates can be
manually applied to any planet’s production queue. Templates are saved for
the duration of the game but may be edited at any time.
Adding Large
orders
SHIFT-Add adds up
to 10. CTRL-Add
adds up to 100.
Pressing
CTRL+SHIFT when
clicking on the Add
button will add as
many of that item
as possible. This
also works if you
press CTRL+SHIFT
and double click on
the item in the
inventory list. These
keys behave the
same when used
with the Remove
button.
Speedy Removal
SHIFT-Remove
removes up to 10.
CTRL-Remove
removes up to 100.
Pressing
CTRL+SHIFT when
clicking on the
Remove button will
remove as many of
that item as
possible. This also
works if you press
CTRL+SHIFT and
double click on the
item in the queue.
These keys behave
the same when
used with the Add
button.
Page 92

7-4 P L A Y I N G S T A R S !
You apply templates by simply selecting the template name instead of
manually adding the items to the production queue. When you apply a
template, all auto-build items currently in the queue are replaced with the list
of items in the template.
Production Template Strategy
To help illustrate how production templates are useful, here’s an example of a
useful default template for new colonies:
Minimum Terraform Up to 10%
Factories (Auto Build) Up to 10
Mines (Auto Build) Up to 10
Defenses (Auto Build) Up to 2
Factories (Auto Build) Up to 25
Mines (Auto Build) Up to 25
Maximum Terraform Up to 10%
Defenses (Auto Build) Up to 5
Minimum Terraform Up to 10%
The planet will work on terraforming first if it is possible and people might die
otherwise. This handles fledgling negative worlds, overcrowding and disasters.
Factories (AB) Up to 10 / Mines (AB) Up to 10
Page 93

P R O D U C T I O N 7-5
You want constant progress on improving the planet’s productivity. This is
what fledgling colonies spend most of their time doing.
Defenses (AB) Up to 2
If the planet is doing well enough to complete all those mines and factories
you can afford to work on defenses a bit to keep from falling way behind.
Fledgling colonies don’t make it this far.
Factories (AB) Up to 25 / Mines (AB) Up to 25
At this point we want to ensure the planet has the maximum number of mines
and factories. Only mature planets will reach this point.
Maximum Terraform Up to 10%
Push a mature planet to perfection. The mines and factories are probably
maximized for the current population so, if possible, increase the maximum
population and growth rate.
Defenses (AB) Up to 5
Add defenses if the colony has the maximum number of mines and factories
possible for the current population.
Contribute only Leftover Resources
While the colony is fledgling it is a good idea to have “Contribute only
leftover resources to research” checked. When the colony reaches the point
were the defenses are being auto-built you can deselect the “Contribute only
…” option.
Creating a Template
1. Make sure the auto-build items in the queue are arranged in the same
order in which they should appear in the template.
2. Make sure the Contribute only Leftover Resources to Research checkbox
is set the way you want it to be reflected in the template.
Auto-build items do
not need to be
consecutively listed
nor do they need to
appear at the top of
the list to work.
Page 94

7-6 P L A Y I N G S T A R S !
When Contribute Only Leftover... is checked the custom template will
include the label Don’t Contribute to Research (until production is
complete). Otherwise the template reads Contribute to Research (before
production begins).
3. Right-click on the blue diamond and select <Customize>.
4. Select default or one of the three other template choices.
5. Click on Import .
6. Type in a name for the template and OK the name dialog.
7. OK the Template dialog. The template is now ready to apply. If you
created a default template, it will be applied automatically whenever you
establish a new colony.
Manually Applying a Template
Right-click on the blue diamond and select a template to apply to the current
production queue. The auto-build items in the template are applied
underneath the last item currently in the queue.
Page 95

Editing a Template
1. Repeat steps 1 & 2 above.
2. Right-click on the blue diamond and select <customize>.
3. Select the template to be edited.
4. Click on Import.
5. Type in a new name for the template if you wish and OK the name
dialog.
6. Click on OK. The edited template is now ready to apply.
Renaming or Deleting a Template
P R O D U C T I O N 7-7
1. In the Production dialog, right-click on the blue diamond and select
<Customize>.
2. Select one of the three non-default templates. Click on Delete to erase the
template contents and it’s name or click on Rename and type in a new
name.
CLEARING THE PRODUCTION QUEUE
¯ To remove all items from the production queue click on the Clear button
in the Production dialog or the Production tile.
If the item is removed from the queue before completion, resources and
minerals already spent on the item are lost.
UNBLOCKING A PRODUCTION QUEUE
The default
template cannot be
renamed. To clear
the contents of the
existing default
template you must
import an empty
production queue.
Page 96

7-8 P L A Y I N G S T A R S !
If your planet’s mineral concentration runs so low that the time to completion
exceeds 100 years, the item name turns red. This means it will practically
never be completed unless you do something about it. You have two choices:
transport minerals from other planets or use mineral alchemy (or use a
combination of the two).
Transporting Minerals
To transport minerals, set up freighter waypoints to transport minerals from
your remote miners or mineral-rich planets to your planet with the blocked
production queue. If you have a mass driver on the needy planet and the
mineral-rich planet, you can also fling mineral packets between planets
without using ships.
Mineral Alchemy
Mineral alchemy transmutes resources into minerals (sort of your own
Philosopher’s Stone). If you can’t complete an item in the queue because
you’ve run low on one or more minerals, place mineral alchemy in the queue
ahead of the item you’re trying to build. Each unit of mineral alchemy will
turn a mere 100 of your resources (25 if you have the Mineral Alchemy trait)
into 1 kT of each of the three minerals. This is a good strategy for unblocking
queues on a planet where you have a large population and can quickly
replace the resources used by alchemy.
Add as many mineral alchemy units as you need to finish the item stuck in
the queue. Like other items in a queue, the color of each Mineral Alchemy
task will tell you how long it will take for the process to complete. If you have
a large number of resources dedicated to production, you can create a large
amount of minerals fairly quickly.
Mineral alchemy is one of the items available for auto-building. Consider
adding it to your default or a custom production template, if it isn’t already
there. If auto-alchemy is placed in front of an item, it will be used only if you
have a mineral shortage. If it is the only item in the queue, it will convert
resources into minerals until you remove it or place another item immediately
following.
Page 97

P R O D U C T I O N 7-9
ADDING AUTO-BUILD ITEMS TO THE QUEUE
Auto-build items are always in italic, but appear differently in the production
inventory and queue.
When they’re in the inventory, they are labeled as Auto-build. When you add
them to the queue, they are labeled <Item> up to <number>; for example,
Factories Up to 50. The latter number indicates that the queue will attempt to
produce the stated number of that item every year.
Auto-build Mineral Alchemy is the exception, displaying as Mineral Alchemy
as needed. If you insert it in front of an item in the queue you want to perform
as much Alchemy as possible to maximize the production rate for that item. If
you already have enough minerals, Mineral Alchemy isn’t needed and doesn’t
happen. It’s a great insurance policy that always does the right thing. If
Alchemy is the last item in the queue, it means to spend all remaining
resources on Mineral Alchemy.
Auto-build items can be used to create a default queue for newly colonized
worlds, or for items you wish to produce on any world whenever extra
resources are available for production, or when the queue is empty of
anything but auto build items. For example, early in the game, it’s useful to
continuously build mines and factories. It’s always useful to auto-terraform
when conditions are less than perfect and you have the means.
Like any production item, auto build items can be inserted anywhere in the
queue. An auto build item stays in the queue until you remove it. This means
your production queue will annually attempt to build these items when
possible. You can always place other items ahead of auto-build items, or
rearrange the items in the queue. Auto build items that cannot be built are
skipped.
Page 98

7-10 P L A Y I N G S T A R S !
There are, however, differences between the behavior of auto-build items and
others in the queue:
• Auto-build items do not block the queue. If they cannot be performed,
they are skipped over.
• Auto-build items are never automatically removed from the queue. They
remain there until manually removed and activate only when necessary
and possible.
• You never make progress on auto-build items. When work is done it is
seen as a partially completed normal build item in the queue.
Auto-build items include Mines, Factories, Defenses, Mineral Alchemy,
Terraforming, and auto-building and flinging Mineral Packets (if you have a
mass driver).
CHANGING THE ORDER OF PLANETS IN THE PRODUCTION DIALOG
You can use the Planet report to change the order in which planets appear in
the production dialog. This allows you to easily find the planets that may
need upgrades of a specific type (such as starbases) and add the upgrades to
the production queue.
1. Press F3 to open the Planet report.
2. Click at the head of any column, choosing a sort that appeals to you. You
may want to sort by starbase, by production, mines, factories—anything
you wish.
3. Click in on the Production column to open the queue for that planet.
4. Click on Next, paging through the queues for each planet. Notice they
appear in the order you specified in the report.
Changing the sort
order of planets
also changes the
order in which they
appear when you
click on Next and
Prev in the Planet
tile.
Page 99

P R O D U C T I O N 7-11
CONDITIONS THAT AFFECT PRODUCTION
Page 5 of the View Race dialog tells you if you excel at building and
operating factories and mines, as well as how many resources N colonists will
generate each year (not counting the resources created by factories). The more
each of the following conditions are true, the more your race will excel at
production:
• One resource is generated each year for every seven colonists.
• Factories produce 15 resources per year.
• Every factory requires five resources (and the usual amount of minerals) to
build.
• Colonists may operate 25 factories.
• Factories cost one mineral less to build.
Of course, the mining rate also affects production. The closer your race is to
meeting one or more of the following conditions, the better:
• Mines produce 25 kT of minerals per year.
• Every mine requires two resources to build.
• Every 10,000 colonists can operate 25 mines.
How Research Makes Production Cheaper
Production of a particular item becomes cheaper when all research
requirements are surpassed by one level. For example, an engine requiring
research level 3 Propulsion and level 1 Energy becomes 4% cheaper when
you attain level 4 Propulsion and level 2 Energy, 16% cheaper with level 7
Propulsion, level 5 Energy, and so on. You can eventually reduce the cost of
producing some items by 75% (or 80%, if you possess the Bleeding Edge trait,
which decreases costs at a rate of 5% per level instead of the normal 4%).
Learn more about
Factories, p 6-5
Mining, p 13-1
Research, p 8-1
Page 100

7-12 P L A Y I N G S T A R S !
Disaster Strikes Planet X!
When comets or other naturally occurring blunt instruments crash into
inhabited planets, the planet’s production queue is reset. All work in progress
is lost, including the resources spent on that work. It’s not all bad. Usually a
cosmic barrage brings extra minerals that you can apply immediately to
production.
 Loading...