

Page 1
™
P.O. Box 18979 ¢ Irvine, CA 92623
Blizzard Entertainment
1
Page 2
Copyright © 1998 by Blizzard Entertainment
The use of this software product is subject to the terms of the enclosed End User
License Agreement. You must accept the End User License Agreement before you
can use this product. The Campaign Editor contained in this product is provided
strictly for your personal use. The use of the Campaign Editor is subject to additional
license restrictions contained inside the product and may not be commercially exploited.
Starcraft, Diablo and Battle.net are trademarks and Blizzard Entertainment and
Warcraft are registered trademarks of Davidson and Associates, Inc. All other
trademarks and trade names are the properties of their respective owners.
Uses Smacker Video Technology, Copyright © 1 994-1998 by Invisible Inc. d.b.a. RAD Software
Blizzard Entertainment
P.O. Box 18979
Irvine, CA 92623
Customer Service / Technical Support and ‘Fax-back’ service
Tel: (0118) 920 9111
Fax: (0118) 987 5603
If you would prefer to write to us, please send your mail to the following address:
CUC Software International Ltd
Customer Services / Mail Order / Tech Support Department
2 Beacontree Plaza • Gillette Way
Reading • Berkshire
RG2 0BS • United Kingdom
http://www.blizzard.com World Wide Web
support@blizzard.com Online Technical Support
2
Blizzard Entertainment
Page 3

Table of Contents
Getting Started (PC)......................................... 4
Troubleshooting (PC)......................................... 5
Getting Started (MAC)...................................... 6
Troubleshooting (MAC)..................................... 6
Technical Support............................................. 7
MultiPlayer Games............................................8
Game Tutorial................................................. 12
HotKeys ..........................................................22
Resources...................................................... 23
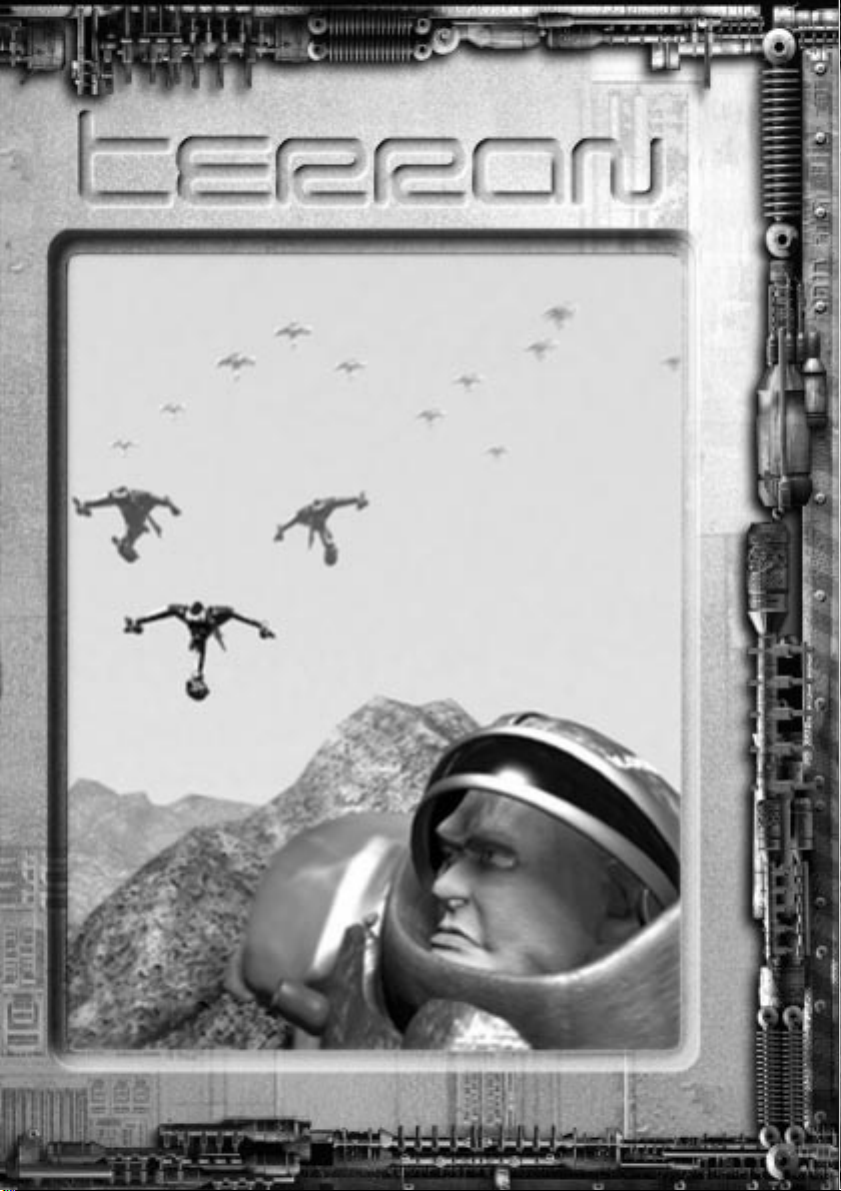
Terran
History.................................................... 26
Overview................................................. 34
Units....................................................... 35
Buildings..................................................42
Factions.................................................. 47
Zerg
History.................................................... 51
Overview..................................................55
Units........................................................56
Structures.............................................. 62
Broods.................................................... 68
Protoss
History.....................................................
Overview..................................................
Units........................................................80
Buildings................................................. 85
Tribes...................................................... 89
Roster of Heroes............................................ 91
Credits........................................................... 94
71
79
Blizzard Entertainment
3
Page 4
g GETTING STARTED (PC) D
System Requirements
Computer: Starcraft requires an IBM PC or 100% compatible computer, with
a Pentium
megabytes of RAM.
Operating System: You must be utilising Windows
4.0 or later to play Starcraft on your system.
Controls: A keyboard and a 100% Microsoft®-compatible mouse are required.
Drives: A hard drive with 80 MB of disk space available and a double speed
CD-ROM drive are necessary for installation and play. A quad-speed CD-ROM
drive is necessary to view cinematic sequences.
Video:
DirectDraw®. You must have DirectX® 2.0 or better installed on your system to
play the game (DirectX 5.0 is included on the Starcraft CD.)
Sound: Starcraft will work with any DirectX 2.0 or better compatible sound
card. To play the music during the game, your sound card must be configured
for playing digital audio.
®
90MHz or better processor. Your computer must have at least 16
®
95 later or Windows® NT
Starcraft requires a Local-bus SVGA video card that supports
Installation of Starcraft
Place the Starcraft CD into your CD-ROM drive. If your computer is AutoPlay
capable, a Starcraft menu will automatically appear on the screen. Select “Install
Starcraft” from the list of choices to start the installation program. Follow the onscreen instructions to install Starcraft on your system. After the game is successfully
installed, a Starcraft shortcut will be added to your Start menu.
If your system is not AutoPlay capable, open the “My Computer” icon on your
Desktop, then select the drive letter that represents your CD-ROM drive. Doubleclick on the “Install” icon and continue as above.
Installation of DirectX
Make sure that the Starcraft CD is in your CD-ROM drive. When you begin the
installation process, Starcraft will automatically detect whether you have DirectX
2.0 or better. Should you need to update your version of DirectX or install it for the
first time, you will be prompted to do so. As Starcraft cannot be played without
DirectX, we highly recommend installing it immediately should you be so directed.
If you experience any problems with Starcraft, please see our Troubleshooting
section before attempting to contact technical support.
4
Blizzard Entertainment
Page 5

t TroubleShooting (pc) ]
Starcraft requires that you have Microsoft’s DirectX 2.0 or higher installed and that your video and sound
cards are DirectX 2.0 compatible. DirectX 5.0 is included on the Starcraft CD and can be installed by
running “Install DirectX” from the list of options. The most common problem with DirectX games is the
drivers that are in use for your sound card and your video card. If you have problems with Starcraft, you
should always contact your video and sound card manufacturer (either through their web sites or over the
telephone) for information on obtaining the latest drivers. Most problems will stem from systems that are
using older drivers.
I do not have any video when I start Starcraft!
This problem is usually attributed to older, or incompatible, DirectX drivers. Starcraft runs in 640x480
mode and some video cards have a problem with DirectX automatically switching to that resolution.
You can manually change the screen resolution to 640x480 with 256 colours as the colour depth by
opening the Start menu and then opening the Control Panel in the Settings folder. Open the Display
Control Panel, click on the Settings tab, and change your Display Area and Colour Palette settings.
Starcraft loads, but after playing for awhile, I receive a DirectSound Error, DirectDraw Error or Page
Fault!
These issues are directly attributed to both the DirectSound and DirectDraw drivers that are in use on
your system. To correct these problems, you will want to obtain the latest DirectX compatible sound
drivers from your sound card manufacturer, and the latest DirectX compatible video drivers from your
video card manufacturer. If this problem persists, please contact our Technical Support department or
check the Technical Support FAQ at http://www.blizzard.com.
I am not hearing any music or sound effects in Starcraft.
Make sure that your sound card is compatible with DirectX 2.0 or higher. Sound cards that are not
supported under Microsoft’s DirectX will not work with Starcraft. Install DirectX 5.0 from the Starcraft
CD. You should also contact your sound card manufacturer to obtain the latest drivers for your system
and information on installing them.
I keep hearing static or feedback during the game.
This usually occurs with older sound card drivers. Contact your sound card manufacturer to obtain the
latest drivers. You also may want to check your mixer settings by opening the Start menu and then
opening the Programs, Accessories and Multimedia folders in that order. Select the “Volume
Control”option. You may now adjust your mixer settings by moving the sliders up or down.
Why am I only getting a black screen when I start Starcraft?
Either your video card is not DirectX compatible, or you are using an older version of DirectX. You will
need to install DirectX 5.0 from the Starcraft CD and/or obtain DirectX compatible drivers from your
video card manufacturer.
Will Starcraft work on my Cyrix 6x86, MediaGX, or AMD K6 computer?
Yes.
Can I run Starcraft on my 486 or other non-Pentium processor?
Starcraft has been optimised to run best on a Pentium 90 or faster processor. While CPUs slower than
a Pentium 90 may run the game, it may not run properly or at playable speeds.
Is there any way to play the full version of Starcraft without the CD?
No, you must have the Starcraft CD in your CD-ROM drive in order to play a full-version single player
game. See the Multiplayer section of this manual for information on “spawning” Starcraft on other
systems.
Can I install Starcraft to a compressed drive?
This should cause no problems. However, due to performance issues, we do not recommend it.
Blizzard Entertainment
5
Page 6

n GeTTing STarTed (Mac®) o
System Requirements
Computer: Starcraft requires a Mac OS® computer with a PowerPC® processor
and 16 megabytes of physical RAM plus Virtual Memory (32 megabytes of
RAM recommended). For multiplayer games of Starcraft, 32 megabytes of
physical RAM is required.
Operating System: Starcraft requires System 7.5 or higher.
Controls: A keyboard and mouse are required. If you have a two button
mouse, please consult your mouse manual for instructions on configuring the
second button to simulate a command (z) click.
Drives: A hard drive and a double-speed or faster CD-ROM drive are required
for installation and play. A quad-speed CD-ROM drive is necessary to view
cinematic sequences.
Video: Starcraft requires that your computer support at least a 640 x 480
display in 256 colours.
Sound: Starcraft will work with any Mac OS compatible system’s built in
sound.
Installation of Starcraft
Place the Starcraft CD into your CD-ROM drive. Double-click on the Starcraft
CD Icon, and then double-click on the “Starcraft Installer” to copy the required
game and system files to your hard drive. The installer will present an abbreviated
“Read Me”. Please read this, as it will contain the most up to date information
about Starcraft.
TroubleshooTing
Most problems running Starcraft on the Macintosh® are resolved by making sure
that the proper extensions are loaded and that there are no extension conflicts.
Below is the Minimal Extension list for Starcraft Macintosh:
Apple CD-ROM
DrawSprocket
Sound Manager (for Systems earlier than 7.5.3 only)
Open Transport (Optional)
The easiest way to avoid extension conflicts is to set up an Extension Set specifically
for Starcraft using the Extensions Manager Control panel (or third party equivalent).
Select only the extensions you need loaded, save the set and restart your Macintosh.
6
®
Blizzard Entertainment
Page 7

j Technical SupporT x
online Support Services
Blizzard Entertainment provides upcoming news, software updates, product
demos, reviews, technical support and more on the following online services.
Internet: support@blizzard.com (for IBM-PC)
macsupport@blizzard.com (for Macintosh)
World Wide Web: http://www.blizzard.com/support.htm
http://www.battle.net
Additional Support Services
Technical Support, with faxing capability for most problems, is currently available
twenty-four hours per day, seven days a week.
You may contact CUC Software International Ltd via fax and mail.
Fax: (0118) 987 5603
We receive faxes 24 hours a day, and will respond 9 A.M. to 5 P.M., Monday
through Friday, holidays excluded.
Mail: CUC Software International Ltd
Customer Services / Mail Order / Tech Support Department
2 Beacontree Plaza, Gillette Way
Reading, Berkshire
RG2 0BS, United Kingdom
Before You Call for Technical Support
If you are having problems, please consult the “Troubleshooting” section before
calling technical support. We receive many calls every day and can deal with your
inquiry more efficiently if you know the following information:
• The manufacturer of your computer and the CPU type/speed
• How much RAM your system has
• The version and type of operating system that you are using
• The manufacturer and model of your video card, sound card and modem
Our technical support number is (0118) 920 9111. Our hours are 9 A.M. to 5
P.M., Monday through Friday, holidays excluded. Have a pen and paper handy
when you call, and be near your computer if at all possible. NO GAME PLAYING
HINTS WILL BE GIVEN THROUGH THIS NUMBER.
Blizzard Entertainment
7
Page 8
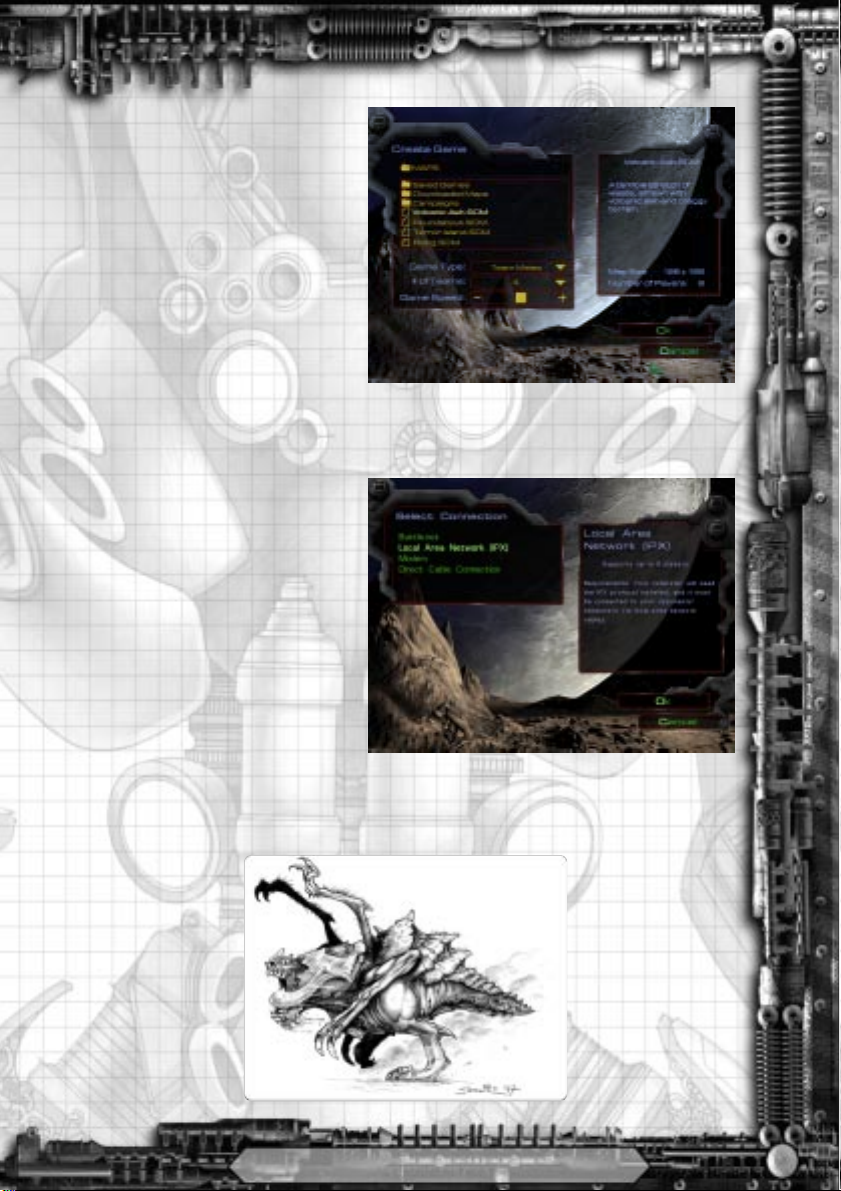
n Multiplayer Games F
Multiplayer Gaming
Starcraft allows you to play with up to
eight players in either stand-alone
scenarios or in multiplayer campaigns.
Each side can be controlled by either a
human or computer opponent. The first
time you start a multiplayer game over a
modem, direct connection or local area
network, you will be asked to create a
multiplayer ID. This multiplayer ID will be
used whenever you enter into a game
using any of these three connection
methods. Battle.net requires the creation
of a separate Battle.net ID.
Connection Methods
It is important to note that any multiplayer game is limited by the quality of the connection
of all of the systems involved. Heavy network traffic, poor cabling, line noise, latency, and
other environmental effects can adversely affect the reliability and performance of a
multiplayer game.
Battle.net Connection
Supports: 2-8 players
Requires: A 32-bit TCP/IP connection to the Internet. This can either be a dial-up connection
or a direct connection.
Battle.net is Blizzard Entertainment’s
Internet gaming service. It allows players
from around the world to battle against
each other. Battle.net also supports a
world-wide ranking system, enabling you
to test your Starcraft skills against
comparable opponents. Select the
“Battle.net” connection method to
connect to Battle.net. If your computer is
configured to automatically dial out,
Starcraft will dial your Internet Service
Provider. Otherwise, you must establish a
connection to your Internet Service
Provider before running Starcraft. Once
connected to Battle.net, you can chat with other players to arrange, create, and join games.
Specific information is available from within Battle.net by pressing the F1 key on the keyboard.
8
Blizzard Entertainment
Page 9
Troubleshooting: Check with your
Internet Service Provider to find out the
latency level of your connection and
whether your connection supports 32-bit
TCP/IP applications. A high latency
connection with any of the players can
result in an unstable multiplayer game. If
you are having problems connecting with
Battle.net call your Internet Service
Provider and ask for their most up to date
32-bit program to connect to the Internet.
IPX Network Connection
Supports: 2-8 players
Requires: 2 or more computers,
connected to an active IPXcompatible network
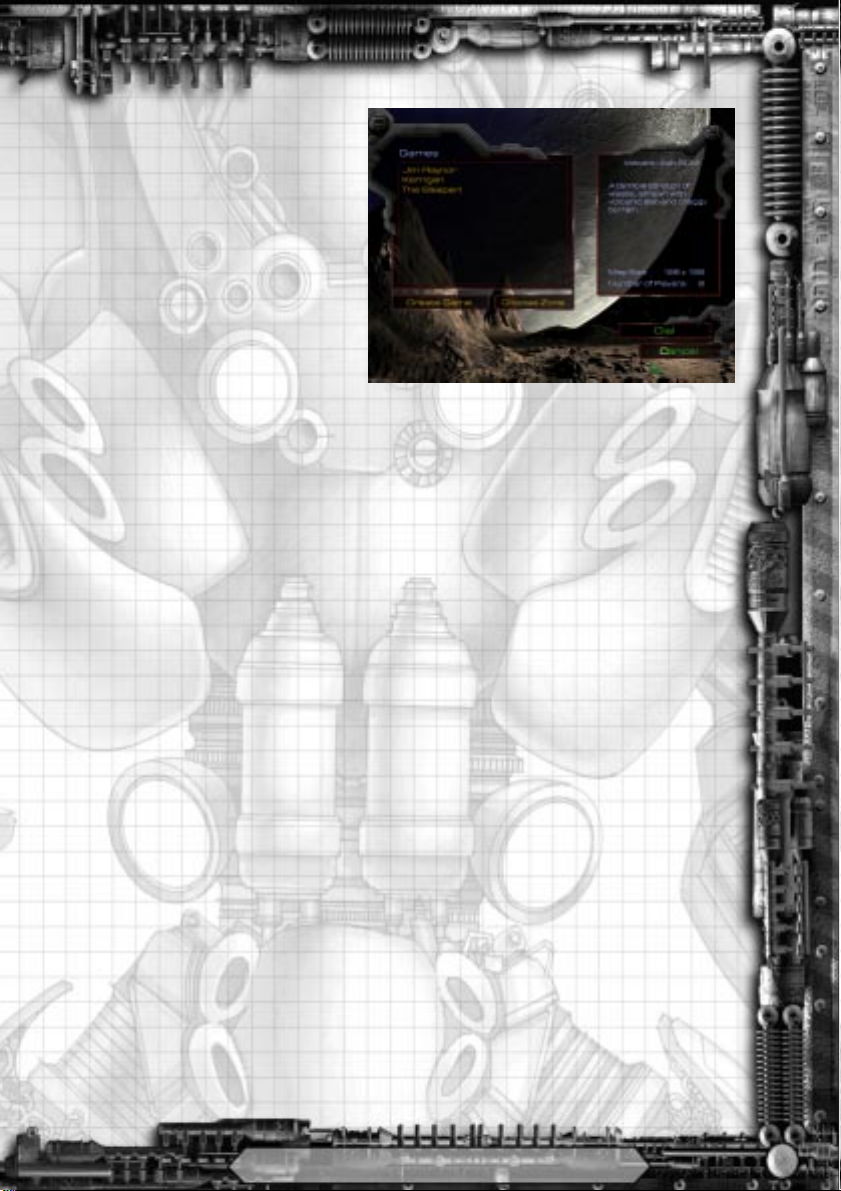
To create a game, click “Create.” The
name of that game will be based on your
multiplayer ID. If you wish to join a
specific game, you will need to know the
name of the game prior to joining. To join
a game, select the desired game from the
list and click OK.
Troubleshooting: Check the settings for
the IPX/SPX protocol in the “Network”
control panel; contact your network
administrator for assistance in setting up your network connection. You will need to be sure
that all computers are configured to see the same IPX frame type. Check all the physical
network connections. Note that Starcraft will only work across one network segment.
Blizzard Entertainment
9
Page 10

Modem Connection
Supports: 2 players
Requires: 2 computers, each with its own modem and telephone line
If your system has one modem installed, that modem will automatically be chosen when
you select Modem as your connection type. If you have more than one modem installed,
you will need to choose the specific modem that you wish to use.
The player that is answering the call should select “Create Game” from the menu. The
other player should select “New Number” and enter the game creator’s phone number. If
the game creator’s number has been previously entered, it can be selected from the menu
list. If their modem is set up correctly, their game will automatically answer the incoming
call and establish the connection.
Troubleshooting: Your modem needs to be set up correctly in the Windows 95 or Windows
NT “Modems” Control Panel before Starcraft will recognise it. Check your modem’s settings
by opening the “Modems” Control Panel. Click on the “Diagnostics” tab, and double-click
on the modem that you wish to check. Windows 95 and Windows NT will run a test on your
modem. If any errors are reported, consult your modem manufacturer. Make sure that the
modem’s COM port is not being used by another application.
Direct Connection
Supports: 2-4 players
Requires: 2 or more computers connected via their serial ports with a null-modem cable.
One player needs to select the “Create
Game” option to start a game. If the
second player does not automatically join,
select “Retry Connection” to attempt to
join the game again. Should you wish to
link three or four computers for direct
connection play, please refer to the
SERIAL.DOC technical help file in the
Starcraft directory.
Troubleshooting: Check the cable to
ensure that it is a null-modem cable and
double check the connections. If a nullmodem adapter is being used, make sure
that only one adapter is being used. The
cable needs to connect to the serial port or COM ports on each computer, not the parallel
(printer) ports. Make sure that there are no conflicts between the COM ports that are being
used for the null-modem connection and any other devices on either system.
10
Blizzard Entertainment
Page 11
AppleTalk Network
Connection [MAC]
Supports: 2-8 players
Requires: 2 or more Macintosh
computers, connected to an
active AppleTalk network.
To create a game, click “Create”. The
name of that game will be based on your
multiplayer ID. A player who wishes to
join your game will need to know the
game’s name.
If your network has more than one AppleTalk zone, then you can click the “Choose
Zone” button to select the zone that Starcraft will listen to in search of a game. Note that
Starcraft will only display games on one AppleTalk Zone at a time.
Troubleshooting: Check the settings for your network in the “AppleTalk” or “Network”
control panel; consult your owner's manual for assistance in setting up your network
connection. Check all of the physical network connections.
Spawned Games
Starcraft allows for up to eight players to compete in multiplayer games with only one CD
using a feature known as “Spawning”. To create a spawned copy, simply install Starcraft
onto any computer using your Starcraft CD. When prompted to enter your CD Key, enter
the CD Key associated with the Starcraft CD from which you are installing the spawned
copy. When you run Starcraft without a CD (indicating that you are using a spawned version),
you can only play multiplayer games created by the person who spawned your copy of
Starcraft and has the Starcraft CD in his computer.
Certain features of Starcraft are only available when you have the Starcraft CD in the
drive. These include playing the single player campaigns, creating multiplayer games, playing
against players with different CD keys and using the Campaign Editor.
Blizzard Entertainment
11
Page 12

Game tutorial
NoTES oN USING THE MoUSE IN STARCRAFT
The majority of your control during a game of Starcraft is through using your mouse. The
mouse performs the following actions:
SELECTION (LEFT-CLICK)
The left mouse button is used to select units, buildings, command buttons and points of
action (locations where orders are carried out).
AUTO COMMANDS (RIGHT-CLICK)
When you have a unit or group selected, the right mouse button can be used to issue
intelligent commands that will automatically be carried out. Macintosh users with a one
button mouse can hold down the command (z) key and click to use Auto Commands.
1. Select an SCV.
2. While the SCV is selected, move the targeting cursor over a mineral field. Right-
click (Macintosh:z-click) on the minerals to be Gathered.
3. The SCV will automatically move to the mineral field and begin gathering resources.
4. Select a Marine.
5. While the Marine is selected, move the targeting cursor to an open area. Right-click
(Macintosh: z-click) on that area to order the Marine to move.
6. The Marine will automatically move to the selected area.
7. By using the Auto Command feature, units can be ordered to perform logical tasks
(move, gather resources, repair, attack) without multiple keystrokes or button
commands.
STARCRAFT Tutorial
The game begins with a graphic introduction to the world of Starcraft. If you would like to
bypass this introduction, press the space bar or click the left mouse button. After the
introduction you will be taken to the Starcraft Main Menu.
Click on the Single Player option or type “S” to begin a single player game. Note that the
letter S in “Single Player” is a different colour than the rest of the title. This different coloured
letter is a “hotkey” (or keyboard shortcut) which, when entered, allows you to bypass clicking
with the mouse. This convention is used throughout the game.
The next step is to create your player ID. The first time you run Starcraft, you are
automatically prompted to enter a new ID name. Enter any name that you wish, and then
click on the OK button. To start playing with the ID you have just created, select OK again.
The next screen allows you to start the Terran, Zerg or Protoss Campaign, Load a Saved
Game or Load a Custom Mission. To access the Starcraft Tutorial, select the Terran Campaign.
12
Blizzard Entertainment
Page 13
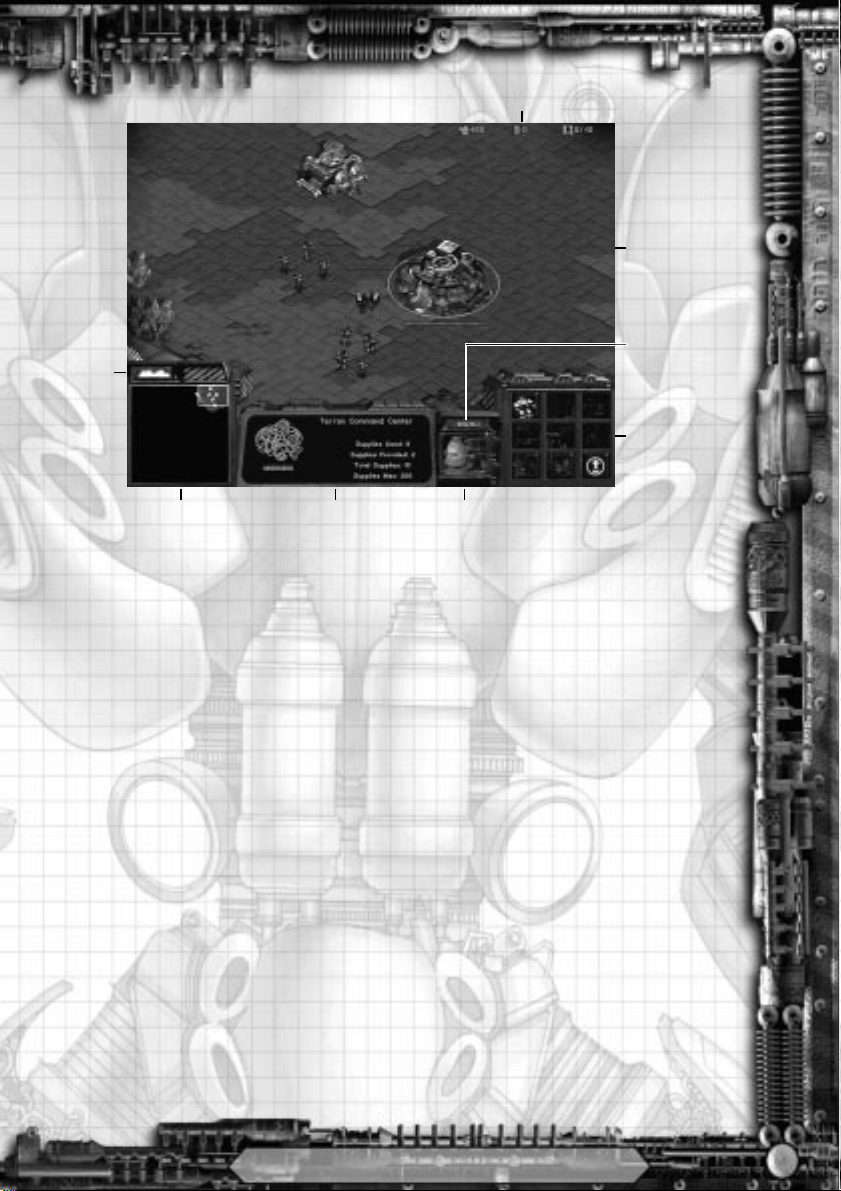
Resources
Main
Screen
Hide
Terrain
Mini Map
PortraitStatus Display
Menu
Command
Buttons
RESOURCES
This indicates the amount of harvested Minerals and refined Vespene Gas you currently
have accumulated, as well as the current level of Supplies you have.
PORTRAIT
This is a close up of the unit currently selected.
STATUS DISPLAY
This is detailed information, including numeric statistics on any building or single unit
selected in the Main Screen.
COMMAND BUTTONS
These are the different commands available to the unit, such as Build, Attack, etc.
MINI MAP
This is a bird’s eye view of your Main Screen that allows you to see the entire battlefield at
once. Your buildings and units appear as green squares. Other player’s units, buildings and
resource nodes appear as different colours. This map will increase in detail as you explore
the lands surrounding your outpost.
MAIN SCREEN
This is the main field of play. Here you will be able to see, in great detail, the events that
transpire in the area around you. You may select units or buildings in this window using the
mouse. When one of your units is selected, a green circle will surround the unit, indicating
that it is now prepared to receive your orders.
Blizzard Entertainment
13
Page 14

HIDE TERRAIN
This button toggles whether or not terrain is displayed in the Mini Map. Hiding terrain
may make it easier to spot enemy units.
MENU
This button calls up the Starcraft Options menu.
Save Game: This allows you to save the game you are currently engaged in.
Load Game: This allows you to load and continue a game that you have previously
saved.
Pause Game: This allows you to pause the game you are currently engaged in.
Options: This brings up the Speed and Sound menus.
Help: This allows you to access a list of keyboard commands as well as Starcraft
Tips.
Mission Objectives: This displays the victory conditions for the current mission.
End Mission: This allows you to terminate the current mission. You will be asked to
confirm your decision.
Return to Game: This closes the Starcraft Options menu and allows you to resume
the game you are currently engaged in.
During a single player game clicking the Menu Button also pauses the game.
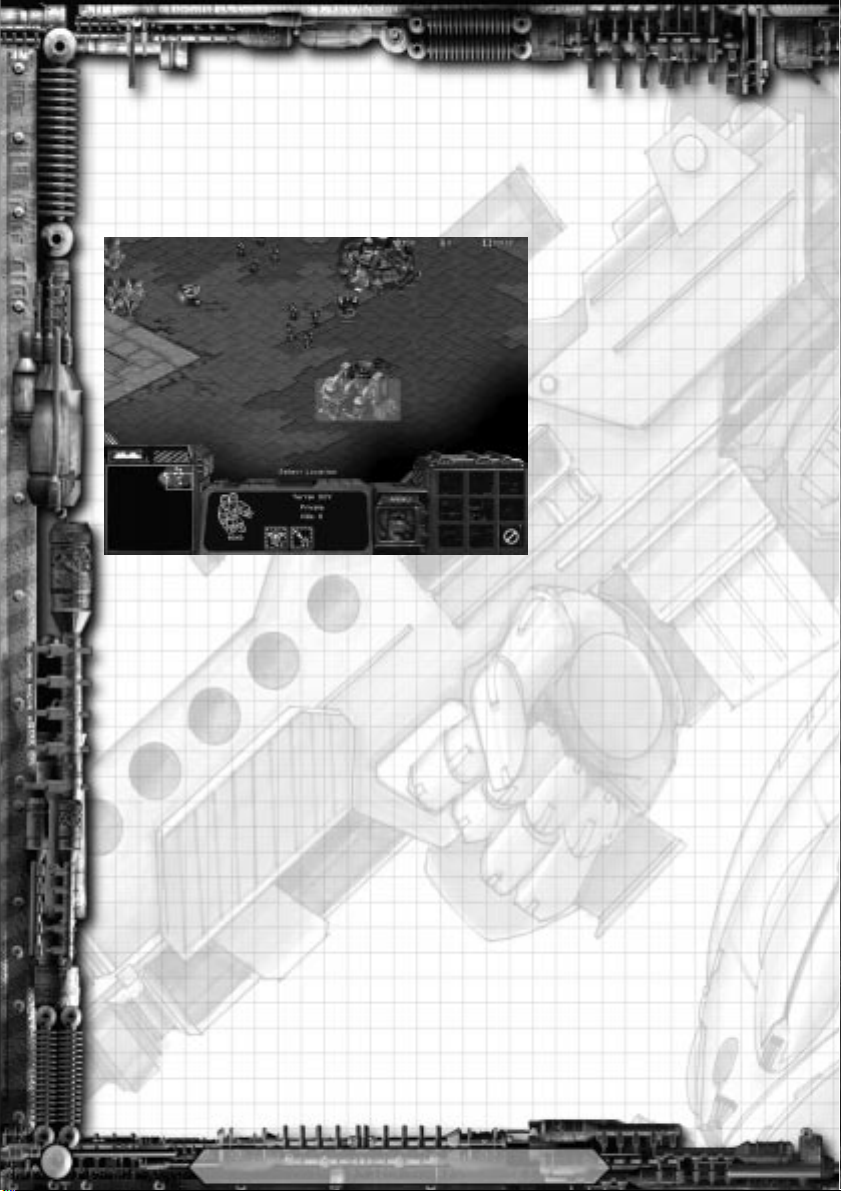
ESTABLISHING YoUR oUTPoST
Your mission is to create a small outpost on an abandoned space platform. In the centre of
your Main Screen you will see a Command Centre, a Supply Depot, a group of Terran
Marines and an SCV.
1. Move the arrow over the Command Centre. When you are over a unit or building on
the Command Map that you are able to select, the arrow will change into a selection
cursor.
2. Select the Command Centre. When you select a unit or building, a coloured circle
highlights your choice. Also, a description of the selection will appear at the bottom
of the Main Screen in the Status Display area.
BUILDING AN SCV
1. Move the arrow over the SCV Command Button. The words Build SCV will appear in
an automated heads-up display. Note that the cost of building this unit and how
many supplies it requires appears in a heads-up display that is directly connected
to the Command Button. All costs for buildings and upgrades will appear in the
same way.
2. Click on the Build SCV button. This begins the process of building your SCV. Note
that the state of completion and the units in the queue to be built are shown in the
Status Display area.
14
Blizzard Entertainment
Page 15
3. After the SCV is built, it will
appear on the Main Screen.
4. Should you attempt to build
another SCV, the message
Not Enough Supplies…
Build More Supply Depots
will display directly on the
Main Screen.
5. To view your current
available supplies, select
your Command Centre or
any Supply Depot. You can
also reference the display in
the upper right corner of the Main Screen. You must have supplies available in
order to build or train more units. To increase the supplies available for use by
your outpost, another Supply Depot must be built.
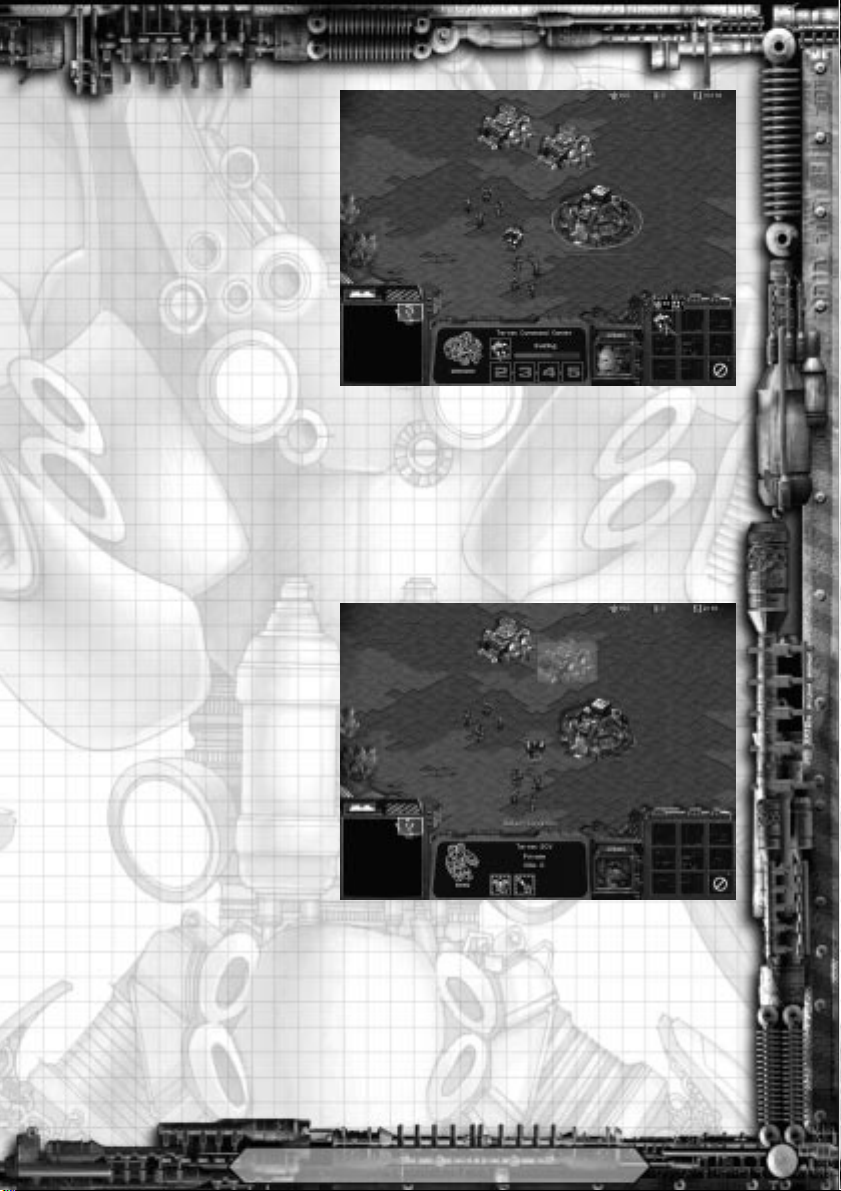
CoNSTRUCTIoN oF BUILDINGS
1. Select an SCV.
2. Move the arrow over the
Build Structure button in
the Command Button area
and select this option. This
will open the Basic
Structure selection panel.
3.Move the mouse over the
buttons and select the one
that says Build Supply
Depot. A green tinted
image of a Supply Depot
will appear on the
Command Map. The green
area represents the amount
of space required to
construct this structure.
Buildings must have ample space available in explored territory in order to be placed.
Specific Restrictions
Command Centres must be constructed a minimum distance from any Mineral Fields
or Vespene Geysers.
Buildings may only be constructed on terrain that is defined as suitable for
construction.
Buildings may only be constructed in areas that have been explored.
Blizzard Entertainment
15
Page 16

If you attempt to place a building in a location that is restricted, the portion of the building
image that lies within the restricted location will be denoted by a red tint. Also, a message
will inform you why you cannot build there, and you will be unable to place the building.
4. To place a building, select an area that falls within the restrictions for construction.
When you have chosen an appropriate site, left-click to place the building. The SCV
will move to the selected site and begin construction. Note that construction does
not begin until the SCV reaches the selected site. Any obstacles present when the
SCV reaches the site will prevent the construction from commencing.
If you select the new Supply Depot while it is being constructed, you will notice a
completion bar in the Status Display area. A status bar located below the selected building
indicates how much damage the structure can take before it is destroyed. Note that a building
under construction begins in a weakened state and only reaches full strength when
construction has been completed.
5. Once the SCV has completed this construction, select the new Supply Depot. Notice
that the total available supplies have been increased. Remember that you can also
select your Command Centre or refer to the display in the upper right corner of the
Main Screen.
The construction of certain buildings provides opportunities for various unit upgrades.
When such an upgrade is available, moving the arrow over the associated Command Button
will activate a heads-up display listing the requirements to obtain that upgrade.
EXPLoRATIoN AND THE FoG oF WAR
You will now want to begin gathering resources such as Minerals and Vespene Gas. To
increase your reserves, you must find Mineral fields to harvest and search for Vespene geysers
that may be found about the area. Initially, the area around your Command Centre and
Supply Depot is unexplored and will appear as great black regions on both your Main
Screen and Mini Map.
1. Select an SCV. Then select the Move button from the Command Console.
2. A targeting cursor will appear
on the Main Screen. Use this to
indicate the destination of the
selected unit.
3. Send your SCV into the
unmapped region to the left of the
Command Centre. Your SCV will
immediately head off in that
direction, surveying any territory
it encounters.
4. As your unit enters unknown
regions, they will become visible
on both your Main Screen and
the Mini Map. Continue to
16
Blizzard Entertainment
Page 17

explore the area immediately around your Command Centre and then return the
SCV to its starting location.
5. The area that is no longer in the vision of any of your units or buildings becomes
shrouded. While the terrain that is in the shrouded area is still known, any units
that you do not control that enter into this “Fog of War” will not be visible on the
Main Screen or the Mini Map.
6. If buildings occupy an area that is later shrouded by the Fog of War, they will continue
to be shown in their last known state.
7. When your units re-enter these shrouded areas, your knowledge of the terrain and
any units or buildings in that area will be updated.
GATHERING Resources
1. To the left of your Command
Centre should be a group
of Mineral fields. Instruct
your SCV to Gather these
Minerals by selecting the
corresponding button from
the Command Console.
2. A targeting cursor will appear
as you move the mouse
back to the Main Screen.
Left-click the Mineral field
you wish to mine.
3. You can also order the SCV
to gather resources by
simply right-clicking on the
Mineral field you wish to mine.
4. Your SCV will begin working the Mineral field and will return gathered resources to
Protoss High Templar, wearing the
much prized Khadarin Amulet
Blizzard Entertainment
17
Page 18
the Command Centre on its own. The SCV will repeat this gathering cycle until
the Minerals run out or the unit is given another command.
Now that you have found a source of Minerals, gathering Vespene Gas is next.
1. South of your Command
Centre is a large Vespene Geyser.
Select an SCV and move it next
to the Geyser.
2. Select the Build Structure
button in the Command Console
area.
3. Move the arrow over the
buttons and select the one that
says Build Refinery. Once you
have collected the required
amount of resources as indicated
in the heads-up display, select the
Build Refinery button.
4. Move the image of the Refinery
over the Vespene Geyser. When
the placement mask displays all
green, click the left mouse button and place the building.
Note: If you stop an SCV while it is returning to the Command Centre with a load of
resources, the Gather button will be replaced by a Return Cargo button that you can select
to resume delivery and continue gathering resources.
Viewing the Maps
To move around in each scenario, you can use either the Mini Map or the Main Screen
1. To move using the Mini Map, select the white box and move it around by holding
down the left mouse button and dragging it where desired.
2. You can also select any area on the Mini Map and immediately jump to that location.
3. To move on the Main Screen, move the arrow cursor to any edge of the screen and
the map will automatically scroll in the direction the arrow is pointing.
4. To use the keyboard to scroll on the Main Screen, use the arrow keys or the numeric
keypad arrows.
Unit commands & CoMBAT
You can give commands to your units at any time. All of your units share common
commands, but some have specific abilities.
18
Blizzard Entertainment
Page 19
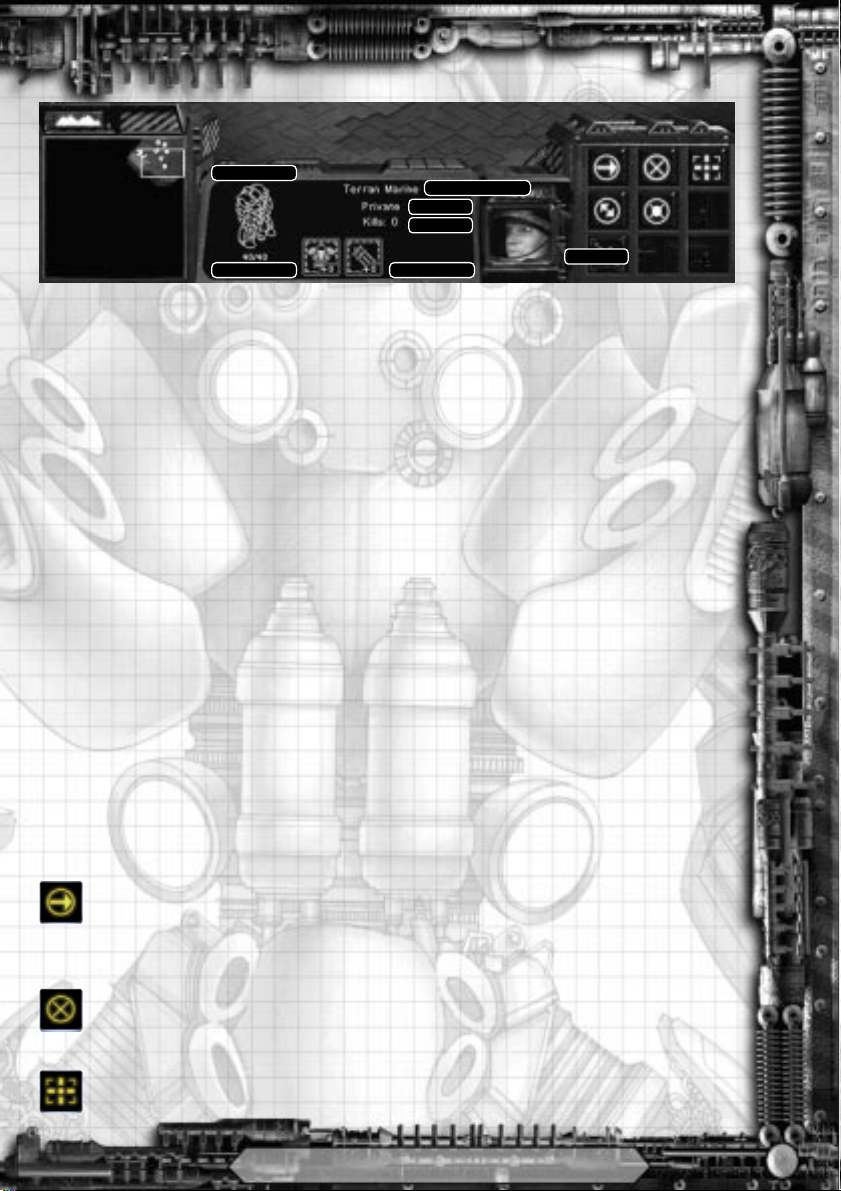
Wireframe
Hit Points
Unit Designation
Rank
Kills
Equipment
Portrait
1. Select a Marine. This will activate the Status Display, Command Button and Portrait
areas in the Command Console.
WIREFRAME
A graphic representation of the health of your unit
HIT POINTS
A numeric representation of the health of your unit
UNIT DESIGNATION
The name of your unit
RANK
The military rank of your unit
KILLS
Number of enemy units personally eliminated in battle
EQUIPMENT
Armour, Weapons or Special Equipment and their levels of upgrade
PORTRAIT
A close-up view of your unit
oPTIoNS
Move
2. While having the Marine selected, click the Move button.
3. A targeting cursor will appear on the Main Screen. Use this to indicate the
Stop
4. While the Marine is moving, click the Stop button. The unit will halt all
Attack
5. While the Marine is selected, click the Attack icon.
destination where you wish to send the selected unit.
actions and await new orders.
Blizzard Entertainment
19
Page 20
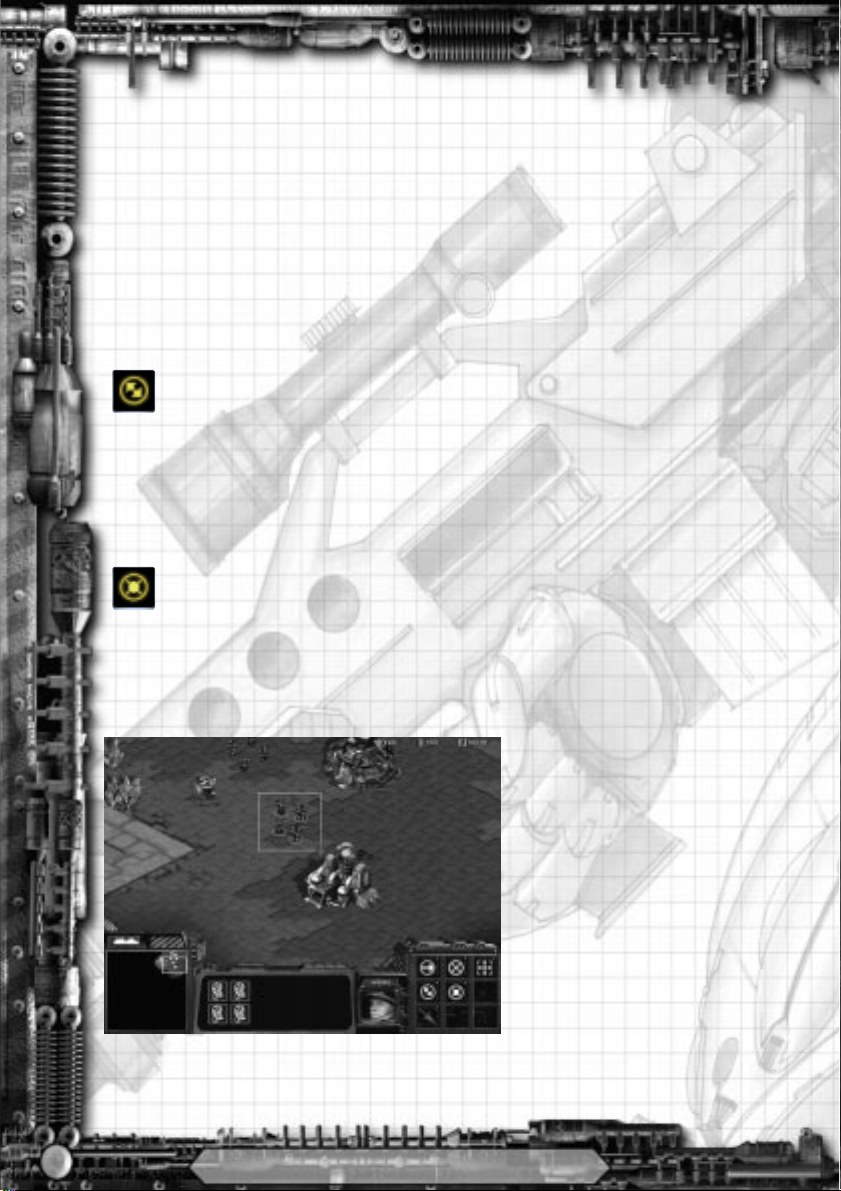
6. A targeting cursor will appear on the Main Screen. Use this to indicate the
target the selected unit will be sent to engage.
7. Select the Command Centre as the target you wish to engage. Normally you
would never attack your own buildings, but until you feel ready to assault the
enemy, they make for an easy fight.
8. While the Marine is attacking it, select the Command Centre.
9. Note that the hit point bar, numerical ratio and unit wireframe reflect the state
of the structure as it sustains damage.
10. Select the attacking Marine and click the Stop button to halt your attack.
Patrol
11. While the Marine is selected, click the Patrol button.
12. A targeting cursor will appear on the Main Screen. Use this to indicate the
second point of a patrol route (the first point being the current location of the
unit). The unit will now move between these two points repeatedly. While in
patrol mode your units will attack any enemy units they encounter.
13. To cease patrolling, select the Marine and click the Stop button.
Hold Position
14. While the Marine is selected, click the Hold Position button.
15. The Marine will now hold his position and defend that specific point, not
moving to engage an enemy unit.
16. To cease Holding Position, select the Marine and click the Stop button.
ADDITIoNAL oRDERS
Grouping Units
1. There are several different ways of
grouping units and issuing
commands to them as a group. Up
to twelve units may be placed in any
one group.
2. Clicking and dragging across the
Main Screen allows you to draw a
rectangle around the units you wish
to select.
3. You may also select groups by
holding down the shift key while
selecting units. Holding shift while
selecting a unit will add him to the
current group.
4. Holding shift while clicking on an already selected unit will remove just that unit
from a group.
20
Blizzard Entertainment
Page 21
5. Holding shift while clicking on a wireframe in the Status Display area will remove
just that unit from a group.
6. Clicking on a wireframe in the Status Display area will select ONLY that unit and
remove all other units from the group.
7. If you have only one unit selected and click on his portrait, it will centre the Main
Screen on his location.
Groups are automatically saved into memory and can be recalled by selecting any
member of that group while holding down the Alt key (Option key on the
Macintosh.)
8. Groups can be set and saved into memory by holding down the Ctrl key and selecting
a number from 0 to 9. This group can then be reselected by pressing the
corresponding number key. Pressing the number key a second time will centre the
Main Screen on that group.
Follow Command
9. Units can be made to follow a specific unit.
10. Select a unit or group that will be following a lead unit.
11. To choose the lead unit, immediately select it with the right mouse button (or z-
click on the Macintosh.) The lead unit will then be outlined by a blinking green
circle.
12. Moving the lead unit will cause the attached units to “follow the leader.”
Special Unit Commands
Transports
1. Transports are used to ferry your units across vast distances and impassible terrain.
You can automatically load units onto a Transport by group selecting the units you
would like to place onto the ship and then right-clicking the Transport. The number
of units that can enter the transport is determined by the relative sizes of the units.
2. The Transport will be highlighted by a blinking green circle and will automatically
move towards the units requesting pick-up. The selected units will also move towards
the Transport and automatically enter it when it arrives.
3. Units can disembark from a Transport, after the ship has moved to its destination, by
selecting the Unload All button in the Command Console.
A targeting cursor will appear on the Main Screen. Use this to indicate where you
wish the units to be unloaded.
4. A single unit can be made to disembark from a Transport by clicking on it’s wireframe
in the Status Display area while the Transport is selected. This will cause only the
unit whose wireframe is chosen to disembark from the ship.
Blizzard Entertainment
21
Page 22

List of Hotkeys
F10 Game Menu
Alt-M Game Menu
Alt-S Save Game
Alt-L Load Game
Alt-H Help Menu
F1 Help Menu
Alt-O Options Menu
+ Increase Game Speed
- Decrease Game Speed
Ctrl-X Exit Starcraft
Alt-X Exit Starcraft
Ctrl-Q Quit Mission
Alt-Q Quit Mission
Ctrl-M Toggle Music On/Off
Ctrl-S Toggle SFX On/Off
Space Bar Centre on Last Transmission
Ctrl+# Assign Group #
# Select Assigned Group
# again Centre on Assigned Group
Alt+Select Unit Recall Group
Shift+Issue Command Set Waypoint
Ctrl-C Centre on Selected Unit
Alt-C Centre on Selected Unit
Tab Hide/Reveal Terrain in Minimap
Shift+Tab Toggle Diplomacy Colours in Minimap
Green: Your troops
Yellow: Allied Troops
Red: Enemy Troops
Enter Send Message
Shift+Enter Send Message to All
Ctrl+Enter Send Message to Allies
Shift+Select Unit Add/Remove Unit from Current Selection
Ctrl+Select Unit Selects all units of that type on the Main Screen
22
Blizzard Entertainment
Page 23
Resources
In order to build up your army, you will need to collect the raw materials necessary to
develop and build your war machines. There are two types of resources. You will need to
procure both in order to build your full complement of troops.
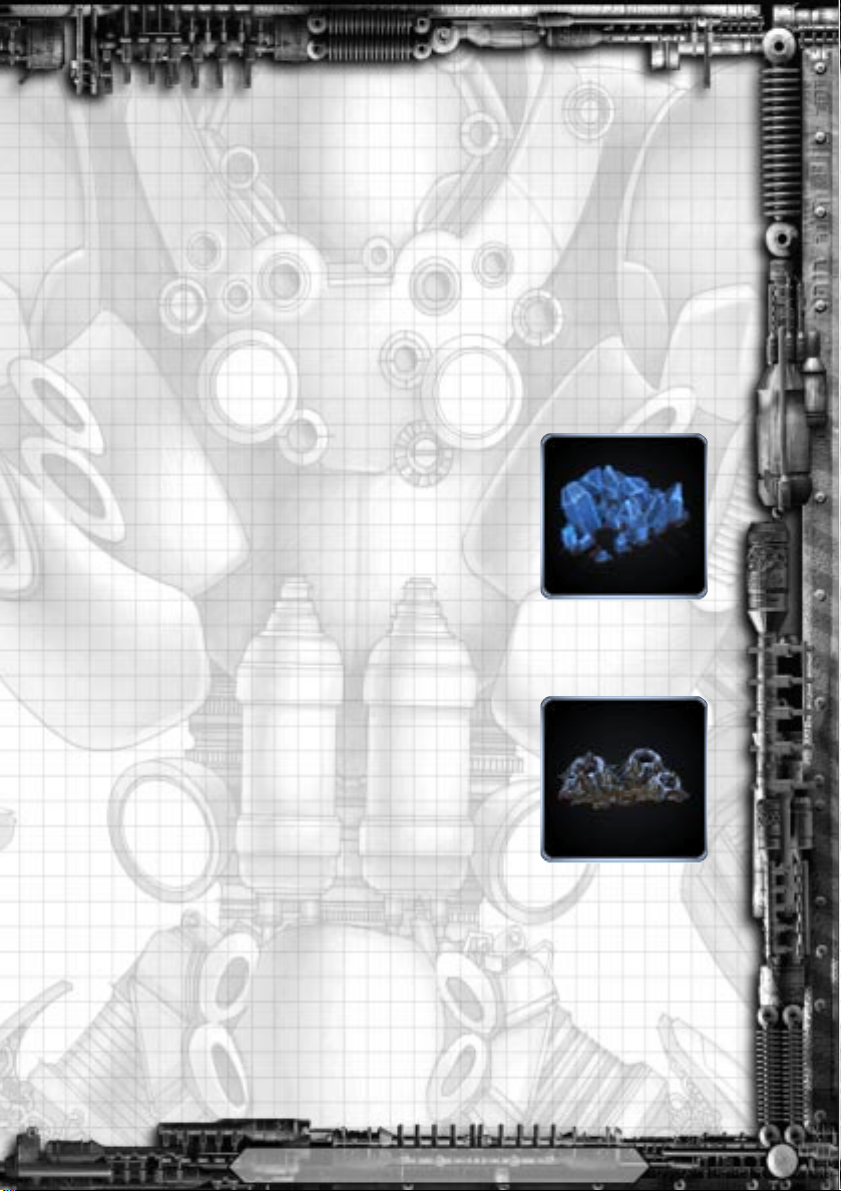
Mineral Deposits
The planets along the rim are often dotted with clusters of
precious Mineral crystals. These Minerals are smelted down
and used to create the armoured hulls of starships, vehicles
and personal armour. Even the Zerg require Minerals to harden
their carapaces and develop strong teeth and bones. The
Mineral crystals take some time to gather, and only SCVs,
Drones, and Probes have the necessary equipment to break
off bits of the crystals and return them to the proper building.
Vespene Geysers
Vespene gas has an unusually high potential energy rating,
and as such it is highly valued for use as a fuel in highperformance engines and energy reactors. The Zerg have
adapted themselves to use raw Vespene as a source of
nourishment to drive their greatly accelerated metabolisms.
Even the Protoss require Vespene to work as a catalyst for their
psi-driven machines. Geysers of this powerful green gas can
be found on many planets along the Rim, and several space
stations have been built over Vespene-rich asteroid belts. A
refinery of some sort must be built over an active geyser to
process and package the gas for its collection by the different
species.
While an individual geyser has an effectively unlimited
amount of gas within it, after a certain point the geyser
“collapses” and only trace amounts of Vespene can be refined
from it. Most commanders would do well to seek fresh geysers
to ensure that they have enough fuel to maintain their military.
Blizzard Entertainment
23
Page 24

the Campaign Editor
The Starcraft campaign editor allows for the creation of unlimited campaigns to play in
Starcraft. These campaigns can be for either single player or multiplayer use and can consist
of multiple maps, mission briefings, specific conditions for each map and special unit
attributes. The campaign editor files are automatically transferred to other players in
multiplayer games, ensuring the flexibility to easily design, create, and immediately play a
scenario against any and all opponents.
The campaign editor offers the power of a detailed programming language presented in
an accessible format that can be learned in a short time. These “triggers” take the place of
complex programming statements and allow novices and veterans alike to create a richly
detailed world in which to play.
For detailed descriptions on using the Starcraft campaign editor and tips on creating maps
and missions, please refer to the comprehensive help file located on the Starcraft CD.
Editor Features
• Powerful trigger-language which allows you to create cause and effect
statements that can be used throughout your campaign.
• Ability to create maps that range in size from 64x64 to 256x256. Rectangular
map sizes such as 256x64 or 96x128 are also available.
• Complete access to all of the units and buildings in the game, including
heroes from each of the species.
24
• Ability to set up ‘Forces’ where multiple players are tasked with a common
set of victory conditions or other conditional guidelines.
• Ability to modify each of the individual unit and building statistics.
• Regions can be defined and named, to specify actions that should happen
in specific areas on the map.
Blizzard Entertainment
Page 25
Blizzard Entertainment
25
Page 26

STARCRAFT
Terran History
The Decline of Western CiviliSation
lthough technology and world
culture progressed rapidly
A
century, their advancements paled in
comparison to the seemingly reckless leaps
that would follow. By the end of the twentyfirst century, mankind had seen bold and
unprecedented changes within the world.
Radical new technologies were surfacing at
incredible rates, offering increased access
to advanced computers and informational
databases to even the most destitute nations
of Earth. In the wake of the eradication of
Communism from the Eastern Nations,
nuclear weapons quickly became available
in abundance. The international power
structure, once defined primarily by the
acquisition of capital and military
superiority, was blasted apart as third-world
nations rose to challenge the economic and
military might of the world’s super-powers.
As the manipulative sciences of
cybernetics, cloning and gene-splicing rose
steadily into the public forum, militant
humanist and hard-line religious groups
challenged the rights of private interest
corporations who profited from genetic
experimentation. Multitudes of people were
being augmented with cybernetic implants
while others began to manifest slight
physical mutations ranging from heightened
senses to advanced telepathy. These
dramatic changes within the human gene
pool caused widespread panic amongst
many of the fundamental humanist factions.
Technology continued to evolve and
spread, and population rates soared. Near
throughout the twentieth
the end of the twentieth century, there were
six billion people upon the earth. Within three
hundred years, the population had grown to
an estimated twenty-three billion. Pollution
and a lack of natural resources and affordable
fuels added to the fire as world leaders sought
ways to stem the growth of their nation’s
inhabitants. Popular sentiment held that the
world was plummeting towards an inevitable
catastrophe as overpopulation and genetic
alteration swept across the globe.
Meanwhile, as tensions rose around the
world regarding the use and capitalisation of
cybernetics and genetic mutations, many core
international economic systems folded in
upon themselves and shut down. Horrific acts
of terrorism and violence erupted between
the corporate sector and the humanist
factions, resulting in forced police actions
across the globe. Irresponsible media
coverage of these atrocious police actions
spurred the already rampant civil chaos in
many of the larger countries. Ultimately, the
precarious balance of world power exploded
into international pandemonium.
The New order
On November 22, 2229, the United Powers
League was founded. The UPL was to become
the ultimate incarnation of the vision of a
unified humanity held by the now defunct
United Nations. This new order encompassed
and controlled close to ninety-three percent
of the earth’s population, failing only to bring
order to a few volatile South American states.
The UPL was founded upon the basis of
26
Blizzard Entertainment
Page 27

‘enlightened socialism’, but often resorted
to harsh, fascist police actions to maintain
the public order. With its control lasting for
nearly eighty years, the UPL began to devise
a rigid agenda that would unify the various
cultures of humanity for all time. Great
lengths were taken to eradicate the last
vestiges of racial separatism, and the
Unitariate Commissions banned many of the
world’s oldest religions. English was
designated as the common tongue of the
planet, replacing many ancient languages
that were subsequently banned in their
native countries.
Although religions were officially banned
by the UPL, the organisation held an almost
zealous belief in the supposed ‘divinity of
mankind’. This quasi-religious dogma called
for the immediate eradication of any nonvital prosthetics or mutations amongst the
pure-strain human gene pool. Hard-line UPL
proponents and scholars argued that genetic
alteration, cyber technology, and the use of
psychoactive drugs all led to the eventual
degeneration of the human species. The UPL
leaders formulated a bold plan that would
assure that humanity would persevere,
unscathed by the tempting corruption of
radical technologies.
The Great Purification
Like the bloody Inquisitions that
devastated Europe eight hundred years
before, the UPL set in motion one of the
harshest agendas ever conceived by
humanity: Project Purification. This
genocidal crusade was the Government’s
final solution to the matter of cleansing
humanity of its more degenerate facets. UPL
troops scoured every nation on earth,
rounding up dissidents, hackers, synthetics,
the cybernetically enhanced, tech-pirates,
and criminals of every kind. This planet-wide
culling resulted in the eradication of nearly
400,000,000 people. The
world-media, now
under the strict control of the UPL,
downplayed the horrific violence and kept
the general populace of Earth unaware of the
scope of the atrocities being committed.
Despite their heinous acts, the UPL
succeeded in advancing many core
technologies. Fields of research that had lain
dormant for decades were opened again
under UPL control. The Space Exploration
programs of the mid-twentieth century,
abandoned by the American and Russian
governments due to drastically reduced
budgets and incessant political sabotage,
became the basis for a new era of exploration
for humanity. The coupling of cryogenic
hibernation with warp-drive technology
resulted in the ability to travel amongst the
stars. Within the span of forty years the UPL
founded colonies upon the moon and many
of the other planets within the Terran solar
system.
During this period, a brilliant young
scientist named Doran Routhe made plans
to consolidate his power within the UPL.
Uninvolved with the vulgarities of Project
Purification, Routhe was obsessed with
founding colonies upon the worlds found
beyond the Terran Sector. Routhe was
convinced that the discovery of new minerals
and alternate fuel sources on the outlying
worlds would make him one of the most
influential men on Earth. Through his
political connections and personal fortune,
Routhe was able to secure thousands of UPL
prisoners to use as guinea pigs for his secret
plans.
The prisoners, slated for mass execution
under the edict of Project Purification, were
transported to Routhe’s private laboratories.
Routhe, planning on sending the prisoners
off to colonise the outlying worlds, had his
science crews prep nearly 56,000 people for
long-term cryogenic hibernation.
Cataloguing the various mutations and
cybernetic enhancements of the
Routhe input all of the data into a
prisoners,
Blizzard Entertainment
27
Page 28

revolutionary supercomputer. This Artificial
Tele-empathic Logistics Analysis System,
known as ATLAS, then processed this
genetic information and was able to predict
which of the prisoners should be able to
survive the trial to come. Only 40,000 of
the prisoners were deemed viable to
survive the rigorous conditions. Those
40,000 were then loaded onto four
gargantuan, automated deep-space
supercarriers. As the prisoners were
prepped for cryogenic ‘cold sleep’, the
ships were loaded with enough supplies,
rations and hardware to aid them once they
arrived at their scheduled destination. The
navigation computer was then
programmed with the coordinates of the
outlying planet Gantris VI. All seemed in
perfect preparation, but even Routhe could
not have imagined that the prisoners would
be launched to their almost certain deaths
in the galactic rim.
The Exiles and the Long
Sleep
The ATLAS was installed into the first of
the supercarriers, the Nagglfar. Three other
carriers — the Argo, the Sarengo, and the
Reagan — were programmed to follow the
Nagglfar as it was launched into the void
of space towards Gantris VI. Over the
course of this journey, which later
generations would call ‘The Long Sleep’,
ATLAS continued to monitor the humans
kept in cryogenic stasis. Evaluating the
numerous mutations and enhancements
found within the prisoner’s gene pool,
ATLAS became aware of a powerful
mutagenic strain that existed in some of
their DNA. While this mutation was found
to reside in less than one percent of the
prisoners, it seemed to augment the latent
psionic potential within the human brain.
ATLAS calculated that, should the prisoners
survive in their new environment, many of
them might benefit from this psionic
mutation within only a few generations. These
findings were recorded and relayed back to
Earth, straight into the logs of Doran Routhe.
Originally scheduled as a one-year trip,
their voyage took a turn for the worse. At some
point during the journey the navigational
systems linked to ATLAS shut down, erasing
not only the coordinates of Gantris VI, but
those of the Earth as well. The four ships,
carrying their hapless cargo in stasis, barrelled
blindly through space at warp speeds for
nearly thirty years.
Eventually, the warp-drive engines of the
four supercarriers reached critical meltdown.
After twenty-eight years of warp travel, the
huge ships emerged into real space near the
edge of a habitable star system. Some 60,000
light years from the Earth, their engines
destroyed and their life-support batteries
nearly exhausted, the ships engaged their
emergency protocols and plummeted towards
the nearest habitable worlds in the system.
The Reagan and the Sarengo crash landed
on the world that would be named Umoja.
The Sarengo, which had suffered massive
systems failures during its atmospheric
descent, smashed into the planet killing all of
its 8,000 passengers. The Reagan was more
fortunate, making a controlled descent and
landing safely. Once the ship had landed, the
‘cold sleep’ chambers were deactivated and
the surviving passengers slowly awakened. The
passengers, attempting to discern where they
were and how long they had ‘slept’, found
that the ATLAS system had somehow erased
all knowledge of their journey from their
computer banks.
The Argo landed upon the red world of
Moria. Its passengers met with the same fate
as those aboard the Reagan, as all information
regarding their current status was erased. Only
the passengers of the Nagglfar could access
their ship’s computers to discern their plight.
They accessed ATLAS directly and confirmed
their growing suspicions that they would never
see the Earth again, for although they had
28
Blizzard Entertainment
Page 29

Blizzard Entertainment
29
Page 30

landed on the temperate planet of Tarsonis,
the Nagglfar was damaged beyond repair.
The surviving exiles, now spread across
three worlds, began to salvage their wrecked
ships in an attempt to find refuge in their
new surroundings.
The Confederacy
and the New World
The inhabitants of each planet worked to
survive in what they termed ‘the New
World’. Unaware that their fellows also
thrived upon the other worlds in the system,
the vagabond Terrans made do with
whatever meager resources they could find.
Having lost the means to communicate over
interplanetary distances when their ships
were stripped for essential materials, the
Terrans lived in isolation for decades. In a
relatively short amount of time, the three
isolated groups of Terrans founded sister
colonies upon their respective worlds, and
although it would be at least sixty years
before the three colonies would be reunited
by space travel, each of them grew into
prosperous, self-contained communities.
Tarsonis, the largest and most
technologically advanced of the colonies,
soon developed second generation subwarp engines. This allowed their ships to
explore the myriad, barren planets of the
surrounding star system and eventually led
them to find the other survivors of the Long
Sleep.
Once reunited, the three colonies
benefited from mutual trade and commerce
treaties. Although Tarsonis kept pushing
Umoja and Moria to join in a conglomerated
government, the two colonies steadfastly
refused. The fleets of Tarsonis continued to
explore the Terran patch of space that came
to be known as the Koprulu Sector.
Founding prosperous colonies upon
seven other worlds within the system
enabled the military might of Tarsonis to
grow by leaps and bounds. A new
government, christened the Terran
Confederacy, was founded by the Tarsonian
colonies. The Morian colony, which had
benefited from having the largest resource
mining operations in the Sector, began to fear
that this new Confederacy might attempt to
move in and regulate their lucrative
operations. Thus the Kel-Morian Combine
was formed; a shady, corporate partnership
that would supply military aid to any Mining
Guild that was oppressed by Confederate
policy. Tensions rose between the
Confederacy and the Combine leading to the
outbreak of the Terran Guild Wars.
The Guild Wars lasted for nearly four years,
with the Confederacy eventually
“negotiating” peace with the Combine.
Although the Combine retained its autonomy,
almost all of its supporting Mining Guilds
were annexed into the holdings of the
Confederacy. The Umojan colony, after
seeing what blatant abuse the Confederacy
was capable of, founded the Umojan
Protectorate. This nationalised militia would
work to keep its colony free from Confederate
tyranny. In the final analysis, the Guild Wars
assured the Confederacy its position as the
dominating factor within the Terran power
structure.
The might of the Confederacy continued
to grow as its ‘Prospectors’ claimed world
after world with their reckless expansionism.
Pirate groups and radical militia organisations
began to spring up more frequently as
Confederate enforcement agencies continued
to abuse their citizenry. One of the greatest
examples of revolt against Confederate policy
was the Rebellion of Korhal.
The Rebellion of Korhal
Korhal was one of the core Confederate
worlds originally settled by Tarsonian
colonists. A world of affluence and
enlightenment, Korhal contributed greatly to
30
Blizzard Entertainment
Page 31

the military and technological advancements
of the Confederacy. Although the
Confederacy benefited from Korhal’s
continued productivity, the citizens of the
colony resented their forced affiliation with
the often-corrupt Confederate Senators.
Attempting to retain their independence,
the citizenry of Korhal instigated numerous
riots against the local Confederate militia.
The Confederates responded in kind and
declared martial law throughout the colony.
This only seemed to agitate the populace
even more, escalating the already rampant
civil chaos. The Confederates believed that
if their most treasured and pampered colony
could turn against them, then all of their
other colonies might revolt as well. It was
decided that the crisis on Korhal would be
ended by any means necessary. Korhal
would serve as a chilling example to all of
the colonies in the Confederacy.
A dynamic Korhalian Senator by the name
of Angus Mengsk took it upon himself to
formalise the sentiments of his fellow
citizens. Their cry for freedom was
undeniable when Mengsk actively declared
war against the Confederates. Whipping the
people of Korhal into a volatile, patriotic
frenzy, the Senator succeeded in capturing
all of the Confederate outposts on Korhal.
Issuing statements declaring that the
Confederacy no longer held any claim over
the world of Korhal, Mengsk succeeded in
garnering the respect and admiration of
many other struggling colonies.
The Confederates, seeking to contain the
situation, pulled their forces from Korhal and
withdrew their fleet from its skies. Mengsk
and the other leaders of the revolt, believing
that they had won their independence,
celebrated their victory over the
Confederacy. The Confederates, knowing
that a perceived loss to Korhal might instigate
other colonies to revolt, planned to retake
the planet through subtler means.
The Confederates sent three of their
deadliest assassins, known only as Ghosts,
to eliminate Mengsk and his supporters on
Korhal. The Senator’s decapitated body,
along with those of his wife and young
daughter, were found the next morning on
the private balcony of his towering, fortresslike headquarters. Mengsk’s head was never
found. While the assassination did much to
weaken the revolt on Korhal, it also fueled
the fires that would eventually forge the
greatest enemy the Confederacy would ever
know…
Arcturus Mengsk, an accomplished
Confederate Prospector and businessman,
did not take the news of his family’s death
well. Having been a Prospector for years,
Arcturus knew of the despicable lengths that
the Confederacy would go to in an effort to
reach its objectives. He was uninterested
with greater Sector politics and was even
alarmed and somewhat embarrassed by the
actions of his estranged father on Korhal. He
never dreamed, however, that his family
would be killed merely to prove a point. Their
deaths stirred something inside the young
Arcturus, leading him to forsake his
promising future and follow a lonely path of
vengeance.
Rallying the various militant groups that
had followed his father against the
Confederates, Arcturus succeeded in
fashioning an impressive, yet somewhat
ragtag, army. Mengsk’s followers struck
boldly at various Confederate bases and
installations, costing the Confederacy billions
of credits in men, machines and equipment.
With rumours spreading of a secret alliance
between Mengsk’s group and the Umojan
Protectorate, the Confederate government
quickly decided on a final solution to their
problem. A salvo of one thousand
Apocalypse-class nuclear missiles was fired
at the planet of Korhal from the distant
Confederate capital of Tarsonis. Over
4,000,000 people were annihilated during
Blizzard Entertainment
31
Page 32

32
Blizzard Entertainment
Page 33

the savage attack. In a single instant, the
prosperous colony of Korhal was reduced to
nothing more than a super-heated sphere of
blackened glass and stirring phantoms.
The news of the holocaust reached Mengsk
at a secret base located within the borders
of the Umojan Protectorate. With nothing left
save vengeance, Arcturus and those gathered
with him on that sorrowful day pledged a
sacred vow to bring down the Confederacy
at all costs.
Calling themselves the Sons of Korhal,
Arcturus and his renegade team of volunteers
quickly made names for themselves as the
most wanted fugitives in the Sector. Striking
silently and swiftly, the Sons of Korhal won
countless victories over the Confederacy. But
with every battle won in the name of justice,
Arcturus was portrayed as a madman and a
terrorist by the Confederate-controlled
media. Most colonies refused to house or
provide services to anyone affiliated with the
outlaw group. Yet, despite seemingly
overwhelming odds and scandalous public
opinion, Mengsk never gave up the fight
against the Confederates. To this day, the Sons
of Korhal continue to confound Confederate
enforcement agencies as they work to bring
about their mission of liberation for the
Sector.
The massive ships opened fire upon the
unsuspecting colony, continuing to decimate
every inhabited settlement on the planet. This
unprecedented attack caught the
Confederate forces by surprise, sending the
shocked Terran fleets into disarray. Although
they had never encountered alien species of
any kind, they rushed quickly to defend
themselves against this new, mysterious
enemy.
The Confederacy launched a clumsy
counter attack against the alien fleet as it
made its way towards the second Terran
planet of Mar Sara. The alien fleet, identifying
itself as the Protoss, mysteriously withdrew
its forces and spared the colony. Soon
afterwards, a second, terrifying alien
presence was discovered on the outskirts of
Mar Sara. These new, insect-like invaders
were very different from the Protoss that
attacked the colony just a short time before.
No Terran agency could account for the
disturbing presence of not one, but two
strange alien races within their colonies.
Overcome by a collective, paranoid terror
and encumbered by their own political
infighting, the hapless Terran factions could
only watch as an ever-increasing tide of alien
invaders made their way towards the heart
of the war torn Terran Sector.
War
The various colonial powers and pirate
militias continued to spar with the
Confederate forces. Although many of the
groups were constantly at odds with one
another, the overall Terran presence within
the Koprulu Sector continued to strengthen
and expand. These petty squabbles would
end soon enough as the Terran colonies
found themselves caught in the midst of a
struggle of epic proportions.
Without warning a fleet of fifty alien
warships descended from the skies over the
outlying Confederate colony of Chau Sara.
Blizzard Entertainment
33
Page 34

Terran Species Overview
Forced to adapt to a harsh existence on the mostly lifeless worlds along the Galactic Rim,
the Terrans are masters of survival. Possessing neither the advanced technology of the Protoss
nor the natural prowess of the Zerg, their military consists of a varied mix of units. From the
effective, yet expendable, Marine conscripts to the highly trained Wraith pilots, the Terrans
are a tenacious lot who are quite unwilling to concede their territory.
Despite the setbacks this young species has suffered, the Terrans have managed to spread
from world to world, fully believing that they can stand against any opposition.
Mobile Buildings
The key to the survival of the Terran species is flexibility. Their primary structures
are equipped with self-contained thruster systems that enable low altitude flight
and allow them to change locations. A building in flight is unable to perform any
of its normal operations. Also, any structures that had been added onto a mobilised
building are left behind and are non-functional. Once the primary building has
landed it quickly regains full functionality, although the abandoned add-on structure
remains useless. The nomadic abilities of the Terrans allow them to not only travel
from one cache of resources to the next, but to evade an impending attack as well.
Finally, if the appropriate primary building is instructed to land next to an abandoned
add-on, even one built by enemy Terrans, it can be captured and put to use.
Critical Building Damage
The primary drawback of the modular and often improvised technology employed
by the Terrans is that their buildings are particularly vulnerable to extensive damage.
Ruptured Vespene tanks and sudden power surges can cause an already damaged
structure to collapse, even if it is no longer under direct attack. Any Terran building
which is severely damaged drops into the “red zone”, indicated by the structure’s
Hit Point bar turning red. A building so damaged will continue to lose Hit Points
unless it is repaired enough to return to Yellow or Green status.
Support
With the exception of add-ons, all Terran buildings have self-contained power
generators and do not require additional support or resources once constructed.
Since add-ons are powered by the building that they are attached to, they will shut
down if the primary structure is destroyed or disconnected.
Terran troops and vehicles, however, do require a constant supply of food, fuel,
and spare parts that are provided by Supply Depots. The current level of available
Supplies is displayed in the upper right hand corner of the Main Screen. Any Supply
Depot will also display current Supply statistics when selected. If there are not
enough Supply Depots to properly support the current number of Terran forces,
the training or manufacture of additional units will not be possible until additional
Supply Depots are constructed.
34
Blizzard Entertainment
Page 35

Terran Units
Marine
Role: Armoured Infantry Trooper
Armament: CMC-300/400 Powered Combat Suit
8mm C-14 “Impaler” Gauss Rifle
Marines are the first line of defense for most Terran
colonies. A majority of them were at one time
criminals or rebels who have undergone mandatory
Neural Resocialisation. Freed from any previous
allegiances or ideologies, these fearless men and
women are ready to defend Confederate interests with
their lives.
The Powered Combat Suit worn by Confederate
Marines is effective against most small-arms fire and
provides them with full life-support and NBC
(Nuclear/Biological/Chemical) shielding for operation
in deep space and hostile environments. The C-14
Impaler Gauss Rifle fires 8mm metal “spikes” at
hypersonic speeds. The rounds are designed to provide
maximum penetration against all armour types. To
preserve both ammo usage and minimise power
requirements, the rifle uses a capacitor system to fire
in short, controlled bursts.
Firebat
Role: Armoured Assault Trooper
Armament: CMC-660 Heavy Combat Suit
Plasma-based Perdition Flame Throwers
Like standard Marine Infantry, Firebats are typically
“culturally challenged persons” who have been
Resocialised by the Confederate government.
Equipped with powerful, arm-mounted flame
throwers, they serve as assault troopers in the various
Terran Militias. Although their attack has a limited
range, the flame throwers cause considerable damage
to any target caught within the stream of fire. Firebat
Combat Suits provide additional protection from heat
and flame, although they are significantly heavier than
standard Marine armour.
Blizzard Entertainment
35
Page 36

StimPack
The newest versions of the Marine
Powered Combat Suit and Firebat Heavy
Combat Suit feature an in-field chemical
delivery system filled with a powerful
mixture of synthetic adrenaline and
endorphins coupled with a powerful
psychotropic aggression amplifier. When
activated, the StimPack provides the user
with greatly increased speed and reflexes.
Some tissue damage may result.
Side effects including insomnia, weight
loss, tremors, grand mal seizures, mania/
hypomania, paranoiac hallucinations,
severe internal hemorrhaging and
cerebral deterioration have all been
declared nominal and well within
Confederate acceptable safety margins.
Ghost
Role: Espionage/Intelligence Agent
Armament: Hostile Environment Suit
25mm C-10 Canister Rifle
Personal Cloaking Device (Special Issue)
Ghosts epitomise the height of human evolution and
physical conditioning. Born with incredible psionic
potential, these agents are quarantined by the
Confederate Government and trained from infancy to
channel their psionic energies to augment their natural
physical strength and endurance. As a precautionary
measure, Psychic Dampeners are surgically implanted
in all Ghosts.
36
Cloak
The most unnerving of these agent’s
skills is the ability to cloak themselves
from enemy detection. This ‘invisibility’
has earned the Ghosts a fear-inspired
reputation for their mysterious battlefield
tactics. Older models of the Ghost Hostile
Environment Suit may not be equipped
with a personal cloaking device, but they
may be retrofitted with them in the field.
Blizzard Entertainment
Page 37

Lockdown
The C-10 Canister Rifle normally fires
High-Explosive rounds, but it can also be
armed with special Lockdown rounds that
temporarily disable mechanised units caught
within the blast. The Lockdown shell must
be charged with a small amount of energy
before use.
Nuclear Strike
One of the primary responsibilities of the
Ghost is to locate enemy units or structures
for tactical nuclear strikes. Using a special
frequency targeting laser, the Ghost can
direct missiles from any friendly silos with
pinpoint accuracy.
Vulture
Role: Scavenger Hover-Cycle
Armament: Anti-Personnel Fragmentation Grenades
Spider Mines (Optional)
The armoured Vulture Hover Bikes, used primarily for
scouting the myriad wastelands of the Terran Colonies,
are designed for speed and reliability. The Limited Gravity
Hover Technology used by the Vulture allows it to travel
over rough terrain without loss of traction or speed.
Although ill-suited for heavy combat, they make excellent
skirmishers and the bike-mounted grenade launcher is
extremely effective against lightly armoured targets.
Spider Mines
Although Spider Mine deployment
systems are still not standard equipment on
the Vulture, they are becoming more
popular, especially on border worlds. Spider
Mines can be used to protect resource
reserves and vital tactical locations. The
small mines bury themselves in the ground
and wait for enemy units to approach. Once
activated, the mines will arm themselves and
scuttle towards their targets.
Blizzard Entertainment
37
Page 38

Goliath
Role: Forward Assault Strike Armour
Armament: Twin 30mm Autocannons
Hellfire Anti-Air Missiles
The Goliaths, manufactured by LarsCorp Technologies,
were originally built for the Kel-Morian Combine to serve
as infantry support. Corporate saboteurs stole the plans
and sold them to Confederate interests, and to this day
the Goliath is well-known along the Rim.
Featuring all-terrain maneuverability and a computerbased heavy-weapons systems, the Goliath is equally
adept at providing both ground level and anti-air support.
It is armed with twin 30mm smoothbore Autocannons
and Hellfire-AA Scatter Missiles.
The use of Goliaths in the infamous Kel-Morian Mining
Revolts showed just how effective even a small number
of these versatile Combat Walkers can be when engaged
in intensive urban warfare.
Arclite Siege Tank
Role: Mobile Artillery Cannon
Armament: Twin 80mm Cannons
120mm Shock Cannon
The heavily armoured Arclite Siege Tank is renowned
throughout the Confederacy for its devastating firepower
and stalwart emplacement/advance tactics. Originally
designed to serve as a “final defense” security cannon,
the versatility of the Goliath Walker showed that mobility
was crucial in maintaining an effective military. In its final
form, the Siege Tank is intended to operate as a twostage vehicle, although the first series of tanks produced
were single-stage vehicles that were later upgraded.
38
Siege Mode
The primary form of the Arclite Siege Tank
is extremely effective, but city assaults and
base defense required more firepower than
even these machines could effectively
provide. The solution was to provide a
secondary, artillery-based mode for the tank.
Once transformed into Siege Mode, the
Arclite tank sacrifices mobility to deploy its
awesome Shock Cannon.
Blizzard Entertainment
Page 39

SCV
Role: Space Construction Vehicle
Armament: Fusion Cutters
Initially used during the reconstruction of the
Tarsonian Orbital Platforms, the T-280 SCV (Space
Construction Vehicle) became a staple in intra-Colonial
construction and engineering due to its ability to
perform a multitude of tasks, including the construction
of new buildings and the transportation of raw resource
materials. It is this versatility, and an unmatched
reliability, that make the SCV an invaluable tool in
rapidly establishing Marine encampments and strike
bases on any terrain.
Repair
SCVs can repair damaged buildings
and mechanical units to quickly bring
them back to full capacity. Conducting
repairs uses a small amount of resources,
depending on the extent of the damage
that must be fixed. Select an SCV and
left-click the Repair button. With the
targeting cursor, select the damaged
mechanical unit to be repaired.
Dropship
Role: Armoured Personnel Carrier
Armament: None
Heavily armoured Terran Dropships are a vital part
of Colonial defense and are fully rated for both
atmospheric and deep space flight. The daredevil pilots
of these sometimes faulty, unreliable ships are charged
with delivering Marine armour and infantry to any
hotspot or combat zone. Early experiments in
equipping Dropships with weapons systems were
scrapped in favour of greater carrying capacity.
Unloading Units
True to its name, the Dropship is
capable of extremely rapid deployment.
Selecting the Unload All button will drop
off all carried units at the selected
location. To drop off specific units one at
a time, click on the unit wireframe in the
Status Display on the console.
Blizzard Entertainment
39
Page 40

CF/A-17 Wraith
Role: Space Superiority Fighter
Armament: Gemini Air-to-Air Missiles
25mm Burst Laser (Model CF/A-17G only)
The versatile one-man Wraith fighters are a new
addition to the Colonial space forces. Traditionally, most
space battles took place between large capitol ships and
smaller gunships, but Tarsonian technicians found that
small, dynamic high-speed fighters could repeatedly deal
damage to large ships while still evading most defensive
battery attacks. The Wraith is the newest of these space
superiority fighters, and although normally armed only
with air-to-air missiles, newer variants also utilise a bellymounted burst laser for ground attacks.
Cloaking Field
The new CF/A-17G Wraith features a
built-in cloaking field which runs off of the
fighter’s main power supply. When active,
the cloaking field hides the Wraith from
enemy view. This has proven invaluable in
both base defense and strike operations.
Behemoth Battlecruiser
Role: Command Ship
Armament: Laser Batteries
Yamato Cannon (Limited Availability)
The massive, Behemoth-Class Battlecruisers are virtual
flying fortresses, built to keep the peace within the Terran
Sector. Outfitted with multiple laser batteries and thick
NeoSteel armour, these ships are easily the most powerful
of the Colonial vessels. Many Colonial generals use
Battlecruisers as their command centers during long space
campaigns.
Yamato Cannon
Recent research has also led to the
development of the devastating Yamato
Cannon, a terrifying weapon that uses an
intense magnetic field to focus a small
nuclear explosion into a cohesive beam of
energy. The Cannon requires a huge energy
reserve to fire, but its effects are impressive,
to say the least. Terran engineers are
currently working overtime to retrofit
existing Battlecruisers with Yamato devices,
40
Blizzard Entertainment
Page 41

but many older ships are still in service.
Explorer Science Vessel
Role: Mobile Research Station
Armament: None
Many Colonies have placed Explorer Vessels at
strategic points throughout the galaxy to further study
anomalous phenomena, and the Corps’ own Epsilon
Squadron uses them extensively along Confederate
borders for surveillance and study. Recently, as alien
forces have begun to infringe upon Colonial space,
Explorer Vessels and crew have been recalled to provide
electronic warfare and combat support. The primary
ability of the Explorer is detecting concealed enemy units.
By outfitting the Explorer with special modifications,
several other useful effects can be created.
Defensive Matrix
Confederate scientists are still working
on creating stable, long-term force field
generators, but early research has enabled
the deployment of a short-lived defensive
matrix that can absorb significant
punishment. This energy matrix can be
created around any unit within a short
range of the Explorer.
EMP Shockwave
By generating a massive, short-ranged
electromagnetic pulse, the Explorer can
disable shields and special electronics on
any nearby units. Although the vessel
creating the EMP is not affected, any
friendly units within the radius of the EMP
pulse are subject to its effects.
Irradiate
Targeting a unit with this effect will bathe
it in a high-energy stream of radioactive
particles, saturating it with damaging
energy. The radioactive field will damage
any personnel within close proximity of the
irradiated unit. The field will lose energy
over time, but not before it deals
considerable damage to clustered troops.
Blizzard Entertainment
41
Page 42

Terran Buildings
Command Centre (Mobile Building)
Command Centres serve as the focal points for all Terran outposts.
Originally designed to be roving resource processors for Confederate
Prospectors, the Command Centres can pick up stakes and move on to
new Mineral or Vespene deposits. They also have the ability to manufacture
SCVs and serve as the return point for mining vehicles. Heavily armoured
and sturdy, the slow moving Command Centres are most vulnerable when
they are on the move.
ComSat Station (Add-On to Command Centre)
This auxiliary building provides the Command Centre with
improved communications and scanning technologies.
• Scanner Sweep. Directing a focused scanner sweep of an
area will reveal any units and buildings located there,
including cloaked and concealed enemies.
Nuclear Silo (Add-On to Command Centre)
After the Korhal incident, full-scale nuclear weapons were
banned from use on habitable worlds, but smaller tactical
nuclear weapons are still used by Confederate forces.
• Build Nuke. The somewhat dangerous Nuclear Silo can
produce and house a single tactical nuclear warhead. To
prevent outside tampering with the missile guidance
commands, a Ghost agent is required to actually direct the
missile to its target.
42
Supply Depot
The Supply Depot houses all of the goods, tools, and accessories that
are necessary in the day-to-day running of Terran outposts. As various
encampments grow and prosper, it is necessary to provide an everincreasing amount of supplies for colonists and military forces alike.
Vespene Refinery
The rather ramshackle Refineries were designed to speed up the arduous
process of Vespene mining on the more desolate Terran worlds. Once
constructed on top of a Vespene geyser, the Refinery will automatically
package the gas into containers easily transportable by SCVs.
Blizzard Entertainment
Page 43

Barracks (Mobile Building)
The Barracks houses and trains all of the Terran infantry units.
Like the Command Centre, it is a mobile structure able to traverse
great distances in order to reach new hot-zones or deployment
centres.
Academy
The Confederate Marine Corps is always researching new
technologies and seeking to improve the quality of its personnel.
The Academy is the primary centre of this research.
• Research U-238 Shells. These depleted uranium shells are
designed to provide a greater firing range for the C-14 Gauss
Rifle carried by Terran Marines.
• Research StimPack. When activated, the StimPack provides
the user with greatly increased speed and reflexes. Some
tissue damage may result.
Engineering Bay (Mobile Building)
An Engineering Bay is vital to improving the quality of weapons
and armour used by Terran ground troops. Possessing a degree of
mobility, the Engineering Bay is one of the more vital buildings in
any Terran settlement.
• Upgrade Infantry Weapons. This upgrade enhances the
standard issue weapons carried by the Terran Marine,
Firebat and Ghost.
• Upgrade Infantry Armour. This upgrade enhances the standard
issue armour worn by the Terran Marine, Firebat and Ghost.
Factory (Mobile Building)
The massive, automated Factory is the primary production center
for all Terran ground-based vehicles, from the speedy Vulture to the
massive Siege Tank. Factories are heavily armoured and mobile, but
their tremendous import to a strong military presence makes them
likely targets for enemy forces.
Machine Shop (Add-On to Factory)
The Factory is primarily designed to assemble prefabricated
vehicle designs and components. A Machine Shop is necessary to
process the parts needed for heavier vehicles and to develop new
technology and upgrades for existing vehicle designs.
Blizzard Entertainment
43
Page 44

• Ion Thrusters. Originally designed for inneratmosphere shuttles, these engines have been
modified to provide increased speed for the Terran
Vulture Hover Cycle.
• Spider Mines. Vultures can be equipped with small,
motion-detecting mines that bury themselves once
deployed. These mines automatically track nearby
targets.
• Siege Tech. This technology retrofits the Arclite Siege
Tank to transform into a stationary artillery piece
capable of delivering increased damage at a longer
range.
Armoury
Within the battered walls of the Armoury, Terran researchers and
test groups work to develop improved materials for the heavy
weapons and armour used by Terran vehicles and starships.
• Upgrade Vehicle Weapons. This upgrade enhances the
standard issue weapons mounted on the Terran Vulture,
Goliath and Siege Tank.
• Upgrade Vehicle Plating. This upgrade hardens the standard
armour of the Terran Vulture, Goliath and Siege Tank.
• Upgrade Ship Weapons. This upgrade enhances the standard
issue weapons mounted on the Terran Wraith and
Battlecruiser.
• Upgrade Ship Plating. This upgrade strengthens the standard
armour of the Terran Wraith, Dropship, Science Vessel and
Battlecruiser.
44
Starport (Mobile Building)
The large, highly advanced Starport is responsible for the
construction and maintenance of all space-faring vehicles and
starships used by the Confederacy. Like all primary structures it is
mobile, but extremely vulnerable, while in transit.
Control Tower (Add-On to Starport)
A Control Tower is necessary to coordinate the construction and
upgrading of advanced Terran vessels.
• Burst Lasers. This secondary weapon system is designed
exclusively for the Wraith, enabling air-to-ground assaults.
Blizzard Entertainment
Page 45

Science Facility (Mobile Building)
Terran researchers work with forced diligence at the Science Facility
to develop radical new weapons and defensive systems for the good
of the Confederacy. Rumoured to study and analyse the radically
advanced technology of the Protoss, these scientists constantly strive
to bridge the vast gap between Terran science and alien knowledge.
• Defensive Matrix. Research of this technology creates a type
of defensive field deployable by the Explorer Science Vessel.
• EMP Shockwave. Explorer Science Vessels outfitted with EMP
Generators can disable nearby shields and special
electronics through a massive, short ranged electromagnetic
pulse.
• Irradiate. Created as a by-product of research into nuclear
waste disposal, radiation field generation has become a
growing area of Science Vessel experiments. Effects of
Irradiation are limited to a localised radius around the
specified target.
• Titan Reactor. When installed onboard Explorer Science
Vessels, these giant fusion-pod reactors provide increased
energy output.
Physics Lab (Add-On to Science Facility)
By adding a high-energy particle accelerator and exhaustive
diagnostic equipment to an existing Research Centre, Terran
scientists have been able to facilitate the development of various
technological advancements.
• Cloaking Field. The activation of a Cloaking Field renders the
Wraith fighter undetectable to most units.
• Apollo Reactor. These high-yield uranium reactors permit the
Wraith fighter to remain cloaked for longer periods of time.
• Yamato Gun. By using an intense magnetic field to focus a
small nuclear explosion into a cohesive beam of energy, the
Yamato Gun allows Terran Battlecruisers to blast a path through
almost any defense.
• Colossus Reactor. The increased energy output of this reactor
better meets the massive energy requirements of the Yamato
Cannon.
Blizzard Entertainment
45
Page 46

Covert Ops Centre (Add-On to Science Facility)
Only the most trusted officers and researchers are
allowed into the Covert Ops Centre, which conducts all
experimental research for the Confederate Intelligence
Corps.
• Lockdown. Designed for the Ghost C-10 Canister Rifle,
Lockdown ammo temporarily disables mechanised units
caught within their blast.
• Ocular Implants. In an effort to improve their effectiveness
as covert operatives, Ghost agents can undergo radical
surgery to replace their eyes with these sight-range
enhancing cybernetic devices.
• Personal Cloaking. Based on the stealth technology
employed by Wraith fighters, personal cloaking fields
provide Ghost agents with the ultimate in infiltration
capabilities.
• Moebius Reactor. The exclusive equipment of Ghost
agents, these micro-reactors are designed for use with
both Lockdown and Cloaking technologies.
Missile Turret
Missile Turrets are relatively inexpensive structures that will
automatically target and fire upon incoming enemy aircraft. They also
serve as sentry stations equipped with powerful sensors capable of
detecting cloaked vessels.
46
Bunker
Designed to safeguard troops from enemy fire, Bunkers can be
constructed to defend any pivotal location. Troops within Bunkers can
fire upon enemy forces while remaining safe from damage sustained
from enemy fire.
Blizzard Entertainment
Page 47

The Terran Factions
The various Terran military factions all benefit from the hardware and advanced weaponry
produced by the colonies of the Koprulu Sector. Many of the factions are fond of modifying
their weaponry based upon the specific customs or preferences of their combat group.
Although most Terran tanks, starfighters and war machines were designed and produced by
privately owned corporations, the plans and technical layouts have been stolen, pawned,
smuggled out and put into the hands of various faction scientists.
The Terran Confederacy
The Terran Confederacy consists of nearly a dozen planets within the Koprulu Sector. The
primary worlds within the Confederacy are Tarsonis, Tyrador IX, Brontes, Chau Sara, and
Dylar IV. The Military Squadrons that strive to protect the Confederate worlds consist of
conscripts and ex-criminals from all over the Sector. Many warriors are forced to undergo
the rigorous process of Neural Resocialisation. This process reprograms even the most
hardened criminals and converts them into loyal and stalwart defenders of the Confederacy.
Omega Squadron “the Death's Head Legion”
Commander: Lt. Commander Gregory Reikson
Designation: Heavy Assault Squadron
Base of Operations: Dylar IV
Squadron Colour: Black
The Death's Head Legion is renowned throughout Confederate space for its unrelenting
savagery in battle. Only called upon in severe crisis situations, the Legion's warriors fearlessly
enter any battle against the enemies of the Confederacy. The Legion is mainly comprised of
ex-criminals who have been resocialised and now selflessly give their lives in service to the
society that they once threatened.
Nova Squadron
Commander: Colonel Jackson Hauler
Designation: Black Ops./Espionage Squadron
Base of Operations: Mobile
Squadron Colour: Purple
Mystery and intrigue always seem to surround the enigmatic Nova Squadron. Charged
with policing the other Confederate Armed Forces and gathering intelligence on the myriad
Pirate Militias, Nova Squadron often find themselves in the middle of some new conspiracy.
Blizzard Entertainment
47
Page 48

Mistrusted and shunned by their fellow warriors, Nova Squadron keeps on the move,
constantly seeking to undo the considerable political sabotage and corruption that runs
rampant through the government of the Confederacy.
Alpha Squadron “the Blood Hawks”
Commander: General Edmund Duke
Designation: Advanced Tactical Strike Squadron
Base of Operations: Chau Sara
Squadron Colour: White
Alpha Squadron prides themselves as being the “first group in and first group out” of any
hot zone. Their lightning quick attacks on unsuspecting enemy encampments have gained
them a notorious reputation. Their skill and precision in quick tactical maneuvers is evident
as the fatality rating of the Blood Hawks is the lowest amongst the Confederate forces.
Smoking craters, scorched earth, and piles of enemy bodies are all tell-tale signs of their
ferocity and efficiency in battle.
The Pirate Militias
The Pirate Militias operate outside of Confederate control, lawlessly ravaging bordering
worlds and outlying colonies. Many of the Pirate groups contain large, self-supported armies
that fund themselves by exploiting vast resource deposits upon the many worlds within the
Sector. These Pirates have little respect for the colonies they ravage or the worlds which they
rape of resources. They constantly vie not only with one another, but also against the
Confederacy that constantly threatens to shut down their reckless operations.
48
The Sons of Korhal
Commander: Arcturus Mengsk
Designation: Renegade Activist Coalition
Base of Operations: Mobile
Militia Colour: Red
One of the founding worlds upon which the Confederacy was built, Korhal has been a
hot-zone of anti-Confederate sentiment since its inception. As civil violence ensued against
the Confederate forces on Korhal, the Confederacy decided to make an object lesson of the
Colony. A massive nuclear strike decimated Korhal, leaving the Confederates unchallenged
by any other Colony. Arcturus Mengsk, a one-time Confederate Prospector, founded the
Sons of Korhal in order to topple the corrupt Confederate institution and build a new system
of government that would benefit all Terrans within the sector. Mengsk’s methods and tactics
range from harsh to nefarious. Heralded by radicals as a visionary and a patriot, Mengsk is
seen by the Confederacy as a terrorist and a madman.
Blizzard Entertainment
Page 49

The Umojan Protectorate
Commander: Minister Jorgensen
Designation: Neutral Protectorate
Base of Operations: Umoja
Militia Colour: Aqua
The people of Umoja have chosen to remain separate and autonomous from the
Confederate worlds. The Umojans consider themselves to be an enlightened people,
harbouring obvious contempt for their sister colonies that submit to the near-fascist yoke of
the Confederacy. The Umojans have retained a strong military force known as the Protectorate
that keeps other factions from interfering in Umojan affairs. The Protectorate seeks a truce
with the Protoss, believing that the elder race can teach them the mysteries of the greater
meaning of life, the universe, and everything.
The Kel-Morian Combine
Commander: Gen Mah Sakai
Designation: Mining Coalition/Renegade Pirate Group
Base of Operations: Moria
Militia Colour: Green
The Kel-Morian Combine is comprised of two powerful organisations: The Kelanis Guild
and the Morian Mining Coalition. These two groups, both with questionable ties to the
Confederacy, have banded together in order to maximise their ability to drain the resources
from numerous worlds within the sector. The Combine is the largest non-Confederate
organisation operating within Terran space. Equipped with thousands of armed troops and
hardware, the Combine strictly enforces its myriad territorial operations. It is rumoured that
the Combine actually supplies the Confederacy with fuels and resources. So great is their
political influence, the Confederate forces have been banned from prosecuting the Combine
for any potentially criminal action.
Corporal G. Montag going through final field
inspection, moments before Omega Squadron’s
epic victory over Tal Qirat
Blizzard Entertainment
49
Page 50

50
Blizzard Entertainment
Page 51

STARCRAFT
Zerg History
The Grand Experiment
riven to perfect their science of
proto-genetic evolution, the
D
as the Xel’Naga traveled to the distant fringeworld of Aiur. The vast jungles of Aiur had
produced the most advanced race that the
Xel’Naga had ever seen. Believing that they
could steer the race’s evolution to the pinnacle
of physical perfection, the Xel’Naga began to
conduct their proto-genetic experiments. The
race that the Xel’Naga would eventually name
‘Protoss’ advanced rapidly and gained what
their creators termed ‘a distinct purity of form’.
Unfortunately, the Xel’Naga pushed their
experiment too far. The inherent essence and
sentience of the Protoss developed far too
rapidly, leading to bitter strife and division
between them and their creators. The
Xel’Naga deemed that the purity of form they
sought to create had been sullied by a conflict
of essence and thus decreed that the Protoss
were, in fact, a failed creation. The Xel’Naga
abandoned their children and launched
themselves into the void.
ancient, enigmatic race known
The Birth of the Zerg
Travelling thousands of light years into the
burning core of the galaxy, the Xel’Naga
eventually settled upon the volatile ash-world
of Zerus. The Xel’Naga planned to continue
their Grand Experiment of evolution, only this
time they dismissed their tenets of physical
form and focused chiefly on the pursuit of a
distinct purity of essence. Residing in their
massive ships high above the fires of Zerus,
the Xel’Naga began once again to challenge
the wiles of fate.
The Xel’Naga were more successful with
their second venture than they could have
imagined. They laboured to advance the
evolution of the most insignificant life form
on Zerus, a race of miniature insectoids
known as the Zerg. Through Xel’Naga protogenetic manipulations, the Zerg survived
the torrential firestorms of their world and
thrived. Although extremely small, wormlike, and possessing no ability to manipulate
their physical surroundings, the Zerg
adapted to survive. They developed the
ability to burrow into the flesh of the less
vulnerable species indigenous to Zerus.
Feeding off the nutrients contained within
the spinal fluids of their hosts, the Zerg
learned to parasitically merge with their host
creatures. Once they became capable of
controlling the metabolic and anatomical
processes of their hosts, the Zerg used their
new bodies to manipulate their
surroundings.
As the Zerg incorporated more and more
host creatures into their fold, they began to
assimilate their various genetic strains and
processes. Zerg chemistry began to mutate
and adapt according to the volume of new
genetic material being processed. However,
as diverse as the range of host creatures
became, there was always the undeviating
drive to consume only the most
evolutionarily advanced species
encountered. The Zerg were innately
selective as to which species they
consumed, ensuring that at every stage of
their development they were at the top of
the proverbial food chain. Any race that the
Zerg came across that was deemed
Blizzard Entertainment
51
Page 52

unworthy of assimilation was eradicated to
further purify the strains.
The Xel’Naga soon made an alarming
discovery. The original races assimilated by
the Zerg were hardly recognisable after only
a few generations of their inception.
Somehow the Zerg had developed the
ability to supercharge and steer the latent
evolutionary processes within their host
creatures. The host creatures fell prey to the
effects of gradual physical mutations that
caused all of the various strains to grow
armour piercing spines, razor-sharp limbs,
and ultra dense carapaces. Over a
surprisingly short amount of time, the strains
grew to resemble a terrifyingly ravenous and
unified race.
overmind
The Xel’Naga, remembering all too well
that their failure with the Protoss was a result
of pushing the sentience of the fledgling
species too quickly, decided to follow a
different path with the burgeoning Zerg.
Attempting to waylay the potential hazards
of differing egos, the Xel’Naga structured
the collective sentience of the Zerg into a
unified, amalgamated ‘Overmind’. The
Overmind coalesced into a semi-sentient
being that represented the primary drives
and instincts of all of the Zerg strains. As
time passed, the Overmind developed the
rudiments of personality and advanced
intellect.
Although the Overmind directed the
actions of every creature within the swarm,
it did so through the use of secondary
agents. The Overmind created a new strain
of Zerg that could facilitate the
communication of its whims. These
Cerebrates were massive versions of the
original Zerg insectoids and were
engineered to process and carry out the
various objectives of the Overmind. Each
Cerebrate had a unique objective, such as
‘defend the Hive’, ‘scout for potential strains’,
‘produce more warriors’, or ‘eradicate all life
forms’. The Cerebrates were then empowered
to build their own Hive clusters and carry
out their intended agendas. Over time they
developed personalities that corresponded to
their primary drives. However, the Cerebrates
were still genetically incapable of ignoring
or overriding the commands of the
Overmind.
The Zerg chain of command lengthened
as new races were incorporated into the
swarm. Cerebrates began to use secondary
agents to communicate their orders as well.
For the defense and productivity of the
immediate Hive, the Cerebrates turned to
Queens to further extend their control over
the swarms. The Queens oversaw Drone
activity throughout the resource lines of the
Hives and kept a vigilant watch over the
budding spore colonies of the collective. In
times of battle, Cerebrates called upon the
Overlords to directly relay their commands
to the myriad warriors of the swarm.
Overlords not only transported Zerg warriors
into the fray, but also directed their attacks
against their enemies. Just as the Cerebrates
followed the Overmind, the Queens and
Overlords were incapable of disobeying the
commands from their Cerebrates. This rigid
system of command kept the swarms at peak,
savage efficiency.
As the swarms continued to grow and
strengthen, the Overmind turned its thoughts
towards its own future. It realised that within
a few short centuries its race had assimilated
all of the indigenous life upon Zerus. It knew
that to further evolve the swarm, the Zerg
would need to leave Zerus. The Overmind
began to reach out with its senses, looking
for something - anything - which would
provide them with transport from this world.
That opportunity soon arrived. A race of
gargantuan, space-faring life forms passed
through the Zerus system, and the Overmind
called to them. Drawn to the barren world
52
Blizzard Entertainment
Page 53

by this beacon, they were quickly assimilated
by the swarm. The inclusion of super-dense
hides and the ability to exist in a vacuum
bolstered the genetic pool of the swarm. Soon
the Zerg warriors were conditioned to survive
the harshness of space.
This pivotal moment in the development of
the Zerg was not lost to the Xel’Naga. The Zerg,
despite having an extreme physical handicap,
had succeeded in not only surviving, but in
retaining the purity of their terrible overriding
essence. The Xel’Naga knew that they had
achieved their goal.
The Fall of the Xel’Naga
The pride in their achievements proved to be
the fatal downfall of the Xel’Naga. The
Overmind, while slowly expanding itself into
the void of space, became aware of the mighty
Xel’Naga world-ships hovering ominously
above the skies of Zerus. The Xel’Naga, having
kept a constant watch on the Overmind, were
horrified to find that it had actually severed their
psychic link, effectively hiding itself from their
view. With its need to consume driving its
minions into a lustful frenzy, the Overmind
launched the now space-faring Zerg swarms at
the unsuspecting Xel’Naga. The ancient race did
what they could to stem the tide of the everadvancing Zerg onslaught, but in the end their
efforts were in vain. Wave after wave of Zerg
swarms hammered the reinforced hulls of the
Xel’Naga’s ships with no signs of abatement.
Within only a few hours the Zerg overran the
defenses of their creators and laid waste to the
Xel’Naga fleet.
As the greater whole of the Xel’Naga race was
consumed by the raging, genetic whirlwind of
the Zerg, the Overmind gained the knowledge
and insights of its masters. The Overmind
processed thousands of sentient beings into
itself, causing it to grow far more powerful than
it had ever imagined. It learned the secrets of
the sacred Khaydarin Crystals, and began to
incorporate the energies of these Crystals into
its own. Through the intimate knowledge
of evolution and proto-genetic physiology
gained from the Xel’Naga, the Overmind
was able to increase the level of sentience
in many of the higher Zerg strains, while
still keeping them fully under its control.
Through dissecting the memories of the
Xel’Naga, the Overmind was made aware
of the myriad races that had at one time
or another been influenced by the ancient
race. The Xel’Naga had kept a detailed
genetic history of each race, giving the
Overmind a clear understanding of their
respective strengths and weaknesses.
Most importantly, the Overmind learned
of an exceedingly powerful race that lived
near the galaxy’s fringe known only as
the Protoss. The Overmind knew then that
the Protoss and the Zerg would eventually
be caught in an inevitable, apocalyptic
conflict.
The Determinant
The Zerg left the lifeless, burning world
of Zerus and laid waste to every planet
they found along their path towards the
Protoss Homeworld. As they progressed
slowly through the trackless dark between
the stars, the Zerg assimilated only the
strongest of the races that they came
across. The swarm continued to build
steadily, ever-increasing in size and
power. As they progressed, the Overmind
sent out numerous deep-space probes
that scouted ahead of the swarm,
searching for new worlds to plunder.
Despite innumerable victories, the
Overmind was greatly disturbed. The
Overmind was aware that the Protoss had
become a highly psionic race, able to
bend and warp the very fabric of reality
to their whims. It sought a way to counter
the awesome might of the Protoss, but
found no answers among the genetic
strains it devoured.
Blizzard Entertainment
53
Page 54

On the verge of despair, the Overmind
made an amazing discovery. One of its deepspace probes had relayed the location and
vital statistics of a race that occupied a series
of nondescript worlds, right under the
shadow of the Protoss.
The new race, called Humanity, was mere
generations away from developing into a
formidable psionic power. But the Overmind
also knew that Humanity was still in its infant
stages, hardly capable of defending itself
against the ravenous Zerg. Although a shortlived and seemingly frail species, the
Overmind knew that Humanity would be the
final determinant in its victory over the
Protoss. If it could assimilate the psionic
potential of Humanity, the Overmind would
have the ability to combat the Protoss on its
own terms.
Thus, the Zerg swarms slowly made their
way towards the burgeoning worlds of
Humanity. The journey lasted for sixty years,
but eventually the massive, extended Zerg
Swarm reached the outskirts of the Terran
Sector of Koprulu. Sending in a scouting
Brood, the Overmind soon discovered that
the Humans dwelt on over a dozen different
worlds within the Sector. Seeding the
atmosphere of the planet called Chau Sara
with rudimentary Hive-spores, the Overmind
began to unfold its master plan to enslave
Humanity. The Hive-spores gradually drifted
down to the surface of Chau Sara and
saturated the ground with their denuding,
alien toxins. Although the Human colonists
had no idea that the Zerg had subtly infested
the topsoil of their world, Zerg minions began
to descend to the planet’s surface and
construct their bizarre structures and Hive
clusters. Once the infestation of the colony
was well underway, the Overmind sent its
voracious children to the other nearby
worlds. Insidious and elusive in their tasks,
the agents of the Overmind soon infested
the colonial worlds of Chau Sara, Mar Sara,
Brontes, and Dylar IV, unnoticed by the
denizens of those colonies.
Yet, from out of the cold void of space, a
mighty fleet of Protoss warships emerged to
combat the Zerg invasionary forces. The
Overmind, anxious to learn what it could
about the enigmatic Protoss, decided to let
them hamper the initial infestation process.
Holding its ravenous warriors at bay, the
Overmind watched as the Protoss razed the
colony of Chau Sara. Apparently, the Protoss
were aware that the Hive Spores had already
despoiled the planet and seeking to prevent
further infestation, incinerated the planet.
Such decisive action pleased the
Overmind, who could only marvel at how
the Protoss wrought absolute devastation
with such grace and power. Knowing that
the coming conflict would be the greatest
challenge of its existence, the Overmind
pulled its forces back to observe how the
Protoss, and Humanity, would react next.
54
Blizzard Entertainment
Page 55

Zerg Species overview
The Zerg are composed of several different types of creatures that have been integrated
into the Swarm by the Overmind. These creatures, or breeds, have been selectively evolved
to become efficient killers and to assist the Zerg in their quest for ultimate power. The Zerg
do not utilise technology in the common sense, but their natural weaponry and armour is
comparable to the most advanced gadgetry employed by any other species. This biological
evolution, combined with an unmatched savagery and their blind devotion to the Overmind,
make the Zerg an extremely formidable and deadly foe.
Zerg Life Cycle
The Zerg do not train or manufacture their military like other species. Instead, a
central Hatchery produces Larvae which, in turn, metamorph into the various Zerg
breeds. This system of creation is both an advantage and a drawback as all Zerg
production is necessarily centralised. Great care must be taken to guard the
Hatchery, and it is advisable to quickly create new hatcheries for increased Larvae
production.
The Creep
Zerg structures are effectively giant organs, making a Zerg colony a living creature.
To provide the required nourishment and infrastructure, the Zerg produce a living
carpet of bio-matter that invading forces have dubbed the Creep. Creep, produced
by both Hatcheries and the aptly named Creep Colonies, will spread rather quickly
across any fertile ground. The Hatchery is the only structure that can be built
without the benefit of existing Creep since it has been genetically designed to
automatically produce enough to fuel its own growth. The Creep itself is extremely
durable and capable of near-instantaneous regeneration, only retreating from
infested ground when a Hatchery or Colony is destroyed.
Regeneration
Perhaps the greatest advantage of the Zerg and their biological nature is an
amazing healing and regenerative ability. A Zerg colony will remain viable unless
every creature and structure is completely destroyed, as even a Zerg on the verge
of death will eventually return to full health.
Control
The Zerg Overmind maintains a constant psionic link with its servants, but in
order to issue commands on an individual level, it must use Overlords to relay its
orders to the other Zerg breeds. A Zerg colony cannot grow beyond the collective
ability of all Overlords to provide the necessary amount of Control. The current
level of Control is always displayed in the upper right hand corner of the Main
Screen, and selecting any individual Overlord will also display the current level of
Control required and provided.
Blizzard Entertainment
55
Page 56

Zerg Units
Larva
Type: Hive Spawn
Core Genus: Original Zerg Strain
Primary Attack: None
The closest creatures to the original Zerg insectoids
are the Zerg Larvae. Although their size and toughness
were greatly boosted by the Xel’Naga during their
experiments, they still possess the two traits that originally
intrigued the ancient masters: genetic versatility and
psychic sensitivity.
Each larva contains within it the genetic makeup of
every other Zerg breed. A young hive will only have the
genetic code for the most basic of Zerg breeds, such as
the Drone, but as it grows and develops new structures,
the larvae can expand their library of genetic strains. With
a command from the Overmind, the larvae will enter a
pupal state and begin the metamorphosis into whichever
breed is required by the hive.
Drone
Type: Hive Worker
Core Genus: Gashyrr Wasp
Primary Attack: Spines
The savage Gashyrr Wasps of Eldersthine were initially
inducted into the Swarm to serve as resource gatherers.
Over time they became Drones, engineered with the
Larvae’s ability to break down their own genetic coding
and transform themselves into rudimentary Zerg
structures. A transforming Drone needs the Creep to
provide nourishment and mass to support its new form.
Like the Larvae, Drones are controlled by the Overlords
who monitor their progress through a type of instinctive
telepathy. Drones are also unusually single-minded about
their tasks, diligently working even through raging
combat.
56
Burrow
Drones have shown the ability to burrow
into the ground when under attack. This
technique allows them to remain concealed
from their enemies while regenerating or
waiting for reinforcements to arrive.
Blizzard Entertainment
Page 57

Overlord
Type: Airborne Commander
Heavy Transport (advanced strains)
Core Genus: Gargantis Proximae
Primary Attack: None; may house other breeds
The semi-intelligent, space-faring behemoths known
as the Gargantis Proximae were inducted into the Swarm
so that their heightened senses could benefit Zerg warriors
in battle. The Gargantis flyers were assimilated into the
Swarm so well that the Cerebrates use them to maintain
control over their forces. Overlords keep the warriors of
the swarm ordered and coordinated during battle, and
with their enhanced senses they often serve as advanced
scouts. They have the innate ability to sense any hidden
enemy units, including those under the effects of cloaking
systems or distortion fields.
In addition to commanding troops against their
enemies, the Overlords also have the responsibility of
transporting Zerg warriors within the hollows of their
reinforced carapace hides. Only larger Zerg nests seem
to have this particular breed of Overlord, but it is generally
a good idea to kill these creatures on sight for safety’s
sake.
Zergling
Type: Light Assault Warrior
Core Genus: Zz’gashi Dune-runners
Primary Attack: Claws
The small, savage dune-runners of the sand-world
Zz’gash were incorporated into the Zerg Swarm to serve
as scouts and initial assault troops. Although the Zerglings
are little more than feral animals, they work well in large
groups under the command of larger Zerg warriors. The
voracious Zerglings are fond of ripping enemies to shreds
with their razor-limb sickles and fangs. Because the
genetic code of the Zergling is so simple to replicate, a
single Larva can spawn two separate Zerglings.
Burrow
Like the Drone, some Zerglings have been
noted to burrow underground to set up
ambushes or to protect themselves from air
strikes. Care should be taken when scouting
for resources in Zerg inhabited areas, as any
number of Zerglings could be lying in wait
for the unwary.
Blizzard Entertainment
57
Page 58

Hydralisk
Type: Medium Assault Warrior
Core Genus: Slothien
Primary Attack: Needle Spines
The peaceful, herbivore herds of Slothien were
assimilated into the Zerg Swarm in order to produce
one of the most fierce and diabolical of the Zerg strains.
The evolutionary matrix of the caterpillar-like Slothien
was supercharged by the Overmind, twisting the hapless
creatures into the nightmarish killers known as
Hydralisks. These once mild creatures now hunger for
blood and violence, and they are infamous for acting in
a particularly sadistic fashion.
The spindly, snake-like Hydralisks house hundreds
of armour piercing spines within their upper carapace
plates. These spines can be fired in volleys at enemies
approaching from either the ground or the air, and
massed groups of Hydralisks should be approached with
extreme caution.
Burrow
Hydralisks are especially fond of lying
in wait for their prey. Groups of them have
been observed burrowing into the ground
in the pathway of civilian workers,
uncovering themselves when they sense
an opponent is near.
58
Ultralisk
Type: Heavy Assault Warrior
Core Genus: Brontolith
Primary Attack: Kaiser Blades
Bearing little resemblance to the docile Brontolith that
they were evolved from, the dreaded Ultralisk is the
most powerful of the Zerg ground forces. They serve as
the backbone of the Swarm’s armies and should be
considered as dangerous as any armoured vehicle. These
massive monstrosities are used as living battering rams
against all manner of enemies. The large, bone-like
scythes that protrude from the their backs are nearly
indestructible, allowing them to tear through most
known substances with ease. The best way to approach
these creatures is from the air.
Blizzard Entertainment
Page 59

Mutalisk
Type: Medium Attack Flyer
Core Genus: Mantis Screamer
Primary Attack: Acid Spray
The Mutalisk has been little changed from its original
form, the roving Mantis Screamer of the desolate Dinares
Sector. Capable of both atmospheric and deep space
flight, Mutalisks are the primary flying force of the Zerg.
They attack by spewing forth a highly concentrated acid
spray that will burn through even the thickest of armour.
Guardian Form
Mutalisks can also metamorph into
another form, which is believed to be based
on the nesting form of the Mantis Screamer.
The Zerg Guardian has a thicker armoured
carapace and attacks by lobbing explosive
gobs of acid which have a much longer
range than the Mutalisk’s spray. This acid
can only be directed at targets on the
ground below. Guardians have no natural
defenses against aerial opponents.
Scourge
Type: High Speed Attacker
Core Genus: Unknown
Primary Attack: Plasma metamorphosis
In stark contrast to the lumbering Guardian is the tiny
Scourge. These blind terrors seek out enemy starships
and dive into them. Catalytic agents found within the
body of the Scourge cause it to explode like a living
plasma bomb when it smashes itself against the hull of a
larger vessel. Large numbers of these creatures can
cripple a squad of fighters or even a Battlecruiser. Like
the Zergling, the simplistic genetic makeup of the
Scourge allows two of them to hatch from a single egg.
Blizzard Entertainment
59
Page 60

Queen
Type: Hive Warden
Core Genus: Arachnis Brood-Keeper
Primary Attack: Glave Wurm
The Zerg Queen does not produce larvae, as her name
might suggest, but she has earned her royal status from
her ability to spawn numerous other parasitic creatures.
The Queen can also attack by expelling a voracious
symbiote that rapidly slices its way through opposing
forces. Since her lightly armoured body leaves her
vulnerable to attack, the Queen usually stays near the
central hive to watch over maturing Zerg.
Spawn Broodlings
The Queen launches a small glob of
spores at an enemy ground unit. The spores
attempt to “fertilise” any organic matter that
they come in contact with and are capable
of eating through the armoured shells of
Tanks and Goliaths to reach the occupants
within. Victims are instantly metabolised
and used to feed the growth of a pair of
Broodlings, which hatch within moments.
This explosive birth is fatal to the hapless
host. The Broodlings are small but vicious
and will attack any nearby enemies
60
Parasite
By attaching a tiny, remora-like parasite
to another unit, the Queen can allow the
Overmind to see through the eyes of the
enemy. The parasite is not readily visible and
once detected can only be removed by
killing it’s host.
Ensnare
The Queen sprays her victims with a thick
mucous that slows down advancing (or
retreating) forces. This biological film will
eventual dissolve.
Infestation
The most feared of the Queen’s abilities
is the power to Infest a Terran Command
Center and bring its occupants under the
Overmind’s control. The Queen must enter
Blizzard Entertainment
Page 61

a badly damaged Command Centre and
saturate it with parasitic bio-toxins. Once
infested, the Command Centre’s occupants
can be turned into mindless suicide soldiers.
Infested Terran
Once Terran soldiers and civilians, the
infested victims of the Zerg are completely
consumed by the will of the Overmind. Their
bodies twisted and mutated to produce
extremely unstable chemicals, infested
soldiers long only to find the Swarm’s
enemies and destroy them by detonating
their own bodies in a cloud of toxic fluid.
As with other Zerg ground units, an Infested
Terran also has the ability to burrow.
Defiler
Type: Viral Shock Trooper
Core Genus: Unknown
Primary Attack: Venom
Defilers are the perfect example of the fanatic and
sadistic nature of the Zerg. Like the Larvae, the Defiler
carries within it the genetic code of every other Zerg breed,
but it does not produce them. To the contrary, the Defiler
uses these genetic matrices to produce cancer-like toxins
which have dramatic and deadly effects on the Zerg.
Although it would seem counter-productive for the Zerg
to kill their own troops, the catastrophic effects produced
by this forced devolution have been known to destroy
legions of enemy troops. The Defiler can also defend itself
by spitting its corrosive venom, but it prefers to avoid direct
combat.
Burrow
Defilers can also burrow into the ground
like their lesser brethren. A common tactic
of these vile creatures is to attack until they
run out of prepared toxins, and then burrow
down until they can rejuvenate their stores
of venom.
Dark Swarm
The body of a Defiler is covered with a
countless number of smaller creatures that
feed off each other. By spontaneously
Blizzard Entertainment
61
Page 62

launching a number of these creatures into the
fray, the Defiler can create a thick cloud of living
insects to distract the Swarm’s enemies and
provide cover for other Breeds.
Plague
With this ability, the Defiler produces a batch
of corrosive spores that it then explosively
projects in a dense cloud around its enemies.
This highly toxic cloud corrodes anything caught
within its midst.
Consume
As the only breed in the Swarm to show
tendencies of cannibalism, the Defiler
sometimes feeds off of its own species to regain
lost energy. While this practice is particularly
repulsive to most civilised species in the galaxy,
it has proven to be an effective, if unsavoury,
tactic.
62
This once valiant Terran warrior is now
prepared to give his life for the glory of
the Overmind.
Blizzard Entertainment
Page 63

Zerg Structures
Hatchery
The Hatchery is the heart of any Zerg cluster. It acts not only as a
resource return point and processing centre, but it produces the
Larvae from which all other Zerg are spawned. Larvae are produced
at a steady rate and will stay near the Hatchery of their creation. Like
all Zerg structures, Hatcheries are living organisms that heal damage
over time, making them very difficult to eradicate. The Hatchery is
the only structure that can be built without the benefit of existing
Creep since it has been genetically designed to automatically produce
enough to fuel its own growth. Creep Colonies, however, are required
to extend this bio-matter further.
• Burrowing. Excepting the massive Ultralisk, all Zerg creatures
that inhabit the ground may gain the ability to bury
themselves beneath any surface.
Lair
A Hatchery that “matures”, or evolves, into a Lair
benefits from both increased toughness and extended
access to the stored genetic knowledge of the
Overmind. This allows Zerg Drones to metamorph into
more complex structures, which in turn provide the
genetic code needed by Larvae to metamorph into new
breeds.
• Ventral Sacs. Overlords can be genetically altered to
develop large areas on their underbodies that are
capable of carrying other Zerg.
• Antennas. As antennas are capable of vastly increasing
the sensory range of an Overlord, many brood leaders
are altered in this way.
• Pneumatised Carapace. Biologically modified Vespene
gas is stored in the Carapace and grants improved
mobility to the Overlord.
Hive
The most evolved form of the Hatchery is the Hive.
Protected by a dense exoskeleton and granted full
access to the Overmind’s pool of knowledge, a Hive
enables its cluster to produce the most sophisticated
breeds and structures to be found within the Swarm.
Blizzard Entertainment
63
Page 64

Extractor
Zerg rely on the high-energy state of Vespene gas to power their incredible
metabolisms and fuel the accelerated growth of their larvae. The Extractor
is essentially a giant organ that sits atop a Vespene geyser and packages the
gas into small flesh-wrapped sacs that can be easily carried by Zerg Drones
to a nearby Hatchery for absorption. Since the Extractor lives on Vespene
gas itself, it does not need to be built on an area already covered in Creep.
Creep Colony
Creep Colonies generate and maintain the thick organic bio-matter that
other Zerg structures need to function. The Colony will continue to produce
an ever-expanding zone of infested terrain until it reaches its maximum
range of influence. Even before a Creep Colony has blanketed its immediate
surroundings with Creep, it can be transformed to provide either air or
ground defense for the Hive cluster.
Spore Colony
When a Creep Colony metamorphs into a Spore Colony, it grows a special
sensory organ exactly like those found in Overlords. This sensory cluster
gives the Spore Colony the innate ability to detect cloaked and concealed
units. The Spore Colony also produces a corrosive variation of the Creep
that it can launch at passing air units.
Sunken Colony
While the Spore Colony provides excellent defense against aerial assaults,
the Sunken Colony protects the Hive cluster from ground-based attacks.
Rooting itself deep within the Creep, the Sunken Colony grows multiple
tendrils that it can use to attack any enemies that come too close to its
deadly grasp.
64
Spawning Pool
Contained within the primordial ooze of the Spawning Pool is the basic
genetic makeup of the most prolific of the Zerg warrior breeds, the ravenous
Zergling. Once grown, the Spawning Pool provides this genetic information
to any Larvae produced by the same cluster, allowing them to metamorph
into Zergling.
• Metabolic Boost. This alteration of Zergling physiology serves to
increase their reflexes and rate of movement.
• Adrenal Glands. Changing this delicate glandular balance induces
a kind of battle frenzy that increases the rate at which Zerglings
attack.
Blizzard Entertainment
Page 65

Evolution Chamber
The Overmind knows that complacency is the road to defeat, and it
works constantly to further evolve its children and make them more
efficient killers. The Evolution Chamber provides a testing ground for
the Overmind to manipulate the genetic code of its lesser spawn, gifting
them with enhanced physical abilities.
• Upgrade Melee Attacks. This evolution enhances the natural
weaponry of the Zergling and Ultralisk.
• Upgrade Missile Attacks. This evolution enhances the natural
weaponry of the Drone, Hydralisk and Defiler.
• Upgrade Ground Carapace. This evolution enhances the natural
defenses of all ground-based minions of the Swarm.
Hydralisk Den
The Hydralisk Den bears only a passing resemblance to the nests of
the once-peaceful Slothien that the Hydralisks were evolved from.
The slime-covered walls of this vile place contain within them the
knowledge necessary for a Hive cluster to produce Hydralisk warriors.
• Muscular Augments. Hydralisks can be genetically altered for
increased musculature such that their rate of locomotion is
greatly enhanced.
• Grooved Spines. This subtle variation in the needle spines of
the Hydralisk allows for an increased attack range.
Nydus Canal
The precise origin of the Nydus Canal is unknown, and the exact
process of its operation is also a mystery. The initial canal entrance is
created and then, when a suitable site is found, a sister entrance can
be opened. The Canal then enables Zerg ground units to travel from
one end to the other at extremely high speed regardless of intervening
terrain. This enables multiple Hatcheries located across a large area to
function as one unified nest, with Zerg warriors travelling from one
combat zone to another quickly and efficiently.
Spire
The Mantis Screamers that were assimilated and turned into the
terrifying Mutalisks once built their towering nests on lifeless worlds,
using any surfaces that could be found. The Spire, though similar in
appearance to the Mantis aeries, has been altered to sustain itself by
feeding on the Creep.
Blizzard Entertainment
65
Page 66

• Flyer Attacks. This evolution enhances the natural weaponry of
the Mutalisk, Guardian and Queen.
• Flyer Carapace. This evolution enhances the natural defenses of
all aerial minions of the Swarm.
Greater Spire
The armoured Greater Spire carries the genetic code for the deadliest
Zerg flyers and can be used to further enhance and evolve existing breeds.
This structure enables the deadly Mutalisk to transform into its Guardian
aspect, in which it sacrifices its speed and aerial assault to gain the
ability to attack ground based enemies with devastating effect.
Queen’s Nest
The Queen’s Nest is a festering mound of living organisms that live
off of the Creep and provide the Queen with her various abilities. The
many holes around the base of the Nest house numerous colonies of
parasitic creatures that are nurtured by the Queen herself. These
“children” in turn willingly sacrifice themselves to serve the Overmind
as required.
• Gamete Meiosis. By increasing the reproductive rate of the
symbiotic and parasitic creatures that serve the Queen, her
ability to spawn these creatures is augmented.
• Spawn Broodlings. The Queen spawns Broodlings by first infesting
her victim with self-replicating spores. Upon maturation, the
Broodlings erupt from their host and search for new enemies.
• Parasite. By attaching this tiny parasite to an enemy unit, the
Zerg can see through the eyes of the host.
• Ensnare. The Queen vomits forth spores that secrete a sticky
mucous, slowing any units that become enmeshed in her
gelatinous trap.
• Infestation. By infesting a Terran Command Center with her
parasitic bio-toxin, the Queen brings volatile new creations
into the Swarm.
66
Ultralisk Cavern
Deep within the shelled Cavern are numerous high-radiation deposits
and dangerous substances. The extremely hostile environment within
the cavern is what gives the mighty Ultralisk its unearthly toughness. Its
genetic material has been subjected to countless tests and experiments,
and only the final, viable code is used to provide Zerg Larvae with the
key necessary to metamorph into a new Ultralisk.
Blizzard Entertainment
Page 67

Defiler Mound
The area around the Defiler’s lair is littered with mineral chunks
that have become tainted by the venomous essence of the Defiler
itself. The bottom of the Mound is a disgusting pool of cancerous soup
strewn with a tangled mass of horribly twisted biological rejects. From
this organic poison comes the various venoms that are used by the
Defiler as weapons against the enemies of the Swarm.
• Metasynaptic Node. By stimulating the growth of this portion
of the Defiler brainstem, this mutation increases the rate at
which bio-toxins are secreted.
• Dark Swarm. The Defiler discharges a thick cloud of parasitic
creatures that negate all ranged attacks that pass through it.
• Plague. The Defiler releases acidic toxins that cause damage
to anything trapped within this corrosive cloud.
• Consume. By devouring members of its own Brood, the Defiler
can absorb the vital energies of its victims.
Blizzard Entertainment
67
Page 68

Zerg Broods
Although there is very little known about the different Broods that comprise the Zerg
Swarms, some Terran scientists have attempted to document and classify a few of the larger
Broods that have ransacked their colonies. It seems clear that each distinct Brood stems
from a unique Cerebrate that carries out the will of the Overmind. Each Cerebrate is
empowered to build its own Brood to accomplish its specified goals. Although the Broods
are difficult to distinguish from one another, Terran scouts have witnessed that they vary in
functionality and purpose. It has been noted that certain Broods work with each other in
unison, as if they were operating as cohesive detachments of a larger, tactical force. Terran
explorers have named each discernable Brood with names of ancient beasts from old Earth
mythologies.
The Command Wing
Tiamat
Cerebrate: Daggoth
Estimated Size: 6,500,000/ all strains
Primary Directive: Command Fleet
Brood Colour: Red
Tiamat is the largest and most powerful Brood within the extended Swarm. It is speculated
that the Overmind itself is protected deep within the safety of this living fleet. The most
advanced Overlords and Queens define the rigid infrastructure of Tiamat and help to drive
the lesser Broods to total domination over their enemies. Tiamat excels at tactical space
combat and only dispatches its ravenous surface attackers under the most dire of
circumstances.
68
Fenris
Cerebrate: Nargil
Estimated Size: 5500/ various strains
Primary Directive: Hunter Swarm
Brood Colour: Green
The Fenris Brood is known for its superior tracking abilities and is often called upon to
hunt down escaped breeders and wayward enemies of the Swarm across wild terrain or
through the endless void of space. Although the numbers of this Brood are few, it carries
out its pursuit with merciless precision and cunning. Their primary role, however, is to find
new races and genetic strains that will benefit the swarm through absorption. Once an
acceptable race is found, the Fenris Brood will hound it until it has been either assimilated
by the Overmind or eradicated completely.
Blizzard Entertainment
Page 69

Baelrog
Cerebrate: Gorn
Estimated Size: 6000
Primary Directive: Terror Squad
Brood Colour: White
The Baelrog Brood consists of the most fearsome of all Zerg warriors. Ravenous and
bloodthirsty to the extreme, the Baelrog Brood is often called upon to sow terror and confusion
amongst enemy ranks. Resorting to atrocious acts of cannibalism and indiscriminate slaughter,
Baelrog typically causes enemy warriors to flee for their lives or turn upon their own kind in
order to find some desperate means of escape from the horrendous Zerg onslaught.
Primary Strikeforce
Garm
Cerebrate: Zasz
Estimated Size: 10,000/ various strains
Primary Directive: Primary Assault Force
Brood Colour: Orange
Named after the fierce hellhound of Norse myth, Garm strikes with alarming speed and
ferocity. The minions of this Brood excel at hit and run raids that weaken their enemy’s
defensive formations. Zasz, the cunning Cerebrate of this Brood, delights in preemptive
attacks, relying chiefly upon surprise to throw enemy forces into total chaos.
Jormungand
Cerebrate: Araq
Estimated Size: 3,000,000/ all strains
Primary Directive: Primary Support Force
Brood Colour: Purple
The Jormungand Brood is one of the most heavy-handed of the Zerg attack forces. Typically
called upon to follow Garm’s preemptive strikes, Jormungand Brood pacifies all other
resistance to the Swarm. Jormungand relies on strength of numbers and brute force to
overcome any foe and excels at ground-based combat and direct unit-to-unit warfare.
Surtur
Cerebrate: Kagg
Estimated Size: 2,600,000
Primary Directive: Heavy Support Force
Brood Colour: Blue
Should the Jormungand Brood fail to achieve total victory over an enemy force, the Surtur
Brood is released into the combat zone. Named after the fiery Titan of destruction from
Norse mythology, the Surtur Brood is let loose upon any remaining enemy warriors. This
Brood is so completely destructive when unleashed it is kept restrained within the recesses
of the Zerg fleet and is only called upon under the most extreme circumstances. The Surtur
Brood has been known to eradicate friendly Zerg troops as well as enemies in its furious
rampages
.
Blizzard Entertainment
69
Page 70

70
Blizzard Entertainment
Page 71

STARCRAFT
Protoss History
The Xel’Naga and the First Born
lthough only fragmented
A
ancient Protoss texts speak of
a highly advanced race that ruled over
thousands of worlds in the galaxy, tens of
millions of years ago. This enigmatic race,
often called the Xel’Naga, or ‘wanderers
from afar’, was rumoured to have seeded
and cultivated thousands of various species
on the cold and barren worlds within their
domain. Protoss traditions hold that the
Xel’Naga were a peaceful and benevolent
race, utterly consumed with the study and
propagation of sentient evolution within the
universe. Nothing is known of the origin of
the Xel’Naga, save that they were not native
to the galaxy over which they held sway.
Obsessed with fashioning the perfect lifeform, the Xel’Naga laboured to create a
creature that would be defined by a distinct
purity of form. For thousands of years they
carefully steered the delicate evolutionary
processes of their budding species. Although
their protracted experiments produced
many intriguing deviants and mutations, the
races that the Xel’Naga cultivated always fell
short of their enormous expectations.
Despairing at last, the Xel’Naga focused
their frustrated efforts on the most promising
of their engineered worlds. Aiur, a massive
jungle-world on the galaxy’s fringe, had
borne a race of highly advanced beings.
These beings were incredibly adaptable to
harsh natural conditions and climates. Their
strength and speed were unparalleled
amongst the other races known to the
Xel’Naga. The race had even developed a
documentation remains,
rudimentary tribal society based upon grouphunting and warrior rule. However, their most
distinct aspect was that they communicated
with each other through a very complex
method of instinctive telepathy, allowing them
to operate communally with striking
efficiency. The Xel’Naga were pleased with
the progress of their latest creation and
conceded that the new race was the first of
all their experiments to evolve beyond the
feral constraints of baser life-forms. To signify
their ascension in the galactic order, the
Xel’Naga gave the new race the name of
Protoss, or ‘the First Born’. The early Protoss
lived in harmony and seclusion upon the
world of Aiur for hundreds of generations,
never knowing of the Xel’Naga who watched
over them from afar. Although the Protoss
were the most advanced species to arise, the
Xel’Naga were still unsatisfied with their slow
progress and saw fit to drive the Protoss’
evolution even further. The Xel’Naga spent
yet another millennium subtly guiding the
steps of their children, eventually succeeding
in leading the Protoss to the state of total
sentience and awareness. The First Born
gradually became highly intellectual and
introspective, achieving great heights in not
only their cultural advancements, but
personal, individualistic advancements as
well. Exhilarated by their seeming success,
the Xel’Naga finally made themselves known
to the Protoss, never suspecting the chaos that
was to come.
Blizzard Entertainment
71
Page 72

The Departure
and the Aeon of Strife
The Protoss civilisation spread across the
face of Aiur within only a few thousand years,
eventually culminating with the warring
Tribes settling under a centralised rule. In an
attempt to discern the full extent of their
creation’s evolution, the Xel’Naga had come
down from the heavens and integrated
themselves into the Protoss culture. The
arrival of the Xel’Naga seemed to bring the
scattered Tribes even closer together as the
overjoyed Protoss looked to their wizened
creators for new truths and insights. The
Xel’Naga marveled at how driven the Protoss
were to plumb the mysteries of the universe
around them. The Protoss harboured an
insatiable lust for knowledge that led them
to develop radical, progressive strains of
scientific and meta-neural study. As their
understanding and personal awareness grew,
the Protoss became exceedingly proud and
began to see more value in personal
achievements than communal advancement.
The more successful Tribes began to isolate
themselves from one another, each seeking
to define their own roles, not only within
their immediate society, but within the
greater universe as well. As the Tribes grew
further and further apart, the Xel’Naga reeled
in frustration. They speculated that perhaps
they had pushed the evolution of the Protoss
too far, marring the purity of their creation.
Many Xel’Naga believed that the Protoss had
lost their greatest strengths, as individual egos
arose to overpower the once primary
communal link. The Tribes, driven by
individualistic pursuits, rekindled their own
ancient principles and rites in order to set
themselves even further apart from their
brethren. Where once there was only awe
and reverence for their creators, suspicions
began to brew amongst the Tribes regarding
the interests of the Xel’Naga in their affairs.
As months passed on Aiur, the Protoss began
to shy from their Xel’Naga teachers, and each
Tribe cultivated wild and unsubstantiated
rumours of their creator’s supposed treachery.
Attempting to completely sever themselves
from the rest of their race, the Tribes began to
lose the connection to their primal psychic
link. This breakdown in the inherent empathy
of the Protoss for one another did the most to
dissolve the last remnants of unity and
brotherhood amongst them. The severing of
the psychic link was also the greatest sign, to
the Xel’Naga, that the Protoss had tragically
lost the most fundamental element of their
greatness. Believing that they had made a
grave mistake in pushing their failed creation
too fast, the Xel’Naga made to depart Aiur
forever. The suspicious Protoss, at hearing of
their creators’ departure, reacted with a rash,
violent attack upon the Xel’Naga’s worldships. Many hundreds of Xel’Naga were
murdered by the raging Protoss, who only
decades before had worshipped them as gods.
The Xel’Naga fended off the Protoss’ reckless
attack and sorrowfully launched the greater
number of their massive ships into the trackless
void beyond Aiur. The Protoss Tribes, left
confused and abandoned in the wake of the
Departure, turned on each other in despair.
What followed has been recorded as the
bloodiest, most violent civil war ever recorded
in galactic history: The Aeon of Strife. The
raging battles waged during the Aeon of Strife
were fought by countless generations of
Protoss, all bent on perpetuating the guilt and
blame for their abandonment. Although few
actual records remain from this ‘lost period’
of Protoss history, it is clear that the First Born
devolved into frantic legions of merciless
killers. Driven by centuries of unthinking
hatred towards their brethren, entire
generations of Protoss lived and died without
ever knowing the legacies of their past or of
the primal psychic bond that their forefathers
had once shared. It is legend that even the
greater land-masses of Aiur were devastated
by the epic struggle between the maddened
Tribes. It seemed that the whole of the once
glorious Protoss culture was precariously
poised upon the precipice of total
annihilation.
72
Blizzard Entertainment
Page 73

Blizzard Entertainment
73
Page 74

Khala: The Path of
Ascension
Although there were many different
factors that led to the ending of the Aeon
of Strife, one unprecedented discovery is
cited with bringing about the radical
changes of the Second Age. As the ancient,
vicious blood feuds continued to take their
toll upon yet another generation of Protoss
warriors, one eccentric mystic stumbled
upon a pivotal insight. The mystic, whose
true name has been forgotten in the annals
of history, was eventually named Khas or
‘he who brings order’. Khas, having studied
the archaic, forbidden teachings of the
Xel’Naga, unearthed ancient, monolithic
artifacts known as the Khaydarin Crystals.
The Crystals, left behind by the Xel’Naga,
were fundamental in facilitating their protogenetic experiments. Khas was able to
channel the primal energies of the Crystals
through himself, allowing him to access the
primordial, psychic bond of his race. For
the first time in thousands of years, the
primal chord of the Protoss was tapped.
Flooded by emotions emanating from every
member of his race, Khas became aware
that the Protoss had not lost their primal
link, but had simply forgotten how to attune
themselves to it. Horrified by the warring
emotions that had been tearing his race
apart for countless centuries, Khas began
to search for a way to heal the searing pains
of his people. Khas, gathering many young
Protoss together, was able to teach the new
generation of warriors how to access their
latent psychic bond. These young ones,
suddenly free to distance themselves from
the horrendous strife around them, were
able to see clearly that the conflict of their
race was folly. They believed that the
Xel’Naga had been right to abandon them
and that because their racial essence had
been corrupted by the rise of ego, they were
indeed a failed creation. They maintained,
however, that because their inherent failure
was not of their own doing, the inner conflict
of the Protoss and racial turmoil was baseless
and hollow. Khas developed a radical system
of psychic progression that he hoped would
discipline the new generation and keep them
from repeating the tragic mistakes of their
ancestors. His theory, known as the Khala, or
‘Path of Ascension’, called all Protoss to
forsake their own whims and strive to reunify
their once mighty, communal race. The
greatest hope of Khas was that the Khala would
instill a new sense of essence and vitality
within the Protoss race. Slowly, many Protoss
gave up their ages-old feuds and rallied behind
the ever-growing legions of the Khalai. This
marked the true turning point in the Aeon of
Strife and led to the rise of the Second Age.
As the terrible wars subsided and the Tribes
once more began to heal and bond, the
premise of the Khala began to permeate even
the deepest, most fundamental roots of Protoss
society.
Dae’Uhl: The Stewardship
The Khala, primarily meant to define a rigid
system of behaviour, also called for a shift from
Tribal society to a Caste system. All members
of the Protoss Tribes were split into three new
castes: the Judicators, the Khalai, and the
Templar. This shift worked to remove the last
remnants of the old hostilities between the
Tribes and strengthen the resolve of the Protoss
to embrace a new beginning. The Judicator
caste was comprised of Protoss elders and
statesmen, with its main responsibility being
the governing of the Protoss under the dictates
of the Khala’s Law. The Judicator Assembly was
ruled over by a small group of Elders known
as the Conclave. The second Caste, known as
the Khalai, comprised the greater bulk of
Protoss society. The Khalai caste represented
the driving industrialists, scientists, and
workers who continued to rebuild their
homelands after the harsh conflicts of the Aeon
of Strife. The third caste, called the Templar,
were the holy warriors and defenders of Aiur,
74
Blizzard Entertainment
Page 75

who followed the Khala’s disciplines to
achieve ever-escalating pinnacles of psionic
power. Under the new leadership of the
Conclave and their Judicator Administrates,
and armed with the zealous might of the
Templar, the Protoss soon rebuilt their
decimated world of Aiur into a bustling
paradise. With their growing prosperity
leading them to rediscover many of the
sciences and studies they had lost, the
Protoss learned to travel amongst the stars.
Over the course of only a few hundred years,
the Protoss conquered hundreds of worlds
within their corner of the galaxy, and spread
the fruits of their great civilisation to many
of the more advanced races that they
encountered. All in all, the Protoss
inadvertently succeeded in reclaiming an
eighth of the worlds once presided over by
the Xel’Naga. In keeping with the strict
codes of the Khala, the Protoss took upon
themselves the burden of the Dae’Uhl, or
‘Great Stewardship’. Following the ancient
traditions of the Xel’Naga, the Dae’Uhl
called for the Protoss to protect and
safeguard the lesser races that lived under
their shadow. Unlike their predecessors,
however, the Protoss refused to manipulate
or interfere in the evolutionary processes of
the lesser races under their protection. Ever
vigilant against xenomorphic threats, the
Protoss kept a close watch over their
unsuspecting wards. But, much like the
Xel’Naga many millennia before, the Protoss
kept their presence hidden from the lesser
races in their care. Many hundreds of species
grew and thrived on the various worlds
within their space, never knowing that they
were secretly guarded from on high.
The Dark Templar
Although their new enlightened
civilisation grew and thrived, the Protoss
Conclave kept a dark, shameful secret
hidden from the masses. There were a few
dissident Tribes who refused to embrace the
Khala, believing that their individual identities
would be erased to further promote the
Judicator rule. The Rogue Tribes were not
hostile or militant, but they believed that the
Conclave’s communal agenda would be the
eventual doom of their race. Thus, the
knowledge of the Rogue Tribes was kept
hidden, for the Conclave believed that their
aberrant influence might spread throughout
Protoss society and destroy all that Khas had
accomplished. Convinced that the Rogue
Tribes constituted a palpable threat to the new
order, the Conclave ordered the Templar forces
to eradicate the dissidents. The Templar, led
by a young warrior named Adun, could not
bring themselves to slaughter their wayward
brethren. Instead, the idealistic Adun
attempted to hide the Rogue Tribes away from
the sight of the Conclave. Adun believed that
he could convince the Rogues of the Khala’s
truth by teaching them how to manipulate
their own latent psionic powers. Although
their powers equaled those of the mighty
Templar, the Rogues still refused to submit
their passionate, free spirits to the Khala.
Without the discipline of the Path of
Ascension, the powers of the Rogues spiraled
out of control and unleashed horrible,
devastating storms across the fields of Aiur.
The Conclave, shocked that the Templar had
not destroyed the Rogue Tribes, attempted to
salvage the desperate situation. If the Conclave
punished Adun and the Templar for their
insubordination, it would be forced to publicly
admit the existence of the Rogues. Thus the
Conclave decided to banish the wayward
Tribes from Aiur forever. The Templar under
Adun were sworn to silence as the Rogues
were loaded onto an ancient, but functional
Xel’Naga ship and launched into the void of
space. Forever after the Rogue Tribes would
be known as the Dark Templar. Over time,
the legend of the Dark Templar spread across
the face of Aiur, sparking the imaginations of
many young Protoss. To show their disdain
for the Conclave and their Judicator lackeys,
Blizzard Entertainment
75
Page 76
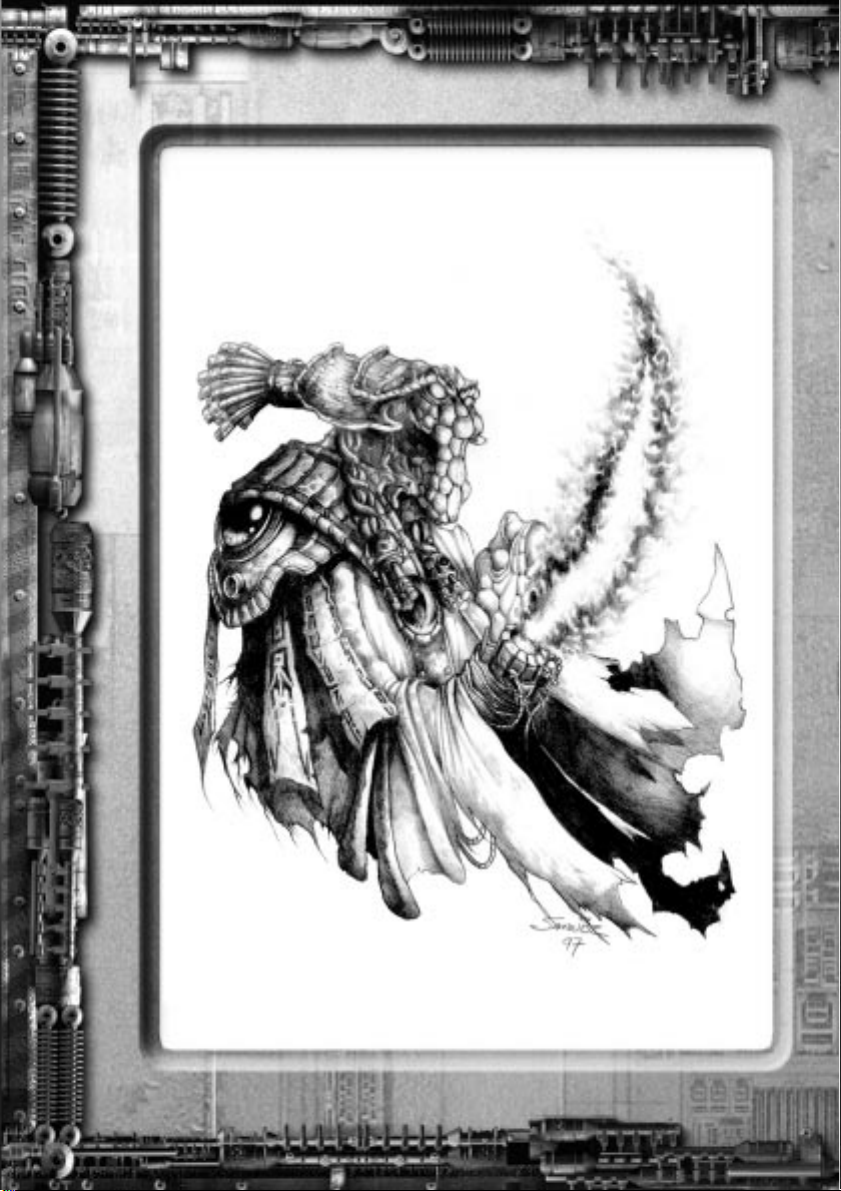
76
Blizzard Entertainment
Page 77

the Dark Templar ceremoniously cut off their
nerve-appendages, effectively severing
themselves from the basic communal link
that all Protoss share. It was widely rumoured
that since the Shadow Hunters were cut off
from the primal chord of their race, they were
forced to draw their psionic energies from
the dark, cold void of space. This tale, above
all others, worked to incriminate the
vagabond warriors for all time. Hunted and
feared by their own brethren, the Dark
Templar led a solitary existence within their
space-faring vessels. Traveling throughout the
cold void of space, they never abandoned
their love for Aiur, and thus worked to
safeguard their long lost Homeworld in any
way they secretly could.
Humanity and the Coming
of the Zerg
The Protoss bore silent witness to the
portentous arrival of Humanity to their edge
of space. Although the Protoss were
uncertain of the vagabond origins of the
Terrans, they knew that these volatile, short
lived humans would prove to be interesting
study. Two centuries passed as the Protoss
watched over the budding Terran colonists.
The Terrans had succeeded in building up
rudimentary colonies on over a dozen worlds
within the Protoss’ borders. Although the
technology of the Terrans was inferior to that
of the Protoss, they adapted to the worlds
upon which they lived and thrived. The
Protoss found the Terrans to be fascinating
in that they constantly fought against one
another, yet still advanced their technologies
and industries by leaps and bounds.
The Protoss were alarmed at how quick
the Terrans were to access and drain the
natural resources from their various worlds.
It seemed to the Protoss that the Terrans had
no respect for the delicate balance of nature,
as they recklessly sped from one world to
the next, leaving nothing but barren
wastelands in their wake. Bidden by the
strict dictates of the Dae’Uhl, the Protoss
were forbidden to directly interfere with the
reckless Terrans, no matter how much they
wished to do so. This disjointed relationship
lasted for many years between the two
races. Yet a routine Protoss scouting mission
found evidence that spelled certain doom
for the hapless Terrans.
The High Templar Tassadar, accompanied
by his renowned Templar expeditionary
force, found a number of small biological
constructs floating near the borders of
Protoss space. Upon close inspection,
Tassadar deduced that the rather
nondescript alien organisms were in fact
deep space probes. Although Tassadar
could not discern their point of origin, it
was clear that they were heading towards
the Koprulu sector of Terran colonies.
Tassadar brought the living probes back
to Aiur for immediate study. The strange
aliens were unlike anything that the Protoss
had ever seen before. The respective
physiologies of the probes were apparently
engineered for deep space travel and
reconnaissance. In an attempt to discern
their primary quarry, the Protoss focused
the energies of the Khaydarin Crystals
through the tiny minds of the probes. The
Protoss were shocked to discover that the
alien probes responded quickly and
naturally to the powerful energies of the
Crystals. Their shock was garnered from the
fact that only creatures born of the
Xel’Naga’s proto-genetics could properly
process the energies of the great Crystals.
More alarming was the vague thought
stream that kept repeating, over and over,
through the tiny brains of the probes;‘Find
Humanity’…‘Eradicate’…‘Learn’…‘Evolve’...
The Protoss speculated that the probes
were the harbingers of a bold new threat
to their section of the galaxy. If the creatures
were engineered with Xel’Naga
technologies, they would be very advanced
and extremely powerful.
Blizzard Entertainment
77
Page 78

It seemed clear to the Protoss that this
new race constituted a palpable danger to
all living beings, and that wherever the
greater bulk of the race was, it must still be
searching for the unsuspecting Terran
colonists.
The Protoss began to send out advance
scouts to scour the surrounding space-ways
for any sign of the alien invaders. Tassadar
claimed that under the dictates of the
Dae’Uhl, it was the chosen responsibility
of the Protoss to protect the races under their
watch. The Conclave, however, argued that
if the ‘worthless’ race of Terrans had already
been infested by some new threat, they must
be put to the flame and eradicated. A great
debate began between the Judicators and
the Templar as to how they should involve
themselves in the Terrans’ imminent plight.
The one fact that both castes agreed upon
was that the creatures were undeniably
engineered through Xel’Naga sciences. And
if they were indeed created by the Ancient
Ones, the Protoss had best be on their guard.
It was agreed to send Tassadar and his
expeditionary force to monitor the Terran
worlds and attempt to discern the severity
of the impending danger. To this end,
Tassadar led his command ship, the
Gantrithor, and an escort of massive Protoss
warships towards the Terran sector of
Koprulu.
The Beginning of the End
Upon arriving in the Terran Sector,
Tassadar’s scouts found evidence that the
mysterious alien threat had already begun
to take its toll upon the Terran colonies.
Upon closer inspection, Tassadar found that
the fringe-colony of Chau Sara had indeed
been infested by alien organisms.
The entire surface of the colony had been
covered with a thick, toxic substance that
continued to erode the planet’s crust. To make
matters worse, the aliens themselves had
either infested or slaughtered most of the
human colonists. Tassadar, horrified by the
colony’s devastation, could only wonder why
the Terrans had not already rushed to aid their
besieged world.
The Conclave, hearing of the colony’s fate,
immediately ordered Tassadar to burn the
entire planet of its infestation. Knowing that
the burning would eradicate all life on the
planet, Tassadar sorrowfully obeyed his
masters. The lumbering Protoss warships
powered up their weapons and opened fire
upon the unsuspecting colony. This costly ploy
was successful in destroying the alien
infestation, but there were still a few
neighboring worlds that had no doubt been
infested as well. Tassadar was ordered to burn
those worlds and any other Terran settlement
that had even the slightest possibility of
infestation. While moving his fleet to the
second infested colony of Mar Sara, Tassadar
began to doubt the morality of his orders.
The Terran warriors, caught completely by
surprise by the initial attack of the Protoss upon
Chau Sara, launched a fleet of starships to
intercept Tassadar’s fleet. The Terran fleet
prepared to defend the colony from the
Protoss, just as Tassadar commanded his ships
to pull away and withdraw. Tassadar, struggling
with his inner doubts, could not bring himself
to destroy Mar Sara or the fleet that had come
to protect it. He sought a way to defeat the
aliens without arbitrarily wiping out humanity
in the process. Thus engaged, Tassadar refused
to follow the genocidal orders of his masters.
Remaining with his fleet, far outside the range
of Terran sensors, Tassadar waited and watched
as the alien presence continued to encroach
across the Terran wastelands.
78
Blizzard Entertainment
Page 79

Protoss Species Overview
In stark contrast to the adaptive Terrans and feral Zerg are the stolid, conservative Protoss.
With their highly advanced technology and potent psionic abilities, the Protoss have long
considered themselves the most powerful species in the known galaxy. Although they are
not a prolific people, they have learned to bolster the ranks of their military with robotic war
machines and to combine their intrinsic psionic ability with technology, thus producing
some of the most effective warriors ever known. If the Protoss have a weakness, though, it is
their refusal to accept change. The tenets of the Khala form a rigid path, and the Protoss are
loathe to deviate from it for fear of once again falling into civil strife.
Shields
Defensive energy shields protect all Protoss military units, and this provides
perhaps their greatest advantage in battle. During the Aeon of Strife, Protoss warriors
used focused psionic energy to surround themselves in impregnable energy shields.
Over time, Conclave scholars and Templar sages learned to reproduce the energy
shield using induced psi-field generators, which allowed even the smallest robotic
machine to surround itself with a protective field. Protoss energy shields are effective
at stopping all manner of physical and energy attacks, but they can be depleted
during an attack. Given time, a shield will recharge to full strength, and Shield
Batteries can be accessed to increase the rate of this regeneration.
Warp Gates
The Protoss are a meticulous species, and their manufacturing techniques and
tools have been developed over generations by Khalai workers. Protoss structures
are produced on the Protoss Homeworld of Aiur. Robotic Probes use special warp
beacons to provide an anchor and entry point for a special warp gate that brings in
the fully functional building from Aiur. This allows the Protoss to quickly establish
a base once they have created a Psionic Matrix.
Psionic Matrix
Protoss buildings and units, to a lesser extent, draw their energy from a great
psionic energy matrix that emanates from Aiur. While the Nexus provides a link to
this matrix, Pylons are needed to actually tap into the energy required to provide
Psionic energy (Psi) to new colonies. Each Pylon generates a short-ranged aura of
Psi, which can provide the power needed by buildings and warp gates. If a Protoss
building loses its connection to the Psionic Matrix, it will shut down until it is
reconnected, and new units cannot be gated in if there is insufficient Psi to provide
them with power. Available Psi energy is displayed in the upper right-hand corner
of the Main Screen, and selecting a Pylon or attempting to warp in a new building
will display a blue aura that represents the extent of the current Psionic Matrix.
Blizzard Entertainment
79
Page 80

Protoss Units
Probe
Role: Resource Gatherer, Worker
Armament: Particle Beam
Probes are robotic drones that service the Nexus and
gather the numerous resources needed to power Protoss
technologies. Probes also manufacture and plant the
micro-beacons that anchor the teleport matrices of
Protoss structures. These beacons allow the Protoss to
warp in prefabricated buildings from their Homeworld.
Zealot
Role: Assault Warrior
Armament: Psionic Blades
Templar warriors who have yet to reach the upper
levels of the Khala are known as Zealots. These fearless
warriors attune themselves to the Khala’s disciplines and
can invoke a near-berserker rage while in battle.
Enhanced with cybernetic grafts and outfitted with their
coveted power suits, the Zealots exemplify the unbridled
ferocity of the Protoss at war. Their forearm units are
capable of channeling psionic energy, manifesting it as
deadly blades that are used as their primary melee
weapon.
80
Dragoon
Role: Medium Support Warrior
Armament: Phase Disruptor
Veteran Protoss warriors who have been crippled or
mortally wounded in combat can volunteer to continue
their service to the Conclave by being transplanted into
Dragoon exoskeletons. The shattered bodies of the
volunteers are housed within large, mechanical walkers.
By focusing through the Khala, the fallen warriors can
control the movements of the Dragoon as naturally as if
they were within their former bodies. Dragoons provide
essential supporting fire for the Zealot forces by
launching bolts of antiparticles sheathed in a psychically
charged field. These disintegration bolts are effective
against both air and ground targets.
Blizzard Entertainment
Page 81

High Templar
Role: Psionic Warrior
Armament: Psi Assault
The High Templar are seasoned, veteran warriors of
the Protoss armies. Respected and honoured throughout
the Protoss Empire for their bravery and prowess, the
Templar are ever vigilant against threats to the Protoss
Homeworld of Aiur. The High Templar have sacrificed
the priciples of martial training in order to more
perfectly command the awesome psionic abilities that
define their station.
Psionic Storm
One of the first lessons of the Khala is
how to close one’s mind to the outside
world. The Protoss are such powerful
psychics that they can inadvertently send
out psychic “ripples” that are disruptive
to other life forms. With careful training,
High Templar learn to focus these ripples
into a storm of raw psychic energy that is
capable of literally tearing apart the minds
of lesser species.
Hallucination
It is rumoured that some High Templar
have learned to create illusionary
duplicates of other beings. While these
phantasms have no physical substance,
they can be used to draw fire away from
friendly units or sow confusion amongst
enemy forces.
Summon Archon
In times of great peril, High Templar
warriors can sacrifice themselves and
merge together as a powerful, psionic
entity: the Archon.
Blizzard Entertainment
81
Page 82

Archon
Role: Heavy Assault Warrior
Armament: Psionic Shockwave
These swirling, burning effigies of the Protoss spirit
radiate incalculable power, and their devastating psionic
storms can be unleashed against cowering enemy forces
both in the air and on the ground. Although the Protoss
are loathe to sacrifice valuable Templar, those that do
achieve this final level of commitment are honoured in
the annals of the Templar Archives.
Reaver
Role: Heavy Mobile Artillery
Armament: Manufactures Scarab Drones
Automatons used primarily for ground support, the
massive, mechanical Reavers are renowned for their
ability to level entire colonies in moments. The Reaver
itself does not mount any weaponry, but instead houses
a micro-manufacturing plant similar to the Protoss
Carrier.
Create Scarab
Reavers house and construct tiny robotic
drones called Scarabs. The Scarabs are
launched in groups at enemy targets or
installations. Unlike the Interceptors found
on Protoss Carriers, the Scarabs do not
return to the Reaver after they attack.
Instead, they explode on impact,
generating devastating electromagnetic
fields that cause heavy damage to their
targets.
82
Scout
Role: High Speed Fighter
Armament: Dual Photon Blasters
Anti-Matter Missles
Although the Protoss regard these powerful fighters
as mere scouts, they are easily a match for most other
flying vessels. Armed for both air and ground attacks,
the main function of the Scouts is to serve as point guards
for the Protoss fleet, although they are often called upon
to engage various hostile forces.
Blizzard Entertainment
Page 83

Shuttle
Role: Armoured Transport
Armament: None
Protoss Shuttles are used to carry ground forces into
the midst of battle. These robotic flyers are heavily
armoured, but maintain no offensive weaponry. Shuttles
are large enough to carry even the massive Reavers within
their hulls.
Arbiter
Role: Judicator Sanctum
Armament: Phase Disruptor Cannon
Shrouded in mystery and permeated by latent psionic
energy, the lumbering Arbiter ships often accompany
Protoss warfleets into battle. Psychic Judicators crew the
Arbiter ships, and they use the Arbiter as a focal point to
project a reality-warping field that serves to conceal all
friendly units within close proximity. Since the Arbiter
must be anchored firmly in space-time to safely generate
such a large field, it is immune to the effects and remains
visible, even when surrounded by the field of another
Arbiter.
Recall
Shuttles serve as the primary transport
vehicle for Protoss ground troops, but
recently the Protoss have found that the
ability to rapidly bring more fighting forces
to war zones is invaluable. The Recall ability
creates a tear in the fabric of space-time,
and any friendly units that enter the swirling
vortex will instantaneously appear next to
the Arbiter that initiated the effect.
Stasis Field
In addition to destabilising the very fabric
of the universe to generate its distortion
field, some Arbiters are capable of
strengthening discrete pockets of spacetime. Anything caught within these absolute
pockets is beyond the reach of any normal
interaction, friendly or otherwise. Units
trapped in a stasis field can neither move
nor attack, and are completely immune to
the effects of damage and special abilities.
Blizzard Entertainment
83
Page 84

Carrier
Role: Battle Cruiser/Command Ship
Armament: Manufactures Interceptors
The massive Carriers serve as command centres for
the leaders of the Protoss fleets. Heavily armoured and
shielded, Carriers can punch their way through enemy
blockades by unleashing flights of robotic Interceptors
at vital enemy targets. Although the Carriers have no
weapon batteries or armaments of any kind, their
deployment of Interceptor flights makes them devastating
in ship to ship battle.
Build Interceptor
The maneuverable, computer guided
Interceptors tear through enemy flight
formations and relentlessly strafe slower
targets with potent plasma-charges.
Manufactured and serviced inside of the
Carrier bays, a number of prepped
Interceptors can be launched in rapid
succession.
Observer
Role: Light Non-combat Scout
Armament: None
These small drones are employed to survey vast
wasteland areas or observe and record battles for study
within the Archives. Their complex sensor array leaves
little energy for defenses, but they can detect cloaked or
concealed units with ease, making them invaluable on
the battlefield.
Observers that are used for deep-space exploration
are often deployed without any defensive systems, but
when used in a combat zone they are equipped with a
micro-cloaking field to hide them from the enemy. Like
the Arbiter, the Observer does not require any additional
energy to maintain the field.
84
Blizzard Entertainment
Page 85

Protoss Buildings
Nexus
The mammoth, pyramidal visage of the Nexus looms over each
and every Protoss settlement. The Nexus serves as a psychic anchor,
allowing the Protoss to access their psionic energy matrix from
across the galaxy. The Nexus also manufactures the small robot
Probes that gather precious resources and lay down the warp
beacons required to teleport in other Protoss buildings.
Pylon
Carved from the sacred Khaydarin Crystals found only on the
Protoss Homeworld, Pylons act as focal points for the Psionic
Matrix emitted by the Nexus. The floating Pylons can power any
Protoss buildings within a large radius around them, and
establishing a network of Pylons is essential to properly expanding
a new Protoss colony.
Gateway
The swirling rift at the centre of the massive Gateway is where
the highly trained Protoss ground troops can be warped in from
their Homeworld of Aiur.
Forge
Even though their technology is incredibly advanced when
compared to that of other species, the Protoss constantly strive to
enhance and refine their weapons and armour. Work at the great
Forge rarely ceases, as this edifice is where much of this research
takes place.
• Upgrade Ground Weapons. This upgrade enhances the
weapons employed by the Probe, Zealot, High Templar
and Dragoon.
• Upgrade Shields. This upgrade intensifies the shields of
Protoss units.
• Upgrade Ground Armour. This upgrade strengthens the
armour worn by the Probe, Zealot, High Templar,
Dragoon and Reaver.
Blizzard Entertainment
85
Page 86

Cybernetics Core
The Cybernetics Core is a secondary Protoss building which houses
the construction materials and automated factories essential to the
production of the powerful Protoss Dragoons. Located deep within
the Core are the mysterious essence translators that bond the spirits of
fallen Protoss to the cold metal exoskeletons of the Dragoons.
• Singularity Charge. By employing technology that restructures
antiparticle amplitudes, the Dragoon Phase Disruptor range
is extended.
• Upgrade Air Weapons. This upgrade intensifies the weapons
mounted on the Scout, Arbiter and Carrier.
• Upgrade Air Armour. This upgrade strengthens the armour of
all Protoss aerial units.
Citadel of Adun
The ultimate goal of all Protoss warriors is to achieve the highest
level of Khala. To this end they spend much of their time in deep
meditation and sparring with each other in the floating Citadels. Named
for one the greatest masters of the Khala, the Citadels of Adun are
centers of learning and research for acolyte warriors
• Leg Enhancements. Zealot power suits can be enhanced with
cybernetic boosters that enable these warriors to close on
their victims with frightening speed.
86
Robotics Facility
The Protoss rely on automated war machines to bolster their numbers
and avoid the loss of Protoss life. While the Robotics Facility
manufactures these vehicles, other buildings are required to expand
its capabilities.
Robotics Support Bay
This secondary buildings is intended to bolster the capabilities of
the Robotics Facility. While it does not manufacture new units itself, it
can develop more efficient components for Protoss war machines.
• Upgrade Scarab Damage. By synchronising their electro-
magnetic fields, Scarabs are capable of delivering tremendous
amounts of concussive damage.
• Increase Reaver Capacity. By installing a neoteric micromanufacturing plant, the Reaver can increase the number of
Scarabs that are stored within its hull.
• Gravitic Drive. By combining anti-gravity theory with current
repulser technology, these engines provide increased speed
for the Shuttle.
Blizzard Entertainment
Page 87

Observatory
History is of vital importance to the Protoss, as they believe that great
events echo across space-time and serve as lessons for those wise enough
to study them. Even during the Aeon of Strife, Protoss scribes recorded
the wars and their heroes for future reference. The Observatory is a modern
refinement of the ancient scribe library, and it is here that the data gathered
by the robot Observers is recorded and catalogued for study by future
generations of Protoss.
• Gravitic Booster. By combining anti-gravity theory with current
micro-thruster technology, these engines provide increased
speed for the Protoss Observer.
• Sensor Array. Observers can be outfitted with enhanced scanners
that enable this aerial automaton to better gather battlefield
intelligence.
Templar Archives
The Templar Archives are dark, mysterious buildings that serve as
training centres for the legions of the High Templar. These honoured
warriors, charged with wielding the awesome psionic powers of their
race, use the Archives to directly commune with their ancient ancestors
and thereby gain knowledge inaccessible to ordinary warriors.
• Khaydarin Amulet. By equipping themselves with amulets carved
from Khaydarin crystal, the High Templar are able to channel
the energies of the Khala with greater efficiency.
• Psionic Storm. By opening their minds and unleashing raw psychic
energy, the High Templar can assault multiple enemies at once.
• Hallucination. By learning this mental discipline, The High Templar
can implant images within the minds of their enemies. While
these phantasms have no substance, they are perfect replicas of
the original.
• Summon Archon. Through an act of great and honoured sacrifice,
two High Templar can combine their essence to bring forth a
supreme psychic warrior.
Stargate
The mighty warships of the Protoss fleet require a much stronger warp
link than the Gateway provides. The immense Stargate is capable of calling
ships from high orbit around Aiur to distant planet surfaces.
Fleet Beacon
Easily recognised, the Fleet Beacon is built around a huge sphere
painstakingly carved from the largest and purest of Khaydarin crystals.
The Beacon focuses Psi through this sphere to strengthen and magnify
the warp rift created by the Stargate, allowing it to teleport the largest of
the Protoss warships.
Blizzard Entertainment
87
Page 88

• Apial Sensors. Located in the nose section of the Protoss Scout,
these special sensors provide longer sight range.
• Gravitic Thrusters. By combining anti-gravity theory with current
micro-thruster technology, these engines provide increased
speed for the Protoss Scout.
• Increase Carrier Capacity. This upgrade refits the Carrier with
additional fighter bays.
Arbiter Tribunal
The mighty Arbiter warships, surrounded as they are in a permanent
distortion field, are extremely difficult to safely teleport. The Tribunal
serves as a warp anchor of sorts, strengthening local space-time so that
the Arbiters may be brought through the Stargates.
• Khaydarin Core. By infusing pure Khaydarin crystals into the heart
of the ship’s reactor, the Arbiter gains increased energy storage
capacity.
• Recall. The development of space folding technology allows the
Arbiter to act as an anchor point and instantly transport units to
its location.
• Stasis. By manipulating space-time fields, the Arbiter can place
units in a state of Stasis. While the affected unit cannot move, it
is also unaffected in any way by other units.
Shield Battery
The Shield Battery has a Khaydarin core that absorbs local Psi energy
and contains it until it is needed by nearby Protoss warriors. By touching
one of the Battery’s many energy spokes, any friendly Protoss warrior or
vehicle can rapidly recharge its own shield levels. The Battery does have
a limited capacity, but will recharge itself over time. Careful deployment
of multiple Batteries can spell the difference between victory and defeat
in any campaign.
88
Photon Cannon
The Protoss revel in the glory of personal combat, but they also
recognise the need for automated defenses to watch over their colonies.
The Photon Cannon fires an encapsulated antimatter sphere similar to
that generated by the Dragoon. It is an effective weapon against both air
and ground targets. The Cannons are also enhanced with special sensor
technology borrowed from the tiny Observer, enabling them to detect
cloaked and hidden units. As with all Protoss buildings, care should be
taken to provide ample Pylon support for Cannons. Should their link to
the Psionic Matrix be broken, they will shut down — thus leaving the
way open to the enemies of Aiur.
Blizzard Entertainment
Page 89

Protoss Tribes
Although the Khala has called upon the Protoss to forsake their ancient Tribal society and
embrace the new castes of Judicator, Templar and Khalai, many still cling to the fleeting
customs and trappings of the old ways. The various Tribes remain intact only to remind the
Protoss of the follies of their past. With the ascension of the Judicator as the ruling caste
above all Protoss, the old dilemma of Tribal separatism no longer threatens the greater
society. The most distinguishable aspect of the Tribes is that each sect of Protoss has its own
unique skin shades ranging from mottled grey to a dark, aphotic blue.
Ara
Caste: Judicator
Station: Conclave Praetor Guard
Tribal Colour: Red
The Ara is a relatively young Tribe, by Protoss standards. They were the first group to rally
behind the vision of Khas for a unified race after the ending of the Aeon of Strife. The
youthful enthusiasm of the Ara helped to promote the mandates of the Khala, and ease the
fragmented Tribes into a lasting peace. The Ara maintains the power within the Judicator
caste and thus controls who presides within the ruling Conclave. In light of recent events,
the Ara hold to the tenet that the Zerg should be the greatest concern of the Protoss and that
Humanity should be left to its own fate.
Akilae
Caste: Templar
Station: High Templar Command
Tribal Colour: Green
The Akilae represent the strongest fighting force within Protoss society. The Akilae
dominated the other Tribes for hundreds of years during the Aeon of Strife, but quickly saw
that Khas’ vision of unity heralded a bold new age for their race. Entrusted with protecting
the Homeworld of Aiur, the Akilae have stalwartly upheld their charge for generations. Led
by the powerful High Templar, the Akilae command the might of all Protoss Templar at war.
Although extremely loyal, the Akilae have recently argued with their Judicator superiors
that Humanity should be saved from the Zerg threat, not arbitrarily destroyed because of it.
Shelak
Caste: Judicator
Station: Librarians, Keepers of the Khaydarin Crystals
Tribal Colour: White
The Shelak Tribe was the Tribe closest to the ancient Xel’Naga race. Therefore, they were
appointed by the Judicator to study and protect the powerful Khaydarin Crystals that empower
the awesome technologies of the Protoss. The Shelak, intrigued by the legacy of the Xel’Naga,
Blizzard Entertainment
89
Page 90

continuously study their ancient texts. Although the Judicator have banned all Xel’Naga
teachings, the Shelak are still allowed access to the archives. The Judicator hope that the
Shelak can unravel the mysteries of the Xel’Naga and thus expand their knowledge through
the Khala.
Sargas
Caste: Templar
Station: Enforcers/ Assassins
Tribal Colour: Blue
Easily the most notorious of the Tribes, the Sargas have offered a tenuous allegiance to the
Judicator Conclave. Much like the Venatir before them, the Sargas continually fight to override
the effects of the Khala upon their Tribe. Obsessed with holding onto their ‘free will’ and
Tribal identity, the Sargas offer their aid only when it serves their purposes. The Conclave
has found that the Sargas are extremely adept at the arts of killing. Thus, their members have
been made the official assassins of the Protoss, deftly eradicating any dissidents or enemies
with the ancient grace of their hunter-race. It has been noted that more Dark Templar stem
from the Sargas Tribe than from any other.
Auriga
Caste: Templar
Station: Protectors of the Great Fleet
Tribal Colour: Orange
Charged with servicing and operating the massive Carrier ships and Arbiters that protect
the space-ways of Aiur, the Auriga Tribe has never faltered in its duty to the Conclave. Tens
of thousands of years ago, they were the first to construct sailing ships that they boldly
launched upon the furious seas of Aiur. Captivated with the thrill of driving their vessels into
the unknown, the Auriga stand ever ready to combat any threat that might loom above the
Protoss Homeworld.
90
Furinax
Caste: Khalai
Station: Weaponsmiths and Technologists
Tribal Colour: Purple
Even though the Furinax Tribe reviles warfare of any kind, they can be counted upon to
defend their Homeworld with savagery and honour. For generations the Furinax have served
their race as weaponsmiths and builders. Obsessed with merging the sacred energies of the
Khaydarin Crystals with modern technologies, they revel in their progressive crafts. The
greatest feats of the Furinax Smiths are the revolutionary power suits of the Zealots and the
powerful Dragoon exoskeletons.
Blizzard Entertainment
Page 91

Roster of HeroEs
Arcturus Mengsk
Male Terran, age 38
Former Confederate Prospector
Leader of the Sons of Korhal
Arcturus was once a successful
Prospector for the Confederate
government. Although his homeworld,
Korhal IV, was a hotbed of civil violence
and anti-Confederate sentiment, Arcturus
served his government with courage and
honor. As the civil turmoil reached the
boiling point on Korhal, the Confederates
launched a salvo of Apocalypse-Class
nuclear missiles at the inflamed colony.
Korhal IV was devastated, leaving Arcturus
with only ghosts of the family and life he
once knew. He immediately resigned his
Prospector commission and vowed to
bring down the Confederate government
that destroyed his life. Gathering many of
the survivors of the Korhal catastrophe,
Arcturus founded a militant terrorist group
known as the Sons of Korhal to aid him in
bringing down the hated Confederates.
Jim Raynor
Male Terran, age 29
Former Colonial Marshal
Commander in the Sons of Korhal
An ex-Confederate Marshal, Jim Raynor
is now a loyal supporter of the antiConfederate organisation led by Arcturus
Mengsk. Raynor spent many years keeping
the peace on the colony of Mar Sara, but
as Confederate enforcements became
increasingly harsh, Raynor decided to join
up with the Sons of Korhal. Although he is
new to the movement, Raynor has proven
himself to be a dynamic leader and he is
well liked and respected by the troops
under his command. Despite his often
sarcastic demeanour, Jim is fiercely loyal
to the Sons of Korhal and will put it all on
the line without hesitation.
Blizzard Entertainment
91
Page 92

Sarah Kerrigan
Female Terran, age 26
Former Confederate Assassin
2nd in Command of the Sons of Korhal
Brought into the Confederate Ghost
program as a child, Kerrigan was never
given the chance for a normal life. The
neural processing treatments that were used
to dampen and pacify her latent psychic
powers left her a withdrawn and introverted
young girl. Forced to murder countless
enemies of her Confederate masters,
Kerrigan was finally exposed to a series of
clandestine experiments conducted by the
Confederate Government. During a raid on
a remote Terran outpost, Arcturus Mengsk
discovered and rescued Kerrigan from the
Confederate scientists. The Confederates
had ruined both their lives, and it was a
simple matter to convince the young
woman to lend her formidable combat skills
to his cause. Although Kerrigan is often
called upon to be an executioner, she has
never fully embraced the darker aspect of
her true nature.
Edmund Duke
Male Terran, age 53
Confederate General
Alpha Squadron Division
General Edmund Duke has been a
stalwart defender of the Confederacy for
over forty years. Motivated by his love of
power and control rather than any heartfelt political affiliation, Duke has earned a
reputation for running things ‘by the book’.
His long years of service with Alpha
Squadron have left him with extensive
tactical experience, making him one of the
greatest military minds in the Terran Sector.
Despite his abilities, Duke’s ego and
insufferable pride often lead to hostile
confrontations with those under his
command.
Aldaris
Protoss, Age 740
Judicator
Advisor to Koprulu Expeditionary Force
Aldaris is a strong believer in the Protoss
vision of the New Beginning. He holds the
virtues of communal achievement and
selfless honour above all things. Aldaris is
charged with watching over Tassadar’s
command of the expeditionary force and is
quick to chastise the younger Protoss for his
mistakes. Aldaris has no compunction
against branding those who do not conform
to Protoss dogma as heretics and traitors.
Zeratul
Protoss, age 634
Praetor of the Dark Templar
Assassin/ Adventurer
Like all of his dark brethren, Zeratul was
banished from the Protoss Homeworld long
ago for refusing to submit his will to the
‘communal glory’ of the Khala. Because of
this, Zeratul harbours a deep seated hatred
for the Protoss Conclave and the Judicator
caste who were responsible for his wrongful
exile. Zeratul is proud and noble, but is
marked by a dark and tragic aura. Although
he is secretive and calculating, Zeratul is
extremely honourable and would gladly risk
everything to defend his long-lost
homeworld of Aiur.
Fenix
Protoss, age 397
Templar
Praetor of the Protoss Defense Forces
Fenix rose up through the Templar ranks
alongside his friend Tassadar. He is both
cunning and powerful and has fought against
the enemies of the Protoss in countless
battles. Capable of strong empathy and
tremendous rage, Fenix has long been one
of Tassadar’s greatest supporters. Fenix is
distrustful of Aldaris and the Judicator caste,
and thus relies only upon the honour of his
fellow Templar warriors and his own
unparalleled skill in the theater of battle.
92
Blizzard Entertainment
Page 93

Tassadar
Protoss, age 356
High Templar
Executor of the Koprulu Expedition
Tassadar exemplifies the growing rift
within Protoss society. Born into a new
generation that looks ahead to a dynamic
future, Tassadar is frustrated by the stoic view
that his elders hold of the past. Tassadar feels
that the unbending nature of the Protoss and
their inability to re-evaluate ancient traditions
will be the doom of his race. Fascinated by
the power and mysticism of the renegade
Dark Templar caste, Tassadar hopes to find
some way to bridge the gap between these
exiles and his masters.
The Overmind
Bodiless Entity, age Unknown
Master of the Zerg Swarms
Created several millennia ago by the
enigmatic Xel’Naga, the Overmind
represents the collective consciousness of the
Zerg race. Believing that it exists to become
the perfect life-form by assimilating the
strongest species in the universe, the
Overmind is obsessed with its sacred
mission. Brilliant and cunning in the extreme,
the Overmind will stop at nothing to ensure
its success. The Overmind has the deepest
respect for the Protoss, whom it believes to
be the greatest species it has sought to
conquer. The inevitable conflict with the
Protoss will be its ultimate test.
Daggoth
Zerg Cerebrate, age Unknown
Master of the Tiamat Brood
Like all Cerebrates, Daggoth was created
to help the Overmind keep control over the
Zerg Broods. Commanding the largest Zerg
Brood, Tiamat, Daggoth serves the Overmind
with ferocity and valour. Daggoth is easily
one of the strongest willed Cerebrates, often
advising other Cerebrates as to how they
might best serve the Overmind.
Zasz
Zerg Cerebrate, age Unknown
Master of the Garm Brood
Zasz is one of the most clever Cerebrates,
who never ceases to question his fellows.
Zasz is driven to know all that he can about
the other Cerebrates, so that they might all
work together efficiently. However, Zasz’s
sniveling nature often disturbs his fellows
who find him to be somewhat unstable.
Although Zasz is irritating, he is absolutely
loyal to the Overmind and the sacred
mission of his race.
Blizzard Entertainment
93
Page 94

Game Design
Blizzard Entertainment
Executive Producer
Allen Adham
Producers
James Phinney, Bill Roper, Mike Morhaime
Senior Designers
James Phinney, Chris Metzen
Lead Programmer
Bob Fitch
Programming
Collin Murray, Michael Morhaime, Frank Pearce,
Patrick Wyatt, Mike O’Brien, Gage Galinger, Dan
Liebgold, Rob Huebner
AI Programming
Bob Fitch, Brian Fitzgerald, Brian Bishop
Campaign Editor
Jeff Strain
Battle.net Programming
Mike O’Brien, Scott Coleman, Dan Liebgold
Installer Programming
Michael Heiberg
Art Directors
Samwise Didier, Duane Stinnett
3D Artwork
Justin Thavirat, Trevor Jacobs, Samwise Didier,
Roman Kenney, Maxx Marshall, Rob
McNaughton, Micky Nielsen, David Pursley, Eric
Flannum, Bill Petras, Duane Stinnett, Nick
Carpenter, Dave Berggren, Brian Sousa
Artwork
Dave Berggren, Samwise Didier, Trevor Jacobs,
Justin Thavirat, Nick Carpenter, Duane Stinnett
Technical Artists
Robert Djordjevich, Jeffrey Vaughn, Peter
Underwood
Director of Blizzard Film
Matt Samia
Cinematic Directors
Matt Samia, Duane Stinnett
Cinematic 3D Artists
Matt Samia, Duane Stinnett, Brian Sousa, Nick
Carpenter, Trevor Jacobs, Harley Huggins II, Rob
McNaughton, Scott Abeyta, Stu Rose, Sharon
Shellman, Bill Petras, David Pursley, Maxx
Marshall, Eric Flannum
Cinematic Technical Artist/Video Engineer
Joeyray Hall
Storyboard Artists
Nick Carpenter, Bill Petras, David Pursley, Matt
Samia, Duane Stinnett, Justin Thavirat, Brian Sousa
- Credits -
Audio Producers
Glenn Stafford, Shane Dabiri
Music
Glenn Stafford, Jason Hayes, Derek Duke, Big Tuna
Sound Design
Glenn Stafford, Jason Hayes, Tracy W. Bush, Joeyray
Hall, Matt Uelmen
Voice Production, Direction & Casting
Glenn Stafford, Mark Schwarz, Chris Metzen
Recording Engineer
Robert Koenigsberg
Script & Story
Chris Metzen, James Phinney
Voices
Glynnis Talken, Michael Gough, Paul Eiding, Lani
Minella, Bill Roper, Glenn Stafford, Chris Metzen,
Matt Samia, Jason Hayes, Tiffany Hayes, Tracy W.
Bush, Allen Adham, Paul W. Sams, Jorge Rivero,
Harley Huggins II, Duane Stinnett, Micky Neilson,
James W. Harper, Jack Ritschel, Robert Clotworthy,
James “Whiteboy” Page
Strike Team
Allen Adham, James Phinney, Mike O’Brien,
Samwise Didier, Chris Metzen, Bob Fitch, Mike
Morhaime, Patrick Wyatt
Associate Producers
Shane Dabiri, Mark Kern
Scenario Design
James Phinney, Chris Metzen, Eric Flannum
Scenario Layout
Eric Flannum, Dean Shipley, Ian Welke, Chris Sigaty,
Rev. Dan Moore
Manual Design & Layout
Peter Underwood, Bill Roper, Chris Metzen, Jeffrey
Vaughn
Manual Artwork
Samwise Didier, Chris Metzen, Bill Petras, Sharon
Shellman, Brian Sousa, Stu Rose, Eric Flannum, Scott
Abeyta, Peter Underwood, Rob McNaughton
Director of Operations
Isaac Matarasso
Director of Support Services
Robert Bridenbecker
QA Manager
Michael Brannigan
Lead Tester
Chris Sigaty
Assistant Lead Tester
Ian Welke
QA Analysts
Geoff Fraizer, Mike Givens, David Hale, Brian Love,
Dan Moore, Matt Morris, Dean Shipley, Jamie Wiggs
94
Blizzard Entertainment
Page 95

Additional Testing
Eric Dodds, Frank Gilson, John Lagrave, Judah
Mehler, Nick Santucci, Derek Simmons, Phil Stuart,
Chris Millar
Hardware Specialist
Vic Larson
Lead Technical Support
Twain Martin, John Schwartz
Technical Support
Michael Barken, Roger Eberhart, Liem Le, Kirk
Mahony, Mike Murphy, Chad Myers, Brandon
Riseling, Jason Schmit, Mick Yanko
Online Support
Alen Lapidis, Scott Mercer, Pat Nagle, Collin Smith
Office Administration
Christina Cade, Kira Inlow, Dana Martin
Executive Dunsel
Alan Dabiri
Localisation Producers
Flavie Gufflet-Dowling, Shane Dabiri
Localisation Coordinators
Antje Hink, Louis Mutter
Localisation QA
Padraig McCaul, Shane Moran, Juan Martinez
Localisation Engineer
Mike Hayes, Damien Monaghan
Localisation Support
Florian Muller, Astrid Schiller
Localisation Graphics and Design
Sheila Stephens
Information Systems Manager
Adrian Luff
Information Systems
Chad Chaudhry, Andrew Edwards, Hung Nyugen
Public Relations
Susan Wooley
Business Development
Paul W. Sams, Melissa Edwards, Shannon Welch
Legal Counsel
Paula V. Duffy, Eric Roeder, Kevin Crook, Mark
Reichenthal
Marketing
John Patrick, Steve Huot, Neal Hubbard, Kathy
Carter, Jessica Monson, Steve Parker, Mike Bannon,
Jeff Chenault
U.S. Sales
Todd “Little Buddy” Coyle, Danny Kearns
International Sales
Jack Allewaert, Ralph Becker, Christophe Ramboz,
Jean-Daniel Pages, Florian Mueller
Direct Sales
Rob Beatie, Kim Farrington
Manufacturing
John Goodman, Tom Bryan, Jaime Chavez
Battle.net Hosting Partners
GlobalCenter, MindSpring, Exodus, Multiplay
Thanks To
Blizzard North, Walter Forbes, Henry Silverman,
Ron Millar, Adam Maxwell, Rob Pardo, Wizards of
the Coast, Omar Adham, Gretchen Witte, Ray the
Soda Guy, Robert A. Heinlein, Insomnia, Scott
Adams, Trisha Ann Ochoa, Patricia Ford, Sausage
McMuffins, Team Fortress Software, The Prodigy,
Rage Against the Machine, Mountain Dew, Karen
Peris (glow), Terry Gilliam, Tracey McNaughton,
Jackie Chan, Strung Out, John P. Kee, Evander
Holyfield, Erykah Badu, Scooperelli, Brazil 2001,
Paul Thomas Anderson, the Shmoo, Gabrielle
(Xena’s scene-stealin’ friend), Krissann, Steven Ward
Bush, The Aesir, Nena, Team Hamro, Natalie
Merchant, Dr. Gregory T. Street, Walt Simonson, Bob
Huggins, Karen Mikinka, Jenny Porter, Stanley
Kubrick, Walter Takata, Steven Spielberg, Susan
Stafford, Victor & Beverly Morhaime, Moebius,
Edwin Braun, the Girls of Crazy Horse II, Guinness
Brewing Company,The Poxy Boggards, Chris
Quiming, Juan Giminez, Ray’s Pork Rinds, James
Shipley, Lisa Pearce, Storm Watch 97 “El Nino”,
Jason Thor Hall, monkeys,Damian Russell Hall,
Gene Roddenberry, Shane’s (not Alan’s) Mom, Molly
Miller, Pen Pen, Marlboro, Dawn Sexton, Fran
Loosen, Alison Leigh Breckenridge, Dawn Caddel,
Lady Ariana, Stan Winston, Avalon Tattoo, Danny
Boyle, the Notorious Crawfords, Master Brandon
Dillon, Bill and Sharon Strain, Ozora Mirai, Tori
Fitch, Eufemia Palomino, Bob & Frances
Bridenbecker, Nuclear Rabbit, Kali Old Schoolers,
Long Island Ice Teas, Michael Miller, Carl Sagan,
The Andrews Boys, The Universal Cleric
Corporation, Teri Huggins Garrison, Soul Coughing,
Valerie Marshall, Quinn Stafford, Elizabeth Millar,
Lyssa Lenske, Michael Mann, Kristin Huntsman,
Guttermouth, Rebekah, Melissa Estes, Alen Yen,
Rush, Annie and Baby Madeline Strain, the residents
of SouthPark, Big Joe, Stymie Evets, Sandra
Schneible, The Barenaked Ladies, Chow Yun Fat,
Herodotus, Bob Moseley, 420, Christy Goddess,
Ayukawa Madoka, Ethan Stafford, Martin Luther
King Jr., ChickenKing, Richard Corben, Dragu
Energists, Leslie the Long Beach Lovely, George
Lucas, Miyazaki Hayao, Lucky the donkey, Sen.-
CA, Salty Dog (R), Amos the Dog, James Cameron,
Operation CWAL
And you for reading this!
Special Thanks To
Chris McLeod
Bob and Jan Davidson
Blizzard Entertainment
95
Page 96

YOU SHOULD CAREFULLY READ THE FOLLOWING END USER LICENSE AGREEMENT BEFORE INSTALLING THIS SOFTWARE PROGRAM. BY
INSTALLING, COPYING OR OTHERWISE USING THE SOFTWARE PROGRAM, YOU AGREE TO BE BOUND BY THE TERMS OF THIS AGREEMENT. IF YOU DO
NOT AGREE WITH THE TERMS OF THIS AGREEMENT, PROMPTLY RETURN THE UNUSED SOFTWARE PROGRAM TO THE PLACE FROM WHICH YOU
This software program (the “Program”), any printed materials, any on-line or electronic documentation, and any and all copies and derivative works of such software
program and materials are the copyrighted work of Blizzard Entertainment, a division of Davidson & Associates, Inc., or its suppliers. All use of the Program is governed
by the terms of the End User License Agreement which is provided below (“License Agreement”). The Program is solely for use by end users according to the terms of the
License Agreement. Any use, reproduction or redistribution of the Program not in accordance with the terms of the License Agreement is expressly prohibited.
1. Limited Use License. Blizzard Entertainment (“Blizzard”) hereby grants, and by installing the Program you thereby accept, a limited, non-exclusive license and
right to install and use one (1) copy of the Program for your use on either a computer or portable computer. In addition, the Program has a multi-player capability that
allows up to eight players per registered version of the Program to play concurrently. These additional copies of the Program are known as and referred to hereafter as
“Spawned Versions.” You may install Spawned Versions of the Program on an unlimited number of computers. However, Spawned Versions of the Program must be
played in conjunction with the registered version of the Program from which they were spawned. All of the terms and conditions of the License Agreement shall also
apply to the Spawned Version of the Program, with the exception that the Spawned Version may be installed on as many computers as you wish. The Program also
contains a Campaign Editor (the “Editor”) that allows you to create custom levels or other materials for your personal use in connection with the Program (“New
Materials”). All use of the Editor or any New Materials is subject to this License Agreement. The Program is licensed, not sold. Your license confers no title or ownership
in the Program.
2. Ownership. All title, ownership rights and intellectual property rights in and to the Program and any and all copies thereof (including but not limited to any titles,
computer code, themes, objects, characters, character names, stories, dialog, catch phrases, locations, concepts, artwork, animations, sounds, musical compositions,
audio-visual effects, methods of operation, moral rights, any related documentation, and “applets” incorporated into the Program) are owned by Blizzard Entertainment
or its licensors. The Program is protected by the copyright laws of the United States, international copyright treaties and conventions and other laws. All rights are
reserved. The Program contains certain licensed materials and Blizzard’s licensors may protect their rights in the event of any violation of this Agreement.
3. Responsibilities of End User.
A. Subject to the Grant of License hereinabove, you may not, in whole or in part, copy, photocopy, reproduce, translate, reverse engineer, derive source code,
modify, disassemble, decompile, create derivative works based on the Program, or remove any proprietary notices or labels on the Program without the prior consent,
in writing, of Blizzard.
B. The Program is licensed to you as a single product. Its component parts may not be separated for use on more than one computer.
C. You are entitled to use the Program for your own use, but you are not entitled to:
(i) sell, grant a security interest in or transfer reproductions of the Program to other parties in any way, nor to rent, lease or license the Program to others
without the prior written consent of Blizzard.
(ii) exploit the Program or any of its parts for any commercial purpose including, but not limited to, use at a cyber café, computer gaming center or any other
location-based site. Blizzard may offer a separate Site License Agreement to permit you to make the Program available for commercial use; contact
Blizzard for details;
(iii) use or allow third parties to use the Editor and the New Materials created thereby for commercial purposes including, but not limited to,
distribution of New Materials on a stand alone basis or packaged with other software or hardware through any and all distribution channels, including,
but not limited to, retail sales and on-line electronic distribution without the express written consent of Blizzard; and
(iv) host or provide matchmaking services for the Program or emulate or redirect the communication protocols used by in the network feature of the Program,
through protocol emulation, tunneling, modifying or adding components to the Program, use of a utility program or any other techniques now known
or hereafter developed, for any purpose including, but not limited to, network play over the Internet, network play utilising commercial or noncommercial gaming networks or as part of content aggregation networks without the prior written consent of Blizzard.
4. Program Transfer. You may permanently transfer all of your rights under this License Agreement, provided the recipient agrees to the terms of this License
Agreement and you agree to remove the Program and any New Materials from your computer or portable computer.
5. Termination. This License Agreement is effective until terminated. You may terminate the License Agreement at any time by destroying the Program and any New
Materials. Blizzard may, at its discretion, terminate this License Agreement in the event that you fail to comply with the terms and conditions contained herein. In such
event, you must immediately destroy the Program and any New Materials.
6. Export Controls. The Program may not be re-exported, downloaded or otherwise exported into (or to a national or resident of) any country to which the U.S. has
embargoed goods, or to anyone on the U.S. Treasury Department’s list of Specially Designated Nationals or the U.S. Commerce Department’s Table of Denial Orders.
By installing the Program, you are agreeing to the foregoing and you are representing and warranting that you are not located in, under the control of, or a national or
resident of any such country or on any such list.
7. Limited Warranty. Blizzard expressly disclaims any warranty for the Program, Editor and Manual(s). The Program, Editor and Manual(s) are provided “as is”
without warranty of any kind, either express or implied, including, without limitation, the implied warranties of merchantability, fitness for a particular purpose, or
noninfringement. The entire risk arising out of use or performance of the Program and Manual(s) remains with the User, however Blizzard warrants up to and including
90 days from the date of your purchase of the Program that the media containing the Program shall be free from defects in material and workmanship. In the event that
the media proves to be defective during that time period, and upon presentation to Blizzard of proof of purchase of the defective Program, Blizzard will at its option 1)
correct any defect, 2) provide you with a product of equal or lesser value, or 3) refund your money. Some states do not allow the exclusion or limitation of implied
warranties or liabilities for incidental damages, so the above limitations may not apply to you.
8. Limitation of Liability. NEITHER BLIZZARD, DAVIDSON & ASSOCIATES, INC., ITS PARENT, SUBSIDIARIES OR AFFILIATES SHALL BE LIABLE IN ANY WAY
FOR LOSS OR DAMAGE OF ANY KIND RESULTING FROM THE USE OF THE PROGRAM OR EDITOR INCLUDING, BUT NOT LIMITED TO, LOSS OF GOODWILL,
WORK STOPPAGE, COMPUTER FAILURE OR MALFUNCTION, OR ANY AND ALL OTHER COMMERCIAL DAMAGES OR LOSSES.
9. Equitable Remedies. You hereby agree that Blizzard would be irreparably damaged if the terms of this License Agreement were not specifically enforced, and
therefore you agree that Blizzard shall be entitled, without bond, other security, or proof of damages, to appropriate equitable remedies with respect to breaches of this
License Agreement, in addition to such other remedies as Blizzard may otherwise have available to it under applicable laws.
10. Miscellaneous. This License Agreement shall be deemed to have been made and executed in the State of California and any dispute arising hereunder shall be
resolved in accordance with the law of California. You agree that any claim asserted in any legal proceeding by one of the parities against the other shall be commenced
and maintained in any state or federal court located in the State of California, County of Los Angeles, having subject matter jurisdiction with respect to the dispute
between the parties. This License Agreement may be amended, altered or modified only by an instrument in writing, specifying such amendment, alteration or
modification, executed by both parties. In the event that any provision of this License Agreement shall be held by a court or other tribunal of competent jurisdiction to
be unenforceable, such provision will be enforced to the maximum extent permissible and the remaining portions of this License Agreement shall remain in full force
and effect. This License Agreement constitutes and contains the entire agreement between the parties with respect to the subject matter hereof and supersedes any prior
oral or written agreements.
I hereby acknowledge that I have read and understand the foregoing License Agreement and agree that the action of installing the Program is an acknowledgment
of my agreement to be bound by the terms and conditions of the License Agreement contained herein. I also acknowledge and agree that this License Agreement is the
complete and exclusive statement of the agreement between Blizzard and myself and that the License Agreement supersedes any prior or contemporaneous agreement,
either oral or written, and any other communications between Blizzard and myself.
OBTAINED IT FOR A FULL REFUND.
END USER LICENSE AGREEMENT
96
Blizzard Entertainment
 Loading...