


SUPREME
SPO 6213

GB
TABLE OF CONTENTS
SAFETY INSTRUCTIONS....................... |
2 |
INSTALLATION OF THE OVEN.............. |
4 |
Electricals................................................ |
4 |
Connection to the electrical |
|
power mains............................................. |
7 |
INSTRUCTIONS FOR USE..................... |
8 |
Oven Racks............................................. |
8 |
Oven extendable racks (if present)....... |
9 |
Removable Guides ................................ |
10 |
Before hook-up....................................... |
11 |
Demonstration mode.............................. |
11 |
Setting the clock..................................... |
12 |
Actions that are possible with |
|
the oven off........................................... |
13 |
Turning on the oven............................. |
13 |
Key (or child safety) function................. |
14 |
Padlock function (door lock) (only available |
|
in some models) ................................... |
14 |
MAIN FUNCTIONS................................ |
15 |
Cooking functions.................................. |
15 |
Instructions for use................................. |
18 |
SPECIAL FUNCTIONS......................... |
20 |
Boost (quick preheat)............................ |
20 |
Pizza mode........................................... |
20 |
Self clean.............................................. |
22 |
Oven light control................................ |
23 |
Setting the temperature...................... |
24 |
PROGRAMMING THE OVEN............. |
25 |
Timer programming.............................. |
26 |
Automatic functions.............................. |
29 |
Cooking mode table with |
|
preset temperatures.............................. |
32 |
DOOR LOCKING SYSTEM................. |
33 |
Automatic door locking during |
|
pyrolytic cycle........................................ |
33 |
Oven lights............................................ |
33 |
CLEANING AND MAINTENANCE....... |
34 |
Self-cleaning cycle (pyrolytic cycles).... |
34 |
Oven door removal............................... |
35 |
Removing the “FULL GLASS” |
|
panoramic door..................................... |
36 |
How to remove the inner glass of the |
|
“FULL GLASS” panoramic door.......... |
37 |
Replacement of the oven light............. |
38 |
Dear Customer,
we would like to thank you and congratulate you on your choice.
This new product has been carefully designed and built using top quality materials, and meticulously tested to ensure that it meets all your culinary requirements.
Please read and observe these simple instructions, which will enable you to achieve excellent results from the very first time you use it. This state-of-the-art appliance comes to you with our very best wishes.
THE MANUFACTURER
IMPORTANT
The oven’s data plate is accessible even with the oven fully installed. The plate is visible simply by opening the door. Always quote the details from it to identify the appliance when ordering spare parts.
1

GB
SAFETY INSTRUCTIONS
-Do not disassemble any parts prior to having disconnected the oven from the mains.
-Do not use the appliance if any part is broken (for example a glass). Disconnect it from the mains and call service.
-Before using the oven, it is recommended to make it operate at noload at the maximum temperature for an hour to eliminate the insulating material odour.
-In all models, leave the door closed when the grill is used.
-The cooling fan may remain in operation so long as the oven is hot, even after it has been switched off.
-During the use the appliance becomes very hot; don’t touch the heating elements inside the oven.
-During the oven operation, the front is heated as well; consequently keep children clear of the oven, especially during self-cleaning.
-Parents and adults should pay particular attention when using the product in presence of children.
-Children should be overseen so as to ensure that they don’t play with the equipment.
-Keep children under age 8 away, unless constantly supervised.
-This appliance is not intended for use by persons (including children over age 8) with reduced physical sensory or mental capabilities, or lack of experience and knowledge, unless they have been given supervision or instruction concerning use of the appliance by a person responsable for their safety.
-Children may not perform cleaning and maintenance unsupervised.
-In order to avoid damage to the oven enamel coat, do not cover the oven muffle sole with any item (e.g. aluminum foil, pans and the likes).
-Do not use harsh abrasive cleaners or sharp metal scrapers to clean the oven door glass since they can scratch the surface, which may result in shattering of the glass.
-Abrasive detergents and steam cleaning equipment should not be used for cleaning.
-Before performing self-cleaning, take out all accessories (grills, dishes, pans) to avoid damaging them, remove large cooking residues and then close the door, ensuring that it is closed properly.
-The oven is cool and power to the oven has been turned off before removing the door. Failure to do so could result in electrical shock or burns.
2

GB
Refer to the figures below for the correct placement of the grills EMBOSSED GUIDES
REMOVABLE GUIDES
3

GB
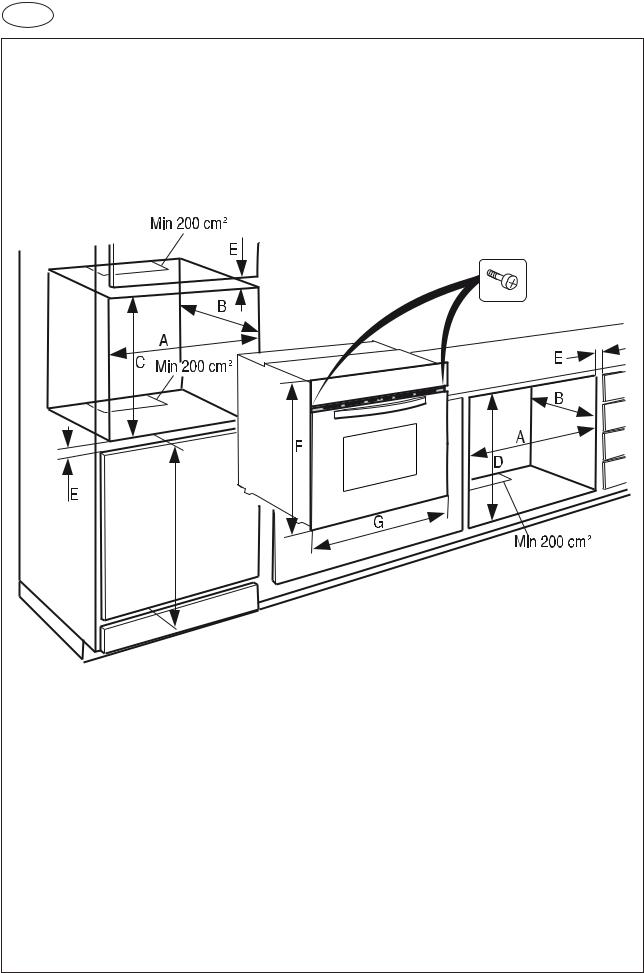
INSTALLATION OF THE OVEN
To install the oven into the kitchen a cutout should be made in accordance with the dimensions shown in Fig. 1.
The apparatus is to be fastened to the top by means of the two screws provided in the kit through the holes made on the oven uprights.
The cabinet in which the apparatus is installed shall be open on the back side to ensure a sufficient air circulation and prevent overheating.
Leave a gap of at least 200 cm2 (see Fig. 1) for air circulation if the oven is installed in a column; this is not necessary if the oven is installed under the work top.
WARNING
As the apparatus is to be fitted in your kitchen furniture, make sure that all surfaces in contact with the oven can resist a temperature of approx 90°C.
Electricals
- Absorbed power: |
|
oven top element:................................................. |
2400W 230V - 2400W 240V |
oven bottom element: .......................................... |
2100W 230V - 2100W 240V |
round element (hot air): ....................................... |
2500W 240V (on some models) |
additional oven bottom element: ......................... |
1000W 230V - 1000W 240V |
|
(on some models) |
roasting jack motor: ............................................... |
4 W (on some models) |
lamp: .................................................................... |
25 W |
hot air fan motor:................................................... |
25 W |
cooling fan motor:.................................................. |
25 W |
-Maximum absorbed power: (see data plate).
-Supply voltage: (see data plate).
NOTE
This appliance is in compliance with following European directives: 2006/95/CE (LVD), 2004/108/CE (EMC), 2011/65/CE (RoHS), 2012/19/UE (WEEE), 2002/40/CE.
4

GB
Respect for the environment
The documentation for this appliance is printed on paper bleached without chlorine or recycled paper to contribute to protecting the environment. The packaging was designed to prevent damage to the environment; they are ecological products that can be recovered or recycled.
Recycling the packing saves raw materials and reduces the volume of industrial and domestic waste.
THE PACKING MATERIAL is 100% recyclable and marked with the recycling symbol. Dispose of in conformity with local law. The packing material (plastic bags, polystyrene parts, etc.) must be kept out of the reach of children because it is potentially dangerous. THIS APPLIANCE is marked in conformity with European Directive 2012/96/UE, Waste Electrical and Electronic Equipment (WEEE). By making sure that this product is disposed of correctly, the user contributes to preventing potential negative consequences for the environment and health.
THE SYMBOL on the product or accompanying documentation indicates that this product must not be treated as domestic waste but must be delivered to a suitable collection point for the recycling of electrical and electronic equipment.
5
GB
H
Dimensions are in centimeters
Appliances |
A |
B |
C |
|
D |
E |
F |
G |
H |
||
Single oven |
56 |
55 |
58,5 |
|
59,5 |
Min |
58,9 |
59,5 |
86,5 |
||
|
1,3 |
||||||||||
|
|
|
|
|
|
|
|
|
|
|
|
|
|
|
|
|
|
|
|
|
|
|
|
|
|
|
|
|
Fig. 1 |
|
|
|
|
|
|
|
|
|
|
|
|
|
|
|
|
|
|
6
GB
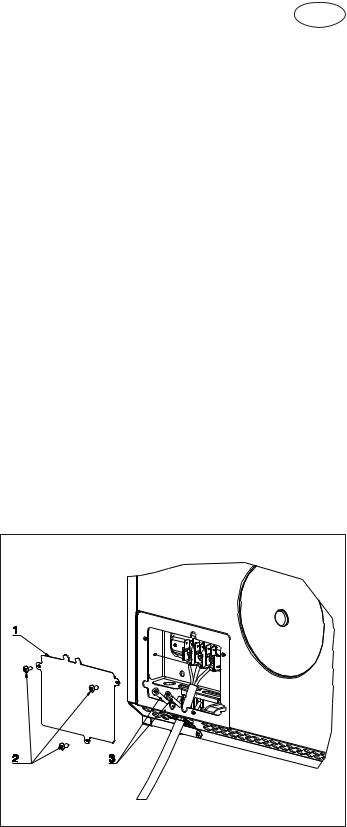
Connection to the electrical power mains
WARNING
This apparatus must be earthed.
The oven is only for domestic use.
The feed voltage and the absorbed power are as indicated on the data plate attached to the left-hand side upright, which can be seen when the oven door is open.
Connecting must be carried out by qualified personnel and in accordance with the regulations currently in force.
The manufacturer can not be held responsible for any damages to persons or objects caused by failure to observe these instructions.
If the supply cord is damaged, it must be replaced by the manufacturer, its service agent or similarly qualified persons in order to avoid a hazard.
The oven must be connected to the mains through a multipole circuit breaker with a contact-to-contact gap of at least 3 mm, making sure that the earth wire is not disconnected. For connecting use a flexible cable of the H05V2V2-F 3x1,5 mm2 type remembering to make it long enough to allow the oven to be removed from its housing unit when maintenance work is required.
To connect the cable to the oven |
|
||
proceed as follows (see Fig. 2): |
|
|
|
- Remove the lid (1) by unfastening |
|
||
the three screws (2). Unfasten the |
|
||
two screws (3) for the cable holder |
|
||
and feed the cable through the |
|
||
opening immediately below |
the |
|
|
cover. |
|
|
|
- Remove about 12 cm of the outside |
|
||
insulation from the cable and shorten |
|
||
the two active wires (live and neutral) |
|
||
to 6 cm, leaving long the one to |
be |
|
|
connected to the main earth terminal |
|
||
on the terminal box; remove about |
|
||
1 cm of the main insulation from the |
Fig. 2 |
||
three wires and connect them correctly |
|||
|
|||
to the terminal box, remembering to respect the polarities. |
|
||
-Tighten the two screws (3) of the cable holder and put the lid (1) back on with the three screws (2).
7

GB
INSTRUCTIONS FOR USE
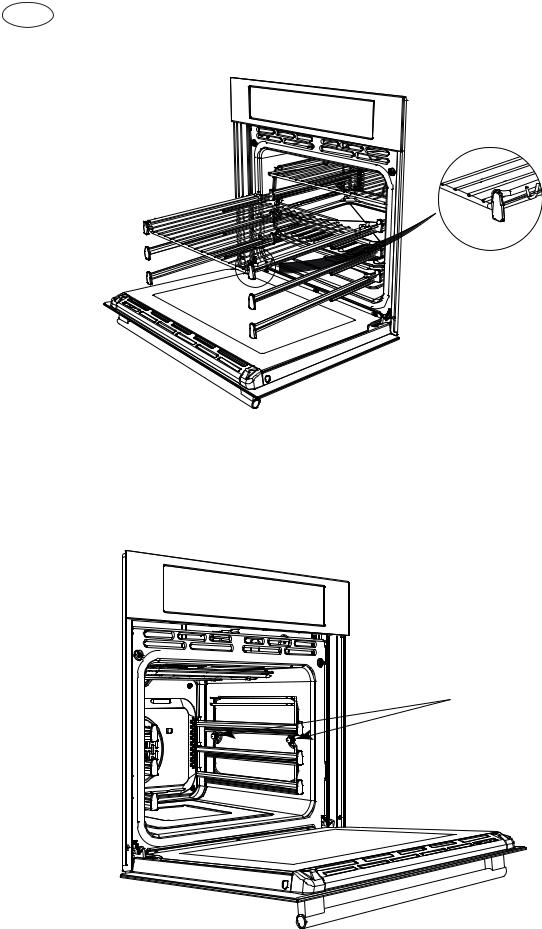
Oven Racks
WARNING
Never use aluminum foil to cover the oven racks or to line the oven. It can cause damage to the oven liner if heat is trapped under the foil.
WARNING
Make sure you do not force it to avoid damage to the enamel.
The oven has rack guides at four levels. Rack
positions are numbered from the bottom rack guide (#1) to the top (#4). Check cooking charts for best rack positions to use when cooking.
Each level guide consists of paired supports formed in the walls on each side of the oven cavity.
Always be sure to position the oven racks before turning on the oven. Make sure that the racks are level once they are in position.
The racks are designed to stop when pulled forward to their limit.
To remove oven rack from the oven (see Fig. 4):
1 Pull rack forward.
2 Lift rack up at front and then remove it.
To replace an oven rack (see Fig. 5):
1 Place rear of rack between rack level guides.
2 While lifting front of rack, slide rack in all the way while lowering the front.
EMBOSSED GUIDES REMOVABLE GUIDES
1 |
2 |
1 |
2 |
Fig. 4
EMBOSSED GUIDES REMOVABLE GUIDES
1 |
1 |
2 |
2 |
|
Fig. 5
8
GB
Oven extendable racks (if present)
The extendable rack allows for easier access to cooking foods. It extends beyond the standard flat rack bringing he food closer to the user.
WARNING
Make sute that:
•When the rack is outside of the oven, slide arms do not lock. They could unexpectedly extend if the rack is carried incorrectly. Extending slide arms could cause injury. Rack should only be held or carried by grasping the sides.
•To avoid burns, pull rack all the way out and lift pan above handle when transferring food to and from oven.
NOTE
Always remove the extendable rack before self-cleaning the oven. DO NOT USE IN PIZZA MODE
To remove extendable rack from the oven (see Fig. 6):
1 Lift of rack slightly and push it until the stop release.
2Raise back of rack until frame and stop clear rack guide.
3 Pull rack down and out.
EMBOSSED GUIDES
1 |
2 |
3 |
Fig. 6
To replace an extendable rack (see Fig. 7):
1 Grasp rack firmly on both sides. Place rack (including frame) above desired rack guide.
2Push all the way in until the back of the rack drops into place.
3 Pull both sections forward until stops activates. Rack should be straight and flat, not crooked.
1 |
2 |
3 |
Fig. 7
9
GB
REMOVABLE GUIDES
NOTE
Always remove the removable guides before oven self-cleaning by unscrewing the nuts (A) shown in Figure 3b.
A
Fig. 3b
10
GB
Introduction to the oven
Dear Customer, your new oven is controlled by an electronic board that constantly monitors its operation to improve its performance.
The touch controls are state-of-the-art, precise and reliable.
The interface is elegant, orderly and discrete, more intuitive than ever!
A few buttons, many functions and no combination or sequence is difficult to enter, so you can concentrate on following the recipe and the oven is ready in two clicks!
Installation and hook-up
Dear Customer, this oven is a sophisticated electronic appliance, classified as a durable good. Its installation requires qualified professionals for both the hook-up of the power line and itsplacement in the kitchen counter.
Before hook-up
When the oven is connected to the electric mains for the first time, the display will ask you to select your language;use the buttons  to select the language you want;
use the button  to confirm the choice;
ITALIANO
ENGLISH
DEUTSCH
FRANCAISE
ENSPAÑOL
NEDERLANDS
PORTUGUÊS
POLSKI
(from now on, the language choice will remain fixed even when their are power outages).
Now, it goes into demonstration mode.
Demonstration mode
This is the mode that the oven is normally in every time that there is a power failure and, consequently, when it is first hooked-up:
the purpose is to show how you can control it with a recorded sequence of commands.
In this mode, the oven is never REALLY turned on, i.e., the heating elements are never powered!
The control panel is INACTIVE and, so, the oven will not respond to commands!
11
GB
PIZZA
5 sec.!!
To disable the demonstration mode, touch the light symbol for five seconds:  the control will go to normal operation and ready for turning on.
Now you can set the time but it is not necessary for turning on the oven.
Setting the clock
PIZZA |
The oven will signal that it is connected to the power mains with a double beep.
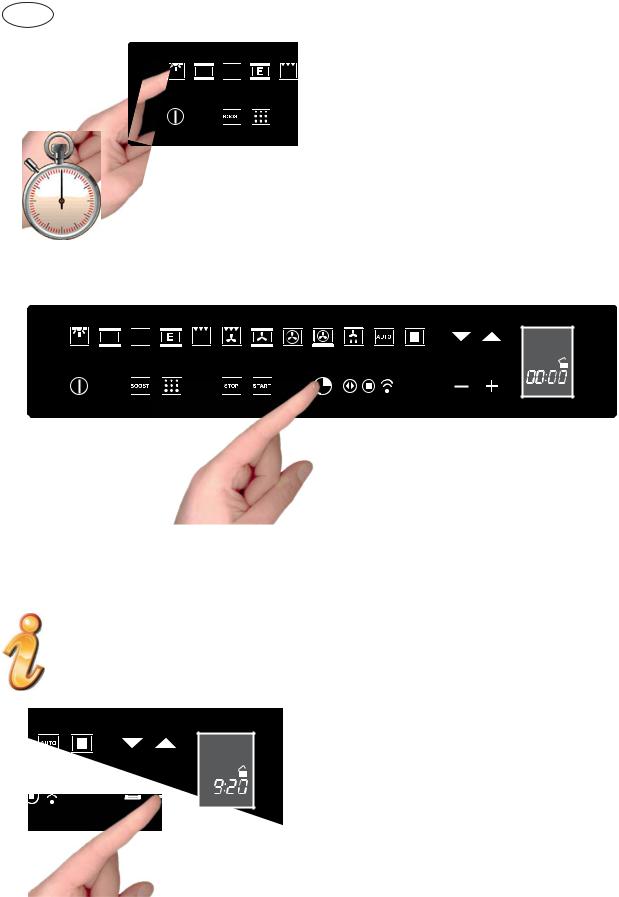
To set the system time, press the “TIMER FUNCTIONS” button  for at least 3 seconds
Each command activated is confirmed by a beep.
Set the clock with the + and - buttons: during setting the separator dots flash, the time has been set when the dots remain steady on.
12
GB
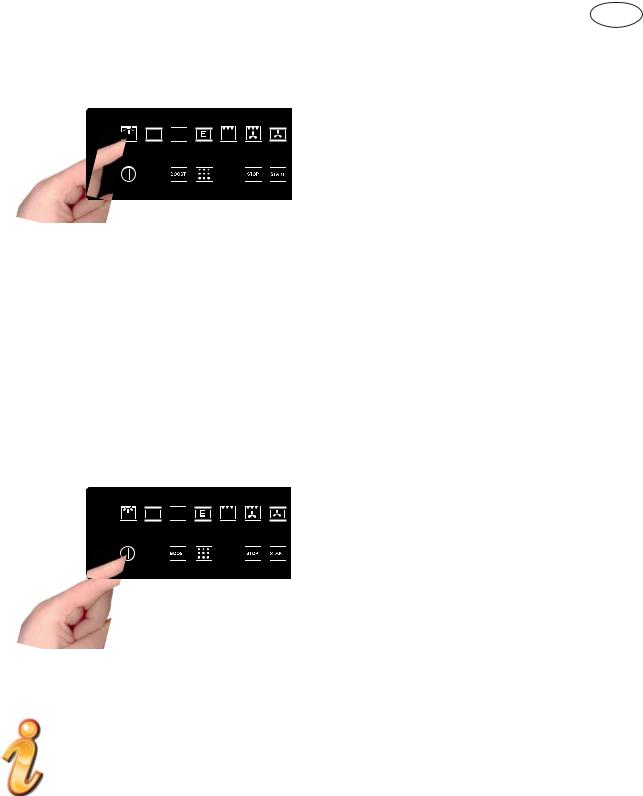
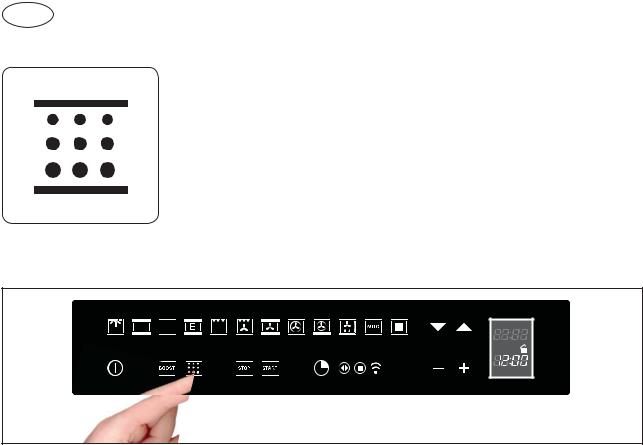
ACTIONS THAT ARE POSSIBLE WITH THE OVEN OFF - Turn on oven light
PIZZA
The oven light is turned on/off by touching the symbol as shown in the figure.
- Change the Language
When the oven is off, you can change the language of the display by simultaneously selecting  and the + in the lower right for at least 3 seconds.
Then use  to select the language and confirm the choice with
  .
.
- Setting the “minute-counter” timer function
See the appropriate section on page 25.
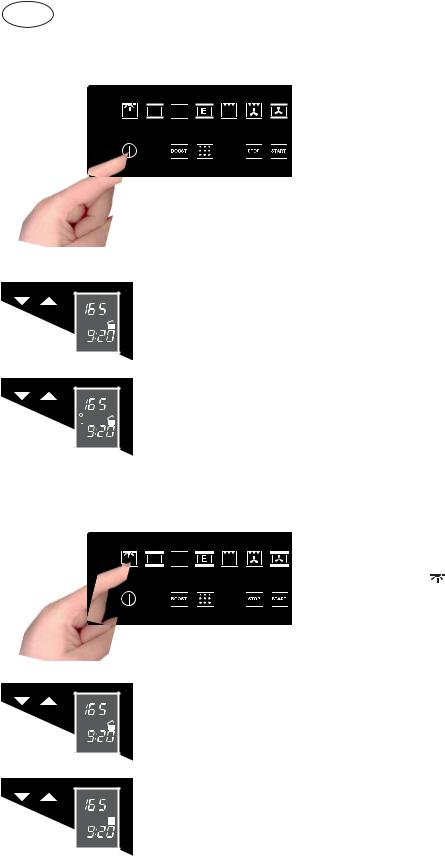
TURNING ON THE OVEN
PIZZA
Turn the oven on by pressing the  symbol shown in figure.
to activate the oven functions, always press  except for the light and timer functions, which are independent
The command activates all the icons by lighting up their backgrounds.
NOTE: Remember that the oven only turns on if the key function is deactivated
The word ON appears on the display for a minute. The control is waiting for you to select a cooking function. Otherwise, the oven assumes that it was turned on by accident and, for safety reasons, it automatically turns off displaying the word OFF for several seconds.
13
GB
Key function (keypad lock)
PIZZA
The key function is activated/deactivated by pressing the  button for at least 3 seconds. You can activate and deactivate the operating mode of the oven at any time.
If the key symbol is ABSENT, it means that the KEYPAD LOCK function is not active.
If the key symbol is DISPLAYED, it means that the KEYPAD LOCK function is active.
Padlock function (door lock) (only available in some models)
PIZZA
The padlock function is activated/deactivated by pressing the  key for at least 3 seconds. You can activate and deactivate the oven mode at any time.
The OPEN padlock symbol means that the DOOR LOCK function is not active.
The CLOSED padlock symbol means that the DOOR LOCK function is active.
14
GB
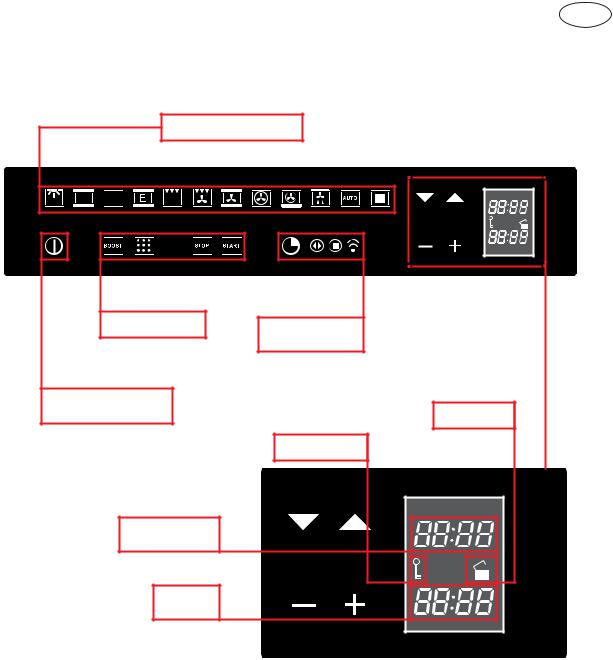
MAIN FUNCTIONS
Overview of the command panel
Cooking functions |
PIZZA |
Special function |
Programmin the |
oven |
Oven ON/OFF |
|
Lock oven ON/OFF |
Door lock |
Keypad lock |
Temperature |
Clock |
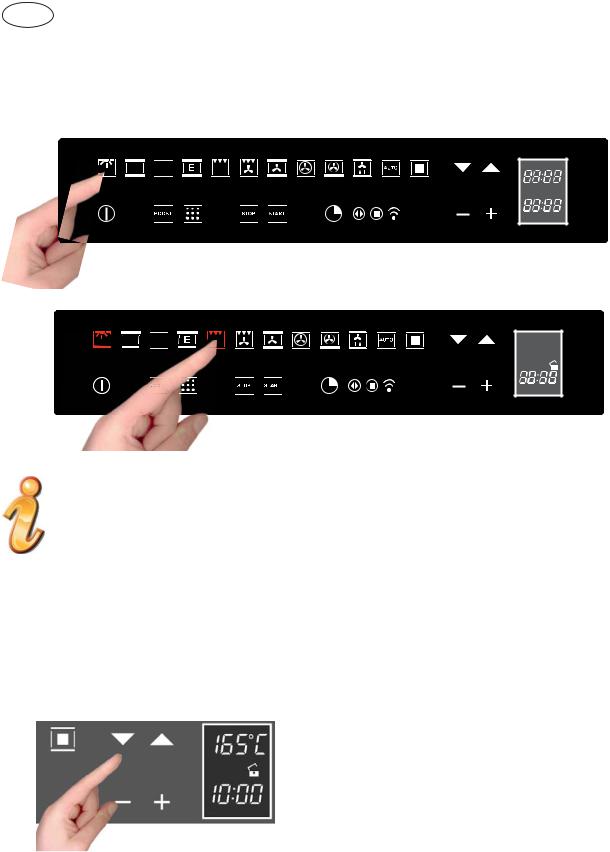
The cooking functions
The provides eleven specific cooking functions!
To activate a function, just touch the corresponding symbol.
Each function has a temperature setting selected on the basis of cooking tests of the recipes that are typically used, which can be easily changed based on your own experience.
Attention:
“During use, the accessible parts of the oven can become very hot. Children should be kept at a distance; you should also be careful not to touch the heating elements inside the oven.”
15
GB
Cooking functions
Each type of oven is provided for various cooking systems.
|
Icon |
|
Mode Description |
Used for… |
||||||
|
|
|
|
|
|
|
|
The light is on only. |
--- |
|
|
|
|
|
|
|
|
|
|||
|
|
|
|
|
|
|
|
|||
|
|
|
|
|
|
|
|
In this mode only the fan inside of the |
This mode is used to defrost |
|
|
|
|
|
|
|
|
|
|||
|
|
|
|
|
|
|
|
|||
|
|
|
|
|
|
|
|
|||
|
|
|
|
|
|
|
|
|||
|
|
|
|
|
|
|
|
chamber is running. |
deepfrozen food. |
|
|
|
|
|
|
|
|
|
In |
this mode both upper (top) |
This is the traditional mode of cooking |
|
|
|
|
|
|
|
|
|||
|
|
|
|
|
|
|
|
|||
|
|
|
|
|
|
|
|
|||
|
|
|
|
|
|
|
|
|||
|
|
|
|
|
|
|
|
and lower (bottom) oven heating |
on one shelf. Therefore only one rack |
|
|
|
|
|
|
|
|
|
|||
|
|
|
|
|
|
|
|
|||
|
|
|
|
|
|
|
|
elements are used to heat the oven |
can be used when selecting the Bake |
|
|
|
|
|
|
|
|
|
|||
|
|
|
|
|
|
|
|
air. However, no fan is used to |
mode. Ideal for Appetizers, Biscuits, |
|
|
|
|
|
|
|
|
|
circulate the heat. |
Coffee Cakes and Cookies. |
|
|
|
|
|
|
|
|
|
The Pizza mode uses the additional |
The Pizza mode has been specifically |
|
|
PIZZA |
|||||||||
|
lower heating element + the circular |
designed so you can bake perfect |
||||||||
|
|
|
|
|
|
|
|
|||
|
|
|
|
|
|
|
|
heating element |
PIZZAS in a few minutes. |
|
|
|
|
|
|
|
|
|
|||
|
|
|
|
|
|
|
|
located behind the fan cover in the |
NOTES: in this particular cooking |
|
|
|
|
|
|
|
|
|
rear wall of the oven. |
mode, the temperature in the oven |
|
|
|
|
|
|
|
|
|
|
|
reaches 350 °C. |
|
|
|
|
|
|
|
|
This mode is intended to save energy. |
Ideal for frozen or precooked food, |
|
|
|
|
|
|
|
|
|
|||
|
|
|
|
|
|
|
|
|||
|
|
|
|
|
|
|
|
|||
|
|
|
|
|
|
|
|
In particular the oven cooling fan |
and small portions-mealsThe preheat |
|
|
|
|
|
|
|
|
|
|||
|
|
|
|
|
|
|
|
|||
|
|
|
|
|
|
|
|
works only when needed e.g. when |
time is very short and cooking tends |
|
|
|
|
|
|
|
|
|
|||
|
|
|
|
|
|
|
|
the oven is hot and the electronics |
to be slower.It is not recommended |
|
|
|
|
|
|
|
|
|
require cooling. |
for heavy loads e.g. large portions or |
|
|
|
|
|
|
|
|
|
|
|
big meal preparation. |
|
|
|
|
|
|
|
|
The Convection bake mode uses the |
It can also be used for baking-cooking |
|
|
|
|
|
|
|
|
|
|||
|
|
|
|
|
|
|
|
|||
|
|
|
|
|
|
|
|
|||
|
|
|
|
|
|
|
|
upper (top) oven heating element, the |
Appetizers, Biscuits, Coffee Cakes |
|
|
|
|
|
|
|
|
|
|||
|
|
|
|
|
|
|
|
|||
|
|
|
|
|
|
|
|
lower (bottom) heating element and |
and Cookies on one or more levels. |
|
|
|
|
|
|
|
|
|
|||
|
|
|
|
|
|
|
|
the convection fan inside the oven. |
|
|
|
|
|
|
|
|
|
|
The True Convection Bake mode |
Consequently different foods can be |
|
|
|
|
|
|
|
|
|
|||
|
|
|
|
|
|
|
|
|||
|
|
|
|
|
|
|
|
uses the circular or third heating |
cooked simultaneously (maximum |
|
|
|
|
|
|
|
|
|
|||
|
|
|
|
|
|
|
|
element hidden behind the baffle at |
three levels) and is suitable for |
|
|
|
|
|
|
|
|
|
|||
|
|
|
|
|
|
|
|
the back wall of the oven. The heat is |
preparing a complete dinner (small |
|
|
|
|
|
|
|
|
|
circulated throughout the oven by the |
portions). Mixing of flavours is |
|
|
|
|
|
|
|
|
|
convection fan. |
avoided and an important energy |
|
|
|
|
|
|
|
|
|
|
|
saving is obtained. |
16

|
GB |
Suitable for preparing a complete |
Ideal for steak, hamburgers, chicken |
dinner (small portions). Mixing of |
quarters or chicken breasts. |
flavours is avoided and an important |
|
energy saving is obtained. |
|
The Grill mode uses intense heat |
Ideal for preparing toast, browning |
radiated from the upper (top) heating |
and grilling. |
element. |
If the spit motor is fitted the spit |
|
roasting of a whole chicken or turkey |
|
is possible. |
The grill uses intense heat radiated |
Ideal for toasting, browning and |
by the heating element |
grilling. |
|
If rotisserie spit is mounted on the |
|
motor, you can cook a whole chicken |
|
or turkey. |
The standard time is 1.30 h and can |
PYRO or self-cleaning mode. Here |
be changed. (see page 22) |
the oven is automatically cleaned by |
|
burning-off cooking residues at high |
|
temperature (about 475 °C) from |
|
1.30 h to 3 h. During the self-cleaning |
|
cycle all fumes produced are filtered |
|
and then expelled to ambient. |
17
GB
Instructions for use
Conventional cooking
A classic system that uses upper and lower heat suitable for cooking a single dish.
It is a good idea to insert the food when the oven has reached its preset temperature, i.e., when the °C is locked and you have heard the beep.
If you need to lower or raise the temperature towards the end of cooking, press the most suitable cooking symbol and adjust the temperature as you see fit.
We recommend opening the door as little as possible during cooking.
Fan cooking
In this type of cooking, a fan located in the rear part circulates warm air inside the oven, distributing it uniformly. This cooks food faster than conventional cooking.
This system is good for cooking on several shelves and even for different types of foods (fish, meat, etc. ).
Defrosting
When you select ventilated cooking and set the temperature to 0 °C, the fan will circulate cold air inside the oven, favouring the rapid defrosting of frozen foods.
Pre-heating is not necessary but it is better to do it for pastries (you can increase the temperature up to 60 °C).
18
GB
Grill cooking
Type of cooking for grilling or browning foods.
Some ovens can even have a motorised rod for cooking on a spit.
The grill with the food to be cooked is placed in the 1st or 2nd position from the bottom. Pre-heat for 5 minutes.
Cooling fan
The fan is located on the upper part of the oven and creates a flow of cooling air inside the cabinet and across the front of the oven.
It starts when the oven chamber reaches about 80 °C.
The fan turns off when the temperature of the oven chamber falls below about 60 °C.
19
GB
Eco-Bake
This function is defined in order to obtain a consistent energy saving. The cooling fan is initially off and turns on only when the inner parts temperature gets high, then it works with the heating elements. Cooking might be a little bit slower than the standard Bake, especially when the oven is heavily loaded.
Special functions
Boost (quick preheat)
BOOST – FAST TIMES
To shorten cooking times with fast pre-heating
This special function can be activated after selecting a cooking function and is used to reduce the time required to reach the set cooking temperature.
PIZZA |
PIZZA |
It is possible to disconnect the turbo heat function “BOOST“ or change cooking function at any time.
PIZZA MODE
PIZZA
The PIZZA MODE was specifically designed so you can bake perfect PIZZAS in just a few minutes.
For perfect results, press the PIZZA key to access this special recipe. After you make your settings, “PIZZA MODE”
will do the rest, reaching about 350 °C by turning on the heating elements at 100% of their capacity.
At this temperature, you are guaranteed to have a crispy base and proper cooking of the toppings of your pizza, like at the pizzeria.
20
GB
The secret to a good pizza is in the simplicity of a well-leavened dough, prepared and cooked well: use a small quantity of good quality toppings.
DOUGH BASE PREPARATION
Once you have a ball of leavened dough, slam it on the work surface to improve its elasticity, spread it with your fingertips and let it rest for a few minutes before proceeding (the dough becomes more elastic and will stretch better). Spread (you run roll) until the dough is 30 cm in diameter and place it on the grill provided (never use baking paper or anything else) then garnish with toppings to your taste.
Turn on the PIZZA function, set the number of pizzas you want to cook at the same time
(1 or 2), press the |
|
|
|
|
key and set the type of pizza that you are baking (Thin or Thick), |
|||||||||
|
|
|
|
|||||||||||
|
|
|
||||||||||||
(see table below) and then confirm with the |
|
|
|
key and you will be given the cooking |
||||||||||
|
|
|
||||||||||||
time and the level on which |
|
|
|
|
|
|
||||||||
|
|
|
|
|
|
|||||||||
you should position the pizza |
|
|
|
|
|
|
||||||||
(afterwards). |
|
|
|
|
|
|
|
|
|
|||||
Once confirmed with |
the |
|
|
|
|
|
|
|
|
|||||
key, the oven preheats and, |
|
|
|
|
|
|
||||||||
when finished, it beeps and |
|
|
|
|
|
|
||||||||
the display will tell |
that it’s |
|
|
|
|
|
|
|||||||
the right moment to put in the |
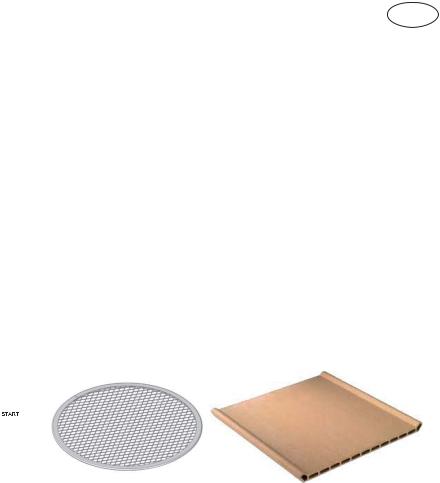
PIZZA grill |
Oven stone (optional) |
||||||||||||
pizzas. Baking automatically |
||||||||||||||
|
|
|
|
|
Insert before the |
|||||||||
starts when you close the |
|
|
|
|
|
|||||||||
|
|
|
|
|
preheating the oven |
|||||||||
door and, from now to the end, |
|
|
|
|
|
|||||||||
|
|
|
|
|
|
|||||||||
there are no other settings or |
|
|
|
|
|
|
||||||||
|
|
|
|
|
|
|||||||||
anything to turn on; |
|
|
|
|
|
|
|
|
|
|||||
you must simply follow the instructions on the display. |
|
|||||||||||||
TIPS FOR A GOOD PIZZA:
•Given the high temperatures and short baking time, we recommend that you insert and remove the pizzas quickly so that the door is open for as short a time as possible and the temperature doesn’t drop.
•Once the beep and display indicate that baking is finished, immediately remove the pizza, since the cooking times are very short and even a few seconds can have a significant effect.
•The baking time can be changed based on the type of dough and pizza; changes should be made with the +/- keys before pressing the start key. At the end of the recipe, you will be asked if you want to save it in your personal recipes.
Pizza |
Weight Leavened Dough |
Diameter |
Thin |
180gr |
30cm |
Thick |
260gr |
30cm |
Note: |
|
After the first pizza, you can immediately continue baking other pizzas without having to |
|
preheat. |
21 |
GB
Self clean (only available in some models)
PYRO or self-cleaning mode. The oven is cleaned by burning cooking residues at high temperature (about 475 °C) for from 1.5 to 3 hours. During the self-cleaning cycle, all the fumes produced are filtered and then vented outside.
Turn on the oven with the power button and then press “CLEAN” key
PIZZA
The “START” key begins to flash waiting for confirmation of the duration time of the cycle. The display shows three time options between 1:30 h and 3:00 h; with the  keys, you can select the desired duration based on the accumulated dirt (see the paragraph Cleaning and Maintenance on page 34).
After selecting the duration, press the “START” key to confirm and then press it again to start the cycle; at this point the door immediately locks and the CLEAN and the residual time is displayed along with the padlock symbol that shows the status of the door.
At the end of self-cleaning, the door remains locked while the oven cools. When the oven is cool, the door unlocks and there is an intermittent beep and a message on the display. At this point, press the ON/OFF key to end the cycle and proceed to remove the internal residue.
The clean time can be set according to the same rules of the automatic functions, and therefore the pyrolitic cycle can be delayed.
Touch  key in any moment to stop the oven.
The door remains locked until the oven temperature drops below the safety threshold, at this time the control unlocks the door.
The cooling fan starts as soon as the function is selected and turns to its higher speed when the inner parts get hot. The oven temperature is automatically set to 475°C in order to perfectly clean the cavity.
The control also locks immediately the door in order to guarantee the user safety, given that the temperature inside gets very hot. A lock icon on the temperature display shows
22

GB
the status of the latch mechanism at any time:
Door unlocked,  ;Door locked,
  .
.
Latch moving, transition in progress, lock symbol flashing.
Oven light control
The light control is active on all the cooking functions and is independent, meaning that it can be switched on or off to suit your requirements, when you want! The oven light is usually kept on throughout the heating time and then for three minutes after reaching the temperature set. From then on, the oven light switches off to save power. To check the cooking, it may be necessary to switch on the internal light. All you have to do is touch the light symbol: the light will stay on for three minutes and then switch off automatically. Naturally you can switch it off immediately by touching the light symbol again. Some models are equipped with a door control. This feature uses sensor technology to detect the position of the door to control the oven light: the opening of the door is indicated by a beep and the light comes on. It switches off when the door is closed again.
23
GB
Simple cooking commands
Thanks to state-of-the-art controls, only two touches are required to set a cooking mode: turn on the oven and select the most suitable function for the dish you are about to cook… you choose it and you touch it!
PIZZA
PIZZA
MAX |
The control suggests a temperature for each function, which you can change at any time, but if you consider it suitable, you don’t need to do anything else, the oven will start by itself in just a few seconds!
Setting the temperature
The uses a temperature probe that is accurate to ±5 °C for the maximum reliability of the cooking temperatures requested.
You can change the temperature at any time. After selecting the cooking function, just touch the symbols  and the setting range varies from +50 °C to MAX.
You don’t need to confirm the change, the control turns on by itself after a few seconds.
During heating, the centigrade symbol (°C) flashes to indicate that it is heating up to reach the selected temperature. When the temperature is reached, it beeps.
NOTE: some models may display the current temperature in the oven until the temperature set is reached. If you want to check the temperature set, press any one of the  buttons and, if you wish, you can use them to change the temperature set.
24

GB
Residual heat
While cooking food, the structure of the oven stores heat. This heat is kept isolated from the rest of the kitchen thanks to generous heat insulation and certain construction techniques.
This heat is gradually dissipated over time and can still be a resource in the kitchen, if it is managed: the control shows the internal temperature after the oven is turned off until it falls to 50 °C.
Use this characteristic to keep foods warm or to complete their cooking gently!
PROGRAMMING THE OVEN
The programming of the oven provides three modes for controlling the cooking time. They can be used in combination with normal cooking functions.
The functions can be selected in sequence, from left to right, by touching the clock symbol.
At each touch, a symbol lights up in sequence.
Note: It is not possible to program preset recipes.
25
GB
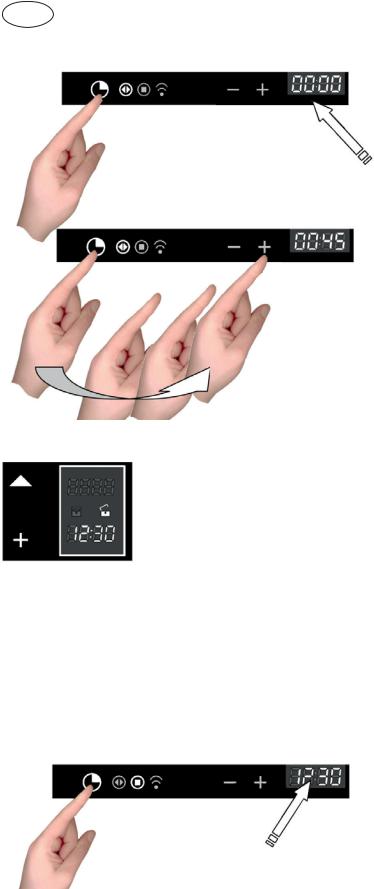
Timer programming: cooking time
Touch the timer symbol once and the relative symbol will light up. Plus, the clock display will replace the current time:
The separator dots flash to indicate that you can program the cooking time.
Once the cooking time is entered, the display will flash the current time again and the “cooking time” symbol will be lit.
The countdown begins now. After the indicated time has elapsed, the oven will beep and the heating elements, and cooking, will be turned off. The following words will appear on the display: “Program finished remove the dish”: press any button to stop the beeping or open the door. After one minute, the oven will automatically turn off, if other cooking functions have not been set.
Timer programming: end-of-cooking time
Touch the timer symbol two times and the relative symbol will light up.
The separator does will flash to indicate that you can set the end-of- cooking time.
26
GB
Set the end-of-cooking time by touching the “+” and “-” symbols.
Once the end-of-cooking time is entered, the display will flash the current time again and the “end-of-cooking time” symbol will be lit.
The countdown starts now. When the set time has been reached, the oven will beep and the heating elements will turn off, ending cooking. The following words will appear on the display: “Program finished remove the dish”: press any button to stop the beeping or open the door. After eight seconds, the oven will automatically turn off, if other cooking functions have not been set.
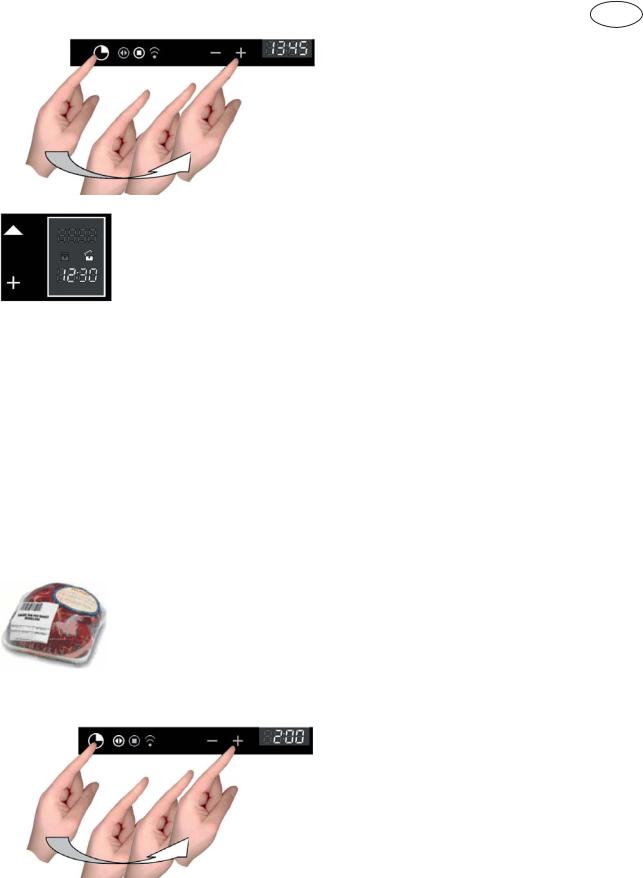
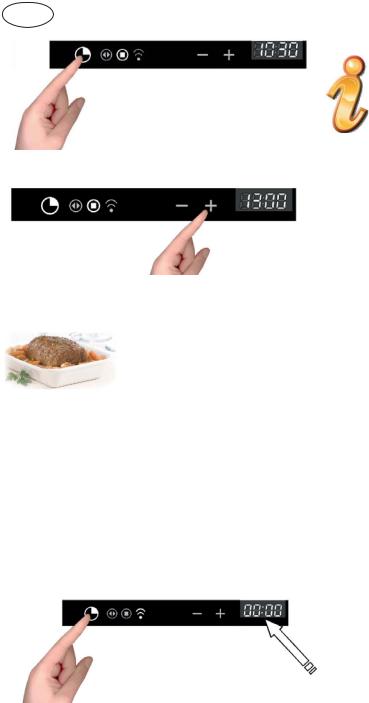
Timer programming: delayed cooking
By combining the two modes, “cooking time” and “end-of-cooking time”, you can program the oven so that cooking starts later than the current time.
For example, if you want to go out at 8:30 and you want a roast to be ready when you return at 13:00, do this:
Prepare the roast for cooking and put it in the oven
Turn on the oven, select the cooking function and set the temperature.
Then set the cooking time, which we assume to be two hours.
27
GB
Now, set the end-of-cooking time: the control normally adds the cooking time to the current time, so it proposes an end-of-cooking time, which in our case would be 10:30 (8:30+2:00).
Change the end-of-cooking time to what you want, in our example 13:00
The oven goes to standby mode, turning off the oven light.
The control automatically turns the oven on at 11:00 (13:00-2:00) and turns it off at 13:00. The roast will be ready when you return!
Programming the timer: minute-counter
The minute-counter is a function of the timer that is independent from the operation of the oven, i.e., it does not stop cooking or turn off the oven but functions as an alarm. You can set it at any time, such as to remind you when to check cooking on the burners, in addition to the oven, or for other kitchen tasks.
It is even available when the oven is off and, in this case, just touch the timer function symbol one time. But, if you are using it with the oven on, you must touch the time function symbol three times:
The separator dots flash to indicate you can set the time.
Touch the “+” and “-” symbols to set the minutes.
The countdown starts now. After the indicated time passes, the over will and the dedicated symbol will flash: press any button to stop the beep.
Programming the timer: cancelling the program
To cancel a program, you must set the previously assigned value to zero or turn on the oven.
28
 Loading...