


LIFELINE & CREATIVE
LO 9014 TC CO 9014 TC

Caro Cliente,
sentitamente La ringraziamo e ci congratuliamo per la scelta da Lei fatta. Questo nuovo prodotto, accuratamente progettato e costruito con materiali di primissima qualità, e stato accuratamente collaudato per poter soddisfare tutte le Sue esigenze di una perfetta cottura.
La preghiamo pertanto di leggere e rispettare le facili istruzioni che Le permetteranno di raggiungere eccellenti risultati sin dalla prima utilizzazione. Con questo moderno apparecchio Le formuliamo i nostri più vivi auguri.
IL COSTRUTTORE
I |
Italiano |
I |
|
|
|
GB English
FR Français
DE Deutsch
ES Español
PT Português
QUESTO PRODOTTO È STATO CONCEPITO PER UN IMPIEGO DI TIPO DOMESTICO.
IL COSTRUTTORE DECLINA OGNI RESPONSABILITÀ NEL CASO DI EVENTUALI DANNI A COSE O PERSONE DERIVANTI DA UNA NON CORRETTA INSTALLAZIONE O DA USO IMPROPRIO, ERRONEO OD ASSURDO. L’APPARECCHIONONDEVEESSEREUSATO DA PERSONE (COMPRESI BAMBINI) CON RIDOTTE CAPACITÀ FISICHE, SENSORIALI O MENTALI, O DA PERSONE CHE MANCANO DELL’ESPERIENZA E DELLE CONOSCENZE NECESSARIE SE NON SOTTO LA SUPERVISIONE O DIETRO ISTRUZIONI SULL’USO DELL’APPARECCHIO DA PARTE
DI UNA PERSONA RESPONSABILE PER LA LORO SICUREZZA.
I BAMBINI DEVONO ESSERE CONTROLLATI PER ASSICURARSI CHE NON GIOCHINO CON L’APPARECCHIO. VIETATO APPORRE CARTA INTERNA DE FORNO PER CUCINARE. L’AZIONE DEL RISCALDAMENTO DELLA RESISTENZA INFERIORE PROVOCA IL SURRISCALDAMENTO DELLA PARTE BASSA DEL FORNO PROVOCANDONE IL DANNEGGIAMENTO E ADDIRITTURA GRAVI CONSEGUENZE (RISCHIO DI INCENDIO) ANCHE SUL MOBILE DI SUPPORTO DEL FORNO STAGNOLA, PENTOLE O SIMILI A CONTATTO CON LA BASE.
3

I Indice
Istruzioni per l’utente, 5
Primo utilizzo, 5
Pannelli autopulenti, 5
Rispetto dell’ambiente catalitici, 5
Frontale comandi, 6
Istruzioni di funzionamento:
-cottura con la funzione “convenzione”, 6
-cottura con la funzione “ventilato”, 6
-scongelamento, 6
-cottura alla griglia, 7
Ventilazione di raffreddamento, 7
Presentazione del forno, 7
La modalità dimostrazione, 7 Regolazione dell’orologio, 8 Accensione del forno, 8 Funzioni Principali, 8
Panoramica del frontalino comandi, 8 Le funzioni di cottura, 8
Semplici gesti per cucinare, 9 Regolazione della temperatura di cottura, 9 Calore residuo, 10
La sonda cibo, 10
Come utilizzare la sonfa cibo, 10
Funzioni speciali: turbo heat e turbo clean, 12 Controllo della luce forno, 13
Programmazione del forno, 13
Programmazione timer: tempo di cottura, 13 Programmazione timer: ora di fine cottura, 14 Programmazione timer: cottura posticipata, 14 Programmazione timer: contaminuti, 14 Programmazione timer: cancellazione programma, 15
La sicurezza, 15
Funzione blocco forno, 15
Sostituzione lampada, 16 Smontaggio della porta del forno, 16
Istruzioni per l’installatore, 17
Incasso del forno, 17
Allacciamento elettrico, 18
Caratteristiche tecniche, 18
!
IMPORTANTE
La targhetta delle caratteristiche del forno è accessibile anche ad apparecchio installato. In questa targhetta, visibile aprendo la porta, sono riportati tutti i dati di identificazione dell’apparecchio a cui si dovrà fare riferimento per richiesta di ricambi.
Durante il funzionamento l’apparecchio diventa molto caldo, fare attenzione a non toccare gli elementi riscaldanti all’interno del forno.
4

Istruzioni per l’utente
Primo utilizzo
Il forno va pulito a fondo con acqua e sapone e risciacquato accuratamente. Per togliere i telai laterali nei forni con pareti lisce procedere come illustrato in figura.
Riscaldare il forno per circa 30 minuti alla massima temperatura; verranno così eliminati tutti i residui grassi di lavorazione che potrebbero causare sgradevoli odori in fase di cottura.
Importante:
come precauzione di sicurezza prima di procedere a qualsiasi operazione di pulizia del forno staccare sempre la spina della presa di corrente o togliere la linea di alimentazione dell’apparecchio. Inoltre evitare di usare sostanze acide o alcaline (succhi di limone, aceto, sale, pomodori ecc.). Evitare di usare prodotti a base di cloro, acidi o abrasivi specialmente per la pulizia delle pareti verniciate.
NON UTILIZZARE PILITORI A VAPORE PER LA PULIZIA DEL FORNO.
Pannelli autopulenti catalici |
I |
|
PANNELLI AUTOPULENTI
La funzione CLEAN attiva la reazione che provoca la pulizia.
I nostri forni con pareti lisce hanno la possibilità di montare all’interno della muffola dei pannelli autopulenti che ricoprono le pareti.
Questi speciali pannelli, da agganciare alle pareti prima dei telai laterali, sono ricoperti di uno speciale smalto catalitico microporoso che ossida e vaporizza gradualmente gli schizzi di olio e grasso eliminandoli durante le cotture sopra i 200°C.
Se dopo una cottura di cibi molto grassi il forno non è pulito, farlo funzionare a vuoto alla massima temperatura per un tempo massimo di 60 minuti.
I pannelli autopulenti non devono essere lavati né puliti con prodotti abrasivi o prodotti contenenti acidi o alcali.
Rispetto dell’ambiente
La documentazione del presente apparecchio utilizza carta sbiancata, senza cloro, oppure carta riciclata allo scopo di contribuire alla protezione dell’ambiente Gli imballaggi sono concepiti per non danneggiare l’ambiente; possono essere recuperati o riciclati essendo prodotti ecologici.
Riciclando l’imballaggio, si contribuirà ad un risparmio di materie prime e ad una riduzione del volume degli scarti industriali e domestici.
5

I |
Funzioni pannello comandi |
|
Simboli funzioni sul commutatore |
||
|
Lampada forno (rimane sempre accesa durante il funzionamento).
Resistenza superiore ed inferiore.
Regolazione del termostato da 50° C a MAX.
Resistenza superiore (grill superficie a potenza ridotta). Regolazione del termostato da 50° a 200° C.
Resistenza inferiore. Regolazione del termostato da 50° C a MAX.
Resistenza superiore (grill superficie)
Doppia resistenza superiore (grill grande superficie). Regolazione del termostato da 50° a 200° C.
Doppia resistenza superiore con ventilatore (grill grande superficie). Regolazione del termostato da 50° a 200° C.
Resistenza superiore, inferiore con ventilatore. Regolazione del termostato da 50° C a MAX.
Resistenza circolare con ventilatore.
Regolazione del termostato da 50° C a MAX.
Resistenza inferiore + Resistenza circolare con ventilatore. Regolazione del termostato da 50° C a MAX.
Ventilatore per scongelamento. Regolazione del termostato a 0° C.
Doppia resistenza superiore (grill grande superficie). Regolazione del termostato da 50° a 200° C. Resistenza inferiore. Regolazione del termostato da 50° C a MAX.
Istruzioni di funzionamento
Cottura convenzionale
Sistema classico che utilizza calore superiore ed inferiore adatto per la cottura di un solo piatto.
E’ bene che il cibo venga inserito quando il forno ha raggiunto la temperatura prestabilita, cioè quando si e’ spenta la spia luminosa. Se verso fine cottura si avesse necessità di incrementare la temperatura inferiore o superiore, posizionare il commutatore nella rispettiva posizione. Si consiglia di aprire il meno possibile la porta del forno durante la cottura.
Cottura ventilato
Con questo tipo di cottura, un ventilatore posto nella parte posteriore fa circolare l’aria calda all’interno del forno, distribuendola in modo uniforme. La cottura avviene più rapidamente rispetto alla cottura convenzionale. Il sistema risulta idoneo per la cottura su più ripiani ed anche per cibi di natura diversa (pesce, carne ecc. ).
Scongelamento
Selezionando una delle funzioni di cottura ventilato e regolando il termostato sullo zero, il ventilatore farà circolare all’interno del forno aria fredda, favorendo così un rapido scongelamento dei cibi congelati.
Non e’ necessario il preriscaldamento, ma per pasticceria e’ preferibile farlo.
6

Cottura al grill
Tipo di cottura per la grigliatura o doratura dei cibi. Alcuni forni possono essere completi di motorino asta e spiedo per cottura al girarrosto.
La griglia con il cibo da cuocere va inserito nella 1 o 2 posizione da sopra.
Preriscaldare per 5’. Ruotare la manopola del termostato con temperature da 50° a 200°.
Ventilatore di raffreddamento
RAFFREDDAMENTO TANGENZIALE
Un sistema forzato di circolazione dell’aria contribuisce a ridurre la temperatura dello scambio di calore sia nelle parti frontali che laterali dei forni
Il ventilatore è posto sulla parte superiore del forno e crea un circolo d’aria di raffreddamento all’interno del mobile e attraverso la porta del forno stesso.
Entra in funzione quando la parte esteriore del forno raggiunge i 60°C ca.
Accendendo il forno e impostando il termostato a 200°C, il ventilatore entra in funzione dopo 10 min ca. Lo spegnimento I del ventilatore avviene quando la parte esteriore del forno scende sotto i 60°C.
Dopo un utilizzo del forno a 200°C il ventilatore si spegne dopo 30 min. ca.
Presentazione del forno
Il suo nuovo forno è gestito da una scheda elettronica che si occupa di monitorarne in ogni istante il funzionamento per migliorarne le prestazioni, tutte.
Il controllo touch control è di ultima generazione, preciso, affidabile.
L’interfaccia è elegante, ordinata e discreta, più intuitiva che mai!
Pochi tasti, molte funzioni, nessuna combinazione o sequenza difficile di tasti, concentratevi a seguire la ricetta , il forno è pronto con due gesti!!
La modalità dimostrazione
Si chiama così la modalità nella quale il forno si presenta normalmente ogni volta che la tensione di alimentazione viene a mancare, e di conseguenza al primo allacciamento: lo scopo è di visualizzare tutte le potenzialità del controllo con una sequenza registrata di comandi.
In questa modalità il forno non viene MAI azionato realmente, cioè non vengono accese le resistenze termiche!!
Il pannello di controllo è INATTIVO e quindi il forno non risponderà ai comandi!
5 sec.!!
Per disabilitare la modalità dimostrazione toccare per cinque secondi il simbolo luce: il controllo entrerà in funzionamento normale e pronto per l’accensione.
7

Regolazione dell’orologio
I
Il forno segnalerà l’avvenuto collegamento alla rete elettrica con un doppio segnale acustico.
Per regolare l’ora di sistema tenere attivo il tasto “FUNZIONI TIMER” per 5 sec.
Ogni comando attivato viene confermato da un segnale acustico.
Regolare l’orologio con i tasti + e - : durante l’impostazione lampeggiano i puntini separatori, l’ora viene acquisita quando i puntini divengono fissi.
Accensione del forno
Il forno si accende agendo sul simbolo ON/OFF schematizzato in figura.
Il controllo attiva tutte le icone illuminandone lo sfondo.
Per un minuto dall’accensione, il controllo aspetta che una funzione di cottura venga scelta. In caso contrario interpreta l’accensione come accidentale e, per motivi di sicurezza, spegne automaticamente il forno.
Funzioni principali
Panoramica del frontalino comandi
Temperatura
Orologio
Funzioni
Programmazione |
|
|
forno |
Temperatura |
Orologio |
Funzioni speciali
On/o forno
On/o blocco
Le funzioni di cottura
Il controllo mette a disposizione ben dodici funzioni specifiche di cottura!
Ogni funzione ha una temperatura impostata scelta in base a prove di cottura su ricette che tipicamente la utilizzano e possono essere facilmente variate a seconda della propria esperienza.
Nella seguente tabella indichiamo i risultati delle prove di cottura eseguite presso i nostri laboratori da un cuoco professionista, in ogni caso si tratta di indicazioni e i valori che proponiamo servono per partire a sperimentare le proprie ricette ed ottenere sempre i migliori risultati!
8

I
Semplici gesti per cucinare
Bastano due semplici gesti per impostare una cottura grazie alla logica di controllo di ultima generazione: accendere il forno e scegliere la funzione più idonea alla pietanza che state per cucinare…la scegliete e semplicemente la toccate!
Il controllo propone una temperatura per ogni funzione, è possibile in qualsiasi momento modificarla, ma se la ritenete idonea non occorre fare altro, il forno si attiverà da solo in pochi secondi!
Regolazione della temperatura
Il controllo si avvale di una sonda temperatura con precisione di ± 5°C per la massima affidabilità delle temperature di cottura richieste.
Per modificare la temperatura basta agire sui simboli più e meno, il campo di regolazione varia da +50°C a +250°C.
Non occorre confermare la modifica, il controllo si attiva dopo pochi secondi in maniera autonoma.
Durante il riscaldamento il simbolo di grado centigrado (°C) lampeggia ad indicare la termoregolazione per raggiungere la temperatura scelta.
Al raggiungimento lo segnalerà con un segnale acustico.
9

Calore residuo
I Durante la cottura dei cibi la struttura del forno immagazzina calore, questo calore è mantenuto isolato dal resto della cucina grazie ad un isolamento termico generoso e ad alcuni accorgimenti di costruzione.
Questo calore viene disperso gradualmente nel tempo e può rappresentare ancora una risorsa in cucina se viene gestito: il controllo indica la temperatura interna, dopo lo spegnimento del forno, fino al raggiungimento dei 50°C.
Sfruttate questa caratteristica per mantenere i cibi caldi, oppure per terminarne la cottura in maniera dolce !
Sonda cibo (o termometro a sonda)
SONDA TEMPERATURE
La tenerezza, il gusto ed il sapore sono il risultato di un controllo preciso e funzionale.
La sonda cibo è un termometro che, inserito nella pietanza, permette di controllarne la temperatura interna e di usarla per stabilire la fine della cottura. Infatti può capitare che all’esterno la carne, ad esempio, sembri ben cotta ma all’interno sia ancora al sangue!
La temperatura raggiunta dai cibi, durante la cottura, è strettamente collegata con problemi di ordine igienico/
salutistico, infatti i batteri possono essere presenti in qualunque carne, così come nel pollame nel pesce e nelle uova crude. Alcuni batteri fanno andare a male il cibo, altri, come la Salmonella, Campylobacter jejuni, Listeria monocytogenes, Escherichia coli e lo Staphylococcus aureus, possono nuocere, anche gravemente, alla salute.
I batteri si moltiplicano molto rapidamente sopra i 4.4º e fino a 60ºC. La carne macinata è particolarmente a rischio da questo punto di vista.
Per evitare la moltiplicazione dei batteri è necessario:
•Non scongelare i cibi a temperatura ambiente, ma nel frigo oppure nel forno con l’apposita funzione. In quest’ultimo caso cucinare il cibo immediatamente dopo.
•Riempire il pollame poco prima di mangiarlo; non acquistare pollame ripieno confezionato e comprare il pollame ripieno già cotto solo se lo si mangerà entro 2 ore.
•Marinare il cibo in frigo, non a temperatura ambiente.
•Usare una sonda cibo per controllare la temperatura della carne, del pesce e del pollame se sono più spessi di 5 cm in modo da accertarsi che vengano raggiunte le temperature minime di cottura.
I maggiori pericoli vengono dal pollame cotto male, particolarmente pericoloso per la Salmonella;
•Evitare di interrompere la cottura, cioè di cuocere parzialmente, conservare e quindi finire di cucinare più tardi, è possibile che in questo modo si raggiungano nel cibo temperature “tiepide” favorevoli alla crescita batterica.
•Arrostire la carne ed il pollame in forno a temperature di almeno 165°C.
Come utilizzare la sonda cibo? |
|
|
|
|
|
La |
presa |
della |
sonda |
||
cibo |
è situata |
nell’angolo |
|||
frontale in alto a sinistra |
|||||
della cavità forno, protetta |
|||||
da un coperchio metallico. |
|||||
Inserire |
lo |
spinotto fino |
|||
in |
fondo: |
se |
inserito |
||
correttamente, |
il |
controllo |
|||
avviserà |
con |
un |
doppio |
||
segnale acustico. |
|
||||
10
|
|
|
|
|
Inserire |
la sonda al |
|
|
|
|
|
||
|
|
|
|
|
||
|
|
|
|
|
||
|
|
|
|
|||
|
|
|
|
|
centro |
del cibo, evitando |
di toccare ossa o parti grasse.
Tenete presente che la sonda cibo non funziona se viene connessa a forno già acceso!
Accendete il forno!
Selezionate la funzione di cottura più idonea alla vostra ricetta.
Dopo 5sec. il display temperature si commuta per visualizzare la temperatura della sonda cibo cioè quella che dovrà essere raggiunta all’interno della pietanza.
Potete modificare il valore della temperatura interna minima richiesta in un intervallo da +30°C a +99°C ma consigliamo di consultare la tabella sottostante presa dal “THE NATIONAL FOOD SAFETY DATABASE (USA)”.
ALIMENTO |
|
|
TEMPERATURA |
|
I |
||
|
|
INTERNA MINIMA |
|
|
|||
|
|
|
|
|
|
||
|
|
|
|
|
|
|
|
|
|
Macinati |
|
|
|||
|
|
|
|
|
|
|
|
Hamburger |
|
|
71°C |
|
|
||
|
|
|
|
|
|
|
|
Manzo, Vitello, Agnello, |
|
74°C |
|
|
|||
Maiale |
|
|
|
|
|||
|
|
|
|
|
|
||
Pollo, Tacchino |
|
|
74°C |
|
|
||
|
|
|
|
|
|
||
|
Manzo, Vitello, Agnello |
|
|
||||
|
|
|
|
|
|
|
|
Arrosti e Bistecche: |
|
|
|
|
|
|
|
|
|
|
|
|
|
|
|
|
|
|
|
La temperatura per la cottura al |
|
|
|
al sangue |
|
|
sangue non viene riportata dal |
|
|
||
|
|
NFSD perchè non sicura dal |
|
|
|||
|
|
|
|
|
|
||
|
|
|
|
punto di vista sanitario |
|
|
|
|
|
|
|
|
|
|
|
media al sangue |
|
|
63°C |
|
|
||
|
|
|
|
|
|
|
|
media |
|
|
71°C |
|
|
||
|
|
|
|
|
|
|
|
ben cotta |
|
|
77°C |
|
|
||
|
|
|
|
|
|
|
|
|
|
|
Maiale |
|
|
||
|
|
|
|
|
|||
Braciole, Arrosti, Costolette: |
|
|
|||||
|
|
|
|
|
|
|
|
media |
|
|
71°C |
|
|
||
|
|
|
|
|
|
|
|
ben cotta |
|
|
77°C |
|
|
||
|
|
|
|
|
|
|
|
Prosciutto, fresco |
|
|
71°C |
|
|
||
|
|
|
|
|
|
|
|
Salsicce, fresche |
|
|
71°C |
|
|
||
|
|
|
|
|
|
|
|
|
|
Pollame |
|
|
|||
|
|
|
|
|
|
|
|
Pollo, intero o a pezzi |
|
|
82°C |
|
|
||
|
|
|
|
|
|
|
|
Anatra |
|
|
82°C |
|
|
||
|
|
|
|
|
|
|
|
Tacchino intero (non |
|
|
82°C |
|
|
||
ripieno) |
|
|
|
|
|||
|
|
|
|
|
|
||
Tacchino petto |
|
|
77°C |
|
|
||
|
|
|
|
|
|
|
|
|
|
|
|
|
|
|
|
|
|
|
|
|
|
|
|
|
|
|
|
|
|
|
|
Se lo spinotto viene tolto a cottura iniziata, il controllo blocca il forno e avvisa dell’errore con segnali acustici: reinserire lo spinotto per riprendere la cottura!
11

Quando si cucina con l’ausilio della sonda cibo, I tutte le temperature preimpostate vengono modificate, per coerenza con la filosofia di utilizzo, a 165°C: si potranno variare da un minimo di 120°C al massimo di 250°C. Per lo stesso motivo la
funzione scongelamento viene disattivata.
Funzioni speciali
Boost (rapido preriscaldo)
BOOST - TEMPI RAPIDI Per abbreviare i tempi delle cotture con un preriscaldamento rapido.
La fine della cottura è discriminata dal raggiungimento della temperatura interna impostata per la sonda cibo, tutte le funzioni di programmazione del forno (funzioni timer) vengono inibite, tranne la funzione avvisatore acustico (contaminuti).
Quando la sonda cibo rileverà la temperatura per la quale è stata impostata, automaticamente il forno verrà disattivato e verrete avvisati da un segnale acustico!
Al termine della cottura ricordarsi di scollegare la sonda cibo ed estrarla dal forno.
ATTENZIONE : dopo la cottura la sonda e’ molto calda.
Nel caso la sonda venga lasciata collegata al forno, ma non inserita nel cibo, può generarsi un errore (ERR3) sul display del timer. L’errore scompare scollegando la sonda dal forno.
Questa funzione speciale è attivabile dopo aver selezionato una funzione di cottura ed il suo utilizzo serve per diminuire il tempo necessario a raggiungere la temperatura impostata di cottura.
Questo lasso di tempo è chiamato “preriscaldo” ed è richiesto in praticamente tutte le ricette.
In ogni momento è possibile disinserire la funzione “turbo heat” o cambiare funzione di cottura.
Clean (rapida pulizia)
CLEAN - PULIZIA ASSISTITA
Ciclo ad alta temperatura (250 °C), combinato con i pannelli autopulenti per la pulizia dolce e non invasiva del vano cottura.
Il corretto funzionamento è abbinato all’utilizzo dei pannelli laterali e del copriventola catalitico: si tratta di uno speciale smalto a struttura microporosa che decompone il grasso proiettato mediante un processo catalitico di ossidazione che trasforma i residui in prodotti gassosi.
Il turbo clean si attiva solo se non è stata selezionata una funzione di cottura, quindi: accendere il forno e toccare per cinque secondi il simbolo come in figura.
12
Programmazione del forno |
I |
|
La programmazione del forno mette a disposizione tre |
||
|
||
modalità per il controllo della durata di cottura. Sono disponibili |
|
|
in abbinamento alle normali funzioni di cottura, se usate la |
|
|
sonda carne vengono disattivate (vedi capitolo dedicato). |
|
5 sec.!!
Il processo di pulizia avviene ad una temperatura di 250°C per la durata di un’ora, NON utilizzarla per la cottura dei cibi!
La luce forno viene attivata, è possibile in ogni momento spegnerla e riaccenderla.
Tutti i pannelli autopulenti hanno un’efficacia di rendimento pari a circa trenta utilizzi, dopo tale limite i pannelli dovrebbero essere sostituiti.
I pannelli vanno puliti solamente con acqua corrente e possono essere richiesti al Vs. rivenditore specializzato.
Controllo della luce forno
Il controllo della luce è attivo su tutte le funzioni di cottura ed è indipendente da esse cioè può essere accesa o spenta, a seconda delle Vostre necessità, quando lo volete!
Normalmente la luce del forno è tenuta accesa durante il riscaldamento e poi per tre minuti dopo il raggiungimento della temperatura impostata. A partire da quel momento la luce forno viene spenta per motivi di risparmio energetico.
Per verificare la cottura può rendersi necessario accendere la luce interna, per questo basta toccare il simbolo della luce: resterà accesa per tre minuti per poi spegnersi da sola, naturalmente potete spegnerla subito dopo toccando nuovamente il simbolo luce.
In alcuni modelli è disponibile il controllo della porta .Questa caratteristica si avvale di una tecnologia di rilevamento della posizione della porta per controllare la luce del forno: l’apertura della porta forno viene segnalata da un segnale acustico e la luce viene accesa, viene poi spenta quando è richiusa.
Le funzioni sono selezionabili in sequenza, da sinistra a destra, toccando il simbolo orologio: ad ogni tocco si illuminerà un simbolo, in sequenza.
Programmazione timer: tempo di cottura
Toccare una volta il simbolo timer, si accenderà il simbolo relativo. Inoltre il display dell’orologio sostituirà l’indicazione dell’ora corrente:
I puntini separatori lampeggiano ad indicare che è possibile programmare il tempo di cottura.
Una volta definito il tempo di cottura, il display visualizzerà ancora l’ora corrente, il simbolo “durata cottura” sarà acceso.
A partire da ora inizia il conteggio. trascorso il tempo indicato il forno lo segnalerà acusticamente, le resistenze termiche vengono spente terminando quindi la cottura, lampeggerà il simbolo dedicato e ,nel display orologio, la durata che era
13

I |
|
stata impostata: premere un tasto qualsiasi per interrompere |
|
la segnalazione acustica. |
|
|
|
Il forno, dopo otto secondi, si spegnerà autonomamente se |
|
||
|
|
altre funzioni di cottura non vengono impostate. |
|
|
Programmazione timer: ora di fine cottura |
|
|
Toccare due volte il simbolo timer, si accenderà il simbolo |
|
|
relativo: |
|
|
|
|
|
|
I puntini separatori lampeggiano ad indicare che è possibile programmare l’ora di fine cottura.
Impostare l’ora di fine cottura toccando i simboli “+” e “-“.
Una volta definita l’ora di fine cottura, il display visualizzerà ancora l’ora corrente, il simbolo “fine cottura” sarà acceso.
A partire da ora inizia il conteggio. Raggiunta l’ora impostata, il forno lo segnalerà acusticamente, le resistenze termiche verranno spente, terminando quindi la cottura. Lampeggerà sia il simbolo dedicato sia, nel display orologio, l’ora di fine cottura che era stata impostata: premere un tasto qualsiasi per
interrompere la segnalazione acustica.
Il forno, dopo otto secondi, si spegnerà autonomamente se altre funzioni di cottura non vengono impostate.
Programmazione timer: cottura posticipata
Tramite la combinazione delle due modalità “tempo di cottura” e “ora di fine cottura” si può impostare il forno in modo che cominci la cottura ad un’ora posticipata rispetto all’attuale.
Per esempio, sono le ore 8:30 e state per uscire di casa ma volete che al vostro rientro alle ore 13:00 sia pronto un’ arrosto, ecco come fare:
Preparate l’arrosto per la cottura, infornatelo.
Accendete il forno, scegliete la funzione di cottura e impostate la temperatura.
A questo punto impostate la durata di cottura, supponiamo due ore.
14

Definite adesso l’ora di fine cottura : il controllo normalmente somma all’ora attuale il tempo di cottura e la propone come ora di fine cottura, nel nostro caso proporrà le ore 10:30 (8:30+2:00).
Modificate l’ora di fine cottura per farla coincidere con quella da Voi desiderata, nel nostro esempio le 13:00.
Il forno si pone ora in attesa (stand-by) spegnendo la luce forno: quando sarà l’ora di cominciare la cottura, la luce non verrà accesa automaticamente poiché è nella logica del controllo presupporre che la partenza posticipata coincida con la vostra assenza e quindi non serva tenerla accesa inutilmente.
Il controllo attiverà autonomamente il forno alle ore 11:00 (13:00-2:00) e lo spegnerà alle 13:00, al vostro rientro troverete l’arrosto pronto!
Programmazione del timer: contaminuti
Il contaminuti è una funzione del timer che è indipendente dal funzionamento del forno, cioè non blocca la cottura e non spegne il forno, funziona come avvisatore acustico.
Lo potete impostare in qualsiasi momento, per esempio come promemoria di controllo della cottura ai fornelli, oltre che del forno,o di altre attività di cucina.
E’ disponibile anche a forno spento, in questo caso basta toccare una volta il simbolo delle funzioni timer.
Se invece lo utilizzate a forno acceso, dovete toccare in sequenza il simbolo funzioni timer tre volte:
I puntini separatori lampeggiano ad indicare che è possibile |
I |
impostare il valore. |
Impostare i minuti agendo sui simboli “+” e “-“.
A partire da ora inizia il conteggio. Trascorso il tempo indicato il forno lo segnalerà acusticamente, lampeggerà il simbolo dedicato : premere un tasto qualsiasi per interrompere la segnalazione acustica.
Programmazione del timer: cancellazione del programma
Per cancellare una programmazione è necessario portare a zero il valore assegnato precedentemente, oppure spegnere il forno.
La sicurezza: blocco accensione del forno
Il controllo mette a disposizione un blocco del frontalino comandi per impedire l’accensione del forno o la manomissione delle impostazioni di cottura.
L’attivazione e la disattivazione avviene, in ogni istante, per mezzo del tasto di accensione (on/off).
5 sec.!!
Toccare il simbolo on/off per almeno tre secondi per attivare o disattivare, alternativamente, il blocco forno:
Blocco attivato:
simbolo lucchetto rosso chiuso su display.
Ogni azione connessa all’utilizzo della cottura è disabilitata.
15

I
Blocco disattivato: simbolo lucchetto bianco aperto su display.
Sostituzione della lampada del forno
IMPORTANTE:
La lampada del forno deve avere precise caratteristiche:
a)struttura adatta alle alte temperature (fino a 300 gradi)
b)alimentazione: vedere valore V/Hz indicato sulla targa matricola
c)potenza 25 W.
d)attacco di tipo E 14 Prima di procedere, staccare l’apparecchio dalla linea di alimentazione.
-Per evitare danni, stendere nel forno uno strofinaccio per stoviglie;
-svitare la protezione in vetro della lampada;
-svitare la vecchia lampada e sostituirla con la nuova;
-rimontare la protezione in vetro e togliere lo strofinaccio per stoviglie;
-collegare nuovamente l’apparecchio alla linea di alimentazione.
Smontaggio della porta forno
Lo smontaggio della porta forno può essere facilmente effettuato operando come segue:
-aprire totalmente la porta;
-sollevare le due levette indicate in fig.;
-richiudere la porta sul primo scatto di arresto determinato dalle due levette sollevate in precedenza;
-sollevare la porta verso l’alto e verso l’esterno del forno per estrarla dalle sedi;
Per rimontare la porta, inserire le cerniere nelle apposite sedi e quindi riportare le due levette nella posizione di chiusura.
16

Istruzioni per l’installatore |
|
|
Incasso del forno |
|
|
I |
||
Il forno può essere installato sotto un piano di cottura |
||
|
||
oppure in colonna. Le dimensioni dell’incasso devono |
|
|
essere come riportato in figura. |
|
|
Il materiale del mobile deve essere in grado di resistere |
|
|
al calore. Il forno deve essere centrato rispetto alle pareti |
|
|
del mobile e fissato con le viti e bussole che sono fornite |
|
|
in dotazione. |
|
|
min 5 |
|
Incasso Built-under |
min 5 |
|
|
min 475 |
|
|
849 |
|
|
860 |
|
|
min 5 |
|
50 |
477 |
|
472 |
||
510 |
||
|
893 |
|
|
517 |
|
|
538 |
Incasso a colonna
min 480
860
849
50
510 |
477 |
472
 893 517
538
17

I |
Allacciamento elettrico |
|
Prima di effettuare l’allacciamento elettrico accertarsi |
||
|
||
|
che: |
-le caratteristiche dell’impianto siano tali da soddisfare quanto indicato sulla targa matricola applicata sul fronte del forno;
-l’impianto sia munito di un efficace collegamento di terra secondo le norme e le disposizioni di legge in vigore. La messa a terra è obbligatoria a termini di
legge.
Il cavo in nessun punto dovrà raggiungere una temperatura superiore di 50°C quella ambiente.
Se un apparecchio fisso non è provvisto di cavo di alimentazione e di spina, o di altro dispositivo che assicuri la disconnessione dalla rete, con una distanza di apertura dei contatti che consenta la disconnessione completa nelle condizioni della categoria di sovratensione III, tali dispositivi di disconnessione devono essere previsti nella rete di alimentazione conformemente alle regole di installazione.
La presa o l’interruttore onnipolare devono essere facilmente raggiungibili con l’apparecchiatura installata.
N.B. Il costruttore declina ogni responsabilità nel caso che quanto sopra e le usuali norme antinfortunistiche non vengano rispettate.
TIPI E DIAMETRO MINIMO DEI CAVI
|
SASO |
|
|
H05RR-F 3x1,5 mm2 |
H05RR-F 3x2,5 mm2 |
H05VV-F 3x1,5 mm2 |
H05VV-F 3x2,5 mm2 |
H05RN-F 3x1,5 mm2 |
H05RN-F 3x2,5 mm2 |
H05V2V2-F 3x1,5 mm2 |
H05V2V2-F 3x2,5 mm2 |
|
|
|
|
CARATTERISTICHE TECNICHE
DIMENSIONI MUFFOLA |
Larghezza (mm) |
607 |
VOLUME UTILE |
|
|
Altezza (mm) |
|
335 |
75 litri |
||
|
|
(statico/ventilato) |
|||
|
Profondità (mm) |
390 |
|
||
|
|
|
|||
|
|
|
|
||
|
ASSORBIMENTI ELEMENTI RISCALDANTI |
|
|||
|
|
|
|
|
|
Elemento esterno resistenza cielo |
1100 W |
|
|
|
|
|
|
|
|
|
|
Elemento interno resistenza cielo |
1750 W |
|
|
|
|
|
|
|
|
|
|
Elemento circolare |
|
2300 W |
|
|
|
|
|
|
|
|
|
Elemento suola |
|
1300 W |
|
|
|
SERVIZIO ASSISTENZA TECNICA: 199.151.195
18

Dear Customer,
we would like to thank you and congratulate you on your choice.
This new product has been carefully designed and built using top quality materials, and meticulously tested to ensure that it meets all your culinary requirements.
Please read and observe these simple instructions, which will enable you to achieve excellent results from the very first time you use it. This state-of-the-art appliance comes to you with our very best wishes.
THE MANUFACTURER
THIS PRODUCT IS DESIGNED FOR DOMESTIC USE.
THE MANUFACTURER DECLINES ALL RESPONSIBILITY FOR DAMAGES TO THINGS OR PEOPLE DERIVING FROM INCORRECT INSTALLATION OR IMPROPER, ERRONEOUS OR UNSUITABLE USE.
THE APPLIANCE MUST NOT BE USED BY PEOPLE (INCLUDING CHILDREN) WITH PHYSICAL, SENSORIAL OR MENTAL IMPAIRMENTS, OR BY PEOPLE WITHOUT THE NECESSARY EXPERIENCE OR KNOWLEDGE, UNLESS THEY ARE SUPERVISED OR INSTRUCTED IN THE USE OF THE APPLIANCE
I Italiano
GB |
English |
GB |
|
|
|
FR Français
DE Deutsch
ES Español
PT Português
BY A PERSON RESPONSIBLE FOR THEIR SAFETY.
CHILDREN MUST BE SUPERVISED TO ENSURE THAT THEY DO NOT PLAY WITH THE APPLIANCE.
DO NOT PLACE TIN FOIL, PANS OR SIMILAR IN CONTACT WITH THE INNER BASE OF THE OVEN TO COOK. THE HEATING ACTION OF THE LOWER RESISTANCE CAUSES THE LOWER PART OF THE OVEN TO OVERHEAT, LEADING TO DAMAGE AND EVEN SERIOUS CONSEQUENCES (FIRE RISK) ALSO TO THE UNIT IN WHICH THE OVEN IS INSTALLED.
19

Contents
User instructions, 21
First use, 21
Self-cleaning catalytic panels, 21
GB Respect for the environment, 21
Control panel functions, 22
Instructions for use:
-conventional cooking, 22
-fan cooking, 22
-Defrosting, 22
-grill cooking, 23
Cooling fan, 23
Oven presentation, 23 Demo mode, 23 Regulating the clock, 24 Switching on the oven, 24
Main Functions, 24
View of front console, 24 Cooking functions, 24
Simple gestures for cooking, 25 Regulating the cooking temperature, 24 Residual heat, 26
The food probe, 26 Using the food probe, 26
Special functions: turbo heat and turbo clean, 30 Special functions, 28
Oven light control, 29
Programming the oven, 29
Programming the timer: cooking time, 29 Programming the timer: cooking end time, 30 Programming the timer: delayed cooking, 30 Programming the timer: minute counter, 31 Programming the timer: cancelling the programme, 31
Safety, 31
Over lock function, 31
Light replacement, 32 Removing the oven door, 32
Installation instructions, 33
Flush fitting, 33
Electrical connections, 34
Technical features, 34
!
IMPORTANT
The oven’s data plate is accessible even with the oven fully installed. The plate is visible simply by opening the door. Always quote the details from it to identify the appliance when ordering spare parts.
The appliance becomes very hot during use. Take great care not to touch the heating elements inside the oven.
20
User instructions
The first time you use the oven
Clean the oven thoroughly with soapy water and rinse well. To remove the lateral frames from smooth-walled ovens, proceed as shown in the figure.
Operate the oven for about 30 minutes at maximum temperature to burn off all traces of grease which might otherwise create unpleasant smells when cooking.
Important:
As a safety precaution, before cleaning the oven, always disconnect the plug from the power socket or the power cable from the oven. Do not use acid or alkaline substances to clean the oven (lemon juice, vinegar, salt, tomatoes etc.). Do not use chlorine based products, acids or abrasive products to clean the painted surfaces of the oven.
DO NOT USE STEAM CLEANERS TO CLEAN THE OVEN.
Self-cleaning catalytic panels
GB
SELF-CLEANING PANELS
The CLEAN function activates the reaction that causes cleaning
Our smooth walled ovens can be fitted with selfcleaning panels to cover the inside walls.
These special panels are simply hooked on to the walls before the side frames are fitted. They are coated in a special, micro-porous catalytic enamel which oxidises and gradually vaporises splashes of grease and oil at cooking temperatures above 200° C.
If the oven is not clean after cooking fatty foods, operate the empty oven for 60 minutes (max.) at maximum temperature. Never wash or clean selfcleaning panels with abrasive, acid, or alkaline products.
Respect for the environment
La documentazione del presente apparecchio utilizza carta sbiancata, senza cloro, oppure carta riciclata allo scopo di contribuire alla protezione dell’ambiente Gli imballaggi sono concepiti per non danneggiare l’ambiente; possono essere recuperati o riciclati essendo prodotti ecologici.
Riciclando l’imballaggio, si contribuirà ad un risparmio di materie prime e ad una riduzione del volume degli scarti industriali e domestici.
21

Control panel functions
Function symbols on the selector
Oven light (stays on while oven is in use).
GB
Top and bottom heating elements.
Thermostat setting from 50°C to MAX.
Top heating element (small, low power grill).
Thermostat setting from 50°C to 200°C.
Bottom heating element. Thermostat setting from 50°C to MAX.
Top heating element (small, low)
Double top heating element (large area grill).
Thermostat setting from 50°C to 200°C.
Double top heating element with fan (large area grill). Thermostat setting from 50°C to 200°C.
Top and bottom heating elements with fan.
Thermostat setting from 50°C to MAX.
Circular heating element with fan. Thermostat setting from 50°C to MAX.
Bottom heating element + Circular heating element with fan. Thermostat setting from 50°C to MAX.
Fan for defrosting. Thermostat setting at 0°C.
Double top heating element (large area grill). Thermostat setting from 50°C to 200°C. Bottom heating element. Thermostat setting from 50°C to MAX.
Instructions for use
Conventional cooking
Conventional cooking uses top and bottom heat to cook a single dish.
Place the food in the oven only once cooking temperature has been reached, i.e. when the heating indicator goes out.
If you want to increase top or bottom temperature towards the end of the cooking cycle, set the temperature control to the right position. It is advisable to open the oven door as little as possible during cooking.
Fan cooking
For this type of cooking a fan positioned at the back allows the circulation of hot air inside the oven, creating uniform heat. In this way cooking is more rapid than conventional cooking. It is a suitable method for cooking dishes on more than one shelf, especially when the food is of different types (fish, meat etc.).
Defrosting
By selecting one of the fan cooking functions and setting the thermostat to zero, the fan allows cold air to circulate inside the oven. In this way frozen food can be rapidly defrosted.
It is not essential to preheat the oven, but you are advised to do so when cooking pastries.
22
Grill cooking
Use the grill to grill or brown foods. Some ovens may be equipped with an electric motor, spit and skewers for turning on the spit.
Place the shelf with the food to be cooked in the 1st or 2nd position from the top.
Pre-heat the oven for 5 minutes. Turn the thermostat to a temperature between 50° and 200.
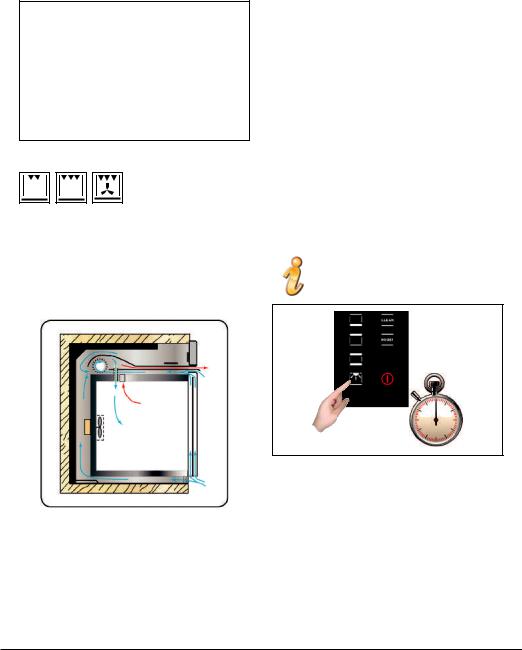
Cooling fan
TANGENTIAL COOLING
A forced air circulation system which contributes to reducing the heat exchange temperature in the front and lateral areas of the ovens.
The fan is positioned on the upper part of the oven and create a circle of cooling air on the inside of the furniture and through the door of the oven. It is turned on when the temperature of the outer shell of the oven reaches 60°C.
By switching on the oven with the thermostat at 200°C the fan starts working after approx.10 min.
It is turned off when the temperature of the outer shell of the oven descends under 60°C.
By switching off the oven with the thermostat at 200°C the fan stops working after approx. 30 min.
Oven presentation |
GB |
Your new oven is managed by an electronic card which |
|
constantly monitors its operation in order to improve its all- |
|
round performance. |
|
The state-of-the-art, reliable and precise touch control system. |
|
The elegant, orderly and discreet interface, more user-friendly |
|
than ever before! |
|
Just a few buttons, lots of functions and no difficult combination |
|
or sequence of buttons. Simply concentrate on following the |
|
recipe and the oven is ready with two movements!!! |
|
Demo mode |
|
This is the name of the mode usually implemented by the oven |
|
every time the electricity supply fails and also when the oven |
|
is first connected. |
|
The aim is to display all the control potentials with a recorded |
|
sequence of commands. |
|
In this mode the oven is NEVER really activated, as |
|
the heating elements are not switched on!! |
|
The control panel is NOT ACTIVE so the oven does |
|
not respond to commands! |
|
5 sec.!!
To disable the demo mode, touch the light symbol for five seconds: the controls will enter into standard operational mode and the oven is ready to be switched on.
23

Regulating the clock
GB
The control will wait eight seconds after switch-on for a cooking function to be chosen. Otherwise it interprets the switch-on as accidental and automatically switches off the oven for safety reasons.
Main Functions
View of front console
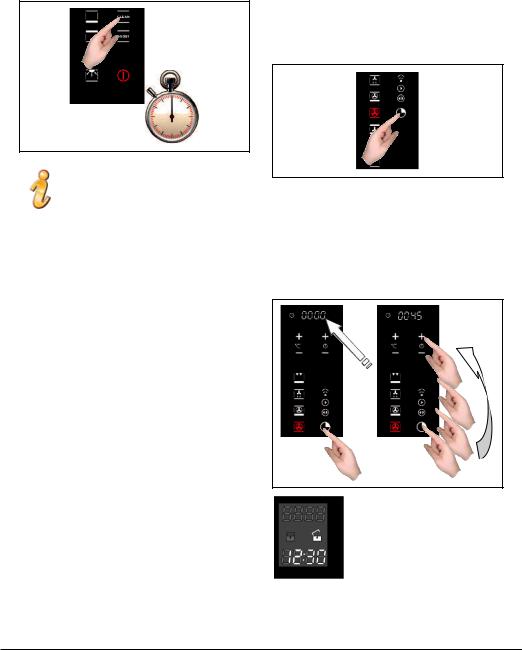
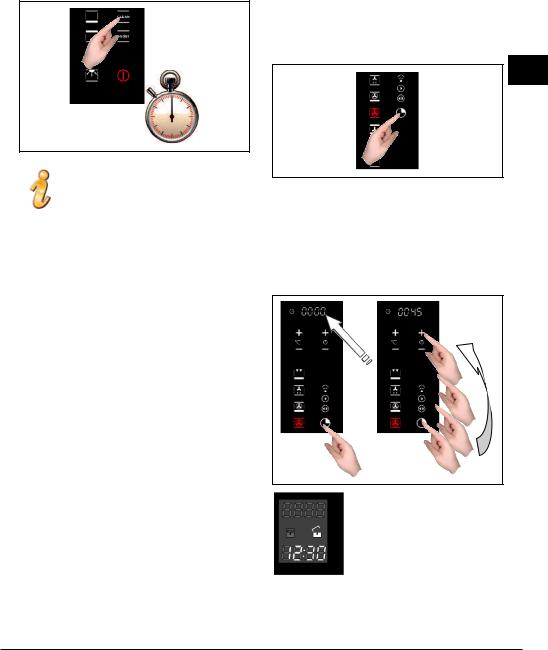
The oven signals the connection to the electricity main with a double beep.
To regulate the system time, press the TIMER FUNCTIONS button for 5 sec.
Every control used is confirmed by a beep.
Regulate the clock using the + and – buttons: the dividing dots flash while the time is being set and stop flashing when the time has been acquired.
Switching on the oven
The oven is switched on using the ON/OFF symbol shown in the figure.
The control activates all the symbols, illuminating the background.
Temperature
Oven lock
Clock
|
|
|
|
|
|
|
|
|
|
|
|
|
Cooking |
|
|
|
|
|
|
|
|
|
|
|
|
|
|
|
|
|
|
|
|
|
|
|
|
|
functions |
|
|
|
|
Programming |
|
|
|
|
|
|
|
|
|
|
|
|
the oven |
|
Temperature |
|
Clock |
|||
|
|
|
|
|
|
|
|
|
|
|
|
|
|
|
|
|
|
|
|
|
|
|
|
|
|
Special functions
Oven On/O
Oven lock On/Of
Cooking functions
The control makes a total of twelve specific cooking functions available!
Every function has a set temperature chosen on the basis of cooking tests using frequently used recipes and can easily be adjusted to suit personal preference.
The following table contains the results of the cooking tests carried out in our laboratories by a professional chef. However, this is merely a guide and the values indicated are simply to help you get started and try our your own recipes, always achieving the best results!
24

GB
Simple gestures for cooking
Two simple movements are all it takes to set a cooking programme, thanks to the state-of-the-art control logic: switch on the oven and select the best function for the dish you are preparing. Simply select it and touch it!
The control proposes a temperature for every function. It is possible to change it t any time, but if you are happy with it, you don’t need to do anything else. The oven will be automatically activated in a few seconds!
Temperature Regulation
The control makes use of a temperature probe with a level of precision of ±5°C offering maximum reliability of the cooking times required.
To change the temperature simply use the plus and minus symbols. The range of regulation varies from +50°C to +250°C. It isn’t necessary to confirm the change, as the control is automatically activated after just a few seconds.
During the heating process, the degrees centigrade symbol (°C) symbol flashes,
indicating that the heat is being regulating to reach the temperature required.
When the correct temperature is reached, you will hear a beep.
25

Residual heat
While cooking food, the structure of the oven stores heat. This heat is kept isolated from the rest of the kitchen thanks to an excellent insulation system and certain construction details.
The heat is gradually dispersed can be used as a further cooking resource if managed appropriately: the control GB indicates the interior temperature, after the oven has been
switched off, until it reaches 50°C.
use this feature to keep food warm or to gently complete the cooking process.
Food probe (or probe thermometer)
TEMPERATURE PROBE
Tenderness, taste and flavour are the result of precise ad functional control.
The food probe is a thermometer which, when inserted into the food, makes it possible to check the internal temperature and use it to establish the end of cooking.
For example, meat may look like it is cooked on the outside, but still be pink on the inside!
The temperature reached by food during cooking is closely linked to problems relating to health and hygiene. Bacteria can be contained in every kind of meat, poultry and fish, as well
as raw eggs.
Certain types of bacteria make food go off, while others, such as Salmonella, Campylobacter jejuni, Listeria monocytogenes, Escherichia coli and Staphylococcus aureus can be seriously harmful to human health.
Bacteria multiply very quickly above a temperature of 4.4° up to 60°C. Mince is particularly at risk from this point of view. To prevent bacteria from multiplying, it is necessary to take the following measures:
•Do not defrost food at room temperature, always in the fridge or in the oven using the specific function. In the latter case, cook the food immediately afterwards.
•Stuff chicken just before eating it. Never buy pre-packed ready-stuffed chicken and only buy ready-cooked stuffed chicken when you intend to eat it within 2 hours.
•Marinate food in the fridge, not at room temperature.
•Use a food probe to check the temperature of meat, fish and poultry if they are more than 5 cm thick, to ensure that the minimum cooking temperatures are reached.
The greatest hazards are posed by poorly cooked chicken, particularly at risk from Salmonella.
•Avoid interrupting the cooking process, i.e., partially cooking food, storing it and completing the cooking process later. This sequence encourages the growth of bacteria due to the “warm” temperatures reached inside the food.
•Roast meat and poultry in the oven at temperatures of at least 165°C.
Using the food probe
The food probe socket is situated in the top front corner of the oven cavity, protected by a metal cover.
Push the plug in as far as it will go. If it is correctly inserted, the control will give off a double beep.
26

|
|
|
|
|
|
Push the |
probe |
into |
|
|
|
|
|
|
|||
|
|
|
|
|
|
|||
|
|
|
|
|
|
|||
|
|
|
|
|
|
|||
|
|
|
|
|
|
|||
|
|
|
|
|
|
the centre |
of the food, |
|
|
|
|
|
|
|
avoiding touching |
bones |
|
|
|
|
|
|
|
or fatty areas. |
|
|
|
|
|
|
|
|
|
|
|
Remember that the probe will not work if it is connected when the oven is already switched on!
Switch on the oven!
Select the best cooking function for your recipe.
After 5 sec. the temperature display switches to indicate the temperature of the food probe, i.e., the temperature which must
be reached inside the food.
You can change the minimum internal temperature value to suit requirements within an interval of +30°C to +99°C , but we recommend that you consult the table below, taken from THE NATIONAL FOOD SAFETY DATABASE (USA).
FOOD |
MINIMUM INTERNAL |
|
||||
TEMPERATURE |
|
|
||||
|
|
|
||||
|
|
|
|
|
||
|
Mince |
|
||||
|
|
|
|
|
|
|
Hamburger |
71°C |
|
|
|||
GB |
||||||
|
|
|
|
|
||
Beef, veal, lamb, pork |
74°C |
|
||||
|
|
|||||
|
|
|
|
|
||
Chicken, turkey |
74°C |
|
|
|||
|
|
|
|
|
||
|
Beef, veal, lamb |
|
|
|||
|
|
|
|
|
|
|
Roasts and steaks: |
|
|
|
|
||
|
|
|
|
|
||
|
|
The cooking temperature for |
|
|
||
Rare |
rare meat is not indicated by |
|
||||
the NFSD as it is unsafe for |
|
|
||||
|
|
|
||||
|
|
health reasons |
|
|||
|
|
|
|
|
||
Medium-rare |
63°C |
|
|
|||
|
|
|
|
|
||
Medium |
71°C |
|
|
|||
|
|
|
|
|
||
Well done |
77°C |
|
|
|||
|
|
|
|
|
||
|
Pork |
|
|
|||
|
|
|
|
|
|
|
Chops, roasts, ribs: |
|
|
|
|
||
|
|
|
|
|
||
Medium |
71°C |
|
|
|||
|
|
|
|
|
||
Well done |
77°C |
|
|
|||
|
|
|
|
|
||
Fresh ham |
71°C |
|
|
|||
|
|
|
|
|
||
Fresh sausages |
71°C |
|
|
|||
|
|
|
|
|
||
|
Poultry |
|
|
|||
|
|
|
|
|
||
Whole chicken or chicken |
82°C |
|
|
|||
pieces |
|
|
|
|
||
Duck |
82°C |
|
|
|||
|
|
|
|
|
||
Whole turkey (not stuffed) |
82°C |
|
|
|||
|
|
|
|
|
||
Turkey breast |
77°C |
|
|
|||
|
|
|
|
|
|
|
|
|
|
|
|
|
|
|
|
|
|
|
|
|
|
|
|
|
|
|
|
If the plug is removed after cooking begins, the control blocks the oven and signals the error by beeping: plug the probe in again to resume cooking!
27

When cooking with the aid of the food probe, all the pre-set temperatures are changed, to maintain consistency with the philosophy of use, to 165°C: they can be varied from a minimum of 120°C to a maximum of 250°C. For the same reason, the
defrosting function is deactivated.
GB
Special functions
Boost (quick preheat)
BOOST – FAST TIMES
To shorten cooking times with fast pre-heating
The end of cooking, established by reaching the internal temperature set for the food probe. All the oven programming functions (timer functions) are stopped, apart from the beeper (minute counter).
When the food probe senses the temperature for which it has been set, the oven is automatically deactivated and you will hear a beep!
When the cooking time is up, remember to disconnect the food probe and remove it from the oven.
CAUTION: the probe is very hot after cooking.
If the probe is left connected to the oven but not inside the food, an error may be generated (ERR3) on the timer display. The error will disappear when the probe is disconnected from the oven.
This special function can be activated after selecting a cooking function and is used to reduce the time required to reach the set cooking temperature.
This period of time is known as preheating, and is required in practically all recipes.
It is possible to disconnect the turbo heat function or change cooking function at any time.
Clean (quick cleaning)
ASSISTED CLEANING
High temperature cycle (250°C), combined with self-cleaning panels for gentle, non-invasive cleaning of the cooking chamber. ì
Correct operation is combined with the use of the lateral panels and catalytic fan cover: the oven is treated with special enamel with a micro-porous structure, which breaks down the fat projected thanks to a catalytic oxidisation process which transforms residues into gaseous products.
The turbo clean function is only activated when no cooking function has been selected, so: switch on the oven and touch the symbol as shown in the figure for five seconds.
28
5 sec.!!
The cleaning process takes place at a temperature of 250°C and lasts one hour. Do not use it for cooking food!!
The oven light is activated and can be switched off and on again at any time.
All the self-cleaning panels will perform effectively for thirty cleaning processes, after this limit the panels must be replaced. The panels should be cleaned exclusively with tap water and replacements can be ordered from your specialised dealer.
Oven light control
The light control is active on all the cooking functions and is independent, meaning that it can be switched on or off to suit your requirements, when you want!
The oven light is usually kept on throughout the heating time and then for three minutes after reaching the temperature set. From then on, the oven light switches off to save power.
To check the cooking, it may be necessary to switch on the internal light. All you have to do is touch the light symbol: the light will stay on for three minutes and then switch off automatically. Naturally you can switch it off immediately by touching the light symbol again.
Some models are equipped with a door control. This feature uses sensor technology to detect the position of the door to control the oven light: the opening of the door is indicated by a beep and the light comes on. It switches off when the door is closed again.
Programming the oven
The programming of the oven offers three modes for controlling the cooking time. They are available with the standard cooking functions. When the food probe is used, they are deactivated (see specific chapter).
GB
The functions can be selected in sequence, from left to right, by touching the clock symbol: every time it is touched, a symbol lights up in sequence.
Programming the timer: cooking time
Touch the timer symbol once. The relative symbol lights up. The clock display will replace the indication of the current time: The dividing dots flash to indicate that it is possible to programme the cooking time.
Once the cooking time has been set, the display will show the current time again and the cooking time symbol will be lit.
The count begins now. When the time is up, the oven will make a beeping sound, the heating elements will be switched off and cooking will stop.
The special symbol will flash, as will the duration which was
29

set on the clock display. Press any button to stop the beeping sound.
After eight seconds, the oven switches off automatically unless other cooking functions are programmed.
GB Programming the timer: cooking end time
Touch the timer symbol twice. The relative symbol lights up.
The dividing dots flash to indicate that it is possible to programme the cooking end time.
Set the cooking end time by touching the + and – symbols.
Once the cooking end time has been set, the display will show the current time again and the cooking end symbol will be lit.
The count begins now. When the set time is reached, the oven will give off a beep, the heating elements will be switched off and cooking will stop.
The special symbol will flash, as will the cooking end time which was set on the clock display: press any button to stop
the beeping sound.
After eight seconds, the oven switches off automatically unless other cooking functions are programmed.
Programming the timer: delayed cooking
Using the combination of the two cooking time and cooking end time modes, it is possible to programme the oven to start cooking at a later time than the current time.
For example, it is 8.30 a.m. and you’re about to leave home, but you would like a roast to be ready for 1.00 p.m.. Here’s what to do:
Prepare the roast for cooking and place it in the oven.
Switch on the oven, select the cooking function and set the temperature.
Now set the cooking time, let’s say two hours.
30
 Loading...