


en
es
fr
F6FBM36S1
Instruction Manual
Instrucciones para el uso
Notice d’Utilisation

Please read this manual before using the product!
Dear Customer,
We'd like you to make the best use of our product, which has been manufactured in modern facilities with care and meticulous quality controls.
Thus, we advise you to read the entire user manual before you use the product. In case the product changes hands, do not forget to hand the guide to its new owner along with the product.
This guide will help you use the product quickly and safely.
t Please read the user guide carefully before installing and operating the product. t Always observe the applicable safety instructions.
t Keep the user guide within easy reach for future use.
t Please read any other documents provided with the product.
C Important information and useful tips.
A Risk of life and property.
B Risk of electric shock.
The product’s packaging is made of recyclable materials, in accordance with the National Environment Legislation.

|
|
|
|
|
|
|
|
|
|
1 Important instructions for safety and |
4 |
Preparation |
15 |
|
|||||
environment |
3 |
|
|
|
|
|
|
|
|
|
4.1 |
|
Things to be done for energy saving |
15 |
|
||||
|
|
|
|
|
|
||||
1.1 |
General safety |
3 |
|
|
|||||
|
4.2 |
|
Recommendations for the fresh food |
|
|
||||
1.1.1 HCA warning . . . . . . . . . . . . . . . . . . . . . . |
.4 |
|
|
|
|
compartment . . . . . . . . . . . . . . . . . . . . . . |
15 |
|
|
1.1.2 For products with a water dispenser . . . . . |
.4 |
|
4.3 |
|
Initial use . . . . . . . . . . . . . . . . . . . . . . . . . |
16 |
|
||
1.2 |
Intended use . . . . . . . . . . . . . . . . . . . . . . |
.5 |
|
5 |
Operating the product |
17 |
|
||
1.4 |
Compliance with WEEE Directive and Disposing |
|
|||||||
|
|
|
|
|
|
||||
|
. . . . . . . . . . . . . . .of the Waste Product: |
.5 |
|
5.1 |
|
Indicator panel . . . . . . . . . . . . . . . . . . . . . |
17 |
|
|
1.5 |
Compliance with RoHS Directive:. . . . . . . . . |
.5 |
|
5.2 Activating water filter change warning . . . . . |
20 |
|
|||
1.6 |
Package information. . . . . . . . . . . . . . . . . . |
.5 |
|
5.3 U4 Control Board Forever 3K Display Activating/ |
|||||
2 |
Your Refrigerator |
6 |
|
|
|
|
Deactivating Of Ice-Off Function . . . . . . . . |
22 |
|
|
5.4 |
|
Dual cooling system |
23 |
|
||||
|
|
|
|
|
|
||||
3 |
Installation |
7 |
|
5.5 |
|
. . . . . . . . . . . . . . . . .Freezing fresh food |
23 |
|
|
|
5.6 |
|
Recommendations for preserving the frozen |
||||||
|
|
|
|
|
|||||
3.1 |
Appropriate installation location . . . . . . . . |
.7 |
|
|
|
|
. . . . . . . . . . . . . . . . . . . . . . . . . . . .food |
24 |
|
3.2 |
Electrical connection . . . . . . . . . . . . . . . . |
.7 |
|
5.7 |
|
Placing the food . . . . . . . . . . . . . . . . . . . . |
24 |
|
|
3.5 |
Illumination lamp . . . . . . . . . . . . . . . . . . . |
.8 |
|
5.8 |
|
Deep-freeze information. . . . . . . . . . . . . . |
24 |
|
|
3.6 |
Door open warning. . . . . . . . . . . . . . . . . . |
.8 |
|
5.9 |
|
Removing door shelves . . . . . . . . . . . . . . |
25 |
|
|
3.3 Adjusting the gap between the upper door. . |
.8 |
|
5.10 |
Glass shelves. . . . . . . . . . . . . . . . . . . . . . |
25 |
|
|||
3.4 |
Adjusting the feet. . . . . . . . . . . . . . . . . . . |
.8 |
|
5.11 |
Chiller compartment. . . . . . . . . . . . . . . . . |
25 |
|
||
3.7 |
Water connection. . . . . . . . . . . . . . . . . . . |
12 |
|
5.12 |
Crisper. . . . . . . . . . . . . . . . . . . . . . . . . . . |
26 |
|
||
3.7.1 Before Installation . . . . . . . . . . . . . . . . . . |
12 |
|
5.13 |
Humidity controlled crisper . . . . . . . . . . . . |
26 |
|
|||
3.8 |
Connecting the water hose to the |
|
|
5.14 |
Movable middle section . . . . . . . . . . . . . . |
26 |
|
||
|
refrigerator . . . . . . . . . . . . . . . . . . . . . . . |
12 |
|
5.15 |
Ion . . . . . . . . . . . . . . . . . . . . . . . . . . . . . |
27 |
|
||
3.9 |
Connecting the water line to the water |
|
|
5.16 |
Odor filter . . . . . . . . . . . . . . . . . . . . . . . . |
27 |
|
||
|
supply . . . . . . . . . . . . . . . . . . . . . . . . . . . |
12 |
|
5.17 |
Using internal water dispenser . . . . . . . . . |
27 |
|
||
3.10 Water filter . . . . . . . . . . . . . . . . . . . . . . . . |
12 |
|
5.18 |
Dispensing water . . . . . . . . . . . . . . . . . . . |
27 |
|
|||
3.11 Attaching the internal filter into the |
|
|
5.19 |
For using water dispenser. . . . . . . . . . . . . |
28 |
|
|||
|
refrigerator . . . . . . . . . . . . . . . . . . . . . . . |
13 |
|
5.20 |
Refrigerator shelf weight limitations. . . . . . |
29 |
|
||
3.12 Before starting to use the water/ice |
|
|
6. |
Maintenance and cleaning |
30 |
|
|||
|
dispenser . . . . . . . . . . . . . . . . . . . . . . . . |
13 |
|
|
|||||
3.13 Transportation of the product |
14 |
|
|
|
|
|
|
|
|
|
6.1 |
|
Avoiding bad odors |
30 |
|
||||
|
|
|
|
|
|
||||
|
|
|
|
6.2 |
|
Protecting the plastic surfaces . . . . . . . . . |
30 |
|
|
|
|
|
|
7 |
Troubleshooting |
31 |
|
||
|
|
|
|
|
|
|
|
|
|
|
2 /33 EN |
Refrigerator / User Manual |
|
|
|

1 Important instructions for safety and environment
This section contains safety instructions that will help protect from risk of personal injury or property damage. Failure to follow these instructions shall void any warranty.
Intended use
–WARNING: Keep ventilation openings, in the appliance enclosure or in the built-in structure, clear of obstruction.
–WARNING: Do not use mechanical devices or other means to accelerate the defrosting
process, other than those recommended by the manufacturer.
–WARNING: Do not damage the refrigerant circuit. NOTE :This warning is only applicable to
appliances with refrigerating circuits which are accessible to the user.
–WARNING: Do not use electrical appliances inside the food storage compartments of the
appliance, unless they are of the type recommended by the manufacturer.
This appliance is intended to be used in household and similar applications such as
–staff kitchen areas in shops, offices and other working environments;
–farm houses and by clients in hotels, motels and other residential type environments;
–bed and breakfast type environments;
–catering and similar non-retail applications.
1.1 General safety
t 5IJT QSPEVDU DBO CF VTFE CZ DIJMESFO BU BOE above 8 years old and by persons whose physical, sensory or mental capabilities were not fully developed or who lack experience and knowledge provided that they are supervised or trained on the safe usage of the product and the risks it brings out. Children must not play with the product. Cleaning and maintenance works should not be performed by children unless they are supervised by someone.
t 6OQMVH UIF QSPEVDU JG B GBJMVSF PDDVST XIJMF JU JT in use.
t *G UIF QSPEVDU IBT B GBJMVSF JU TIPVME OPU CF operated unless it is repaired by the Authorised Service Agent. There is the risk of electric shock!
t $POOFDU UIF QSPEVDU UP B HSPVOEFE PVUMFU protected by a fuse complying with the values in the rating plate. Have the grounding installation made by a qualified electrician. Our company shall not be liable for any damages that will arise when the product is used without grounding in accordance with the local regulations.
t 6OQMVH UIF QSPEVDU XIFO OPU JO VTF
t /FWFS XBTI UIF QSPEVDU CZ TQSFBEJOH PS QPVSJOH water onto it! There is the risk of electric shock!
t /FWFS UPVDI UIF QMVH XJUI XFU IBOET /FWFS unplug by pulling on the cable, always pull out by grabbing the plug.
t *U JT SFDPNNFOEFE UP DMFBO UIF UJQ PG UIF QMVH regularly with a dry cloth.
t %P OPU QMVH UIF SFGSJHFSBUPS JG UIF XBMM PVUMFU JT loose.
t /FWFS DPOOFDU ZPVS SFGSJHFSBUPS UP FMFDUSJDJUZ saving systems. Such systems are harmful for the product.
t 6OQMVH UIF QSPEVDU EVSJOH JOTUBMMBUJPO NBJOUFnance, cleaning and repairing procedures.
t "MXBZT IBWF UIF JOTUBMMBUJPO BOE SFQBJSJOH procedures carried out by the Authorised Service Agent. Manufacturer shall not be held liable for damages that may arise from
procedures carried out by unauthorised persons. t %P OPU FBU DPOF JDF DSFBN BOE JDF DVCFT JN-
mediately after you take them out of the freezer compartment! This may cause frostbite in your mouth!
t %P OPU UPVDI GSP[FO GPPE CZ IBOE 5IFZ NBZ stick to your hand!
t %P OPU QVU CPUUMFE BOE DBOOFE MJRVJE CFWFSBHFT in the freezer compartment. They may burst!
t /FWFS VTF TUFBN BOE TUFBN BTTJTUFE DMFBOJOH materials to clean or defrost the refrigerator. Steam will cause short circuit or electric shock
|
3 / 33 EN |
Refrigerator / User Manual |
|
|
|

Important instructions for safety and environment
since it would get into contact with the electrical parts in the refrigerator!
t %P OPU VTF NFDIBOJDBM EFWJDFT PS PUIFS NFUIods to accelerate the defrosting process, other than those recommended by the manufacturer.
t /FWFS VTF UIF QBSUT PO ZPVS SFGSJHFSBUPS TVDI BT the door and drawer as a means of support or step. This will cause the product to tip over or parts of it get damaged.
t %P OPU EBNBHF UIF DPPMJOH DJSDVJU XIFSF UIF refrigerant is circulating, with drilling or cutting tools. The refrigerant that might blow out when the gas channels of the evaporator, pipe extensions or surface coatings are punctured may cause skin irritations and eye injuries.
t %P OPU DPWFS PS CMPDL UIF WFOUJMBUJPO IPMFT PO the refrigerator with any material.
t 1MBDF UIF CFWFSBHF XJUI IJHIFS QSPPGT UJHIUMZ closed and vertically.
t %P OPU VTF HBTFPVT TQSBZT OFBS UIF QSPEVDU since there is the risk of fire or explosion!
t 'MBNNBCMF JUFNT PS QSPEVDUT UIBU DPOUBJO GMBNmable gases (e.g. spray) as well as the explosive materials should never be kept in the appliance.
t %P OPU QMBDF DPOUBJOFST GJMMFE XJUI MJRVJE PO UPQ of the product. Spilling water on an electrical component may cause electric shocks or risk of fire.
t %P OPU TUPSF QSPEVDUT WBDDJOFT IFBU TFOTJUJWF medicines, scientific materials and etc.) that require a precise temperature control in the refrigerator.
t *G ZPV XJMM OPU PQFSBUF UIF QSPEVDU GPS B MPOH period of time, unplug and unload the food in it.
t *G UIF QSPEVDU JT FRVJQQFE XJUI CMVF MJHIU EP OPU look at the blue light with optical tools.
t &YQPTJOH UIF QSPEVDU UP SBJO TOPX TVO BOE wind is dangerous with respect to electrical safety.
t *O QSPEVDUT XJUI NFDIBOJDBM DPOUSPM UIFSNPstat), wait for minimum 5 minutes to plug in the product again after unplugging it.
t %P OPU PWFSMPBE UIF QSPEVDU *U NBZ GBMM XIFO the door is opened, and cause injury or damage. Similar problems may occur in case of putting things on top of the product.
t *G UIF QSPEVDU T EPPS JT FRVJQQFE XJUI B IBOEMF do not pull by the handle when changing the
place of the product. Handle may get loose.
t 1BZ BUUFOUJPO OPU UP IBWF ZPVS IBOE PS BOZ QBSU PG your body get caught by the moving parts inside the product.
1.1.1 HCA warning
t *G ZPVS QSPEVDU T DPPMJOH TZTUFN DPOUBJOT 3 B
This gas is flammable. Therefore, pay attention to not damaging the cooling system and piping during usage and transportation. In the event of damage, keep your product away from potential fire sources that can cause the product catch a fire and ventilate the room in which the unit is placed.
Ignore this warning if your product’s cooling system contains R134a.
Type of gas used in the product is stated in the type plate which is on the left wall inside the refrigerator. Never throw the product in fire for disposal.
CIf the product is equipped with a cooling system containing R134a gas, ignore this warning.
CYou can learn the gas used in production of your product on the rating plate located on the left inner part of it.
AWARNING: Never dispose the product in fire.
1.1.2 For products with a water dispenser
t Pressure for cold water inlet shall be maximum 90 psi (620 kPa). If your water pressure exceeds 80 psi (550 kPa), use a pressure limiting valve in your mains system. If you do not know how to check your water pressure, ask for the help of a professional plumber.
t If there is risk of water hammer effect in your installation, always use a water hammer prevention equipment in your installation. Consult Professional plumbers if you are not sure that there is no water hammer effect in your installation.
t Do not install on the hot water inlet. Take precautions against of the risk of freezing of the hoses. Water temperature operating interval shall be 33°F (0.6°C) minimum and 100°F (38°C) maximum.
|
4 /33 EN |
Refrigerator / User Manual |
|
|
|

Important instructions for safety and environment
t 6TF POMZ QPUBCMF XBUFS
1.2 Intended use
t 5IJT QSPEVDU IBT CFFO EFTJHOFE GPS EPNFTUJD use. It is not suitable for commercial use and it must not be used out of its intended use.
t 1SPEVDU NVTU CF VTFE POMZ GPS TUPSJOH GPPE t 5IF NBOVGBDUVSFS XBJWFT BOZ SFTQPOTJCJMJUZ
arisen from incorrect usage or transportation. t 0SJHJOBM TQBSF QBSUT XJMM CF QSPWJEFE GPS
years, following the product purchasing date.
1.3 Children’s safety
t *G UIF EPPS IBT B MPDL UIF LFZ TIPVME CF LFQU away from reach of children.
t$IJMESFO NVTU CF TVQFSWJTFE UP QSFWFOU UIFN from tampering with the product.
DANGER: Risk of child entrapment. Before you throw away your old refrigerator or freezer:
At 5BLF PGG UIF EPPST t -FBWF UIF TIFMWFT JO QMBDF TP UIBU
children may not easily climb inside.
1.4 Compliance with WEEE Directive and Disposing of the Waste Product:
This product complies with EU
WEEE Directive (2012/19/EU). This product bears a classification symbol
for waste electrical and electronic equipment (WEEE).This product
has been manufactured with high quality parts and materials which
can be reused and are suitable for recycling. Do not dispose of the waste product with normal domestic and other wastes at the end of its service life. Take it to the collection center
for the recycling of electrical and electronic equipment. Please consult your local authorities to learn about these collection centers.
1.5 Compliance with RoHS Directive:
The product you have purchased complies with EU RoHS Directive (2011/65/EU). It does not contain harmful and prohibited materials specified in the Directive.
1.6 Package information
t 1BDLBHJOH NBUFSJBMT PG UIF QSPEVDU BSF manufactured from recyclable materials in accordance with our National Environment Regulations. Do not dispose of the packaging materials together with the domestic or other wastes. Take them to the packaging material collection points designated by the local authorities.
t « Contact qualified personnel for disposal. t « Contact qualified personnel for servicing. »
DANGER: Risk Of Fire or Explosion. Flammable Refrigerant Used.
A Do Not Use Mechanical Devices To Defrost Refrigerator. Do Not Puncture Refrigerant Tubing”.
DANGER: Risk Of Fire Or Explosion.
Flammable Refrigerant Used. To Be
A Repaired Only By Trained Service
Personnel. Do Not Puncture
Refrigerant Tubing”.
CAUTION : Risk Of Fire Or Explosion. Flammable Refrigerant Used.
A Consult Repair Manual/Owner’s Guide Before Attempting To Service This Product. All Safety Precautions Must be Followed.
CAUTION : Risk Of Fire Or Explosion.
A Dispose Of Properlty In Accordance
With Federal Or Local Regulations.
Flammable Refrigerant Used.
CAUTION : Risk Of Fire Or Explosion
Due To Puncture Of Refrigerant
A Tubing; Follow Handling
Instructions Carefully. Flammable
Refrigerant Used”.
|
5 / 33 EN |
Refrigerator / User Manual |
|
|
|

2 Your Refrigerator
3 |
|
11 |
|
10 |
9 |
|
4 |
8 |
1 |
|
7 |
|
5 |
2
12 |
13 |
15 |
14 |
1- |
Refrigerator compartment |
9- Adjustable glass shelf |
2- |
Freezer compartment |
10Blower |
3- |
Display/indicator panel |
11Water filter |
4- |
Door shelf |
12Ice container |
5- |
Bottle shelf |
13Frozen food storage compartment (upper) |
6- |
Chiller compartment |
14Frozen food storage compartment (lower) |
7- |
Crispers |
15Seperator |
8- İnner water dispenser
|
6 /33 EN |
Refrigerator / User Manual |
|
|
|

3 Installation
Refer to the nearest Authorized Service Agent for installation of the product. To make the product ready for use, make sure that the electricity installation is appropriate before calling the Authorized Service Agent. If not, call a qualified electrician to have any necessary arrangements carried out.
CPreparation of the location and electrical installation at the place of installation is under customer's responsibility.
BProduct must not be plugged in during installation. Otherwise, there is the risk of death or serious injury!
WARNING: Installation and electrical Bconnections of the product must be carried
out by the Authorized Service Agent. Manufacturer shall not be held liable for damages that may arise from procedures carried out by unauthorized persons.
AWARNING: Prior to installation, visually check if the product has any defects on it. If so, do not have it installed. Damaged products cause risks for your safety.
C Make sure that the power cord is not pinched or crushed while pushing the product into its place after installation or cleaning procedures.
3.1 Appropriate installation location
WARNING: If the door of the room where Athe product will be placed is too small for
the product to pass, then the product's doors must be removed and the product must be turned aside to pass it through.
t Install the product where it will not be exposed to temperatures below freezing or exposed to outdoor weather conditions.
t Do place the product near a grounded electrical outlet.
t Do not place the product on materials such as rugs or carpets.
t Place the product on an even floor surface to prevent jolts.
3.2 Electrical connection
Connect the product to a grounded outlet protected by a fuse complying with the values in the rating plate. Our company shall not be liable for any damages that will arise when the product is used without grounding in accordance with the local regulations.
t &MFDUSJDBM DPOOFDUJPO NVTU DPNQMZ XJUI OBUJPOBM regulations.
t 1PXFS DPSE NVTU CF XJUIJO FBTZ SFBDI BGUFS installation.
t 5IF WPMUBHF BOE BMMPXFE GVTF PS CSFBLFS protection are specified in the Rating Plate which is affixed to interior of the product. If the current value of the fuse or breaker in the house does not comply with the value in the
rating plate, have a qualified electrician install a suitable fuse.
t 5IF TQFDJGJFE WPMUBHF NVTU CF FRVBM UP ZPVS mains voltage.
t %P OPU NBLF DPOOFDUJPOT WJB FYUFOTJPO DPSET PS
multi-plugs.
B
B
7 / 33 EN

Installation
3.3 Adjusting the gap between the upper door
-Upper hinge group is fixed with 3 screws.
-The hinge cover is attached after the sockets are installed.
- Then the hinge cover is fixed with two screws.
3.4 |
Adjusting the feet |
If the product stands unbalanced after installation adjust the feet. Taking help from someone to slightly lift the refrigerator will facilitate this process.
BWARNING: First unplug the product. Product must not be plugged in when adjusting the feet. There is the risk of electric shock!
Turn the front feet to balance the product. The corner where the foot exists is lowered when you turn in the direction of arrow and raised when you turn it in the opposite direction.
3.5 Illumination lamp
Do not attempt to repair yourself but call the Authorized Service Agent if the LED illumination lamps do not go on or are out of order.
The lamp(s) used in this appliance is not suitable for household room illumination. The intended purpose of this lamp is to assist the user to place foodstuffs in the refrigerator/freezer in a safe and comfortable way.
3.6 Door open warning
An audio warning signal will be given when the door of your product is left open for 1 minute. This warning will be muted when the door is closed or any of the display buttons (if any) are pressed.
8 /33 EN |
Refrigerator / User Manual |

Installation
DIMENSIONS [36” FRENCH REFRIGERATOR]
PRODUCT DIMENSIONS
|
9 / 33 EN |
Refrigerator / User Manual |
|
|
|
Installation
DIMENSIONS [36” FRENCH REFRIGERATOR]
F D O M D
|
|
H |
O |
|
|
H |
T O C |
|
|
D |
C |
O |
|
|
D |
|
H |
|
|
|
|
|
A |
|
|
|
|
|
|
|
|
C |
O |
|
|
|
|
D |
|
|
|
|
|
|
|
|
|
|
|
|
|
|
|
|
|
|
|
|
|
1 |
1 |
|
|
|
1 |
1 |
|
|
|
|
|
|
|
|
|
|
|
|
|
|
|
|
|
|
|
|
|
|
|
|
|
|
|
|
|
|
|
|
|
|
|
|
|
|
|
|
|
|
|
|
|
|
|
|
|
|
|
|
|
|
D |
|
H |
|
|
|
C |
|
|
|
D |
D |
O |
|
|
T |
D |
D |
O |
|
|
|
E |
|
|
|
F |
|
|
|
|
|
G |
|
|
|
|
H |
|
|
|
|
|
|
|
|
|
|
|
|
|
|
|
|
|
|
|
|
|
|
|
|
1 |
|
|
|
|
|
|
11 |
|
|
|
|
|
11 |
|
|
|
|
|
|
|
|
|
|
|
|
|
|
|
|
|
|
|
|
|
|
|
|
|
|
|
|
|
|
|
|
|
|
|
|
|
|
|
|
|
|
|
|
D |
D |
O |
|
|
T |
D |
D |
|
|
|
|
D |
|
|
|
D |
O |
|
|
|
|
|
|
O |
|
H |
|
|
F |
C |
T H |
|
||||||
|
|
|
I |
|
|
|
O |
|
|
|
|
|
|
|
|||||
|
|
|
|
|
|
|
|
|
|
|
|
|
|
|
|
|
|
||
|
|
|
|
|
|
|
|
|
|
|
|
|
|
|
|
|
|
|
|
1 |
|
|
|
|
1 |
|
|
|
1 |
|
1 |
|
|
|
|
|
|
||
|
|
|
|
|
|
|
|
|
|
|
|
|
|
|
|
|
|
|
|
|
|
|
|
|
|
|
|
|
|
|
|
|
|
|
|
|
|
|
|
|
|
D |
O |
3 |
|
|
D |
O |
3 |
|
D |
D |
O |
3 |
|
D |
D |
O |
3 |
|
F |
H |
T H |
|
|
F |
C |
T H |
|
|
|
||||||||
|
|
|
|
|
|
|
P |
|
|
|
|
R |
|
||||||
|
|
|
M |
|
|
|
N |
|
|
|
|
|
|
|
|
|
|
||
|
|
|
|
|
|
|
|
|
|
|
|
|
|
|
|
|
|
||
1 |
|
1 |
|
11 |
1 |
|
|
|
1 |
1 |
|
|
|
1 |
1 |
|
|||
|
|
|
|
|
|
|
|
|
|
|
|
|
|
|
|
|
|
|
|
|
10 /33 EN |
Refrigerator / User Manual |
|
|
|

Installation
DIMENSIONS [36” FRENCH REFRIGERATOR]
F F D O
F F D O 3 M
|
11 / 33 EN |
Refrigerator / User Manual |
|
|
|

Installation
3.7 Water connection
First you must connect the water hose to the refrigerator.
3.7.1 Before Installation
Make sure that you have everything necessary to ensure proper installation before proceeding, including:
Internal water filter for use inside the fridge.
3.8 Connecting the water hose to the refrigerator
1. Slip the union (B) onto the water hose (A).
2. Push the water hose downwards firmly to slip it onto the water inlet valve (C).
3. Tighten the union (C) by hand to secure it onto
the water inlet valve.
C
3.9 Connecting the water line to the water supply
Connect the water line to a water supply valve. If a valve is not present or you are not sure, consult a qualified plumber.
3.10 Water filter
To fit the water filter, follow the instructions below referring to the figures supplied:
|
12 /33 EN |
Refrigerator / User Manual |
|
|
|

Installation
3.11Attaching the internal filter into the refrigerator
AWARNING: Water filter cleans some foreign particles in the water. It does not purify water from microorganisms.
AWARNING: Ice Off button must be pressed before replacing the water filter or installing the by-pass cover.
AWARNING: Unplug the product during the replacement of the filter.
1.Pull the water filter cover slowly.
2.Remove the water filter bypass cover by turning it downwards.
AWARNING: Ensure that the Ice Off mode is enabled before removing the by-pass cover.
CIt is normal that a few drops of water drip after the cover has been removed.
3.Seat the water filter cover into the mechanism and push forwards to lock it in place.
4.Press “Ice Off” button on the display again to exit this mode.
C Water filter must be replaced every 6 months. When replacing the water filter or if you will not use the filter anymore, remove it as illustrated in the figure and
install the bypass cover. Make sure that the "Ice Off" mode is enabled before removing the filter.
3.12Before starting to use the water/ice dispenser
t Water system of the refrigerator must be connected to the cold water line. It must not be connected to hot water line.
t No water may be obtained in the initial startup of the refrigerator. Because there is air in the system. To discharge air from the system, press dispenser latch for 1-2 minutes until water comes from the dispenser. Water flow may be irregular at the beginning. After the air in the system is discharged, water flow will return to normal.
t During initial use, you will have to wait approximately 12 hours for the water to cool down.
t It will take around 1-2 days for the system to produce required amount of ice.
t The first 10 glasses of water should not be consumed.
t First several glasses of water may be turbid when the filter is used for the first time. Therefore, do not consume the first several glasses of water.
t If the water dispenser is not used for a long period of time, first 1-2 glasses of water can be hot.
t If a power outage or a temporary failure occurs while the refrigerator is operating, ice can melt down a little bit and then get frozen again. In such a case, ice cubes can stick to each other. If the outage or failure prolongs, ice can melt down causing water leakage. If you experience such a problem, empty and clean the ice container.
|
13 / 33 EN |
Refrigerator / User Manual |
|
|
|

Installation
t Ice cubes can stick to each other if they are left in the container for a long time.
t Water system installation of the refrigerator must be performed by the Authorized Service Agent.
t Water system of the product is designed to operate only with water. Do not use beverage such as soft drinks and/or juices in the water system.
t It is recommended that the water is disconnected if you will not be using the refrigerator for a long period of time due to vacation or similar reasons.
t Do not attempt to dismantle the ice container group assembly parts.
t Do not attempt to clean the ice container assembly without removing it from the refrigerator.
t When taking water from the water dispenser, remove the glass from the opening 1 second after releasing the trigger. Thus, water in the system will not drip into the drip tray.
3.13 Transportation of the product
1. Unplug the product before transporting it.
2. Remove water connections.
3. Secure the shelves, accessories, crisper and etc. in the refrigerator by adhesive tape before
repackaging it.
C
C
A
|
14 /33 EN |
Refrigerator / User Manual |
|
|
|

4 Preparation
4.1 Things to be done for Aenergy saving
t Do not leave the doors of your refrigerator open for a long time.
t Do not put hot food or drinks in your refrigerator.
t Do not overload the refrigerator. Cooling capacity will fall when the air circulation inside is hindered.
t Do not place the refrigerator in places subject to direct sunlight. Install the product at least 30 cm (12in.) away from heat sources.
t Pay attention to store your food in refrigerator in closed containers.
t Since hot and humid air will not directly penetrate into your product when the doors are not opened, your product will optimize itself in conditions sufficient to protect your food. Functions and components such as compressor, fan, heater, defrost, lighting, display and so on will operate according to the needs to consume minimum energy under
these circumstances.
t You can load maximum amount of food to the freezer compartment of the refrigerator by removing the freezer compartment shelf of drawer. Declared energy consumption value of the refrigerator was determined with the freezer compartment shelf or drawer removed and with maximum amount of food loaded. There is no risk in using a shelf or drawer suitable for the shapes and sizes of the foods to be frozen.
t Thawing frozen food in refrigerator compartment will both provide energy saving and preserve the food quality.
|
The ambient temperature of the room |
|
where you install the refrigerator should |
Cat least be 10ºC /50°F. Operating your |
|
|
refrigerator under cooler conditions than |
|
this is not recommended. |
|
Inside of your refrigerator must be cleaned |
Cthoroughly. |
|
C |
If two refrigerators are to be installed side |
by side, there should be at least 4 cm |
|
(1.6in.) distance between them. |
|
4.2 Recommendations for the fresh food compartment
t Do not allow the food to touch the temperature sensor in fresh food compartment. To allow the fresh food compartment keep its ideal storage temperature, sensor must not be hindered by food.
t Do not put hot food and beverages inside the product.
|
15 / 33 EN |
Refrigerator / User Manual |
|
|
|

Preparation
4.3 Initial use
Before starting to use the product, check that all preparations are made in accordance with the instructions in sections "Important instructions for safety and environment" and "Installation".
t Clean the interior of the refrigerator as recommended in the “Maintenance and cleaning” section. Check that inside of it is dry before operating it.
t Plug the refrigerator into the grounded wall outlet. When the door is opened the interior illumination will turn on.
t Run the refrigerator without putting any food for 6 hours and do not open its door unless
certainly required.
C
C
|
16 /33 EN |
Refrigerator / User Manual |
|
|
|

5 Operating the product
5.1 Indicator panel
Touch-control indicator panel allows you to set the temperature and control the other functions of the refrigerator. Just press the relevant buttons for function settings.
1 |
2 |
3 |
4 |
5 |
6 |
|
|
7 |
8 |
9 |
|
|
|
10 |
11 |
12 |
13 |
14 |
15 |
16 |
|
||||||||||||||||||
|
|
|
|
|
|
|
|
|
|
|
|
|
|
|
|
|
|
|
|||||||||||||||||||||
|
|
|
|
|
|
|
|
|
|
|
|
|
|
|
|
|
|
|
|
|
|
|
|
|
|
|
|
|
|
|
|
|
|
|
|
|
|
|
|
|
|
|
|
|
|
|
|
|
|
|
|
|
|
|
|
|
|
|
|
|
|
|
|
|
|
|
|
|
|
|
|
|
|
|
|
|
|
|
|
|
|
|
|
|
|
|
|
|
|
|
|
|
|
|
|
|
|
|
|
|
|
|
|
|
|
|
|
|
|
|
|
|
|
|
|
|
|
|
|
|
|
|
|
|
|
|
|
|
|
|
|
|
|
|
|
|
|
|
|
|
|
|
|
|
|
|
|
|
|
|
|
|
|
|
|
|
|
|
|
|
|
|
|
|
|
|
|
|
|
|
|
|
|
|
|
|
|
|
|
|
|
|
|
|
|
|
|
|
|
|
|
|
|
|
|
|
|
|
|
|
|
|
|
|
|
|
|
|
|
|
|
|
|
|
|
|
|
|
|
|
|
|
|
|
|
|
|
|
|
|
|
|
|
|
|
|
|
|
|
|
|
|
|
|
|
|
|
|
|
|
|
|
|
|
|
|
|
|
|
|
|
|
|
|
|
|
|
|
|
|
|
|
|
|
|
|
|
|
|
1-On/Off function
Press the On/Off button for 3 seconds to turn off or turn on the refrigerator.
2-Quick Refrigerator Function
When you press Quick Refrigerator button, the temperature of the compartment will be colder than the adjusted values.
This function can be used for food placed in the refrigerator compartment and required to be cooled down rapidly.
If you want to cool large amounts of fresh food, it is recommended to active this feature before putting the food into the fridge. Quick Refrigerator indicator will remain lit when the Quick Refrigerator function is enabled. To cancel this function press Quick Refrigerator button again. Quick Refrigerator indicator will turn off and return to its normal settings.
If you do not cancel it, Quick Refrigerator will cancel itself automatically after 1 hours or when the refrigerator compartment reaches to the required temperature. This function is not recalled when power restores after a power failure.
*20 *19 |
*18 |
*17 |
|
|
3-Vacation Function
Press the Quick Refrigerator\Vacation button for 3 seconds to activate Vacation function.”--” icon Comes on when the function is active.Function is
deactivated by pressing the same button for 3 seconds again or by pressing Refrigerator set button. When vacation mode is activated, set values does not seem for fresh food cabin. Line is occured on segments of fresh food.
When vacation mode is activated, temperature of fresh food is hotter than 50 Fahrenheit degree ( 10 celcius degree) so please do not keep foods in fresh food cabinet. Tempature of freezer is not affected.
4-Refrigerator Set Function
This function allows you to make the refrigerator compartment temperature setting. Press this button to set the temperature of the refrigerator compartment to 8,7,6,5,4,3,2.. respectively.
39,40,41,42,43,44,45,46,33,34,35,36,37,38, 39 °F.
5-Off Indicator
Off Indicator illuminated when the refrigerator is in“Off” mode.
6-Quick Refrigerator Indicator
This icon illuminated when the Quick Refrigerator function is active.
7-Refrigerator Compartment Temperature Setting Indicator
Indicates the temperature set for the Refrigerator Compartment.
|
17 / 33 EN |
Refrigerator / User Manual |
|
|
|

Operating the product
8-Vacation Indicator
This icon illuminated when the Vacation function is active.
9-High Temperature Error/Warning Indicator
This icon comes on during high temperature failures should not be hyphenated.
10-Freezer Compartment
Temperature Setting Indicator Indicates the temperature set for the Freezer Compartment.
11-Eco-Extra Indicator
Eco-Extra Indicator illuminated when the Eco Extra function is active.
12-Quick Freeze Indicator
This indicator illuminates when the Quick Freezer function is active.
13-Freezer Set Function
This function allows you to make the freezer compartment temperature setting. Press this button to set the temperature of the freezer compartment to -15,-16,-18,-19 ,-20,-21,-22,-15...respectively.
5,3,0,-1,-2,-3,-4,-5,-6,-7-8,5.
14-Quick Freeze Function
Quick Freeze indicator turns on when the Quick Freeze function is on. To cancel this function press Quick Freeze button again. Quick Freeze indicator will turn off and return to its normal settings. If you do not cancel it, Quick Freeze will cancel itself automatically after 24 hours or when the freezer compartment reaches to the required temperature. If you want to freeze large amounts of fresh food, press the Quick Freeze button before putting the food into the freezer compartment. If you press the Quick Freeze button repeatedly with short intervals, the electronic circuit protection will be activated immediately.
This function is not recalled when power restores after a power failure.
15-Eco-Extra (Special Economic Usage) Function
Press the Quick Freeze\Eco Extra button for 3 seconds to activate the Eco Extra Function.
Refrigerator will start operating in the most economic mode at least 6 hours later and the economic usage indicator will turn on when the function is active. Press the Quick Freeze button for 3 seconds again to deactivate the Eco Extra Function.
16-Alarm Off
When the refrigerator door is opened for 1 minutes or when there a sensor failure, a sound alarm turns on. Alarm can be turned off by pressing “Alarm Off” button.
Sensor failure alarm will not sound until power failure. If you close the door and then open again “Door open alarm” will be activated again after
1minutes later .
High temperature error can be turned off by pressing “Alarm Off” button. If the error conditions continue, the error will be displayed again after defined time interval.
The product will give an alarm once the water filter has completed its lifecycle. The alarm will go off when you press and hold the display off key for 3 seconds.
17-Filter reset button (*optional)
The filter is reset when the alarm off button is pressed for 3 seconds. Filter reset icon goes off.
18-Ice machine off button (*optional)
Ice machine active or deactive when freezer set button is pressed for 3 seconds.
19. Filter reset icon (*optional)
This icon turns on when the filter needs to be reset.
20-Ice machine off icon (*optional)
This icon lits when the ice machine is deactive, this icon power off when the ice machine is active.
|
18 /33 EN |
Refrigerator / User Manual |
|
|
|

Operating the product
(This feature is optional) Sabbath Mode:
Press the Refrigerator Set Function Button for 3 seconds to activate or deactivate the Sabbath Mode. When Sabbath Mode is activated, the display, alarm, door opening or light buttons will not function:
The cooling algorithm is set according to the sabbath fashion.
If the user does not deactivate the Sabbath mode, the refrigerator will automatically cancel it in 72 hours.
|
19 / 33 EN |
Refrigerator / User Manual |
|
|
|
Operating the product
5.2 Activating water filter change warning
(For products connected to the mains water line and equipped with filter)
Water filter change warning is activated as follows:
Automatic filter usage time calculation is not enabled ex factory. It must be enabled in products equipped with a filter.
The fourever display board we use in the refrigerator has a six-key system. Set values are shown in the display.
|
|
|
|
|
|
|
|
|
|
|
|
|
|
|
|
|
|
|
|
|
|
|
|
|
|
|
|
|
|
|
|
|
|
|
|
|
|
|
|
|
|
|
|
(Product on - o ) |
|
Quick Fridge |
|
Cooler Set |
|
Freezer Set |
|
Quick Freeze |
|
Alarm O |
|||||||||||
|
|
|
(Vaca6on) |
|
|
|
|
|
*(Ice O ) |
|
(Eco-Extra) |
|
*(Filter Reset) |
||||||||
|
|
|
|
|
|
|
|
|
|
|
|
|
|
|
|
|
|
|
|
|
|
|
|
|
|
|
|
|
|
|
|
|
|
|
|
|
|
|
|
|
|
|
|
|
|
|
|
|
|
|
|
|
|
|
(Fahrenheit-Celsius exchange) |
|
|
|
|
|
|
|
|
|
|
|
|
|
|
|
|
|
|
|
|
|
|
|
|
|
|
|
|
|
|
||
|
|
|
|
|
|
|
|
|
|
|
|
|
|
|
|
|
|
|
|
|
|
*(3second pressing) |
Press the Alarm off button for 3 seconds to |
|
activate the filter counter |
||
|
After the product is energized, it is expected to see the cabin set values on the display and if we press the Alarm Off button for 3 second, the filter counter is activated.
|
20 /33 EN |
Refrigerator / User Manual |
|
|
|

Operating the product
Activating filter counter is complete. After 3120 hours (130 days), the filter warning LED lights up and warns the user.
It must be pressed the Alarm Off button for 3 seconds to turn off this warning.
LED can be turned off by pressing
Filter warning LED.
the button for 3 seconds when the filter warning LED is activated
Once the filter has been replaced, press the Alarm Off button for 3 seconds. The filter counter is activated again. 3120 hours are expected to be completed for next warning
Again, press the Alarm Off button for 3 seconds to activate the filter counter
NOTE: This function must be triggered and activated manually by the customer. If this function is not desired to be used again, the second time after the warning LED has been turned off, it must be not activated the function.
|
21 / 33 EN |
Refrigerator / User Manual |
|
|
|

Operating the product
5.3 U4 Control Board Forever 3K Display Activating/ Deactivating Of Ice-Off Function
The Forever display board we use in the refrigerator has a six-key system. Set values are shown on the display.
|
|
|
|
|
|
|
|
|
|
|
|
|
|
|
|
|
|
|
|
|
|
|
|
|
|
|
|
|
|
|
|
|
|
|
|
|
|
|
|
|
|
|
|
|
|
|
|
|
|
|
|
|
|
|
|
(Product(Ürün aç-kapat)On/ |
|
|
QuickHızlı Soğut |
|
|
|
FridgeSoğutucuSet |
|
|
|
FreezerDondurucuSet |
|
|
QuickHızlı DondurFreeze |
|
|
|
Alarmrm OffOff |
|
||||||||
Off) |
|
|
(Tatil) |
|
|
|
|
|
|
|
|
(Buz İptal) |
|
|
(Ecoko--Ekstra)Extra) |
|
|
|
|
Res ) |
|
||||||
|
|
Fridge |
|
|
|
|
|
|
|
|
(Ice-off) |
|
|
|
|
|
(Filtre Reset) |
|
|||||||||
|
|
|
|
(Vacation) |
|
|
|
|
|
|
|
|
|
|
|
|
|
|
|
|
|
|
|
|
|
||
|
|
|
|
|
|
|
|
|
|
|
|
|
|
|
|
|
|
|
|
|
|
|
|
|
|||
*(pressing 3 sec.)
Step 1: Ice-off function is activated by pressing the Freezer Set button for 3 seconds at any time after it is powered. The Ice-off icon turns on in the display and ice formation stops.
Freezer Set
Dondurucu Set
(Ice-off)
(Buz İptal)
Freezer Set
Dondurucu Set
(Ice(Buz-off)İptal)
IceBuz-offİptalIconİkonu
When the Freezer Set button is pressed for 3 seconds while the Ice-off icon is on, the Ice-off function is deactivated.
The Ice-off icon goes out on the display and ice formation starts.
|
22 /33 EN |
Refrigerator / User Manual |
|
|
|

Operating the product
5.4 Dual cooling system
Your refrigerator is equipped with two separate cooling systems to cool the fresh food compartment and freezer compartment.Thus, air and odor in the fresh food compartment and
frozen food compartment do not get mixed. Thanks to these two separate cooling systems, cooling speed is much higher then other refrigerators.
Also additional power saving is provided since the defrosting is performed individually.
5.5 Freezing fresh food
t 8SBQ UIF GPPE PS QMBDF UIFN JO B DPWFSFE container before putting them in the refrigerator.
t )PU GPPE BOE CFWFSBHFT NVTU DPPM EPXO UP UIF room temperature before putting them in the refrigerator.
t 5IF GPPE UIBU ZPV XBOU UP GSFF[F NVTU CF GSFTI and in good quality.
t %JWJEFE UIF GPPE JOUP QPSUJPOT BDDPSEJOH UP ZPVS family’s daily or meal based consumption needs.
t 1BDL UIF GPPE JO BO BJSUJHIU NBOOFS UP QSFWFOU them from drying even if they are going to be stored for a short time.
t .BUFSJBMT UP CF VTFE GPS QBDLBHJOH NVTU CF tear-proof and resistant to cold, humidity, odor, oils and acids and they must also be airtight. Moreover, they must be well closed and they must be made from easy-to-use materials that are suitable for deep-freezers.
|
23 / 33 EN |
Refrigerator / User Manual |
|
|
|

Operating the product
Freezer |
Refrigerator |
|
|
Compartment |
Compartment |
Explanations |
|
Setting |
Setting |
|
|
-15°C / 5°F |
4°C / 39°F |
This is the normal recommended setting. |
|
-20°C / -4°F |
3°C / 37°F |
These settings are recommended when the ambient temperature |
|
exceeds 30°C/86°F. |
|||
|
|
||
|
|
Use when you wish to freeze your food in a short time. Your |
|
Quick Freeze |
4°C / 39°F |
refrigerator will return to its previous mode when the process is |
|
|
|
over. |
|
|
|
Use these settings if you think that your refrigerator compartment is |
|
-24°C / -12°F |
2°C / 35°F |
not cold enough because of the hot ambient conditions or frequent |
|
|
|
opening and closing of the door. |
|
|
|
Use this function when you place too much into the refrigerator |
|
-15°C / 5°F or |
Quick |
compartment or when you need to cool your food quickly. It is |
|
colder |
Refrigerator |
recommended that you activate Quick Refrigerator function 4-8 |
|
|
|
hours before placing the food. |
Recommended Using Temparature: FF: 4°C / 39°F Frz : -15°C / 5°F
5.6 Recommendations for preserving the frozen food
t /PUF UIF GPMMPXJOH UP FOTVSF UIBU UIF IJHI RVBMJUZ achieved by the frozen food manufacturer and the food retailer is maintained:
1.Put packets in the freezer as quickly as possible after purchase.
2.Make sure that contents of the package are labelled and dated.
3.Check whether the “Use By” and “Best Before” dates on the packaging are exceed or not.
5.7Placing the food
Freezer |
Various frozen food such |
|
compartment |
as meat, fish, ice cream, |
|
shelves |
vegetables and etc. |
|
Refrigerator |
Food in pans, covered plates |
|
compartment |
||
and closed containers |
||
shelves |
||
|
||
|
|
|
Refrigerator |
Small and packaged food or |
|
compartment |
beverage (such as milk, fruit |
|
door shelves |
juice, beer and etc.) |
|
Crisper |
Vegetables and fruits |
|
Fresh zone |
Delicatessen products |
|
(cheese, butter, salami and |
||
compartment |
||
etc.) |
||
|
5.8 Deep-freeze information
Food must be frozen as rapidly as possible when they are put in a refrigerator in order to keep them in good quality.
You can keep the freshness of food for many months (at -15°C / 5°F or lower temperatures in the deep freeze).
CDivided the food into portions according to your family’s daily or meal based consumption needs.
CPack the food in an airtight manner to prevent them from drying even if they are going to be stored for a short time.
|
24 /33 EN |
Refrigerator / User Manual |
|
|
|
Operating the product
t 'SP[FO GPPE NVTU CF VTFE JNNFEJBUFMZ BGUFS they are thawed and they should never be refrozen.
t %P OPU GSFF[F UPP MBSHF RVBOUJUJFT PG GPPE BU POF time. The quality of the food is best preserved when it is frozen right through to the core as quickly as possible.
t 1MBDJOH XBSN GPPE JOUP UIF GSFF[FS DPNQBSUNFOU causes the cooling system to operate continuously until the food is frozen solid.
Materials to be used for packaging must be tearproof and resistant to cold, humidity, odor, oils and acids.
Foods to be frozen should not be allowed to come in contact with the previously frozen items to prevent them from getting thawed partially.
CFrozen food must be used immediately after they are thawed and they should never be re-frozen.
5.9 Removing door shelves
You can remove the door shelves to clean them. Push the desired shelf up to remove it.
Do not remove the door shelf when there is food in it.
First empty the materials inside in.
5.10 Glass shelves
You can remove the glass shelves to clean them. Be careful when removing the shelves since they are heavy.
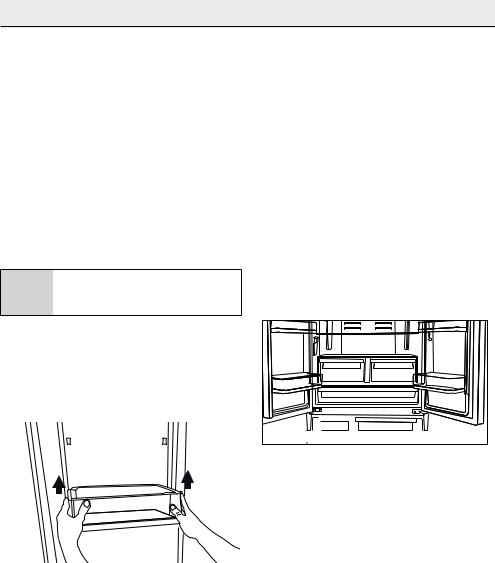
5.11 Chiller compartment
Chiller compartments allow you to prepare the food for freezing. You can also use these compartments to store your food at a
temperature a few degrees below the refrigerator compartment.
You can increase the inner volume of your refrigerator by removing any of the chiller compartments:
1.Pull the compartment towards yourself until it stops.
2.Lift the compartment about 1 cm (0.39in) up and pull towards yourself to remove it from its seating.
|
|
|
|
|
|
|
|
|
|
|
|
|
|
|
|
|
|
|
|
|
|
|
|
|
|
|
|
|
|
|
|
|
|
|
|
|
|
|
|
|
|
|
|
|
|
|
|
|
|
|
|
|
|
|
|
|
|
|
|
|
|
|
|
|
|
|
|
|
|
|
|
|
|
|
|
|
|
|
|
|
|
|
|
|
|
|
|
|
|
|
|
|
|
|
|
|
|
|
|
|
|
25 / 33 EN |
|
|
|
Refrigerator / User Manual |
|
|
|
|
|
|
|
|
|
|
|
|
|

Operating the product
5.12 Crisper
Crisper of the refrigerator is designed specially to keep the vegetables fresh without loosing their humidity. For this purpose, cool air circulation is intensified around the crisper in general. Remove the door shelves that stand against the crisper before removing the crispers.
5.13 Humidity controlled crisper
Humidity rates of the vegetables and fruit are kept under control with the feature of humiditycontrolled crisper and the food is ensured to stay fresh for longer.
We recommend you to place the leafy vegetables such as lettuce, spinach and the vegetables which are sensitive to humidity loss, in a horizontal manner as much as possible inside the crisper, not on their roots in a vertical position.
While the vegetables are being placed, specific gravity of the vegetables should be taken into consideration. Heavy and hard vegetables should be put at the bottom of the crisper and the lightweight and soft vegetables should be placed over.
Never leave the vegetables inside the crisper in their bags. If the vegetables are left inside their bags, this will cause them to decompose
in a short period of time. In case contacting with other vegetables is not preferred for hygiene concerns, use a perforated paper and other similar packaging materials instead of a bag.
Do not place together the pear, apricot, peach, etc. and apple in particular which have a high level of generation of ethylene gas in the same crisper with the other vegetables and fruit. The ethylene gas which is emitted by these fruit may cause
the other fruit to ripen faster and decompose in a shorter time.
5.14 Movable middle section
Movable middle section is intended to prevent the cold air inside the refrigerator from escaping outside. Sealing is provided when the gaskets on the door presses on the surface of the movable
middle section while the refrigerator compartment doors are closed.
C Movable middle section is closed when the left door of the refrigerator compartment
is open. Movable middle section moves with the aid of the plastic part on the body while closing the door. Do not try to open by hand.
|
26 /33 EN |
Refrigerator / User Manual |
|
|
|

Operating the product
5.15 Ion
Air is ionized by means of the ionizer system in the refrigerator compartment air duct. Thanks to this system, air-borne bacteria and odorising molecules are eliminated.
5.16 Odor filter
Odor filter in the air duct of the refrigerator compartment prevents build-up of unpleasant odors in the refrigerator.
5.17 Using internal water dispenser
After connecting the refrigerator to a water source or replacing the water filter, flush the water system. Use a sturdy container to depress and hold the water dispenser lever for 5 seconds, then release it for 5 seconds. Repeat until water
begins to flow. Once water begins to flow, continue depressing and releasing the dispenser paddle
(5 seconds on, 5 seconds off) until a total of 5-6 gal. (15L) has been dispensed. This will flush air from the filter and water dispensing system, and prepare the water filter for use. Additional flushing may be required in some households. As air is cleared from the system, water may spurt out of the dispenser.
Allow 24 hours for the refrigerator to cool down and chill water. Dispense enough water every week to maintain a fresh supply.
After 5 minutes of continuous dispensing, the dispenser will stop
Cdispensing water to avoid flooding. To continue dispensing, press the dispenser paddle again.
5.18 Dispensing water
Hold a container under the dispenser spout while pressing the dispenser pad.
Release the dispenser pad to stop dispensing.
CIt is normal for the first few glasses of water taken from the dispenser to be warm.
CIf the water dispenser is not used for a long period of time, dispose of first few glasses of water to obtain fresh water.
During initial use, you will have to wait approximately 24 hours for the water to cool down.
|
27 / 33 EN |
Refrigerator / User Manual |
|
|
|

Operating the product
5.19 For using water dispenser
Before using your refrigerator first time and after replacing your water filter, water dispenser may drip drops of water. To prevent water dripping or leaking from dispenser, please bleed the air from the system by dispensing 5-6 gallons (about 15 liter) of water
Athrough the water dispenser before the first use and every time after you change the water filter. This will
remove any air trapped in the system and stop the water dispenser from leaking. Checking coupler position and the straightness of water line at the back of the unit will be required if there’s an obstruction in water flow.
CIf your water dispenser is leaking just a few drops of water after you have dispensed some water, this is normal.
|
28 /33 EN |
Refrigerator / User Manual |
|
|
|

Operating the product
5.20Refrigerator shelf weight limitations
Freshfood compartment centilever shelves, those that only have rear supports, are tested for max 25kg (55pounds) per each part.
Crispers will hold up to 15kg (33pounds) per each one. These are dynamic loads for crispers.
Ice container bin holds up to 10kg (22pounds), it is for usage without ice. Upper freezer bin will hold up to 24kg (53 pounds) and drawer holds up to 30kg (66pounds). These are dynamic loads for ice bin, upper freezer bin and drawer.
4 kg=(8.80 pound) |
|
|
25 kg=(55.11 pound) |
4 kg=(8.80 pound) |
|
|
48 kg=(105.82 pound) |
|
15 kg=(33.06 pound) |
6 kg=(13.22 pound) |
|
|
20 kg=(44.01 pound) |
10 kg=(22.04 pound) |
22 kg=(48,50 pound) |
|
|
Up to 5 kg/11 pound day ice production |
|
|
30 kg=(66.13 pound) |
|
29 / 33 EN |
Refrigerator / User Manual |
|
|
|
 Loading...