


FILOTOP
CPH 401 BQ TC CPH 401 FR TC

Caro Cliente,
sentitamente La ringraziamo e ci congratuliamo per la scelta da Lei fatta. Questo nuovo prodotto, accuratamente progettato e costruito con materiali di primissima qualità, è stato accuratamente collaudato per poter soddisfare tutte le Sue esigenze di una perfetta cottura.
La preghiamo pertanto di leggere e rispettare le facili istruzioni che Le permetteranno di raggiungere eccellenti risultati sin dalla prima utilizzazione.
Con questo moderno apparecchio Le formuliamo i nostri più vivi auguri.
IL COSTRUTTORE
Indice
Istruzioni per l’utente, 4
Installazione, 4
Uso, 5
Manutenzione, 5
Istruzioni Touch Control, 6
Istruzioni per l’installatore, 8
Installazione, 8
Posizionamento, 8
Collegamento elettrico, 8
I |
Italiano |
I |
|
|
|
GB English
FR Français
DE Deutsch
ES Español
PT Português
Dati tecnici
Alimentazione |
230 V |
Potenza (Barbecue) |
2400 W |
Potenza (Friggitrice) |
2300 W |
Cavo di alimentazione |
3x1,5 mm2 |
QUESTO PRODOTTO È STATO CONCEPITO PER UN IMPIEGO DI TIPO DOMESTICO.
IL COSTRUTTORE DECLINA OGNI RESPONSABILITÀ NEL CASO DI EVENTUALI DANNI A COSE O PERSONE DERIVANTI DA UNA NON CORRETTA INSTALLAZIONE O DA USO IMPROPRIO, ERRONEO OD ASSURDO. L’APPARECCHIO NON DEVE ESSERE USATO DA PERSONE (COMPRESI BAMBINI) CON RIDOTTE CAPACITÀ FISICHE,
SENSORIALI O MENTALI, O DA PERSONE CHE MANCANO DELL’ESPERIENZA E DELLE CONOSCENZE NECESSARIE SE NON SOTTO LA SUPERVISIONE O DIETRO ISTRUZIONI SULL’USO DELL’APPARECCHIO DA PARTE DI UNA PERSONA RESPONSABILE PER LA LORO SICUREZZA.
I BAMBINI DEVONO ESSERE CONTROLLATI PER ASSICURARSI CHE NON GIOCHINO CON L’APPARECCHIO.
3

Istruzioni per l’utente
I Installazione
Tutte le operazioni relative all’installazione (allacciamento elettrico) devono essere eseguite da personale qualificato secondo le norme vigenti.
Per le istruzioni specifiche vedi la parte riservata all’installatore.
Uso
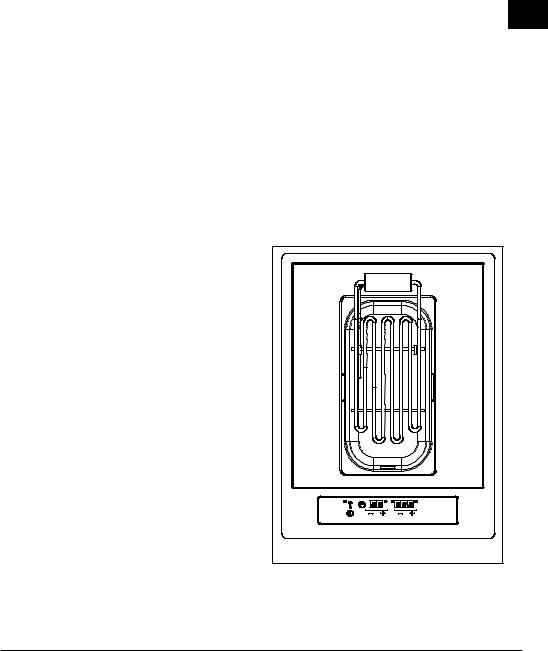
Barbecue (Fig. 1)
Il barbecue consente di effettuare rapide cotture alla griglia. Agendo sui comandi Touch Control si accende la resistenza (vedi paragrafo “istruzioni Touch Control“) che può cuocere più o meno velocemente in funzione della posizione scelta da 1 a 12.
Il funzionamento come grill si ottiene impostando il livello di potenza a 12.
Ciò non significa che non si possano effettuare ottime cotture alla griglia anche nelle posizioni intemedie anzi, tali posizioni sono consigliate nelle cotture di pietanze delicate o quando si voglia ottenere una cottura uniforme dei cibi anche nelle parti interne.
La roccia lavica contenuta nella vaschetta ha la funzione di assorbire le gocce di olio o di grasso che si producono durante la cottura; inoltre accumula calore durante la prima fase di funzionamento della resistenza e consente quindi, di ottenere una grigliatura più uniforme che è molto simile a quella che si ottiene usando la carbonella. Nella vaschetta, al posto della roccia lavica, può essere messa acqua (strato consigliato circa 3 cm).
La presenza di acqua nella vaschetta elimina l’insorgere di odori sgradevoli, senza minimamente compromettere le prestazioni del barbecue.
Per ottenere migliori risultati si consiglia quindi di preriscaldare la roccia lavica per almeno 10 minuti sulla posizione 1.
Questo accorgimento è particolarmente consigliato in occasione della prima accensione dell’apparecchio, perchè permette di diminuire il rischio che durante la cottura le vivande assorbano gli odori che la resistenza produce durante la prima accensione.
|
|
|
|
|
|
Fig. 1 |
11 |
10 |
9 |
8 |
7 |
5 |
4 |
|
1 |
|
2 |
|
3 |
|
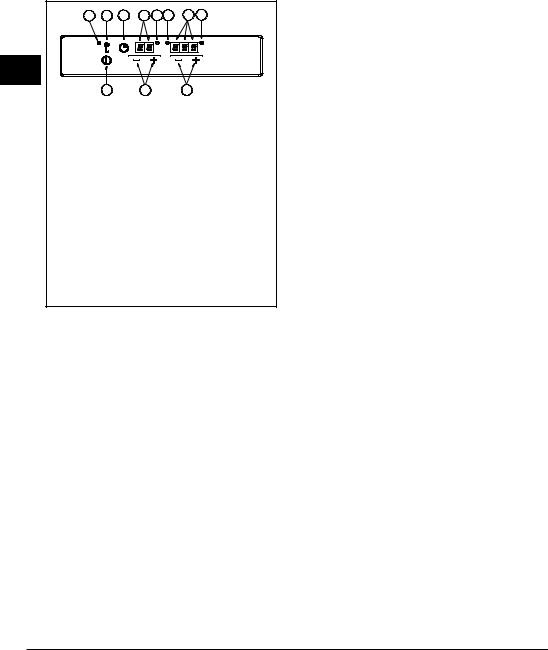
Legenda:
1Accensione/spegnimento ON/OFF
2Incremento/decrementotimer in minuti (da 0 a 99) del
3Incremento/decremento in livelli (da 0 a 12) della potenza
4Spia di funzionamento
5Display visualizzazione livello di potenza
7Spia attivazione timer
8Display visualizzazione timer
9Attivazione timer
10 Blocco tastiera
11 Spia attivazione blocco tastiera
Fig. 1a
4
Uso
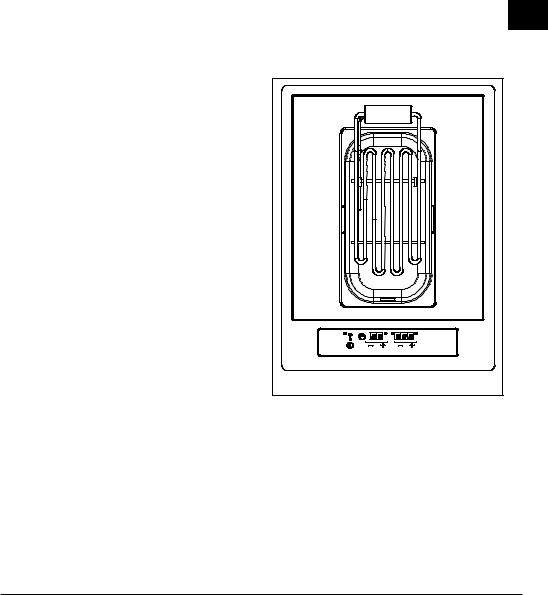
Friggitrice (Fig. 2)
La messa in funzione dell’apparecchio si effettua agendo sui comandi Touch Control (vedi paragrafo “istruzioni Touch Control“) che consentono di impostare una temperatura compresa tra 80 e 200 °C.
La friggitrice è dotata di una sonda che mantiene costante la temperatura del bagno d’olio, inoltre un termostato di sicurezza entra automaticamente in funzione in caso di difettoso funzionamento della sonda principale, impedendo all’olio di raggiungere temperature troppo elevate, circa 220° C.
L’uso di questo apparecchio è molto semplice, tuttavia per ottenere i migliori risultati è opportuno adottare alcuni facili accorgimenti come:
-prima di mettere l’olio per la prima volta, pulire accuratamente le parti d’acciaio e la resistenza in modo da eliminare gli eventuali residui di lavorazione.
-Non accendere mai l’apparecchio con le resistenze ruotate fuori della vasca.
-Non accendere mai l’apparecchio senza che vi sia l’olio nella vaschetta.
-Usare sempre olii vegetali adatti per friggere: sono sconsigliati gli olii di semi vari e l’olio di semi di girasole.
-La quantità di olio contenuta nella vasca varia da un minimo di l 2 ad un massimo di l 2,7. Se durante l’uso il livello dell’olio dovesse scendere sotto il minimo, si dovrà intervenire con un’aggiunta di olio fresco.
Si consiglia di effettuare le aggiunte con olio dello stesso tipo. I livelli massimo e minimo sono contrassegnati con due incisioni sulla parete verticale della vaschetta.
-L’olio può essere usato più volte, si consiglia però di filtrarlo fra una cottura e l’altra, in modo da eliminare i depositi che si possono verificare.
-Si consiglia comunque di cambiare l’olio molto spesso perchè anche se ben filtrato piccole particelle residue possono prendere fuoco durante la cottura.
-Prima di introdurre i cibi nella friggitrice, controllare che siano perfettamente asciutti. Attendere che l’olio abbia raggiunto la tempera desiderata.
-Per i cibi surgelati si consiglia di scongelare a bassa temperatura e successivamente friggere ad alta temperatura.
La temperatura da impostare può variare in funzione della quantità dei cibi da cuocere ed al gusto personale del consumatore, tuttavia in linea generale può essere preso in considerazione il seguente schema:
Livello di temperatura |
Pietanza |
160° C |
coscie, ali di pollo |
170° C |
frittelle, pesci |
180° C |
crocchette |
190° C |
patatine fritte |
- Spesso durante la cottura si devono aggiungere sale o aromi: evitate, per quanto possibile di effettuare queste I aggiunte direttamente nella friggitrice perchè il sale, cadendo nei bagni d’olio, ne riduce la qualità.
- In caso di mancato funzionamento, prima di richiedere l’intervento tecnico, provare a ripristinare il termostato premendo il pulsantino visibile, dopo aver tolto la vaschetta dell’olio e svitato il tappo di protezione, sulla parete interna anteriore.
Manutenzione
Prima di ogni operazione disinserire elettricamente l’apparecchiatura.
Per una maggiore durata dell’apparecchiatura è indispensaabile eseguire periodicamente un’accurata pulizia generale tenendo presente quanto segue:
-le parti in acciaio devono essere pulite con prodotti idonei (reperibili in commercio) non abrasivi o corrosivi. Evitare prodotti a base di cloro (varecchina, ecc);
-evitare di lasciare sul piano di lavoro sostanze acide o alcaline (aceto, sale, succo di lione, ecc).
Fig. 2 |
5

I |
11 |
10 |
9 |
8 |
7 |
6 |
5 |
4 |
1 |
2 |
3 |
Legenda:
1Accensione/spegnimento ON/OFF
2Incremento/decrementotimer in minuti (da 0 a 99) del
3Incremento/decremento in °C (da 40 a 200) della temperatura dell’olio
4Spia di funzionamento
5Display visualizzazione temperatura olio
6Spia di raggiungimento tempertura impostata
7Spia attivazione timer
8Display visualizzazione timer
9Attivazione timer
10 Blocco tastiera |
|
11 Spia attivazione blocco tastiera |
Fig. 2a |
|
Istruzioni Touch Control
Barbecue (Fig. 1) / Friggitrice (Fig. 2):
Accensione (barbecue)
1Toccare il tasto (1) per attivare il controllo: l’indicatore di livello (5) mostra “00” e il led (4) si accende.
2Eseguire la successiva operazione entro 10 secondi, altrimenti il dispositivo si spegne automaticamente.
Accensione (friggitrice)
1Toccare il tasto (1) per attivare il controllo: l’indicatore di livello (5) mostra “000” e il led (4) si accende.
2Eseguire la successiva operazione entro 10 secondi, altrimenti il dispositivo si spegne automaticamente.
Spia di funzionamento (barbecue)
Una volta attivato il controllo con il tasto (1), la spia di funzionamento (4) si accende e rimane accesa fintantoché non si preme nuovamente il tasto (1).
Spie di funzionamento (friggitrice)
Una volta attivato il controllo con il tasto (1), la spia di funzionamento (4) si accende e rimane accesa fintantoché non si preme nuovamente il tasto (1).
Inoltre, quando viene impostato un determinato livello di temperatura, la spia (6) lampeggia fintantoché la temperatura dell’olio non raggiunge il valore impostato; al raggiungimento di tale valore, la spia rimane accesa senza più lampeggiare.
Controllo della potenza (barbecue)
1Utilizzare i tasti “+” e “-“ (3) per regolare la potenza dal livello 0 al livello 12. La pressione continua di uno di questi tasti determina la diminuzione o l’aumento del valore impostato.
Controllo della temperatura (friggitrice)
1Utilizzare i tasti “+” e “-“ (3) per regolare la temperatura dell’olio da 80°C a 200 °C. La possibilità di regolazione è a step di 10 °C. La pressione continua di uno di questi tasti determina la diminuzione o l’aumento del valore impostato.
Spegnimento della resistenza (barbecue/friggitrice)
1Portare il valore impostato a 0 mediante il tasto “-“ (3). Dopo 3 secondi la resistenza si spegne.
Spegnimento rapido della resistenza (barbecue/ friggitrice)
1 Per spegnere automaticamente la resistenza, premere contemporaneamente i tasti “+” e “-“ (3).
Indicatire di calore residuo (“H”) (barbecue/ friggitrice)
Una volta spento l’apparecchio, il display (5) visualizza il simbolo “H” (calore residuo).
L’indicazione rimane per circa 40 minuti.
Spegnimento dell’apparecchio (barbecue/friggitrice)
1 L’apparecchio può essere spento in qualsiasi momento mediante il tasto di accensione/ spegnimento (1)
Blocco della tastiera (chiave) (barbecue/friggitrice)
1L’intero apparecchio può essere bloccato con il tasto di blocco o chiave (10), al fine di impedire operazioni non intenzionali. La funzione serve anche come sicurezza per i bambini. Fintanto che la funzione di blocco è attiva, l’azione sui tasti non ha alcun effetto salvo lo spegnimento (1). Quando è attivo il blocco, il led (11) rimane acceso.
Spegnimento di sicurezza (barbecue/friggitrice)
1Se la resistenza rimane inavvertitamente accesa, il sistema di controllo, trascorso il limite d’accensione, provvede a spegnerla automaticamente. In questo caso compare il simbolo “H”.
Il limite di accensione varia in funzione del livello
6

impostato in quel momento e varia in modo proporzionato da un minimo di 1 ora al livello massimo, ad un massimo di 6 ore al livello minimo.
Funzione timer (barbecue/friggitrice)
Anche questa funzione semplifica il processo di cottura permettendo di fare a meno della presenza umana durante tutto il ciclo di cottura.
Impostato il timer, una volta trascorso il tempo impostato, la resistenza verrà spenta automaticamente.
Se la resistenza è impostata a 0, allora la funzione timer funziona semplicemente come conta minuti (si veda il capitolo specifico “funzione timer come conta minuti”).
Attivazione della funzione timer (barbecue)
1Selezionare un livello di potenza compreso tra 1 e 12
2Toccare il tasto timer (9), il display del timer (8) visualizza “00” e la spia (7) si illumina.
3Selezionare il tempo di cottura in minuti (da 0 a 99) per mezzo dei tasti “+” e “-“ (2). La funzione timer si attiva entro pochi secondi e la spia (7) inizia a lampeggiare ad indicare che la funzionalità è attiva. Tenendo costantemente premuto il tasto “+” o “-“ (2) è possibile impostare rapidamente il tempo di cottura.
Attivazione della funzione timer (friggitrice)
1 Selezionare un livello di temperatura dell’olio compreso tra 80 °C e 200 °C.
2 Toccare il tasto timer (9), il display del timer (8) visualizza “00” e la spia (7) si illumina.
3Selezionare il tempo di cottura in minuti (da 0 a 99) per mezzo dei tasti “+” e “-“ (2). La funzione timer si attiva entro pochi secondi e la spia (7) inizia a lampeggiare ad indicare che la funzionalità è attiva. Tenendo costantemente premuto il tasto “+” o “-“ (2) è possibile impostare rapidamente il tempo di cottura.
Spegnimento rapido della resistenza e della funzione timer (barbecue/friggitrice)
1 Toccando simultaneamente i tasti “+” e “-“ (3) la resistenza viene spenta immediatamente e la funzione timer disattivata.
Attivazione della funzione timer usata come contaminuti (barbecue/friggitrice)
Se la resistenza è impostata sul livello 00, il timer può essere impiegato come conta minuti
Impostazione timer come contaminuti (barbecue)
Se il dispositivo è spento:
1Toccare il tasto d’accensione (1);
2Toccare il tasto timer (9);
3Impostare il tempo desiderato con i tasti “+” e “-“ (2)
Se il dispositivo è acceso e la resistenza è impostata ad
un valore di potenza superiore a 00: |
I |
1 Portare la potenza a 00; |
2Toccare il tasto timer (9);
3Impostare il tempo desiderato con i tasti “+” e “-“ (2)
Impostazione timer come contaminuti (friggitrice)
Se il dispositivo è spento:
4Toccare il tasto d’accensione (1);
5Toccare il tasto timer (9);
6Impostare il tempo desiderato con i tasti “+” e “-“ (2)
Se il dispositivo è acceso e la resistenza è impostata ad un valore di temperatura superiore a 000:
4Portare la temperatura a 000;
5Toccare il tasto timer (9);
6Impostare il tempo desiderato con i tasti “+” e “-“ (2)
Spegnimento della funzione contaminuti (barbecue/ friggitrice)
Quando il tempo è scaduto viene emesso un segnale acustico per la durata di 2 minuti.
Per interrompere in anticipo la segnalazione acustica è sufficiente toccare un tasto qualunque.
Se si vuol interrompere il timer prima del suo scadere:
1Toccare il tasto di timer (9)
2Azzerare il tempo tenendo premuto il tasto “-“ (2)
Disattivazione rapida della funzione contaminuti (barbecue/friggitrice)
Premere simultaneamente i tasti “+” e “-“ (2).
Messaggi di errore
-AL0 (BARBECUE/FRIGGITRICE) Nel caso in cui rimanga premuto un tasto per un tempo superiore a 90 secondi, verrà emesso un doppio segnale acustico e visualizzato AL0 sul display a 3 cifre.
-AL1 (FRIGGITRICE) Nel caso in cui la sonda sia in corto circuito, viene visualizzato AL1 sul display a 3 cifre.
-AL2 (FRIGGITRICE) Nel caso in cui la sonda non sia connessa, dopo circa 5 minuti dall’accensione, viene visualizzato AL2 sul display a 3 cifre.
-AL3 (BARBECUE/FRIGGITRICE) Nel caso in cui la temperatura in corrispondenza della scheda elettronica raggiunga gli 85°, viene visualizzato AL3 sul display a 3 cifre.
7

Istruzioni per l’installatore
Installazione
I Le presenti istruzioni sono rivolte all’installatore qualificato quale guida all’installazione, regolazione e manutenzione secondo le leggi e le norme in vigore.
Gli interventi devono essere sempre effettuati ad apparecchiatura disinserita elettricamente.
Funzionamento (Fig. 3 e 4)
L’apparecchio è previsto per essere incassato in un piano di lavoro come illustrato nelle apposite figure. Predisporre su tutto il perimetro del piano il sigillante a corredo (Fig. 5).
Collegamento elettrico
Prima di effettuare l’allacciamento elettrico accertarsi
che:
- le caratteristiche dell’impianto siano tali da soddisfare quanto indicato sulla targa metricola applicata sul fondo del piano;
- l’impianto sia munito di un efficace collegamento di terra secondo le norme e le disposizioni di legge in vigore. La messa terra è obbligatoria a termini di legge.
-Nel caso che l’apparecchiatura non sia munita di cavo e/o di relativa spina utilizzare materiale idoneo per l’assorbimento indicato in targa e per la temperatura di lavoro. Il cavo in nessun punto dovrà raggiungere una temperatura superiore di 50°C a quella ambiente.
-Per il collegamento diretto alla rete, è necessario prevedere un dispositivo che assicuri la disconnessione dalla rete, con una distanza di apertura dei contatti che consenta la disconnessione completa nelle condizioni della categoria III, conformemente alle regole di installazione.
-La spina o l’interruttore onnipolare devono essere facilmente raggiungibili con l’apparecchiatura installata.
-L’apparecchio NON è destinato ad essere utilizzato per mezzo di un timer esterno o di un sistema separato di controllo remoto.
-Nel caso si dovesse sostituire il cavo di alimentazione della friggitrice usare esclusivamente un cavo resistente all’olio tipo H05RN-F o H07RN-F.
-Nel caso si dovesse sostituire il cavo di alimentazione del barbecue usare un cavo del tipo H05RR-F o equivalente.
N.B.: Il costruttore declina ogni responsabililtà nel caso che quanto sopra e le usuali norme antiinfortunistiche non vengano rispettate.
SERVIZIO ASSISTENZA TECNICA: 199.151.195
8

Mod: CPH 401 BQ TC |
|
|
|
|
||
|
|
|
1 |
|
|
|
77 |
|
|
|
|
|
1.5 |
R |
|
380 |
R |
381 |
+1 |
|
1 |
1 |
|
||||
|
|
2 |
0 |
|
||
|
1 |
|
|
|
|
I |
|
|
|
|
|
|
|
510 |
|
|
+1 0 |
|
|
+1 0 |
|
|
511 |
|
|
490 |
|
|
|
|
|
360 |
+1 |
|
|
|
|
|
0 |
|
|
|
|
|
|
|
|
Fig. 3 |
Mod: CPH 401 FR TC |
|
|
|
||
|
|
|
1 |
|
|
181 |
|
|
|
1.5 |
|
R |
|
380 |
R |
381 |
+1 |
11 |
1 |
0 |
|||
|
2 |
||||
|
|
|
|
|
|
510 |
|
|
+1 0 |
|
+1 0 |
|
|
511 |
|
490 |
|
|
|
|
|
360 |
+1 |
|
|
|
|
0 |
|
|
|
|
|
|
Fig. 4 |
Fig. 5 |
9 |
Dear Customer,
We would like to thank you and congratulate you on your choice. This new product has been carefully designed and built using top quality materials, and meticulously tested to ensure that it meets all your culinary requirements. Please read and observe these simple instructions, which will enable you to achieve excellent results from the very first time you use it. This state-of-the- art appliance comes to you with our very best wishes.
THE MANUFACTURER
Index
User instructions, 12
Installation, 12
Use, 13
Maintenance, 13
Touch Control Instructions, 14
Installation instructions, 16
Installation, 16
Positioning, 16
Electrical connection, 16
I Italiano
GB |
English |
GB |
|
|
|
FR Français
DE Deutsch
ES Español
PT Português
Technical data
Power |
230 V |
Power (Barbecue) |
2400 W |
Power (Fryer) |
2300 W |
Power supply cable |
3x1,5 mm2 |
THIS PRODUCT IS DESIGNED FOR DOMESTIC USE. THE MANUFACTURER DECLINES ALL RESPONSIBILITY FOR PERSONAL INJURY OR PROPERTY DAMAGE DERIVING FROM INCORRECT INSTALLATION OR IMPROPER, ERRONEOUS OR UNSUITABLE USE. THE APPLIANCE MUST NOT BE USED BY PEOPLE (INCLUDING CHILDREN) WITH PHYSICAL, SENSORIAL OR MENTAL IMPAIRMENTS, OR BY PEOPLE WITHOUT THE NECESSARY
EXPERIENCE OR KNOWLEDGE, UNLESS THEY ARE SUPERVISED OR INSTRUCTED IN THE USE OF THE APPLIANCE BY A PERSON RESPONSIBLE FOR THEIR SAFETY. CHILDREN MUST BE SUPERVISED TO ENSURE THAT THEY DO NOT PLAY WITH THE APPLIANCE.
11

User instructions
Installation
All installation operations (electrical connection) must be carried out by people qualified in compliance with the laws in force. For specific instructions, see the
GB installation section.
Use
Barbecue (Fig. 1)
The barbecue is used for quick cooking on the grill. Pressing the Touch Control commands turns on the heating element (see the paragraph “Touch Control instructions”), which can cook more or less quickly depending on the level chosen from 1 a 12.
To use the grill, select power level 12.
This doesn’t mean that you can’t achieve excellent results cooking on the grill even with the intermediate power levels. These levels are recommended for cooking delicate foods or when you want uniform cooking of the food even inside.
The lava rocks in the tray absorb the drops of oil or grease that are produced during cooking; Plus, they accumulate heat as the heating elements are warming up and, thus, provide more uniform grilling, similar to the effect of cooking over charcoal briquettes. You can put water in the tray, in place of the lava rocks (we recommend a layer 3 cm deep).
Water in the tray eliminates unpleasant odours without affecting the performance of the barbecue in any way. So, for best results, we recommend pre-heating the lava rocks for at least 10 minutes at level 1.
This is especially recommended when you turn on the appliance for the first time because it decreases the risk that the food will absorb the odours that the heating element produces the first time it is turned on.
|
|
|
|
|
|
Fig. 1 |
11 |
10 |
9 |
8 |
7 |
5 |
4 |
|
1 |
|
2 |
|
3 |
|
Legend:
1ON/OFF
2Increase/decrease timer minutes (from 0 to 99)
3Increase/decrease12) the power level (from 0 to
4Operating indicator light
5Power level display
7Timer running light
8Timer display
9Start timer
10Lock keypad
11Lock keypad indicator light
Fig. 1a
12
Use
Fryer (Fig. 2)
The appliance is operated using the Touch Control commands (see the paragraph “Touch Control“) which can set a temperature between 80 and 200 °C.
The fryer has a probe that keeps the oil at a constant temperature. In addition, if the main probe is not working properly, a safety thermostat intervenes, at about 220° C, to keep the oil from getting too hot. This device is very easy to use but, to obtain the best results, you should follow a few simple rules:
- Before putting oil in it for the first time, carefully clean the steel parts and the heating elements to eliminate any residues from the manufacturing process.
- Never turn the appliance on with the heating elements turned outside the tub.
- Never turn the appliance on without oil in the tub.
- Always use vegetable oil suitable for frying: oils made from sunflower and other seeds are not recommended.
- The quantity of oil in the tub can vary from a minimum of 2 to a maximum of 2.7 litres. If the level of oil drops below the minimum during frying, you must add fresh oil. We recommend that you add the same type of oil. The maximum and minimum levels are etched on the vertical wall of the tub.
- The oil can be reused several times but we recommend that you filter it between one use and the next to remove any food residues.
- In any case, the oil should be changed very often because, even if it is well filtered, small food residues can catch fire during frying.
- Make sure that the food is perfectly dry before putting in the fryer. Wait until the oil has reached the desired temperature.
- We recommend that frozen foods be thawed at a low temperature and then fried at a high temperature. The temperature setting can vary with the quantity of food to be cooked and the user’s personal taste but, in general, you should keep the following chart in mind:
Temperature Level |
Food |
160° C |
chicken thighs and wings |
170° C |
fritters, fish |
180° C |
croquettes |
190° C |
French fries |
- During cooking, it is often necessary to add salt or flavouring: to the extent possible, avoid doing this directly in the fryer because salt falling in the oil reduces its quality.
- If the fryer malfunctions, before asking for service, try to reset the thermostat by pressing the little button that you can see on the inside of the front wall, after you remove the oil tub and unscrew the protection plug.
Maintenance
Unplug the appliance before performing any maintenance. To increase the life of the appliance, it is essential to periodically perform a general cleaning, keeping the following in mind:
- the steel parts must be cleaned with a suitable product (available in stores) that is not abrasive or corrosive. GB Avoid products that contain chlorine (bleach, etc.);
-avoid leaving acid or alkaline substances on the work surface (vinegar, salt, lemon juice, etc.).
Fig. 2 |
13
11 |
10 |
9 |
8 |
7 |
6 |
5 |
4 |
GB
1 |
2 |
3 |
Legend
1ON/OFF
2Increase/decrease timer minutes (from 0 to 99)
3Increase/decrease the temperature of the oil in °C (from 40 to 200)
4Operating indicator light
5Display the oil temperature
6 |
Indicator that the set temperature has been |
|
reached |
|
|
7 |
Timer running light |
|
8 |
Timer display |
|
9 |
Start timer |
|
10 |
Lock keypad |
|
11 |
Lock keypad indicator light |
Fig. 2a |
|
|
|
Touch Control Instructions
Barbecue (Fig. 1)/Fryer (Fig. 2):
Power-on (barbecue)
1Touch the button (1) to turn on the control: the level indicator (5) displays “00” and the LED (4) is on.
2Press the next button within 10 seconds or the device will automatically turn off.
Power-on (fryer)
1Touch the button (1) to turn on the control: the level indicator (5) displays “000” and the led (4) is on.
2Press the next button within 10 seconds or the device will automatically turn off.
Operating indicator light (barbecue)
When you turn on the control with the button (1), the operating indicator light (4) turns on and stays on until you touch the button (1) again.
Operating indicator lights (fryer)
When you turn on the control with the button (1), the operating indicator light (4) turns on and stays on until you touch the button (1) again.
In addition, when you set a certain temperature level, the indicator light (6) flashes until the oil reaches the temperature setting; when the temperature setting is reached, the indicator light stays on without flashing.
Power control (barbecue)
1Use the “+” and “-” buttons (3) to adjust the power between level 0 and level 12. Holding down one of these buttons, lowers or raises the level setting.
Temperature control (fryer)
1Use the “+” and “-” buttons (3) to adjust the temperature of the oil from 80 °C to 200 °C. The temperature can be changed in steps of 10 °C. Holding down one of these buttons, lowers or raises the level setting.
Turning off the heating element (barbecue/fryer)
1Lower the setting to 0 using the “-” button (3). The heating element will turn off after 3 seconds.
Press the “+” and “-” buttons at the same time (3).
Fast turn-off of the heating elements (barbecue/ fryer)
1To turn the heating element off automatically, press the “+” and “-” buttons (3) at the same time.
Residual heat (“H”) indicator (barbecue/fryer)
When the appliance is off, the display (5) shows the symbol “H” (residual heat).
This indicator will remain on for about 40 minutes.
Turning off the appliance (barbecue/fryer)
The appliance can be turned off at any time using the on/off button (1)
Locking the keypad (key) (barbecue/fryer)
1The entire appliance can be locked with the keypad lock or button (10) to prevent unintended operation. This function also protects children. As long as the lock is active, touching the buttons has no effect except to turn off the appliance (1). When the lock is active, the LED (11) remains lit.
Safety power-off (barbecue/fryer)
1 If the heating element is inadvertently turned on, the control system automatically turns it off after the power-on limit has elapsed. In this case, “H” is displayed. The power-on limit varies depending on the level set at that time and varies proportionally from a minimum of 1 hour at the maximum level, to a maximum of 6 hours at the minimum level.
14

Timer function (barbecue/fryer)
This function simplifies cooking by allowing the cooking cycle to continue without your presence. When you set the timer, the heating element is automatically turned off after the set time has elapsed. If the heating element is set to 0, the timer just counts minutes (see the chapter “using the timer to count minutes”).
Turning on the timer function (barbecue)
1Select a power level between 1 and 12
2Touch the timer button (9), the timer display (8) shows “00” and the indicator light (7) turns on.
3Select the cooking time in minutes (from 0 to 99) using the “+” and “-” buttons (2). The timer function will turn on in a few seconds and the indicator light (7) starts flashing to indicate that the function is on. You can quickly set the cooking time by holding down the “+” or “-” button (2).
Turning on the timer function (fryer)
1Select an oil temperature level between 80 °C and 200 °C.
2Touch the timer button (9), the timer display (8) shows “00” and the indicator light (7) turns on.
3Select the cooking time in minutes (from 0 to 99) using the “+” and “-” buttons (2). The timer function will turn on in a few seconds and the indicator light (7) starts flashing to indicate that the function is on. You can quickly set the cooking time by holding down the “+” or “-” button (2).
Fast turn-off of the heating element and timer function (barbecue/fryer)
1When you touch the “+” and “-” buttons (3) at the same time, the heating element immediately turns off and the timer function is cancelled.
Turning on the timer function to count minutes (barbecue/fryer)
If the heating element is set to level 00, the timer can be used to count minutes
Setting the timer to count minutes (barbecue)
If the appliance is off:
1Touch the on/off button (1);
2Touch the timer button (9);
3Set the desired time using the “+” e “-” buttons (2)
If the appliance is on and the heating element is set to a power level higher than 00:
1Set the power to 00;
2Touch the timer button (9);
3Set the desired time using the “+” e “-” buttons (2)
Setting the timer to count minutes (barbecue)
If the appliance is off:
4Touch the on/off key (1);
5Touch the timer button (9);
6Set the desired time using the “+” e “-” buttons (2)
If the appliance is on and the heating element is set to a GB temperature level higher than 000:
4Set the temperature to 000;
5Touch the timer button (9);
6Set the desired time using the “+” e “-” buttons (2)
Turning off the minute-counter function (barbecue/ fryer)
When the time has elapsed, a buzzer sounds for 2 minutes.
To cancel the buzzer early, just touch any button.
If you want to interrupt the timer before it runs down:
1Touch the timer button (9)
2Zero the time by holding down the “-” button (2)
Quickly turning off the minute-counter function (barbecue/fryer)
Press the “+” and “-” buttons (2) at the same time.
Error messages
-AL0 (BARBECUE/FRYER) If a button is pressed for more than 90 seconds, the buzzer will sound and AL0 will appear on the 3-digit display.
-AL1 (FRYER) If the probe has a short circuit, AL1 will appear on the 3-digit display.
-AL2 (FRYER) If the probe is not connected, AL2 will appear on the 3-digit display after it is on for about 5 minutes.
-AL3 (BARBECUE/FRYER) If the temperature of the electronic board reaches 85°, AL3 will appear on the 3-digit display.
15

Installation instructions
Installation
These instructions are provided for qualified installers as a guide to installation, adjustment and maintenance in conformity with current laws and standards. Service must always be performed with the appliance disconnected
from the electricity.
GB
Operation (Fig. 3 and 4)
The appliance is designed to be built in to a work surface as shown in the figure. Prepare the edge of the hob with the sealant provided (Fig. 5).
Electrical connection
Before connecting to the electricity, make sure that:
-the characteristics of the system match the data on the bottom of the hob;
-the system has an effective earth connection compliant with current standards and laws. An earth connection is required by law.
-If the appliance has no cable and/or plug, use material suitable for the absorption indicated on the registration plate and for the working temperature. The cable must not reach a temperature higher than 50 °C above room temperature in any point.
-For direct connection to the mains, it is necessary to provide a device that ensures disconnection from the mains, with an open distance of the contacts that allows complete disconnection under Category III conditions, conforming to the installation rules.
-The omnipolar plug or switch must be easy to reach when the appliance is installed.
-The appliance is NOT intended for use with an external timer or a separate remote control system.
-If it is necessary to replace the power cord of the fryer, use only an oil-resistant type H05RN-F or H07RN-F cable.
-If it is necessary to replace the power cord of the barbecue, use an H05RR-F type cable or equivalent.
Note: The manufacturer declines all liability if the usual accident prevention standards and the above instructions are not followed.
16
 Loading...