


Operating Manual |
System |
FUJITSU Tablet STYLISTIC Q704

Contact address in North America
FUJITSU AMERICA INC:
1250 East Arques Avenue Sunnyvale
CA 94085-3470, U.S.A.
Telephone: 800 831 3183 or 408 746 6000 "http://solutions.us.fujitsu.com" "http://solutions.us.fujitsu.com/contact"
Have a question? Email us at: "AskFujitsu@us.fujitsu.com"
Copyright
© 2013 Fujitsu America, Inc. All rights reserved. B5FK-2461-01ENZ0
FUJITSU Tablet STYLISTIC Q704
Operating Manual
Fujitsu Contact Information |
7 |
Notational conventions |
8 |
Ports and controls |
9 |
Important notes |
12 |
First-time setup of your device |
16 |
Working with the Tablet PC |
20 |
Accessories for your Tablet PC |
|
(optional) |
41 |
Security functions |
59 |
Connecting external devices |
66 |
Settings in BIOS Setup Utility |
70 |
Troubleshooting and tips |
73 |
Technical data |
80 |
Manufacturer’s notes |
86 |
Appendix |
91 |
Index |
100 |

Copyright and Trademark Information
Fujitsu America, Incorporated has made every effort to ensure the accuracy and completeness of this document; however, as ongoing development efforts are continually improving the capabilities of our products, we cannot guarantee the accuracy of the contents of this document. We disclaim liability for errors, omissions, or future changes.
Fujitsu, the Fujitsu logo and LIFEBOOK are registered trademarks of Fujitsu Limited or its subsidiaries in the United States and other countries.
Intel and Intel Core are trademarks or registered trademarks of Intel Corporation or its subsidiaries in the United States and other countries.
Microsoft and Windows are either registered trademarks or trademarks of Microsoft Corporation in the United States and/or other countries.
The ExpressCard word mark and logo are owned by the Personal Computer Memory Card International Association (PCMCIA) and any use of such marks by Fujitsu America, Incorporated is under license.
Google is a trademark or registered trademark of Google Incorporated. Bluetooth is a trademark of Bluetooth SIG, Inc., USA.
OmniPass is a trademark of Softex, Inc.
Roxio is a trademark of Roxio, a division of Sonic Solutions.
PowerDirector, PowerDVD, YouCam, and MakeDisc are trademarks of CyberLink Corp.
Adobe, Acrobat, and Adobe Reader are either a reg istered trademarks or trademarks of Adobe Systems Incorporated in the United States and/or other countries.
Made under license from DTS Licensing Limited. DTS and the symbol are registered trademarks and & DTS Boost is a trademark of DTS, Inc. Product contains software. © DTS, Inc. All rights reserved.
The DVD player found in some models of the LIFEBOOK notebook incorporates copyright protection technology that is protected by method claims of certain U.S. patents and other intellectual property rights owned by Macrovision Corporation and other rights users. Use of this copyright protection technology must be authorized by Macrovision Corporation, and is intended for home and other limited viewing uses only unless authorized by Macrovision Corporation. Reverse engineering or disassembly is prohibited.
All other trademarks specified here are the property of their respective owners.

|
Contents |
Contents |
|
Fujitsu Contact Information . . . . . . . . . . . . . . . . . . . . . . . . . . . . . . . . . . . . . . . |
. . . . . . . . . . . . . . . . . . . . . 7 |
Notational conventions . . . . . . . . . . . . . . . . . . . . . . . . . . . . . . . . . . . . . . . . . . . |
. . . . . . . . . . . . . . . . . . . . . 8 |
Ports and controls . . . . . . . . . . . . . . . . . . . . . . . . . . . . . . . . . . . . . . . . . . . . . . . . |
. . . . . . . . . . . . . . . . . . . . . 9 |
Important notes . . . . . . . . . . . . . . . . . . . . . . . . . . . . . . . . . . . . . . . . . . . . . . . . . . . |
. . . . . . . . . . . . . . . . . . . . . 12 |
Safety instructions . . . . . . . . . . . . . . . . . . . . . . . . . . . . . . . . . . . . . . . . . . . . . . . . . |
. . . . . . . . . . . . . . . . . . . . . 12 |
Additional safety notes for devices with radio components . . . . . . . . . . . . . |
. . . . . . . . . . . . . . . . . . . . . 12 |
Protecting the display screen . . . . . . . . . . . . . . . . . . . . . . . . . . . . . . . . . . . . . . . |
. . . . . . . . . . . . . . . . . . . . . 13 |
Energy saving . . . . . . . . . . . . . . . . . . . . . . . . . . . . . . . . . . . . . . . . . . . . . . . . . . . . . |
. . . . . . . . . . . . . . . . . . . . . 13 |
Energy saving under Windows . . . . . . . . . . . . . . . . . . . . . . . . . . . . . . . . . . |
. . . . . . . . . . . . . . . . . . . . . 13 |
Traveling with your Tablet PC . . . . . . . . . . . . . . . . . . . . . . . . . . . . . . . . . . . . . . . |
. . . . . . . . . . . . . . . . . . . . . 13 |
Before you travel . . . . . . . . . . . . . . . . . . . . . . . . . . . . . . . . . . . . . . . . . . . . . . |
. . . . . . . . . . . . . . . . . . . . . 14 |
Transporting the Tablet PC . . . . . . . . . . . . . . . . . . . . . . . . . . . . . . . . . . . . . . |
. . . . . . . . . . . . . . . . . . . . . 14 |
Storing your Tablet PC . . . . . . . . . . . . . . . . . . . . . . . . . . . . . . . . . . . . . . . . . . . . . |
. . . . . . . . . . . . . . . . . . . . . 15 |
Cleaning the Tablet PC . . . . . . . . . . . . . . . . . . . . . . . . . . . . . . . . . . . . . . . . . . . . . |
. . . . . . . . . . . . . . . . . . . . . 15 |
First-time setup of your device . . . . . . . . . . . . . . . . . . . . . . . . . . . . . . . . . . . . |
. . . . . . . . . . . . . . . . . . . . . 16 |
Unpacking and checking the device . . . . . . . . . . . . . . . . . . . . . . . . . . . . . . . . . |
. . . . . . . . . . . . . . . . . . . . . 16 |
Choose a location . . . . . . . . . . . . . . . . . . . . . . . . . . . . . . . . . . . . . . . . . . . . . . . . . . |
. . . . . . . . . . . . . . . . . . . . . 17 |
Connecting the AC adapter . . . . . . . . . . . . . . . . . . . . . . . . . . . . . . . . . . . . . . . . . |
. . . . . . . . . . . . . . . . . . . . . 17 |
Switching on the device for the first time . . . . . . . . . . . . . . . . . . . . . . . . . . . . . |
. . . . . . . . . . . . . . . . . . . . . 18 |
Installing Bonus Apps . . . . . . . . . . . . . . . . . . . . . . . . . . . . . . . . . . . . . . . . . . . |
. . . . . . . . . . . . . . . . . . . . . 19 |
Working with the Tablet PC . . . . . . . . . . . . . . . . . . . . . . . . . . . . . . . . . . . . . . . |
. . . . . . . . . . . . . . . . . . . . . 20 |
Status indicators . . . . . . . . . . . . . . . . . . . . . . . . . . . . . . . . . . . . . . . . . . . . . . . . . . . |
. . . . . . . . . . . . . . . . . . . . . 20 |
Switching the Tablet PC on . . . . . . . . . . . . . . . . . . . . . . . . . . . . . . . . . . . . . . . . . |
. . . . . . . . . . . . . . . . . . . . . 21 |
Programing the ON/OFF button . . . . . . . . . . . . . . . . . . . . . . . . . . . . . . . . . |
. . . . . . . . . . . . . . . . . . . . . 21 |
Switching the Tablet PC off . . . . . . . . . . . . . . . . . . . . . . . . . . . . . . . . . . . . . . . . . |
. . . . . . . . . . . . . . . . . . . . . 22 |
Handwriting recognition . . . . . . . . . . . . . . . . . . . . . . . . . . . . . . . . . . . . . . . . . . . . . |
. . . . . . . . . . . . . . . . . . . . . 22 |
Touchscreen . . . . . . . . . . . . . . . . . . . . . . . . . . . . . . . . . . . . . . . . . . . . . . . . . . . . . . . |
. . . . . . . . . . . . . . . . . . . . . 23 |
Select display orientation (portrait or landscape format) . . . . . . . . . . . . . . . |
. . . . . . . . . . . . . . . . . . . . . 24 |
Using fingers . . . . . . . . . . . . . . . . . . . . . . . . . . . . . . . . . . . . . . . . . . . . . . . . . . . . . . |
. . . . . . . . . . . . . . . . . . . . . 24 |
Calibrate the Dual Digitizer for finger-based operation of the device. |
. . . . . . . . . . . . . . . . . . . . . 24 |
Actions with one finger (Windows 8.1 Pro) . . . . . . . . . . . . . . . . . . . . . . . . |
. . . . . . . . . . . . . . . . . . . . . 25 |
Actions with one finger (Windows 7 / Windows 8.1 Desktop) . . . . . . . |
. . . . . . . . . . . . . . . . . . . . . 27 |
Actions with two fingers (Windows 7 / Windows 8.1 Desktop) . . . . . . |
. . . . . . . . . . . . . . . . . . . . . 28 |
Using the stylus . . . . . . . . . . . . . . . . . . . . . . . . . . . . . . . . . . . . . . . . . . . . . . . . . . . . |
. . . . . . . . . . . . . . . . . . . . . 30 |
Stylus location . . . . . . . . . . . . . . . . . . . . . . . . . . . . . . . . . . . . . . . . . . . . . . . . . |
. . . . . . . . . . . . . . . . . . . . . 31 |
Adjusting the stylus . . . . . . . . . . . . . . . . . . . . . . . . . . . . . . . . . . . . . . . . . . . . . |
. . . . . . . . . . . . . . . . . . . . . 31 |
Calibrating the stylus . . . . . . . . . . . . . . . . . . . . . . . . . . . . . . . . . . . . . . . . . . . |
. . . . . . . . . . . . . . . . . . . . . 32 |
Installing a stylus tether . . . . . . . . . . . . . . . . . . . . . . . . . . . . . . . . . . . . . . . . . |
. . . . . . . . . . . . . . . . . . . . . 32 |
Tablet buttons . . . . . . . . . . . . . . . . . . . . . . . . . . . . . . . . . . . . . . . . . . . . . . . . . . . . . |
. . . . . . . . . . . . . . . . . . . . . 33 |
Webcam . . . . . . . . . . . . . . . . . . . . . . . . . . . . . . . . . . . . . . . . . . . . . . . . . . . . . . . . . . |
. . . . . . . . . . . . . . . . . . . . . 33 |
Rechargeable battery . . . . . . . . . . . . . . . . . . . . . . . . . . . . . . . . . . . . . . . . . . . . . . |
. . . . . . . . . . . . . . . . . . . . . 34 |
Charging and maintaining the battery . . . . . . . . . . . . . . . . . . . . . . . . . . . . |
. . . . . . . . . . . . . . . . . . . . . 34 |
Using the energy saving functions . . . . . . . . . . . . . . . . . . . . . . . . . . . . . . . . . . . |
. . . . . . . . . . . . . . . . . . . . . 35 |
Memory cards . . . . . . . . . . . . . . . . . . . . . . . . . . . . . . . . . . . . . . . . . . . . . . . . . . . . . |
. . . . . . . . . . . . . . . . . . . . . 36 |
Supported formats . . . . . . . . . . . . . . . . . . . . . . . . . . . . . . . . . . . . . . . . . . . . . |
. . . . . . . . . . . . . . . . . . . . . 36 |
Inserting the memory card . . . . . . . . . . . . . . . . . . . . . . . . . . . . . . . . . . . . . . |
. . . . . . . . . . . . . . . . . . . . . 36 |
Removing the memory card . . . . . . . . . . . . . . . . . . . . . . . . . . . . . . . . . . . . . |
. . . . . . . . . . . . . . . . . . . . . 37 |
Fujitsu |
3 |

Contents |
|
SIM card . . . . . . . . . . . . . . . . . . . . . . . . . . . . . . . . . . . . . . . . . . . . . . . . . . . . . . . . . . . . . . . . . . . . . . . . . . . . . . . |
38 |
Inserting a SIM card . . . . . . . . . . . . . . . . . . . . . . . . . . . . . . . . . . . . . . . . . . . . . . . . . . . . . . . . . . . . . . . . . |
38 |
Removing a SIM card . . . . . . . . . . . . . . . . . . . . . . . . . . . . . . . . . . . . . . . . . . . . . . . . . . . . . . . . . . . . . . . |
39 |
Wireless LAN/Bluetooth/UMTS/LTE radio components . . . . . . . . . . . . . . . . . . . . . . . . . . . . . . . . . . . . . |
39 |
Switching the wireless components on and off . . . . . . . . . . . . . . . . . . . . . . . . . . . . . . . . . . . . . . . . . |
39 |
Further information on WLAN and Bluetooth . . . . . . . . . . . . . . . . . . . . . . . . . . . . . . . . . . . . . . . . . . . |
40 |
Access via Wireless WAN . . . . . . . . . . . . . . . . . . . . . . . . . . . . . . . . . . . . . . . . . . . . . . . . . . . . . . . . . . . . |
40 |
Ethernet and LAN (only with performance cradle or Keyboard Dock) . . . . . . . . . . . . . . . . . . . . . . . . |
40 |
GPS . . . . . . . . . . . . . . . . . . . . . . . . . . . . . . . . . . . . . . . . . . . . . . . . . . . . . . . . . . . . . . . . . . . . . . . . . . . . . . . . . . . |
40 |
Accessories for your Tablet PC (optional) . . . . . . . . . . . . . . . . . . . . . . . . . . . . . . . . . . . . . . . . . . . . . . |
41 |
Your performance cradle (optional) . . . . . . . . . . . . . . . . . . . . . . . . . . . . . . . . . . . . . . . . . . . . . . . . . . . . . . . |
41 |
Cradle components . . . . . . . . . . . . . . . . . . . . . . . . . . . . . . . . . . . . . . . . . . . . . . . . . . . . . . . . . . . . . . . . . . |
42 |
Setting up the cradle . . . . . . . . . . . . . . . . . . . . . . . . . . . . . . . . . . . . . . . . . . . . . . . . . . . . . . . . . . . . . . . . |
42 |
Connecting the Tablet PC to the cradle . . . . . . . . . . . . . . . . . . . . . . . . . . . . . . . . . . . . . . . . . . . . . . . |
43 |
Disconnecting the Tablet PC from the cradle . . . . . . . . . . . . . . . . . . . . . . . . . . . . . . . . . . . . . . . . . . |
45 |
Keyboard cover (optional) . . . . . . . . . . . . . . . . . . . . . . . . . . . . . . . . . . . . . . . . . . . . . . . . . . . . . . . . . . . . . . . |
45 |
Keyboard cover components . . . . . . . . . . . . . . . . . . . . . . . . . . . . . . . . . . . . . . . . . . . . . . . . . . . . . . . . . |
46 |
Connecting the Tablet PC to the keyboard cover . . . . . . . . . . . . . . . . . . . . . . . . . . . . . . . . . . . . . . . |
47 |
Separating the Tablet PC from the keyboard cover . . . . . . . . . . . . . . . . . . . . . . . . . . . . . . . . . . . . |
48 |
Keyboard docking station (optional) . . . . . . . . . . . . . . . . . . . . . . . . . . . . . . . . . . . . . . . . . . . . . . . . . . . . . . . |
49 |
Ports on the keyboard docking station . . . . . . . . . . . . . . . . . . . . . . . . . . . . . . . . . . . . . . . . . . . . . . . . |
49 |
Connecting the Tablet PC to the keyboard docking station . . . . . . . . . . . . . . . . . . . . . . . . . . . . . . |
51 |
Separating the Tablet PC from the keyboard docking station . . . . . . . . . . . . . . . . . . . . . . . . . . . . |
52 |
VESA mounting attachment (optional) . . . . . . . . . . . . . . . . . . . . . . . . . . . . . . . . . . . . . . . . . . . . . . . . . . . . |
53 |
Hand strap (optional) . . . . . . . . . . . . . . . . . . . . . . . . . . . . . . . . . . . . . . . . . . . . . . . . . . . . . . . . . . . . . . . . . . . . |
54 |
Shoulder strap (optional) . . . . . . . . . . . . . . . . . . . . . . . . . . . . . . . . . . . . . . . . . . . . . . . . . . . . . . . . . . . . . . . . |
55 |
Folio case (optional) . . . . . . . . . . . . . . . . . . . . . . . . . . . . . . . . . . . . . . . . . . . . . . . . . . . . . . . . . . . . . . . . . . . . . |
56 |
Micro USB adapters . . . . . . . . . . . . . . . . . . . . . . . . . . . . . . . . . . . . . . . . . . . . . . . . . . . . . . . . . . . . . . . . . . . . . |
57 |
Security functions . . . . . . . . . . . . . . . . . . . . . . . . . . . . . . . . . . . . . . . . . . . . . . . . . . . . . . . . . . . . . . . . . . . . . |
59 |
Configuring the fingerprint sensor . . . . . . . . . . . . . . . . . . . . . . . . . . . . . . . . . . . . . . . . . . . . . . . . . . . . . . . . |
60 |
Configuring password protection in BIOS Setup Utility . . . . . . . . . . . . . . . . . . . . . . . . . . . . . . . . . . . . . . |
61 |
Protecting BIOS Setup Utility (supervisor HDD password and user HDD password) . . . . . . . |
61 |
Password protection for booting the operating system . . . . . . . . . . . . . . . . . . . . . . . . . . . . . . . . . . |
62 |
Password protection for the hard disk . . . . . . . . . . . . . . . . . . . . . . . . . . . . . . . . . . . . . . . . . . . . . . . . . |
63 |
SmartCard reader (optional) . . . . . . . . . . . . . . . . . . . . . . . . . . . . . . . . . . . . . . . . . . . . . . . . . . . . . . . . . . . . . |
64 |
Inserting the SmartCard . . . . . . . . . . . . . . . . . . . . . . . . . . . . . . . . . . . . . . . . . . . . . . . . . . . . . . . . . . . . . |
64 |
Trusted Platform Module - TPM (device dependent) . . . . . . . . . . . . . . . . . . . . . . . . . . . . . . . . . . . . . . . . |
65 |
Enabling TPM . . . . . . . . . . . . . . . . . . . . . . . . . . . . . . . . . . . . . . . . . . . . . . . . . . . . . . . . . . . . . . . . . . . . . . . |
65 |
Disabling TPM . . . . . . . . . . . . . . . . . . . . . . . . . . . . . . . . . . . . . . . . . . . . . . . . . . . . . . . . . . . . . . . . . . . . . . |
65 |
Connecting external devices . . . . . . . . . . . . . . . . . . . . . . . . . . . . . . . . . . . . . . . . . . . . . . . . . . . . . . . . . . . |
66 |
Connecting an external monitor . . . . . . . . . . . . . . . . . . . . . . . . . . . . . . . . . . . . . . . . . . . . . . . . . . . . . . . . . . |
67 |
HDMI port (only performance cradle and keyboard docking station) . . . . . . . . . . . . . . . . . . . . . . |
67 |
VGA monitor port (only performance cradle and keyboard docking station) . . . . . . . . . . . . . . . |
67 |
Connecting USB devices . . . . . . . . . . . . . . . . . . . . . . . . . . . . . . . . . . . . . . . . . . . . . . . . . . . . . . . . . . . . . . . . |
68 |
How to remove USB devices correctly . . . . . . . . . . . . . . . . . . . . . . . . . . . . . . . . . . . . . . . . . . . . . . . . |
68 |
Headphones port . . . . . . . . . . . . . . . . . . . . . . . . . . . . . . . . . . . . . . . . . . . . . . . . . . . . . . . . . . . . . . . . . . . . . . . |
69 |
Settings in BIOS Setup Utility . . . . . . . . . . . . . . . . . . . . . . . . . . . . . . . . . . . . . . . . . . . . . . . . . . . . . . . . . . |
70 |
Starting the BIOS Setup Utility . . . . . . . . . . . . . . . . . . . . . . . . . . . . . . . . . . . . . . . . . . . . . . . . . . . . . . . . . . . |
70 |
BIOS Setup Utility operation . . . . . . . . . . . . . . . . . . . . . . . . . . . . . . . . . . . . . . . . . . . . . . . . . . . . . . . . . . . . . |
71 |
Exiting BIOS Setup Utility . . . . . . . . . . . . . . . . . . . . . . . . . . . . . . . . . . . . . . . . . . . . . . . . . . . . . . . . . . . . . . . . |
72 |
4 |
Fujitsu |

Contents |
|
Exit Saving Changes - save changes and exit BIOS Setup Utility . . . . . . . . . . . . . . . . . . . . . . . |
72 |
Exit Discarding Changes - Reject changes and exit BIOS Setup Utility . . . . . . . . . . . . . . . . . . . |
72 |
Load Setup Defaults – load default values . . . . . . . . . . . . . . . . . . . . . . . . . . . . . . . . . . . . . . . . . . . . . |
72 |
Discard Changes - Discard Changes without exiting BIOS Setup Utility . . . . . . . . . . . . . . . . . . |
72 |
Save Changes - save changes without exiting the BIOS Setup Utility . . . . . . . . . . . . . . . . . . . . |
72 |
Save changes and power off . . . . . . . . . . . . . . . . . . . . . . . . . . . . . . . . . . . . . . . . . . . . . . . . . . . . . . . . |
72 |
Troubleshooting and tips . . . . . . . . . . . . . . . . . . . . . . . . . . . . . . . . . . . . . . . . . . . . . . . . . . . . . . . . . . . . . . |
73 |
Help if problems occur . . . . . . . . . . . . . . . . . . . . . . . . . . . . . . . . . . . . . . . . . . . . . . . . . . . . . . . . . . . . . . . . . . . |
73 |
Recovering your Factory Image . . . . . . . . . . . . . . . . . . . . . . . . . . . . . . . . . . . . . . . . . . . . . . . . . . . . . . |
73 |
The Tablet PC’s date or time is incorrect . . . . . . . . . . . . . . . . . . . . . . . . . . . . . . . . . . . . . . . . . . . . . . . . . . |
74 |
Battery indicator does not illuminate . . . . . . . . . . . . . . . . . . . . . . . . . . . . . . . . . . . . . . . . . . . . . . . . . . . . . . |
74 |
The Tablet PC’s touchscreen remains dark . . . . . . . . . . . . . . . . . . . . . . . . . . . . . . . . . . . . . . . . . . . . . . . . |
74 |
The display on the Tablet PC’s touchscreen is difficult to read. . . . . . . . . . . . . . . . . . . . . . . . . . . . . . . |
74 |
The external monitor remains blank . . . . . . . . . . . . . . . . . . . . . . . . . . . . . . . . . . . . . . . . . . . . . . . . . . . . . . |
75 |
The external monitor is blank or the image is unstable . . . . . . . . . . . . . . . . . . . . . . . . . . . . . . . . . . . . . |
75 |
The cursor does not correctly follow the stylus movements . . . . . . . . . . . . . . . . . . . . . . . . . . . . . . . . . |
75 |
Stylus input not working . . . . . . . . . . . . . . . . . . . . . . . . . . . . . . . . . . . . . . . . . . . . . . . . . . . . . . . . . . . . . . . . . |
76 |
The Tablet PC does not start after switch on . . . . . . . . . . . . . . . . . . . . . . . . . . . . . . . . . . . . . . . . . . . . . . . |
76 |
The Tablet PC stops working . . . . . . . . . . . . . . . . . . . . . . . . . . . . . . . . . . . . . . . . . . . . . . . . . . . . . . . . . . . . . |
76 |
The printer does not print . . . . . . . . . . . . . . . . . . . . . . . . . . . . . . . . . . . . . . . . . . . . . . . . . . . . . . . . . . . . . . . . |
77 |
The wireless connection to a network does not work . . . . . . . . . . . . . . . . . . . . . . . . . . . . . . . . . . . . . . . |
77 |
The battery discharges too quickly . . . . . . . . . . . . . . . . . . . . . . . . . . . . . . . . . . . . . . . . . . . . . . . . . . . . . . . . |
77 |
SmartCard reader is not recognized . . . . . . . . . . . . . . . . . . . . . . . . . . . . . . . . . . . . . . . . . . . . . . . . . . . . . . |
78 |
Acoustic warning . . . . . . . . . . . . . . . . . . . . . . . . . . . . . . . . . . . . . . . . . . . . . . . . . . . . . . . . . . . . . . . . . . . . . . . . |
78 |
Error messages on the screen . . . . . . . . . . . . . . . . . . . . . . . . . . . . . . . . . . . . . . . . . . . . . . . . . . . . . . . . . . . |
78 |
Technical data . . . . . . . . . . . . . . . . . . . . . . . . . . . . . . . . . . . . . . . . . . . . . . . . . . . . . . . . . . . . . . . . . . . . . . . . . |
80 |
Tablet PC . . . . . . . . . . . . . . . . . . . . . . . . . . . . . . . . . . . . . . . . . . . . . . . . . . . . . . . . . . . . . . . . . . . . . . . . . . . . . . |
80 |
WLAN specifications . . . . . . . . . . . . . . . . . . . . . . . . . . . . . . . . . . . . . . . . . . . . . . . . . . . . . . . . . . . . . . . . . . . . |
82 |
Rechargeable battery . . . . . . . . . . . . . . . . . . . . . . . . . . . . . . . . . . . . . . . . . . . . . . . . . . . . . . . . . . . . . . . . . . . |
82 |
AC adapter (65 W) . . . . . . . . . . . . . . . . . . . . . . . . . . . . . . . . . . . . . . . . . . . . . . . . . . . . . . . . . . . . . . . . . . . . . . |
83 |
Performance cradle (optional) . . . . . . . . . . . . . . . . . . . . . . . . . . . . . . . . . . . . . . . . . . . . . . . . . . . . . . . . . . . . |
83 |
Keyboard cover (optional) . . . . . . . . . . . . . . . . . . . . . . . . . . . . . . . . . . . . . . . . . . . . . . . . . . . . . . . . . . . . . . . |
83 |
Keyboard docking station (optional) . . . . . . . . . . . . . . . . . . . . . . . . . . . . . . . . . . . . . . . . . . . . . . . . . . . . . . . |
84 |
VESA mounting attachment (optional) . . . . . . . . . . . . . . . . . . . . . . . . . . . . . . . . . . . . . . . . . . . . . . . . . . . . |
84 |
Hand strap (optional) . . . . . . . . . . . . . . . . . . . . . . . . . . . . . . . . . . . . . . . . . . . . . . . . . . . . . . . . . . . . . . . . . . . . |
84 |
Shoulder strap (optional) . . . . . . . . . . . . . . . . . . . . . . . . . . . . . . . . . . . . . . . . . . . . . . . . . . . . . . . . . . . . . . . . |
84 |
Micro USB adapters . . . . . . . . . . . . . . . . . . . . . . . . . . . . . . . . . . . . . . . . . . . . . . . . . . . . . . . . . . . . . . . . . . . . . |
85 |
Manufacturer’s notes . . . . . . . . . . . . . . . . . . . . . . . . . . . . . . . . . . . . . . . . . . . . . . . . . . . . . . . . . . . . . . . . . . |
86 |
Disposal and recycling . . . . . . . . . . . . . . . . . . . . . . . . . . . . . . . . . . . . . . . . . . . . . . . . . . . . . . . . . . . . . . . . . . |
86 |
Recycling your battery . . . . . . . . . . . . . . . . . . . . . . . . . . . . . . . . . . . . . . . . . . . . . . . . . . . . . . . . . . . . . . . |
86 |
Declarations of Conformity . . . . . . . . . . . . . . . . . . . . . . . . . . . . . . . . . . . . . . . . . . . . . . . . . . . . . . . . . . . . . . . |
86 |
Regulatory notices . . . . . . . . . . . . . . . . . . . . . . . . . . . . . . . . . . . . . . . . . . . . . . . . . . . . . . . . . . . . . . . . . . . . . . |
87 |
FCC Notices . . . . . . . . . . . . . . . . . . . . . . . . . . . . . . . . . . . . . . . . . . . . . . . . . . . . . . . . . . . . . . . . . . . . . . . . |
87 |
DOC (Industry CANADA) notice . . . . . . . . . . . . . . . . . . . . . . . . . . . . . . . . . . . . . . . . . . . . . . . . . . . . . . |
87 |
ENERGY STAR Compliance . . . . . . . . . . . . . . . . . . . . . . . . . . . . . . . . . . . . . . . . . . . . . . . . . . . . . . . . . . . . . |
90 |
Appendix . . . . . . . . . . . . . . . . . . . . . . . . . . . . . . . . . . . . . . . . . . . . . . . . . . . . . . . . . . . . . . . . . . . . . . . . . . . . . . |
91 |
Image Backup and Recovery Procedures . . . . . . . . . . . . . . . . . . . . . . . . . . . . . . . . . . . . . . . . . . . . . . . . . |
91 |
Creating a Backup of Bootable Disk and Recovery Image . . . . . . . . . . . . . . . . . . . . . . . . . . . . . . |
91 |
RECOVER YOUR SYSTEM WHEN THE HARD DRIVE IS STILL ACCESSIBLE . . . . . . . . . . . . . |
92 |
Using the Recovery and Utility Tools . . . . . . . . . . . . . . . . . . . . . . . . . . . . . . . . . . . . . . . . . . . . . . . . . . |
92 |
Fujitsu |
5 |

Contents |
|
Restore the Recovery Image from Hidden Partition . . . . . . . . . . . . . . . . . . . . . . . . . . . . . . . . . . . . . |
94 |
RECOVER YOUR SYSTEM WHEN THE HARD DRIVE IS NOT BOOTABLE . . . . . . . . . . . . . . . . |
95 |
Restore the Recovery Image for Full Hard Drive . . . . . . . . . . . . . . . . . . . . . . . . . . . . . . . . . . . . . . . |
95 |
Recovering Your Recovery Image Using Recovery and Utility (for new hard drive or |
|
non-bootable hard drive) . . . . . . . . . . . . . . . . . . . . . . . . . . . . . . . . . . . . . . . . . . . . . . . . . . . . . . . . . . . . . |
96 |
Installing the Software after the Recovery Image is Restored . . . . . . . . . . . . . . . . . . . . . . . . . . . . |
97 |
Index . . . . . . . . . . . . . . . . . . . . . . . . . . . . . . . . . . . . . . . . . . . . . . . . . . . . . . . . . . . . . . . . . . . . . . . . . . . . . . . . . . |
100 |
6 |
Fujitsu |

Fujitsu Contact Information
Fujitsu Contact Information
Service and Support
You can contact Fujitsu Service and Support in the following ways:
•Toll free phone: 1-800-Fujitsu (1-800-838-5487)
•Website: "http://solutions.us.fujitsu.com/www/content/support/contact/index.php"
Before you place the call, you should have the following information ready so that the customer support representative can provide you with the fastest possible solution:
•Product name
•Product configuration number
•Product serial number
•Purchase date
•Conditions under which the problem occurred
•Any error messages that have occurred
•Type of device connected, if any
Fujitsu Shopping Online
Please go to "http://www.shopfujitsu.com/store/ ".
Maintaining Latest Configuration
To ensure that you always have the most current driver updates related to your system, you should occasionally access the Fujitsu Software Download Manager (FSDM) utility. The FSDM utility is available from the Fujitsu Support site. FSDM will allow you to view a list of the most current drivers, utilities, and applications to determine whether you have the latest versions. If you have a Windows 7 or Windows 8/8.1 operating system, you will need to go to the Support Site to download the FSDM Utility: "http://support.fujitsupc.com/CS/Portal/support.do?srch=DOWNLOADS".
Limited Warranty
Your LIFEBOOK notebook is backed by a Fujitsu International Limited Warranty. Check the service kit that came with your notebook for the Limited Warranty period and terms and conditions.
Fujitsu |
7 |

Notational conventions
Notational conventions
|
|
|
Pay particular attention to text marked with this symbol. Failure to observe |
||
|
|
|
these warnings could pose a risk to health, damage the device, or lead |
||
|
|
|
to loss of data. The warranty will be invalidated if the device becomes |
||
|
|
|
defective through failure to observe these warnings. |
||
|
|
|
Indicates important information for the proper use of the device. |
||
|
|
|
|
|
|
|
► |
Indicates an activity that must be performed. |
|||
|
|
Indicates a result. |
|||
|
|
|
|
||
|
|
|
|
|
|
|
This font |
Indicates data entered using the keyboard in a program dialog or at the |
|||
|
|
|
command line, e.g. your password (Name123) or a command used to start |
||
|
|
|
a program (start.exe) |
||
|
This font |
Indicates information that is displayed on the screen by a program, e.g.: |
|||
|
|
|
Installation is complete. |
||
|
|
|
|
|
|
|
This font |
Indicates |
|||
|
|
|
• terms and texts used in a software interface, e.g.: Click on Save |
||
|
|
|
• names of programs or files, e.g. Windows or setup.exe. |
||
|
"This font" |
Indicates |
|||
|
|
|
• cross-references to another section, e.g. "Safety information" |
||
|
|
|
• cross-references to an external source, e.g. a web address: For more |
||
|
|
|
information, go to "http://solutions.us.fujitsu.com/" |
||
|
|
|
• names of CDs, DVDs and titles or designations for other materials, e.g.: |
||
|
|
|
"CD/DVD Drivers & Utilities" or "Safety/Regulations" manual |
||
|
Key |
|
Indicates a key on the keyboard, e.g: |
F10 |
. |
|
|
|
|||
|
This font |
Indicates terms and texts that are emphasized or highlighted, e.g.: Do |
|||
|
|
|
not switch off the device. |
||
8 |
Fujitsu |
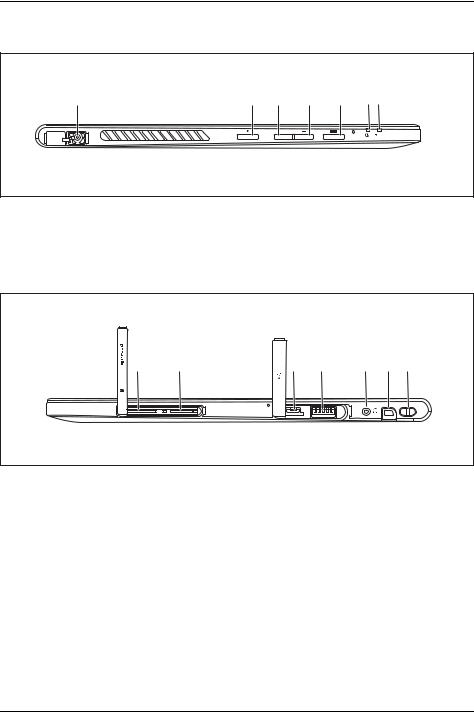
Ports and controls
Ports and controls
This chapter presents the individual hardware components of your device. It gives an overview of the indicators and connections of the device. Please familiarize yourself with these items before you start to work with the device.
Front |
|
|
|
|
|
|
|
1 |
|
|
|
|
2 |
3 |
5 |
6 |
8 |
|
|
|
|
|
|
|
|
|
7 |
|
4 |
|
|
8 |
|
|
|
|
7 |
|
|
|
|
6 |
5 |
|
|
|
|
|
1 |
= Touchscreen |
6 |
= Mechanical mounting for keyboard docking |
|
2 |
= Webcam |
|
station / keyboard cover / cradle |
|
3 |
= Webcam LED |
7 |
= Docking port |
|
4 |
= |
Ambient light sensor |
8 |
= Air inlet |
5 |
= |
Speaker |
|
|
Fujitsu |
9 |
Ports and controls
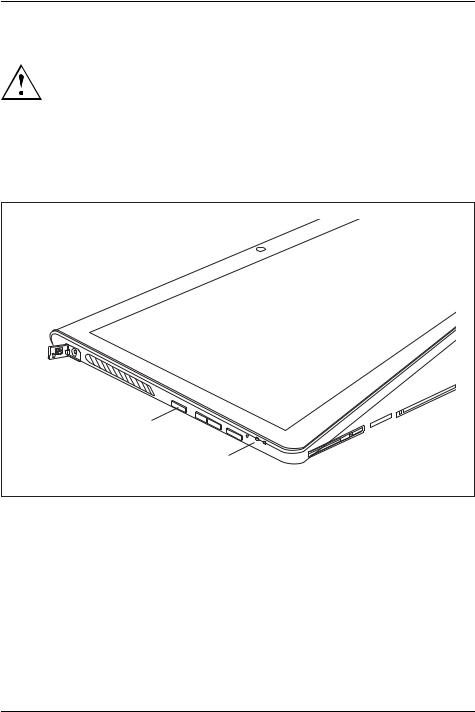
Left-hand |
side |
|
|
|
|
|
|
|
1 |
2 |
3 |
4 |
5 |
6 |
7 |
1 |
= DC jack (DC IN, protected by cover) |
5 |
= Shortcut button |
|
2 |
= ON/OFF button |
6 |
= Power-on indicator |
|
3 |
= |
Increase volume button |
7 |
= Battery charging indicator |
4 |
= |
Decrease volume button |
|
|
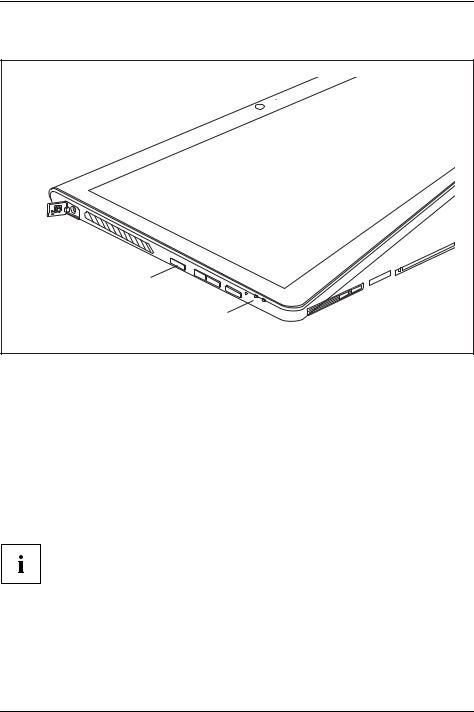
Right-hand side
1 |
2 |
3 |
4 |
5 |
6 |
7 |
1 |
= SIM card slot (format: micro SIM, |
4 |
= USB port (USB 3.0, protected by cover) |
|
|
protected by cover) |
5 |
= Headphones port |
|
2 |
= Storage card slot (format: micro SD, |
6 |
= Stylus holder |
|
|
protected by cover) |
7 |
= Eyelet for stylus cord |
|
3 |
= Micro USB port (protected by cover) |
|||
|
|
10 |
Fujitsu |
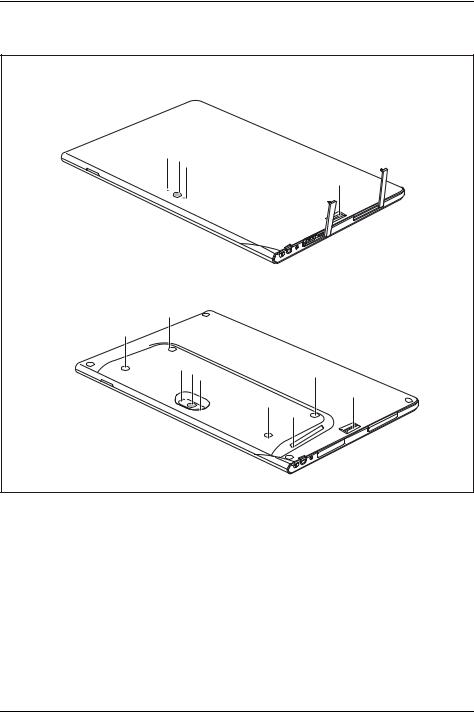
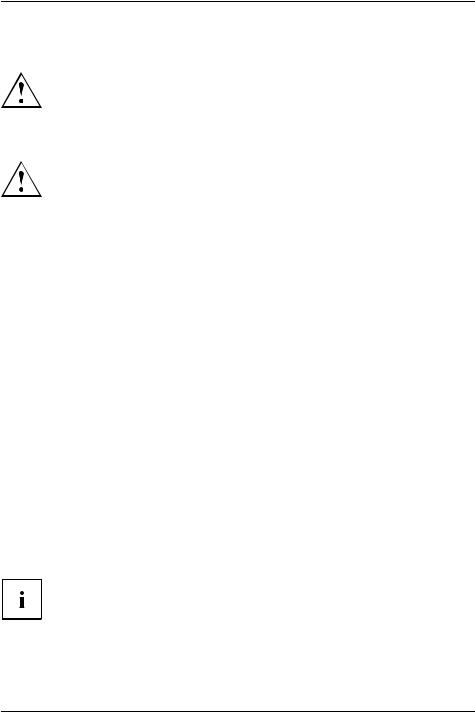
Ports and controls
Back (2 variants: standard shell and smart card shell)
4 3 2
1
5
5
4 3 2 |
5 |
5
1
6
1 |
= Fingerprint sensor |
5 |
= |
Screw holes (device-dependent) for |
2 |
= Camera light |
|
|
securing accessories |
3 |
= Webcam |
6 |
= SmartCard reader (device dependent) |
|
4 |
= Webcam LED |
|
|
|
Fujitsu |
11 |
Important notes
Important notes
This chapter contains essential safety information which must be followed when working with your Tablet PC. The other notes provide useful information about your Tablet PC.
Safety instructions
Please follow the safety notes provided in the "Safety/Regulations" manual as well as the safety notes given below.
Please pay special attention to the sections in the manual marked with the symbol on the left.
When connecting and disconnecting cables, observe the relevant notes in this operating manual.
Read the information on the ambient conditions in the "Technical data", Page 80 chapter and the information in the "First-time setup of your device", Page 16 chapter before preparing your Tablet PC for use and switching it on for the first time.
When cleaning the device, please observe the relevant notes in the section .
Pay attention to the additional safety notes for devices with radio components provided in the "Safety/Regulations" manual.
This Tablet PC complies with the relevant safety regulations for data processing equipment. If you have questions as to whether you can set up the Tablet PC in the intended environment, please contact your sales outlet or our hotline/service desk.
Additional safety notes for devices with radio components
If a radio component (Wireless LAN, Bluetooth, UMTS/LTE) is integrated in your Tablet PC, you must be sure to observe the following safety precautions when using your Tablet PC:
•Switch off the radio components when you are in an aircraft or driving in a car.
•Switch off the radio components when you are in a hospital, an operating room or near a medical electronics system. The transmitted radio waves can impair the operation of medical devices.
•Switch off the radio components, when you let the device get near flammable gases or into hazardous environments (e.g. gas station, paint stores), as the transmitted radio waves can cause an explosion or a fire.
For further information on how to switch the radio components on and off, refer to "Switching the wireless components on and off", Page 39.
12 |
Fujitsu |

Important notes
Protecting the display screen
Depending on your device configuration, where applicable your device is not waterproof. In this event, do not pour liquids onto the device and do not wash it with a wet cloth. Do not place items on the top of the display, or damage may occur.
During normal use of the device, small particles from the environment can become embedded in the pen tip and scratch the screen. The warranty does not cover a scratched screen.
Energy saving
If you will not be using your Tablet PC, switch it off. Switch off any connected external devices when they are not in use. If you use the energy-saving functions, the Tablet PC uses less power. If you do this, you will be able to work longer with the Tablet PC before having to recharge the battery.
The energy efficiency is increased and environmental pollution is reduced. You save money and help protect the environment.
Energy saving under Windows
►Make use of the available energy saving functions as described in chapter "Using the energy saving functions", Page 35.
Traveling with your Tablet PC
Please follow the instructions below when traveling with your Tablet PC.
Fujitsu |
13 |
Important notes
Before you travel
►Back up important data stored on your hard disk.
►Switch off the radio component for data security reasons. With data traffic via a wireless connection, it is also possible for unauthorized third parties to receive data.
Information on activating data encryption is provided in the documentation for your radio component.
►If you want to use your Tablet PC during a flight, first check with the airline company whether this is allowed.
When traveling in other countries
►If you are traveling abroad, check that the AC adapter can be operated with the local AC voltage. If this is not the case, obtain the appropriate AC adapter for your Tablet PC. Do not use any other voltage converter!
►Check whether the local AC voltage and the AC cable are compatible. If this is not the case, buy an AC cable that suits the local conditions.
►Enquire with the appropriate government office of the country you will be traveling in as to whether you may there operate the radio component integrated in your Tablet PC (also see ).
Transporting the Tablet PC
Protect the Tablet PC from severe shocks and extreme temperatures (e.g. direct sunlight in a car).
•Do not transport your Tablet PC while it is turned on.
•Carry your Tablet PC with you while traveling, rather than checking it in as baggage.
•Never put your Tablet PC through a metal detector; have it hand-inspected by security personnel. You can however, put your Tablet PC through a properly tuned X-ray machine. To avoid problems, place it close to the entrance of the machine and remove it as soon as possible or have it hand-inspected by security personnel. Security officials may require you to turn your Tablet PC on, so make sure you have a charged battery on hand.
►Switch the Tablet PC off.
►Unplug the AC plug of the AC adapter and all external devices from the power outlets.
►Disconnect the AC adapter cable and the data cables for all external devices.
►To protect against damaging jolts and bumps, use a suitable Tablet PC carrying case to transport your Tablet PC.
14 |
Fujitsu |
Important notes
Storing your Tablet PC
•If storing your Tablet PC for a month or longer, turn it off, fully charge the battery, then remove and store all Lithium Polymer batteries.
•Store your Tablet PC in a cool, dry location. Temperatures should remain between 13ºF / -25ºC and 140ºF / 60ºC.
•Store your Tablet PC and batteries separately. If you store your Tablet PC with a battery installed, the battery will discharge, and battery life will be reduced. In addition, a faulty battery might damage your Tablet PC.
•Always power off the Tablet PC before transporting and/or packaging it. After shutting down the Tablet PC, wait until the status led panel indicates power off condition (i.e., no lights are illuminated).
•It is possible that the Tablet PC may not automatically go to power-off or hibernate mode when you close the lid. This situation may occur due to pre-operating system boot password security settings or some other application running on the Tablet PC.
•Attempting to transport the Tablet PC while power is on may damage the Tablet PC due to shock or overheating.
Cleaning the Tablet PC
•Use of incorrect cleaners can result in optical impairment of the LCD and / or damage to the computer. Always refer to the cleaner manufacturer’s guidelines and material safety data sheets fo proper handling and use of the products.
•Never use ammonia, acidic, or alkaline cleaners or organic chemicals such as paint thinner, acetone or kerosene. It may damage surface finishes and the coating of the LCD screen.
•Never use compressed air for cleaning your computer.
•If your Tablet PC has a Smart Card slot, be very careful to avoid any liquid entering the slot as this can damage the unit.
Cleaning guidelines using recommended off-the-shelf cleaners: Computer exterior
To clean the exterior, use one of the following off-the-shelf products:
•Office Depot® #154-616 b Cleaning Kit
•Meridrew Enterprises Klear Screen® Wipes
•3M CL563 Cleaner Wipes
After cleaning with one of these products, gently polish with a dry, soft, lint-free cloth until the solution is no longer visible.
Disinfecting STYLISTIC computers
Wipe the surface with a soft cloth wipe and a 50% ethanol solution or use another ethanol-based germicide which has been registered as a hospital disinfectant by the EPA.
Fujitsu |
15 |

First-time setup of your device
First-time setup of your device
Please read the chapter "Important notes", Page 12.
If your device is equipped with a Windows operating system, the necessary hardware drivers and supplied software are already pre-installed.
Before switching it on for the first time, connect the device to the AC voltage using the AC adapter, see "Connecting the AC adapter", Page 17. The AC adapter must remain connected during the whole of the installation process.
A system test is performed when your device is first switched on. Various messages can appear. The display may remain dark for a short time or may flicker.
Please follow the instructions on the screen.
NEVER switch off your device during the first-time setup process.
The battery must be charged if you want to operate your device using the battery.
When used on the move, the built-in battery provides the device with the necessary power. You can increase the operating time by using the available energy-saving functions.
For instructions on how to connect external devices (e.g. mouse, printer) to your Tablet PC, please refer to the operating manual for your device.
Unpacking and checking the device
If you find that damage has occurred during transport, please notify your local sales outlet immediately!
►Unpack all the individual parts.
►Check your device for any visible damage which may have occurred during transportation.
You may need to reuse the packaging in future, for example if you need to transport your device.
16 |
Fujitsu |
First-time setup of your device
Choose a location
Choose a suitable location for the device before setting it up. In doing so, please follow these instructions:
•Never place the device or the AC adapter on a heat-sensitive surface. The surface could be damaged as a result.
•Never place the device on a soft surface (e.g. carpeting, upholstered furniture, bed). This can result in damage caused by overheating.
•The underside of the device heats up during normal operation. Prolonged contact with skin can become unpleasant or even result in burns.
•Place the device on a stable, flat, non-slippery surface. Please note that the rubber feet of the device may mark certain types of delicate surfaces.
•Keep other objects at least 100 mm / 4 inches away from the device and its AC adapter to ensure adequate ventilation.
•Do not expose the device to extreme environmental conditions. Protect the device against dust, humidity and heat.
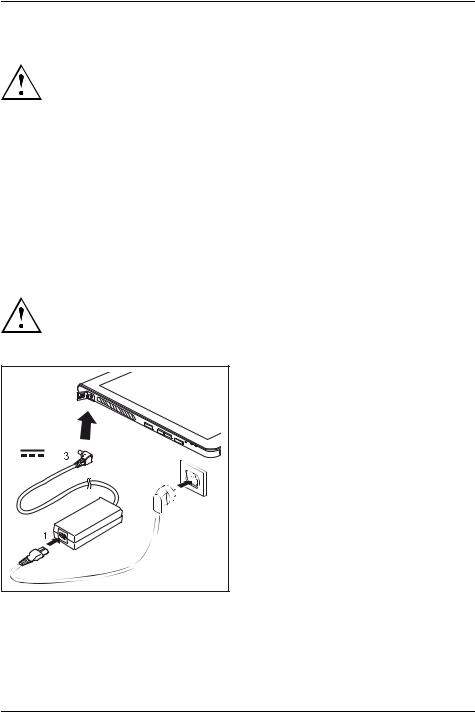
Connecting the AC adapter
Observe the safety notes in the enclosed "Safety/Regulations" manual.
The supplied AC cable conforms to the requirements of the country in which you purchased your device. Make sure that the AC cable is approved for use in the country in which you intend to use it.
2 |
►Open the cover of the DC jack socket (DC IN).
►Connect the AC cable (1) to the AC adapter.
►Plug the AC cable (2) into a power outlet.
►Connect the AC adapter cable (3) to the DC jack socket (DC IN) of the device.
Fujitsu |
17 |
First-time setup of your device
Switching on the device for the first time
On devices with an ON/OFF button for radio components: Before switching the device on, slide the ON/OFF button for radio components to the "ON" position.
When you switch on the device for the first time, the supplied software will be installed and configured. Because this procedure must not be interrupted, you should set aside enough time for it to be fully completed and connect the device to the AC supply using the AC adapter.
During installation, the device must only be rebooted when you are requested to do so.
To make it easier to use your device for the first time, the operating system is pre-installed on the hard disk.
1 |
2 |
►Press the ON/OFF button (1) for about one second to switch the device on.The power-on indicator (2) lights up whenever the system is switched on.
►During the installation process, follow the on-screen instructions.
18 |
Fujitsu |
First-time setup of your device
If a Windows operating system is installed on your device, you will find more information on the system and drivers, help programs, updates, manuals etc. on the device. This information can also be found online at "http://support.fujitsupc.com/CS/Portal/support.do?srch=DOWNLOADS".
You can find information and help on the Windows operating system functions online at "http://windows.microsoft.com".
If a Windows 8.1 operating system is installed on your Tablet PC, a tutorial is automatically started when a new user logs on for the first time to show you how to use the new functions of Windows 8.1.
Installing Bonus Apps
After you have started your system the first time, you will see a Bonus Apps icon on your desktop.
► Click on the icon to see which additional applications are available for you to install.
Applications that are already installed appear in grey, those that are available for installation appear in blue.
► Select the applications you wish to install by selecting the checkbox adjacent to your selection.
or
► Click Select All if you would like to install all available applications
►To confirm your selection click Install.
Note that in some cases (depending upon which application was selected for installation) after installation completes, the system will prompt you to reboot.
There are also cases in which if multiple applications are selected to install but one of them needs a reboot, the system will reboot and continue installing the rest of the selected applications.
Fujitsu |
19 |

Working with the Tablet PC
Working with the Tablet PC
This chapter describes the basics for operating your Tablet PC. You can find instructions on how to connect external devices (e.g. mouse, flash storage) to the Tablet PC in
the chapter "Connecting external devices", Page 66.
Please refer to the notes in the chapter "Important notes", Page 12.
Status indicators
The status indicators (1,2) provide information about the status of the power supply, the drives, and the keyboard functions etc.
|
1 |
2 |
Status indicator |
Description |
|
Power-on indicator
•Indicator lights up blue: The Tablet PC is switched on.
•The indicator flashes: The Tablet PC is in sleep mode (Save-to-RAM).
•The indicator lights up, alternating between blue and white: The Tablet PC is in S3 mode and the wireless component (Wi-Fi or WWAN) is switched on.
•The indicator lights up white: The Tablet PC is in S4 or S5 mode and the wireless component (Wi-Fi or WWAN) is switched on.
•The indicator is not lit up: The Tablet PC is switched off or in Save-to-Disk mode.
Battery charging indicator
•The indicator lights up red: The AC adapter is connected.
•The indicator is flashing red: The battery has a charging error.
•The indicator is not lit up: The AC adapter is not connected.
20 |
Fujitsu |
Working with the Tablet PC
Switching the Tablet PC on
1 |
2 |
► Press the ON/OFF button (1) for about one second to switch the device on.
The power-on indicator (2) lights up whenever the system is switched on.
Programing the ON/OFF button
You can program the ON/OFF button:
Operating system |
Menu |
Windows 7 |
Start - (Settings) - Control Panel - System and |
|
Security - Power Options |
Windows 8.1 |
Windows 8.1 Desktop - Control Panel - Hardware |
|
and Sound - Power Options |
If you have assigned a password, you must enter this when requested to do so in order to start the operating system. Detailed information can be found in the chapter "Security functions", Page 59.
Fujitsu |
21 |

Working with the Tablet PC
Switching the Tablet PC off
Back up your data and close all applications before you switch off your device. Otherwise data might be lost.
►Shut down the operating system correctly.
►If the Tablet PC does not switch itself off automatically, press the ON/OFF button for approx. five seconds.
Handwriting recognition
For detailed information on handwriting recognition, see the documentation for your operating system. At present, handwriting recognition under Windows 7 or Window 8.1 supports the following languages:
English, German, French, Italian, Japanese, Korean, Chinese (traditional and simplified), Dutch, Portuguese, Spanish, Brazilian, Norwegian (Bokmål and Nynorsk), Swedish, Finnish, Danish, Polish, Rumanian, Serbian (Cyrillic and Latin script), Catalan, Russian, Czech and Croatian.
Under Windows 8.1 you can set the required language under Control Panel – Time, Language and Region – Language.
22 |
Fujitsu |

Working with the Tablet PC
Touchscreen
High-quality LCD screens (TFT) are installed in Fujitsu Tablet PCs. For technical reasons, these screens are manufactured for a specific resolution. An optimal, clear picture can only be ensured in the resolution intended for the particular screen. A screen resolution which differs from the specification can result in an unclear picture.
The screen resolution of your Tablet PC’s touchscreen is optimally set at the factory.
Current production technology cannot guarantee an absolutely fault-free screen display. A few isolated constantly lit or unlit pixels (picture elements) may be present. The maximum permitted number of such faulty pixels is specified in the international standard ISO 9241-307 (Class II).
Example:
A screen with a resolution of 1280 x 800 has 1280 x 800 = 1024000 pixels. Each pixel consists of three subpixels (red, green and blue), so there are almost 3 million subpixels in total. According to ISO 9241-307 (class II), a maximum of 2 light and 2 dark pixels and in addition 5 light or 10 dark subpixels or an equivalent mix (1 light subpixel counts as 2 dark subpixels) are allowed to be defective.
Pixel |
A pixel consists of 3 subpixels, normally red, green and |
|
blue. A pixel is the smallest element that can be generated |
|
by complete functionality of the display. |
Subpixel |
A subpixel is a separately addressable internal structure |
|
within a pixel that enhances the pixel function. |
Cluster |
A cluster contains two or more defective pixels or |
|
subpixels in a 5 x 5 pixel block. |
Background lighting
LCD screens are operated with background lighting. The luminosity of the background lighting can decrease over the period of use of the Tablet PC. However, you can adjust the brightness of your monitor yourself.
Ambient light sensor
If your notebook was shipped with the Windows operating system, the screen brightness is regulated by the ambient light sensor and is dependent on the particular light conditions. This results in optimum readability and longer battery life at the same time.
If your notebook was shipped with Windows 8.1, the adaptive brightness setting is deactivated. To change the ambient light sensor settings, select Control Panel - System and Security - Power Options - Change plan settings - Change advanced power settings - Display - Activate adaptive brightness setting..
Select On to activate the adaptive brightness setting with the help of the ambient light sensor.
Synchronizing the display on the touchscreen and an external monitor
In Windows 7, you can switch between touchscreen and external monitor, if you open
Control Panel - Windows Mobility Center, section External Display.
In Windows 8.1 wipe your finger over the screen from the right-hand edge. The setting Charms - Devices - Second monitor opens. Select the desired output type.
You can also use the Fujitsu Display Manager in the Windows Mobility Center to set the output type.
Fujitsu |
23 |
Working with the Tablet PC
Select display orientation (portrait or landscape format)
You can choose to use either portrait or landscape format for the display.
Windows 7
You can change these settings in the Fujitsu menu or under Start - (Settings -)
Control Panel - Hardware and Sound - Display - Settings.
Windows 8.1
You can change these settings under Windows 8.1 Desktop - Control Panel - Hardware and Sound - Windows Mobility Center / Rotate screen.
In the Fujitsu Tablet Controls settings, profiles are saved for operation with different screen orientations. These profiles have preset standard configurations that can be modified as desired.
These settings do not just affect the screen settings on the Tablet PC, but also on external monitors that are connected.
Using fingers
You can execute certain commands by using your finger tip on the touchscreen of your device.
Alternatively, everything which you can select or activate using your finger tip can also be selected or activated using the stylus.
Calibrate the Dual Digitizer for finger-based operation of the device.
If Windows 8.1 is installed on your Tablet PC, your Tablet PC is already calibrated at initial setup.
If a different operating system is installed on your Tablet PC, you must calibrate it with your fingers before first use, so that it recognizes your fingertips as accurately as possible.
As soon as you notice that the accuracy is becoming worse, you must recalibrate the device.
Operating system |
Menu |
Windows 7 / |
To calibrate, run the Hardware and Sound / Tablet PC Settings function in the |
Windows 8.1 Desktop |
Control Panel. You need to calibrate both portrait and landscape formats. |
24 |
Fujitsu |
Working with the Tablet PC
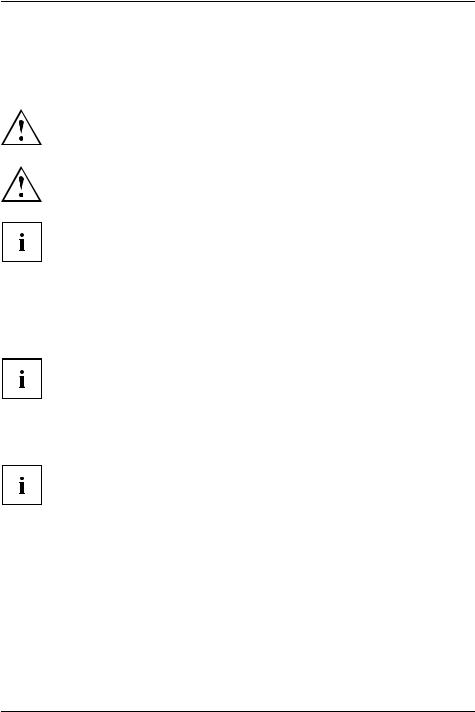
Actions with one finger (Windows 8.1 Pro)
Action |
Description |
||||||||
Wipe your finger over the screen from the |
► Open Charms with system commands |
||||||||
right-hand edge. |
|
(equivalent to pressing the Windows button + |
|||||||
|
|
|
|
|
|
|
|
C |
button). |
|
|
|
|
|
|
|
► Working with the mouse: Position the mouse |
||
|
|
|
|
|
|
|
|
pointer at the bottom right-hand edge of the |
|
|
|
|
|
|
|
|
|
screen. |
|
|
|
|
|
|
|
|
|
|
|
|
|
|
|
|
|
|
|
|
|
|
|
|
|
|
|
|
|
|
|
|
|
|
|
|
|
|
|
|
|
|
|
|
|
|
|
|
|
|
|
Wipe your finger over the screen from the |
► Switch between the most recently used |
|||||||
left-hand edge. |
applications (equivalent to pressing the |
|||||||
|
|
|
|
|
|
Windows button + |
Ctrl |
+ Space). |
|
|
|
|
|
|
► Working with the mouse: Position the mouse |
||
|
|
|
|
|
|
pointer at the bottom left-hand edge of the |
||
|
|
|
|
|
|
screen. |
||
|
|
|
|
|
|
|
|
|
|
|
|
|
|
|
|
|
|
|
|
|
|
|
|
|
|
|
|
|
|
|
|
|
|
|
|
|
|
|
|
|
|
|
|
|
Wipe your finger over the screen from the top |
► Open the App commands (equivalent to |
||||||
or bottom edge. |
pressing the Windows button + Z button). |
||||||
|
|
|
|
|
|
|
Wipe from the top to the bottom of the screen |
|
|
|
|
|
|
|
to dock or close the current App. |
|
|
|
|
|
|
|
► Working with the mouse: Right-click on the |
|
|
|
|
|
|
|
App to display the App commands. |
|
|
|
|
|
|
|
|
|
|
|
|
|
|
|
|
|
|
|
|
|
|
|
|
|
|
|
|
|
|
|
|
|
|
|
|
|
|
|
|
Fujitsu |
25 |
Working with the Tablet PC
Action |
Description |
|||||
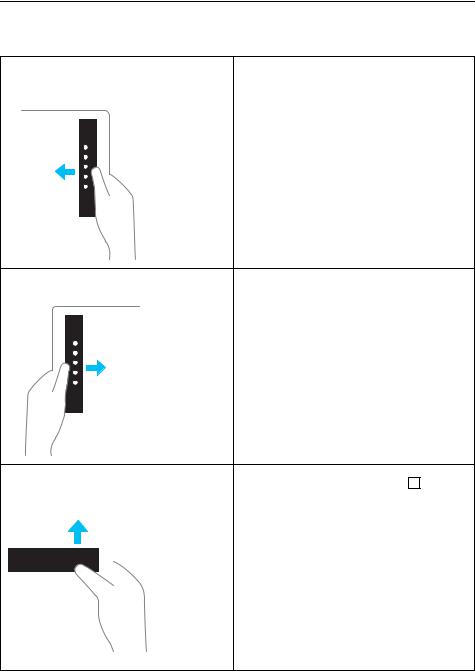
Press and hold |
► Keep your finger pressed on an object on the |
|||||
|
|
|
|
|
|
screen to display a menu with further options. |
|
|
|
|
|
|
|
|
|
|
|
|
|
► Working with the mouse: Move the mouse |
|
|
|
|
|
|
pointer over the object to display a menu with |
|
|
|
|
|
|
|
|
|
|
|
|
|
further options. |
|
|
|
|
|
|
|
|
|
|
|
|
|
|
Tap on an object |
► Tap your finger on an object on the screen |
|||||
|
|
|
|
|
|
to open an App or a link or to execute a |
|
|
|
|
|
|
command. |
|
|
|
|
|
|
► Working with the mouse: Left-click on the |
|
|
|
|
|
|
|
|
|
|
|
|
|
object. |
|
|
|
|
|
|
|
|
|
|
|
|
|
|
Scroll / Move object / Swivel object |
► Use this function to scroll through lists or |
||||||||
|
|
|
|
|
|
|
|
|
websites or to swivel or move an object. |
|
|
|
|
|
|
|
|
|
► Working with the mouse: Left-click on the |
|
|
|
|
|
|
|
|
|
object, keep the mouse button pressed and |
|
|
|
|
|
|
|
|
|
move / swivel the object or scroll. |
|
|
|
|
|
|
|
|
|
|
|
|
|
|
|
|
|
|
|
|
|
|
|
|
|
|
|
|
|
|
26 |
Fujitsu |
Working with the Tablet PC
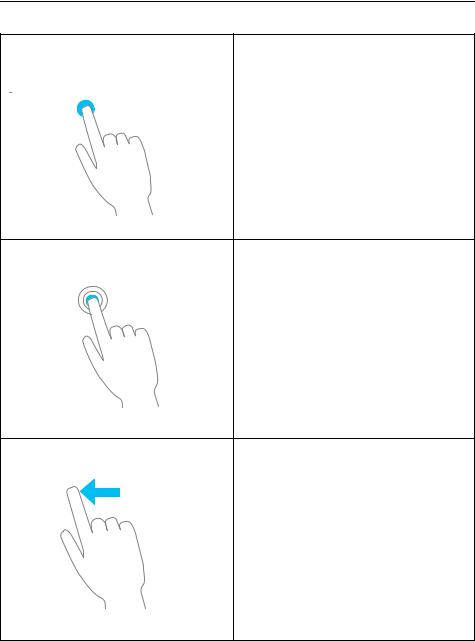
Actions with one finger (Windows 7 / Windows 8.1 Desktop)
Action |
Description |
Selecting objects (click with the left mouse |
► Tap once briefly with the finger on the object. |
button) |
|
Starting programs (double-click with the left |
► Use one finger to tap twice in quick |
mouse button) |
succession on the program symbol. |
Moving objects/windows (while holding the left |
|
mouse button pressed, drag & drop) |
|
|
► Place your finger on the object/window, |
|
keep your fingertip pressed against |
|
the touchscreen and move the desired |
|
object/window. |
Opening a context menu (click with the right |
► Tap your finger on the desired item. |
mouse button) |
Keep your fingertip pressed against the |
|
touchscreen. |
|
The context menu appears. |
|
|
Moving the cursor |
► Position one finger on the touchscreen and |
|
move your finger in the desired direction. |
Fujitsu |
27 |

Working with the Tablet PC
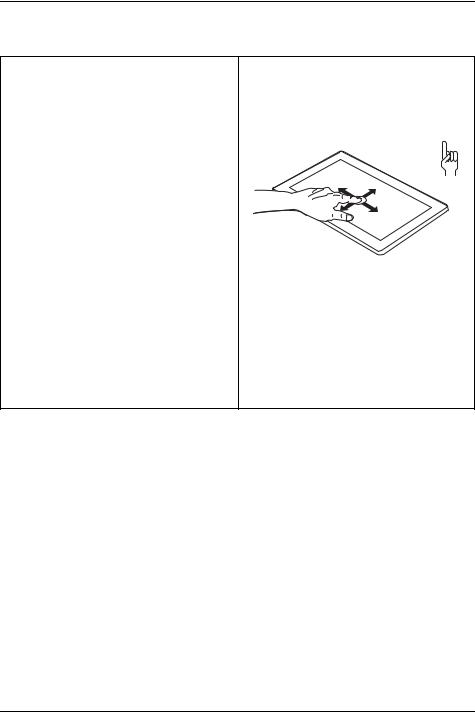
Actions with two fingers (Windows 7 / Windows 8.1 Desktop)
Action |
Description |
Scrolling
► Place two fingers on the touchscreen. ► Move the fingers up to scroll up.
or
► Move the fingers down to scroll down.
Rotating
► Position your thumb on the touchscreen and rotate the image clockwise or counter-clockwise using your index finger.
28 |
Fujitsu |
 Loading...