

Page 1

FRITZ!Fon C4
Configuration
and Operation
Page 2

Table of Contents
Important Instructions . . . . . . . . . . . . . . . . . . . . . 6
Safety Instructions . . . . . . . . . . . . . . . . . . . . . . . . . . . . . . . . 6
Note for Hearing Aid Users . . . . . . . . . . . . . . . . . . . . . . . . . . 6
Prerequisites for Operating FRITZ!Fon . . . . . . . . . . . . . . . . . 6
2 Starting Operation of the FRITZ!Fon . . . . . . . . . . 10
2.1 Inserting the Battery . . . . . . . . . . . . . . . . . . . . . . . . . . . . . . 10
2.2 Charging the Battery . . . . . . . . . . . . . . . . . . . . . . . . . . . . . . 11
2.3 Registering FRITZ!Fon with the Base Station . . . . . . . . . . . 11
2.4 Navigating in the Menus . . . . . . . . . . . . . . . . . . . . . . . . . . . 14
1 FRITZ!Fon C4 at a Glance. . . . . . . . . . . . . . . . . . . . 7
1.1 Package Contents . . . . . . . . . . . . . . . . . . . . . . . . . . . . . . . . . 7
1.2 Getting to Know the FRITZ!Fon. . . . . . . . . . . . . . . . . . . . . . . . 8
1.3 Icons on the Display . . . . . . . . . . . . . . . . . . . . . . . . . . . . . . . 9
3 Making Telephone Calls . . . . . . . . . . . . . . . . . . . 15
3.1 Function Keys for Making Telephone Calls . . . . . . . . . . . . . 15
3.2 Dialing Numbers . . . . . . . . . . . . . . . . . . . . . . . . . . . . . . . . . 15
3.3 Accepting a Call . . . . . . . . . . . . . . . . . . . . . . . . . . . . . . . . . . 15
3.4 Enabling Direct Pickup . . . . . . . . . . . . . . . . . . . . . . . . . . . . 16
3.5 Adjusting the Volume . . . . . . . . . . . . . . . . . . . . . . . . . . . . . 16
3.6 Disabling Do Not Disturb. . . . . . . . . . . . . . . . . . . . . . . . . . . 16
3.7 Switching on Hands-Free Calling . . . . . . . . . . . . . . . . . . . . 17
FRITZ!Fon C4 2
Page 3

3.8 Muting the Microphone. . . . . . . . . . . . . . . . . . . . . . . . . . . . 17
3.9 Locking Keys. . . . . . . . . . . . . . . . . . . . . . . . . . . . . . . . . . . . . 17
3.10 Paging a Mislaid FRITZ!Fon . . . . . . . . . . . . . . . . . . . . . . . . . 18
3.11 Connecting a Headset . . . . . . . . . . . . . . . . . . . . . . . . . . . . . 19
4 Entering Telephone Numbers . . . . . . . . . . . . . . . 20
4.1 Assigning Telephone Numbers in the FRITZ!Box . . . . . . . . 20
4.2 Selecting a Telephone Number before a Call . . . . . . . . . . . 21
5 Using the Telephone Book and Call Lists . . . . . .22
5.1 Setting Up a Telephone Book in FRITZ!Box. . . . . . . . . . . . . 22
5.2 Calling a Telephone Number from the Telephone Book. . . 23
5.3 Calling a Telephone Number from the Call List . . . . . . . . . 24
5.4 Changing or Adding a Telephone Number . . . . . . . . . . . . . 24
5.5 Searching in the Telephone Book. . . . . . . . . . . . . . . . . . . . 25
5.6 Saving New Telephone Book Entry . . . . . . . . . . . . . . . . . . . 26
5.7 Saving Numbers from the Call List . . . . . . . . . . . . . . . . . . . 27
6 Convenience Functions for Telephone Calls. . . . 28
6.1 Making Internal Calls. . . . . . . . . . . . . . . . . . . . . . . . . . . . . . 28
6.2 Answering Machine. . . . . . . . . . . . . . . . . . . . . . . . . . . . . . . 28
6.3 CLIR for One Call (Case by Case) . . . . . . . . . . . . . . . . . . . . . 33
6.4 Alternating Between Calls . . . . . . . . . . . . . . . . . . . . . . . . . . 34
6.5 Establishing a Three-Party Conference Call . . . . . . . . . . . . 35
6.6 Configuring Call Diversion. . . . . . . . . . . . . . . . . . . . . . . . . . 36
FRITZ!Fon C4 3
Page 4

7 Switching the Alarm On and Off . . . . . . . . . . . . . 38
7.1 Setting Up the Alarm . . . . . . . . . . . . . . . . . . . . . . . . . . . . . . 38
7.2 Switching the Alarm On and Off . . . . . . . . . . . . . . . . . . . . . 39
8 Configuring the Baby Monitor. . . . . . . . . . . . . . . 40
9 Internet Services . . . . . . . . . . . . . . . . . . . . . . . . . 41
9.1 Receiving and Sending E-mail. . . . . . . . . . . . . . . . . . . . . . . 41
9.2 Receiving RSS Feeds . . . . . . . . . . . . . . . . . . . . . . . . . . . . . . 44
9.3 Listening to Podcasts . . . . . . . . . . . . . . . . . . . . . . . . . . . . . 45
9.4 Listening to Web Radio . . . . . . . . . . . . . . . . . . . . . . . . . . . . 46
10 Opening New Messages . . . . . . . . . . . . . . . . . . . 48
11 Configuring FRITZ!Fon . . . . . . . . . . . . . . . . . . . . . 49
11.1 Configuring the Start Screen. . . . . . . . . . . . . . . . . . . . . . . . 49
11.2 Configuring Favorites. . . . . . . . . . . . . . . . . . . . . . . . . . . . . . 50
11.3 Settings in the FRITZ!Fon Menu. . . . . . . . . . . . . . . . . . . . . . 52
11.4 Settings in the FRITZ!Box User Interface. . . . . . . . . . . . . . . 54
11.5 DECT Eco: Switching Off Radio When Idle. . . . . . . . . . . . . . 55
12 Updating the Firmware . . . . . . . . . . . . . . . . . . . . 57
12.1 Preparation: Checking the FRITZ!Box Firmware . . . . . . . . . 57
12.2 Performing a Firmware Update . . . . . . . . . . . . . . . . . . . . . . 57
FRITZ!Fon C4 4
Page 5

13 Operating Devices in the Home Network . . . . . . 58
13.1 Switching the FRITZ!Box Wireless Network On and Off . . . 58
13.2 Switching Smart Home Devices On and Off . . . . . . . . . . . . 58
13.3 Using FRITZ!Fon as a Media Player . . . . . . . . . . . . . . . . . . . 59
14 Writing Text . . . . . . . . . . . . . . . . . . . . . . . . . . . . . 60
15 Technical Specifications . . . . . . . . . . . . . . . . . . . 62
16 Customer Service. . . . . . . . . . . . . . . . . . . . . . . . . 63
16.1 Support from the Support Team . . . . . . . . . . . . . . . . . . . . . 63
16.2 Manufacturer’s Warranty . . . . . . . . . . . . . . . . . . . . . . . . . . 64
Legal Notice. . . . . . . . . . . . . . . . . . . . . . . . . . . . . 65
Declaration of CE Conformity . . . . . . . . . . . . . . . 66
Disposal Information. . . . . . . . . . . . . . . . . . . . . . 67
Index . . . . . . . . . . . . . . . . . . . . . . . . . . . . . . . . . . 68
FRITZ!Fon C4 5
Page 6

Important Instructions
Safety Instructions
When working with the FRITZ!Fon, follow the instructions below to
protect yourself and the device from damage.
• Never let liquids get inside the FRITZ!Fon. Otherwise, electric
shocks or short circuits may result.
• Protect the FRITZ!Fon from direct sunlight.
Note for Hearing Aid Users
If you wear a hearing aid, FRITZ!Fon can cause unpleasant noises.
These are caused by radio signals coupled into the hearing aid.
Prerequisites for Operating FRITZ!Fon
• You need a DECT base station that is connected with a tele-
phone line or the Internet.
• If you would like to use all of the functions offered by the
FRITZ!Fon, you need a FRITZ!Box that supports DECT as your
base station. The latest firmware must be installed on both
devices.
FRITZ!Fon C4 6
Page 7

FRITZ!Fon C4 at a Glance
1 FRITZ!Fon C4 at a Glance
FRITZ!Fon C4 is a cordless telephone with which you can make telephone calls on the Internet and the fixed-line network. FRITZ!Fon was
developed especially for the FRITZ!Box, but can be used with other
DECT base stations.
Telephone calls over the Internet can be conducted with FRITZ!Fon in
HD to enjoy natural sound quality.
FRITZ!Fon supports DECT Eco “No Emission”. If all of the cordless telephones registered with one FRITZ!Box support DECT Eco, the
FRITZ!Box can switch off DECT transmission whenever the telephones
are on standby.
1.1 Package Contents
• FRITZ!Fon C4
• Charging cradle with power supply unit
• Rechargeable battery
FRITZ!Fon C4 7
Page 8
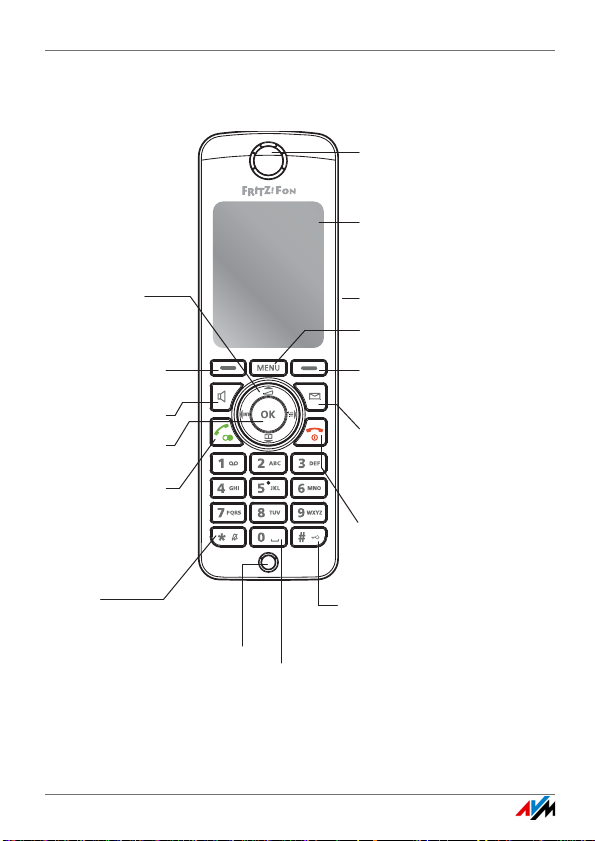
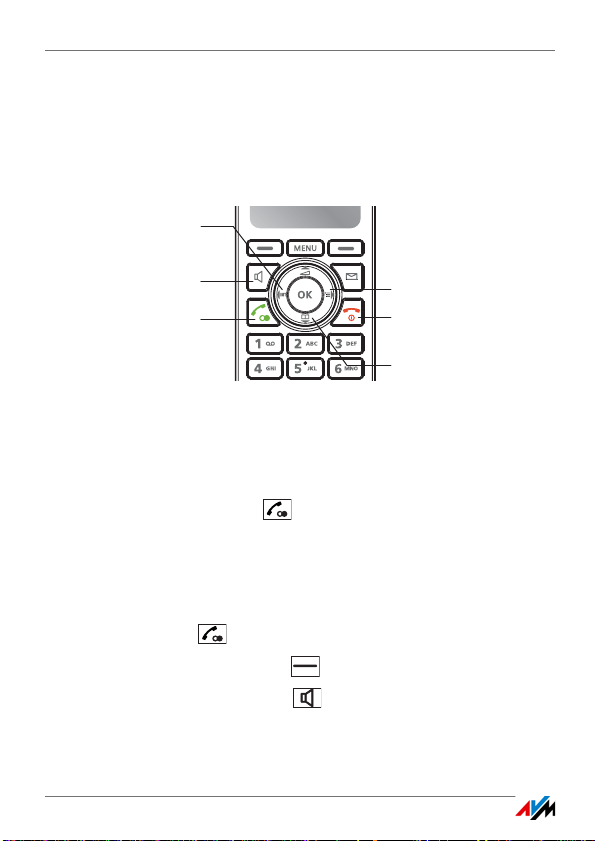
Getting to Know the FRITZ!Fon
Speaker
(speaker for
hands-free calling on the reverse)
Display
Display key
changing features, active
feature on display above key
Hang up key
ending calls
switching on/off (press and hold)
canceling functions
Microphone
Display key
as right display key
Control ring
Volu me
Call list
Telephone book
internal calls
Navigate
Hands-free
calling key
Call key
accepting calls
making calls
redialing
Notification key, flashes for
new calls
new messages on
the answering machine
new e-mails, podcasts, RSS
new software updates
Menu key
OK key
Port for headset
and headphone
0 key
rotate display to read e-mails, RSS messages
open Internet services (press and hold)
for text entry: spaces, special characters
* key
Do Not Disturb (press and hold)
for text entry: special characters
# key
key lock (press and hold)
for text entry: special characters,
capital letters (press and hold)
1.2 Getting to Know the FRITZ!Fon
FRITZ!Fon C4 8
Page 9
Icons on the Display
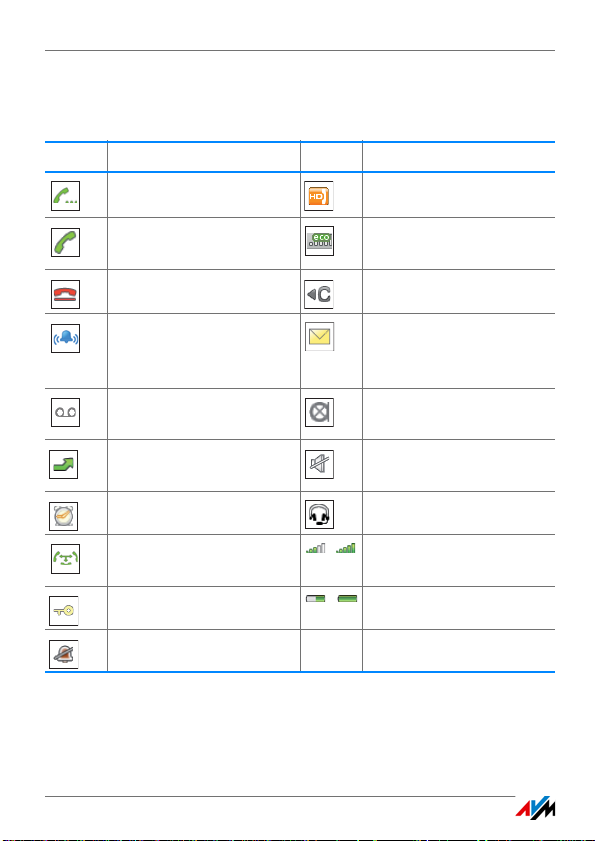
1.3 Icons on the Display
Symbol Meaning Symbol Meaning
Establishing connection Call in HD
Connection established “DECT Eco” function en-
abled in the FRITZ!Box
Connection cleared Deletes the last entry
Incoming call Missed calls, new messag-
es or firmware update available
Answering machine enabled
Call diversion active Loudspeaker/Handset mut-
Alarm active Headset connected
Three-party conference call Quality of connection with
Keypad locked Battery state of charge
Microphone off
ed
base station
Do Not Disturb enabled
FRITZ!Fon C4 9
Page 10
Starting Operation of the FRITZ!Fon
2 Starting Operation of the FRITZ!Fon
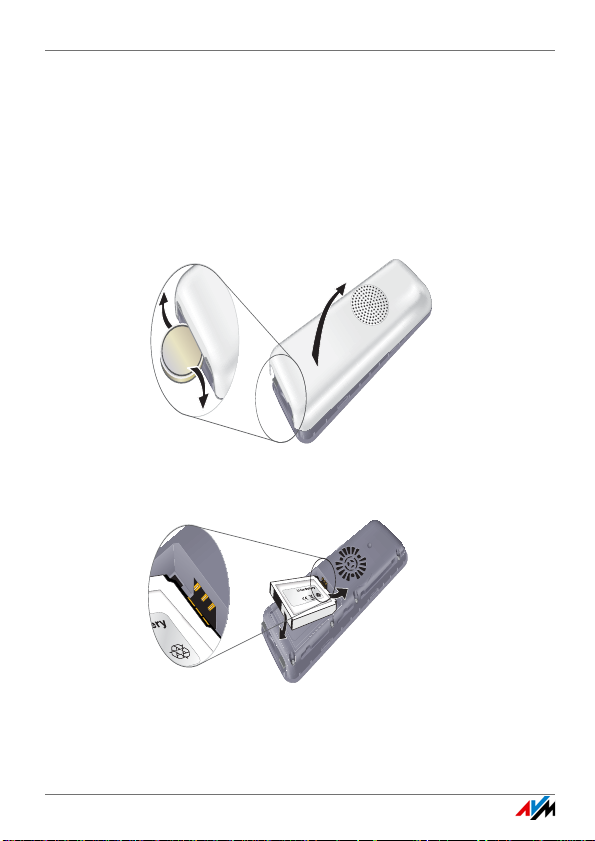
2.1 Inserting the Battery
1. Place a coin in the slot at the bottom of FRITZ!Fon. Rotate the
coin until the battery cap pops open and take off the battery
cap.
2. Insert the battery. The conductors of the battery must be in
contact with the conductors in the housing.
3. Close the battery compartment.
FRITZ!Fon C4 10
Page 11
Charging the Battery
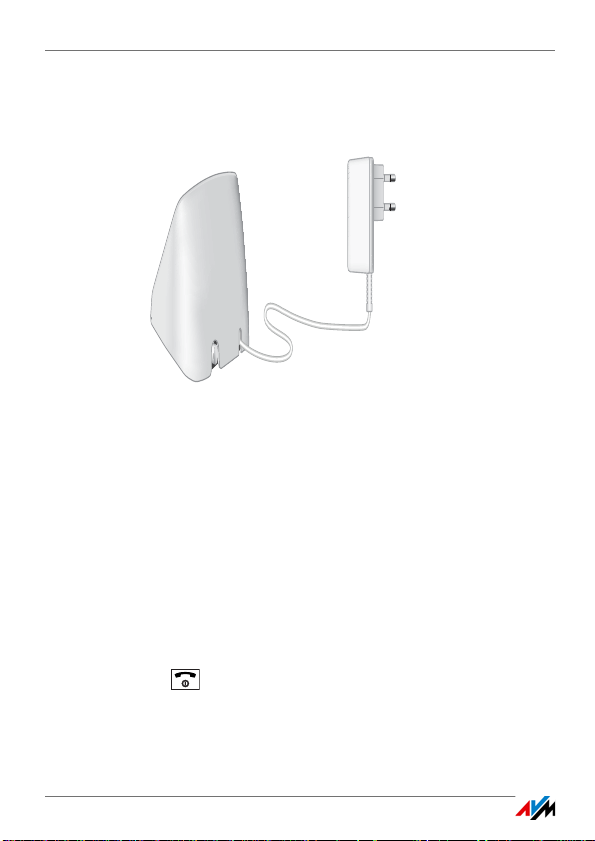
2.2 Charging the Battery
1. Connect the power supply unit to the charging station.
2. Plug the other end into a power outlet.
3. Place the FRITZ!Fon in the charging station.
The battery will be charged.
2.3 Registering FRITZ!Fon with the Base Station
Register your FRITZ!Fon with your FRITZ!Box or another DECT base station.
Registering with the Base Station
1. To switch on FRITZ!Fon, press and hold down the hang up but-
ton .
The display shows “Press and hold down DECT button on the
base station!”.
FRITZ!Fon C4 11
Page 12

Registering FRITZ!Fon with the Base Station
2. Press the “DECT” or “Registration” button on your base sta-
tion. Press and hold the button until FRITZ!Fon requests a PIN
or is successfully registered.
3. If the PIN of the base station is requested, enter the PIN and
press “OK”.
In all FRITZ!Box models the PIN is preset to “0000”.
FRITZ!Fon registering with the base station.
Registering at Multiple Base Stations
You can register FRITZ!Fon at up to four base stations, and change the
active base station quickly as needed.
Here is how to register FRITZ!Fon with the second, third or fourth base
station:
1. Press the menu key .
2. Select “Settings / OK / Registration / OK / Register / OK”.
3. Press the “DECT” or “Registration” button on your base sta-
tion. Press and hold the button until FRITZ!Fon requests a PIN
or is successfully registered.
If the PIN of the base station is requested, enter the PIN and
press “OK”.
In your FRITZ!Box, the PIN is preset to “0000”.
FRITZ!Fon is now registered.
FRITZ!Fon C4 12
Page 13

Registering FRITZ!Fon with the Base Station
Switching Base Stations
If FRITZ!Fon is registered at multiple base stations, you can switch
base stations as follows:
1. Press the menu key .
2. Select “Settings / OK / Registration / OK / Register / OK”.
3. Select a base station and press “OK”.
FRITZ!Fon connects to the base station.
Deregistering from a Base Station
If you no longer use one of the base stations, deregister FRITZ!Fon
from that base station.
1. Press the menu key .
2. Select “Settings / OK / Registration / OK / Deregister / OK”.
3. Select a base station and press “OK”.
FRITZ!Fon is deregistered from the base station.
FRITZ!Fon C4 13
Page 14

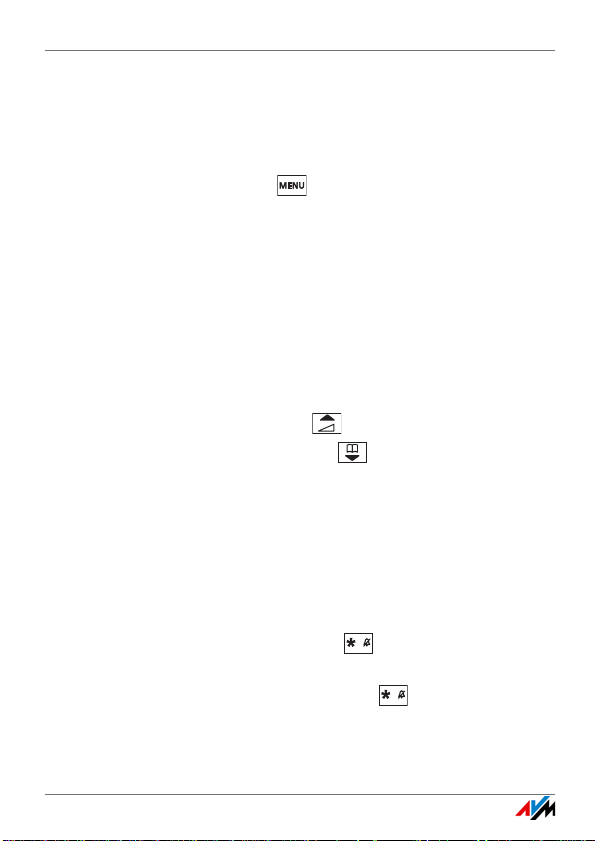
Navigating in the Menus
2.4 Navigating in the Menus
The functions of FRITZ!Fon are operated using a menu, which has a
main menu and several submenus.
With the control ring and the left display key you can navigate
up, down and back through the menus.
Select functions using the “OK” button or the right display key .
Back
Back
Down
FRITZ!Fon C4 14
Select / OK
Up
Select / OK
Page 15
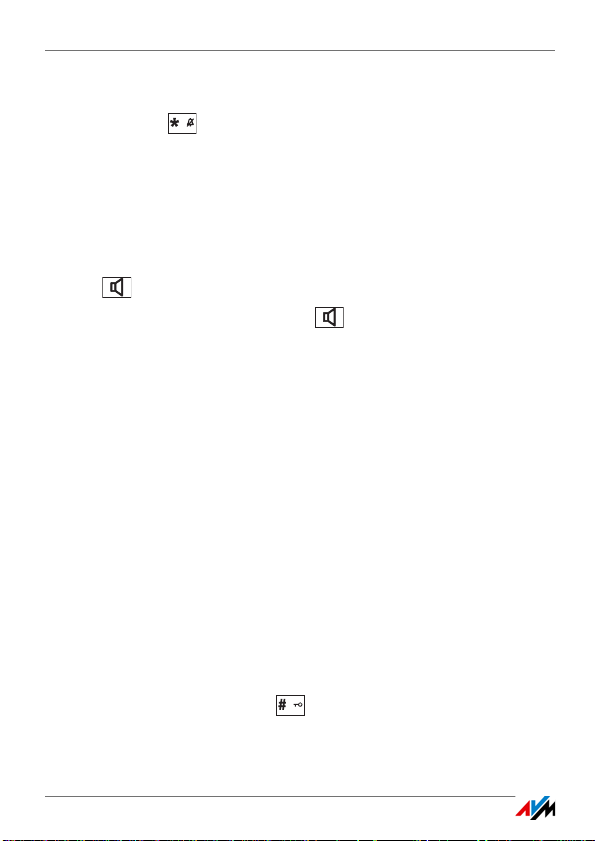
Making Telephone Calls
Call list
Hang up key
Call key /
Redialing
Telephone book
Internal calls
Hands-free calling
3Making Telephone Calls
3.1 Function Keys for Making Telephone Calls
3.2 Dialing Numbers
1. Enter a telephone number.
2. Press the call key .
3.3 Accepting a Call
To pick up a call, press one of the following buttons:
• call key
• display key “Pick Up”
• hands-free calling key
FRITZ!Fon C4 15
Page 16
Enabling Direct Pickup
3.4 Enabling Direct Pickup
If the “Direct pickup” function is enabled, FRITZ!Fon accepts a call immediately as soon as you take FRITZ!Fon out of the charging station.
1. Press the menu key .
2. Select “Settings / OK / Telephony / OK / Pick up directly”.
3. Press the display key “On”.
Direct pickup is enabled.
3.5 Adjusting the Volume
The volume of a call can be adjusted during calls with the handset
and hands-free calls.
Press the top of the control ring to turn up the volume.
Press the bottom of the control ring to turn down the volume.
3.6 Disabling Do Not Disturb
You can switch off the ring tone. The display of FRITZ!Fon continues to
indicate incoming calls.
Switching Off the Ring Tone
To switch off the ring tone, press the key until the symbol “Do
Not Disturb” appears on the display.
To switch the ring tone back on, press the key until the symbol
“Do Not Disturb” disappears from the display.
FRITZ!Fon C4 16
Page 17
Switching on Hands-Free Calling
Switching Off Ringer for a Call
Press the and hold it down until the telephone stops ringing.
You can pick up the call now or wait until the caller hangs up. The
next time a call arrives FRITZ!Fon will ring again.
3.7 Switching on Hands-Free Calling
To switch on hands-free calling, press the Hands-Free Calling button
before or during a telephone call.
Press the Hands-free calling key again to return to handset operation.
3.8 Muting the Microphone
You can switch off the microphone of the FRITZ!Fon and a connected
headset. Then the other parties will no longer be able to hear you.
To mute the microphone, press the display key “Mute” during a call.
Press the display key “Loud” to switch the microphone back on.
3.9 Locking Keys
If you lock the keys of your FRITZ!Fon, you can only call emergency
numbers.
You can still pick up incoming calls. When the keylock is enabled, you
must press and hold down the hang up button to end a call.
To lock the keys, press the until “Keypad locked” appears on the
display.
FRITZ!Fon C4 17
Page 18

Paging a Mislaid FRITZ!Fon
To unlock the keys, press the until “Keypad unlocked” appears
on the display.
Enabling Active Keylock
The active keylock is a setting in the “Settings / Telephony” menu.
This setting determines whether the keys remain locked when you
pick up a call while the keylock is enabled.
If you disable active keylock (preset), you can use FRITZ!Fon’s keypad
for the duration of the call. When you enable the active keylock, the
keypad remains locked.
3.10 Paging a Mislaid FRITZ!Fon
If you have mislaid your FRITZ!Fon, you can have it ring:
1. Press the “DECT” or the “Find” button on your base station.
FRITZ!Fon rings.
2. To stop the ringing, press any key on the FRITZ!Fon or the
“DECT” or “Find” button on the base station.
FRITZ!Fon C4 18
Page 19
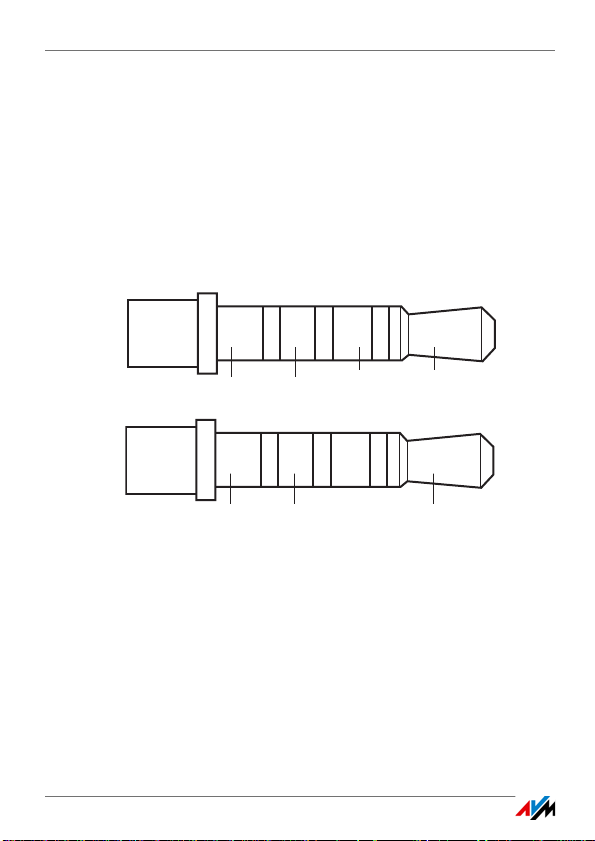
Connecting a Headset
GroundMicrophone
Left
audio signal
Right
audio signal
GroundMicrophone Audio signal
3.11 Connecting a Headset
Suitable Headsets
The headset must meet the following specifications:
• Headphone impedance: 32 ohms
• Microphone impedance: 800 ohms – 2.2 kOhm
• 3.5 mm jack, assignment (stereo / mono):
Connecting a Headset
Connect the headset to the headset socket.
The headset is now ready for operation.
FRITZ!Fon C4 19
Page 20

Entering Telephone Numbers
4 Entering Telephone Numbers
If you have more than one telephone number, you can assign your
FRITZ!Fon telephone numbers for outgoing and incoming calls.
The telephone number for outgoing calls is the one your FRITZ!Fon
uses when you call someone. The telephone numbers for incoming
calls are the ones at which your FRITZ!Fon can be reached.
Telephone numbers are assigned to your FRITZ!Fon in the DECT base
station.
4.1 Assigning Telephone Numbers in the FRITZ!Box
If your FRITZ!Fon is registered to a FRITZ!Box, assign the numbers as
follows:
1. Open the user interface of the FRITZ!Box in a web browser
(http://fritz.box).
2. Select “DECT / Cordless Telephones”.
3. Click the “Edit” button to open the settings of your FRITZ!Fon.
4. Select a telephone number for outgoing calls and one or more
telephone numbers for incoming calls.
For more information on configuring telephone numbers, click
“Help” in the user interface.
5. Click “OK” to save the settings.
FRITZ!Fon C4 20
Page 21

Selecting a Telephone Number before a Call
4.2 Selecting a Telephone Number before a Call
If FRITZ!Fon is registered with a FRITZ!Box, you can select a telephone
number before you place a call. If you do not select a telephone number, the number you assigned to FRITZ!Fon in the FRITZ!Box will be
used.
Prerequisites
This is how FRITZ!Fon must be set up in the FRITZ!Box user interface:
• For incoming calls the option “React only to the following num-
bers” must be enabled.
• At least one of the numbers enabled for incoming calls cannot
be enabled for outgoing calls.
Selecting a Telephone Number
1. Press the menu key .
2. Select “Settings / OK / Telephony / OK / Number for Outgoing
Calls / OK”.
3. Select a telephone number and then press “OK”.
The telephone number appears on the FRITZ!Fon display and the
FRITZ!Fon uses this number to make the next call.
FRITZ!Fon C4 21
Page 22

Using the Telephone Book and Call Lists
5 Using the Telephone Book and Call Lists
If you use a FRITZ!Box that supports DECT as a base station, you can
use the telephone book and the call lists of the FRITZ!Box on the
FRITZ!Fon.
5.1 Setting Up a Telephone Book in FRITZ!Box
In the default setting the FRITZ!Fon uses the first telephone book of
the FRITZ!Box.
You can also use a different telephone book on your FRITZ!Fon. The
telephone book must be configured in the FRITZ!Box first.
Setting Up a New Telephone Book
You can save up to six different telephone books in the FRITZ!Box.
You can also enable up to six online telephone books in the Internet.
1. Open the user interface of the FRITZ!Box in a web browser
(http://fritz.box).
2. Select “Telephony / Telephone book”.
3. Click the “New telephone book” link.
For more information on setting up the new telephone book,
see the Help on the user interface.
4. Set up the new telephone book.
For more information on setting up the telephone book, click
“Help” in the user interface.
FRITZ!Fon C4 22
Page 23

Calling a Telephone Number from the Telephone Book
Selecting a Telephone Book in FRITZ!Fon
If you have set up multiple telephone books in your FRITZ!Box, you
can select a telephone book on the FRITZ!Fon.
1. Press the bottom of the control ring .
The telephone book is opened.
2. Press the display key “Options”.
3. Select “Change Phone Book / OK”.
4. Select a telephone book and click “OK”.
5.2 Calling a Telephone Number from the Telephone Book
You can make calls from the telephone book:
1. Press the bottom of the control ring .
The telephone book is opened.
2. Select an entry.
3. Press the call key .
or
Press “OK”, select “Dial” and select a telephone number.
Press the call key .
The call will be connected.
FRITZ!Fon C4 23
Page 24

Calling a Telephone Number from the Call List
5.3 Calling a Telephone Number from the Call List
You can make calls from the call lists:
1. Press the key and select a call list.
or
Press the call key to open the redial list.
2. Select an entry.
3. Press the call key .
The call will be connected.
5.4 Changing or Adding a Telephone Number
Telephone numbers from the telephone book and the call list can be
changed or extended before dialing. For example, you can add an extension:
1. Press the bottom of the control ring to open the telephone
book.
or
Press the key and select a call list.
or
Press the call key to open the redial list.
2. Select an entry.
3. Press the display key “Options”.
FRITZ!Fon C4 24
Page 25

Searching in the Telephone Book
4. Select “Use” and press “OK”. If the entry has more than one
telephone number, select one telephone number.
The telephone number appears on the display. The cursor
blinks after the last numeral.
5. Change or add to the telephone number.
6. Press the call button .
The call will be connected.
5.5 Searching in the Telephone Book
Finding and Calling a Telephone Number
1. Press the bottom of the control ring .
The telephone book is opened.
2. Enter one or more starting letters of the name to search for.
The marking in the telephone book jumps to this letter.
For more on entering letters, see the section Writing Text from
page 60.
3. Press the call key .
or
Press “OK” and select “Dial”. Select a telephone number and
press the call key .
The call will be connected.
FRITZ!Fon C4 25
Page 26

Saving New Telephone Book Entry
Enabling the Simplified (Vanity) Telephone Book Search
When you enable the simplified telephone book search, it is no longer necessary to press keys multiple times.
By pressing the “5” key, for instance, you can view all of the entries
that begin with “J”, “K”, or “L”. Without the simplified telephone
book search you have to press twice for “K” and three times for “L”.
1. Open the user interface of the FRITZ!Box in a web browser
(http://fritz.box).
2. Select “Telephony / Telephony Devices”.
3. Click the “Edit” button to open the settings of your FRITZ!Fon.
4. Switch to the “Telephony Device Features” tab.
For more information on enabling the simplified telephone
book search, see the Help on the user interface.
5.6 Saving New Telephone Book Entry
1. Press the bottom of the control ring .
The telephone book is opened.
2. Press the display key “Options”.
3. Select “New Entry / OK”.
4. Enter a name and a telephone number.
For more on entering names and telephone numbers, read the
section Writing Text from page60.
5. Press the display key “OK”.
FRITZ!Fon C4 26
Page 27

Saving Numbers from the Call List
5.7 Saving Numbers from the Call List
A telephone number from a call list can be saved to the telephone
book:
1. Press the and select a call list.
2. Select a telephone number.
3. Press the display key “Options” and select “Copy”.
4. Select “New Entry / OK”.
5. Enter a name.
6. Select “Home”, “Office” or “Mobile”.
7. Press the display key “Paste”.
The telephone number from the call list is added.
8. Press the display key “Save”.
The new telephone book entry is saved.
FRITZ!Fon C4 27
Page 28

Convenience Functions for Telephone Calls
6 Convenience Functions for Telephone Calls
With FRITZ!Fon you can use convenience functions provided by your
base station for telephone calls.
FRITZ!Fon offers its full range of functions when the base station is a
DECT-ready FRITZ!Box and both devices have the latest firmware installed. For more information, read Updating the Firmware on
page 57.
You can also register FRITZ!Fon with DECT base stations from other
manufacturers. In this case, however, FRITZ!Fon cannot provide any
additional functions that are not supported by the base station.
6.1 Making Internal Calls
If other telephones are connected with the base station of your
FRITZ!Fon, you can make free internal calls.
1. Press the left of the control ring .
2. Select a telephone.
3. Press the call key .
The call will be connected.
6.2 Answering Machine
If you use a FRITZ!Box that supports DECT as a base station, you can
configure an answering machine for FRITZ!Fon in the FRITZ!Box.
If you have multiple FRITZ!Fon cordless telephones, you can set up a
separate answering machine for each FRITZ!Fon.
FRITZ!Fon C4 28
Page 29

Answering Machine
Setting Up an Answering Machine in FRITZ!Box
1. Open the user interface of the FRITZ!Box in a web browser
(http://fritz.box).
2. Select “Telephony / Answering Machine”.
3. Click the link “Another answering machine”.
4. Specify the mode, greeting delay and recording length. In the
“Greeting only” mode, callers cannot leave you any messages.
5. Enter a name for the answering machine and confirm by click-
ing “Next”.
6. Select one or multiple telephone numbers that you assigned
for incoming calls to your FRITZ!Fon as well.
7. Click “Next” and “Apply”.
The answering machine has been configured.
Switching the Answering Machine On and Off
1. Press the menu key .
2. Select “Answering machine / OK”.
3. Press the display key “Options”.
4. Select “Settings / OK”.
5. Select an operating mode.
In the “Greeting only” mode, callers cannot leave you any messages.
6. Press the hang up key .
FRITZ!Fon C4 29
Page 30

Answering Machine
Recording a Greeting
You can use the start and end announcements on the answering machine or record your own announcements:
1. Press the menu key .
2. Select “Answering Machine / OK”.
3. Press the display key “Options” and select “Settings / OK”.
4. Select an operating mode and press “Options”.
5. In the operating mode “With recording”, you select “Start
greeting” and press “OK / Record / OK”.
In the operating mode “Greeting only”, you select “Record /
OK”.
6. Speak the entire greeting and confirm that you have finished
by clicking “OK”.
7. Select “Play / OK” to check your recording.
8. Select “Ring delay / OK”.
9. Specify how many seconds should lapse before the call is
picked up and press “OK”.
10. Select “Activate / OK / Private greeting / OK”.
11. To set up an end greeting in the “With recording” operating
mode, press the “Back” display key.
To return to the start screen, press the hang up key .
FRITZ!Fon C4 30
Page 31

Answering Machine
Playing Back Messages
When new messages are waiting, the messages key on FRITZ!Fon
flashes red.
To play back all new messages, press and hold down the answering
machine key .
To select a message, press the messages key . The most recent
message is at the top of the list.
To listen again to messages you have already heard, select “Call list /
OK / Messages / OK” in the menu.
Deleting Messages
1. Press and hold the .
2. Select a message and then press “OK”.
3. Select “Delete / OK”.
The message will be deleted.
With the option “Delete all old” you can delete all messages that
have been listened to already.
Picking Up a Call from the Answering Machine
You can pick up calls that the answering machine has answered and
accept them on your FRITZ!Fon:
1. Press the display key “Options”.
2. Select “Answer / OK”.
FRITZ!Fon C4 31
Page 32

Answering Machine
Listening In as New Messages Are Recorded
You can use FRITZ!Fon’s loudspeaker to listen when the answering
machine records a new message. Enable the “Listen in” function:
1. Open the user interface of the FRITZ!Box in a web browser
(http://fritz.box).
2. Select “DECT / Cordless Telephones”.
3. Click the “Edit” button for FRITZ!Fon.
4. On the “Telephony Device Features” tab, enable the “Listen in
on the answering machine” setting.
5. Click “OK”.
Answering Machine Voice Menu
The answering machine can also be operated via a voice-controlled
menu that takes you step by step through the settings and functions.
1. Press the left of the control ring .
2. Select an answering machine.
3. Press the call key .
You will enter the voice menu of the answering machine.
For an overview of the voice menu, see the manual of your FRITZ!Box.
FRITZ!Fon C4 32
Page 33

CLIR for One Call (Case by Case)
6.3 CLIR for One Call (Case by Case)
When making a call you can ensure that the party called does not see
your telephone number. For this you can suppress the telephone
number for a single call. This function is also known as CLIR (Calling
Line Identification Restriction).
1. Press the display key “Favorites” and select “Anonymous call /
OK”.
or
Press the menu key and select “Settings / OK / Telephony
/ OK / Anonymous call / OK”
2. Press the display key “On”.
The “Next call” setting is enabled.
3. Press the hang up menu key .
Your telephone number will be suppressed for the next outgoing call.
If you would like to suppress your number permanently, enable CLIR
in the FRITZ!Box user interface. For more information, read Settings in
the FRITZ!Box User Interface on page 54.
FRITZ!Fon C4 33
Page 34

Alternating Between Calls
6.4 Alternating Between Calls
While you are on the phone you can call a second party and switch
(alternate) between the two calls as often as desired.
1. Make a call or pick up a call.
2. Press the display key “R” (consultation).
The first call is on hold.
3. Make the second call:
Press the telephone book key , select an entry, and press
“OK”.
or
Enter an external telephone number.
or
Press the left of the control ring , select a telephone and
press “OK”.
4. Once the second call is connected, you can alternate:
Press the display key “Options” and select “Alternate / OK”.
You are connected to the first party again.
Using “Options / Alternate / OK” you can alternate between the two
calls as often as you like.
FRITZ!Fon C4 34
Page 35

Establishing a Three-Party Conference Call
6.5 Establishing a Three-Party Conference Call
Three parties can confer with each other in real time in a three-party
conference call. Two external and one internal party, or two internal
and one external party can participate in the three-party conference
call.
1. Make a call or pick up a call.
2. Press the display key “R” (consultation).
The first call is on hold.
3. Make the second call:
Press the telephone book key , select an entry, and press
“OK”.
or
Enter an external telephone number.
or
Press the left of the control ring , select a telephone and
press “OK”.
4. Once the second call has been connected, press the “Options”
key on the display.
5. Select “Conference / OK”.
The three-party conference is set up.
FRITZ!Fon C4 35
Page 36

Configuring Call Diversion
6.6 Configuring Call Diversion
Call diversion forwards incoming calls, for instance, to your mobile
telephone.
You can set up call diversion for the following calls:
• for all calls to FRITZ!Fon
• for all calls that come from a certain telephone number
• for all anonymous calls in which the caller does not transmit a
telephone number
The following destinations can be defined for call diversion:
• a different telephone connected to the FRITZ!Box
• an external telephone number
• an answering machine set up in the FRITZ!Box
Configuring Call Diversion in the FRITZ!Box
1. Open the user interface of the FRITZ!Box in a web browser
(http://fritz.box).
2. Select “Telephony / Call Handling / Call Diversion”.
3. Click “New Call Diversion” and set up a new call diversion.
For comprehensive information on setting up call diversion,
see the Help on the user interface.
FRITZ!Fon C4 36
Page 37

Configuring Call Diversion
Switching Call Diversion On and Off
A call diversion setting configured for FRITZ!Fon can be switched on
and off on the FRITZ!Fon.
1. Press the menu key .
2. Select “Supplementary services / OK / Call diversion / OK”.
3. Select a call diversion setting.
4. Press the display key “On” or “Off”.
5. Press the hang up key .
FRITZ!Fon C4 37
Page 38

Switching the Alarm On and Off
7 Switching the Alarm On and Off
If your FRITZ!Fon is registered with a FRITZ!Box, you can configure up
to three different alarms.
7.1 Setting Up the Alarm
1. Press the menu key .
2. Select “Supplementary services / OK / Alarm / OK”.
3. Select an alarm.
4. Press the display key “Options”.
5. In the “New alarm time” menu, set the time for the alarm to
ring and press “OK”.
6. Select your FRITZ!Fon in the “Telephone” menu and press
“OK”.
7. From the “Interval” menu, select “none” or one or more week-
days. Press “OK”.
8. Select a ring tone from the “Alarm tone” menu and press
“OK”.
If web radio stations are configured in the FRITZ!Box, you can
select a radio station as an alarm signal.
9. Press the hang up key .
The alarm is active. The alarm icon appears on the display.
FRITZ!Fon C4 38
Page 39

Switching the Alarm On and Off
7.2 Switching the Alarm On and Off
1. Press the menu key .
2. Select “Supplementary services / OK / Alarm / OK”.
3. Select an alarm.
4. Press the display key “Options”.
5. Select “Alarm on / OK” or “Alarm off / OK”.
The alarm is turned on or off.
FRITZ!Fon C4 39
Page 40

Configuring the Baby Monitor
8 Configuring the Baby Monitor
If your FRITZ!Fon is registered with a FRITZ!Box, you can configure the
FRITZ!Fon as a baby monitor.
FRITZ!Fon will then call a specified telephone number whenever the
ambient noise reaches a defined level.
1. Press the menu key .
2. Select “Supplementary services / OK / Baby monitor / OK /
Destination no. / OK”.
3. Enter a telephone number and press “OK”.
or
Delete all of the numerals already entered. Press the display
key “Options” and select “Telephone book / OK”. Select a tele-
phone book entry and press “OK”.
or
Delete all of the numerals already entered. Press the display
key “Options” and select “Internal call / OK”. Select a tele-
phone and then press “OK”.
4. Select “Activation / OK”.
5. Press “Options”, select a sensitivity level, and press “OK”. The
higher the sensitivity, the less the ambient noise needed to
trigger a call.
FRITZ!Fon is configured. “Baby monitor enabled” is shown on the dis-
play. Now you can place the FRITZ!Fon near the sleeping child.
To switch off the baby monitor, press the hang up key .
FRITZ!Fon C4 40
Page 41

Internet Services
9 Internet Services
If your FRITZ!Fon is registered with a FRITZ!Box, with FRITZ!Fon you
can read and write e-mail, read RSS feeds, and listen to podcasts or
web radio.
9.1 Receiving and Sending E-mail
With FRITZ!Fon you can receive and send e-mail when your computer
is switched off. In the FRITZ!Box you can set up up to ten e-mail accounts for this purpose. If you have more than one FRITZ!Fon cordless
telephones you can use different e-mail accounts on the different
cordless telephones.
Setting Up an E-mail Account
Set up the e-mail accounts you would like to use with FRITZ!Fon in the
FRITZ!Box:
1. Open the user interface of the FRITZ!Box in a web browser
(http://fritz.box).
2. Select “DECT / Internet Services / E-mail”.
3. Click the “New E-mail Account” button.
4. Set up the e-mail account on “Account Information” and “Ad-
ditional Settings” tabs.
For comprehensive information on setting up the e-mail ac-
count, see the Help on the user interface.
FRITZ!Fon C4 41
Page 42

Receiving and Sending E-mail
Reading E-mail
Opening E-mail
1. Press and hold the key.
The “Internet services” menu is opened.
2. Select “E-mail / OK”.
3. If more than one e-mail account is set up, select an e-mail ac-
count and press “OK”.
4. Select an e-mail and press “OK”.
The e-mail appears on the display.
Navigating in E-mail
With the control ring you can navigate up and down in an e-mail message and skip to the next or the previous e-mail.
With the “OK” key you can page forward and skip to the next e-mail.
Rotate Display
With the key you can rotate the display:
Press once to rotate the display by 90°.
Press twice to rotate the display by 270°.
Press three times to reset the display.
FRITZ!Fon C4 42
Page 43

Receiving and Sending E-mail
Sending E-mail
1. Press and hold the key.
The “Internet services” menu is opened.
2. Select “E-mail / OK”.
3. If more than one e-mail account is set up, select an e-mail ac-
count and press “OK”.
4. Press the display key “Options” or “New”.
5. Select “New e-mail / OK”.
6. Write the subject line and the text.
For more on writing text, read page 60.
7. Press the display key “Options”.
8. Select a recipient from the telephone book and press “OK”.
or
Select “Send to mailing list” and enter one or more e-mail ad-
dresses. Press the display key and select “Send / OK”.
Use a comma to separate the individual addresses.
The e-mail message will be sent.
FRITZ!Fon C4 43
Page 44

Receiving RSS Feeds
9.2 Receiving RSS Feeds
You can read RSS feeds with FRITZ!Fon. RSS is a format for rendering
headlines and what are usually short items on certain subjects.
These could be, for instance, the latest headlines or information
about changes on the provider’s website.
Configuring RSS Feeds
RSS feeds provide RSS messages. Configure the RSS feeds you would
like to receive with FRITZ!Fon in the FRITZ!Box:
1. Open the user interface of the FRITZ!Box in a web browser
(http://fritz.box).
2. Select “DECT / Internet Services / RSS Feeds”.
3. Select a preset RSS feed from the drop-down list, or select
“Other RSS feed” and configure a new RSS feed.
The Help of the FRITZ!Box user interface presents comprehensive in-
formation on all of the settings for RSS feeds.
Reading RSS Feeds
Opening an RSS Feed
1. Press and hold the key.
The “Internet services” menu is opened.
2. Select “RSS feeds / OK”.
3. If more than one RSS feed is configured, select an RSS feed
and press “OK”.
FRITZ!Fon C4 44
Page 45

Listening to Podcasts
4. Select an RSS message and then press “Show”.
The RSS feed appears on the display.
Navigating in RSS Feeds
Use the the control ring to navigate upward and downward in the
message and to skip to the next or the previous message.
With the “OK” key you can page forward and skip to the next message.
Rotate Display
With the key you can rotate the display:
Press once to rotate the display by 90°.
Press twice to rotate the display by 270°.
Press three times to reset the display.
9.3 Listening to Podcasts
With FRITZ!Fon you can listen to podcasts.
Addresses of podcasts are listed, for instance, at
www.ipodder.org/directory/4/podcasts
Setting Up a Podcast
Configure the podcasts you would like to listen to with FRITZ!Fon in
the FRITZ!Box:
1. Open the user interface of the FRITZ!Box in a web browser
(http://fritz.box).
2. Select “Home Network / Media Server / Podcast”.
.
FRITZ!Fon C4 45
Page 46

Listening to Web Radio
3. Select a preset podcast from the drop-down list, or select
“Other podcast” and configure a new podcast.
The Help of the FRITZ!Box user interface presents comprehensive in-
formation on all of the settings for podcasts.
Playing a Podcast
1. Press and hold the key.
The “Internet services” menu is opened.
2. Select “Podcasts / OK”.
3. If more than one podcast is configured, select a podcast and
press “OK”.
4. Select an entry and then press “OK”.
The entry will be played back.
Press the top of the control ring to turn the volume up or
down.
9.4 Listening to Web Radio
With FRITZ!Fon you can listen to web radio (also called “Internet radio”).
Many web radio station addresses are available, for instance, at
www.onlineradiostations.com
and www.shoutcast.com.
FRITZ!Fon C4 46
Page 47

Listening to Web Radio
Setting Up a Web Radio Station
Configure the radio stations you would like to listen to with FRITZ!Fon
in the FRITZ!Box:
1. Open the user interface of the FRITZ!Box in a web browser
(http://fritz.box).
2. Select “Home Network / Media Server / Web Radio”.
3. Select from the drop-down menu a preselected web radio sta-
tion, or select “Another Web Radio Station” and set up a new
radio station.
The radio station must use the “pls”, “m3u” or “mp3” format.
The Help of the FRITZ!Box user interface presents comprehensive in-
formation on all of the settings for web radio stations.
Playing a Web Radio Station
1. Press and hold the key.
The “Internet services” menu is opened.
2. Select “Web radio / OK”.
3. If more than one radio station is configured, select a radio sta-
tion and press “OK”.
The radio station will be played.
Press the top of the control ring to turn the volume up or
down.
FRITZ!Fon C4 47
Page 48

Opening New Messages
10 Opening New Messages
If new messages are available, the notification key flashes, and the
“New Messages” icon appears in the display. Messages are:
• missed calls
• new firmware updates
• new messages on the answering machine
• new e-mail, podcasts and RSS feeds
Here is how to open new messages:
1. Press .
2. If different kinds of messages have arrived, for instance
“Missed calls” and “E-mail”, select one kind of message and
press “OK”.
3. Select a message and then press “OK”.
New messages are black; messages that have already been
read are gray.
The message appears on the display.
FRITZ!Fon C4 48
Page 49

Configuring FRITZ!Fon
11 Configuring FRITZ!Fon
11.1 Configuring the Start Screen
Instead of the preset start screen you can set up your own background image or configure a clock as the start screen.
Selecting a Start Screen
1. Press the menu key .
2. Select “Settings / OK / Display / OK / Start screen / OK”.
3. Select a start screen and press “OK”.
Assigning a Background Image
If you selected the “Background image” start screen, you can assign
a picture:
1. Open the user interface of the FRITZ!Box in a web browser
(http://fritz.box).
2. Select “DECT / Cordless Telephones”.
3. Open the settings of your FRITZ!Fon and switch to the “Tele-
phony Device Features” tab.
4. Click “Assign background image” and “Browse...” to select a
picture in JPEG format.
5. Click “Open” and then “OK”.
The image appears on the FRITZ!Fon start screen.
FRITZ!Fon C4 49
Page 50

Configuring Favorites
Opening the Event Log
The preset start screen “Events” shows events like missed calls, new
messages on the answering machine, new e-mail and the last web
radio station played.
You can open the events directly from the start screen:
1. Press the “OK” key.
The “Event” menu appears.
2. Select an event by pressing the top or the bottom of
the control ring.
3. Press “OK”.
11.2 Configuring Favorites
The favorites on the start screen provide for fast access to frequently
used menus and contents (for instance, web radio stations).
Adding Favorites
1. Press the display key “Favorites”.
2. Select “New favorite / OK”.
3. Press the display key “Continue”.
4. Navigate to the desired menu item.
5. Press the display key .
If no star is displayed over the display key on the right, the
menu item is already a favorite or cannot be defined as a favor-
ite.
FRITZ!Fon C4 50
Page 51

Configuring Favorites
Moving Around Favorites
You can change the order of the favorites.
1. Press the display key “Favorites”.
2. Select a favorite.
3. Press the display key “Options”.
4. Select “Move / OK”.
5. Press on the top or the bottom of the control ring un-
til the favorite has the desired position in the list.
Deleting Favorites
1. Press the display key “Favorites”.
2. Select a favorite.
3. Press the display key “Options”.
4. Select “Delete / OK”.
FRITZ!Fon C4 51
Page 52

Settings in the FRITZ!Fon Menu
11.3 Settings in the FRITZ!Fon Menu
Audio Settings
The “Settings / Audio” menu contains the following settings:
• Volume: volume of the ring tone, the handset and the speaker
during hands-free calling
The volume of the handset and the speaker can be set during a
call; see Adjusting the Volume on page 16.
• Ring tone
• Signal tones: You can switch on and off the tones that signal a
key click, the arrival of new messages, and the handset exiting
the transmission range of the DECT base station. The “Signal
tones” option contains the warning signal when the battery is
low and the signal when the handset is placed in the charging
station.
• Configuring a headset: See Connecting a Headset on page 19.
Display Settings
The “Settings / Display” menu contains the following settings:
• Brightness: The brightness of the display
• Power save: You can enable a screen saver to save electricity.
• Start screen: See Configuring the Start Screen on page 49.
FRITZ!Fon C4 52
Page 53

Settings in the FRITZ!Fon Menu
Telephony Settings
The “Settings / Telephony” menu contains the following settings:
• Own telephone no.: See Selecting a Telephone Number before
a Call on page 21.
• Anonymous call: See CLIR for One Call (Case by Case) on
page 33.
• Pick up directly: See Enabling Direct Pickup on page 16.
• Active keylock: See Enabling Active Keylock on page 18.
• Secure: When “Secure” is enabled, FRITZ!Fon establishes only
encrypted DECT connections. This option must be disabled for
operation with a DECT repeater that does not support any en-
crypted connections.
Resetting
You can restore FRITZ!Fon to its factory settings. Settings you have
configured will be discarded.
1. Press the menu key .
2. Select “Settings / OK / Reset / OK / OK”.
FRITZ!Fon is reset.
FRITZ!Fon C4 53
Page 54

Settings in the FRITZ!Box User Interface
11.4 Settings in the FRITZ!Box User Interface
If you use a FRITZ!Box that supports DECT as a base station, you can
configure your FRITZ!Fon in the user interface of the FRITZ!Box.
All current functions and settings are at your disposal if both devices
are using the current firmware. For more information, see the
Updating the Firmware from page 57 section.
1. Open the user interface of the FRITZ!Box in a web browser
(http://fritz.box).
2. Select “DECT / Cordless Telephones”.
3. Click the “Edit” button to open the settings of your FRITZ!Fon.
4. Configure the desired settings.
For more information on these settings, see the Help on the
user interface.
5. Then click the “OK” button to save your settings.
You can configure the following settings:
• Telephone number for outgoing calls: The telephone number
FRITZ!Fon uses to place outgoing calls to the public telephone
network.
• Numbers for incoming calls: FRITZ!Fon rings when calls arrive
for these telephone numbers.
• Name: The name of the device, to be displayed in the
FRITZ!Fon display and in the call list of the FRITZ!Box.
• Telephone book: Select a telephone book for FRITZ!Fon.
FRITZ!Fon C4 54
Page 55

DECT Eco: Switching Off Radio When Idle
• Ring tones: You can assign various ring tones to your FRITZ!Fon
and add an MP3 file as a ring tone of your own.
• Do Not Disturb: You can define periods of time when FRITZ!Fon
does not ring.
• Properties of the telephony device: You can enable various ad-
ditional convenience features (for instance “busy on busy” and
CLIR), select a background image for the start screen, and
change the sound settings for your FRITZ!Fon.
11.5 DECT Eco: Switching Off Radio When Idle
Your FRITZ!Fon supports DECT Eco “No Emission”. Thanks to DECT
Eco, the FRITZ!Box can switch off DECT transmission whenever all
cordless telephones are on standby.
The connection between the FRITZ!Box and the telephones remains
active, however. You can place and accept calls at any time.
Prerequisite for Using DECT Eco
DECT Eco can be used only if all of the cordless telephones registered
with the FRITZ!Box support DECT Eco.
To find out whether your cordless telephone supports DECT Eco, see
the “DECT / DECT Monitor” menu in the FRITZ!Box user interface.
Enabling DECT Eco in the FRITZ!Box
1. Open the user interface of the FRITZ!Box in a web browser
(http://fritz.box).
2. Select the “DECT / Base Station” menu.
FRITZ!Fon C4 55
Page 56

DECT Eco: Switching Off Radio When Idle
3. Enable the “DECT Eco” option and define when DECT Eco
should be active.
4. Click the “Apply” button to save the settings.
5. Register your FRITZ!Fon and all of the cordless telephones on
the FRITZ!Box again.
DECT Eco is enabled.
FRITZ!Fon C4 56
Page 57

Updating the Firmware
12 Updating the Firmware
AVM provides firmware updates for FRITZ!Fon. A firmware update
brings the functions of your FRITZ!Fon up to date.
12.1 Preparation: Checking the FRITZ!Box Firmware
FRITZ!Fon must be registered with a FRITZ!Box with the latest firmware. Check the FRITZ!Box firmware:
1. Press the menu key .
2. Select “Home Network / OK / FRITZ!Box version / OK”.
3. Press the display key “Check”.
4. If “The latest firmware is not installed” message appears on
the display, update the firmware of the FRITZ!Box.
Open the user interface of the FRITZ!Box in a web browser
(http://fritz.box) and start the “Update” Wizard.
12.2 Performing a Firmware Update
1. Press the menu key .
2. Select “Settings / OK / Firmware update / OK”.
3. If a new firmware update is available, answer “OK” to the fol-
lowing questions.
The firmware is transmitted to FRITZ!Fon. Then the FRITZ!Fon will re-
start.
FRITZ!Fon C4 57
Page 58

Operating Devices in the Home Network
13 Operating Devices in the Home Network
If you use a FRITZ!Box that supports DECT as a base station, you can
use FRITZ!Fon to operate other devices in the home network.
13.1 Switching the FRITZ!Box Wireless Network On and Off
The WLAN function of your FRITZ!Box can be switched on and off using
the FRITZ!Fon.
1. Press the menu key .
2. Select “Home Network / OK / WLAN / OK”.
3. Press the display key “On ” or “Off”.
The wireless LAN function of the FRITZ!Box is switched on or off.
If you configured wireless LAN guest access in the user interface of
the FRITZ!Box, you can also switch this guest access on and off with
the FRITZ!Fon.
13.2 Switching Smart Home Devices On and Off
If you use smart home devices from AVM, you can switch the outlets
on the devices on and off with FRITZ!Fon:
1. Press the menu key .
2. Select “Home Network / OK / Smart Home / OK”.
3. Select a smart home device.
4. Press the display key “On” or “Off”.
The socket of the smart home device is switched on or off.
FRITZ!Fon C4 58
Page 59

Using FRITZ!Fon as a Media Player
13.3 Using FRITZ!Fon as a Media Player
With FRITZ!Fon you can play music stored on the FRITZ!Box or another
media server in the home network.
You can use your FRITZ!Fon as a playback device or use FRITZ!Fon to
remote control music playback on other UPnP-compatible devices in
the home network.
1. Press the menu key .
2. Select “Home Network / OK / Media Player / OK”.
3. Select a media server.
4. Press the display key “Options”.
5. To view the contents of the media server, select “Open folder /
OK”.
To start music playback with FRITZ!Fon, select “Play folder /
OK” or “Play title / OK”.
To play the music on another UPnP-compatible device in the
home network, select “Destination: <device_name> / OK”.
FRITZ!Fon C4 59
Page 60

Writing Text
14 Writing Text
This chapter describes how to enter text on the FRITZ!Fon.
Entering Numerals, Letters and Text
To enter a letter, a numeral, or a character, press the corresponding
key.
The keys 0 – 9, the * key and the # key are assigned to the following
letters, numerals and characters:
Key1 x 2 x3 x4 x5 x6 x7 x8 x9 x10 x11 x12 x13 x
1Space1£$¥
2 A a B b C c 2 Ä ä Á á À à Â â Ã ã Ç ç Ææ å
3 D d E e F f 3 Ë ë É é È è Ê ê
4 G g H h I i 4 Ï ï Í í Ì ì Î î
5 J j K k L l 5
6 M m N n O o 6 Ö ö Ñ ñ Ó ó Ò ò Õ õ Ô ô Ø ø
7 P p Q q R r S s 7 ß
8 T t U uV v 8 Ü üÚ úÙ ùÛ ûÝ ý
9 W w X x Y y Z z 9
0Space. , ?! 0+- : " ' ; _
** /()<=>%{} [ ]
## @\&§~
1 x = press once, 2 x = press twice, and so on
FRITZ!Fon C4 60
Page 61

Writing Text
Setting Caps, Lower Case and Numerals
Press the menu key until the desired text entry mode is set.
The current text entry mode is displayed at the bottom right of the
display.
Text Entry Mode Function
Shift Capitalize next letter
ABC Capitals
abc Lower case
123 Numerals
Abc Standard mode
Navigating in Text
To move the cursor forward, press the right side of the control ring
. When you hold the key down, the cursor jumps one word
ahead.
To move the cursor backward, press the left side of the control ring
. When you hold the key down, the cursor jumps one word back.
To move a line upward, press the top of the control ring .
To move a line downward, press the bottom of the control ring .
Deleting Text
To delete text to the left of the cursor, press the display key
.
FRITZ!Fon C4 61
Page 62

Technical Specifications
15 Technical Specifications
• DECT wireless standard
• Range: up to 300 m indoors and up to 40 m outdoors
• Standby time up to up to 240 h
• Talking time up to up to 15 h
• Display: 240 x 320 pixels, 262 000 colors
• Keypad with function keys, control keys and number keys
• 2 charging contacts on the bottom
• On/off switch using the hang-up key
• Loudspeaker/microphone
• Dimensions (W x D x H): approx. 48 x 145 x 18 mm
• Weight: 106 g
• Supply voltage of the charging station: 230 V / 50 Hz
• 1 rechargeable battery pack, 750 mAh, 3.7 V, with deep dis-
charge protection
Charge time for loading in charging station: about 6 hours at
10°C – to 30°C
• Ambient conditions: Operating temperature: 0 °C – 3 °C, stor-
age temperature: -20 °C – 45 °C, relative humidity: 5% – 95%,
no condensation
• DECT Eco: with suitable DECT base station, DECT transmission
can be switched off on standby
• Conforms to CE standards
FRITZ!Fon C4 62
Page 63

Customer Service
16 Customer Service
16.1 Support from the Support Team
Our Service area can be reached in the Internet at:
avm.de/en/service
Click “Support” and open a support query. First you receive a selection of FAQs.
If you require additional help on a technical problem, click “Contact
Support”. Fill out the support form and send it to us. Our Support
team will respond by e-mail as quickly as possible.
If you cannot send us any support request by e-mail you can also
reach our Support desk by fax.
Customers from Germany 030 390 04 390
Customers from Austria 0043 1 267 56 02
Customers from Switzerland 0041 44 242 86 04
FRITZ!Fon C4 63
Page 64

Manufacturer’s Warranty
16.2 Manufacturer’s Warranty
We offer a manufacturer’s warranty of 2 years on the hardware of this
original product. Batteries constitute expendable material, which is
not covered by the warranty. The warranty period begins with the purchase date from the first end user. Compliance with the warranty period can be proven by submission of the original invoice or comparable documents. This warranty does not restrict your warranty rights
based on the contract of sale or other statutory rights.
Within the warranty period, we will remove defects to the product
which are demonstrably due to faults in materials or manufacturing.
Our warranty does not cover defects which occur due to incorrect installation, improper use, non-observance of instructions in the user
manual, normal wear and tear or defects in the environment of the
system (third-party hardware or software). We may, at our discretion,
repair or replace the defective product. Claims other than the right to
the removal of defects which is mentioned in these terms of warranty
are not constituted.
We guarantee that the software conforms with general specifications,
not, however, that the software meets your individual requirements.
Delivery costs will not be reimbursed. Products which have been replaced revert to our ownership. Claims recognized under warranty
entail neither an extension or recommencement of the warranty period. If we reject a warranty claim, this claim lapses no later than six
months after being rejected by us.
This warranty shall be governed by German substantive law, to the
exclusion of the United Nations Convention on Contracts for the International Sale of Goods (CISG).
FRITZ!Fon C4 64
Page 65

Legal Notice
This documentation and the software it describes are protected by copyright. AVM grants the nonexclusive right to use the software, which is supplied exclusively in object code format. The licensee
may create only one copy of the softwa re, which may be used exclusively for backup use.
AVM reserves all rights that are not expressly granted to the licensee. Without previous approval in
writing, and except for in cases permitted by law, it is particularly prohibited to
• copy, propagate or in any other manner make this documentation or this software publicly ac-
cessible, or
• process, disassemble, reverse engineer, translate, decompile or in any other manner open the
software and subsequently copy, propagate or make the software publicly accessible in any
other manner.
This documentation and software have been produced with all due care and checked for correctness
in accordance with the best available technology. AVM GmbH disclaims all liability and warranties,
whether express or implied, relating to the AVM product’s quality, performance or suitability for any
given purpose which deviates from the performance specifications contained in the product description. The licensee bears all risk in regard to hazards and impairments of quality which may arise in
connection with the use of this product.
AVM will not be liable for damages arising directly or indirectly from the use of the manual or the
software, nor for incidental or consequential damages, except in case of intent or gross negligence.
AVM expressly disclaims all liability for the loss of or damage to hardware or software or data as a
result of direct or indirect errors or destruction and for any costs (including connection charges) related to the documentation and the software and due to incorrect installations not performed by
AVM it self.
The information in this documentation and the software are subject to change without notice for the
purpose of technical improvement.
© AVM GmbH 2014—2016. All rights reserved. Documentation release 06/2016
AVM Audiovisuelles Marketing
und Computersysteme GmbH
Alt-Moabit 95
D 10559 Berlin
Germany
Unless otherwise indicated, all trademarks mentioned are legally protected trademarks owned by
AVM. This includes product names and logos in particular. Microsoft, Windows and the Windows logo are trademarks owned by Microsoft Corporation in the USA and/or other countries. Bluetooth is a
trademark of Bluetooth SIG Inc. licensed to AVM GmbH. All other products and company names are
trademarks of their respective owners.
AVM Computersysteme
Vertriebs GmbH
Alt-Moabit 95
D 10559 Berlin
Germany
AVM in the Internet:
avm.de/en
FRITZ!Fon C4 65
Page 66

Declaration of CE Conformity
Declaration of CE Conformity
AVM declares herewith that the device is compliant with the basic requirements and the relevant rules in directives 2014/53/EU,
2009/125/EC and 2011/65/EU.
The declaration of CE conformity is available at en.avm.de/ce
.
FRITZ!Fon C4 66
Page 67

Disposal Information
In accordance with European regulations, the FRITZ!Fon C4, as well as
all devices and electronic components contained in the package, may
not be disposed with household waste.
After use, please dispose of FRITZ!Fon C4 and all electronic components and devices included with delivery at a collection point in your
local community for the disposal of electric and electronic appliances.
The FRITZ!Fon C4 contains a rechargeable battery. This battery, too,
may not be disposed with household waste. Please bring the discharged batteries to a local or retail collection point.
Symbol for the separate collection of electric and electronic devices
FRITZ!Fon C4 67
Page 68

Index
A
active keylock . . . . . . . . . . . . . 18
alarm . . . . . . . . . . . . . . . . . . . . 38
alternating between calls . . . . 34
answering machine. . . . . . . . . 28
audio settings . . . . . . . . . . . . . 52
B
baby monitor . . . . . . . . . . . . . . 40
base station. . . . . . . . . . . . . . . 11
batteries
disposal . . . . . . . . . . . . . . 67
battery
inserting . . . . . . . . . . . . . . 10
C
call
accepting . . . . . . . . . . . . . 15
calling anonymously . . . . 33
pickup. . . . . . . . . . . . . 31, 31
placing . . . . . . . . . . . . . . . 15
call diversion . . . . . . . . . . . . . . 36
call list, dialing from . . . . . . . . 24
calling . . . . . . . . . . . . . . . . . . . 15
calls
accepting . . . . . . . . . . . . . 16
capital letters . . . . . . . . . . . . . . 8
CE conformity declaration. . . . 66
charging . . . . . . . . . . . . . . . . . .11
CLIR. . . . . . . . . . . . . . . . . . . . . . 33
condition upon delivery. . . . . .53
consultation . . . . . . . . . . . . . . .34
contacts, saving . . . . . . . . . . . .26
convenience functions. . . . . . .28
copyright. . . . . . . . . . . . . . . . . . 65
customer service . . . . . . . . . . . 63
D
declaration of CE conformity . . 66
DECT base station . . . . . . . . . .11
DECT Eco. . . . . . . . . . . . . . . . . . 55
deregistering from DECT base
station. . . . . . . . . . . . . . . . . . 13
dialing. . . . . . . . . . . . . . . . . . . . 15
from call list. . . . . . . . . . . .24
from telephone book . . . .23
display settings . . . . . . . . . . . .52
disposal . . . . . . . . . . . . . . . . . . 67
Do Not Disturb . . . . . . . . . . . . . 16
FRITZ!Fon C4 68
Page 69

E
e-mail
reading . . . . . . . . . . . . . . . 42
sending. . . . . . . . . . . . . . . 43
setting up account . . . . . . 41
entering letters . . . . . . . . . . . . 60
entering numerals. . . . . . . . . . 60
entering special characters . . 60
entering text . . . . . . . . . . . . . . 60
F
factory settings . . . . . . . . . . . . 53
favorites. . . . . . . . . . . . . . . . . . 50
firmware update . . . . . . . . . . . 57
function keys. . . . . . . . . . . . . . . 8
for telephone calls. . . . . . 15
K
keys
assignment . . . . . . . . . . . . 60
locking. . . . . . . . . . . . . . . . 17
overview . . . . . . . . . . . . . . . 8
L
legal notice. . . . . . . . . . . . . . . . 65
M
making calls . . . . . . . . . . . . . . .15
manufacturer’s warranty . . . . .64
media player . . . . . . . . . . . . . . 59
menu . . . . . . . . . . . . . . . . . . . . 14
microphone off. . . . . . . . . . . . . 17
muting . . . . . . . . . . . . . . . . . . . 17
H
hands-free calling . . . . . . . . . . 17
headphones . . . . . . . . . . . . . . 19
headset . . . . . . . . . . . . . . . . . . 19
I
icons on the display . . . . . . . . . 9
imprint. . . . . . . . . . . . . . . . . . . 65
internal calls . . . . . . . . . . . . . . 28
Internet radio . . . . . . . . . . . . . 46
Internet services
e-mail . . . . . . . . . . . . . . . . 41
podcasts. . . . . . . . . . . . . . 45
RSS feeds . . . . . . . . . . . . . 44
FRITZ!Fon C4 69
N
navigating. . . . . . . . . . . . . 14, 14
notice, legal . . . . . . . . . . . . . . . 65
numbers. . . . . . . . . . . . . . . . . .20
O
opening messages. . . . . . . . . . 48
operating . . . . . . . . . . . . . . . . .15
P
package contents. . . . . . . . . . . . 7
paging. . . . . . . . . . . . . . . . . . . .18
picking up call . . . . . . . . . . . . . 31
podcast. . . . . . . . . . . . . . . . . . . 45
Page 70

R
radio station
configuring . . . . . . . . . . . . 47
listening to . . . . . . . . . . . . 47
recycling. . . . . . . . . . . . . . . . . . 67
redialing . . . . . . . . . . . . . . . . . 24
registering with
DECT base station . . . . . . . . 11
reset. . . . . . . . . . . . . . . . . . . . . 53
ring tones. . . . . . . . . . . . . . . . . 52
RSS feeds. . . . . . . . . . . . . . . . . 44
S
screen saver . . . . . . . . . . . . . . 52
searching. . . . . . . . . . . . . . . . . 18
in telephone book . . . . . . 25
settings
audio . . . . . . . . . . . . . . . . 52
signal tones. . . . . . . . . . . . . . . 52
speaker phone . . . . . . . . . . . . 17
special characters. . . . . . . . . . . 8
start screen . . . . . . . . . . . . . . . 49
support . . . . . . . . . . . . . . . . . . 63
switching off ringing . . . . . . . . 16
switching smart home devices 58
switching wireless LAN
on and off. . . . . . . . . . . . . . . 58
switching outlet on and off. . . 58
T
telephone book
finding entry . . . . . . . . . . . 25
new entry. . . . . . . . . . . . . . 26
selecting a
telephone number. . . . . 23
setting up . . . . . . . . . . . . .22
telephone number
dialing . . . . . . . . . . . . . . . . 15
suppressing . . . . . . . . . . . 33
telephone numbers . . . . . . . . .20
three-party conference call . . . 35
V
volume . . . . . . . . . . . . . . . 16, 52
W
warranty . . . . . . . . . . . . . . . . . . 64
web radio . . . . . . . . . . . . . . . . .46
web services
Internet radio . . . . . . . . . .46
FRITZ!Fon C4 70
 Loading...