


ENGLISH
FAGOR SPLENDID PRESSURE COOKER
USER’S MANUAL
1

ENGLISH
CONTENTS
Important Safeguards . . . . . . . . . . . . . . . . . . . . . . . . . . . . . . . . . . . . . . . . . . . . . . . . . . . . . . 3 Introduction. . . . . . . . . . . . . . . . . . . . . . . . . . . . . . . . . . . . . . . . . . . . . . . . . . . . . . . . . . . . . . . 5 Fagor SPLENDID Pressure Cooker line . . . . . . . . . . . . . . . . . . . . . . . . . . . . . . . . . . . . . . . . 5 Components and Features . . . . . . . . . . . . . . . . . . . . . . . . . . . . . . . . . . . . . . . . . . . . . . . . . . 6 Cooking with the Fagor SPLENDID Pressure Cooker . . . . . . . . . . . . . . . . . . . . . . . . . . . . 8
•Before first use
•Adding Food and Liquid
•Closing the lid & cooking
•Releasing Pressure After Cooking
Care and Cleaning . . . . . . . . . . . . . . . . . . . . . . . . . . . . . . . . . . . . . . . . . . . . . . . . . . . . . . . . 11
• Cleaning the operating valve
Basic instructions for cooking . . . . . . . . . . . . . . . . . . . . . . . . . . . . . . . . . . . . . . . . . . . . . . 13
•Fresh and frozen vegetables
•Fresh and dried fruits
•Dried beans and other legumes
•Grains
•Meat
•Seafood and fish
Adapting Traditional Recipes to use in the pressure cooker . . . . . . . . . . . . . . . . . . . . . 17 Troubleshooting . . . . . . . . . . . . . . . . . . . . . . . . . . . . . . . . . . . . . . . . . . . . . . . . . . . . . . . . . . 18 Home Canning With your Pressure Cooker . . . . . . . . . . . . . . . . . . . . . . . . . . . . . . . . . . . 21
• Home Canning Safeguard
Home Canning Recipes . . . . . . . . . . . . . . . . . . . . . . . . . . . . . . . . . . . . . . . . . . . . . . . . . . . . 25
Español . . . . . . . . . . . . . . . . . . . . . . . . . . . . . . . . . . . . . . . . . . . . . . . . . . . . . . . . . . . . . . . . . 27
Français . . . . . . . . . . . . . . . . . . . . . . . . . . . . . . . . . . . . . . . . . . . . . . . . . . . . . . . . . . . . . . . . 55
Limited Warranty . . . . . . . . . . . . . . . . . . . . . . . . . . . . . . . . . . . . . . . . . . . . . . . . . . . . . . . . . 77
2

This is a U.L.-listed appliance. The following safeguards are recommended by most portable appliance manufacturers.
IMPORTANT SAFEGUARDS
When using pressure cookers, basic safety precautions should always be followed:
1.Read all instructions.
2.Do not touch hot surfaces. Use handles or knobs.
3.Close supervision is necessary when the pressure cooker is used near children.
4.Do not place the pressure cooker in a heated oven.
5.Extreme caution must be used when moving a pressure cooker containing hot liquids.
6.Do not use pressure cooker for other than intended use.
7.This appliance cooks under pressure. Improper use may result in scalding injury. Make certain unit is properly closed before operating. See the "Closing the Lid and Cooking" section in this manual.
8.Do not fill the unit over two thirds full. When cooking foods that expand during cooking such as rice or dried vegetables, do not fill the unit over one half full. Over filling may cause a risk of clogging the vent pipe and developing excess pressure. See the "Basic instructions for cooking" section in this manual.
9.Be aware that certain foods, such as applesauce, cranberries, pearl barley, oatmeal or other cereals, split peas, noodles, macaroni, rhubarb, or spaghetti can foam, froth, and sputter, and clog the pressures release device (steam vent). These foods should not be cooked in a pressure cooker.
10.Always check the pressure release devices for clogging before use.
11.Do not open the pressure cooker until the unit has cooled and all internal pressure has been released. If the handles are difficult to push apart, this indicates that the cooker is still pressurized - do not force it open. Remove the pressure regulator an run cold water over the cooker to cool it to reduce the internal pressure. Any pressure in the cooker can be hazardous. See the "Releasing Pressure After Cooking" section in this manual.
12.Do not use this pressure cooker for pressure frying with oil.
13.When the normal operating pressure is reached, turn the heat down so all the liquid, which creates the steam, does not evaporate.
ENGLISH
14. SAVE THESE INSTRUCTIONS. |
3 |

ENGLISH
Manufacturer’s Recommendations
To fully enjoy your new Fagor pressure cooker, please read carefully these recommendations before you start using your pressure cooker, and follow them accordingly:
1.Please make sure children do not have access to or reach the pressure cooker while cooking.
2.Never use the pressure cooker with a worn or torn gasket. Inspect the gasket before every use to make sure it is pliable and does not have any cracks or tears. If you need to replace it, see the Care and Cleaning section of this manual for instructions.
3.To reduce the risk of burns or spills, the lid and pot handle should be positioned so that it is turned inward towards the back of the stove, and does not extend over adjacent surface units or overhang over the edge of the stove top.
4.While cooking with the Fagor pressure cooker, please make sure the safety vent points towards the back of the stove and away from you. This will reduce the risk of burns in the event the safety vent is triggered to release excess pressure.
5.It is very important that the pressure cooker is not filled over two thirds of its capacity with food and liquid. If you’re cooking grains or foods that expand during cooking, do not fill the cooker more than half full. Too much steam might be produced if the unit is too full with food and liquid.
6.Before cooking make sure that the gasket is in good condition and in place, and that the operating valve is free of food particles that could clog it up. See the instructions found in this manual for more detailed instructions.
7.Make sure the pressure cooker has been properly closed before cooking. The handles should be aligned and the lid should glide easily back and forth. If the lid is not closed and locked securely in place, the pressure cooker will not build pressure.
8.After releasing the pressure from the pressure cooker, open the lid towards the back of your stove since there may be some steam still inside the cooker.
9.Caution: do not use the pressure cooker on an outdoor LP gas burner or commercial ranges. This pressure cooker is for household use ONLY.
10.Pressure cookers are not to be used for medical purposes, such as sterilizers, as pressure cookers are not designed to reach the temperatures necessary for complete sterilization.
11.Do not allow anyone who is not familiar with the instructions to use the cooker.
4

Introduction
Thank you for purchasing a Fagor Pressure Cooker. We appreciate the confidence you have placed in our company by selecting one of our many pressure cookers. We are confident that the pressure cooker will give you many years of excellent service.
Surrounded by endless myths, pressure cookers are probably the least understood of cookware. This is unfortunate since pressure cookers provide many advantages over traditional cooking. First and foremost, most foods can be cooked in a fraction of the time, in most cases up to one third of the time. Since the food is being cooked for such a shorter period, it is less likely to lose its color and flavor, as well as vital minerals and vitamins that are normally evaporated or diluted when cooking in large quantities of water, for longer periods of time. Made from high-quality, heavy-gauge stainless steel, Fagor pressure cookers are manufactured and designed with a concern for function and safety, meeting all international safety standards. Fagor’s easy-to-use pressure regulators make it simpler than ever to determine the proper amount of pressure and how to maintain it. The pressure release valves signal when to lower or raise the burner heat in order to maintain the desired level of pressure. We know that once you begin using your Fagor Pressure Cooker, you’ll understand why it is the single most important piece of cookware you’ll ever own.
Today people are more conscious of the food and products they consume that affect the environment. Fagor recognizes consumer demand for more eco-friendly products and manufacturing processes. Fagor pressure cookers are made of partially recycled stainless steel and are polished using only mechanical procedures instead of chemical. In addition to being manufactured in a more environmentally respectful way, pressure cookers save you energy in the kitchen too. Compared to traditional cooking methods, cooking with a pressure cooker saves up to 70% cooking time. And less time spent cooking means less energy used, and less heat produced in the kitchen. Also, cooking at high temperatures and high speed retains essential vitamins and nutrients, bringing you healthier meals. Using Fagor pressure cookers will not only make a difference in your health, but a difference in our world. This may be the most efficient piece of cookware in your kitchen.
Before you begin cooking, it is important that you read this detailed user’s manual and make sure you understand how to operate, care and maintain your Fagor Pressure Cooker so that you will be able to enjoy many years of use.
If you would like to learn more about our other products, please visit our website at www. fagoramerica.com
Fagor SPLENDID Pressure Cooker line
The Fagor SPLENDID Pressure Cooker line consists of the following models:
•4 qt. pressure cooker (item # 918060616) includes:
-Instruction manual
-Color recipe book
•6 qt. pressure cooker (item # 918060607) includes:
-Instruction manual
-Color recipe book
•5-piece SPLENDID 2-in-1 Pressure Cooker set (item # 918060714) includes:
-6 qt. and 4 qt. nesting pots
-Pressure Cooker Lid - fits both pots
-Tempered glass lid - fits both pots, easily converts either pot into an everyday stock pot
-Stainless steel steamer basket with trivet
-Instruction manual
-Color recipe book
•10 qt. pressure cooker / canner (item # 918060812) includes:
-Instruction manual
-Color recipe book
•5-piece SPLENDID 2x1 Multipressure Cooker Set (item # 918060803) includes:
-8 qt. pot
-4 qt. pot
-Pressure Cooker Lid - fits both pots
-Tempered glass lid - fits both pots, easily converts either pot into an everyday stock pot
-Stainless steel pasta / steamer basket with trivet
-Instruction manual
-Color recipe book
ENGLISH
5

ENGLISH
Components and Features
1.Pressure Cooker Pot: Made of high-quality, heavy-gauge, 18/10 stainless steel. All cooking takes place in the pressure cooker pot.
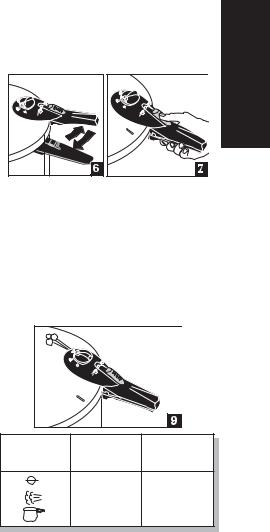
2.Lid: Made of high-quality, heavygauge stainless steel. The lid must be properly locked in position in order to build sufficient pressure for cooking. The raised indentation on top of the lid, located to the left of the handle, allows you to easily align the lid to the
cutout on top of the base handle when closing the pressure cooker (Fig. 6)
WARNING: NEVER FORCE THE PRESSURE COOKER OPEN
6.Operating Valve: This operating valve features a pressure setting (the picture of a pot), a steam release position (with a picture of steam), and an unlock position (picture of a circle with a line through it) (Figures 8-9-10). Note that the operating valve will not simply turn to the unlock position. See the Care and Cleaning section of this manual for instructions on how to turn the valve to the unlock position to remove it.
3.Pot Handle: Besides being used to move and carry the pressure cooker,
the pot handle interlocks with the lid handle when the lid is turned clockwise. (Fig. 6)
4.Lid Handle: Used to remove the lid from the pressure cooker, the lid handle contains important components vital to the use of the pressure cooker.
To reduce the risk of burns or spills, the lid and pot handle should be positioned so that it is turned inward towards the back of the stove, and does not extend over adjacent surface units or overhang over the edge of the stove top.
5.Support Grip Handle: The support grip handle provides greater stability when moving or carrying the pressure cooker.
6
Selector’s |
Pounds of |
|
|
Pressure per |
Pressure level |
||
Position |
|||
Square Inch (psi) |
|
||
|
|
||
|
0 |
Unlock Position |
|
|
0 |
Steam Release Position |
15 High

7.Pressure Lock: The purple pressure lock allows you to lock the pressure cooker in order to build pressure when the lid is closed. To lock the pressure cooker, slide the pressure lock button up towards the lid. (Fig. 7).
To unlock, slide the lock down towards the end of the handle.
For safety reasons, the unit will not build pressure if the pressure lock has not been pushed to the closed position. This measure guarantees that the cooker will never open while it’s under pressure.
8.Silicone Gasket: In order to provide an air-tight seal, a silicone gasket is positioned around the underside of the lid. Never use the pressure cooker without the silicone gasket properly positioned. Do not use the pressure cooker with a worn or torn gasket, which should be replaced immediately. Contact the Fagor Customer Service Department at: 1-800-207-0806 or email at: info@fagoramerica.com. You can also purchase a gasket online at www.fagoramerica.com.
9.Safety valve: Located under the lid, the safety valve is activated in case of an excess pressure buildup (Fig. 3). The pressure cooker cannot be opened if there is still pressure inside the cooker.
is rapid cooking, the bottom of the pressure cooker pot has a thermo heat conductive base, comprised of three layers of metal. The first layer is stainless steel, which is safe for contact with food. In view of the fact that aluminum should not be in contact with food and it does not have magnetic properties, the aluminum middle layer is sandwiched between the two outer layers. Aluminum is the best heat conductor and therefore provides faster and more even heat distribution. The last layer is stainless steel with magnetic properties, making the pressure cooker compatible with induction cooking.
11.Pressure Indicator: The pressure indicator is the yellow tipped rod, located on top of the lid handle. It indicates whether there is pressure inside the cooker. As the pressure cooker heats and pressure builds, the pressure indicator will rise automatically producing a slight amount of steam that escapes from the lid handle. (Fig. 12) If the pressure indicator is raised, there is pressure inside the cooker and the pressure cooker cannot be opened. The pressure lock on the lid will be blocked and will not slide to the open position. If the pressure indicator is not raised, there is no pressure inside the cooker, and you can safely open the lid.
ENGLISH
10.Thermo Heat Conductive Base:
Since the objective of a pressure cooker
12.Safety Vent: In case of high-pressure buildup, steam will be released through the safety vent cutout located in the rim of the lid (Fig. 4). The cutout in the handle of the pressure cooker is an emergency
7

ENGLISH
pressure release mechanism that should never become operative under normal use. If both pressure release valves become blocked due to over filling, for example, the pressure will tear the gasket and escape through this hole.
WARNING: Excess steam escaping through the hole will be very hot and might cause serious injuries. In the event the safety vent is triggered to releaseexcesspressure,alwaysplace the pressure cooker on the stove in such a position that the Safety Vent is not facing towards you or towards anything that could get damaged by the steam and sputtering liquid.
Cooking with the Fagor SPLENDID Pressure Cooker
NOTE: FAGOR PRESSURE COOKERS ARE INTENDED FOR HOUSEHOLD DOMESTIC COOKING SURFACES ONLY.
Before the First Use
To open the pressure cooker, pull the pressure lock towards the end of the handle (Fig. 5) and slide the lid handle to the right (counterclockwise) holding the base handle with your left hand, and lifting the lid.
Before using the Fagor SPLENDID Pressure Cooker for the first time, wash all the parts and components with warm water and mild dishwashing soap. Rinse well and towel dry. The pressure cooker
pot is dishwasher safe. Fagor America recommends hand washing the pressure cooker lid and all its components.
Always remove the gasket when washing the lid. Wash the gasket with warm, soapy water; rinse well and towel dry. Cover the gasket with a thin coat of cooking oil (e.g., vegetable, olive, canola, etc.). Follow this procedure every time you wash the pressure cooker in order to extend the life of the gasket and to facilitate locking the lid in place.
Adding Food and Liquid
1.To cook with the Fagor SPLENDID pressure cooker, it is very important to use at least 1/2 a cup of liquid if you’re cooking for 10 minutes or less, or 2 cups of water if you’re cooking for more than 10 minutes; NEVER USE LESS.
It is important to always use some
cooking liquid in a pressure cooker since it is the liquid that creates the steam necessary to build the pressure. Without liquid the pressure cooker cannot build any pressure. You can use water, broth, wine or any other kind of liquid to cook, except oil. You can use oil to brown meat or soften onions directly in your pressure cooker before adding the rest of the ingredients, but the oil should never be the ONLY cooking liquid.
WARNING: Pressure cookers are NOT pressure fryers.
WARNING: Do not fill the pressure cooker more than two thirds full with liquid and food, or half full if
8
you’re cooking foods that expand during cooking (for example rice or other grains).
2.Never fill the pressure cooker more than two thirds full. It is necessary to leave enough space in the cooker for it to be able to build pressure. Fill only halfway when cooking with foods that will either expand in size and/or produce foam as they cook, such as dried beans or other legumes and grains. Also fill only halfway when preparing soups or stock.
3.You can add food and liquid directly into the pressure cooker, or, optionally, you can steam your food in a steamer basket (steamer baskets sold separately). To use a steamer basket, place a metal support trivet on the bottom of the pressure cooker, add at least half a cup of liquid, and place the steamer basket containing the food on top.
Closing the Lid and Cooking
1.When you’re ready to start cooking, place the lid on the pressure cooker pot by aligning the mark on the lid with the mark on the top of the pot handle (Fig. 6). Once these two marks are aligned, press the lid down lightly, then slide the lid handle to the left (clockwise), bringing the pot and lid handles together. Push the pressure lock button up towards the center of the lid to lock it (Fig. 7). If you don’t push the lock to the closed position, the cooker will not build any pressure. This is a safety measure designed to prevent accidental opening of the cooker while under pressure. The lock will block automatically as soon as the pressure indicator has risen, and will unblock only when the pressure indicator has dropped again.
ENGLISH
2.Once the pressure cooker is locked, turn the operating valve to the pressure setting (Fig. 9 the picture of the pot). This is the only setting you can cook on; if you cook with the operating valve turned to the picture of the steam, the pressure cooker will not build pressure. The level of pressure reached is a high pressure, equivalent to 15 psi (15 pounds of pressure per square inch).
Selector’s |
Pounds of |
|
|
Pressure per |
Pressure level |
||
Position |
Square Inch |
||
|
|||
|
(psi) |
|
|
|
0 |
Unlock Position |
|
|
0 |
Steam Release Position |
|
|
15 |
High |
3. Position the pressure cooker on the center of the stove burner. The Fagor SPLENDID Pressure Cooker can be used on all types of burners including gas, electric, ceramic and induction. As to not discolor the sides of the pot, always adjust the burner so that when using gas, the flames remain under the base and do not extend up the sides. When cooking on an electric burner, select a burner the same diameter as the base or smaller.
4. Begin heating with the burner set on high heat (ELECTRIC STOVE
9

ENGLISH
USERS –SEE BELOW). When the pressure indicator has risen and steam starts to come out of the operating valve for first time, lower the heat to maintain a gentle, steady stream of steam. At this moment, the COOKING TIME STARTS and you have to start timing you recipe. It is recommended that a kitchen timer be used to monitor the exact cooking time.
5.If at any time during cooking an excessive amount of steam is released by the operating valve, lower the burner heat to adjust and maintain the proper level of pressure. The steam should come out in a gentle, steady flow. If the steam is gushing or very forceful, lower the heat.
6.If the pressure drops or there is no steam coming out of the operating valve, raise the burner heat just until a gentle, steady stream of steam is released and can be maintained.
7.While cooking, never inadvertently shake the pressure cooker. This can cause the automatic valve to release steam, which will create a drop in pressure.
NOTE TO ELECTRIC STOVE USERS
Since the coils on an electric stove retain heat for a long time, food often becomes overcooked when the burner is turned down for simmering (when cooking time is started). To compensate for that, you have two options:
1.Two Burner Method: Turn on two electric stove burners, one on high and other on low. Place your pressure cooker on the burner set to high, and bring to pressure. Once pressure has been achieved, move your cooker over to the burner set on low and start your pressure cooking time. Make sure the burner is not too low; there should always be some steam coming out of the operating valve. If
there is no more steam coming out of the operating valve and/or the pressure indicator drops, raise the heat until steam starts coming out of the operating valve, and adjust the cooking time by 1 or 2 minutes.
2.One Burner Method: Turn on one burner to medium heat and bring your cooker to pressure. Once pressure has been achieved and steam starts to come out of the operating valve, turn your burner to low and start your pressure cooking time. Make sure you don’t lower your heat too much; there should always be some steam coming out of the operating valve. If there is no more steam coming out of the operating valve and/or the pressure indicator drops, raise the heat until steam starts coming out of the operating valve, and adjust the cooking time by 1 or 2 minutes.
Releasing Pressure After Cooking
Always check your recipe to determine if the pressure cooker should be cooled down naturally or whether the quick release method should be used. The Fagor SPLENDID pressure cooker also features an automatic release position on the automatic valve that can be used for releasing pressure automatically when cooking foods such as stews, meats, poultry, soups. Do not use for vegetables or tender foods as this will result in overcooking.
1.Natural Release Method: To use this method, remove the pressure cooker from the hot burner and let the pressure drop and cool down naturally. Depending on the amount of food and liquid in the cooker, this method can take from 10 to 15 minutes. Once the pressure has been released completely and the pressure indicator has dropped, go to step # 4 in this section.
10
2. Cold Water Release Method: this method is used to release pressure as quickly as possible, and is primarily used for vegetables, seafood and other tender foods that can quickly overcook. To use this method, remove the pressure cooker from the burner, place in the sink and run cold tap water gently over the lid until steam dissipates and the pressure indicator is lowered (Fig 11). When putting the cooker in the sink, tilt it so the cold water will run down the sides of the cooker. Once the pressure has been released completely and the pressure indicator has dropped, go to step # 4 in this section. NEVER IMMERSE THE PRESSURE COOKER IN WATER.
3.Automatic Release Method: When using the automatic release method, turn the dial on the operating valve to the steam release position (steam drawing position, fig. 8), and the steam will be released automatically. Once the steam has totally been released and the pressure indicator has dropped, go to #4 in this section (below).
4.After all the pressure has been released and the yellow pressure indicator has dropped, slide the pressure cooker lock down towards the end of the handle (fig. 5). Hold the pot handle with your left hand and slide the lid handle to the right with your right hand. Even though you have already
released the pressure, never open |
ENGLISH |
|||
|
||||
the pressure cooker towards your |
|
|||
face since there may be intense |
|
|||
cooking steam still inside the unit. |
|
|||
To avoid the risk of scalding, let the |
|
|||
droplets of condensed water drip |
|
|||
|
||||
back from the lid into the cooker. |
|
|||
|
|
|
|
|
|
|
|
|
|
|
|
|
|
|
5.Opening during cooking. If you should need to open the pressure cooker during the cooking process, it must be depressurized first as described in this section. We recommend using the automatic release method for this purpose, as this method will cool down your pressure cooker the least, hence aiding to build pressure again faster to continue cooking. The lid will be hot, so be careful when
opening and closing it; to reduce the risk of burns, only touch the handles. Remember that you are interrupting the cooking process by opening the cooker; when you continue cooking, you must adjust the remaining cooking time and set the timer accordingly.
6.Never force the cooker open. It may only be opened if the pressure indicator has dropped into its socket completely and no more steam escapes when the safety lock is moved to the open position.
Care and Cleaning
1.The Fagor SPLENDID Pressure Cooker is made of high-quality, heavy
gauge, 18/10 stainless steel. |
11 |

ENGLISH
2.The pressure cooker pot is dishwasher safe, but the lid should be washed by hand with warm water, mild, dishwashing soap and a nonabrasive cleaning pad. Since the exterior of the pressure cooker has a mirror finish, if you wash it by hand do not use metal scouring pads or abrasive cleaners, which will scratch and possibly ruin the finish.
3.To remove stubborn stains and any
discoloration in the interior of the pressure cooker, try adding the juice of half a lemon and 1 to 2 cups of water to the pressure cooker pot. Cook at high pressure for 15 minutes, then remove from heat. Let pressure release naturally, then wash as usual.
4.After cleaning, towel dry with a clean, soft kitchen cloth to retain the polished mirror finish.
5.In order to extend the life of the silicone gasket, remove after every use and wash with warm water and mild, dish washing soap. Rinse and dry well, then cover with a thin coat of vegetable oil before replacing. For increased safety and best results, the silicone gasket should be replaced approximately every 12-15 months, depending on the usage. You can order a new gasket by calling Fagor Customer Service Number at: 1-800-207-0806, or by going to the online shop section of our website: www.fagoramerica.com.
6.To store, DO NOT LOCK THE LID IN PLACE. Simply place the lid upside down on top of the pressure cooker pot. This will avoid the risk of a vacuum forming inside the cooker during storage, which would make the opening of the lid difficult. It will also prevent stale odors from forming inside the cooker.
7.Before using the Fagor SPLENDID pressure cooker, always check the
handles, the base handle, support grip, and the lid handle to make sure that they are securely screwed in place. If not, tighten the handle screws with a screwdriver.
8.Replacement Parts: Only use
authentic |
replacement |
parts |
|
manufactured and |
distributed |
||
by Fagor |
America, |
Inc. The use |
|
of any unauthorized parts and or attachments may cause unit failure and will void any warranty protection provided by the manufacturer. You can order spare parts by calling Fagor Customer Service Number at: 1-800-207-0806, or by going to the online shop section of our website: www.fagoramerica.com.
Cleaning the Operating Valve
After every use, check to make sure that the operating valve is clear of any built-up particles. To do so, move the operating valve to the position shown in Fig. 8 and remove the valve (see detailed instructions below). Clean it by running water through it. Next, lift the lid up to the light and look through the hole under the operating valve. Make sure you can see through it and there are no food particles blocking it. If necessary, clean it with a small brush or pipe cleaner.
TO REMOVE THE OPERATING VALVE FOR CLEANING PURPOSES:
1.Turn the operating valve to the release pressure position (picture of the steam, see Fig. 8).
2.Gently lift the operating valve upward,
12
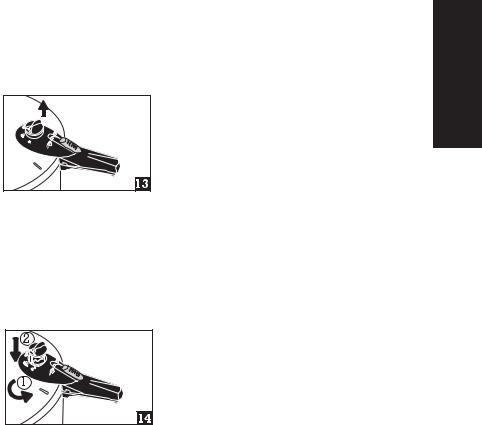
not more than a quarter of an inch (Fig. 13).
3.As you are pulling the valve up,
keep trying to turn it to the left, counterclockwise, toward the picture of the circle with the line through it. You are looking for a groove, once you find this groove the valve will allow you to turn to the unlock position (picture of the circle with the line through it, see Fig. 14).
4.Lift the valve upwards and out. Clean as instructed above.
TO REPLACE THE VALVE AFTER CLEANING
Point the vent in the valve to the unlock position. Place the valve in its socket and turn it to the right towards the steam release position. You will hear it click back into place as you turn it to the steam release position.
Basic instructions for cooking
In this section you will find basic instructions for cooking foods which are most commonly prepared in pressure cookers.
Do not chop or cut food inside the cooker with a knife or other sharp utensil to avoid scratching the bottom.
For soups and stocks, do not fill pressure cooker over 1/2 full!
Remember to ALWAYS use some cooking liquid. Operating the cooker without any cooking liquid or allowing the cooker to boil dry will damage the cooker and will not allow it to build pressure for proper functioning.
Fresh and frozen vegetables
•Wash all fresh vegetables thoroughly.
•Peel all root vegetables, such as red beets, carrots, potatoes and turnips.
•Whole winter pumpkin should be pierced several times with a fork before cooking.
•When you steam vegetables in a steamer basket (steamer baskets sold separately) you should use at least half a cup of water.
•If the approximate cooking time is more than 10 minutes you should use two cups of water.
•Never fill the pressure cooker to more than two thirds of its capacity.
•When you cook frozen vegetables you must extend the total cooking time by between 1 and 2 minutes.
•If possible, use the cold water release method when the cooking time is completed. This is the fastest way to release the steam and will avoid overcooking tender vegetables. You can also use the automatic release method.
ENGLISH
13

ENGLISH
VEGETABLES |
|
APPROXIMATE |
|
|
COOKING TIME |
Artichoke, large, without leaves |
9-11 minutes |
|
Artichoke, medium, without leaves |
|
6-8 minutes |
Asparagus, fine, whole |
1–1½ minutes |
|
Asparagus, thick, whole |
|
1-2 minutes |
Beans, in the pod |
|
4 minutes |
Beans, white, in the pod |
|
8 minutes |
Broccoli |
|
2-3 minutes |
Brussels sprouts, whole |
|
4 minutes |
Cabbage, red or green, ¼-inch slices |
1 minute |
|
Cabbage, red or green, in quarters |
|
3-4 minutes |
Carrots, ¼-inch slices |
|
1 minute |
Carrots, 1-inch slices |
|
4 minutes |
Cauliflower, flower heads |
|
2-3 minutes |
Common cabbage, thickly cut |
|
1-2 minutes |
Corn, on the cob |
|
3 minutes |
Endive, thickly cut |
|
1-2 minutes |
Green beans, whole |
|
2-3 minutes |
Green curly kale, thickly cut |
|
5 minutes |
Okra, small pods |
|
2-3 minutes |
Onions, whole, 1½-inch diameter |
|
2 minutes |
Peas, in the pod |
|
1 minute |
Potatoes, red, 1½-inch slices |
|
6 minutes |
Potatoes, red, new, small, whole |
|
5 minutes |
Potatoes, white, 1½-inch slices |
|
6 minutes |
Potatoes, white, new, small, whole |
|
5 minutes |
Pumpkin, 2-inch slices |
|
3-4 minutes |
Red beet, in ¼-inch slices |
|
4 minutes |
Red beet, large, whole |
|
20 minutes |
Red beet, small, whole |
|
12 minutes |
Spinach, fresh, thickly cut |
|
2 minutes |
Spinach, frozen |
|
4 minutes |
Swede (yellow turnip), 1-inch slices |
|
7 minutes |
Sweet potato, 1½-inch slices |
|
5 minutes |
Swiss chard, thickly cut |
|
2 minutes |
Tomatoes, in quarters |
|
2 minutes |
Turnip, in 1½-inch slices |
|
3 minutes |
Turnip, small, in quarters |
|
3 minutes |
Zucchini, Acorn, half |
|
7 minutes |
Zucchini, Summer, 1-inch slices |
|
8 minutes |
Fresh and dried fruit
Fresh fruit:
•Wash and pit or core fruit. If you prefer, peel and slice it.
•Cook fruit in a steamer or pasta basket when possible (steamer baskets sold separately) and add at least half a cup of water or fruit juice.
•Never fill the pressure cooker to more than two thirds of its capacity.
•If you prefer, add sugar and/or seasoning to the fruit before or after cooking.
•When you cook whole or halved fruit, use the cold water or automatic release method. When you cook fruit in slices or pieces to make purée or conserve use the natural release method.
•Cooking times can vary depending on the ripeness of the fruit.
Dried fruit:
•Put dried fruit in the pressure cooker with 1 cup of water or fruit juice for each cup of dried fruit.
•If you prefer, you can add seasoning or other flavoring. Use the cold water or automatic release method when the cooking period is complete. If after the cooking period the fruit is still hard, let it simmer in the cooker with the lid removed until it is ready. Add water if necessary.
FRUIT |
APPROXIMATE |
|
COOKING TIME |
Apples, dried |
3 minutes |
Apples, fresh in slices or pieces |
2-3 minutes |
Apricots, dried |
4 minutes |
Apricots, fresh, whole or in halves |
2-3 minutes |
Blueberries |
8-10 minutes |
Peaches, dried |
4-5 minutes |
Peaches, fresh, in halves |
3 minutes |
Pears, dried |
4-5 minutes |
Pears, fresh in halves |
3-4 minutes |
Prunes |
4-5 minutes |
Raisins |
4-5 minutes |
Dried beans and other legumes
•WARNING: Never fill the pressure cooker to more than half its
14

capacity with beans and legumes, as these foods tend to expand and froth during cooking.
•Clean out any foreign particles. Rinse them with warm water.
•Soak beans in four times their volume of warm water for at least four hours before cooking, or if you prefer, leave them to soak overnight. Do not add salt to the water as this hardens the beans and prevents absorption of water.
•Do not soak dried split lentils.
•After soaking, remove floating beans and shell.
•Strain the water off the beans.
•Rinse in warm water (this also applies to dried split lentils).
•Put the beans or legumes in the pressure cooker. Add three cups of water for each cup of beans or legumes. Do not add salt; beans and legumes should be seasoned after cooking.
•Add a tablespoon of vegetable oil for each cup of water to eliminate the foam they produce.
•To add more flavor, cook beans or lentils with some bay leaves and a small peeled onion embedded with two cloves of spice.
•After the cooking time is up, use the natural release method to allow the pressure to decrease naturally.
•Cooking times may vary depending on the quality of the beans or other legumes. If after the recommended cooking time the beans are still hard, continue cooking them with the lid off. If necessary, add water.
•A cup of beans or other legumes yields approximately two cups when cooked.
BEANS AND LEGUMES |
APPROXIMATE |
|
COOKING TIME |
Azuki beans |
4-5 minutes |
Beans, white |
5-7 minutes |
Beans, scarlet, red |
10-12 minutes |
Beans, black |
8-10 minutes |
Beans, colored |
4-6 minutes |
Pigeon peas |
7-9 minutes |
Chick peas |
10-12 minutes |
Lentils, red |
7-9 minutes |
Lentil soup |
8-10 minutes |
Lentils, green |
8-10 minutes |
Grains
•WARNING: Never fill the pressure cooker to more than half its capacity with grains, as these foods tend to expand and froth during cooking.
•Clean out any foreign particles. Rinse them with warm water. Soak grains, in four times their volume of warm water for at least four hours before cooking them, or if you prefer, leave them to soak overnight. Do not add salt for this will harden grains and prevent them from absorbing water.
•Do not leave rice to soak.
•After soaking remove floating grains or shells.
•Drain the water off the grains.
•Rinse grains in warm water (this also applies to rice.)
•Cook each cup of grain in the quantity of water indicated in the recipe or on the package.
•If you prefer, add salt to taste.
•After the cooking time is up, use the natural release method to allow the pressure to decrease naturally.
•Cooking times may vary depending on the quality of the grains. If after the recommended cooking time the grains are still hard, continue cooking them with the lid off. If necessary, add water.
•A cup of grains expands to approximately two cupfuls when cooked.
GRAINS |
APPROXIMATE |
COOKING |
(1 cup) |
WATER QUANTITY |
TIME |
Rice, basmati |
1 ½ cups |
5-7 minutes |
Rice, brown |
1 ½ cups |
15-20 minutes |
Rice, long grain |
1 ½ cups |
5-7 minutes |
Rice, wild |
3 cups |
22-25 minutes |
ENGLISH
15

ENGLISH
Meat and Poultry
•Remove all the visible fat from the meat or poultry. If you are preparing a complete cut of meat or poultry, such as a roast, cut it in such a way that it fits in the cooker without touching the sides.
•Meat and poultry cut up into small
pieces cooks faster.
• To achieve best results, brown the meat or poultry with 2 to 3 tablespoons of vegetable or olive oil in the pressure cooker with the lid off and before adding the other ingredients. Do not overload the pressure cooker (never more than two thirds full). Brown the meat in batches, if necessary. Drain the excess fat and begin cooking as indicated in the recipe.
•Always cook meat and poultry with at least 1/2 a cup of liquid. If the cooking time exceeds 15 minutes, use two cups of liquid. Meats with preservatives or salted meats should be covered by the water.
•Never fill the pressure cooker more than 2/3 full.
•When you prepare a concentrated stock or soup, put all the ingredients in the pressure cooker and add water to half its capacity.
•Exact cooking times vary depending on the quality and quantity of the meat which is cooked. Unless the recipe indicates otherwise, the cooking times given are for 3 lbs of meat or poultry. Also, the larger the cut of meat, the longer the cooking time will be.
•After the cooking time is up, use the natural release method to allow the pressure to decrease naturally.
•When you cook beef or poultry with vegetables, begin by cooking the meat in stock or another liquid. Subtract from the cooking time recommended for the meat
the cooking time of the vegetable ingredient which takes longest to cook. Pressure cook the meat for this time. Release the pressure from the cooker using the automatic release method. Open the cooker and add the vegetables. Check the seasoning. Bring the pressure cooker up to pressure again and continue pressure cooking for the cooking time recommended for the vegetables.
Ifyouwanttoaddvegetableswhichcook rapidly, such as peas or mushrooms, do not pressure cook them at the same time as the other vegetables that take longer to cook. Add them to the cooker right before serving and boil them in the pressure cooker with the lid off until they are ready.
Example: if you are cooking a beef brisket (cooking time 35 minutes) with potatoes (cooking time 6 minutes) and sliced carrots (cooking time 1 minute), you should first cook the meat by itself for 29 minutes, then release the pressure, add the potatoes and cook for an additional 6 minutes. Finally, add the carrots and let them simmer for a couple more minutes until they are cooked.
MEAT AND POULTRY |
APPROXIMATE |
|
COOKING TIME |
Beef/veal, roast or brisket |
35-40 minutes |
Beef/veal, (shanks) |
|
1 ½-inch wide |
25-30 minutes |
Beef/veal, 1-inch cubes, |
|
1 ½-pounds |
10-15 minutes |
Beef/veal, roast or brisket |
35-40 minutes |
Beef, dressed, 2 pounds |
10-15 minutes |
Meatballs, 1-2 pounds |
5-10 minutes |
Beef, cured |
50-60 minutes |
Pork, roast |
40-45 minutes |
Pork, ribs, 2 pounds |
15 minutes |
Pork leg, smoked, 2 pounds |
20-25 minutes |
Pork, ham, pieces |
20-25 minutes |
16

Lamb, leg |
35-40 minutes |
Lamb, 1-inch cubes, 1 ½-pounds |
10-18 minutes |
Chicken, whole, 2 to 3 pounds |
12-18 minutes |
Chicken, in pieces, 2 to 3 pounds |
8-10 minutes |
Spring chickens, two |
8-10 minutes |
Soup or concentrated |
|
stock of beef or fowl |
10-15 minutes |
Seafood and fish
•Clean and gut fish. Take out all the visible bone.
•Scrub and rinse shellfish in cold water. Soak clams and mussels in a container of cold water with the juice of one lemon, for an hour, to remove sand from them.
•Cooking times can vary depending on the seafood which is cooked.
•Cook seafood in a steamer or pasta basket when possible (steamer baskets sold separately) with at least ¾ cup of liquid. Apply a fine layer of vegetable oil to the steamer basket when you cook fish to avoid sticking.
•If you prefer, add seasoning or flavoring to the cooking liquid.
•Never fill the pressure cooker to more than two thirds of its capacity.
•When you prepare concentrated stock or soup put all the ingredients in the pressure cooker and add water to half of its capacity.
•Use the automatic or cold water release method when cooking time is up.
SEAFOOD AND FISH |
APPROXIMATE |
|
COOKING TIME |
Crab |
2-3 minutes |
Fish fillet, 1 ½-to 2 pounds thick |
2-3 minutes |
Fish soup or concentrated fish stock |
5-6 minutes |
Fish, whole, gutted |
5-6 minutes |
Lobster, 1 ½-to 2 pounds |
2-3 minutes |
Mussels |
2-3 minutes |
Prawns (shrimp) |
1-2 minutes |
Adapting Traditional Recipes to Use in the Pressure Cooker
It is easy to adapt your favorite recipe for use in a pressure cooker. For the most part, soups, stews, braised and slow-roasted meats and poultry, and slow-simmered recipes, such as tomato sauce and fruit preserves provide the best results.
Meats and Poultry: When preparing meats and poultry, brown well in the pressure cooker pot using at least 2 tablespoons of vegetable or olive oil. Drain any excess fat and sautè onions, garlic or any other vegetables as called for in the recipe. Add the remaining ingredients and at least a 1/2 cup of cooking liquid such as broth, diluted tomato puree or wine.
Soups: Soups are quick and easy to prepare. Add meat, poultry or seafood to the pressure cooker along with any desired vegetables, herbs and spices. Add liquid ingredients, filling pressure cooker only halfway.
Tomato Sauce and Fruit Preserves:
When preparing tomato sauce, sauté minced onion and/or garlic. Add and brown the meats as specified in the recipe. Add the strained or pureed tomatoes, filling the pressure cooker only halfway. Position lid and lock in place. Cook for 20 minutes. Remove from heat and let pressure drop naturally. Season with salt and pepper to taste. To make fruit preserves, place the fruit in the pressure cooker with the desired quantity of sugar. Let sit one hour to release natural juices of fruit. Bring to a boil, uncovered. Stir well and add other ingredients as indicated in your recipe. Position lid and lock in place. Cook for 8 minutes. Remove from heat and use the natural release method to let the pressure drop naturally.
ENGLISH
17

ENGLISH
Troubleshooting
In order to ensure best results when using the Fagor SPLENDID pressure cooker, be certain to read all of the instructions and safety tips contained in this owner’s manual and all other printed materials provided by the manufacturer. The following are practical tips and solutions to some common problems you may experience when using the Fagor SPLENDID pressure cooker.
PROBLEM: The lid got jammed while trying to slide it closed, and will not open or close.
REASON: If the instructions in the “Closing the Lid and Cooking” section of this manual were not followed carefully, the lid might get jammed while trying to close it.
SOLUTION: If there is some resistance when attempting to slide the lid closed, do not force it. Stop, slide it back, lift the lid and try aligning the marks again as described in the “Closing the Lid and Cooking” section of this manual.
If the lid jams, never try to force it closed. To un-jam try sliding the lid open again. If you cannot open it, please contact the Fagor Customer Service Department at: 1-800-207-0806 or email at: info@fagoramerica.com.
PROBLEM: There is water leaking from the lower handle while the cooker is building pressure.
REASON: While the pressure cooker is building pressure, a little water might drip from around the area of the pressure lock on the pot handle. The water comes from steam condensed on the inside of the lid. The dripping will stop when the pressure cooker reaches full pressure. However, if it’s a continuous leak, or does not stop after pressure has been reached, it might be for one of the following reasons:
1.The nuts and screws on the handle have loosened.
2.The gasket has not been oiled.
SOLUTION: 1. Make sure the lower handle is screwed tight to the pot before using the pressure cooker or after the all pressure has been released. Tighten the screws with a screwdriver if necessary.
2. Make sure you wash and dry your gasket after every use, and oil it regularly.
PROBLEM: Pressure does not build up (the visual pressure indicator does not pop up after more than 5 minutes on high heat).
REASON: 1. There is not enough liquid.
2.The pressure cooker was not properly closed.
3.The valve is dirty and/or obstructed.
4.The silicone gasket is not in place, or is dirty or worn.
5.The operating valve is not in the correct position.
SOLUTION: 1. Always use the appropriate amount of liquid called for in the recipe. This amount should never be less than ½ cup. However, never fill the pressure cooker more than half full with liquids.
2.Following the instructions given in this manual, close the pressure cooker so that a tight seal is created, which will allow for adequate pressure build-up.
3.The valve can become dirty when cooking foods such as dried beans which have a tendency to foam. Clean the valve periodically.
4.Make sure the silicone gasket is clean and well positioned before using the pressure cooker. After continued use, the silicone gasket will begin to wear and should be replaced at least once a year if the pressure cooker is used frequently.
5.Make sure the operating valve has been turned to the pressure setting (the picture of a pot). The pressure cooker will not build up pressure if the operating valve is turned to the steam release position (the picture of the steam).
18

PROBLEM: The visual pressure indicator has popped up, but there is no steam released by the operating valve.
REASON: 1. There is not enough liquid in the cooker.
2.The valve is dirty and/or obstructed.
3.The burner heat is not high enough.
SOLUTION: 1. Make sure there is enough liquid. There should always be at least half a cup of liquid in the pressure cooker, or 2 cups if the cooking time is over 10 minutes.
2.The valve can become dirty when cooking foods such as dried beans which have a tendency to foam. Clean the valve periodically. See the Care and Cleaning section in this manual for instructions on how to remove the valve for cleaning.
3.Turn up the heat to medium high until a gentle, steady stream of steam is released from the operating valve.
PROBLEM: A gentle, steady stream of steam is released from the operating valve and small drops of water condensation collect on the lid.
REASON: When used properly, the operating valve will release a gentle steady stream of steam as well as some drops of condensed water on the lid.
SOLUTION: This is normal operation. If there is a lot of water gushing out of the operating valve with the steam, see below.
ENGLISH
PROBLEM: A strong, forceful, gushing jet of steam is escaping from the operating valve with or without drops of condensation.
REASON: 1. The burner heat is too high.
2.The valve is dirty.
3.The safety valve is malfunctioning.
SOLUTION: 1. Lower the heat so that only a gentle, steady stream of steam is released.
2.Check the valve to see if there are any remaining food particles. Remove with a toothpick.
3.The safety valve must be replaced. Contact the Fagor Customer Service Department at: 1-800-207-0806 or email at: info@fagoramerica.com.
19

ENGLISH
PROBLEM: Steam is escaping around the edge of the lid.
REASON: 1. The pressure cooker is too full.
2.The pressure cooker was not closed properly.
3.The silicone gasket is not in place, or it is dirty or worn.
SOLUTION: 1. Never fill the pressure cooker more than half or ²/³ full or ½ full when cooking liquids or foods that froth and expand during cooking.
2.Following the instructions given in this manual, close the pressure cooker so that a tight seal is created which will allow for adequate pressure build-up.
3.Make sure the silicone gasket is clean and well positioned before using the pressure cooker. After continued use, the silicone gasket will begin to wear and should be replaced at least once a year if the pressure cooker is used frequently.
PROBLEM: The pressure cooker cannot be opened after cooking.
REASON: 1. There is still pressure built-up in the pressure cooker.
2.If the pressure indicator has dropped but you still cannot open the lid, it might be because the the pressure lock has not been moved to the open position.
SOLUTION: 1. Use the automatic or the cold water release method to release any remaining pressure. Make sure the pressure indicator has dropped. Try opening again.
2.Move the pressure lock down towards the end of the handle to the open position. Try opening again.
PROBLEM: Foods are under-cooked.
REASON: 1. Cooking time is too short.
2.The automatic or cold water release method was inadequately used to release the pressure.
SOLUTION: 1. Always check the cooking time in your recipe. If still under-cooked, extend cooking time by approx. 1 to 2 minutes and cook under pressure, or simmer without lid until desired texture is achieved.
2.Use natural release method so that food has benefit of additional cooking time as pressure drops.
PROBLEM: Food is over-cooked.
REASON: 1. Cooking time is too long.
2. The natural release method was inadequately used to release pressure.
SOLUTION: 1. Always check the cooking times in your recipe. If food is overcooked, shorten the cooking time by at least 1 to 2 minutes.
2.Use the automatic or cold water release method so that pressure drops immediately.
20
Home Canning with your Pressure Cooker
(APPLIES TO 10 QT MODEL ONLY, ITEM
# 918060812)
HOME CANNING OVERVIEW:
Home canning is a method of preserving food that provides a gratifying method for producing and storing some of our favorite recipes. Canning enables us to store recipes and enjoy them later or give as gifts to friends & loved ones. Understanding the basic steps for preparation and right equipment are all you need to create a fabulous array of provisions to stock in your pantry. Once the method has been mastered, most people find that canning is one of the most simple and rewarding ways to ensure having your favorite fruits, vegetables, and even meats year-round.
Canning food at home has increased in popularity. Families are educating themselves on the methods of canning. These basic guidelines will teach you how to can your most favorite recipes in your Fagor Pressure Cooker.
Why Can Foods?
Canning can be a safe and cost-effective way to preserve quality food at home. It is an important, safe method of food preservation if practiced properly. The canning process involves placing foods in jars and heating them to a temperature which destroys microorganisms that could be a health hazard or cause the food to spoil. Air is driven from the jar during heating, and as it cools, a vacuum seal is formed. The vacuum seal prevents air from getting back into the product, protecting it from microorganisms that could re-contaminate the food.
Before You Begin: Recommended tools for Canning
1.Wire Rack to safely maneuver the hot jars in and out of the pressure cooker.
2.Jar Lifter to safely grab the hot jars.
3.Ladle to scoop food into the jars.
4.Bubble freer to prevent bubbles of air
from remaining trapped in the jar and causing contamination.
5.Jar Wrench to close the lids safely.
6.Magnetic Lid wand to safely lift the sterilized lids out of the hot water in the pressure cooker
7.Wide mouth funnel to make sure all the food goes into the jar!
8.Glass jars: Use only standard home canning jars. Also commonly referred as "Mason Jars"
9.Canning Lids: These flat metal lids with sealing compound and a metal screw band are the most popular and recommended type of lid for home canned products.
NOTE: Fagor includes among its variety of accessories for pressure cookers a 7-piece Home Canning Kit with Bonus Cookbook that includes the 7 recommended tools mentioned above (except the glass jars and canning lids). The wire rack included in the kit holds four half-pint jars. The Fagor Home Canning kit is sold separately from the 10 qt Pressure Cooker/ Canner. For more information on this kit, please call 1- 800-207-0806 M-F 9-5 pm EST or visit the Accessories section on our website: www.fagoramerica.com.
1. Jar selection, Preparation and Use:
Examine jars and discard those with nicks, cracks and rough edges. These defects will not permit an airtight seal on the jar, and food spoilage will result. All canning jars should be washed in soapy water, rinsed well and then kept hot before use. This could be done in the dishwasher or by placing the jars in the water that is heating in your canner. The jars need to be kept hot to prevent breakage when they’re filled with a hot product and placed in the canner for processing.
Jars processed in a boiling water bath canner for 10 minutes or more or in a pressure cooker will be sterilized during processing. Jars that will be filled with
ENGLISH
21

ENGLISH
food and processed for less than 10 minutes in a boiling water bath canner need to be sterilized by boiling them for 10 minutes. NOTE: If you are at an altitude of 1000 feet or more, boil an additional minute for each 1000 feet of additional altitude. See below for canning methods and recipe timing.
2. Lid selection, preparation & use
The common self-sealing lid consists of a flat metal lid held in place by a metal screw band during processing. The flat lid is crimped around its bottom edge to form a trough, which is filled with a colored gasket material. When jars are processed, the lid gasket softens and flows slightly to cover the jar-sealing surface, yet allows air to escape from the jar.
It is best to buy only the quantity of lids you will use in a year. Never reuse lids. To ensure a good seal, carefully follow the manufacturer’s directions in preparing lids for use. Examine all metal lids carefully. Do not use old, dented, or deformed lids or lids with gaps or other defects in the sealing gasket.
Follow the manufacturer’s guidelines enclosed or on the box for tightening the jar lids properly.
•If screw bands are too tight, air cannot vent during processing, and food will discolor during storage.
•Over-tightening also may cause lids to buckle and jars to break, especially with pressure-processed food.
•If screw bands are too loose, liquid may escape from jars during processing,
seals may fail, and the food will need to be reprocessed.
Do not retighten lids after processing jars. As jars cool, the contents in the jar contract, pulling the self-sealing lid firmly against the jar to form a high vacuum.
Screw bands are not needed on stored jars. They can be removed easily after jars are cooled. When removed, washed, dried, and stored in a dry area,
screw bands may be used many times. If left on stored jars, they become difficult to remove, often rust, and may not work properly again.
3. Canning Methods:
There are two safe ways of canning, depending on the type of food being canned: the pressure canning method and the boiling water bath method.
PRESSURE CANNING METHOD:
With the pressure canning method, the jars of food are placed in 2 to 3 inches of water in a pressure cooker and heated under pressure at a temperature of 240 °F or above for a specific length of time, which differs for every recipe.
Pressure canning can be used to can all types of food. It is also the only safe method of canning lowacid foods, which have a ph greater than 4.6. Low-acid canned foods are not acidic enough to prevent the growth of the bacterium Clostridium botulinum, which may cause botulism. To destroy the bacteria, foods must be processed at a temperature of at least 240 ºF, which can only be reached in a pressure cooker. Processing foods under pressure at a temperature of 240 ºF during an adequate time ensures the destruction of the largest number of heat-resistant microorganisms in home-canned foods.
Low-acid foods include all vegetables, meats, poultry, and seafood. This method is also recommended for canning such items as soups, stews and chili.
Note: Although considered fruit, tomatoes have a ph value close to 4.6. Therefore, you should typically process them in a pressure canner.
WARNING: 240 ºF can only be reached in a pressure cooker/ canner. Never attempt to can lowacid foods using the boiling water bath method.
22

Instructions for pressure canning method:
Processing Instructions: Fill the jars. Allow the proper headspace according to processing directions for specific foods. This is necessary so that all the extra air will be removed during processing, and a tight vacuum seal will be formed.
To make sure that air bubbles have not been trapped inside the jar, run a bubble freer or any plastic or rubberlike utensil around the edges of the jar, gently shifting the food, so that any trapped air is released. After the air bubbles have been removed, more liquid may need to be added to the jar to ensure proper headspace.
Wipe off the rims of the jars with a clean, damp cloth. Screw on the lids, but not too tightly — air needs to escape during processing. Set the jars of food on the rack and lower the rack into the pressure cooker so steam can flow around each jar. Add 2-3 inches of boiling water to the bottom of the cooker (pour it between the jars, not directly on them, to prevent breakage). Put the lid on the cooker. Once pressure is reached, keep the pressure constant by regulating the heat under the pressure cooker. Do not lower the pressure by raising or lowering the heat during the processing. Keep drafts from blowing on the pressure cooker. Fluctuating pressure causes loss of liquid from jars and underprocessing.
When the processing is completed, carefully remove the pressure cooker from the heat. If the pressure cooker is too heavy, simply turn it off.
WARNING: Let the pressure in the pressure cooker drop to zero using the natural release method. Do not use the cold water pressure release method for pressure canning. Never use the automatic release method to hasten the reduction in pressure when canning foods.
When the pressure cooker is depressurized, unlock the lid and tilt the far side up, so the steam escapes away from you. Use a jar lifter to carefully remove the jars from the pressure cooker. Place the hot jars on a rack, dry towels, boards or newspaper, right side up to prevent the jars from breaking on contact with a cold surface. Leave at least 1inch of space between the jars. Do not tighten the lids. Allow the jars to cool, untouched for 12 to 24 hours.
BOILING WATER BATH METHOD:
The boiling water method is safe for high-acid foods such as fruits and pickles, as well as pie filling, jam, jellies, marmalade and other preserves. In this method, jars of food are heated by being completely covered with boiling water (212 ºF at sea level).
Note: If you are unsure of the PH value of the foods you want to cook, we strongly recommend using the pressure canning method.
Instructions for boiling water bath method:
Fill the pot about halfway with hot water. Turn on the burner and heat the water. Have the water in the canner hot but not boiling to prevent breakage of the jars when they’re placed in the canner. Follow the same steps detailed in the pressure cooker method for filling jars. When the water in the pot reaches a rolling boil, begin counting the correct processing time. Boil gently and steadily for the recommended time, adjusting the heat and adding more boiling water as necessary.
Use a jar lifter to carefully remove the jars as soon as the processing time is up. Place the hot jars right side up on a rack, dry towels, boards or newspapers to prevent the jars from breaking on contact with a cold surface. Leave at least 1 inch of space between jars.
ENGLISH
23
 Loading...