

ERBA 18021, HVLP 20148, HVLP 20180 Instruction Manual
BEDIENUNGSANLEITUNG: DL-Schlagschrauber 1/2“ *
D
GB
INSTRUCTION MANUAL: Air Powered Ratchet Wrench 1/2“ *
MODE D‘EMPLOI: Clé à Cliquet Pneumatique 1/2“ *
FR
NÁVOD NA OBSLUHU: Pneumatický račňový kľúč 1/2“ *
SK
NÁVOD K OBSLUZE: Pneumatický račkový klíč 1/2“ *
CZ
INSTRUKCJA OBSŁUGI: Pneumatyczny klucz z grzechotką 1/2“ *
PL
MANUALE DI ISTRUZIONI: Chiave a cricchetto ad aria compressa 1/2“ *
IT
HASZNÁLATI ÚTMUTATÓ: Sűrített levegővel működő racsnis csavarkulcs 1/2“ *
HU
UPUTE ZA UPORABU: Pneumatski ključ sa čegrtaljkom 1/2“ *
HR
РЪКОВОДСТВО С ИНСТРУКЦИИ: Пневматичен гаечен ключ с храпов механизъм 1/2“
BG
NAVODILA ZA UPORABO: Pnevmatski ragljasti vijačnik 1/2“ *
SL
MANUAL DE INSTRUCȚIUNI: Cheie cu clichet pneumatică 1/2“ *
RO
4
9
14
19
21
29
34
39
44
*
49
54
59

1
4
3
2
* Technische Änderungen vorbehalten
* Technical changes reserved
* Sous réserve de modifications techniques
* Technické zmeny vyhradené
* Technické změny vyhrazeny
* Producent zastrzega sobie prawo do wprowadzania zmian technicznych
* Soggetto a modifiche tecniche
* A műszaki változtatások joga fenntartva
* Pridržavamo pravo na tehničke izmjene
* запазено е правото за технически промени
* Pravice do tehničnih sprememb pridržane
* Ne rezervăm dreptul de a efectua modificări tehnice

DE - BEDIENUNGSANLEITUNG
INHALT
1. Sicherheitshinweise
2. Produktbeschreibung
3. Bestimmungsgemäße Verwendung
4. Einsatzbeschränkungen
5. Technische Daten
6. Geräuschemissionswerte
7. Notwendige Informationen für die Inbetriebnahme
8. Bedienungshinweise / Fehlerbeschreibung
9. Service und Ersatzteile
10. Garantie
11. Entsorgung
12. Rechtliche Hinweise
13. Konformitätserklärung
Seite
5
5
5
5
5
6
6
6
6
6
6
6
7
Seite 3
ERBA GmbH
A-1230 Wien
Talpagasse 6
Servicehotline: Tel: +43(0) 1 930 10 - 160 · Fax: +43(0) 1 930 10 - 960 · E-Mail: service@erba.at
Bedienungsanleitung
18019
Druck- und Satzfehler vorbehalten!
Stand: 06/2017

DE - BEDIENUNGSANLEITUNG
1. SICHERHEITSHINWEISE
Bitte lesen Sie vor der Inbetriebnahme des Gerätes zu Ihrer eigenen Sicherheit dieses Handbuch
und die allgemeinen Sicherheitshinweise gründlich durch. Wenn Sie das Gerät Dritten überlassen,
legen Sie diese Gebrauchsanleitung immer bei. Wir übernehmen keine Haftung für Unfälle oder
Schäden, die durch Nichtbeachtung dieser Anleitung und den Sicherheitshinweisen entstehen.
Wenn Sie Schutzvorrichtungen entfernen, verändern oder andere bauliche Veränderungen vornehmen entfällt jegliche Haftung des Herstellers!!
Vor der ersten Inbetriebnahme sollten Sie unbedingt einige Tropfen Öl In den Luftanschluß des
Werkzeuges geben, damit bei Arbeitsbeginn eine entsprechende Schmierung gewährleistet ist.
Achten Sie bitte darauf, dass den Werkzeugen ein Druckluftfilter sowie ein Öler vorgeschaltet
wird (Wartungseinheit). Der Filter hat die Aufgabe Kondensat und sonstige Verunreinigungen zu
entfernen, der Öler versorgt zur Schmierung das Werkzeug laufend mit Öl. Mit dem Druckregler
kann man den Arbeitsdruck justieren.
Wichtiger Hinweis: Werkzeuge, die während des Betriebes nicht laufend mit Öl versorgt werden,
werden infolge “Trockenlaufes” defekt. In so einem Fall kann KEIN Garantieanspruch gestellt werden.
Der Druckluftschlauch (Gewebe od. Spiralschlauch) muss mit einem Kupplungs-Anschluss versehen sein, um ein schnelles An-/Abkuppeln des Gerätes vom Schlauch zu ermöglichen.
Verwenden Sie kein normales Motorenöl, sondern ein Spezialöl (z.B. ERBA-DL-Spezialöl Art.
Nr.18200) für Druckluftwerkzeuge.
Der Betriebsruck muss auf max. 6,3 bar eingestellt werden und sollte keinesfalls überschritten werden.
Sie sollten für Druckluftwerkzeuge einen eigenen Druckluftschlauch verwenden, da dieser mit
Öl in Kontakt gerät. (Zum Ausblasen oder Farbspritzen sollte dieser Schlauch nicht mehr verwendet werden).
Die höchste Leistung Ihres Druckluftgerätes erhalten Sie, wenn Sie einen Schlauch mit ausreichendem Innendurchmesser (6 mm oder 9 mm) verwenden.
Schließen Sie nicht mehr als zwei Geräte gleichzeitig an dieselbe Zuleitung an.
Bei längerem Nichtgebrauch des Druckluftwerkzeuges füllen Sie bitte einige Tropfen Öl in den Luftanschluß und lassen es kurz durchlaufen. Somit wird eine Konservierung des Luftmotors erreicht.
Wichtiger Hinweis: Bei allen Arbeiten am Druckluftwerkzeug selbst müssen Sie dieses – zu Ihrer
eigenen Sicherheit – immer vorher vom Druckluftschlauch abkuppeln.
Seite 4
ERBA GmbH
A-1230 Wien
Talpagasse 6
Servicehotline: Tel: +43(0) 1 930 10 - 160 · Fax: +43(0) 1 930 10 - 960 · E-Mail: service@erba.at
Bedienungsanleitung
18019
Druck- und Satzfehler vorbehalten!
Stand: 06/2017

DE - BEDIENUNGSANLEITUNG
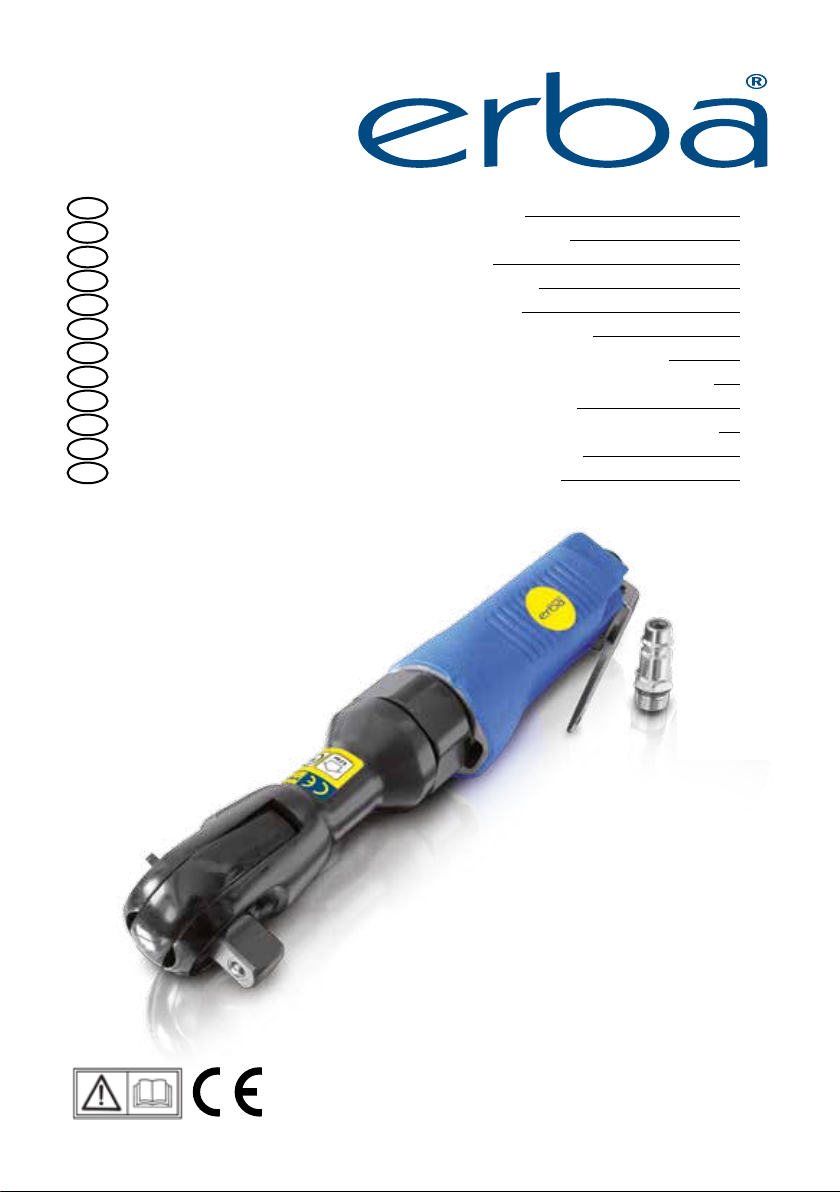
2. PRODUKTBESCHREIBUNG
1 - Links-Rechts-Lauf
2 - Werkzeugaufnahme 1/2“
3 - Start/Stop
4 - Luftkupplung
3. BESTIMMUNGSGEMÄSSE VERWENDUNG
Der DL-Schlagschrauber eignet sich zum Lösen und Anziehen von Muttern und Bolzen. Das Gerät
ist zur Verwendung mit einem geeigneten Druckluftkompressor vorgesehen. Jede andere Verwendung ist nicht bestimmungsgemäß. Für alle Schäden/Verletzungen, die aus nicht bestimmungsgemäßer Verwendung resultieren haftet der Benutzer des Gerätes, nicht jedoch der Hersteller/Händler.
4. EINSATZBESCHRÄNKUNGEN
Bitte beachten Sie, dass dieses Gerät bestimmungsgemäß nicht für den gewerblichen Einsatz konstruiert wurde. Wir übernehmen keine Gewährleistung, wenn das Gerät in Gewerbe-, Handwerksoder Industriebetrieben sowie bei gleichzusetzenden Tätigkeiten eingesetzt wird.
5. TECHNISCHE DATEN
Antrieb:
Betriebsdruck:
Drehmoment max.:
Luftverbrauch:
Leerlaufdrehzahl:
Schalldruckpegel L(pa):
Schalldruckpegel L(wa):
Vibration am Griff:
Seite 5
ERBA GmbH
A-1230 Wien
Talpagasse 6
Servicehotline: Tel: +43(0) 1 930 10 - 160 · Fax: +43(0) 1 930 10 - 960 · E-Mail: service@erba.at
1/2“
6,3 bar
68 NM
77 l/min
160 U/min-1
90,8dB(A)±3dB
101,8dB(A)±3dB
4,4 m/s
Bedienungsanleitung
18019
Druck- und Satzfehler vorbehalten!
Stand: 06/2017
2
DE - BEDIENUNGSANLEITUNG
6. GERÄUSCHEMISSIONSWERTE
Siehe Technische Daten.
7. NOTWENDIGE INFORMATIONEN FÜR DIE INBETRIEBNAHME
Das Produkt wird in betriebsfertigem Zustand geliefert. Beachten Sie jedoch die Bedienungs- und
Wartungshinweise.
8. BEDIENUNGSHINWEISE / FEHLERBEHEBUNG
Verbinden Sie den DL-Schlagschrauber mit dem Druckluftschlauch. (4)
Um eine Schraube zu lösen oder festzuziehen stecken Sie die entsprechende Stecknuss auf das Gerät. (2)
Setzen Sie die nun das Gerät auf die Schraube und drücken Sie den Bedienhebel (3).
Um die Drehrichtung zu wechseln drücken Sie die Schaltnocke (1) in die entsprechende Position.
9. SERVICE UND ERSATZTEILE
Verwenden Sie nur Original-Ersatzteile.
10. GEWÄHRLEISTUNG
Es gelten die gesetzlichen Gewährleistungsbestimmungen.
11. ENTSORGUNG
Das Produkt befindet sich in einer Verpackung um Transportschäden zu verhindern. Diese Verpackung ist Rohstoff und wiederverwendbar oder kann wieder dem Rohstoffkreislauf zugeführt
werden. Das Gerät und dessen Zubehör bestehen aus verschiedenen Materialien, wie z.B. Metalle,
Kunststoffe, Flüssigkeiten, Öle, etc. Führen Sie defekte Bauteile der Sondermüllentsorgung zu. Fragen Sie im Fachgeschäft oder in der Gemeindeverwaltung nach.
12. RECHTLICHE HINWEISE
Alle Rechte vorbehalten. Dieses Handbuch ist urheberrechtlich geschützt. Vervielfältigung in mechanischer, elektronischer und jeder anderen Form ohne die schriftliche Genehmigung des Herstellers ist verboten.
Seite 6
ERBA GmbH
A-1230 Wien
Talpagasse 6
Servicehotline: Tel: +43(0) 1 930 10 - 160 · Fax: +43(0) 1 930 10 - 960 · E-Mail: service@erba.at
Bedienungsanleitung
18019
Druck- und Satzfehler vorbehalten!
Stand: 06/2017
DE - BEDIENUNGSANLEITUNG
KONFORMITÄTSERKLÄRUNG
DECLARATION OF CONFORMITY
Modelle/models:
18021 DL-Schlagschrauber 1/2“
ERBA GmbH, Talpagasse 6, 1230 Wien, erklärt hiermit dass das angeführte Modell den folgenden
CE Qualitätsstandards, Prüfungen und maßgeblichen Sicherheitsanforderungen entspricht:
Maschinenrichtline: 2006/42/EC
– EN ISO 11148-6:2012
– AfPS GS 2014:01
Wien, 01.06. 2017
For and on behalf of ERBA GmbH (authorized signature)
Dominik Schilling
Technischer Koordinator
ERBA GmbH, Talpagasse 6, 1230 Wien, Austria
Seite 7
ERBA GmbH
A-1230 Wien
Talpagasse 6
Servicehotline: Tel: +43(0) 1 930 10 - 160 · Fax: +43(0) 1 930 10 - 960 · E-Mail: service@erba.at
Bedienungsanleitung
18019
Druck- und Satzfehler vorbehalten!
Stand: 06/2017

GB - INSTRUCTION MANUAL
Table of contents
1. Safety instructions
2. Product description
3. Designated use
4. Restrictions of use
5. Technical data
6. Noise emission values
7. Important information for initial operation
8. Operation instructions
9. Service and replacement parts
10. Warranty
11. Disposal
12. Legal information
13. Declaration of conformity
Page
9
10
10
10
10
11
11
11
11
11
11
11
12
Page 8
ERBA GmbH
A-1230 Wien
Talpagasse 6
Servicehotline: Tel: +43(0) 1 930 10 - 160 · Fax: +43(0) 1 930 10 - 960 · E-Mail: service@erba.at
Instruction manual
18019
Changes, print, punctuation and other errors reserved!
Issue: 06/2017
GB - INSTRUCTION MANUAL
1. SAFETY INSTRUCTIONS
Read this material before using this product. Failure to do so can result in serious injury. KEEP THIS
MANUAL. When giving this machine to third parties, always include this manual. We do not accept
any liabilities for accidents or damages that result from misuse. Removal/Alteration of any
safety devices or of the machine in general will result in the loss of warranty. The
buyer assumes all risk and liability arising out of his or her repairs/alterations to the
original product or replacement parts thereto, or arising out of his or her installation
of replacement parts thereto.
Prior to first use put a few drops of oil in the air coupling of the machine to ensure sufficient
lubrication.
Install an air filter, pressure regulator and a oiler between the machine and the source of compressedair. The filter will keep condensate and dirt from entering the machine and the oiler
will keep the tool lubricated. With the pressure regulator you can regulate the amount of air
pressure.
Air tools that are not sufficiently oiled during operation may become damaged and such damages are exempt from any warranty claims.
The air hose must be fitted with quick-couplings, so that it can be quickly removed in an
emergency.
Only use ils that are designed for use in air tools (like ERBA Art. Nr. 18200). Do not use regular
motoroil!
The working pressure must not exceed 6,3 bar.
Use seperate air hoses for tools that require lubrication (like ratchet wrenches, impact wrenches, etc.) and tools that do not (like spray guns, dust guns, etc.) to avoid contamination of
spraypaint or surfaces with residual oil from the hose.
Use hoses with suitable inner diameter (6-9mm) for maximum efficiency.
Do not connect more than two air tools to the same air supply at the same time.
If the tool is stored for longer periods of time, put a few drops of oil in the air coupling of the tool
and operate the tool for a few seconds so that all internal parts are well lubricated for storage.
Always disconnect the air-hose when performing any kind of maintainance work on the tool.
Page 9
ERBA GmbH
A-1230 Wien
Talpagasse 6
Servicehotline: Tel: +43(0) 1 930 10 - 160 · Fax: +43(0) 1 930 10 - 960 · E-Mail: service@erba.at
Instruction manual
18019
Changes, print, punctuation and other errors reserved!
Issue: 06/2017
GB - INSTRUCTION MANUAL
2. PRODUCT DESCRIPTION
1 - left/right rotation switch
2 - 1/2“ tool connector
3 - on/off switch
4 - air coupling
3. DESIGNATED USE
The air powered ratchet wrench is designed to loosen/tighten bolts and nuts. A suitable air compressor
must be used. Any other use is prohbited. The buyer accepts all liabilities, legal and otherwise, for
any damage or injury resulting from improper use of the product (i.e. any other use than the above
stated designated use).
4. RESTRICTIONS
Please note, that this product is not designed for commercial or industrial use. We accept no liability
or warranty claims should the product be used in industrial and/or commercial operations.
5. TECHNICAL DATA
Connector:
Working pressure:
Max. torque:
Air consumption:
No load speed:
Sound pressure level L(pa):
Sound pressure level L(wa):
Vibration on handle:
Page 10
ERBA GmbH
A-1230 Wien
Talpagasse 6
Servicehotline: Tel: +43(0) 1 930 10 - 160 · Fax: +43(0) 1 930 10 - 960 · E-Mail: service@erba.at
1/2“
6,3 bar
68 NM
77 l/min
160 U/min-1
90,8dB(A)±3dB
101,8dB(A)±3dB
4,4 m/s
Instruction manual
18019
Changes, print, punctuation and other errors reserved!
Issue: 06/2017
2

GB - INSTRUCTION MANUAL
6. NOISE EMISSION VALUES
See technical data.
7. IMPORTANT INFORMATION FOR INITIAL OPERATION
See operation instructions.
8. OPERATION INSTRUCTIONS
connect the ratchet wrench to the air hose with the air coupling (4)
chose the correct sized socket bit for the given application and connect it to the tool connector (2).
put the ratchet wrench on the bolt/nut you want to tighten/loosen, chose the rotational direction
accordingly (1) and engage the powerswitch (4).
9. SERVICE AND REPLACEMENT PARTS
Use original spare parts only.
10. WARRANTY
Legal warranty regulations apply.
11. DISPOSAL
Our products are packed in order to prevent damage during transport. Packing materials are valuable resurces and therefore can and should be recycled. The product itself consists of various
materials (metals, oils, plastic, etc.) and should be disposed with care and in accordance with your
federal and local disposal regulations.
12. LEGAL INFORMATION
All rights reserved. This manual is copyrighted. Reproduction in and form (digital, print, etc.) is
strictly prohibited without the written permission of ERBA GmbH.
Page 11
ERBA GmbH
A-1230 Wien
Talpagasse 6
Servicehotline: Tel: +43(0) 1 930 10 - 160 · Fax: +43(0) 1 930 10 - 960 · E-Mail: service@erba.at
Changes, print, punctuation and other errors reserved!
Instruction manual
18019
Issue: 06/2017
GB - INSTRUCTION MANUAL
DECLARATION OF CONFORMITY
Models:
18021 Air powered ratchet wrench 1/2“
ERBA GmbH, Talpagasse 6, 1230 Wien, hereby states, that the mentioned model meet the
following CE/RoHS quality standards, approvals and relevant safety requirements:
Machinery Directive: 2006/42/EC
– EN ISO 11148-6:2012
– AfPS GS 2014:01
Vienna, 01.06.2017
For and on behalf of ERBA GmbH (authorized signature)
Dominik Schilling
Technical coordinator
ERBA GmbH, Talpagasse 6, 1230 Wien, Austria
Page 12
ERBA GmbH
A-1230 Wien
Talpagasse 6
Servicehotline: Tel: +43(0) 1 930 10 - 160 · Fax: +43(0) 1 930 10 - 960 · E-Mail: service@erba.at
Instruction manual
18019
Changes, print, punctuation and other errors reserved!
Issue: 06/2017
FR - MODE D‘EMPLOI
Table des matières
1. Consignes de sécurité
2. Description du produit
3. Usage conforme
4. Restrictions d‘utilisation
5. Données techniques
6. Valeurs d‘émissions sonores
7. Informations importantes pour la première utilisation
8. Utilisation
9. Entretien/pièces de rechange
10. Garantie
11. Mise au rebut
12. Mentions légales
13. Déclaration de Conformité
Recherche
14
15
15
15
15
16
16
16
16
16
16
16
17
Page 13
ERBA GmbH
A-1230 Wien
Talpagasse 6
Servicehotline: Tel: +43(0) 1 930 10 - 160 · Fax: +43(0) 1 930 10 - 960 · E-Mail: service@erba.at
MODE D‘EMPLOI
18019
Sous réserve de modifications, différences!
Édition: 06/2017
FR - MODE D‘EMPLOI
1. CONSIGNES DE SÉCURITÉ
Lisez ce document avant d‘utiliser le produit. Faute de quoi, vous vous exposez à un risque de graves blessures corporelles. GARDEZ CE MODE D‘EMPLOI Si vous donnez cette machine à une autre
personne, donnez-lui impérativement ce mode d‘emploi. Nous déclinons toute responsabilité pour
les dommages ou accidents résultant d‘une utilisation non conforme. L‘enlèvement/altération
d‘un des dispositifs de sécurité ou de la machine dans son ensemble entraîne la perte de
la garantie. L‘acheteur assume la totalité des risques et responsabilités découlant de ses
réparations/altérations du produit original ou de ses pièces de rechange, ou découlant de
son installation des pièces de rechange.
Avant la première utilisation, mettez quelques gouttes d‘huile dans le raccord pneumatique de
l‘outil pour garantir une lubrification suffisante.
Installez un filtre à air, un détendeur et un huileur entre l‘outil et la source d‘air comprimé. Le
filtre empêchera les saletés et les condensats d‘entrer dans l‘outil et l‘huileur maintiendra l‘outil
lubrifié. Le détendeur vous permet de réguler le volume de pression pneumatique.
Les outils pneumatiques insuffisamment huilés pendant l‘utilisation peuvent être endommagés
et ces dommages ne sont pas couverts par la garantie.
Le tuyau d‘air peut être installé avec des raccords rapides afin de pouvoir être retiré rapidement
en cas d‘urgence.
Utilisez exclusivement des huiles conçues pour l‘usage dans les outils pneumatiques (par exemple ERBA Art. Nr. 18200). N‘utilisez pas d‘huile moteur ordinaire !
La pression de service ne doit pas dépasser 6,3 bars.
Utilisez des tuyaux à air séparés pour les outils nécessitant une lubrification (par exemple les
clés à cliquet, les clés à choc, etc.) et les outils n‘en nécessitant pas (par exemple les pistolets
de pulvérisation, les pistolets anti-poussières, etc.) pour éviter la contamination des surfaces ou
des peintures pulvérisées par l‘huile résiduelle des tuyaux.
Utilisez des tuyaux d‘un diamètre interne approprié (6-9 mm) pour maximiser l‘efficacité.
Ne raccordez pas plus de deux outils pneumatiques sur la même alimentation en air comprimé
en même temps.
Avant toute période de stockage prolongée de l‘outil, mettez quelques gouttes d‘huile dans le
raccord pneumatique de l‘outil et faites fonctionner l‘outil quelques secondes pour que toutes
les pièces internes soient bien lubrifiées avant le stockage.
Débranchez toujours le tuyau d‘air avant d‘effectuer tout type de travail de maintenance sur l‘outil.
Page 14
ERBA GmbH
A-1230 Wien
Talpagasse 6
Servicehotline: Tel: +43(0) 1 930 10 - 160 · Fax: +43(0) 1 930 10 - 960 · E-Mail: service@erba.at
MODE D‘EMPLOI
18019
Sous réserve de modifications, différences!
Édition: 06/2017

FR - MODE D‘EMPLOI
2. DESCRIPTION DU PRODUIT
1 - Sélecteur de rotation gauche/droite
2 - Carré 1/2“
3 - Interrupteur marche/arrêt
4 - Raccord pneumatique
3. USAGE CONFORME
La clé à cliquet pneumatique est conçue pour visser/dévisser les boulons et les écrous. Un compresseur d‘air approprié doit être utilisé. tTout autre type d’utilisation est à proscrire. L‘acheteur
assume l‘ensemble des responsabilités, légales ou autres, pour les éventuels dommages ou blessures résultant d‘une utilisation incorrecte de l‘appareil (c.à.d. toute utilisation non conforme, voir
ci-dessus).
4. RESTRICTIONS
Veuillez noter que ce produit n‘a pas été conçu pour être utilisé dans un environnement industriel ou
commercial. Nous déclinons toute responsabilité et toute garantie à partir du moment où l‘appareil
est utilisé dans un environnement industriel et/ou commercial.
5. DONNÉES TECHNIQUES
Raccord :
Pression de service :
Couple maximal :
Consommation d’air :
Vitesse à vide :
Niveau de pression acoustique L(pa) :
Niveau de puissance acoustique L(wa) :
Vibration de la poignée :
Page 15
ERBA GmbH
A-1230 Wien
Talpagasse 6
Servicehotline: Tel: +43(0) 1 930 10 - 160 · Fax: +43(0) 1 930 10 - 960 · E-Mail: service@erba.at
1/2“
6,3 bar
68 NM
77 l/min
160 U/min-1
90,8dB(A)±3dB
101,8dB(A)±3dB
4,4 m/s
MODE D‘EMPLOI
18019
Sous réserve de modifications, différences!
Édition: 06/2017
2
FR - MODE D‘EMPLOI
6. VALEURS D‘ÉMISSIONS SONORES
Voir données techniques.
7. INFORMATIONS IMPORTANTES POUR LA PREMIÈRE UTILISATION
Voir Utilisation.
8. UTILISATION
Raccordez la clé à cliquet au tuyau d‘air avec le raccord pneumatique (4).
Choisissez la douille de la taille appropriée pour l‘application à réaliser et attachez-la au carré de l‘outil (2).
Placez la clé à cliquet sur le boulon/écrou à visser/dévisser, sélectionnez le sens de rotation correspondant (1) et actionnez l‘interrupteur marche/arrêt (3).
9. ENTRETIEN/PIÈCES DE RECHANGE
Utilisez uniquement des pièces de rechange d’origine.
10. GARANTIE
Les garanties légales s’appliquent.
11. MISE AU REBUT
Nos produits sont emballés de manière à prévenir tout risque de dommages pendant le transport.
Les matériaux d‘emballage constituent des ressources de valeur, qui peuvent et doivent être recyclées. Le produit lui-même est constitué de matériaux variés (métaux, huiles, plastique etc.) et doit
donc être éliminé de manière responsable et conforme aux réglementations locales et régionales.
12. MENTIONS LÉGALES
Tous droits réservés. Ce mode d‘emploi est protégé par copyright. La reproduction sous toutes ses
formes (imprimée, numérique etc.) est strictement interdite sans l‘autorisation écrite d‘ERBA GmbH.
Page 16
ERBA GmbH
A-1230 Wien
Talpagasse 6
Servicehotline: Tel: +43(0) 1 930 10 - 160 · Fax: +43(0) 1 930 10 - 960 · E-Mail: service@erba.at
Sous réserve de modifications, différences!
MODE D‘EMPLOI
18019
Édition: 06/2017
FR - MODE D‘EMPLOI
DÉCLARATION DE CONFORMITÉ
Modèles :
18021 Clé à Cliquet Pneumatique 1/2“
ERBA GmbH, Talpagasse 6, 1230 Vienne, Autriche, déclare par la présente que le modèle indiqué
est conforme aux homologations, exigences et normes de qualité CE/RoHS.
Directive machines: 2006/42/CE
– EN ISO 11148-6:2012
– AfPS GS 2014:01
Vienne, 01.06.2017
Pour et au nom d‘ERBA GmbH (signature autorisée)
Dominik Schilling
Coordinateur technique
ERBA GmbH, Talpagasse 6, 1230 Vienne, Autriche
Page 17
ERBA GmbH
A-1230 Wien
Talpagasse 6
Servicehotline: Tel: +43(0) 1 930 10 - 160 · Fax: +43(0) 1 930 10 - 960 · E-Mail: service@erba.at
MODE D‘EMPLOI
18019
Sous réserve de modifications, différences!
Édition: 06/2017

SK - NÁVOD NA OBSLUHU
Obsah
1. Bezpečnostné pokyny
2. Popis výrobku
3. Zamýšľané použitie
4. Obmedzenia použitia
5. Technické údaje
6. Hodnoty emisie hluku
7. Dôležité informácie pre uvedenie do prevádzky
8. Návod na obsluhu
9. Servis a náhradné diely
10. Záruka
11. Likvidácia
12. Právne informácie
13. Vyhlásenie ozhode
Strana
19
20
20
20
20
21
21
21
21
21
21
21
22
Strana 18
ERBA GmbH
A-1230 Wien
Talpagasse 6
Servicehotline: Tel: +43(0) 1 930 10 - 160 · Fax: +43(0) 1 930 10 - 960 · E-Mail: service@erba.at
Návod na obsluhu
18019
Zmeny, tlač, interpunkcia a iné chyby vyhraden
Vydanie: 06/2017

SK - NÁVOD NA OBSLUHU
1. BEZPEČNOSTNÉ POKYNY
Pred použitím tohto výrobku si prečítajte tento materiál. Ak tak neurobíte, môže dôjsť
k vážnemu zraneniu. USCHOVAJTE SI TENTO NÁVOD Pri odovzdaní tohto prístroja tretím
osobám vždy pribaľte aj tento návod. Nepreberáme žiadnu zodpovednosť za nehody
alebo škody spôsobené zneužitím. Demontáž / zmena akýchkoľvek bezpečnostných
prvkov alebo prístroja všeobecne bude mať za následok stratu záruky. Kupujúci preberá všetky riziká a zodpovednosť vyplývajúce z opravy / úpravy pôvodného výrobku
alebo náhradných dielov alebo z inštalácie náhradných dielov.
Pred prvým použitím dajte do vzduchovej spojky stroja niekoľko kvapiek oleja, aby ste
zaistili dostatočné premazanie.
Namontujte vzduchový filter, regulátor tlaku a olejničku medzi stroj a zdroj stlačeného
vzduchu. Filter zabraňuje vnikaniu kondenzátu a nečistôt do stroja a olej bude udržovať
nástroj premazaný. S regulátorom tlaku môžete regulovať množstvo tlaku vzduchu.
Pneumatické nástroje, ktoré nie sú dostatočne naolejované počas prevádzky, sa môžu
poškodiť a takéto poškodenia sú vylúčené z akýchkoľvek záručných nárokov.
Vzduchová hadica musí byť vybavená rýchlospojkami, aby mohla byť v núdzovom prípade rýchlo odstránená.
Používajte iba oleje, ktoré sú určené na použitie v pneumatických nástrojoch (ako je
ERBA č. výr. 18200). Nepoužívajte bežný motorový olej!
Pracovný tlak nesmie prekročiť 6,3 baru.
Použite samostatné vzduchové hadice pre nástroje, ktoré vyžadujú mazanie (ako sú
račňové kľúče, rázové utahovače atď.) a nástroje, ktoré nevyžadujú (ako striekacie
pištole, prachové pištole apod.), aby nedošlo ku kontaminácii postrekovej farby alebo
povrchov zvyškovým olejom z hadice.
Pre maximálnu účinnosť použite hadice s vhodným vnútorným priemerom (6-9 mm).
Nepripojujte súčasne viac než dve pneumatické náradia do rovnakého prívodu vzduchu.
Ak má byť nástroj dlhšiu dobu uložený, nakvapkajte do vzduchovej spojky nástroja
niekoľko kvapiek oleja a nástroj na niekoľko sekúnd zapnite, aby sa všetky vnútorné
časti dobre premazali pre uskladnenie.
Pri robení akýchkoľvek servisných prác na nástroji vždy odpojte vzduchovú hadicu.
Strana 19
ERBA GmbH
A-1230 Wien
Talpagasse 6
Servicehotline: Tel: +43(0) 1 930 10 - 160 · Fax: +43(0) 1 930 10 - 960 · E-Mail: service@erba.at
Návod na obsluhu
18019
Zmeny, tlač, interpunkcia a iné chyby vyhraden
Vydanie: 06/2017
 Loading...