

Page 1

User's Guide
NPD5016-00 EN
Page 2

User's Guide
Copyright
Copyright
No part of this publication may be reproduced, stored in a retrieval system, or transmitted in any form or by any
means, electronic, mechanical, photocopying, recording, or otherwise, without the prior written permission of
Seiko Epson Corporation. No patent liability is assumed with respect to the use of the information contained
herein. Neither is any liability assumed for damages resulting from the use of the information herein.
information contained herein is designed only for use with this Epson printer. Epson is not responsible for any use
of this information as applied to other printers.
Neither Seiko Epson Corporation nor its aliates shall be liable to the purchaser of this product or third parties for
damages, losses, costs, or expenses incurred by the purchaser or third parties as a result of accident, misuse, or
abuse of this product or unauthorized modications, repairs, or alterations to this product, or (excluding the U.S.)
failure to strictly comply with Seiko Epson Corporation's operating and maintenance instructions.
Seiko Epson Corporation and its aliates shall not be liable for any damages or problems arising from the use of
any options or any consumable products other than those designated as Original Epson Products or Epson
Approved Products by Seiko Epson Corporation.
e
Seiko Epson Corporation shall not be held liable for any damage resulting from electromagnetic interference that
occurs from the use of any interface cables other than those designated as Epson Approved Products by Seiko
Epson Corporation.
© 2013 Seiko Epson Corporation. All rights reserved.
contents of this manual and the
e
specications
of this product are subject to change without notice.
2
Page 3

User's Guide
Trademarks
Trademarks
❏ EPSON® is a registered trademark, and EPSON EXCEED YOUR VISION or EXCEED YOUR VISION is a
trademark of Seiko Epson Corporation.
❏ PRINT Image Matching™ and the PRINT Image Matching logo are trademarks of Seiko Epson Corporation.
Copyright © 2001 Seiko Epson Corporation. All rights reserved.
❏ Intel
❏ EPSON Scan soware is based in part on the work of the Independent JPEG Group.
❏
❏ Microso
❏ Apple, Macintosh, Mac OS, OS X, and Bonjour are trademarks of Apple Inc., registered in the U.S. and other
is a registered trademark of Intel Corporation.
®
libti
Copyright © 1988-1997 Sam
Copyright © 1991-1997 Silicon Graphics, Inc.
Permission to use, copy, modify, distribute, and sell this
hereby granted without fee, provided that (i) the above copyright notices and this permission notice appear in
all copies of the soware and related documentation, and (ii) the names of Sam Leer and Silicon Graphics
may not be used in any advertising or publicity relating to the
permission of Sam Leer and Silicon Graphics.
THE SOFTWARE IS PROVIDED "AS-IS" AND WITHOUT WARRANTY OF ANY KIND, EXPRESS,
IMPLIED OR OTHERWISE, INCLUDING WITHOUT LIMITATION, ANY WARRANTY OF
MERCHANTABILITY OR FITNESS FOR A PARTICULAR PURPOSE.
IN NO EVENT SHALL SAM LEFFLER OR SILICON GRAPHICS BE LIABLE FOR ANY SPECIAL,
INCIDENTAL, INDIRECT OR CONSEQUENTIAL DAMAGES OF ANY KIND, OR ANY DAMAGES
WHATSOEVER RESULTING FROM LOSS OF USE, DATA OR PROFITS, WHETHER OR NOT ADVISED
OF THE POSSIBILITY OF DAMAGE, AND ON ANY THEORY OF LIABILITY, ARISING OUT OF OR IN
CONNECTION WITH THE USE OR PERFORMANCE OF THIS SOFTWARE.
, Windows®, and Windows Vista® are registered trademarks of Microso Corporation.
®
countries. AirPrint is a trademark of Apple Inc.
Leer
soware
soware
and its documentation for any purpose is
without the
specic,
prior written
❏ Apple Chancery, Chicago, Geneva, Hoeer Text, Monaco and New York are trademarks or registered
trademarks of Apple Inc.
❏ Google Cloud Print™ is a registered trademark of Google Inc.
❏ Monotype is a trademark of Monotype Imaging, Inc. registered in the United States Patent and Trademark
and may be registered in certain jurisdictions.
Oce
❏ Albertus, Arial, Gill Sans, Joanna and Times New Roman are trademarks of e Monotype Corporation.
❏ ITC Avant Garde, ITC Bookman, ITC Lubalin, ITC Mona Lisa Recut, ITC Symbol, ITC Zapf-Chancery, and
ITC Zapf Dingbats are trademarks of International Typeface Corporation registered in the United States Patent
and Trademark Oce and may be registered in certain jurisdictions.
❏ Clarendon, Helvetica, New Century Schoolbook, Optima, Palatino, Stempel Garamond, Times and Univers are
registered trademarks of Heidelberger Druckmaschinen AG, which may be registered in certain jurisdictions,
exclusively licensed through Linotype Library GmbH, a wholly owned subsidiary of Heidelberger
Druckmaschinen AG.
❏ Wingdings is a registered trademark of Microso Corporation in the United States and other countries.
❏ Antique Olive is a registered trademark of Marcel Olive and may be registered in certain jurisdictions.
❏ Adobe SansMM, Adobe SerifMM, Carta, and Tekton are registered trademarks of Adobe Systems Incorporated.
❏ Marigold and Oxford are trademarks of AlphaOmega Typography.
3
Page 4

User's Guide
Trademarks
❏ Coronet is a registered trademark of Ludlow Type Foundry.
❏ Eurostile is a trademark of Nebiolo.
❏ Bitstream is a registered trademark of Bitstream Inc. registered in the United States Patent and Trademark
Oce and may be registered in certain jurisdictions.
❏ Swiss is a trademark of Bitstream Inc. registered in the United States Patent and Trademark
registered in certain jurisdictions.
❏ PCL is the registered trademark of Hewlett-Packard Company.
❏ Adobe, Adobe Reader, PostScript3, Acrobat, and Photoshop are trademarks of Adobe systems Incorporated,
which may be registered in certain jurisdictions.
❏ Getopt
Copyright © 1987, 1993, 1994 e Regents of the University of California. All rights reserved.
Redistribution and use in source and binary forms, with or without modication, are permitted provided that
the following conditions are met:
1. Redistributions of source code must retain the above copyright notice, this list of conditions and the following
disclaimer.
2. Redistributions in binary form must reproduce the above copyright notice, this list of conditions and the
following disclaimer in the documentation and/or other materials provided with the distribution.
4. Neither the name of the University nor the names of its contributors may be used to endorse or promote
products derived from this soware without specic prior written permission.
THIS SOFTWARE IS PROVIDED BY THE REGENTS AND CONTRIBUTORS ''AS IS'' AND ANY EXPRESS
OR IMPLIED WARRANTIES, INCLUDING, BUT NOT LIMITED TO, THE IMPLIED WARRANTIES OF
MERCHANTABILITY AND FITNESS FOR A PARTICULAR PURPOSE ARE DISCLAIMED. IN NO EVENT
SHALL THE REGENTS OR CONTRIBUTORS BE LIABLE FOR ANY DIRECT, INDIRECT, INCIDENTAL,
SPECIAL, EXEMPLARY, OR CONSEQUENTIAL DAMAGES (INCLUDING, BUT NOT LIMITED TO,
PROCUREMENT OF SUBSTITUTE GOODS OR SERVICES; LOSS OF USE, DATA, OR PROFITS; OR
BUSINESS INTERRUPTION) HOWEVER CAUSED AND ON ANY THEORY OF LIABILITY, WHETHER IN
CONTRACT, STRICT LIABILITY, OR TORT (INCLUDING NEGLIGENCE OR OTHERWISE) ARISING IN
ANY WAY OUT OF THE USE OF THIS SOFTWARE, EVEN IF ADVISED OF THE POSSIBILITY OF SUCH
DAMAGE.
Oce
and may be
❏ Arcfour
is code illustrates a sample implementation of the Arcfour algorithm.
Copyright © April 29, 1997 Kalle Kaukonen. All Rights Reserved.
Redistribution and use in source and binary forms, with or without modication, are permitted provided that
this copyright notice and disclaimer are retained.
THIS SOFTWARE IS PROVIDED BY KALLE KAUKONEN AND CONTRIBUTORS ''AS IS'' AND ANY
EXPRESS OR IMPLIED WARRANTIES, INCLUDING, BUT NOT LIMITED TO, THE IMPLIED
WARRANTIES OF MERCHANTABILITY AND FITNESS FOR A PARTICULAR PURPOSE ARE
DISCLAIMED. IN NO EVENT SHALL KALLE KAUKONEN OR CONTRIBUTORS BE LIABLE FOR ANY
DIRECT, INDIRECT, INCIDENTAL, SPECIAL, EXEMPLARY, OR CONSEQUENTIAL DAMAGES
(INCLUDING, BUT NOT LIMITED TO, PROCUREMENT OF SUBSTITUTE GOODS OR SERVICES; LOSS
OF USE, DATA, OR PROFITS; OR BUSINESS INTERRUPTION) HOWEVER CAUSED AND ON ANY
THEORY OF LIABILITY, WHETHER IN CONTRACT, STRICT LIABILITY, OR TORT (INCLUDING
NEGLIGENCE OR OTHERWISE) ARISING IN ANY WAY OUT OF THE USE OF THIS SOFTWARE, EVEN
IF ADVISED OF THE POSSIBILITY OF SUCH DAMAGE.
4
Page 5

User's Guide
Trademarks
❏ microSDHC Logo is a trademark of SD-3C, LLC.
Note: microSDHC is built into the product and cannot be removed.
❏ General Notice: Other product names used herein are for identication purposes only and may be trademarks
of their respective owners. Epson disclaims any and all rights in those marks.
5
Page 6

User's Guide
Contents
Contents
Copyright
Trademarks
About This Manual
Introduction to the Manuals..................10
Marks and Symbols........................10
Descriptions Used in this Manual..............11
Operating System References.................11
Important Instructions
Safety Instructions.........................12
Printer Advisories and Warnings.............. 13
Advisories and Warnings for Setting Up/
Using the Printer........................13
Advisories and Warnings for Using the
Printer with a Wireless Connection...........14
Advisories and Warnings for Using the
Touchscreen........................... 14
Advisories and Warnings for Using the
Optional Cabinet........................14
Protecting Your Personal Information...........15
Administrator Settings
Locking the Printer Settings Using an
Administrator's Password....................16
Unlocking the Printer Settings................ 16
User Feature Restrictions....................16
Printer Basics
Part Names and Functions...................18
Control Panel............................ 22
Buttons and Lights.......................22
Icons Displayed on the LCD Screen...........22
Icons Displayed on the Soware Keyboard of
the LCD Screen.........................24
Menu Options............................24
Copy Mode............................24
Scan Mode.............................26
Fax Mode............................. 28
Memory Device Mode....................29
Setup Mode............................30
Contacts Mode......................... 40
Presets Mode...........................41
Status Menu............................41
Loading Paper
Paper Handling Precautions..................42
Available Paper and Capacities................42
List of Paper Types.......................45
Loading Paper in the Paper Cassette............46
Loading Paper in the Rear Paper Feed...........48
Loading Paper in the Front Paper Feed Slot. . . . . . . 50
Loading Envelopes and Precautions............ 51
Setting the Paper Size and Paper Type for Each
Paper Source.............................52
Placing Originals
Available Originals for the ADF...............53
Placing Originals on the ADF.................53
Placing Originals on the Scanner Glass. . . . . . . . . . 55
Managing Contacts
Registering Contacts....................... 57
Registering Grouped Contacts................57
Registration and Backup of Contacts Using a
Computer...............................58
Printing
Printing from the Control Panel...............59
Printing from a Computer...................59
Authenticating Users in the Printer Driver
when User Feature Restriction Is Enabled (for
Windows Only).........................60
Printing Basics - Windows.................60
Printing Basics - Mac OS X.................62
Printing on 2-Sides.......................63
Printing Several Pages on One Sheet..........66
Printing to Fit the Paper Size................67
Printing Multiple Files Together (for
Windows Only).........................68
Enlarged Printing and Making Posters (for
Windows Only).........................69
Printing on Envelopes.................... 75
Printing Using Advanced Features........... 76
Printing Using a PostScript Printer Driver........78
Printing Using a PostScript Printer Driver -
Windows..............................78
6
Page 7

User's Guide
Contents
Printing Using a PostScript Printer Driver -
Mac OS X.............................80
Setting Items for the PostScript Printer Driver. . . 83
Printing Using the Epson Universal P6 Printer
Driver (for Windows Only)...................83
Smart Devices Printing......................84
Canceling Printing.........................84
Canceling Printing - Printer Button...........84
Canceling Printing - Status Menu............84
Canceling Printing - Windows.............. 85
Canceling Printing - Mac OS X..............85
Copying
Scanning
Scanning Using the Control Panel..............87
Scanning to an Email.....................87
Scanning to a Network Folder or FTP Server. . . . 88
Scanning to a Memory Device.............. 88
Scanning to the Cloud....................89
Scanning Using Document Capture Pro (for
Windows Only).........................89
Scanning to a Computer (WSD).............90
Scanning from a Computer...................90
Authenticating Users when Using Access
Control in EPSON Scan (for Windows Only). . . .90
Scanning in Oce Mode..................91
Scanning in Professional Mode..............92
Smart Devices Scanning.....................94
Faxing
Setting Up a Fax...........................95
Connecting to a Phone Line................95
Making Basic Fax Settings................. 99
Sending Faxes...........................101
Basic Fax Sending Operations..............101
Various Ways of Sending Faxes.............103
Receiving Faxes..........................107
Setting Receiving Mode..................107
Various Ways of Receiving Faxes............108
Making Output Settings for Received Faxes. . . . 109
Using Other Faxing Features.................111
Printing Fax Report and List...............111
Setting Security for Faxing................ 112
Checking Fax Jobs......................112
Replacing Ink Cartridges and Other
Consumables
Checking the Status of the Ink Cartridges and
the Maintenance Box......................114
Checking the Status of the Ink Cartridges and
the Maintenance Box - Control Panel........ 114
Checking the Status of the Ink Cartridges and
the Maintenance Box - Windows............114
Checking the Status of the Ink Cartridges and
the Maintenance Box - Mac OS X...........114
Ink Cartridge Codes.......................115
Ink Cartridge Handling Precautions...........115
Replacing Ink Cartridges................... 116
Maintenance Box Code.....................118
Maintenance Box Handling Precautions........ 118
Replacing a Maintenance Box................118
Maintenance Rollers Codes..................120
Replacing Maintenance Rollers in Paper
Cassette 1.............................. 120
Replacing Maintenance Rollers in Paper
Cassette 2 to 4...........................124
Temporarily Printing with Black Ink...........127
Temporarily Printing with Black Ink - Windows 128
Temporarily Printing with Black Ink -
Mac OS X............................ 129
Conserving Black Ink when the Black Ink Is
Low (for Windows Only)................... 130
Improving Print and Scan Quality
Checking and Cleaning the Print Head.........131
Checking and Cleaning the Print Head -
Control Panel..........................131
Checking and Cleaning the Print Head -
Windows.............................132
Checking and Cleaning the Print Head -
Mac OS X............................ 132
Aligning the Print Head....................132
Aligning the Print Head - Control Panel. . . . . . 133
Aligning the Print Head - Windows..........133
Aligning the Print Head - Mac OS X.........134
Cleaning the Paper Path....................134
Cleaning the ADF........................ 135
Cleaning the Scanner Glass..................137
Applications and Network Service
Information
Epson Connect Service.....................138
7
Page 8

User's Guide
Contents
Web Cong.............................138
Necessary Applications.....................138
Windows Printer Driver..................138
Mac OS X Printer Driver................. 140
EPSON Scan (Scanner Driver).............142
Document Capture Pro (for Windows Only). . . 142
PC-FAX Driver (Fax Driver)...............143
FAX Utility........................... 143
E-Web Print (for Windows Only)...........143
EPSON Soware Updater.................144
EpsonNet Cong.......................144
Uninstalling Applications...................144
Uninstalling Applications - Windows.........144
Uninstalling Applications - Mac OS X........145
Installing Applications.....................146
Installing a PostScript Printer Driver.........146
Installing the Epson Universal P6 Printer
Driver (for Windows Only)................149
Updating Applications and Firmware.......... 150
Solving Problems
Checking the Printer Status..................151
Checking Messages on the LCD Screen. . . . . . . 151
Error Code on the Status Menu.............152
Checking the Printer Status - Windows.......157
Checking Printer Status - Mac OS X......... 157
Removing Jammed Paper...................157
Removing Jammed Paper from the Front
Cover (A)............................ 158
Removing Jammed Paper from the Rear
Paper Feed (B1). . . . . . . . . . . . . . . . . . . . . . . . 159
Removing Jammed Paper from the Front
Paper Feed Slot (B2). . . . . . . . . . . . . . . . . . . . . 159
Removing Jammed Paper from the Paper
Cassette (C1/C2/C3/C4)..................160
Removing Jammed Paper from Rear Cover 1
(D1) and Rear Cover 2 (D2)...............161
Removing Jammed Paper from the Rear
Cover (E) of the Optional Paper Cassette Unit. . 162
Removing Jammed Paper from the ADF (F). . . 163
Paper Does Not Feed Correctly. . . . . . . . . . . . . . . 165
Original Does Not Feed in the ADF. . . . . . . . . .166
Power and Control Panel Problems............167
Power Does Not Turn On.................167
Power Does Not Turn O.................167
LCD Screen Gets Dark...................167
Printer Does Not Print.....................167
Printout Problems........................168
Print Quality Is Poor.................... 168
Copy Quality Is Poor....................169
An Image of the Reverse Side of the Original
Appears in the Copied Image..............170
e Position, Size, or Margins of the Printout
Are Incorrect..........................170
Paper Is Smeared or Scued...............170
Printed Characters Are Incorrect or Garbled. . . 171
e Printed Image Is Inverted..............172
e Printout Problem Could Not be Cleared. . . 172
Printing Is Too Slow.......................172
PostScript Printer Driver Problems............172
Printer Does Not Print While Using
PostScript Printer Driver................. 172
Printer Does Not Print Correctly While
Using PostScript Printer Driver.............173
Print Quality Is Poor While Using PostScript
Printer Driver......................... 173
Printing Is Too Slow While Using PostScript
Printer Driver......................... 173
Cannot Start Scanning.....................173
Scanned Image Problems...................174
Scan Quality Is Poor.....................174
Characters Are Blurred...................175
An Image of the Reverse Side of the Original
Appears in the Scanned Image............. 175
Moiré (Cross-Hatch) Patterns Appear in the
Scanned Image.........................175
Scanning Area or Direction Is Not Correct. . . . 175
e Scanned Image Problem Could Not be
Cleared..............................176
Other Scanning Problems...................176
umbnail Preview Does Not Work Properly. . .176
Scanning Is Too Slow....................176
Scanning Stops when Scanning to PDF/
Multi-TIFF........................... 177
Problems when Sending and Receiving Faxes. . . . .177
Cannot Send or Receive Faxes..............177
Cannot Send Faxes......................178
Cannot Send Faxes to a Specic Recipient. . . . . 179
Cannot Send Faxes at a Specied Time....... 179
Cannot Receive Faxes....................179
Memory Full Error Occurs................179
Sent Fax Quality Is Poor..................180
Faxes Are Sent at the Wrong Size............180
Received Fax Quality Is Poor...............181
Cannot Receive A3 Size Faxes..............181
Received Faxes Are Not Printed............ 181
Other Faxing Problems.....................181
Cannot Make Calls on the Connected
Telephone............................181
8
Page 9

User's Guide
Contents
Answering Machine Cannot Answer Voice
Calls................................182
Sender's Fax Number Not Displayed on
Received Faxes or the Number Is Wrong......182
Other Problems..........................182
Slight Electric Shock when Touching the
Printer...............................182
Operation Sounds Are Loud...............182
e Date and Time Are Incorrect........... 182
Memory Device Is not Recognized..........183
Cannot Save Data to a Memory Device.......183
Forgot Your Password....................183
Application Is Blocked by a Firewall (for
Windows Only)........................183
Appendix
Technical Specications....................184
Printer
Scanner Specications...................184
Interface Specications...................185
Fax Specications.......................185
Wi - F i
Ethernet Specications...................186
Security Protocol.......................186
External USB Device Specications..........187
Supported Data
Dimensions...........................188
Electrical Specications..................188
Environmental Specications..............189
System Requirements....................189
Font Information.........................190
Available Fonts for PostScript..............190
Available Fonts for PCL 5.................191
Available Fonts for PCL 6.................193
List of Symbol Sets......................194
Regulatory Information....................200
Standards and Approvals................. 200
Restrictions on Copying..................201
Printer Transfer and Transportation...........202
Printer Transfer Within a Short Distance. . . . . . 202
Transporting the Printer..................202
Installing the Optional Units.................203
Optional Cabinet Code...................203
Installing the Optional Cabinet.............203
Optional Paper Cassette Unit Code..........208
Installing the Optional Paper Cassette Units. . . 209
Printer Sharing...........................213
Where to Get Help........................214
Technical Support Web Site................214
Specications
Specications
....................184
.....................186
Specications
..............187
Contacting Epson Support................214
9
Page 10

User's Guide
About This Manual
About This Manual
Introduction to the Manuals
e latest versions of the following manuals are available from the Epson support website.
http://www.epson.eu/Support (Europe)
http://support.epson.net/ (outside Europe)
❏ Important Safety Instructions (paper manual)
Provides you with instructions to ensure the safe use of this printer. is manual may not be included
depending on model and region.
❏ Start Here (paper manual)
Provides you with an introduction to the printer and services.
❏ User's Guide (PDF manual)
is manual. Provides instructions on using the printer, replacing ink cartridges, maintenance, and solving
problems.
❏ Network Guide (PDF manual)
Provides information on network settings and solving problems when using the printer on a network.
❏ Administrator's Guide (PDF manual)
Provides network administrators with information on management and printer settings.
❏ Epson Connect Guide (PDF manual)
Provides information on Epson Connect services.
website.
https://www.epsonconnect.com/
http://www.epsonconnect.eu (Europe only)
As well as the manuals above, check the various types of help information available from the printer itself or from
the applications.
guide is available from the Epson Connect portal
is
Marks and Symbols
Caution:
!
Instructions that must be followed carefully to avoid bodily injury.
Important:
c
Instructions that must be observed to avoid damage to your equipment.
Note:
Instructions containing useful tips and restrictions on printer operation.
&
Related Information
10
Page 11

User's Guide
About This Manual
Links to related sections.
Descriptions Used in this Manual
❏ Screenshots of the printer driver and the EPSON Scan (scanner driver) screens are from Windows 8 or Mac OS
X v10.8.x. e content displayed on the screens varies depending on the model and situation.
❏ Illustrations of the printer used in this manual are examples only. Although there may be slight
depending on the model, the method of operation is the same.
❏ Some of the menu items on the LCD screen vary depending on the model and settings.
dierences
Operating System References
Windows
In this manual, terms such as "Windows 8.1", "Windows 8", "Windows 7", "Windows Vista", "Windows XP",
"Windows Server 2012", "Windows Server 2008 R2", "Windows Server 2008", "Windows Server 2003 R2", and
"Windows Server 2003" refer to the following operating systems. Additionally, "Windows" is used to refer to all
versions.
❏ Microso® Windows® 8.1 operating system
❏
Microso®
❏ Microso® Windows® 7 operating system
❏ Microso® Windows Vista® operating system
❏ Microso® Windows® XP operating system
❏ Microso® Windows® XP Professional x64 Edition operating system
Windows® 8 operating system
❏ Microso® Windows Server® 2012 operating system
❏ Microso® Windows Server® 2008 R2 operating system
❏ Microso® Windows Server® 2008 operating system
❏
Microso®
❏ Microso® Windows Server® 2003 operating system
Mac OS X
In this manual, "Mac OS X v10.9.x" refers to "OS X Mavericks" and "Mac OS X v10.8.x" refers to "OS X Mountain
Lion". Additionally, "Mac OS X" is used to refer to "Mac OS X v10.9.x", "Mac OS X v10.8.x", "Mac OS X v10.7.x",
"Mac OS X v10.6.x", and "Mac OS X v10.5.8".
Windows Server® 2003 R2 operating system
11
Page 12

User's Guide
Important Instructions
Important Instructions
Safety Instructions
Read and follow these instructions to ensure safe use of this printer. Make sure you keep this manual for future
reference. Also, be sure to follow all warnings and instructions marked on the printer.
❏ Use only the power cord supplied with the printer and do not use the cord with any other equipment. Use of
other cords with this printer or the use of the supplied power cord with other equipment may result in re or
electric shock.
❏ Be sure your AC power cord meets the relevant local safety standard.
❏ Never disassemble, modify, or attempt to repair the power cord, plug, printer unit, scanner unit, or options by
yourself, except as specically explained in the printer's manuals.
❏ Unplug the printer and refer servicing to qualied service personnel under the following conditions:
e power cord or plug is damaged; liquid has entered the printer; the printer has been dropped or the casing
damaged; the printer does not operate normally or exhibits a distinct change in performance. Do not adjust
controls that are not covered by the operating instructions.
❏ Place the printer near a wall outlet where the plug can be easily unplugged.
❏ Do not place or store the printer outdoors, near excessive dirt or dust, water, heat sources, or in locations
subject to shocks, vibrations, high temperature or humidity.
❏ Take care not to spill liquid on the printer and not to handle the printer with wet hands.
❏ Keep the printer at least 22 cm away from cardiac pacemakers. Radio waves from this printer may adversely
aect the operation of cardiac pacemakers.
❏ If the LCD screen is damaged, contact your dealer. If the liquid crystal solution gets on your hands, wash them
thoroughly with soap and water. If the liquid crystal solution gets into your eyes, ush them immediately with
water. If discomfort or vision problems remain
❏ Avoid using a telephone during an electrical storm. ere may be a remote risk of electric shock from lightning.
❏ Do not use a telephone to report a gas leak in the vicinity of the leak.
❏ e printer is heavy and should not be
people should assume the correct positions as shown below.
lied
a thorough
aer
or carried by less than two people. When
ushing,
see a doctor immediately.
the printer, two
liing
12
Page 13

User's Guide
Important Instructions
❏ Be careful when you handle used ink cartridges, as there may be some ink around the ink supply port.
❏ If ink gets on your skin, wash the area thoroughly with soap and water.
❏ If ink gets into your eyes, ush them immediately with water. If discomfort or vision problems continue aer
a thorough ushing, see a doctor immediately.
❏ If ink gets into your mouth, see a doctor right away.
❏ Do not disassemble the ink cartridge and the maintenance box; otherwise ink may get into your eyes or on your
skin.
❏ Do not shake ink cartridges too vigorously; otherwise ink may leak from the cartridge.
❏ Keep ink cartridges and maintenance box out of the reach of children.
Printer Advisories and Warnings
Read and follow these instructions to avoid damaging the printer or your property. Make sure you keep this
manual for future reference.
Advisories and Warnings for Setting Up/Using the Printer
❏ Do not block or cover the vents and openings in the printer.
❏ Use only the type of power source indicated on the printer's label.
❏ Avoid using outlets on the same circuit as photocopiers or air control systems that regularly switch on and
❏ Avoid electrical outlets controlled by wall switches or automatic timers.
❏ Keep the entire computer system away from potential sources of electromagnetic interference, such as
loudspeakers or the base units of cordless telephones.
❏ e power-supply cords should be placed to avoid abrasions, cuts, fraying, crimping, and kinking. Do not place
objects on top of the power-supply cords and do not allow the power-supply cords to be stepped on or run over.
Be particularly careful to keep all the power-supply cords straight at the ends and the points where they enter
and leave the transformer.
❏ If you use an extension cord with the printer, make sure that the total ampere rating of the devices plugged into
the extension cord does not exceed the cord's ampere rating. Also, make sure that the total ampere rating of all
devices plugged into the wall outlet does not exceed the wall outlet's ampere rating.
❏ If you plan to use the printer in Germany, the building installation must be protected by a 10 or 16 amp circuit
breaker to provide adequate short-circuit protection and over-current protection for the printer.
❏ When connecting the printer to a computer or other device with a cable, ensure the correct orientation of the
connectors. Each connector has only one correct orientation. Inserting a connector in the wrong orientation
may damage both devices connected by the cable.
o.
❏ Place the printer on a at, stable surface that extends beyond the base of the printer in all directions. e
printer will not operate properly if it is tilted at an angle.
❏ When storing or transporting the printer, avoid tilting it, placing it vertically, or turning it upside down;
otherwise ink may leak.
❏ Allow space behind the printer for the cables.
❏ Allow space above the printer so that you can fully raise the document cover.
❏ Leave enough space in front of the printer for the paper to be fully ejected.
13
Page 14

User's Guide
Important Instructions
❏ Avoid places subject to rapid changes in temperature and humidity. Also, keep the printer away from direct
sunlight, strong light, or heat sources.
❏ Do not insert objects through the slots in the printer.
❏ Do not put your hand inside the printer during printing.
❏ Do not touch the white
❏ Do not use aerosol products that contain ammable gases inside or around the printer. Doing so may cause
re.
❏ Do not move the print head by hand; otherwise, you may damage the printer.
❏ Be careful not to trap your ngers when closing the document cover.
❏ Do not press too hard on the scanner glass when placing the originals.
❏ Always turn the printer o using the
P
until the
❏ Before transporting the printer, make sure that the print head is in the home (far right) position and the ink
cartridges are in place.
❏ If you are not going to use the printer for a long period, be sure to unplug the power cord from the electrical
outlet.
light stops
cable inside the printer.
at
P
button. Do not unplug the printer or turn o the power at the outlet
ashing.
Advisories and Warnings for Using the Printer with a Wireless Connection
❏ Do not use this printer inside medical facilities or near medical equipment. Radio waves from this printer may
adversely
the operation of electrical medical equipment.
aect
❏ Do not use this printer near automatically controlled devices such as automatic doors or re alarms. Radio
waves from this printer may adversely aect these devices, and could lead to accidents due to malfunction.
Advisories and Warnings for Using the Touchscreen
❏ e LCD screen may contain a few small bright or dark spots, and because of its features it may have an uneven
brightness. ese are normal and do not indicate that it is damaged in any way.
❏ Only use a dry, so cloth for cleaning. Do not use liquid or chemical cleaners.
❏ e exterior cover of the touchscreen could break if it receives a heavy impact. Contact your dealer if the panel
surface chips or cracks, and do not touch or attempt to remove the broken pieces.
❏ Press the touchscreen gently with your
❏ Do not operate by a sharp edge thing such as a ball point pen, sharp pencil, stylus pen and so on.
❏ Condensation inside the touchscreen due to abrupt changes in temperature or humidity may cause
performance to deteriorate.
Do not press force or operate with your nails.
nger.
Advisories and Warnings for Using the Optional Cabinet
❏
cabinet is exclusively designed to install this printer on top as well as the optional paper cassette units. Do
is
not install any other products except for the specied printer and paper cassette unit.
❏ Do not climb on the cabinet or place heavy object on it.
❏ Make sure you use the cabinet with the two stands attached.
14
Page 15

User's Guide
Important Instructions
❏ Secure the printer or the optional paper cassette unit to the cabinet using the two attachments and screws
supplied with the cabinet.
❏ When using the printer, make sure you lock the casters at the front of the cabinet.
❏ Do not move the cabinet when the casters are locked.
❏ When moving the cabinet with the printer or the optional paper cassette unit installed, avoid moving over
uneven or rough surfaces.
Protecting Your Personal Information
is printer allows you to store names, telephone numbers, and email addresses in its memory even when the
power is turned o.
If you give the printer to someone else or dispose of it, erase the memory by selecting Setup > System
Administration > Restore Default Settings > Clear All Data and Settings on the control panel.
15
Page 16

User's Guide
Administrator Settings
Administrator Settings
Locking the Printer Settings Using an Administrator's Password
You can set an administrator's password to lock the printer settings so that they cannot be changed by other users.
You can lock the following settings.
❏ System Administration
❏ Eco Mode
❏ Presets
❏ Contacts
You cannot change settings without entering the password. is password is also required when you make settings
using Web Cong or EpsonNet Cong.
Important:
c
Do not forget the password. If you forget the password, contact your dealer.
1. Enter Setup from the home screen.
2. Select Admin Settings > Admin Password.
3. Select Register, and then enter a password.
4. Enter the password again.
5. Select Lock Setting, and then enable it.
Unlocking the Printer Settings
1. Enter Setup from the home screen.
2. Select Admin Settings.
3.
Enter the administrator's password.
4. Select Lock Setting, and then disable it.
User Feature Restrictions
Note:
Mac OS X is not supported.
e administrator can restrict printer features for individual users. To use a restricted feature, the user has to enter
an ID and password on the control panel. Use this feature to prevent misuse of the printer.
16
Page 17

User's Guide
Administrator Settings
Use Web Cong to congure restriction settings on a computer. See the Administrator's Guide for more details.
Aer conguring settings on the computer, enable the user restriction feature on the printer. Select Setup > System
Administration > Security Settings > Access Control from the home screen, and then enable it.
17
Page 18
User's Guide
Printer Basics
Printer Basics
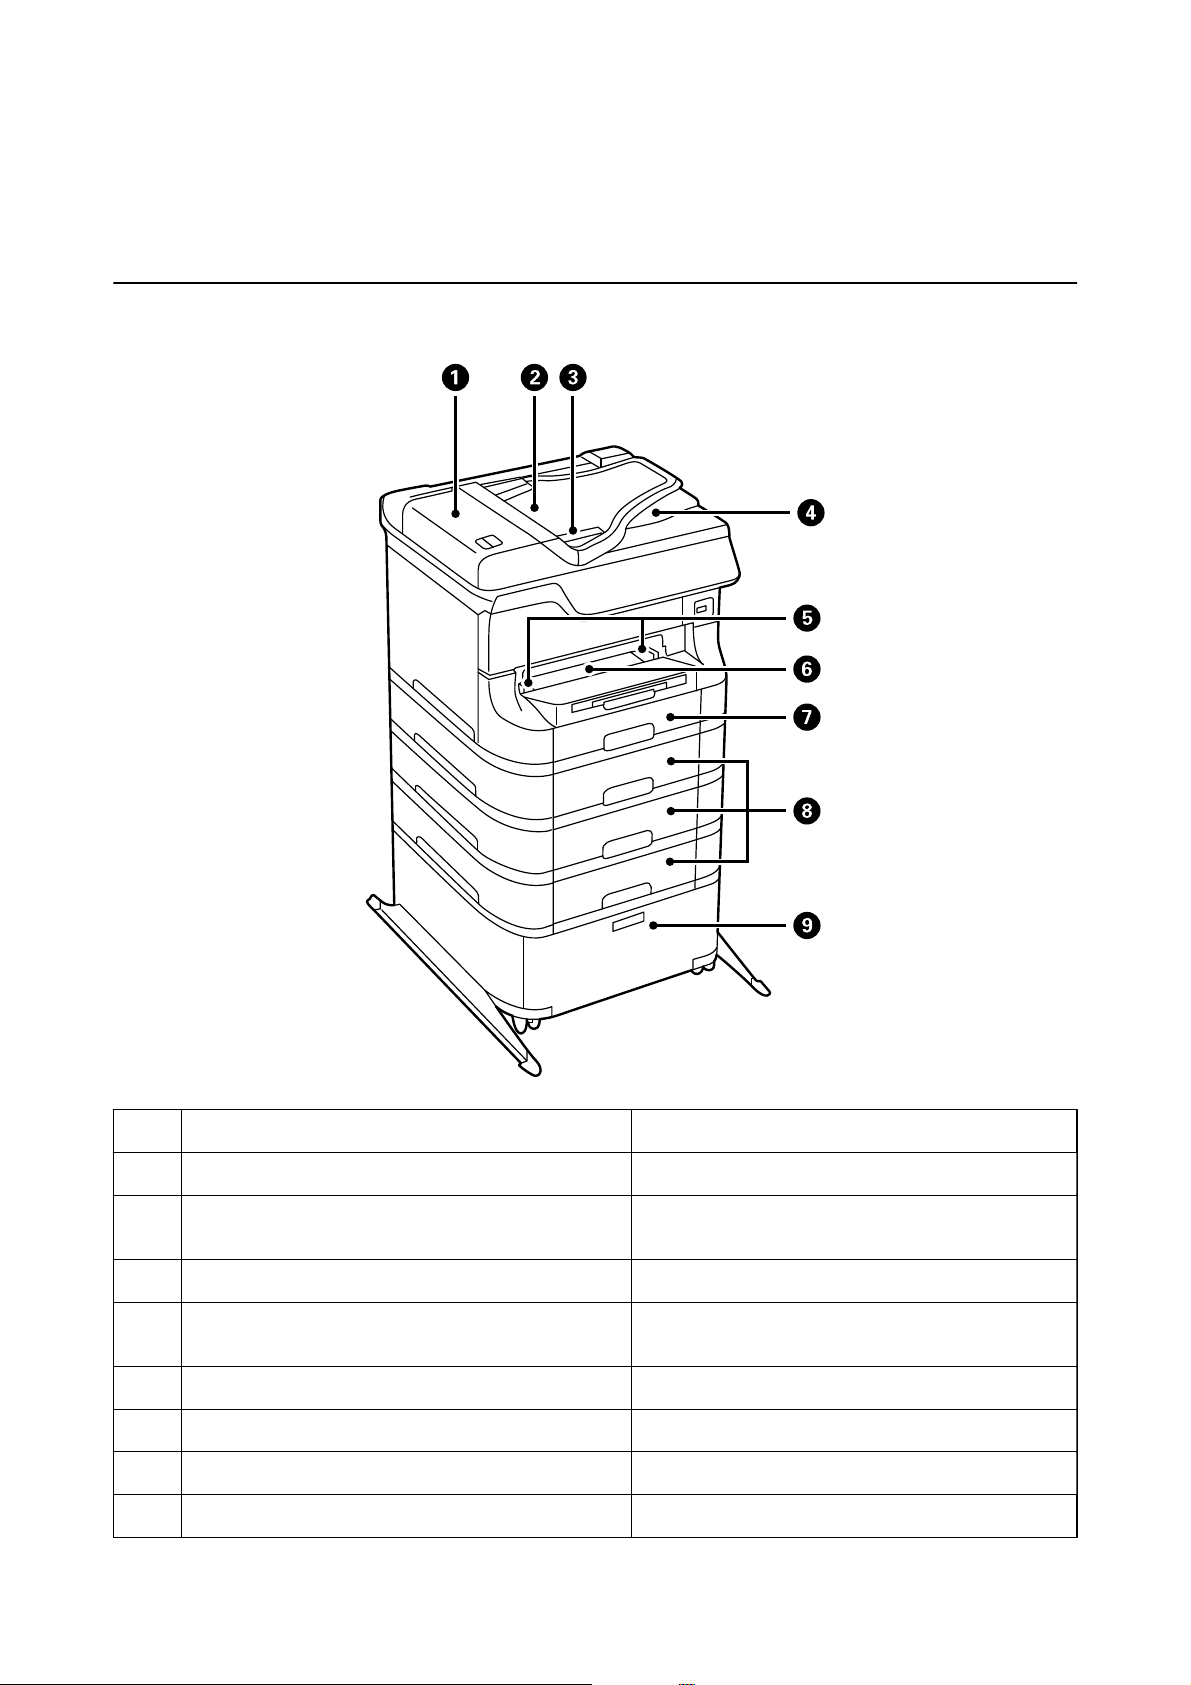
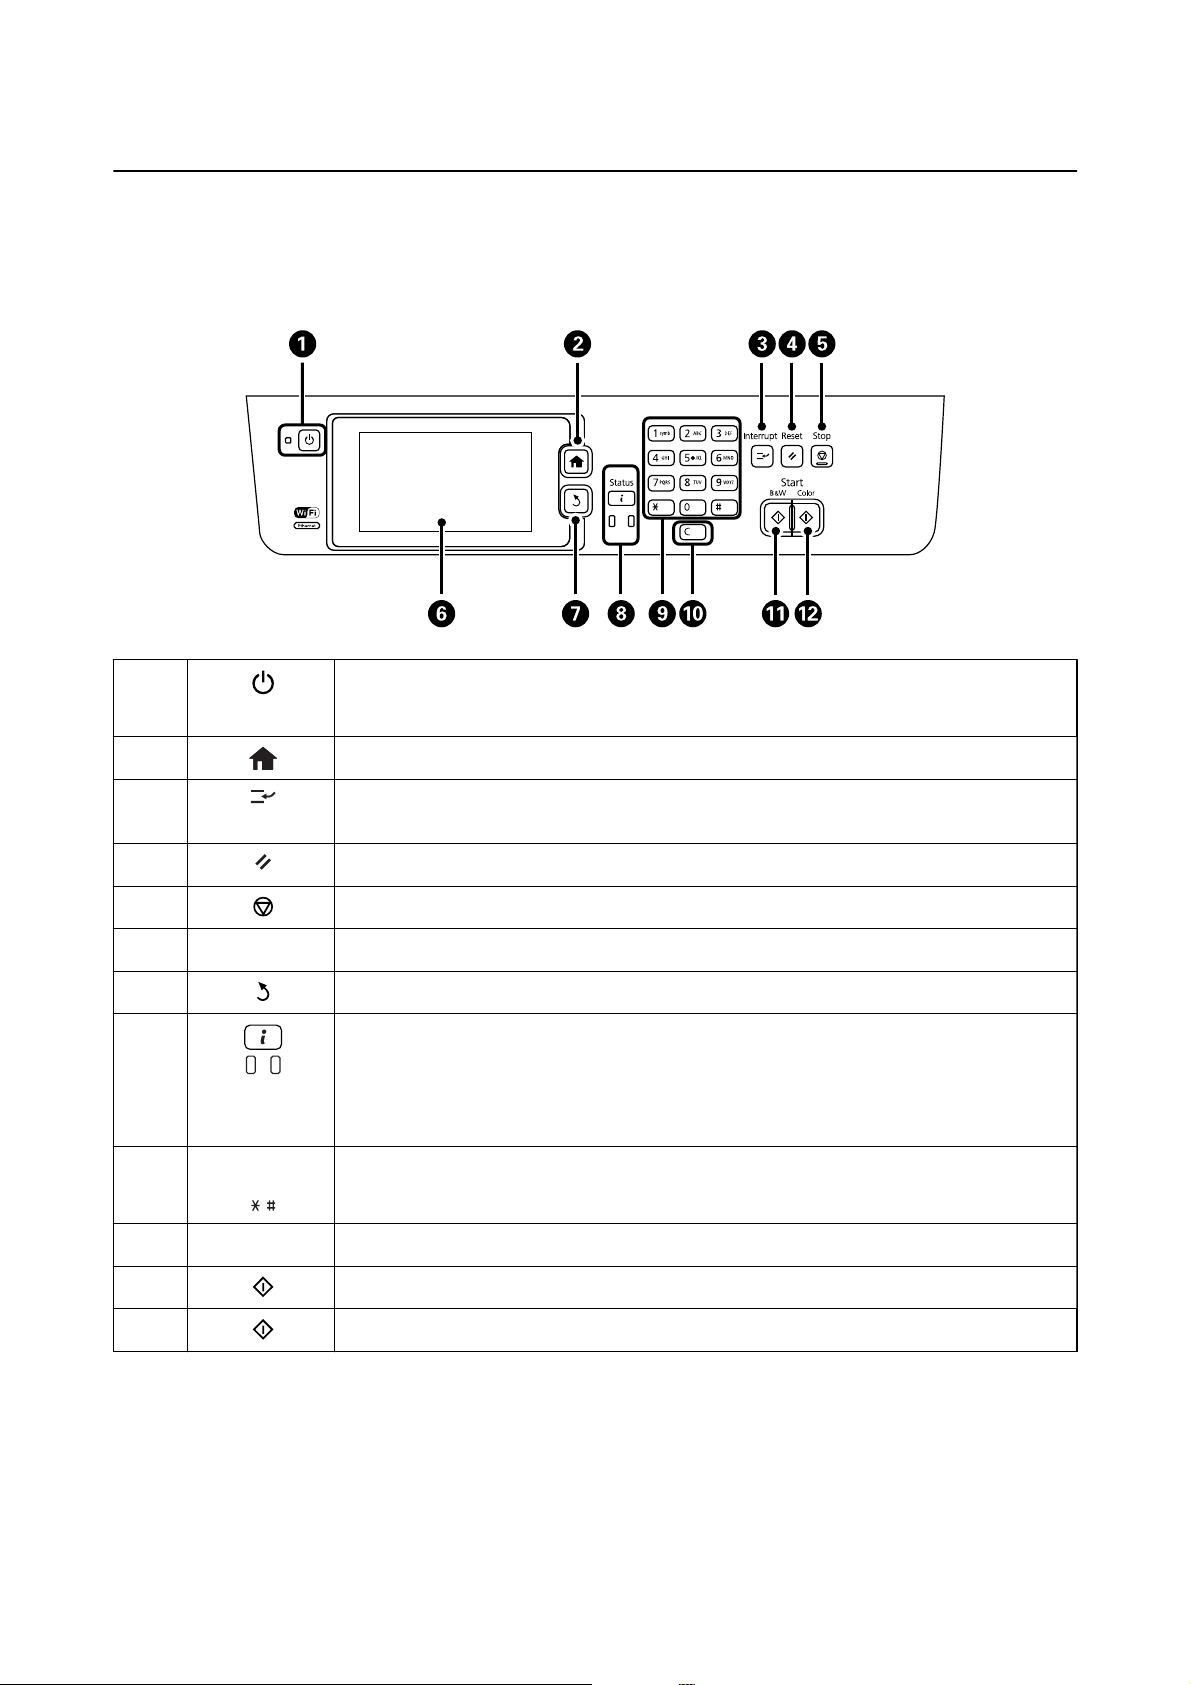
Part Names and Functions
A
B
C
D
E
F
G
H
I
ADF (Automatic Document Feeder) cover (F) Open when removing jammed originals in the ADF.
ADF input tray (F) Feeds originals automatically.
Edge guides Feeds originals straight into the printer. Slide to the
edges of the originals.
ADF output tray Holds originals ejected from the ADF.
Edge guides Feeds the paper straight into the printer. Slide to the
edges of the paper.
Front paper feed slot (B2) Load one sheet of paper at a time by hand.
Paper cassette 1 (C1) Loads paper.
Paper cassette 2 to 4 (C2 to C4) Optional paper cassette units. Load paper.
Cabinet Optional cabinet. Stores paper or other consumables.
18
Page 19
User's Guide
Printer Basics
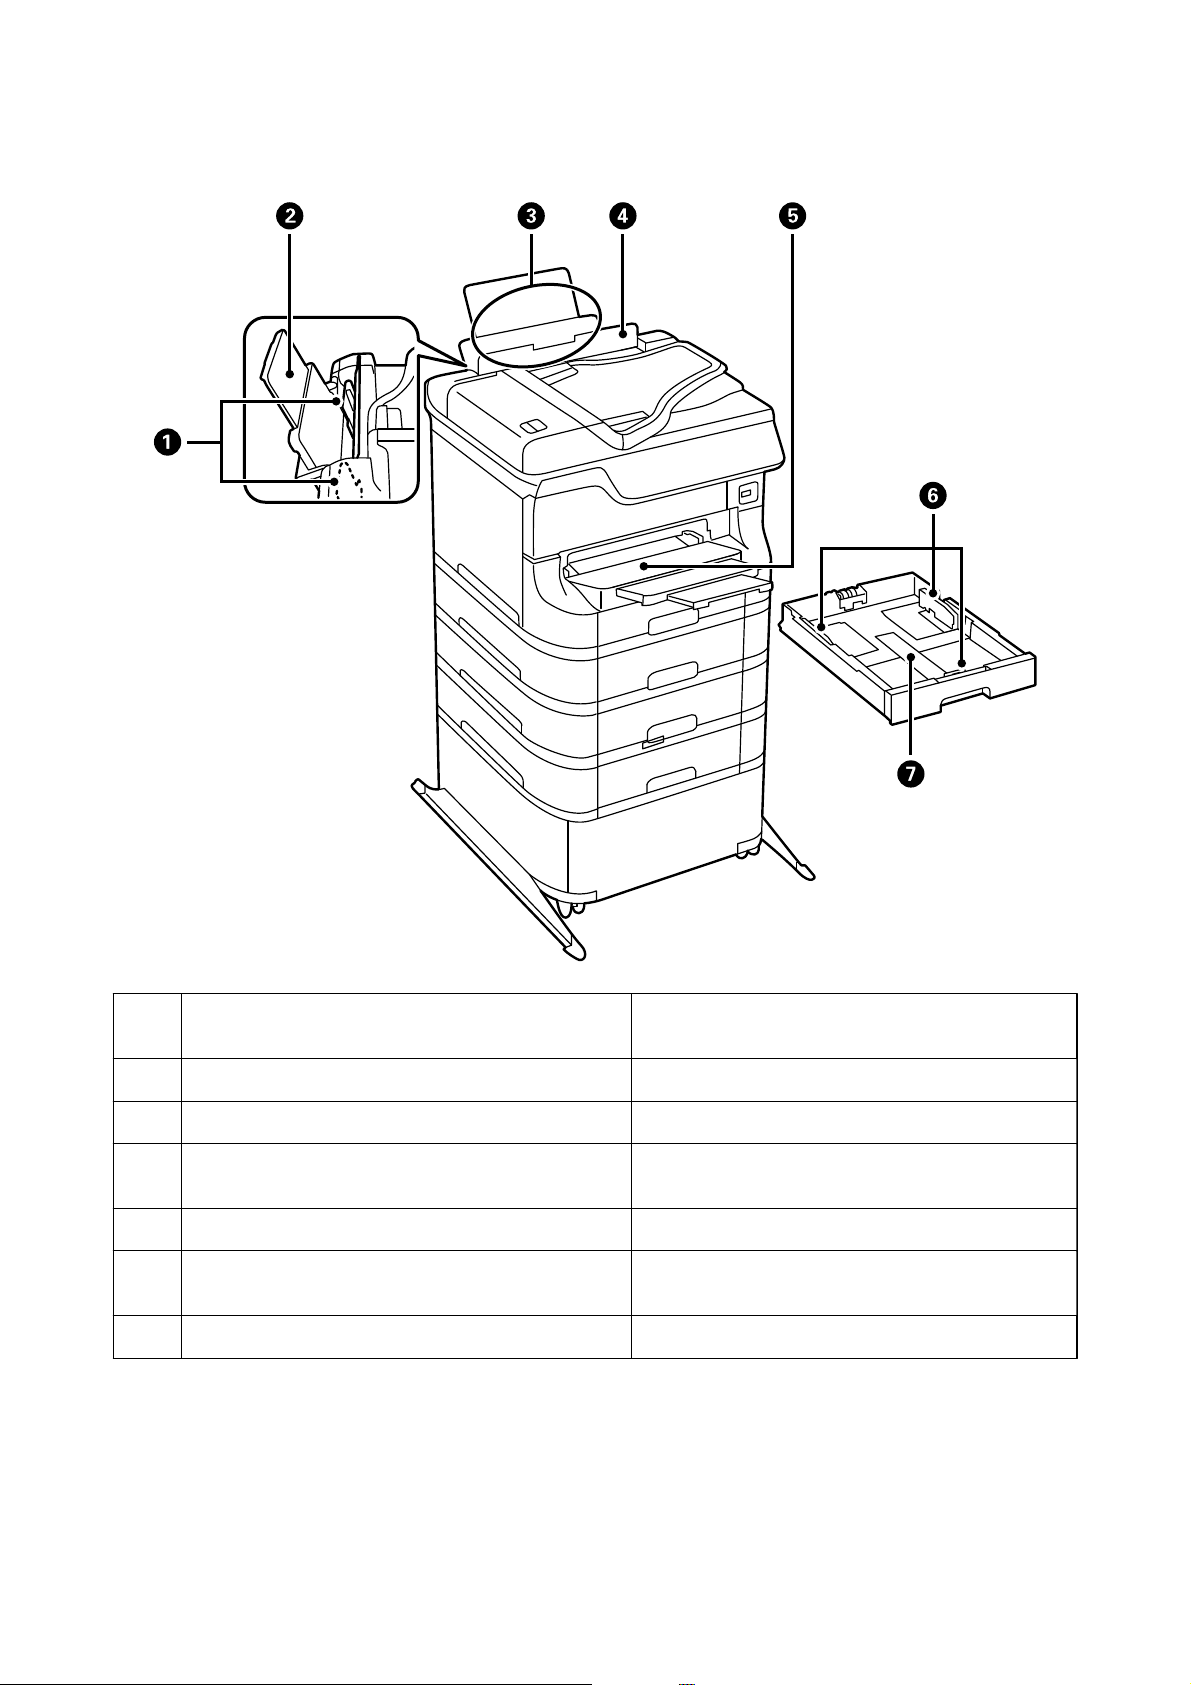
A
B
C
D
E
F
G
Edge guides Feeds the paper straight into the printer. Slide to the
edges of the paper.
Paper support Supports loaded paper.
Rear paper feed (B1) Loads paper.
Feeder guard Prevents foreign substance from entering the printer.
Usually keep this guard closed.
Output tray Holds the ejected paper.
Edge guides Feeds the paper straight into the printer. Slide to the
edges of the paper.
Paper cassette Loads paper.
19
Page 20
User's Guide
Printer Basics
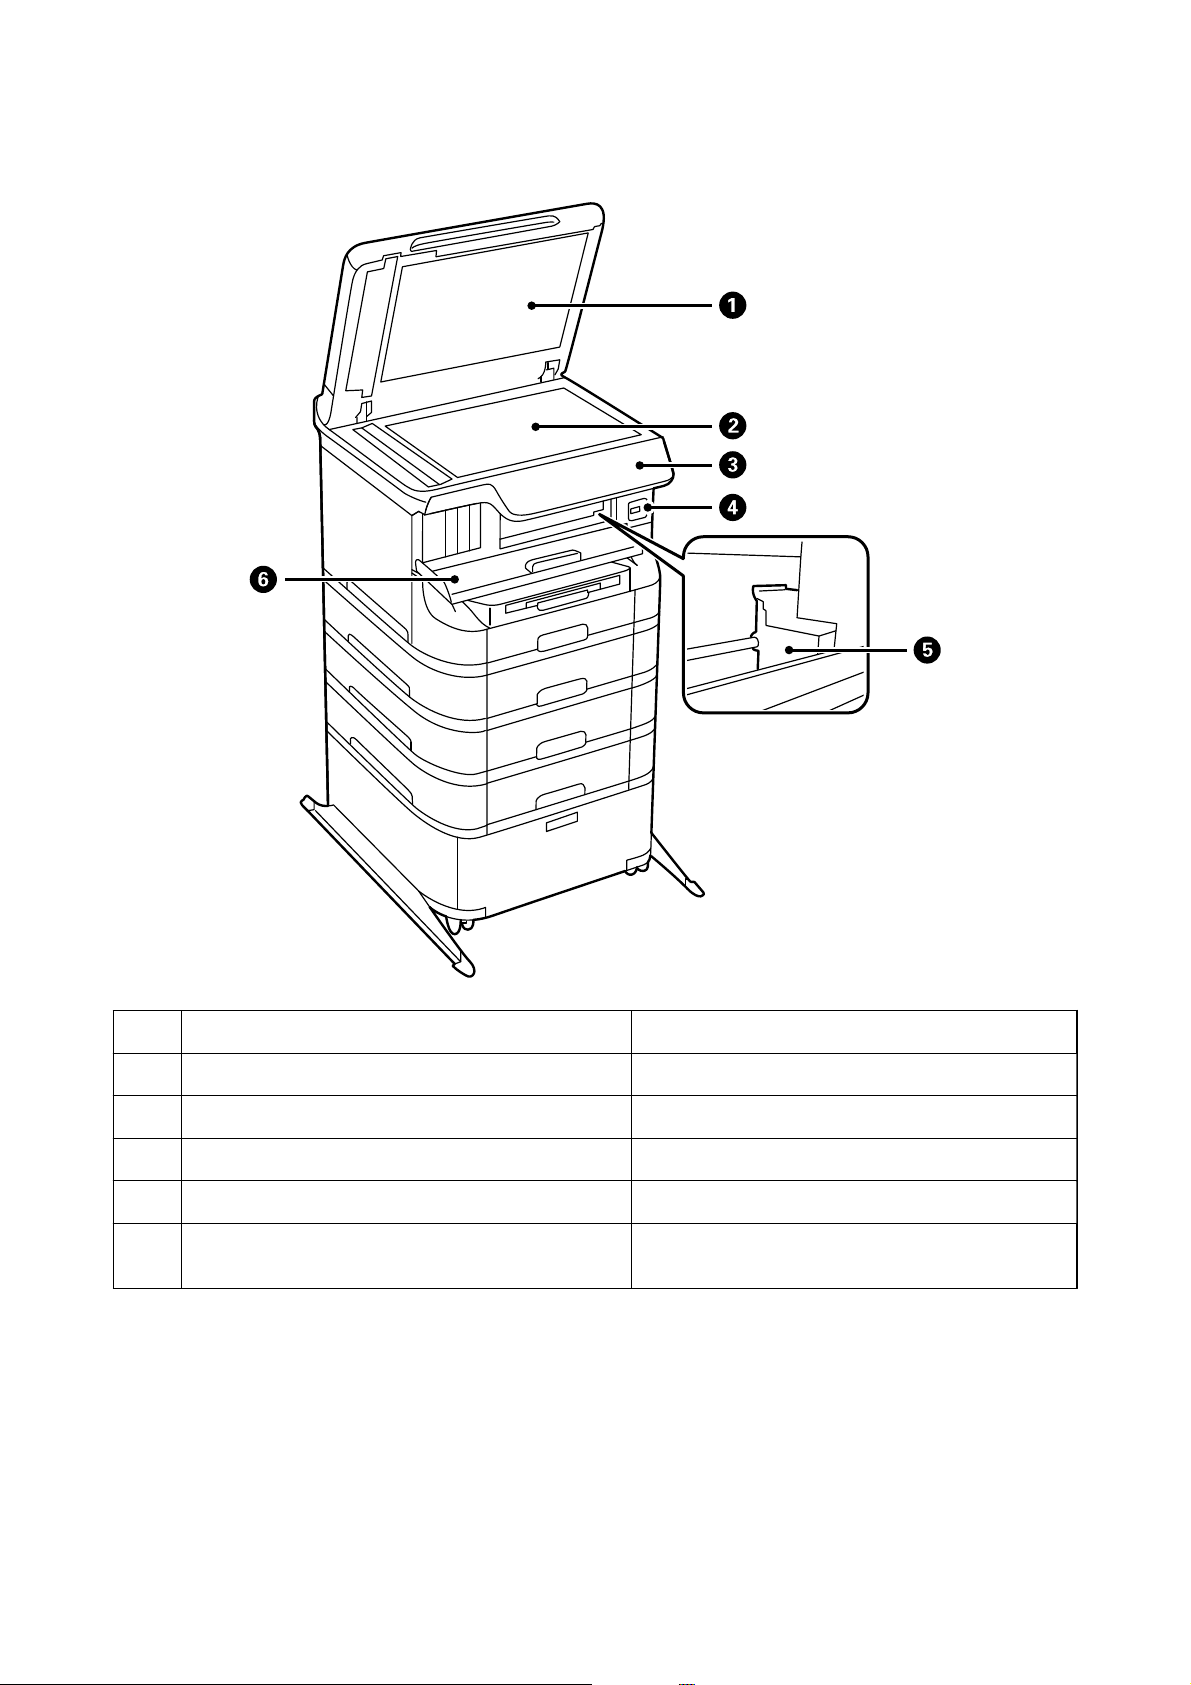
A
B
C
D
E
F
Document cover Blocks external light while scanning.
Scanner glass Scans placed originals.
Control panel Operates the printer.
External interface USB port Connects memory devices.
Print head Fires ink.
Front cover (A) Open when replacing ink cartridges or removing
jammed paper inside the printer.
20
Page 21
User's Guide
Printer Basics
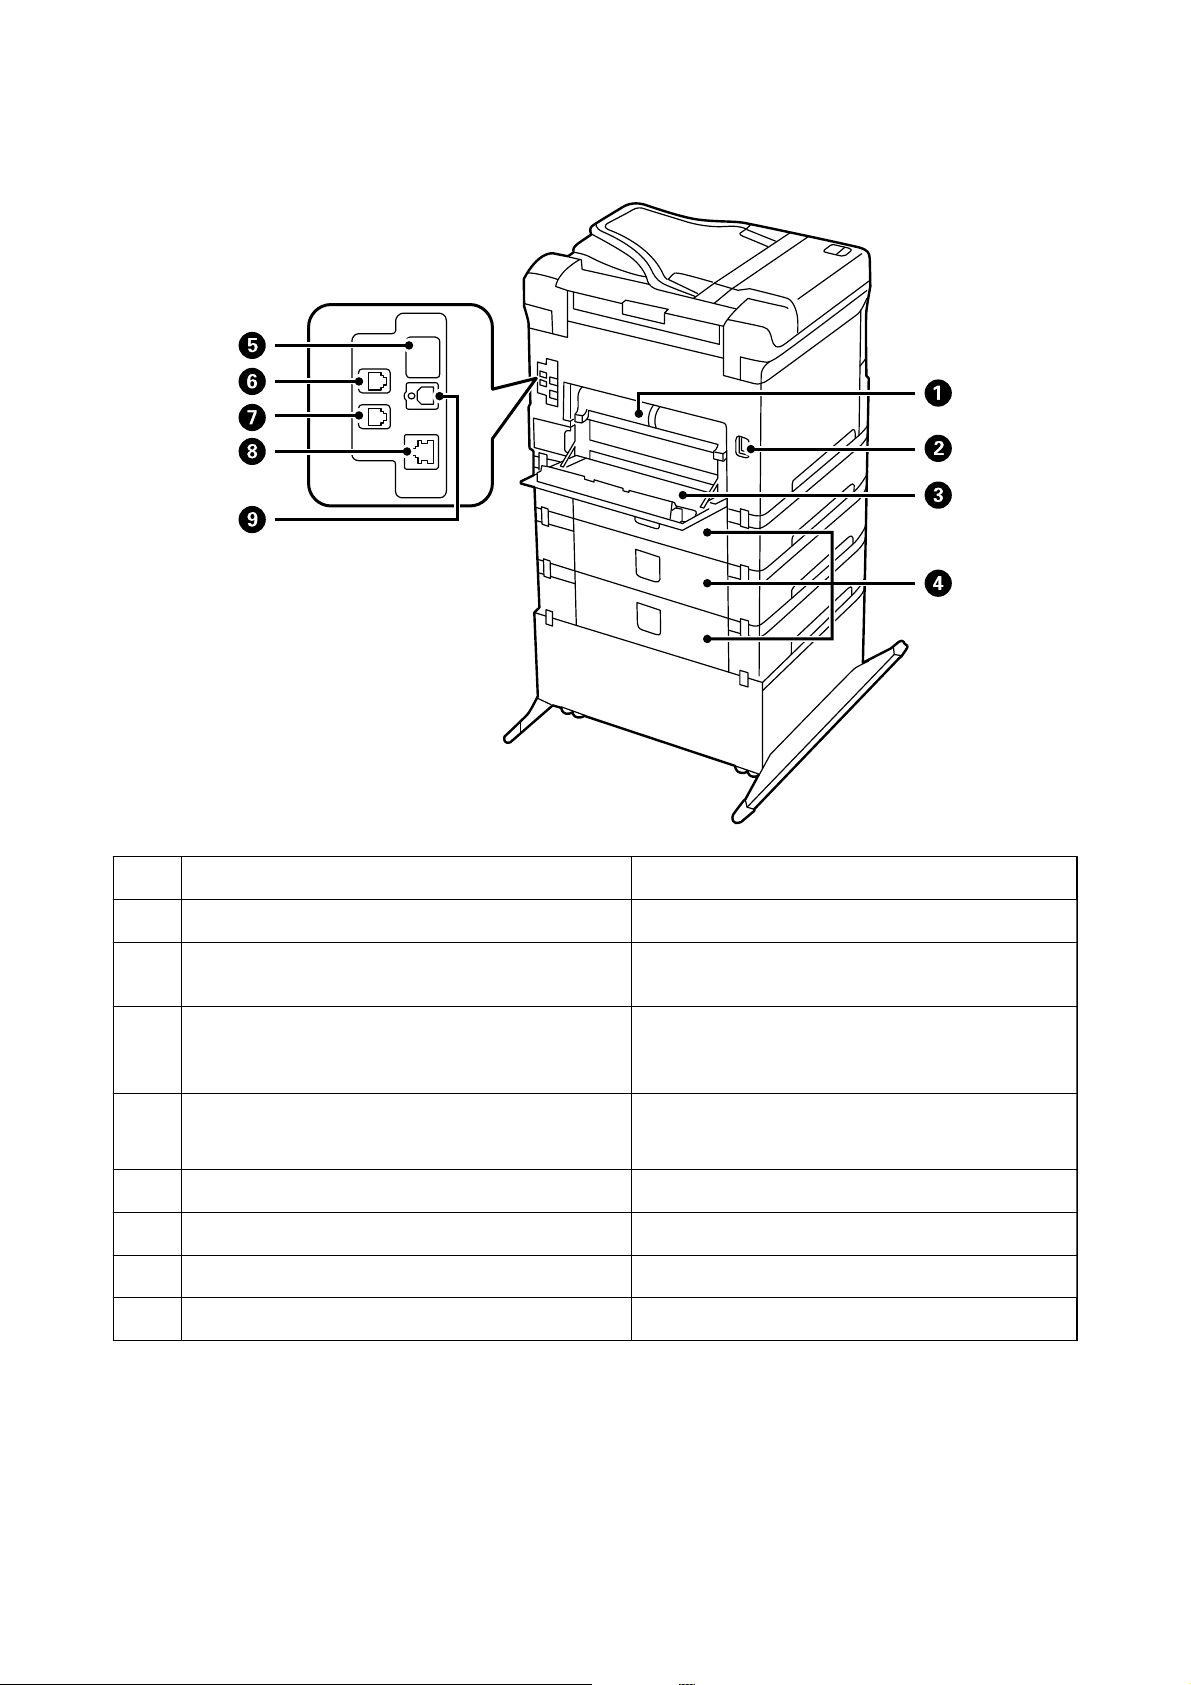
A
B
C
D
E
F
G
H
I
Rear cover 2 (D2) Pull out when removing jammed paper.
AC inlet Connects the power cord.
Rear cover 1 (D1) Open when replacing the maintenance box or
maintenance rollers, or removing jammed paper.
Rear cover (E) Covers for the optional paper cassette units. Open
when replacing the maintenance rollers or removing
jammed paper.
Service USB port USB port for future use.
Do not remove the sticker.
LINE port Connects a phone line.
EXT. port Connects external phone devices.
LAN port Connects a LAN cable.
USB port Connects a USB cable.
21
Page 22
User's Guide
Control Panel
Buttons and Lights
Printer Basics
A
B
C
D
E
F
G
H
I
J
Turns the printer on or o.
Unplug the power cord when the power light is o.
Displays the home screen.
Pauses the current job and allows you to interrupt another job. Press this button again to
restart a paused job.
Returns the current settings to their previous status.
Stops the current operation.
- Displays menus and messages. Touch the LCD screen to select a menu, and scroll by swiping.
Returns to the previous screen.
Displays the Status Menu. You can check the printer's status and job history.
The error light on the left ashes or turns on when an error occurs.
The data light on the right ashes when the printer is processing data. It turns on when there
are queued jobs.
0 - 9
,
c Clears number settings such as the number of copies.
Enters numbers, characters, and symbols.
K
L
Starts printing, copying, scanning, and faxing in black and white.
Starts printing, copying, scanning, and faxing in color.
Icons Displayed on the LCD Screen
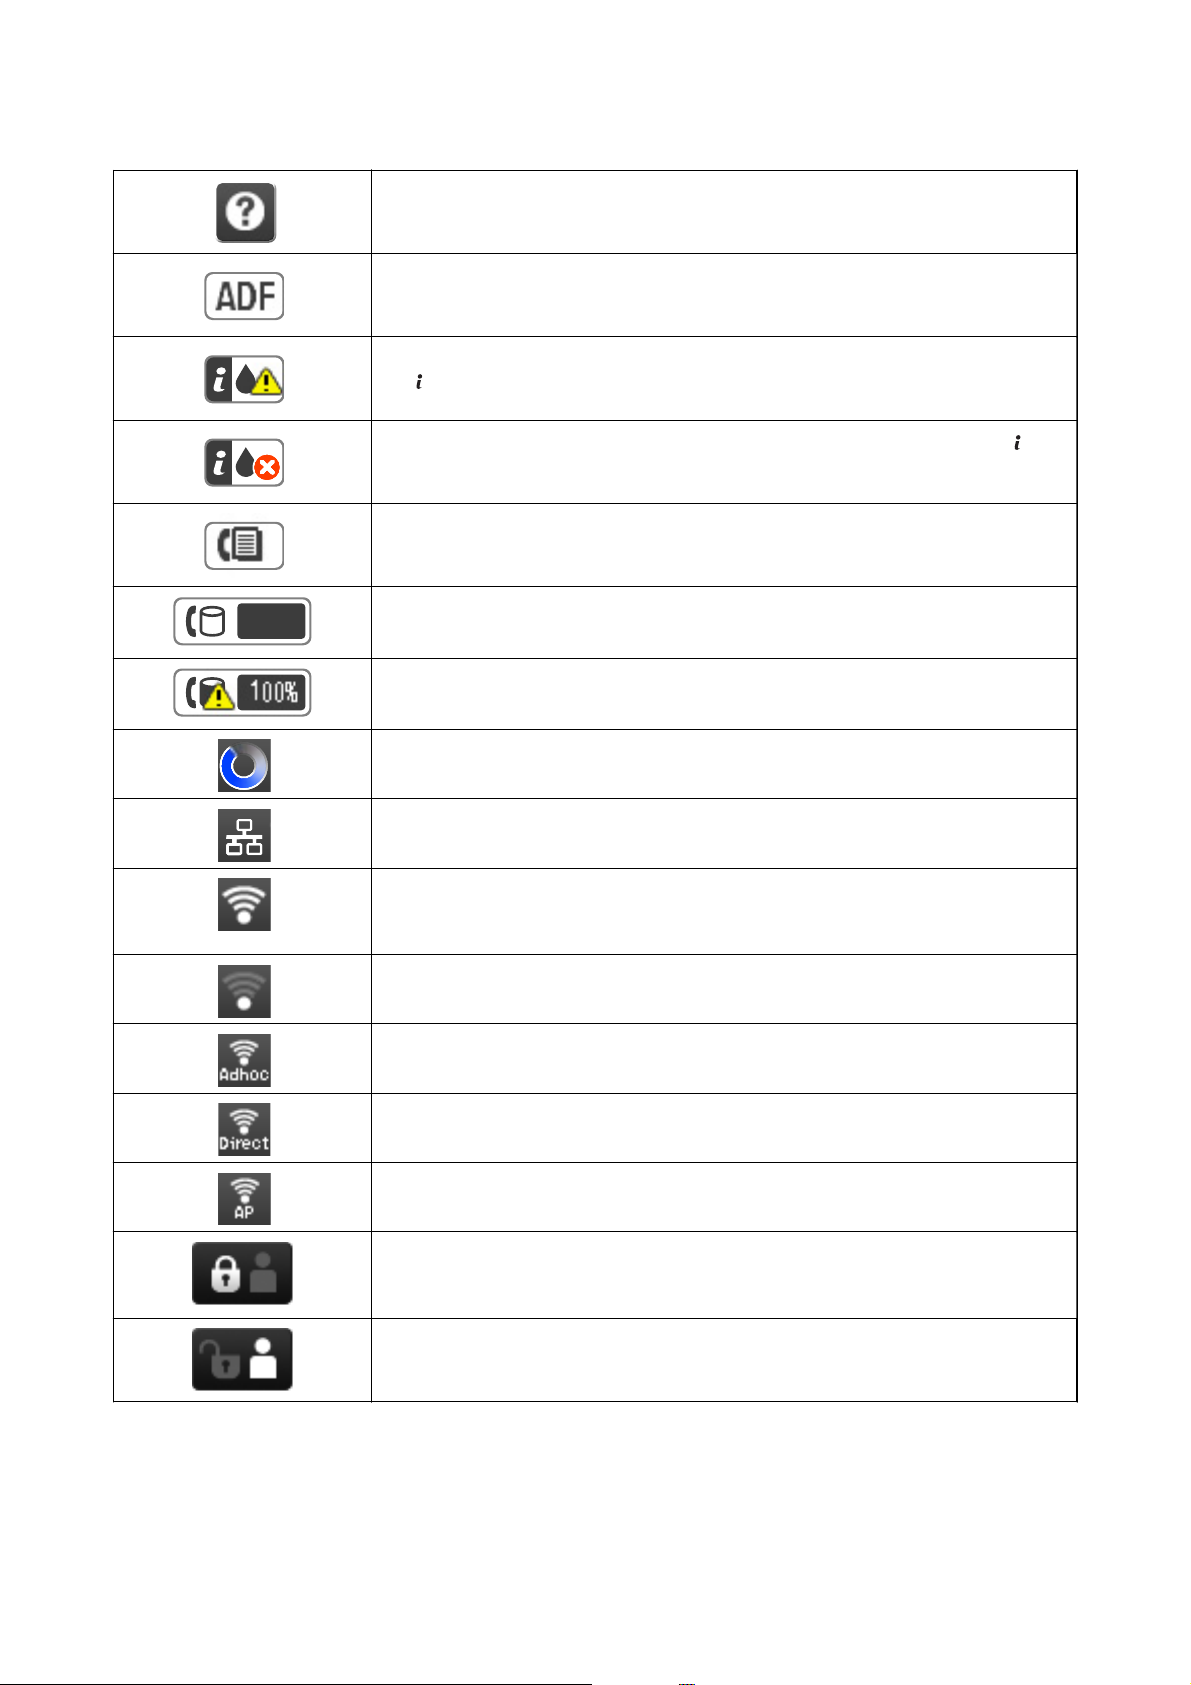
e following icons are displayed on the LCD screen depending on the printer's status. Press the network icon to
check the current network settings and make Wi-Fi settings.
22
Page 23
User's Guide
Printer Basics
Press this icon to view operating instructions such as how to load paper, and how to place
originals.
Turns on when originals are placed in the ADF.
Turns on when ink cartridges are running low or the maintenance box is nearly full. Press
button, and then select Printer Information to check the status.
the
Turns on when ink cartridges are expended or the maintenance box is full. Press the
button, and then select Printer Information to check the status.
Turns on when received documents that have not yet been read, printed, or saved, are
stored in the product's memory.
Indicates fax memory usage.
Indicates that the fax memory is full. Delete unnecessary documents from the inbox.
Indicates that the printer is connecting to a wireless (Wi-Fi) or wired (Ethernet) network.
Turns on while the printer is connected to a wired (Ethernet) network.
Turns on while the printer is connected to a wireless (Wi-Fi) network. The number of bars
indicates the signal strength of the connection. The more bars there are, the stronger the
connection.
Indicates a problem with the printer's wireless (Wi-Fi) network connection, or that the
printer is searching for a wireless (Wi-Fi) network connection.
Indicates that the printer is connected to a wireless (Wi-Fi) network in Ad Hoc mode.
Indicates that the printer is connected to a wireless (Wi-Fi) network in Wi-Fi Direct mode.
Indicates that the printer is connected to a wireless (Wi-Fi) network in Simple AP mode.
Indicates that the user restriction feature is enabled. Press this icon to log in to the printer.
You need to enter a user name and password. Contact your printer administrator for login
information.
Indicates that a user with access permission has logged in.
Related Information
& “Memory Full Error Occurs” on page 179
23
Page 24
User's Guide
Printer Basics
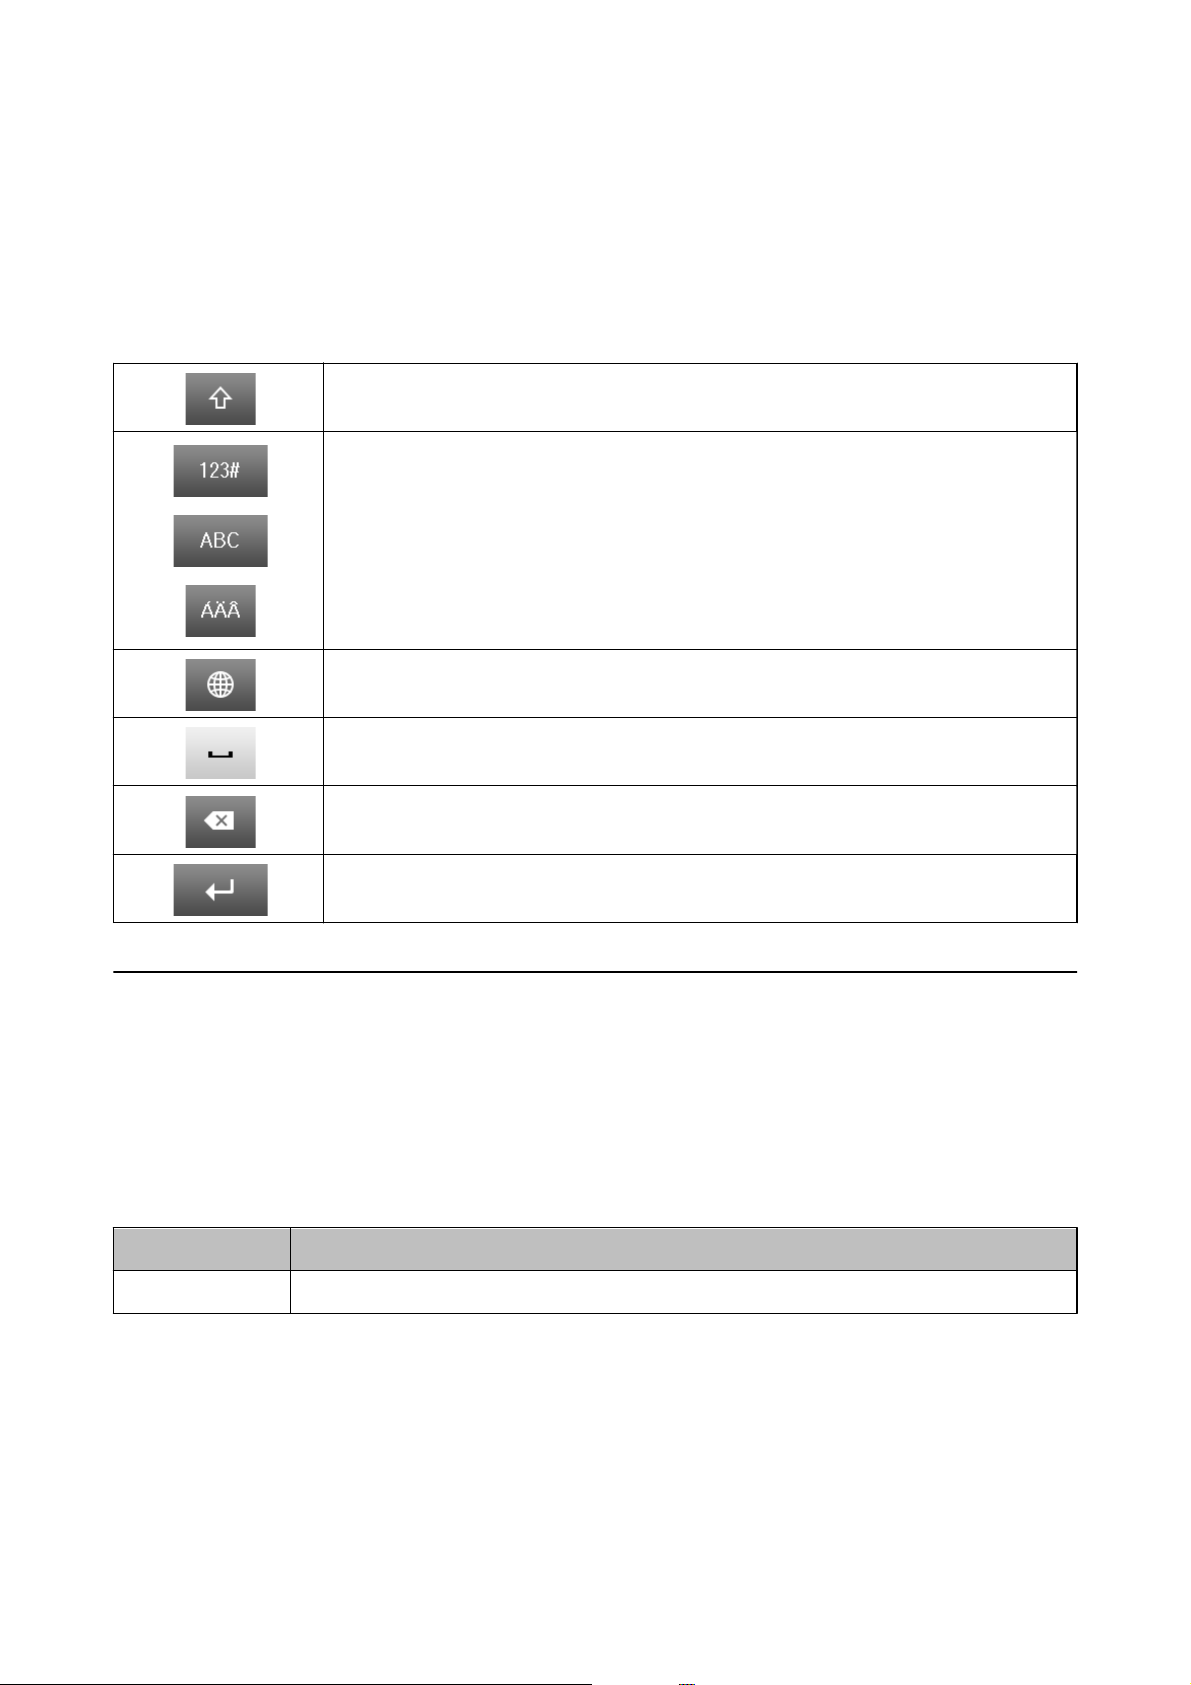
Icons Displayed on the Software Keyboard of the LCD Screen
You can enter characters and symbols by using the soware keyboard screen when you register a contact, make
network settings, and so on. e following icons are displayed on the soware keyboard screen.
Note:
Available icons vary depending on the setting item.
Switches between upper case and lower case.
Switches the character type.
123#: Enters numbers and symbols.
ABC: Enters letters.
ÁÄÂ: Enters special characters such as umlauts and accents.
Changes the keyboard layout.
Enters a space.
Deletes a character to the left.
Enters a character.
Menu Options
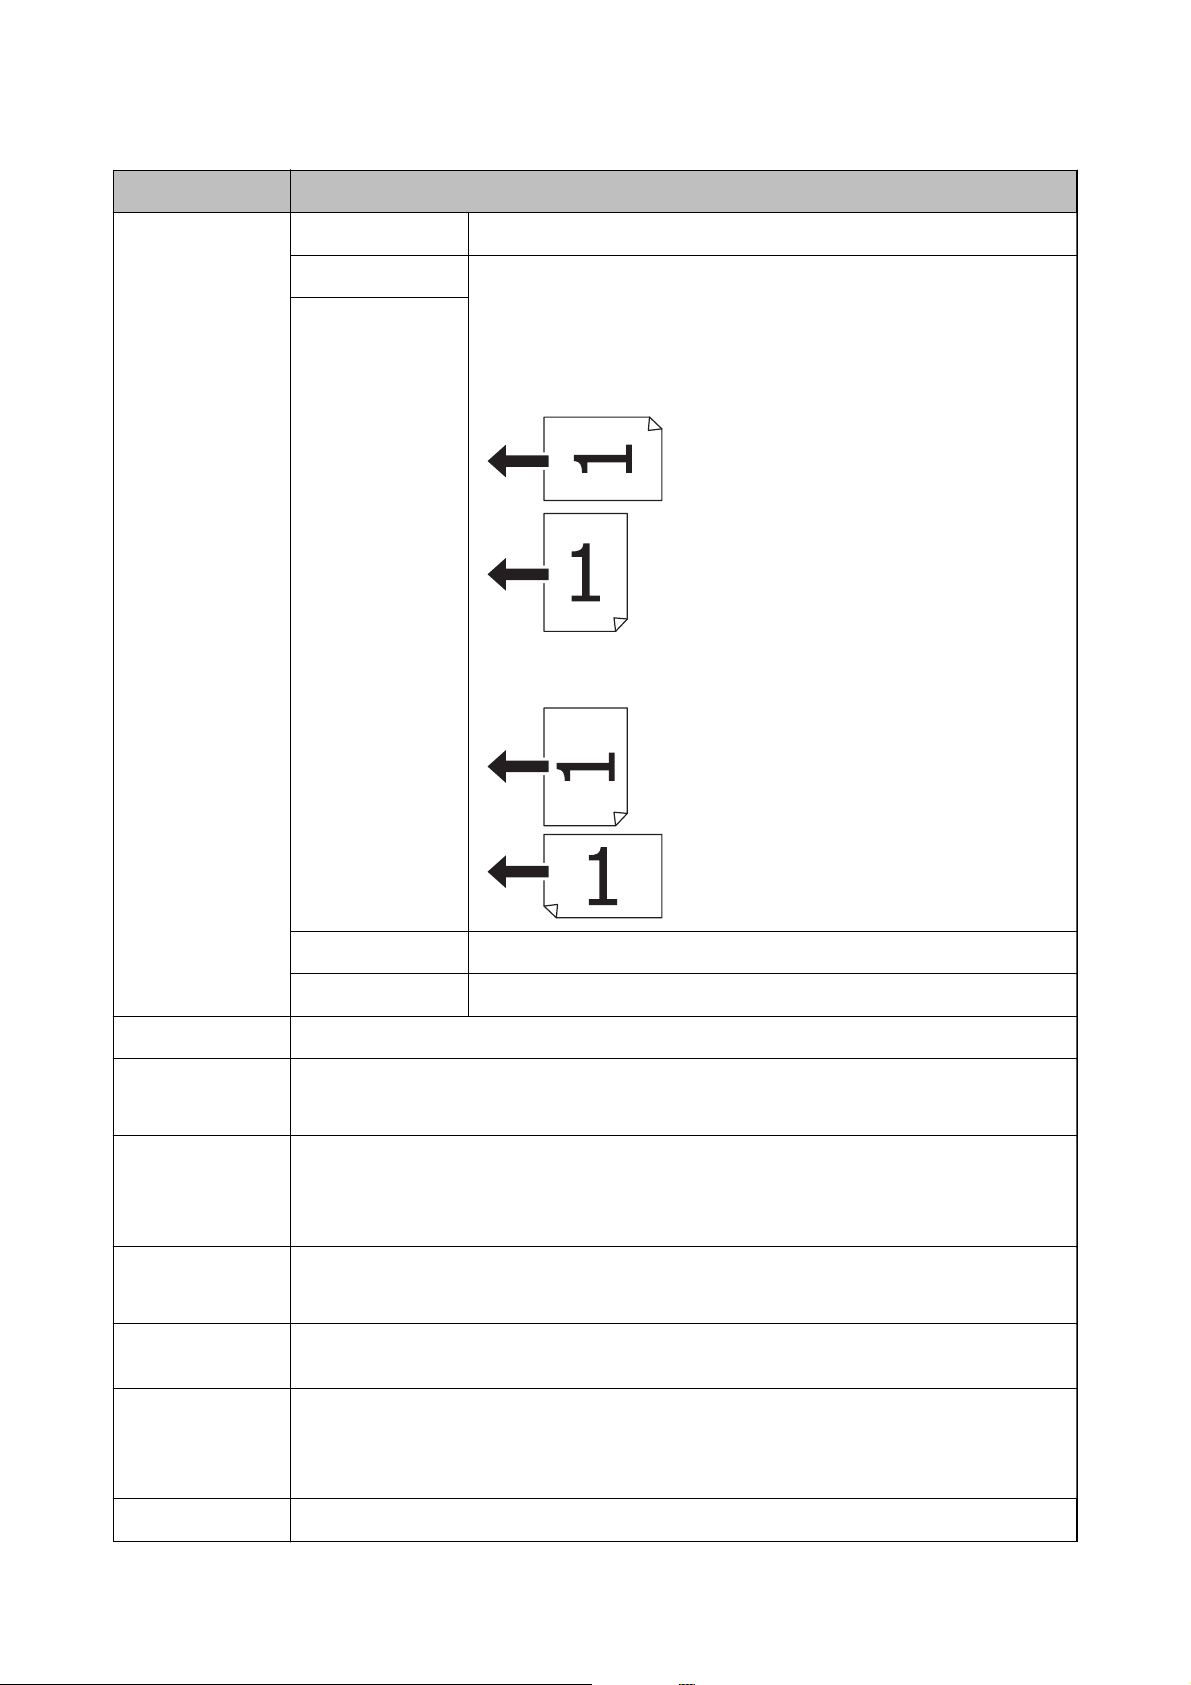
Copy Mode
Note:
❏ Available menus vary depending on the layout you selected.
❏ Press Settings to display hidden setting menus.
Menu Settings and Explanations
Number of copies Enter the number of copies.
24
Page 25
User's Guide
Printer Basics
Menu Settings and Explanations
Layout With Border Copies with a border around the edges.
2-up Copies multiple page originals onto one sheet.
4-up
When placing originals in the ADF, insert them into the feeder from the top or
left edge.
Load vertical originals as shown below, and select Portrait from Document
Orientation.
Load vertical originals as shown below, and select Landscape from
Document Orientation.
ID Card Scans both sides of an ID card and copies onto one side of A4 size paper.
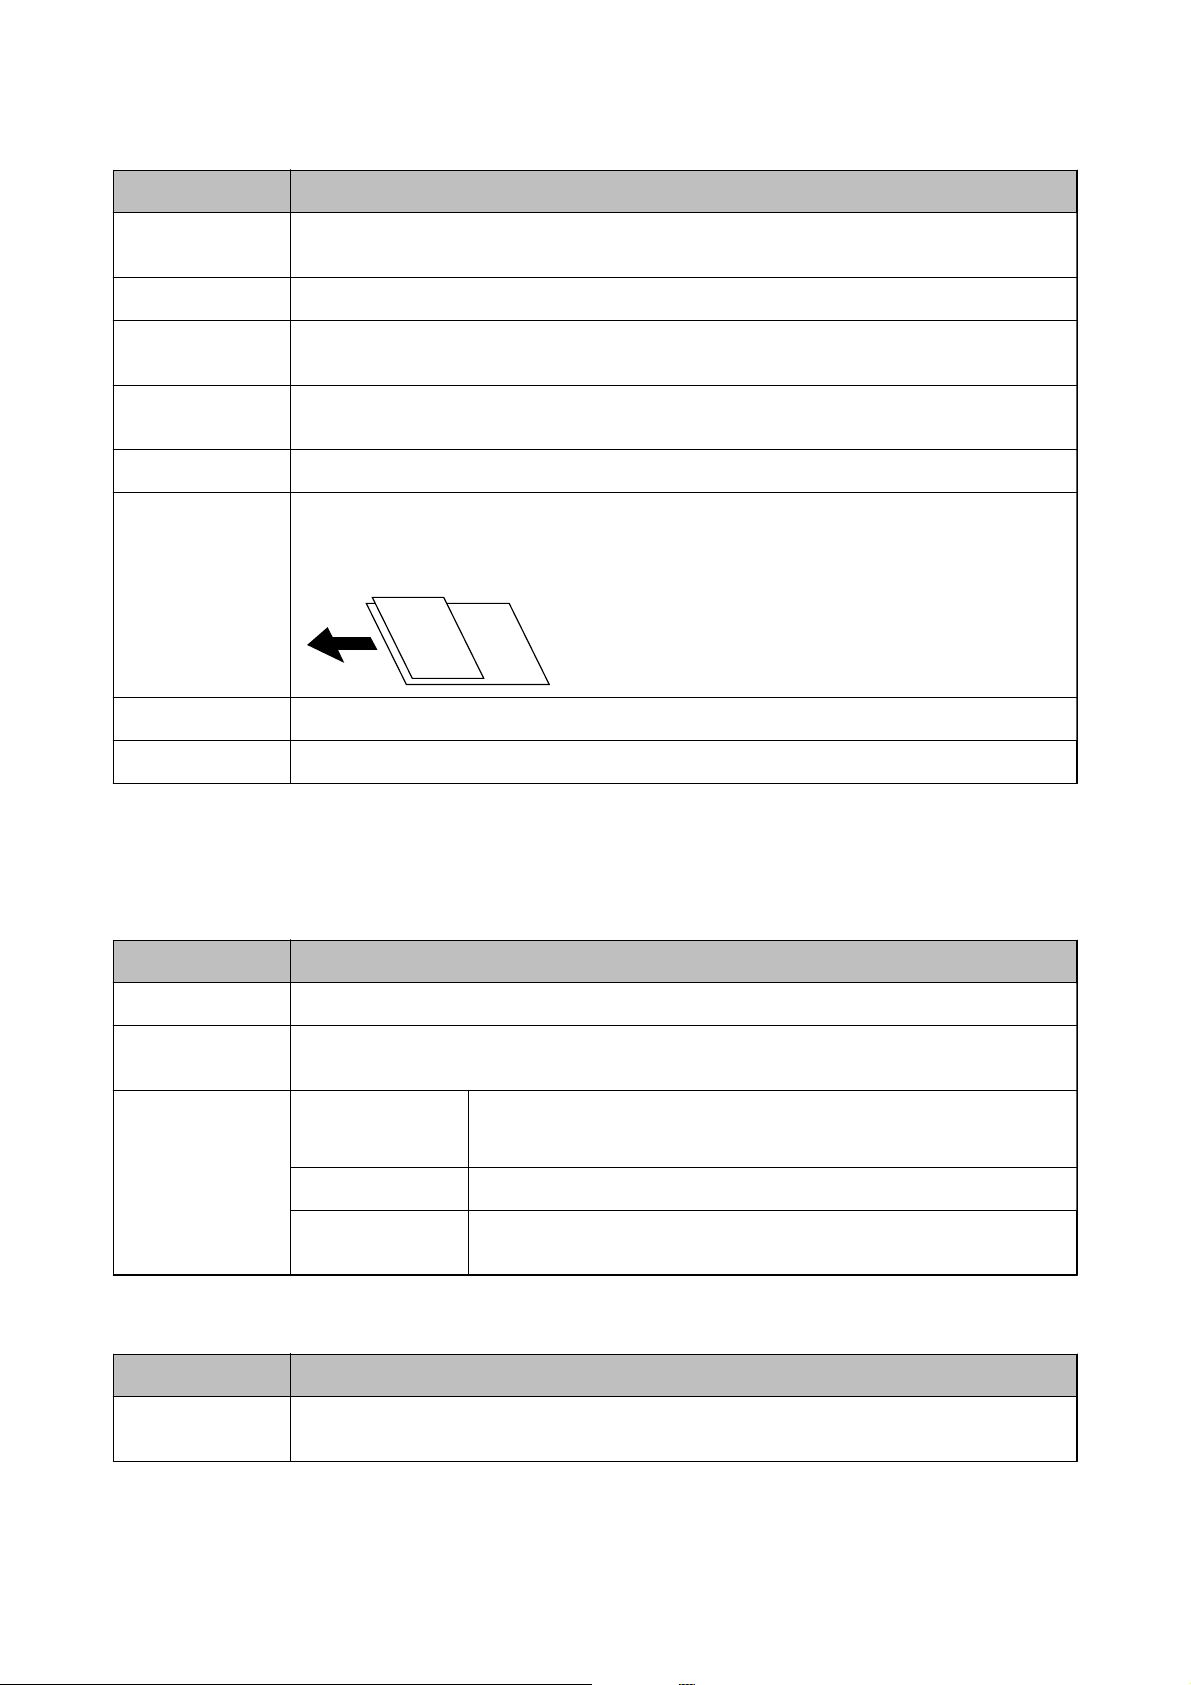
Split Pages Copies two facing pages of a booklet onto separate sheets of paper.
Document Size Select the size of your original.
Zoom Enlarges or reduces the original.
Select Auto Fit Page to t to the paper size of the selected paper source.
Paper Source Select the paper source that you want to use.
Auto: Feeds paper automatically using the Paper Setup settings made when you loaded the paper.
Front Paper Feed Slot: Select the paper size and paper type you loaded in the front paper feed slot.
2-Sided Select 2-sided layout.
Select a layout, press Settings, and then select the binding position of your original and the paper.
Document
Orientation
Quality Select the type of your original.
Density Set the density of your copies.
Select the orientation of your original.
Text: Provides faster printing, but the printouts may be faint.
Photo: Provides higher quality printing, but the printing speed may be slower.
25
Page 26
User's Guide
Menu Settings and Explanations
Printer Basics
Layout Order
Scan Order
Remove Shadow Removes shadows that appear in the center of copies when copying a booklet or that appear around
Remove Punch
Holes
Collate Copy Prints multiple copies of multiple originals collated in order and sorts them into sets.
Mixed Documents You can place the following combination of sizes in the ADF at the same time. A3 and A4; B4 and B5.
Dry Time Select the drying time.
Advanced Settings Adjust image settings such as contrast and saturation.
Select the copy layout for multiple pages when you have selected 2-up or 4-up as the Layout
setting.
Select which page of a booklet to scan when you have selected Split Pages as the Layout setting.
copies when copying thick paper.
Removes the binding holes when copying.
When using these combinations, originals are copied at the actual size of the originals.
Place your originals as shown below.
Scan Mode
Email
Menu Settings and Explanations
Contacts Select email addresses to send the scanned image from the contacts list.
Form at
Menu Email Settings Subject: Enter a subject for the email.
Network Folder/FTP
Menu Settings and Explanations
Contacts Select a folder in which to save the scanned image from the contact list. You do not need to make
Select the format in which to save the scanned image. When you select TIFF (Single Page) or TIFF
(Multi Page), only monochrome scanning is available.
Filename Prex: Enter a prex for the name of the le to be sent.
Basic Settings
Scan Report Prints a history that shows when and to which email address scanned les
location settings when you have selected a folder from the contacts list.
See the list of menus in Settings.
have been sent.
26
Page 27
User's Guide
Menu Settings and Explanations
Printer Basics
Location Communication
Mode
Location Enter a folder path in which to save the scanned image.
User Name Enter a user name for the specied folder.
Password Enter a password for the specied folder.
Connection Mode Select the connection mode.
Port Number Enter a port number.
Form at
Menu File Settings
Select the format in which to save the scanned image. When you select TIFF (Single Page), only
monochrome scanning is available.
Basic Settings
Scan Report Prints a history that shows when and to which folder the scanned les have
Memory Device
Menu Settings and Explanations
Select the communication mode.
Enter a prex for the le name in Filename Prex.
See the list of menus in Settings.
been sent.
Form at
Settings
Select the format in which to save the scanned image. When you select TIFF (Multi Page), only
monochrome scanning is available.
See the list of menus in Settings.
Cloud
Menu Settings and Explanations
Format Select the format in which to save the scanned image.
Settings
See the list of menus in Settings.
Document Capture Pro
menu has no setting item.
is
Computer (WSD)
is menu has no setting item.
Settings
Note:
Available menus vary depending on the destination type, such as email or folder, and the format in which scanned images
are saved.
27
Page 28
User's Guide
Menu Settings and Explanations
Resolution Select the scanning resolution.
Scan Area Select the scan area.
Auto Cropping: Crops the white space around the text or image when scanning.
Max Area: Scans at the maximum scan area of the scanner glass or the ADF.
Printer Basics
2-Sided
Document Type Select the type of your original.
Density Select the contrast of the scanned image.
Document
Orientation
Compression Ratio Select how much to compress the scanned image.
PDF Settings
Attached File Max
Size
Scans both sides of the original. When performing 2-sided scanning, select Binding Direction and
then select the binding position of the original.
Select the orientation of your original.
When you have selected PDF as the save format setting, use these settings to protect PDF les.
Document Open Password: Creates a PDF le that requires a password when opening.
Permissions Password: Creates a PDF le that requires a password when printing or editing.
Select the maximum le size that can be attached to the email.
Fax Mode
From the home screen, select Fax > Menu. You can access some of the setting menus directly from the Fax screen.
Menu Settings and Explanations
Fax Send Settings Resolution Select the resolution of the outgoing fax.
Select Photo for originals that contain both text and photo images.
Density Set the density of the outgoing fax.
Document Size
(Glass)
ADF 2-Sided When sending a monochrome fax, both sides of the original placed in the
Direct Send See the pages that describe these features for more details.
Priority Send
Continuous Scan
from ADF
Transmission
Report
Select the size and orientation of the original you placed on the scanner
glass.
ADF are scanned.
Prints a transmission report automatically after you send a fax. Select Print
on Error to print a report only when an error occurs.
28
Page 29

User's Guide
Printer Basics
Menu Settings and Explanations
Send Fax Later See the pages that describe these features for more details.
Polling Receive
Polling Send
Store Fax Data
Fax Report Fax Settings List Prints the current fax settings.
Fax Log Prints a transmission report automatically after you send a fax. You can set to
print this report automatically using the following menu.
Setup > System Administration > Fax Settings > Output Settings > Fax
Log Auto Print
Transmission
Report
Stored Fax
Documents
Protocol Trace Prints a detailed report for the previous fax that was sent or received.
Prints a report for the previous fax that was sent or received through polling.
Prints a list of fax documents stored in the printer’s memory, such as
unnished jobs.
Related Information
& “Sending Many Pages of a Monochrome Document (Direct Send)” on page 105
& “Sending a Fax Preferentially (Priority Send)” on page 106
& “Sending Dierent Size Documents Using ADF (Continuous Scan from ADF)” on page 106
& “Sending Faxes at a Specied Time (Send Fax Later)” on page 104
& “Receiving Faxes by Polling (Polling Receive)” on page 109
& “Sending Faxes on Demand (Polling Send)” on page 105
“Storing a Fax Without Specifying a Recipient (Store Fax Data)” on page 104
&
Memory Device Mode
Note:
Memory device is a generic name for external USB devices such as USB ash drives.
File format
Menu Settings and Explanations
JPEG Select the le format of the le you want to print.
TIFF
PDF
Settings
Note:
Available menus vary depending on the selected le format.
29
Page 30
User's Guide
Menu Settings and Explanations
Printer Basics
Number of
printouts
Settings Paper Source Select the paper source that you want to use.
Enter the number of printouts.
When you select Front Paper Feed Slot, select the paper size and paper type
you loaded in the Front Paper Feed Slot.
Layout Select the layout.
Quality Select the print quality.
Date Select the format of the date on the printouts.
Fit Frame Crops the top and bottom edges of the image to t in the selected paper size.
Turning this o causes margins to appear on the left and right side of the
image.
Bidirectional Select which side to re ink when the print head moves. Turn this on under
normal usage.
Enabled: Prints when the print head moves in both directions.
Disabled: Prints only when the print head moves in one direction. Print
quality improves, but the printing speed is slow.
2-Sided Select 2-sided layout.
Select a layout, select Settings, and then select the binding position and
drying time.
Print Order Last Page on Top: Prints from the rst page of a le.
First Page on Top: Prints from the last page of a le.
Image Adjustments Enhance Select the image correction method.
On: Enhances the image automatically by using Epson's unique image
analysis and image processing technology.
P.I.M.: Adjusts the image by using your camera's PRINT Image Matching or Exif
Print information.
Fix Red-Eye Fixes red-eye in photos.
Corrections are not applied to the original le, only to the printouts.
Depending on the type of photo, parts of the image other than the eyes may
be corrected.
Menu Select Images
Select Group Select this menu to select another group.
Select All Images selects all of the images on the memory device.
Setup Mode
Menu Settings and Explanations
Ink Levels Displays the approximate levels of the ink cartridges and the maintenance box.
When an exclamation mark is displayed, the ink cartridge is running low on ink or the maintenance
box is nearly full.
30
Page 31

User's Guide
Menu Settings and Explanations
Printer Basics
Maintenance Print Head Nozzle
Check
Print Head
Cleaning
Print Head
Alignment
Thick Paper Reduces ink smearing when printing. Enable this feature only when you see
Paper Guide
Cleaning
Remove Paper Use this feature if there are still some torn pieces of paper inside the printer
Maintenance Roller
Information
Prints a pattern to check if the print head nozzles are clogged.
Cleans clogged nozzles in the print head.
Adjusts the print head to improve print quality.
Run Vertical Alignment if your printouts look blurry or text and lines are
misaligned.
Run Horizontal Alignment if your printouts contain horizontal banding at
regular intervals.
ink smearing on your printouts because it may lower the printing speed. This
feature is disabled when the power is turned
Use this feature to feed plain paper for cleaning when there are ink stains on
the internal rollers or a paper feed problem has occurred.
even after removing jammed paper.
Displays the status of the maintenance rollers for the paper cassette in the
Maintenance Roller Status.
After replacing maintenance rollers, select Reset Maintenance Roller
Counter to reset the counter for the paper cassette in which you replaced the
maintenance rollers.
o.
Paper Setup Select the paper size and paper type you loaded in each paper source.
Print Status Sheet Conguration
Status Sheet
Supply Status
Sheet
Usage History
Sheet
PS3 Status Sheet Prints an information sheet when you use this printer as a PostScript printer.
PS3 Font List Prints a list of fonts that are available for a PostScript printer.
PCL Font List Prints a list of fonts that are available for an Epson Universal P6 printer.
Network Status Wi-Fi/Network
Status
Wi-Fi Direct Status
Email Server Status Displays the current email server settings.
Epson Connect
Status
Google Cloud Print
Status
Prints an information sheet showing the current printer status and settings.
Prints an information sheet showing the status of consumables.
Prints an information sheet showing the usage history of the printer.
Displays or prints the current network settings.
Displays whether or not the printer is registered and connected to Epson
Connect or Google Cloud Print service.
See the Epson Connect portal website for more details.
https://www.epsonconnect.com/
http://www.epsonconnect.eu (Europe only)
31
Page 32

User's Guide
Printer Basics
Menu Settings and Explanations
Admin Settings These menus allow an administrator to register an administrator password to protect the printer
settings from being changed by other users.
Admin Password Set, change, or reset the administrator password.
If you forget the password, contact your dealer.
System
Administration
Lock Setting
See the pages that describe these features for more details.
You need to enter an administrator password when you enter the System
Administration settings and when you change the settings of Eco Mode,
Presets, and the contacts.
Related Information
“System Administration” on page 32
&
System Administration
Select Setup on the home screen, and then select System Administration.
32
Page 33
User's Guide
Menu Settings and Explanations
Printer Basics
Printer Settings Paper Source
Settings
USB I/F Timeout
Setting
Printing Language Select the printing language for the USB interface or the network interface.
Rear Paper Feed
Priority
A4/Letter Auto
Switching
Auto Select Settings Specify which paper source to feed from when using
Error Notice Displays an error message when the paper size or
Specify the length of time in seconds that must elapse before ending USB
communication with a computer after the printer receives a print job from a
PostScript printer driver or Epson Universal P6 printer driver. If the job ending
is not clearly dened from a PostScript printer driver or Epson Universal P6
printer driver, it can cause endless USB communication. When this occurs, the
printer ends communication after the specied time has elapsed. Enter 0
(zero) if you do not want to end communication.
Feeds paper from the rear paper feed on a priority
basis.
Feeds paper from the paper source set as A4 size
when there is no paper source set as Letter, or feeds
from the paper source set as Letter size when there is
no paper source set as A4.
features such as copying and faxing. When there are
multiple paper sources available, paper is fed from
the paper source with paper settings that match the
copy or print job.
type settings in Paper Setup and the print settings
do not match.
Auto Error Solver Select an action to perform when a 2-sided printing error or a memory full
error occurs.
❏ 2-sided printing error
Enabled: If a 2-sided job is sent when there is no paper available that
supports 2-sided printing, the printer displays an error message, and then
automatically prints on only one side of the paper.
Disabled: The printer displays an error message and cancels printing.
❏ Memory full error
Enabled: If the printer's memory becomes full while printing, the printer
displays an error message, and then prints only the part of the data that
the printer could process.
Disabled: The printer displays an error message and cancels printing.
Memory Device
Interface
PC Connection via
USB
Memory Device Enables a memory device inserted in the printer. If
this feature is disabled, the printer does not recognize
the inserted memory device.
File Sharing Select whether to give write access to the memory
device from a USB-connected computer or from a
network-connected computer.
Enables the printer which is connected to the computer over a USB
connection. If this feature is disabled, the computer does not recognize
printers with a USB connection.
33
Page 34

User's Guide
Printer Basics
Menu Settings and Explanations
Common Settings LCD Brightness Adjust the brightness of the LCD screen.
Sound Adjust the volume and select the type of audio.
Sleep Timer Select the time period before the printer enters sleep mode (energy saving
mode) when no operations are performed.
The LCD screen turns black when the set time passes.
Power O Timer You can adjust the time before power management is applied. Any increase
will
before making any change.
Date/Time Settings Date/Time Enter the current date and time.
the product’s energy
aect
eciency.
Please consider the environment
Wi-Fi/Network
Settings
Daylight Saving
Tim e
Time Dierence Enter the time dierence between your local time and
Country/Region Select the country or region.
Language Select the display language.
Operation Time
Out
Wi-Fi/Network
Status
Wi-Fi Setup Wi-Fi Setup Wizard See the Network Guide for more details.
If this feature is enabled, the LCD screen returns to the home screen when no
operations have been performed for about three minutes. This feature is
automatically enabled when the user restriction feature is enabled.
Displays or prints the network settings and connection status.
Push Button Setup
(WPS)
PIN Code Setup
(WPS)
Wi-Fi Auto Connect
Disable Wi-Fi You may be able to resolve network problems by
Select the summer time setting that applies to your
area.
UTC (Coordinated Universal Time).
disabling the Wi-Fi settings or making the Wi-Fi
settings again. See the Network Guide for more details.
Epson Connect
Services
Google Cloud Print
Services
Wi-Fi Direct Setup See the Network Guide for more details.
Connection Check Checks the status of the network connection and prints the network
connection check report. If there are any problems with the connection, see
the check report to solve the problem.
Advanced Setup See the Network Guide for more details.
You can suspend or resume the Epson Connect or Google Could Print service, or cancel using the
services (restore the default settings).
See the Epson Connect portal website for more details.
https://www.epsonconnect.com/
http://www.epsonconnect.eu (Europe only)
34
Page 35

User's Guide
Menu Settings and Explanations
Printer Basics
Copy Settings
Scan Settings
Fax Settings
Universal Print
Settings
The settings made in the User Default Settings are displayed as the default settings in each mode.
For details on the setting items, see the list of menus for each mode.
See the list of menus in Fax Settings.
These print settings are applied when printing from an external device without using the printer
driver, or when printing from a PostScript printer driver.
Top Oset Adjust the top or left margin of the paper.
Left Oset
Top Oset in Back Adjust the top margin or left margin for the back of the page when
performing 2-sided printing.
Left Oset in Back
Check Paper Width Checks the paper width before the printer starts printing. This prevents
printing beyond the edges of the paper when the paper size setting is not
correct, but the printing time may be little longer.
Dry Time Select the drying time when performing 2-sided printing.
Skip Blank Page Skips blank pages in the print data automatically.
PDL Print
Conguration
See the list of menus in PDL Print Conguration.
Security Settings Access Control Requires the administrator password to operate the printer.
Select whether or not to allow jobs that do not have the necessary
authentication information.
Delete All
Condential Jobs
Eco Mode The following Eco mode settings are available. When these settings are disabled, the settings made in
Common Settings are applied.
Congure Sleep Timer Select the time period before the printer enters sleep
Clear Internal
Memory Data
Deletes the print settings for a PostScript printer driver and Epson Universal P6 printer driver.
Select Clear All to delete all of the data for a PostScript printer driver and Epson Universal P6 printer
driver that is saved in the printer's memory.
Deletes all saved condential jobs.
mode (energy saving mode) when no operations are
performed.
The LCD screen turns black when the set time passes.
LCD Brightness Adjust the brightness of the LCD screen.
2-Sided (Copy) Sets 2-sided copying as the default setting.
2-Sided (Memory
Device)
Sets 2-sided printing as the default setting.
Restore Default
Settings
Resets the selected settings to their defaults.
Related Information
& “Copy Mode” on page 24
35
Page 36
User's Guide
Printer Basics
& “Scan Mode” on page 26
& “Fax Settings” on page 36
& “PDL Print Conguration” on page 39
Fax Settings
From the home screen, select Setup > System Administration > Fax Settings.
Menu Settings and Explanations
User Default
Settings
Send Settings Auto Rotation An A4 size original placed in the ADF or on the scanner glass with its long
Receive Settings Receive Mode Select the receive mode.
The settings made in this menu become your default settings for sending faxes. For details on the
setting items, See the list of menus in Fax mode.
edge facing to the left is sent as an A3 size fax.
Enabled: The printer rotates the scanned image to send it at A4 size.
Disabled: The printer sends the document at A3 size and the recipient
machine prints it on A3 paper, or reduces the image to A4 size.
Batch Send See the page that describes this feature.
Save Failure Data Saves documents that failed to be sent in the printer's memory. You can
resend the documents from the Status Menu.
DRD If you have subscribed to a distinctive ring service from your telephone
company, select the ring pattern to be used for incoming faxes (or select On).
Rings to Answer Select the number of rings that must occur before the printer automatically
receives a fax. Select "0" (zero) if you want to receive faxes with no ringing.
Remote Receive When you answer an incoming fax call on a phone connected to the printer,
you can start receiving the fax by entering the code using the phone.
36
Page 37
User's Guide
Printer Basics
Menu Settings and Explanations
Output Settings Fax Output You can set to save received documents in the inbox, on a memory device, or
on a computer, or forward the documents.
Auto Reduction Reduces large received documents to t on the paper in the paper source.
Reducing may not always be possible depending on the received data. If this
is turned o, large documents are printed at their original size on multiple
sheets, or a blank second page may be ejected.
Auto Rotation Rotates a landscape-oriented A5, B5, A4, or Letter size received document so
that it is printed on the correct paper size. This setting is applied when two or
more paper sources are set for fax printing in Paper Source Settings > Auto
Select Settings, and the paper size settings use the following combinations;
A3 and A4, B4 and B5, or A4 and A5.
Collation Stack Prints received documents from the last page (print in descending order) so
that the printed documents are stacked in the correct page order. When the
printer is running low on memory, this feature may not be available.
Print Suspend Time
Forwarding Report Prints a report after forwarding a received document.
Attach Image to
Report
Fax Log Auto Print Prints the fax log automatically.
Report Format
Turn this on and enter the Time to Stop and Time to Restart to stop printing
documents received during the specied time period and save them in the
memory instead. Before using this feature, make sure there is enough free
memory. You can check and print documents received during that time from
the Status Menu. This feature can be used for noise prevention at night or to
prevent condential documents from being disclosed while you are away.
Prints a Transmission Report with an image of the rst page of the sent
document.
On(Large Image): Prints the upper part of the page without reducing.
On(Small Image): Prints the entire page reducing it to t onto the report.
On(Every 30): Prints a log every time 30 fax jobs are completed.
On(Time): Prints the log at a specied time. However, if the number of fax jobs
exceeds 30, the log is printed before the specied time.
Select a format for fax reports other than Protocol Trace. Select Detail to
print with error codes.
37
Page 38
User's Guide
Printer Basics
Menu Settings and Explanations
Basic Settings Fax Speed Select the fax transmission speed.
We recommend selecting Slow(9,600bps) when a communication error
occurs frequently, when sending/receiving a fax to/from abroad, or when you
are using an IP (VoIP) phone service.
ECM Automatically corrects errors in the fax transmission (Error Correction Mode),
mostly caused by telephone line noise. If this is disabled, you cannot send or
receive documents in color.
Dial Tone Detection Detects a dial tone before starting to dial.
If the printer is connected to a PBX (Private Branch Exchange) or digital phone
line, the printer may fail to start dialing. In this situation, change the Line
Typ e setting to PBX. If this does not work, disable this feature. However,
disabling this feature may drop the rst digit of a fax number and send the
fax to the wrong number.
Dial Mode Select the type of phone system to which you have connected the printer.
When set to Pulse, you can temporarily switch the dialing mode from pulse
to tone by pressing
screen. Depending on the region, this setting may not be displayed.
("T" is entered) while entering numbers on the fax top
Line Type Select the line type to which you have connected the printer. For more
Header Enter your sender name and fax number. These appear as a header on
Security Settings Direct Dialing
Restrictions
Conrm Address
List
Inbox Password
Settings
Backup Data Auto
Clear
Clear Backup Data
details, see the page that describes the settings for PBX.
outgoing faxes.
You can enter up to 40 characters for your name, and up to 20 digits for your
fax number.
Enable this to prevent fax numbers from being entered manually allowing
the operator to select recipients only from the contacts list or sent history.
Select Enter Twice to require the operator to enter the fax number again
when a number is entered manually.
Displays a recipient conrmation screen before starting the transmission.
Select to password protect the inbox to restrict users from viewing received
faxes.
Select Change to change the password, and select Reset to cancel password
protection. When changing or resetting the password, you need the current
password.
Fax documents deleted by using the control panel disappear from the LCD
screen, but their backups are temporarily stored in the memory. The
following features delete backups.
Backup Data Auto Clear: Automatically deletes backups each time a sent or
received document is deleted.
Clear Backup Data: Deletes all backups. Run this before you give the printer to
someone else or dispose of it.
Check Fax
Connection
Fax Setting Wizard Select to make basic fax settings by following the on-screen instructions.
Checks if the printer is connected to the phone line and ready for fax transmission, and prints the
check result on A4 size plain paper.
For more details, see the page that describes basic fax settings.
38
Page 39

User's Guide
Printer Basics
Related Information
& “Fax Mode” on page 28
& “Making Output Settings for Received Faxes” on page 109
& “Sending Multiple Faxes to the Same Recipient at Once (Batch Send)” on page 106
& “Making Basic Fax Settings” on page 99
PDL Print Conguration
Select Setup > System Administration > Universal Print Settings > PDL Print Conguration from the home
screen.
Menu Settings and Explanations
Common
Settings
Paper Size Select the paper size.
Paper Type Select the paper type.
Orientation Select the printing direction.
Quality Select the print quality.
Ink Save Mode Conserves ink by reducing the print density.
Print Order Last Page on Top: Prints from the rst page of a le.
First Page on Top: Prints from the last page of a le.
Number of
Copies
Binding Margin Select the binding position.
Auto Paper
Ejection
2-Sided Printing Performs 2-sided printing.
Set the number of copies.
Ejects paper automatically when printing is stopped during a print job.
39
Page 40

User's Guide
Printer Basics
Menu Settings and Explanations
PCL Menu Font Source Resident: Select to use a preinstalled font on the printer.
Download: Select to use a font you have downloaded.
Font Number Select the default font number for the default font source. The available number
varies depending on the settings you made.
Pitch Set the default font pitch if the font is scalable and of xed-pitch. You can select from
0.44 to 99.99 cpi (characters per inch), in 0.01 increments.
This item may not appear depending on the font source or font number settings.
Height Set the default font height if the font is scalable and proportional. You can select
from 4.00 to 999.75 points, in 0.25 increments.
This item may not appear depending on the font source or font number settings.
Symbol Set Select the default symbol set. If the font that you selected in the font source and the
font number setting is not available in the new symbol set setting, the font source
and the font number settings are automatically replaced with the default value, IBM-
US.
Form Set the number of lines for the selected paper size and orientation. This also causes a
line spacing (VMI) change, and the new VMI value is stored in the printer. This means
that later changes in the page size or orientation settings cause changes in the Form
value based on the stored VMI.
CR Function Select the line feed command when printing with a driver from a specic operating
system.
LF Function
Paper Source
Assign
PS3 Menu Error Sheet Prints a sheet showing the error status when any PostScript errors occur while
Coloration Select the color mode for PostScript printing.
Image Protect Disable this feature to lower the print quality automatically if the printer's memory
Binary Enable this feature when printing data that contains binary images.
Text Detection Converts the text le to a PostScript le when printing.
Set the assignment for the paper source select command. When 4 is selected, the
commands are set as compatible with the HP LaserJet 4. When 4K is selected, the
commands are set as compatible with the HP LaserJet 4000, 5000, and 8000. When
5S is selected, the commands are set as compatible with the HP LaserJet 5S.
printing and any errors occur while printing a PDF le.
becomes full.
The application may send the binary data even if the printer driver setting is set to
ASCII, but you can print the data when this feature is enabled.
This feature is available when Printing Language is set to PS3.
PDF Page Size
Select the paper size when printing a PDF le. If Auto is selected, the paper size is
determined based on the size of the rst page that is printed.
Contacts Mode
Menu Description
Menu Registers contacts and a contact group, or prints the contacts list.
40
Page 41

User's Guide
Printer Basics
Menu Description
View Select whether to display all contacts or the contacts for each feature only.
LDAP allows you to search in the contacts registered in the LDAP server.
Presets Mode
You can register frequently used copy, fax, and scan settings as presets. To register a preset, select Presets from the
home screen, select Add New, and then select the feature for which you want to register a contact. Make the
necessary settings, press Save, and then enter a name for the preset.
To load a registered preset, select the preset from the list.
Press Preset on the screen of each feature. You can register the current address (except for address that have been
entered directly and the contacts in the LDAP address list) and settings.
Menu Description
Menu Displays the details of registered presets, and allows you to change their names, edit, and delete.
Status Menu
Press the button on the control panel.
Menu Description
Printer Information Displays the status of the consumables and any errors that have occurred in the printer. Select the
error from the list to display the error massage.
Job Monitor Displays a list of ongoing jobs and jobs waiting to be processed. You can also cancel jobs.
Job History Displays the job history. If a job has failed, an error code is displayed in the history.
Job Storage
Condential Job Displays a list of jobs for which a password has been set. To print a job, select the job and enter the
Select Inbox to display the received faxes stored in the printer's memory.
password.
41
Page 42

User's Guide
Loading Paper
Loading Paper
Paper Handling Precautions
❏ Read the instruction sheets supplied with the paper.
❏ Fan and align the edges of the paper before loading. Do not fan or curl photo paper. Doing so may damage the
printable side.
❏ If the paper is curled, atten it or curl it slightly in the opposite direction before loading. Printing on curled
paper may cause paper jams and smears on the printout.
❏ Do not use paper that is wavy, torn, cut, folded, damp, too thick, too thin, or paper that has stickers stuck to it.
Using these types of paper causes paper jams and smears on the printout.
❏ Make sure you are using long-grain paper. If you are not sure what type of paper you are using, check the paper
packaging or contact the manufacturer to conrm the paper specications.
Related Information
& “Printer Specications” on page 184
Available Paper and Capacities
Epson recommends using genuine Epson paper to ensure high-quality printouts.
Genuine Epson Paper
Note:
Genuine Epson paper is not available when printing with the Epson Universal P6 printer driver.
42
Page 43

User's Guide
Loading Paper
Media Name Size Loading Capacity (Sheets) 2-Sided
Paper
Cassette 1
Paper
Cassette 2
to 4
Rear Paper
Feed
Front
Paper Feed
Slot
Printing
Epson Bright White
Ink Jet Paper
Epson Ultra Glossy
Photo Paper
Epson Premium
Glossy Photo Paper
Epson Premium
Semigloss Photo
Paper
Epson Photo Paper
Glossy
Epson Matte
PaperHeavyweight
A4 200 400 50 1
A4, 13 × 18 cm
(5 × 7 in.), 10 ×
15 cm (4 × 6 in.)
A3+, A3 – – 10 – –
A4, 13 × 18 cm
(5 × 7 in.), 16:9
wide size (102 ×
181 mm), 10 ×
15 cm (4 × 6 in.)
A3+, A3 – – 10 – –
A4, 10 × 15 cm
(4 × 6 in.)
A4, 13 × 18 cm
(5 × 7 in.), 10 ×
15 cm (4 × 6 in.)
A3+, A3 – – 10 – –
A4 ––20––
––20––
––20––
––20––
––20––
Auto, Manual
*
Epson Photo
Quality Ink Jet
Paper
* Only use the rear paper feed to print 2-sided print jobs manually. You can load up to 30 sheets for paper with one side
already printed.
A3+, A3 – – 50 – –
A4 ––70––
43
Page 44

User's Guide
Loading Paper
Commercially Available Paper
Media Name Size Loading Capacity (Sheets or Envelopes) 2-Sided
Paper
Cassette 1
Paper
Cassette 2
to 4
Rear Paper
Feed
Front
Paper Feed
Slot
Printing
Plain paper
Copy paper
Letterhead
Recycled paper
Color paper
Preprinted paper
A3, B4
Legal, Letter,
A4, B5, A5
B6, A6 Up to the
Executive Up to the
User Dened
(mm)
55 × 127 to 105
× 148,
Up to the line under the
symbol inside the edge
guide.
Up to the line under the
symbol inside the edge
guide.
line under
d
the
symbol
inside the
edge guide.
line under
the
d
symbol
inside the
edge guide.
--1–Manual
d
d
–801
–801
50 1 Auto,
80 1 Auto,
Manual
Manual
Manual
Manual
*1*2
*1*2
*1*2
*1*2
297 × 431.8 to
329 × 1200
User Dened
(mm)
105 × 148 to
148 × 210
User Dened
(mm)
148 × 210 to
215 × 297
User Dened
(mm)
215 × 297 to
297 × 431.8
Thick paper A3, B4, Legal,
Letter, A4, B5,
A5, A6,
Executive
User Dened––1–Manual
––801
––801Auto,
––501Auto,
––10–
Manual
Manual
Manual
Manual
*1*2
*1*2
*1*2
*3
44
Page 45

User's Guide
Loading Paper
Media Name Size Loading Capacity (Sheets or Envelopes) 2-Sided
Paper
Cassette 1
Paper
Cassette 2
to 4
Rear Paper
Feed
Front
Paper Feed
Slot
Printing
Envelope Envelope #10,
Envelope DL,
Envelope C6
Envelope C4––1––
*1 Only use the rear paper feed to print 2-sided print jobs manually.
*2 You can load up to 30 sheets for paper with one side already printed.
*3 You can load up to 5 sheets for paper with one side already printed.
––10––
Related Information
& “Part Names and Functions” on page 18
List of Paper Types
To obtain optimum printing results, select the paper type that suits the paper.
Media Name Media Type
Control Panel Printer Driver PostScript Printer
Driver
Epson Universal P6
Printer Driver
Copy paper, Plain
paper
Epson Bright White
Ink Jet Paper
Letterhead Letterhead Letterhead Letterhead Letterhead
Recycled paper Recycled Recycled Recycled Recycled
Colored paper Color Color Color Color
Preprinted paper Preprinted Preprinted Preprinted Preprinted
Epson Ultra Glossy
Photo Paper
Epson Premium
Glossy Photo Paper
Epson Premium
Semigloss Photo
Paper
Epson Photo Paper
Glossy
plain papers plain papers Plain Plain
Ultra Glossy Epson Ultra Glossy Epson Ultra Glossy -
Prem. Glossy Epson Premium
Glossy
Prem. Semigloss Epson Premium
Semigloss
Glossy Photo Paper Glossy Photo Paper Glossy -
Epson Premium
Glossy
Epson Premium
Semigloss
-
-
45
Page 46

User's Guide
Media Name Media Type
Loading Paper
Control Panel Printer Driver PostScript Printer
Driver
Epson Matte PaperHeavyweight
Epson Photo Quality
Ink Jet Paper
Thick paper Thick-Paper Thick-Paper Thick Thick
Envelope Envelope Envelope Envelope Envelope
Matte Epson Matte Epson Matte -
Epson Universal P6
Printer Driver
Loading Paper in the Paper Cassette
Note:
If the optional cabinet and the paper cassette units are installed, do not pull out two or more paper cassettes at the same
time.
1. Check that the printer is not operating, and then pull out the paper cassette.
46
Page 47

User's Guide
Loading Paper
2. Slide the front edge guide to its maximum position, and then slide the side edge guides to adjust to the paper
size you want to use.
3. Load paper with the printable side facing down, and then slide the front edge guide to the edge of the paper.
Important:
c
Do not load more than the maximum number of sheets specied for the paper. For plain paper, do not load
above the line just under the
4. Check that the paper size label matches the size of the paper loaded in the paper cassette. If it does not match,
remove the holder and change the paper size indicated on the label.
5. Insert the paper cassette all the way.
6. On the control panel, set the size and type of the paper you loaded in the paper cassette.
d
symbol inside the edge guide.
47
Page 48

User's Guide
7. Slide out the output tray.
Related Information
& “Paper Handling Precautions” on page 42
& “Available Paper and Capacities” on page 42
Loading Paper
Loading Paper in the Rear Paper Feed
1. Open the feeder guard and pull out the paper support.
2.
Slide the edge guides.
48
Page 49
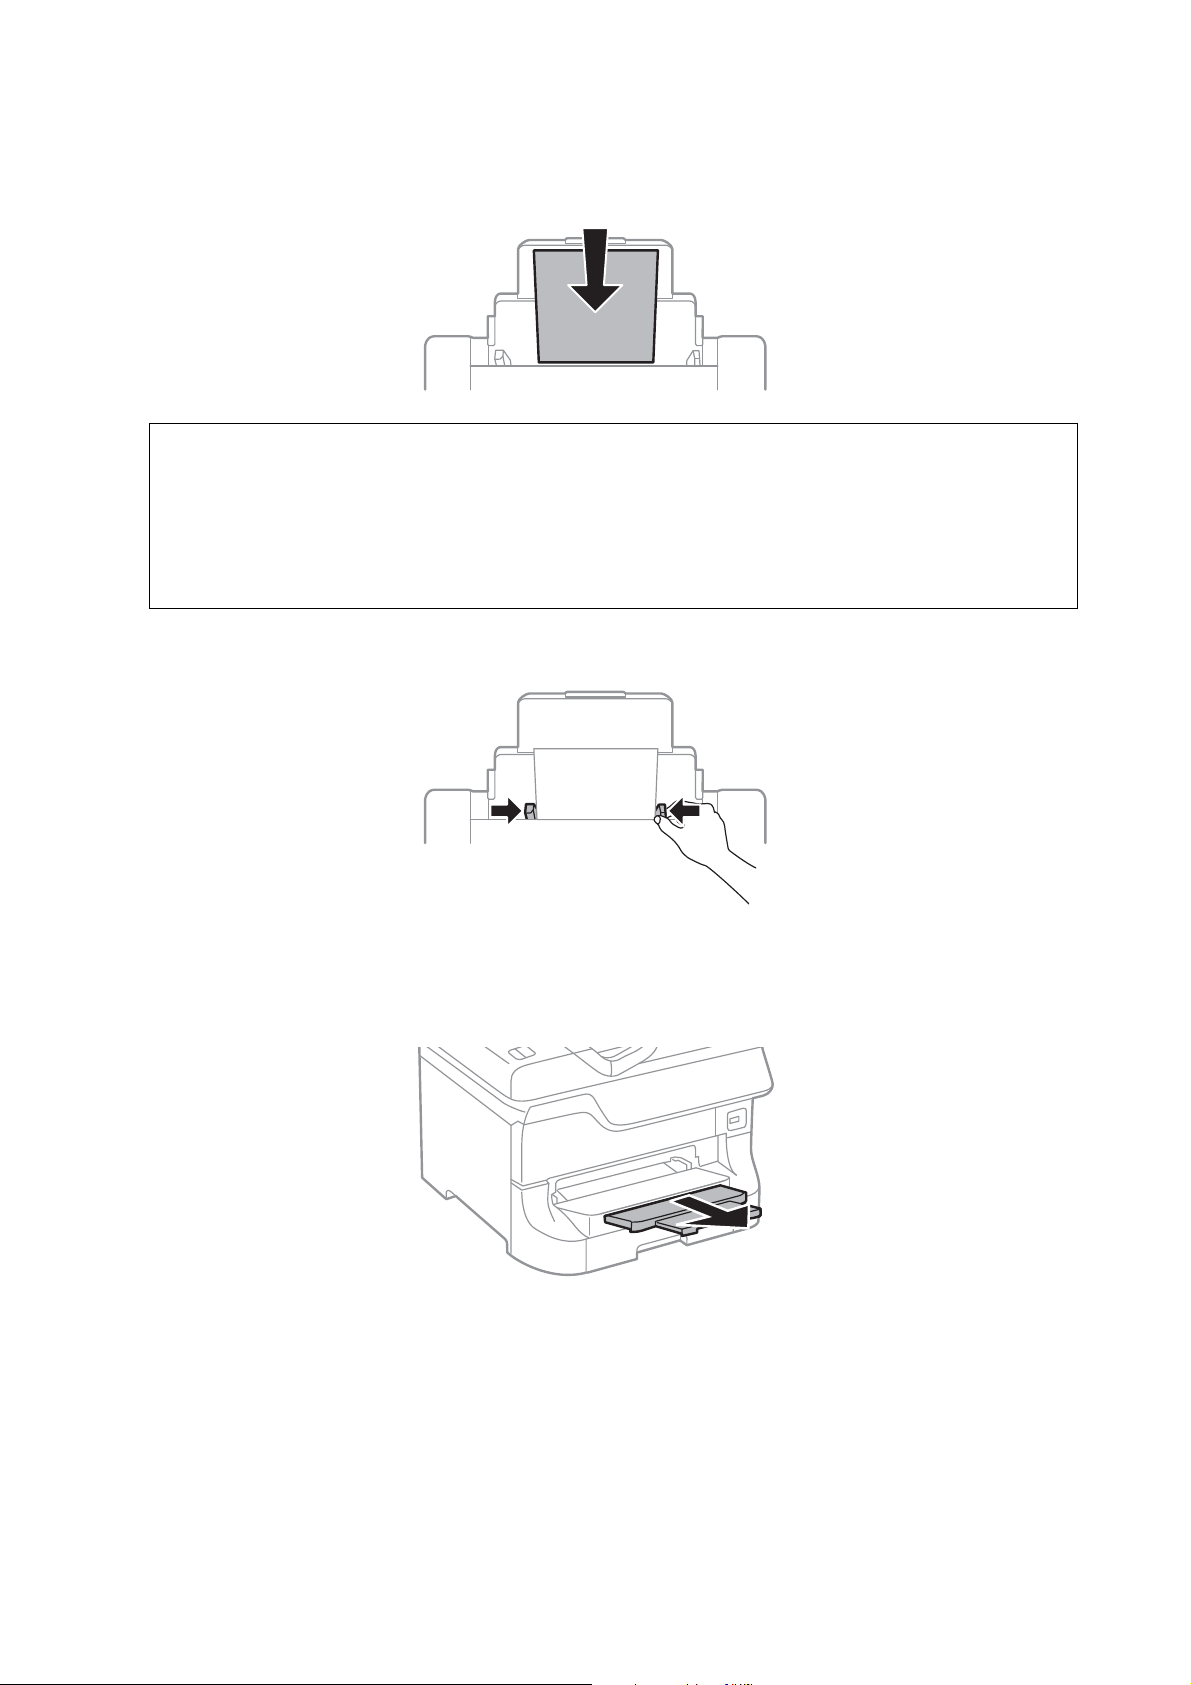
User's Guide
Loading Paper
3. Load paper at the center of the rear paper feed with the printable side facing up.
Important:
c
❏ Do not load more than the maximum number of sheets
above the line just under the
❏ Load paper short edge rst. However, when you have set the long edge as the width of the user dened size,
load paper long edge rst.
d
symbol inside the edge guide.
specied
for the paper. For plain paper, do not load
4. Slide the edge guides to the edges of the paper.
5. On the control panel, set the size and type of the paper you loaded in the rear paper feed.
6.
Slide out the output tray.
49
Page 50

User's Guide
Loading Paper
Note:
❏ Return the remaining paper to its package. If you leave it in the printer, the paper may curl or the print quality may
decline.
❏ You can use pre-punched paper under the following conditions. Automatic 2-sided printing is not available for pre-
punched paper.
❏ Loading capacity: One sheet
❏ Available size: A3, B4, A4, B5, A5, Letter, Legal
❏ Binding holes: Do not load paper with the binding holes at the top or the bottom.
Adjust the print position of your le to avoid printing over the holes.
Related Information
& “Paper Handling Precautions” on page 42
& “Available Paper and Capacities” on page 42
& “Loading Envelopes and Precautions” on page 51
Loading Paper in the Front Paper Feed Slot
You can only load one sheet of paper in the front paper feed slot. Because the front paper feed slot also serves the
output tray, you cannot load paper during printing.
Important:
c
You can load paper with a thickness of 0.08 to 0.11 mm in the front paper feed slot. However, even if the thickness is
within this range, some papers may not be fed correctly depending on their hardness.
1. Slide out the output tray.
50
Page 51
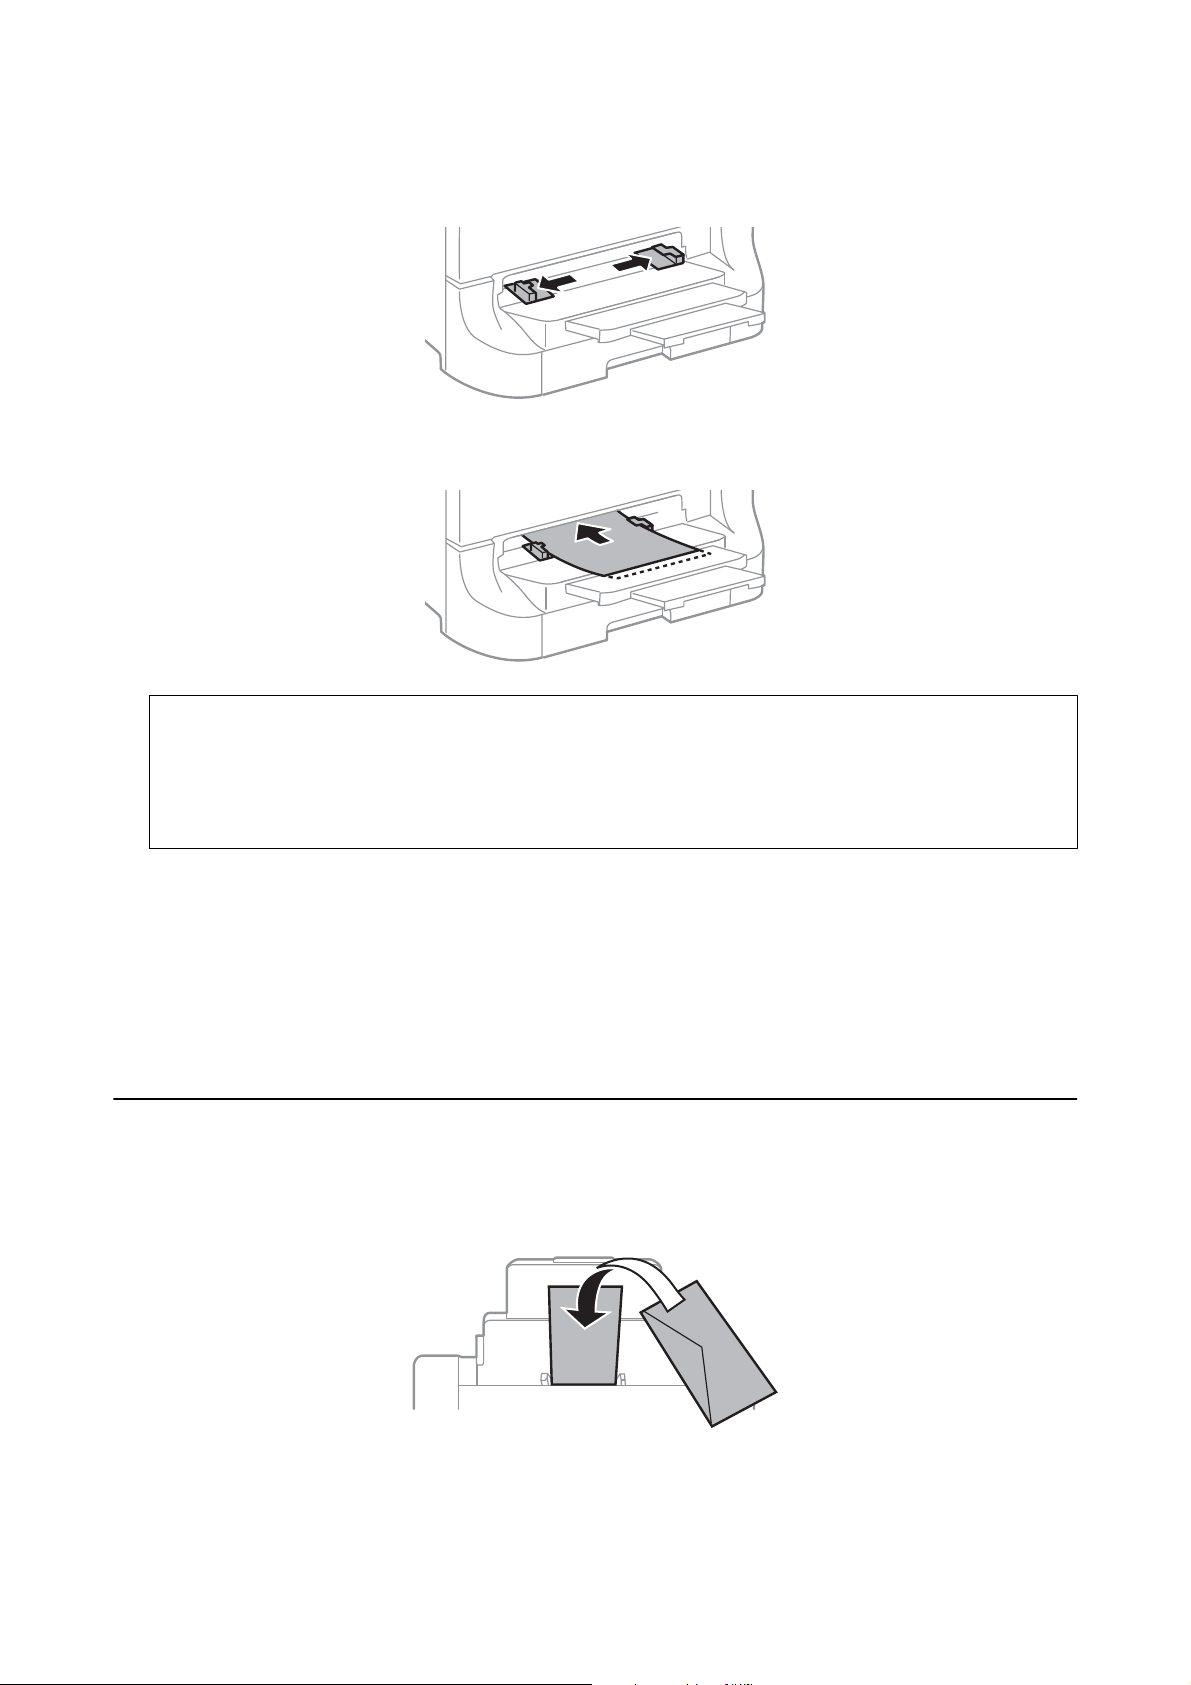
User's Guide
Loading Paper
2. Slide the edge guides to adjust to the paper size you want to use.
3. Insert the paper with the printable side facing down until the printer partially pulls in the paper.
Important:
c
❏ Load paper short edge
load paper long edge rst.
❏ Keep the paper straight to prevent it from being fed askew.
Note:
If the printer does not pull in the paper, load it again.
Related Information
& “Paper Handling Precautions” on page 42
&
“Available Paper and Capacities” on page 42
Loading Envelopes and Precautions
Envelopes can only be loaded in the rear paper feed. Load envelopes short edge rst at the center with the ap
facing down, and slide the edge guides to the edges of the envelopes.
However, when you have set the long edge as the width of the user
rst.
dened
size,
51
Page 52

User's Guide
Loading Paper
❏ Fan and align the edges of the envelopes before loading. When the stacked envelopes are pued up with air,
press them down to
❏ Do not use envelopes that are curled or folded. Using these envelopes causes paper jams and smears on the
printout.
❏ Do not use envelopes with adhesive surfaces on the aps or window envelopes.
❏ Avoid using envelopes that are too thin, as they may curl during printing.
Related Information
& “Available Paper and Capacities” on page 42
& “Loading Paper in the Rear Paper Feed” on page 48
them before loading.
atten
Setting the Paper Size and Paper Type for Each Paper Source
Aer loading paper, set the paper size and paper type for each paper source on the control panel. Once these
settings have been made, when automatic paper source selection is enabled, paper is automatically fed from a
paper source that matches the paper size and type settings for the print job. You do not need to select the paper
source each time you print.
1. Enter Setup from the home screen.
2. Select Paper Setup.
3. Select a paper source.
4. Select the paper size and paper type you loaded.
Related Information
& “List of Paper Types” on page 45
52
Page 53
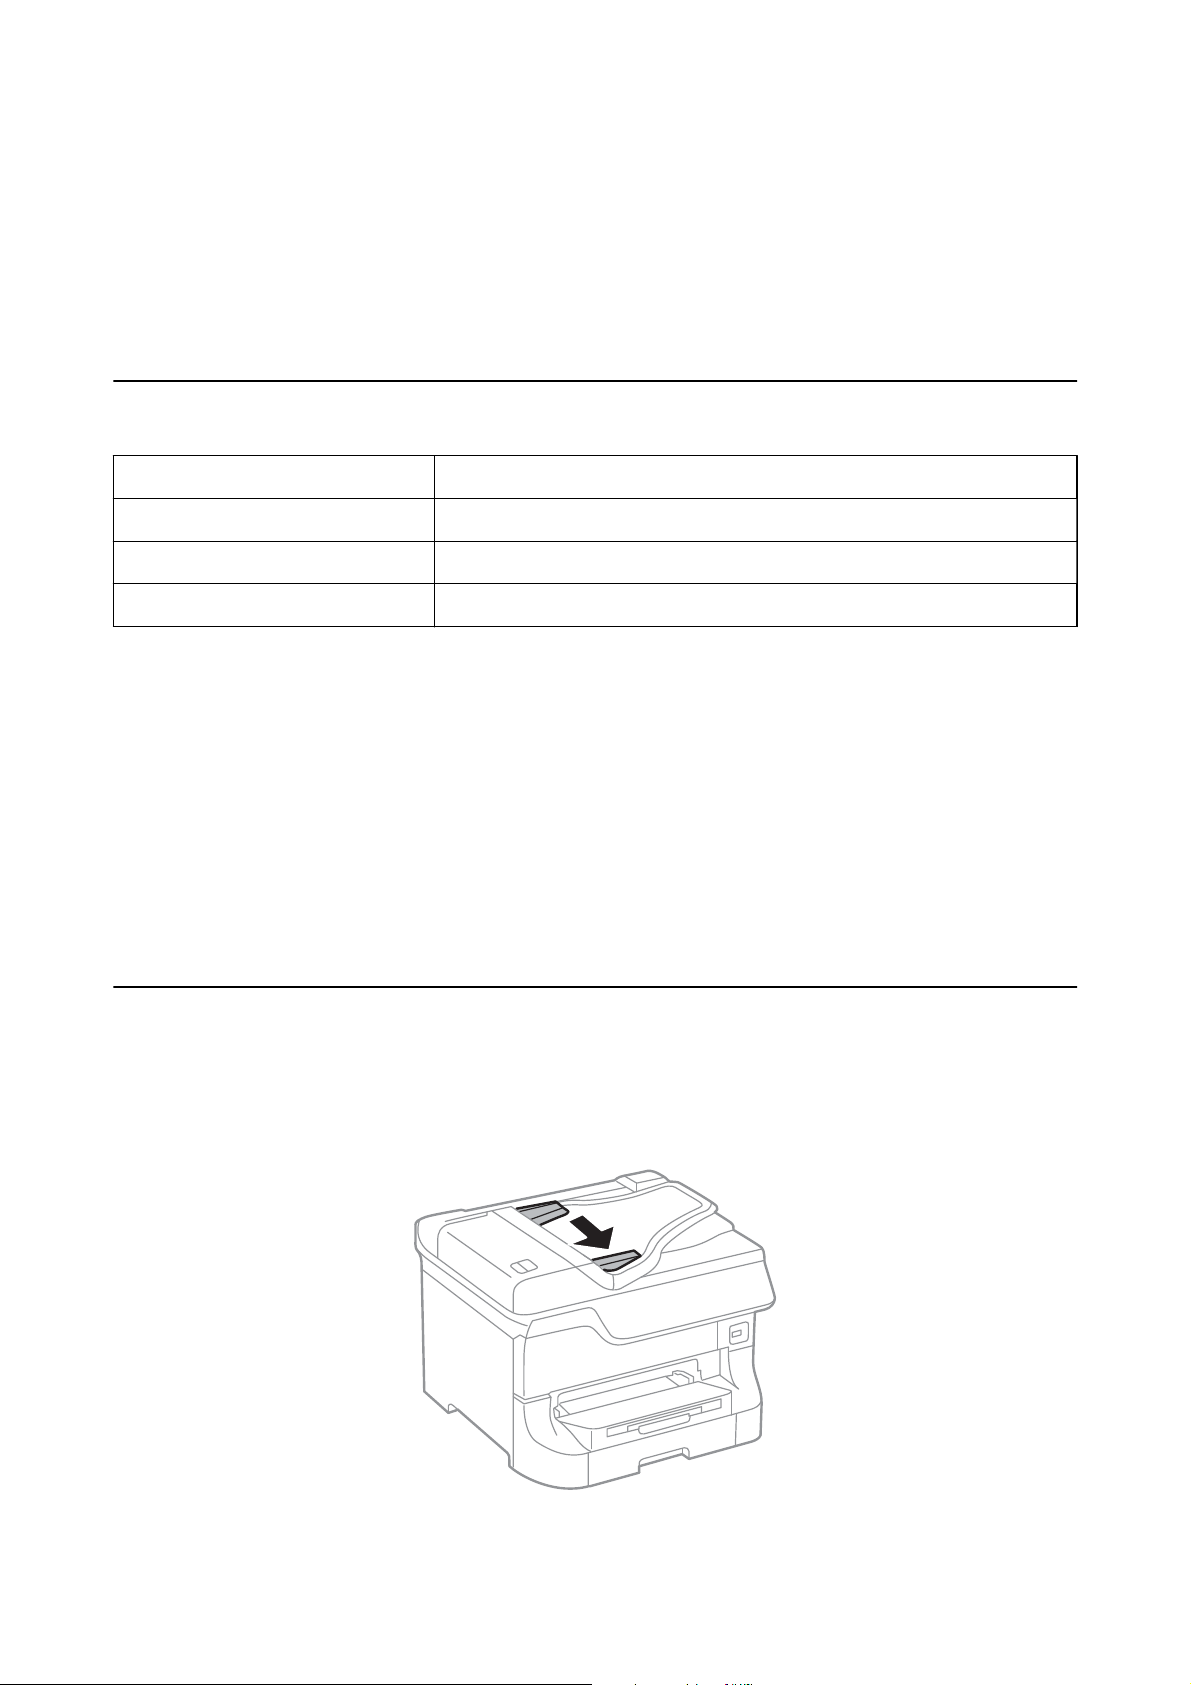
User's Guide
Placing Originals
Placing Originals
Place originals on the scanner glass or the ADF. Use the scanner glass for originals that the ADF does not support.
You can scan multiple originals and both sides of the originals at the same time with the ADF.
Available Originals for the ADF
Available Paper Sizes A6 landscape/A5 to Ledger (Maximum 297 × 431.8 mm)
Paper Type Plain paper
Paper Thickness (Weight of Paper) 52 to 105 g/m
Loading Capacity 50 sheets or 5 mm
To prevent paper jams, avoid placing the following originals in the ADF. For these types, use the scanner glass.
❏ Originals that are torn, folded, wrinkled, deteriorated, or curled
❏ Originals with binder holes
❏ Originals held together with tape, staples, paper clips etc.
❏ Originals that have stickers or labels stuck to them
❏ Originals that are cut irregularly or not right angled
❏ Originals that are bound
❏ OHPs, thermal transfer paper, or carbon backs
Placing Originals on the ADF
1.
Align the edges of the originals.
2. Slide the edge guides.
53
Page 54
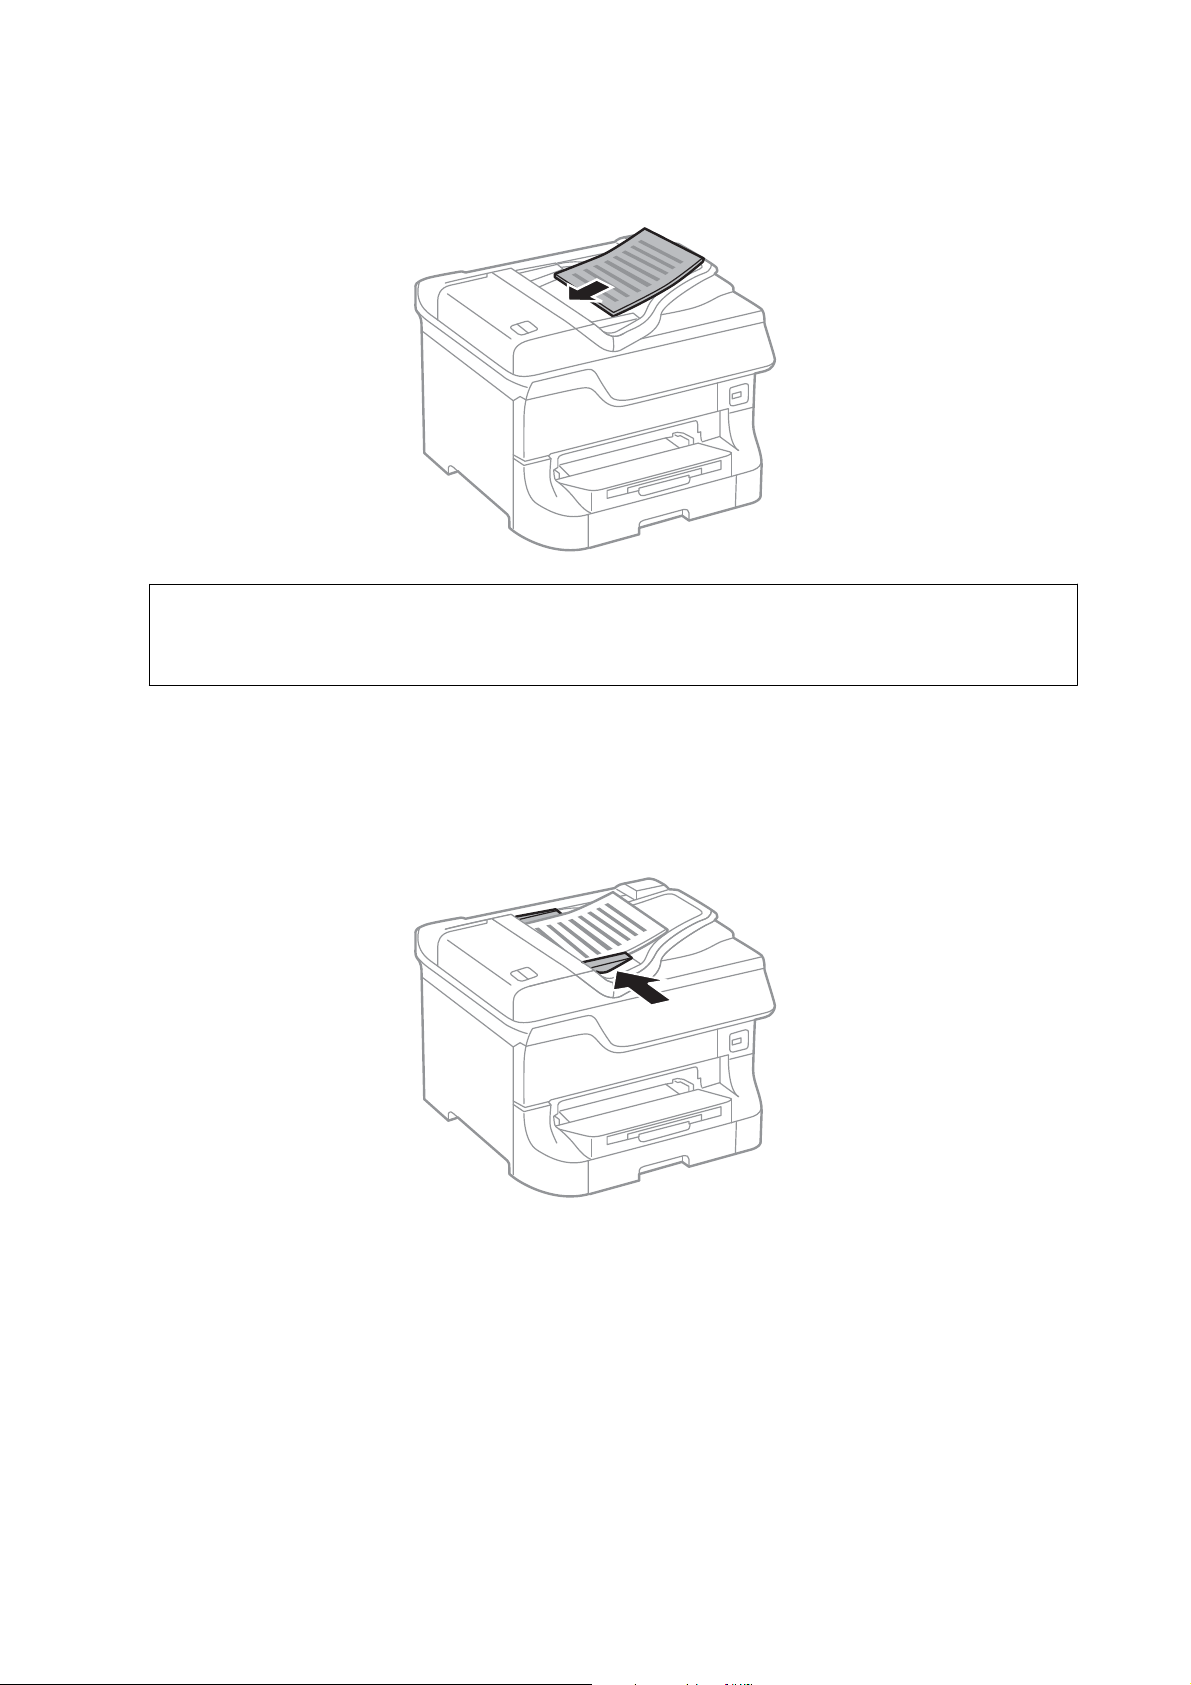
User's Guide
Placing Originals
3. Place the originals in the center of the ADF, facing up.
Important:
c
Do not load originals above the line just under the
d
symbol inside the edge guide.
Note:
You can place originals smaller than A4 size with the long edge facing toward the ADF.
4.
Slide the edge guides to the edges of the originals.
e size of the originals is automatically detected.
Note:
Some sizes may not be automatically detected. In this situation, manually select the size of the originals.
Related Information
& “Available Originals for the ADF” on page 53
54
Page 55

User's Guide
Placing Originals
Placing Originals on the Scanner Glass
Caution:
!
Be careful not to trap your
Important:
when closing the document cover. Otherwise you may be injured.
ngers
c
When placing bulky originals such as books, prevent exterior light from shining directly onto the scanner glass.
1. Open the document cover.
2. Remove any dust or stains on the scanner glass.
3. Place the original face-down and slide it to the corner mark.
Note:
❏ A range of 1.5 mm from the edges of the scanner glass is not scanned.
❏ When originals are placed in the ADF and on the scanner glass, priority is given to the originals in the ADF.
55
Page 56

User's Guide
Placing Originals
4. Close the cover gently.
size of the originals is automatically detected.
e
Note:
❏ Some sizes may not be automatically detected. In this situation, manually select the size of the originals.
❏ Remove the originals aer scanning or copying. If you leave the originals on the scanner glass for a long time, they
may stick to the surface of the glass.
56
Page 57

User's Guide
Managing Contacts
Managing Contacts
Registering a contacts list allows you to easily enter destinations. You can register up to 200 entries, and you can
use the contacts list for faxing, Scan to Email, and Scan to Network Folder/FTP.
You can also register contacts in the LDAP server. See the Administrator's Guide to register contacts in the LDAP
server.
Registering Contacts
1.
Select Contacts from the home screen, the Scan mode, or the Fax mode.
2. Press Menu, and then select Add Entry.
3. Select in which mode you want to use the contact.
Note:
is screen is displayed when you open the contacts list from the home screen.
4. Select the entry number that you want to register.
5. Make the necessary settings for each mode.
Note:
When entering a fax number, enter an external access code at the beginning of the fax number if your phone system is
PBX and you need the access code to get an outside line. If the access code has been set in the Line Type setting, enter a
hash (#) instead of the actual access code. To add a pause (pause for three seconds) during dialing, enter a hyphen by
pressing
6. Press Save.
Note:
To edit or delete an entry, select the target entry and press Edit or Delete.
.
Registering Grouped Contacts
Adding contacts to a group allows you to send a fax or send a scanned image by an email to multiple destinations
at the same time.
1. Select Contacts from the home screen, the Scan mode, or the Fax mode.
2. Press Menu, and then select Add Group.
3.
Select in which mode you want to use the grouped contact.
Note:
is screen is displayed when you open the contacts list from the home screen.
4. Select the entry number that you want to register.
5. Enter Name and Index Word, and then press Proceed.
57
Page 58

User's Guide
Managing Contacts
6. Press the check box of the contacts that you want to register in the group.
Note:
❏ You can register up to 199 contacts.
❏ To deselect, press the check box of the contact again.
7. Press Save.
Note:
To edit or delete a grouped contact, select the target grouped contact and press Edit or Delete.
Registration and Backup of Contacts Using a Computer
You can register and backup contacts on the printer using EpsonNet Cong. See the EpsonNet Cong help for
details.
Contacts data may be lost due to a printer malfunction. We recommend that you make a backup of the data
whenever you update the data. Epson shall not be responsible for the loss of any data, for backing up or recovering
data and/or settings even during a warranty period.
Related Information
& “EpsonNet Cong” on page 144
58
Page 59

User's Guide
Printing
Printing
Printing from the Control Panel
You can print data stored on a memory device, such as a USB ash drive, directly.
1. Load paper in the printer.
2. Insert a memory device into the printer's external interface USB port.
3. Enter Memory Device from the home screen.
4. Select a le format.
Note:
If you have more than 999 images on your memory device, images are automatically divided into groups and the group
selection screen is displayed. Select the group that contains the image you want to print. Images are sorted by the date
they were taken. To select another group, select Options > Select Group.
5. Select the le you want to print.
6. Enter the number of printouts using the numeric keypad.
7. Press Settings, and then make print settings.
Note:
When you select JPEG as the
y
Press the
8.
Press the
Related Information
& “Loading Paper in the Paper Cassette” on page 46
& “Loading Paper in the Rear Paper Feed” on page 48
& “Loading Paper in the Front Paper Feed Slot” on page 50
& “Part Names and Functions” on page 18
& “Memory Device Mode” on page 29
button, or swipe the screen horizontally to select the image.
x
button.
format, you can adjust the image. Press Adjustments. You can also add more images.
le
Printing from a Computer
If you cannot change some of the printer driver settings, they may have been restricted by the administrator.
Contact your printer administrator for assistance.
59
Page 60

User's Guide
Printing
Authenticating Users in the Printer Driver when User Feature Restriction Is Enabled (for Windows Only)
When the user feature restriction is enabled, a user ID and password are required to print. Register the user ID and
password in the printer driver. If you do not know the password, contact your printer administrator.
1. Access the printer driver window.
2. Click Printer and Option Information on the Maintenance tab.
3.
Select Save Access Control settings, click Settings, and then enter the user name and the password.
Related Information
& “Windows Printer Driver” on page 138
Printing Basics - Windows
Note:
❏ See the online help for explanations of the setting items. Right-click an item, and then click Help.
❏ Operations may dier depending on the application. See the application's help for details.
1. Load paper in the printer.
Open the
2.
3. Select Print or Print Setup from the File menu.
4. Select your printer.
you want to print.
le
60
Page 61

User's Guide
Printing
5. Select Preferences or Properties to access the printer driver window.
6. Make the following settings.
❏ Paper Source: Select the paper source in which you loaded the paper.
❏ Document Size: Select the paper size you set in the application.
❏ Orientation: Select the orientation you set in the application.
❏ Paper Type: Select the type of paper you loaded.
Make sure you select the correct paper type to optimize the print quality.
❏ Color: Select Grayscale when you want to print in black or shades of gray.
Note:
If you are printing high-density data on plain paper, letterhead, or preprinted paper, select Standard-Vivid as the
Quality setting to make your printout vivid.
7. Click OK to close the printer driver window.
8. Click Print.
Related Information
& “Available Paper and Capacities” on page 42
& “Loading Paper in the Paper Cassette” on page 46
& “Loading Paper in the Rear Paper Feed” on page 48
&
“Loading Paper in the Front Paper Feed Slot” on page 50
&
“List of Paper Types” on page 45
&
“Authenticating Users in the Printer Driver when User Feature Restriction Is Enabled (for Windows Only)” on
page 60
61
Page 62

User's Guide
Printing
Printing Basics - Mac OS X
Note:
Operations dier depending on the application. See the application's help for details.
1. Load paper in the printer.
2. Open the
3. Select Print from the File menu or another command to access the printer driver window.
If necessary, click Show Details or
you want to print.
le
d
to expand the print window.
4. Make the following settings.
❏ Printer: Select your printer.
❏ Paper Size: Select the paper size you set in the application.
❏ Orientation: Select the orientation you set in the application.
62
Page 63

User's Guide
5. Select Print Settings from the pop-up menu.
Printing
6. Make the following settings.
❏ Paper Source: Select the paper source in which you loaded the paper.
❏ Media Type: Select the type of paper you loaded.
Make sure you select the correct paper type to optimize the print quality.
❏ Grayscale: Select to print in black or shades of gray.
7. Click Print.
Related Information
& “Available Paper and Capacities” on page 42
& “Loading Paper in the Paper Cassette” on page 46
& “Loading Paper in the Rear Paper Feed” on page 48
&
“Loading Paper in the Front Paper Feed Slot” on page 50
&
“List of Paper Types” on page 45
Printing on 2-Sides
You can use either of the following methods to print on both sides of the paper.
❏ Automatic 2-sided printing
❏ Manual 2-sided printing (for Windows only)
When the printer has nished printing the rst side, ip the paper over to print on the other side.
63
Page 64

User's Guide
Printing
You can also print a booklet that can be created by folding the printout. (For Windows only)
Note:
❏ If you do not use paper that is suitable for 2-sided printing, the print quality may decline and paper jams may occur.
❏ Depending on the paper and the data, ink may bleed through to the other side of the paper.
Related Information
& “Available Paper and Capacities” on page 42
Printing on 2-Sides - Windows
Note:
❏ Manual 2-sided printing is available when EPSON Status Monitor 3 is enabled. If EPSON Status Monitor 3 is disabled,
access the printer driver, click Extended Settings on the Maintenance tab, and then select Enable EPSON Status
Monitor 3.
❏ Manual 2-sided printing may not be available when the printer is accessed over a network or is used as a shared printer.
1. Load paper in the printer.
2. Open the
3. Access the printer driver window.
4.
Select Auto (Long-edge binding), Auto (Short-edge binding), Manual (Long-edge binding), or Manual
(Short-edge binding) from 2-Sided Printing on the Main tab.
Click Settings and make the appropriate settings.
5.
you want to print.
le
Note:
To print a folded booklet, select Booklet.
6. Click Print Density, select the document type from Select Document Type, and then click OK to close the
window.
e printer driver automatically sets the Adjustments options for that document type.
Note:
Printing may be slow depending on the combination of options selected for Select Document Type in the Print Density
Adjustment window and for Quality on the Main tab.
7. Set the other items on the Main and More Options tabs as necessary, and then click OK.
64
Page 65

User's Guide
Printing
8. Click Print.
For manual 2-sided printing, when the rst side has nished printing, a pop-up window is displayed on the
computer. Follow the on-screen instructions.
Related Information
& “Loading Paper in the Paper Cassette” on page 46
& “Loading Paper in the Rear Paper Feed” on page 48
& “Loading Paper in the Front Paper Feed Slot” on page 50
& “Printing Basics - Windows” on page 60
Printing on 2-Sides - Mac OS X
1. Load paper in the printer.
2. Open the
3. Access the printer driver window.
4. Select Two-sided Printing Settings from the pop-up menu.
5.
Select the bindings and Document Type.
Note:
❏ Printing may be slow depending on the Document Type setting.
❏ If you are printing high-density data such as photos or graphs, select Text & Gr aphics or Tex t & P h otos as th e
Document Type setting. If scung occurs or the image bleeds through to the reverse side, adjust the print density
and ink drying time by clicking the arrow mark next to Adjustments.
6. Set the other items as necessary.
7. Click Print.
Related Information
“Loading Paper in the Paper Cassette” on page 46
&
“Loading Paper in the Rear Paper Feed” on page 48
&
“Loading Paper in the Front Paper Feed Slot” on page 50
&
“Printing Basics - Mac OS X” on page 62
&
you want to print.
le
65
Page 66

User's Guide
Printing
Printing Several Pages on One Sheet
You can print two or four pages of data on a single sheet of paper.
Printing Several Pages on One Sheet - Windows
1. Load paper in the printer.
2.
Open the le you want to print.
3. Access the printer driver window.
4. Select 2-Up or 4-Up as the Multi-Page setting on the Main tab.
5. Click Page Order, make the appropriate settings, and then click OK to close the window.
6. Set the other items on the Main and More Options tabs as necessary, and then click OK.
7. Click Print.
Related Information
& “Loading Paper in the Paper Cassette” on page 46
& “Loading Paper in the Rear Paper Feed” on page 48
& “Loading Paper in the Front Paper Feed Slot” on page 50
& “Printing Basics - Windows” on page 60
Printing Several Pages on One Sheet - Mac OS X
1. Load paper in the printer.
2. Open the le you want to print.
3. Access the printer driver window.
4. Select Layout from the pop-up menu.
66
Page 67

User's Guide
Printing
5. Set the number of pages in Pages per Sheet, the Layout Direction (page order), and Border.
6. Set the other items as necessary.
7. Click Print.
Related Information
& “Loading Paper in the Paper Cassette” on page 46
& “Loading Paper in the Rear Paper Feed” on page 48
& “Loading Paper in the Front Paper Feed Slot” on page 50
& “Printing Basics - Mac OS X” on page 62
Printing to Fit the Paper Size
You can print to t the paper size you loaded in the printer.
Printing to Fit the Paper Size - Windows
1.
Load paper in the printer.
2. Open the le you want to print.
3. Access the printer driver window.
4.
Make the following settings on the More Options tab.
❏ Document Size: Select the paper size you set in the application.
❏ Output Paper: Select the paper size you loaded in the printer.
Fit to Page is selected automatically.
Note:
If you want to print a reduced image at the center of the page, select Center.
5.
Set the other items on the Main and More Options tabs as necessary, and then click OK.
6. Click Print.
Related Information
& “Loading Paper in the Paper Cassette” on page 46
67
Page 68
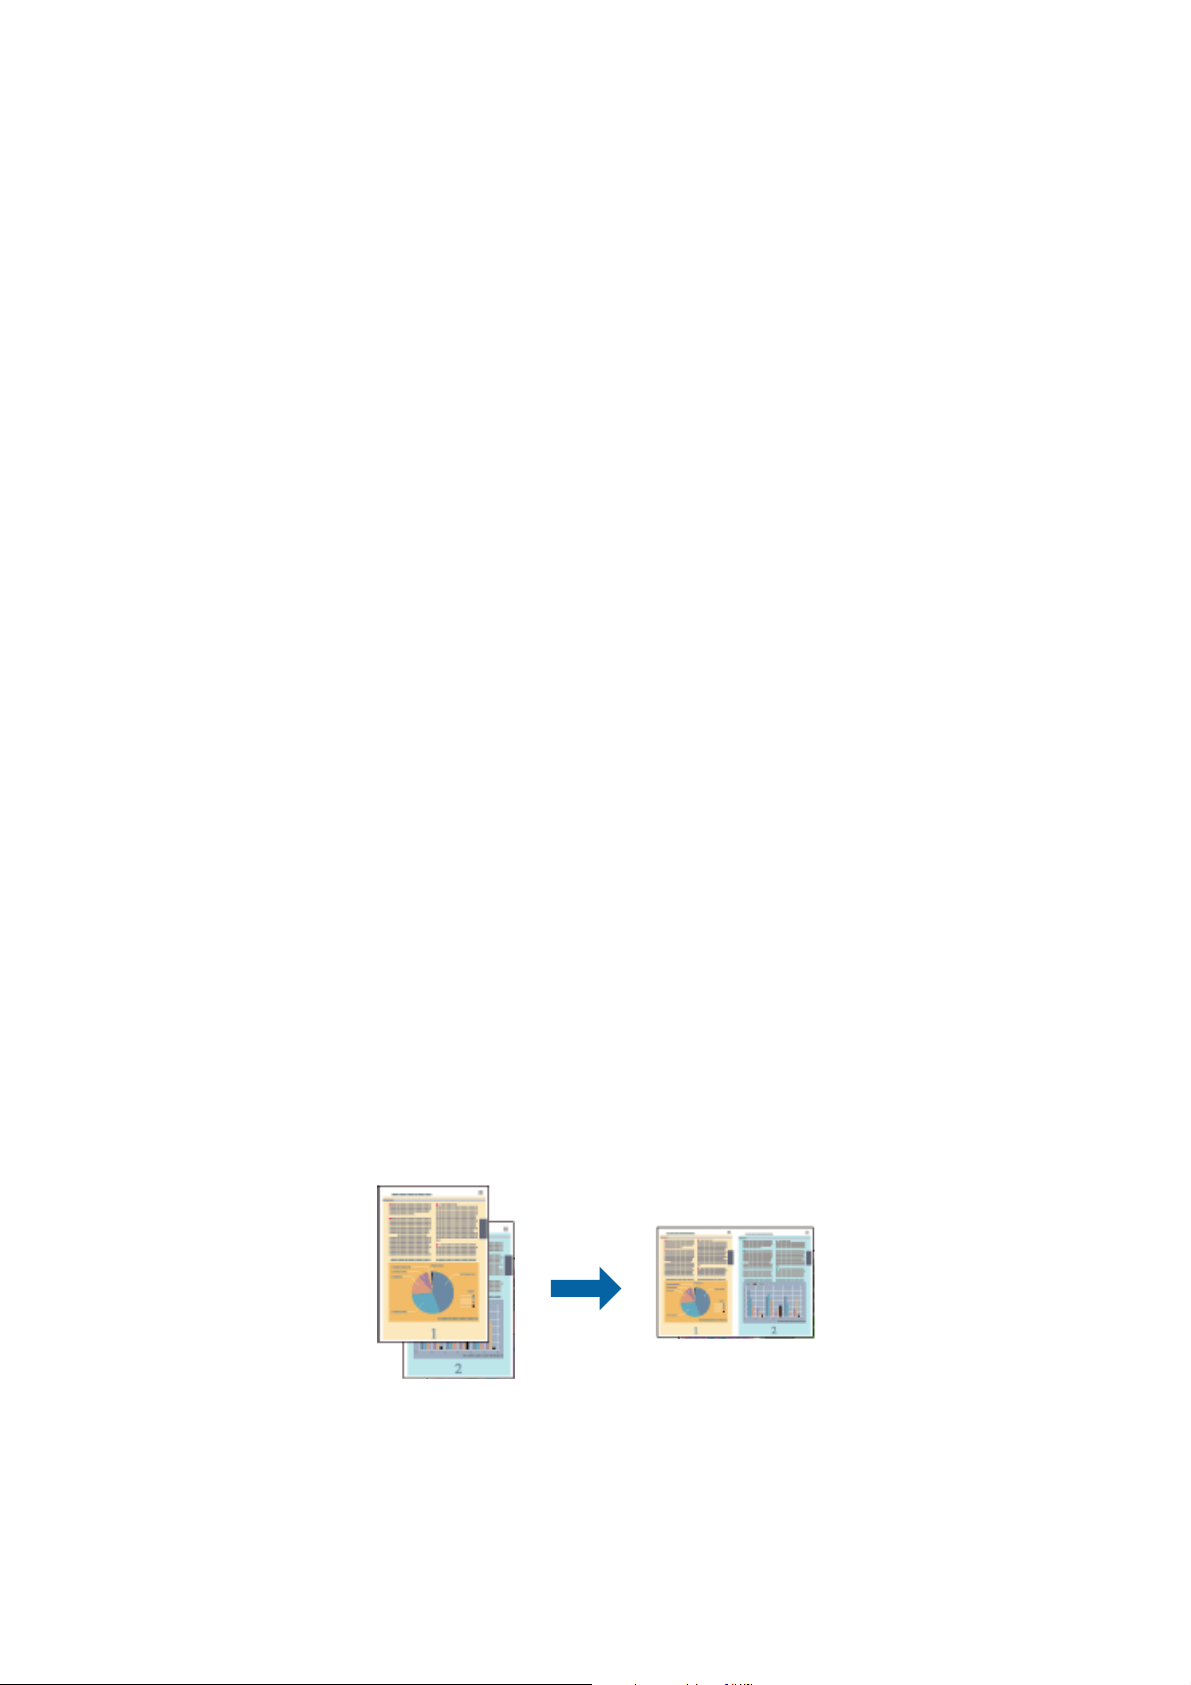
User's Guide
Printing
& “Loading Paper in the Rear Paper Feed” on page 48
& “Loading Paper in the Front Paper Feed Slot” on page 50
& “Printing Basics - Windows” on page 60
Printing to Fit the Paper Size - Mac OS X
1.
Load paper in the printer.
2. Open the le you want to print.
3. Access the printer driver window.
4.
Select the size of the paper you set in the application as the Paper Size setting.
5. Select Paper Handling from the pop-up menu.
6. Select Scale to t paper size.
7. Select the paper size you loaded in the printer as the Destination Paper Size setting.
8. Set the other items as necessary.
9. Click Print.
Related Information
& “Loading Paper in the Paper Cassette” on page 46
& “Loading Paper in the Rear Paper Feed” on page 48
& “Loading Paper in the Front Paper Feed Slot” on page 50
& “Printing Basics - Mac OS X” on page 62
Printing Multiple Files Together (for Windows Only)
Job Arranger Lite allows you to combine several les created by dierent applications and print them as a single
print job. You can specify the print settings for combined
such as layout, print order, and orientation.
les,
Note:
To op e n a Print Project saved in Job Arranger Lite, click Job Arranger Lite on the printer driver's Maintenance tab. Next,
select Open from the File menu to select the le. e extension of the saved les is "ecl".
1. Load paper in the printer.
68
Page 69
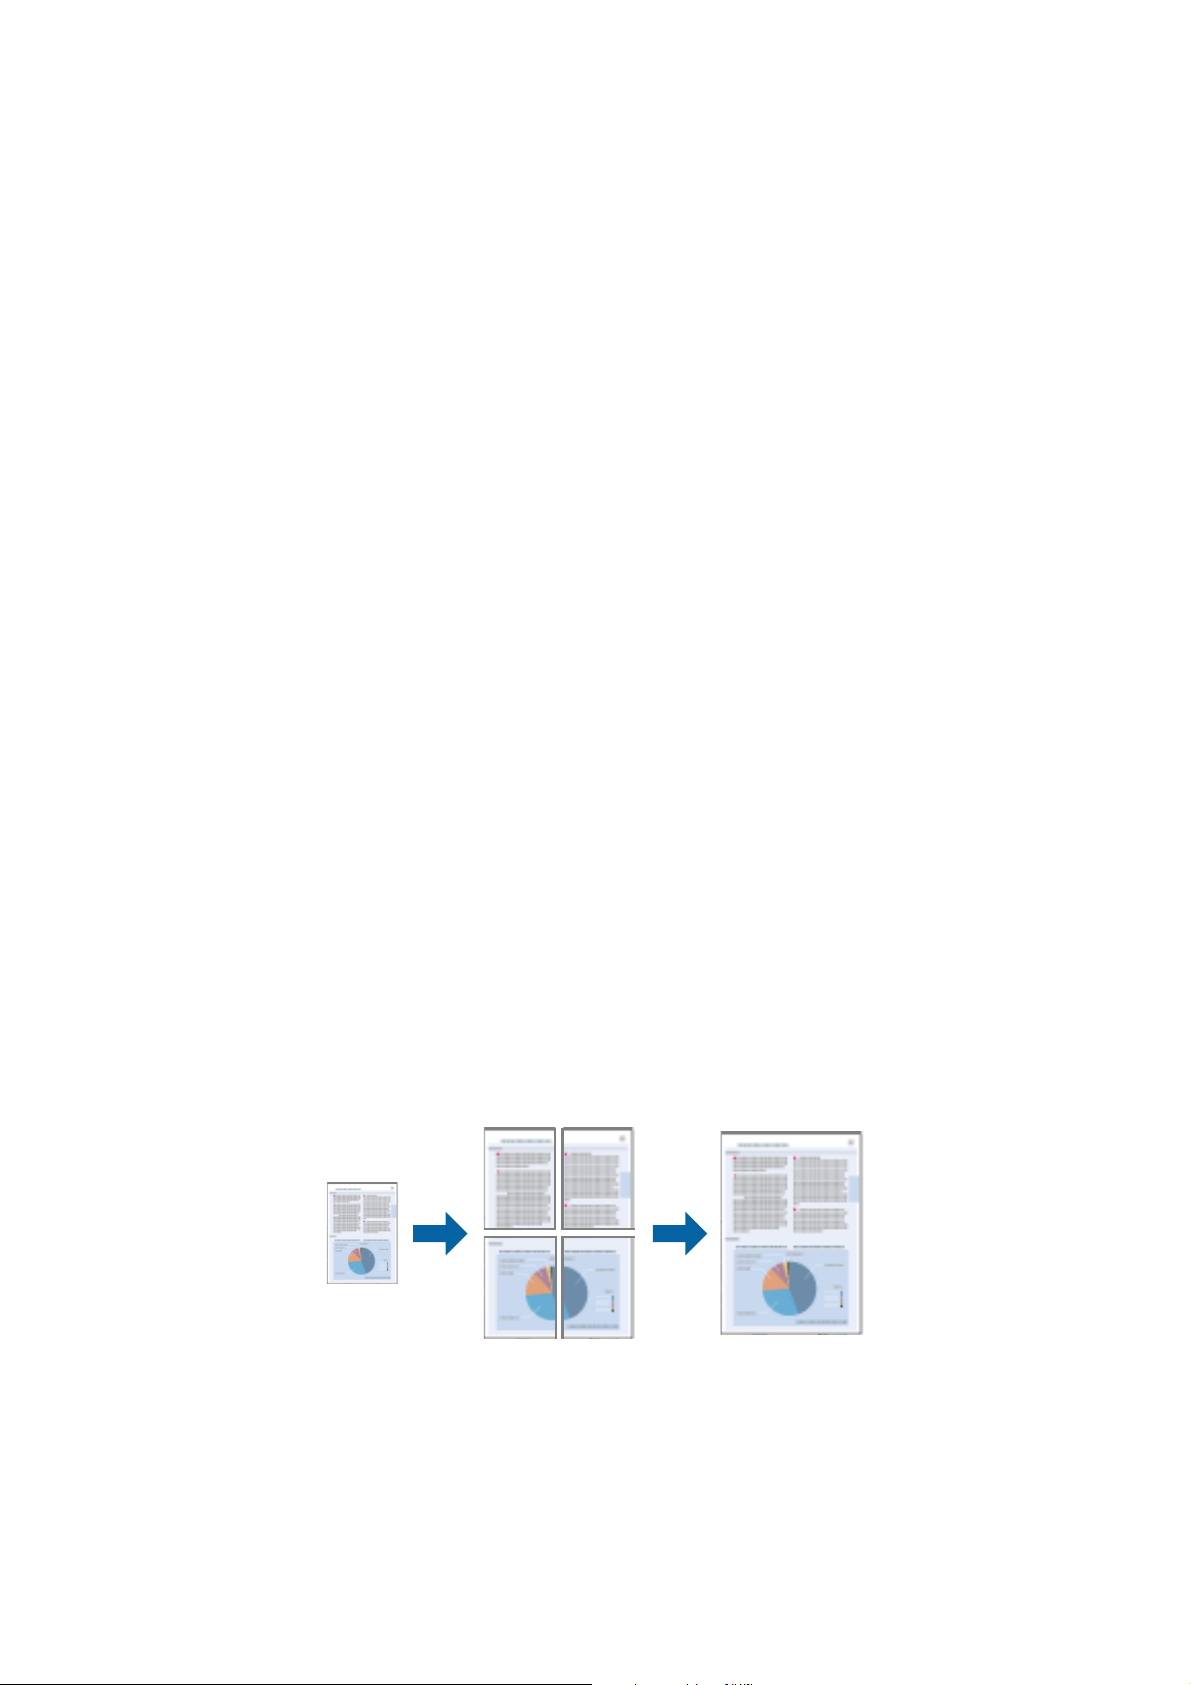
User's Guide
Printing
2. Open the le you want to print.
3. Access the printer driver window.
4.
Select Job Arranger Lite on the Main tab.
5. Set the Paper Source, Document Size, Orientation, and Paper Type.
6. Click OK to close the printer driver window.
7. Click Print.
e Job Arranger Lite window is displayed and the print job is added to the Print Project.
8. With the Job Arranger Lite window opened, open the le that you want to combine with the current le, and
then repeat steps 3 to 7.
Note:
If you close the Job Arranger Lite window, the unsaved Print Project is deleted. To print later, select Save from the File
menu.
9. Select the Layout and Edit menus in Job Arranger Lite to edit the Print Project as necessary.
10. Select Print from the File menu.
Related Information
& “Loading Paper in the Paper Cassette” on page 46
& “Loading Paper in the Rear Paper Feed” on page 48
& “Loading Paper in the Front Paper Feed Slot” on page 50
& “Printing Basics - Windows” on page 60
Enlarged Printing and Making Posters (for Windows Only)
You can print one image on multiple sheets of paper to create a larger poster. You can print alignment marks that
help you stick the sheets together.
1.
Load paper in the printer.
2. Open the le you want to print.
3. Access the printer driver window.
4. Select 2x1 Poster, 2x2 Poster, 3x3 Poster, or 4x4 Poster from Multi-Page on the Main tab.
69
Page 70

User's Guide
Printing
5. Click Settings, make the appropriate settings, and then click OK.
6. Set the other items on the Main and More Options tabs as necessary, and then click OK.
7.
Click Print.
Related Information
& “Loading Paper in the Paper Cassette” on page 46
& “Loading Paper in the Rear Paper Feed” on page 48
& “Loading Paper in the Front Paper Feed Slot” on page 50
& “Printing Basics - Windows” on page 60
Making Posters Using Overlapping Alignment Marks
Here is an example of how to make a poster when 2x2 Poster is selected, and Overlapping Alignment Marks is
selected in Print Cutting Guides.
70
Page 71
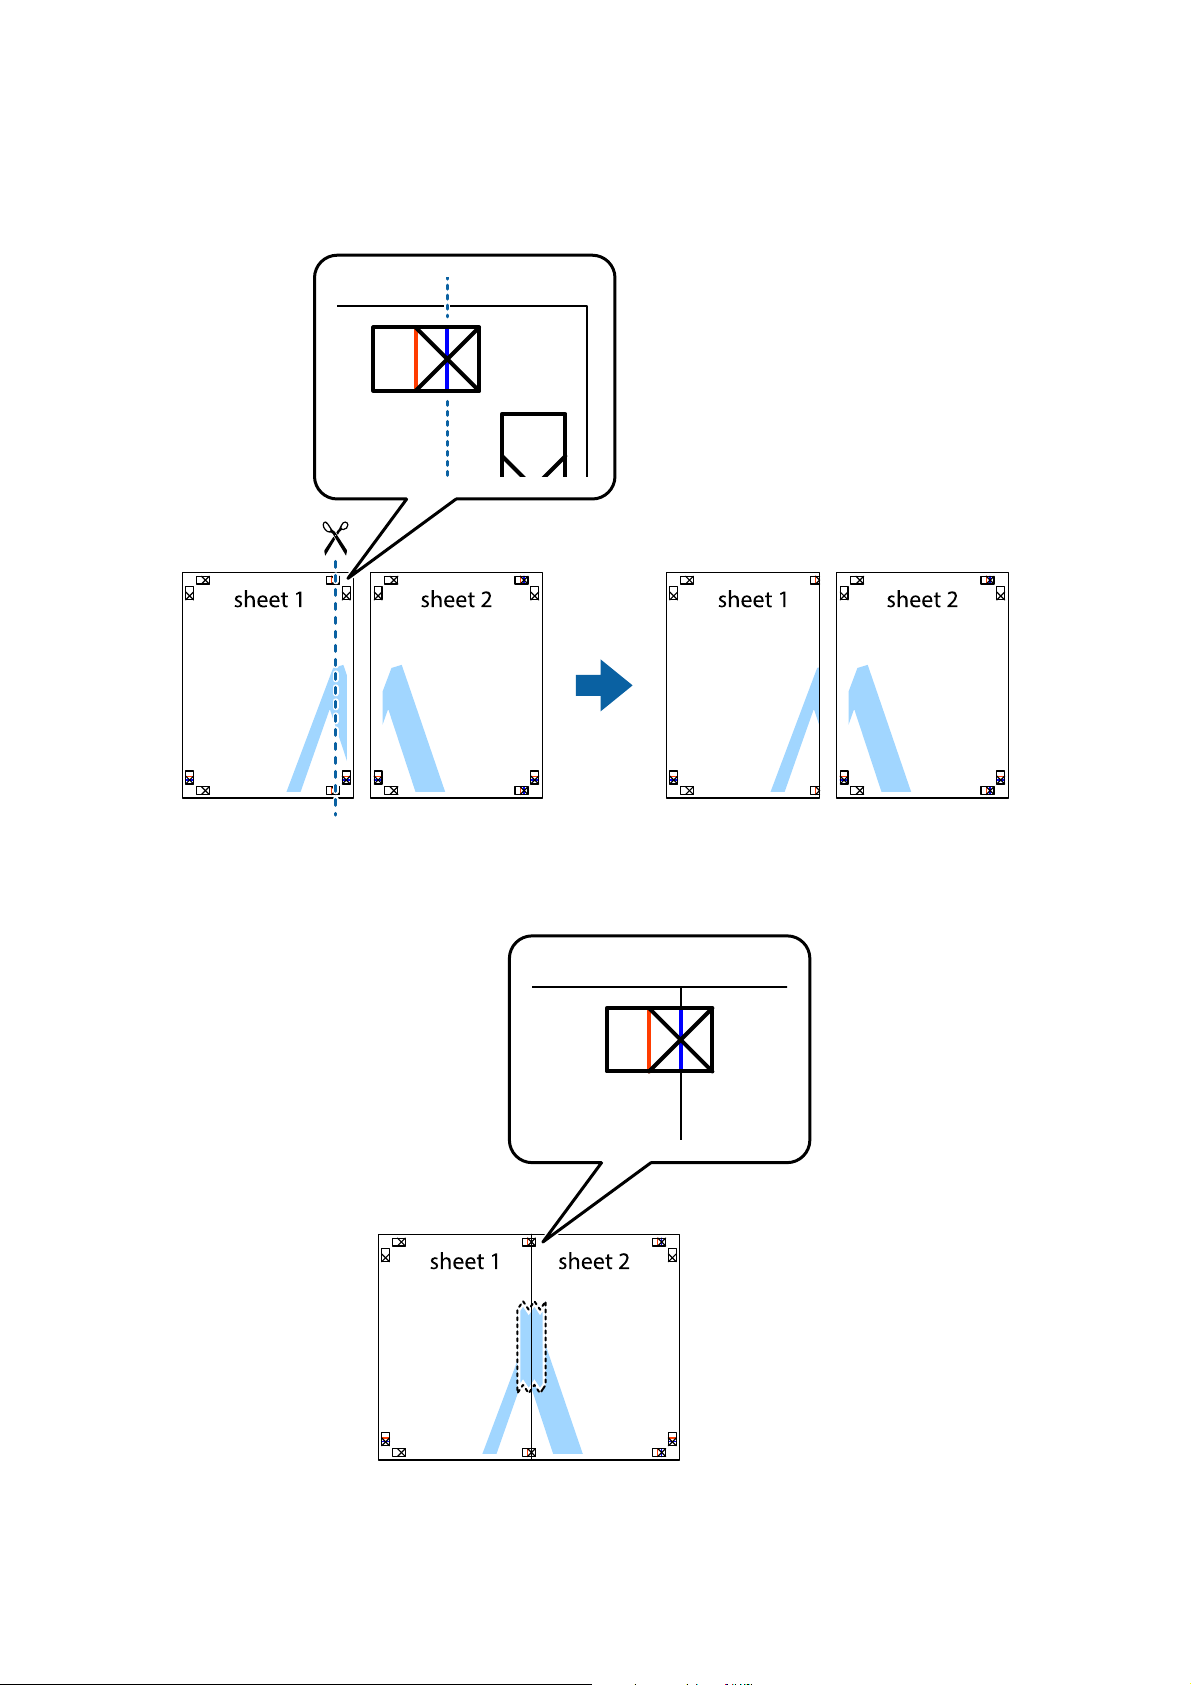
User's Guide
Printing
1. Prepare Sheet 1 and Sheet 2. Cut o the margins of Sheet 1 along the vertical blue line through the center of
the top and bottom cross marks.
2. Place the edge of Sheet 1 on top of Sheet 2 and align the cross marks, then temporarily tape the two sheets
together from the back.
71
Page 72
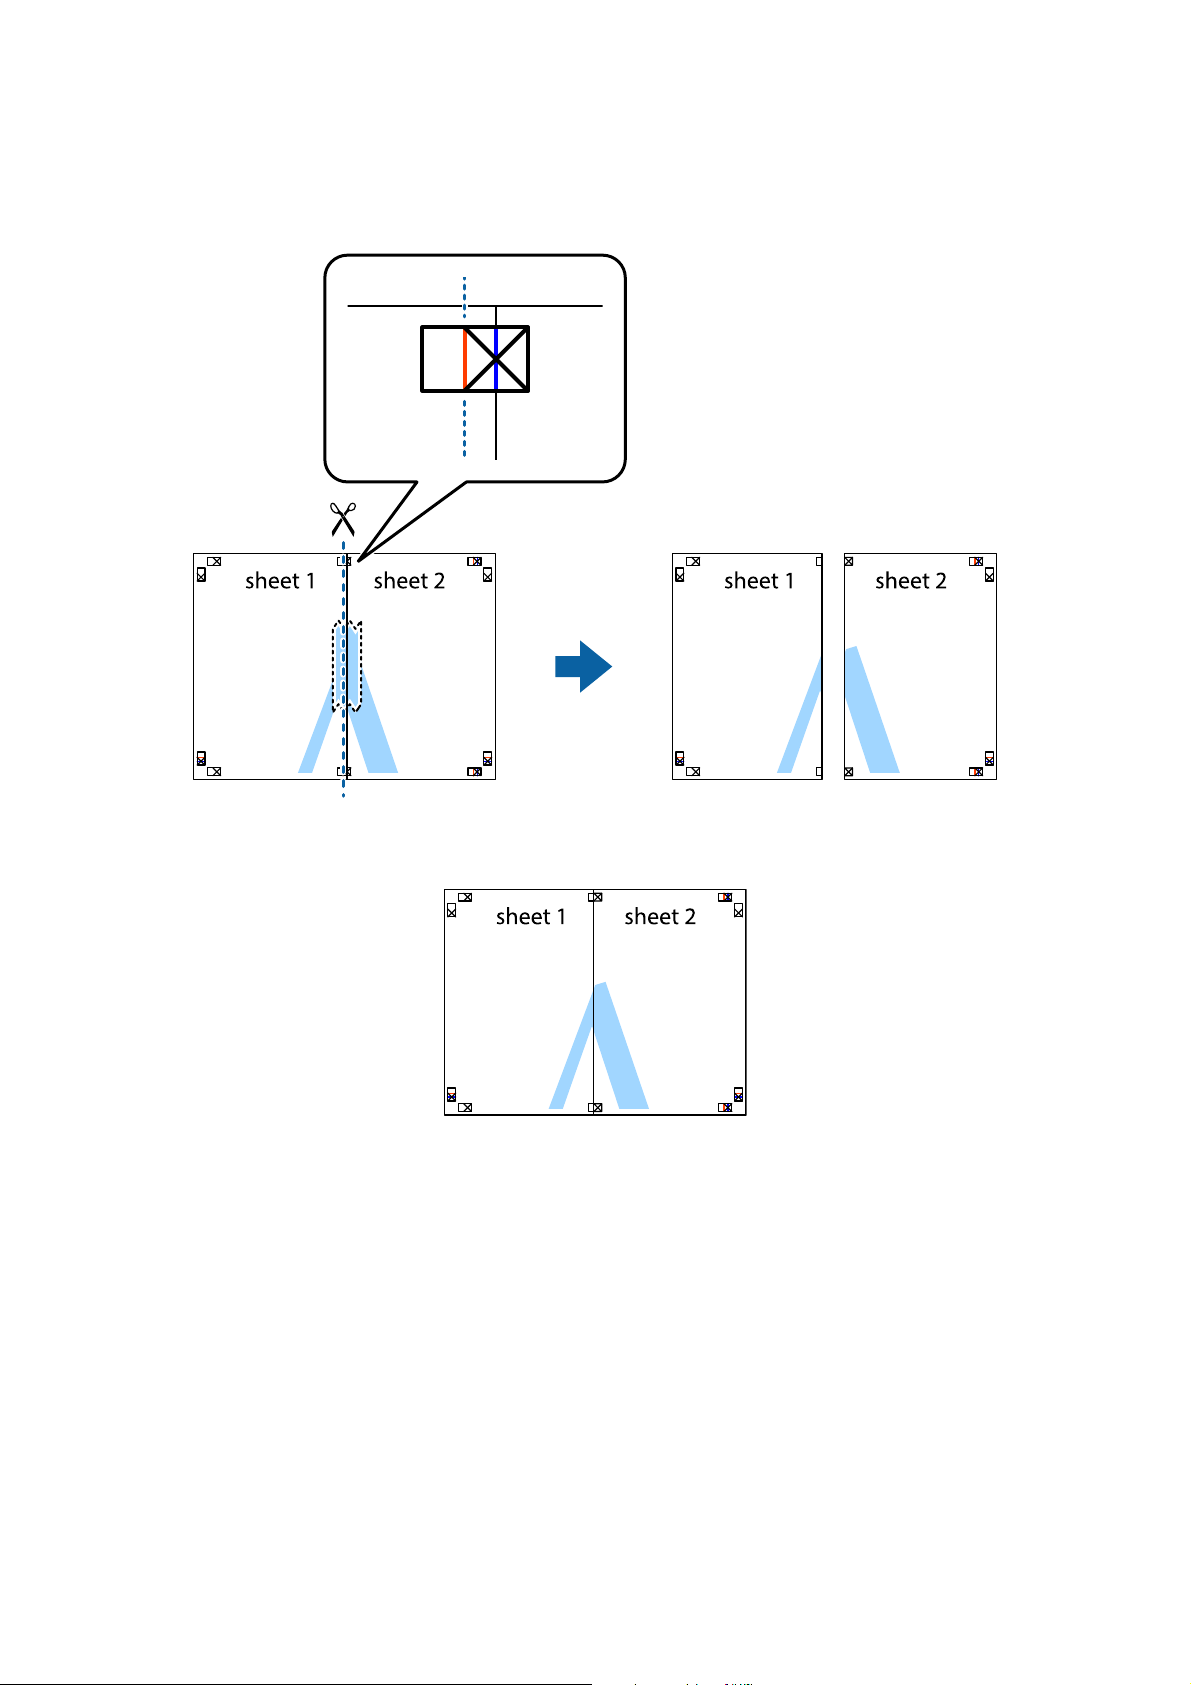
User's Guide
Printing
3. Cut the taped sheets in two along the vertical red line through the alignment markers (this time, the line to the
of the cross marks).
le
4. Tape the sheets together from the back.
5. Repeat steps 1 to 4 to tape Sheet 3 and Sheet 4 together.
72
Page 73
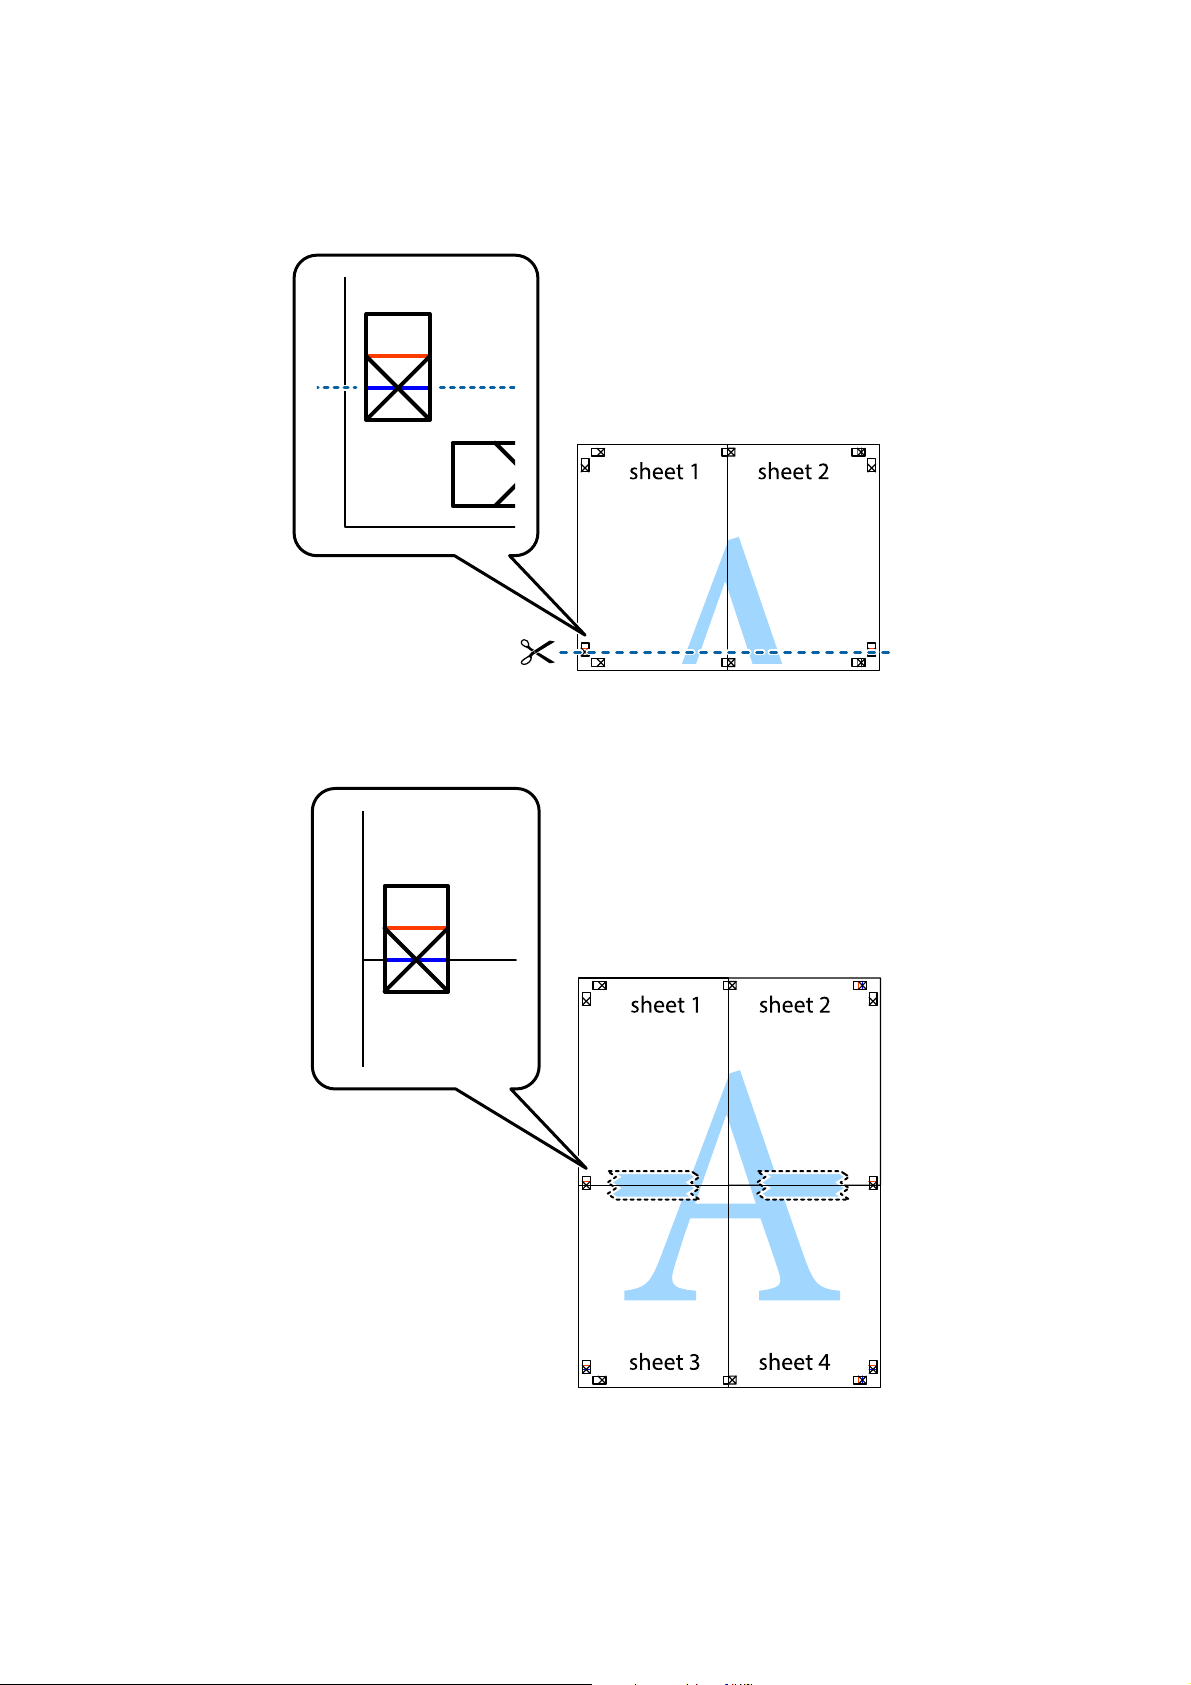
User's Guide
Printing
6. Cut o the margins of Sheet 1 and Sheet 2 along the horizontal blue line through the center of the le and right
side cross marks.
7. Place the edge of Sheet 1 and Sheet 2 on top of Sheet 3 and Sheet 4 and align the cross marks, and then
temporarily tape them together from the back.
73
Page 74

User's Guide
Printing
8. Cut the taped sheets in two along the horizontal red line through the alignment markers (this time, the line
above the cross marks).
9. Tape the sheets together from the back.
74
Page 75

User's Guide
Printing
10. Cut o the remaining margins along the outer guide.
Printing on Envelopes
Printing on Envelopes - Windows
1.
Load envelopes in the printer.
2.
Open the le you want to print.
3. Access the printer driver window.
4. Make the following settings on the Main tab.
❏ Paper Source: Select the paper source in which you loaded the envelopes.
❏ Document Size: Select the envelope size you set in the application.
❏ Orientation: Select landscape.
❏ Paper Type: Select Envelope.
75
Page 76

User's Guide
Printing
5. Set the other items on the Main and More Options tabs as necessary, and then click OK.
6. Click Print.
Related Information
& “Loading Envelopes and Precautions” on page 51
& “Printing Basics - Windows” on page 60
Printing on Envelopes - Mac OS X
1. Load envelopes in the printer.
2. Open the
3. Access the printer driver window.
4. Make the following settings.
❏ Paper Size: Select the envelope size you set in the application.
❏ Orientation: Select landscape.
5. Select Print Settings from the pop-up menu.
6. Make the following settings.
❏ Paper Source: Select the paper source in which you loaded the envelopes.
❏ Media Type: Select Envelope.
7.
Click Print.
Related Information
& “Loading Envelopes and Precautions” on page 51
& “Printing Basics - Mac OS X” on page 62
you want to print.
le
Printing Using Advanced Features
is section introduces a variety of additional layout and printing features available on the printer driver.
Related Information
“Windows Printer Driver” on page 138
&
“Mac OS X Printer Driver” on page 140
&
Adding a Printing Preset
If you create your own preset of frequently used print settings on the printer driver, you can print easily by
selecting the preset from the list.
76
Page 77

User's Guide
Printing
Windows
To add your own preset, set items such as the Document Size and Paper Type on the Main or More Options tab,
and then click Add/Remove Presets in Printing Presets.
Mac OS X
Access the printer driver window. To add your own preset, set items such as the Paper Size and Media Type, and
then save the current settings as the preset in the Presets setting.
Printing a Reduced or Enlarged Document
You can reduce or enlarge the size of a document by a specic percentage.
Windows
Set the Document Size on the More Options tab. Select Reduce/Enlarge Document, Zoom to, and then enter a
percentage.
Mac OS X
Access the printer driver window. Select Scale, and then enter a percentage.
Adjusting the Print Color
You can adjust the colors used in the print job.
PhotoEnhance produces sharper images and more vivid colors by automatically adjusting the contrast, saturation,
and brightness of the original image data.
Note:
❏ ese adjustments are not applied to the original data.
❏ PhotoEnhance adjusts the color by analyzing the location of the subject. erefore, if you have changed the location of
the subject by reducing, enlarging, cropping, or rotating the image, the color may change unexpectedly. Selecting the
borderless setting also changes the location of the subject resulting in changes in color. If the image is out of focus, the tone
may be unnatural. If the color is changed or becomes unnatural, print in a mode other than PhotoEnhance.
Windows
Select Custom as the Color Correction setting on the More Options tab. Click Advanced, select the Color
Management setting, and then make appropriate settings.
Mac OS X
Access the printer driver window. Select Color Matching from the pop-up menu, and then select EPSON Color
Controls. Select Color Options from the pop-up menu, and then select one of the available options. Click the
arrow next to Advanced Settings and make the appropriate settings.
Printing an Anti-Copy Pattern (for Windows Only)
You can print documents with invisible letters such as "Copy". ese letters appear when the document is
photocopied so that the copies can be distinguished from the original. You can also add your own anti-copy
pattern.
77
Page 78

User's Guide
Printing
Note:
is feature is only available when the following settings are selected.
❏ Paper Type: plain papers
❏ Quality: Standard
❏ Auto 2-sided printing: Disabled
❏ Color Correction: Automatic
❏ Short Grain Paper: Disabled
Click Watermark Features on the More Options tab, and then select an anti-copy pattern. Click Settings to
change details such as the size and density.
Printing a Watermark (for Windows Only)
You can print a watermark such as "Condential" on your printouts. You can also add your own watermark.
Click Watermark Features on the More Options tab, and then select a watermark. Click Settings to change details
such as the color and position of the watermark.
Printing a Header and Footer (for Windows Only)
You can print information such as a user name and printing date as headers or footers.
Click Watermark Features in the More Options tab, and then select Header/Footer. Click Settings and select
necessary items from the drop-down list.
Setting a Password for a Print Job (for Windows Only)
You can set a password for a print job to prevent printing until the password is entered on the printer's control
panel.
Select Condential Job on the More Options tab, and then enter a password.
To print the job, press the
and enter the password.
button on the printer's control panel, and then select Condential Job. Select the job
Printing Using a PostScript Printer Driver
Printing Using a PostScript Printer Driver - Windows
1. Load paper in the printer.
2. Open the le you want to print.
3.
Access the PostScript printer driver window.
78
Page 79

User's Guide
Printing
4. Select the orientation you set in the application as the Orientation on the Layout tab.
5. Make the following settings on the Paper/Quality tab.
❏ Paper Source: Select the paper source in which you loaded the paper.
❏ Media: Select the type of paper you loaded.
79
Page 80
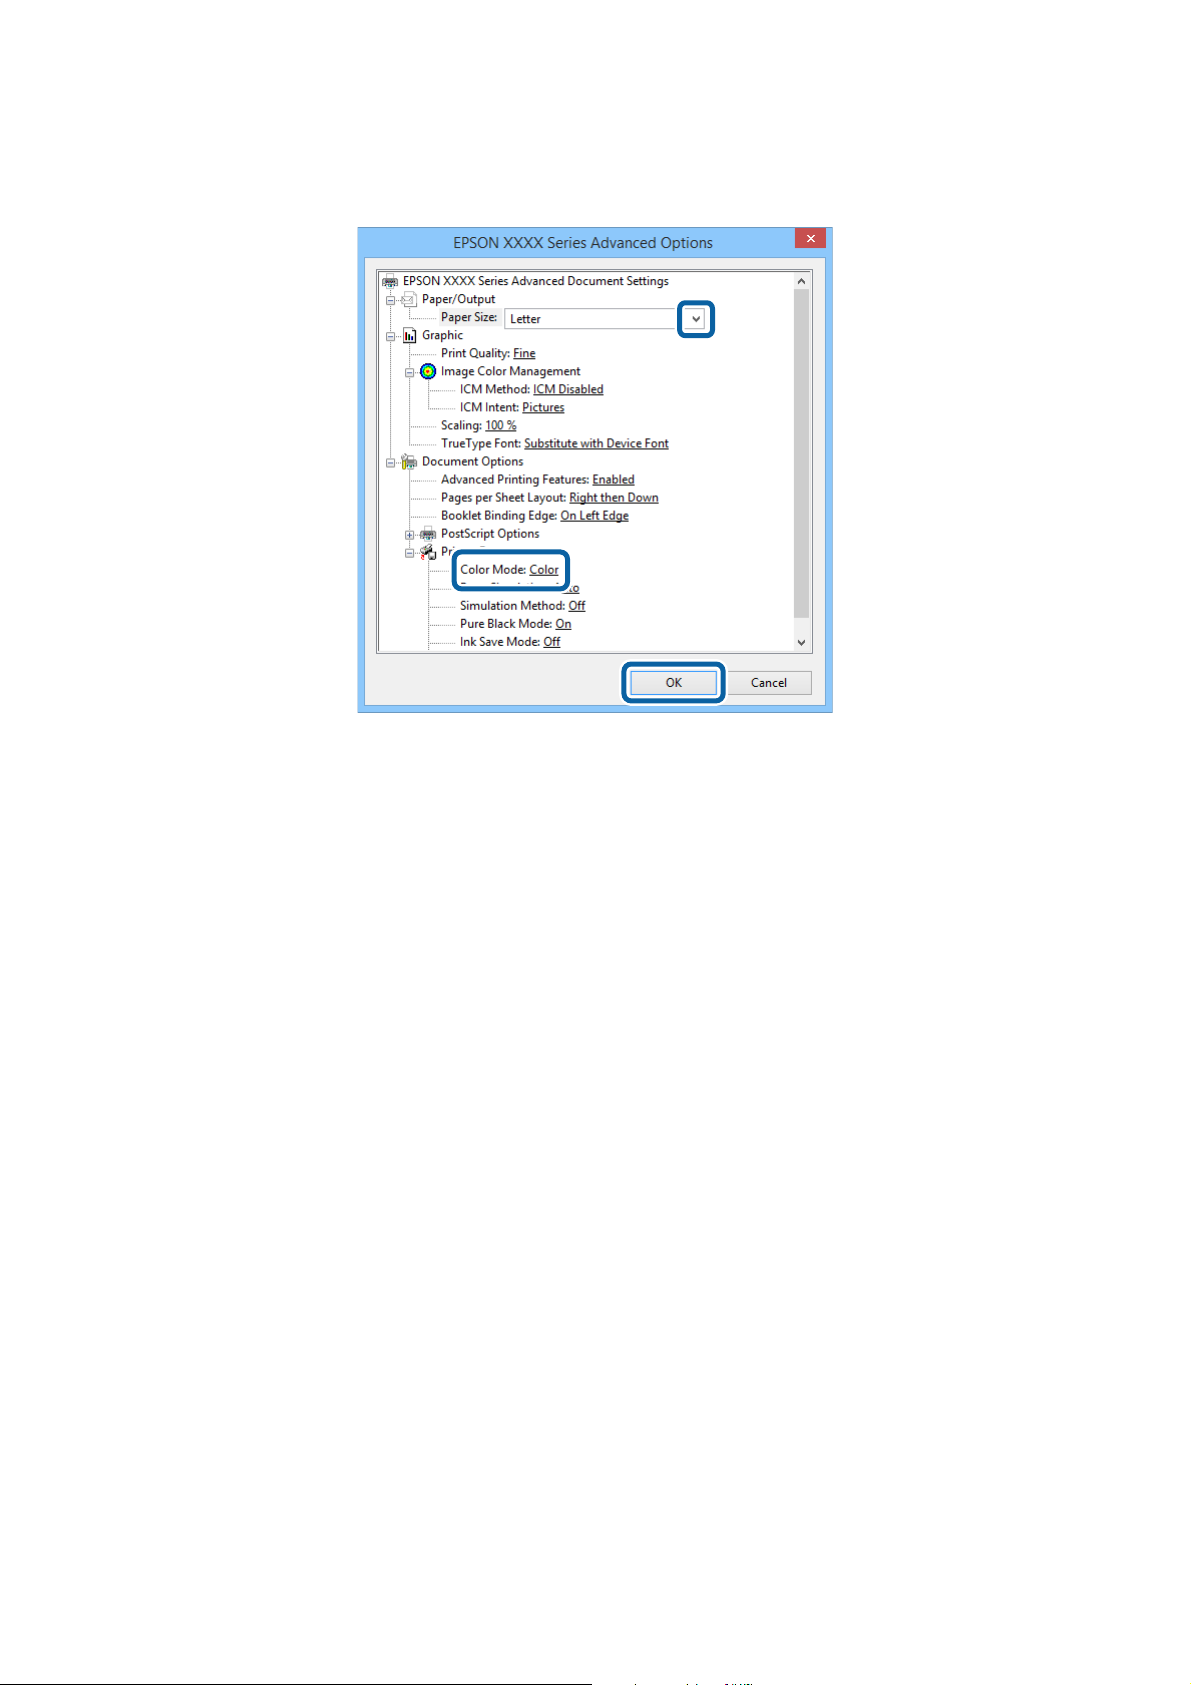
User's Guide
Printing
6. Click Advanced, make the following settings, and then click OK.
❏ Paper Size: Select the paper size you set in the application.
❏ Color Mode: Select to print in full color or monochrome.
7. Click OK.
8. Click Print.
Printing Using a PostScript Printer Driver - Mac OS X
1. Load paper in the printer.
2. Open the le you want to print.
80
Page 81

User's Guide
3. Access the printer driver window.
Printing
4. Make the following settings.
❏ Printer: Select your printer.
❏ Paper Size: Select the paper size you set in the application.
❏ Orientation: Select the orientation you set in the application.
5. Select Paper Feed from the pop-up menu, and then select the paper source in which you loaded the paper.
81
Page 82
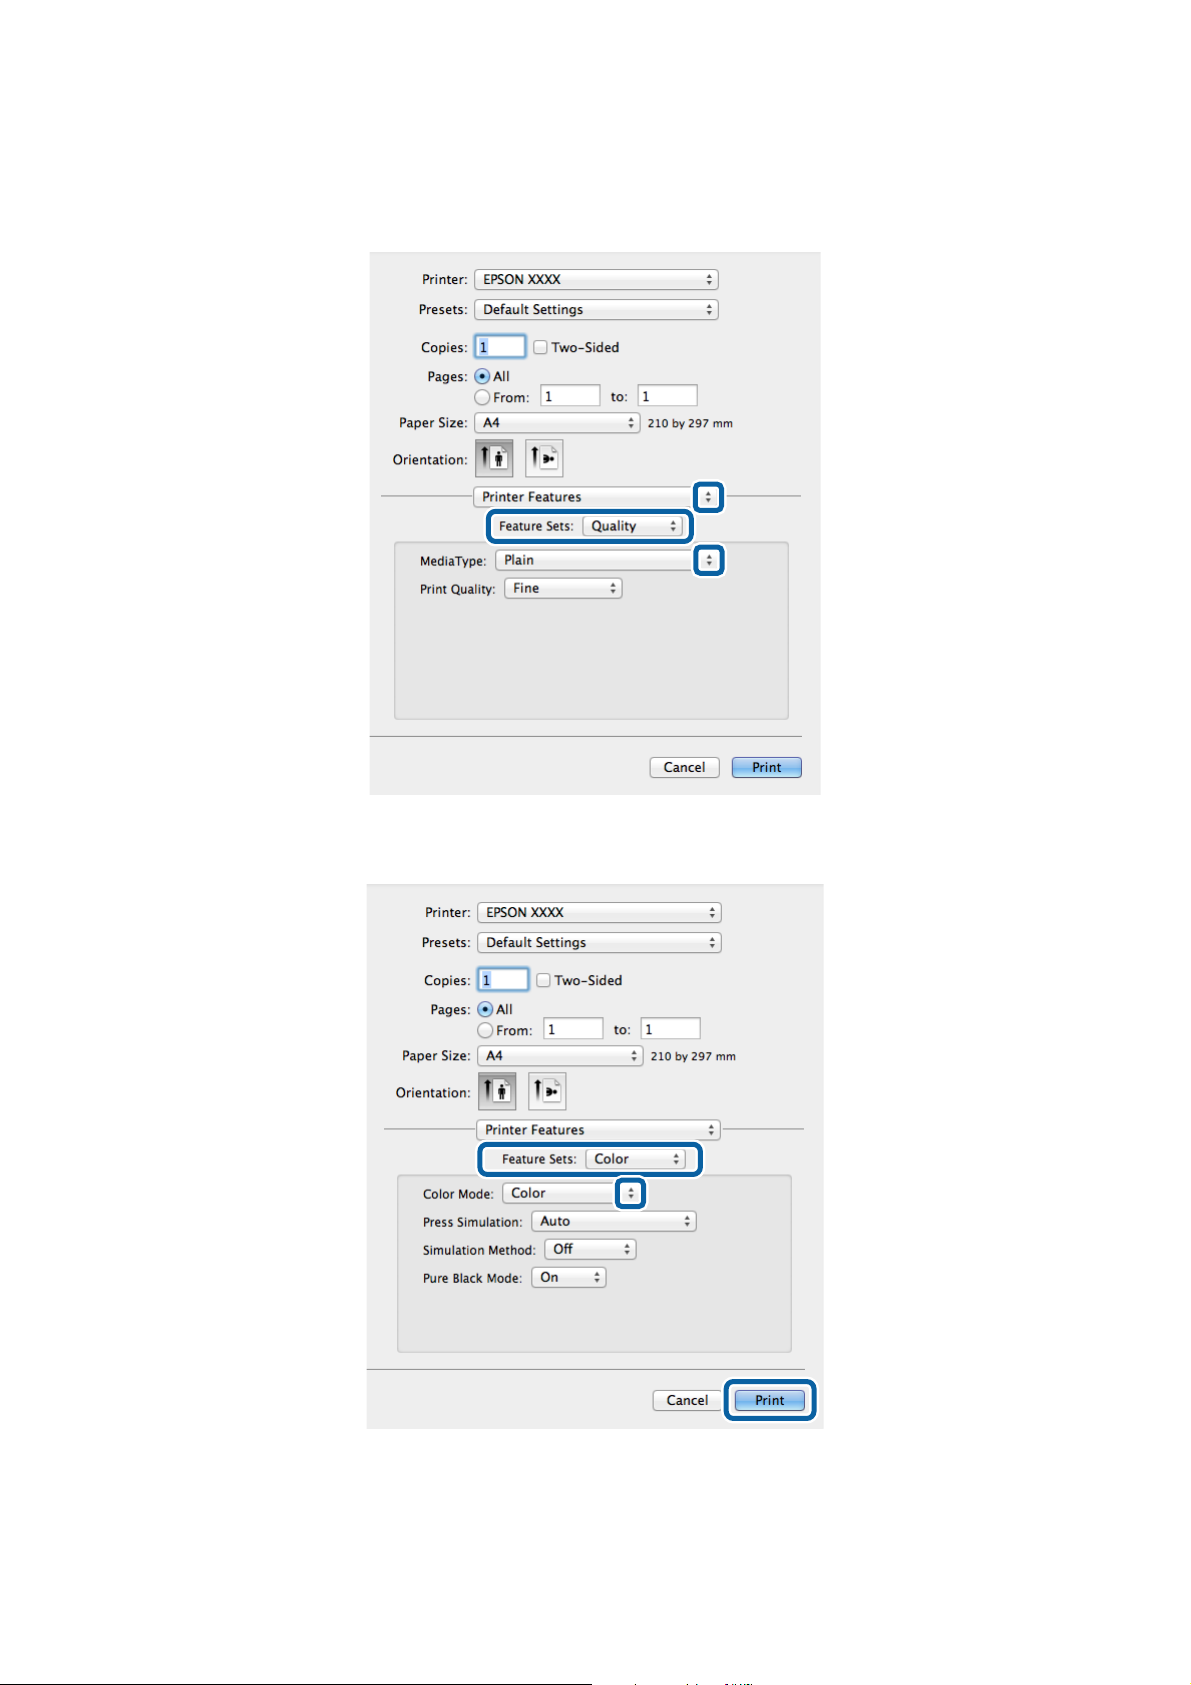
User's Guide
Printing
6. Select Printer Features from the pop-up menu, select Quality as the Feature Sets setting, and then select the
type of paper you loaded as the MediaType setting.
7.
Select Color as the Feature Sets setting, and then select the setting for Color Mode.
8. Click Print.
82
Page 83
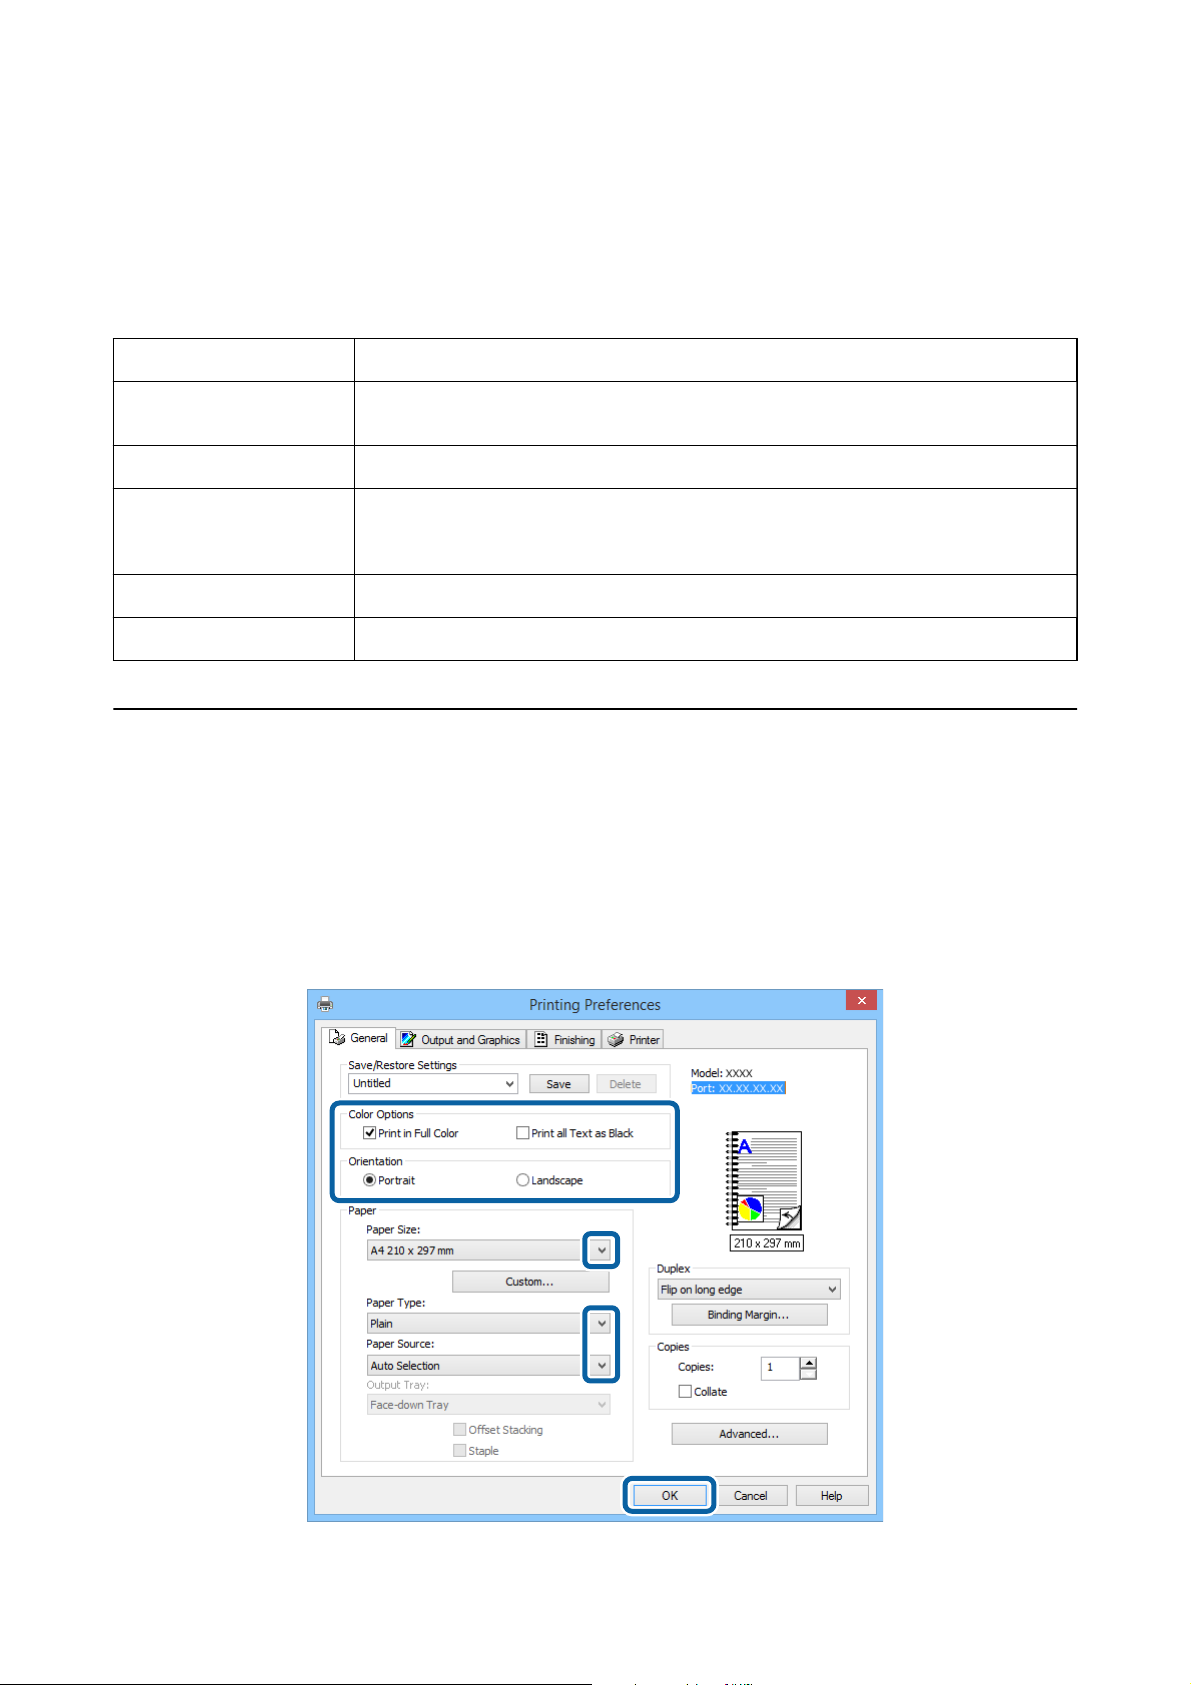
User's Guide
Printing
Setting Items for the PostScript Printer Driver
Click Advanced to make the following settings.
Note:
e availability of these settings varies by model.
Color Mode Select whether to print in color or in monochrome.
Press Simulation You can select a CMYK ink color to simulate when you print by reproducing the CMYK ink
color of the
Simulation Method Select the method of color conversion for the CMYK simulation.
Pure Black Mode Select whether or not to print black text data or line drawing data using only black ink.
However, other color inks may be consumed depending on the paper, even when this
feature is set.
Ink Save Mode Conserves ink by reducing the print density.
oset
press.
Rotate by 180º Rotates the data 180 degrees before printing.
Printing Using the Epson Universal P6 Printer Driver (for Windows Only)
1. Load paper in the printer.
2. Open the le you want to print.
3. Access the Epson Universal P6 printer driver window.
83
Page 84
User's Guide
Printing
4. Make the following settings.
❏ Color Options: Select to print in full color or black.
❏ Orientation: Select the orientation you set in the application.
❏ Paper Size: Select the paper size you set in the application.
❏ Paper Type: Select the type of paper you loaded.
❏ Paper Source: Select the paper source in which you loaded the paper.
5. Click OK.
6. Click Print.
Smart Devices Printing
By using the Epson iPrint application you can print photos, documents, and Web pages from a smart device such
as a smartphone or tablet. To use Epson iPrint, install it on your smartphone or tablet.
Visit the following website for more details.
http://ipr.to/c
Canceling Printing
Note:
❏ In Windows, you cannot cancel a print job from the computer once it has been completely sent to the printer. In this case,
cancel the print job by using the printer's control panel.
❏ When printing several pages from Mac OS X, you cannot cancel all of the jobs by using the control panel. In this case,
cancel the print job from the computer.
❏ If you have sent a print job from Mac OS X v10.6.x or v10.5.8 through the network, you may not be able to cancel
printing from the computer. In this case, cancel the print job by using the printer's control panel. If you cannot cancel
printing from the control panel, see the Network Guide.
Canceling Printing - Printer Button
Press the y button to cancel the print job in progress.
Canceling Printing - Status Menu
1. Press the button to display Status Menu.
84
Page 85

User's Guide
Printing
2. Select Job Monitor > Print Job.
Ongoing jobs and jobs that are standing by are shown in the list.
3. Select the job that you want to cancel.
4. Press Cancel.
Canceling Printing - Windows
1.
Access the printer driver window.
2. Select the Maintenance tab.
3. Click Print Queue.
4. Right-click on the job you want to cancel and then select Cancel.
Related Information
& “Windows Printer Driver” on page 138
Canceling Printing - Mac OS X
1. Click the printer icon in the Dock.
2. Select the job you want to cancel.
3.
Cancel the job.
❏ Mac OS X v10.8.x to Mac OS X v10.9.x
Click
❏ Mac OS X v10.5.8 to v10.7.x
Click Delete.
next to the progress meter.
85
Page 86

User's Guide
Copying
Copying
1. Load paper in the printer.
2. Place the originals.
3. Enter Copy from the home screen.
4. Enter the number of copies by using the numeric keypad.
5. Press Layout, and then select the appropriate layout.
6. Make other settings as necessary. You can make detailed settings by pressing Settings.
Note:
❏ Press Preset to save your settings as a preset.
❏ Press Preview to preview the copy results. However, you cannot preview when you have placed the originals on the
ADF.
7.
Press the
Related Information
& “Loading Paper in the Paper Cassette” on page 46
& “Loading Paper in the Rear Paper Feed” on page 48
& “Loading Paper in the Front Paper Feed Slot” on page 50
& “Placing Originals” on page 53
& “Copy Mode” on page 24
&
“Presets Mode” on page 41
x
button.
86
Page 87

User's Guide
Scanning
Scanning
Scanning Using the Control Panel
Scanning to an Email
You can send scanned image les by email directly from the printer through a pre-congured email server. Before
using this feature, you need to
You can specify the email address by entering directly, but it may be easier if you register the email address in the
contacts list rst.
Note:
Before you use this feature, make sure you have set the date/time and time
congure
the email server. See the Administrator's Guide for more details.
dierences
in Date/Time Settings correctly.
1. Place the originals.
2. Enter Scan from the home screen.
3. Select Email.
4. Enter the email addresses.
❏ To select from the contacts list: Press Contacts, press the check box to add a check mark to a contact, and
then press Proceed.
❏ To enter the email address manually: Select Enter Email Address > Enter Email Address, enter the email
address, and then press the enter key at the bottom-right of the screen.
Note:
You can send emails to up to 10 individual email addresses and groups.
5. Press Format, and then select the le format.
6. Press Menu, and then make settings for Email Settings and Basic Settings.
Note:
❏ You can specify the maximum size for les that can be attached to an email in Attached File Max Size.
❏ When you select PDF as the le format, you can set a password to protect the le. Select PDF Settings, and then
make settings.
❏ Press Preset to save your settings as a preset.
7. Press the x button.
e scanned image is sent by email.
Related Information
“System Administration” on page 32
&
“Managing Contacts” on page 57
&
& “Placing Originals” on page 53
& “Scan Mode” on page 26
& “Presets Mode” on page 41
87
Page 88

User's Guide
Scanning
Scanning to a Network Folder or FTP Server
You can save the scanned image to a specied folder on a network. You can specify the folder by entering a folder
path directly, but it may be easier if you register the folder information in the contacts list rst.
1. Place the originals.
2. Enter Scan from the home screen.
3. Select Network Folder/FTP.
4. Specify the folder.
❏ To select from the contacts list: Press Contacts, select a contact, and then press Proceed.
❏ To enter the folder path directly: Press Enter Location. Select Communication Mode, enter the folder path
as Location, and then make other folder settings.
5. Press Format, and then select the
6. Press Menu, and then make settings for File Settings and Basic Settings.
Note:
❏ When you select PDF as the
make settings.
❏ Press Preset to save your settings as a preset.
7.
Press the
e scanned image is saved.
Related Information
& “Managing Contacts” on page 57
& “Placing Originals” on page 53
& “Scan Mode” on page 26
& “Presets Mode” on page 41
x
button.
le
format.
le
format, you can set a password to protect the
Scanning to a Memory Device
Select PDF Settings, and then
le.
You can save the scanned image to a memory device.
1.
Insert a memory device into the printer's external interface USB port.
2. Place the originals.
3. Enter Scan from the home screen.
Select Memory Device.
4.
5. Press Format, and then select the le save format.
88
Page 89

User's Guide
6. Press Settings, and then make scan settings.
Note:
❏ When you select PDF as the
make settings.
❏ Press Preset to save your settings as a preset.
7. Press the x button.
e scanned image is saved.
Related Information
& “Part Names and Functions” on page 18
& “Placing Originals” on page 53
& “Scan Mode” on page 26
& “Presets Mode” on page 41
format, you can set a password to protect the
le
Scanning
Select PDF Settings, and then
le.
Scanning to the Cloud
You can send scanned images to destinations that you specied on the Epson Connect user page.
See the Epson Connect portal website for details.
https://www.epsonconnect.com/
http://www.epsonconnect.eu (Europe only)
Scanning Using Document Capture Pro (for Windows Only)
You can scan the original using the settings specied in Document Capture Pro.
Note:
❏ Before scanning, install Document Capture Pro and make settings for the job.
❏ Before scanning, connect the printer and the computer to the network.
1.
Place the originals.
2. Enter Scan from the home screen.
3. Select Document Capture Pro.
4. Press Select Computer, and then select the computer registered to the job in Document Capture Pro.
Note:
❏ If you select Option > Network Scanning Settings, and enable Protect with password in Document Capture Pro,
enter a password.
❏ If you set only one job, proceed to step 6.
5. Select the job.
6.
Press the area in which the job content is displayed, and check the job details.
89
Page 90

User's Guide
Scanning
7. Press the x button.
e scanned image is saved.
Related Information
& “Placing Originals” on page 53
& “Document Capture Pro (for Windows Only)” on page 142
Scanning to a Computer (WSD)
Note:
❏ Before using this feature, you need to setup your computer. See the Network Guide for more details.
❏ is func t i o n is only a v a i l ab l e for comp u t e r s running Wi n d o w s 8.1/ Wi n d ow s 8/Win d o w s 7 /Windo w s Vi sta.
1.
Place the originals.
2. Enter Scan from the home screen.
3. Select Computer (WSD).
4. Select a computer.
x
5. Press the
e scanned image is saved.
Note:
See your computer's documentation for information on where the scanned image is stored on the computer.
Related Information
& “Placing Originals” on page 53
button.
Scanning from a Computer
See the EPSON Scan help for an explanation of the setting items.
Authenticating Users when Using Access Control in EPSON Scan (for Windows Only)
When the access control function is enabled for a printer, you need to enter a user ID and password when
scanning. Register a user name and password in EPSON Scan. If you do not know the password, contact your
printer administrator.
1. Access the EPSON Scan Settings.
❏ Windows 8.1/Windows 8/Windows Server 2012
Enter "EPSON Scan Settings" in the search charm, and then select the displayed icon.
❏ Except Windows 8.1/Windows 8/Windows Server 2012
90
Page 91

User's Guide
Click the start button, and select All Programs or Programs > EPSON > EPSON Scan > EPSON Scan
Settings.
2. Click Access Control.
3. Enter the user name and the password.
Scanning
Scanning in
You can scan many text documents quickly.
1. Place the originals.
2. Start EPSON Scan.
3. Select Oce Mode from the Mode list.
Oce
Mode
4. Make the following settings on the Main Settings tab.
❏ Document Source: Select the document source in which you placed your original.
❏ Size: Select the size of your original.
❏ Image Type: Select the type of image you want to scan.
❏ Resolution: Select the resolution of the image you want to scan.
91
Page 92

User's Guide
Scanning
5. Click Preview.
e preview window opens.
Note:
If you have place originals in the ADF, the rst page of the originals is ejected when the preview is nished. Place your
rst document page on top of the rest of the pages, and then load the entire original into the ADF.
6. Conrm the preview, and make settings on the Image Adjustment tab as necessary.
Note:
You can adjust the image such as making text enhancements.
7. Click Scan.
8. In the File Save Settings window, make appropriate settings and then click OK.
e scanned image is saved in the specied folder.
Note:
When you select PDF as the Image Format setting, you can set a password to protect the
Security tab, and then make settings.
Click Options, select the
le.
Related Information
“Placing Originals” on page 53
&
“EPSON Scan (Scanner Driver)” on page 142
&
Scanning in Professional Mode
You can scan images while adjusting the quality and color. is mode is recommended for advanced users.
1. Place the originals.
2. Start EPSON Scan.
92
Page 93

User's Guide
3. Select Professional Mode from the Mode list.
Scanning
4. Make the following settings.
❏ Document Source: Select the document source in which you placed your original.
❏ Auto Exposure Type: Select the exposure type that suits your original.
❏ Image Type: Select the type of image you want to scan.
❏ Resolution: Select the resolution of the image you want to scan.
❏ Target Size: Select the output image size you want to scan to.
93
Page 94

User's Guide
Scanning
5. Click Preview.
e preview window opens.
Note:
If you have place originals in the ADF, the rst page of the originals is ejected when the preview is nished. Place your
rst document page on top of the rest of the pages, and then load the entire original into the ADF.
6. Check the preview, and adjust the image as necessary.
Note:
You can make various image adjustments such as improving the color, sharpness, and contrast.
7. Click Scan.
8. In the File Save Settings window, make appropriate settings and then click OK.
e scanned image is saved in the specied folder.
Note:
When you select PDF as the Image Format setting, you can set a password to protect the
Security tab, and then make settings.
Click Options, select the
le.
Related Information
& “Placing Originals” on page 53
& “EPSON Scan (Scanner Driver)” on page 142
Smart Devices Scanning
By using the Epson iPrint application you can scan photos and documents from smart devices such as
smartphones or tablets. To use Epson iPrint, install it on your smartphone or tablet.
Visit the following website for more details.
http://ipr.to/c
94
Page 95

User's Guide
Faxing
Faxing
Setting Up a Fax
Connecting to a Phone Line
Compatible Telephone Lines
You can use the printer over standard analogue telephone lines (PSTN = Public Switched Telephone Network) and
PBX (Private Branch Exchange) telephone systems.
You may not be able to use the printer with the following phone lines or systems.
❏ VoIP phone line such as DSL or
❏ Digital phone line (ISDN)
❏ Some PBX telephone systems
❏ When adapters such as terminal adapters, VoIP adapters, splitters, or DSL router are connected between the
telephone wall jack and the printer
ber-optic
digital service
Connecting the Printer to a Phone Line
Connect the telephone line and the printer using the following phone cable.
❏ Phone line: RJ-11 (6P2C)
❏ Telephone set connection: RJ-11 (6P2C)
Depending on the area, a phone cable may be included with the printer. If it is included, use that cable.
You may need to connect the phone cable to an adapter provided for your country or region.
Important:
c
Remove the cap from the EXT. port of the printer only when connecting your telephone to the printer. Do not
remove the cap if you are not connecting your telephone.
In areas where lightning strikes occur frequently, we recommend that you use a surge protector.
95
Page 96

User's Guide
Faxing
Connecting to a Standard Phone Line (PSTN) or PBX
Connect a phone cable from the telephone wall jack or PBX port to the LINE port on the back of the printer.
Related Information
& “Making Settings for a PBX Phone System” on page 100
Connecting to DSL or ISDN
Connect a phone cable from the DSL modem or the ISDN terminal adapter to the LINE port on the back of the
printer. See the manuals that came with the modem or the adapter for details.
96
Page 97
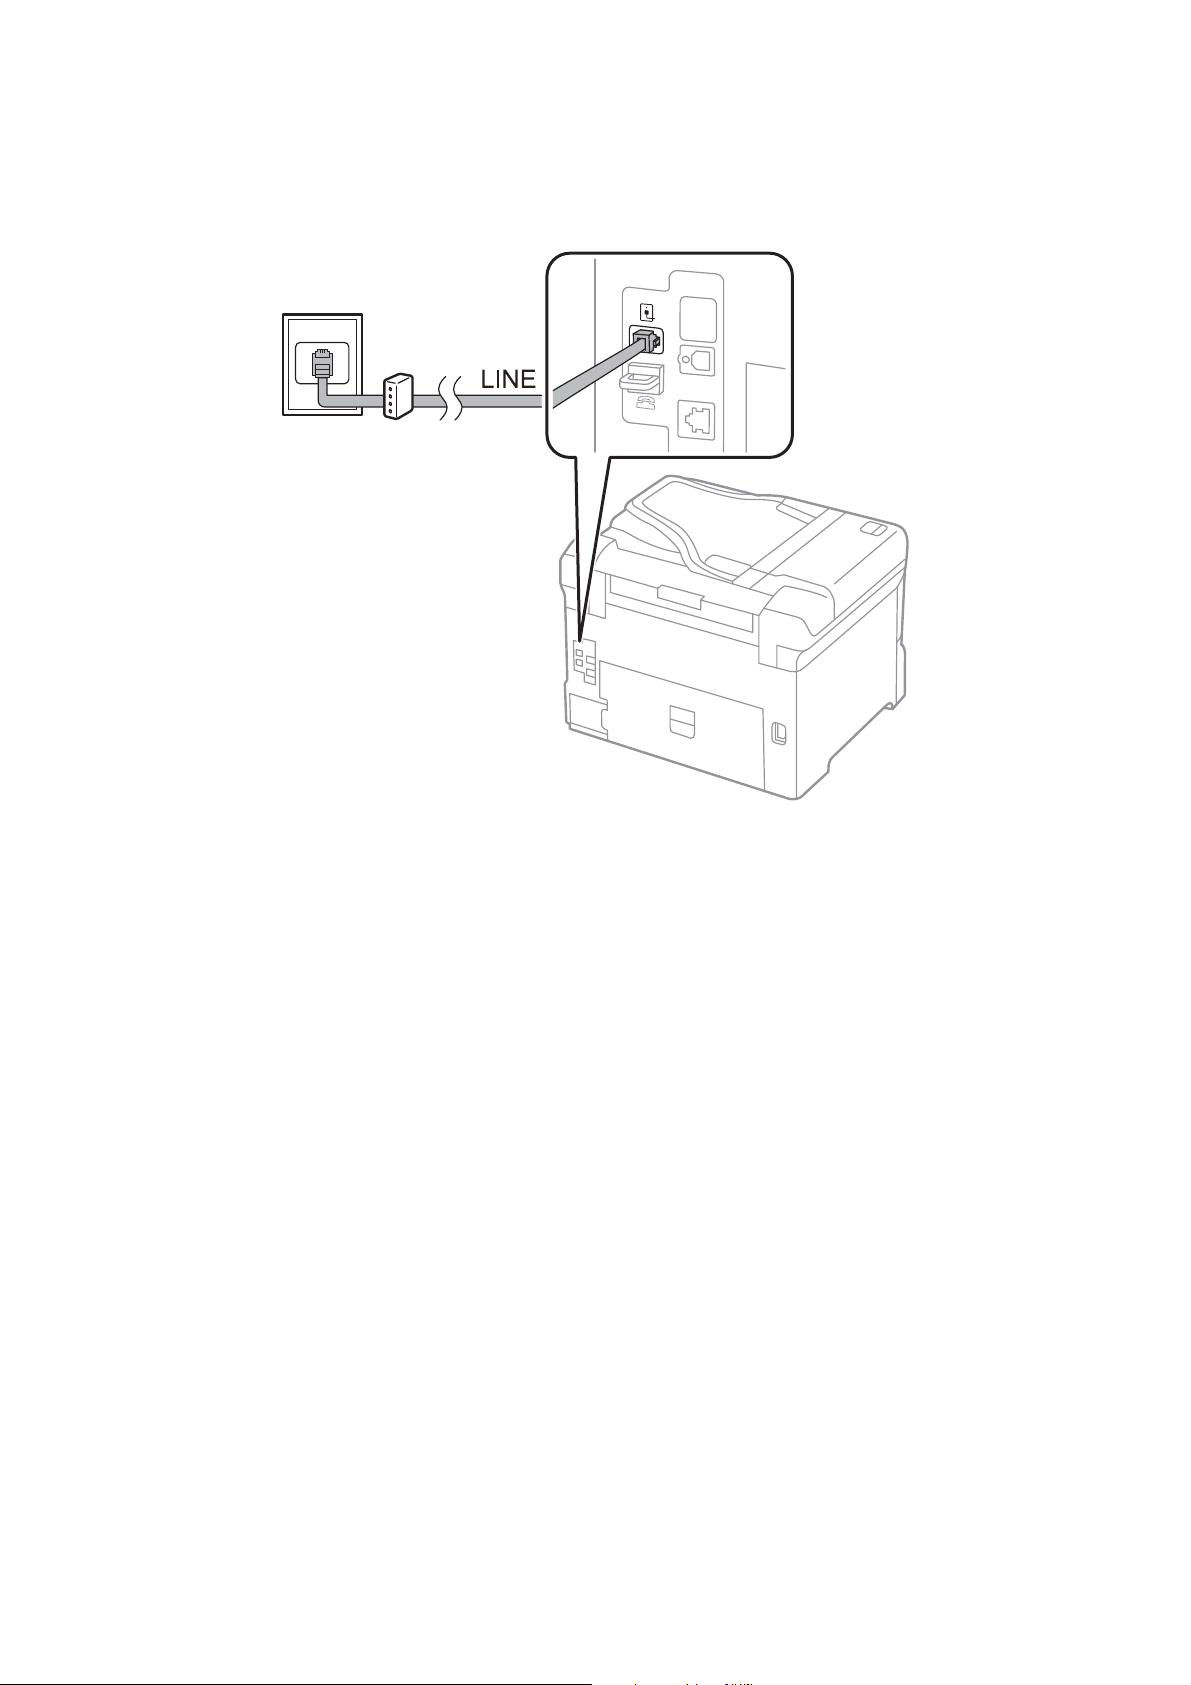
User's Guide
Faxing
Note:
If your DSL modem is not equipped with a built-in DSL lter, connect a separate DSL lter.
Connecting Your Phone Device to the Printer
When using the printer and your telephone on a single phone line, connect the telephone to the printer.
Note:
❏ If your phone device has a fax function, disable the fax function before connecting. See the manuals that came with the
phone device for details.
❏ When connecting an answering machine, make sure you set the Rings to Answer setting correctly.
97
Page 98

User's Guide
Faxing
1. Remove the cap from the EXT. port on the back of the printer.
2. Connect the phone device and the EXT. port with a phone cable.
98
Page 99

User's Guide
Faxing
Important:
c
When sharing a single phone line, make sure you connect the phone device to the EXT. port of the printer. If
you split the line to connect the phone device and the printer separately, the phone and the printer do not work
correctly.
3. Pick up the handset of the connected phone device and conrm that the [e phone line is in use.] message is
displayed on the LCD screen.
If the message is not displayed, check that the phone cable is securely connected to the EXT. port.
Related Information
& “Settings for the Answering Machine” on page 107
Making Basic Fax Settings
First make basic fax settings such as Receive Mode using the Fax Setting Wizard, and then
settings as necessary.
e Fax Setting Wizard is automatically displayed when the printer is turned on for the rst time. Once you have
made the settings, you do not need to make them again unless the connection environment is changed.
If an administrator has locked the settings, only the administrator can make the settings.
congure
the other
Making Basic Fax Settings Using the Fax Setting Wizard
Make basic settings by following the on-screen instructions.
1. Connect the printer to the phone line.
Important:
c
Because an automatic fax connection check runs at the end of the wizard, make sure you connect the printer to
the phone line before starting the wizard.
2. Enter Setup from the home screen.
3. Select System Administration > Fax Settings > Fax Setting Wizard, and then press Start.
wizard begins.
e
4. On the fax header entry screen, enter your sender name such as your company name.
Note:
Your sender name and your fax number appear as the header for outgoing faxes.
5. On the phone number entry screen, enter your fax number.
6. On the DRD Setting screen, make the following settings.
❏ If you have subscribed to a distinctive ring service from your telephone company: Press Proceed, select the
ring pattern to be used for incoming faxes, and then go to step 9. Receive Mode is automatically set to
Auto.
❏ If you do not need to set this option: Press Skip, and then go to the next step.
99
Page 100

User's Guide
Faxing
Note:
❏ Distinctive ring services, oered by many telephone companies (the service name diers by company), allows you to
have several phone numbers on one phone line. Each number is assigned a
number for voice calls and another for fax calls. Select the ring pattern assigned to fax calls in DRD.
❏ Depending on the region, On and O are displayed as the DRD options. Select On to use the distinctive ring feature.
7.
On the Receive Mode Setting screen, select whether you are using your phone device connected to the printer.
❏ When connected: Press Ye s , and go to the next step.
❏ When not connected: Press No and go to step 9. Receive Mode is set to Auto.
8. On the Receive Mode Setting screen, select whether you want to receive faxes automatically.
❏ To receive automatically: Press Ye s . Receive Mode is set to Auto.
❏ To receive manually: Press No. Receive Mode is set to Manual.
dierent
ring pattern. You can use one
9. On the
To correct or change settings, press the
10. Press Start to run the fax connection check, and when the screen prompts you to print the check result, press
the
A report of the check result that shows the connection status is printed.
Note:
❏ If there are any errors reported, follow the instructions on the report to solve them.
❏ If the Select Line Type screen is displayed, select the line type. When you are connecting the printer to a PBX phone
❏ If the Select Dial Tone Detection screen is displayed, select Disable.
Related Information
& “Connecting the Printer to a Phone Line” on page 95
& “Setting Receiving Mode” on page 107
& “Making Settings for a PBX Phone System” on page 100
& “Fax Settings” on page 36
Conrm
x
button.
system or terminal adapter, select PBX.
However, setting this to Disable may cause the printer to skip the rst digit of a fax number when dialing and send
the fax to the wrong number.
Settings screen, check the settings you made, and then press Proceed.
y
button.
Making Basic Fax Settings Individually
You can make fax settings without using the fax setting wizard by selecting each setting menu individually.
settings congured using the wizard can also be changed. For more details, see the list of menus in fax settings.
Related Information
& “Fax Settings” on page 36
Making Settings for a PBX Phone System
Make the following settings when using the printer in oces that use extensions and require external access codes,
such as 0 and 9, to get an outside line.
100
e
 Loading...