

Page 1

Register your instrument!
www.eppendorf.com/myeppendorf
Mastercycler pro
Operating manual
Page 2

©
Copyright
permission of Eppendorf AG.
Trademarks
2013 Eppendorf AG, Hamburg. No part of this publication may be reproduced without the prior
Eppendorf
registered trademarks of Eppendorf AG.
Registered trademarks are not marked with
Notice
The software of the Mastercycler pro contains open source software. License information is available as
PDF documents via the Eppendorf node. To export the license documents, connect a memory device, select
the Eppendorf node in the navigation tree and press the softkey.
®
, the eppendorf logo, Mastercycler®, SteadySlope®, vapoprotect® and Eppendorf twin.tec® are
®
or ™ in all cases in this manual.
6321 900.150-03/082013
Page 3

Table of contents
Mastercycler pro
English (EN)
Operating manu al Mastercycler proseeon p.Fig.Tab.p.
English (EN)Operating manual
Table of contents
1 Operating instructions . . . . . . . . . . . . . . . . . . . . . . . . . . . . . . . . . . . . . . . . . . . . . . . . . . . . . . . . . . . . . . 7
1.1 Using this manual . . . . . . . . . . . . . . . . . . . . . . . . . . . . . . . . . . . . . . . . . . . . . . . . . . . . . . . . . . . . . 7
1.2 Danger symbols and danger levels . . . . . . . . . . . . . . . . . . . . . . . . . . . . . . . . . . . . . . . . . . . . . . . . 7
1.3 Symbols used . . . . . . . . . . . . . . . . . . . . . . . . . . . . . . . . . . . . . . . . . . . . . . . . . . . . . . . . . . . . . . . . 8
1.4 Abbreviations used . . . . . . . . . . . . . . . . . . . . . . . . . . . . . . . . . . . . . . . . . . . . . . . . . . . . . . . . . . . . 8
2 Product description . . . . . . . . . . . . . . . . . . . . . . . . . . . . . . . . . . . . . . . . . . . . . . . . . . . . . . . . . . . . . . . . 9
2.1 Main illustration . . . . . . . . . . . . . . . . . . . . . . . . . . . . . . . . . . . . . . . . . . . . . . . . . . . . . . . . . . . . . . 9
2.2 Delivery package. . . . . . . . . . . . . . . . . . . . . . . . . . . . . . . . . . . . . . . . . . . . . . . . . . . . . . . . . . . . . 11
2.2.1 Mastercycler pro and Mastercycler pro S . . . . . . . . . . . . . . . . . . . . . . . . . . . . . . . . . . . 11
2.2.2 Mastercycler pro 384 . . . . . . . . . . . . . . . . . . . . . . . . . . . . . . . . . . . . . . . . . . . . . . . . . . 11
2.3 Features. . . . . . . . . . . . . . . . . . . . . . . . . . . . . . . . . . . . . . . . . . . . . . . . . . . . . . . . . . . . . . . . . . . . 12
2.3.1 Features of the Mastercycler pro variants. . . . . . . . . . . . . . . . . . . . . . . . . . . . . . . . . . . 13
2.3.2 Networking . . . . . . . . . . . . . . . . . . . . . . . . . . . . . . . . . . . . . . . . . . . . . . . . . . . . . . . . . . 13
3
3 Safety. . . . . . . . . . . . . . . . . . . . . . . . . . . . . . . . . . . . . . . . . . . . . . . . . . . . . . . . . . . . . . . . . . . . . . . . . . . 15
3.1 Intended use . . . . . . . . . . . . . . . . . . . . . . . . . . . . . . . . . . . . . . . . . . . . . . . . . . . . . . . . . . . . . . . . 15
3.2 User profile . . . . . . . . . . . . . . . . . . . . . . . . . . . . . . . . . . . . . . . . . . . . . . . . . . . . . . . . . . . . . . . . . 15
3.3 Note on product liability . . . . . . . . . . . . . . . . . . . . . . . . . . . . . . . . . . . . . . . . . . . . . . . . . . . . . . . 15
3.4 Warnings for intended use . . . . . . . . . . . . . . . . . . . . . . . . . . . . . . . . . . . . . . . . . . . . . . . . . . . . . 15
3.5 Warning signs on the device. . . . . . . . . . . . . . . . . . . . . . . . . . . . . . . . . . . . . . . . . . . . . . . . . . . . 19
4 Installation . . . . . . . . . . . . . . . . . . . . . . . . . . . . . . . . . . . . . . . . . . . . . . . . . . . . . . . . . . . . . . . . . . . . . . 21
4.1 Unpacking the device . . . . . . . . . . . . . . . . . . . . . . . . . . . . . . . . . . . . . . . . . . . . . . . . . . . . . . . . . 21
4.2 Selecting the location . . . . . . . . . . . . . . . . . . . . . . . . . . . . . . . . . . . . . . . . . . . . . . . . . . . . . . . . . 22
4.2.1 Space requirements and bearing capacity . . . . . . . . . . . . . . . . . . . . . . . . . . . . . . . . . . 22
4.2.2 Mains connection . . . . . . . . . . . . . . . . . . . . . . . . . . . . . . . . . . . . . . . . . . . . . . . . . . . . . 22
4.3 Installing the instrument. . . . . . . . . . . . . . . . . . . . . . . . . . . . . . . . . . . . . . . . . . . . . . . . . . . . . . . 23
4.4 Shut down . . . . . . . . . . . . . . . . . . . . . . . . . . . . . . . . . . . . . . . . . . . . . . . . . . . . . . . . . . . . . . . . . . 26
5 Operation . . . . . . . . . . . . . . . . . . . . . . . . . . . . . . . . . . . . . . . . . . . . . . . . . . . . . . . . . . . . . . . . . . . . . . . 27
5.1 Initial steps . . . . . . . . . . . . . . . . . . . . . . . . . . . . . . . . . . . . . . . . . . . . . . . . . . . . . . . . . . . . . . . . . 27
5.1.1 Using the vapo.protect heated lid . . . . . . . . . . . . . . . . . . . . . . . . . . . . . . . . . . . . . . . . . 27
5.1.2 Control panel keys. . . . . . . . . . . . . . . . . . . . . . . . . . . . . . . . . . . . . . . . . . . . . . . . . . . . . 30
5.2 Initial start-up of the Mastercycler pro . . . . . . . . . . . . . . . . . . . . . . . . . . . . . . . . . . . . . . . . . . . . 31
5.2.1 Defining the administrator PIN . . . . . . . . . . . . . . . . . . . . . . . . . . . . . . . . . . . . . . . . . . . 31
5.2.2 Other steps . . . . . . . . . . . . . . . . . . . . . . . . . . . . . . . . . . . . . . . . . . . . . . . . . . . . . . . . . . 32
5.3 User login and logout . . . . . . . . . . . . . . . . . . . . . . . . . . . . . . . . . . . . . . . . . . . . . . . . . . . . . . . . . 33
5.3.1 Logging in as a user . . . . . . . . . . . . . . . . . . . . . . . . . . . . . . . . . . . . . . . . . . . . . . . . . . . 33
5.3.2 Changing the user . . . . . . . . . . . . . . . . . . . . . . . . . . . . . . . . . . . . . . . . . . . . . . . . . . . . . 33
5.3.3 Logging out as a user . . . . . . . . . . . . . . . . . . . . . . . . . . . . . . . . . . . . . . . . . . . . . . . . . . 34
5.4 Overview of operation with the control panel. . . . . . . . . . . . . . . . . . . . . . . . . . . . . . . . . . . . . . . 35
5.4.1 Navigation tree overview . . . . . . . . . . . . . . . . . . . . . . . . . . . . . . . . . . . . . . . . . . . . . . . 35
5.4.2 Using the navigation tree . . . . . . . . . . . . . . . . . . . . . . . . . . . . . . . . . . . . . . . . . . . . . . . 36
5.4.3 Using external storage media . . . . . . . . . . . . . . . . . . . . . . . . . . . . . . . . . . . . . . . . . . . . 37
5.4.4 Selecting export file formats . . . . . . . . . . . . . . . . . . . . . . . . . . . . . . . . . . . . . . . . . . . . . 38
Page 4

Table of contents
Mastercycler pro
4
English (EN)
5.5 Managing folders and programs. . . . . . . . . . . . . . . . . . . . . . . . . . . . . . . . . . . . . . . . . . . . . . . . . 39
5.5.1 Creating folders and programs . . . . . . . . . . . . . . . . . . . . . . . . . . . . . . . . . . . . . . . . . . . 39
5.5.2 Copying folders and programs . . . . . . . . . . . . . . . . . . . . . . . . . . . . . . . . . . . . . . . . . . . 40
5.5.3 Deleting folders and programs . . . . . . . . . . . . . . . . . . . . . . . . . . . . . . . . . . . . . . . . . . . 40
6 Programming . . . . . . . . . . . . . . . . . . . . . . . . . . . . . . . . . . . . . . . . . . . . . . . . . . . . . . . . . . . . . . . . . . . . 41
6.1 Overview of the program editor . . . . . . . . . . . . . . . . . . . . . . . . . . . . . . . . . . . . . . . . . . . . . . . . . 41
6.1.1 Opening the program editor . . . . . . . . . . . . . . . . . . . . . . . . . . . . . . . . . . . . . . . . . . . . . 41
6.1.2 Structure of the program editor . . . . . . . . . . . . . . . . . . . . . . . . . . . . . . . . . . . . . . . . . . 41
6.2 Defining general settings . . . . . . . . . . . . . . . . . . . . . . . . . . . . . . . . . . . . . . . . . . . . . . . . . . . . . . 42
6.2.1 Opening the header. . . . . . . . . . . . . . . . . . . . . . . . . . . . . . . . . . . . . . . . . . . . . . . . . . . . 42
6.2.2 Editing header settings . . . . . . . . . . . . . . . . . . . . . . . . . . . . . . . . . . . . . . . . . . . . . . . . . 42
6.3 Editing programs . . . . . . . . . . . . . . . . . . . . . . . . . . . . . . . . . . . . . . . . . . . . . . . . . . . . . . . . . . . . 44
6.3.1 Inserting a program step. . . . . . . . . . . . . . . . . . . . . . . . . . . . . . . . . . . . . . . . . . . . . . . . 44
6.3.2 Editing parameters . . . . . . . . . . . . . . . . . . . . . . . . . . . . . . . . . . . . . . . . . . . . . . . . . . . . 45
6.3.3 Deleting individual program steps . . . . . . . . . . . . . . . . . . . . . . . . . . . . . . . . . . . . . . . . 46
6.3.4 Deleting all program steps . . . . . . . . . . . . . . . . . . . . . . . . . . . . . . . . . . . . . . . . . . . . . . 47
6.3.5 Exporting a program listing . . . . . . . . . . . . . . . . . . . . . . . . . . . . . . . . . . . . . . . . . . . . . 47
6.3.6 Saving a program and exiting the editor . . . . . . . . . . . . . . . . . . . . . . . . . . . . . . . . . . . 47
7 PCR run . . . . . . . . . . . . . . . . . . . . . . . . . . . . . . . . . . . . . . . . . . . . . . . . . . . . . . . . . . . . . . . . . . . . . . . . . 49
7.1 Preparation . . . . . . . . . . . . . . . . . . . . . . . . . . . . . . . . . . . . . . . . . . . . . . . . . . . . . . . . . . . . . . . . . 49
7.1.1 Selecting the sample tubes . . . . . . . . . . . . . . . . . . . . . . . . . . . . . . . . . . . . . . . . . . . . . . 49
7.1.2 Loading the thermoblock . . . . . . . . . . . . . . . . . . . . . . . . . . . . . . . . . . . . . . . . . . . . . . . 50
7.1.3 Sample volume . . . . . . . . . . . . . . . . . . . . . . . . . . . . . . . . . . . . . . . . . . . . . . . . . . . . . . . 50
7.2 Starting the program. . . . . . . . . . . . . . . . . . . . . . . . . . . . . . . . . . . . . . . . . . . . . . . . . . . . . . . . . . 51
7.2.1 Status view . . . . . . . . . . . . . . . . . . . . . . . . . . . . . . . . . . . . . . . . . . . . . . . . . . . . . . . . . . 52
7.3 Interrupting or stopping the program. . . . . . . . . . . . . . . . . . . . . . . . . . . . . . . . . . . . . . . . . . . . . 53
7.3.1 Interrupting the program . . . . . . . . . . . . . . . . . . . . . . . . . . . . . . . . . . . . . . . . . . . . . . . 53
7.3.2 Continuing the program . . . . . . . . . . . . . . . . . . . . . . . . . . . . . . . . . . . . . . . . . . . . . . . . 53
7.3.3 Stopping the program . . . . . . . . . . . . . . . . . . . . . . . . . . . . . . . . . . . . . . . . . . . . . . . . . . 53
7.4 Using protocols . . . . . . . . . . . . . . . . . . . . . . . . . . . . . . . . . . . . . . . . . . . . . . . . . . . . . . . . . . . . . . 53
7.5 Shutting down and switching off the device. . . . . . . . . . . . . . . . . . . . . . . . . . . . . . . . . . . . . . . . 54
8 System management . . . . . . . . . . . . . . . . . . . . . . . . . . . . . . . . . . . . . . . . . . . . . . . . . . . . . . . . . . . . . . 55
8.1 Administrator functions . . . . . . . . . . . . . . . . . . . . . . . . . . . . . . . . . . . . . . . . . . . . . . . . . . . . . . . 55
8.2 Managing user accounts . . . . . . . . . . . . . . . . . . . . . . . . . . . . . . . . . . . . . . . . . . . . . . . . . . . . . . . 55
8.2.1 Creating user accounts . . . . . . . . . . . . . . . . . . . . . . . . . . . . . . . . . . . . . . . . . . . . . . . . . 55
8.2.2 Editing user accounts . . . . . . . . . . . . . . . . . . . . . . . . . . . . . . . . . . . . . . . . . . . . . . . . . . 56
8.2.3 Deleting user accounts . . . . . . . . . . . . . . . . . . . . . . . . . . . . . . . . . . . . . . . . . . . . . . . . . 56
8.2.4 Changing the PIN . . . . . . . . . . . . . . . . . . . . . . . . . . . . . . . . . . . . . . . . . . . . . . . . . . . . . 56
8.3 System settings . . . . . . . . . . . . . . . . . . . . . . . . . . . . . . . . . . . . . . . . . . . . . . . . . . . . . . . . . . . . . . 58
8.4 Cycler functions . . . . . . . . . . . . . . . . . . . . . . . . . . . . . . . . . . . . . . . . . . . . . . . . . . . . . . . . . . . . . 60
8.4.1 Cycler system functions . . . . . . . . . . . . . . . . . . . . . . . . . . . . . . . . . . . . . . . . . . . . . . . . 60
8.4.2 Self test . . . . . . . . . . . . . . . . . . . . . . . . . . . . . . . . . . . . . . . . . . . . . . . . . . . . . . . . . . . . . 61
8.5 Managing and backing up data. . . . . . . . . . . . . . . . . . . . . . . . . . . . . . . . . . . . . . . . . . . . . . . . . . 61
8.5.1 Backing up data . . . . . . . . . . . . . . . . . . . . . . . . . . . . . . . . . . . . . . . . . . . . . . . . . . . . . . 61
8.5.2 Exporting and importing programs . . . . . . . . . . . . . . . . . . . . . . . . . . . . . . . . . . . . . . . 62
Page 5

Table of contents
Mastercycler pro
English (EN)
8.6 Performing a control panel software update. . . . . . . . . . . . . . . . . . . . . . . . . . . . . . . . . . . . . . . . 63
8.6.1 Performing an automatic software update . . . . . . . . . . . . . . . . . . . . . . . . . . . . . . . . . . 63
8.6.2 Performing a manual software update . . . . . . . . . . . . . . . . . . . . . . . . . . . . . . . . . . . . . 63
8.7 Transferring programs from the Mastercycler 533x. . . . . . . . . . . . . . . . . . . . . . . . . . . . . . . . . . 64
9 Quick start. . . . . . . . . . . . . . . . . . . . . . . . . . . . . . . . . . . . . . . . . . . . . . . . . . . . . . . . . . . . . . . . . . . . . . . 67
9.1 Login . . . . . . . . . . . . . . . . . . . . . . . . . . . . . . . . . . . . . . . . . . . . . . . . . . . . . . . . . . . . . . . . . . . . . . 67
9.2 Creating folders and programs . . . . . . . . . . . . . . . . . . . . . . . . . . . . . . . . . . . . . . . . . . . . . . . . . . 68
9.3 Copying folders and programs . . . . . . . . . . . . . . . . . . . . . . . . . . . . . . . . . . . . . . . . . . . . . . . . . . 68
9.4 Deleting folders and programs . . . . . . . . . . . . . . . . . . . . . . . . . . . . . . . . . . . . . . . . . . . . . . . . . . 69
9.5 Editing programs . . . . . . . . . . . . . . . . . . . . . . . . . . . . . . . . . . . . . . . . . . . . . . . . . . . . . . . . . . . . 69
9.6 Stopping and starting programs . . . . . . . . . . . . . . . . . . . . . . . . . . . . . . . . . . . . . . . . . . . . . . . . . 71
9.7 Switching off the device . . . . . . . . . . . . . . . . . . . . . . . . . . . . . . . . . . . . . . . . . . . . . . . . . . . . . . . 71
10 Maintenance . . . . . . . . . . . . . . . . . . . . . . . . . . . . . . . . . . . . . . . . . . . . . . . . . . . . . . . . . . . . . . . . . . . . . 73
10.1 Cleaning . . . . . . . . . . . . . . . . . . . . . . . . . . . . . . . . . . . . . . . . . . . . . . . . . . . . . . . . . . . . . . . . . . . 73
10.1.1 Cleaning the housing . . . . . . . . . . . . . . . . . . . . . . . . . . . . . . . . . . . . . . . . . . . . . . . . . . 74
10.1.2 Cleaning the heated lid . . . . . . . . . . . . . . . . . . . . . . . . . . . . . . . . . . . . . . . . . . . . . . . . . 74
10.2 Disinfection/decontamination . . . . . . . . . . . . . . . . . . . . . . . . . . . . . . . . . . . . . . . . . . . . . . . . . . . 76
10.3 Decontamination before shipment . . . . . . . . . . . . . . . . . . . . . . . . . . . . . . . . . . . . . . . . . . . . . . . 76
5
11 Troubleshooting . . . . . . . . . . . . . . . . . . . . . . . . . . . . . . . . . . . . . . . . . . . . . . . . . . . . . . . . . . . . . . . . . . 77
11.1 General errors . . . . . . . . . . . . . . . . . . . . . . . . . . . . . . . . . . . . . . . . . . . . . . . . . . . . . . . . . . . . . . . 77
11.2 Error messages . . . . . . . . . . . . . . . . . . . . . . . . . . . . . . . . . . . . . . . . . . . . . . . . . . . . . . . . . . . . . . 77
12 Transport, storage and disposal . . . . . . . . . . . . . . . . . . . . . . . . . . . . . . . . . . . . . . . . . . . . . . . . . . . . . 79
12.1 Packing . . . . . . . . . . . . . . . . . . . . . . . . . . . . . . . . . . . . . . . . . . . . . . . . . . . . . . . . . . . . . . . . . . . . 79
12.2 Transport. . . . . . . . . . . . . . . . . . . . . . . . . . . . . . . . . . . . . . . . . . . . . . . . . . . . . . . . . . . . . . . . . . . 80
12.3 Disposal. . . . . . . . . . . . . . . . . . . . . . . . . . . . . . . . . . . . . . . . . . . . . . . . . . . . . . . . . . . . . . . . . . . . 81
13 Technical data. . . . . . . . . . . . . . . . . . . . . . . . . . . . . . . . . . . . . . . . . . . . . . . . . . . . . . . . . . . . . . . . . . . . 83
13.1 Power supply. . . . . . . . . . . . . . . . . . . . . . . . . . . . . . . . . . . . . . . . . . . . . . . . . . . . . . . . . . . . . . . . 83
13.2 Weight/dimensions . . . . . . . . . . . . . . . . . . . . . . . . . . . . . . . . . . . . . . . . . . . . . . . . . . . . . . . . . . . 83
13.3 Ambient conditions . . . . . . . . . . . . . . . . . . . . . . . . . . . . . . . . . . . . . . . . . . . . . . . . . . . . . . . . . . . 83
13.4 Application parameters . . . . . . . . . . . . . . . . . . . . . . . . . . . . . . . . . . . . . . . . . . . . . . . . . . . . . . . . 84
13.5 Control panel. . . . . . . . . . . . . . . . . . . . . . . . . . . . . . . . . . . . . . . . . . . . . . . . . . . . . . . . . . . . . . . . 84
14 Ordering Information . . . . . . . . . . . . . . . . . . . . . . . . . . . . . . . . . . . . . . . . . . . . . . . . . . . . . . . . . . . . . . 85
14.1 Mastercycler pro . . . . . . . . . . . . . . . . . . . . . . . . . . . . . . . . . . . . . . . . . . . . . . . . . . . . . . . . . . . . . 85
14.2 Accessories . . . . . . . . . . . . . . . . . . . . . . . . . . . . . . . . . . . . . . . . . . . . . . . . . . . . . . . . . . . . . . . . . 85
14.3 Consumables . . . . . . . . . . . . . . . . . . . . . . . . . . . . . . . . . . . . . . . . . . . . . . . . . . . . . . . . . . . . . . . . 86
14.4 Recommended auxiliary materials . . . . . . . . . . . . . . . . . . . . . . . . . . . . . . . . . . . . . . . . . . . . . . . 87
Index . . . . . . . . . . . . . . . . . . . . . . . . . . . . . . . . . . . . . . . . . . . . . . . . . . . . . . . . . . . . . . . . . . . . . . . . . . . 88
Page 6

Table of contents
Mastercycler pro
6
English (EN)
Page 7

Operating instructions
Mastercycler pro
English (EN)
1 Operating instructions
1.1 Using this manual
Read the operating manual before you operate the device for the first time.
Please view this manual as part of the product and keep it somewhere easily accessible.
If this manual is lost, please request another one. The current version of the operating manual can be
found on our website at www.eppendorf.com
The sequences of actions in this operating manual are described for operation using the
control panel and the language setting English.
Alternatively, you have the following possibilities:
• Operate the Mastercycler pro via a mouse (see p. 26).
• Change the dialog language (see p. 58).
.
1.2 Danger symbols and danger levels
7
Representation Meaning
DANGER
Risk of electric shock with potential for severe injury or death as a consequence.
DANGER
Risk of explosion with potential for severe injury or death as a consequence.
DANGER
Bio hazard with potential for risk to health or death as a consequence.
DANGER
Risk of burns.
WAR N ING
Warning of potential injury or health risk.
CAUTION
Refers to risk of damage to property.
Refers to particularly useful information and tips.
Page 8

Operating instructions
Mastercycler pro
8
English (EN)
1.3 Symbols used
Depiction Meaning
1.
2.
Actions without a specified order
• List
Text Display text or software text
1.4 Abbreviations used
ESP
Electronic Sample Protection
Actions in the specified order
Additional information
PCL
Printer Command Language (standard for controlling printers)
PCR
Polymerase Chain Reaction
PDF
Portable Document Format
PIN
Personal Identification Number
PS
PostScript® (standard for controlling printers)
TSP
Thermal Sample Protection
USB
Universal Serial Bus
Page 9

2 Product description
5
6
7
8
9
10
1 2 3 4
11
2.1 Main illustration
Abb. 2-1: Mastercyclerpro - front and rear view
Product description
Mastercycler pro
English (EN)
9
Fig. 2-1: Mastercycler pro - front and rear view
1Lid handle
For opening and closing and also locking and
unlocking the heated lid.
2 vapo.protect heated lid
3 Address display
4 Status lamp
5 Rear plate with ventilation slots
6 Mains connection socket
7 Mains switch
0 = switched off, I = switched on.
8Terminal block
See detail drawing (Fig. 2-2 on p. 10).
9 Retaining clip
For control panel.
10 Thermoblock
11 Nameplate
Page 10

10
Printer RS 232 Control Panel CAN_out CAN_in Term Address
1 2 3 4 5 6 7
1
2
3
4
Product description
Mastercycler pro
English (EN)
Abb. 2-2: Terminal block
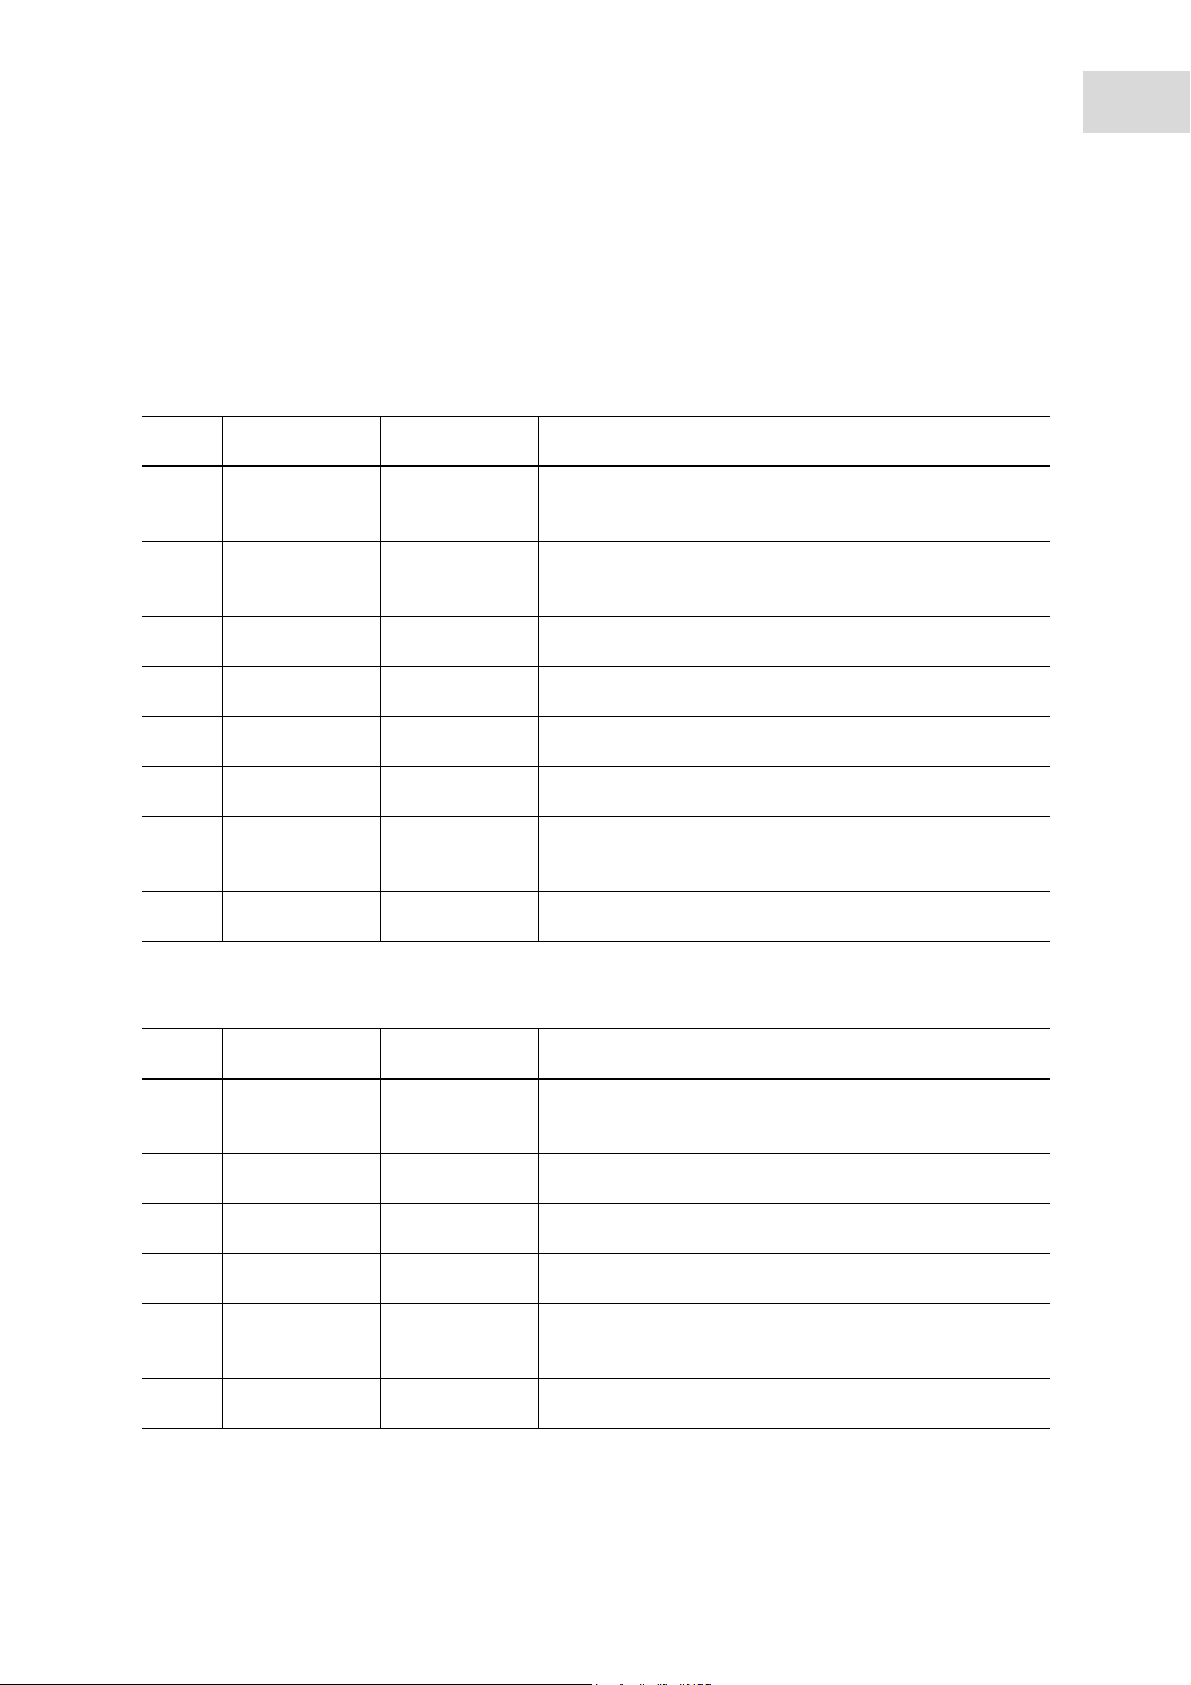
Fig. 2-2: Terminal block
1 Parallel interface
Connection for printer.
2 Serial interface (RS 232)
Connection for Eppendorf temperature validation
system.
3 Control panel connection
4CAN out
Data outlet for connecting several
Mastercycler pro or Mastercycler ep.
Abb. 2-3: Control panel
5CAN in
Data inlet for connecting several
Mastercycler pro or Mastercycler ep.
6Term switch
Termination of CAN bus when networking several
Mastercycler pro or Mastercycler ep.
Lower position: ON. Upper position: OFF.
7 Address dial
Setting of device address when networking
several Mastercycler pro or Mastercycler ep.
Fig. 2-3: Control panel
1Display
2USB port1
For mouse, printer or storage medium.
3USB port2
For mouse, printer or storage medium.
4 MMC slot
For data exchange via a MultiMediaCard (MMC).
Only devices meeting the IEC 950/EN 60950 (UL 1950) standards may be connected to the interfaces of the
Mastercycler pro and the control panel.
Page 11
2.2 Delivery package
The contents of the delivery package depend on the variant of your Mastercycler pro.
2.2.1 Mastercycler pro and Mastercycler pro S
Product description
Mastercycler pro
English (EN)
11
QuantityOrder no.
(International)
1 6321 000.019 - 230 V / 50 - 60 Hz
or 6321 000.027 950030010 120 V / 50 Hz, with US- plug
1 6325 000.013 - 230 V / 50 - 60 Hz
or 6325 000.021 950030020 120 V / 50 Hz, with US-plug
1 6321 900.150 -
1-
1- -
1 - 100 pieces
1 - PCR clean, 2 pieces
1 - self-adhesive, 5 pieces
Order no.
(North America)
Description
Mastercycler pro
Mastercycler pro S
Operating Manual Mastercycler pro
Certificate of Conformity
Mains cable
Eppendorf PCR tubes 0.2 mL
Eppendorf twin.tec skirted
96-well PCR plates
PCR film
2.2.2 Mastercycler pro 384
QuantityOrder no.
(International)
1 6324 000.010 - 230 V / 50 - 60 Hz
or 6324 000.028 950030030 120 V / 50 Hz, with US-plug
1-
1-
1- -
1- 2 pieces
1 - self-adhesive, 5 pieces
Order no.
(North America)
Description
Mastercycler pro 384
Operating manual
Certificate of Conformity
Mains cable
Eppendorf twin.tec
384-well PCR plates
PCR film
Page 12

12
Product description
Mastercycler pro
English (EN)
2.3 Features
Product variants
The Mastercycler pro is available in three variants.
• Mastercycler pro
• Mastercycler pro S
• Mastercycler pro 384
All variants are provided with the following features:
Triple Circuit Technology
All Mastercycler pro thermomodules feature extremely fast heating and cooling rates. Triple Circuit
Technology ensures a homogeneous temperature distribution and enables the generation of specific
temperature gradients for PCR optimizations.
SteadySlope
SteadySlope Technology ensures that the heating and cooling ramp rates for thermal modules are identical
in both gradient and normal operation. That means you can expect identical temperature control
characteristics in both optimization and routine experiments, as well as a reliable transfer of the
optimization results to the routine application.
vapo.protect
All variants of the Mastercycler pro have avapo.protect heated lid. A flexible pressure element ensures that
force is applied evenly to the surface of the tubes or plate. This reduces evaporation from the reaction
sample effectively. The vapo.protect heated lid performs automatic tube height adjustment for all sample
tubes and PCR plates.
TSP
The heated lid of the Mastercycler pro series is equipped with TSP technology (Thermal Sample
Protection). The thermoblock is continuously kept at 20°C during the lid heating phase. This means TSP
reduces the thermal load on your samples and minimizes the probability of non-specific product formation
during the PCR.
Self-test function
You can use the integrated self test function of the Mastercycler pro in combination with the control panel
with USB ports to check whether the thermoblock is functioning properly without the need for any further
tools. A separately available USB key is required for the self test function (see Accessories on p. 85).
Control
The Mastercycler pro is controlled via the control panel. It can also be controlled via the PC software
CycleManager pro.
Page 13

Product description
Mastercycler pro
2.3.1 Features of the Mastercycler pro variants
Variant Features
Mastercycler pro • Freely programmable temperature gradient over 12 rows.
• A gradient range of up to 20°C.
•Robust, specially coated aluminum block.
• Holds up to 96 PCR tubes (0.2 ml) or a 96-well PCR plate.
Mastercycler pro S • Highest temperature control speed due to silver block: up to 6°C/s.
• Standard PCR possible in under 30 min.
• Pulse function for device-driven hot start for avoiding non-specific PCR product
formation.
• Freely programmable temperature gradient over 12 rows.
• Extended gradient range of up to 24°C.
• Holds up to 96 PCR tubes (0.2 ml) or a 96-well PCR plate.
Mastercycler pro 384 • Freely programmable temperature gradient over 24 rows.
• A gradient range of up to 20°C.
• Holds a 384-well PCR plate.
13
English (EN)
2.3.2 Networking
Mini-satellite system
Up to five devices from the Mastercycler pro or Mastercycler ep series can be interconnected and operated
via a central control panel. The procedure for setting up this type of configuration is described separately
(see Operating multiple Mastercycler pro via a control panel ("mini-satellite" system) on p. 23).
PC control
You can use the PC software CycleManager pro to control up to 30 devices from the Mastercycler pro or
Mastercycler ep series in a network. This software is available separately for purchase (see Accessories on
p. 85).
Page 14

14
Product description
Mastercycler pro
English (EN)
Page 15

Safety
Mastercycler pro
English (EN)
3Safety
3.1 Intended use
The Mastercycler pro is intended to be used in research and routine laboratories in the field of biomedical
sciences.
The Mastercycler pro is used to control the temperature of aqueous solutions, suspensions, and emulsions
in closed micro test tubes for enzymatic reactions, typically for polymerase chain reaction (PCR).
The Mastercycler pro is intended exclusively for indoor use.
3.2 User profile
This device must only be used by skilled personnel with the appropriate training.
15
Before using the device, read the operating manual carefully and familiarize yourself with the device's
mode of operation.
3.3 Note on product liability
In the following cases the protection provided in the device may be impaired. The liability for the function
of the device passes to the operator if:
• The device is not used in accordance with the operating manual.
• The device is used outside the range of application described herein.
• The device is used with accessories or consumables (e.g. tubes and plates) which are not recommended
by Eppendorf.
• The device is maintained or repaired by persons not authorized by Eppendorf.
• The owner has made unauthorized modifications to the device.
3.4 Warnings for intended use
Read the operating manual first and follow the general safety instructions below before using the
Mastercycler pro.
DANGER! Risk of explosion!
Do not operate the device in rooms where work is being carried out with explosive
substances.
Do not use this device to process any explosive or highly reactive substances.
Do not use this device to process any substances which could create an explosive
atmosphere.
Page 16

16
Safety
Mastercycler pro
English (EN)
DANGER! Risk when handling toxic or radioactively-marked liquids or pathogenic germs.
Follow national regulations governing the handling of these substances.
For complete instructions regarding the handling of germs or biological material of risk
group II or higher, please refer to the "Laboratory Biosafety Manual" (Source: World
Health Organization, current edition of the Laboratory Biosafety Manual).
WARNING! Risk to health and bio hazard when operated with lid open.
The tube lids may pop open at high block temperatures.
Close the lid of the device when heating samples.
DANGER! Electric shock as a result of penetration of liquid.
Switch off the device and disconnect it from the power supply before starting cleaning or
disinfecting.
Do not allow any liquids to enter the inside of the housing.
Do not perform spay disinfection.
Only reconnect the device to the power supply once it is completely dry.
DANGER! Lethal voltages inside the device.
Ensure that the housing is always closed and undamaged so that no parts inside the device
can be contacted by accident.
Do not remove the housing of the device.
Do not allow the device to be opened by anyone except service personnel who have been
specifically authorized by Eppendorf.
DANGER! Electric shock.
Switch off the device and disconnect the power plug before starting to maintain or clean.
WARNING! Damage due to incorrect power supply.
Only connect the device to power sources that match the electrical specifications on the
device's nameplate.
Use only sockets with protective earth.
WARNING! Injury from trapping or crushing.
Do not place your fingers between the lid and the housing when opening and closing the
device or when opening it into the cleaning position.
Do not reach in under the open lid.
Take care that the stand is properly engaged so that the lid stays in the opened position.
Page 17

Safety
Mastercycler pro
English (EN)
WARNING! Burns from hot thermoblock and heated lid.
The thermoblock, the inner side of the heated lid and micro test tubes/PCR plates can reach
temperatures of over 50 °C very quickly.
The heated lid should be kept closed until temperatures of 30 °C or less are reached.
Take note of the symbols on the thermoblock warning that surfaces may be hot.
If you are using well caps consisting of thermally insulating material, please keep in mind
that the temperature on the inside of the heated lid can be significantly higher than the
temperature displayed.
Before starting cleaning wait for the thermoblock and heated lid to cool down.
WARNING! Injury from sharp-edged components.
When the Mastercycler pro is in the open position, sharp-edged components are exposed.
When cleaning the Mastercycler pro, the sharp edges on the rollflex cable and the guide rail
may cause injuries.
Take special care and wear protective gloves.
17
WARNING! Risk to health if used incorrectly.
If incubation is performed incorrectly, sample material may be released and the thermoblock
and the heated lid damaged.
Ensure that the PCR plates are correctly inserted in the thermoblock.
Always close the heated lid before heating the samples to prevent the lids of the tubes from
bursting open.
WARNING! Risk to health from contaminated device
Perform decontamination before storing or dispatching the device and/or its accessories.
CAUTION! Unsuitable tubes can result in sample material escaping.
Unsuitable tubes may be so severely damaged that sample material is released.
Use only tubes whose properties meet at least the requirements specified in these
operating instructions.
This is especially important when working with infectious material.
WARNING! Poor safety due to incorrect accessories and spare parts.
The use of accessories and spare parts other than those recommended by Eppendorf may
impair the safety, function and precision of the device. Eppendorf accepts no warranty or
liability for damage caused by non-recommended accessories and spare parts or incorrect
use.
Use only accessories recommended by Eppendorf and original spare parts.
Page 18

18
Safety
Mastercycler pro
English (EN)
WARNING! Risk of injury when lifting and transporting the device.
Lifting the device with the wrong posture may cause serious damage to your health. If the
device falls to the ground it can cause injuries.
Do not lift the device by the handle or the housing of the heated lid.
Carry the device securely with both hands to prevent it from slipping.
Always keep a straight back when lifting and carrying the device.
CAUTION! Damage to heated lid from sharp-edged sample tubes or objects.
Use only tubes whose properties meet at least the requirements specified in these
operating instructions.
Do not use any sharp-edged or sharp objects on the heated lid.
Extra caution should be exercised when cleaning so as not to damage the heated lid.
CAUTION! Escaping liquid can cause damage to the device.
If the flexible pressure unit of the heated lid is damaged, liquid can escape and enter the
device.
1. Leave the lid open.
2. Disconnect the power plug immediately from the power supply.
3. Contact Eppendorf Service.
CAUTION! Damage to the thermoblock from incorrect operation.
Do not fill sample material directly into the thermoblock.
CAUTION! Damage to electronic components through formation of condensation.
After the device has been moved from a cool to a warmer environment, formation of
condensation can occur inside the device.
Allow the device to warm up for at least 12 hours after being set up before you connect it
to the mains power supply.
CAUTION! Material damage from uneven work surface.
Position the device on level and stable work surface which is capable of bearing the weight
of the device. The device must not be placed on a trolley or at an angle.
CAUTION! Damage due to overheating.
Do not place the device close to sources of heat (e.g. radiator, drying cabinet).
Do not expose the device to direct sunlight.
Allow air to circulate freely by leaving at least 10 cm to adjoining devices or to the wall and
keep the underside of the device clear.
Page 19

CAUTION! Lack of safety due to missing operating manual.
1
2
When passing on the device, always enclose the operating manual.
If you lose the operating manual, request a replacement. The current version of the
operating manual and the safety instructions can also be found on our
websitewww.eppendorf.com
.
3.5 Warning signs on the device
This section explains the warning signs used on the Mastercycler pro.
Safety
Mastercycler pro
English (EN)
19
1 WARNING
Risk of burns from the hot thermoblock (triangle with tip
facing down) or the hot inner side of the heated lid
(triangle with tip facing up).
Gradient operation can result in the temperature being
hotter on the right side than on the left side
2 WARNING
Risk of burns from hot surfaces.
Page 20

20
Safety
Mastercycler pro
English (EN)
Page 21
Installation
Mastercycler pro
English (EN)
4 Installation
4.1 Unpacking the device
WARNING! Risk of injury when lifting and transporting the device.
Lifting the device with the wrong posture may cause serious damage to your health. If the
device falls to the ground it can cause injuries.
Do not lift the device by the handle or the housing of the heated lid.
Carry the device securely with both hands to prevent it from slipping.
Always keep a straight back when lifting and carrying the device.
1. Release the four plastic locking clips at the long sides of the carton by pulling out the flaps.
2. Lift the carton lid and take the foam upper part off the Mastercycler pro.
3. Take the carton insert out of the carton lid (contains the mains cable).
4. Take the Mastercycler pro out of the plastic bag.
5. With both hands, hold the Mastercycler pro by the lower half of the housing and lift it out of the
package.
6. Remove all the packing material.
7. Visually check the device to ensure that no damage has occurred during shipment.
8. Check the completeness of the delivery (see Delivery package on p. 11).
21
Never use a device if it shows any signs of damage. In this case, contact your distributor or the
appropriate Eppendorf office.
• Retain the packing material for shipping or storing the Mastercycler pro at a later date.
• Ship the Mastercycler pro only in the original packing material.
Page 22

22
Installation
Mastercycler pro
English (EN)
4.2 Selecting the location
4.2.1 Space requirements and bearing capacity
CAUTION! Material damage from uneven work surface.
Position the device on level and stable work surface which is capable of bearing the weight
of the device. The device must not be placed on a trolley or at an angle.
CAUTION! Damage due to overheating.
Do not place the device close to sources of heat (e.g. radiator, drying cabinet).
Do not expose the device to direct sunlight.
Allow air to circulate freely by leaving at least 10 cm to adjoining devices or to the wall and
keep the underside of the device clear.
Information regarding the dimensions and weight of the device components can be found separately(see
Weight/dimensions on p. 83).
When selecting a location for the Mastercycler pro ensure that the following criteria are met:
• The surface must have sufficient bearing capacity and ensure the required stability.
• The feet at the front of the unit must be secured to prevent them from slipping.
• The device must be positioned at a height which provides for convenient and safe operation.
• Additional space is required for free air circulation at the back of the device (10 cm) and for the control
panel at the front (14 cm).
4.2.2 Mains connection
CAUTION! Connected devices may be shut down due to a power supply overload.
The total current consumption of the devices can exceed the maximum permitted supply
rating when multiple power sockets are used. In this case, the mains fuse interrupts the
electric circuit. The connected devices are shut down.
Do not use multiple sockets when connecting several Mastercycler pro.
Information on the power consumption of the Mastercycler pro is provided separately (see Power supply on
p. 83).
• You need an earthed wall socket for the power supply of the Mastercycler pro. Use the supplied power
cable to connect the Mastercycler pro.
• The control panel is supplied via the Mastercycler pro and does not require an additional power supply.
Page 23

Installation
Term
Mastercycler pro
English (EN)
4.3 Installing the instrument
This section describes how to start up the Mastercycler pro with the control panel and how to operate
several devices belonging to the Mastercycler pro and Mastercycler ep series with each other in a network.
The connections and switches are located at the back of the device (see Main illustration on
p. 9).
• Follow the steps below to define the settings and connect the devices before switching on
the Mastercycler pro.
• Never disconnect the control panel from a Mastercycler pro that is switched on.
4.3.1 Operating a Mastercycler pro via a control panel
1. Connect the cable on the control panel to the Control Panel connector of the
Mastercycler pro.
23
2. Set Term switch to ON (lower position).
3. Use the address dials to set the address of the Mastercycler pro to 01. To do this,
turn the left dial into position 0 and the right dial to 1, as shown in the illustration.
4. Connect the power cable to the Mastercycler pro and to the mains supply.
4.3.2 Operating multiple Mastercycler pro via a control panel ("mini-satellite" system)
CAUTION! Connected devices may be shut down due to a power supply overload.
The total current consumption of the devices can exceed the maximum permitted supply
rating when multiple power sockets are used. In this case, the mains fuse interrupts the
electric circuit. The connected devices are shut down.
Do not use multiple sockets when connecting several Mastercycler pro.
A control panel can be used to control up to five devices belonging to the Mastercycler pro or Mastercycler
ep series (also in combination). Each additional device connected requires its own CAN bus cable. CAN bus
cables are available separately for purchase (see Accessories on p. 85).
Page 24
24
CAN_out
CAN_in
Term
Term
CAN_out Control PanelCAN_in Term Address CAN_out CAN_in Term AddressCAN_out CAN_in Term Address
Installation
Mastercycler pro
English (EN)
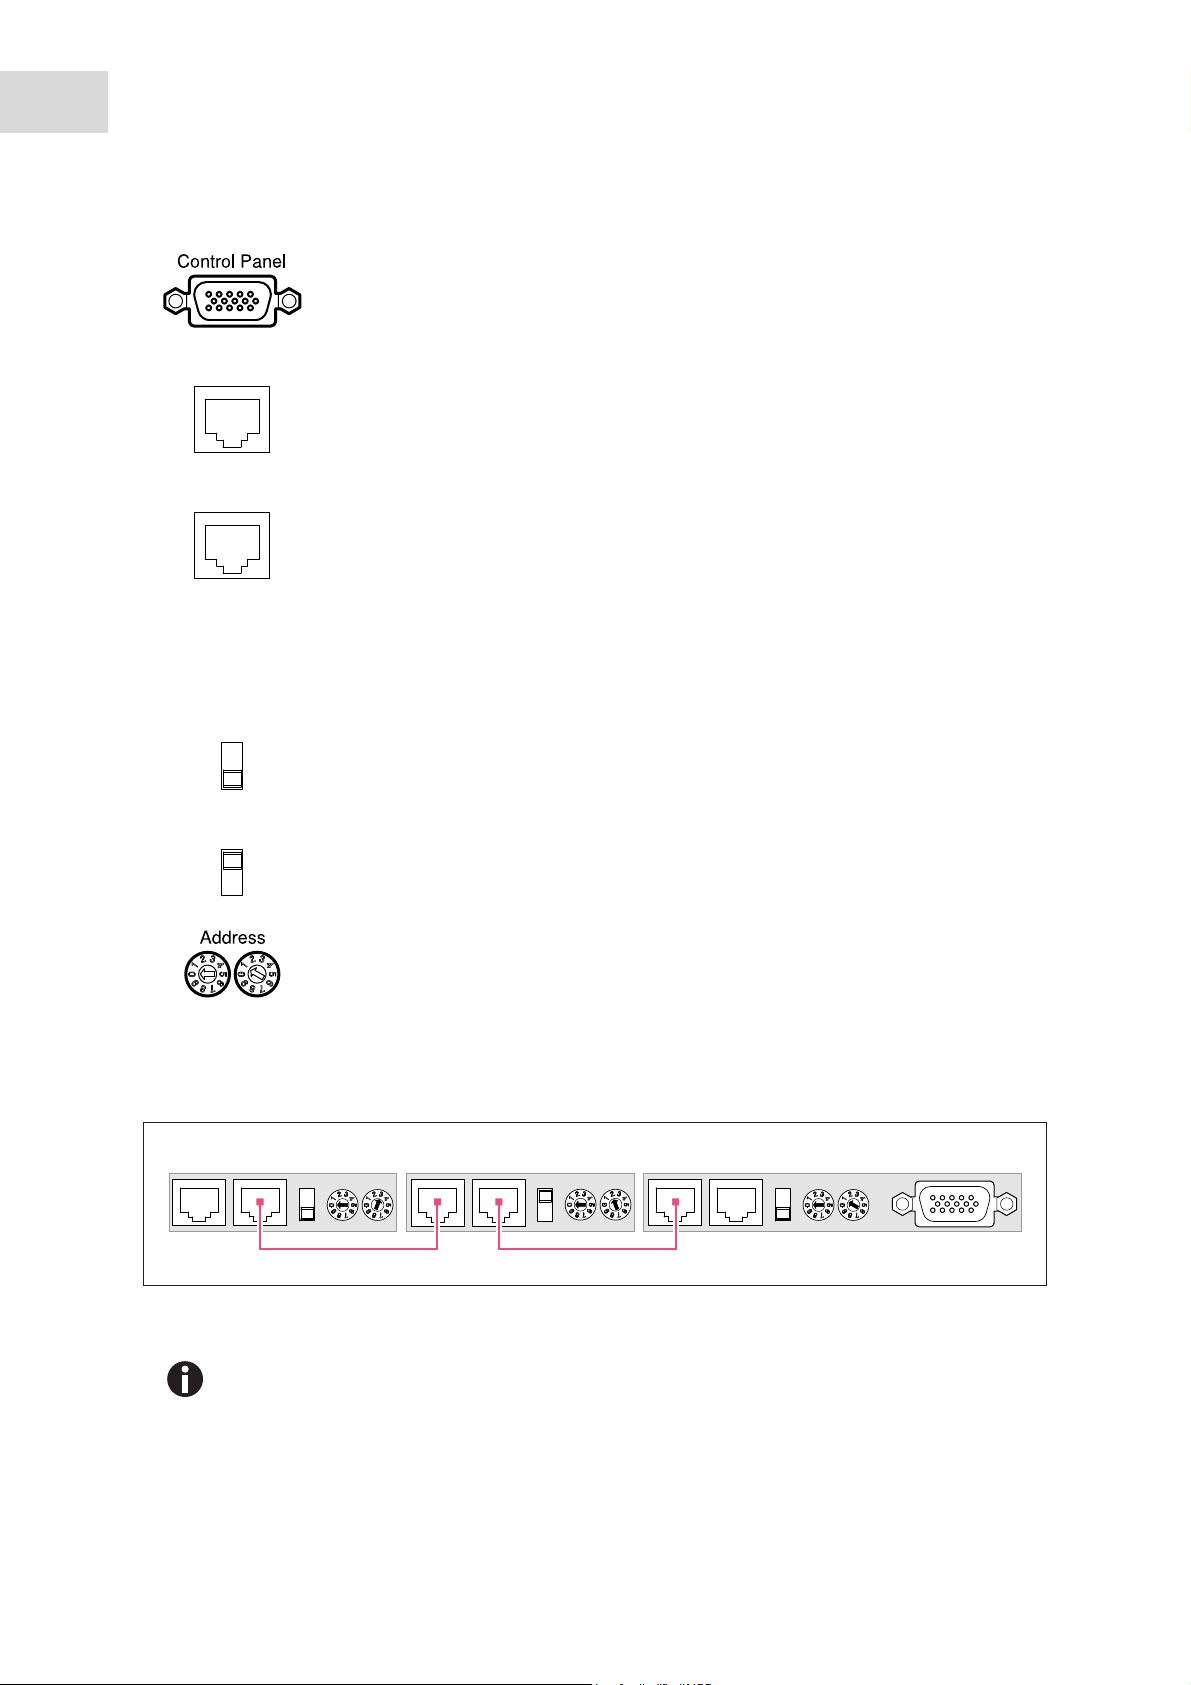
1. Connect the cable on the control panel to the "Control Panel" connector of the first
device.
2. Connect the CAN bus cable to the "CAN_out" connector of the first device.
3. Connect the free end of the CAN bus cable to the "CAN_in" connector of the
second device.
Connecting additional devices
4. Always use the CAN bus cable to connect the "CAN_out" connector of the last
connected device to the "CAN_in" connector of the new device.
Device 3 Device 2 Device 1
Abb. 4-1: Address and Term settings and wiring connections for a network consisting of t hree devices
5. Set the Term switch of the first and last device to "ON" (lower position).
6. Set the Term switch of all other devices to "OFF" (upper position).
Note: If the network consists of exactly two devices, the Term switch of both
devices must be set to "ON".
7. For the first device connected to the control panel, set the address to 01.
8. Define one unique address from 02 to 05 on each additional device.
Fig. 4-1: Address and Term settings and wiring connections for a network consisting of three devices
Each address may only be assigned once within the network.
The address that was set for the Mastercycler pro will be displayed by the two-digit address
display 3 on the heated lid during operation (see Main illustration on p. 9).
Page 25

Installation
Mastercycler pro
English (EN)
4.3.3 Connecting Mastercycler pro to an existing Mastercycler ep
You can extend an existing system of one or more Mastercycler ep devices with a corresponding control
panel using devices of the Mastercycler pro series.
When operating the Mastercycler pro with a Mastercycler ep control panel (without USB
connections), the following restrictions apply:
• The self test function is not available.
• The PDF file format is not available for exporting programs, protocols and log files.
• No USB devices can be connected. Information for connecting a PS/2 mouse can be found
in the Mastercycler ep operating manual.
Prerequisites
Before a Mastercycler pro can be connected to an existing Mastercycler ep system, the software of the
control panel and of the connected Mastercycler ep has to be updated. For more information, contact the
Eppendorf branch for your country (see back cover flap).
25
1. Follow the instructions in the Mastercycler ep operating manual to update the control panel software.
2. After restarting the control panel, synchronize all connected Mastercycler ep with the control panel.
3. Shut down the control panel (see p. 54) and switch off all Mastercycler ep devices.
4. Set the address of the new Mastercycler pro to the next free address number.
Example:
If you already operate two Mastercycler ep devices, set the address of the new
Mastercycler pro to 03.
5. Connect the cables and define the Term settings.
6. Switch all devices on and register them at the control panel.
The Mastercycler pro is displayed as an additional cycler node on the control panel.
4.3.4 Using the USB ports
The control panel of the Mastercycler pro has two USB ports (see Fig. 2-3 on p. 10) for connecting a
mouse, printer, storage medium or the self test USB key.
If you would like to use more than two USB devices at the control panel at the same time, you can make
use of a USB hub.
Page 26

26
Installation
Mastercycler pro
English (EN)
4.3.5 Connecting the printer
The Mastercycler pro can be connected to a parallel interface printer in order to print protocols and
programs in text format.
Connect the printer via a parallel data cable to the parallel interface (see Fig. 2-2 on p. 10) of the
Mastercycler pro.
A printer with USB interface can be connected to the control panel to print protocols, programs and self
test certificates.
Prerequisites
®
The USB printer must be compatible with the PostScript
can be found in the operating manual for your printer.
1. Us a USB cable to connect the printer to one of the two USB ports (see Fig. 2-3 on p. 10) of the control
panel.
or PCL printer standards. Further information
4.3.6 Connecting the mouse
You can connect a USB mouse (not included in the delivery package) to the control panel.
Connect the plug of the mouse to one of the USB ports on the right-hand side of the control panel (see
Fig. 2-3 on p. 10).
The mouse pointer appears in the display.
4.4 Shut down
Proceed as follows if you do not want to use the Mastercycler pro for longer than a week.
1. Load the block with an empty PCR plate(see p. 50).
2. Close the heated lid and flip the handle forwards (see p. 27).
3. Disconnect the Mastercycler pro from the power supply.
Do not leave the lid of the Mastercycler pro in an open position in order to avoid the block from becoming
contaminated.
Page 27

Operation
Mastercycler pro
English (EN)
5 Operation
5.1 Initial steps
Check the correct installation
Before the Mastercycler pro is started up for the first time, ensure the following:
• The device is correctly connected.
• The device is free of damage.
• Make sure that air can circulate freely around the ventilation slots on the rear of the device and around
the fan behind the feet.
5.1.1 Using the vapo.protect heated lid
Thevapo.protectheated lid features a heated flexible pressure unit. When the lid closes, the pressure unit
comes to rest lightly on the surface of the sample tubes. A liquid cushion in the pressure unit is then used to
create a pressure to ensure that the tubes are pressed uniformly into the thermoblock thereby protecting
the tube seals against evaporation. The heating process prevents condensation from forming in the upper
area of the tube when the reaction liquid is heated.
27
5.1.1.1 Closing the heated lid
Prerequisites
The thermoblock of the Mastercycler pro is loaded with sample tubes or a PCR plate (see Loading the
thermoblock on p. 50).
CAUTION! Damage to heated lid from sharp-edged sample tubes or objects.
Use only tubes whose properties meet at least the requirements specified in these
operating instructions.
Do not use any sharp-edged or sharp objects on the heated lid.
Extra caution should be exercised when cleaning so as not to damage the heated lid.
Page 28
28
2
1
Operation
Mastercycler pro
English (EN)
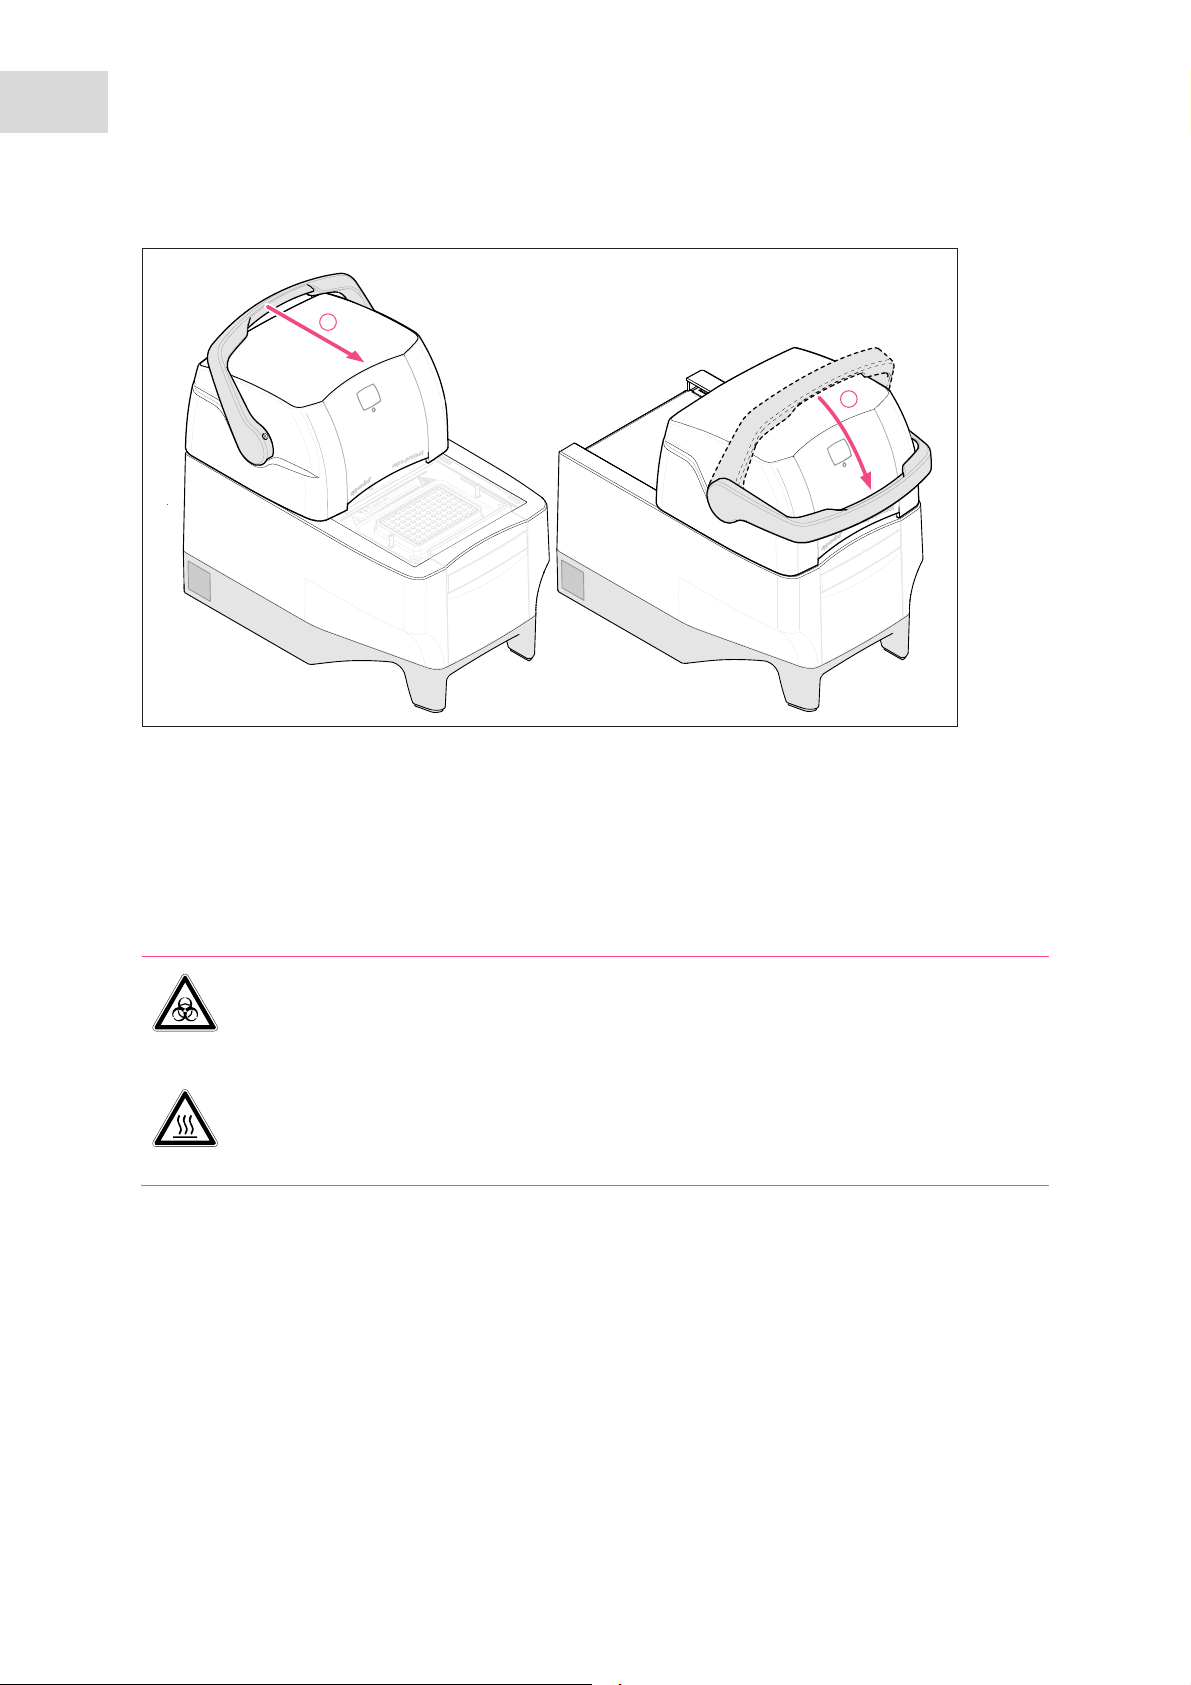
1. Pull vapo.protect heated lid forwards at the lid handle as far as possible so that the lid handle can be
rotated.
2. Flip the handle over the heated lid until it clicks into place.
You can now start a program run or manually temperature-control the lid and the samples.
5.1.1.2 Opening the heated lid
WARNING! Risk to health and bio hazard when operated with lid open.
The tube lids may pop open at high block temperatures.
Close the lid of the device when heating samples.
WARNING! Risk of burns from the hot thermoblock and heated lid.
The thermoblock and the heated lid very quickly reach temperatures above 95 °C.
Keep heated lid closed until the temperature of the thermoblock is below 30 °C.
Open the heated lid in one go as follows:
Flip the lid handle up over the heated lid and push the heated lid by the handle to the rear position until
it stops.
Page 29

Operation
Mastercycler pro
English (EN)
5.1.1.3 Status lamp
The vapo.protect heated lid is equipped with a status lamp 2(see Main illustration on p. 9) which allows the
current operating status of the Mastercycler pro to be visible from far off.
Status lamp Operating status
Illuminates green The Mastercycler pro is idle.
Flashes green A program run is active.
Flashes orange The program run is waiting for user intervention in a pause or hold step(see
Editing programs on p. 44).
Flashes red A fault has occurred. Additional information on the type of fault is displayed on
the control panel (see Error messages on p. 77).
5.1.1.4 Address display
29
The vapo.protect heated lid is equipped with a two-digit address display so that the cycler can be identified
easily (see Main illustration on p. 9).
The displayed address number matches the cycler numbering in the operating software. The address
setting is described separately.
Page 30

30
Delete
Enter
Next
Stop
Start
2
3
5
6
0
.
8
9
abc
jkl mno
tuv wxyz
def
1
7
pqrs
4
ghi
Start
Stop
Next
DeleteDelete
EnterEnter
Delete
2
3
5
6
0
.
8
9
abc
jkl mno
tuv wxyz
def
1
7
pqrs
4
ghi
Operation
Mastercycler pro
English (EN)
5.1.2 Control panel keys
Start the selected program.
Stop the running program.
Function keys
The function of the key changes with the software dialog and appears in the display
immediately above the key.
• Step-by-step navigation.
The current position of the cursor is marked.
• Move the cursor within an alphanumerical input field.
Move cursor into the next input field.
Delete the following elements:
• Delete characters that are to the right of the cursor.
• Marked signs.
• Marked folders or programs.
• Confirm input.
• Open selection lists.
• Enter digits and text in input fields.
In the case of numerical input fields (e.g. temperature and time entries) the keys
only represent numbers. For decimal numbers with numbers after the decimal
point, use the period as a decimal point.
Alphanumerical input fields have keys with multiple functions.
To enter text, keep pressing the key with the relevant letter until the desired letter
is displayed.
Example: To e nter pcr 3 in a text field, press the following keys in quick succession:
1. for p: press 7 once
2. for c: press 2 three times
3. for r: press 7 three times
4. for the blank space: press 0 (zero) twice
5. for 3: press 3 four times
Page 31

Operation
Mastercycler pro
English (EN)
5.2 Initial start-up of the Mastercycler pro
During the initial startup of the control panel you can define an administrator PIN in order to protect the
system against access by unauthorized persons. These data are saved in the control panel and are not lost
when the Mastercycler pro is switched off.
5.2.1 Defining the administrator PIN
If no administrator PIN has been defined, you are prompted to do so.
CAUTION! Loss of data due to misuse or loss of administrator PIN.
The administrator PIN protects the system from undesired access to its configuration and to
the stored data of all users.
Make a note of the administrator PIN and keep it in a safe place. If you lose the
administrator PIN, contact Eppendorf Service.
Allow access to the administrator PIN only to persons who are allowed to edit the
configuration of the system and who have the knowledge required to do this.
31
If you do not want to use the user management option, you do not have to define an
administrator PIN. In this case, leave the input fields of the Input Admin PIN window empty
and deactivate the PIN function. Further information on user management is provided
separately (see p. 58).
Page 32

32
Delete
2
3
5
6
0
.
8
9
abc
jkl mno
tuv wxyz
def
1
7
pqrs
4
ghi
Next
DeleteDelete
Operation
Mastercycler pro
English (EN)
To define the administrator PIN, perform the following steps in the sequence described.
1. Switch on the Mastercycler pro at the mains power switch.
The Input Admin PIN window appears.
2. Enter the desired administrator PIN using the numerical keys on the control panel.
The PIN can be between 4 and 8 digits long.
3. Go to the Confirmation field and enter the PIN again to confirm.
4. If your two PIN entries do not match each other, an error message is displayed. In
this case, delete the incorrectly entered PIN and repeat the PIN entries.
5. Confirm by pressing the OK function key.
After successful confirmation of the administrator PIN, the navigation tree appears in the control panel
display. You are now logged in as the administrator.
•If the PIN function is activated, you must define an administrator PIN. Otherwise this input
prompt will appear each time the device is switched on.
• You can also change the administrator PIN subsequently (see Changing the PIN on p. 56).
5.2.2 Other steps
5.2.2.1 Setting the date and time
The date and time of the control panel are displayed in the upper right-hand corner of the display. As the
administrator you can change this internal clock at any time (see p. 58).
5.2.2.2 Setting up user accounts
To be able to use the Mastercycler pro, you must set up at least one user account. Detailed information
about setting up user accounts and about user administration can be found separately(see Managing user
accounts on p. 55).
Page 33

Operation
Enter
NextNext
Delete
2
3
5
6
0
.
8
9
abc
jkl mno
tuv wxyz
def
1
7
pqrs
4
ghi
Mastercycler pro
English (EN)
5.3 User login and logout
The functions described here are only available if the PIN function is activated.
5.3.1 Logging in as a user
Before you can log in under your user name, your administrator must have set up a user account for you.
Perform the following steps in the sequence described.
1. Switch on the Mastercycler pro at the mains power switch.
The control panel switches on automatically and the software is loaded.
When the software has been loaded, the control panel displays the User
Loginwindow.
2. Open the list with the Enter key and select the user name.
33
3. Press theNext key.
The cursor switches to the PIN field.
4. Enter your personal PIN using the numerical keys on the control panel.
If the PIN is wrong, the message Wrong PIN appears. Use theLogin function key to
return to the User Login window, delete the incorrectly entered PIN with the Delete
key and repeat the PIN entry.
5. Press the OK function key to confirm the entry.
The navigation tree is displayed on the control panel.
You are now logged in under your user name and can work with the Mastercycler pro.
5.3.2 Changing the user
If another user is already logged in, you can log in as follows:
Page 34

34
Operation
Mastercycler pro
English (EN)
1. Mark your user node.
2. Press the Login function key.
3. Log in as a user.
The user who was previously logged on is automatically logged out.
5.3.3 Logging out as a user
You can log yourself out from the control panel to protect your programs against unauthorized changes.
1. Mark your user node.
2. Press the Logout function key.
You are now logged out.
The guest user is automatically logged in. Guest users cannot start any programs and just have
read-only rights for all programs and folders in the control panel.
Page 35

5.4 Overview of operation with the control panel
1
2
4
5
6
3
5.4.1 Navigation tree overview
Operation
Mastercycler pro
English (EN)
35
1 Window title
Displays the current level (user level, cycler level,
top level) in the navigation tree and the title of
dialog windows. A status symbol is displayed on
the right-hand side of the window title if the
external storage medium (MMC or USB) is
accessed.
2 Main node
Eppendorf is the main node containing all the
other nodes.
3User node
The main node contains a user node for each user
who has been set up. You can store folders and
programs below your own user node. You can
start the programs in your own user node on
every cycler that is connected.
4Cycler node
Each cycler that is connected and switched on is
displayed by a separate cycler node. Here you
can open the status view of the respective cycler
and access additional cycler-specific functions.
The numbering corresponds to the address of the
cycler.
5System node
This node contains the most important system
settings. Some settings can only be edited by the
administrator.
6 MMC and USB nodes
These two nodes are only visible if an appropriate
storage medium is inserted into the control panel.
These nodes can be used to access external
storage media (MMC or USB), e.g. for
transferring programs to a different control panel
or for a system backup.
Page 36

36
Operation
Mastercycler pro
English (EN)
Abb. 5-1: Navigation tree of the Mastercycler pro. The MMC and USB nodes are only visible if a storage medium has been inserted.
Fig. 5-1: Navigation tree of the Mastercycler pro. The MMC and USB nodes are only visible if a storage
medium has been inserted.
5.4.2 Using the navigation tree
5.4.2.1 Opening the node
You have three options:
Mark the node with the arrow keys and press the Enter key or the arrow key .
This opens the node and the plus symbol in front of the node changes to a minus
symbol.
Or click on the plus symbol in front of the node with the mouse.
Alternatively, use the mouse to double-click on the desired node.
Page 37

Operation
Mastercycler pro
English (EN)
5.4.2.2 Closing the node
Carry out the above-mentioned steps in the reverse order:
Use the mouse to click on the minus symbol in front of the node.
Alternatively, double-click on the node.
Or mark the node with the arrow keys and press the Enter key or the arrow key .
This closes the node and the minus symbol in front of the node changes to a plus
symbol.
5.4.3 Using external storage media
You can save programs, log files and protocols on an MMC memory card or a USB storage medium and
then, for example, archive or print them out on a PC. External storage media are also needed for data
backups and software updates.
37
The status of the USB ports is indicated by the following symbols in the upper right-hand
corner of the control panel:
• USB ports deactivated. The USB ports cannot be used if the control panel is connected
to a Mastercycler ep.
Connect the control panel to a Mastercycler pro to activate the USB ports.
• USB error. A faulty or incompatible USB device has been connected.
Disconnect all USB devices and switch the control panel off. After restarting, all USB ports
will be reactivated.
5.4.3.1 Inserting storage media
Connecting a USB storage medium
Insert the USB storage medium into a USB port
on the right-hand side of the control panel
(Fig. 2-3 on p. 10).
After a few seconds, the USB node appears in the
navigation tree. The programs and user nodes saved
on the USB storage medium can be accessed via this
node.
The control panel creates a folder called \eppendorf on the USB storage medium where all
files will be saved.
Inserting an MMC memory card
Insert the MMC memory card into the MMC slot
on the right-hand side of the control panel
(Fig. 2-3 on p. 10) until it locks into position.
After a few seconds, the MMC node appears in the
navigation tree. The programs and user nodes saved
on the MMC can be accessed via this node.
Page 38

38
Operation
Mastercycler pro
English (EN)
5.4.3.2 Removing storage media
CAUTION! Device damage due to cancellation of the update process.
Ensure power supply during the update.
Do not switch the cycler off during the update.
Do not disconnect the control panel from the cycler during the update.
Leave the external storage medium in the control panel until the latter has been restarted
after the update and you have logged on again.
Removing the USB storage medium
Caution! The symbol is displayed in the upper
right corner while the USB storage medium is being
accessed. Wait until it has disappeared before
removing the USB storage medium.
Remove the USB storage medium.
The USB node disappears from the navigation tree. The MMC node disappears from the navigation tree.
Removing the MMC memory card
Caution! The symbol is displayed in the upper
right corner while the MMC is being accessed. Wait
until it has disappeared before removing the MMC.
1. Briefly press on the projecting end of the inserted
MMC.
2. Pull the MMC out of the slot.
5.4.4 Selecting export file formats
When exporting programs, protocols and log files to external storage media, you can choose between
text-only format (.TXT) and PDF.
Select memory device Select USB or MMC as the storage medium for the file you would like to
export, if more than one storage medium is connected to the system.
Select file format Selecting the file format:
• PDF: Saves the file as PDF.
Use this setting if you only want to print or view the documents on your
PC. You need to have a PDF reader software installed (e.g. Adobe
Reader
• Text-only (.TXT): Saves the file in text-only format (.TXT). Use this
setting if you want to process the document content electronically (e.g.
embed it in a report).
®
).
®
Confirm your selection with OK.
The file is copied to the external storage medium, and the file name is displayed.
Page 39

5.5 Managing folders and programs
If you are logged in as a normal user (not as the administrator), you are only authorized to
create, edit and delete programs and folders below your own user node. More information on
user rights can be found in a separate section(see Administrator functions on p. 55).
5.5.1 Creating folders and programs
5.5.1.1 Creating folders
Proceed as follows:
1. Mark the user node.
2. Press the New Folder function key.
3. Use the numerical keys on the control panel to enter a name for the new folder.
Instead of the numerical keys, you can also use the software keyboard to make entries in text
fields. This is called up with the Keybd function key.
Operation
Mastercycler pro
English (EN)
39
4. To enter a comment for the new folder, select the Next key in the Comment field.
5. Enter a comment text using the numerical keys and confirm by pressingOK.
The folder is created and appears in the navigation tree under your user node.
You can change the name and the comment of the folder at any time using theProp. function
key.
5.5.1.2 Creating a new program
Proceed as follows:
1. In the navigation tree, open your own user node and possibly the folder in which you want to create the
new program.
2. Press the New function key.
Page 40

40
Operation
Mastercycler pro
English (EN)
The New Cycler Program window is displayed. You can enter a name and a comment for the new
program using the numerical keys here.
3. Press the OK function key.
The program is created and appears under your user node.
You can change the name of the program or the comment at any time using the Prop. function
key.
To protect a program against inadvertent changes, you can use the Prop. function key to mark
it as write-protected (read only). This means the program can then be displayed in the
program editor(see p. 41), but not changed. This is recommended when working without a
PIN.
5.5.2 Copying folders and programs
You can copy folders and programs to your own user nodes as follows. When copying a folder, the
programs it contains are also automatically copied.
1. In the user node belonging to any user, mark the folder or the program you want to copy.
2. Press the Copy function key.
A message appears informing you that the folder or the program was copied to the clipboard.
3. Confirm the note with OK.
4. Mark your own user node. If you want to copy a single program, you can also select a folder below your
user node to which you want to insert the program.
5. Press the Paste function key.
If a program or folder already exists with the same name, you will be prompted to enter a new name.
The folder or program is inserted under your user node. You can now start or edit this program.
5.5.3 Deleting folders and programs
1. In the navigation tree, mark the folder or the program.
2. Press the Delete key.
A confirmation prompt appears.
3. Confirm confirmation prompt with Yes.
The folder or program is deleted.
Page 41

Programming
1
2
3
5
4
7
6
8
9
10
Mastercycler pro
English (EN)
6 Programming
6.1 Overview of the program editor
The graphic program editor can be used to view and change existing programs.
6.1.1 Opening the program editor
1. Mark the desired program in the navigation tree or create a new program (see Creating a new program
on p. 39).
2. Press the Edit function key.
The program editor is displayed.
6.1.2 Structure of the program editor
A program consists of a program header and up to 99 program steps, which are processed successively by
the cycler. The program editor features a graphic user interface for intuitive creation and adjustment of
user-specific programs.
41
1 Number of the program step
2 Block temperature [°C]
The thermoblock is heated or cooled in the relevant
step at this temperature.
3 Hold time [mm:ss]
The set block temperature is maintained for this
time.
4 Average temperature for gradient steps
When using gradient steps, increasing temperatures
are generated across the columns of the
thermoblock from left to right. The average
temperature is displayed here.
5 Program step highlighted marking
The selected program step is highlighted in blue.
New program steps are inserted before the marked
step.
6 Step number within the cycle
The step number within a cycle and the total
number of steps in the cycle are displayed on the top
right. Example: 2/3: Step 2 of a 3-step cycle (3
StepCyc).
7 Active input field
Numerical keys are used to make entries.
8 Extended program step
Program steps are indicated by an asterisk* if they
are associated with a temperature or holding time
increment or with a reduced heating or cooling rate.
9 Marking of gradient steps
Gradient steps are indicated by three horizontal
lines.
10 Number of cycles
The cycle number indicates how often the program
steps indicated by the green horizontal arrow are to
be repeated.
Page 42

42
Programming
Mastercycler pro
English (EN)
6.2 Defining general settings
Each Mastercycler pro program features a program header in which you can define the block temperature
control mode and heated lid behavior. These settings are valid for the entire program.
6.2.1 Opening the header
1. Open the program editor (see Opening the program editor on p. 41).
2. Press the Header function key.
The header settings are displayed.
6.2.2 Editing header settings
Mastercycler Defining the cycler type
• To create a program, which is suitable for all Mastercycler pro devices, selectany
(default setting).
• To create a program for a specific Mastercycler pro (e.g. pro S) or Mastercycler ep,
select the desired cycler version from the list. The program can then only be
started on this type of cycler variant.
Lidtemp. Heated lid temperature (37 °C to 110 °C). The set lid temperature is maintained
constant during the program run.
The heated lid remains switched off if temperatures of less than 37 °C are entered.
Page 43

Programming
Mastercycler pro
English (EN)
43
TSP/ESP heated
lid
Switch off lid at
low block
temperature
Temp. mode Block temperature control mode
Preheat heated lid
• Mastercycler pro: Switch TSP on and off.
When TSP is activated, the heated lid is heated to the set temperature, while the
block is maintained constant at 20 °C. The program is started after the lid
temperature has been reached.
• Mastercycler ep: Switch ESP on and off.
When ESP is activated, the heated lid is first heated to the set temperature before it
is lowered onto the tube surfaces. The program is started after the heated lid has
been lowered.
Lid heater with automatic switch-off
• Activated (default setting): The lid heater switches off if program steps have block
temperatures of <15°C.
• Deactivated: The lid heater switches off after the end of the program. If the last
command in a program is a hold step, the heated lid remains switched on until the
Enter key is pressed.
Note: This option is useful if you have inserted hold step as the last program step in
order to automatically cool the samples after the PCR.
• block (default setting): The temperature of the thermoblock is directly controlled by
the current temperatures measured at the integrated sensors.
Use this setting for Fast PCR, for low reaction volumes (< 20 μL) and for templates
with a low G/C content. With this setting you achieve the shortest program
runtimes.
• safe: Block temperature control mode for difficult templates and large reaction
volumes.
Use this setting for sample volumes of 50 μL or more or for amplifying samples
with a high G/C content. The program runtimes are a bit longer than with thefast
setting.
• fast: Block temperature control mode for standard applications.
Use this setting for sample volumes between 20 μL and 50 μL or if theblock setting
only results in a weak amplification. The program runtimes are a bit longer than
with theblock setting.
Simulate
Mastercycler
gradient
Impulse This is only displayed if under Mastercycler the pro S or ep gradient S setting were
With this setting it is possible to simulate the temperature control behavior of the
Mastercycler 5333 or Mastercycler gradient 5331. This allows you to transfer
programs from these cycler models without making adjustments to the
Mastercycler pro(see Transferring programs from the Mastercycler 533x on p. 64).
If this option is deactivated, Mastercycler 5333/5331 programs will have to be
adjusted for the Mastercycler pro due to the different temperature control behavior.
This may influence the PCR results.
selected.
If this option is activated, a higher heating rate (pulse) is achieved during the first
temperature control step. This can reduce non-specific PCR product formation.
Page 44

44
Programming
Mastercycler pro
English (EN)
6.3 Editing programs
You can add, edit or delete steps in new (see p. 39) or copied (see p. 40) programs.
6.3.1 Inserting a program step
1. Program editor(see Opening the program editor on p. 41) .
2. Use the arrow keys to mark the program step before which the new program step is to be inserted.
The marked program step is highlighted in blue.
3. Press the Insert function key.
A list appears containing the available program steps.
4. Use the arrow keys to select the desired program step.
The following program steps are available:
1StepCyc
to3StepCyc
nStepCyc Cycle program step with an adjustable number of temperature steps. After selecting
Temp Individual temperature step with adjustable block temperature and hold time.
Hold Temperature step with adjustable block temperature and indefinite hold time.
Sound This program step emits an acoustic signal.
Pause Like Hold. The block temperature remains set to the value of the previous temperature
Cycle program step with 1 to 3 temperature steps with an adjustable number of
repetitions (1 to 99).
With cycle program steps you can increase or reduce the block temperatures and hold
times by a preset value after each cycle (see Editing parameters on p. 45).
this program step and confirming by pressingEnter a dialog window appears for the
following entries.
• Steps per Cycle: Number of temperature steps per cycle (1 to 20)
• Number of Cycles: Number of cycles (1 to 99). If you have inserted a cycle with
more than 6 steps, use the arrow keys and to display the hidden steps.
The set temperature is maintained until the user presses the Enter key. A
corresponding prompt is displayed in the status view and also indicated by the status
light flashing orange (see Status lamp on p. 29).
step.
5. Press theInsert function key.
The program step is inserted with standard parameters.
You can now insert additional program steps or edit the parameters of the program steps.
Page 45

Programming
Mastercycler pro
English (EN)
6.3.2 Editing parameters
1. Use the arrow keys to mark the desired program step.
The marked program step is highlighted in blue.
You can make the settings for temperature, hold time and number of repetitions directly in this view.
Changing the temperature
2. Use the arrow keys to mark the temperature.
The temperature is highlighted in blue.
3. Use the numerical keys to enter a new value between 4.0 °C and 99.0 °C (in increments of 0.1 °C).
4. Confirm by pressing the Enter key.
Changing the hold time
5. Mark the hold time.
45
The hold time is highlighted in blue.
6. Use the numerical keys to enter a new value between 000:00 to 999:59 (mmm:ss, in increments of 1 s).
7. Confirm by pressing the Enter key.
Changing the number of cycles
8. Mark the value for the repetitions.
The value is highlighted in blue.
9. Use the numerical keys to enter the number of repetitions (1 to 99).
10.Confirm by pressing the Enter key.
You can change other parameters for the marked program step:
Extended options
11.Press the Options function key.
The extended parameter settings for the marked program step are displayed.
Page 46

46
Programming
Mastercycler pro
English (EN)
Temp Temperature for the program step.
Equivalent to directly editing in the program view.
Temp Inc./Dec. For changing the temperature to the next cycle.
Values ranging from -10.0 °C to +10.0 °C in increments of 0.1 °C are possible.
You can switch between positive and negative values by pressing the+/- function key.
Gradient Column temperature gradient in the thermoblock.
Enter the temperature range into thefrom (left-hand side of block) andto (right-hand
side of block) fields. TheTemp and Temp Incr. fields are deactivated.
To display the temperatures in the individual columns, press the ShowGrad function
key. The temperatures displayed there are interpolated approximation values.
Maximum gradient range and course depend on the type of block used. To use the
extended gradient spread on devices with silver block (Mastercycler pro S and
Mastercycler ep gradient S), define the appropriate cycler type in the program header
in advance(see p. 42).
TIME Hold time for the program step.
Equivalent to directly editing in the program view.
Time Inc./Dec. For changing the hold time to the next cycle.
Values ranging from -01:00 to +01:00 in increments of 1 s are possible.
You can switch between positive and negative values by pressing the +/- function key.
Ramp Temperature control speed of the thermoblock.
Values ranging from 1 % to 75 % and also 100 % are possible.
12.Press theOK function key to accept the settings.
The program view appears.
13.Press the >> function key and then Save.
The changes are saved.
14.Press the Exit function key to exit the editor.
6.3.3 Deleting individual program steps
1. Use the arrow keys to mark the desired program step.
The marked program step is highlighted in blue.
2. Press the Delete key.
3. Press the Save function key to save the change.
Press the Exit function key to exit the editor.
Page 47

Programming
Mastercycler pro
6.3.4 Deleting all program steps
1. Press the ClearAll function key.
A prompt appears asking whether you want to delete all the program steps.
2. Press the OK function key.
All program steps are deleted.
6.3.5 Exporting a program listing
You can export a program to an external storage medium as a file for documentation purposes.
1. Insert the external storage medium into the control panel.
2. Press the >> function key.
3. Press the Export function key.
4. Select the format (Text or PDF) and confirm with OK.
The program listing is saved to the external storage medium as a file.
47
English (EN)
6.3.6 Saving a program and exiting the editor
1. Press the >> function key.
2. Press the Save function key.
The program is saved to the internal memory of the control panel.
3. Press the Exit function key.
The navigation tree is displayed. You can now start the program (see Starting the program on p. 51).
Page 48

48
Programming
Mastercycler pro
English (EN)
Page 49

7PCR run
7.1 Preparation
7.1.1 Selecting the sample tubes
CAUTION! Unsuitable tubes can result in sample material escaping.
Unsuitable tubes may be so severely damaged that sample material is released.
Use only tubes whose properties meet at least the requirements specified in these
operating instructions.
This is especially important when working with infectious material.
CAUTION! Damage to heated lid from sharp-edged sample tubes or objects.
Use only tubes whose properties meet at least the requirements specified in these
operating instructions.
Do not use any sharp-edged or sharp objects on the heated lid.
Extra caution should be exercised when cleaning so as not to damage the heated lid.
PCR run
Mastercycler pro
English (EN)
49
CAUTION! Temperatures on the inside of the heated lid may be higher.
If well caps consisting of thermally insulating material are used, the temperature on the inside
of the heated lid can be significantly higher than the temperature displayed.
If you are using well caps consisting of thermally insulating material, for example foamed
material, make sure that it is heat-resistant up to at least 140 °C.
The Mastercycler pro can be used with a great variety of sample tube and plate types. Consider the
following when selecting sample tubes, plates and lids:
• Only use sample tubes, plates and lids which have a heat resistance of up to approx. 120 °C.
• The sample tubes and plates must fit into the thermoblock bores free from play to achieve a good heat
transfer.
Page 50

50
PCR run
Mastercycler pro
English (EN)
7.1.2 Loading the thermoblock
CAUTION! Damage to the thermoblock from incorrect operation.
Do not fill sample material directly into the thermoblock.
7.1.2.1 Loading a 96 well block
The Mastercycler pro and Mastercycler pro S can be loaded with 0.2 mL single tubes or strips. You can also
use a 96-well PCR plate. The following PCR plate types are compatible with the Mastercycler pro:
Semi-skirted PCR plate Skirted PCR plate Non-skirted/unskirted PCR plate
PCR plate with surrounding
half-edge.
PCR plate with a surrounding
edge.
PCR plate without any surrounding
edge.
7.1.2.2 Loading a 384-well block
The Mastercycler pro 384 can be loaded with a 384-well PCR plate.
To seal the PCR plates, you can use adhesive and heat sealing films, lid strips or reusable silicone mats.
A selection of the PCR micro test tubes and lids can be found separately (see Consumables on p. 86).
7.1.3 Sample volume
The liquid level in the micro test tube should not be above the upper edge of the block.
You can use the following standard values for the maximum sample volumes:
• Mastercycler pro and Mastercycler pro S: Maximum 100 μL per single reaction.
• Mastercycler pro 384: Maximum 25 μL per single reaction.
The sample volumes that can actually be used may vary depending on the type of micro test tube used.
Page 51

PCR run
Mastercycler pro
English (EN)
7.2 Starting the program
Start the PCR programs from the editor or the navigation tree.
If the PIN function is activated, you can only start programs which are stored below your user node (see
p. 55).
Prerequisites
You are logged in as user and the program to be started is saved.
1. Mark the program in the navigation tree with the arrow keys or open it in the editor.
2. Insert the sample tubes (see Loading the thermoblock on p. 50).
3. Close the heated lid (see Closing the heated lid on p. 27).
(For devices from the Mastercycler ep series with motorized lid, this will be closed automatically when
the program is started.)
51
4. Press the Start key.
If several cyclers are connected, the Cycler Selection dialog appears.
5. Mark the desired cycler.
6. Press the OK function key.
7. Devices from the Mastercycler ep series only: you are prompted to enter the tube type. Select the tube
type used: Tubes for individual tubes or Plate for a PCR plate. Press the OK function key.
The program is started and the status view appears.
Page 52

52
1
2
3
4
5
6
7
8
9
PCR run
Mastercycler pro
English (EN)
7.2.1 Status view
The status view is automatically displayed immediately after a program is started. It shows the progress of
and information on a running program. The currently active step is displayed as a flashing line.
1 Program path and cycler
2 Remaining runtime
3 Start and end time of the program
4 Block and heated lid temperature
5 Device status
If you have activated the TSP/ESP function in the program header (see p. 42), the heated lid is
heated or cooled to the desired temperature before the program run starts. This process is
indicated in the status view by the message TSP Heated Lid.
You can exit the status view at any time via the Exit function key to return to the navigation tree and, for
example, edit another program or start a program on a different cycler. The program that was already
started is not interrupted as a result.
6Cycle number
7 Block target temperature
8 Remaining hold time
9 Information on the current program step
7.2.1.1 Displaying the status view
Proceed as follows:
1. Mark the cycler in the navigation tree.
2. Press the Status function key.
The cycler is indicated in the navigation tree with a green symbol while it executes a
program.
Page 53

Mastercycler pro
English (EN)
7.3 Interrupting or stopping the program
You can temporarily interrupt the program run in the status view, for instance, to add reagent, or
completely stop the program.
7.3.1 Interrupting the program
1. Open status view (see Starting the program on p. 51).
2. Press the Stop key.
The status view shows Paused.
Observe the safety precautions for opening the heated lid (see Opening the heated lid on p. 28).
7.3.2 Continuing the program
PCR run
53
1. If the heated lid is opened, draw the heated lid forwards over the samples and close the lid.
2. Press the Resume function key.
The status view displays running and the program run is continued.
7.3.3 Stopping the program
Press the Abort function key.
The status Idle is displayed. The program has been aborted and cannot be continued.
7.4 Using protocols
The Mastercycler pro creates a protocol for each program run where all executed program steps and any
interruptions and errors are recorded.
After running a PCR program, you can view the associated protocol on the control panel, save it on an MMC
or a USB memory or send it to a printer.
The protocol is overwritten the next time a program is started on the Mastercycler pro.
Prerequisites
The cycler is idling.
1. Mark the desired cycler node in the navigation tree.
2. Press the function key Protocol.
Page 54

54
PCR run
Mastercycler pro
English (EN)
The protocol is displayed.
3. Use the function keys << and >> to go one page back or forward.
Use the arrow keys on the control panel to move the visible section.
Further functions for saving and printing the protocol are available in the protocol screen.
Saving a protocol Printing a protocol
1. Insert a USB storage medium or an MMC .
2. Press the function key Export.
3. Select Text or PDF file format.
The protocol is copied to the external storage
medium.
1. Check if the printer is connected correctly and is
ready for printing.
2. Press the function key Print.
The protocol is printed.
7.5 Shutting down and switching off the device
Shut down the control panel before you shut down the Mastercycler pro:
1. Mark the Eppendorf orSystem node in the navigation tree.
2. Press the Shutdown function key.
A confirmation message appears.
3. Press Shutdown function key.
The control panel is shut down.
4. Switch off the cycler at the mains power switch.
Page 55

System management
Mastercycler pro
English (EN)
8 System management
8.1 Administrator functions
The software of the Mastercycler pro differentiates between standard users and the administrator.
The access rights are distinguished as follows:
Procedure Standard user Administrator
Copying programs From every user node in user's
own nodes
Creating, deleting, editing and
starting programs
Managing user accounts and
setting PINs
Making system settings None All
Performing self test, validation
and calibration
Performing backups, restores and
software updates
Only programs below user's own
node
Only change own user name and
PIN
Only self test and validation Self test, validation and
Only backups All
From every user node in all user
nodes
All programs
Create, change, delete user
accounts. Change PIN of each
user.
calibration
55
ThePIN setting can be used to define whether all users have to log in with their user names and PINs before
using Mastercycler pro or whether all users should receive administrator rights (without entering their user
names and PINs).
8.2 Managing user accounts
8.2.1 Creating user accounts
• You can only assign a user name once.
• The administrator uses the fixed user name_admin.
You can set up a separate user account for each user:
1. In the navigation tree, mark the Eppendorf node at the very top.
2. Press the NewUser function key.
TheNew User window is displayed.
Page 56

56
System management
Mastercycler pro
English (EN)
3. Enter the name and PIN for the new user. Repeat the PIN entry in the Confirmation field.
4. Confirm by pressing the OK function key.
The new user account is set up. In the navigation tree, a new user node is displayed with this user name.
The user can now log in with his or her PIN at any time.
8.2.2 Editing user accounts
You can subsequently change the user name, the PIN and the comment for an existing user account
depending on your user rights (see p. 55):
1. In the navigation tree, mark the user node and press the Prop. function key.
The User Properties window is displayed.
2. Change the settings for the user account and confirm with the OK function key.
8.2.3 Deleting user accounts
To delete a user account, you need to be logged in as the administrator.
When a user account is deleted, the user node selected as well as all its folders and programs
are deleted from the navigation tree. Deletion of a user account cannot be undone.
1. In the navigation tree, mark the user node and press the Delete key.
A prompt appears asking you if you are sure you want to delete the user.
2. Confirm by pressing the OK function key.
The user account is deleted.
8.2.4 Changing the PIN
If you work with the PIN function, only the administrator is authorized to make system settings and manage
user accounts.
Page 57

System management
8.2.4.1 Changing the administrator PIN
If you are logged on as an administrator, you can change the administrator PIN at any time.
CAUTION! Loss of data due to misuse or loss of administrator PIN.
The administrator PIN protects the system from undesired access to its configuration and to
the stored data of all users.
Make a note of the administrator PIN and keep it in a safe place. If you lose the
administrator PIN, contact Eppendorf Service.
Allow access to the administrator PIN only to persons who are allowed to edit the
configuration of the system and who have the knowledge required to do this.
1. Switch on the Mastercycler pro and log in as the administrator.
2. In the navigation tree, mark the System node and press the Prop. function key.
The System Properties window is displayed.
Mastercycler pro
English (EN)
57
3. Enter the new administrator PIN using the numerical keys on the control panel.
Delete incorrectly entered PINs with the Delete key and repeat the PIN entry.
4. Enter the new PIN in the Confirmation field to confirm again.
5. Confirm with the OK function key.
The new administrator PIN is immediately valid.
8.2.4.2 Changing the user PIN
You can change the PIN for logging into your user account at any time. To do this, proceed as follows.
1. In the navigation tree, mark your own user node and press the Prop. function key.
TheUser Properties window is displayed.
2. Enter the new user PIN with 4 to 8 digits with the numerical keys on the control panel.
Delete incorrectly entered PINs with the Delete key and repeat the PIN entry.
3. Reenter the new PIN in the Confirmation box to confirm it.
4. Confirm by pressing the OK function key.
The new user PIN is immediately valid.
Page 58

58
System management
Mastercycler pro
English (EN)
8.3 System settings
Open the System node to set the following system settings.
Show free
system memory
Exporting the
log file
Changing date
and time
Change country
settings
Activating or
deactivating the
acoustic signal
Activating or
deactivating
PINs
Mark the node System memory and press the function key Show.
The system memory is shown as a red-green marking at the lower end of the display
(red for the used memory, green for free memory).
Press the Show function key again to hide the display.
Mark the Logfile node and press the Export or the Export 20 function key.
The log file or the last 20 entries of the log file are written to an MMC or USB storage
medium.
The log file can be displayed using the function key Show.
1. Mark the node Date + Time and press the function key Set.
2. Set date and time and confirm using OK.
The country settings are indicated with the international area code (e.g. 001 for USA).
The language (German or English) as well as the date and time format (12 or 24 hour
format) are defined in the country settings.
1. Mark the node Country Settings and press the function key Set.
2. Select the required settings and confirm using OK.
The Mastercycler pro is immediately shut down. The modified settings apply after the
next start.
Mark the node Beeper and activate or deactivate it.
If the red checkmark is set, the acoustic signal for error messages and key presses is
activated.
Use the PIN node to define whether or not a PIN entry is required for working.
• Mark the node PIN and activate or deactivate it.
The control panel is immediately shut down. The modified settings apply after the
next start.
Page 59

System management
Mastercycler pro
English (EN)
59
Performing a
software
synchronization
Exporting
user-related data
Use the update node to perform a software synchronization between the cycler and the
control panel. The software synchronization may be necessary if you receive error
messages after updating the software of the control panel.
1. Highlight Update node.
2. Press Cycler function key.
3. Select the Cycler.
4. Press Start.
Use the UserLog node to export or display all the actions that were performed on the
control panel as a log file.
You can save login and logout information, all changes and interventions in a running
program related to specific users.
Mark UserLog and press the desired function key:
Show: Display user log. You can print or export the user log in the display.
Exp+Clear: Transfer the user log to the MMC or USB storage medium and delete
the log from the control panel afterwards.
Export: Copy the user log to the MMC or USB storage medium.
Page 60

60
System management
Mastercycler pro
English (EN)
8.4 Cycler functions
In the Cycler node, you can view and adjust the status of the thermoblock and the heated lid. You can also
retrieve the protocol of the last PCR program used.
Prop. Display device properties.
Incubate Control the thermoblock temperature (4.0°C to 99.0°C).
Lid Control the heated lid temperature (37°C to 110°C).
Status Switch to status view while the program is running.
Protocol Display, export or print out protocol of the last PCR program processed.
The protocol contains a record of the temperature curve and the device settings. The
previous protocol is overwritten whenever a new program is started on the cycler.
8.4.1 Cycler system functions
The System node contains the cycler system level with the following function keys.
Block Display block type, serial number as well as the date when the last validation and
calibration took place.
Restart Entry for maximum duration of interruption of voltage supply (mm:ss) after which a
running program should be automatically restarted. The program is not restarted after
a longer interruption.
Sensors Current sensor temperatures for the lid and block.
Validation Check block temperature control with the temperature validation system.
Calibration Calibrate and adjust block temperature control with the temperature validation
system. Only displayed if the administrator is logged in.
Using the functions Validation and Calibration requires the Eppendorf temperature validation
system (see Accessories on p. 85). For information on how to use this system, refer to the
corresponding operating manual.
Page 61

System management
Mastercycler pro
English (EN)
8.4.2 Self test
The self test function of the Mastercycler pro allows you to perform a quick check regarding the following
attributes of the thermoblock without requiring an external measurement system:
• Heating and cooling rates
• Proper functioning of the temperature control circuit
• Temperature homogeneity in each of the three zones of the block and across the entire block
61
After a successful self test, a certificate can be generated in PDF format.
A separately available USB key is required for performing the self test (see Accessories on p. 85). Please
refer to the documentation of the self test USB key for a detailed description of the self test function.
8.5 Managing and backing up data
8.5.1 Backing up data
The function keys in the above view show the options available to the administrator for transferring data.
Standard users only have the option of performing backups here.
Insert an MMC memory card or a USB storage medium into the right-hand side of the control panel.
The node MMC or USB will be displayed in the navigation tree.
Select the MMC or USB node.
Page 62

62
System management
Mastercycler pro
English (EN)
Backup Back up user nodes, folders and programs onto an external storage medium.
• MMC: The MMC inserted will automatically be completely deleted at the start of
the backup process.
• USB: Any files and folders in the directory \eppendorf will be deleted automatically
at the start of the backup process.
The backed-up data can be copied into the control panel using the Restore function.
Restore Administrator only: copy the user nodes, folders and programs saved on the external
storage medium during a backup to the control panel.
This process deletes any user nodes, folders and programs which already exist in the
control panel. After the restore process, only the data copied from the external storage
medium will be available.
8.5.2 Exporting and importing programs
Export
Importing
programs and
folders
1. In the navigation tree, mark the program.
2. Insert an MMC or a USB storage medium into the slot on the right-hand side of the
control panel.
3. Press the Export .
The program is copied to the MMC or the USB storage medium.
The exported programs can be transferred to a different control panel.
1. Insert an MMC or a USB storage medium into the slot on the right-hand side of the
control panel.
2. Open the node MMC or USB and mark the folder or program you would like to
import.
3. Press the function key Copy.
4. Mark the user node or folder in the destination and press the function key Paste.
Page 63

8.6 Performing a control panel software update
CAUTION! Device damage due to cancellation of the update process.
Ensure power supply during the update.
Do not switch the cycler off during the update.
Do not disconnect the control panel from the cycler during the update.
Leave the external storage medium in the control panel until the latter has been restarted
after the update and you have logged on again.
• Synchronize all connected Cyclers after the software update.
• Create an up-to-date backup immediately after an update.
8.6.1 Performing an automatic software update
System management
Mastercycler pro
English (EN)
63
The auto update function automatically initiates a software update on the control panel.
Prerequisites
• You are logged on as an administrator or the PIN function is switched off.
• All connected cyclers are idling.
• The navigation tree is displayed.
1. Log on as administrator or deactivate the PIN function.
2. Insert MMC memory card or USB storage medium with the new software version.
3. Confirm query with Yes.
The software version currently installed and the software version on the storage medium are displayed.
4. Press the Update function key to start the update. You can cancel the operation using the Restart
function key.
The update may take several minutes. Afterwards, the control panel will automatically restart.
8.6.2 Performing a manual software update
If the automatic update was canceled or did not start, you can also perform a manual update.
Prerequisites
• You are logged on as an administrator or the PIN function is switched off.
• An MMC memory card or a USB storage medium with a newer software version is inserted into the
control panel.
1. Highlight MMC node or USB.
2. Press Firmware function key.
Always complete the software update for the control panel first, and then the update for all
connected Cyclers (software synchronization).
Page 64

64
System management
Mastercycler pro
English (EN)
3. Select Software Update Control Panel entry and press the Start function key.
The software version currently installed and the software version on the storage medium are displayed.
4. Press the Update function key to start the update. You can cancel the operation using the Restart
function key.
The update may take several minutes. Afterwards, the control panel will automatically restart.
8.7 Transferring programs from the Mastercycler 533x
PCR programs established on the Mastercycler (5333) or the Mastercycler gradient (5331) can easily be
transferred to the Mastercycler pro without first having to optimize the temperatures and hold times.
Enter the program into the Mastercycler pro editor:
Example
1 T = 94.0° 0:02:00
2 T = 94.0° 0:00:15
3 T = 60.0° 0:00:15
+0.0° +0:00
R = 3.0°/s +0:0°/s
G =10.0°
4 T = 72.0° 0:00:30
5 GOTO 2 REP 29
6 T = 72.0° 0:02:00
7 HOLD 4.0° ENTER
Page 65

Make the settings in the header(see Editing header settings on p. 42).
System management
Mastercycler pro
English (EN)
65
Setting from the Mastercycler 533x
program
LID 105 °C Lidtemp 105 °C
Wait
AUTO
CNTRL
Block temperature control behavior Activate theSimulate Mastercycler gradient checkbox
Corresponding setting in the program header
TSP/ESP heated lid
Switch off lid at low block temperature
BLOCK =Temp. mode block
TUBE = Temp. mode safe orfast
Press the OK function key.
The editor is displayed.
Press the >> function key and then Save.
You can start the program without renewed optimization of the parameters.
Page 66

66
System management
Mastercycler pro
English (EN)
Page 67

9 Quick start
Enter
Enter
Delete
2
3
5
6
0
.
8
9
abc
jkl mno
tuv wxyz
def
1
7
pqrs
4
ghi
Enter
9.1 Login
1. Open list.
2. Select user.
Quick start
Mastercycler pro
English (EN)
67
3. Confirm selection.
4. Go to the PIN field.
5. Enter and confirm PIN.
Page 68

68
Delete
2
3
5
6
0
.
8
9
abc
jkl mno
tuv wxyz
def
1
7
pqrs
4
ghi
Enter
Enter
Quick start
Mastercycler pro
English (EN)
9.2 Creating folders and programs
1. Select the user or folder.
2. Press NewFolder orNew.
3. Enter and confirm names and
comments.
9.3 Copying folders and programs
1. Select the folder or program.
2.Press the Copy function key.
3. Confirm selection.
4. Mark the target folder or user.
5. Press Paste.
Page 69

9.4 Deleting folders and programs
Delete
EnterEnter
EnterEnter
EnterEnter
Mastercycler pro
1. Mark the folder or program.
2. Press the Delete key.
3. Confirm the selection.
Quick start
69
English (EN)
9.5 Editing programs
1. Select the program.
2. Open the program editor.
3.Press the Header function key.
6. Set the lid functions and control mode.
7. Confirm input.
Page 70

70
Delete
2
3
5
6
0
.
8
9
abc
jkl mno
tuv wxyz
def
1
7
pqrs
4
ghi
Delete
2
3
5
6
0
.
8
9
abc
jkl mno
tuv wxyz
def
1
7
pqrs
4
ghi
Enter
Quick start
Mastercycler pro
English (EN)
8. Press the Insert function key.
9. Select the program step.
10. Enter the temperatures, hold times
and cycle number.
11. Select the program step.
12. Press the Options function key.
13. Set the gradient, increment and
ramp.
14. Confirm input.
15. Press the >> function key.
16. Press the Save function key.
17. Press the Exit function key.
Page 71

9.6 Stopping and starting programs
Enter
Start
Quick start
Mastercycler pro
English (EN)
1. Mark the program.
2. Insert the sample tubes.
3. Close the heated lid.
4. Start the program.
5. With several connected cyclers: Mark
the cycler.
6. Confirm input.
71
9.7 Switching off the device
7. You can use the status view to carry
out the following program commands
• Stop
• Abort
• Resume
1. Mark the Eppendorf or System node.
2. Press the Shutdown function key.
3. Switch off the Mastercycler pro at the
mains power switch.
Page 72

72
Quick start
Mastercycler pro
English (EN)
Page 73

10 Maintenance
10.1 Cleaning
DANGER! Electric shock.
Switch off the device and disconnect the power plug before opening the device,
performing work on electrical connections or starting maintenance or cleaning work.
WARNING! Burns from hot thermoblock and heated lid.
The thermoblock, the inner side of the heated lid and micro test tubes/PCR plates can reach
temperatures of over 50 °C very quickly.
The heated lid should be kept closed until temperatures of 30 °C or less are reached.
Take note of the symbols on the thermoblock warning that surfaces may be hot.
If you are using well caps consisting of thermally insulating material, please keep in mind
that the temperature on the inside of the heated lid can be significantly higher than the
temperature displayed.
Before starting cleaning wait for the thermoblock and heated lid to cool down.
Maintenance
Mastercycler pro
English (EN)
73
WARNING! Injury from sharp-edged components.
When the Mastercycler pro is in the open position, sharp-edged components are exposed.
When cleaning the Mastercycler pro, the sharp edges on the rollflex cable and the guide rail
may cause injuries.
Take special care and wear protective gloves.
WARNING! Injury from trapping or crushing.
Do not place your fingers between the lid and the housing when opening and closing the
device or when opening it into the cleaning position.
Do not reach in under the open lid.
Take care that the stand is properly engaged so that the lid stays in the opened position.
CAUTION! Damage to heated lid from sharp-edged sample tubes or objects.
Use only tubes whose properties meet at least the requirements specified in these
operating instructions.
Do not use any sharp-edged or sharp objects on the heated lid.
Extra caution should be exercised when cleaning so as not to damage the heated lid.
Page 74

74
2
1
Maintenance
Mastercycler pro
English (EN)
CAUTION! Caution when using aggressive chemicals.
Aggressive chemicals may damage both the device and its accessories.
Do not use any aggressive chemicals on the device and accessories such as strong or weak
bases, strong acids, acetone, formaldehyde, halogenated hydrocarbons or phenol.
If the device becomes contaminated with aggressive chemicals, clean it immediately with a
neutral cleaning agent.
We recommend that you regularly clean the surfaces of the Mastercycler pro.
10.1.1 Cleaning the housing
Clean the surfaces of the Mastercycler pro with a damp, lint-free cloth. Use a neutral lab cleaner if
necessary.
Instructions on disinfecting and decontaminating the device are described separately(see Disinfection/
decontamination on p. 76).
10.1.2 Cleaning the heated lid
10.1.2.1 Moving the heated lid into cleaning position
1. Push the heated lid into rear position.
2. To open the lock, press the left and right latches underneath the front edge of the heated lid upwards
(1).
3. Fold up the heated lid (2) until the stand (4) is locked.
Page 75

Maintenance
2
1
3
4
1
2
Mastercycler pro
English (EN)
75
1 Lid release latches
2 Heating unit
3 Rollflex cable
4Stand
4. Remove any contamination in the area of the block and on the inner side of the lid with a damp, lint-free
cloth. Use a neutral lab cleaner if necessary. Remains of markings from tube lids on the heating unit can
be removed with ethanol or isopropanol.
Keep the block bores free of dust and lint.
Even small amounts of deposits can affect the heat transfer between the block and sample
tubes.
10.1.2.2 Moving the lid out of the cleaning position
1. While holding the front edge of the lid with your right hand, pull the stand 1forwards with your left
hand.
2. Lower the heated lid slowly until it locks into the horizontal position.
Page 76

76
Maintenance
Mastercycler pro
English (EN)
10.2 Disinfection/decontamination
DANGER! Electric shock as a result of penetration of liquid.
Switch off the device and disconnect it from the power supply before starting cleaning or
disinfecting.
Do not allow any liquids to enter the inside of the housing.
Do not perform spay disinfection.
Only reconnect the device to the power supply once it is completely dry.
CAUTION! Material damage from UV and other high-energy radiation.
Do not use UV, beta, or gamma radiation or any other high-energy radiation source for
disinfecting.
Required equipment
• Alcohol (ethanol, isopropanol) or disinfectants containing alcohol
• Mild, soap-based household cleaning agent
Proceed as follows:
1. Select a disinfection method that complies with the legal regulations and guidelines applicable to your
range of application.
2. Switch off the device and disconnect it from the power supply.
3. Wipe down all parts of the device and accessories, including the connecting cable, with the disinfectant.
4. Clean the device with a mild soap-based household cleaning agent (see Cleaning on p. 73).
10.3 Decontamination before shipment
If you are shipping the device to the authorized Technical Service for repairs or to your authorized dealer
for disposal please note the following:
WARNING! Risk to health from contaminated device
1. Follow the instructions in the decontamination certificate. It is available in PDF format on
our homepage(www.eppendorf.com/decontamination)
2. Decontaminate all the parts you want to dispatch.
3. Enclose the fully-completed decontamination certificate for returned goods (incl. the serial
number of the device) with the dispatch.
.
Page 77

Troubleshooting
Mastercycler pro
English (EN)
11 Troubleshooting
11.1 General errors
Technical faults may be triggered by faults such as a power failure or power fluctuations. In most cases it is
therefore sufficient simply to switch the device off and back on again after about 10 seconds. If the fault
occurs again, please note the fault code (e.g. 0x0B04) and inform Eppendorf Service.
11.2 Error messages
Symptom/message Cause Remedy
0x0108
0x2800 to0x2802
0x0140 Incompatible or defective mouse
0x0709
0x070A
0x070B
0x0D1D
0x0D1E
0x2600 to0x260F
0x0D25
0x0D26
0x2900 to0x2906
0x0DA1
0x0DA2
The software versions of the control
panel and the cycler are not compatible.
Damaged file found during software
update.
Incompatible or defective printer,
incorrect printer settings, loose cable
connection.
Communication problem with the
temperature validation system.
Incorrect lid status.
A software synchronization is needed.
Check the plug connection of the
mouse or replace the mouse.
Download the software update packet
(ZIP archive) again from the
Eppendorf homepage and unpack it
on an empty MMC.
Replace the MMC.
Check the cable connection between
the cycler and the printer.
Replace the printer cable.
Check the printer status (e.g. paper
blockage, offline).
Check cables between the cycler and
the temperature validation system,
using the temperature validation
system documentation as a reference.
Make sure that the lid is fully in the
front position at the program start and
is not wedged.
Insert the sample tubes into the block
before the program start.
77
If further error messages appear:
1. Switch off the Mastercycler pro.
2. Check all cable connections.
If the fault occurs again after switching on the device, please note the fault code and contact
Eppendorf Service.
Page 78

78
Trou bleshooting
Mastercycler pro
English (EN)
Page 79

12 Transport, storage and disposal
12.1 Packing
WARNING! Risk of injury when lifting and transporting the device.
Lifting the device with the wrong posture may cause serious damage to your health. If the
device falls to the ground it can cause injuries.
Do not lift the device by the handle or the housing of the heated lid.
Carry the device securely with both hands to prevent it from slipping.
Always keep a straight back when lifting and carrying the device.
CAUTION! Injury caused by breakage or slipping of packing materials.
If the device falls to the ground it can cause injuries.
Always hold the device at the base of the housing when lifting it.
Do not lift the device by the packing materials.
Transport, storage and disposal
Mastercycler pro
English (EN)
79
CAUTION! Damage as a result of incorrect packing.
Eppendorf accepts no warranty or liability for damage caused by incorrect packing.
Only dispatch the device in the original packaging provided for transport.
Use the supplied packing material when packing the device for transport or storage. If you do not have this
anymore or if it is damaged, contact your Eppendorf office.
The packaging of the device consists of:
• 1 plastic bag for wrapping the device
• 1 foam bottom part
•1 foam lid part
• 1 carton consisting of bottom, lid and insert for small parts
• 4 plastic locking clips
• 1 empty PCR plate
Page 80

80
Transport, storage and disposal
Mastercycler pro
English (EN)
Proceed as follows:
1. Pay attention to the decontamination notes (see Decontamination before shipment on p. 76).
2. Switch off the device and open the heated lid.
3. Let the device stand for 30 minutes and ensure that there is no condensate in the thermoblock.
4. Disconnect the device from the power supply.
5. Disconnect all the connections from the rear of the device and remove the control panel.
6. Load the thermoblock with an empty PCR plate.
7. Close the heated lid.
8. Pack the device into the plastic bag.
9. Place the foam bottom part onto the bottom of the packaging.
10.Hold the device at the front and back of the lower part of the housing and lift it into the foam bottom
part.
11.Place the foam lid on top of the device.
12.Close the carton lid and insert the four plastic locking clips into the cut-outs on the side of the carton.
13.For fastening, push in the flaps of the plastic locking clips.
12.2 Transport
Use only the original packaging for transport.
The transport and storage conditions are described separately(see Ambient conditions on p. 83).
Page 81

Transport, storage and disposal
Mastercycler pro
English (EN)
12.3 Disposal
In the event of disposing of the product, please observe the applicable legal regulations.
Information on the disposal of electrical and electronic devices in the European Community
The disposal of electrical devices is regulated within the European Community by national regulations
based on EU Directive 2002/96/EC pertaining to waste electrical and electronic equipment (WEEE).
In accordance with this, any devices delivered after 13/08/2005 on a business-to-business basis, which
includes this product, may no longer be disposed of in household waste. To document this they have been
marked with the following identification:
81
As disposal regulations may differ from one country to another within the EU please contact your supplier,
if necessary.
Page 82

82
Transport, storage and disposal
Mastercycler pro
English (EN)
Page 83

13 Technical data
13.1 Power supply
Voltage 100 to 130 V
200 to 240 V
Frequency 50 Hz to 60 Hz
Power consumption 950 W
Overvoltage category II (IEC 610 10-1)
Degree of contamination: 2
Protection class 1
13.2 Weight/dimensions
Technical data
Mastercycler pro
English (EN)
83
Dimensions (W x D x H) 26.0 cm × 41.5 cm × 37.0 cm
(without control panel)
26.0 cm × 50.0 cm × 44.5 cm (with lid in cleaning
position)
Depth with the control panel connected: + 14 cm.
Weight 18.5 kg (without control panel)
13.3 Ambient conditions
General operation +15 °C to +35 °C
to 70 % rel. humidity
up to 2000 m above sea level (approx. 80 kPa)
Storage conditions -20 °C to +70 °C
to 85 % rel. humidity
Page 84

84
Technical data
Mastercycler pro
English (EN)
13.4 Application parameters
Parameter Mastercycler pro Mastercycler pro S Mastercycler pro 384
Sample capacity 96 x 0.2 ml PCR tubes or a 96-well PCR plate
(unskirted, semi-skirted, skirted; according to SBS
standard)
Tem perature control
range of the block
Gradient range 1 °C to 20 °C 1 °C to 24 °C 1 °C to 20 °C
Temperature range of the
gradient
Tem perature control
range of the lid
Block homogeneity *
35 °C
90 °C
Control accuracy* ±0.2 °C
Heating rate** approx. 4 °C/s approx. 6 °C/s approx. 4 °C/s
Cooling rate** approx. 3 °C/s approx. 4.5 °C/s approx. 3 °C/s
4°C to 99°C
30 °C to 99 °C
37 °C to 110 °C
≤ ±0.3 °C
≤ ± 0.4 °C
one 384-well PCR plate
* with deactivated gradient function
** measurements on the block
13.5 Control panel
Number of Mastercycler pro devices that can be
controlled the control panel
Number of programs > 700
Number of folders > 100
Max. number of cycles 99 (1 to 20 temperature control steps per cycle)
Dimensions (W x D x H) 25 cm x 16.5 cm x 11 cm
Weight 1.7 kg
Connections 2× USB for mouse, printer, USB storage medium
Power source/consumption Occurs over connected Mastercycler pro
1 to 5
and self test USB key
1× MMC slot
Page 85

14 Ordering Information
14.1 Mastercycler pro
Ordering Information
Mastercycler pro
English (EN)
85
Order no.
(International)
6321 000.019 - 230 V / 50 - 60 Hz
6321 000.027 950030010 120 V / 50 Hz, with US- plug
6325 000.013 - 230 V / 50 - 60 Hz
6325 000.021 950030020 120 V / 50 Hz, with US-plug
6324 000.010 - 230 V / 50 - 60 Hz
6324 000.028 950030030 120 V / 50 Hz, with US-plug
6320 000.007 950030050 Control Panel
Order no. (North
America)
Description
Mastercycler pro
Mastercycler pro S
Mastercycler pro 384
14.2 Accessories
Use only genuine Eppendorf accessories or accessories approved by Eppendorf.
Order no.
(International)
6320 071.001 950030040 For Mastercycler pro and Mastercycler nexus
5341 612.006 950014008 50 cm
5341 611.000 950014016 150 cm
5075 780.003 960002008 MultiMediaCard
0055 000.298 950008059 for Mastercycler, Mastercycler ep, Mastercycler pro and
5331 233.007 on request Sensor for 384 well block
5349 810.001 950017007 CD incl. instructions and connection cabel
5349 820.007 950017202 CD incl. instructions
Order no. (North
America)
Description
Selftest USB Key
CAN-Bus cable
connecting cable between 2 thermomodules
Temperature Verification System – Single-channel
Mastercycler nexus, Thermomixer compact, Thermomixer
comfort, Thermostat plus
CycleManager pro
Page 86

86
Ordering Information
Mastercycler pro
English (EN)
14.3 Consumables
Order no.
(International)
0030 128.648 951020401 clear
0030 128.575 951020303 standard profile, clear
0030 133.307 0030133307 low profile, clear
0030 133.358 0030133358 low profile, divisible, clear
0030 133.366 0030133366 standard profile, clear
0030 133.374 0030133374 divisible, clear
0030 129.300 0030129300 clear
0030 129.326 0030129326 clear
0030 129.504 0030129504 clear
0030 129.512 0030129512 clear
0030 129.342 0030129342 clear
0030 128.508 951020702 clear
0030 124.332 951010006 PCR clean, colorless
0030 124.359 951010022 colorless
0030 124.804 0030124804 0.1 mL, without lid, 10 × 12 strips
0030 124.812 0030124812 domed, 10 × 12 strips
0030 124.820 0030124820 flat, 10 × 12 strips
0030 124.839 0030124839 domed, 10 × 12 strips
0030 124.847 0030124847 flat, 10 × 12 strips
Order no.
(North America)
Description
twin.tec PCR Plate 96, skirted
low profile, wells colorless, 25 pieces
twin.tec PCR Plate 96, semi-skirted
Wells colorless, 25 pieces
twin.tec PCR Plate 96 unskirted
Wells colorless, 20 pieces
twin.tec microbiology PCR Plate 96 skirted
Wells colorless, 10 pieces
twin.tec microbiology PCR Plate 96 semi-skirted
Wells colorless, 10 pieces
twin.tec PCR Plate 96 LoBind semi-skirted
wells colorless, 25 pieces
twin.tec PCR Plate 96 LoBind skirted
wells colorless, 25 pieces
twin.tec microbiology PCR Plate 384
Wells colorless, 10 pieces
twin.tec PCR Plate 384
Wells colorless, 25 pieces
PCR Tubes 0,2 mL
1,000 pieces
PCR Tube Strips 0,2 mL
10 × 12 strips
PCR Tube Strips
PCR Tube Strips + Cap Strips
Cap Strips
Page 87

Ordering Information
Mastercycler pro
English (EN)
87
Order no.
(International)
0030 127.838 0030127838 100 pieces
0030 127.854 0030127854 100 pieces
0030 127.781 0030127781 adhesive, 100 pieces
0030 127.790 0030127790 adhesive, 100 pieces
The twin.tec PCR plates are also available in various frame colors (red, yellow, green, blue). The complete
range of PCR consumables can be found in the Eppendorf catalog or at www.eppendorf.com
Order no.
(North America)
Description
Heat Sealing PCR Film
Heat Sealing PCR Foil
PCR Film
PCR Foil
.
14.4 Recommended auxiliary materials
Order no.
(International)
0030 124.235 951010031 Set of 10
0030 124.243 951010049 Set of 5
0030 127.153 951023108 1 piece
5390 000.024 - 230 V / 50 Hz
5390 000.016 951023078 115 V / 60 Hz
5390 100.029 951023086 for 384-well PCR plate
3881 000.023 022510541 pink
3881 000.031 022510525 blue
0030 127.455 951010065 10 pieces
Order no.
F(North America)
Description
Work tray
for 96 × 0.2 mL PCR tubes, 5-/8-PCR tube strips and plates
without border
Frame for work tray
Capping Aid
Heat Sealer
Base Plate
PCR-Cooler
PCR Rack
Page 88

88
Index
Mastercycler pro
English (EN)
Index
1
1 … 3 StepCyc (program step)..............................44
A
Access rights .........................................................55
Address display .....................................................29
Administrator functions.........................................55
Alarm
Activate ............................................................58
Deactivate ........................................................58
Auto-Restart ..........................................................60
Auto-update of the control panel software............63
B
Backup...................................................................62
Beeper ...................................................................58
block (header setting)............................................43
D
Date + Time .......................................................... 58
Decontamination................................................... 76
Define administrator PIN...................................... 31
Desinfection.......................................................... 76
Disposal ................................................................ 81
E
Export ............................................................. 62, 62
Program listing................................................ 47
F
fast (header setting).............................................. 43
Folder
Import.............................................................. 62
Folders
Changing the comment ................................... 39
Changing the name ......................................... 39
Copy ................................................................ 40
Delete .............................................................. 40
New ................................................................. 39
C
Change country settings........................................58
Changing the date .................................................58
Changing the time .................................................58
Cleaning
Heated lid.........................................................74
Housing............................................................74
Confirmation..........................................................57
Connect the control panel
Connecting multiple cyclers ............................23
Connecting the mouse .....................................26
to the Mastercycler pro....................................23
Connecting the mouse...........................................26
Connecting the printer ..........................................26
Control Panel
Keys..................................................................30
Country Settings....................................................58
G
Gradient .......................................................... 41, 46
Guest
User ................................................................. 34
H
Heated lid
Address display ............................................... 29
Cleaning position............................................. 74
Close................................................................ 27
Control temperature (manually)...................... 60
Open ................................................................ 28
Status lamp...................................................... 29
Switch lid heater off automatically.................. 43
Temperature control before program start...... 43
Hold (program step) ............................................. 44
Holding time increment........................................ 41
Page 89

Index
Mastercycler pro
English (EN)
89
I
Impulse..................................................................43
Incubate.................................................................60
K
Keys .......................................................................30
L
Log file
Display .............................................................58
Export...............................................................58
Login .....................................................................33
Logout ...................................................................34
M
Mains connection ..................................................22
Mini-satellite system
Networking ......................................................13
Set-up...............................................................23
MMC
Insert ................................................................37
Labware ...........................................................38
Use ...................................................................37
N
Navigation tree......................................................35
Networking
Connecting Mastercycler pro to the
Mastercycler ep................................................25
Mini-satellite system ..................................13, 23
PC control ........................................................13
n StepCyc (program step)......................................44
P
Deactivate........................................................ 58
Define .............................................................. 31
Program
Change comment ............................................ 40
Continue .......................................................... 53
Copy ................................................................ 40
Delete .............................................................. 40
Edit header ...................................................... 42
Export.............................................................. 62
Import.............................................................. 62
Interrupt .......................................................... 53
New ................................................................. 39
Rename............................................................ 40
Restore ............................................................ 62
Save ................................................................. 62
Start ................................................................. 51
Stop ................................................................. 53
Transfer from the Mastercycler 533x.............. 64
Write protection .............................................. 40
Program editor
Description ...................................................... 41
Editing parameters.......................................... 45
Exit .................................................................. 47
Export program listing .................................... 47
Extended options............................................. 45
Header............................................................. 42
Insert step........................................................ 44
Open ................................................................ 41
Save program .................................................. 47
Set gradient ..................................................... 46
Set holding time increment............................. 46
Set temperature control speed........................ 46
Set temperature increment ............................. 46
Program header
Define cycler type............................................ 42
Impulse............................................................ 43
Set lid temperature.......................................... 42
Simulate Mastercycler gradient ...................... 43
Switch off lid at low block temperature .......... 43
Temp. mode..................................................... 43
TSP/ESP heated lid.......................................... 43
Pause (program step) ............................................44
PDF........................................................................38
PIN
Activate ............................................................58
Administrator ...................................................31
Change .............................................................57
Protocol
Display............................................................. 53
Print................................................................. 54
Save ................................................................. 54
Page 90

90
Index
Mastercycler pro
English (EN)
R
Restart ...................................................................60
Restore ..................................................................62
S
safe (header setting)..............................................43
Safety instructions
Meaning of symbols...........................................7
Sample tubes .........................................................49
Sample volume ......................................................50
Select Location ......................................................22
Self test..................................................................61
Show system memory ...........................................58
Simulate Mastercycler 5333/5331.........................43
Software
Synchronization ...............................................59
Update control panel .......................................63
Update Cycler ..................................................59
Sound (program step) ...........................................44
Space requirements...............................................22
Status lamp............................................................29
Status view ............................................................52
Switch ESP on and off ...........................................43
Switch lid heater off automatically........................43
Switch off device ...................................................54
Switch TSP on and off ...........................................43
System memory.....................................................58
Thermoblock
Calibration and adjustment ............................. 60
Control temperature (manually)...................... 60
Equipment ....................................................... 50
Sample volume ................................................ 50
Self test............................................................ 61
Validate............................................................ 60
Time increment..................................................... 46
TXT ....................................................................... 38
U
Unpacking............................................................. 21
Update control panel software.............................. 63
USB
Connecting a storage medium ........................ 37
Connecting the printer .................................... 26
Ports ............................................................... 25
Removing the storage medium ....................... 38
Use storage media........................................... 37
User
Change ............................................................ 33
Login ............................................................... 33
Logout ............................................................. 34
User accounts
Access rights ................................................... 55
Create .............................................................. 55
Delete .............................................................. 56
Edit .................................................................. 56
User log
Display............................................................. 59
Export.............................................................. 59
Exporting and importing................................. 59
System settings .....................................................58
T
Temp (program step).............................................44
Temp. mode...........................................................43
Temperature control speed .............................41, 46
Temperature increment...................................41, 46
Text file format ......................................................38
Page 91

Page 92

Page 93

Page 94

Evaluate your manual
Give us your feedback.
www.eppendorf.com/manualfeedback
Your local distributor: www.eppendorf.com/contact
Eppendorf AG · 22331 Hamburg · Germany
eppendorf@eppendorf.com · www.eppendorf.com
 Loading...