

Page 1

E
ualh MultiCon
N)manual
epBlue™ with MultiCon
Software manual
Software-Version 40.1
Page 2

Copyright
©
2013 Eppendorf AG, Hamburg. No part of this publication may be reproduced without the prior
permission of the copyright owner.
Trademarks
®
Eppendorf
Excel
, the Eppendorf logo, epMotion®, and epT.I.P.S.® are registered trademarks of Eppendorf AG.
®
and Windows® are registered trademarks of Microsoft Corporation in the United States and other
countries.
®
Registered trademarks are not marked in all cases with
or ™ in this manual.
The software of the device (firmware) contains open source software. License information is available on
request from Eppendorf AG.
Only for epMotion M5073 and 5075m: Limited Use Label License NOTICE TO PURCHASER; LIMITED
LICENSE FOR RESEARCH USE ONLY.
This product and its use may be covered by one or more patents owned by Gen-Probe Incorporated. The
purchase price for this product includes only limited, nontransferable rights under certain claims of certain
patents owned by Gen-Probe Incorporated to use this product for research purposes only. No other rights
are conveyed. Purchaser is not granted any rights under patents of Gen-Probe Incorporated to use this
product for any commercial use. Further information regarding purchasing a license under patents of
Gen-Probe Incorporated to use this product for any other purposes, including, without limitation, for
commercial use, may be obtained by contacting Gen-Probe Incorporated, Attn: Business Development
Department, 10210 Genetic Center Drive, San Diego, California 92121-4362, U.S.A.
5075 900.866-01/122013
Page 3

Table of contents
epBlue™ with MultiCon
English (EN)
Table of contents
1 Operating instructions . . . . . . . . . . . . . . . . . . . . . . . . . . . . . . . . . . . . . . . . . . . . . . . . . . . . . . . . . . . . . . 9
1.1 Using this manual . . . . . . . . . . . . . . . . . . . . . . . . . . . . . . . . . . . . . . . . . . . . . . . . . . . . . . . . . . . . . 9
1.2 Danger symbols and danger levels . . . . . . . . . . . . . . . . . . . . . . . . . . . . . . . . . . . . . . . . . . . . . . . . 9
1.2.1 Danger symbols. . . . . . . . . . . . . . . . . . . . . . . . . . . . . . . . . . . . . . . . . . . . . . . . . . . . . . . . 9
1.2.2 Danger levels. . . . . . . . . . . . . . . . . . . . . . . . . . . . . . . . . . . . . . . . . . . . . . . . . . . . . . . . . 10
1.3 Symbols used . . . . . . . . . . . . . . . . . . . . . . . . . . . . . . . . . . . . . . . . . . . . . . . . . . . . . . . . . . . . . . . 10
1.4 Abbreviations used . . . . . . . . . . . . . . . . . . . . . . . . . . . . . . . . . . . . . . . . . . . . . . . . . . . . . . . . . . . 11
1.5 Glossary. . . . . . . . . . . . . . . . . . . . . . . . . . . . . . . . . . . . . . . . . . . . . . . . . . . . . . . . . . . . . . . . . . . . 12
2 Product description . . . . . . . . . . . . . . . . . . . . . . . . . . . . . . . . . . . . . . . . . . . . . . . . . . . . . . . . . . . . . . . 17
2.1 Features. . . . . . . . . . . . . . . . . . . . . . . . . . . . . . . . . . . . . . . . . . . . . . . . . . . . . . . . . . . . . . . . . . . . 17
2.1.1 epBlue . . . . . . . . . . . . . . . . . . . . . . . . . . . . . . . . . . . . . . . . . . . . . . . . . . . . . . . . . . . . . . 17
2.1.2 Assistants . . . . . . . . . . . . . . . . . . . . . . . . . . . . . . . . . . . . . . . . . . . . . . . . . . . . . . . . . . . 18
3 Operation. . . . . . . . . . . . . . . . . . . . . . . . . . . . . . . . . . . . . . . . . . . . . . . . . . . . . . . . . . . . . . . . . . . . . . . . 19
3.1 Starting and exiting epBlue . . . . . . . . . . . . . . . . . . . . . . . . . . . . . . . . . . . . . . . . . . . . . . . . . . . . 19
3.1.1 Starting epBlue . . . . . . . . . . . . . . . . . . . . . . . . . . . . . . . . . . . . . . . . . . . . . . . . . . . . . . . 19
3.1.2 Starting epBlue for the first time . . . . . . . . . . . . . . . . . . . . . . . . . . . . . . . . . . . . . . . . . 19
3.1.3 Logging in as User. . . . . . . . . . . . . . . . . . . . . . . . . . . . . . . . . . . . . . . . . . . . . . . . . . . . . 19
3.1.4 Logging off as a user. . . . . . . . . . . . . . . . . . . . . . . . . . . . . . . . . . . . . . . . . . . . . . . . . . . 20
3.1.5 Exiting epBlue and switching off MultiCon . . . . . . . . . . . . . . . . . . . . . . . . . . . . . . . . . 21
3.2 Initial steps . . . . . . . . . . . . . . . . . . . . . . . . . . . . . . . . . . . . . . . . . . . . . . . . . . . . . . . . . . . . . . . . . 21
3.2.1 Using the touch screen and mouse. . . . . . . . . . . . . . . . . . . . . . . . . . . . . . . . . . . . . . . . 21
3.2.2 Using the screen key pad . . . . . . . . . . . . . . . . . . . . . . . . . . . . . . . . . . . . . . . . . . . . . . . 21
3.2.3 File menu. . . . . . . . . . . . . . . . . . . . . . . . . . . . . . . . . . . . . . . . . . . . . . . . . . . . . . . . . . . . 22
3.2.4 Status area. . . . . . . . . . . . . . . . . . . . . . . . . . . . . . . . . . . . . . . . . . . . . . . . . . . . . . . . . . . 23
3
4 epBlue Application Runner - Carrying out the application . . . . . . . . . . . . . . . . . . . . . . . . . . . . . . . . 25
4.1 Opening an application . . . . . . . . . . . . . . . . . . . . . . . . . . . . . . . . . . . . . . . . . . . . . . . . . . . . . . . . 25
4.2 Preparing the application run . . . . . . . . . . . . . . . . . . . . . . . . . . . . . . . . . . . . . . . . . . . . . . . . . . . 26
4.2.1 Selecting the device . . . . . . . . . . . . . . . . . . . . . . . . . . . . . . . . . . . . . . . . . . . . . . . . . . . 26
4.2.2 Entering the sample quantity . . . . . . . . . . . . . . . . . . . . . . . . . . . . . . . . . . . . . . . . . . . . 27
4.2.3 Setting the HEPA air filter and the UV lamp. . . . . . . . . . . . . . . . . . . . . . . . . . . . . . . . . 27
4.2.4 Placing the labware on the epMotion worktable . . . . . . . . . . . . . . . . . . . . . . . . . . . . . 28
4.2.5 Setting the run parameters for the optical sensor . . . . . . . . . . . . . . . . . . . . . . . . . . . . 28
4.2.6 Setting the ID tracking parameters . . . . . . . . . . . . . . . . . . . . . . . . . . . . . . . . . . . . . . . . 29
4.2.7 Entering the filling level of the labware . . . . . . . . . . . . . . . . . . . . . . . . . . . . . . . . . . . . 31
4.3 Starting the application. . . . . . . . . . . . . . . . . . . . . . . . . . . . . . . . . . . . . . . . . . . . . . . . . . . . . . . . 34
4.4 Controlling the application . . . . . . . . . . . . . . . . . . . . . . . . . . . . . . . . . . . . . . . . . . . . . . . . . . . . . 34
4.5 Ending the application . . . . . . . . . . . . . . . . . . . . . . . . . . . . . . . . . . . . . . . . . . . . . . . . . . . . . . . . 35
5 epBlue LogViewer - Managing logs . . . . . . . . . . . . . . . . . . . . . . . . . . . . . . . . . . . . . . . . . . . . . . . . . . 37
5.1 Displaying protocols . . . . . . . . . . . . . . . . . . . . . . . . . . . . . . . . . . . . . . . . . . . . . . . . . . . . . . . . . . 37
5.2 Saving the protocol as a PDF file . . . . . . . . . . . . . . . . . . . . . . . . . . . . . . . . . . . . . . . . . . . . . . . . 38
Page 4

Table of contents
epBlue™ with MultiCon
4
English (EN)
6 epBlue Application Editor - Creating and editing applications. . . . . . . . . . . . . . . . . . . . . . . . . . . . . 39
6.1 Overview . . . . . . . . . . . . . . . . . . . . . . . . . . . . . . . . . . . . . . . . . . . . . . . . . . . . . . . . . . . . . . . . . . . 39
6.2 Creating an application . . . . . . . . . . . . . . . . . . . . . . . . . . . . . . . . . . . . . . . . . . . . . . . . . . . . . . . . 39
6.2.1 Menu bar . . . . . . . . . . . . . . . . . . . . . . . . . . . . . . . . . . . . . . . . . . . . . . . . . . . . . . . . . . . . 39
6.2.2 Creating an empty application . . . . . . . . . . . . . . . . . . . . . . . . . . . . . . . . . . . . . . . . . . . 40
6.2.3 Copying applications . . . . . . . . . . . . . . . . . . . . . . . . . . . . . . . . . . . . . . . . . . . . . . . . . . . 40
6.2.4 Saving an application . . . . . . . . . . . . . . . . . . . . . . . . . . . . . . . . . . . . . . . . . . . . . . . . . . 41
6.2.5 Positioning labware. . . . . . . . . . . . . . . . . . . . . . . . . . . . . . . . . . . . . . . . . . . . . . . . . . . . 41
6.2.6 Defining the application parameters of the labware . . . . . . . . . . . . . . . . . . . . . . . . . . . 44
6.2.7 Activating ID tracking of the labware . . . . . . . . . . . . . . . . . . . . . . . . . . . . . . . . . . . . . . 44
6.2.8 Defining procedures . . . . . . . . . . . . . . . . . . . . . . . . . . . . . . . . . . . . . . . . . . . . . . . . . . . 45
6.2.9 Checking an application . . . . . . . . . . . . . . . . . . . . . . . . . . . . . . . . . . . . . . . . . . . . . . . . 47
6.3 Commands . . . . . . . . . . . . . . . . . . . . . . . . . . . . . . . . . . . . . . . . . . . . . . . . . . . . . . . . . . . . . . . . . 47
6.3.1 Sample transfer command . . . . . . . . . . . . . . . . . . . . . . . . . . . . . . . . . . . . . . . . . . . . . . 48
6.3.2 Reagent transfer command . . . . . . . . . . . . . . . . . . . . . . . . . . . . . . . . . . . . . . . . . . . . . . 56
6.3.3 Dilute command . . . . . . . . . . . . . . . . . . . . . . . . . . . . . . . . . . . . . . . . . . . . . . . . . . . . . . 57
6.3.4 Pool command. . . . . . . . . . . . . . . . . . . . . . . . . . . . . . . . . . . . . . . . . . . . . . . . . . . . . . . . 60
6.3.5 Pool one destination command . . . . . . . . . . . . . . . . . . . . . . . . . . . . . . . . . . . . . . . . . . . 60
6.3.6 Comment command . . . . . . . . . . . . . . . . . . . . . . . . . . . . . . . . . . . . . . . . . . . . . . . . . . . 61
6.3.7 Exchange command . . . . . . . . . . . . . . . . . . . . . . . . . . . . . . . . . . . . . . . . . . . . . . . . . . . 62
6.3.8 Magnetic separation command. . . . . . . . . . . . . . . . . . . . . . . . . . . . . . . . . . . . . . . . . . . 62
6.3.9 Mix command . . . . . . . . . . . . . . . . . . . . . . . . . . . . . . . . . . . . . . . . . . . . . . . . . . . . . . . . 63
6.3.10 Number of samples command . . . . . . . . . . . . . . . . . . . . . . . . . . . . . . . . . . . . . . . . . . . 64
6.3.11 Temperature command . . . . . . . . . . . . . . . . . . . . . . . . . . . . . . . . . . . . . . . . . . . . . . . . . 65
6.3.12 Thermomixer command . . . . . . . . . . . . . . . . . . . . . . . . . . . . . . . . . . . . . . . . . . . . . . . . 66
6.3.13 Vacuum command. . . . . . . . . . . . . . . . . . . . . . . . . . . . . . . . . . . . . . . . . . . . . . . . . . . . . 68
6.3.14 Transport command . . . . . . . . . . . . . . . . . . . . . . . . . . . . . . . . . . . . . . . . . . . . . . . . . . . 69
6.3.15 User intervention command . . . . . . . . . . . . . . . . . . . . . . . . . . . . . . . . . . . . . . . . . . . . . 70
6.3.16 Wait command . . . . . . . . . . . . . . . . . . . . . . . . . . . . . . . . . . . . . . . . . . . . . . . . . . . . . . . 70
6.3.17 Importing commands from a CSV file. . . . . . . . . . . . . . . . . . . . . . . . . . . . . . . . . . . . . . 71
6.4 Pattern. . . . . . . . . . . . . . . . . . . . . . . . . . . . . . . . . . . . . . . . . . . . . . . . . . . . . . . . . . . . . . . . . . . . . 76
6.4.1 Menu bar in the Edit Pattern window . . . . . . . . . . . . . . . . . . . . . . . . . . . . . . . . . . . . . . 77
6.4.2 Defining regular patterns . . . . . . . . . . . . . . . . . . . . . . . . . . . . . . . . . . . . . . . . . . . . . . . 77
6.4.3 Defining irregular patterns . . . . . . . . . . . . . . . . . . . . . . . . . . . . . . . . . . . . . . . . . . . . . . 79
6.5 Optical sensor . . . . . . . . . . . . . . . . . . . . . . . . . . . . . . . . . . . . . . . . . . . . . . . . . . . . . . . . . . . . . . . 80
6.5.1 Detect volumes . . . . . . . . . . . . . . . . . . . . . . . . . . . . . . . . . . . . . . . . . . . . . . . . . . . . . . . 80
6.5.2 Detect tips . . . . . . . . . . . . . . . . . . . . . . . . . . . . . . . . . . . . . . . . . . . . . . . . . . . . . . . . . . . 83
6.5.3 Check labware placement . . . . . . . . . . . . . . . . . . . . . . . . . . . . . . . . . . . . . . . . . . . . . . . 83
7 epBlue Application Editor - Managing applications and folders. . . . . . . . . . . . . . . . . . . . . . . . . . . . 85
7.1 Menu bar and start screen . . . . . . . . . . . . . . . . . . . . . . . . . . . . . . . . . . . . . . . . . . . . . . . . . . . . . 85
7.2 Copying and deleting applications . . . . . . . . . . . . . . . . . . . . . . . . . . . . . . . . . . . . . . . . . . . . . . . 86
7.2.1 Copying applications . . . . . . . . . . . . . . . . . . . . . . . . . . . . . . . . . . . . . . . . . . . . . . . . . . . 86
7.2.2 Deleting an application . . . . . . . . . . . . . . . . . . . . . . . . . . . . . . . . . . . . . . . . . . . . . . . . . 86
7.3 Changing the labware properties . . . . . . . . . . . . . . . . . . . . . . . . . . . . . . . . . . . . . . . . . . . . . . . . 86
7.4 Importing and exporting applications. . . . . . . . . . . . . . . . . . . . . . . . . . . . . . . . . . . . . . . . . . . . . 87
7.4.1 Importing applications . . . . . . . . . . . . . . . . . . . . . . . . . . . . . . . . . . . . . . . . . . . . . . . . . 87
7.4.2 Exporting applications . . . . . . . . . . . . . . . . . . . . . . . . . . . . . . . . . . . . . . . . . . . . . . . . . 89
7.5 Saving an application as a PDF file. . . . . . . . . . . . . . . . . . . . . . . . . . . . . . . . . . . . . . . . . . . . . . . 90
Page 5

Table of contents
epBlue™ with MultiCon
English (EN)
8 epBlue Labware Editor - Creating and managing labware . . . . . . . . . . . . . . . . . . . . . . . . . . . . . . . . 91
8.1 Overview of labware . . . . . . . . . . . . . . . . . . . . . . . . . . . . . . . . . . . . . . . . . . . . . . . . . . . . . . . . . . 91
8.2 Managing labware. . . . . . . . . . . . . . . . . . . . . . . . . . . . . . . . . . . . . . . . . . . . . . . . . . . . . . . . . . . . 92
8.2.1 Menu bar . . . . . . . . . . . . . . . . . . . . . . . . . . . . . . . . . . . . . . . . . . . . . . . . . . . . . . . . . . . . 92
8.2.2 Deactivating and activating labware . . . . . . . . . . . . . . . . . . . . . . . . . . . . . . . . . . . . . . . 93
8.2.3 Delete labware. . . . . . . . . . . . . . . . . . . . . . . . . . . . . . . . . . . . . . . . . . . . . . . . . . . . . . . . 93
8.2.4 Import labware . . . . . . . . . . . . . . . . . . . . . . . . . . . . . . . . . . . . . . . . . . . . . . . . . . . . . . . 93
8.2.5 Export labware . . . . . . . . . . . . . . . . . . . . . . . . . . . . . . . . . . . . . . . . . . . . . . . . . . . . . . . 95
8.2.6 Viewing the properties of the labware . . . . . . . . . . . . . . . . . . . . . . . . . . . . . . . . . . . . . 96
8.2.7 Setting the bottom tolerance. . . . . . . . . . . . . . . . . . . . . . . . . . . . . . . . . . . . . . . . . . . . . 96
8.3 Creating labware combinations . . . . . . . . . . . . . . . . . . . . . . . . . . . . . . . . . . . . . . . . . . . . . . . . . 98
8.3.1 Creating a labware combination. . . . . . . . . . . . . . . . . . . . . . . . . . . . . . . . . . . . . . . . . . 98
8.3.2 Creating a labware combination based on existing labware . . . . . . . . . . . . . . . . . . . 100
8.3.3 Equipping the racks, thermoracks and Reservoir Rack modules with individual
vessels . . . . . . . . . . . . . . . . . . . . . . . . . . . . . . . . . . . . . . . . . . . . . . . . . . . . . . . . . . . . . 102
8.3.4 Equipping the Reservoir Rack with reservoirs and Reservoir Rack modules . . . . . . . 103
8.4 Labware library . . . . . . . . . . . . . . . . . . . . . . . . . . . . . . . . . . . . . . . . . . . . . . . . . . . . . . . . . . . . . 104
8.4.1 Loading labware definitions from the Eppendorf webpage . . . . . . . . . . . . . . . . . . . . 104
8.4.2 Requesting labware definitions. . . . . . . . . . . . . . . . . . . . . . . . . . . . . . . . . . . . . . . . . . 105
8.4.3 Adding a labware definition to the labware library. . . . . . . . . . . . . . . . . . . . . . . . . . . 105
8.5 Labware types in epBlue. . . . . . . . . . . . . . . . . . . . . . . . . . . . . . . . . . . . . . . . . . . . . . . . . . . . . . 105
8.5.1 Reaction vessels . . . . . . . . . . . . . . . . . . . . . . . . . . . . . . . . . . . . . . . . . . . . . . . . . . . . . 105
8.5.2 epT.I.P.S. Motion . . . . . . . . . . . . . . . . . . . . . . . . . . . . . . . . . . . . . . . . . . . . . . . . . . . . . 105
8.5.3 MTP plates . . . . . . . . . . . . . . . . . . . . . . . . . . . . . . . . . . . . . . . . . . . . . . . . . . . . . . . . . 105
8.5.4 PCR plates . . . . . . . . . . . . . . . . . . . . . . . . . . . . . . . . . . . . . . . . . . . . . . . . . . . . . . . . . . 106
8.5.5 Filter plates . . . . . . . . . . . . . . . . . . . . . . . . . . . . . . . . . . . . . . . . . . . . . . . . . . . . . . . . . 106
8.5.6 Racks . . . . . . . . . . . . . . . . . . . . . . . . . . . . . . . . . . . . . . . . . . . . . . . . . . . . . . . . . . . . . . 106
8.5.7 Rack 96 . . . . . . . . . . . . . . . . . . . . . . . . . . . . . . . . . . . . . . . . . . . . . . . . . . . . . . . . . . . . 106
8.5.8 Rack LC . . . . . . . . . . . . . . . . . . . . . . . . . . . . . . . . . . . . . . . . . . . . . . . . . . . . . . . . . . . . 106
8.5.9 ReservoirRack . . . . . . . . . . . . . . . . . . . . . . . . . . . . . . . . . . . . . . . . . . . . . . . . . . . . . . . 106
8.5.10 Reservoir Rack Module TC . . . . . . . . . . . . . . . . . . . . . . . . . . . . . . . . . . . . . . . . . . . . . 107
8.5.11 Thermoracks . . . . . . . . . . . . . . . . . . . . . . . . . . . . . . . . . . . . . . . . . . . . . . . . . . . . . . . . 107
8.5.12 Tip Holder . . . . . . . . . . . . . . . . . . . . . . . . . . . . . . . . . . . . . . . . . . . . . . . . . . . . . . . . . . 107
8.5.13 Thermoadapter . . . . . . . . . . . . . . . . . . . . . . . . . . . . . . . . . . . . . . . . . . . . . . . . . . . . . . 108
8.5.14 Thermoblocks . . . . . . . . . . . . . . . . . . . . . . . . . . . . . . . . . . . . . . . . . . . . . . . . . . . . . . . 108
5
9 epBlue simulation - Simulating applications . . . . . . . . . . . . . . . . . . . . . . . . . . . . . . . . . . . . . . . . . . 109
9.1 Simulating the application . . . . . . . . . . . . . . . . . . . . . . . . . . . . . . . . . . . . . . . . . . . . . . . . . . . . 109
9.1.1 Starting a simulation . . . . . . . . . . . . . . . . . . . . . . . . . . . . . . . . . . . . . . . . . . . . . . . . . . 109
9.1.2 Controlling the simulation. . . . . . . . . . . . . . . . . . . . . . . . . . . . . . . . . . . . . . . . . . . . . . 110
Page 6

Table of contents
epBlue™ with MultiCon
6
English (EN)
10 epBlue ID - Working with ID tracking. . . . . . . . . . . . . . . . . . . . . . . . . . . . . . . . . . . . . . . . . . . . . . . . 111
10.1 ID lists . . . . . . . . . . . . . . . . . . . . . . . . . . . . . . . . . . . . . . . . . . . . . . . . . . . . . . . . . . . . . . . . . . . . 111
10.1.1 Overview . . . . . . . . . . . . . . . . . . . . . . . . . . . . . . . . . . . . . . . . . . . . . . . . . . . . . . . . . . . 111
10.1.2 Input lists and result lists . . . . . . . . . . . . . . . . . . . . . . . . . . . . . . . . . . . . . . . . . . . . . . 112
10.2 Commands for working with IDs . . . . . . . . . . . . . . . . . . . . . . . . . . . . . . . . . . . . . . . . . . . . . . . 112
10.3 Reading IDs into epBlue . . . . . . . . . . . . . . . . . . . . . . . . . . . . . . . . . . . . . . . . . . . . . . . . . . . . . . 113
10.4 Managing ID lists . . . . . . . . . . . . . . . . . . . . . . . . . . . . . . . . . . . . . . . . . . . . . . . . . . . . . . . . . . . 114
10.4.1 Displaying ID lists . . . . . . . . . . . . . . . . . . . . . . . . . . . . . . . . . . . . . . . . . . . . . . . . . . . . 114
10.4.2 Filtering and sorting ID lists . . . . . . . . . . . . . . . . . . . . . . . . . . . . . . . . . . . . . . . . . . . . 115
10.4.3 Import ID lists . . . . . . . . . . . . . . . . . . . . . . . . . . . . . . . . . . . . . . . . . . . . . . . . . . . . . . . 115
10.4.4 Export ID lists . . . . . . . . . . . . . . . . . . . . . . . . . . . . . . . . . . . . . . . . . . . . . . . . . . . . . . . 116
10.4.5 Delete ID lists . . . . . . . . . . . . . . . . . . . . . . . . . . . . . . . . . . . . . . . . . . . . . . . . . . . . . . . 116
10.5 Making the basic settings for the epBlue ID. . . . . . . . . . . . . . . . . . . . . . . . . . . . . . . . . . . . . . . 117
10.5.1 Making the basic settings for the epBlue ID. . . . . . . . . . . . . . . . . . . . . . . . . . . . . . . . 117
11 epBlue settings - Checking components and making the basic settings . . . . . . . . . . . . . . . . . . . . 119
11.1 Overview . . . . . . . . . . . . . . . . . . . . . . . . . . . . . . . . . . . . . . . . . . . . . . . . . . . . . . . . . . . . . . . . . . 119
11.2 Levelsensor options . . . . . . . . . . . . . . . . . . . . . . . . . . . . . . . . . . . . . . . . . . . . . . . . . . . . . . . . . 119
11.3 Tool interlock. . . . . . . . . . . . . . . . . . . . . . . . . . . . . . . . . . . . . . . . . . . . . . . . . . . . . . . . . . . . . . . 120
11.3.1 Lock the tool . . . . . . . . . . . . . . . . . . . . . . . . . . . . . . . . . . . . . . . . . . . . . . . . . . . . . . . . 121
11.3.2 Unlocking the tool. . . . . . . . . . . . . . . . . . . . . . . . . . . . . . . . . . . . . . . . . . . . . . . . . . . . 121
11.4 Dosing device . . . . . . . . . . . . . . . . . . . . . . . . . . . . . . . . . . . . . . . . . . . . . . . . . . . . . . . . . . . . . . 121
11.4.1 Reading out the tool . . . . . . . . . . . . . . . . . . . . . . . . . . . . . . . . . . . . . . . . . . . . . . . . . . 121
11.5 Gripper . . . . . . . . . . . . . . . . . . . . . . . . . . . . . . . . . . . . . . . . . . . . . . . . . . . . . . . . . . . . . . . . . . . 122
11.5.1 Moving the gripper arms . . . . . . . . . . . . . . . . . . . . . . . . . . . . . . . . . . . . . . . . . . . . . . 122
11.6 Temperature control unit X . . . . . . . . . . . . . . . . . . . . . . . . . . . . . . . . . . . . . . . . . . . . . . . . . . . . 123
11.7 Thermomixer. . . . . . . . . . . . . . . . . . . . . . . . . . . . . . . . . . . . . . . . . . . . . . . . . . . . . . . . . . . . . . . 124
11.7.1 Checking the mixing function of the thermomixer. . . . . . . . . . . . . . . . . . . . . . . . . . . 124
11.7.2 Checking the temperature control of the thermomixer . . . . . . . . . . . . . . . . . . . . . . . 125
11.8 Magnetic separation . . . . . . . . . . . . . . . . . . . . . . . . . . . . . . . . . . . . . . . . . . . . . . . . . . . . . . . . . 126
11.9 UV lamp . . . . . . . . . . . . . . . . . . . . . . . . . . . . . . . . . . . . . . . . . . . . . . . . . . . . . . . . . . . . . . . . . . 127
11.9.1 Decontaminating the worktable . . . . . . . . . . . . . . . . . . . . . . . . . . . . . . . . . . . . . . . . . 127
11.10 HEPA air filter . . . . . . . . . . . . . . . . . . . . . . . . . . . . . . . . . . . . . . . . . . . . . . . . . . . . . . . . . . . . . . 128
11.10.1 Switching on the HEPA air filter . . . . . . . . . . . . . . . . . . . . . . . . . . . . . . . . . . . . . . . . . 128
11.10.2 Switching off the HEPA air filter . . . . . . . . . . . . . . . . . . . . . . . . . . . . . . . . . . . . . . . . . 129
11.11 Setting the barcode reader . . . . . . . . . . . . . . . . . . . . . . . . . . . . . . . . . . . . . . . . . . . . . . . . . . . . 129
12 epBlue settings - Creating and managing users. . . . . . . . . . . . . . . . . . . . . . . . . . . . . . . . . . . . . . . . 131
12.1 Managing the user accounts as an administrator. . . . . . . . . . . . . . . . . . . . . . . . . . . . . . . . . . . 131
12.1.1 Logging in as administrator in epBlue . . . . . . . . . . . . . . . . . . . . . . . . . . . . . . . . . . . . 131
12.1.2 epBlue user groups . . . . . . . . . . . . . . . . . . . . . . . . . . . . . . . . . . . . . . . . . . . . . . . . . . . 131
12.1.3 User accounts . . . . . . . . . . . . . . . . . . . . . . . . . . . . . . . . . . . . . . . . . . . . . . . . . . . . . . . 133
12.1.4 Assigning a new password for a user account . . . . . . . . . . . . . . . . . . . . . . . . . . . . . . 136
12.2 Managing your own user account. . . . . . . . . . . . . . . . . . . . . . . . . . . . . . . . . . . . . . . . . . . . . . . 136
12.2.1 Signing into and out of the user account . . . . . . . . . . . . . . . . . . . . . . . . . . . . . . . . . . 136
12.2.2 Changing the password of your own user account. . . . . . . . . . . . . . . . . . . . . . . . . . . 136
Page 7

Table of contents
epBlue™ with MultiCon
English (EN)
13 epBlue Settings - Saving data and creating print templates. . . . . . . . . . . . . . . . . . . . . . . . . . . . . . 139
13.1 Data backup . . . . . . . . . . . . . . . . . . . . . . . . . . . . . . . . . . . . . . . . . . . . . . . . . . . . . . . . . . . . . . . 139
13.1.1 Securing the database. . . . . . . . . . . . . . . . . . . . . . . . . . . . . . . . . . . . . . . . . . . . . . . . . 139
13.1.2 Creating an automatic backup . . . . . . . . . . . . . . . . . . . . . . . . . . . . . . . . . . . . . . . . . . 140
13.1.3 Restoring the database . . . . . . . . . . . . . . . . . . . . . . . . . . . . . . . . . . . . . . . . . . . . . . . . 141
13.2 Changing the device name . . . . . . . . . . . . . . . . . . . . . . . . . . . . . . . . . . . . . . . . . . . . . . . . . . . . 142
13.3 Print templates . . . . . . . . . . . . . . . . . . . . . . . . . . . . . . . . . . . . . . . . . . . . . . . . . . . . . . . . . . . . . 143
13.3.1 Create print templates. . . . . . . . . . . . . . . . . . . . . . . . . . . . . . . . . . . . . . . . . . . . . . . . . 144
13.3.2 Saving print templates as default . . . . . . . . . . . . . . . . . . . . . . . . . . . . . . . . . . . . . . . . 144
13.3.3 Delete print templates. . . . . . . . . . . . . . . . . . . . . . . . . . . . . . . . . . . . . . . . . . . . . . . . . 144
14 epBlue - Software error messages . . . . . . . . . . . . . . . . . . . . . . . . . . . . . . . . . . . . . . . . . . . . . . . . . . 145
15 Ordering information . . . . . . . . . . . . . . . . . . . . . . . . . . . . . . . . . . . . . . . . . . . . . . . . . . . . . . . . . . . . . 175
15.1 Accessories . . . . . . . . . . . . . . . . . . . . . . . . . . . . . . . . . . . . . . . . . . . . . . . . . . . . . . . . . . . . . . . . 175
Index . . . . . . . . . . . . . . . . . . . . . . . . . . . . . . . . . . . . . . . . . . . . . . . . . . . . . . . . . . . . . . . . . . . . . . . . . . 176
7
Page 8

Table of contents
epBlue™ with MultiCon
8
English (EN)
Page 9
Operating instructions
epBlue™ with MultiCon
English (EN)
1 Operating instructions
1.1 Using this manual
Your epMotion operating manual consists of hardware instructions and software instructions. Short
instructions are available for optional software enhancements.
The operating manual is part of the product.
9
The current version of the operating manual can be found on our webpage:
Read the operating manual in full before using the device.
Store the operating manual at an easily accessible location.
The device may only be transferred with the operating manual.
If the operating manual is lost, replace it immediately. Please contact Eppendorf AG for further details.
www.eppendorf.com.
1.2 Danger symbols and danger levels
The safety precautions in these instructions have the following danger symbols and danger levels:
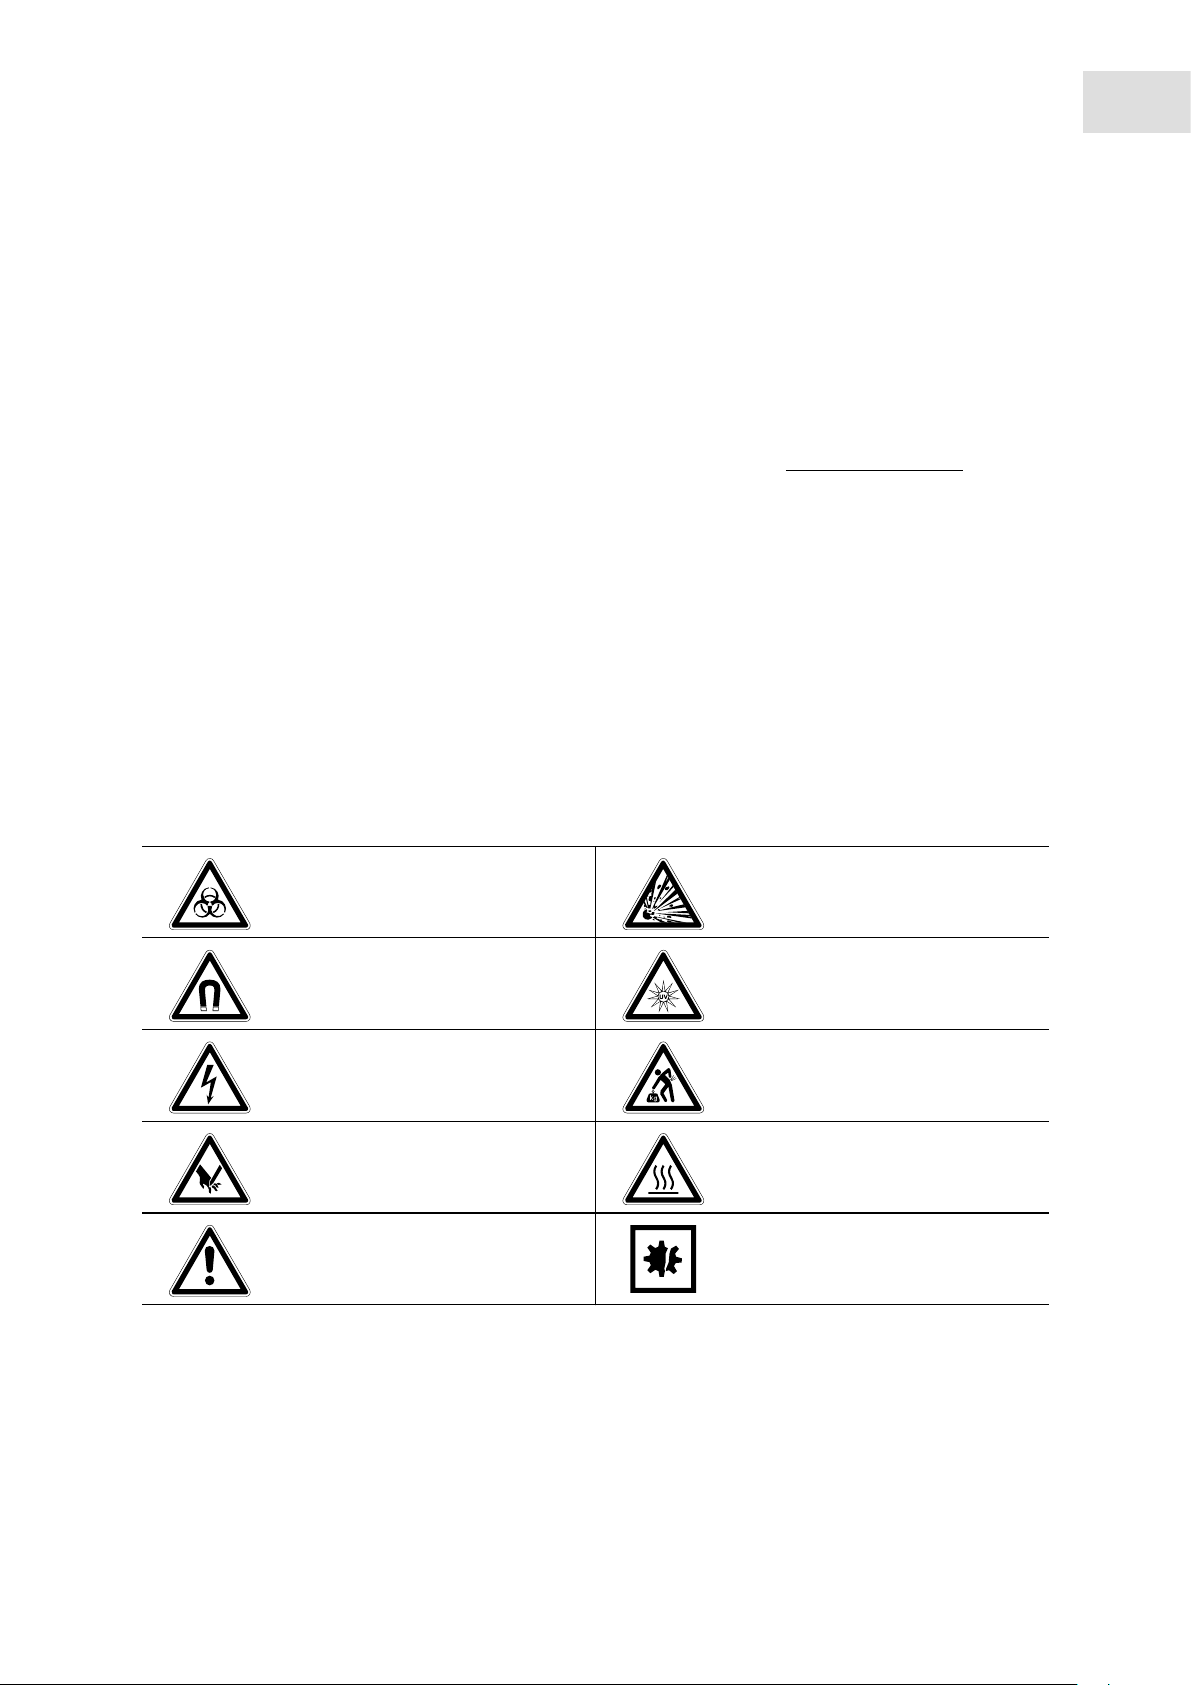
1.2.1 Danger symbols
Biohazard Explosion
Strong magnetic field UV radiation
Electric shock Heavy loads
Cuts Hot surface
Hazard point Material damage
Page 10
10
Operating instructions
epBlue™ with MultiCon
English (EN)
1.2.2 Danger levels
DANGER Will lead to severe injuries or death.
WARNING Can lead to severe injuries or death.
CAUTION May lead to light to moderate injuries.
NOTICE May lead to material damage.
1.3 Symbols used
Depiction Meaning
1.
2.
Actions without a specified order
• List
Text Display text or software text
Actions in the specified order
Additional information
Page 11

1.4 Abbreviations used
BCR
Bar code reader
CSV
Comma Separated Value
DNA
Deoxyribonucleic acid
DWP
Deepwell plate
epT.I.P.S.
eppendorf Totally Integrated Pipetting System
Operating instructions
epBlue™ with MultiCon
English (EN)
11
HEPA
High Efficiency Particulate Air (filter)
LH
Liquid Handling
LIMS
Laboratory Information Management System
MTP
Microplate
PCR
Polymerase chain reaction
PDF
Portable Document Format
TMX
Thermomixer
USB
Universal serial bus
UV
Ultraviolet radiation
VAC
Vacuum unit
Page 12

12
Operating instructions
epBlue™ with MultiCon
English (EN)
1.5 Glossary
A
Administrator
User who has the rights to administrate epBlue.
Application
Program for a specific application. An application includes the procedure and the equipping of the
worktable.
B
Bar code reader
Device for scanning a barcode.
Blow-out
Movement of the piston. The liquid in the pipette tip will be dispensed after the pipetting step.
C
CleanCap
Optional epMotion equipment. The CleanCap includes a HEPA air filter and at least one UV lamp.
Command
A step in a procedure. Various parameters can be set for commands. Each command triggers an action,
e.g., the transport of liquids.
CSV file
Text file for exchanging structured information.
D
Destination labware
Rack or plate with destination positions.
Destination location
Labware that liquid is dispensed into exclusively during the application.
Dispensing tool
Tool that aspirates and dispenses liquid. Single-channel dispensing tools and eight-channel dispensing
tools are available for various volume ranges.
E
Entry list
ID list assigned to a labware at the start of the application. The ID list contains the name of the labware, IDs
for the positions of the labware and descriptions. epBlue imports and exports the IDs of the labware by
means of entry lists. epBlue can process entry lists in the formats CSV and XML.
Page 13

Operating instructions
epBlue™ with MultiCon
English (EN)
epBlue
Software for creating and administering applications and labware. The epMotion is controlled using the
software. The software includes a user administration system. Modular extension of epBlue is possible.
With the epBlue ID module you can track samples during the application. The labware is labeled with IDs
for this purpose. The sample tracking is documented automatically.
epT.I.P.S. Motion
epMotion pipette tips. Only epT.I.P.S.® Motion can be used on the epMotion. epT.I.P.S.® Motions are
available with or without a filter.
F
Filling volume
Maximum liquid volume of a labware. The epMotion uses the gripper to transport the labware up to the
filling volume. The epMotion aspirates liquid from the labware up to the filling volume. The filling volume is
higher than the working volume.
13
G
Gripper
Tool that transports labware.
H
Height adapter
Adapter for low labware. The height differences among the labware will be offset to decrease the tool
holder paths, thereby decreasing the run time of the application as well.
HEPA air filter
Air filter. The air filter prevents particles such as dust and germs from the environment entering the
epMotion work room.
I
ID
Character string which is used by the epBlue ID module to identify the labware.
Input list
ID list with information on source labware. The input list contains the IDs of the source positions. epBlue
creates an input list for each source labware for which ID tracking is active.
Intermediate labware
Rack or plate with intermediate positions.
Intermediate location
Position in the labware that is both source and destination of liquid transfers.
Page 14

14
Operating instructions
epBlue™ with MultiCon
English (EN)
L
Lab administrator
User who has the rights to administrate applications and labware.
Labware
Racks, plates, tips, etc. which are placed on the worktable.
Location
Area where labware is placed on the worktable.
M
MagSep
System consisting of the magnetic finger module, thermomixer and PrepRack and reagents for nucleic acid
preparation with the epMotion.
MultiCon
epMotion operator panel. You can control your epMotion using the control unit and the epBlue software.
P
Pattern
Pattern in which liquid is aspirated and dispensed. Patterns are defined in a transfer command. Patterns are
defined as regular patterns and irregular patterns. Patterns are independent in x-direction and y-direction.
Procedure
Sequence of commands that are executed one after the other. Part of an application.
R
Rack
Mount for tubes or pipette tips.
Remaining volume
Volume that cannot be aspirated from a vessel. The distance from the pipette tip to the vessel base, defined
in the software, and the defined immersion depth of the pipette tip in the liquid, must be observed.
Therefore, the pipette tip cannot aspirate the volume. The remaining volume depends on the vessel
geometry.
Reservoir
Reservoirs are used to hold reagents. Reservoirs are hung in a ReservoirRack or placed directly on the
worktable.
Result list
ID list with information on destination labware and intermediate labware. The result list contains the IDs of
destination positions and intermediate positions. epBlue creates a result list for each destination labware
and intermediate labware for which ID tracking is active.
Page 15

Operating instructions
epBlue™ with MultiCon
English (EN)
S
SafeRack
Rack with ep.T.I.P.S. Motion pipette tips. The SafeRack features a partition that prevents the contamination
of adjacent tips. Use the SafeRacks if you would like to use tips several times.
Source labware
Rack or plate with source positions.
Source location
Position in the labware that liquid is aspirated from exclusively during the application.
T
Thermal module
Thermal module for labware that is integrated in the worktable.
15
Thermoadapter
Heat-conductive adapter for holding plates.
Thermoblock
Thermoadapter that is permanently connected to a PCR plate or PCR vessel.
Thermorack
Temperable rack for smaller vessels, e.g., Safe-Lock tubes for 0.5 mL, 1.5 mL or 2 mL.
V
Vacuum unit
The vacuum unit uses a vacuum to suck liquid from a filter plate. The vacuum unit consists of a vacuum
manifold, vacuum pump and Vac Frame.
Vessel
Tube or single well of a plate.
W
Working volume
Liquid volume for a labware. The epMotion fills a vessel with low levels of contamination up to the working
volume. The working volume is less than the filling volume.
Worktable
epMotion work surface where labware and tools are placed. In the software, the epMotion worktable is
shown as the epBlue worktable.
Page 16

16
Operating instructions
epBlue™ with MultiCon
English (EN)
Page 17

Product description
epBlue™ with MultiCon
English (EN)
2 Product description
2.1 Features
The epBlue software is used to control the epMotion. epBlue consists of several components.
Which modules are available depends on the features of your epMotion and the specification of the
software.
2.1.1 epBlue
Module Description Operating manual
Application Editor • Create applications.
• Manage applications.
Application Runner • Execute applications. (see epBlue Application Runner - Carrying
Application Simulator • Simulate applications. (see epBlue simulation - Simulating
ID list management • Manage ID lists. (see epBlue ID - Working with ID tracking
Labware Editor • Manage labware. (see epBlue Labware Editor - Creating and
Log Viewer • Display and print logs. (see epBlue LogViewer - Managing logs on
Settings • Check components of the device.
• Perform basic settings.
• User administration.
• Backup database.
• Perform basic settings for ID
tracking.
(see epBlue Application Editor - Creating
and editing applications on p. 39)
(see epBlue Application Editor - Managing
applications and folders on p. 85)
out the application on p. 25)
applications on p. 109)
on p. 111)
managing labware on p. 91)
p. 37)
(see epBlue settings - Checking
components and making the basic settings
on p. 119)
(see epBlue settings - Creating and
managing users on p. 131)
(see epBlue Settings - Saving data and
creating print templates on p. 139)
(see epBlue ID - Working with ID tracking
on p. 111)
17
Page 18

18
Product description
epBlue™ with MultiCon
English (EN)
2.1.2 Assistants
Assistants are programs for a specific application. Assistants are optionally available and described in
separate operating manuals. The following assistants are available for epBlue:
Prep Assistant
• Nucleic acid preparation with Eppendorf MagSep kits. After that, a PCR setup can be performed.
PCR Assistant
• Create PCR master mixes and dilution series for quantification standards, normalization of sample
concentrations, and setting up PCR reactions.
LH assistant
• Create Liquid Handling applications such as assay setup, pooling and reformatting of samples; cherry
picking.
Page 19

epBlue™ with MultiCon
3 Operation
3.1 Starting and exiting epBlue
3.1.1 Starting epBlue
Prerequisites
• The device does not show any sign of external damage.
Switch on the epMotion using the mains/power switch.
Switch on the MultiCon.
To start epBlue, double-click on the epBlue symbol on the desktop.
Alternatively, open the Windows start menu and select Programs >Eppendorf > epBlue.
epBlue is started. The login screen appears.
3.1.2 Starting epBlue for the first time
Operation
19
English (EN)
Prerequisites
• epMotion and MultiCon were installed by a service technician.
• epBlue has been started (see p. 19).
• epBlue displays the login screen.
1. Log in as an administrator (see Logging in as administrator in epBlue on p. 131).
2. Create user accounts (see Creating a user account on p. 134).
3. Log off as administrator.
4. Log on to epBlue as a user (see Logging in as User. on p. 19).
3.1.3 Logging in as User.
Prerequisites
• epBlue has been started (see p. 19).
• epBlue displays the login screen.
• The administrator has created a user account for the user.
1. Enter the name of the user account and the password.
If you have forgotten your password, please contact your administrator (see p. 136).
2. Press the Login button.
The epBlue start screen appears. The symbols that are displayed depend on your user rights and the
features of your epMotion.
Page 20
20
Operation
epBlue™ with MultiCon
English (EN)
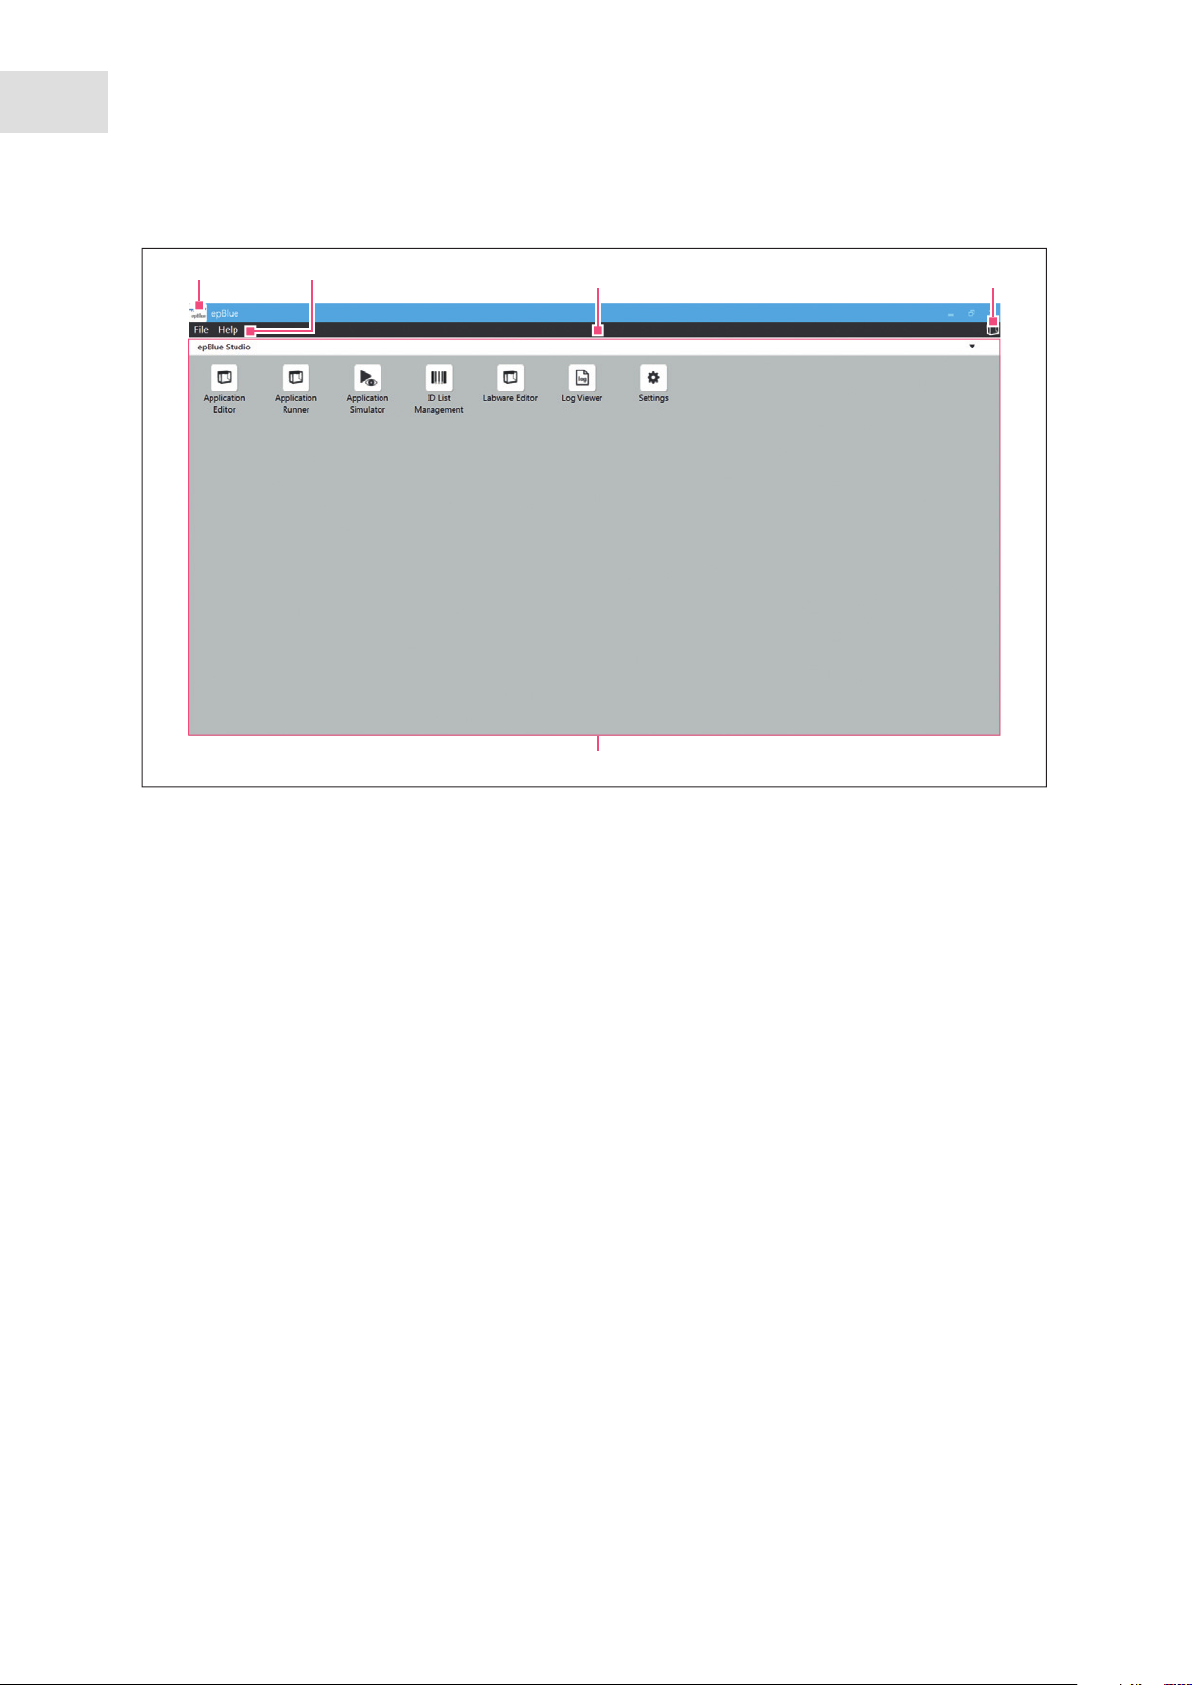
Abb. 3-1: epBlue start screen
1
2
3
4
5
Fig. 3-1: epBlue start screen
1 Eppendorf menu
Exit the program.
2 Menu bar
Contains functions that can be accessed in all
4 Status area
epMotion status.
5 Working range
Contents and applications.
applications.
3 Information area
Contains information on the open file.
3.1.4 Logging off as a user
You can only log off if all applications started from your user account have been exited. If you want to log
off before completing an application, the application has to be ended manually.
Prerequisites
• All applications have been ended and saved.
• Changes to the labware have been saved.
In the File menu, select the Log off entry.
You are logged out of your account. The login screen appears.
Page 21

Operation
epBlue™ with MultiCon
English (EN)
3.1.5 Exiting epBlue and switching off MultiCon
1. In the Eppendorf menu, select Close.
2. When the program is ended, shut down MultiCon.
3. Switch off the epMotion using the mains power switch.
3.2 Initial steps
3.2.1 Using the touch screen and mouse
You can operate the MultiCon by using the touch screen or a USB mouse.
Connect the mouse to a USB interface on the MultiCon.
Tab. 3-1: Touch screen/mouse comparison
Touch screen Mouse
Tap Click using the left mouse button
Tap and hold 2 s Click using the right mouse button
Drag Drag with the left mouse button pressed down
Tap twice Double click using the left mouse button
21
3.2.2 Using the screen key pad
Enter the numbers and letters using the screen key pad.
Abb. 3-2: Screen key pad
Fig. 3-2: Screen key pad
Automatically show the screen key pad.
epBlue automatically shows a key pad if you have selected an input field.
Manually show the screen key pad.
In the File menu, select the Show keyboard entry.
Page 22
22
Operation
epBlue™ with MultiCon
English (EN)
Switch the automatic display of the screen key pad on and off.
In the File menu, select the Show keyboard automatically entry.
Tab. 3-2: epBlue key combinations
Enter special characters.
Press the letter key for 2 s.
Confirm your entry.
Switch between lowercase
letters and capital letters.
Switch the key pad.
Show the screen key pad.
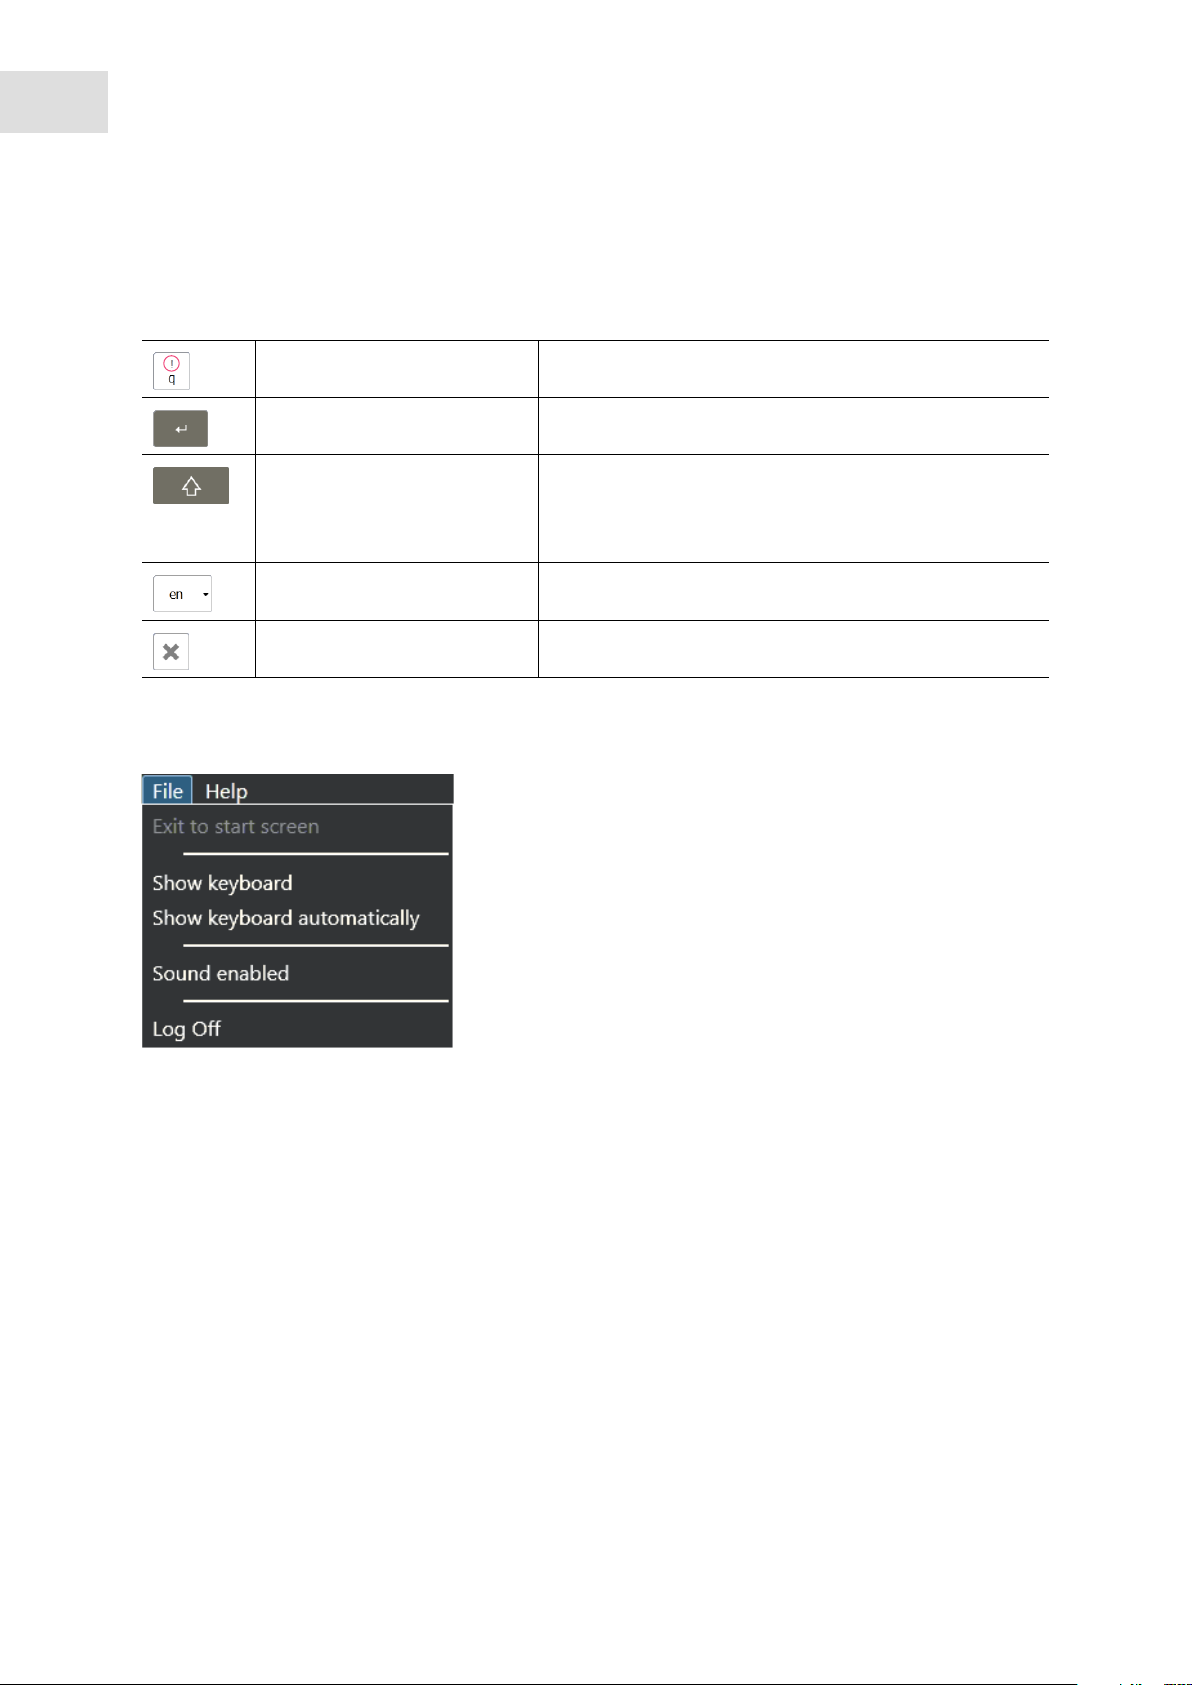
3.2.3 File menu
Abb. 3-3: File drop-down menu
Press the key once.
To enter a capital letter, press the key once. Then press
the letter.
To switch the key pad to all capital letters, press the key
twice.
To switch between the English and German key pads,
press the key once.
Press the key once.
Fig. 3-3: File drop-down menu
Exit to start screen entry
Show the epBlue start screen.
Menu – Show keyboard
Manually show the screen key pad.
Menu – Show keyboard automatically
Switch the automatic display of the screen key
pad on and off.
Sound enabled entry
Switch the system sound on or off.
Log Off entry
User is logged out. The login window appears.
Page 23

Abb. 3-4: Help drop-down menu
Fig. 3-4: Help drop-down menu
Operation
epBlue™ with MultiCon
English (EN)
23
Device manuals entry
Open the operating manual of the device.
About epBlue entry
Show the epBlue version.
Software manuals entry
Open the operating manual of the software.
3.2.4 Status area
The status area is located in the top right of the screen.
If you click on the epMotion in the status area, the following information will be displayed:
• Serial number of the epMotion
• Features of the epMotion
• Firmware version
• epMotion status
• Actual temperature of a thermal module or Thermomixer.
Example Info: C3:21°C. The thermal module in location C3 has a temperature of 21°C.
Page 24

24
Operation
epBlue™ with MultiCon
English (EN)
Page 25

epBlue Application Runner - Carrying out the application
epBlue™ with MultiCon
4 epBlue Application Runner - Carrying out the application
This chapter describes how to carry out an application on the epMotion.
4.1 Opening an application
Abb. 4-1: Selecting an application
25
English (EN)
Fig. 4-1: Selecting an application
Prerequisites
• epMotion is ready for operation.
• Application Runner is started.
1. Select the application in the Select application area.
Recently used applications can be found in the Recently used area.
Open applications in the Select application area have a red padlock .
The Properties area displays the properties of the selected application.
2. Press the Next button.
The application is opened.
Page 26
26
epBlue Application Runner - Carrying out the application
epBlue™ with MultiCon
English (EN)
4.2 Preparing the application run
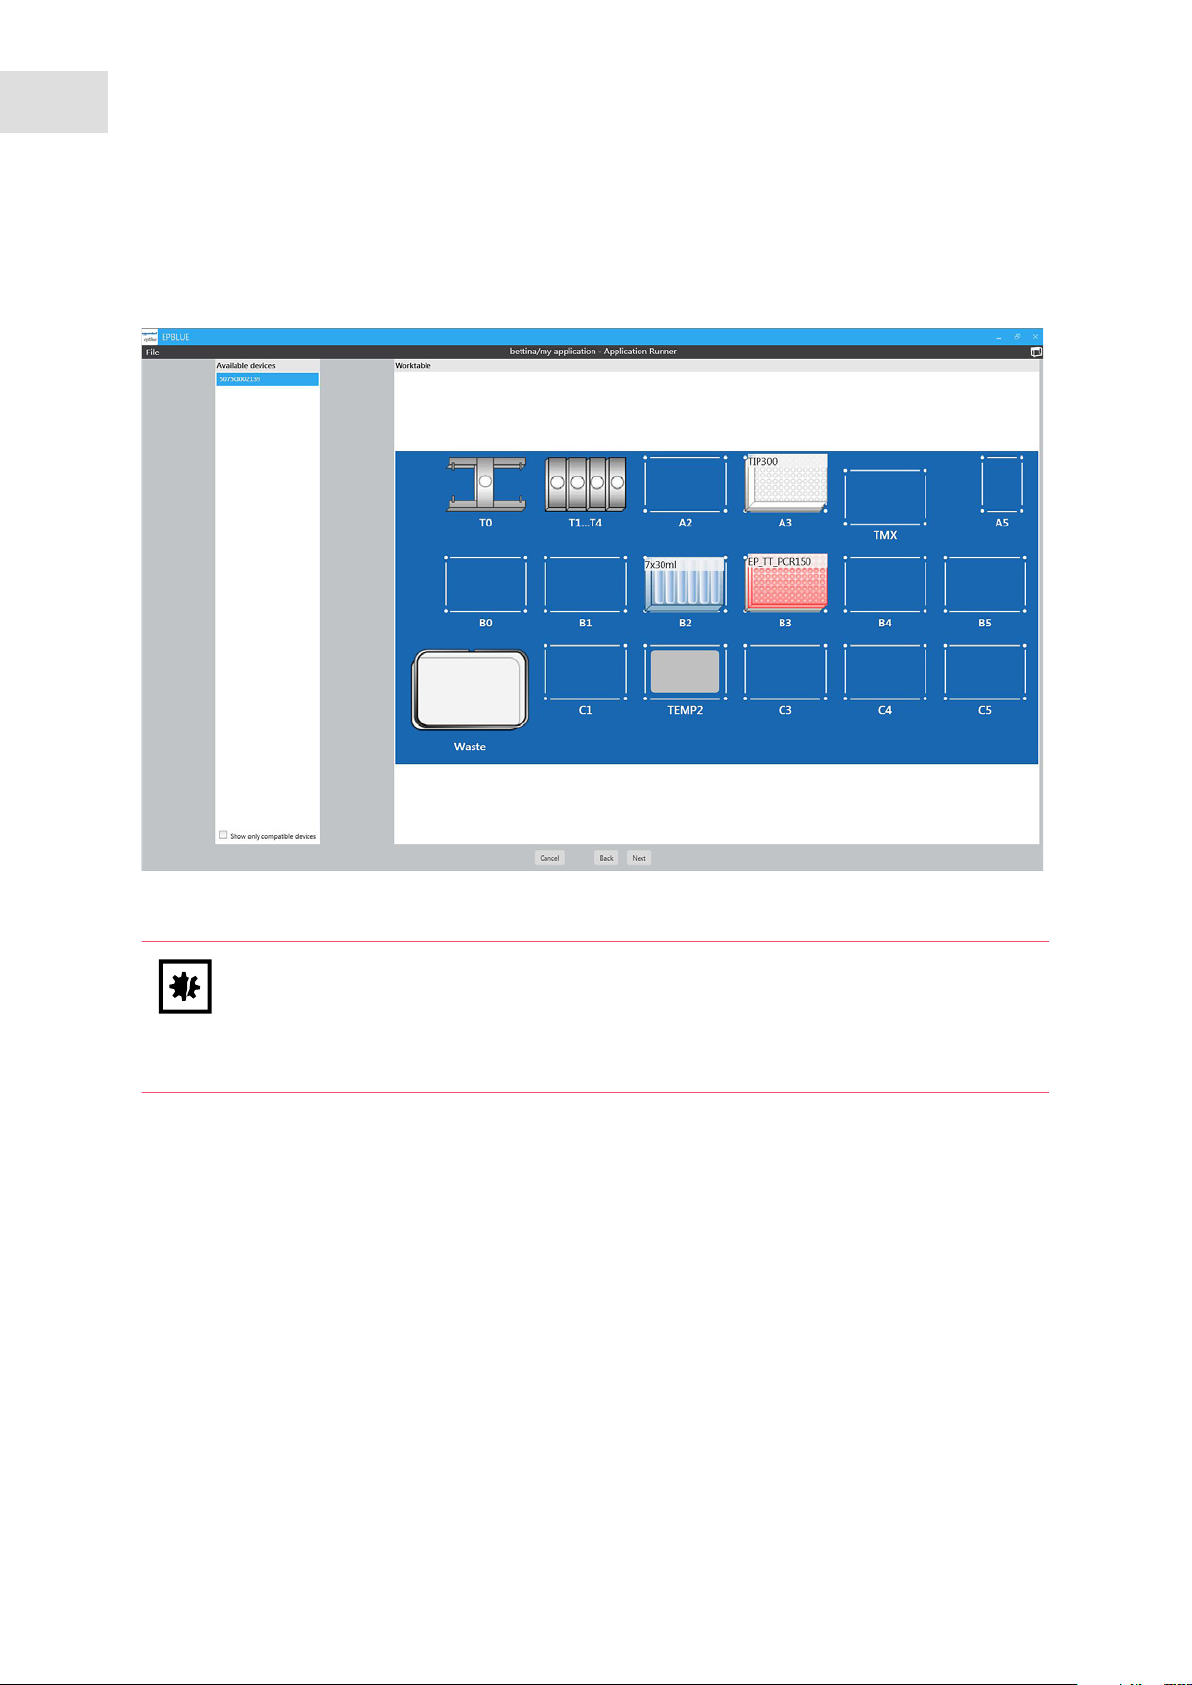
4.2.1 Selecting the device
Abb. 4-2: Selection of an available device
Fig. 4-2: Selection of an available device
NOTICE! Tool collisions with incorrectly positioned labware.
Labware must be positioned on the epMotion worktable as defined in the application.
Tools and labware become damaged in a collision. A collision can lead to sample loss.
Check the positioning of the labware before starting the application.
In the Available devices area, the connected epMotion is displayed.
Prerequisites
epMotion is ready for operation.
1. Select the device for the application run.
2. Press the Next button.
Page 27

epBlue Application Runner - Carrying out the application
epBlue™ with MultiCon
4.2.2 Entering the sample quantity
Abb. 4-3: Process control window
Fig. 4-3: Process control window
The window Process control appears if the sample quantity in the application is variable.
1. Enter the sample quantity for the current run.
2. Press the OK button.
27
English (EN)
4.2.3 Setting the HEPA air filter and the UV lamp
Abb. 4-4: Setting the parameters for the HEPA air filter and the UV lamp
Fig. 4-4: Setting the parameters for the HEPA air filter and the UV lamp
If your epMotion is equipped with a HEPA air filter and UV lamp, you can define the settings for the HEPA
air filter and the UV lamp.
Activate or deactivate the HEPA air filter.
Define whether a decontamination is to be carried out before the application.
The worktable may only be decontaminated if no labware or tools are present on the worktable.
Page 28

28
epBlue Application Runner - Carrying out the application
epBlue™ with MultiCon
English (EN)
4.2.4 Placing the labware on the epMotion worktable
Position the labware on the epMotion worktable according to the application.
Additional information on positioning the labware can be found in the hardware operating manual.
4.2.5 Setting the run parameters for the optical sensor
If you have the epBlue ID module, the Use bar codes checkbox will appear in the window.
In the application, you defined the application parameters for the optical sensor. You can enter run
parameters to use other settings of the optical sensor for an individual run. The run parameters overwrite
the application parameters for this run only (see Optical sensor on p. 80).
Abb. 4-5: Setting the run parameters
Fig. 4-5: Setting the run parameters
Use Barcodes checkbox
Activate ID tracking.
Detect volumes radio button
Activate the Detect volumes function. The
parameters set in the application for the labware
are used.
Use required minimum volumes radio button
epBlue assumes that all vessels are filled with the
minimum required volume for this run. Use this
function for dry runs.
Input volumes manually radio button
Deactivate the Detect volumes function. You have
to enter the sample volume manually.
Detect tips checkbox
Activate the Detect tips function.
Check labware placement checkbox
Activate the Check labware placement function.
Page 29
epBlue Application Runner - Carrying out the application
epBlue™ with MultiCon
English (EN)
1. Set the functions of the optical sensor.
2. Activate ID tracking, if required.
3. Press the Run button.
4.2.6 Setting the ID tracking parameters
If you have the epBlue ID module and ID tracking is activated for the labware, a window appears. In the
labware settings, you defined whether the IDs are entered manually or read in via the entry list. The
window displays the corresponding option.
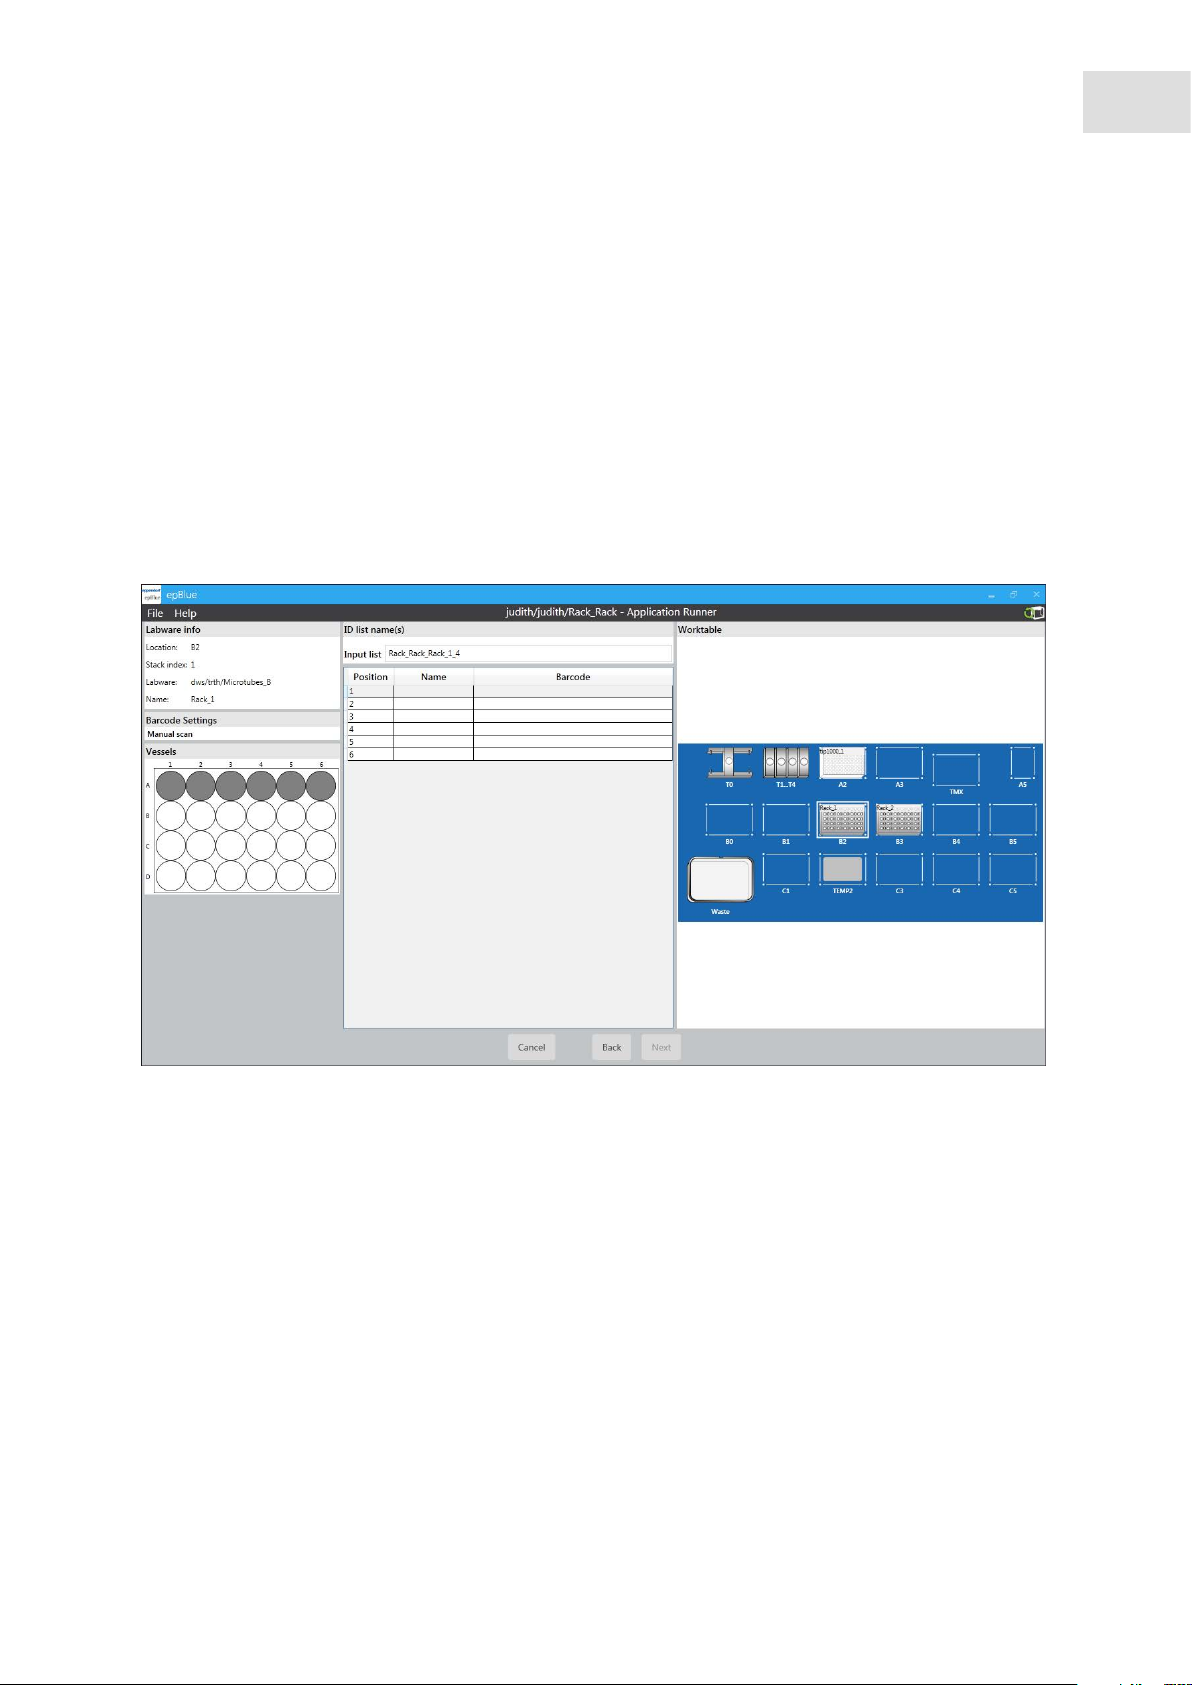
4.2.6.1 Entering IDs manually
Abb. 4-6: Entering IDs manually
29
Fig. 4-6: Entering IDs manually
Prerequisites
• Labware ID tracking is activated.
• The manual scan option is activated for the labware.
1. Press the Next button.
You are prompted to enter the IDs for the labware. The labware is marked with a red border.
2. Enter the name for the ID list that is created during the application for this labware in the List name
field.
3. Read the ID with the barcode reader or enter it manually.
4. If 2 IDs are to be assigned for a reagent, 2 entry fields appear. If you are using only one ID, press the
Use only one ID button.
Page 30

30
epBlue Application Runner - Carrying out the application
epBlue™ with MultiCon
English (EN)
5. Confirm your entry with the OK button.
6. Press the Next button to enter the ID for the next labware.
7. When all IDs have been entered, the application starts.
4.2.6.2 Reading the IDs with an entry list
Prerequisites
• Labware ID tracking is activated.
• The Entry list option is activated for the labware.
1. Press the Next button.
You are prompted to enter the IDs for the labware. The labware is marked with a border.
2. Press the Select ID list button.
The Select ID list window appears.
By default, the window shows all compatible entry lists.
3. Import the entry list, if required (see p. 115)
4. Select the entry list to be imported.
5. Press the OK button.
6. Enter the ID for the selected position.
epBlue compares the entered ID with the ID of the entry list.
7. If the ID does not correspond to the ID of the entry list, an error message appears. Correct the
corresponding ID.
8. When all IDs have been entered, the application starts.
Page 31

epBlue Application Runner - Carrying out the application
epBlue™ with MultiCon
4.2.7 Entering the filling level of the labware
4.2.7.1 Checking the filling level automatically
If the Detect volumes function is active, the optical sensor checks the filling level after the start.
If the following problems occur, a dialog window appears:
• Filling level too low.
• Filling level too high.
• Filling level cannot be correctly detected.
Abb. 4-7: Checking window
31
English (EN)
Fig. 4-7: Checking window
Maximum volume
Filling level of the vessel.
Minimum volume
Volume required to remove the set liquid
quantity.
Calculated volume
Volume in the vessel, calculated using vessel
data and the liquid level.
Repeat scan button
Abort button
Aborts the application.
User input button
Manual volume entry.
Accept level and continue button
Accept the displayed calculated volume.
µL input field
Manually select the volume if the User Input
button has been selected.
Repeat Detect volumes.
NOTICE! Dispensing error due to refilling of vessels.
The optical sensor only checks the level of the vessels at the specified location.
Only change the volume of the vessels at the specified location.
Do not change the volume of the vessels at other locations.
If the Calculated volume is larger than the Maximum volume, remove liquid from the vessel.
If the Calculated volume is smaller than the Minimum volume, add liquid to the vessel.
The optical sensor cannot carry out a detection if there is an air bubble in the liquid. Remove the air
bubble. Select Repeat scan to repeat the detection.
Page 32

32
epBlue Application Runner - Carrying out the application
epBlue™ with MultiCon
English (EN)
4.2.7.2 Entering the filling level manually
If the Detect volumes function is not active, you have to enter the filling level manually after the start.
Abb. 4-8: Entering the filling level
Fig. 4-8: Entering the filling level
Labware info area
Information on the selected labware.
Liquid detection area
Optical sensor settings for the selected labware.
Off The filling level is not checked.
Random positons The filling level of the first, the
last, and of 8 randomly selected vessels is
checked.
All used positions The filling level is checked in all
used positions.
Volume column
Enter the volume for the selected labware.
Page 33

epBlue Application Runner - Carrying out the application
epBlue™ with MultiCon
English (EN)
Tab. 4-1: Meaning of the columns in the Volume table
Column Meaning
Red border Entry of an invalid volume. Invalid volumes are volumes that are smaller than the
required volume or larger than the maximum volume of the labware.
Position Position of the labware on the worktable.
Minimum volume Volume that is required for this run.
Start Volume Actual volume in the labware.
Maximal Volume Maximum volume the labware can be filled with.
Proceed as follows:
Enter the filling volume into the Start Volume column.
To enter the same volume for the entire labware, click on the title in the Volume column.
Enter the run parameters of the optical sensor in the Liquid detection area, if necessary.
Press the Run button.
33
Page 34

34
epBlue Application Runner - Carrying out the application
epBlue™ with MultiCon
English (EN)
4.3 Starting the application
Prerequisites
• The labware is positioned on the epMotion worktable.
• epMotion is ready for operation.
• The application run was prepared. (see p. 26)
Click on the Run button.
The application starts.
4.4 Controlling the application
Abb. 4-9: Running application
Fig. 4-9: Running application
Procedure area
Carrying out the application. The epMotion executes the
application until the end.
Executing the application step-by-step. The epMotion
executes the next step and then stops.
Pause. The application stops, but it will not be aborted.
Aborting the application. If you have stopped the
application using the button, the button is now
active.
Commands. The active command is
highlighted blue.
Worktable area
Worktable.
Remaining Runtime area
Status of the application/runtime of the
application/total time for the application.
Log area
Log.
Control the application with the buttons from the Control area.
Page 35

epBlue Application Runner - Carrying out the application
4.5 Ending the application
When the application run is finished, a message appears.
epBlue™ with MultiCon
English (EN)
35
Abb. 4-10: The application is finished
Fig. 4-10: The application is finished
Abb. 4-11: The application was canceled
Fig. 4-11: The application was canceled
1. To confirm the message press the OK button.
2. In the Application Runner window, press the Next button.
The final window appears. If your epMotion is equipped with a HEPA air filter and UV lamp, you can
activate the HEPA air filter and the UV lamp.
Abb. 4-12: Final window
Fig. 4-12: Final window
3. Activate the HEPA air filter, if necessary.
Prerequisites
The worktable of the device must be cleared completely before activating the UV lamp.
4. Activate the UV lamp, if necessary.
5. Press the Exit button to end the application.
Page 36

36
epBlue Application Runner - Carrying out the application
epBlue™ with MultiCon
English (EN)
Page 37

5 epBlue LogViewer - Managing logs
The chapter also describes how to view and print application logs.
5.1 Displaying protocols
Abb. 5-1: Logs window
Fig. 5-1: Logs window
epBlue LogViewer - Managing logs
epBlue™ with MultiCon
English (EN)
37
Prerequisites
• The application was executed (see p. 34).
• The epBlue start screen is shown.
1. Click on the LogViewer symbol.
Select the folder in which the application is saved.
2. Select the log.
The log is opened.
Stored logs column
Logs saved for the selected application
Content area
Content of the opened log
Page 38

38
epBlue LogViewer - Managing logs
epBlue™ with MultiCon
English (EN)
5.2 Saving the protocol as a PDF file
Prerequisites
1. Click on the symbol.
The print preview opens.
2. Check the layout and set up the page.
3. Save or print the document as a PDF file.
4. Close the window.
Tab. 5-1: Symbols in the print preview
Search in the document. Show the first page.
Print the document Show the previous page.
Page setup. Show the next page.
Scale the document. Show the last page.
Zoom in the view. Create a PDF.
Set the zoom factor. Close the view.
Zoom out the view.
Page 39

epBlue Application Editor - Creating and editing applications
epBlue™ with MultiCon
English (EN)
6 epBlue Application Editor - Creating and editing applications
This chapter describes how to create and edit applications in epBlue.
6.1 Overview
Applications are programmed processes in epBlue. An application consists of equipping the worktable and
a sequence of commands. Each command triggers a specific action.
Applications are created in a fixed order:
1. Create an empty application (see p. 40).
2. Position labware and define the application parameters of the labware (see p. 41).
3. Activate ID tracking of the labware (see p. 44).
4. Define the procedure (see p. 45).
5. Check the application (see p. 47).
6. Simulate the application (see p. 109).
39
6.2 Creating an application
6.2.1 Menu bar
Abb. 6-1: Application Editor menu bar.
Fig. 6-1: Application Editor menu bar.
Saving the application.
Saving the application for another worktable.
Saving all applications.
Closing the application.
Cutting the application.
Copying the application.
One step back.
One step forward.
CSV
Import CSV file.
Printing the application.
Checking the application.
Go to simulation.
Pasting the application.
Deleting the application.
Go to Application Runner.
Page 40

40
epBlue Application Editor - Creating and editing applications
epBlue™ with MultiCon
English (EN)
6.2.2 Creating an empty application
Abb. 6-2: Start screen of the Application Editor
Fig. 6-2: Start screen of the Application Editor
Prerequisites
• The Application Editor is open.
1. Select the folder in which the application is to be saved.
2. Click on the symbol in the menu bar.
The Create new application window appears. epBlue detects the connected device.
3. Enter the name and description of the application.
4. Close the window using the Create button.
You have created an empty application. The Worktable window of the application opens.
6.2.3 Copying applications
You can create new applications by copying and changing existing applications.
The Eppendorf folder contains applications defined by Eppendorf AG. These applications
cannot be executed or changed. They are used as templates and examples.
In order to use applications from the Eppendorf folder, copy the corresponding application
to your folder.
To copy an application (see p. 86).
Page 41

epBlue Application Editor - Creating and editing applications
epBlue™ with MultiCon
English (EN)
6.2.4 Saving an application
To save an application, click on the symbol in the toolbar.
To save an application under a new name, click on the symbol in the toolbar.
To save all open applications, click on the symbol in the toolbar.
6.2.5 Positioning labware
6.2.5.1 Positioning the labware on the epBlue worktable
Labware can only be positioned at specific locations. Information on positioning the labware can be found
in the hardware operating manual.
Abb. 6-3: Positioning the labware on the epBlue worktable
41
Fig. 6-3: Positioning the labware on the epBlue worktable
Labware Category column
Overview of all labware types.
Worktable area
epBlue worktable with positioned labware.
Switch to procedure button
To go to the Procedure window, press the
Switch to procedure button.
Labware area
Labware that can be positioned on the epBlue
worktable.
Properties area
Properties of the selected labware.
Placed Labware column
Labware positioned on the epBlue worktable.
Trash
Delete the selected labware from the epBlue
worktable.
Page 42

42
epBlue Application Editor - Creating and editing applications
epBlue™ with MultiCon
English (EN)
Prerequisites
• Labware combinations have been created for reaction vessels (see p. 92).
• The application is open (see p. 25).
• The Worktable window is open.
1. Select labware from the Labware area.
2. Draw the labware to the desired position of the epBlue worktable.
If the labware cannot be positioned at this location, the location is marked in red.
6.2.5.2 Deleting positioned labware from the epBlue worktable
There are several options to delete labware from the epBlue worktable.
Selecting the labware
Activate the checkbox for the corresponding labware in the Placed labware column.
Alternatively, select the labware with the mouse.
Deleting the labware
Drag the selected labware into the trash with the mouse.
Alternatively, click on the symbol in the menu bar.
Or click on the selected labware with the right mouse button and select the Delete function in the
context menu.
6.2.5.3 Stacking labware
The gripper stacks and transports labware. The gripper is required to stack labware or to unstack a stack
during an ongoing application.
You can stack a maximum of 5 plates on the worktable. You can stack a plate on a height adapter. The
maximum stacking height is 126 mm. Stacked labware must have the same properties, e.g. name,
geometry, and bottom tolerance.
The gripper only transports one part at a time. The gripper can stack plates or unstack a stack of plates.
Liquids cannot be transferred in a plate stack.
Functions of the optical sensor in case of stacked plates
• The Check labware placement function is available.
• The Detect volumes function is not available.
You can stack the following plates:
• EP_pDNA_96_MTP
• EP_TT_PCR_150
• EP_TT_PCR_40
• EP_DWP_1200
• EP_pDNA_96_DWP
• EP_DWP_200
Page 43

epBlue Application Editor - Creating and editing applications
epBlue™ with MultiCon
English (EN)
• EP_DWP_2000
• EP_DWP_1000
• EP_DWP_500
• EP_MTP_384
• EP_MTP_96
• EP_MTP_UV_VIS_96
On the vacuum unit, you can stack 4 labware components. Information on the vacuum unit can be found in
the hardware operating manual.
Plates that are stacked may only be filled up to the working volume.
Abb. 6-4: Stacking labware on the epBlue worktable
43
Fig. 6-4: Stacking labware on the epBlue worktable
Proceed as follows to stack labware at a location.
1. Place lower labware at one location.
2. Place upper labware at the same location.
The Placed labware column shows, which labware is placed in the epBlue worktable locations.
The number behind the designation shows how many parts have been stacked at this location. Example:
pcr384_3. Only 3 plates have been stacked.
Page 44

44
epBlue Application Editor - Creating and editing applications
epBlue™ with MultiCon
English (EN)
6.2.6 Defining the application parameters of the labware
You can change the properties of each labware used.
Abb. 6-5: Properties window
Fig. 6-5: Properties window
To change the properties of a labware, double click on the labware.
Alternatively, select the labware and go to the Properties menu with the right mouse button or click on
the Properties button.
The Properties window appears.
Set the properties for the filling level detection of the selected labware.
A description of the properties for the optical sensor (see Optical sensor on p. 80).
6.2.7 Activating ID tracking of the labware
In order for epBlue to create an ID list for a labware, ID tracking of the labware must be active.
ID tracking is activated separately for each labware. To track IDs activate ID tracking for source labware,
intermediate labware, and destination labware.
Prerequisites
• The application is open.
• The Worktable window is open.
Select the option for ID tracking.
The following options are available for ID tracking:
• Manual scan: Enter the ID manually or read it with the barcode reader.
• Entry list: Select ID list. To check the ID list enter the first position of the list or the list ID when starting
the application.
• None: No ID is assigned to the labware.
Page 45

epBlue Application Editor - Creating and editing applications
epBlue™ with MultiCon
English (EN)
6.2.8 Defining procedures
A procedure is a defined sequence of commands that epMotion executes during an application.
Commands are described in the Commands chapter (see p. 47).
The first command of each procedure is the Procedure Start command. The Procedure Start command is
created automatically and cannot be deleted. The Procedure Start command shows the epBlue worktable at
the start of the application. The Procedure Start command does not influence the application.
The software does not include a command for aspirating pipette tips. The user defines which pipette tips
will be used in one command. The user must provide for the corresponding pipette tips on the worktable.
The user defines the dispensing tool with each command. Tools are picked up according to the command
parameters.
Abb. 6-6: Creating a procedure for an application
45
Fig. 6-6: Creating a procedure for an application
Commands column
Available commands.
Procedure column
Sequence of commands. The commands are
executed in the order displayed.
Worktable
The state of the worktable during the execution of
the selected command.
Options area
Parameter of the selected command.
Page 46

46
epBlue Application Editor - Creating and editing applications
epBlue™ with MultiCon
English (EN)
Prerequisites
• The application is open (see p. 25).
• Labware is positioned on the worktable (see p. 25).
• The Procedure window is open.
6.2.8.1 Inserting a command
1. Select a command from the Commands column.
2. Drag the command to the Procedure column.
3. In order to insert a command at the end of the application, double-click on the selected command in the
column Commands.
6.2.8.2 Copying commands
Select a command from the Procedure column.
Click on the symbol in the menu bar.
Alternatively, open the context menu with the right mouse button and select Copy.
6.2.8.3 Inserting a copied command
1. Copy the command.
2. Select the position in the Procedure column where you would like to insert the copied command.
3. Select the Paste command in the context menu.
The copied command is inserted behind the selected position.
6.2.8.4 Changing the command sequence
Select a command in the Procedure column.
Drag the command to the desired position in the procedure.
6.2.8.5 Deleting commands
Select a command in the Procedure column.
Delete the command using the symbol in the menu bar or via the context menu.
6.2.8.6 Changing command parameters
1. Select a command in the Procedure column.
The parameters of the selected command are shown in the Options area.
2. Set the parameters to suit your requirements.
Page 47
epBlue Application Editor - Creating and editing applications
epBlue™ with MultiCon
English (EN)
6.2.9 Checking an application
1. Click on the symbol in the menu bar.
2. Select the Check command function.
The application is checked.
Example: Pipette tips without a filter are placed on the epMotion worktable. In the application, pipette
tips with filter were selected. The screen displays an error message.
6.3 Commands
A procedure is a sequence of commands that epMotion executes during an application run. Commands are
executed one after the other and independent of each other. Each command has a specific set of
parameters.
The software does not include a command for taking up pipette tips. The user defines which pipette tips
will be used in a command. The user positions the corresponding pipette tips on the worktable.
47
The user defines the dispensing tool for each command. Tools are taken up according to the command
parameters.
The parameter set displayed in the software depends on the equipment of your epMotion.
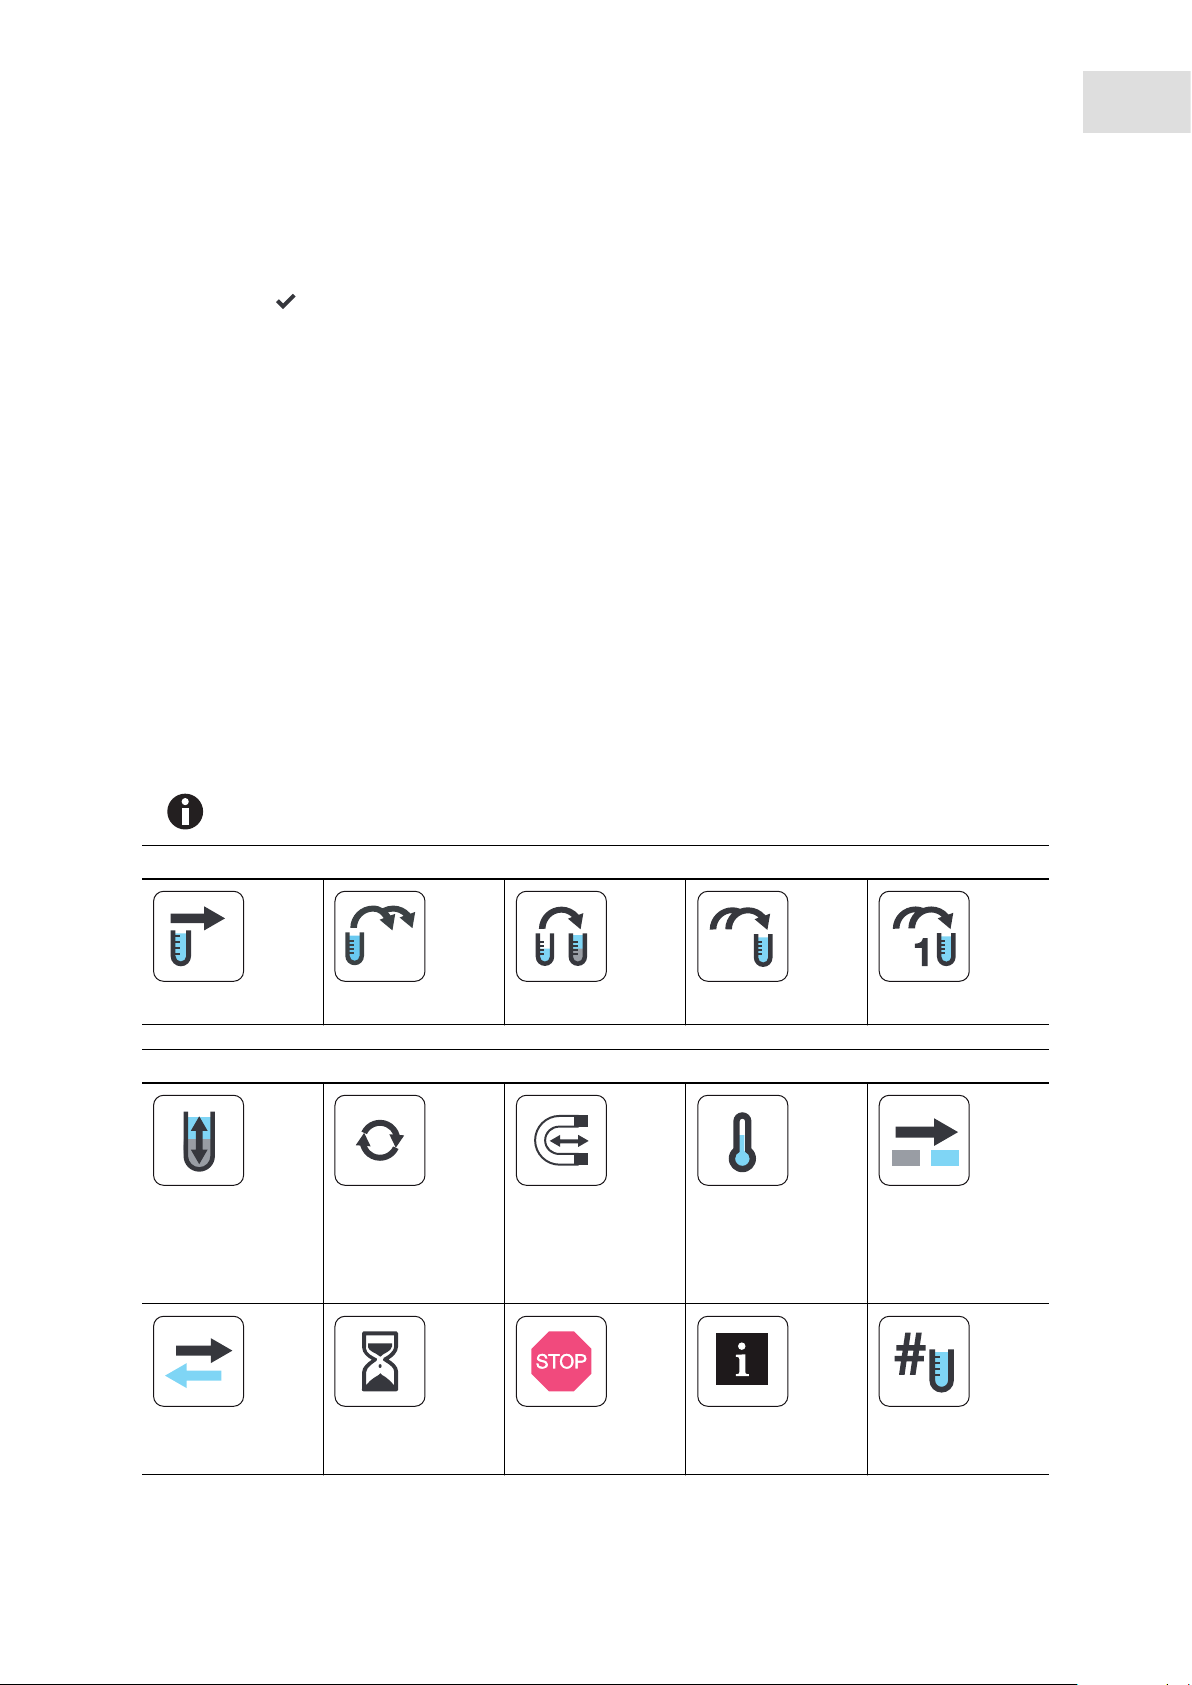
Transfer commands
Sample transfer Reagent transfer Dilute Pool Pool one destination
Additional commands
Mix Thermomixer
epMotion with
thermomixer
Magnetic separation
epMotion with
magnetic finger
module
Temperature
epMotion with
thermal module
Transport
epMotion 5075
epMotion 5073
Exchange
epMotion 5070
Wait User intervention Comment Number of samples
Page 48

48
epBlue Application Editor - Creating and editing applications
epBlue™ with MultiCon
English (EN)
Additional commands
BAR
Vacuum
epMotion with
vacuum unit.
6.3.1 Sample transfer command
Various transfer commands are available to transfer liquids. All transfer commands are derived from the
Sample transfer command.
Abb. 6-7: Principle of the Sample transfer command
Fig. 6-7: Principle of the Sample transfer command
The Sample transfer command is used to transfer liquids from various source positions to several
destination positions. The number of samples that will be aspirated from the source labware depends on
the Number of samples (see p. 64) command.
Page 49

epBlue Application Editor - Creating and editing applications
epBlue™ with MultiCon
English (EN)
6.3.1.1 Sample transfer > Parameter command
Abb. 6-8: Sample transfer > Parameter
Fig. 6-8: Sample transfer > Parameter
Volume Select volume in µL or nL. A decimal place is available for volumes ≤ 99.9 µL.
You can transfer a volume larger than the maximum volume of the pipette tip.
The volume to be transferred will be pipetted in several steps.
Example: The user would like to transfer 1500 µL and enters this value into the
Volume field. If a 1000 µL tip is being used, 2x 750 µL will be pipetted. If a
300 µL tip is being used, 5 x 300 µL will be pipetted.
Pipet. tool Used dispensing tool.
Pipette The volume is individually aspirated and dispensed for each liquid transfer.
Multidispense Aspirate liquid and dispense it in the destination position in defined subsets.
Multiaspirate Aspirate liquid from several source positions using one pipette tip and
dispense the liquid in one destination position. Available for Pool and Pool one
destination commands.
Use filter tips Activate when using tips with filter.
Source Select the source labware. The source labware must be placed on the
worktable. You can select 4 source labwares. If you are using more than one
source labware, the number of positions in the labware (384, 96, 24) must
match. If you dispense within one labware, the source labware and destination
labware are identical.
Destination Select the destination labware. The destination must be placed on the
worktable. You can select 4 destination labwares. If you are using more than
one destination labware, the number of positions in the labware (384, 96, 24)
must match. If you dispense within one labware, the source labware and
destination labware are identical.
Pattern Select the source positions and destination positions. Create replicates.
49
Information on the aspiration and transfer of liquids by means of the epMotion can be found in
the hardware operating manual.
Page 50

50
epBlue Application Editor - Creating and editing applications
epBlue™ with MultiCon
English (EN)
6.3.1.2 Sample transfer > Options command
Abb. 6-9: Sample transfer > Options
Fig. 6-9: Sample transfer > Options
Aspirate from bottom Aspirate liquid from the base of the vessel. When using several vessels with
different volumes, enter the lowest filling volume of these vessels (Sample
transfer > Parameter).
Elution from filter Aspirate liquids from the supernatant in filter plates. Available if in the
Parameter window the Pipette radio button is selected.
Dispense from top During liquid dispensing, position the pipette tips 3 mm – 4 mm below the
edge of the vessel. When using several vessels with different volumes, enter
the highest filling volume of these vessels (Sample transfer > Parameter).
Change Tips Defined time when the pipette tips are changed.
when command finished Eject pipette tips after the end of the command. The liquid will be aspirated
with the same tip from all source labware positions.
before asp. for next
destination well
before each aspiration Eject pipette tips prior to each aspiration. Liquid will always be aspirated with
keep tips, do not change
tips
after XX aspirations Pipette tips will be ejected after a defined number of aspirations.
Restore tips Pipette tips will be placed back into the position of the box they were removed
Eject the pipette tips before the liquid from the next source position is
aspirated. Liquid from the same source position will be aspirated with the same
tip. Liquid from the next source position will be aspirated using a new tip.
a new tip. Additional volume will be discarded in the waste container along
with the pipette tip.
Do not eject pipette tips. Liquid will be aspirated with the same tip from all
source positions. The tips are also used in the next command. If the transfer
type changes in one of the following commands, or the Mix command is used,
the tips will be ejected.
from.
Is only executed if the tips within an application are reused for the same source
vessel.
The restore tips checkbox is only available with specific settings of the Change
Tip option.
Page 51

epBlue Application Editor - Creating and editing applications
Reuse tips Returned pipette tips will be reused.
The pipette tips will be reused within an application for the same source vessel.
Is only executed if the restore tips option was selected in a previous command
and the restored tips are available.
The Reuse tips checkbox is only available with specific settings of the Change
Tip option.
Information on the aspiration and transfer of liquids can be found in the hardware operating
manual.
6.3.1.3 Sample transfer > Mix command
The Mix command is also available for mixing (see p. 63).
Abb. 6-10: Sample transfer > Mix
epBlue™ with MultiCon
English (EN)
51
Fig. 6-10: Sample transfer > Mix
Mix before aspirating Mix before each aspiration. Set the parameters following activation.
If you transfer a larger volume than the maximum volume of the pipette, the
liquid will be mixed before the first aspiration.
Mix after dispensing Mix after each dispensing. Set the parameters following activation. Available
for Transfer type > Pipette.
If you transfer a larger volume than the maximum volume of the pipette, the
liquid will be mixed after the last aspiration.
No. of Cycles Number of mixing cycles.
Speed Mixing frequency. If no entries were made for Speed, the defined aspiration
speed of the liquid type will be used.
Volume Mixing volume
Fixed height Position of the pipette tip on the Z-axis. Fixed aspiration level and dispensing
level. Only for levels below the working volume.
Aspiration Distance between the pipette tip and base of the vessel during aspiration. If
0 mm is entered, the distance will be corrected to 2 mm. The correction is
dependent on the bottom tolerance and type of labware.
Page 52

52
epBlue Application Editor - Creating and editing applications
epBlue™ with MultiCon
English (EN)
Dispense Distance between the pipette tip and base of the vessel during dispensing. If
the dispensing position is above the vessel, the distance will be corrected to
the height of the vessel.
Information on mixing liquids can be found in the hardware operating manual.
NOTICE! Contamination of the dispensing tool due to high mixing speed.
If the mixing speed is too high, liquid may enter the dispensing tool.
If the liquid has a low viscosity or tends to foam, set a low mixing speed.
Use demineralized water to test the mixing settings.
Use pipette tips with filter.
6.3.1.4 Sample transfer > Liquid types
Liquid types are defined in epBlue.
Information on dispensing liquids can be found in the hardware operating manual.
Tab. 6-1: Defined liquid types in epBlue
Liquid type Optimized for 50 µL tips:
pipetting as of
Alcohol 75% Mixture of
75 % ethanol
and 25 % water
Alcohol 98% Alcohol 98 %1 µL 3 µL • New pipette tips are
Glycerol Mixture of
40 % glycerol
and 60 % water
1 to 3 µL 3 µL • Wash reagent in kits for
1 µL 5 µL • Liquid type for enzyme
50 µL tips:
dispensing as of
Remarks
nucleic acid purification. See
applications.
pre-wetted with the liquid to
be aspirated.
Prewetting option is set (see
p. 54).
• For multidispensing with
300 µL pipette tips, the
distance to the filter with
300 µL aspiration is very low.
To prevent the filter from
becoming wetted, pipetting
should be avoided with an
aspiration of 280 µL or more.
solutions.
• If the glycerol content of the
enzyme solutions is
significantly lower, liquid type
Water can be used.
Page 53

epBlue Application Editor - Creating and editing applications
epBlue™ with MultiCon
English (EN)
53
Liquid type Optimized for 50 µL tips:
pipetting as of
Protein Water with
1 % albumin
(10 g/L),
0.01 % Triton
X-100
Protein C Water with
1 % albumin
(10 g/L),
0.01 % Triton
X-100
Rinse Demineralized
water.
Water with low
surfactant
content.
5 µL 5 µL • New pipette tips are
5 µL 5 µL • New pipette tips are
1 µL 3 µL • Low aspiration and dispensing
50 µL tips:
dispensing as of
Remarks
pre-wetted with the liquid to
be aspirated.
Prewetting option is set (see
p. 54).
• The bending of the surface of
the liquid has a negative
impact on the free jet
capability of dispensing in cell
culture plates.
pre-wetted with the liquid to
be aspirated.
Prewetting option is set (see
p. 54).
• Dispensing the liquid with a
greater distance to the
calculated plane surface of the
liquid (4 to 5 mm) than liquid
type Protein.
• All other data such as liquid
type Protein.
• Recommended for nutrient
media.
speed, strongly delayed
blow-out.
• Other data such as liquid type
Water.
• This liquid type is suitable for
the mixing function of a
transfer command or if the Mix
command is used.
• Can increase the risk of
contamination for small
vessels, e.g., PCR plates.
• Recommended in combination
with the Mix option for
reducing the residual moisture
in the pipette tip.
Page 54

54
epBlue Application Editor - Creating and editing applications
epBlue™ with MultiCon
English (EN)
Liquid type Optimized for 50 µL tips:
pipetting as of
Speed_xl Demineralized
1 µL 3 µL • Mixing at high dispensing
water.
Speed_xs Demineralized
1 µL 3 µL • For slow aspiration from filter
water.
Water Demineralized
1 µL 3 µL • Recommended for most
water.
50 µL tips:
dispensing as of
Remarks
speed.
• High dispensing speed poses a
high risk of contamination for
small vessels.
• Good mixing in DWP 96 with
750 µL aspiration and 750 µL
dispensing.
plates.
• Very low aspiration speed.
Sediment will not be
dispersed.
applications.
• Technical data on the
systematic and random errors
were determined using this
liquid type.
6.3.1.5 Changing the liquid type
Changes to the liquid type have effects on the accuracy of pipetting. Changing the presetting
Abb. 6-11: Sample transfer > Liquid types
Fig. 6-11: Sample transfer > Liquid types
To change the liquid type, check the Change parameter checkbox.
Enter the aspiration speed of the liquid in the Aspiration speed field: 0.2 mm/s – 110 mm/s.
For viscous solutions and large aspiration volumes, select a low aspiration speed. The liquid aspiration
will be delayed. The liquid aspiration must be ended before the pipette tip withdraws from the liquid.
Select the low aspiration speed during phase separations or to prevent the distribution of sediments or
particles.
can increase the dispensing deviations.
Page 55

epBlue Application Editor - Creating and editing applications
epBlue™ with MultiCon
English (EN)
Enter the dispensing speed of the liquid in the Dispense speed field. Input range: 0.2 mm/s – 110 mm/s.
Select a low dispensing speed if you dispense larger volumes in empty vessels. A lower dispensing
speed decreases the risk of liquid spraying back. Use larger vessels to achieve better mixing results due
to a higher speed.
Enter the blow-out delay in the Blow delay field. Input range: 0 ms – 99999 ms.
The delay is the break between the end of the dispensing during liquid dispensing and blow-out. This
setting has an effect on the Transfer type Pipette.
If you use liquids with high wetting behavior (e.g., solutions which contain proteins or detergents,
organic solvents) and delayed drain-off characteristics (highly viscous liquids), delay the blow-out. The
residual liquid collects in the lower part of the tip prior to the blow-out.
If you use liquids with low wetting behavior (e.g., water, saline solutions), set the blow-out delay to 0.
Enter the dispensing speed of the blow-out in the Blow speed field. Application.: 0.2 mm/s – 110 mm/s.
Using liquids that tend to form bubbles on the outlet of the pipette tip increases the dispensing speed of
the blow-out. Decrease the dispensing speed if liquid sprays back into the vessel. This setting has an
effect on the Transfer type Pipette.
55
In the Blow movement field, enter the path of the piston during blow-out. Input range: 0 % – 100 % as
percentaged value of the setting Initial stroke.
No blow-out will be carried out during when 0 is entered. The full piston path is part of the dispensing
step.
When entering 100, the entire piston path is available for the blow-out. The blow-out will be conducted
using the Blow delay and Blow speed parameters.
Increase and decrease the Blow movement along with the Blow speed setting. This setting only has an
effect on the Transfer type Pipette.
In the Initial stroke field, enter the path the piston takes before the liquid aspiration. Input range: 0 % –
100 % of the available path, dependent on the type of dispensing tool.
The higher the value, the larger the amount of piston path that is available for the blow-out after liquid
dispensing. To decrease the amount of residual liquid in the pipette tip after dispensing, increase the
value. To decrease the formation of foam during dispensing, decrease the value. Reducing the value can
increase the risk of dispensing errors. A blow-out cannot be conducted if 0 is entered.
If you change the value, the pipette tips will be automatically changed before the liquid aspiration due to
technical reasons.
In the Prewetting field, enter the number of piston movements for pre-wetting the pipette tips. Input
range: 0 – 9 cycles
Non-wetted pipette tips can be pre-wetted to create the same conditions for dispensings.
Wetting the pipette tips:
• For liquids with low vapor pressure.
• For liquids with reduced surface tension and delayed drain-off characteristics.
Page 56

56
epBlue Application Editor - Creating and editing applications
epBlue™ with MultiCon
English (EN)
6.3.1.6 Testing the changed liquid type
Prerequisites
• The parameters of the liquid types are customized to your requirements.
1. Carry out the sample run of the application with demineralized water.
2. Check the precision and accuracy of the dispensing.
3. Check the working volume of the labware. No liquid may spray out of the labware.
4. Carry out the sample run of the application using the provided liquid.
5. Check the precision and accuracy of the dispensing.
6. Check the working volume of the labware. No liquid may spray out of the labware.
6.3.2 Reagent transfer command
The Reagent transfer command is used to transfer a liquid from one or more source positions into several
destination positions. After the first source position has been emptied, the epMotion switches to the next
source position.
Abb. 6-12: Principle of the Reagent transfer command
Fig. 6-12: Principle of the Reagent transfer command
When using multiple source positions and the optical sensor is switched on (see p. 80), the volume of the
first source position will be checked when starting the application run. If there is not enough liquid
available for the number of samples, the Checkrun window appears. To incorporate the next source position
in the calculation, select accept level and continue. The optical sensor checks the next source position. The
calculated volumes will be summed. The application will start if the volume is sufficient.
The Number of samples command is used to define the number of destination vessels.
The parameters of the command Reagent transfer are identical to the command Sample transfer (see p. 48).
Proceed as follows to define the pattern for the Reagent transfer command:
1. Select the source position in the source labware. If you are using several source positions, select these
vessels one after the other.
2. Select the destination position in the destination labware.
Source position and destination position for one pattern are the same color.
Page 57

epBlue Application Editor - Creating and editing applications
epBlue™ with MultiCon
English (EN)
6.3.3 Dilute command
The Dilute command is used to create serial dilution series, e.g., for PCR standards. A defined volume is
pipetted several times from one vessel to the next.
Abb. 6-13: Principle of the Dilute command
Diluent Diluent Diluent
57
Undiluted Sample 1. Dilution 2. Dilution 3. Dilution
Fig. 6-13: Principle of the Dilute command
The parameters of the command Dilute are identical to the command Sample transfer (see p. 48).
If the Dilute command is carried out within one labware the source positions and destination positions must
not overlap.
1. Fill the destination positions with a diluent. Use the Reagent transfer command.
2. Define the number of samples to be diluted using the Number of samples command.
3. In the pattern, define the number of dilution steps. The pattern is limited by a series or column.
4. Enter the options for the Dilute command.
5. To achieve a good mixture of sample and diluent, activate the Mix > Mix after dispensing option.
The sample and diluent will be mixed after each dispensing.
6. To mix the undiluted sample before the first aspiration, activate the Mix before aspirating option.
Proceed as follows to enter the pattern for the Dilute command:
1. Select the source position of the undiluted sample.
2. Select the destination positions of the dilution steps. The number of positions defines the number of
dilution steps.
3. Repeat the procedure for each source position.
Page 58

58
epBlue Application Editor - Creating and editing applications
epBlue™ with MultiCon
English (EN)
6.3.3.1 Example of a dilution series
This example explains the concept of a dilution series. The example does not describe the full application.
Objective
• 24 samples are in a rack with 24 positions and should be diluted 1:1000.
• The dilution should be completed in 3 program steps with dilutions of 1:10.
• First, a single-channel dispensing tool is used. An eight-channel dispensing tool will then be used to
reach a higher speed.
Procedure
• 200 µL of each of the samples will be transferred to the 96-well plate using the Sample transfer
command. The dilutions are carried out in this plate.
• 225 µL of the diluent will be transferred from the 300 mL reservoir to each of the empty wells of the
96-well plate using the Reagent transfer command.
•25 µL of the sample will be aspirated from column 1 using the Dilute command and will be mixed with
respectively 225 µL of the diluent in the columns 2, 3 and 4. The mixing process will be repeated twice
in the following columns.
In this example, each dilution step is a 1:10 dilution. The required 1:1000 dilution will be achieved with the
third 1:10 dilution. The volume aspirated from the undiluted sample also applies for the dilution steps.
Creating dilution series
Transferring undiluted samples to the destination labware
1. Pattern of the Sample transfer command:
The source position and destination position are the same color. epBlue detects the pattern and
suggests the next field.
Page 59

epBlue Application Editor - Creating and editing applications
epBlue™ with MultiCon
English (EN)
Transferring diluent to the destination labware
2. Pattern of the Reagent transfer command:
With an eight-channel dispensing tool, the Reagent transfer command is used to aspirate the diluent
from the 300 mL reservoir and dispense it into the empty wells of the 96-well plate.
59
Carrying out the dilution
3. Pattern of the Dilute command:
Using an eight-channel dispensing tool, liquid is removed from column 1 and mixed with the diluent in
columns 2, 3 and 4. This procedure will be repeated in the following columns.
Page 60

60
epBlue Application Editor - Creating and editing applications
epBlue™ with MultiCon
English (EN)
6.3.4 Pool command
The Pool command can be used to combine liquids from several source positions in one or more destination
positions.
Abb. 6-14: Principle of the Pool command
Fig. 6-14: Principle of the Pool command
The windows and functions of the Pool command are identical with the Sample transfer command (see
p. 48).
If you are using the Multiaspirate function, liquid will be removed from the source positions until the pipette
tip is filled. The contents will then be dispensed in the destination position. In the pattern, you define which
source positions will be pooled in the destination position.
The Number of samples command before the Pool command defines the number of source positions.
Options > Change Tips is set to before asp. for next destination well.
6.3.5 Pool one destination command
The Pool one destination command can be used to combine liquids from several source positions in one
destination position. This command is a simplified Pool command.
The Number of samples command before the Pool one destination command defines the number of source
positions.
The Options > Change Tips option is set to when command finished. The pipette tips are ejected at the end of
the command.
Page 61

6.3.6 Comment command
Abb. 6-15: Comment command
epBlue Application Editor - Creating and editing applications
epBlue™ with MultiCon
English (EN)
61
Fig. 6-15: Comment command
Comment field
Enter comment
A comment can be output using the Comment command. When the command is executed, the comment
will be displayed in the command list of the application runner.
Page 62

62
epBlue Application Editor - Creating and editing applications
epBlue™ with MultiCon
English (EN)
6.3.7 Exchange command
The command Exchange only is available for epMotion 5070.
Abb. 6-16: Exchange command
Fig. 6-16: Exchange command
Labware drop-down menu
Labware taken out of the epMotion
Exchange with drop-down menu
Labware to be placed inside the epMotion
The Exchange command can be used to exchange labware. When the command is executed, epBlue
prompts you to replace the labware manually.
6.3.8 Magnetic separation command
The Magnetic separation command only is available for devices with magnetic finger module.
The Magnetic separation command can be used to separate magnetic beads using the magnetic finger
module.
The Magnetic separation command can only be executed if the PrepRack is positioned on the thermomixer
of the epBlue worktable.
The efficiency of the magnetic separation depends on the properties of the used beads. Eppendorf AG
recommends a Duration of at least 2 min as the initial value.
Page 63

epBlue Application Editor - Creating and editing applications
epBlue™ with MultiCon
English (EN)
If the Magnetic separation command is executed when the Separation On checkbox is checked, the
magnetic fingers will be drawn out. During the waiting period, the magnetic beads will be separated by the
drawn out magnetic fingers on the tube inner wall. After the waiting period has elapsed, the next command
in the procedure will be executed. If the Magnetic separation command is executed when the Separation On
checkbox is not checked, the magnetic fingers will be drawn in.
Abb. 6-17: Magnetic separation command
63
Fig. 6-17: Magnetic separation command
Separation enabled checkbox
Check the checkbox to start the separation.
Uncheck the checkbox to end the separation.
Duration field
Waiting period. The application stops until the
waiting period has elapsed.
Starting the separation
To start the separation, execute the Magnetic separation command when the Separation On checkbox is
activated.
The magnetic fingers will be drawn out.
Exiting the separation
To end the separation, execute the Magnetic separation command when the Separation On checkbox is
deactivated.
The magnetic fingers will be drawn in.
6.3.9 Mix command
The Mix command can be used to mix liquids in a position by multiple aspiration and dispensing steps.
The options of the Mix command are identical with the options of the Sample transfer command in the Mix
area (see p. 51).
Page 64

64
epBlue Application Editor - Creating and editing applications
epBlue™ with MultiCon
English (EN)
6.3.10 Number of samples command
The Number of samples command is used to define how many samples or positions will be processed in the
following transfer commands. The Number of samples command is valid until it has been replaced by a new
Number of samples command.
You can use several Number of samples commands within one application. When the application starts, the
software will query entries for the commands Number of samples. If you do not want to execute part of the
application, enter 0.
If you do not use the Number of samples command, epBlue asks you for the number of samples at the start
of the application. This entry then applies for all commands of the application.
The sample quantity is limited by the pattern.
Abb. 6-18: Number of Samples command
Fig. 6-18: Number of Samples command
Fix Sample Count checkbox
Check the checkbox in order to define the
number of samples.
Uncheck the checkbox to enter the number of
samples at the start of the application.
Number of Samples field
Active if the Fix number of samples checkbox is
checked. Enter the number of samples. This value
will be taken into account for the pattern.
Max Number of Samples field
Active if the Fix number of samples checkbox is
not checked. Maximum number of samples that
can be processed in the application.
Comment field
This text field is displayed when the software asks
for the number of samples. Enter explanatory
information in the field.
In accordance with the subsequent command, the Number of samples command has the following
effects:
• Before the Sample transfer command: number of samples that are aspirated from the source labware.
• Before the Reagent transfer command: number of destination positions into which liquid is dispensed.
• Before the Pool oder Pool one destination command: number of source positions from which liquid is
aspirated.
Page 65

epBlue Application Editor - Creating and editing applications
epBlue™ with MultiCon
English (EN)
• Before the Dilute command: number of samples to be diluted. The number of dilution steps is defined by
the pattern.
• Before the Mix command: number of source positions in which liquid is mixed.
• With an eight-channel dispensing tool: for values between 1 – 8, 8 samples are processed. For values
9 - 16, 16 samples are processed, etc.
6.3.11 Temperature command
The command Temperature only is available for devices with thermal module.
65
With the Temperature command you can temper the labware in a thermal module. The temperature control
stops when the epBlue is exited.
Abb. 6-19: Temperature window
Fig. 6-19: Temperature window
Location drop-down list
Select a thermal module.
Activate the Temperature on
Activate the thermal module. Activated thermal
modules will be switched off when you uncheck
the checkbox.
Activate the Keep Temperature after application
run
Activate the thermal module for the period after
the application has exited. This function can be
used to cool samples after the application run has
been completed.
Temperature field
Set the set temperature of the thermal module.
0 °C – 110 °C range.
Page 66

66
epBlue Application Editor - Creating and editing applications
epBlue™ with MultiCon
English (EN)
6.3.12 Thermomixer command
The command Thermomixer only is available for devices with thermomixer.
The Thermomixer command can be used to set the temperature and speed of the thermomixer.
Abb. 6-20: Thermomixer window
Fig. 6-20: Thermomixer window
Template drop-down list
The templates for the labware contain saved
settings for mixing.
Mixing on checkbox
Activate the mixing function of the thermomixer.
Speed field
Set the mixing frequency. 300 rpm – 2000 rpm
range.
Duration field
Set the mixing time. 5 s – 120 min range.
Information on the thermomixer can be found in the epMotion hardware operating manual.
NOTICE! Contamination of samples and the device due to high mixing frequency.
If the speed is set too high, liquid will spray out of the vessels. Labware may become loose
from the holder and fly about.
Temperature on checkbox
Activate the temperature control of the
thermomixer.
Keep temperature after applicaton run field
Activate the temperature control for the period
after the end of the application. This function can
be used to cool samples or reagents after the end
of the application.
Temperature field
Set the set temperature of the thermomixer,
4 °C – 95 °C range.
Observe the maximum speeds of the labware in the operating instructions.
Page 67

epBlue Application Editor - Creating and editing applications
Tab. 6-2: Maximum speed for labware on the thermomixer
Labware Maximum speed in rpm
Tubes 1000
DWP 96 1200
DWP 384 1200
MTP 6 1000
MTP 96 2000
MTP 384 2000
PCR 96 2000
PCR 384 2000
Reservoir Rack Cannot be mixed
Thermorack/Thermoblock 1000
Thermoadapter 96 1000
Thermoadapter 384 1000
Thermorack TMX 1300
PrepRack 1300
epBlue™ with MultiCon
English (EN)
67
6.3.12.1 Setting the template for the Thermomixer
Prerequisites
• The Thermomixer command is selected (see p. 66).
1. Edit the template in the Options field.
The word Changed appears next to the Save button.
2. Enter the name of the template.
3. Click on the Save button.
The template will be saved.
6.3.12.2 Managing templates for Thermomixer
Abb. 6-21: Labware Editor > TMX Templates
Fig. 6-21: Labware Editor > TMX Templates
Manage the templates for the thermomixer in the Labware Editor > TMX Templates.
Page 68

68
epBlue Application Editor - Creating and editing applications
epBlue™ with MultiCon
English (EN)
6.3.13 Vacuum command
BAR
The command Vacuum only is available for devices with vacuum unit.
The Vacuum command is used to create a vacuum in the vacuum unit. You can aspirate liquid in filter
plates.
Prior to executing the application, equip the vacuum unit as described in the epMotion hardware operating
manual.
Abb. 6-22: Vacuum window
Fig. 6-22: Vacuum window
Frame drop-down list
Type of Vac Frame used.
Pressure field
Vacuum in the vacuum unit. Unit mbar or kPa.
Maximum underpressure 850 mbar/85 kPa.
Duration field
Time during which the vacuum is maintained.
0 s – 100 min 59 s range.
Use Vacuum Lid checkbox
Activate transport of the Vac Lid with the gripper.
Use Vacuum Lid drop-down list
Vac Lid used.
Check levels checkbox
The optical sensor checks the remaining volume
of all wells in a filter plate on the vacuum unit. If
remaining liquid has been detected, a vacuum
will be reapplied. Checking the remaining volume
takes too long.
Page 69

epBlue Application Editor - Creating and editing applications
epBlue™ with MultiCon
English (EN)
6.3.13.1 Transporting the Vac Lid with the gripper
Use the Vacuum command to transport the Vac Lid from location T0 to the filter plate in the vacuum unit
and back to location T0 with the gripper.
Prerequisites
• The Vac Lid is in location T0.
To have the Vac Lid transported from location T0 to the filter plate at the start of the Vacuum command,
activate the Use Vacuum Lid checkbox.
After the time set in the Duration field has elapsed, the gripper takes the Vac Lid off the filter plate at an
underpressure of 100 mbar (10 kPa). The gripper transports the Vac Lid to position T0.
6.3.14 Transport command
69
The command Transport only is available for devices with gripper.
The Transport command can be used to transport labware. The gripper takes labware from one location and
transports it to another location.
Abb. 6-23: Transport window
Fig. 6-23: Transport window
Labware
Select the labware.
To location
Select a location.
Information on the labware that is being transported can be found in the hardware operating
manual.
Page 70
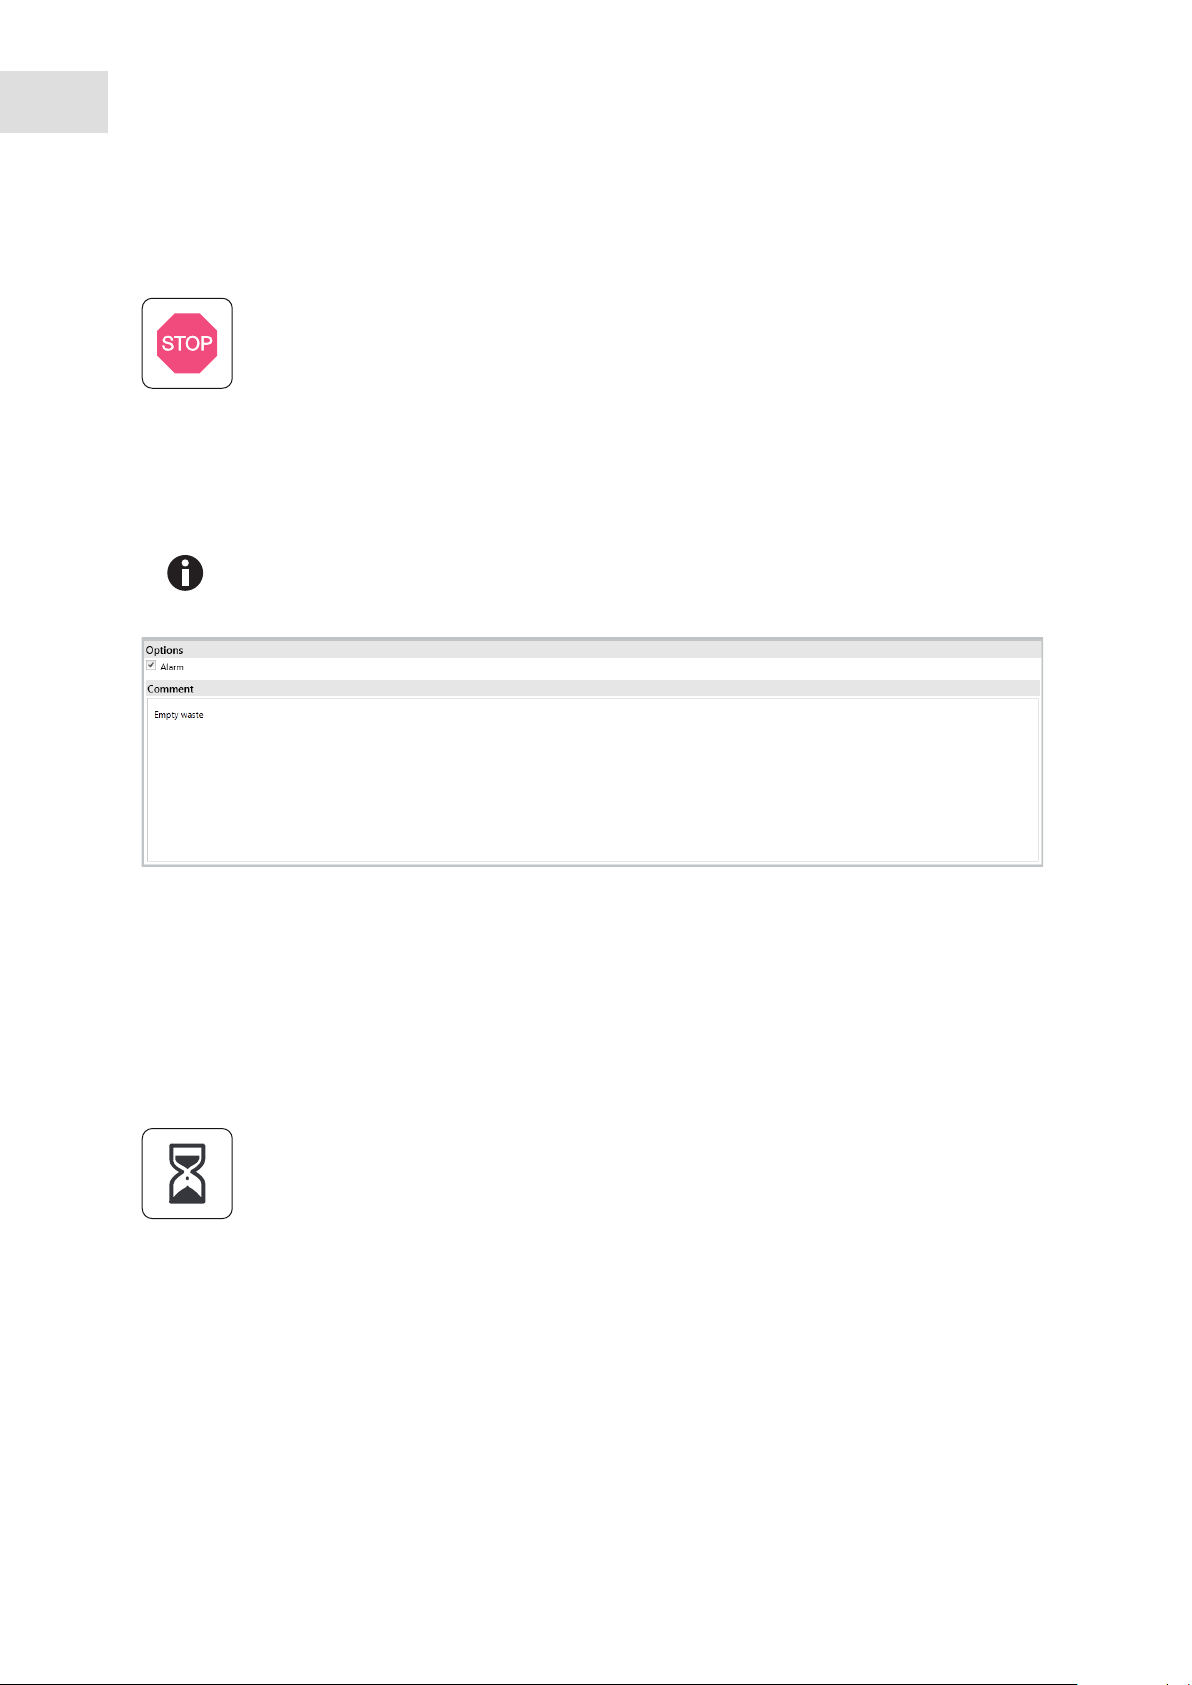
70
epBlue Application Editor - Creating and editing applications
epBlue™ with MultiCon
English (EN)
6.3.15 User intervention command
The User intervention command is used to interrupt an application. The application will be continued when
the user confirms a message.
You can use the User intervention command to empty the waste container manually.
Do not change the filling volume during the interruption. If you need to change the filling
volume, use several applications to do so.
Do not change the equipping of the worktables.
Abb. 6-24: User Invention window
Fig. 6-24: User Invention window
Comment window
The comment appears when the command is
executed.
Alarm checkbox
An acoustic signal sounds if the command is
executed.
6.3.16 Wait command
The Wait command is used to create a waiting period. The application will be continued after the waiting
period. The command can be used to take into account incubation periods between the addition of
reagents.
Page 71

Abb. 6-25: Wait window
Fig. 6-25: Wait window
epBlue Application Editor - Creating and editing applications
epBlue™ with MultiCon
English (EN)
71
Duration field
Waiting period.
Wait for temperature checkbox
Location drop-down list
Thermal module whose temperature control is
waited for.
The waiting period begins after the thermal
module has reached the set temperature.
6.3.17 Importing commands from a CSV file
A CSV file is an ASCII text file. A CSV file defines the structure and contents of a table. Every line of text in
a CSV file describes a row in a table. The columns in the table row must be separated by commas,
semicolons or tabs.
Files can be imported into epBlue in CSV format. epBlue generates individual Sample transfer commands
from the CSV file.
The CSV file contains the following information for each transfer:
• Volume
• Source vessel
• Destination vessel
• Dispensing tool
You can use the CSV files to carry out liquid transfers with various volumes. You can dilute samples with
various concentrations to a uniform concentration (normalization).
Page 72

72
epBlue Application Editor - Creating and editing applications
epBlue™ with MultiCon
English (EN)
6.3.17.1 Creating a CSV file
You can create and edit CSV files using a spreadsheet software or text editor.
Make sure that the table meets the following criteria:
• Each transfer command is defined in a separate row, (Fig. 6-26 on p. 73). In the screenshot, these are
the cells A1 to E1. The names can be abbreviated and also apply to plates.
– Rack
– Source Barcode
– Source List Name
– Destination Barcode
– Destination List Name
• Racks 1 to 4 are specified; they are rows A2 to A5 in the screenshot.
Row 7 contains the listed contents. This corresponds to rows A7 to H7 in the screenshot.
– ID
– Rack: source labware
– Source: position in the source labware
– Rack: destination vessel labware
– Destination: position in the destination labware
– Volume: Transfer volume in µL
– Tool: Dispensing tool
– Name: Name of sample
If you have the epBlue ID module, you can use ID tracking.
If you do not have the epBlue ID module, you can leave the following fields empty:
• Source Barcode
• Source List Name
• Destination Barcode
• Destination List Name
• ID
The ID column must always be present in the CSV file.
• The CSV file has 8 columns.
• Each line of the CSV file must have 7 separating characters. This also applies for empty columns.
• The values start in row 8 and continue without interruption.
• The values must be separated by commas, semicolons or tabs.
• Decimals can be divided by a dot or comma.
• The separating characters for the values and decimals may not be identical.
• There may be no entries below the values. These entries are interpreted as commands during the import
and cause errors.
• Rows that start with # are interpreted as comments. These rows are not imported.
• A maximum of 500 transfer commands are imported.
• A maximum of 4 locations for source labware and 4 locations for destination labware may be used.
The positions in the source labware and destination labware can be entered as numbers (1, 2, 3,
numbered by row) for racks or as alphanumeric coordinates (A1, B5, A3) for plates.
Page 73

epBlue Application Editor - Creating and editing applications
The tools for the CSV file are coded using numbers:
– 1 equals TS_50
– 2 equals TS_300
– 3 equals TS_1000
– Eight-channel dispensing tools cannot be used.
Abb. 6-26: CSV file in a spreadsheet software
epBlue™ with MultiCon
English (EN)
73
Fig. 6-26: CSV file in a spreadsheet software
Abb. 6-27: CSV file in a text editor
Fig. 6-27: CSV file in a text editor
Page 74

74
epBlue Application Editor - Creating and editing applications
epBlue™ with MultiCon
English (EN)
6.3.17.2 Importing a CSV file
Prerequisites
• CSV file available (see p. 72).
A maximum of 500 transfer commands can be imported.
Import a CSV file as follows:
1. Create a new application.
2. Insert the Number of samples command as the first command.
3. In the Number of samples command, activate the Fixed sample count checkbox.
4. Set the Number of samples parameter to 1.
5. Insert the Sample transfer command as the second command.
The settings for all commands in the CSV file are defined in the Sample transfer command.
6. In the command Sample transfer >, determine parameter locations for source labware and destination
labware.
The locations defined in the Sample transfer command are available for the commands in the CSV file.
4 locations each are available for the source labware and the destination labware.
In the example, 2 locations each were defined for the source labware and destination labware in the
Sample transfer command. These locations are available for commands in the CSV file.
The number of the labware from the CSV file must correspond to the parameters for the Sample transfer
command.
Labware is used in the sequence defined in the Sample transfer command. If rack 2 is specified in the
CSV file in column B, the second rack from the Source area will be used as the source vessel for this
command.
Page 75

epBlue Application Editor - Creating and editing applications
epBlue™ with MultiCon
English (EN)
7. Define settings used in the CSV file in the Options and Mix fields.
The Elution from filter option is not available for imported commands.
The mixing volumes and mixing frequencies must be suitable for all imported transfer commands. The
value set for the mixing frequency must be manually overwritten with a different value. If you use
different dispensing tools, use a mixing frequency of 11 mm/s.
8. Check all settings. The settings must meet all of the procedure requirements.
9. Click on the Sample transfer command.
75
10.Click on the symbol in the menu bar.
CSV
11.Select the CSV file Click on the Open button.
The CSV file is imported. Every line in the CSV file corresponds to a Sample transfer command. The
commands are imported into the procedure. The procedure is shown in the Procedure column.
Page 76

76
epBlue Application Editor - Creating and editing applications
epBlue™ with MultiCon
English (EN)
6.4 Pattern
For the pattern, enter the source position and destination position between which liquid transfers take
place. A pattern can contain 4 source labware and 4 destination labware.
Type of pattern Description
Regular pattern • Available for all commands.
• With regular pattern.
• epBlue detects and completes the pattern.
• Not available for ReservoirRacks and ReservoirRack modules.
Irregular pattern • Available for some commands.
• Pattern according to a random pattern.
• epBlue cannot detect and complete the pattern.
• Replicates not possible.
Whether you can define regular or irregular patterns depends on the command and the labware.
Tab. 6-3: Pattern options with regular labware
Command Source labware pattern Destination labware pattern
Sample transfer Regular and irregular Regular and irregular
Reagent transfer Regular and irregular Regular and irregular
Pool Regular Regular and irregular
Pool one Destination Regular and irregular Regular and irregular
Dilute Regular and irregular Regular
Mix Regular and irregular Regular and irregular
Tab. 6-4: Pattern options with ReservoirRack
Equipped with Pattern
ReservoirRack ReservoirRack module Reservoir 30 mL
ReservoirRack module Reservoirs 100 mL
ReservoirRack ReservoirRack module with reaction vessels Irregular
Regular
Page 77

epBlue Application Editor - Creating and editing applications
6.4.1 Menu bar in the Edit Pattern window
Abb. 6-28: Menu bar in the Edit Pattern window
Fig. 6-28: Menu bar in the Edit Pattern window
epBlue™ with MultiCon
English (EN)
77
Reset
Back arrow
Reject pattern.
Complete
Preview
If the pattern is regular, the pattern is completed
until the number of samples defined in the
Number of Samples command is reached.
Show
Next arrow
One step forward.
6.4.2 Defining regular patterns
Prerequisites
• Labware is positioned on the worktable.
• Transfer command or Mix command activated.
1. Select the source labware in the Source area.
2. Select the destination labware in the Destination area.
3. Click on the Pattern button.
The Edit Pattern window appears.
4. To delete an existing pattern, press the Reset button.
One step back.
Preview of the pattern with an increased number
of samples.
Show the pipetting sequence.
If you work with an eight-channel dispensing tool, select the top position. For a 96-well pate,
this will be row A. For a 384-well plate, this will be rows A or B. epBlue will add the pattern for
the remaining channels.
5. Select the first source position in the source labware.
6. Select the first destination position in the destination labware. To create replicates, select several
destination positions one after the other.
Page 78

78
epBlue Application Editor - Creating and editing applications
epBlue™ with MultiCon
English (EN)
Abb. 6-29: Selecting the first source position
Fig. 6-29: Selecting the first source position
Abb. 6-30: Selecting the first destination position
Fig. 6-30: Selecting the first destination position
7. Select the next source position in the source labware.
8. Select the next destination position in the destination labware.
Abb. 6-31: Selecting the next source position
Abb. 6-32: Selecting the next destination position
Fig. 6-31: Selecting the next source position
Fig. 6-32: Selecting the next destination position
epBlue attempts to detect the pattern and marks the next position gray.
If you created replicates during the first step, and select the destination position for the second liquid
transfer, the positions will be defined for the replicates in the same order as in the first step.
9. If the pattern matches your requirements, press the Complete button. The pattern will be completed
automatically up to the defined number of samples.
If you would like to discard the pattern, press the Reset button. Start from the beginning.
10.To check a pattern, press the Show button.
The order of the pattern will be displayed. The source position and destination position of a liquid
transfer are the same color.
Page 79

epBlue Application Editor - Creating and editing applications
epBlue™ with MultiCon
English (EN)
6.4.3 Defining irregular patterns
Irregular patterns can be defined for source labware and destination labware. If the pattern is irregular, it is
not completed.
Prerequisites
• Labware is positioned on the worktable.
• Create the application with the Transfer or Mix command (see p. 48).
1. Press the Pattern button.
Abb. 6-33: Edit Pattern window
79
Fig. 6-33: Edit Pattern window
The Edit Pattern window appears.
2. Check the Irregular pattern checkbox in the Source area.
3. Optional in the Destination area: check the Irregular pattern checkbox.
4. Define the pattern. Specify all source positions and destination positions.
If the pattern is irregular, the software does not complete the pattern automatically. The Complete
button is not active.
Page 80

80
epBlue Application Editor - Creating and editing applications
epBlue™ with MultiCon
English (EN)
6.5 Optical sensor
The hardware operating manual contains a description of the of the functioning of the optical
sensor.
The following functions of the optical sensor can be activated:
• Detect volumes
Determines the filling level for positions of labware, which has the Detect volumes option activated.
• Detect tips
Checks to see if the pipette tips defined in the application are available.
Determines the quantity and position of tips in the rack.
Works only with epT.I.P.S. Motion in TipHolders and Racks from Eppendorf.
• Check labware placement
Detects the labware coding.
Checks to see if the labware on the epMotion worktable matches the labware on the epBlue worktable.
If the optical sensor is switched off, the processing time of the application is reduced.
6.5.1 Detect volumes
The Detect volumes function is used to measure the filling level in vessels.
The optical sensor detects the level of vessels up to the detection limit. The detection limit depends on the
vessel geometry. Generally, levels 3 mm or higher can be detected. Information on detection limits for
individual vessels can be found in the labware library. If the level of the vessel is below the detection limit,
the volume must be entered manually.
The optical sensor can carry out the Detect volumes function in accordance with different specifications.
These specifications are defined in application parameters when the application is created. You can change
the specifications when you start the run by defining different run parameters.
Application parameter Run parameter
Defined when creating the application (see p. 81) Defined when starting the application run
(see p. 82)
Defined individually for each labware used in the
application
Applies for the complete labware of the application
Different parameters can be set for each run
Page 81

epBlue Application Editor - Creating and editing applications
6.5.1.1 Setting application parameters for the Detect volumes function
Abb. 6-34: Properties window
Fig. 6-34: Properties window
Tab. 6-5: Detect volumes
Off • Deactivate the optical sensor.
• The volume of all vessels must be entered when the application is
started.
For labware with ≤ vessels, the volume for each vessel can be
specified in the Volume column.
For labware with > 56 vessels, one volume can be specified for all
vessels. This volume will be recommended at the start of the
application, and can be changed.
• The volume specification does not take into account the surface
meniscus of the liquid.
• If the volume is not enough, the result may be faulty dispensing.
All positions • Check the volume of all positions in a labware.
• If you work with an eight-channel dispensing tool, the epMotion uses
the calculated volume for each vessel.
• If you work with a multi-channel dispensing tool, the epMotion uses
the lowest calculated volume in a column for the liquid aspiration
and the highest calculated volume in a column for the liquid
dispensing.
epBlue™ with MultiCon
English (EN)
81
If the filling levels in one plate differ significantly or the labware has very low filling levels, use
the Aspirate from bottom and Dispense from top option. Do not use the Random access (see
Sample transfer > Options command on p. 50) option.
To set the application parameters for the Detect volumes function (see Defining the application
parameters of the labware on p. 44).
Page 82
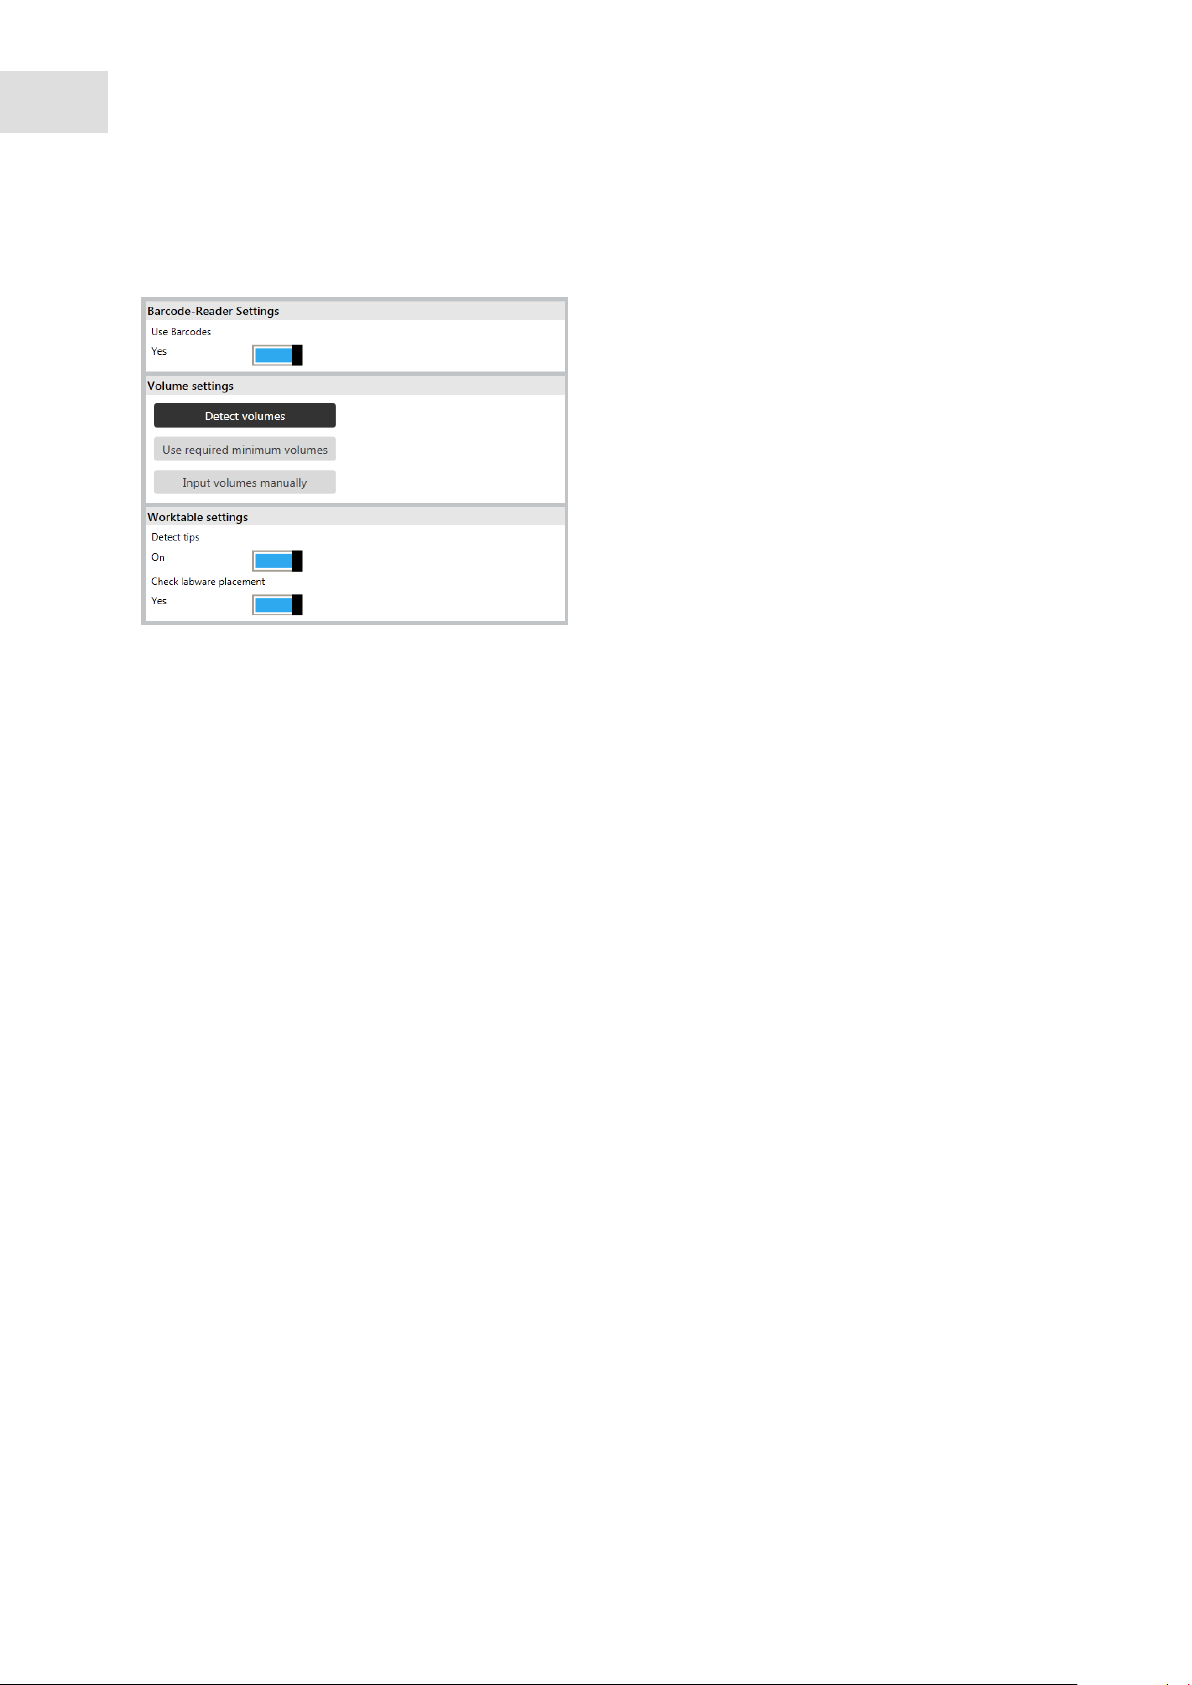
82
epBlue Application Editor - Creating and editing applications
epBlue™ with MultiCon
English (EN)
6.5.1.2 Setting the run parameters for the Detect volumes function
Abb. 6-35: Run parameter settings at the start of the application
Fig. 6-35: Run parameter settings at the start of the application
Detect volumes radio button
Activate the Detect volumes function. The
parameters set in the application for the
labware are used.
Detect tips checkbox
Activate Detect tips.
Check labware placement checkbox
Activate Check labware placement.
Use required minimum volume radio button
epBlue assumes that all vessels are filled with the
minimum required volume for this run. Use this
function for dry runs.
Input volumes manually radio button
Deactivate the Detect volumes function. You have
to enter the sample volume manually.
To set the run parameters for the Detect volumes function (see Setting the run parameters for the optical
sensor on p. 28).
Prerequisites
• Application parameters Off
• Run parameter Detect levels
The filling volume is not measured at the start of the application.
Prerequisites
• Application parameters All positions
• Run parameter Input level manually
The filling volume must be entered manually when the application is started.
Page 83

epBlue Application Editor - Creating and editing applications
epBlue™ with MultiCon
English (EN)
6.5.2 Detect tips
You can only use the Detect tips function, if you are using ep.T.I.P.S. Motion in tip holders and racks by
Eppendorf.
Enter the Detect tips function as a run parameter at the start of the application (see Setting the run
parameters for the optical sensor on p. 28).
The Detect tips function checks the type of pipette tips and determines the number and position of tips in
the rack.
The epT.I.P.S. Motion tray is coded. The optical sensor uses the code to detect the type of pipette tips.
Tab. 6-6: Arrangement of pipette tips if the Detect tips function is activated.
123456789101112
A
B
C
D
E
F
G
123456789101112
A
B
C
D
E
F
G
123456789101112
A
B
C
D
E
F
G
83
The Detect tips function checks to see if there are enough pipette tips available for the application. The
pipette tips must be continuously positioned without gaps. epBlue prompts you to refill the pipette tips
after the available tips have been depleted. In the next application, you can continue using a rack that has
already been opened.
Tab. 6-7: Arrangement of pipette tips if the Detect tips function is deactivated.
123456789101112
A
B
C
D
E
F
G
123456789101112
A
B
C
D
E
F
G
123456789101112
A
B
C
D
E
F
G
If the Detect tips function is deactivated, the columns of the rack must be fully equipped. The tips must be
available as of position A1.
6.5.3 Check labware placement
Enter the Check labware placement function as a run parameter when starting the application (see Setting
the run parameters for the optical sensor on p. 28).
The Check labware placement function detects the labware coding. The function checks if the labware on
the epMotion worktable matches the equipping of the epBlue worktable.
Page 84

84
epBlue Application Editor - Creating and editing applications
epBlue™ with MultiCon
English (EN)
Page 85

epBlue Application Editor - Managing applications and folders
epBlue™ with MultiCon
English (EN)
7 epBlue Application Editor - Managing applications and folders
This chapter describes how to manage applications in epBlue. Folders are managed according to the same
rules.
7.1 Menu bar and start screen
Abb. 7-1: Application Editor menu bar
Fig. 7-1: Application Editor menu bar
85
Creating a new application
Creating a new folder
Opening an application
Editing the application properties
Copying an application or folder
Abb. 7-2: Start screen in the Application Editor
Cutting an application or folder
Pasting an application or folder
Deleting an application or folder
Importing applications
Exporting applications
Fig. 7-2: Start screen in the Application Editor
Page 86

86
epBlue Application Editor - Managing applications and folders
epBlue™ with MultiCon
English (EN)
7.2 Copying and deleting applications
7.2.1 Copying applications
You can copy applications.
The Eppendorf folder contains applications defined by Eppendorf AG. These applications
cannot be executed or changed. They are used as templates and program examples. Copy
these applications to your area in order to modify and execute it.
Prerequisites
• The start screen in the Application Editor is open.
1. Select the desired application.
2. Click on the symbol in the menu bar.
3. Select the folder into which the application is to be inserted.
4. Click on the symbol in the menu bar.
The application appears in the selected folder.
7.2.2 Deleting an application
You can delete an application.
Prerequisites
• The start screen in the Application Editor is open.
1. Select the application.
2. Click on the symbol in the menu bar.
3. Confirm deleting the application by pressing the OK button in the message window.
The application is deleted.
7.3 Changing the labware properties
You can change the name and properties of an application.
Prerequisites
• The start screen in the Application Editor is open.
Select the application.
The properties of the application appear in the Properties field.
Press the symbol in the menu bar.
The Edit Properties window appears.
Page 87

epBlue Application Editor - Managing applications and folders
Abb. 7-3: Edit Properties window
Fig. 7-3: Edit Properties window
Change the application settings.
To save the changes, press the Save button.
epBlue™ with MultiCon
English (EN)
87
7.4 Importing and exporting applications
7.4.1 Importing applications
Tab. 7-1: You can import applications in the following file formats:
File format Source of file
*.ws or *.lhs Applications from the control panel
*.dws Applications from versions < 20.X of epBlue
*.export Applications from versions ≥ 20.X of epBlue
Prerequisites
• The start screen in the Application Editor is open.
1. Select the folder into which the application is to be imported.
2. Click on the symbol in the menu bar.
The Import Applications window appears.
3. Select the applications to be imported.
4. Press the Open button.
The Import Application window appears.
Page 88

88
epBlue Application Editor - Managing applications and folders
epBlue™ with MultiCon
English (EN)
Abb. 7-4: Import Application window
Fig. 7-4: Import Application window
Name area
List of all applications for which import was
selected.
Standard application checkbox
Activate if the application is to be imported.
Selected checkbox
Materials tab
Shows the labware used in the applications.
Import button
Import applications.
Cancel button
Cancel import.
Activated, if the application is an Eppendorf
template.
Define import rules area
Define rules for the import of the applications.
5. Define the rules for importing labware.
6. Click on the Import button.
The files will be imported. A summary of the import will be displayed.
7. Click on the Finish button.
If you import applications from older software versions, the display of the worktable in epBlue
may not match your device configuration. To remedy this problem, save the application under
a new name using Save as.
Page 89

epBlue Application Editor - Managing applications and folders
7.4.2 Exporting applications
You can export applications individually. You can export a folder with applications.
Prerequisites
• The start screen in the Application Editor is open.
1. Select the application to be exported.
2. Click on the symbol in the menu bar.
The Browse For Folder window opens.
3. Select the folder in which the application is to be saved.
4. Press the OK button.
The applications are exported.
Exported applications can only be used with epBlue from version 40.x.
epBlue™ with MultiCon
English (EN)
89
Page 90

90
epBlue Application Editor - Managing applications and folders
epBlue™ with MultiCon
English (EN)
7.5 Saving an application as a PDF file
You can save an application as a PDF file or print the application. An application includes the procedure
and equipping of the worktable. You can save the log of an application as a PDF file or print the log (see
p. 38).
Prerequisites
• A printer is connected to the MultiCon.
• The application is open.
1. Click on the symbol.
The print preview opens. The menu bar contains the following symbols:
Search in the document. Show the first page.
Print the document. Show the previous page.
Page setup. Show the next page.
Scale the document. Show the last page.
Zoom in the view. Create a PDF.
Set the zoom factor. Close the view.
Zoom out the view.
2. Check the layout and set up the page.
3. Save or print the document as a PDF file.
4. Close the window.
Page 91

epBlue Labware Editor - Creating and managing labware
epBlue™ with MultiCon
English (EN)
8 epBlue Labware Editor - Creating and managing labware
This chapter describes how to create and manage labware and labware combinations in epBlue.
Information on properties and use of labware can be found in your hardware operating manual.
8.1 Overview of labware
The name of the labware includes information on the manufacturer and type. Example: EP_MTP_384V
stands for Eppendorf_microplate_384 wells in V-Form.
Tab. 8-1: Labware types
Abbreviation Description
DWP Deepwell plate
FP Filter plate
MTP Microplate
PCR PCR plate
TP Plate with vessels that can be removed individually
Cleanup Plate from the PCR Cleanup Kit
DNA/RNA Plate from the kit for purification and insulation
TT Eppendorf twin.tec
PCR Plate Thermo Fixed combination of thermoblock and PCR plate
Quantities Maximum filling volume of a vessel in mL or µL
91
Tab. 8-2: Plates
Labware type Labware
DWP 96 Deepwell plate with 96 wells
DWP 384 Deepwell plate with 384 wells
MTP 6 Microplate with 6 wells
MTP 24 Microplate with 24 wells
MTP 96 Microplate with 96 wells
MTP 384 Microplate with 384 wells
Page 92

92
epBlue Labware Editor - Creating and managing labware
epBlue™ with MultiCon
English (EN)
8.2 Managing labware
8.2.1 Menu bar
Abb. 8-1: Menu bar in the Labware Editor
Fig. 8-1: Menu bar in the Labware Editor
Create new labware
Open labware
Delete labware
Abb. 8-2: Start screen of the Labware Editor
Display labware properties
Import labware
Export labware
Fig. 8-2: Start screen of the Labware Editor
Page 93

epBlue Labware Editor - Creating and managing labware
epBlue™ with MultiCon
English (EN)
8.2.2 Deactivating and activating labware
To keep a clear overview of your labware library in the Application Editor, you can deactivate labware that is
not being used. Deactivated labware can be reactivated at any time.
Applications with deactivated labware cannot be started. If you start an application with deactivated
labware, an error message appears.
Proceed as follows:
1. Open the Labware Editor.
2. Select the labware.
The status of the labware is displayed in the Properties area.
3. To deactivate the labware, flip the switch from active to inactive.
4. To activate the labware, flip the switch from inactive zu active.
93
8.2.3 Delete labware
You can delete labware that you have created. Proceed as follows:
Prerequisites
• The Labware Editor is open.
1. In the Labware Library, select the labware to be deleted.
2. Check to see if the selected labware is activated.
3. Deactivate activated labware (see p. 93).
4. Click on the symbol to delete the labware.
8.2.4 Import labware
You can import labware files in zip and export formats. Proceed as follows:
Prerequisites
• The Labware Editor is open.
1. Click on the symbol in the menu bar.
The Open Labware window opens.
2. Select the labware file.
3. Press the Open button.
The Import labware window opens.
Page 94

94
epBlue Labware Editor - Creating and managing labware
epBlue™ with MultiCon
English (EN)
Abb. 8-3: Import labware window
Fig. 8-3: Import labware window
Name area
List of the labware selected for import.
Standard labware checkbox
Activated, if the labware is standard Eppendorf
labware.
Selected checkbox
Define import rules area
Define rules for the import of the labware.
Import button
Import labware.
Cancel button
Cancel import.
Activate if the labware is to be imported.
4. Check selected labware files and define rules for the import.
5. To import the labware files, click on the Import button.
The labware files are imported to epBlue.
Abb. 8-4: Imported labware
Fig. 8-4: Imported labware
6. End the import by clicking on the Close button.
Page 95

epBlue Labware Editor - Creating and managing labware
epBlue™ with MultiCon
English (EN)
8.2.5 Export labware
You can export labware files in order to use them for another epMotion. You can export individual labware
files or the content of a folder.
Exported applications can only be used with epBlue from version 40.x.
Proceed as follows:
Prerequisites
• The Labware Editor is open.
1. Select labware or folders.
2. Click on the symbol in the menu bar.
Abb. 8-5: Export labware window
95
Fig. 8-5: Export labware window
The Export labware window appears.
3. Select the labware you would like to export from the Selected column.
4. Confirm the selection by pressing Save.
The Browse For Folder window appears.
5. Select the destination folder.
6. Start export. Press the OK button.
The labware is exported to the selected folder in the format .export.
Page 96

96
epBlue Labware Editor - Creating and managing labware
epBlue™ with MultiCon
English (EN)
8.2.6 Viewing the properties of the labware
Proceed as follows:
Prerequisites
• The Labware Editor is open.
Select the labware.
The properties of the labware are displayed in the Properties column.
8.2.7 Setting the bottom tolerance
NOTICE! Material damage due to placing the pipette tip on the base of the vessel.
If the pipette tips touch the bottom of the tube, the bottom tolerance is too low. The labware
will become damaged and the dispensing volume will be distorted.
Test the application without liquid.
Check the bottom tolerance when exchanging pipette tips, plates and vessels.
If pipette tips become jammed at the base of the vessel, increase the bottom tolerance.
If deviations in the dispensing volume occur, increase the bottom tolerance.
Proceed as follows:
Prerequisites
• The Labware Editor is open.
1. Select the labware.
2. Click on the symbol.
The Edit Properties window appears.
Abb. 8-6: Edit Properties window
Fig. 8-6: Edit Properties window
Page 97

epBlue Labware Editor - Creating and managing labware
epBlue™ with MultiCon
English (EN)
97
Name field
Name of labware
Comment field
Description of labware
Bottom Tolerance field
Bottom tolerance. The lowest bottom tolerance is
200 µm.
3. Change the bottom tolerance in the Bottom Tolerance field.
4. Save changes using the Save button.
The settings are saved. If the labware is write protected, a copy will be saved. Copies are numbered
consecutively.
Remain Volume field
Remaining volume will be calculated.
Eppendorf Standard Labware checkbox
This checkmark is placed automatically and
cannot be removed. Eppendorf Standard Labware
is write-protected.
Save button
Save changes.
Page 98

98
epBlue Labware Editor - Creating and managing labware
epBlue™ with MultiCon
English (EN)
8.3 Creating labware combinations
Before you create an application, you must create the required labware combination and save it in your
labware library.
You have the following options:
• Equipping racks, thermoracks or Reservoir Rack modules with individual vessels.
• Equipping Reservoir Racks with reservoirs or Reservoir Rack modules.
• Creating a labware combination based on existing labware.
8.3.1 Creating a labware combination.
Prerequisites
• The Labware Editor is open.
Abb. 8-7: Create new labware window
Fig. 8-7: Create new labware window
Name field
Name of labware
Comment field
Description of labware
Dialog_Elements radio button
Desired labware combination
Page 99
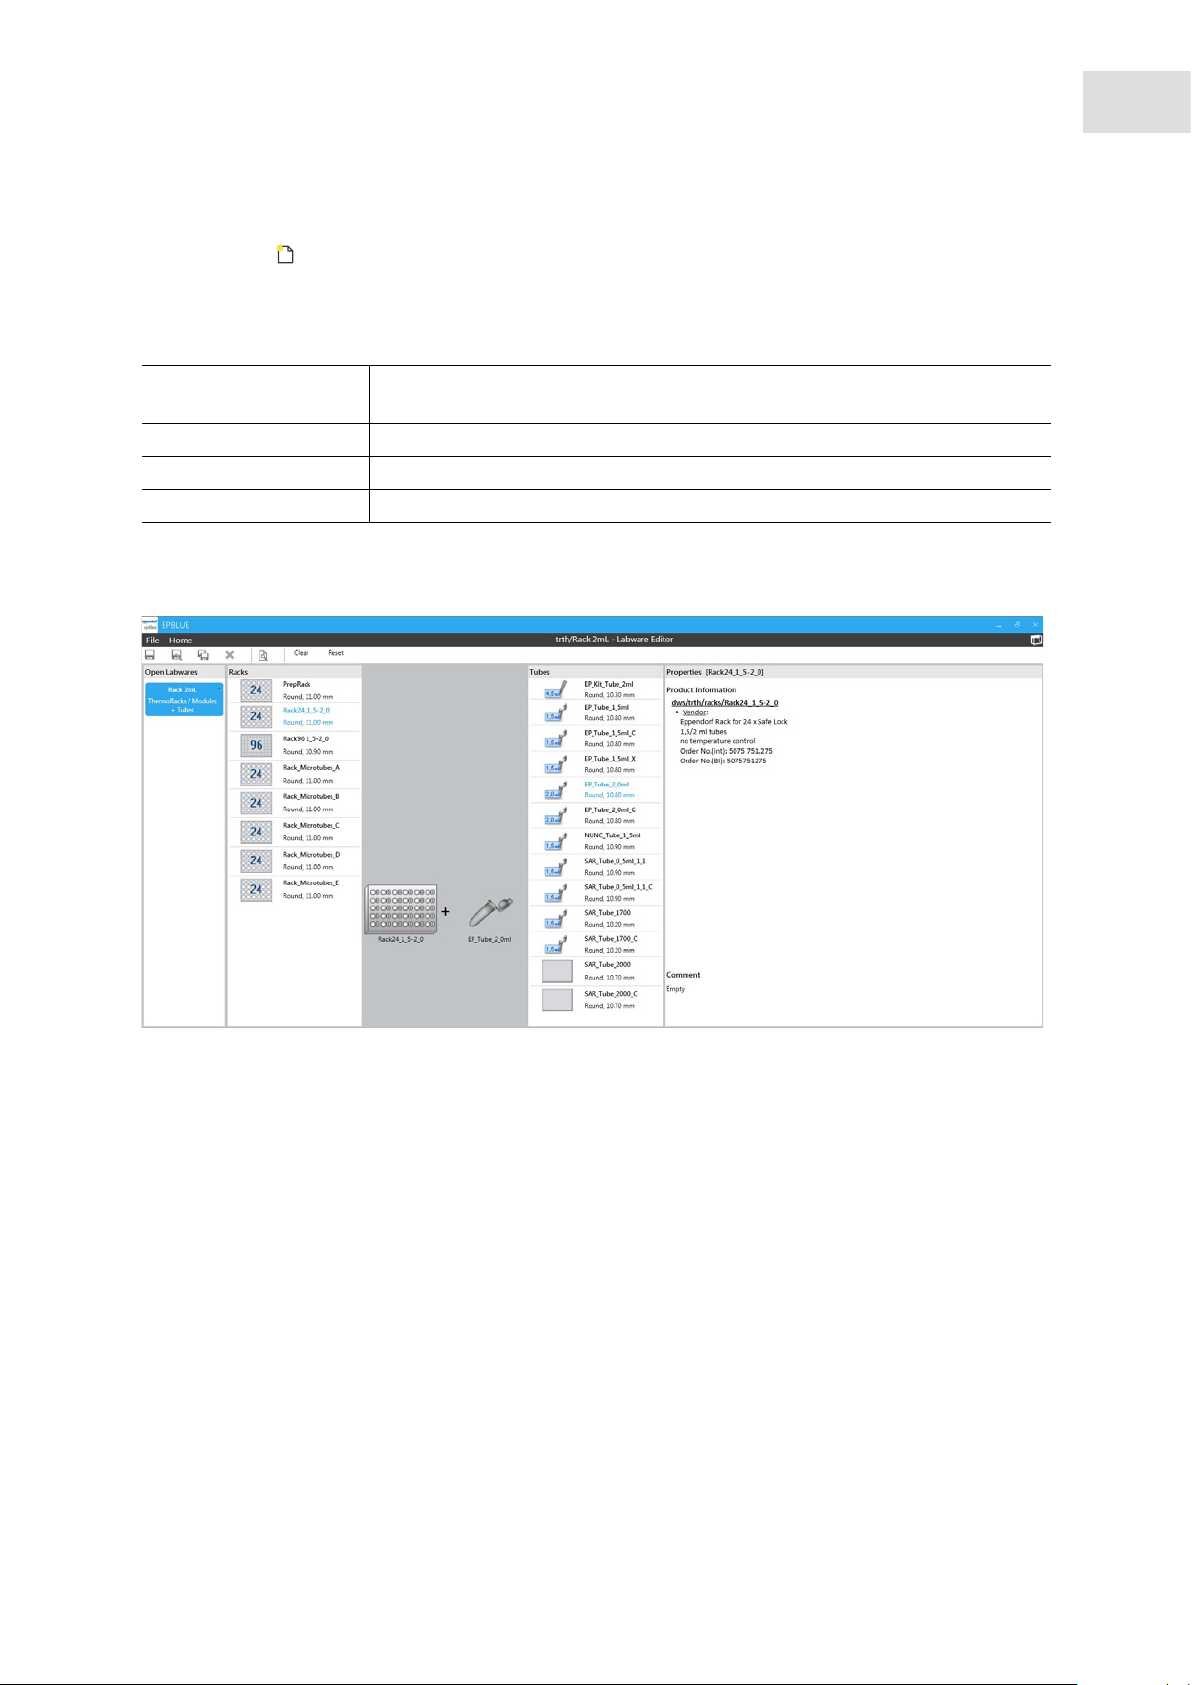
epBlue Labware Editor - Creating and managing labware
1. Click on the symbol in the menu bar.
The Create new labware window opens.
2. Enter the name, description and labware combination.
epBlue™ with MultiCon
English (EN)
99
Racks/
Equip the rack and thermorack with individual vessels.
thermoracks + tubes
Modules + tubes Equip the ReservoirRack Modul with reaction vessels.
ReservoirRack 7 Equip the ReservoirRack 7 with ReservoirRack modules.
ReservoirRack 3 Equip the ReservoirRack 3 with ReservoirRack modules.
3. Press the Create button.
The labware combination is opened. You can create the labware combination.
Abb. 8-8: Creating labware
Fig. 8-8: Creating labware
Page 100

100
epBlue Labware Editor - Creating and managing labware
epBlue™ with MultiCon
English (EN)
8.3.2 Creating a labware combination based on existing labware
Abb. 8-9: Start screen of the Labware Editor
Fig. 8-9: Start screen of the Labware Editor
Prerequisites
• The Labware Editor is open.
1. Select the labware.
The Properties column displays information, properties and detection limits of the labware.
2. Click on the symbol in the menu bar.
The Edit Properties window appears.
 Loading...