


XQUISIT 2

INSTRUCTION MANUAL
09.04 – English Elna International Corp. SA
Printed in JAPAN
www.elna.com

SAVE THESE INSTRUCTIONS
FOR USA ONLY -
This appliance has a polarized plug (one blade wider than the other). To reduce the risk of electric shock, this
plug is intended to fit in a polarized outlet only one way. If the plug does not fit fully in the outlet, reverse the
plug. If it still does not fit, contact a qualified electrician to install the proper outlet. Do not modify the plug in any
way.
Use only foot control YC-700 (UL, CSA) with your Xquisit II.
IMPORTANT SAFETY INSTRUCTIONS
When using an electrical appliance, basic safety precautions should always be
observed, including the following:
Your Elna Xquisit II computerized sewing/embroidery machine is designed and
constructed for HOUSEHOLD use only. Read all instructions before using this
machine.
DANGER- To reduce the risk of electrical shock:
1. An appliance should never be left unattended when plugged in. Always unplug this appliance from the
electric outlet immediately after using and before cleaning.
2. Always unplug before relamping. Replace bulb with same type rated 3 Watts.
W ARNING
- To reduce the risk of burns, fire, electric shock or injury to
persons:
1. Do not allow to be used as a toy. Close attention is necessary when this machine is used by or near
children.
2.
Use this appliance only for its intended use as described in this manual. Use only attachments
recommended by the manufacturer as described in this manual.
3. Never operate this appliance if it has a damaged cord or plug, if it is not working properly, if it has been
dropped or damaged, or dropped into water. Return the appliance to the nearest authorized dealer or service
center for examination, repair, electrical or mechanical adjustment.
4. Never operate the machine with any air openings blocked. Keep ventilation openings of the sewing machine
and foot controller free from accumulation of lint, dust and fibers.
5. Keep fingers away from all moving parts. Special care is required around the sewing machine needle.
6. Always use the proper needle plate. The wrong plate can cause the needle to break.
7.
Do not use bent needles.
8. Do not pull or push fabric while stitching. It may deflect the needle causing it to break.
9. Switch the sewing machine off (“0”) when making any adjustments in the needle area, such as threading
needle, changing needle, threading bobbin, or changing presser foot and the like.
10.
Always unplug sewing machine from the electrical outlet when removing covers, lubricating or when
making any other servicing adjustments mentioned in the instruction manual.
11. Never drop or insert any object into any opening.
12.
Do not use outdoors.
13. Do not operate where aerosol (spray) products are being used or where oxygen is being administered.
14. To disconnect, turn all controls to the off (“0”) position, then remove plug from outlet.

2
SECTION I
Machine Parts and Functions
Machine Parts.....................................................................4
Standard Accessories .........................................................5
Auxiliary Bed/Accessory Box and Free Arm .......................6
Additional Presser Foot Clearance......................................6
Attach and Remove Presser Feet.......................................6
Presser Foot Definitions ..................................................7-8
Presser Foot Storage..........................................................8
Attach and Remove Foot Holder ........................................9
Adjusting Foot Pressure......................................................9
Seam Allowance Lines........................................................9
Knee Lifter.........................................................................10
How to Lower Feed Dog ..................................................10
Controlling Sewing Speed.................................................10
Machine Operation Keys...................................................11
SECTION II
Getting Ready to Sew
Selecting Correct Needle and Thread...............................12
Needle Definitions .......................................................12-13
Changing Needles.............................................................13
For Your Safety .................................................................14
Connecting Machine to Power Supply .............................15
Welcome Screen ..............................................................15
LCD Screen Brightness Control........................................16
Index ............................................................................16-17
First Screen.......................................................................18
Operation Keys .................................................................18
LCD Keys ..........................................................................19
Removing Bobbin from Bobbin Case................................20
Winding Bobbin from Top Spool..................................20-22
Inserting the Bobbin..........................................................22
Automatic Top Threading..................................................23
Manual Top Threading .................................................24-25
Automatic Needle Threader – Manual
Operation.....................................................................26
Drawing Up the Bobbin Thread ........................................27
Test Sewing......................................................................28
How to Access Utility, Heirloom and
Quilting Groups and Folders...................................28-29
How to Select a Stitch......................................................30
Starting to Sew............................................................30-31
Thread Tension .................................................................32
Stitch Width and Length...................................................33
Stitch Width/Needle Position Key.....................................33
Stitch Length Key..............................................................34
Scissors Key and Lock/Reverse Key............................35-36
SECTION III
On-Screen Manual
Sewing Instruction Screens..............................................37
Machine Usage Screens..............................................38-39
Version and Update Data..................................................39
Personalized Machine Settings....................................40-41
SECTION IV
Sewing Techniques
Utility
Straight Stitch..............................................................42
Changing Sewing Direction.........................................42
Sewing on Heavy Fabrics............................................43
Gathering/Shirring........................................................44
Flat Fell Seam..............................................................45
Zippers, Lapped......................................................46-47
Zippers, Centered...................................................48-49
Zippers, Exposed.........................................................50
Invisible Zipper ............................................................51
Rolled Hem..................................................................52
Twin Needle Hem .......................................................53
Basting Stitch..............................................................54
Triple Seam .................................................................54
Saddle Stitch ...............................................................54
Zigzag Stitch................................................................55
Zigzag, Center – Overcast...........................................55
Multi-Cord Foot
Gathering Over a Cord...........................................55
Zigzag, Center – Satin Stitch Applique........................56
Zigzag Left...................................................................57
Zigzag Right.................................................................57
3-Step Zigzag Stitch.....................................................57
Serpentine Stitch.........................................................58
Applying Elastic...........................................................58
Blind Hem Stitch .........................................................59
Stretch Seam...............................................................60
Lingerie Stitch .............................................................60
Super Overlock Stitch..................................................60
Overlock Stitch............................................................61
Super Stretch Stitch....................................................61
Double Overlock Stitch ...............................................61
Tricot Stitch.................................................................62
Shell Tuck....................................................................62
Rickrack.......................................................................63
Eyelets.........................................................................63
Arrowtack....................................................................63
Bartack ........................................................................64
Darning Stitches..........................................................65
Directional Sewing, Straight Stitch..............................65
Directional Sewing, Zigzag Stitch................................65
Buttonholes............................................................66-68
Buttonholes, 4-Step ...............................................69-70
Bound Buttonholes .....................................................71
Corded Buttonholes ....................................................72
Sewing on Buttons......................................................73
Heirloom
Pintucks.......................................................................74
Whip and Roll Hem .....................................................75
Hemstitches................................................................75
Drawn Work and Fringing ...........................................76
Bridging (Fagoting) ......................................................77
Quilting
Patchwork ...................................................................78
Quilt Guide ..................................................................78
Walking Foot ...............................................................79
Quilt Stitch...................................................................79
Buttonhole Appliqué....................................................80
Stippling Stitches.........................................................81
T ABLE OF CONTENTS

3
SECTION V
Decorative Sewing
Access Stitches Using the Key............................82-87
LCD Keys .....................................................................88-89
Test Sewing......................................................................90
How to Program Decorative Patterns...............................91
Single Pattern....................................................................91
Scallop Edges....................................................................92
Twin Needle Decorative Patterns.....................................92
Combining Patterns ..........................................................93
Scissors and Lock/Reverse Keys......................................93
Reset Key..........................................................................93
Elongation Key ..................................................................94
Two Color..........................................................................94
Size Key.............................................................................95
Mirror Image and Face to Face.........................................95
Cascade Key .....................................................................95
Circular Sewing.................................................................96
Alphabets and Editing.......................................................97
Alphabets and Saving Memory.........................................98
Overwriting Memory.........................................................99
Recalling Memory...........................................................100
Deleting Memory............................................................100
Inserting a Second Color.................................................101
SECTION VI
Getting Ready to Embroider...............................102
Attaching Embroidery Foot J ..........................................103
Inserting Embroidery Needle..........................................103
Installing Embroidery Unit...............................................103
Removing Embroidery Unit.............................................103
Welcome Screen ............................................................104
First Screen.....................................................................104
How to Access Alphabets and Designs ..................104-107
Embroidery Cards (Optional)...........................................108
Operation Keys ...............................................................108
LCD Keys.................................................................108-109
Automatic Bobbin Winding......................................110-113
Threading the Machine...................................................113
Preparing the Fabric........................................................113
Embroidery Frames.........................................................114
Securing Fabric in Frame/Hoop.......................................114
Attaching Frame/Hoop....................................................115
Removing Frame/Hoop...................................................115
Embroidering Small Areas...............................................115
SECTION VII
Embroidering
Embroidering a Single Design..................................116-121
Embroidering More Than One Letter ......................122-123
Embroidering Multiple Lines of Letters and
Adding/Editing a Design.....................................124-129
Temp Embroidery Memory.............................................130
Permanent Memory.................................................131-133
Multiple Hoop Embroidery - Characters...................134-140
Multiple Hoop Embroidery with Designs.................141-146
Continuous Embroidery Frame................................146-147
Repositioning Frame After
Embroidery Begins.............................................148-149
SECTION VIII
On-Screen Manual
Machine Usage Screens.................................................150
Personalized Machine Settings................................150-152
Download from Xpressive Software (optional)...............153
SECTION IX
Maintenance
Cleaning the Bobbin Area ...............................................154
Cleaning the Hook Area and Feed Dog...........................154
Cleaning Auto Bobbin Thread Winder.............................155
Changing the Light Bulbs................................................156
Troubleshooting.............................................157-158
Specification Table....................................................158
Index................................................................159-160
Thread Color Conversion Chart..........................
161
NOTE: Information found in this instruction
manual is current at the time of printing. Elna
reserves the right to change and update
specifications and information as needed.
4
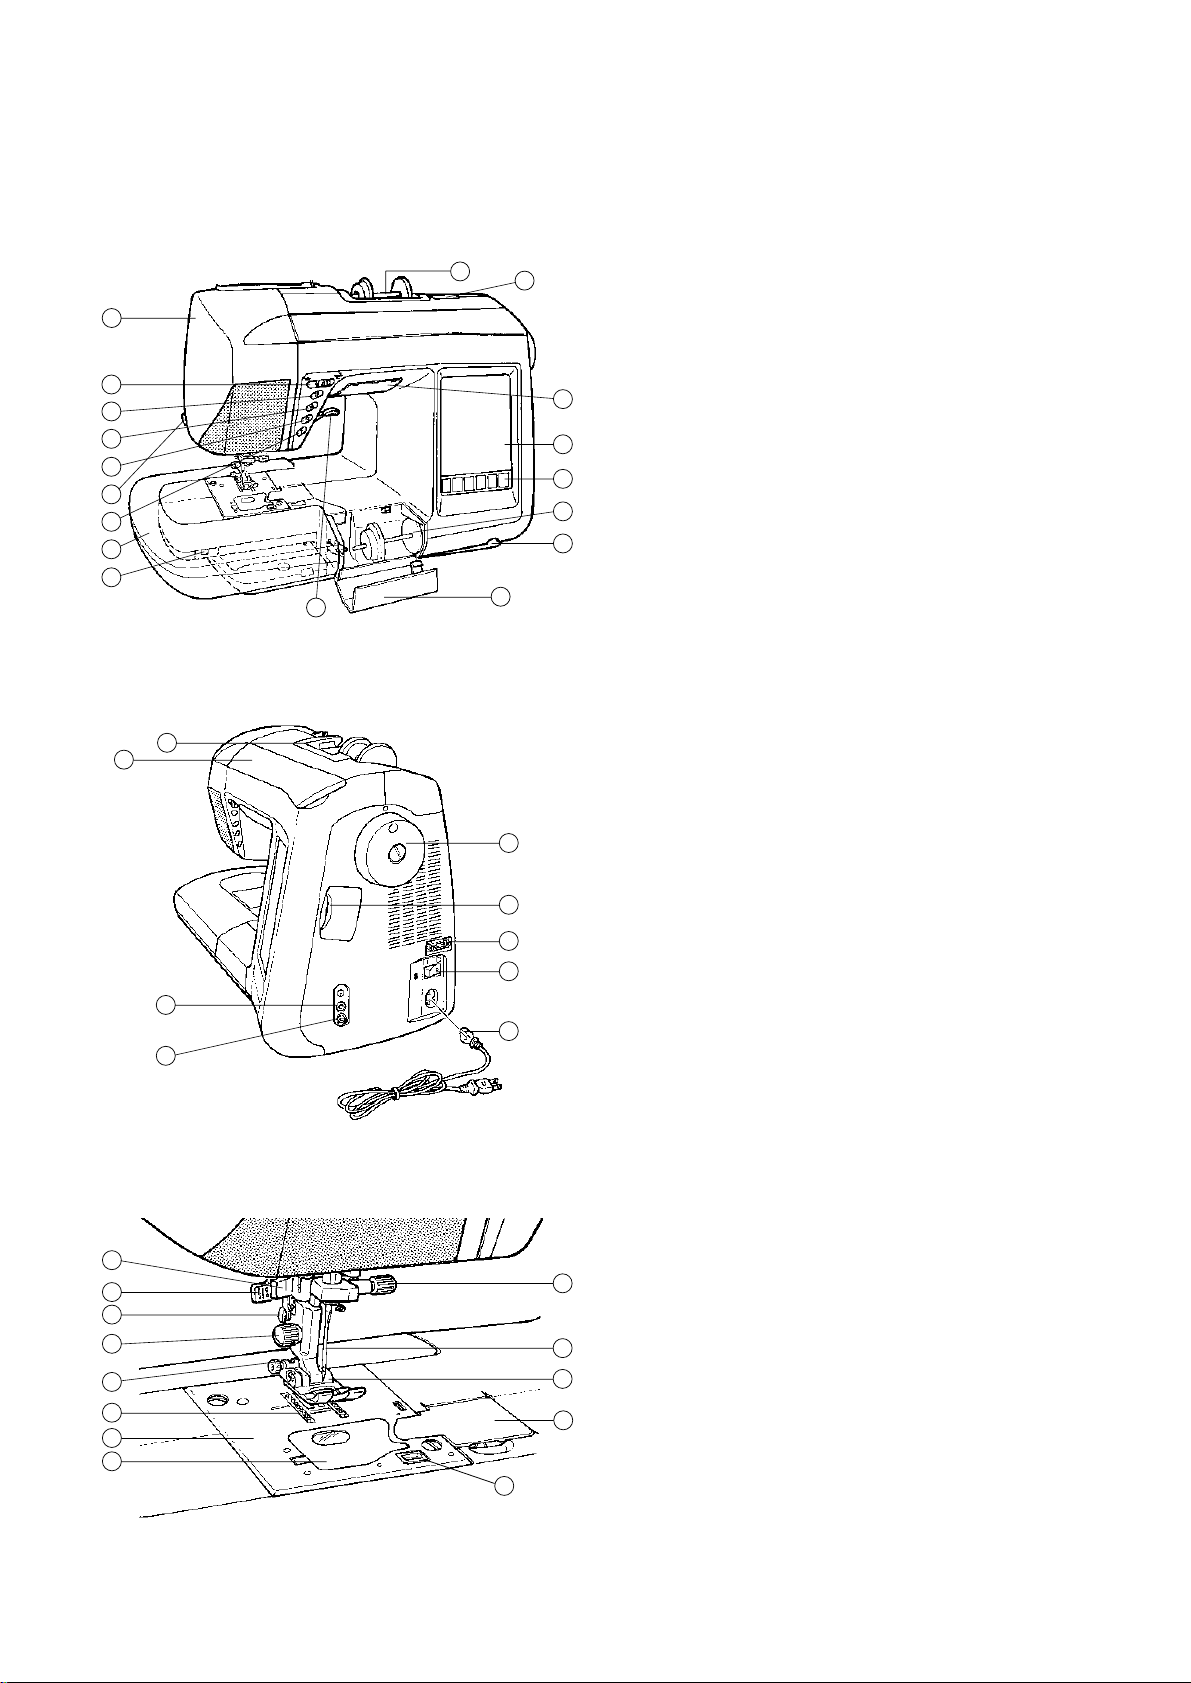
SECTION I
Machine Parts and Functions
Machine Parts
1. Presser foot lifter
2. Drop feed lever
3. Auxiliary bed/accessory box
4. Start/stop key
5. Thread cutter
6. Reverse/backtack key
7. Thread cutter key
8. Up/down Needle key
9. Sewing speed lever
10. Face plate cover
11. Spool pin holder
12. Bobbin winding shaft cover
13. Light
14. LCD screen
15. Operation keys
16. Bottom spool pin for bobbin winding
17. Knee lifter insert
18. Bottom spool pin cover
19. Handle
20. Top accessory storage
21. Handwheel (always turn towards you)
22. Embroidery card insert slot
23. Serial port
24. Power/light switch
25. LCD brightness control
26. Foot control socket
27. Electrical cord and power plug
28. Bobbin case cover button
29. Bobbin case cover
30. Needle plate
31. Feed dog
32. Presser foot holder
33. Presser foot holder screw
34. Presser foot release button
35. Buttonhole lever
36. Automatic needle threader
37. Needle clamp screw
38. Needle
39. Presser foot
40. Automatic bobbin winder cover
20
19
18
17
16
15
14
13
12
11
10
9
8
7
6
5
4
3
2
1
21
22
23
24
27
25
26
36
28
40
39
38
37
35
34
33
32
31
30
29
5
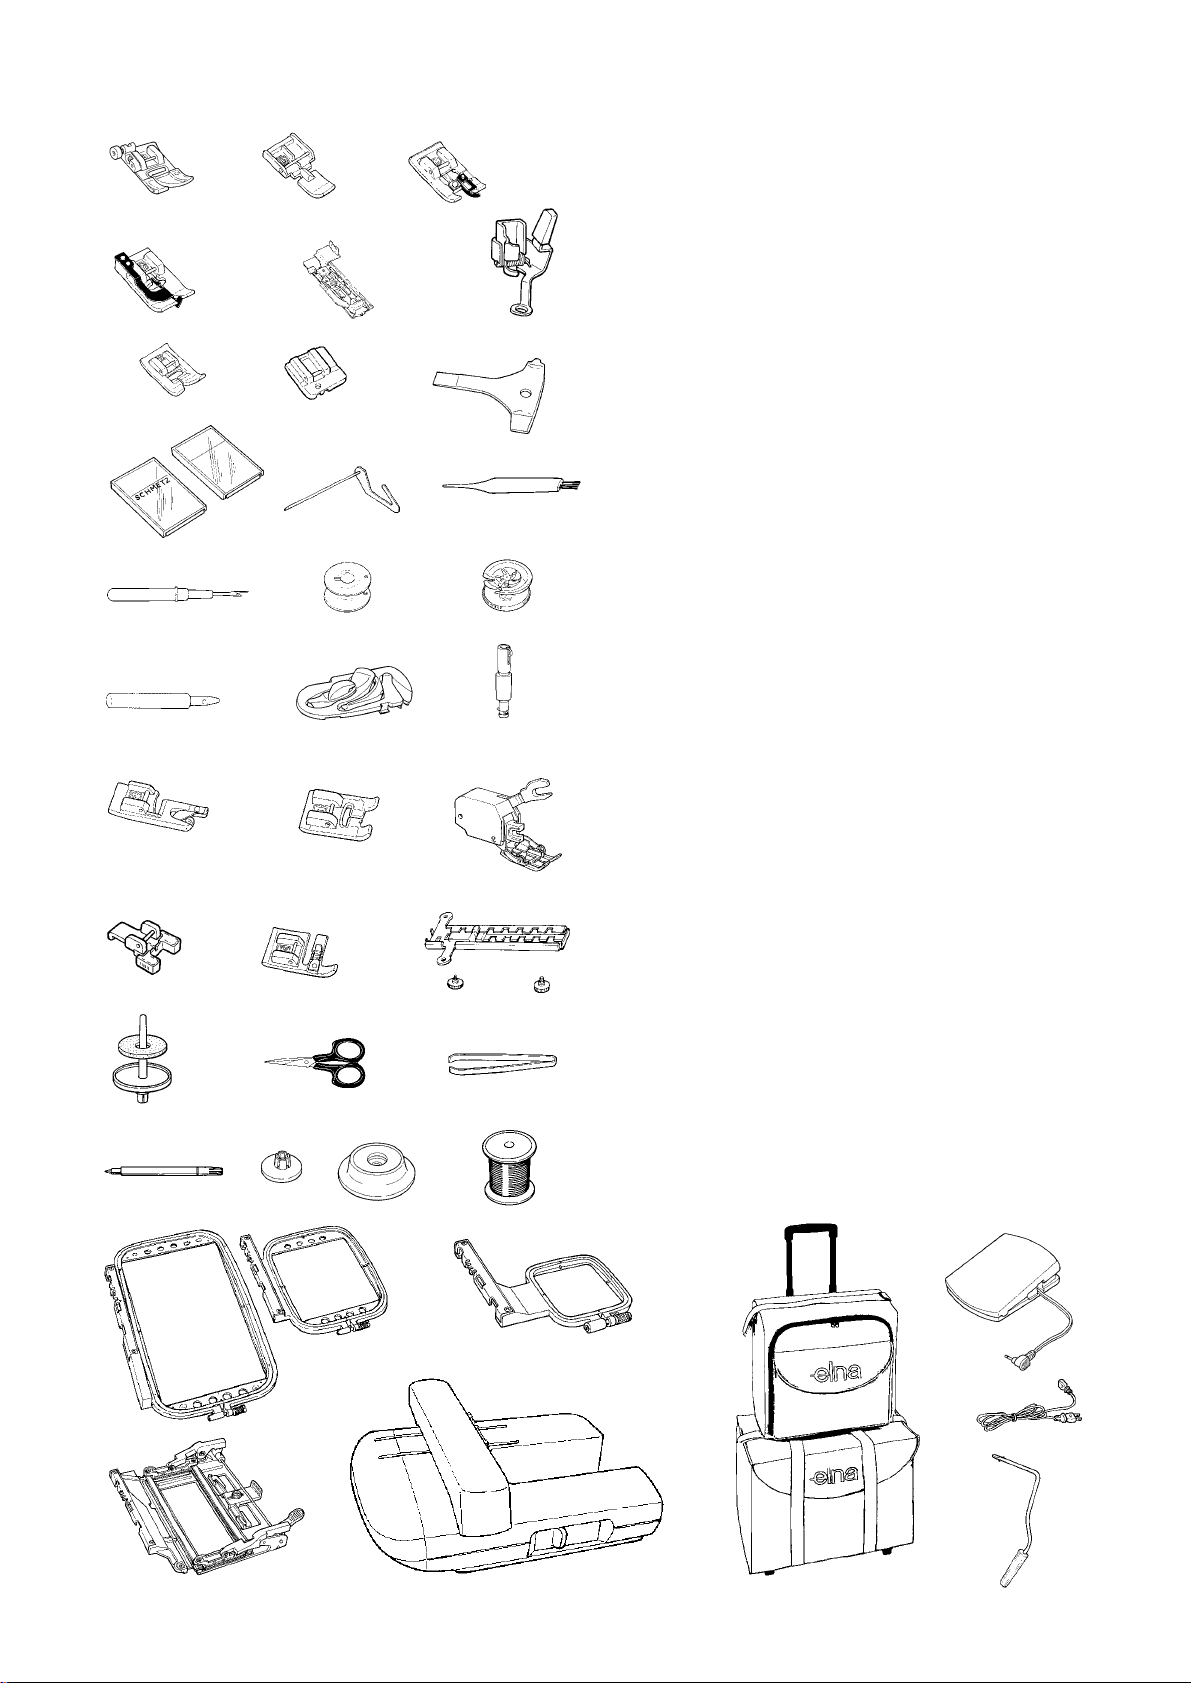
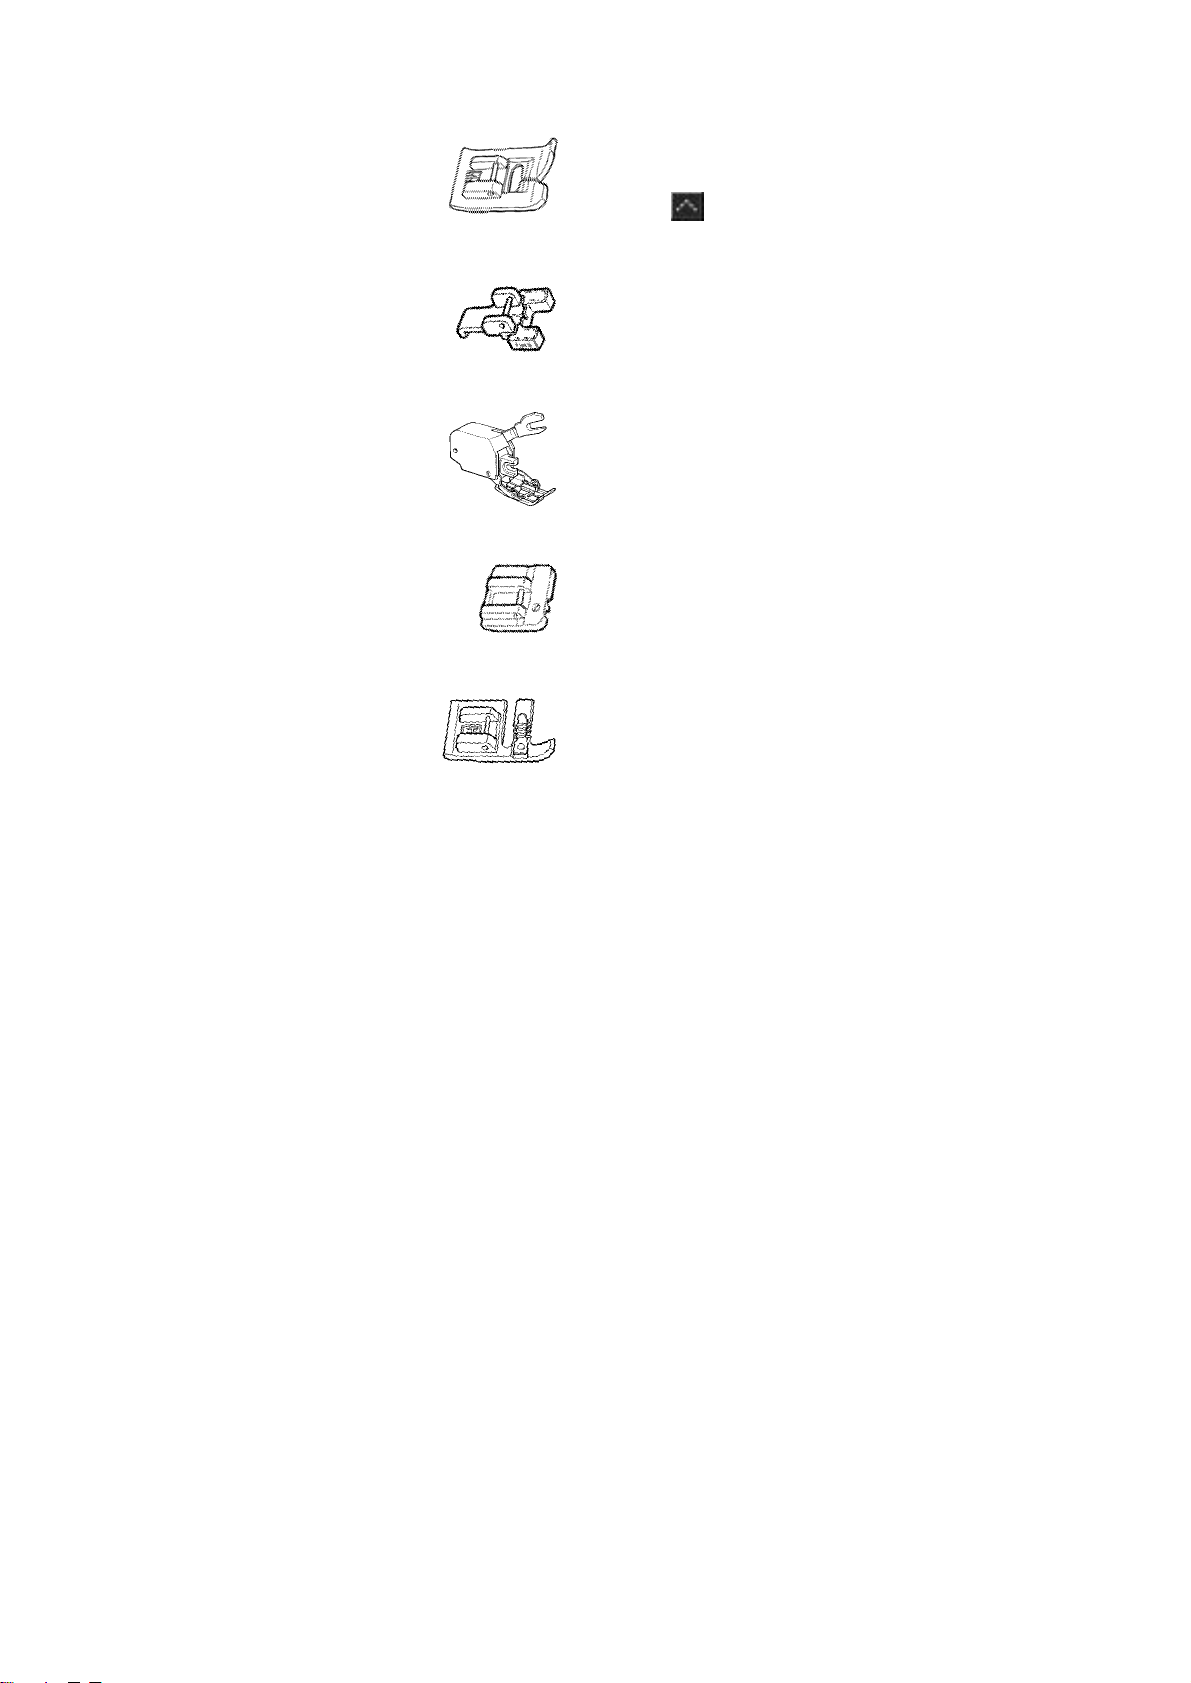
Standard Accessories
1. A:Standard metal foot
2. B:Zipper foot
3. C:Overlock foot
4. D:Blind hem foot
5. E: Automatic buttonhole foot and plate
6. J: Embroidery foot
7. T: Teflon foot
8. G: Invisible zipper foot
9. Screwdriver
10. Needles
11. Quilt guide
12. Lint brush
13. Seam ripper
14. Top winding bobbins (3)
15. Auto winding bobbins (2)
16. Eyelet punch
17. Bobbin winder guide for bottom spool
18. Bobbin winding shaft
19. F: Hemmer foot
20. I: Satin stitch foot
21. Walking foot
22. Sewing on button foot
23. H: Multi-cord foot
24. Circular sewing attachment
25. Additional spool pin and felt
26. Scissors
27. Tweezers
28. Fabric marker
29. Spool cap (1 small)
30. Spool caps (2 large)
31. Elna bobbin thread for embroidery
32. Large embroidery frame
33. Medium embroidery frame
34. Small embroidery frame
35. Continuous frame
36. Embroidery unit
37. Embroidery accessory bag/wheeled bag
38. Foot control
39. Power supply cord
40. Knee lifter
36.
38.
37.
34.
35.
39.
40.
33.
32.
30. 31.
29.
28.
27.
26.
25.
24.
23.
22.
21.
11.
20.
19.
18.
16.
15.
13.
12.
9.
8.
6.
1.
2.
3.
4.
5.
7.
10.
14.
17.
6
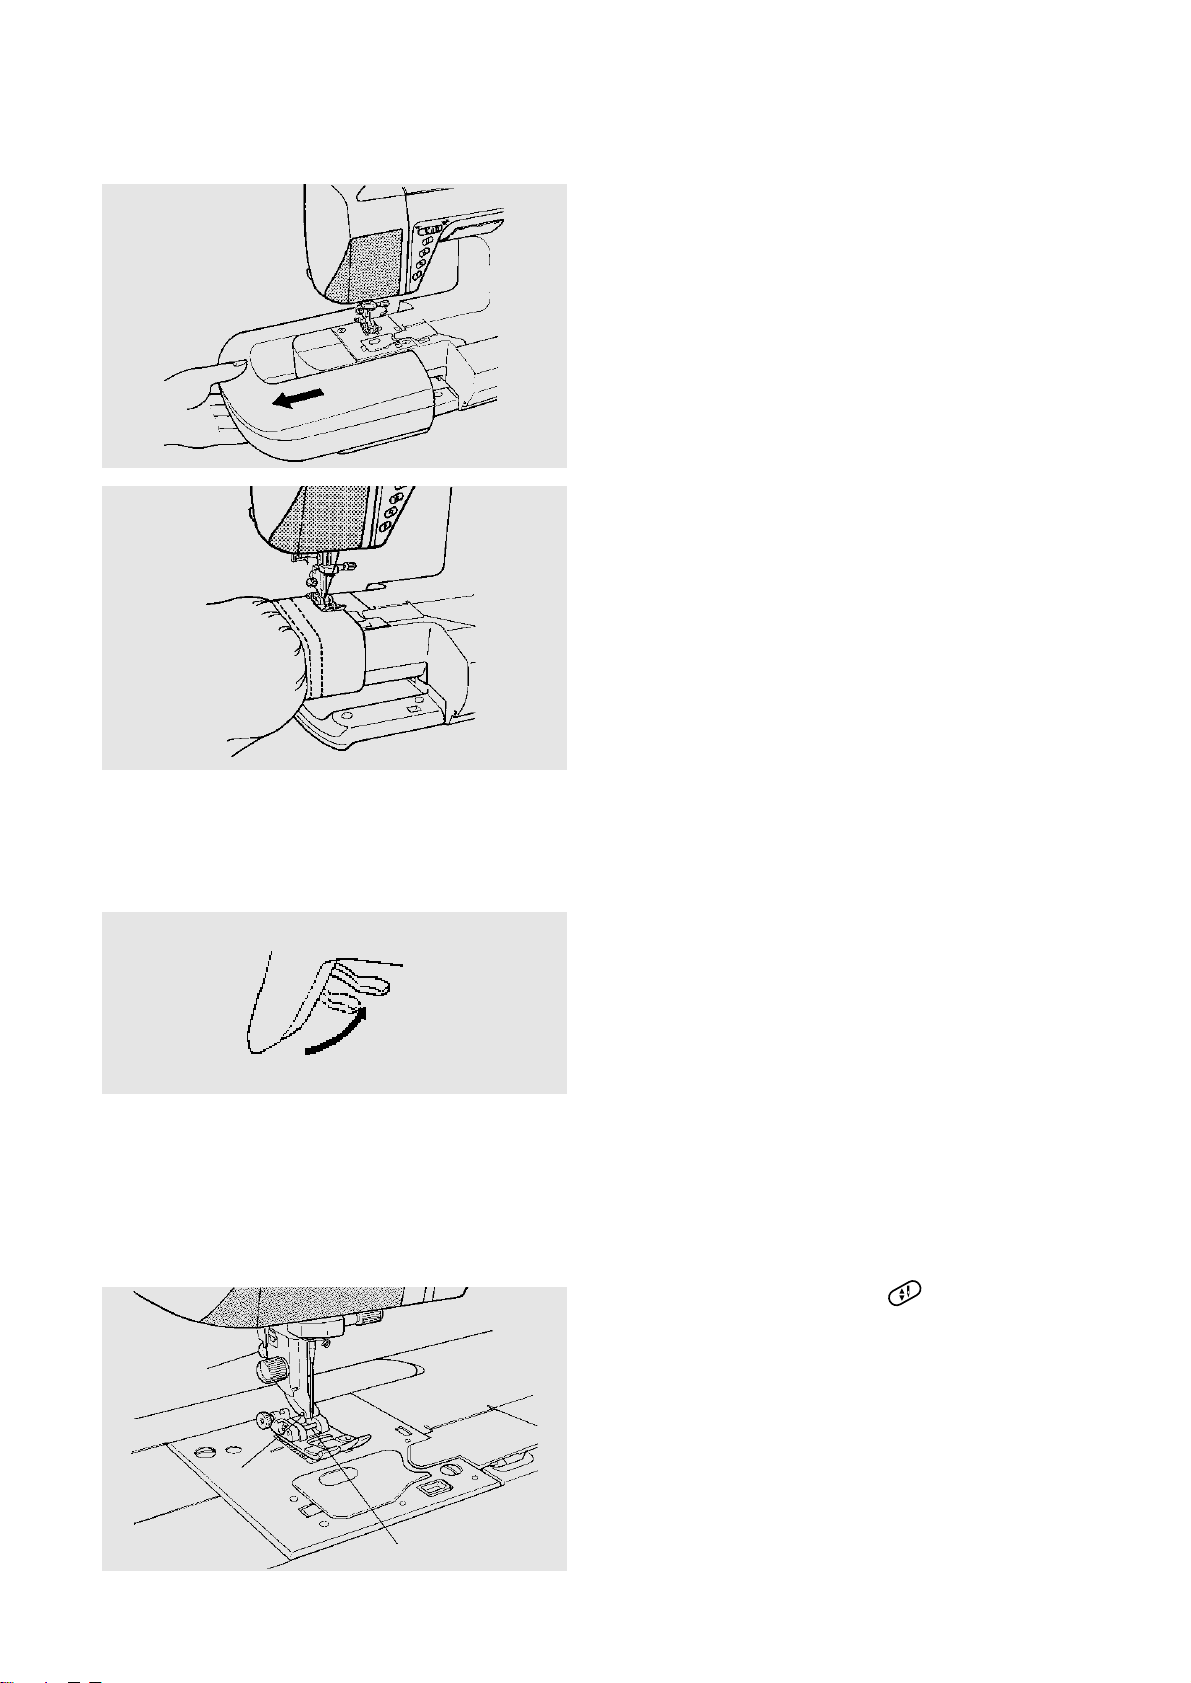
Auxiliary Bed/Accessory Box and Free
Arm
Pull the auxiliary bed/accessory box away from the
machine to expose the free arm.
Advantages of free arm sewing:
• For stitching sleeves, waistbands, pant legs or
any circular garment area.
• For darning socks or mending knees, elbows or
worn areas on children’s clothing.
Attach the auxiliary bed/accessory box for a large
sewing surface.
Additional Presser Foot Clearance
You can raise the presser foot about 6.5 mm (1/4")
higher than the normal up position for easy removal
of presser feet, for placement of heavy fabrics under
the presser foot or for attaching/ removing
embroidery frame.
NOTE: Machine will not sew with the presser
foot raised (up).
Attaching and Removing Presser Foot
Turn handwheel or press the key until needle is
raised. Raise presser foot.
Turn off power/light switch.
Press the button 1 on back of the holder. The
presser foot will drop off. Place the selected presser
foot so the pin 3 on the foot lies just under the
groove 2 of the holder. Lower the presser bar to
attach the foot.
1
2
3
7
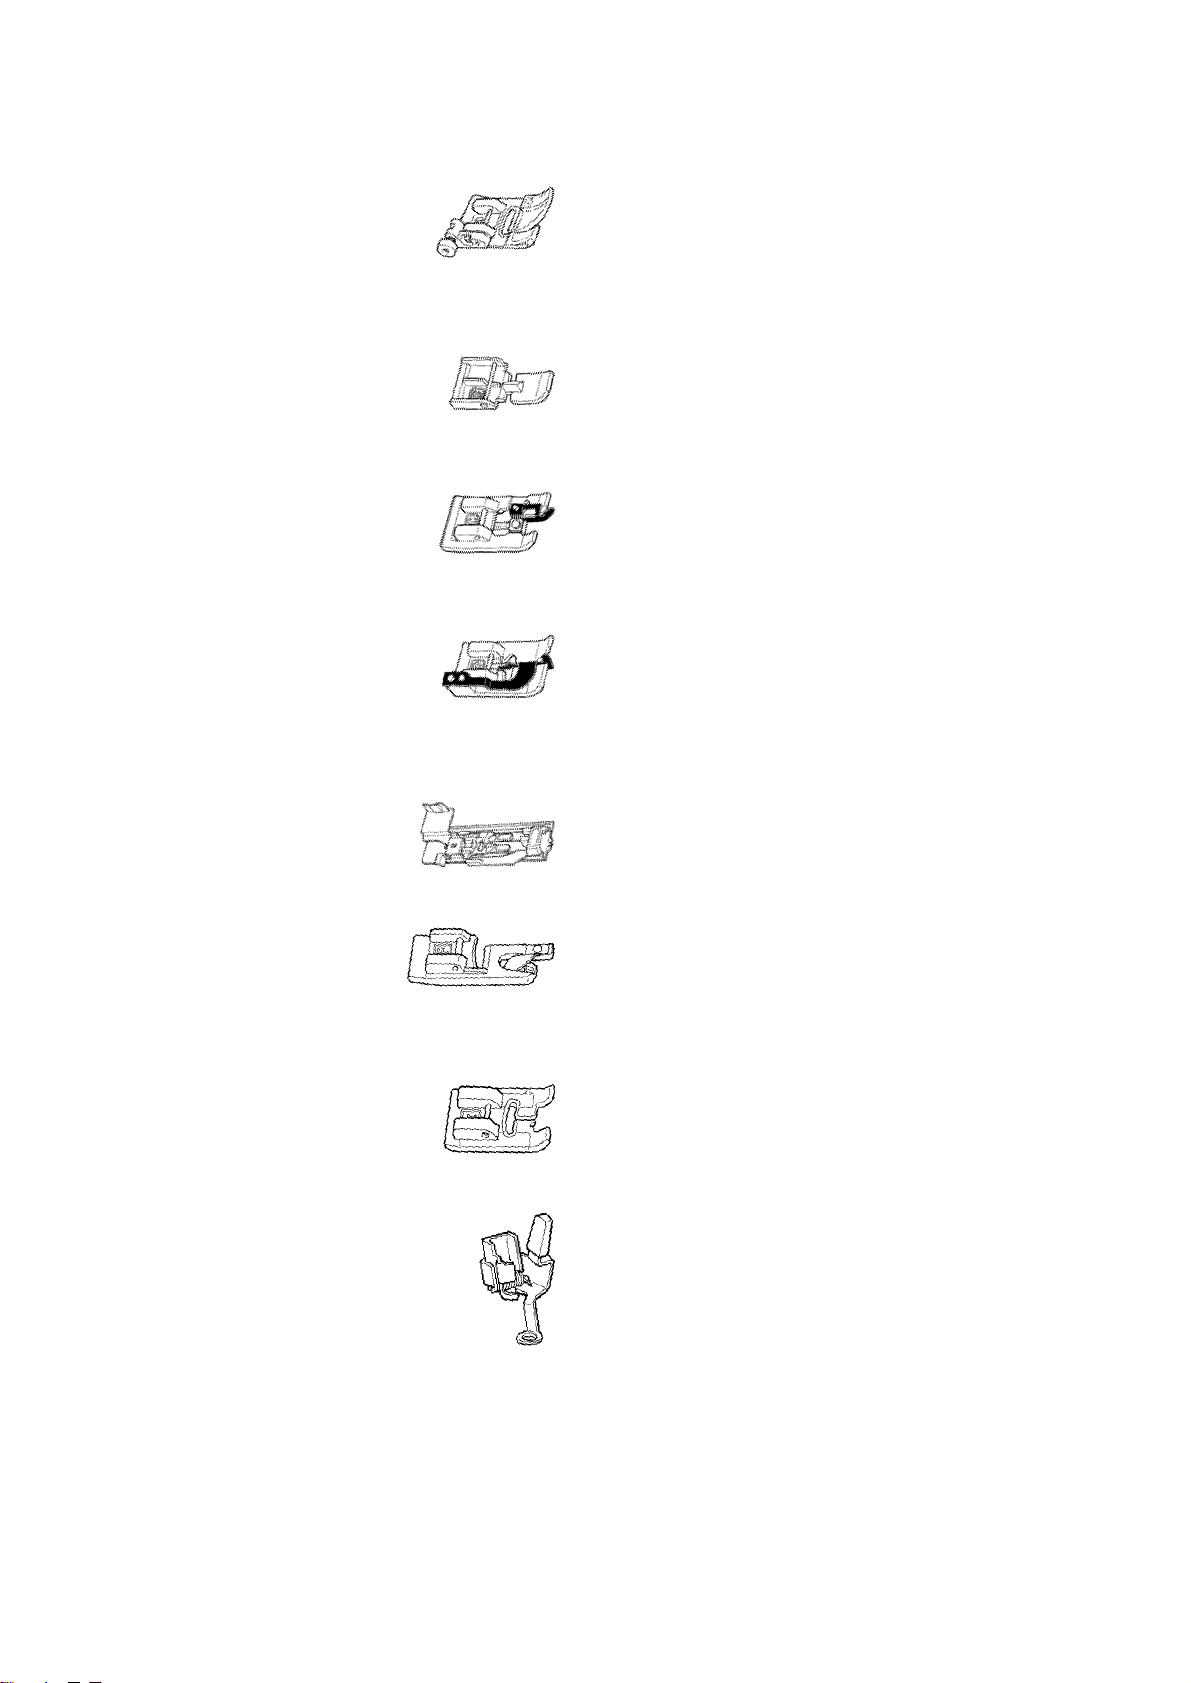
Presser Foot Definitions
A: Standard metal foot
This foot comes attached to the machine and is
mainly used for straight stitches and zigzag stitches
longer than 1.0. The button locks the foot in a
horizontal position helping to sew over multiple
layered seams.
B: Zipper foot
Attach this foot either to the left or right of the
needle to sew each side of the zipper.
C: Overlock foot
Sew the edge of the fabric next to the guide while
overcasting with the zigzag stitch set wider than 5.0.
The metal extension helps the stitch lie flatter.
D: Blind hem foot
The guide on the foot helps ensure that the needle
catches only one or two fibers of the hem, resulting
in an invisible hemline.
E: Automatic buttonhole foot
Place button in foot to determine the buttonhole
size. The machine will automatically sew the
corresponding buttonhole. Also used for bartacks
and darning.
F: Hemmer foot
Insert the fabric into the spiral on this foot. The spiral
rolls the fabric, creating a rolled hem.
I: Satin stitch foot
The cutout on the underside of the foot is designed
to accommodate dense stitch formation. Ideal for
satin and decorative stitches that are 7 mm or less,
with no directional feed.
J: Embroidery foot
Use for automatic embroidery or free motion
embroidery. As the needle lowers into the fabric, the
spring-loaded foot lowers to hold the fabric down. As
needle rises, foot rises and fabric can be moved.
8
T: Decorative stitch foot
The lightweight composition of the foot and the flat
underside are requirements for successful
directional sewing (sideways feeding). Must be used
with key and any pattern wider than 7 mm.
Sewing on button foot
Holds button in place so machine can sew on
button.
Walking foot
Fabric is between an upper and lower feed dog,
preventing fabric from slipping or puckering. Great
for keeping quilt layers from shifting when sewing.
G: Invisible zipper foot
Using left needle position, the grooves on the
underside of the foot allow the stitching to be close
to the zipper teeth.
H: Multi-cord foot
Couching is simplified because the foot is designed
to hold 1 – 3 cords, creating braids and trims.
Presser Foot Storage
Store presser feet in one of three places.
• Auxiliary bed/accessory box
• Top accessory storage – designed for storing
A, B, D, I presser feet and foot holder for
quick access
• Plastic pouch

9
Attaching and Removing the Foot Holder
Turn handwheel or press the key until needle is
raised. Raise presser foot. Turn off power/light
switch.
Turn the screw 1 counterclockwise with the
screwdriver and remove foot holder.
To attach:
A. Place foot holder on needle bar and turn screw
clockwise to tighten. OR
B. Match the hole in the holder 2 with the hole in
the presser bar 3. Put screw into hole. Turn
screw clockwise to tighten.
Adjusting Foot Pressure
There are three settings available for pressure. The
weight and characteristics of your fabrics may
require less pressure than the standard “3”
pressure.
1. Turn off power/light switch.
2. Open face cover.
3. Insert screwdriver.
4. Turn screw counterclockwise only to adjust
foot pressure.
5. Remove screwdriver.
6. Close face cover.
7. Turn on power/light switch.
Seam Allowance Lines
The lines on the needle plate help you measure
seam width.
• The number indicates the distance between the
center needle position and the seam allowance
line.
Angle lines provide accurate measurements for
aligning small fabric pieces when quilting.
1 Millimeters
2 Inches
3 Angle lines
2
3
2
3
120
o
90
o
60
o
45
o
3/8 3/4
7/8
1 Inch
mm
1/2
5/8
10
20
25
15
1
1
1
A
B
10
Knee Lifter
The knee lifter allows you to raise or lower the
presser foot without using your hands. This is
especially beneficial when pivoting corners or
sewing patchwork pieces.
Insert knee lifter. The presser foot rises equal to the
amount of pressure applied to the knee lifter. Move
the knee lifter to the right to raise the presser foot.
Release the knee lifter to lower the presser foot.
How to Lower the Feed Dog
The feed dog should be lowered out of position for
special sewing techniques, such as free motion
embroidery.
The feed dog must always be up for normal sewing.
Locate the feed dog lever on the front of the free
arm. Slide the lever either to the right (down) 1 or
the left (up) 2. To bring up the feed dog, press
key after sliding lever to the left.
Controlling Sewing Speed
Foot Control
Sewing speed can be varied with the foot control 1.
The harder you press on the foot control, the faster
the machine runs.
Speed Control Lever
The sewing speed can also be varied by sliding the
speed control lever 2. For a faster speed 1, slide it
to the right; for a slower speed 4, slide it to the left.
1
2
3
4
1
2
11
Machine Operation Keys
NOTE: The presser foot must be lowered before
pressing any of these keys.
1. Up/Down Needle Key
If the needle is up when you press this key, the
needle will go down to its lowest position.
If the needle is down when you press this
key, the needle will go to its highest position.
Press the key twice to sew a single stitch.
2. Thread Cutter Key
After sewing is stopped, press this key to cut
needle and bobbin threads.
CAUTION: Use the thread cutter A on the
side of the machine for heavy or decorative
threads.
3. Reverse/Backtack Key
Press and hold this key while sewing stitches
1/01, 2/01 and 3/01 and machine sews reverse
straight stitches at a slower speed. Release the
key and machine stops.
Press and hold this key while sewing all other
stitches and machine lockstitches (backtacks).
Release the key and machine stops.
See pages 35-36 for information on how this key
operates when using the and keys on
the LCD.
4. Start/Stop Key
Operates the machine when winding bobbin and
if the foot control is not connected. (If the foot
control is connected, this key acts as a Stop key
only.) Press this key and machine sews a few
stitches slowly and then continues to sew at the
speed set with the speed control lever. Press
key again to stop machine.
Key changes color to show operating status.
Green: Machine ready to sew or sewing
Red: Machine is not ready
Orange: Machine is winding bobbin
A
1
2
3
4
12
SECTION II
Getting Ready to Sew
Selecting the Correct Needle and Thread
There are many kinds of fabrics, threads and
needles. It is important to use the correct ones
together.
Always purchase good quality thread. It should be
strong, smooth and even in thickness. Use the same
thread for needle and bobbin. Always test thread and
needle size on a scrap piece of fabric.
In general, fine threads (the larger the number, the
finer the thread) and needles (smaller the number,
finer the needle) are used for sewing lightweight
fabrics and heavier threads and larger needles are
used for sewing heavyweight fabrics. There are
many specialty needles available from your sewing
machine dealer.
Check your needles frequently for rough or blunt
tips. Snags and runs in knits, fine silks and silk-like
fabrics are permanent and are often caused by
damaged needles.
Needle Definitions
Elna recommends Schmetz® needle system
130/705H.
Universal – an all-purpose needle that handles most
woven and knit fabrics. A universal needle size 14/90
comes inserted in your machine.
Ball point – the point spreads the fibers,
preventing tears and is especially suited for loose
knits and interlock knits. Not recommended for
embroidery.
Denim – the sharp tip effectively pierces densely
woven fabrics such as denim and canvas.
Stretch – specially designed to prevent skipped
stitches in synthetic suedes and elasticized knits
(swimwear).
Leather – the cutting point creates small holes in
leather and suede. Holes remain after stitching is
removed.
Quilt – The tapered point easily penetrates through
multiple layers and crossed seams.
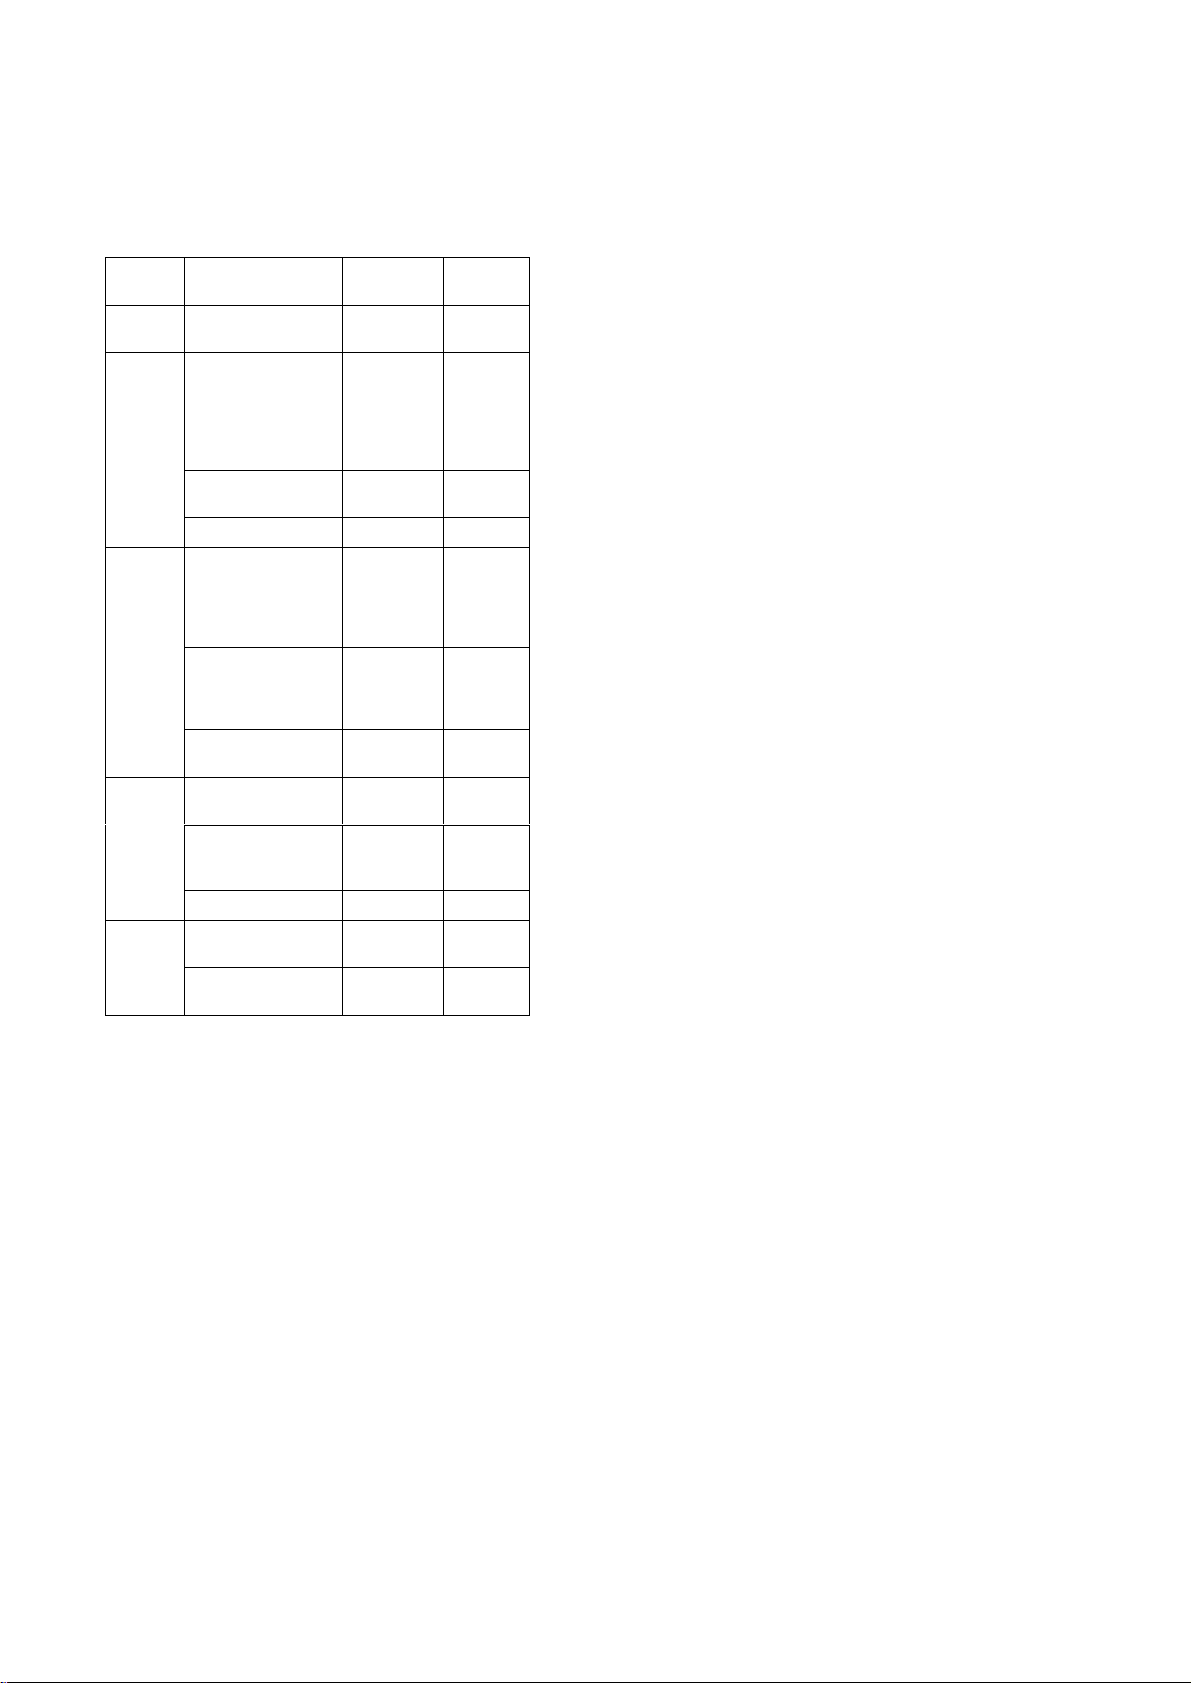
WEIGHT
TYPE
SIZE
Very
Light
Chiffon, Fine Lace,
Organdy
Universal
Ball Point
9/65
10/70
Batiste, Lawn,
Crepe de Chine,
Challis,
Handkerchief Linen,
Crepe, Taffeta,
Satin
Ball Point
Universal
11/75
11/75
12/80
Single Knits, Jersey,
Swimwear, Tricot
Stretch
Ball Point
11/75
11/75
Light
Leather, Suede Leather 12/80
Flannel, Velour,
Velvet, Velveteen,
Corduroy, Linen,
Gabardine, Wool,
Terry, Burlap
Universal 14/90
Double Knits,
Stretch Velour,
Stretch Terry,
Sweater Knits
Ball Point 14/90
Leather, Vinyl,
Suede
Leather 14/90
Denim, Sailcloth,
Ticking
Denim 16/100
Coating, Polar
Fleece, Drapery and
Upholstery Fabrics
Universal 16/100
Heavy
Leather, Suede Leather 16/100
Canvas, Duck,
Upholstery Fabrics
Universal 18/110Very
Heavy
Topstitching for
Special Finish
Topstitching12/80
14/90
NEEDLE
FABRIC
Medium
NEEDLE
13
Topstitching – the extra sharp tip penetrates layers
of fabrics; extra large eye and large groove
accommodate heavyweight topstitching thread.
Machine embroidery – specially suited for rayon,
acrylic or other high-sheen threads used in machine
embroidery. Two common sizes: 75/11 (suitable for
most projects) and 90/14 (recommended for multilayered projects).
Twin/Double – 2 needles are joined on a crossbar
and share a single shaft. Sews two parallel rows of
stitching. Available in universal and ballpoint.
Hemstitch/Wing – wider than a universal needle, it
separates fibers and creates holes for beautiful
heirloom stitches.
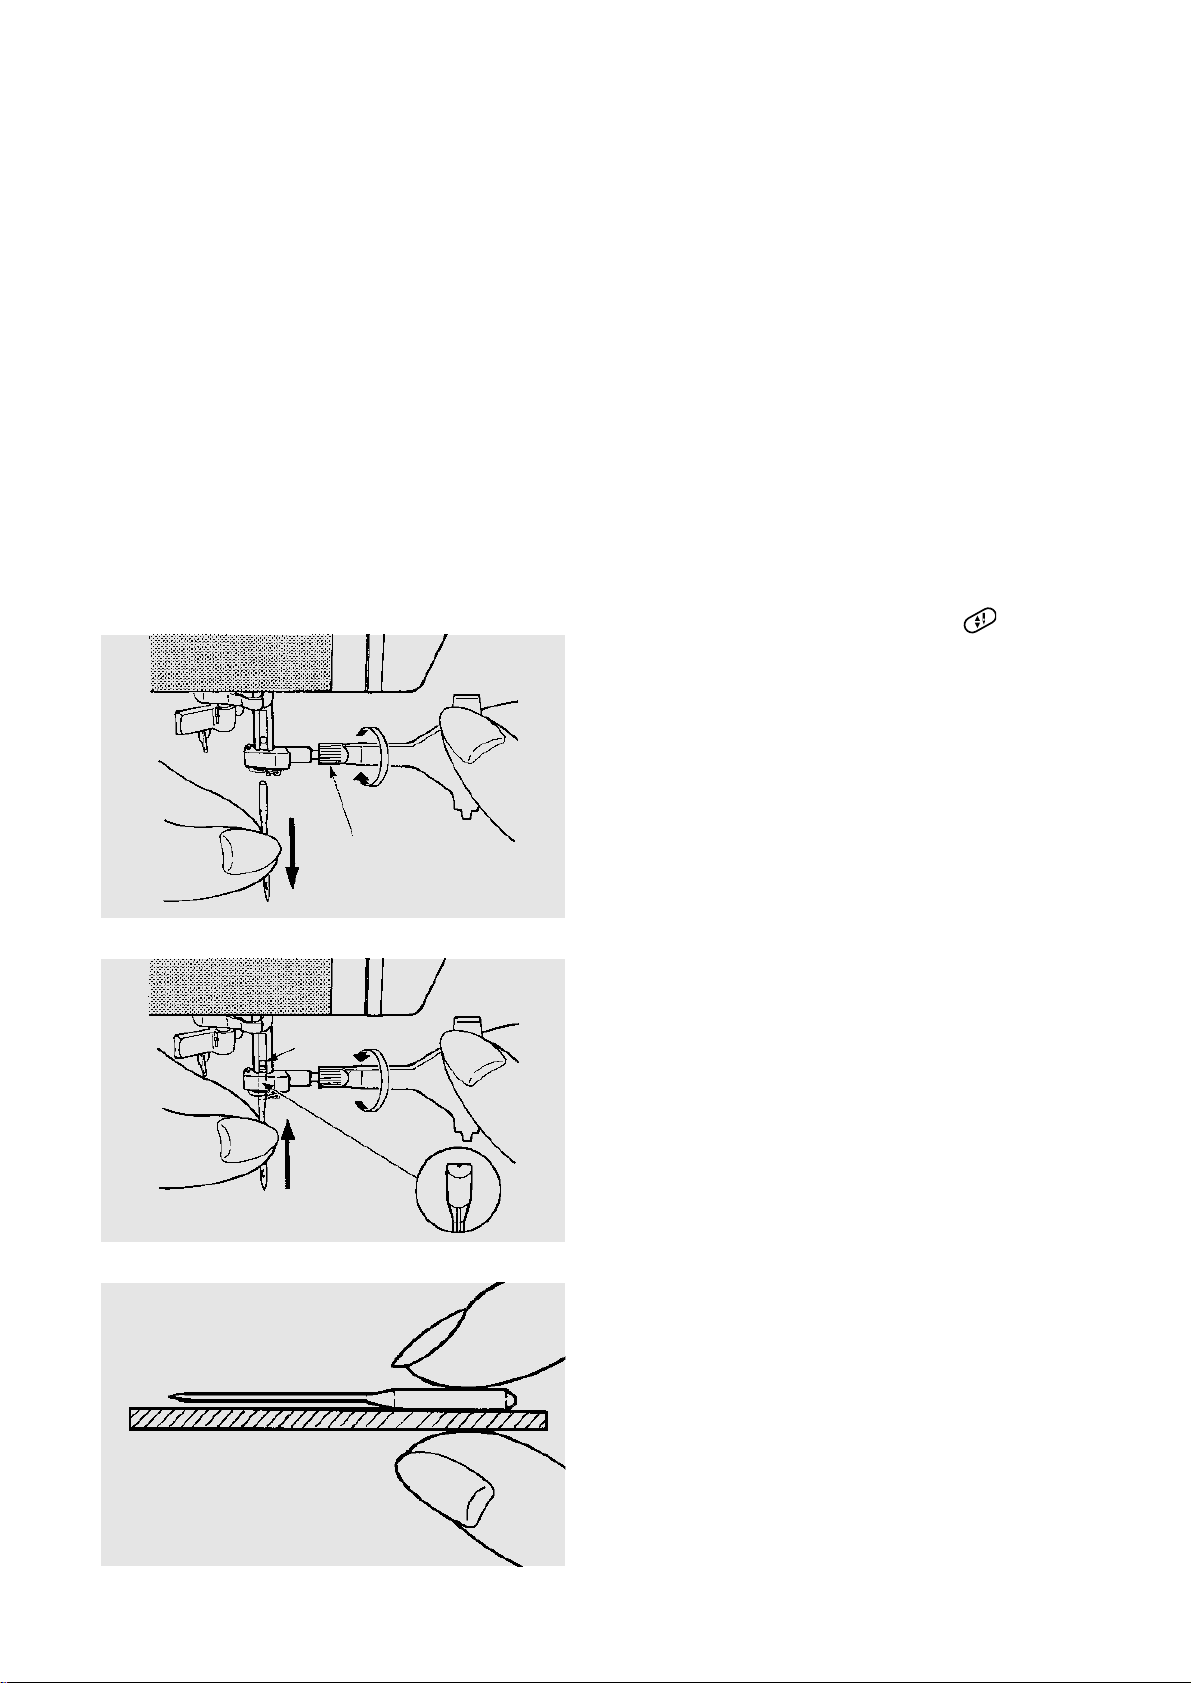
Changing Needles
1. Lower the presser foot. Press the key until
needle is raised. Turn off the power/light switch.
Turn the needle clamp screw A
counterclockwise to loosen. Remove the needle
from the clamp.
2. Insert the new needle into needle clamp B with
flat side to the back. When inserting the needle
into the clamp, push it up as far as it will go and
tighten the needle clamp screw firmly.
CAUTION: If needle is not pushed up as far as
it will go, the automatic needle threader will
not function properly.
3. To determine if the needle is defective, place
the flat side of the needle on something flat (a
needle plate, glass, etc.). The gap between the
needle and flat surface should be consistent.
Never use a bent or blunt needle as it may cause
skipped stitches or thread breakage. Defective
needles can ruin fabric. Always purchase good
quality needles. Change needles often.
B
1
2
3
A

14
For Your Safety
Before connecting the power cord, make sure the voltage and frequency shown on the machine are identical to
your electrical power. USA only – Item: Rated Voltage/Power Consumption, Specification: 120V/0.9A
60Hz.
Your machine may come equipped with a polarized plug (one prong wider than the other). A polarized plug
reduces the risk of electrical shock. This plug is intended to fit into a polarized outlet. If the plug does not fit fully
into the outlet, reverse the plug. If it still does not fit, contact a qualified electrician to install the proper outlet. Do
not modify the plug in any way.
Do not use extension cords or plug adapters.
Do not touch plug with wet hands.
Always turn off the power/light switch first and then unplug from the electrical outlet. Examples:
• when leaving the machine unattended
• during an electrical storm or power failure
• when cleaning the machine
Always turn off the power/light switch:
• when attaching or removing parts such as needle, presser foot, needle plate or embroidery unit
• when manually threading needle or bobbin
• when changing foot pressure
Do not place anything on the foot control.
Do not place heavy items on cords. Do not subject cords to heat. Do not use damaged cords. Have the cord
repaired immediately.
While the machine is in operation, always keep your eye on the sewing area and do not touch any moving parts
such as the thread take-up lever, handwheel or needle.
15
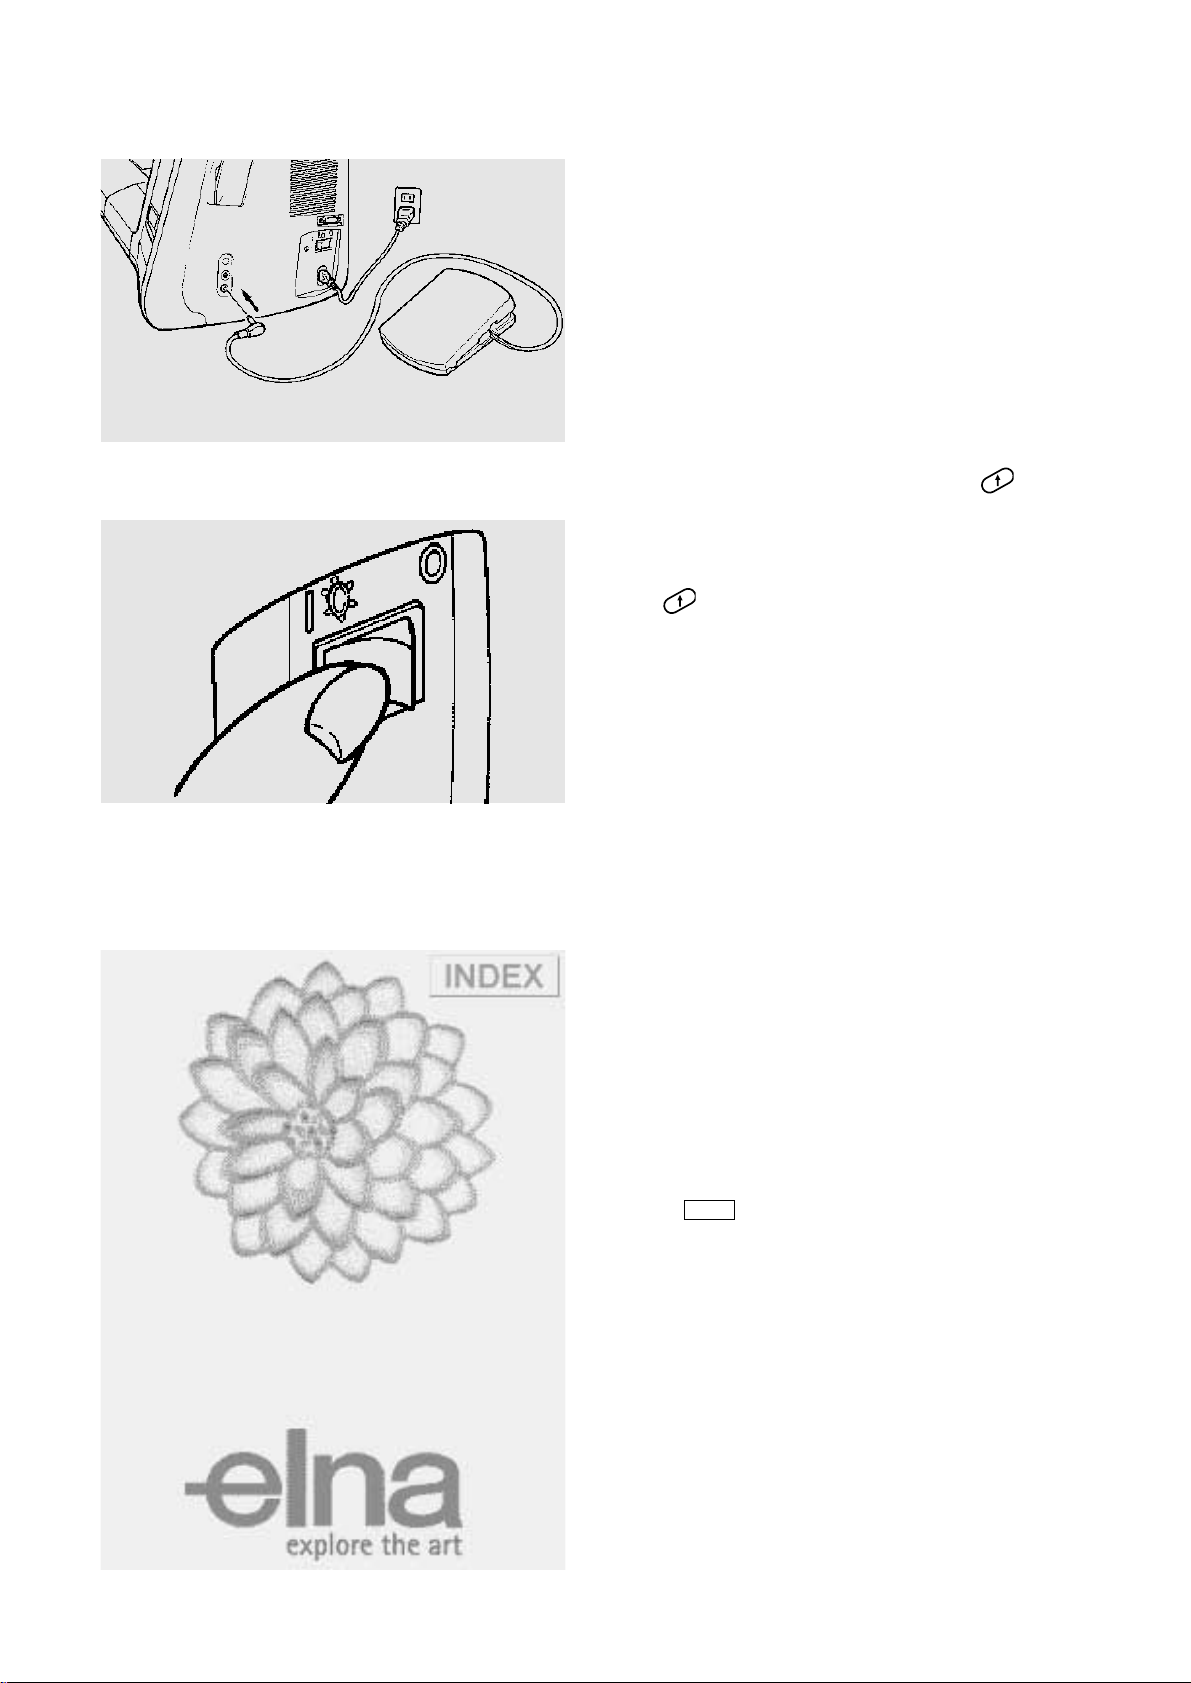
Connecting Machine to Power Supply
NOTE: Your machine should be operated at a
room temperature of 5 - 38˚C (40˚ - 100˚ F).
Extremes of temperature may affect sewing
speed.
Your machine is equipped with a detachable power
cord. First insert machine plug into machine and
then power supply plug into electrical outlet.
Optional – connect the foot control. Pull out the cord
(not past red marking) and plug into machine. When
storing the foot control, pull the cord out about 5 cm
(2") and release it to rewind.
When the foot control is connected, the key
can be used only to stop the machine or wind
bobbin.
NOTE: Machine can be operated using only
the key without connecting the foot control.
NOTE: Use only foot control YC-700 (UL, CSA)
with your Xquisit II(9010).
Welcome Screen
NOTE: Only a light touch is required when
making a selection on the LCD screen. Do not
touch the surface of the screen with any hard or
sharp object, such as pencils, pens, screwdrivers,
etc.
Press power/light switch to turn machine on.
Welcome screen will appear.
Lightly touch Welcome screen to open first screen.
Touch key to directly access index for sewing
instruction screens.
INDEX
16
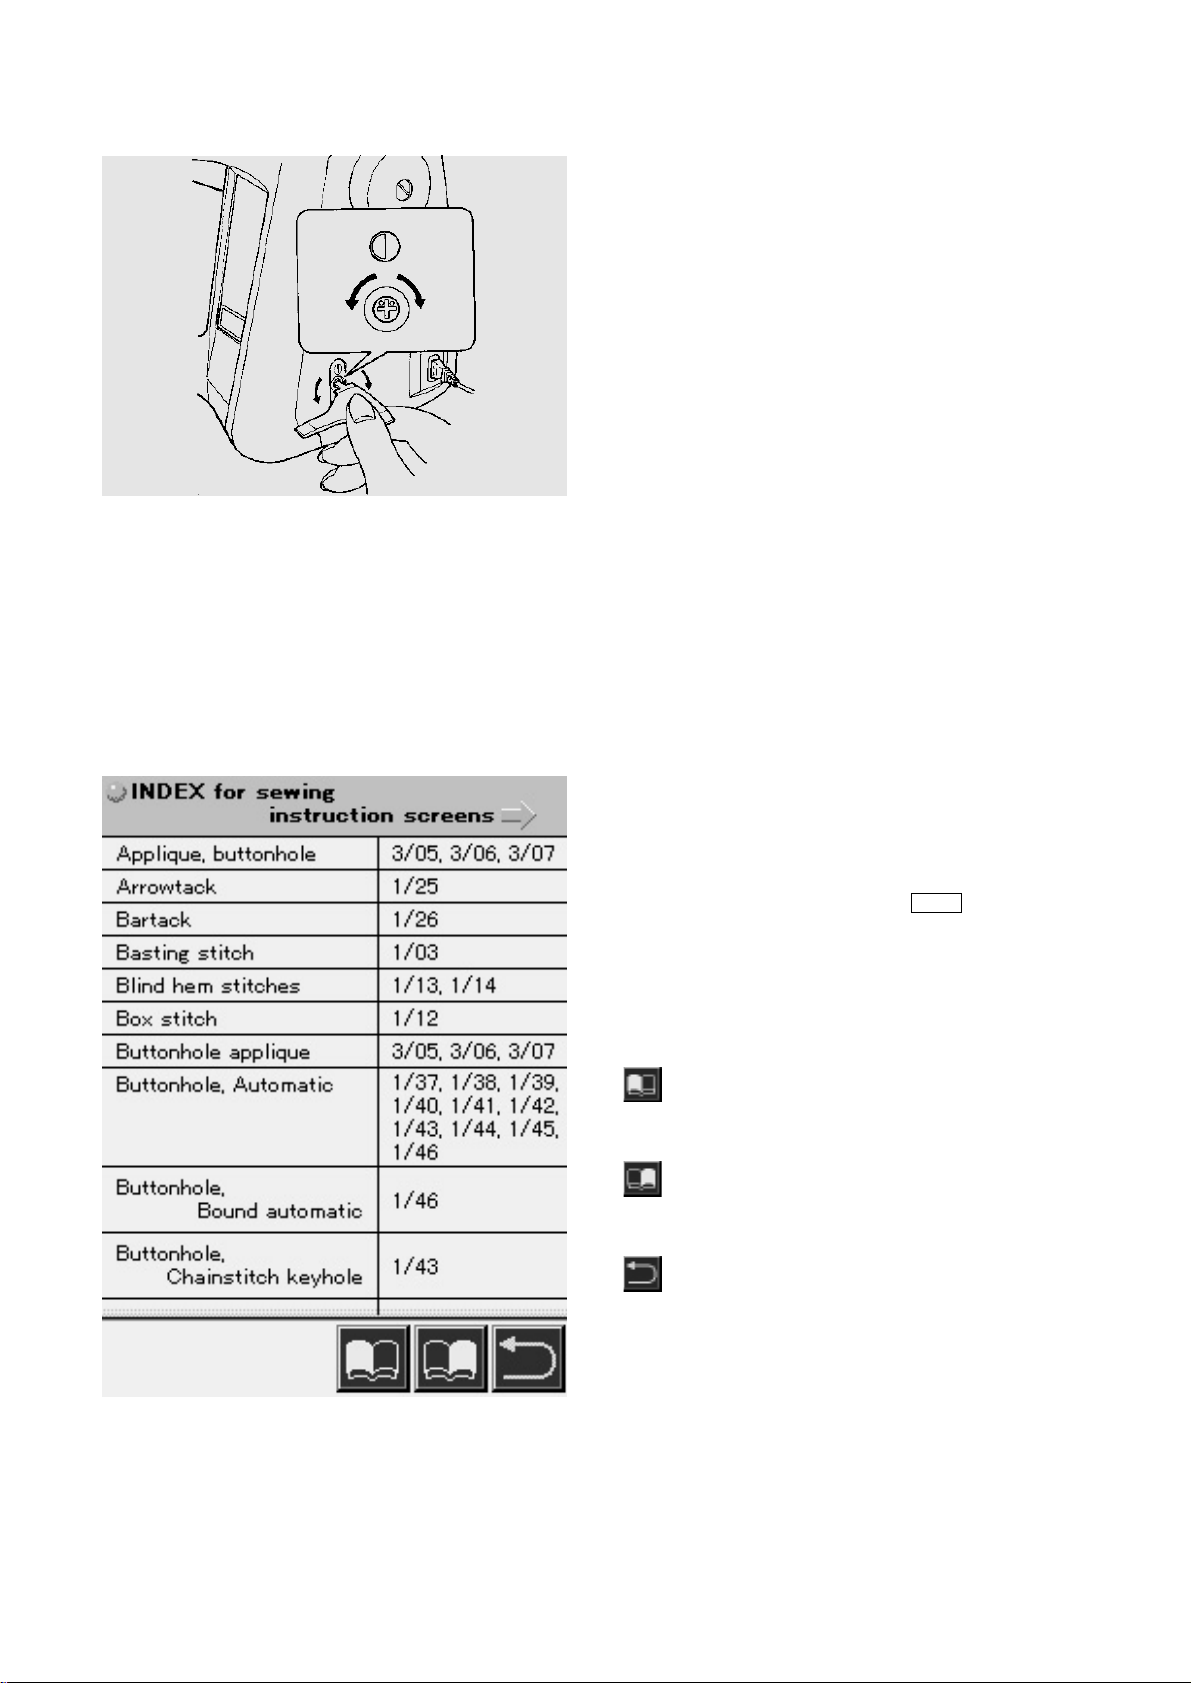
LCD Screen Brightness Control
Insert the narrow end of the screwdriver into the
LCD brightness control located on the right side of
the machine 1. Turn clockwise 2 to increase
brightness; turn counterclockwise 3 to decrease
brightness.
NOTE: Environmental changes might cause the
screen to become lighter or darker.
NOTE: When the machine has been turned off for
an extended period of time, the screen may
appear lighter when first turned on because of
the LCD backlight. The screen will adjust to the
brightness control setting.
NOTE: For best viewing of LCD screen, be sure to
sit directly in front of machine.
Index
This machine provides an on-screen instruction
manual for sewing and embroidery techniques and
machine usage. The Index gives you an overview of
all sewing techniques available on-screen. See page
37.
On the Welcome Screen, touch key to
directly access index for sewing instruction screens.
The index indicates under which stitch(es) you will
find a certain technique. For example, pintucks will
be found in the heirloom group (H), stitch 2/01.
Previous key – use this key to go back to
previous screen in index
Next key – use this key to go forward to
next screen in index
Return key – use this key to exit index
screens
1
23
INDEX
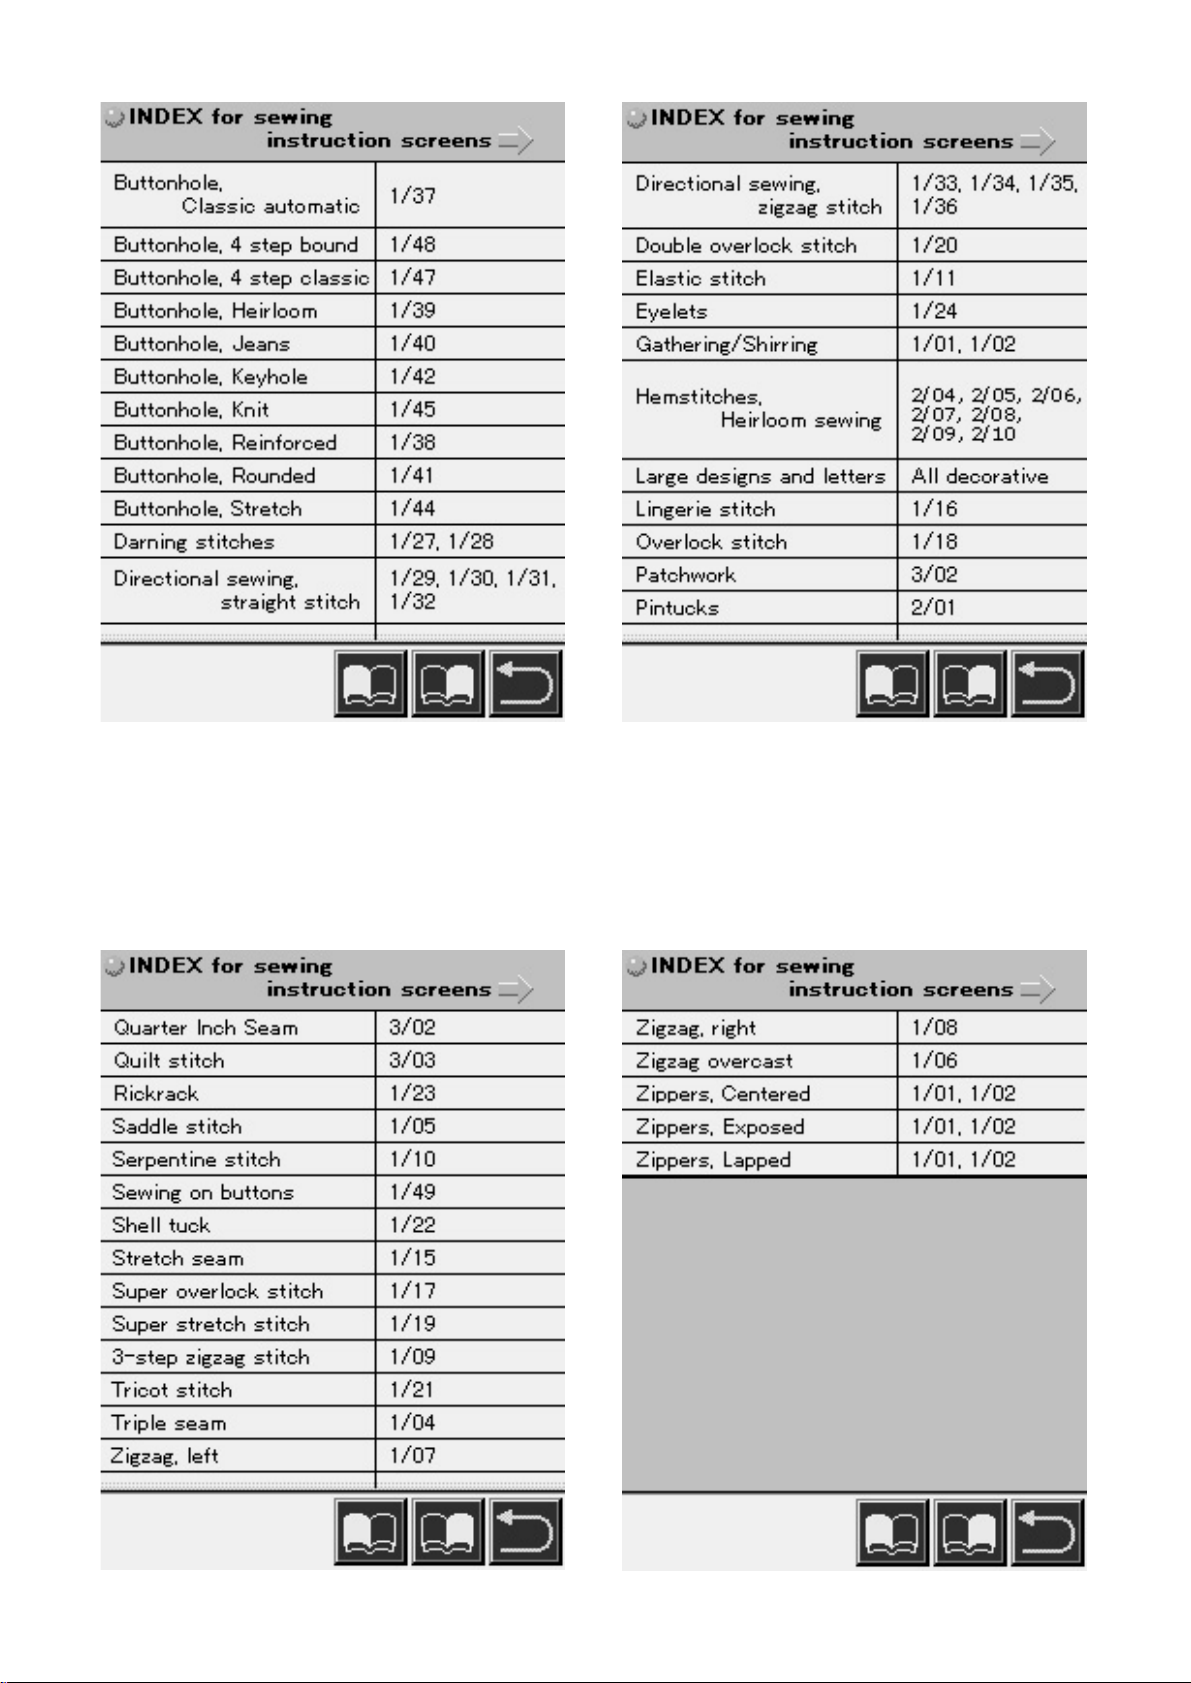
17
18
First Screen
When the first screen opens, the machine
automatically displays the first 12 stitches of the
Utility group (U) and selects 1/01 (straight stitch,
center needle position).
NOTE: If the embroidery unit is attached, the
first embroidery screen will open. See page
104.
Operation Keys
Hint Key
Accesses sewing instruction screens for
selected stitch. See page 37. When
embroidery unit is attached, accesses
machine usage screens. See page 150.
Memory Key
Saves stitch sequence to memory. See page
98-100. When embroidery unit is attached,
saves design(s) to memory. See pages 131-
133.
Adjustment Key
Changes thread tension, stitch length, stitch
width/needle position. See pages 32-34.
When embroidery unit is attached, changes
thread tension.
Auto Top Thread Key
Begins automatic top threading process.
See page 23.
Auto Bobbin Wind Key
Winds bobbin when embroidery unit is
attached. See pages 110-113.
Temp Embroidery Memory Key
Temporarily saves embroidery sewing so
machine can be turned off while sewing a
design. Embroidery can be restarted at
same position when machine is turned on.
Key only operates when embroidery unit is
attached. See page 130.

19
LCD Keys
Lock/Reverse Key
When highlighted yellow, sews lock or
reverse stitches (straight stitches) or stops
pattern sewing and lockstitches (other
stitches). See pages 35-36.
Scissors Key
When highlighted yellow, cuts needle and
bobbin threads. See pages 35-36.
Stitch Width/Needle Position Key
Increases or decreases stitch width or
changes needle position. See page 33.
Stitch Length Key
Increases or decreases stitch length. See
page 34.
Tension Key
Changes pre-programmed tension for
special fabrics and techniques. See page
32.
Decorative Sewing Key
Accesses decorative sewing groups. See
page 82.
20
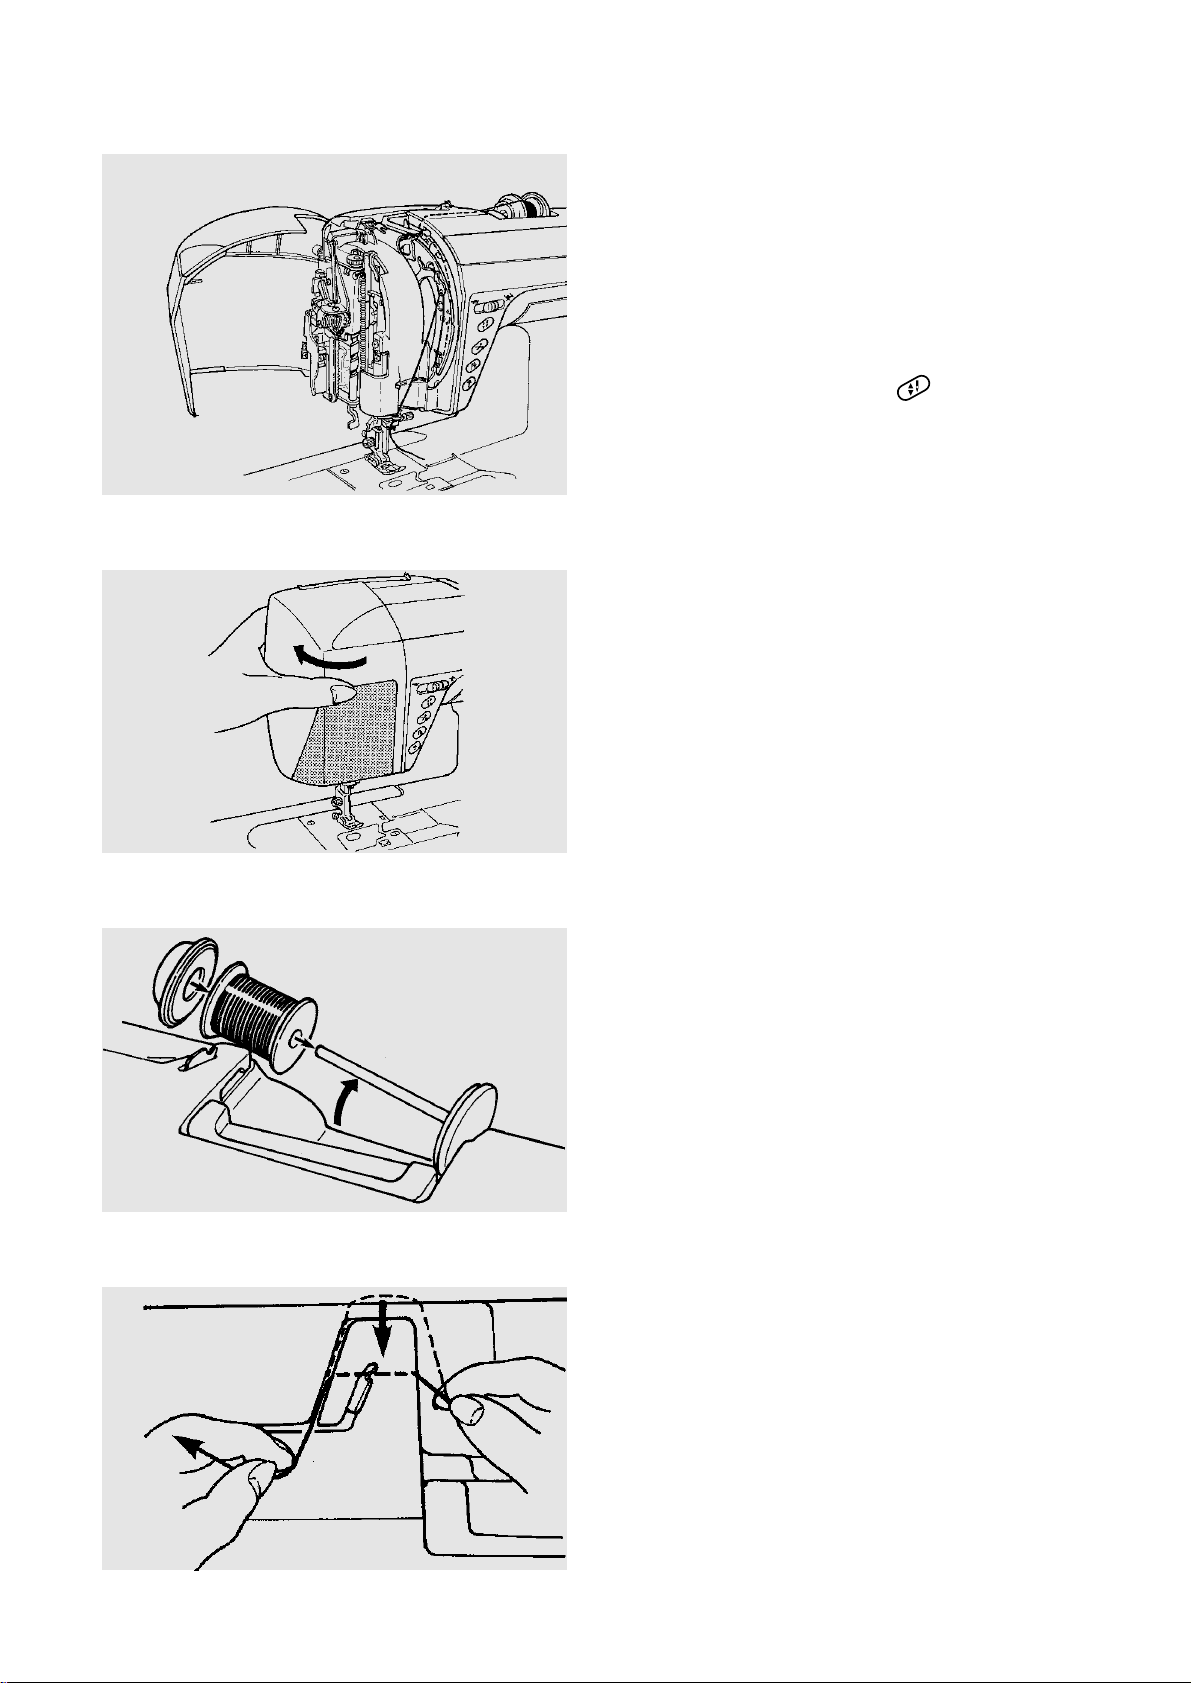
Removing Bobbin from Bobbin Case
Turn off power/light switch.
1. Raise presser foot. Slide bobbin case cover
button forward.
2. Lift away bobbin case cover.
3. Remove bobbin.
Winding Bobbin from Top Spool
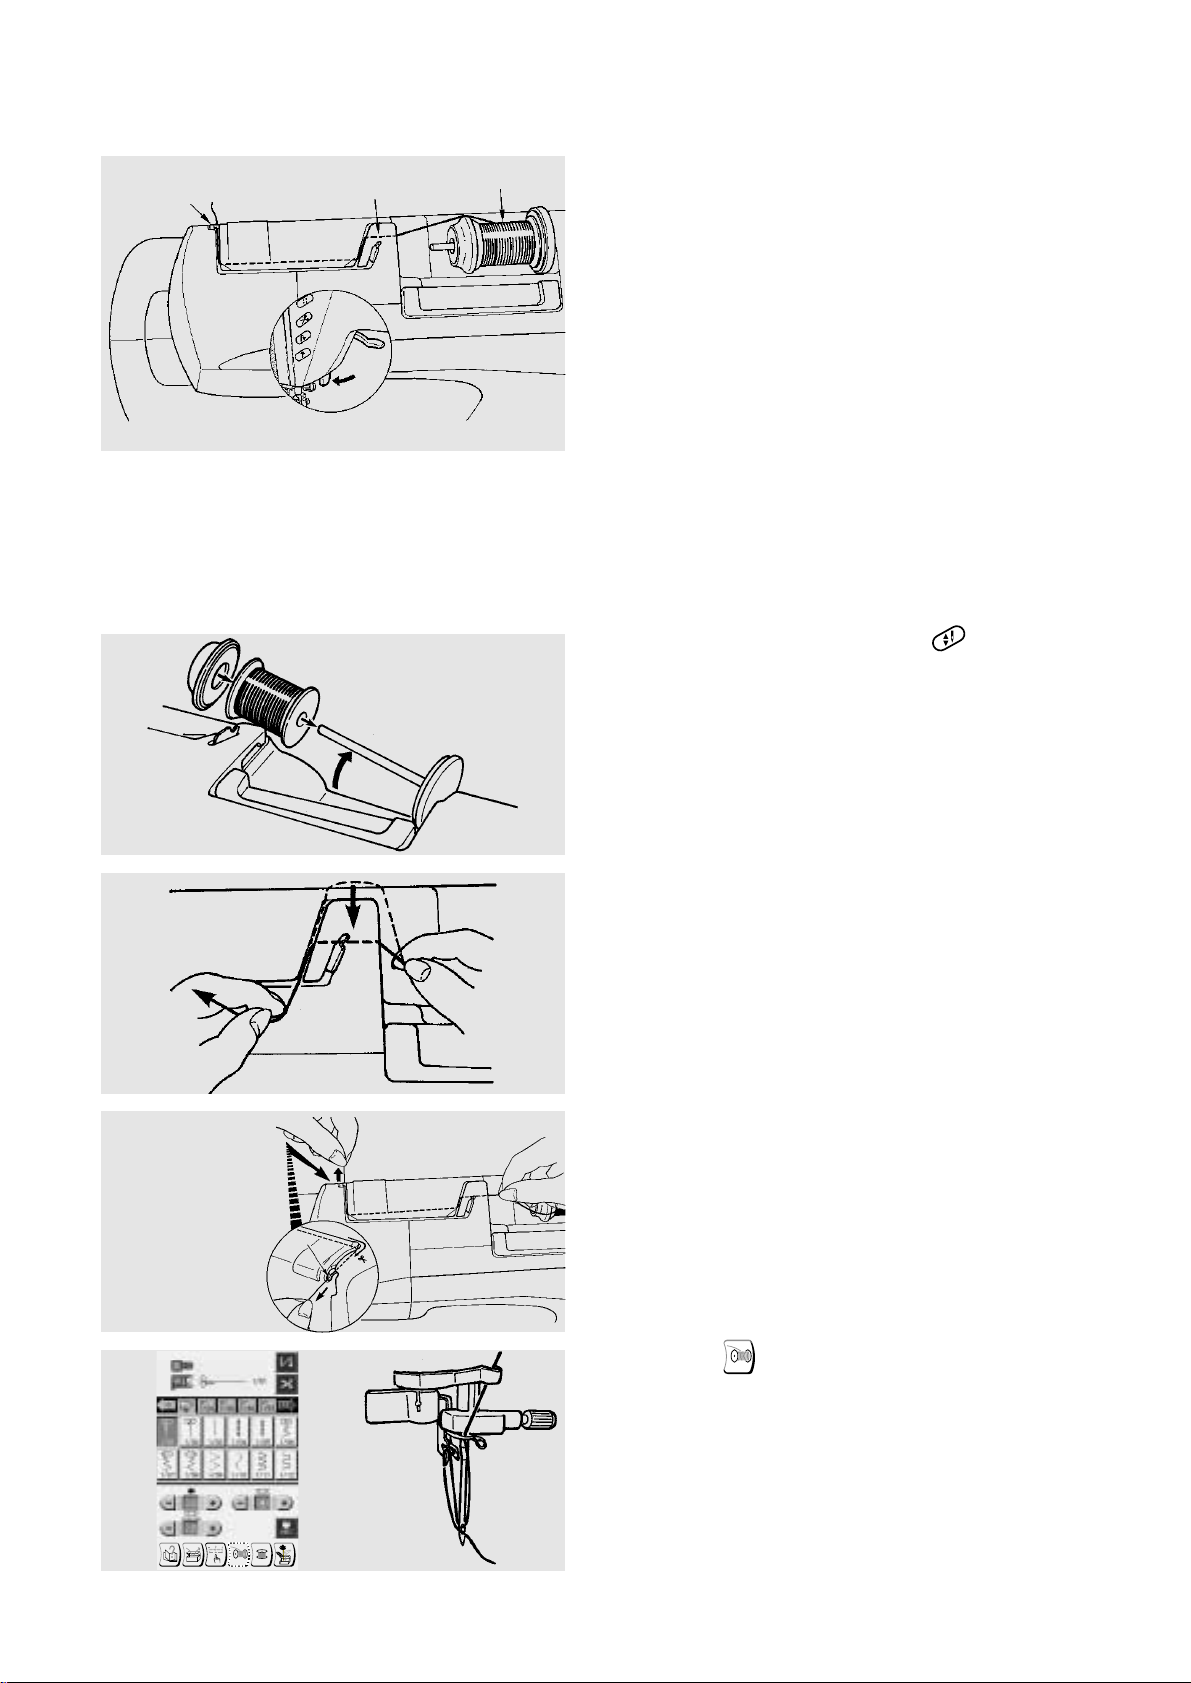
Turn on power/light switch.
1. Place spool of thread on spool pin. Firmly attach
large spool cap with small end towards small
spool A or large end towards large spool B.
Some types of thread spools require the use of
the small spool cap C.
1
2
3
4
5
6
7
8
1
2
3
1
A
B
C
21
2. Using both hands, insert thread into opening.
3. Guide thread up to thread guide.
4. Open bobbin winding shaft cover.
5. Remove bobbin winding shaft from accessory
box. Place bobbin on shaft and attach shaft.
NOTE: Use top winding bobbins only.
CAUTION: Twin needle must be removed
before winding bobbin.
6. Pass the thread through the hole in the bobbin
from the inside to the outside.
2
3
4
5
6
22
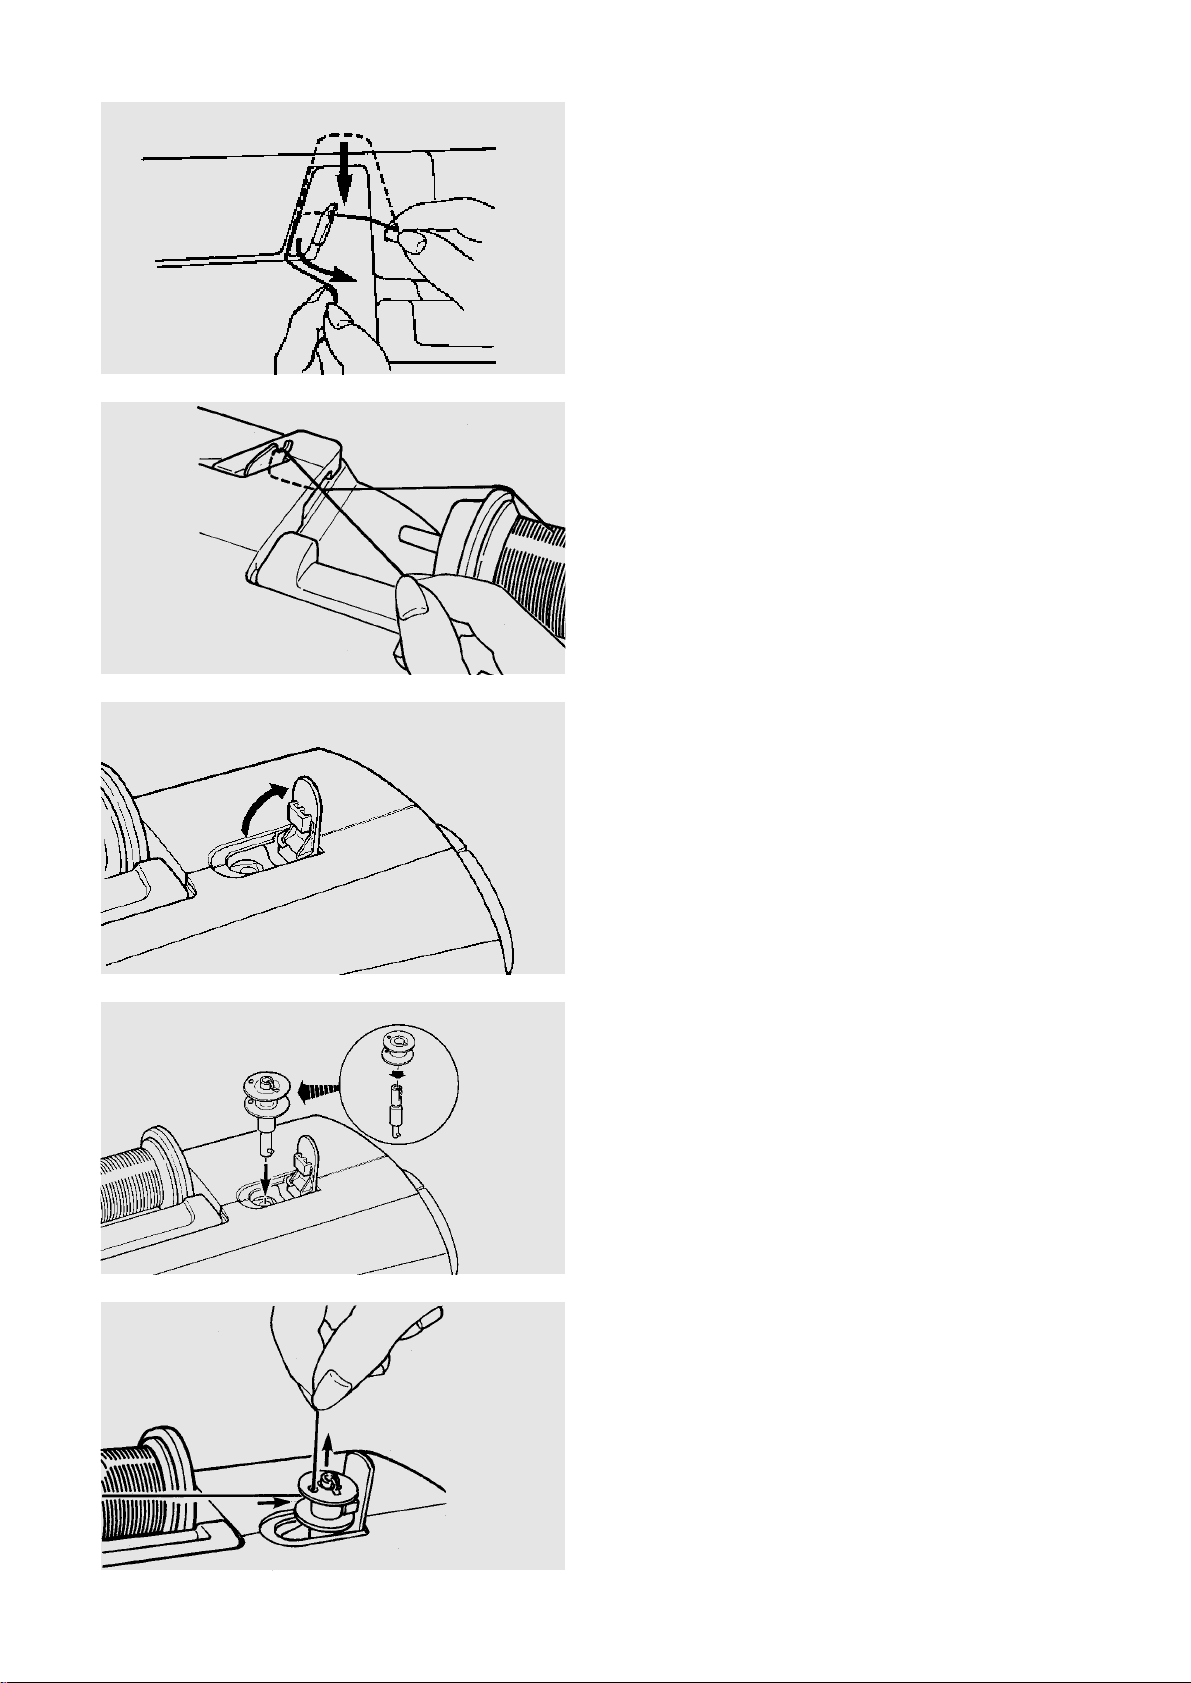
7. Push bobbin to the right.
While holding the free end of the thread, start
the machine. Stop the machine when the bobbin
has made a few turns and cut thread tail close to
hole in bobbin. Continue winding bobbin and
stop machine when bobbin is full.
8. Return bobbin winding shaft to the left. Cut the
thread and remove bobbin. Remove and store
bobbin winding shaft. Close bobbin winding
shaft cover.
NOTE: Be sure to correctly wind the bobbin.
Incorrectly wound bobbins can result in
jammed threads, tension problems, etc.
Inserting the Bobbin
Turn off power/light switch.
1. Raise the presser foot. Place the bobbin in the
bobbin case with the thread running
counterclockwise.
2. Guide the thread into notch A on the front side
of the bobbin case. Hold bobbin with right hand
and pull thread to the left, through tension spring
blades. Continue pulling thread lightly until
thread slips into notch B.
Pull about 15 cm (6") of thread.
3. Replace bobbin case cover.
1
2
3
8
7
A
B
23
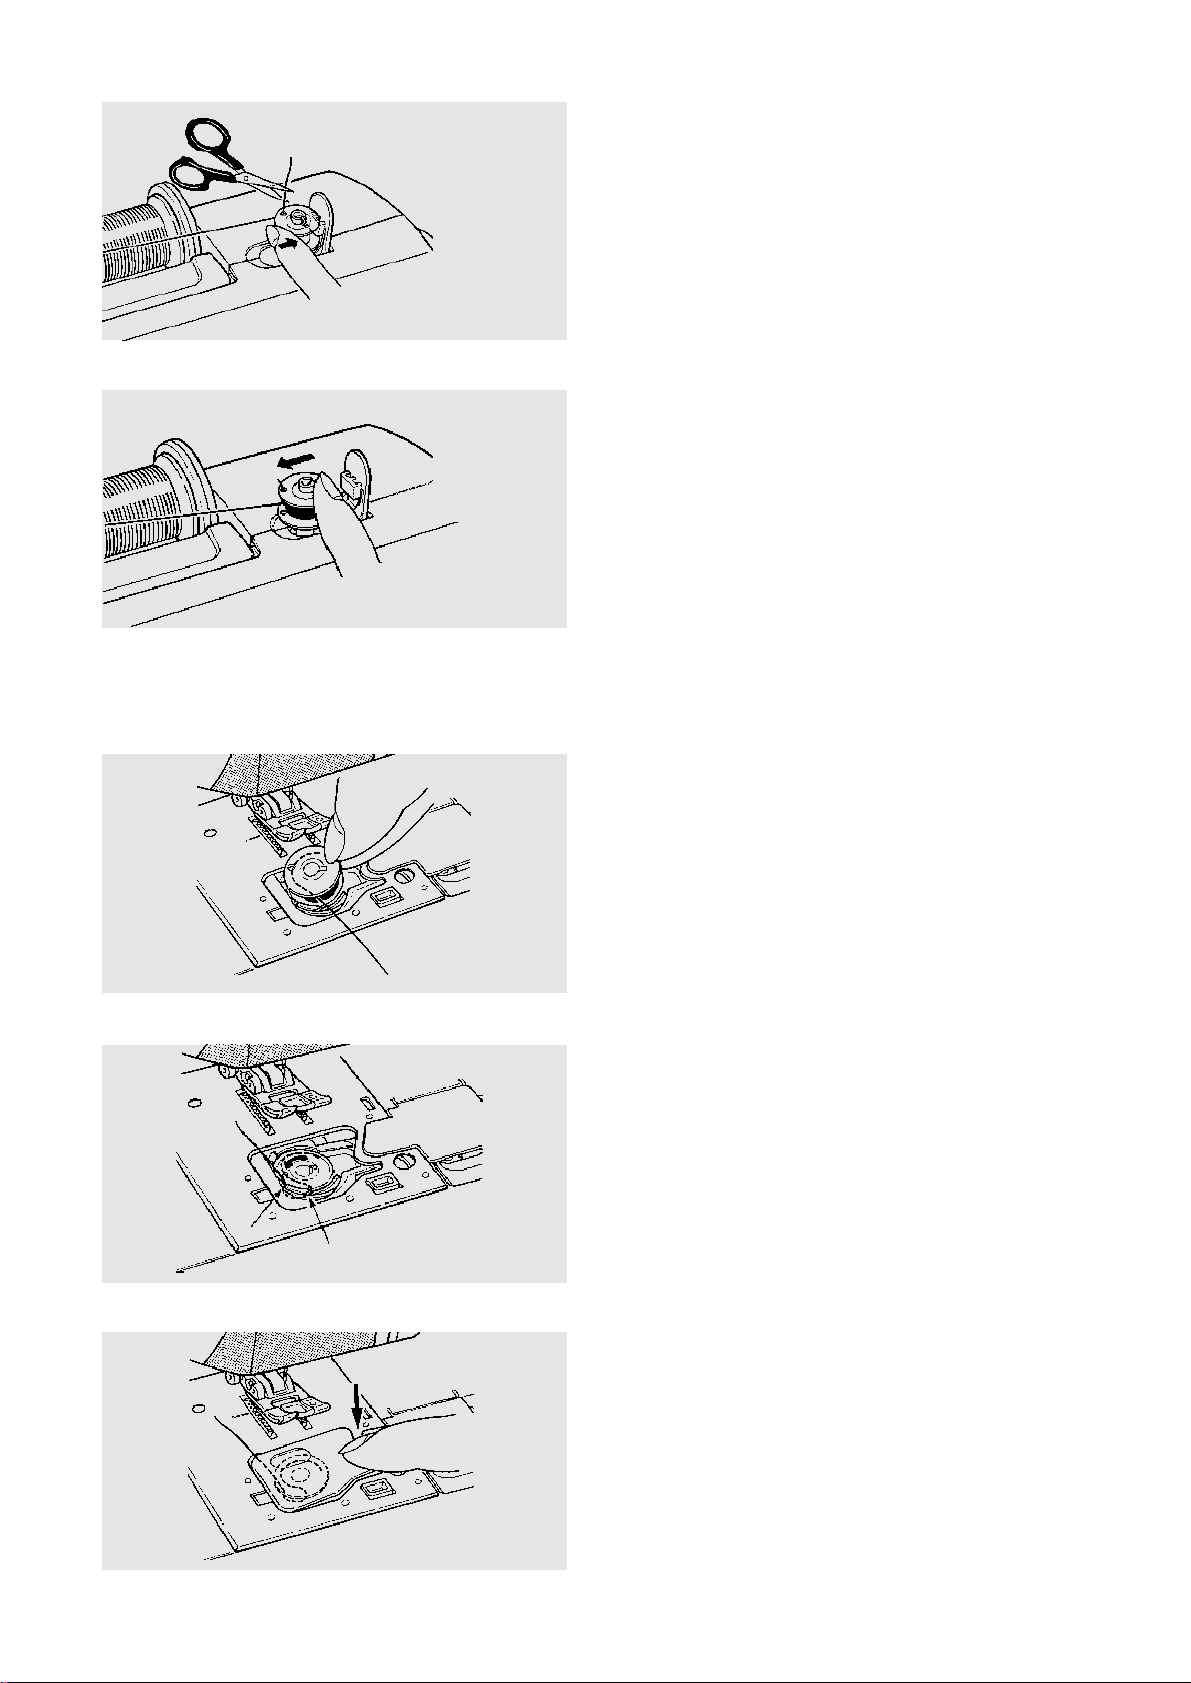
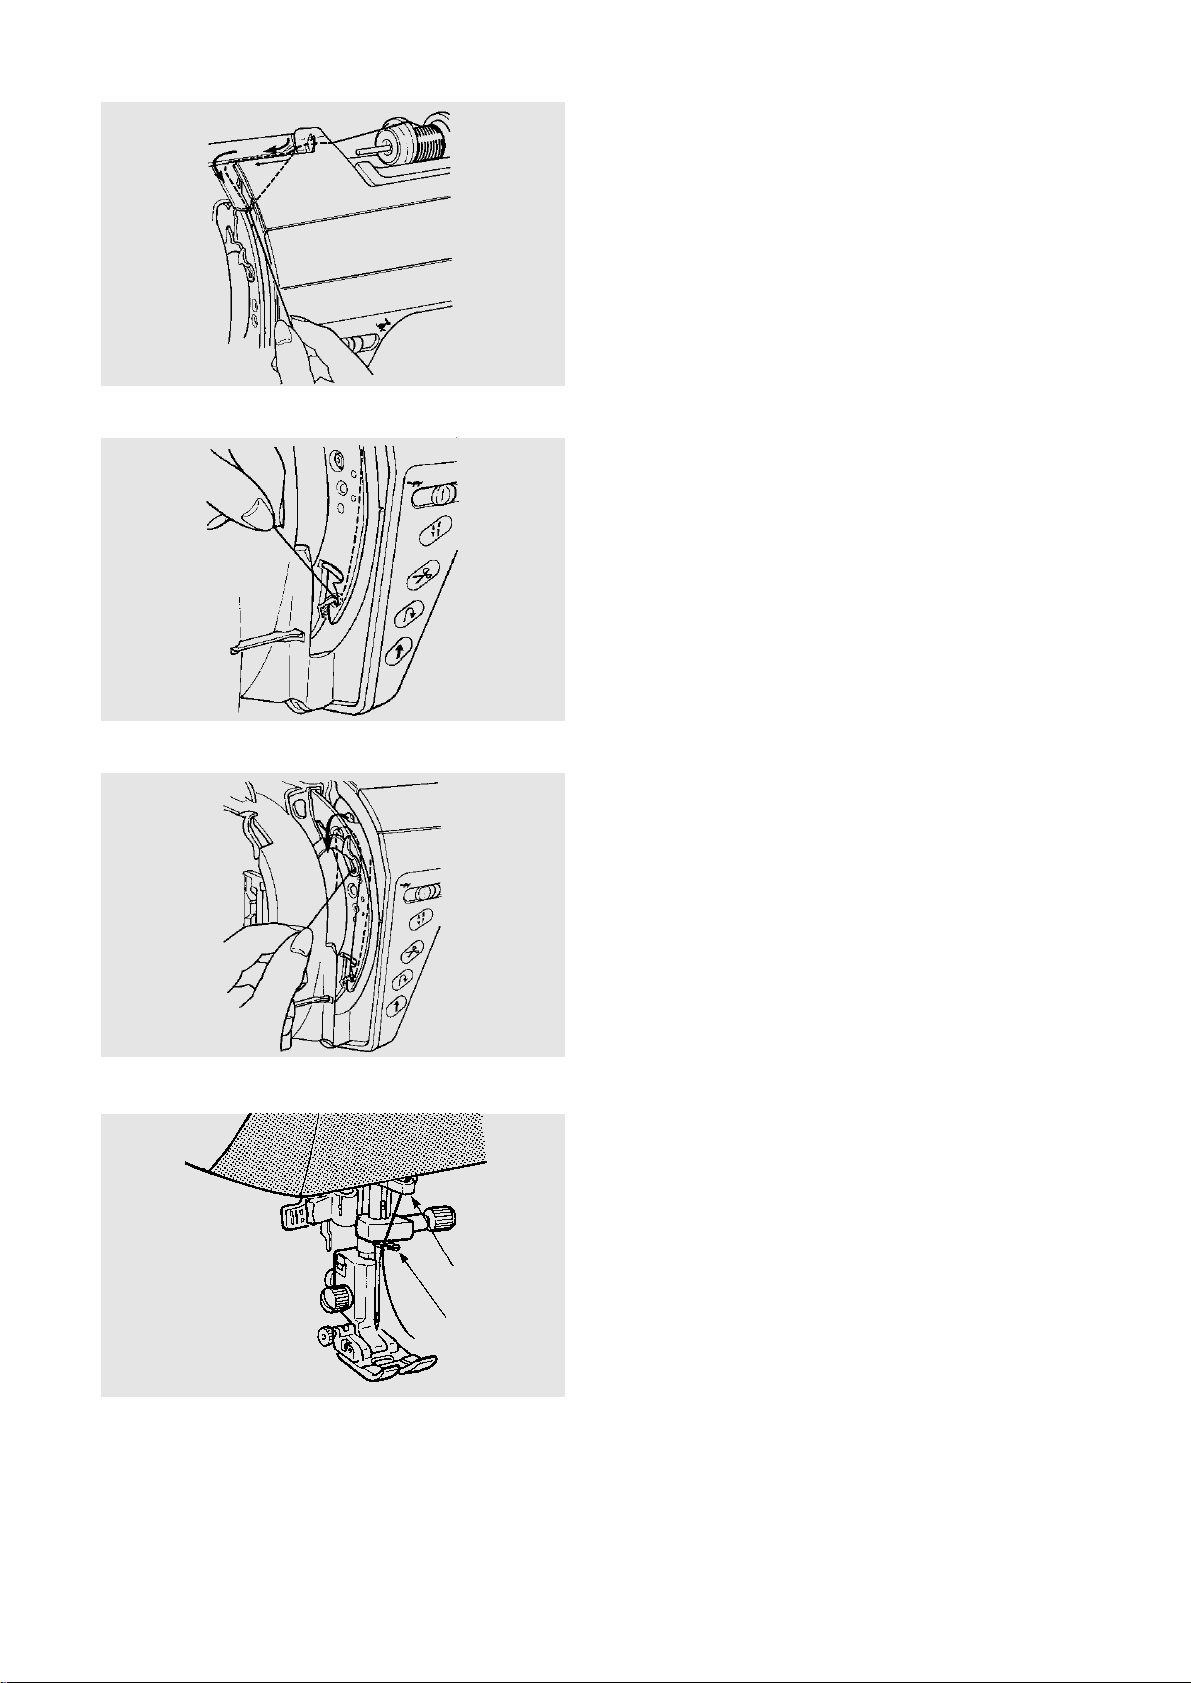
Automatic Top Threading
NOTE: Close face plate cover. Never open face
plate cover when automatic top threading is in
process.
NOTE: Check needle size. Use only size
11/75 – 16/100 (excluding twin and
hemstitch/wing needles) for automatic top
threading. Any other size needle requires manual
threading. See page 24.
NOTE: Check that needle is pushed up as far as it
will go.
NOTE: Some specialty threads will require
manual threading.
Turn on power/light switch and touch Welcome
screen.
2. Using both hands, pull thread into groove of
thread sensor guide.
1. Lower presser foot. Press the key until the
needle is raised. Place spool of thread on spool
pin and firmly attach spool cap. See page 20.
3. Hold thread with right hand while left hand pulls
thread through groove towards back of machine.
Cut using mounted top thread cutter A.
4. Touch key.
NOTE: If the thread is caught on the hook,
remove it before sewing.
1
2
3
4
A
3
2
1
1
A
24
Manual Top Threading
Under certain circumstances, it may be necessary to
thread the machine manually.
• when using needles other than sizes
11/75 – 16/100
• when using specialty needles – twin,
hemstitch/wing, etc.
• when using some specialty threads
1. Lower presser foot. Press key until needle
is raised. Raise presser foot.
2. Open face plate cover.
3. Place spool of thread on spool pin and firmly
attach spool cap. See page 20.
4. Using both hands, pull thread into groove of
thread sensor guide.
1
2
3
4
5
6
7
8
2
3
4
25
5. Pull the thread around upper thread guide.
6. Guide the thread down and around the
checkspring holder.
7. Firmly pull thread from right to left, over the
take-up lever and down into the take-up lever
eye.
8. Proceed down through lower thread guide 1.
Slide thread to the right behind needle bar
thread guide 2. Lower presser foot. Close face
plate cover.
9. Thread needle from front to back or use
automatic needle threader – manual operation.
See page 26.
5
6
7
8
1
2
26
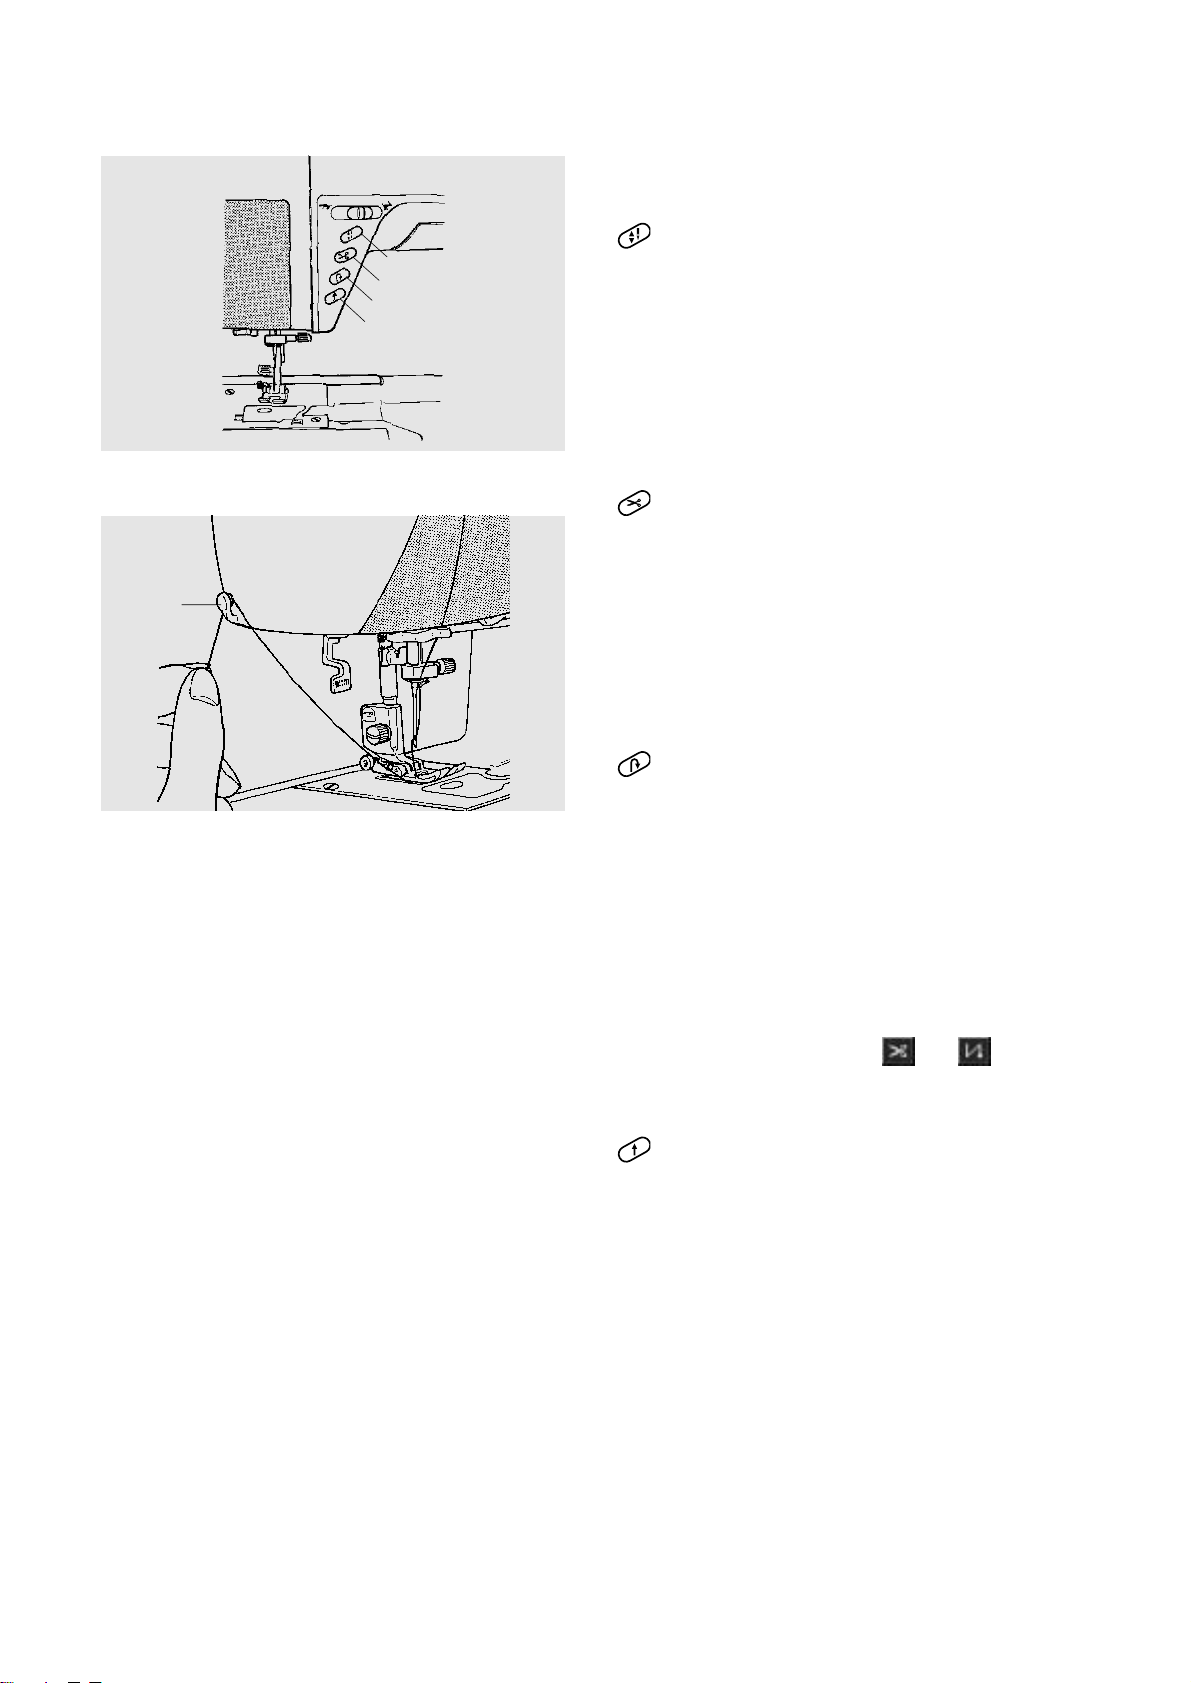
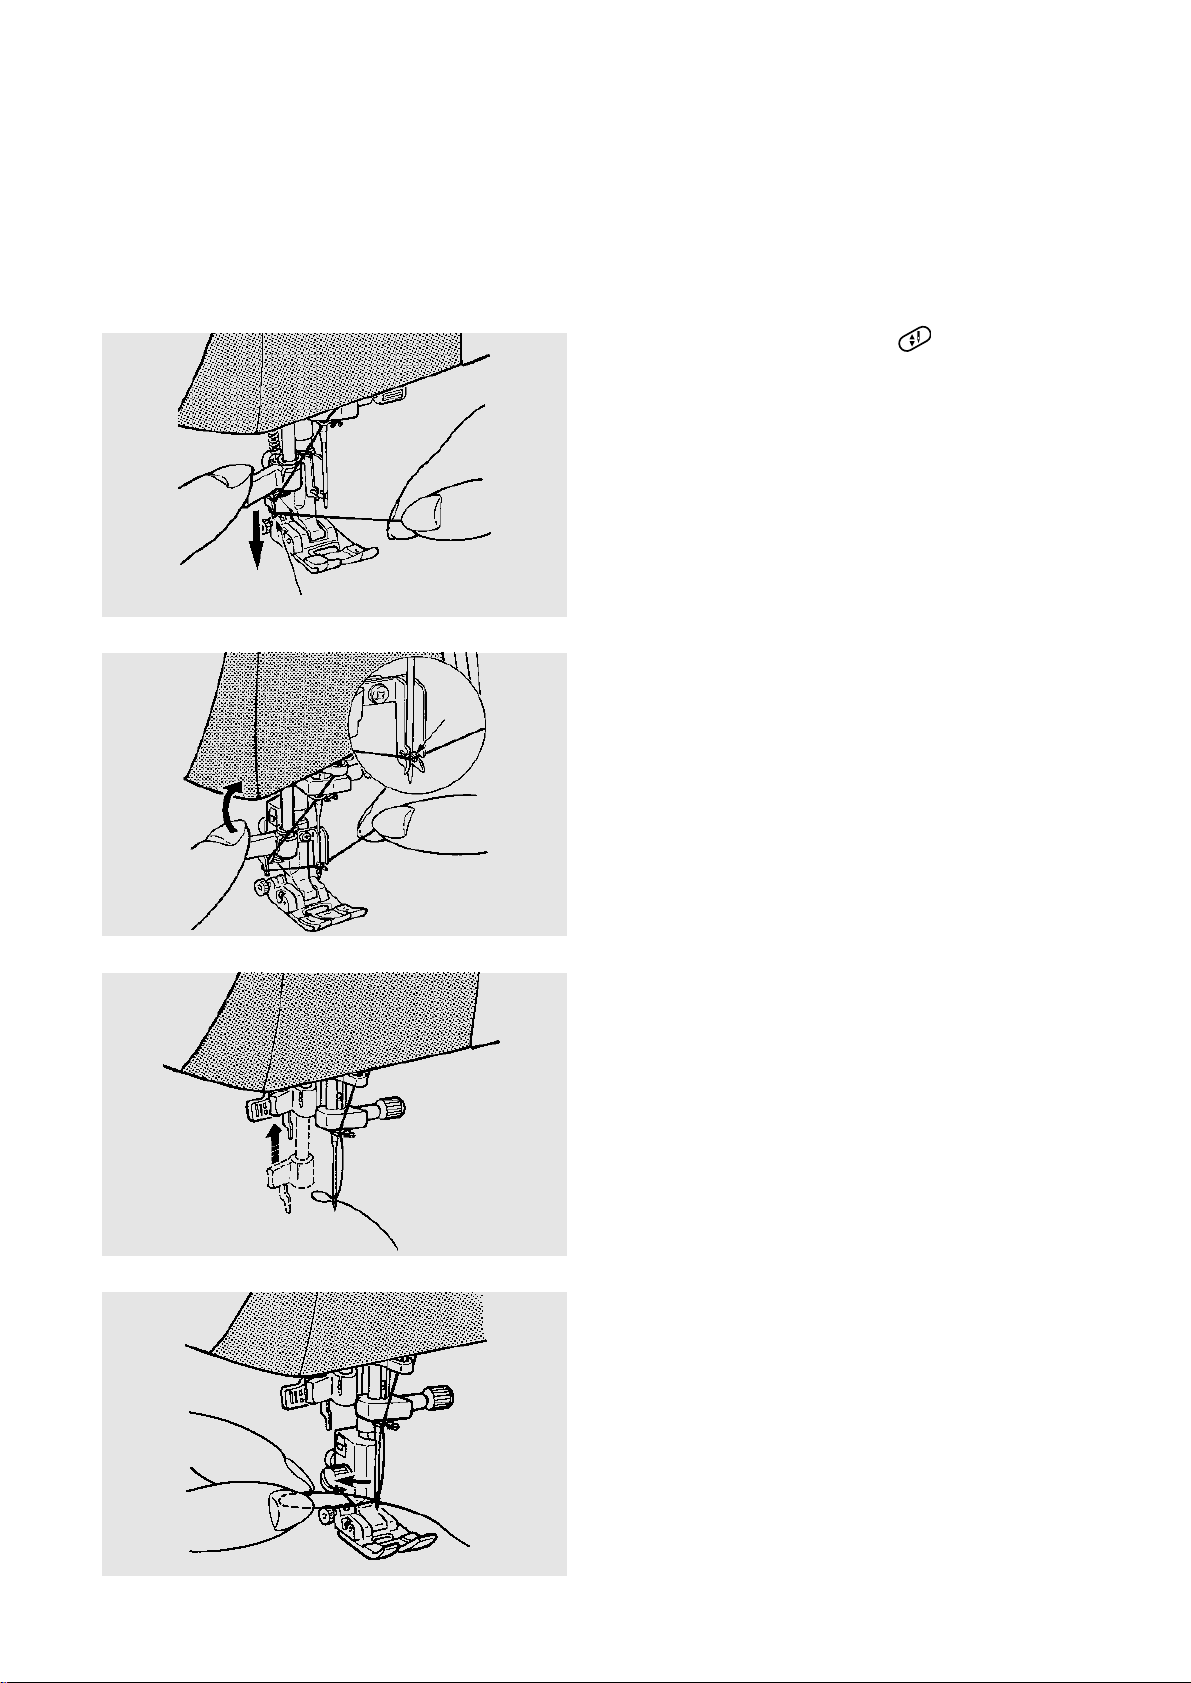
Automatic Needle Threader -
Manual
Operation
NOTE: Check needle size. Use only size 11/75 –
16/100 (excluding twin and hemstitch/wing
needles) for automatic top threading. Any other
size needle requires manual threading. See
pages 24 - 25.
4. Pull thread loop to the back to complete
threading the needle eye.
3. Release needle threader and hook will catch
thread pulling it through the needle eye.
2. Pivot needle threader as shown and hook will go
through eye of needle. Pass thread in front of
needle eye B.
1. Lower presser foot. Press key until needle
is raised. Pull needle threader down. Place
thread into hook A.
CAUTION: Do not lower needle threader
while the machine is sewing.
1
A
B
2
3
4

27
Drawing Up the Bobbin Thread
1. Hold needle thread lightly with left hand.
Press key twice to pick up bobbin thread.
2. Raise presser foot. Pull on needle thread to draw
up loop of bobbin thread.
3. Slide 10 cm (4") of both threads to the back
under presser foot.
NOTE: It is not necessary for bobbin thread
to be drawn up to the surface after using the
key.
28
Test Sewing
Turn on power/light switch and touch the Welcome
Screen. The machine automatically sets itself to sew
1/01, a straight stitch in center needle position. This
key will be highlighted on the screen.
The stitch illustration and number will appear in the
top section of the screen, along with the
recommended foot or feet.
How to Access Utility, Heirloom and
Quilting Groups and Folders
The stitches have been grouped together according
to their characteristics.
The groups are identified by letters or
letters/numbers.
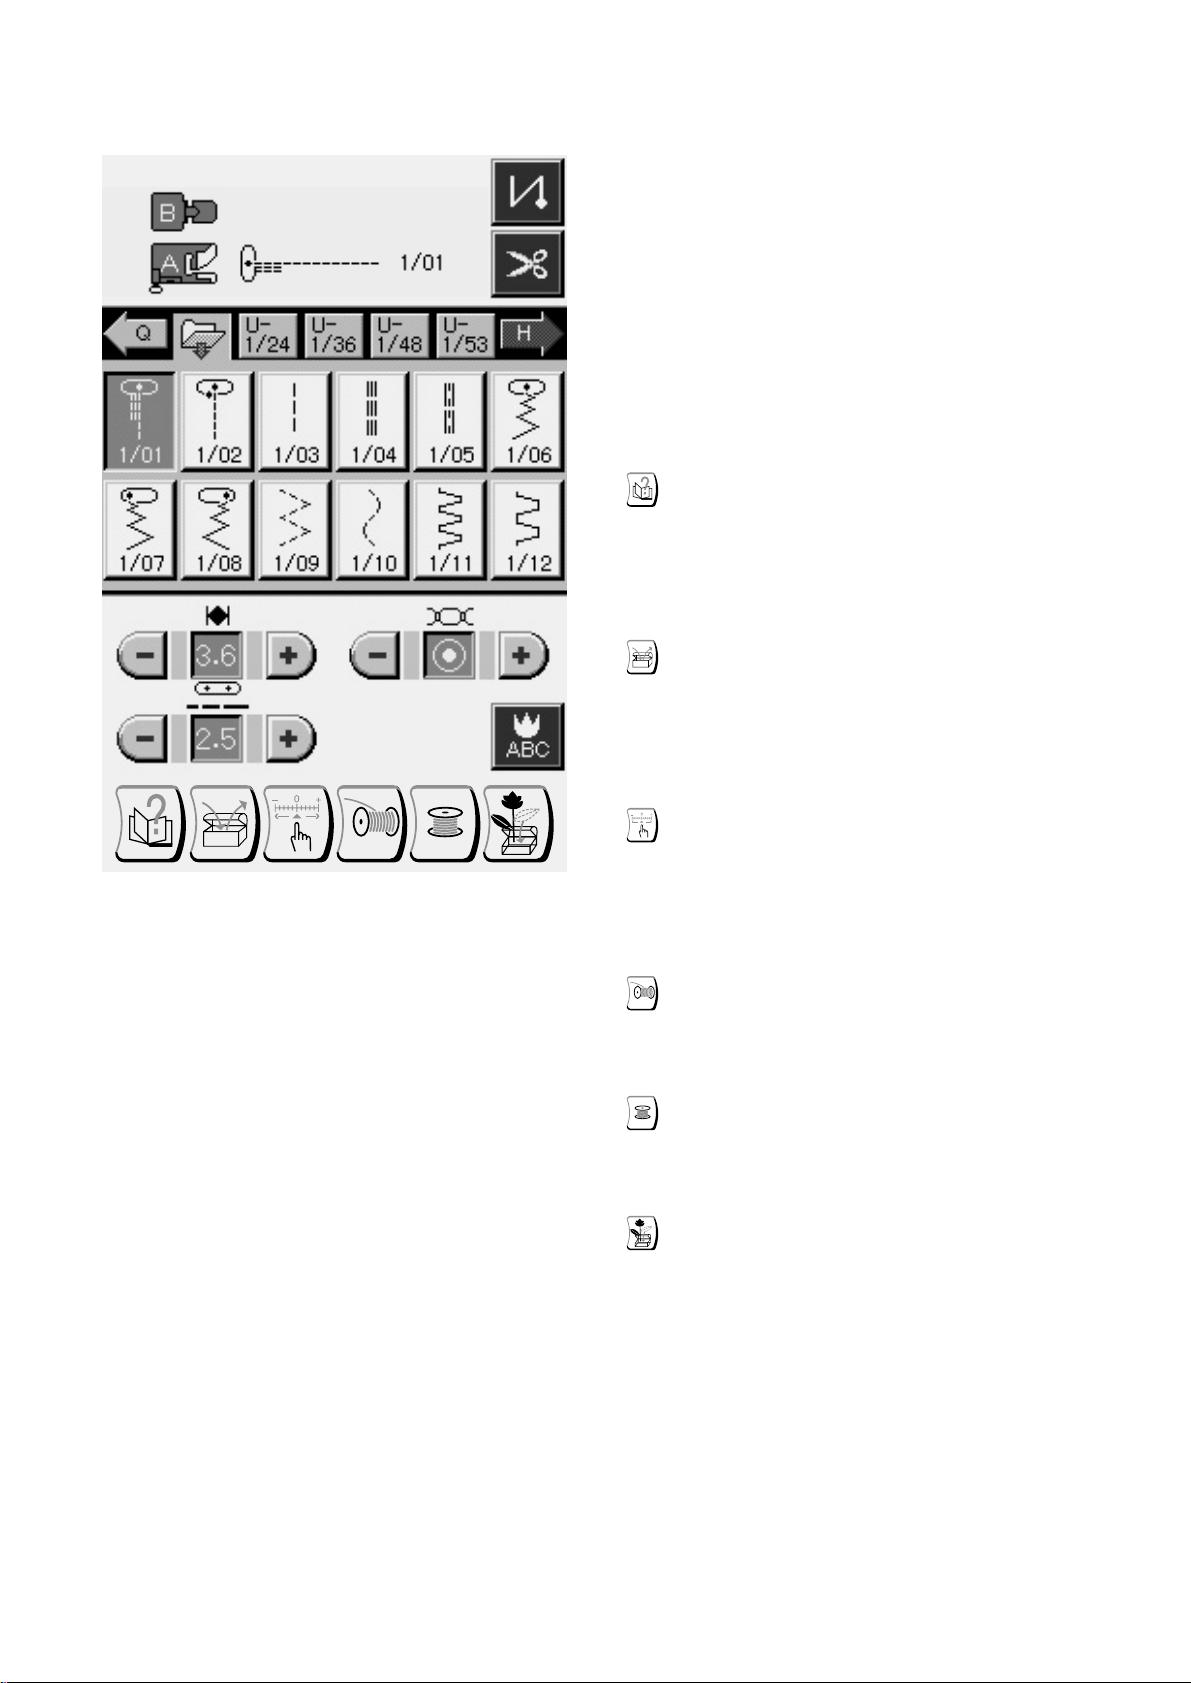
On a Utility (U) screen, touch key to access
Heirloom (H) group or key to access Quilting
(Q) group. The screens for these 3 groups provide
direct access to stitch width, length and tension. To
memorize these stitches in a sequence touch
key. See page 82.
Touch key to go quickly to 1/01 in Utility (U)
group.
H
Q
29
The groups have been arranged into folders. Each
folder is identified by a letter and group number plus
the last stitch number in that folder.
For example, the Utility group has 5 folders:
Folder 1: U-1/12
Folder 2: U-1/24
Folder 3: U-1/36
Folder 4: U-1/48
Folder 5: U-1/53
Touch key to access the folder containing
stitches 1/13 – 1/24.
Utility (U)
Heirloom (H)
Quilting (Q)
 Loading...