


IMPORTANT SAFETY INSTRUCTIONS
Your Elna 6600 sewing machine is designed and constructed for HOUSEHOLD use only. Read all instructions before using this machine.
DANGER– To reduce the risk of electric shock:
1.Your sewing machine should never be left unattended when plugged in. Always unplug the machine from the electrical outlet immediately after using and before cleaning.
2.Always unplug before replacing light bulb. Replace bulb with same type rated 12 Volts, 5 watts.
3.Do not reach for the machine if it has fallen into water. Unplug immediately.
4.Do not place or store machine where it can fall or be pulled into a tub or sink. Do not place it in or drop it into water or other liquid.
WARNING– To reduce the risk of burns, fire, electrical shock or injury:
1.Do not allow machine to be used as a toy. Supervision is necessary when this machine is used by or near children.
2.Use this sewing machine only for its intended use as described in this manual. Only use attachments recommended by the manufacturer as described in this manual.
3.Never operate this machine if it has a damaged cord or plug, is not working properly, has been dropped or damaged or dropped into water. Return the machine to the nearest authorized dealer or service center for examination, repair, electrical or mechanical adjustment.
4.This machine is equipped with a special connection cord which, if damaged, must be replaced by an identical cord. This can be obtained from your dealer.
5.Never operate the sewing machine with any air opening blocked. Keep ventilation openings of the sewing machine and foot control free from the accumulation of lint, dust and fibers.
6.Never drop or insert any object into any opening.
7.Do not use outdoors.
8.Do not operate where aerosol (spray) products are being used or where oxygen is being administered.
9.To disconnect, turn machine off and remove plug from outlet.
10.Do not unplug by pulling on cord. To unplug, grasp the plug, not the cord.
11.Keep fingers away from all moving parts, especially the needle.
12.Always use the proper needle plate. The wrong plate can cause the needle to break.
13.Do not use bent needles.
14.Do not pull or push fabric while stitching. This may deflect the needle causing it to break.
15.Switch the sewing machine off when making any adjustment in the needle area, such as threading needle, changing needle, threading bobbin, changing presser foot, etc.
16.Always unplug the sewing machine from the electrical outlet when removing covers, lubricating or making any other servicing adjustments mentioned in the instruction manual.
SAVE THESE INSTRUCTIONS
IMPORTANT
Be sure to keep machine away from static electricity, heat sources, humidity and direct sunlight.
USA only
Your machine comes equipped with a polarized plug (one prong wider than the other). A polarized plug reduces the risk of electrical shock. This plug is intended to fit into a polarized outlet. If the plug does not fit fully into the outlet, reverse the plug. If it still does not fit, contact a qualified electrician to install the proper outlet. Do not modify the plug in any way.
Use only foot control model 21371 for sewing machine model 6600 (UL, CSA).
1
TABLE OF CONTENTS
SECTION I – Machine Parts and Functions |
|
Part Names ............................................................................................ |
3 |
Standard Accessories......................................................................... |
4-5 |
Presser Foot and Accessory Definitions ............................................ |
5-6 |
Extension Table and Free Arm .............................................................. |
7 |
Circular Sewing Pivot Points ................................................................. |
7 |
Knee Lifter ............................................................................................. |
8 |
Connecting Machine to Power Supply .................................................. |
9 |
Main Function of Keys ......................................................................... |
10 |
Keyboard Selection Keys ............................................................... |
11-13 |
Setting Quick Resumption, Sound and Language Modes ........... |
14-15 |
Controlling Sewing Speed ................................................................... |
15 |
Foot Pressure Dial ............................................................................... |
15 |
How to Drop the Feed Dog ................................................................. |
16 |
Presser Foot Lever .............................................................................. |
16 |
Additional Presser Foot Clearance ..................................................... |
16 |
Attaching and Removing Presser Feet ............................................... |
17 |
Attaching and Removing Shank .......................................................... |
17 |
Seam Allowance Lines ........................................................................ |
17 |
Adjusting Needle Thread Tension ....................................................... |
18 |
Using the Fine Adjustment Screw ....................................................... |
19 |
SECTION II – Getting Ready to Sew |
|
Selecting the Correct Needle and Thread .......................................... |
20 |
Changing Needles ............................................................................... |
20 |
Needle Definitions ............................................................................... |
21 |
Winding a Bobbin .......................................................................... |
22-23 |
Additional Spool Pin ............................................................................ |
23 |
Inserting the Bobbin ............................................................................ |
24 |
Threading the Machine........................................................................ |
25 |
Built-in Needle Threader ..................................................................... |
26 |
Drawing Up the Bobbin Thread ........................................................... |
27 |
SECTION III – Basic Sewing |
|
How to Select a Stitch ......................................................................... |
28 |
Straight Stitch ...................................................................................... |
28 |
Starting to Sew ................................................................................... |
28 |
Finishing Off a Seam ........................................................................... |
28 |
Cutting the Threads ............................................................................. |
29 |
Changing Sewing Direction ................................................................. |
29 |
Adjusting Needle Position ................................................................... |
29 |
Adjusting Stitch Length ....................................................................... |
30 |
Programming My Personal Settings ............................................. |
30-31 |
Sewing on Heavy Fabrics ................................................................... |
32 |
Gathering ............................................................................................. |
32 |
Zipper Insertion ............................................................................. |
33-34 |
Rolled Hem .......................................................................................... |
35 |
Zigzag Stitch ........................................................................................ |
36 |
Overcasting ......................................................................................... |
36 |
Satin Stitch Appliqué ........................................................................... |
37 |
3-Step Zigzag ...................................................................................... |
37 |
Mending a Tear .................................................................................... |
38 |
Apply 7mm (1/4˝) Elastic ..................................................................... |
38 |
Blind Hem Stitches .............................................................................. |
39 |
Lingerie Stitch ...................................................................................... |
39 |
Triple Seam ......................................................................................... |
40 |
Super Overlock Stitch.......................................................................... |
40 |
Super Stretch Stitch ............................................................................ |
40 |
Buttonhole Variations .................................................................... |
41-46 |
Corded Buttonhole .............................................................................. |
47 |
4 Step Memory Buttonholes – Classic and Bound ....................... |
48-51 |
How to Sew on a Button ...................................................................... |
52 |
Darning ................................................................................................ |
53 |
Bartacks ............................................................................................... |
54 |
Arrowtack ............................................................................................. |
55 |
Eyelets ................................................................................................. |
55 |
Shell Tuck ............................................................................................ |
55 |
Basting Stitch....................................................................................... |
56 |
Saddle Stitch ....................................................................................... |
57 |
Stretch Seam ....................................................................................... |
57 |
Overlock Stitch .................................................................................... |
58 |
Double Overlock Stitch ........................................................................ |
58 |
SECTION IV – Quilting |
|
Piecing Fabrics Together ..................................................................... |
59 |
Quilt Stitch ........................................................................................... |
59 |
Quilt Guide ........................................................................................... |
59 |
Open Toe Walking Foot ....................................................................... |
60 |
Patchwork ............................................................................................ |
60 |
French Knots ....................................................................................... |
60 |
Buttonhole Appliqué ............................................................................ |
61 |
Free Motion Quilting or Stippling ........................................................ |
62 |
Stippling Stitch ..................................................................................... |
62 |
SECTION V – Decorative Sewing |
|
Scallop Edges...................................................................................... |
63 |
Corded Trim ......................................................................................... |
63 |
Single Cord For Gathering Heavy Fabric ........................................... |
63 |
Twin Needle Sewing ........................................................................... |
64 |
Twin Needle Decorative Sewing ......................................................... |
65 |
Satin Stitches – Elongation ................................................................. |
65 |
Mirror Image ........................................................................................ |
65 |
Circle Sewing....................................................................................... |
66 |
Large Scallop Border .......................................................................... |
66 |
SECTION VI – Programming Combinations |
|
Single Repeat with Lockstitch ............................................................. |
67 |
Combining a Sequence ...................................................................... |
68 |
Inserting a Second Color..................................................................... |
68 |
Reset Combined Sequence to Beginning ........................................... |
69 |
Reset Combined Sequence to Beginning of Incomplete Stitch ......... |
69 |
Combining Letters ............................................................................... |
70 |
How to Preview the Combined Sequence .......................................... |
71 |
Editing .................................................................................................. |
71 |
Individually Adjusting Stitch Width or Length...................................... |
72 |
Alignment of Stitches within a Sequence ........................................... |
72 |
Permanent Memory |
|
(Saving, Overwriting, Recalling and Deleting) .............................. |
73-74 |
SECTION VII – Heirloom |
|
Pintucks ............................................................................................... |
75 |
Bridging (Fagoting) .............................................................................. |
75 |
Hemstitches ......................................................................................... |
76 |
Fringing ................................................................................................ |
77 |
Drawn Work ......................................................................................... |
77 |
Smocking ............................................................................................. |
78 |
SECTION VIII – Taking Care of Your Machine |
|
Cleaning the Bobbin Area ................................................................... |
79 |
Cleaning the Hook Area and Feed Dog ........................................ |
79-80 |
Replacing the Bobbin Case................................................................. |
80 |
Changing the Light Bulbs .................................................................... |
80 |
STITCH CHART ................................................................ |
81-82 |
OPTIONAL ACCESSORIES .................................................. |
83 |
WARNING MESSAGES .................................................... |
84-85 |
TROUBLESHOOTING ........................................................... |
86 |
INDEX ................................................................................ |
87-88 |
NOTE: Information found in this instruction manual is current at the time of printing. Elna reserves the right to change and update specifications and information as needed.
2

1 2
27 28
26
25
24
23
22
21
20 |
|
|
19 |
|
|
18 |
17 |
16 |
START
STOP
29
30
31
33 |
34 |
|
|
|
32 |
41
40
39
SECTION I - Machine Parts and Functions
Part Names
|
1. |
Top cover (lift up and back) |
|
|
2. |
Stitch chart |
|
|
3. |
Top storage compartment |
|
|
4. |
Bobbin winder spindle |
|
|
5. |
Bobbin winder stop |
|
|
6. |
Selection keys |
|
|
7. |
LCD screen |
|
3 |
8. |
Side storage compartment |
|
9. |
Knee lifter insert channel |
||
|
410. Light panel
11. Speed control lever
512. Up/down needle key
13. Auto-lock key
614. Reverse key
15. Start/stop key
716. Bobbin cover plate release button
17. Bobbin cover plate
818. Extension table (storage box)
19.Needle plate
20.Circular sewing pivot points
21.Needle threader
22. Thread cutter
23. Face plate
9 24. Foot pressure dial
10 25. AUTO tension LED
1126. LED screen brightness control
27.Needle thread tension dial 12 28. Spool pin
13
14
1529. Needle clamp screw
30.Needle
31.Presser foot
32.Shank
33.Thumbscrew
34.Carrying handle
35.Presser foot lever
36.Buttonhole lever
37.Free arm
38.Feed dog lever
3539. Machine sockets
40.Power switch
41.Flywheel (always turn towards you)
37
38
3
2 |
3 |
4 |
1
15
14
13 |
A C |
D |
12 |
E |
F |
|
R |
H |
|
G |
|
11 |
|
|
16 17
19 20
22 23
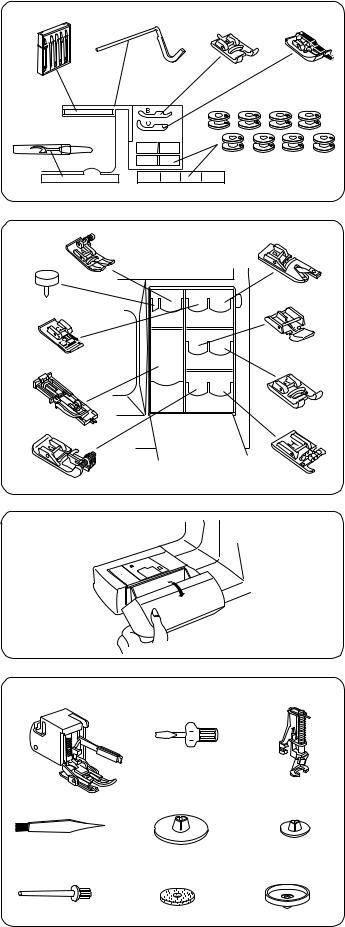
Standard Accessories
5
Top Cover
(Lift up and back)
1.Seam ripper
62. Set of needles
3. Quilt guide
4. B: Buttonhole foot (4-step)
5. Scant 1/4 inch foot
6.Bobbins (8 + 1 in machine = 9 total)
Side Cover
7(Pull down Side Cover to open)
7.D: Hemmer foot
8.E: Zipper foot
8 |
9. |
F: Satin stitch foot |
|
10. |
H: Multi-cord foot |
||
|
|||
|
11. |
G: Blind hem foot |
|
|
12. |
R: Automatic buttonhole foot |
913. C: Overlock foot
|
14. |
Circular sewing pivot pin |
|
15. |
A: Standard metal foot (attached to machine) |
10 |
Storage compartments can be tilted forward for easy |
|
|
access. |
|
Extension Table (Storage Box)
Accessories are stored inside the extension table. Pull lid towards you to open the storage box.
18 |
16. |
Open toe walking foot |
|
17. |
Large screwdriver |
||
|
|||
|
18. |
P-2: Open toe embroidery/darning foot |
|
|
19. |
Lint brush |
|
|
20. |
Large spool holder |
|
|
21. |
Small spool holder |
|
|
22. |
Additional spool pin |
|
21 |
23. |
Spool pin felt |
|
24. |
Spool stand |
||
|
|||
24 |
|
|
4
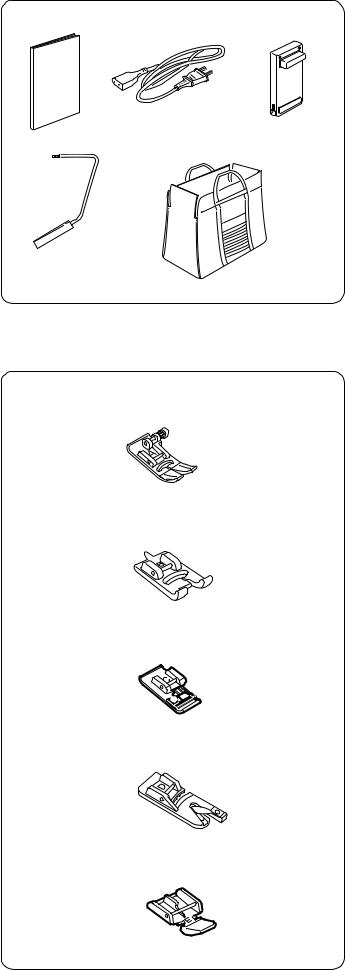
Machine Box
25 |
26 |
27 |
25. Instruction book
26. Power supply cord
27. Foot control
28. Knee lifter
29. Carrying bag
28 |
29 |
Presser Foot and Accessory Definitions
A: Standard Metal Foot
This foot comes attached to your machine. It is mainly used for straight stitches and zigzag stitches longer than 1.0. The button locks the foot in a horizontal position helping to sew over multiple layered seams.
B: Buttonhole Foot
Sew oversized buttonholes for novelty buttons or a decorative accent. The two cutout grooves on the underside of the foot ensure that the buttonhole sides lie parallel to each other.
C: Overlock Foot
Prevent fabric edges from raveling by finishing the edge with a zigzag stitch. The wires/brush on the foot help the stitch lie flatter and reduce puckering. Use with medium weight fabrics.
D: Hemmer Foot
Insert the fabric into the spiral on this foot. The spiral rolls the fabric, creating a rolled hem. An easy, professional way to sew hems.
E: Zipper Foot
Use when sewing zippers into place. The grooves on the underside ensure the foot glides over the zipper coil. Attach either to the left or right of the needle to sew each side of the zipper.
5
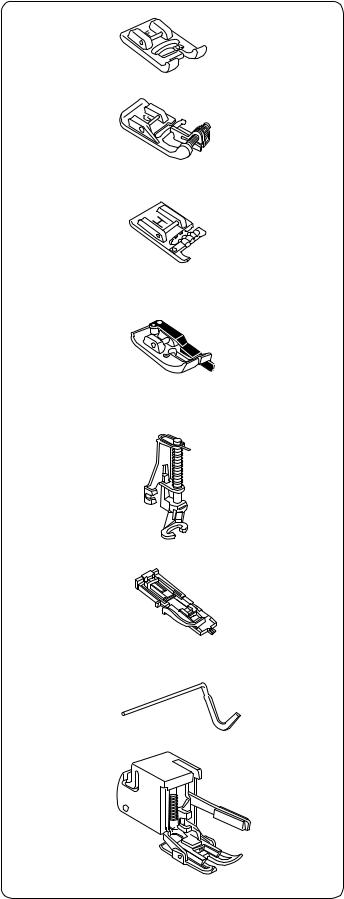
F: Satin Stitch Foot
The cutout on the underside of the foot is designed to accommodate dense stitch formation. Ideal when sewing satin and decorative stitches.
G: Blind Hem Foot
The guide on the foot helps ensure that the needle catches only one or two fibers of the hem, resulting in an invisible hemline.
H: Multi-Cord Foot
Design your own braids or trims. Place one to three cords in the foot and sew over cord(s) for a simple couching method. Or sew over one cord with a zigzag to gather heavier weight fabrics.
Scant 1/4˝ Foot
Accuracy is the key to successful patchwork/quilt sewing. Sewn from 3.5 needle position; the guide on the foot provides a perfect 1/4" seam. Or use 4.5 needle position and achieve the desirable scant 1/4˝ often requested by quilters.
P-2: Open Toe Embroidery/Darning Foot
Skipped stitches are no longer a concern when sewing free motion embroidery, stippling, darning and monogramming. The spring-loaded foot moves up and down at the same time as the needle. Another benefit when using this foot is that the front cutout provides maximum visibility.
R: Automatic Buttonhole Foot
Place button in foot to determine the buttonhole size. The machine will automatically sew the corresponding buttonhole.
Quilt Guide
The quilt guide is helpful when sewing parallel, evenly spaced rows of stitching. May be used with a Open Toe Walking Foot.
Open Toe Walking Foot
Great for keeping quilt layers from shifting when sewing and keeping stripes and checks matched. Fabrics lie between an upper feed dog (on walking foot) and lower feed dog (on machine) to move fabrics simultaneously, preventing them from slipping.
6
Extension Table and Free Arm
Extension Table
The extension table provides more sewing space to make sewing easier. The extension table can be easily removed for free arm sewing.
To Remove:
Pull the end of the extension table away from the machine, as shown.
To Attach:
Push the table back into place to reattach the extension table.
Free Arm
Free arm sewing is good for circle areas like sleeves, waistbands and pant legs. If socks, knee or elbow areas need mending, the free arm will be best to use.
|
Circular Sewing Pivot Points |
q |
The freee arm has holes q that are 1 cm apart from |
|
each other. Use the holes to sew circles and scallops |
|
with the circular sewing pivot pin. See page 66. |
7
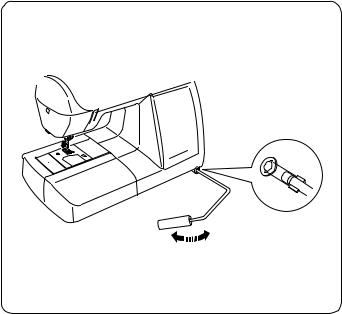
Knee Lifter
The knee lifter allows you to raise or lower the presser foot without using your hands. This is especially beneficial when pivoting corners or sewing patchwork pieces.
Insert knee lifter aligning the slots with the notches.
The presser foot rises equal to the amount of pressure applied to the knee lifter. Stop sewing before moving the knee lifter to the right to raise the presser foot. Release the knee lifter to lower the presser foot.
CAUTION:
Do not touch the knee lifter while sewing; the fabric will not feed properly and the stitches will not form correctly because the tension discs will open.
8
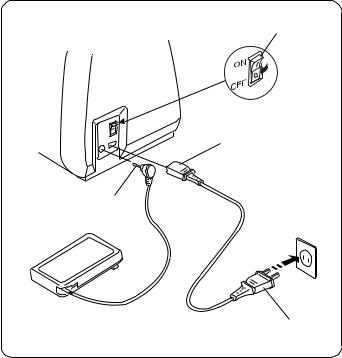
Connecting Machine To Power Supply
q
Before connecting the power cord, make sure the voltage and frequency shown on the machine are identical to your electrical power.
To connect machine to power supply, turn off the power switch q. Insert the foot control plug w and machine
e plug e into the machine and the power supply plug r into the wall socket.
Your machine may come equipped with a polarized plug
w |
(one prong wider than the other). A polarized plug |
|
|
|
reduces the risk of electrical shock. This plug is intended |
|
to fit into a polarized outlet. If the plug does not fit fully |
|
into the outlet, reverse the plug. If it still does not fit, |
|
contact a qualified electrician to install the proper outlet. |
|
Do not modify the plug in any way. |
rIMPORTANT: When using your sewing machine the first
few times, place waste fabric under the presser foot and run the machine without thread for a few minutes. Wipe away excess oil.
NOTE: After turning off the machine, wait 5 seconds before turning it on again.
For Your Safety
Do not use extension cords or plug adapters.
Do not touch plug with wet hands.
Always turn off the power/light switch first and then unplug from the electrical outlet. Examples:
•when leaving the machine unattended
•when cleaning the machine
Always turn off the power/light switch:
•when attaching or removing parts such as needle, presser foot, needle plate
•when threading needle or bobbin
Do not place anything on the foot control.
Do not place heavy items on cords. Do not subject cords to heat. Do not use damaged cords. Have the cord repaired immediately.
While the machine is in operation, always keep your eye on the sewing area and do not touch any moving parts such as the thread take-up lever, flywheel or needle.
9
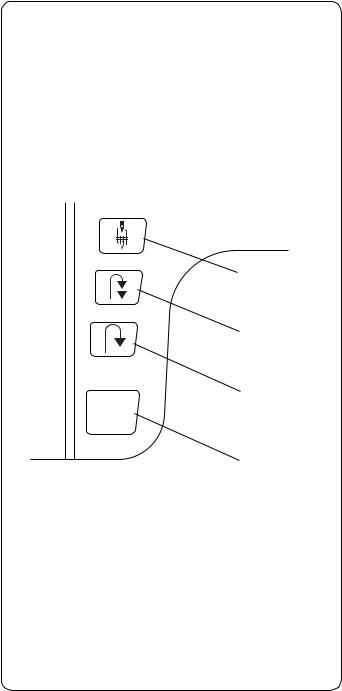
Main Function of Keys
1. START/STOP Key
4
3
2
START
STOP
1
Press this key to start the machine. The first few stitches will be sewn at a slow speed and then machine sews at the speed set by the speed control lever. Press key again to stop machine. Press and continue to hold key to sew at slow speed, release key to sew at set speed. Press key again to stop.
NOTE: The foot control must be detached to use this key.
2.Reverse Key
If you are sewing 1 (straight stitch), 2 (zigzag stitch) or 3 (3-step zigzag stitch), press and hold this key. The machine will sew in reverse until you release the key with or without using the foot control or START/ STOP key.
*If you are sewing any other stitches, utility or decorative, the machine will immediately stop and sew a lockstitch when you press this key.
3.Auto-Lock Key
Press this key while sewing 1 (straight stitch), 2 (zigzag stitch) or 3 (3-step zigzag stitch) and the machine will sew a few stitches in place and stop automatically.
*Press this key while sewing utility or decorative stitches and the machine will complete the stitch, lockstitch and stop.
4.Up/Down Needle Key
If the needle is up when you press this key, the needle will go down to its lowest position. The needle will continue to stop in the down position.
If the needle is down when you press this key, the needle will go to its highest position. The needle will continue to stop in the up position.
NOTE: The needle will always stop in the up position after sewing buttonholes.
10
Keyboard Selection Keys
1 |
2 |
16 |
5 |
6 |
7 |
8 |
9 |
15 |
||||
|
|
|
|
|
|
|
|
|
|
|
|
|
|
|
|
|
|
|
|
|
|
|
|
|
|
|
|
|
|
|
|
|
|
|
|
|
|
|
|
|
|
|
|
|
|
|
|
|
|
|
|
|
|
|
|
|
|
|
|
|
|
|
|
|
|
|
|
|
|
|
|
|
|
|
|
|
|
|
|
|
|
|
|
|
|
|
|
|
|
|
|
|
|
|
|
|
|
|
|
|
|
|
|
|
|
|
|
|
|
|
|
|
|
|
|
|
|
|
|
|
|
|
|
|
|
|
|
|
|
|
|
|
|
|
|
|
|
|
|
|
|
|
|
|
|
|
|
|
|
|
|
|
|
|
|
|
|
|
|
|
|
|
|
|
|
|
|
|
3 |
4 |
10 |
11 |
12 |
13 |
14 |
1. AUTO tension LED
AUTO
The “AUTO” LED indicates the needle thread tension setting.
Green Light – Needle thread tension is set on “AUTO”
No Light – Needle thread tension is manually set between 0 and 9.
Flashing Light – Selected stitch requires a manual setting.
2.LCD Screen Brightness Control
Lighten or darken the screen with this dial.
3.Stitch Width and Needle Position Key
Press “–” or “+” side of key to change setting. Press “–” or “+” to move needle position left or right.
Straight stitches (1, 6, 031, and 078) can be sewn from many needle positions by pressing the “–” or “+” side of the key.
Center needle position is 3.5.
4.Stitch Length Key
Press “–” or “+” side of key to change setting. Depending on the stitch selected, stitch length can be set between 0.0 and 5.0.
NOTE: Fine fabrics should have a stitch length between 1.5 and 2.5, medium fabrics between 2.0 and 3.0 and heavier fabrics between
3.0and 4.0.
5.Twin Needle Key
Press this key to reduce the width of an individual stitch. The twin needle symbol is shown in the LCD screen when it is activated. Press the key again to cancel twin needle function.
6.Elongation Key
Satin stitches 035 to 050 can be lengthened up to five times their regular size without the stitch length varying. Press this key to change the elongation. The LCD screen displays the elongated size; X1, X2, X3, X4 or X5.
11
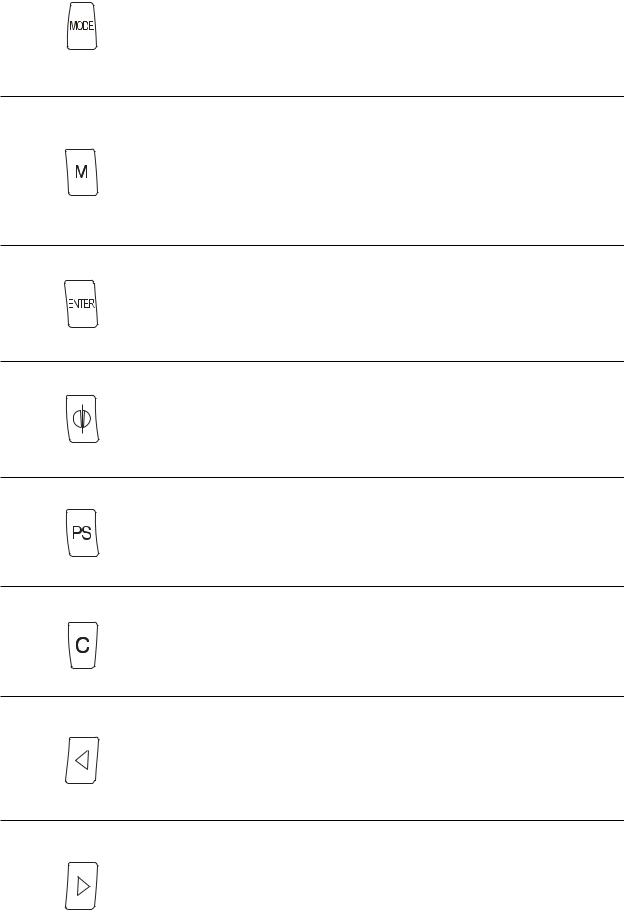
7.Select Mode Key
When you switch on the machine, the Direct Select Mode is active. You can select the first ten stitches (illustrated on the keyboard) with a single touch of the key.
Touch the “MODE” key to activate the 3 Digit Mode. You can select all stitches by entering the 3 digits for the desired stitch.
Touch “MODE” key again to reactivate the Direct Select Mode.
8.Memory Save/Recall Key
The 3 Digit Mode has three separate memories for saving a sequence of stitches. Press this key to activate memory 1 (M1). Press key again to activate M2. Once a memory is activated, press the “ENTER” key to save the sequence.
To recall a saved memory, press “M” key until desired memory appears. To activate the saved sequence, press “Mirror Image” key.
9.Enter Key
Press this key after selecting a stitch in the 3 Digit Mode and that stitch will be memorized. Up to 50 stitches can be combined.
These stitches cannot be memorized into a sequence: 009 - 023 and 030.
10.Mirror Image Key
When this key is pressed after selecting a stitch in the 3 Digit Mode, the stitch will be flipped horizontally (as it appears on the stitch chart).
If you are in a permanent memory (M1, M2, or M3), press this key to recall the saved sequence.
11.My Personal Setting Key
Select a stitch in Direct Select Mode and override the factory settings by changing width/needle position or length. Press this key after changing settings. Press “ENTER” key. New settings will now be saved as the default settings with PS symbol in LCD screen.
12.Clear Key
When this key is pressed, the last memorized stitch or the stitch that is above the cursor will be cleared. Press and hold the “C” key; the entire sequence is cleared. If this key is pressed and held after sewing a sequence, the sequence will be deleted.
13.Review Memory Left Key
Use this key to review stitches in a memorized sequence when all stitches do not appear on the screen.
OR
Press this key to move the cursor left until it is under the stitch that will be edited.
14.Review Memory Right Key
Use this key to review stitches in a memorized sequence when all stitches do not appear on the screen.
OR
Press this key to move the cursor right until it is under the stitch that will be edited.
12
15. Stitch Selection Keys
 +
+  +
+ 
You can select a stitch in the Direct Select Mode by pressing the key that is illustrated with the desired stitch.
To select stitches in the 3 Digit Mode, simply press the three digits for the desired stitch. To cancel the stitch you selected, press the “C” key or select a different stitch.
16. Symbols in the LCD Screen
|
|
q |
|
|
|
|
|
|
|
|
q Selected stitch. |
||
|
|
|
|
|
|
|
|
|
|
|
|||
|
|
|
|
|
|
|
|
|
|
|
|
y |
w Recommended setting for needle thread tension |
|
|
|
|
|
|
|
|
|
|
|
|
||
|
|
|
|
|
|
|
|
|
|
|
|
dial. (If the dial is not set on “AUTO”, a numerical |
|
|
|
|
|
|
|
|
|
|
|
|
|
||
|
|
|
|
|
|
|
|
|
|
|
|
|
|
|
|
|
|
|
|
|
|
|
|
|
u |
value is shown.) |
|
|
|
|
|
|
|
|
|
|
|
|
e Elna recommends using this presser foot for best |
||
|
|
|
|
|
|
|
|
|
|
|
i |
||
|
|
|
|
|
|
|
|
|
|
|
sewing results. |
||
|
|
|
|
|
|
|
|
|
|
|
|||
|
|
|
|
|
|
|
|
|
|
|
|
|
|
|
|
|
|
|
|
|
|
|
|
|
|
|
r Stitch width or needle position – computer |
|
|
|
|
|
|
|
|
|
|
|
|
|
|
|
|
|
|
|
|
|
|
|
|
|
|
|
automatically sets width or needle position after a |
w |
|
e |
r |
t |
|
|
|
|
stitch is selected. |
||||
|
|
|
|
|
|
|
|
|
|
|
|
|
t Stitch length – computer automatically sets length |
|
|
|
|
|
|
|
|
|
|
|
|
|
after a stitch is selected. |
|
|
|
|
|
|
|
|
|
|
|
|
|
y Quick Resumption Mode. Switch off the machine. |
|
|
|
|
|
|
|
|
|
|
|
|
|
The last stitch(es) that were sewn will appear |
|
|
|
|
|
|
|
|
|
|
|
|
|
when machine is switched on. See pages 14-15. |
|
|
|
|
|
|
|
|
|
|
|
|
|
u Twin or single needle. See page 64. |
|
|
|
|
|
|
|
|
|
|
|
|
|
i Sound Mode. Machine beeps after touching any |
|
|
|
|
|
|
|
|
|
|
|
|
|
key. See pages 14-15. |
13
 ~
~ 
 ~
~ 
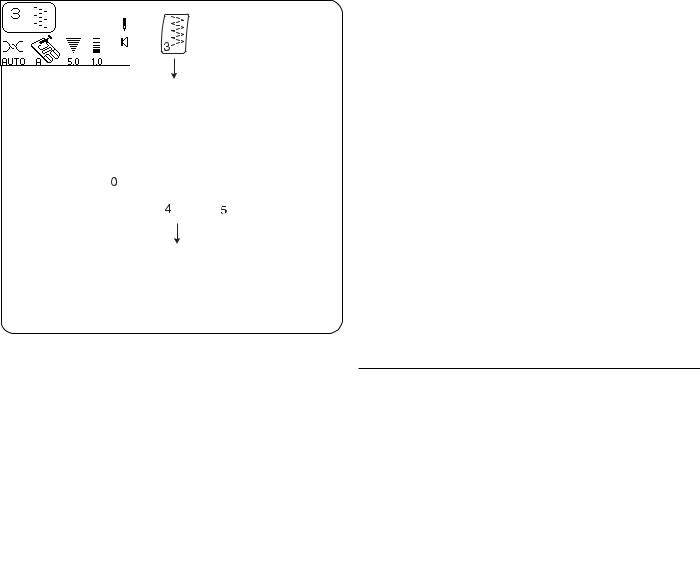
Setting Quick Resumption, Sound and Language
Modes
These three modes/functions can be set according to your preferences. Each new setting requires you to turn OFF the power switch.
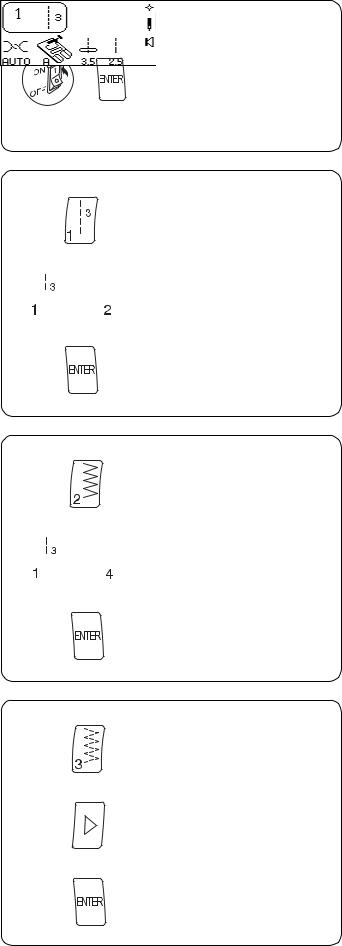
Turn ON the power switch while pressing “ENTER” key. Message screen appears. Press “1” key to change quick resumption or “2” key to change sound or “3” key to change language.
Quick Resumption – The last stitch or memorized sequence of stitches that were sewn will appear when machine is switched on.
Press “1” key.
Press “1” or “2” key to change setting between Normal Set and Resumption Set.
Press “ENTER” key.
Sound – Turn off the beep sound (warning beep sounds will not be turned off) or change the beep volume.
Press “2” key.
Press “1”, “2”, “3”, or “4” key to change between settings.
Press “ENTER” key.
Language – Choose one of the 10 languages: English, Spanish, French, Danish, German, Italian, Dutch, Russian, Slovenian or Swedish.
Press “3” key.
Press “Review Memory Right” key or “Review Memory Left” key to change between languages.
Press “ENTER” key.
14
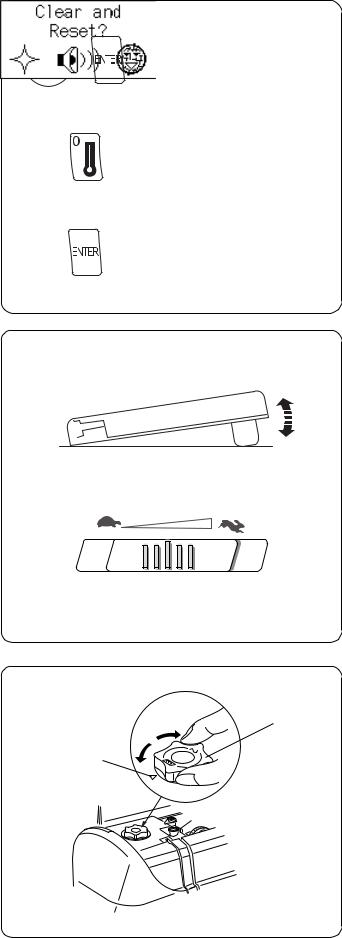
Reset to Factory Default
It is possible to reset the machine to the factory defaults with English language as default.
Turn OFF the power switch. Press “ENTER” key while turning power switch ON. Message screen appears.
Press “0” key. Message screen appears.
Press “ENTER” key to confirm and reset to factory default.
OR
Turn off power switch to cancel the reset.
Controlling Sewing Speed
Sewing speed can be varied with the foot control. The harder you press on the foot control, the faster the machine runs.
The maximum sewing speed can be varied by sliding the speed control lever. For a faster speed, slide it to the right; for a slower speed, slide it to the left.
Foot Pressure Dial
Align the foot pressure dial q with the setting mark w at
q“3” for regular sewing.
w |
Reduce the pressure to “2” for appliqué, cutwork, drawn |
|
work, basting and embroidery. |
||
|
Velours and knits with a lot of stretch may require a “1” setting.
15
w q
q
How To Drop the Feed Dog
The feed dog can be dropped out of position for special sewing techniques: free motion embroidery, stippling, button sewing, etc.
The feed dog must always be up for regular sewing.
Locate the feed dog lever on the back of the free arm. Slide the lever either to the right (down) q or to the left (up) w. To bring up the feed dog, hand turn the flywheel after sliding lever to the left.
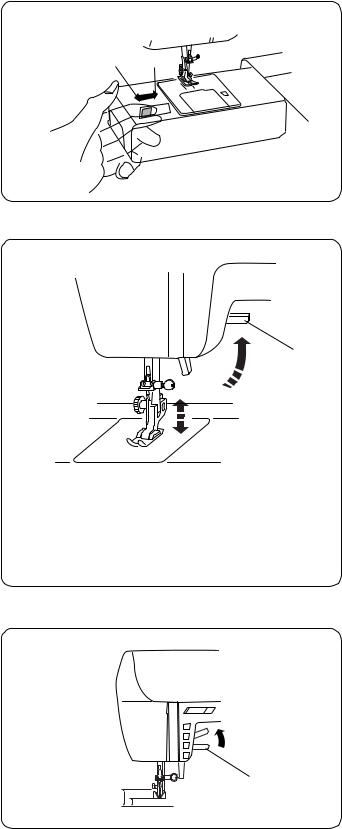
Presser Foot Lever
Raise and lower the foot with this lever q.
Before sewing can occur, the presser foot must be lowered to close the tension discs.
If you attempt to sew with the foot in the up position, the LCD screen will show this message illustration to remind you to lower the foot, and the machine will emit a warning beep.
Additional Presser Foot Clearance
You can raise the presser foot about 6.5 mm (1/4˝) higher than the normal up position for easy removal of the presser foot or to place heavy fabrics under the presser foot. Pull the presser foot lever q up beyond the normal up position.
q
16
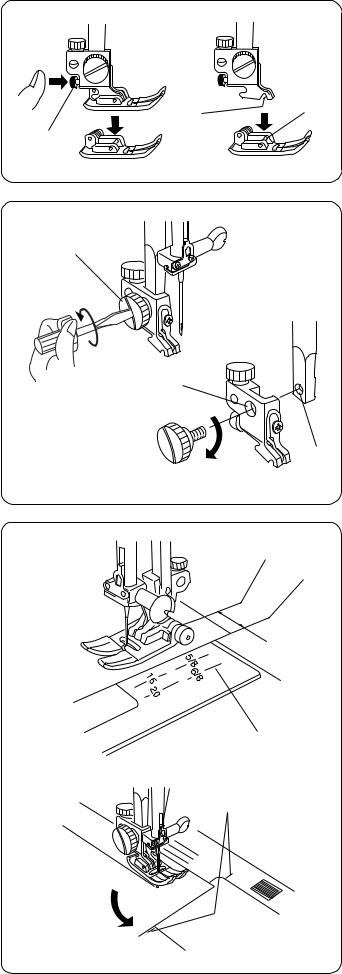
Attaching and Removing Presser Feet
Press the “Up/Down Needle” key until the needle is in the raised position.
Turn OFF the power switch. Raise the presser foot and
w e press the red button q on back of the shank. The
presser foot will drop off.
q
Place the selected presser foot so the pin e on the foot lies just under the groove w of the shank. Lower the presser bar and attach the foot.
Attaching and Removing Shank
q
|
Turn OFF the power switch. Raise the presser bar. |
|
Turn the thumbscrew q counterclockwise with the |
|
screwdriver to remove the shank. |
|
To attach, match the hole in the shank w with the hole in |
|
the presser bar e. Put thumbscrew in hole and turn |
w |
clockwise to tighten. |
e
Seam Allowance Lines
q
w The lines on the needle plate, machine bed and bobbin cover plate help you measure seam width.
The number indicates the distance between the center needle position (3.5) and the seam allowance line.
q |
Center needle position |
w |
Edge of fabric |
e |
Guidelines |
r |
90º pivot angle guideline for 5/8˝ |
e
r
17
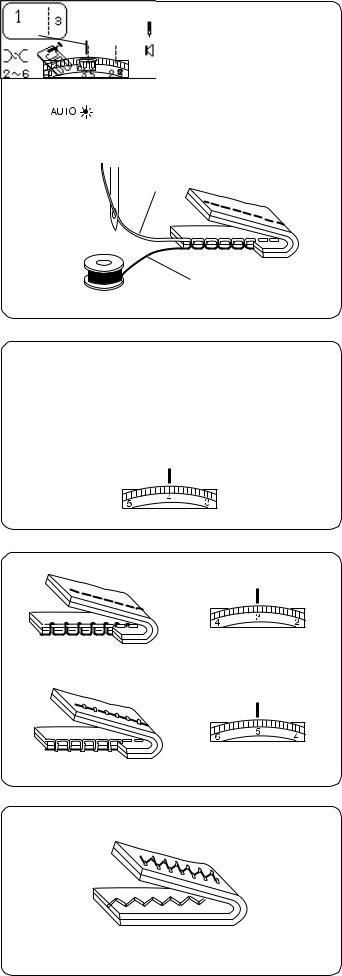
Adjusting the Needle Thread Tension
q |
Choosing the Correct Tension - Straight Stitch |
The ideal straight stitch will have threads locked between the two layers of fabric, as shown left (magnified to show detail). The “AUTO” setting on the needle thread tension dial should be aligned with the setting mark q. A green light will appear.
If you look at the needle thread w (top thread) and bobbin thread e (bottom thread), you will notice that
w |
there are no gaps. Each stitch is smooth and even. |
|
|
|
Occasionally the needle thread tension needs to be |
|
adjusted to a manual setting. Examples: |
|
– |
stiff or heavy fabric |
|
e |
– |
sewing more than two layers of fabric |
|
– |
type of stitch |
||
|
|||
|
– |
thread |
Move the needle thread tension dial off “AUTO” and the computer display screen indicates the suggested manual setting range. Green light disappears.
When adjusting needle thread tension, the higher numbers tighten, the lower numbers loosen.
• Tension is too tight
The bobbin thread shows through on the topside of the fabric and it will feel bumpy.
Turn the dial to a lower number to loosen the needle thread tension.
• Tension is too loose
The needle thread shows through on the underside of the fabric and it will feel bumpy.
Turn the dial to a higher number to tighten the needle thread tension.
• Adjusting Tension for Zigzag and Satin Stitches
The upper thread tension should be slightly looser when sewing a zigzag or a satin stitch. The upper thread should appear slightly on the underside of the fabric.
18
|
Using the Fine Adjustment Screw |
|
Choice of fabrics and threads may affect the stitch |
|
formation. The fine adjustment screw can be used to |
|
either lengthen or shorten the stitch. |
|
q Fine adjustment screw |
|
w Standard mark |
q |
e Setting mark |
w
e
r |
t |
To fine tune, use a screwdriver to move the setting mark. |
•If stitches are too short r, correct by turning the screw in the direction of “+”.
• If stitches are too long t, correct by turning the screw in the direction of “–”.
(+)(–)
y |
u |
• |
If letters/numbers are overlapped y, correct by |
|
|
||
|
|
|
turning the screw in the direction of “+”. |
|
|
• |
If letter/numbers are too spread out u, correct by |
|
|
|
turning the screw in the direction of “–”. |
(+)(–)
|
|
For buttonholes, always make the adjustment according |
i |
o |
to the left side. |
•If left side of buttonhole is less dense (too open) i compared to right side, correct by turning screw in direction of “+”.
•If left side of buttonhole is more dense (too closed) o compared to right side, correct by turning screw in direction of “–”
(+)(–)
19
Weight |
Fabric |
Needle Type |
Needle Size |
||
|
|
|
|
|
|
Very |
Chiffon, Fine Lace, |
Universal |
9 (65) |
||
Light |
Organdy |
Ball Point |
9 (65) |
||
|
|
|
|
|
|
Light |
Batiste, Lawn, Crepe |
Stretch |
11 (75) |
||
|
|
de Chine, Challis, |
|
|
|
|
|
Handkerchief Linen, |
|
|
|
|
|
Crepe, Taffeta, Satin |
Universal |
11 (75) |
|
|
|
|
|
12 |
(80) |
|
|
|
|
|
|
|
|
Single Knits, Jersey, |
Stretch |
11 (75) |
|
|
|
Swimwear, Tricot |
Ball Point |
11 (75) |
|
|
|
|
|
|
|
|
|
Leather, Suede |
Leather |
11 (75) |
|
|
|
|
|
|
|
Medium |
Flannel, Velour, Velvet, |
Universal |
14 |
(90) |
|
|
|
Velveteen, Corduroy, |
|
|
|
|
|
Linen, Gabardine, |
|
|
|
|
|
Wool, Terry, Burlap |
|
|
|
|
|
|
|
|
|
|
|
Double Knits, Stretch |
Ball Point |
14 |
(90) |
|
|
Velour, Stretch Terry, |
|
|
|
|
|
Sweater Knits |
|
|
|
|
|
|
|
|
|
|
|
Leather, Vinyl, Suede |
Leather |
14 |
(90) |
|
|
|
|
|
|
Heavy |
Denim, Sailcloth, |
Denim |
16 |
(100) |
|
|
|
Ticking |
|
|
|
|
|
|
|
|
|
|
|
Coating, Polar Fleece, |
Universal |
16 |
(100) |
|
|
Drapery, and |
|
|
|
|
|
Upholstery Fabrics |
|
|
|
|
|
|
|
|
|
|
|
Leather, Suede |
Leather |
16 |
(100) |
|
|
|
|
|
|
Very |
Canvas, Duck, |
Universal |
18 |
(110) |
|
Heavy |
Upholstery Fabrics |
|
|
|
|
|
|
|
|
|
|
|
|
Topstitching for |
Topstitching |
11 (75) |
|
|
|
Special Finish |
|
14 |
(90) |
|
|
|
|
|
|
SECTION II - Getting Ready to Sew
Selecting the Correct Needle and Thread
There are many kinds of fabrics, threads and needles. It is important to use the correct ones together.
Always purchase good quality thread. It should be strong, smooth and even in thickness. Use the same thread for needle and bobbin. Always test thread and needle size on a scrap piece of fabric.
In general, fine threads (the larger the number, the finer the thread) and needles (the smaller the number, the finer the needle) are used for sewing lightweight fabrics and heavier threads and larger needles are used for sewing heavyweight fabrics. There are many specialty needles available from your sewing machine dealer.
Check your needles frequently for rough or blunt tips. Snags and runs in knits, fine silks and silk-like fabrics are permanent and are often caused by damaged needles.
NOTE: A universal needle size 14/90 comes inserted in your machine.
|
|
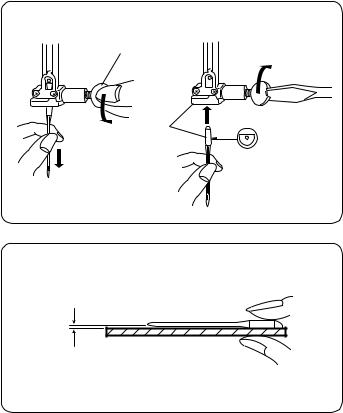
Changing Needles |
1. |
|
2. |
|
q |
1. Turn ON the power switch. Press the “Up/Down |
|
Needle” key to raise the needle. Lower the presser |
|
|
|
|
|
|
foot. Turn OFF the power switch. Turn the needle |
|
|
clamp screw q counterclockwise to loosen. Remove |
|
|
the needle from the clamp. |
|
|
w |
|
|
2. Insert the new needle into needle clamp w with the |
|
|
flat side to the back, pushing it up as far as it will go. |
|
|
Tighten the clamp screw firmly. |
3. To determine if the needle is defective, place the flat side of the needle on something flat (a needle plate,
3. piece of glass, etc.). The gap between the needle and the flat surface should be consistent.
Never use a bent or blunt needle, as it may cause skipped stitches or thread breakage. Defective needles can ruin the fabric. Always purchase good quality needles. Change needles often.
20
Needle Definitions
The illustration identifies the main parts of a sewing
machine needle.
q
q Body
w Shaft
e Long groove (round side of needle) r Short groove (flat side of needle)
t Eye y Point
w
Universal – an all-purpose needle that handles most
e |
woven and knit fabrics. |
|
|
||
|
Ball point – the point spreads the fibers, preventing tears |
|
|
and is especially suited for loose knits and interlock knits. |
|
r |
Not recommended for embroidery. |
|
|
||
t |
Stretch – specially designed to prevent skipped stitches |
|
in synthetic suedes and elasticized knits (swimwear). |
||
|
||
y |
Denim – the sharp point effectively pierces densely |
|
woven fabrics such as denim and canvas. |
||
|
||
|
Topstitching – the extra sharp point penetrates layers of |
|
|
fabrics; extra large eye and large groove accommodate |
|
|
heavyweight topstitching thread. |
|
|
Metallic – the large grooved shaft helps prevent delicate |
|
|
metallic threads from shredding. Another plus, a larger |
|
|
than average eye makes for easier threading. |
|
|
Embroidery – a slightly rounded tip minimizes breakage |
|
|
and skipped stitching when using specialty threads like |
|
|
rayon, acrylic or other high-sheen threads during |
|
|
machine embroidery. |
|
|
Self-Threading – the needle eye has a slit opening on |
|
|
the side to allow the thread to be easily inserted. |
|
|
Leather – the cutting point creates small holes in leather |
|
|
and suede. Holes remain after stitching is removed. |
|
|
Quilt – the tapered point easily penetrates through |
|
|
multiple layers and crossed seams. |
|
|
Wing/Hemstitch – wide flat edges (wings) extend |
|
|
outwards near the eye; they separate fibers and create |
|
|
holes for beautiful heirloom stitches. |
|
|
Twin/Double – 2 needles are joined on a crossbar and |
|
|
share a single shaft. Sews two parallel rows of stitching. |
|
|
Available in universal and ballpoint. |
21
w
q
A
B
w e
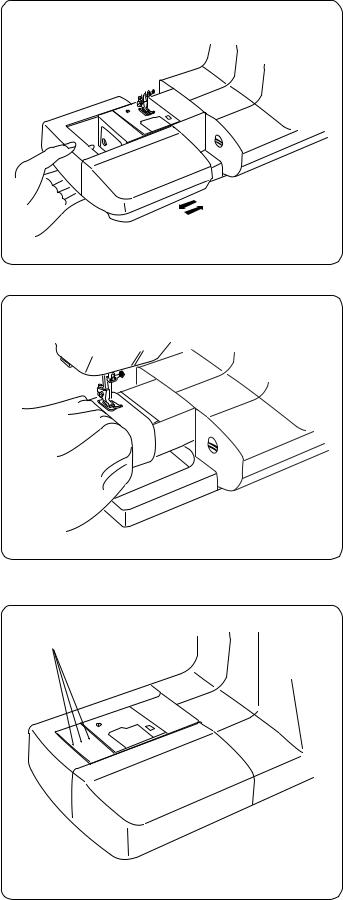
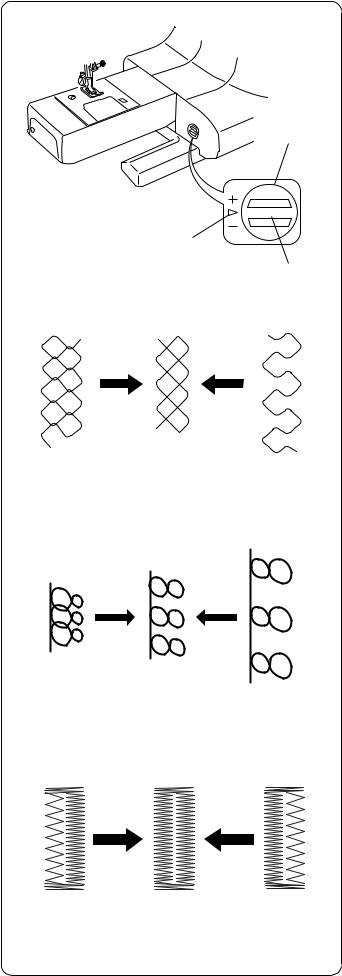
|
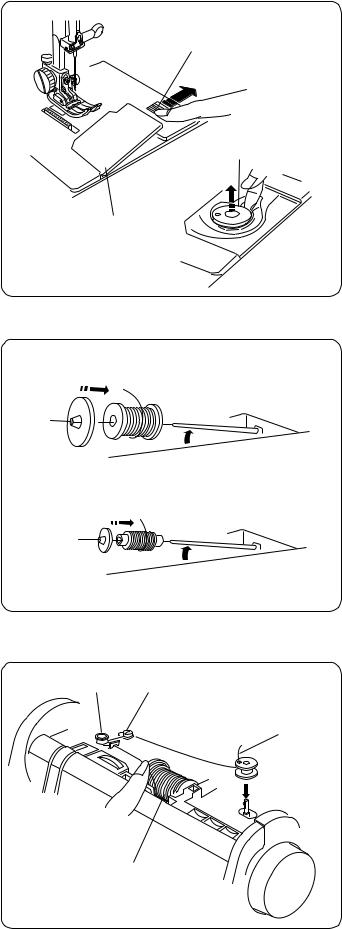
Winding a Bobbin |
q |
To remove bobbin, slide bobbin cover plate release |
|
button q to the right and lift away the bobbin cover plate |
|
w. |
|
Lift out the bobbin e. |
|
e |
|
Turn ON the power switch. |
qLift up the spool pin. Place the spool of thread on the spool pin with the thread coming off the spool as shown. Attach the spool holder and press it firmly against the spool of thread.
NOTE: Spool holder needs to be changed according to the type of thread spool
A.Large spool
B.Small spool
wPull the thread towards the thread guides, under the hook and wrap it around the guide as shown.
re Pull the thread back around the bobbin winder thread guide.
r Pass the thread through the hole in the bobbin from inside to the outside. Place the bobbin on the bobbin winder spindle.
q
22
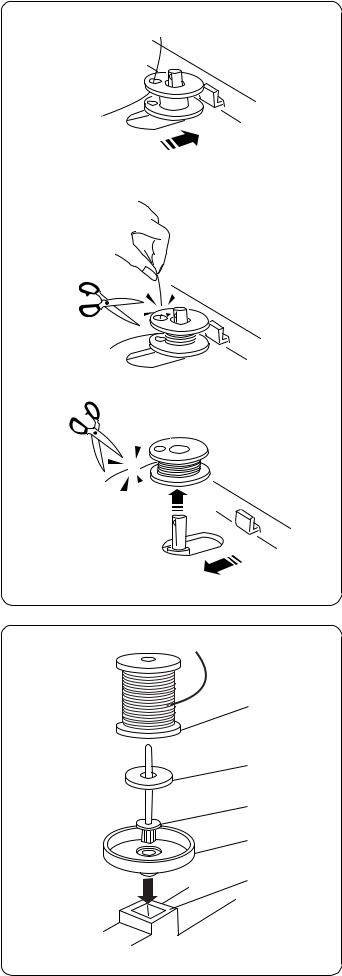
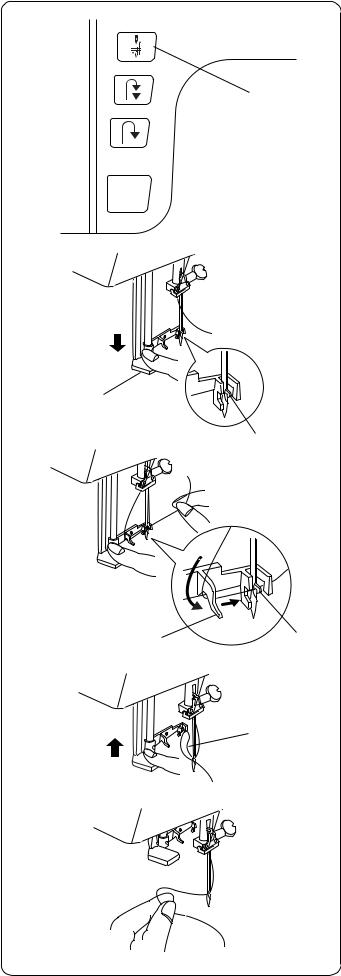
t |
t Push bobbin winder spindle to the right. The |
|
computer display screen will show a bobbin winding |
||
|
||
|
message. |
y |
y Holding the free end of the thread, press the foot |
|
control or Start/Stop key. Stop machine after the |
|
bobbin has made a few turns. Cut the thread tail |
|
close to the hole in the bobbin. Start machine again |
|
to continue winding bobbin. When the bobbin is fully |
|
wound, stop the machine. |
u |
u Move the spindle to the left to return the bobbin |
|
winder to its original position. Cut the thread as |
|
shown. |
Additional Spool Pin
The additional spool pin can be used to wind an extra bobbin without unthreading the machine.
t
PROCEDURE: Insert the spool stand w and the additional spool pin e in the hole q. Place the felt r and spool t on the pin
r with the thread coming off the spool as shown.
e w q
23
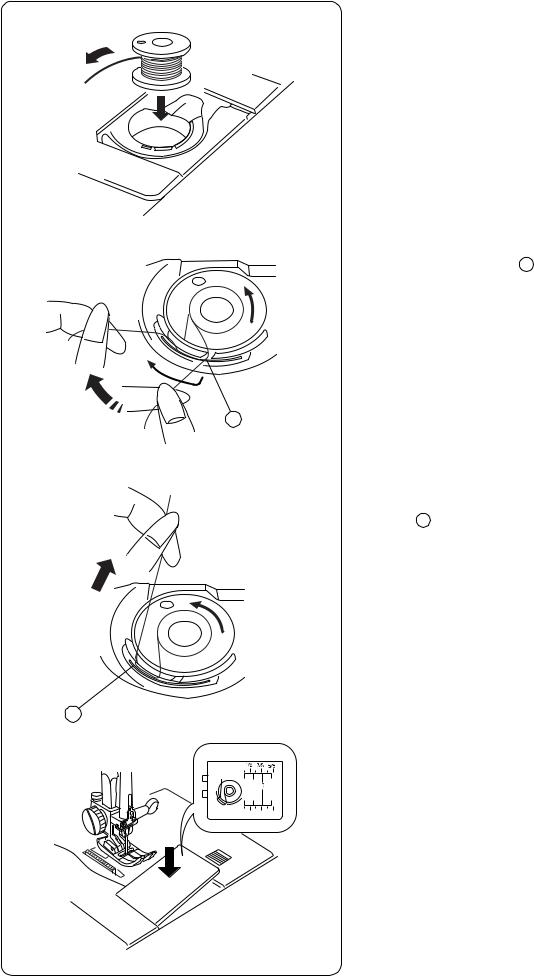
Inserting the Bobbin
Place the bobbin in the bobbin case with the thread running counterclockwise.
Guide the thread into notch A on the front side of the bobbin case.
Hold the bobbin with your right hand and pull the thread to the left, through the tension spring blades.
A
Continue pulling the thread lightly until the thread slips into notch B .
Pull out about 15 cm (6˝) of thread.
B
Replace the bobbin cover plate.
Refer to the chart shown on the bobbin cover plate to check the threading.
24
rw
q
|
e |
y |
t |
|
w
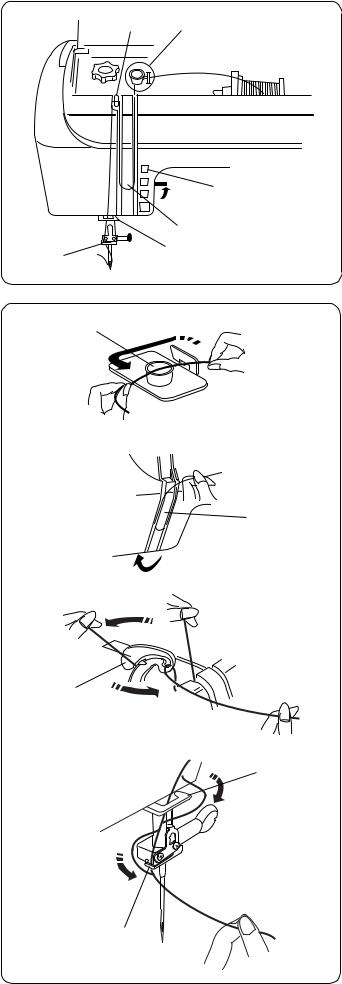
Threading the Machine
Raise the presser foot. Press the “Up/Down Needle” key q until the needle is in an up position.
Pull the thread under the hook and around upper thread guide w.
Guide the thread down right channel and around the checkspring holder e.
e
Firmly pull the thread from right to left, over the take-up lever and down into the take-up lever eye r.
r
t |
Proceed down left channel and through the lower thread |
|
guide t. |
||
|
Slide the thread to the left behind the needle bar thread guide y.
Thread the needle from front to back manually or use the
built-in needle threader.
y
25
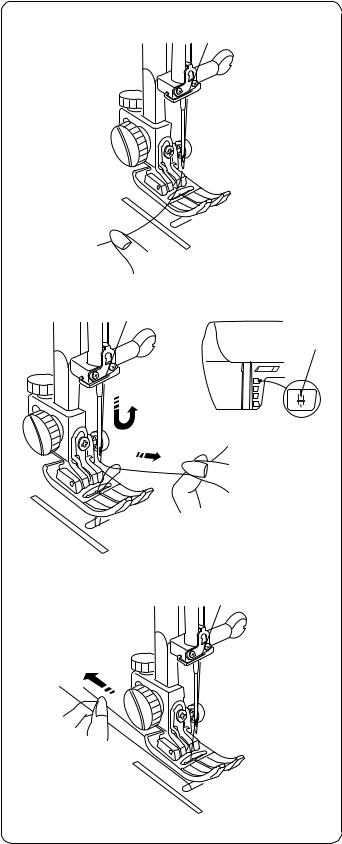
Built-in Needle Threader
Press the “Up/Down Needle” key q until the needle is in an up position. Turn OFF the power switch. Lower the presser foot.
q
START
STOP
Lower the needle threader lever w as far as it will go.
Hook e is automatically inserted into the needle eye.
w
e
Bring the thread around guide r and under hook e.
r |
e |
Slowly release the lever while holding the thread end and let the needle threader return to its original position.
A loop of thread t is pulled through the needle eye.
t
Pull the thread loop off the guide to the back and manually bring the thread through the needle eye.
• The needle threader can be used with #11 to #16 size needles. Thread weight may vary from 30 to 100.
NOTE: Needle threader cannot be used with a twin needle or wing needle.
If the needle threader does not catch a thread loop, check the needle and positioning.
26
Drawing Up the Bobbin Thread
Turn ON the power switch. Raise the presser foot and hold the needle thread lightly with your left hand.
Press the “Up/Down Needle” key q twice to pick up the
qbobbin thread.
Draw up the needle thread together with a loop of bobbin thread.
Slide 10 cm (4˝) of both threads to the back under the presser foot.
27
 Loading...