


Bedienungsanleitung
Stromerzeuger
Operating Instructions
Generator
Mode dʼemploi
Générateur de courant
Istruzioni per lʼuso
Gruppo elettrogeno
BT-PG 750
Art.-Nr.: 41.512.42 I.-Nr.: 01018
2
8
2
1
5
11
8
9
10
2
7
3
1
3
6
4
3
4 5
8
7
6
9
G
I
J
4
10
1
2
3
4

5
D
Achtung!
Beim Benutzen von Geräten müssen einige
Sicherheitsvorkehrungen eingehalten werden, um
Verletzungen und Schäden zu verhindern. Lesen Sie
diese Bedienungsanleitung deshalb sorgfältig durch.
Bewahren Sie diese gut auf, damit Ihnen die
Informationen jederzeit zur Verfügung stehen. Falls
Sie das Gerät an andere Personen übergeben
sollten, händigen Sie diese Bedienungsanleitung
bitte mit aus. Wir übernehmen keine Haftung für
Unfälle oder Schäden, die durch Nichtbeachten
dieser Anleitung und der Sicherheitshinweise
entstehen.
Erklärung der Hinweisschilder auf dem Gerät
(Bild 10)
1. Achtung! Bedienungsanleitung lesen.
2. Achtung! Heiße Teile. Abstand halten.
3. Achtung! Während des Tankens Motor
abstellen.
4. Achtung! Nicht in unbelüfteten Räumen
betreiben.
1. Sicherheitshinweise
Es dürfen keine Veränderungen am
Stromerzeuger vorgenommen werden.
Es dürfen für Wartung und Zubehör nur
Originalteile verwendet werden.
Achtung: Vergiftungsgefahr, Abgase, Kraftstoffe
und Schmierstoffe sind giftig, Abgase dürfen
nicht eingeatmet werden.
Kinder sind vom Stromerzeuger fernzuhalten
Achtung: Verbrennungsgefahr Abgasanlage und
Antriebsaggregat nicht berühren
Benutzen Sie einen geeigneten Gehörschutz,
wenn Sie sich in der Nähe des Gerätes befinden.
Achtung: Benzin und Benzindämpfe sind leicht
entzündlich bzw. explosiv.
Den Stromerzeuger nicht in ungelüfteten
geschlossenen Räumen oder in leicht
entflammbarer Umgebung betreiben.
Explosionsgefahr: Den Stromerzeuger niemals in
Räumen mit leicht entzündlichen Stoffen
betreiben.
Die voreingestellte Drehzahl des Herstellers darf
nicht verändert werden. Stromerzeuger oder
angeschlossene Geräte können beschädigt
werden.
Während des Transports ist der Stromerzeuger
gegen Verrutschen und Kippen zu sichern.
Den Generator mindestens 1m entfernt von
Wänden oder angeschlossenen Geräten
aufstellen.
Dem Stromerzeuger einen sicheren, ebenen
Platz geben. Drehen und Kippen oder Standortwechsel während des Betriebes ist verboten.
Beim Transport und Auftanken den Motor stets
abschalten.
Darauf achten, dass beim Auftanken kein
Kraftstoff auf den Motor oder Auspuff verschüttet
wird.
Stromerzeuger niemals bei Regen oder
Schneefall betreiben.
Den Stromerzeuger nie mit nassen Händen
anfassen
Schützen Sie sich vor elektrischen Gefahren.
Verwenden Sie im Freien nur dafür zugelassene
und entsprechend gekennzeichnete
Verlängerungskabel (H07RN..).
Bei Verwendung von Verlängerungsleitungen
darf deren Gesamtlänge für 1,5 mm250 m, für
2,5 mm2100 m nicht überschreiten.
An den Motor- und Generatoreinstellungen
dürfen keine Veränderungen vorgenommen
werden.
Reparatur- und Einstellarbeiten dürfen nur durch
autorisiertes Fachpersonal ausgeführt werden.
Nicht in der Nähe von offenem Licht, Feuer oder
Funkenflug betanken, bzw. den Tank entleeren.
Nicht rauchen!
Berühren Sie keine mechanisch bewegten oder
heißen Teile. Entfernen Sie keine
Schutzabdeckungen.
Die Geräte dürfen keiner Feuchtigkeit oder Staub
ausgesetzt werden. Zulässige Umgebungstemperatur -10 bis +40°, Höhe: 1000 m über
NN, rel. Luftfeuchtigkeit: 90 % (nicht
kondensierend)
Der Generator wird von einem Verbrennungs-
motor angetrieben, der im Bereich des Auspuffes
und Auspuffaustritts Hitze erzeugt. Meiden Sie
die Nähe dieser Oberflächen wegen der Gefahr
von Hautverbrennungen.
Bei den technischen Daten unter Schallleistungs-
pegel (LWA) und Schalldruckpegel (LpA)
angegebene Werte stellen Emissionspegel dar
und sind nicht zwangsläufig sichere Arbeitspegel. Da es einen Zusammenhang zwischen
Emissions- und Immissionspegeln gibt, kann
dieser nicht zuverlässig zur Bestimmung
eventuell erforderlicher, zusätzlicher Vorsichtsmaßnahmen herangezogen werden.
Einflussfaktoren auf den aktuellen Immissionspegel der Arbeitskraft schließen die
Eigenschaften des Arbeitsraumes, andere
Geräuschquellen, etc., wie z.B. die Anzahl der
Maschinen und anderer angrenzender Prozesse
und die Zeitspanne, die ein Bediener dem Lärm
ausgesetzt ist, ein. Ebenfalls kann der zulässige

6
D
Immissions-pegel von Land zu Land abweichen.
Dennoch wird diese Information dem Betreiber
der Maschine die Möglichkeit bieten, eine
bessere Abschätzung der Risiken und
Gefährdungen durchzuführen.
Achtung: Verwenden Sie ausschließlich
bleifreies Benzin als Kraftstoff.
WARNUNG
Lesen Sie alle Sicherheitshinweise und
Anweisungen. Versäumnisse bei der Einhaltung der
Sicherheitshinweise und Anweisungen können
elektrischen Schlag, Brand und/oder schwere
Verletzungen zur Folge haben.
Bewahren Sie alle Sicherheitshinweise und
Anweisungen für die Zukunft auf.
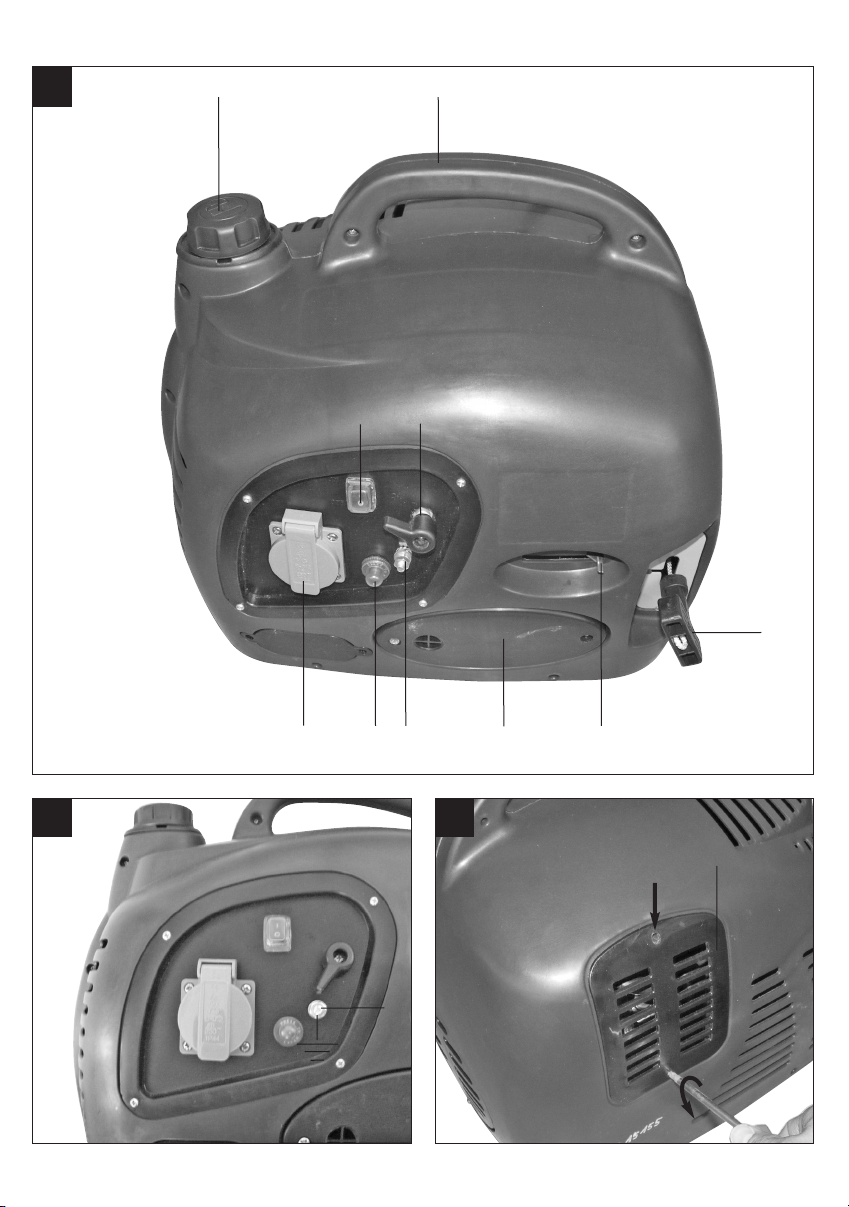
2. Gerätebeschreibung und
Lieferumfang (Bild 1-3)
1. Tragegriff
2. Tankdeckel mit Belüftung
3. Benzinhahn
4. Startseilzug
5. Motorabdeckung
6. Zündkerzendeckel
7. Ein-/Ausschalter
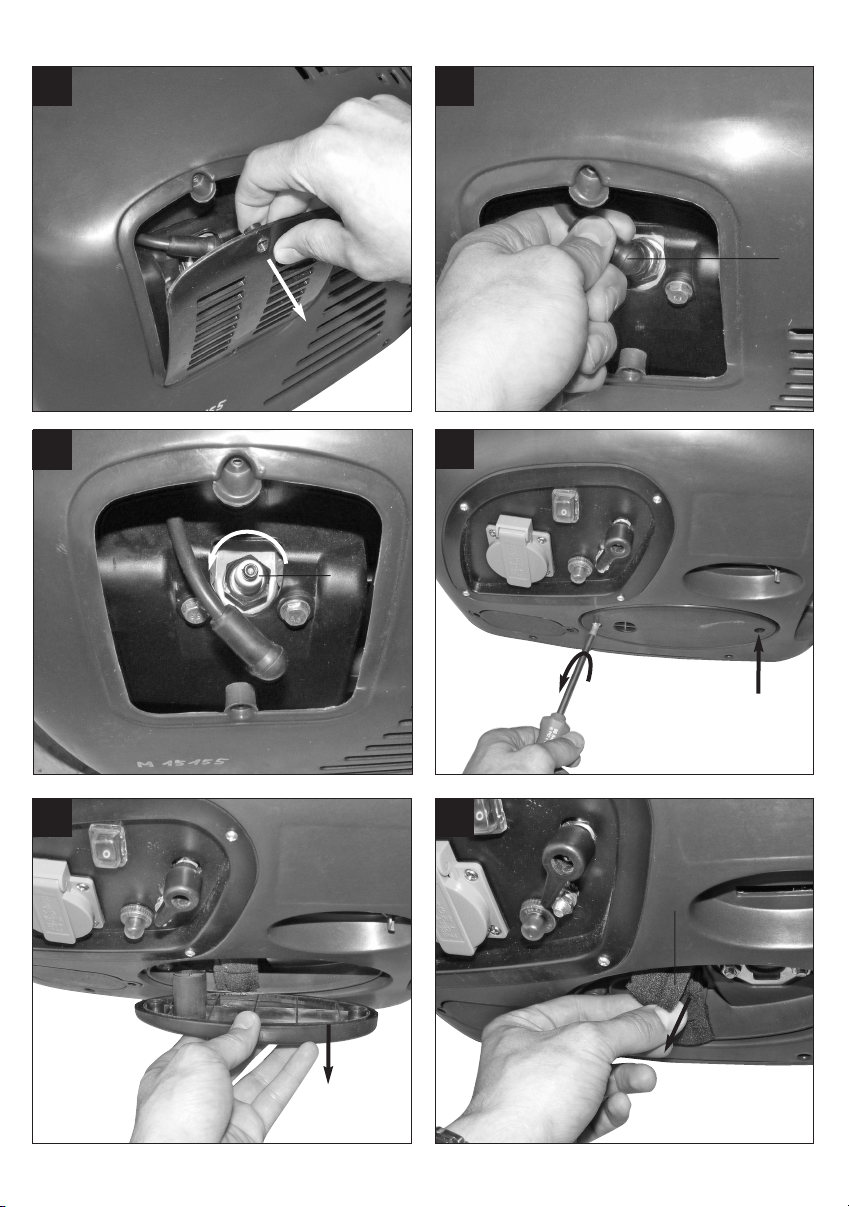
8. Erdungsanschluss
9. Überlastschalter
10. 1x 230V~ – Steckdose
11. Chokehebel
3. Bestimmungsgemäße Verwendung
Das Gerät ist für Anwendungen, welche für einen
Betrieb an 230V~ vorgesehen ist, geeignet.
Beachten Sie unbedingt die Einschränkungen in den
Sicherheitshinweisen.
Die Maschine darf nur nach ihrer Bestimmung
verwendet werden. Jede weitere darüber
hinausgehende Verwendung ist nicht
bestimmungsgemäß. Für daraus hervorgerufene
Schäden oder Verletzungen aller Art haftet der
Benutzer/Bediener und nicht der Hersteller.
Bitte beachten Sie, dass unsere Geräte
bestimmungsgemäß nicht für den gewerblichen,
handwerklichen oder industriellen Einsatz konstruiert
wurden. Wir übernehmen keine Gewährleistung,
wenn das Gerät in Gewerbe-, Handwerks- oder
Industriebetrieben sowie bei gleichzusetzenden
Tätigkeiten eingesetzt wird.
4. Technische Daten
Generator: Synchron
Schutzart: IP23
Dauerleistung P
nenn
(S1) (230 V): 650 W
Maximalleistung P
max
(S2 5 min) (230 V): 720 W
Nennspannung U
nenn
: 1 x 230V~
Nennstrom I
nenn
: 2,8 A 230 V
Frequenz F
nenn
: 50 Hz
Bauart Antriebsmotor: 2 Takt luftgekühlt
Hubraum: 63 cm³
Max. Leistung (Motor): 1,5 kW / 2 PS
Kraftstoff: Mischung 1:50
Tankinhalt: 2,7 l
Verbrauch bei 2/3 Last: ca. 0,73 l/h
Gewicht: 18,7 kg
Schalldruckpegel LpA: 73 dB(A)
Schallleistungspegel L
WA
92 dB (A)
Zündkerze: F5TC
Betriebsart S1 (Dauerbetrieb)
Die Maschine kann dauerhaft mit der angegebenen
Leistung betrieben werden.
Betriebsart S2 (Kurzzeitbetrieb)
Die Maschine darf kurzzeitig mit der angegebenen
Leistung betrieben werden (5 min). Danach muss die
Maschine eine Zeitspanne stillstehen, um sich nicht
unzulässig zu erwärmen (5 min).
5. Vor Inbetriebnahme
Entfernen Sie das Verpackungsmaterial und
überprüfen Sie den Lieferumfang auf Vollständigkeit.
Stellen Sie den Stromerzeuger auf einen stabilen
waagrechten Untergrund, in der Nähe des
Verbrauchers und in belüfteter Umgebung auf.
5.1 Elektrische Sicherheit:
Überprüfen Sie elektrische Geräte und
Zuleitungen. Sie müssen in einem einwandfreien
Zustand sein.
Es dürfen nur Geräte angeschlossen werden,
deren Spannungsangabe mit der

D
7
Ausgangsspannung des Stromerzeugers
übereinstimmt.
Niemals den Stromerzeuger mit dem Stromnetz
(Steckdose) verbinden.
Die Leitungslängen zum Verbraucher sind
möglichst kurz zu halten.
5.2 Umweltschutz
verschmutztes Wartungsmaterial und
Betriebsstoffe in einer dafür vorgesehenen
Sammelstelle abgeben
Verpackungsmaterial, Metall und Kunststoffe
dem Recycling zuführen.
5.3 Erdung
Zur Ableitung statischer Aufladungen ist eine Erdung
des Gehäuses nötig. Hierzu ein Kabel auf der einen
Seite am Erdungsanschluss des Generators (Abb.
2/Pos. 8) und auf der anderen Seite mit einer
externen Masse (z. B. Staberder) verbinden.
5.4 Kraftstoff einfüllen
Schrauben Sie den Tankdeckel (Abb. 1/Pos. 2) ab
und füllen Sie mit Hilfe eines Einfüllstutzens eine
Mischung 1:50 in den Tankbehälter. Achten Sie
darauf dass der Tank nicht überfüllt wird und Benzin
ausläuft. Trocknen Sie verschüttetes Benzin ab und
warten Sie bis sich die Benzindämpfe verflüchtigt
haben (Entzündungsgefahr). Verschließen Sie den
Tankdeckel.
6. Bedienung
Kraftstoffstand prüfen, eventuell nachfüllen
Für ausreichende Belüftung des Geräts sorgen
Vergewissern Sie sich, dass das Zündkabel an
der Zündkerze befestigt ist
Die unmittelbare Umgebung des Stromerzeugers
begutachten
Eventuell angeschlossenes elektrisches Gerät
vom Stromerzeuger trennen
6.1 Motor starten
Achtung! Verwenden Sie keine chemischen
Starthilfsmittel, wie leicht verdunstende Brennstoffe
o. ä.
Benzinhahn (Abb. 1/ Pos. 3) auf „ON“ stellen .
Ein-/ Ausschalter (Abb. 1/ Pos.7) auf Stellung „I“
schalten.
Chokehebel (Abb. 1/ Pos.11) auf Stellung “ ”
stellen.
Den Motor mit dem Startseilzug (Abb.1/ Pos. 4)
starten; hierfür am Griff kräftig anziehen, sollte
der Motor nicht gestartet haben, nochmals am
Startseilzug anziehen. Achtung! Den
Startseilzug immer langsam bis zum ersten
Widerstand herausziehen bevor dieser zum
Starten schnell herausgezogen wird. Lassen Sie
den Startseilzug nach erfolgtem Starten nicht
zurückschleudern.
Chokehebel (Abb. 1/ Pos. 11) nach dem Starten
des Motors (nach ca. 15-30 s) wieder
zurückschieben.
6.2 Belasten des Stromerzeugers
Zu betreibende 230V~ Geräte an die Steckdose
(Abb. 1/ Pos. 10) anschließen.
Achtung! Diese Steckdose darf dauernd (S1)
mit 650W und kurzzeitig (S2) für max. 5 Minuten
mit 720W belastet werden.
Den Generator nicht an ein Haushaltsnetz
anschließen. Dadurch kann eine Beschädigung
des Generators verursacht werden.
Hinweis: Manche Elektrogeräte (Stichsägen,
Bohrmaschinen,…) können einen höheren
Stromverbrauch haben, wenn sie unter erschwerten
Bedingungen eingesetzt werden.
Achten Sie darauf die Abgabeleistung des
Stromerzeugers nicht zu überschreiten.
6.3 Überlastschutz
230V-Steckdose:
Reduzieren Sie die zu entnehmende Leistung.
Drücken Sie den Überlastschalter (Abb. 1/Pos.
9).
Achtung! Sollte dieser Fall auftreten, stellen Sie
sicher, dass die zu entnehmende Leistung die
Abgabeleistung nicht übersteigt und dass keine
defekten Geräte angeschlossen sind.
Achtung! Defekte Überlastschalter dürfen nur durch
baugleiche Überlastschalter mit gleichen
Leistungsdaten ersetzt werden. Wenden Sie sich
hierfür an Ihren Kundendienst.
6.4 Motor abstellen
Den Stromerzeuger kurz ohne Belastung laufen
lassen, bevor Sie ihn abstellen, damit das
Aggregat etwas „nachkühlen“ kann.
Ein-/ Ausschalter (Abb. 1/ Pos. 7) auf Stellung
„0“ schalten.
Benzinhahn (Abb. 1/ Pos. 3) schließen.

D
8
7. Reinigung, Wartung, Lagerung,
Transport und Ersatzteilbestellung
Stellen Sie vor allen Reinigungs- und
Wartungsarbeiten den Motor ab und ziehen Sie den
Zündkerzenstecker von der Zündkerze.
Achtung! Stellen Sie das Gerät sofort ab und
wenden Sie sich an Ihre Service Station:
Bei ungewöhnlichen Schwingungen oder
Geräuschen
Wenn der Motor überlastet scheint oder
Fehlzündungen hat
7.1 Reinigung
Halten Sie Schutzvorrichtungen, Luftschlitze und
Motorengehäuse so staub- und schmutzfrei wie
möglich. Reiben Sie das Gerät mit einem
sauberen Tuch ab oder blasen Sie es mit
Druckluft bei niedrigem Druck aus.
Wir empfehlen, dass Sie das Gerät direkt nach
jeder Benutzung reinigen.
Reinigen Sie das Gerät regelmäßig mit einem
feuchten Tuch und etwas Schmierseife.
Verwenden Sie keine Reinigungs- oder
Lösungsmittel; diese könnten die Kunststoffteile
des Gerätes angreifen. Achten Sie darauf, dass
kein Wasser in das Geräteinnere gelangen kann.
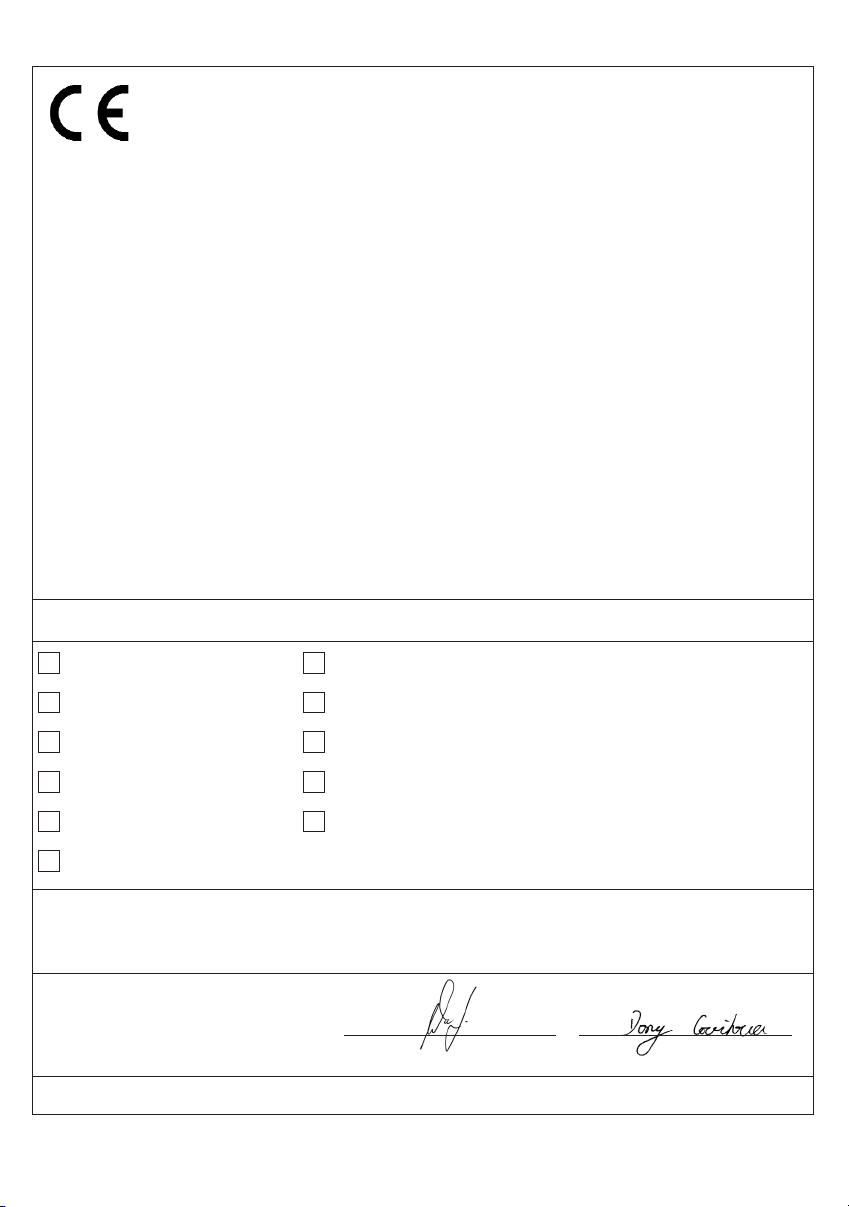
7.2 Luftfilter
Luftfilter regelmäßig reinigen, wenn nötig tauschen.
Beachten Sie hierzu auch die Service-Informationen.
Entfernen Sie den Luftfilterdeckel (Abb. 7-8/ Pos.
5)
Entfernen Sie das Filterelement (Abb. 9/ Pos. G)
Reinigen Sie das Filterelement durch
Ausklopfen. Bei starker Verschmutzung mit
Seifenlauge waschen, anschließend mit klarem
Wasser ausspülen und vor erneutem Einbau an
der Luft trocknen lassen. Achtung! Verwenden
Sie zum Reinigen des Filterelements keine
scharfen Reiniger oder Benzin.
Der Zusammenbau erfolgt in umgekehrter
Reihenfolge
7.3 Zündkerze
Überprüfen Sie die Zündkerze regelmäßig auf
Verschmutzung. Beachten Sie hierzu auch die
Service-Informationen.
Entfernen Sie den Zündkerzendeckel
(Abb. 3-4/Pos. 6).
Ziehen Sie den Zündkerzenstecker (Abb. 5/ Pos
I) mit einer Drehbewegung ab.
Entfernen Sie die Zündkerze (Abb. 6/ Pos J) mit
dem beiliegenden Zündkerzenschlüssel.
Reinigen Sie die Zündkerze mit einer
Kupferdrahtbürste oder setzen Sie eine neue ein.
Der Zusammenbau erfolgt in umgekehrter
Reihenfolge.
7.4 Lagerung
1. Entleeren Sie den Benzintank mit einer
Benzinsaugpumpe.
Achtung! Entfernen Sie das Benzin nicht in
geschlossenen Räumen, in der Nähe von Feuer
oder beim Rauchen. Gasdämpfe können
Explosionen oder Feuer verursachen.
2. Starten Sie den Motor und lassen Sie den Motor
so lange laufen bis das restliche Benzin
verbraucht ist.
3. Lassen Sie das Gerät abkühlen.
4. Entfernen Sie die Zündkerze und füllen Sie ca.
20 ml Motoröl in den Zylinder.
5. Ziehen Sie den Startergriff mehrmals langsam
um die inneren Teile mit Öl zu benetzen.
6. Schrauben Sie die Zündkerze wieder ein.
7. Bewahren Sie das Gerät an einem gut
gelüfteten, sicheren Platz auf.
Achtung! Auch mit geschlossener Tankbelüftung
darf das Gerät nur in aufrechter Position transportiert
werden.
7.5 Ersatzteilbestellung:
Bei der Ersatzteilbestellung sollten folgende
Angaben gemacht werden;
Typ des Gerätes
Artikelnummer des Gerätes
Ident-Nummer des Gerätes
Ersatzteilnummer des erforderlichen Ersatzteils
Aktuelle Preise und Infos finden Sie unter
www.isc-gmbh.info
8. Entsorgung und Wiederverwertung
Das Gerät befindet sich in einer Verpackung um
Transportschäden zu verhindern. Diese Verpackung
ist Rohstoff und ist somit wieder verwendbar oder
kann dem Rohstoffkreislauf zurückgeführt werden.
Das Gerät und dessen Zubehör bestehen aus
verschiedenen Materialien, wie z.B. Metall und
Kunststoffe. Führen Sie defekte Bauteile der
Sondermüllentsorgung zu. Fragen Sie im
Fachgeschäft oder in der Gemeindeverwaltung nach!

D
9
9. Störungen beheben
Störung Ursache Maßnahme
Motor kann nicht gestartet werden Zündkerze verrußt
kein Kraftstoff
Zündkerze reinigen, bzw.
tauschen.
Kraftstoff nachfüllen /
Benzinhahn überprüfen lassen
Generator hat zu wenig oder
keine Spannung
Regler oder Kondensator defekt
Überstromschutzschalter ausgelöst
Luftfilter verschmutzt
Fachhändler aufsuchen
Schalter betätigen und Verbraucher verringern
Filter reinigen oder ersetzen

Important!
When using the equipment, a few safety precautions
must be observed to avoid injuries and damage.
Please read the complete operating instructions and
safety regulations with due care. Keep this manual in
a safe place, so that the information is available at all
times. If you give the equipment to any other person,
hand over these operating instructions and safety
regulations as well. We cannot accept any liability for
damage or accidents which arise due to a failure to
follow these instructions and the safety instructions.
Explanation of the warning signs on the machine
(Fig. 10)
1. Important. Read the operating instructions.
2. Important. Hot parts. Keep your distance.
3. Important. Switch off the engine before refueling.
4. Important. Never operate in non-ventilated rooms.
1. General safety instructions:
앬 No changes may be made to the generator.
앬 Only original parts may be used for maintenance
and accessories.
앬 Important: Danger of poisoning, do not inhale
emissions.
앬 Children are to be kept away from the generator.
앬 Important: Risk of burns. Do not touch the
exhaust system or drive unit.
앬 Wear suitable ear protection when in the vicinity
of the equipment.
앬 Important: Petrol and petrol fumes are highly
combustible or explosive.
앬 Never operate the generator in non-ventilated
rooms or in easyly inflammable adjacency. When
operating the generator in rooms with good ventilation, the exhaust gases must be channeled
directly outdoors through an exhaust hose.
Important: Toxic exhaust gases can escape
despite the exhaust hose. Due to the fire hazard,
never direct the exhaust hose towards
inflammable materials.
앬 Risk of explosion: Never operate the generator in
rooms with combustible materials.
앬 The speed preset by the manufacturer is not
allowed to be changed. The generator or
connected equipment may be damaged.
앬 Secure the generator against shifting and
toppling during transport.
앬 Place the generator at least 1m away from
buildings and the equipment connected to it.
앬 Place the generator in a secure, level position.
Do not turn, tip or change the generator's
position while it is working.
앬 Always switch off the engine when transporting
and refueling the generator.
앬 Make sure that when you refuel the generator no
fuel is spilt on the engine or exhaust pipe.
앬 Never operate the generator in rain or snow.
앬 Never touch the generator with wet hands.
앬 Guard against electric danger. When working
outdoors, use only extension cables that are
approved for outdoor use and which are marked
accordingly (H07RN..).
앬 The overall length of the extension cables used
may not exceed 50 m for 1.5 mm2and 100 m for
2.5 m
2
.
앬 No changes may be made to the settings of the
motor or generator.
앬 Repairs and adjustment work may only be
carried out by authorized trained personnel.
앬 Do not refuel or empty the tank near open lights,
fire or sparks. Do not smoke!
앬 Do not touch any mechanically driven or hot
parts. Do not remove the safety guards.
앬 Do not expose the tools to damp or dust.
Permissible ambient temperature – 10 to + 40
°C, max. altitude above sea level 1000 m,
relative humidity: 90 % (non-condensing)
앬 The generator is driven by a combustion engine,
which produces heat in the area of the exhaust
(on the opposite side of the sockets) and the
exhaust outlet. You should therefore keep clear
of these surfaces because of risk of skin burns.
앬 The values quoted in the technical data for
sound power level (LWA) and sound pressure
level (L
pA) are emission values and not
necessarily reliable workplace values. As there
is a correlation between emission and immission
levels, the values are not a reliable basis for
deciding on any additional precautions which
may be needed. Factors influencing the actual
user immission level include the properties of the
work area, other sound sources etc., the number
of machines and other processes in the vicinity,
as well as the time span in which the operator is
subjected to the noise. Also, the permitted
immission level can vary from country to country.
Nevertheless, with this information the user is
able to make a better assessment of the dangers
and risks involved.
앬 Never use a faulty or damaged electrical
equipment (this also applies to extension cables
and plug connections).
GB
10

GB
11
CAUTION!
Read all safety regulations and instructions.
Any errors made in following the safety regulations
and instructions may result in an electric shock, fire
and/or serious injury.
Keep all safety regulations and instructions in a
safe place for future use.
2. Layout and items supplied (Fig. 1-3)
1. Carry handle
2. Tank cover with ventilation
3. Petrol cock
4. Starter cable
5. Motor cover
6. Spark plug cover
7. ON/OFF switch
8. Earthing connection
9. Economy switch
10. 1x 230V~ socket
11. Oil warning indicator
3. Proper use
The equipment is designed for appliances which
operate at 230 V ~. Be sure to observe the
restrictions in the safety instructions.
The machine is to be used only for its prescribed
purpose. Any other use is deemed to be a case of
misuse. The user / operator and not the
manufacturer will be liable for any damage or injuries
of any kind caused as a result of this.
Please note that our equipment has not been
designed for use in commercial, trade or industrial
applications. Our warranty will be voided if the
machine is used in commercial, trade or industrial
businesses or for equivalent purposes.
4. Technical data
Generator sychronised operation
Protection type: IP23
Continuous rated power P
rated
(S1): 650 W
Maximum power P
max
(S2 5 min) (230 V): 720 W
Rated voltage U
rated
: 1 x 230V~
Rated current I
rated
: 2.8 A (230 V)
Frequency F
rated
: 50 Hz
Drive engine design: 2-stroke, air-cooled
Displacement: 63 cm³
Max. power: 1.5 kW / 2 hp
Fuel: mixture 1:50
Tank capacity: 2.7 l
Consumption at 2/3 load: approx. 0.73 l/h
Weight: 18.7 kg
Sound pressure level LpA: 73 dB(A)
Sound power level LWA: 92 dB (A)
Spark plug: F5TC
Operating mode S1 (continuous operation)
The machine can be continuously operated with the
quoted power output.
Operating mode S2 (temporary operation)
The machine may be temporarily operated with the
quoted power output. Afterwards the machine must
be stopped for a while to prevent it from overheating.
5. Before putting the machine into
operation
Remove the packaging material and check that all
items have been supplied. Place the generator on a
firm, flat surface near the consumer and ensure
proper ventilation.
5.1 Electrical safety:
앬 Electric supply cables and connected equipment
must be in perfect condition.
앬 The generator is to be operated only with
equipment whose voltage specifications conform
with the generator's output voltage.
앬 Never connect the generator to the power supply
(socket-outlet).
앬 Keep the cable length to the consumer as short
as possible.
5.2 Environmental protection
앬 Dispose of soiled maintenance material and
operating materials at the appropriate collection
point.
앬 Recycle packaging material, metal and plastics.
5.3 Connecting to earth
The housing is allowed to be connected to earth in
order to discharge static electricity. To do this,
connect one end of a cable to the earth connection
on the generator (Fig. 2/Item 8) and the other end to

an external earth (for example an earthing rod).
5.4 Topping up fuel
Unscrew the tank cover (Fig. 1/Item 2) and add a
mixture with proportions 1:50 using a filler neck.
Ensure that you do not overfill the tank and spill
gasoline. If you do spill, wipe up the excess amount
and wait until the vapors have evaporated (danger of
ignition.) Screw the tank cover back on.
6. Operation
앬 Check the fuel level and top it up if necessary
앬 Make sure that the generator has sufficient
ventilation
앬 Make sure that the ignition cable is secured to
the spark plug
앬 Inspect the immediate vicinity of the generator
앬 Disconnect any electrical equipment which may
already be connected to the generator
6.1 Starting the engine
Important! Do not use any chemical starting agents
such as highly volatile fuels or similar.
앬 Move petrol cock (Fig.1 Pos. 3) to the “ON”
position
앬 Move the ON/OFF switch (Fig. 1/Item 7) to the “I”
position.
앬 Move the choke lever (Fig.1/Pos. 11) to position
“ ”
앬 Start the engine with the starter cord (Fig. 1/Item
4) by pulling the handle forcefully. If the motor
does not start, pull the starter cable again.
Important! If you do spill, wipe up the excess
amount and wait until the vapors have
evaporated – (danger of ignition.) Do not allow
the starter cable to whip back of its own accord.
앬 Push the choke lever (Fig. 1/Item 11) back
approximately 15 to 30 seconds after the engine
has started.
6.2 Connecting consumers to the generator
앬 Connect the 230 V~ devices to be powered to
the socket (Fig. 1/Item 10). Important: This
socket is allowed to be exposed to a continuous
(S1) load of 650 W and temporarily (S2) for a
maximum of 5 minutes to a load of 720 W.
앬 Do not connect the generator to the household
mains system, since this may damage the
generator.
Note: Some electrical appliances (power jigsaws,
drills, etc.) may have a higher level of power
consumption when used in difficult conditions.
6.3 Overload cut-out
230 V socket
앬 Reduce the level of power to be drawn
앬 Press the overload switch (Fig. 1/Item 9)
Important: If an overload occurs, ensure that the
power drawn does not exceed the generatorʼs
maximum power output and that no defective
devices are connected.
Important: Defective overload cut-outs must be
replaced only by overload cut-outs of identical design
and with the same performance data. If repairs are
necessary, please contact your customer service
center.
6.4 Switching off the engine
앬 Before you switch off the generator, allow it to
run briefly with no consumers so that it can ool
downî.
앬 Move the ON/OFF switch (Fig. 1/Item 7) to the
ì0î position.
앬 Close the petrol cock (Fig. 1/Item 3).
7. Cleaning, maintenance, storage,
transport and ordering of spare parts
Switch off the motor and pull the spark plug boot
from the spark plug before doing any cleaning and
maintenance work on the equipment.
Important: Switch off the machine immediately
and contact your service station:
앬 In the event of unusual vibrations or noise
앬 If the engine appears to be overloaded or
misfires
7.1 Cleaning
Keep all safety devices, air vents and the motor
housing free of dirt and dust as far as possible.
Wipe the equipment with a clean cloth or blow it
with compressed air at low pressure.
We recommend that you clean the device
immediately each time you have finished using it.
Clean the equipment regularly with a moist cloth
and some soft soap. Do not use cleaning agents
or solvents; these could attack the plastic parts
of the equipment. Ensure that no water can seep
into the device.
7.2 Air filter
Clean the air filter at regular intervals, and replace it
if necessary. In this connection, please also read the
service information.
GB
12

GB
13
앬 Remove the air filter cover (Figs. 7-8/Item 5).
앬 Remove the air filter (Fig. 9/Item G).
앬 Clean the air filter by tapping it. In cases of
stubborn dirt first clean with soapy water, then
rinse with clear water and air-dry before
reinserting. Important: Do not use abrasive
cleaners or petrol to clean the air filter.
앬 Assemble in reverse order
7.3 Spark plug
Check the spark plug for wear at regular intervals. In
this connection, please also read the service
information.
앬 Remove the spark plug cover.
앬 Pull off the spark plug boot (Fig. 5/Item I) by
twisting it.
앬 Remove the spark plug (Fig. 6/Item J) using the
supplied spark plug wrench.
앬 Clean the spark plug with a copper wire brush or
fit a new one.
앬 Assemble in reverse order.
7.4 Storage
1. Empty the petrol tank using a petrol suction
pump.
Important: Do not empty the petrol tank in
enclosed areas, near fire or when smoking.
Petrol fumes can cause explosions and fire.
2. Start the engine and run it until the tank and fuel
line are completely empty and the engine stalls.
3. Let the unit cool down.
4. Remove the spark plug and pour approx. 20 ml
of engine oil into the cylinder.
5. Pull the starter handle slowly several times to
coat the internal parts.
6. Screw the spark plug back in.
7. Store the unit in a well-ventilated, safe place.
Important: Always transport the unit in the upright
position (even when the tank breather hole is
closed).
7.5 Ordering replacement parts:
Please quote the following data when ordering
replacement parts:
Type of machine
Article number of the machine
Identification number of the machine
Replacement part number of the part required
For our latest prices and information please go to
www.isc-gmbh.info
8. Disposal and recycling
The unit is supplied in packaging to prevent its being
damaged in transit. This packaging is raw material
and can therefore be reused or can be returned to
the raw material system.
The unit and its accessories are made of various
types of material, such as metal and plastic.
Defective components must be disposed of as
special waste. Ask your dealer or your local council.

GB
14
9. Troubleshooting
Fault Cause Remedy
Engine does not start
Spark plug fouled
No fuel
Clean or replace spark plug
(electrode spacing 0.6 mm)
Refuel / have the petrol cock
checked
Generator has too little or no
voltage
Controller or capacitor defective
Overcurrent circuit-breaker has
triggered
Air filter dirty
Contact your dealer
Actuate the circuit-breaker and
reduce the consumers
Clean or replace the filter

F
15
Attention !
Lors de lʼutilisation dʼappareils, il faut respecter
certaines mesures de sécurité afin dʼéviter des
blessures et dommages. Veuillez donc lire
attentivement ce mode dʼemploi/ces consignes de
sécurité. Veillez à le conserver en bon état pour
pouvoir accéder aux informations à tout moment. Si
lʼappareil doit être remis à dʼautres personnes, veillez
à leur remettre aussi ce mode dʼemploi/ces
consignes de sécurité. Nous déclinons toute
responsabilité pour les accidents et dommages dus
au non-respect de ce mode dʼemploi et des
consignes de sécurité.
Explication des plaques signalétiques situées
sur lʼappareil (figure 10)
1. Attention ! Lisez le mode dʼemploi.
2. Attention ! Pièces brûlantes. Restez à distance.
3. Attention ! Mettez le moteur hors circuit pendant
que vous refaites le plein.
4. Attention ! Nʼutilisez pas lʼappareil dans des
endroits fermés.
1. Recommandations générales
concernant la sécurité
앬 Aucune modification ne doit être entreprise sur le
générateur de courant.
앬 Seules les pièces dʼorigine doivent être
employées pour la maintenance et les
accessoires.
앬 Attention : danger dʼempoisonnement, les gaz
dʼéchappement ne doivent pas être respirés.
앬 Il faut éloigner les enfants du générateur de
courant
앬 Attention : risque de brûlure, ne touchez pas le
système de gaz dʼéchappement, ni le groupe
dʼentraînement
앬 Utilisez un casque anti-bruit, lorsque vous vous
trouvez à proximité de lʼappareil.
앬 Attention : Lʼessence et les vapeurs dʼessence
sont très inflammables et explosives.
앬 Ne faites jamais fonctionner le générateur de
courant dans un endroit non aéré. Lors du
fonctionnement dans un endroit bien aéré, les
gaz dʼéchappement doivent être directement
évacués dehors en passant par un tuyau
dʼéchappement.
앬 Attention : Attention : Attention : Attention:
même lors du fonctionnement avec un tuyau
dʼéchappement, des gaz dʼéchappement
toxiques peuvent sʼéchapper. à cause du risque
dʼincendie, le tuyau dʼéchappement ne doit
jamais être dirigé sur des matières combustibles.
앬 Danger dʼexplosion : ne mettez pas le
générateur de courant en circuit dans un endroit
comprenant des substances très inflammables.
앬 Le régime préréglé par le fabricant ne doit pas
être modifié. Le générateur de courant ou les
appareils raccordés peuvent être endommagés.
앬 Pendant le transport, il faut sʼassurer que le
générateur de courant ne glisse ni ne se
renverse pas.
앬 Positionnez le générateur à une distance de 1m
au minimum des bâtiments ou appareils
raccordés.
앬 Donnez une place sûre et plane au générateur
de courant. Il est interdit de le tourner, de le
renverser ou même de le changer de place
pendant le fonctionnement !
앬 Mettez toujours le moteur hors circuit pour le
transporter ou remplir le réservoir.
앬 Veillez à ne pas renverser de carburant sur le
moteur ou lʼéchappement pendant le
remplissage.
앬 Nʼexploitez pas le générateur de courant lorsquʼil
pleut ou quʼil neige.
앬 Ne touchez jamais le générateur de courant avec
les mains mouillées
앬 Protégez-vous contre les risques liés à
l'électricité. Utilisez en plein air seulement des
rallonges admises pour cela et dûment
caractérisées (H07RN).
앬 Si vous utilisez des rallonges de câbles, la lon
gueur totale pour 1,5 mm
2
ne doit pas dépasser
50 m, pour 2,5 mm2, 100 m.
앬 Il ne faut modifier en aucun cas les réglages de
moteur et de générateur.
앬 Les travaux de réparations et de réglage doivent
exclusivement être effectués par un personnel
spécialisé dûment autorisé.
앬 Ne pas ravitailler ni vidanger à proximité de
lumière sans protection, de feu ou d'étincelles.
Ne pas fumer !
앬 Ne toucher aucune pièce déplacée
mécaniquement ou chaude. Ne retirer aucun
recouvrement de protection.
앬 Les appareils ne doivent pas être soumis à
l'humidité et la poussière. Température ambiante
admise -10 à +40°, altitude max. 1000 m,
humidité de l'air rel. : 90 % (ne condensant pas)
앬 Ce générateur est entraîné par un moteur à
combustion qui génère de la chaleur dans la
zone du pot d'échappement (côté opposé à
celui de la prise) et de sa sortie. Evitez de vous
tenir à proximité de ces surfaces à cause du
risque de brûlures.
앬 Les niveaux d'émission sont représentés dans
les caractéristiques techniques sous les valeurs
données des niveaux acoustiques (LWA) et de

pression acoustique (LpA) et ne sont pas
nécessairement des niveaux de travail sûrs.
Etant donné qu'il existe un lien entre les niveaux
d'émission et d'immission, celui-ci ne peut être
mis à contribution de façon fiable pour la
disposition de mesures de précautions
éventuellement nécessaires et supplémentaires.
Les facteurs qui influencent le niveau
d'immission actuel de la main dʼoeuvre
comprennent les propriétés de l'espace de
travail, d'autres sources de bruit, etc., comme
par ex. le nombre de machines et d'autres
processus limitrophes et la période pendant
laquelle un(e) opérateur/ opératrice est
soumis(e) au bruit. Le niveau d'immission
admissible peut également varier de pays à
pays. Cette information permettra toutefois à
l'exploitant de la machine de mieux évaluer les
risques et dangers.
앬 Nʼutilisez aucun matériel dʼexploitation électrique
(même câbles de rallonge et connecteurs
enfichables) défectueux.
AVERTISSEMENT !
Veuillez lire toutes les consignes de sécurité et
instructions.
Tout non-respect des consignes de sécurité et
instructions peut provoquer une décharge électrique,
un incendie et/ou des blessures graves.
Conservez toutes les consignes de sécurité et
instructions pour une consultation ultérieure.
2. Description de lʼappareil et étendue
de la livraison (fig. 1-3)
1. Poignée
2. Bouchon de réservoir avec aération
3. Robinet dʼessence
4. Corde de lancement
5. Carter du moteur
6. Couvercle de bougie dʼallumage
7. Interrupteur Marche / Arrêt
8. Raccordement de mise à la terre
9. Interrupteur dʼéconomie dʼénergie
10. 1x prise de courant 230V~
11. Levier excentrique
3. Utilisation conforme à lʼaffectation
Lʼappareil convient aux utilisations prévues pour le
fonctionnement avec une tension de 230V~.
Veuillez absolument respecter les limites indiquées
dans les consignes de sécurité.
La machine doit exclusivement être employée
conformément à son affectation. Chaque utilisation
allant au-delà de cette affectation est considérée
comme non conforme. Pour les dommages en
résultant ou les blessures de tout genre, le
producteur décline toute responsabilité et
lʼopérateur/lʼexploitant est responsable.
Veillez au fait que nos appareils, conformément à
leur affectation, nʼont pas été construits, pour être
utilisés dans un environnement professionnel,
industriel ou artisanal. Nous déclinons toute
responsabilité si lʼappareil est utilisé
professionnellement, artisanalement ou dans des
sociétés industrielles, tout comme pour toute activité
équivalente.
4. Données techniques
Générateur: synchrone
Type de protection : IP23
Puissance continue P
nenn
(S1) : 650 W
Puissance maximale P
max
(S2 5 min) : 720 W
Tension assignée U
nenn
: 1 x 230 V~
Courant nominal I
nenn
: 2,8 A (230 V)
Fréquence F
nenn
: 50 Hz
Type de construction du moteur d’entraînement :
2 temps refroidi par air
Cylindrée : 63 cm³
Puissance maxi : 1,5 KW / 2 CV
Carburant : mélange 1:50
Contenance du réservoir : 2,7 l
Consommation à 2/3 de la charge : env. 0,73 l/h
Poids : 18,7 kg
Niveau de pression acoustique LpA: 73 dB(A)
Niveau de puissance acoustique L
WA
92 dB (A)
Bougie d’allumage : F5TC
Mode S1 (fonctionnement continu)
La machine peut être exploitée durablement à la
puissance indiquée.
F
16

F
17
Mode S2 (fonctionnement bref)
La machine peut être exploitée brièvement à la
puissance indiquée. Ensuite, la machine doit rester
arrêtée pendant un moment afin de ne pas
réchauffer de façon inadmissible.
5. Avant la mise en service
Supprimez le matériel dʼemballage et contrôlez
lʼintégralité de la livraison. Placez le générateur de
courant sur un support stable et horizontal, à
proximité du consommateur et dans un
environnement aéré.
5.1 Sécurité électrique
앬 les câbles dʼalimentation électriques et les
appareils raccordés doivent être dans un état
irréprochable.
앬 Seuls des appareils dont lʼindication de tension
correspond à la tension de sortie du générateur
de courant peuvent être raccordés.
앬 Ne raccordez jamais le générateur de courant au
réseau de courant (prise de courant).
앬 Les longueurs de câble au récépteur doivent être
les plus courtes possibles.
5.2 Protection de lʼenvironnement
앬 Eliminez le matériel dʼentretien encrassé et les
carburants usagés dans les dépôts prévus à cet
effet
앬 Recyclez le matériel dʼemballage, le métal et les
matières plastiques.
5.3 Mise à la terre
Pour dériver les charges statiques, il est permis de
mettre le boîtier à la terre. Pour ce faire, raccordez
un câble dʼun côté au branchement de terre du
générateur (fig. 2/pos. 8) et de lʼautre à une masse
externe (p. ex. barrette de terre).
5.4 Remplir de carburant
Vissez le bouchon de réservoir (fig. 1/pos. 2) et
remplissez un mélange 1:50 dans le réservoir à
lʼaide dʼune tubulure de remplissage. Veillez à ne
pas trop remplir le réservoir pour que de lʼessence
ne sʼen échappe pas. Séchez lʼessence renversée et
attendez que les vapeurs dʼessence se soient
évaporées (risque dʼinflammation). Fermez le
bouchon du réservoir.
6. Commande
앬 Contrôlez le niveau de carburant, remplissez
éventuellement
앬 Assurez-vous de la bonne aération de lʼappareil
앬 Assurez-vous que le câble dʼallumage est fixé à la
bougie dʼallumage
앬 Inspectez lʼenvironnement direct du générateur de
courant
앬 Débranchez le matériel électrique éventuellement
raccordé au générateur de courant
6.1 Lancer le moteur
Attention ! Nʼutilisez aucun auxiliaire au démarrage
chimique, comme des combustibles facilement
volatils ou autres du même genre
앬 Mettez le robinet dʼessence (fig.1/pos. 3) sur «
ON ».
앬 Mettez lʼinterrupteur marche / arrêt (fig.1/pos.7)
en position « I ».
앬 Mettez le levier excentrique (fig. 1/pos.11) en
position .
앬 Faites démarrer le moteur avec la corde de
lancement (fig. 1/pos. 4) ; pour cela, tirez très fort
sur la poignée, si le moteur ne démarre pas, tirez
encore la corde de lancement. Attention ! Tirez
toujours lentement la corde de lancement jusquʼà
la première résistance avant de la tirer dʼun coup
sec pour faire démarrer. Ne laissez pas la corde
de lancement sʼenrouler rapidement après le
démarrage.
앬 Repoussez le levier excentrique (fig. 1/pos. 11)
après le démarrage du moteur (au bout dʼenv. 15
à 30 s).
6.2 Charge du générateur de courant
앬 Branchez les appareils 230V~ à la prise de
courant (fig. 1/pos. 10). Attention! Il est possible
de solliciter cette prise durablement (S1) à 650
W et brièvement (S2) pendant maxi. 5 minutes à
720 W.
앬 Ne raccordez pas le générateur au réseau
domestique. Ceci peut entraîner un
endommagement du générateur.
Remarque : Certains appareils électriques (scies à
guichet à moteur, perceuses, etc.) peuvent
consommer plus de courant lorsqu'ils sont utilisés
sous des conditions difficiles.
6.3 Protection contre les surcharges
Prise de courant 230V :
앬 Réduisez la puissance à absorber
앬 Appuyez sur lʼinterrupteur de surcharge (fig.
1/pos. 9)

Attention! Si ce cas devait se produire, assurezvous que la puissance prélevée ne dépasse pas la
puissance de sortie et quʼaucun appareil défectueux
ne soit branché.
Attention! Les interrupteurs de surcharge
défectueux doivent uniquement être remplacés par
des interrupteurs de surcharge dont les données de
puissance sont identiques. Veuillez à ce propos vous
adresser à votre service après vente.
6.4 Mettre le moteur hors circuit
앬 Faites fonctionner le générateur de courant
brièvement sans charge avant de lʼarrêter afin
que le groupe puisse « refroidir ».
앬 Mettez lʼinterrupteur marche / arrêt (fig. 1/pos.7)
en position « 0 ».
앬 Ouvrez le robinet dʼessence (fig. 1/pos. 3).
7. Nettoyage, maintenance, stockage,
transport et commande des pièces de
rechange
Arrêtez le moteur avant tous travaux de nettoyage et
de maintenance et tirez la bougie dʼallumage de sa
cosse.
Attention : arrêtez immédiatement lʼappareil et
faite appel à votre service après vente :
앬 lors de vibrations ou de bruits inhabituels
앬 lorsque le moteur semble être surchargé ou quʼil
présente des défauts dʼallumage
7.1 Nettoyage
Maintenez les dispositifs de protection, les fentes
à air et le carter de moteur aussi propres (sans
poussière) que possible. Frottez lʼappareil avec
un chiffon propre ou soufflez dessus avec de lʼair
comprimé à basse pression.
Nous recommandons de nettoyer lʼappareil
directement après chaque utilisation.
Nettoyez lʼappareil régulièrement à lʼaide dʼun
chiffon humide et un peu de savon. Nʼutilisez
aucun produit de nettoyage ni détergeant ; ils
pourraient endommager les pièces en matières
plastiques de lʼappareil. Veillez à ce quʼaucune
eau nʼentre à lʼintérieur de lʼappareil.
7.2 Filtre à air
Nettoyez régulièrement le filtre à air, si nécessaire
remplacez-le. Veuillez également respecter à ce
propos les informations du service après-vente.
Retirez le couvercle du filtre à air (fig. 7-8/pos. 5)
Retirez la cartouche filtrante (fig. 9/pos. G)
Nettoyez lʼélément filtrant en tapotant dessus. En
cas dʼencrassement important lavez-le avec de
lʼeau de savon, puis rincez à lʼeau claire et
laisser sécher à lʼair avant de le remonter.
Attention! Pour nettoyer lʼélément filtrant,
nʼutilisez pas de produit de nettoyage fort ni
dʼessence.
Le montage sʼeffectue dans lʼordre inverse
7.3 Bougie dʼallumage
Contrôlez régulièrement lʼencrassement de la bougie
dʼallumage. Veuillez également respecter à ce
propos les informations du service après-vente.
Retirez le couvercle de bougie dʼallumage (fig. 3-
4/pos. 6).
Retirez la cosse de bougie dʼallumage (fig.
5/pos. I) dʼun mouvement rotatif.
Retirez la bougie dʼallumage (fig. 6/pos. J) avec
la clé à bougie ci-jointe.
Nettoyez la bougie dʼallumage avec une brosse
à fils de cuivre ou mettez-en une nouvelle.
Le montage est effectué dans lʼordre inverse des
étapes.
7.4 Stockage
1. Videz le réservoir à essence à lʼaide dʼune
pompe dʼaspiration dʼessence.
Attention! Ne retirez pas lʼessence carburant
dans des endroits fermés, à proximité de feu ou
en fumant. Les vapeurs de gaz peuvent causer
des explosions ou un incendie.
2. Lancez le moteur et faites-le tourner jusquʼà ce
que le restant dʼessence soit consommé.
3. Laissez lʼappareil refroidir.
4. Retirez la bougie dʼallumage. et mettez environ
20 ml dʼhuile pour moteur dans le cylindre.
5. Tirez plusieurs fois lentement la poignée de
démarrage pour humidifier les pièces internes
dʼhuile.
6. Vissez à nouveau la bougie dʼallumage.
7. Conservez lʼappareil à un endroit sûr et bien
aéré.
Attention ! Même lorsque la ventilation du réservoir
est fermée, lʼappareil doit uniquement être transporté
en position debout.
7.5 Commande de pièces de rechange :
Pour les commandes de pièces de rechange,
veuillez indiquer les références suivantes:
Type de lʼappareil
No. dʼarticle de lʼappareil
No. dʼidentification de lʼappareil
No. de pièce de rechange de la pièce requise
Vous trouverez les prix et informations actuelles à
lʼadresse www.isc-gmbh.info
F
18

F
19
8. Mise au rebut et recyclage
Lʼappareil se trouve dans un emballage permettant
dʼéviter les dommages dus au transport. Cet
emballage est une matière première et peut donc
être réutilisé ultérieurement ou être réintroduit dans
le circuit des matières premières.
Lʼappareil et ses accessoires sont en matériaux
divers, comme par ex. des métaux et matières
plastiques. Eliminez les composants défectueux
dans les systèmes dʼélimination des déchets
spéciaux. Renseignez-vous dans un commerce
spécialisé ou auprès de lʼadministration de votre
commune !

F
20
9. Dépannages
Dérangement Origine Mesure
Le moteur ne peut pas être
démarré
Bougie d’allumage encrassée
Panne de carburant
Nettoyez la bougie d’allumage ou
remplacez-la. Distance entre
électrodes 0,6 mm
Remplissez de carburant / faites
contrôler le robinet d’essence
Le générateur n’a pas assez de
tension ou n’en a pas du tout
Régulateur ou condensateur
défectueux
Protection contre les surcharges
déclenchée
Filtre à air encrassé
Consultez un spécialiste
Actionner l’interrupteur et diminuer
le consommateur
Nettoyez ou remplacez le filtre

I
21
Attenzione!
Nellʼusare gli apparecchi si devono rispettare diverse
avvertenze di sicurezza per evitare lesioni e danni.
Quindi leggete attentamente queste istruzioni per
lʼuso/le avvertenze di sicurezza. Conservate bene le
informazioni per averle a disposizione in qualsiasi
momento. Se date lʼapparecchio ad altre persone,
consegnate queste istruzioni per lʼuso/le avvertenze
di sicurezza insieme allʼapparecchio. Non ci
assumiamo alcuna responsabilità per incidenti o
danni causati dal mancato rispetto di queste
istruzioni e delle avvertenze di sicurezza.
Spiegazione delle targhette di avvertenze
sullʼapparecchio (Fig. 10)
1. Attenzione! Leggete le istruzioni per lʼuso.
2. Attenzione! Parti molto calde. Tenetevi a
distanza.
3. Attenzione! Spegnete il motore durante il
rifornimento.
4. Attenzione! Non mettete in funzione in locali
non arieggiati.
1. Avvertenze generali di sicurezza
앬 Non si devono effettuare modifiche al gruppo
elettrogeno.
앬 Per la manutenzione e come accessori si devono
utilizzare solo pezzi originali.
앬 Attenzione: pericolo di avvelenamento, i gas di
scarico non devono essere inalati.
앬 Tenete i bambini lontani dal gruppo elettrogeno.
앬 Attenzione: pericolo di ustioni, non toccate lʼimpi
anto di scarico e il gruppo motore.
앬 Utilizzate delle cuffie antirumore adeguate
quando siete nelle vicinanze dellʼapparecchio.
앬 Attenzione: la benzina e i vapori della benzina
sono infiammabili ovvero esplosivi.
앬 Non utilizzate mai il gruppo elettrogeno in locali
non areati. In caso di impiego in locali ben areati,
i gas di scarico devono essere condotti
direttamente allʼaperto mediante un tubo
flessibile di scarico.
앬 Attenzione: anche usando un tubo flessibile di
scarico possono fuoriuscire gas tossici. A causa
del pericolo di incendio, il tubo di scarico non
deve essere mai indirizzato verso sostanze
infiammabili.
앬 Pericolo dʼesplosione: non utilizzate mai il
gruppo elettrogeno in locali con sostanze
facilmente infiammabili.
앬 Non si deve modificare il numero di giri preim
postato dal produttore. Si potrebbe danneggiare
il gruppo elettrogeno o gli apparecchi collegati.
앬 Durante il trasporto si deve assicurare il gruppo
elettrogeno contro lo scivolamento e il
ribaltamento.
앬 Installate il generatore a una distanza di almeno
1 m da edifici o apparecchi collegati.
앬 Mettete il generatore di corrente in un posto
sicuro e piano. È vietato capovolgerlo, ribaltarlo
o spostarlo durante lʼesercizio.
앬 Spegnete sempre il motore durante il trasporto o
il rifornimento di benzina.
앬 Fate attenzione che durante il rifornimento non
sia versata della benzina sul motore o
sullʼimpianto di scarico.
앬 Non usate mai i gruppi elettrogeni se piove o
nevica.
앬 Non toccate mai il gruppo elettrogeno con le
mani bagnate.
앬 Proteggetevi dai pericoli derivanti dalla corrente
elettrica. Usate all'aperto solo i cavi di prolunga
omologati per questo e contrassegnati in modo
corrispondente (H07RN.).
앬 Nell'usare cavi di prolunga non si deve superare
una lunghezza totale di 50 m in caso di sezione
di 1,5 mm
2
e 100 m in caso di 2,5 mm2.
앬 Non si devono eseguire modifiche alle
installazioni del motore e del generatore.
앬 l lavori di riparazione e di regolazione devono
essere eseguiti solo da tecnici autorizzati.
앬 Non riempite o svuotate il serbatoio nelle vicinan-
ze di fiamme vive, fuoco o scintille. Non fumare!
앬 Non toccate parti mosse meccanicamente o
molto calde. Non togliete nessuna copertura di
protezione.
앬 Gli apparecchi non devono essere esposti ad
umidità o polvere. Temperatura ambiente
consentita da -10 a +40°C, altitudine max. sul
livello del mare di 1000 m, umidità relativa
dell'aria: 90% (senza formazione di condensa).
앬 Il generatore viene azionato da un motore a
combustione che produce calore nellʼarea dello
scappamento (sulla parte opposta alle prese di
corrente) e della sua parte finale. Evitate la
vicinanza a queste superfici visto il pericolo di
ustioni cutanee.
앬 I valori indicati nelle caratteristiche tecniche per il
livello di potenza acustica (LWA) ed il livello di
pressione acustica (LpA) rappresentano dei livelli
di emissione e non necessariamente dei livelli
sicuri di lavoro. Dato che non c'è relazione fra il
livello di emissione e quello di immissione, non è
possibile usarlo in modo affidabile per
determinare la necessità di altre eventuali misure
cautelative. Tra i fattori che influiscono su livello
effettivo del livello di immissione per gli operatori
ci sono le caratteristiche dell'ambiente di lavoro,
altre fonti di rumore ecc. come per es. il numero

delle macchine e delle lavorazioni vicine, come
anche la durata dell'esposizione al rumore degli
operatori. Il livello di immissione consentito può
inoltre variare da un paese all'altro. Queste
informazioni danno tuttavia la possibilità
all'utilizzatore della macchina di eseguire una
migliore valutazione dei rischi e dei pericoli.
앬 Non usate dispositivi elettrici (neanche prolunghe
e connettori) difettosi.
AVVERTIMENTO!
Leggete tutte le avvertenze di sicurezza e le
istruzioni.
Dimenticanze nel rispetto delle avvertenze di
sicurezza e delle istruzioni possono causare scosse
elettriche, incendi e/o gravi lesioni.
Conservate tutte le avvertenze e le istruzioni per
eventuali necessità future.
2. Descrizione dellʼapparecchio ed
elementi forniti (Fig. 1-3)
1. Maniglia di trasporto
2. Coperchio del serbatoio con ventilazione
3. Rubinetto della benzina
4. Fune di avvio
5. Copertura del motore
6. Coperchio della candela di accensione
7. Interruttore ON/OFF
8. Presa di terra
9. Interruttore a risparmio energetico
10. 1x presa di corrente da 230V~
11. Levetta dellʼaria
3. Utilizzo proprio
Lʼapparecchio è adatto per impieghi che prevedono
un esercizio a 230 V~. Osservate assolutamente le
limitazioni nelle avvertenze di sicurezza.
Lʼapparecchio deve venire usato solamente per lo
scopo a cui è destinato. Ogni altro tipo di uso che
esuli da quello previsto non è un uso conforme.
Lʼutilizzatore/lʼoperatore, e non il costruttore, è
responsabile dei danni e delle lesioni di ogni tipo che
ne risultino.
Tenete presente che i nostri apparecchi non sono
stati costruiti per lʼimpiego professionale, artigianale
o industriale. Non ci assumiamo alcuna garanzia
quando lʼapparecchio viene usato in imprese
commerciali, artigianali o industriali, o in attività
equivalenti.
4. Caratteristiche tecniche
Generatore: sincrono
Tipo di protezione: IP23
Potenza continua P
nom
(S1): 650 W
Potenza massima P
max
(S2 5 min): 720 W
Tensione nominale U
nom
: 1 x 230V~
Corrente nominale I
nom
: 2,8 A (230 V)
Frequenza F
nom
: 50 Hz
Tipo motore azionamento:
a 2 tempi, raffreddato ad aria
Cilindrata: 63 cm³
Potenza max.: 1,5 kW / 2 PS
Carburante: miscela 1:50
Capacità del serbatoio: 2,7 l
Consumo con carico 2/3: ca. 0,73 l/h
Peso: 18,7 kg
Livello di pressione acustica LpA: 73 dB (A)
Livello di potenza acustica L
WA
92 dB (A)
Candela di accensione: F5TC
Modalità operativa S1 (esercizio continuo)
L'apparecchio può essere fatto funzionare in modo
continuo con la potenza indicata.
Modalità operativa S2 (esercizio breve)
L'apparecchio può essere fatto funzionare
brevemente con la potenza indicata (5 min). Poi
l'apparecchio deve rimanere ferma per un intervallo
di tempo per non surriscaldarsi eccessivamente.
5. Prima della messa in esercizio
Togliete il materiale dʼimballaggio e controllate che
gli elementi forniti siano completi. Mettete il
generatore di corrente su una superficie piana e
orizzontale nelle vicinanze dellʼutenza e in un
ambiente ben areato.
5.1 Sicurezza elettrica
앬 I cavi elettrici di alimentazione e gli apparecchi
collegati devono essere in perfette condizioni.
앬 Si devono collegare solo apparecchi con dati di
tensione che corrispondano alla tensione in
uscita del gruppo elettrogeno.
앬 Non collegate mai il gruppo elettrogeno alla rete
I
22

elettrica (presa di corrente).
앬 Utilizzate cavi tra generatore ed utente i più corti
possibili.
5.2 Protezione ambientale
앬 Consegnate il materiale sporco di manutenzione
e di esercizio presso un apposito punto di
raccolta.
앬 Portate il materiale di imballaggio, il metallo e le
materie plastiche ai centri di riciclaggio.
5.3 Messa a terra
Per la conduzione delle cariche elettriche è
consentita una messa a terra del rivestimento. A tal
fine collegate un cavo con unʼestremità allʼattacco di
terra del generatore (Fig. 2/Pos. 8) e con lʼaltra ad
una massa esterna (per es. un picchetto di massa).
5.4 Riempire di caburante
Svitate il coperchio del serbatoio (Fig. 1/Pos. 2) e
riempite il serbatoio mediante un bocchettone con
miscela 1:50. Fate attenzione che il serbatoio non
venga riempito troppo e che non fuoriesca benzina.
Pulite la benzina eventualmente versata e attendete
che i vapori della benzina si siano dileguati (pericolo
di incendio). Chiudete il coperchio del serbatoio.
6. Uso
앬 Controllate il livello del carburante, rabboccatelo
se necessario.
앬 Provvedete a una ventilazione sufficiente
dellʼapparecchio.
앬 Accertatevi che il cavo di accensione sia
collegato alla candela.
앬 Controllate le dirette vicinanze del gruppo elettro
geno.
앬 Staccate gli apparecchi elettrici eventualmente
collegati al gruppo elettrogeno.
6.1 Avviare il motore
Attenzione! Non usate additivi chimici per facilitare
lʼavvio, come per es. combustibili che evaporano
facilmente o simili.
앬 Portate il rubinetto di benzina (Fig. 1/ Pos. 3) su
“ON”.
앬 Portate lʼinterruttore ON/OFF (Fig. 1/ Pos. 7) in
posizione “I”.
앬 Regolate la levetta dellʼaria (Fig. 1/ Pos. 11) su
“ ”.
앬 Avviate il motore con la fune di avvio, tirando con
forza lʼimpugnatura (Fig.1/Pos.4); se il motore
non dovesse avviarsi tirate ancora una volta la
fune. Attenzione! Prima che la fune di avvio
venga tirata velocemente, estraetela sempre
lentamente fino alla prima resistenza. Dopo aver
avviato il motore non permettete che la fune di
avvio si riavvolga in modo incontrollato.
앬 Dopo lʼavvio del motore (dopo ca. 15-30 sec.)
riportate indietro la levetta dellʼaria (Fig. 1/ Pos.
11).
6.2 Sollecitazione del generatore di corrente
앬 Collegate gli apparecchi da alimentare da 230V~
alla presa di corrente (Fig. 1/ Pos. 10).
Attenzione! Questa presa può essere sollecitata
in modo durevole (S1) con 650 W e brevemente
(S2) per max. 5 minuti con 720 W.
앬 Non collegate il generatore alla rete elettrica di
casa. Ne possono derivare danni al generatore.
Nota: alcuni apparecchi elettrici (seghetti alternativi a
motore, trapani) possono avere un assorbimento di
corrente maggiore se utilizzati in condizioni difficili.
6.3 Protezione dal sovraccarico
Presa da 230 V ~
앬 Riducete la potenza richiesta
앬 Premete lʼinterruttore di sovraccarico (Fig. 1/Pos.
9)
Attenzione! Se ciò si dovesse verificare, accertatevi
che la potenza richiesta non debba superare la
potenza erogata e che non siano collegati
apparecchi difettosi.
Attenzione! Gli interruttori di sovraccarico difettosi
possono essere sostituiti solo con interruttori identici
che abbiano gli stessi dati di prestazioni. Rivolgetevi
per questo al servizio di assistenza.
6.4 Spegnere il motore
앬 Fare funzionare brevemente il generatore di
corrente senza sollecitazione prima di spegnerlo
in modo che possa “raffreddarsi” un poʼ.
앬 Portate lʼinterruttore ON/OFF (Fig. 1/ Pos. 7) in
posizione “0”.
앬 Chiudete il rubinetto di benzina (Fig. 1/ Pos. 3).
7. Pulizia, manutenzione,
conservazione, trasporto e ordinazione
dei pezzi di ricambio
Spegnete il motore prima di ogni lavoro di pulizia e
manutenzione e sfilate il connettore della candela
dalla candela.
I
23

Attenzione! Spegnete subito lʼapparecchio e
rivolgetevi al servizio assistenza:
앬 in caso di vibrazioni o di rumori insoliti;
앬 se il motore sembra sottoposto a sovraccarico o
spesso non si accende;
7.1 Pulizia
Tenete il più possibile i dispositivi di protezione,
le fessure di aerazione e la carcassa del motore
liberi da polvere e sporco. Strofinate
lʼapparecchio con un panno pulito o soffiatelo
con lʼaria compressa a pressione bassa.
Consigliamo di pulire lʼapparecchio subito dopo
averlo usato.
Pulite lʼapparecchio regolarmente con un panno
asciutto ed un poʼ di sapone. Non usate
detergenti o solventi perché questi ultimi
potrebbero danneggiare le parti in plastica
dellʼapparecchio. Fate attenzione che non possa
penetrare dellʼacqua nellʼinterno
dellʼapparecchio.
7.2 Filtro dellʼaria
Pulite regolarmente il filtro dellʼaria o, se necessario,
sostituitelo. A tale riguardo osservate anche le
informazioni sul servizio assistenza.
Togliete il coperchio dal filtro dellʼaria (Fig. 7-8/
Pos. 5)
Togliete lʼelemento filtrante (Fig. 9/Pos. G)
Pulite lʼelemento filtrante dandogli dei leggeri
colpi. Se é molto sporco lavatelo con acqua
saponata, risciacquatelo con acqua pulita e
fatelo asciugare allʼaria prima di rimontarlo.
Attenzione! Non usate detergenti aggressivi o
benzina per pulire lʼelemento filtrante.
Lʼassemblaggio avviene nellʼordine inverso
7.3 Candela di accensione
Controllate che la candela di accensione non sia
sporca. A tale riguardo osservate anche le
informazioni sul servizio assistenza.
Togliete il coperchio della candela di accensione
(Fig. 3-4/Pos. 6)
Sfilate il connettore della candela di accensione
(Fig. 5/Pos. I) con un movimento rotatorio.
Togliete la candela di accensione (Fig. 6/Pos. J)
facendo uso dellʼapposita chiave in dotazione.
Pulite la candela di accensione con una spazzola
a setole di rame o mettetene una nuova.
Lʼassemblaggio avviene nellʼordine inverso.
7.4 Conservazione
1. Svuotate il serbatoio della benzina con una
pompa di aspirazione.
Attenzione! Non svuotate la benzina in locali
chiusi o nelle vicinanze di fiamme vive o mentre
fumate. I vapori del gas possono causare
esplosioni ed incendi.
2. Avviate il motore e fatelo funzionare fino a
quando si sia consumata la benzina restante.
3. Fate raffreddare lʼapparecchio.
4. Togliete la candela di accensione e versate
ca.20ml di olio per motori nel cilindro.
5. Tirate lentamente la fune di avvio alcune volte
per umettare gli elementi interni di olio.
6. Riavvitate la candela.
7. Tenete lʼapparecchio in un ambiente ben areato
e sicuro.
Attenzione! Anche con la ventilazione del serbatoio
chiusa, lʼapparecchio deve essere trasportato solo in
posizione verticale.
7.5 Ordinazione di pezzi di ricambio:
Volendo commissionare dei pezzi di ricambio, si
dovrebbe dichiarare quanto segue:
modello dellʼapparecchio
numero dellʼarticolo dellʼapparecchio
numero dʼident. dellʼapparecchio
numero del pezzo di ricambio del ricambio
necessitato.
Per i prezzi e le informazioni attuali si veda
www.isc-gmbh.info
8. Smaltimento e riciclaggio
Lʼapparecchio si trova in una confezione per evitare i
danni dovuti al trasporto. Questo imballaggio
rappresenta una materia prima e può perciò essere
utilizzato di nuovo o riciclato.
Lʼapparecchio e i suoi accessori sono fatti di
materiali diversi, per es. metallo e plastica.
Consegnate i pezzi difettosi allo smaltimento di rifiuti
speciali. Per informazioni rivolgetevi ad un negozio
specializzato o allʼamministrazione comunale!
I
24

I
25
9. Eliminazione delle anomalie
Anomalia Causa Intervento
Il motore non si avvia
Candela di accensione sporca
Manca il carburante
Pulite la candela di accensione o
sostituitela,
Distanza elettrodi 0,6 mm.
Rabboccate il carburante / fate
controllare il rubinetto della benzina
Il generatore ha poca o nessuna
tensione
Regolatore o condensatore
difettoso
È intervenuto l’interruttore di
protezione contro le sovracorrenti
Filtro dell’aria sporco
Rivolgetevi ad un rivenditore
specializzato.
Azionate l’interruttore e diminuite le
utenze.
Pulite o sostituite il filtro.
26
k
erklärt folgende Konformität gemäß EU-Richtlinie
und Normen für Artikel
t
declares conformity with the EU Directive
and standards marked below for the article
p
déclare la conformité suivante selon la
directive CE et les normes concernant lʼarticle
verklaart de volgende conformiteit in overeenstemming met de EU-richtlijn en normen voor
het artikel
m
declara la siguiente conformidad a tenor de la
directiva y normas de la UE para el artículo
O
declara a seguinte conformidade de acordo
com a directiva CE e normas para o artigo
U
förklarar följande överensstämmelse enl. EUdirektiv och standarder för artikeln
q
ilmoittaa seuraavaa Euroopan unionin direktiivien ja normien mukaista yhdenmukaisuutta
tuotteelle
erklærer herved følgende samsvar med EUdirektiv og standarder for artikkel
T
заявляет о соответствии товара
следующим директивам и нормам EC
B
izjavljuje sljedeću uskladjenost s odredbama i
normama EU za artikl.
Q
declarå urmåtoarea conformitate cu linia directoare CE μi normele valabile pentru articolul.
Z
ürün ile ilgili olarak AB Yönetmelikleri ve
Normlar∂ gere©ince aμa©∂daki uygunluk aç∂kla
mas∂n∂ sunar.
z
‰ЛПТУВИ ЩЛУ ·ОfiПФ˘ıЛ Ы˘МКˆУ›· Ы‡МКˆУ· МВ
ЩЛУ √‰ЛБ›· ∂∂ О·И Щ· ЪfiЩ˘Ф БИ· ЩФ ЪФ˚fiУ
C dichiara la seguente conformità secondo la
direttiva UE e le norme per lʼarticolo
l
attesterer følgende overensstemmelse i
henhold til EU-direktiv og standarder for produkt
j
prohlašuje následující shodu podle směrnice
EU a norem pro výrobek.
A
a következő konformitást jelenti ki a termékekre vonatkozó EU-irányvonalak és normák szerint
X
pojasnjuje sledečo skladnost po smernici EU
in normah za artikel.
deklaruje zgodność wymienionego poniżej
artykułu z następującymi normami na
podstawie dyrektywy WE.
W
vydáva nasledujúce prehlásenie o zhode podľa
smernice EÚ a noriem pre výrobok.
e
деклаpиpа следното съответствие съгласно
диpективите и ноpмите на ЕС за пpодукта.
1
заявляє про відповідність згідно з Директивою
ЄС та стандартами, чинними для даного товару
.
deklareerib vastavuse järgnevatele EL direktiivi
dele ja normidele
G
deklaruoja atitikti pagal ES direktyvas ir normas
straipsniui
4
izjavljuje sledeçi konformitet u skladu s odred
bom EZ i normama za artikl
H
Atbilstības sertifikāts apliecina zemāk minēto preču
atbilstību ES direktīvām un standartiem
E
Samræmisyfirl‡sing sta›festir eftirfarandi samræmi
samkvæmt reglum Evfrópubandalagsins og stö›lum
fyrir vörur
Konformitätserklärung
ISC-GmbH · Eschenstraße 6 · D-94405 Landau/Isar
Stromerzeuger BT-PG 750
Art.-Nr.: 41.512.42 I.-Nr.: 01018 Archivierung: 4151240-24-4155050-06
Subject to change without notice
EN 12601; EN 55014-1; EN 55012; EN 61000-6-1;
TÜV Süd Industrie Service GmbH; KBV VI
Landau/Isar, den 26.06.2008
Dong Guihua
Product-Management
Weichselgartner
General-Manager
98/37/EC
2006/95/EC
97/23/EC
2004/108/EC
90/396/EEC
89/686/EEC
87/404/EEC
R&TTED 1999/5/EC
2000/14/EG_2005/88/EC:
95/54/EC:
97/68/EC:
X
X
X
X
LWM= 88,7 dB; LWA= 92 dB
P = 1,5 kW;

27
Der Nachdruck oder sonstige Vervielfältigung von Dokumentation und
Begleitpapieren der Produkte, auch auszugsweise ist nur mit ausdrücklicher Zustimmung der ISC GmbH zulässig.
The reprinting or reproduction by any other means, in whole or in part,
of documentation and papers accompanying products is permitted only
with the express consent of ISC GmbH.
La réimpression ou une autre reproduction de la documentation et des
documents dʼaccompagnement des produits, même incomplète, nʼest
autorisée quʼavec lʼagrément exprès de lʼentreprise ISC GmbH.
La ristampa o lʼulteriore riproduzione, anche parziale, della
documentazione o dei documenti dʼaccompagnamento dei prodotti è
consentita solo con lʼesplicita autorizzazione da parte della ISC GmbH.
Technische Änderungen vorbehalten
Technical changes subject to change
Sous réserve de modifications
Con riserva di apportare modifiche tecniche

28
t
GUARANTEE CERTIFICATE
Dear Customer,
All of our products undergo strict quality checks to ensure that they reach you in perfect condition. In the unlikely
event that your device develops a fault, please contact our service department at the address shown on this
guarantee card. Of course, if you would prefer to call us then we are also happy to offer our assistance under
the service number printed below. Please note the following terms under which guarantee claims can be made:
1. These guarantee terms cover additional guarantee rights and do not affect your statutory warranty rights.
We do not charge you for this guarantee.
2. Our guarantee only covers problems caused by material or manufacturing defects, and it is restricted to the
rectification of these defects or replacement of the device. Please note that our devices have not been
designed for use in commercial, trade or industrial applications. Consequently, the guarantee is invalidated
if the equipment is used in commercial, trade or industrial applications or for other equivalent activities. The
following are also excluded from our guarantee: compensation for transport damage, damage caused by
failure to comply with the installation/assembly instructions or damage caused by unprofessional
installation, failure to comply with the operating instructions (e.g. connection to the wrong mains voltage or
current type), misuse or inappropriate use (such as overloading of the device or use of non-approved tools
or accessories), failure to comply with the maintenance and safety regulations, ingress of foreign bodies
into the device (e.g. sand, stones or dust), effects of force or external influences (e.g. damage caused by
the device being dropped) and normal wear resulting from proper operation of the device.
The guarantee is rendered null and void if any attempt is made to tamper with the device.
3. The guarantee is valid for a period of 2 years starting from the purchase date of the device. Guarantee
claims should be submitted before the end of the guarantee period within two weeks of the defect being
noticed. No guarantee claims will be accepted after the end of the guarantee period. The original guarantee
period remains applicable to the device even if repairs are carried out or parts are replaced. In such cases,
the work performed or parts fitted will not result in an extension of the guarantee period, and no new
guarantee will become active for the work performed or parts fitted. This also applies when an on-site
service is used.
4. In order to assert your guarantee claim, please send your defective device postage-free to the address
shown below. Please enclose either the original or a copy of your sales receipt or another dated proof of
purchase. Please keep your sales receipt in a safe place, as it is your proof of purchase. It would help us if
you could describe the nature of the problem in as much detail as possible. If the defect is covered by our
guarantee then your device will either be repaired immediately and returned to you, or we will send you a
new device.
Of course, we are also happy offer a chargeable repair service for any defects which are not covered by the
scope of this guarantee or for units which are no longer covered. To take advantage of this service, please send
the device to our service address.

29
p
BULLETIN DE GARANTIE
Chère Cliente, Cher Client,
Nos produits sont soumis à un contrôle de qualité très strict. Si cet appareil devait toutefois ne pas fonctionner
impeccablement, nous en serions désolés. Dans un tel cas, nous vous prions de bien vouloir prendre contact
avec notre service après-vente à l‘adresse indiquée sur le bulletin de garantie. Nous restons également
volontiers à votre disposition au numéro de téléphone de service indiqué plus bas. Pour faire valoir une
demande de garantie, ce qui suit est valable :
1. Les conditions de garantie règlent les prestations de garantie supplémentaires. Vos droits de garantie
légaux ne sont en rien altérés par la garantie présente. Notre prestation de garantie est gratuite.
2. La prestation de garantie s’applique exclusivement aux défauts occasionnés par des vices de fabrication ou
de matériau et est limitée à l’élimination de ces défauts ou encore au remplacement de l’appareil. Veillez au
fait que nos appareils, conformément à leur affectation, n’ont pas été construits pour être utilisés dans un
environnement professionnel, industriel ou artisanal. Un contrat de garantie ne peut avoir lieu dès lors que
l’appareil est utilisé à des activités dans des entreprises professionnelles, artisanales ou industrielles ou
toute autre activité du même genre. Sont également exclus de notre garantie : les prestations de
substitution de dommages dus aux transports, les dommages occasionnés par le non-respect des
instructions de montage ou en raison d’une installation non conforme, du non-respect du mode d’emploi
(comme par exemple le raccordement à une mauvaise tension réseau ou à un mauvais type de courant),
les applications abusives ou non conformes (comme par exemple une surcharge de l’appareil ou encore
l’emploi d’accessoires non homologués), le non-respect des prescriptions de maintenance et de sécurité,
l’infiltration de corps étrangers dans l’appareil (comme par exemple du sable, des pierres ou de la
poussière), l’emploi de la force ou l’influence extérieure (comme par exemple les dommages dus à une
chute), ainsi que l’usure normale conforme à l’utilisation.
Le droit à la garantie disparaît dès lors que des interventions ont lieu sur l’appareil.
3. Le délai de garantie s’élève à 2 ans et commence à la date de l’achat de l’appareil. Les demandes de
garanties doivent être présentées avant écoulement du délai de garantie, dans les deux semaines suivant
le moment auquel le défaut a été reconnu. Toute reconnaissance de demande de garantie après
écoulement du délai de garantie est exclue. La réparation ou l’échange de l’appareil n’entraîne nullement
une prolongation de la durée de garantie. Elle ne fait pas non plus commencer un nouveau délai de
garantie, en raison de cette prestation, pour l’appareil ou pour toute autre pièce de rechange intégrée. Ceci
est également valable lorsqu’un service après-vente sur place a été consulté.
4. Pour faire reconnaître votre demande de garantie, veuillez nous envoyer l’appareil défectueux franco de
port à l’adresse indiquée ci-dessous. Ajoutez à l’envoi l’original du bon d’achat ou de tout autre preuve de
l’achat datée. Veuillez donc toujours bien conserver le bon d’achat en guise de preuve ! Décrivez la raison
de la réclamation le plus précisément possible. Si le défaut de l’appareil est compris dans notre prestation
de garantie, nous vous retournerons sans délai un appareil réparé ou encore un nouveau.
Bien entendu, nous sommes prêts également à réparer les appareils défectueux contre remboursement des
frais, dès lors que l’appareil n’est plus ou pas garanti. Pour ce faire, veuillez envoyer l’appareil à notre adresse
de service après-vente.

30
C
CERTIFICATO DI GARANZIA
Gentili clienti,
i nostri prodotti sono soggetti ad un rigido controllo di qualità. Se l’apparecchio non dovesse tuttavia funzionare
correttamente, ci scusiamo e vi preghiamo di rivolgervi al nostro servizio di assistenza clienti all’indirizzo
indicato in questa scheda di garanzia. Siamo a vostra disposizione anche telefonicamente al numero del
servizio assistenza sotto indicato. Per la rivendicazione dei diritti di garanzia vale quanto segue:
1. Queste condizioni di garanzia regolano ulteriori prestazioni di garanzia. La presente garanzia non tocca i
vostri diritti al ricorso di garanzia previsti dalla legge. Le nostre prestazioni di garanzia sono per voi gratuite.
2. La prestazione di garanzia riguarda esclusivamente le anomalie riconducibili a difetti del materiale o di
produzione ed è limitata all’eliminazione di queste anomalie o alla sostituzione dell’apparecchio. Tenete
presente che i nostri apparecchi non sono stati costruiti per l’impiego professionale, artigianale o
industriale. Un contratto di garanzia non viene concluso quando l’apparecchio viene usato in imprese
commerciali, artigianali o industriali, o con attività equivalenti. Dalla nostra garanzia sono escluse inoltre le
prestazioni di risarcimento per danni dovuti al trasporto o danni causati dalla mancata osservanza delle
istruzioni per il montaggio o per installazione non corretta, dalla mancata osservanza delle istruzioni per
l’uso (come per es. collegamento a tensione di rete o tipo di corrente non corretto), dall’uso improprio o
illecito (come per es. sovraccarico dell’apparecchio o utilizzo di utensili o accessori non consentiti), dalla
mancata osservanza delle norme di sicurezza e di manutenzione, dalla penetrazione di corpi estranei
nell’apparecchio (come per es. sabbia, pietre o polvere), dall’impiego della forza o dall’influsso esterno
(come per es. danni dovuti a caduta) e dall’usura normale e dovuta all’impiego.
Il diritti di garanzia decadono quando sono già effettuati interventi sull’apparecchio.
3. Il periodo di garanzia è 2 anni e inizia alla data d’acquisto dell’apparecchio. I diritti di garanzia devono
essere fatti valere prima della scadenza del periodo di garanzia, entro due settimane dopo avere accertato
il difetto. È esclusa la rivendicazione di diritti di garanzia dopo la scadenza del relativo periodo. La
riparazione o la sostituzione dell’apparecchio non comporta una proroga del periodo di garanzia e con
questa prestazione per l’apparecchio o per pezzi di ricambio eventualmente installati non inizia un nuovo
periodo di garanzia. Questo vale anche nel caso si ricorra ad un servizio sul posto.
4. Per la rivendicazione dei vostri diritti di garanzia inviate l’apparecchio difettoso franco di porto all’indirizzo
sotto indicato. Allegate lo scontrino di cassa in originale o un’altra prova d’acquisto che riporti la data.
Conservate bene perciò lo scontrino di cassa come prova! Indicate il motivo di reclamo nel modo più
dettagliato possibile. Se il difetto dell’apparecchio rientra nella nostra prestazione di garanzia, ricevete
l’apparecchio riparato o un apparecchio nuovo a stretto giro di posta.
Naturalmente effettuiamo a pagamento anche riparazioni sull’apparecchio che non rientrano o non rientrano più
nella garanzia. A tale scopo inviate l’apparecchio all’indirizzo del servizio assistenza.

31
k
GARAN
TIEURKUNDE
Sehr geehrte Kundin, sehr geehrter Kunde,
unsere Produkte unterliegen einer strengen Qualitätskontrolle. Sollte dieses Gerät dennoch einmal nicht einwandfrei funktionieren, bedauern wir dies sehr und bitten Sie, sich an unseren Servicedienst unter der auf dieser Garantiekarte angegebenen Adresse zu wenden. Gern stehen wir Ihnen auch telefonisch über die unten
angegebene Servicerufnummer zur Verfügung. Für die Geltendmachung von Garantieansprüchen gilt Folgendes:
1. Diese Garantiebedingungen regeln zusätzliche Garantieleistungen. Ihre gesetzlichen
Gewährleistungsansprüche werden von dieser Garantie nicht berührt. Unsere Garantieleistung ist für Sie
kostenlos.
2. Die Garantieleistung erstreckt sich ausschließlich auf Mängel, die auf Material- oder Herstellungsfehler
zurückzuführen sind und ist auf die Behebung dieser Mängel bzw. den Austausch des Gerätes beschränkt.
Bitte beachten Sie, dass unsere Geräte bestimmungsgemäß nicht für den gewerblichen, handwerklichen
oder industriellen Einsatz konstruiert wurden. Ein Garantievertrag kommt daher nicht zustande, wenn das
Gerät in Gewerbe-, Handwerks- oder Industriebetrieben sowie bei gleichzusetzenden Tätigkeiten
eingesetzt wird.
Von unserer Garantie sind ferner Ersatzleistungen für Transportschäden, Schäden durch Nichtbeachtung
der Montageanleitung oder aufgrund nicht fachgerechter Installation, Nichtbeachtung der
Gebrauchsanleitung (wie durch z.B. Anschluss an eine falsche Netzspannung oder Stromart),
missbräuchliche oder unsachgemäße Anwendungen (wie z.B. Überlastung des Gerätes oder Verwendung
von nicht zugelassenen Einsatzwerkzeugen oder Zubehör), Nichtbeachtung der Wartungs- und
Sicherheitsbestimmungen, Eindringen von Fremdkörpern in das Gerät (wie z.B. Sand, Steine oder Staub),
Gewaltanwendung oder Fremdeinwirkungen (wie z. B. Schäden durch Herunterfallen) sowie durch
verwendungsgemäßen, üblichen Verschleiß ausgeschlossen.
Der Garantieanspruch erlischt, wenn an dem Gerät bereits Eingriffe vorgenommen wurden.
3. Die Garantiezeit beträgt 2 Jahre und beginnt mit dem Kaufdatum des Gerätes. Garantieansprüche sind vor
Ablauf der Garantiezeit innerhalb von zwei Wochen, nachdem Sie den Defekt erkannt haben, geltend zu
machen. Die Geltendmachung von Garantieansprüchen nach Ablauf der Garantiezeit ist ausgeschlossen.
Die Reparatur oder der Austausch des Gerätes führt weder zu einer Verlängerung der Garantiezeit noch
wird eine neue Garantiezeit durch diese Leistung für das Gerät oder für etwaige eingebaute Ersatzteile in
Gang gesetzt. Dies gilt auch bei Einsatz eines Vor-Ort-Services.
4. Für die Geltendmachung Ihres Garantieanspruches übersenden Sie bitte das defekte Gerät portofrei an die
unten angegebene Adresse. Fügen Sie den Verkaufsbeleg im Original oder einen sonstigen datierten
Kaufnachweis bei. Bitte bewahren Sie deshalb den Kassenbon als Nachweis gut auf! Beschreiben Sie uns
bitte den Reklamationsgrund möglichst genau. Ist der Defekt des Gerätes von unserer Garantieleistung
erfasst, erhalten Sie umgehend ein repariertes oder neues Gerät zurück.
Selbstverständlich beheben wir gegen Erstattung der Kosten auch gerne Defekte am Gerät, die vom Garantieumfang nicht oder nicht mehr erfasst sind. Dazu senden Sie das Gerät bitte an unsere Serviceadresse.
iSC GmbH • Eschenstraße 6 • 94405 Landau/Isar (Deutschland)
Telefon: +49 [0] 180 5 120 509 • Telefax +49 [0] 180 5 835 830 (Anrufkosten: 0,14 Euro/Minute, Festnetz der T-Com)
E-Mail: info@isc-gmbh.info
• Internet: www.isc-gmbh.info

EH 07/2008 (01)
Name:
Service Hotline: 01805 120 509 · www.isc-gmbh.info
(0,14 € / min. Festnetz T-Com) - Mo-Fr. 8:00-20:00 Uhr
Straße / Nr.:
PLZ Ort
Mobil:
Telefon:
Retouren-Nr. iSC:
Kaufbeleg-Nr. / Datum:
Garantie:
JA
NEIN
Welcher Fehler ist aufgetreten (genaue Angabe): Art.-Nr.: I.-Nr.:
Sehr geehrte Kundin, sehr geehrter Kunde,
bitte beschreiben Sie uns die von Ihnen festgestellte Fehlfunktion Ihres Gerätes als Grund Ihrer Beanstandung möglichst genau. Dadurch können wir
für Sie Ihre Reklamation schneller bearbeiten und Ihnen schneller helfen. Eine zu ungenaue Beschreibung mit Begriffen wie „Gerät funktioniert nicht“
oder „Gerät defekt“ verzögert hingegen die Bearbeitung erheblich.
Service Hotline kontaktieren oder bei iSC-Webadresse anmelden - es wird Ihnen eine Retourennummer zugeteilt l Ihre Anschrift eintragen l Fehlerbeschreibung
und Art.-Nr. und I.-Nr. angeben l Garantiefall JA/NEIN ankreuzen sowie Kaufbeleg-Nr. und Datum angeben und eine Kopie des Kaufbeleges beilegen
 Loading...