

Page 1

Art.-Nr.: 20.303.35 I.-Nr.: 11034
Art.-Nr.: 20.303.45 I.-Nr.: 11034
Art.-Nr.: 20.303.25 I.-Nr.: 11024
Originalbetriebsanleitung
Starthilfekabel
Original operating instructions
Jumper Cables
Manual de instruções original
cabo auxiliar de arranque
Mode d’emploi d’origine
Câbles de connexion de batteries
Istruzioni per l’uso originali
cavi di avviamento
BT-BO 16/1 A
BT-BO 25/1 A
BT-BO 35/1 A
Page 2
2
1
Page 3

Achten Sie darauf,
Batterie)
D
3
Starten:
쎲 dass die Kapazität der stromgebenden Batterie
(z.B. 45 Ah) nicht wesentlich unter der der entladenen liegt
쎲 dass nur Batterien gleicher Nennspannung (z.B.
12 V) verbunden werden dürfen
쎲 dass zwischen den Fahrzeugen kein Karosserie-
kontakt hergestellt werden darf (Kurzschlussgefahr)
쎲 dass Zündquellen (z.B. offenes Licht, brennende
Zigaretten oder elektrische Funken) von den
Batterien fernzuhalten sind (Verpuffungsgefahr)
und dass wegen der Verätzungsgefahr man sich
nicht über die Batterien beugt
쎲 dass das Elektrolyt der entladenen Batterie auch
bei niedriger Temperatur flüssig ist
쎲 dass die entladene Batterie nicht von dem dazu-
gehörigen Bordnetz getrennt wird und die Zündungen der Fahrzeuge vor dem Anklemmen der
Starthilfekabel ausgeschaltet sind: bei Schaltgetrieben der Schalthebel in Leerlauf-Stellung; bei
Automatikgetrieben der Wählhebel in Stellung
«P» steht und die Feststellbremse angezogen ist
쎲 dass die Leitungen des Starthilfekabels nicht von
den sich drehenden Teilen im Motorraum erfasst
werden können
쎲 wie und in welcher Reihenfolge Starthilfekabel
an- und abzuklemmen sind
쎲 dass beim Entfernen der Leitungen des Start-
hilfekabels, diese nicht in Kontakt mit sich
drehenden Teilen des Motors kommen.
Danach Motor des Spenderfahrzeugs starten und auf
mittlere Drehzahl bringen. Anschliessend Motor des
liegengebliebenen Fahrzeugs starten. Nach einem
Startvorgang, der nicht länger als 15 Sekunden
dauern soll, ist eine Wartezeit von 1 Minute einzulegen.
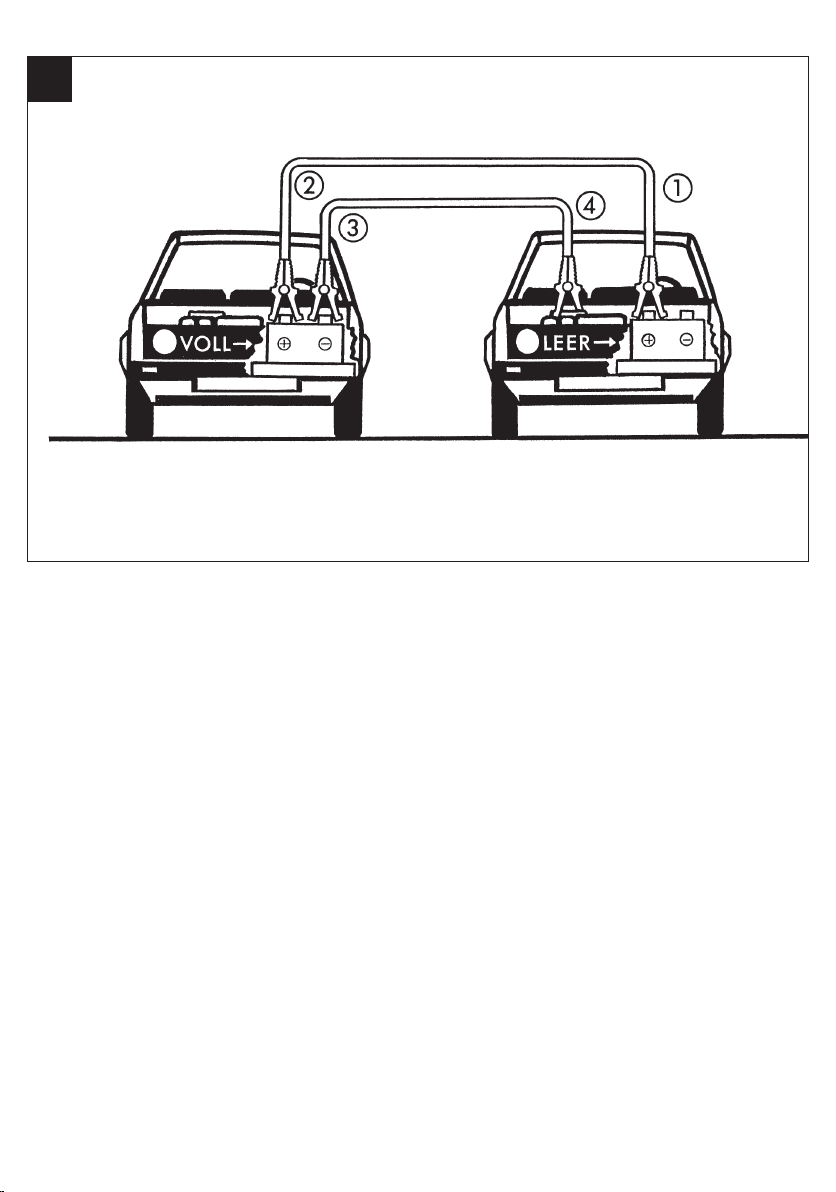
Abklemmen:
Wenn der Motor rund läuft (nach 2 bis 3 Minuten)
Starthilfekabel in umgekehrter Reihenfolge abklemmen: Zuerst schwarze Polzange vom Masseband oder Motorblock des liegengebliebenen Fahrzeuges abnehmen (siehe Bild/Position 4). Dann die
andere schwarze Polzange vom Minuspol der Spenderbatterie (siehe Bild/Position 3) und anschliessend
die beiden roten Polzangen in beliebiger Reihenfolge
abnehmen.
Technische Daten:
BT-BO 16/1 A
Querschnitt 19,4 mm
Länge 3 m
geeignet für Ottomotoren mit max. 2500 ccm (12 V
oder 24 V Batterie)
2
Anklemmen:
Leitung mit den roten Polzangen zuerst am Pluspol
der entladenen Batterie (siehe Bild/Position 1) und
dann am Pluspol der Spenderbatterie (siehe Bild/
Position 2) anklemmen. Anschliessend die Leitung
mit den schwarzen Polzangen am Minuspol der
Spenderbatterie (siehe Bild/Position 3) und danach
an die Fahrzeugmasse des liegengebliebenen Fahrzeuges, z.B. am Masseband oder einer anderen
blanken Stelle am Motorblock (siehe Bild/Position 4),
soweit wie möglich von der Batterie entfernt anklemmen, um das Zünden von möglicherweise entwickeltem Knallgas zu verhindern.
BT-BO 25/1 A
Querschnitt 31,4 mm
Länge 3,5 m
geeignet für Ottomotoren mit max. 5500 ccm und
Dieselmotoren mit max. 3000 ccm (12 V oder 24 V
Batterie)
BT-BO 35/1 A
Querschnitt 4 mm
Länge 4,5 m
geeignet für Ottomotoren mit max. 7000 ccm und
Dieselmotoren mit max. 4000 ccm (12 V oder 24 V
2
2
Page 4

Hinweise:
Starten von Katalysator-Autos
Bei nicht startfähiger Batterie den Motor nur mit
Starthilfekabel und Spenderbatterie starten. Durch
Anschieben oder Abschleppen kann Benzin in den
Auspuff gelangen und den Katalysator beschädigen.
Vor dem Abklemmen einen großen Stromverbaucher
einschalten, um Spannungsspitzen in der Bordelektronik zu vermeiden. Bedienungsanleitung des Autos
bzw. der Zusatzgeräte (wie z.B. Autotelefon, Bordcomputer usw.) auf eventuelle Hinweise zur Ladung
der Batterie und zur Starthilfe beachten.
D
4
Page 5

GB
5
It is vital to make sure that
Disconnecting the jumper leads:
쎲 the capacitance of the battery supplying the
power (e.g. 45 Ah) does not lie substantially
below that of the discharged battery;
쎲 only batteries of identical nominal voltage (e.g.
12 V) are connected together;
쎲 there is no contact between the body work of the
vehicles involved (risk of short-circuiting);
쎲 sources of ignition (e.g. naked lights, burning
cigarettes or electric sparks) are kept away from
the batteries (risk of detonation) and that you
avoid bending over the batteries due to risk of
caustic burns;
쎲 the electrolyte of the discharged battery is still
fluid at low temperature;
쎲 the discharged battery is not disconnected from
its vehicleʼs electric system and that the ignition
of both vehicles is switched off before connecting
up the jumper cables: vehicles with manual
transmissions - place the shift lever in neutral;
vehicles with automatic transmissions - place the
selector lever in position „P“ and pull the hand
brake;
쎲 the leads of the jumper cable cannot get caught
up in any moving parts inside the engine
compartment;
쎲 you know how and in which order you have to
connect and disconnect the jumper cables.
쎲 when you remove the leads of the jumper cable
they do not come into contact with any moving
parts of the engine.
Connecting the jumper leads:
Connect the lead with the red pole clamps first to the
positive pole of the discharged battery (see
Figure/Item 1) and then to the positive pole of the
supplier battery (see Figure/Item 2). Now connect the
lead with the black pole clamps to the negative pole
of the supplier battery (see Figure/Item 3) and then
to ground on the receiver vehicle, e.g. the ground
strap or some other bare point on the engine block
(see Figure/Item 4). Choose a point as far away as
possible from the battery in order to avoid the ignition
of any electrolytic gas which may develop.
Starting:
Start the engine of the supplier vehicle and rev up to
the medium speed range. Then start the engine of
the receiver vehicle. Try for no longer than 15
seconds to start the vehicle, then wait for 1 minute
before trying again.
When the engine is running smoothly (after 2 to 3
minutes), disconnect the jumper cables in reverse
order: First disconnect the black pole clamp from the
ground strap or the engine block of the receiver
vehicle (see Figure/Position 4). Then disconnect the
other black pole clamp from the negative pole of the
supplier battery (see Figure/Item 3). Finally, remove
the two red pole clamps in any order.
Technical data:
BT-BO 16/1 A
Cross cut 19.4 mm
Length 3 m
Suitable for petrol engines with max 2500 cc (12 V or
24 V battery)
BT-BO 25/1 A
Cross cut 31.4 mm
Length 3.5 m
Suitable for petrol engines with max 5500 cc and
diesel engines with max. 3000 cc (12 V or 24 V
battery)
BT-BO 35/1 A
Cross cut 4 mm
Length 4.5 m
Suitable for petrol engines with max 7000 cc and
diesel engines with max. 4000 cc (12 V or 24 V
battery)
Notes:
Starting cars with catalytic converters
If the battery is not able to start the engine, only jump
start it with the jump cables and auxiliary battery. If
you attempt to push off the car or tow it, petrol may
get into the exhaust and damage the catalytic
converter. Switch on a large power consumer before
disconnecting so as to prevent voltage surges in the
electrical system. Refer to the ownerʼs manual for the
car or additional equipment (such as car phone, onboard computer, etc.) for instructions on charging the
battery and jump starting.
2
2
2
Page 6

P
6
Assegure-se de que,
Dar arranque:
쎲 a capacidade da bateria que fornece a corrente
(p. ex. 45 Ah) não é muito inferior à capacidade
da bateria que se encontra descarregada
쎲 conecta apenas baterias com a mesma tensão
nominal (p. ex. 12 V)
쎲 não se pode estabelecer qualquer contacto entre
a carroçaria dos dois veículos (perigo de curtocircuito)
쎲 mantém as fontes de ignição (p. ex. fontes de luz
aberta, cigarros acesos ou faíscas eléctricas)
afastadas das baterias (perigo de deflagração) e
não se debruça sobre as baterias devido à
causticidade das mesmas
쎲 o electrólito da bateria descarregada se encontra
em estado líquido, mesmo a baixas
temperaturas
쎲 a bateria descarregada não é separada do
respectivo sistema eléctrico do veículo e de que
as ignições dos veículos se encontram
desligadas antes de conectar os cabos auxiliares
de arranque: nas caixas de velocidade manuais
a alavanca das mudanças se encontra em
ponto-morto e nas caixas de velocidade
automáticas a alavanca selectora se encontra na
posição «P» e o travão de mão puxado
쎲 os cabos auxiliares de arranque não podem ser
apanhados por peças em movimento dentro do
compartimento do motor
쎲 da sequência e da forma correcta de ligar e
desligar os cabos auxiliares de arranque
쎲 Quando remover o cabo auxiliar de arranque,
certifique-se de que este não entra em contacto
com as peças do motor em rotação.
Ligue de seguida o motor do veículo alimentador e
acelere-o a um regime de rotações médio. Dê
seguidamente arranque ao motor do veículo com a
bateria descarregada. Após cada tentativa de
arranque, que não deve demorar mais de 15
segundos, deve aguardar sempre 1 minuto antes de
tentar novamente.
Desconectar:
Volte a desconectar os cabos auxiliares de arranque
pela sequência inversa quando o motor estiver a
trabalhar de forma regular (após 2 a 3 minutos):
Retire primeiro a garra para o pólo preta da fita de
ligação à massa ou do bloco do motor do veículo
com a bateria descarregada (consulte a
figura/posição 4). Retire de seguida a outra garra
para o pólo preta do pólo negativo da bateria de
alimentação (consulte a figura/posição 3) e depois
ambas as garras para os pólos vermelhas sem
nenhuma ordem específica.
Dados técnicos:
BT-BO 16/1 A
Secção transversal 19,4 mm
Comprimento 3 m
indicado para motores a gasolina com 2500 cm3, no
máx. (bateria de 12 V ou de 24 V)
2
Conectar:
Conecte primeiro o cabo com a garra para o pólo
vermelha ao pólo positivo da bateria descarregada
(consulte a figura/posição 1) e depois ao pólo
positivo da bateria de alimentação (consulte a
figura/posição 2). Conecte de seguida o cabo com a
garra para o pólo preta ao pólo negativo da bateria
de alimentação (consulte a figura/posição 3) e
depois à massa do veículo que tem a bateria
descarregada, p. ex. à fita de ligação à massa ou
noutro local livre no bloco do motor (consulte a
figura/posição 4). Conecte este cabo o mais
afastado possível da bateria, de forma a evitar a
ignição de gás detonante que eventualmente se
tenha formado.
BT-BO 25/1 A
Secção transversal 31,4 mm
Comprimento 3,5 m
indicado para motores a gasolina com 5500 cm3, no
máx. e motores a gasóleo com 3000 cm3, no máx.
(bateria de 12 V ou de 24 V)
BT-BO 35/1 A
Secção transversal 4 mm
Comprimento 4,5 m
indicado para motores a gasolina com 7000 cm
3
, no
máx. e motores a gasóleo com 4000 cm3, no máx.
(bateria de 12 V ou de 24 V)
2
2
Page 7

Instruções:
Dar arranque a veículos com catalisador
Quando a bateria se encontra descarregada proceda
à tentativa de arranque apenas com cabos auxiliares
de arranque e com uma bateria de alimentação.
Empurrar ou rebocar um veículo com catalisador
pode fazer com que entre gasolina para o sistema
de escape, danificando o catalisador. Antes de
desconectar, ligue um grande consumidor de
electricidade para evitar picos de tensão no sistema
electrónico de bordo. Consulte o manual de
instruções do veículo ou dos aparelhos auxiliares
(como p. ex. telefone, computador de bordo, etc.)
para se inteirar de eventuais indicações sobre o
carregamento da bateria e o arranque auxiliado.
P
7
Page 8

F
8
Faites absolument attention à ceci:,
Démarrage:
쎲 la capacité de la batterie fournissant le courant
(par exemple 45 Ah) ne peut être inférieure à
celle de la batterie à recharger;
쎲 seules des batteries de tension nominale
identique (par ex. 12 V) peuvent être reliées;
쎲 les carrosseries des deux véhicules ne peuvent
être en contact lʼune avec lʼautre (risque de
court-circuit);
쎲 les sources dʼallumage (par ex. feu ouvert,
cigarettes allumées ou étincelles électriques)
doivent être éloignées des batteries (risque de
déflagration);
쎲 on ne peut pas se pencher au-dessus des
batteries (risque de brûlures par acide);
쎲 lʼélectrolyte de la batterie déchargée est aussi
liquide à basse température;
쎲 la batterie déchargée ne peut être séparée de
son réseau de bord et les allumages des
véhicules doivent être à lʼarrêt avant la mise en
place des câbles de connexion de batteries: pour
les véhicules à changement de vitesse, le levier
de vitesses doit être en position neutre; pour les
automatiques, le levier de sélection doit être en
position «P» et le frein de parking doit être tiré;
쎲 les câbles de connexion des batteries ne
peuvent être pris dans des parties en
mouvement du moteur;
쎲 lisez comment et dans quel ordre les câbles de
connexion de batteries doivent être branchés et
débranchés.
쎲 En retirant le câble du dispositif dʼassistance au
démarrage, veillez à ce que le câble nʼentre pas
en contact avec des éléments rotatifs du moteur.
Mise en place:
Accrochez dʼabord le câble muni de pinces de borne
rouges à la borne «+» de la batterie déchargée (voir
illustration, position 1) et ensuite à la borne «+» de la
batterie distributrice (voir illustration, position 2).
Accrochez ensuite le câble muni de pinces de borne
noires à la borne «–» de la batterie distributrice (voir
illustration, position 3) et ensuite à la masse du
véhicule en panne, par exemple à la bande de
connexion à la masse ou à un autre endroit dénudé
du bloc moteur (voir illustration, position 4), éloigné
le plus possible de la batterie, pour éviter lʼallumage
de gaz explosifs éventuellement libérés.
Faites ensuite démarrer le moteur du véhicule
distributeur et faites-le tourner à moyen régime.
Faites alors démarrer le moteur du véhicule en
panne. Après un procédé de démarrage, qui ne doit
pas durer plus de 15 secondes, il faut respecter une
pause de 1 minute.
Débrancher:
Lorsque le moteur tourne (pendant 2 à 3 minutes),
débranchez les câbles de connexion de batteries
dans lʼordre inverse: dʼabord la pince de borne noire
de la bande de connexion à la masse ou du bloc
moteur du véhicule en panne (voir illustration,
position 4), puis lʼautre pince de borne noire de la
borne «–» de la batterie distributrice (voir illustration,
position 3) et enfin les deux pinces de borne rouge
dans nʼimporte quel ordre.
Caractéristiques techniques :
BT-BO 16/1 A
Coupe transversale 19,4 mm
Longueur 3 m
Convient aux moteurs Otto de maxi. 2500 cm
(batterie de 12 V ou 24 V)
BT-BO 25/1 A
Coupe transversale 31,4 mm
Longueur 3,5 m
convient aux moteurs Otto de maxi. 5500 cm3et aux
moteurs diesel de maxi. 3000 cm3(batterie 12 V ou
24 V)
BT-BO 35/1 A
Coupe transversale 4 mm
Longueur 4,5 m
convient aux moteurs Otto de maxi. 7000 cm3et aux
moteurs diesel de maxi. 4000 cm3(batterie 12 V ou
24 V)
3
2
2
2
Page 9

Remarques :
Faire démarrer des autos à catalyseur
Lorsque la batterie ne peut pas démarrer, faire
uniquement démarrer le moteur avec le câble de
démarrage et la batterie auxiliaire. Pousser ou
remorquer le véhicule peut faire passer lʼessence
dans le pot dʼéchappement et endommager le
catalyseur. Avant de déconnecter, mettez un grand
consommateur dʼélectricité en circuit afin dʼéviter des
pointes de tension dans lʼélectronique du tableau de
bord. Respecter les éventuelles consignes du mode
dʼemploi de la voiture ou des appareils auxiliaires
(comme par exemple téléphone ou lʼordinateur de
bord, etc.) en rapport avec le chargement de la
batterie.
F
9
Page 10

4000 cm3(batteria da 12 V o 24V)
I
10
Fate attenzione
Avviamento
쎲 che la capacità della batteria caricante
(ad es. 45 Ah) non sia molto inferiore a quella
della batteria scarica
쎲 che possono essere collegate solo batterie della
stessa tensione nominale (ad es. 12 V)
쎲 che non esista nessun contatto tra le carrozzerie
dei veicoli (rischio di corto circuito)
쎲 che fonti di accensione (ad es. fiamme vive,
sigarette accese o scintille elettriche) siano
allontanati dalle batterie (rischio di deflagrazione)
e che, a causa del pericolo presentato dal liquido
corrosivo, non è consigliabile chinarsi sulle
batterie.
쎲 che lʼ elettrolita della batteria scarica è liquido
anche alle basse temperature
쎲 che la batteria scarica non venga staccata dalla
rispettiva rete di bordo e che prima di fissare i
cavi per avviamento tramite collegamento alla
batteria, lʼaccensione dei veicoli sia spenta: in
caso di cambio normale, fare attenzione che la
leva sia in posizione folle e che in caso di cambio
automatico, la leva si trovi in posizione «P» e il
freno di stazionamento sia azionato
쎲 che i conduttori del cavo per avviamento non
tocchino gli elementi in movimento nel vano
motore
쎲 come e in quale ordine i cavi per avviamento
siano da fissare o staccare.
쎲 Nel togliere il cavo per lʼavviamento di soccorso
fate attenzione, che questo non venga in
contatto con le parti rotanti del motore.
Fissaggio
Fissare il cavo con le pinze rosse prima al polo
positivo della batteria scarica (vedi figura/posizione
1) e dopo al polo positivo della batteria carica (vedi
figura/posizione 2). Quindi fissare il cavo con le pinze
nere al polo negativo della batteria di carica (vedi
figura/posizione 3) e dopo alla massa del veicolo in
panne, ad es. al nastro massa o ad unʼaltra parte
lucida del blocco motore (vedi figura/posizione 4).
Fissare i cavi il più lontano possibile dalla batteria,
onde evitare lʼaccensione di gas tonante che
potrebbe essersi formato.
Quindi avviare il motore del veicolo di aiuto e portarlo
a regime medio. In seguito avviare il motore del
veicolo in panne. Dopo una procedura di avviamento
che non deve superare i 15 secondi, è necessario
attendere per 1 minuto prima di ripetere lʼoperazione.
Scollegamento
Appena il motore gira in modo normale (dopo 2 o 3
minuti), staccare i cavi di avviamento nellʼordine
inverso: prima togliere la pinza nera dal nastro di
massa o dal blocco di motore del veicolo fermo (vedi
figura/posizione 4); quindi staccare lʼaltra pinza nera
dal polo negativo della batteria di carica (vedi
figura/posizione 3) e in seguito togliere le due pinze
rosse nellʼordine che preferite.
Caratteristiche tecniche
BT-BO 16/1 A
Sezione 19,4 mm
Lunghezza 3 m
Adatto per motori a benzina con una cilindrata
massima di 2500 cm³ (batteria da 12 V o 24V)
BT-BO 25/1 A
Sezione 31,4 mm
Lunghezza 3,5 m
Adatto per motori a benzina con una cilindrata
massima di 5500 cm3e motori diesel con max.
3000 cm3(batteria da 12 V o 24V)
BT-BO 35/1 A
Sezione 41 mm
Lunghezza 4,5 m
Adatto per motori a benzina con una cilindrata
massima di 7000 cm3e motori diesel con max.
2
2
2
Page 11

Avvertenze
Avviamento di auto dotate di marmitta catalitica
In caso di batteria scarica avviate il motore solo con
cavo di avviamento di soccorso e batteria di
soccorso. Con operazioni di spinta o di traino
potrebbe penetrare benzina nello scappamento e
danneggiare la marmitta catalitica. Prima di staccare
i morsetti, attivate un dispositivo con un elevato
assorbimento di corrente per evitare picchi di
tensione nel sistema elettronico di bordo. Tenete
conto di eventuali avvertenze sulla ricarica della
batteria e sullʼavviamento di soccorso nelle istruzioni
per lʼuso della vettura e degli apparecchi ausiliari
(come per es. telefono dellʼauto, elettronica di
bordo).
I
11
Page 12

12
Der Nachdruck oder sonstige Vervielfältigung von Dokumentation und
Begleitpapieren der Produkte, auch auszugsweise ist nur mit ausdrücklicher Zustimmung der ISC GmbH zulässig.
The reprinting or reproduction by any other means, in whole or in part,
of documentation and papers accompanying products is permitted only
with the express consent of ISC GmbH.
A reprodução ou duplicação, mesmo que parcial, da documentação e
dos anexos dos produtos, carece da autorização expressa da ISC
GmbH.
La réimpression ou une autre reproduction de la documentation et des
documents dʼaccompagnement des produits, même incomplète, nʼest
autorisée quʼavec lʼagrément exprès de lʼentreprise ISC GmbH.
La ristampa o lʼulteriore riproduzione, anche parziale, della
documentazione o dei documenti dʼaccompagnamento dei prodotti è
consentita solo con lʼesplicita autorizzazione da parte della ISC GmbH.
Page 13

13
Technische Änderungen vorbehalten
Technical changes subject to change
Salvaguardem-se alterações técnicas
Sous réserve de modifications
Con riserva di apportare modifiche tecniche
Page 14

14
Page 15

15
t
GUARANTEE CERTIFICATE
Dear Customer,
All of our products undergo strict quality checks to ensure that they reach you in perfect condition. In the unlikely
event that your device develops a fault, please contact our service department at the address shown on this
guarantee card. You can also contact us by telephone using the service number shown. Please note the
following terms under which guarantee claims can be made:
1. These guarantee conditions regulate additional guarantee services. Your statutory guarantee claims are not
aff
ected by this guarantee. Our guarantee is free of charge to you.
2. Our guarantee only covers defects suffered by the device which have been verifiably caused by a material
or manufacturing fault and is limited to the rectification of such defects or the replacement of the device at
our discretion.
Please note that our devices are not designed for use in commercial, trade or professional applications. A
guarantee contract will not be created if the device has been used by commercial, trade or industrial
business or has been exposed to similar stresses during the guarantee period.
3. The following are not covered by our guarantee:
- Damage to the device caused by a failure to follow the assembly instructions or due to incorrect
installation, a failure to follow the operating instructions (for example connecting it to an incorrect mains
voltage or current type) or a failure to follow the maintenance and safety instructions or by exposing the
device to abnormal environmental conditions or by lack of care and maintenance.
- Damage to the device caused by abuse or incorrect use (for example overloading the device or the use or
unapproved tools or accessories), ingress of foreign bodies into the device (such as sand, stones or dust,
transport damage), the use of force or damage caused by external forces (for example by dropping it).
- Damage to the device or parts of the device caused by normal or natural wear or tear or by normal use of
the device.
4. The guarantee is valid for a period of 24 months starting from the purchase date of the device. Guarantee
claims should be submitted before the end of the guarantee period within two weeks of the defect being
noticed. No guarantee claims will be accepted after the end of the guarantee period. The original guarantee
period remains applicable to the device even if repairs are carried out or parts are replaced. In such cases,
the work performed or parts fitted will not result in an extension of the guarantee period, and no new
guarantee will become active for the work performed or parts fitted. This also applies if an on-site service is
used.
5. Please report the defective device on the following internet address to register your guarantee claim:
www.isc-gmbh.info. If the defect is covered by our guarantee, then the item in question will either be repaired
immediately and returned to you or we will send you a new replacement device.
Of course, we are also happy offer a chargeable repair service for any defects which are not covered by the
scope of this guarantee or for units which are no longer covered. To take advantage of this service, please send
the device to our service address.
Also refer to the restrictions of this warranty concerning wear parts, consumables and missing parts as set out in
the service information in these operating instructions.
Page 16

16
O
CERTIFICADO DE GARANTIA
Estimado(a) cliente,
os nossos produtos são submetidos a um rigoroso controlo de qualidade. Se, ainda assim, o aparelho não
funcionar nas devidas condições, lamentamos esse facto e pedimos-lhe que se dirija ao nosso serviço de
assistência técnica na morada indicada no presente certificado de garantia. Se preferir, também pode
contactar-nos telefonicamente através do número de assistência técnica indicado. O exercício dos direitos de
garantia está sujeito às seguintes condições:
1. As presentes condições de garantia regem as prestações de garantia complementar e não afectam os seus
dir
eitos legais de garantia. O nosso serviço de garantia é prestado gratuitamente.
2. O serviço de garantia cobre exclusivamente as deficiências do aparelho decorrentes de erros de material
ou de fabrico comprovados, e está, por nossa opção, limitado à eliminação de tal falta no aparelho ou à
substituição do mesmo.
Chamamos a atenção para o facto de os nossos aparelhos não terem sido concebidos para uso comercial,
artesanal ou profissional. Não haverá, por isso, lugar a um contrato de garantia no caso de o aparelho ter
sido utilizado, dentro do período de garantia, em empresas do sector comercial, artesanal ou industrial ou
actividades equiparáveis.
3. Excluídos pela nossa garantia estão:
- Danos no aparelho resultantes da inobservância das instruções de montagem ou de uma instalação
incorrecta, da inobservância do manual de instruções (como p. ex. a ligação a uma tensão de rede ou tipo
de corrente errada) ou da inobservância das disposições de segurança ou da exposição do aparelho a
condições ambientais anormais ou de uma conservação e manutenção insuficientes.
- Danos no aparelho resultantes de utilizações abusivas ou indevidas (como p. ex. uma sobrecarga do
aparelho ou utilização de ferramentas de trabalho ou acessórios não autorizados), a penetração de corpos
estranhos no aparelho (como p. ex. areia, pedras ou pó, danos de transporte), o uso de força ou impactos
externos (como p. ex. danos resultantes de quedas).
- Danos no aparelho ou nas peças do aparelho associados a um desgaste decorrente do uso, um desgaste
natural habitual ou de outro tipo.
4. O período de garantia é de 24 meses a contar da data de compra do aparelho. Os direitos de garantia
devem ser reclamados dentro do período de garantia, no prazo de duas semanas após ter sido detectado o
defeito. Está excluída a reclamação de direitos de garantia após o termo do período de garantia. A
reparação ou a substituição do aparelho não implica o prolongamento do período de garantia nem dá
origem à contagem de um novo período de garantia para o aparelho ou para eventuais peças
sobressalentes montadas no mesmo. O mesmo se aplica no caso de a assistência técnica ter sido
prestada no local.
5. Para activar a garantia, denuncie o aparelho defeituoso em: www.isc-gmbh.info. Se o defeito do aparelho
estiver abrangido pelo nosso serviço de garantia, ser-lhe-á imediatamente enviado um aparelho novo ou
reparado.
Naturalmente, também teremos todo o gosto em efectuar reparações que não estão, ou deixaram de estar,
abrangidas pelo serviço de garantia. Nesse caso, terá de suportar os custos da reparação. Para este efeito,
deverá enviar o aparelho para a morada do nosso serviço de assistência técnica.
Para peças de desgaste, consumíveis e em falta, consulte as restrições desta garantia, de acordo com as
informações do serviço de assistência técnica deste manual de instruções.
Page 17

17
p
BULLETIN DE GARANTIE
Chère Cliente, Cher Client,
nos produits sont soumis à un contrôle de qualité très strict. Si toutefois, il arrivait que cet appareil ne fonctionne
pas parfaitement, nous en sommes désolés et nous vous prions de vous adresser à notre service après-vente à
l'adresse indiquée sur le bon de garantie. Nous nous tenons également volontiers à votre disposition par
téléphone au numéro de service après-vente indiqué. La garantie est valable dans les conditions suivantes :
1. Ces conditions de garantie gèrent des prestations de garantie supplémentaires. Vos droits légaux en
matièr
e de garantie restent inchangés. Notre prestation de garanti est gratuite pour vous.
2. La prestation de garantie concerne uniquement les défauts de l'appareil dont il est prouvé qu'ils résultent
d'un défaut de matériau ou de fabrication et se limite en fonction de notre décision soit à l'élimination de tels
défauts sur l'appareil, soit au remplacement de l'appareil.
Veillez au fait que nos appareils, conformément au règlement, n'ont pas été conçus pour être utilisés dans
un environnement professionnel, industriel ou artisanal. Il n'y a donc pas de contrat de garantie quand
l'appareil a été utilisé professionnellement, artisanalement ou par des sociétés industrielles ou exposé à
une sollicitation semblable pendant la durée de la garantie.
3. Sont exclus de notre garantie :
- les dommages liés au non-respect des instructions de montage ou en raison d'une installation incorrecte,
au non-respect du mode d'emploi (en raison par ex. du branchement de l'appareil sur la tension de réseau
ou le type de courant incorrect), au non-respect des dispositions de maintenance et de sécurité ou résultant
d'une exposition de l'appareil à des conditions environnementales anormales ou d'un manque d'entretien et
de maintenance.
- les dommages résultant d'une utilisation abusive ou non conforme (comme par ex. une surcharge de
l'appareil ou une utilisation d'outils ou d'accessoires non autorisés), de la pénétration d'objets étrangers
dans l'appareil (comme par ex. du sable, des pierres ou de la poussière), de l'utilisation de la force ou de la
violence (comme par ex. les dommages liés aux chutes).
- les dommages sur l'appareil ou des parties de l'appareil résultant de l'usure normale liée à l'utilisation de
l'appareil ou de toute autre usure naturelle.
4. La durée de garantie est de 24 mois et débute à la date d'achat de l'appareil. Les droits à la garantie doivent
être revendiqués avant l'expiration de la durée de garantie dans un délai de deux semaines après avoir
constaté le défaut. La revendication de droits à la garantie après expiration de la durée de garantie est
exclue. La réparation ou l'échange de l'appareil n'entraîne ni une extension de la durée de garantie ni le
début d'une nouvelle durée de garantie pour cet appareil ou toute autre pièce de rechange installée sur
l'appareil. Cela est valable également dans le cas d'une intervention du service après-vente à domicile.
5. Pour faire valoir vos droits à la garantie, veuillez enregistrer l'appareil défectueux à l'adresse suivante :
www.isc-gmbh.info. Si le défaut de l'appareil est inclut dans la garantie, vous recevrez sans délai un appareil
réparé ou un nouvel appareil.
Bien entendu, nous réparons volontiers les défauts de votre appareil qui ne sont pas ou plus compris dans
l'étendue de la garantie contre le remboursement des frais de réparation. Pour cela, veuillez envoyer l'appareil à
notre adresse de service après-vente.
Pour les pièces d'usure, de consommation et manquantes, nous renvoyons aux restrictions de cette garantie
conformément aux informations du service après-vente de ce mode d'emploi.
Page 18

18
C
CERTIFICATO DI GARANZIA
Gentili clienti,
i nostri prodotti sono soggetti ad un rigido controllo di qualità. Se l'apparecchio non dovesse tuttavia funzionare
correttamente, ci scusiamo e vi preghiamo di rivolgervi al nostro servizio di assistenza clienti all'indirizzo
indicato in questa scheda di garanzia. Siamo a vostra disposizione anche telefonicamente al numero del
Servizio Assistenza indicato. Per la rivendicazione dei diritti di garanzia vale quanto segue:
1. Queste condizioni di garanzia regolano ulteriori prestazioni di garanzia. La presente garanzia non tocca i
v
ostri diritti al ricorso in garanzia previsti dalla legge. Le nostre prestazioni di garanzia sono per voi gratuite.
2. La prestazione di garanzia riguarda esclusivamente i difetti dell'apparecchio provatamente riconducibili a
errori del materiale o di produzione ed è limitata, a nostra discrezione, all'eliminazione di questi difetti o alla
sostituzione dell'apparecchio.
Tenete presente che i nostri apparecchi non sono stati costruiti per l'impiego artigianale, professionale o
imprenditoriale. Pertanto un contratto di garanzia non viene concluso se l'apparecchio è stato usato entro il
periodo di garanzia in attività artigianali, imprenditoriali o industriali o se è stato sottoposto a sollecitazioni
equivalenti.
3. Sono esclusi dalla nostra garanzia:
- Danni all'apparecchio causati dalla mancata osservanza delle istruzioni di montaggio o per
un'installazione non corretta, dalla mancata osservanza delle istruzioni per l'uso (come ad es. collegamento
a una tensione di rete o a un tipo di corrente non corretti), dalla mancata osservanza delle norme relative
alla manutenzione e alla sicurezza, dall'esposizione dell'apparecchio a condizioni ambientali anomale o per
la mancata esecuzione di pulizia e manutenzione.
- Danni all'apparecchio dovuti a usi impropri o illeciti (come per es. sovraccarico dell'apparecchio o utilizzo
di utensili di ricambio o accessori non consentiti), alla penetrazione di corpi estranei nell'apparecchio (come
per es. sabbia, pietre o polvere, danni dovuti al trasporto), all'impiego della forza o a influssi esterni (come
per es. danni causati da caduta).
- Danni all'apparecchio o a parti di esso da ricondurre a un'usura comune, dovuta all'uso o di altro tipo
naturale.
4. Il periodo di garanzia è 24 mesi e inizia a partire dalla data di acquisto dell'apparecchio. I diritti di garanzia
devono essere fatti valere prima della scadenza del periodo di garanzia, entro due settimane dopo avere
accertato il difetto. È esclusa la rivendicazione di diritti di garanzia dopo la scadenza del relativo periodo. La
riparazione o la sostituzione dell'apparecchio non comporta una proroga del periodo di garanzia e con
questa prestazione per l'apparecchio o per pezzi di ricambio eventualmente installati non inizia un nuovo
periodo di garanzia. Ciò vale anche nel caso in cui si ricorra a un servizio sul posto.
5. Per rivendicare il diritto di garanzia vi preghiamo di denunciare l'apparecchio difettoso sul sito internet:
www.isc-gmbh.info. Se il difetto dell'apparecchio rientra nella nostra prestazione di garanzia, ricevete
prontamente l'apparecchio riparato o un apparecchio nuovo.
Naturalmente effettuiamo a pagamento anche riparazioni sull'apparecchio che non rientrano o non rientrano più
nella garanzia. A tale scopo inviate l'apparecchio all'indirizzo del nostro Centro Assistenza.
Per parti mancanti, di consumo e soggette a usura rimandiamo alle limitazioni di questa garanzia secondo le
informazioni sul Servizio Assistenza di queste istruzioni per l'uso.
Page 19

19
k
GARANTIEURKUNDE
Sehr geehrte Kundin, sehr geehrter Kunde,
unsere Produkte unterliegen einer strengen Qualitätskontrolle. Sollte dieses Gerät dennoch einmal nicht
einwandfrei funktionieren, bedauern wir dies sehr und bitten Sie, sich an unseren Servicedienst unter der auf
dieser Garantiekarte angegebenen Adresse zu wenden. Gerne stehen wir Ihnen auch telefonisch über die
angegebene Servicerufnummer zur Verfügung. Für die Geltendmachung von Garantieansprüchen gilt
folgendes:
1. Diese Garantiebedingungen regeln zusätzliche Garantieleistungen. Ihre gesetzlichen
Gewährleistungsansprüche werden von dieser Garantie nicht berührt. Unsere Garantieleistung ist für Sie
kostenlos.
2. Die Garantieleistung erstreckt sich ausschließlich auf Mängel am Gerät, die nachweislich auf einem
Material- oder Herstellungsfehler beruhen und ist nach unserer Wahl auf die Behebung solcher Mängel am
Gerät oder den Austausch des Gerätes beschränkt. Bitte beachten Sie, dass unsere Geräte
bestimmungsgemäß nicht für den gewerblichen, handwerklichen oder beruflichen Einsatz konstruiert
wurden. Ein Garantievertrag kommt daher nicht zustande, wenn das Gerät innerhalb der Garantiezeit in
Gewerbe-, Handwerks- oder Industriebetrieben verwendet wurde oder einer gleichzusetzenden
Beanspruchung ausgesetzt war.
3. Von unserer Garantie ausgenommen sind:
- Schäden am Gerät, die durch Nichtbeachtung der Montageanleitung oder aufgrund nicht fachgerechter
Installation, Nichtbeachtung der Gebrauchsanleitung (wie durch z.B. Anschluss an eine falsche
Netzspannung oder Stromart) oder Nichtbeachtung der Wartungs- und Sicherheitsbestimmungen oder
durch Aussetzen des Geräts an anomale Umweltbedingungen oder durch mangelnde Pflege und Wartung
entstanden sind.
- Schäden am Gerät, die durch missbräuchliche oder unsachgemäße Anwendungen (wie z.B. Überlastung
des Gerätes oder Verwendung von nicht zugelassenen Einsatzwerkzeugen oder Zubehör), Eindringen von
Fremdkörpern in das Gerät (wie z.B. Sand, Steine oder Staub, Transportschäden), Gewaltanwendung oder
Fremdeinwirkungen (wie z. B. Schäden durch Herunterfallen) entstanden sind.
- Schäden am Gerät oder an Teilen des Geräts, die auf einen gebrauchsgemäßen, üblichen oder sonstigen
natürlichen Verschleiß zurückzuführen sind.
4. Die Garantiezeit beträgt 24 Monate und beginnt mit dem Kaufdatum des Gerätes. Garantieansprüche sind
vor Ablauf der Garantiezeit innerhalb von zwei Wochen, nachdem Sie den Defekt erkannt haben, geltend zu
machen. Die Geltendmachung von Garantieansprüchen nach Ablauf der Garantiezeit ist ausgeschlossen.
Die Reparatur oder der Austausch des Gerätes führt weder zu einer Verlängerung der Garantiezeit noch
wird eine neue Garantiezeit durch diese Leistung für das Gerät oder für etwaige eingebaute Ersatzteile in
Gang gesetzt. Dies gilt auch bei Einsatz eines Vor-Ort-Services.
5. Für die Geltendmachung Ihres Garantieanspruches melden Sie bitte das defekte Gerät an unter: www.iscgmbh.info. Ist der Defekt des Gerätes von unserer Garantieleistung erfasst, erhalten Sie umgehend ein
repariertes oder neues Gerät zurück.
Selbstverständlich beheben wir gegen Erstattung der Kosten auch gerne Defekte am Gerät, die vom
Garantieumfang nicht oder nicht mehr erfasst sind. Dazu senden Sie das Gerät bitte an unsere Serviceadresse.
Für Verschleiß-, Verbrauchs- und Fehlteile verweisen wir auf die Einschränkungen dieser Garantie gemäß den
Service-Informationen dieser Bedienungsanleitung.
iSC GmbH • Eschenstraße 6 • 94405 Landau/Isar (Deutschland)
Page 20

EH 04/2014 (01)
09951 / 95 920 + Durchwahl:
Allgemeine Fragen -00 Klima / Heizen / Entfeuchten -30
Stromerzeuger -05 Werkzeugtechnik - Handgeführt -35
Gartentechnik - Benzin -10 Werkzeugtechnik - Stationär -40
Gartentechnik - Elektro -15 Fragen zur Rechnung -50
Gartentechnik - Akku -20 Reparaturanfragen -60
Gewächshaus / Metallgerätehaus -25
Telefax: 01805 / 835 830 (Festnetz: 14 ct/min, Mobilfunk max.: 42 ct/min)
E-Mail: info@isc-gmbh.info · Internet: www.isc-gmbh.info
iSC GmbH · Eschenstraße 6 · 94405 Landau/Isar (Deutschland)
 Loading...