Duke Tri Channel cold pan Installation Manual

Tri-Channel Cold Pan Operation and Installation Instructions
TRI-CHANNEL COLD PAN OPERATION AND INSTALLATION:
CAUTION
Improper installation, adjustment, alteration, service or maintenance can cause property damage, injury or death. Read the installation, operating and maintenance instructions thoroughly before installing this equipment.
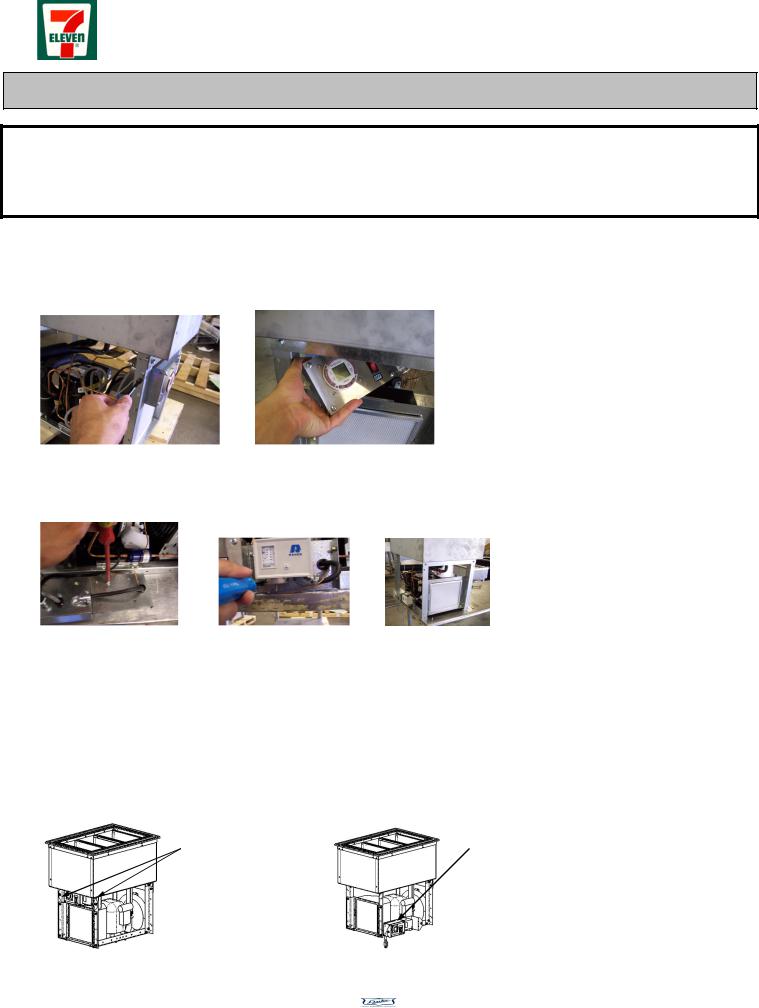
Side Mount Controls Instruction
1.This Tri-Channel Cold Pan Unit can be reconfigured so that the controls are accessible on either side of the unit.
2.Remove 4 mount screws from the control assembly and cut zip ties on thermostat lead; Figure 1.
Figure 1 |
Figure 2 |
3.Carefully maneuver control assembly through the condensing section of the unit to the side position desired; Figure 2.
4.Remove 2 screws from the back of the thermostat and reposition the screws in the top two thermostat mounting holes; Figure 3.
Figure 4 |
Figure 5 |
Figure 3
5.To mount the control assembly to the side angle install 2 mounting screw in the front and 2 mounting screws into the back of the control assembly; Figure 4.
6.With zip ties, tie up extra slack in compressor chord and thermostat lead.
7.The controls are now side mounted; Figure 5. When installing the unit in this configuration, be careful not to damage control section when maneuvering it into the counter.
If unit is configured with drains, follow these steps to reconfigure the control access:
1.Remove 2 bolts and 2 nuts from the sides of the control section; Figure 6.
2.Carefully maneuver controls through the condensing section and remove the bolts from the back of the control box; Figure 2.
3.Align holes on the angle with the bolt holes and reinstall bolts; Figure 7.
|
|
|
|
|
REMOVE 2 |
|
|
REINSTALL 2 |
|
NUTS AND |
|
|
BOLTS ON THE |
|
2 BOLTS |
|
|
BACK OF BOX |
|
|
|
|
Figure 7 |
|
Figure 6 |
|
|
|
|
|
|
|
|
|
071329 |
- 1 - |
08-02-07 |
||

Tri-Channel Cold Pan Operation and Installation Instructions
Installation Instructions
1. The Tri-Channel Cold Pan Unit is to be dropped into a 24 ½” x 17 ¼” top cut-out; Figure 8. The cabinet that the unit is dropped into should provide 400 sq. in. of breathing area at the inlet and outlet ends of the condensing unit. There should be no wall within 6” of the compressor housing.
Figure 8
Figure 9
2. Remove crating from the Tri-Channel Unit; Figure 9. To protect the controls of this unit keep the protective packing material on the control until installation is complete.
Figure 10 |
Figure 11 |
3.Apply a generous bead of silicone rubber sealant such as Dow Corning “RTV” or G. E. Silicone sealant to the top rim.
4.Place two of the crate boards on each long edge of the cut-out; Figure 10.
5.Using two individuals and proper lifting techniques, lift Tri-Channel Unit off of the skid and slowly maneuver it into the cut out and rest top rim on boards, Figure 11.
6.Carefully remove the board from under the top rim; Figure 12.
Figure 12 |
Figure 13 |
|
7.Any excess sealant that squeezes out between the unit top rim and counter top should be wiped off before sealant cures or stripped away with a knife after curing.
8.In order to remove part of the load from the top rim, the bottom of the unit must be supported with metal components that are compatible with the construction of the counter; Figure 13.
9.Plug cord into a properly grounded NEMA 5-15 outlet. Remove packing material from the control assembly.
10.If this unit is provided with drains, the drain must be connected in accordance with local plumbing codes.
071329 |
- 2 - |
08-02-07 |
 Loading...