


Installation & Operation Manual
Australia Version
BURGER KING
FLEXIBLE BATCH
BROILER
Please read this manual completely before attempting to install, operate or service this equipment
This manual is Copyright © 2011 Duke Manufacturing Co. All rights reserved. Reproduction without written permission is prohibited. Duke is a registered
trademark of the Duke Manufacturing Co.
Duke Manufacturing Co.
2305 N. Broadway
St. Louis, MO 63102
Phone: 314-231-1130
Toll Free: 1-800-735-3853
Fax: 314-231-2460 www.dukemfg.com
P/N 175187J

Installation & Operation Manual for Flexible Batch Broiler Australian Units
2

Installation & Operation Manual for Flexible Batch Broiler
Australian Units
TABLE OF CONTENTS
|
PAGE |
I. General Information....................................................................................................... |
5 |
A. Batch Broiler Specifications....................................................................................... |
5 |
A-1.0 Model Number Key...................................................................................... |
5 |
A-2.0 Broiler Dimensions....................................................................................... |
6 |
II. Installation Instructions................................................................................................. |
7 |
A. Qualified Personnel................................................................................................... |
7 |
B. Delivery and Inspection............................................................................................. |
7-8 |
C. Broiler Assembly....................................................................................................... |
9 |
D. Adjustments at Installation........................................................................................ |
11 |
E. Location of the Broiler............................................................................................... |
12 |
F. Gas Piping................................................................................................................. |
12 |
G. Electrical Connections.............................................................................................. |
12 |
H Ventilation................................................................................................................. |
12 |
III. Operation Instructions.................................................................................................. |
13 |
A. Broiler Controls.......................................................................................................... |
13 |
B. Cooking Product........................................................................................................ |
13 |
B-1.0 Lighting the Broiler....................................................................................... |
13 |
B-2.0 Cook Product............................................................................................... |
14 |
B-3.0 Cook Cycle Complete.................................................................................. |
15 |
B-4.0 Fine Cooking Adjustment............................................................................. |
15 |
B-5.0 Cancel a Cook Cycle.................................................................................... |
15 |
B-6.0 Checking the Broiler Temperature................................................................ |
15 |
B-7.0 Checking the Set Point Temperature........................................................... |
15 |
B-8.0 Shutdown the Broiler.................................................................................... |
15 |
C. Cleaning.................................................................................................................... |
15-16 |
C-1.0 Four (4) Hour Cleaning ............................................................................... |
17 |
C-2.0 Daily Cleaning.............................................................................................. |
18-19 |
C-3.0 Weekly Cleaning.......................................................................................... |
20-22 |
C-4.0 Monthly Cleaning......................................................................................... |
23 |
D. Troubleshooting......................................................................................................... |
24-26 |
IV. Service and Repair........................................................................................................ |
27 |
V. Replacement Parts List ................................................................................................ |
28-29 |
VI. Wiring diagram.............................................................................................................. |
30 |
VII. Customer Assistance.................................................................................................. |
31 |
3
Installation & Operation Manual for Flexible Batch Broiler Australian Units
IMPORTANT WARNING AND SAFETY INFORMATION
Post In A Prominent Location Instructions To Be Followed In The Event The UserSmellsGas.ThisInformationShallBeObtainedByConsultingTheLocal Gas Supplier.
FOR YOUR SAFETY:
•Do not store or use gasoline or other flammable vapors or liquids in the vicinity of this or any other appliance.
•Do not spray aerosols in the vicinity of this appliance while it is in operation.


 : Improper installation, adjustment, alteration, service or maintenancecancausepropertydamage,injuryordeath.Readtheinstallation, operating and maintenance instructions thoroughly before installing or servicing this equipment.
THIS MANUAL MUST BE RETAINED FOR FUTURE REFERENCE.
4

Installation & Operation Manual for Flexible Batch Broiler
Australian Units
I.GENERAL INFORMATION
A.Batch Broiler Specifications
|
NATURAL GAS |
PROPANE GAS |
|
|
|
|
|
ALTITUDE (MAXIMUM) |
607 m |
|
607 m |
GAS PIPE CONNECTION |
12.7mm BSPT |
12.7mm BSPT |
|
BURNER AERATION |
OPEN |
|
OPEN |
SHUTTER SETTING |
9.55 mm |
8.00 mm |
|
|
|
|
|
Supply Pressure (KPa) |
1.13 |
|
2.75 |
|
|
|
|
IR Burner Pressure (KPa) |
0.93 |
|
1.99 |
Lower Burner Pressure (KPa) |
0.93 |
|
1.99 |
|
|
|
|
ORIFICE – Front IR Burner (mm) |
2.35 |
|
1.55 |
ORIFICE – Rear IR Burner (mm) |
2.50 |
|
1.61 |
|
|
|
|
ORIFICE – Lower Burner (mm) |
3.05 |
|
1.85 |
|
|
|
|
|
|
|
|
SHIPPING WEIGHT |
204 Kg (450 lbs) |
|
|
|
|
||
SHIPPING DIMENSIONS |
121.9 cm x 99.1 cm x 172.7 cm (48” x |
||
39” x 68”) |
|
||
|
|
||
ELECTRICAL RATING |
230V~ |
50Hz 1.1A 250W |
|
|
|||
A-1. Model Number Key
FBB-XY-230
X identifies Gas Configuration |
Y = C with Catalyst |
||
|
|
|
|
|
DESCRIPTION |
|
MODEL |
|
|
|
|
X = 1 |
Propane Gas with Catalyst |
FBB-1C-230-AU |
|
|
|
|
|
X = 2 |
Natural Gas with Catalyst |
|
FBB-2C-230-AU |
|
|
|
|
5
Installation & Operation Manual for Flexible Batch Broiler Australian Units
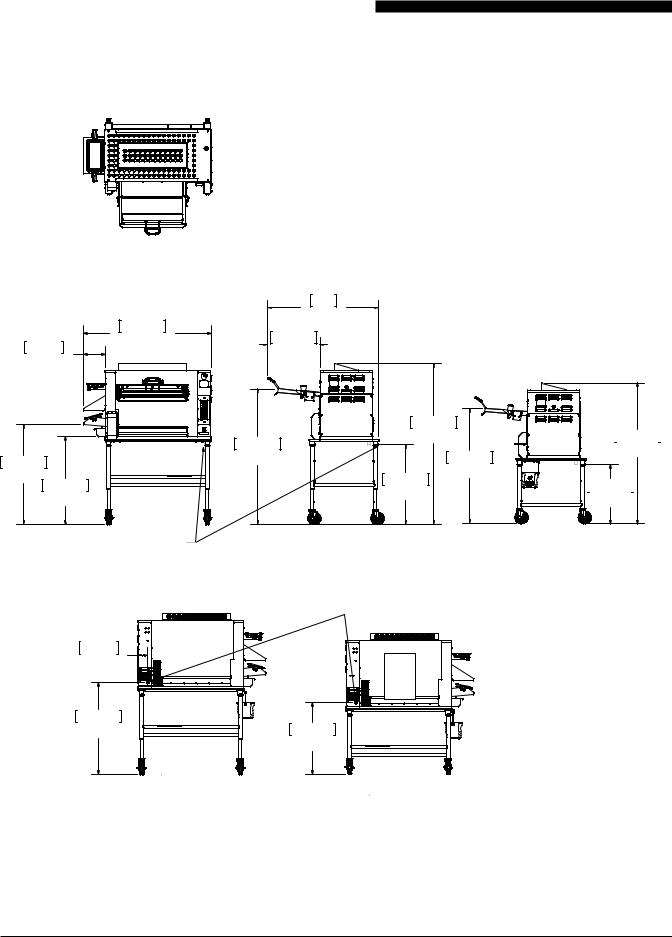
A-2. Broiler Dimensions
Note: Dimension shown in centimeters, bracketed [ ]are in inches
|
|
|
|
|
44" |
|
|
|
50 3/8" |
|
|
111.9 |
|
|
|
|
20 3/4" |
|
||
8 1/2" |
128 |
|
|
|||
|
|
|
52.9 |
|
||
21.6 |
|
|
|
|
||
|
|
|
|
|
||
|
|
|
|
|
63 5/8" |
|
|
|
|
53 5/8" |
161.7 |
|
|
|
|
|
45 5/8" |
|||
39 1/2" |
|
|
136.1 |
|
||
|
|
|
|
|
115.8 |
|
100.3 |
34 3/4" |
|
|
31 1/2" |
||
|
|
|
||||
|
|
|
80 |
|
||
|
88.4 |
|
|
|
||
|
|
|
|
|
||
|
|
GAS CONNECTION* |
|
|
|
|
|
|
3/4" BSPT FEMALE |
|
|
HIGH POSITION |
|
|
|
|
|
|
|
|
|
|
|
|
|
ELECTRICAL CONNECTION* |
|
|
|
|
|
|
FOR 250cm [98"] LONG |
|
|
|
|
|
|
INTERNATIONAL |
|
|
|
|
|
|
ELECTRICAL CORDSET |
|
|
|
3 7/8" |
|
|
|
|
|
|
9.7 |
|
|
|
|
|
|
36 1/4" |
|
|
28 1/4" |
|
|
|
92.2 |
|
|
|
|
|
|
|
|
|
71.9 |
|
|
|
HIGH POSITION |
|
|
LOW POSITION |
|
 55 5/8"
  141.4
141.4
 23 1/2"
  59.8
59.8
LOW POSITION
Note: Refer to Australian Service Agent, as per clause 2.10.2.4(c) of AS4563.
6

Installation & Operation Manual for Flexible Batch Broiler Australian Units
II. INSTALLATION INSTRUCTIONS
A. QUALIFIED PERSONNEL
These installation instructions are for the use of qualified installation and service personnel only. Installationorservicebyotherthanqualifiedpersonnel may result in damage to the broiler and/or injury to the operator.
Qualified installation personnel are those individuals, firms,companiesorcorporationswhicheitherinperson or through an agent is engaged in and responsible for:
• Compliance with the installation in force in the country in which the appliance is to be installed.
•This appliance shall be installed with sufficient ventilationtopreventtheoccurrenceofunacceptable concentrations of substances harmful to health in the room in which the appliance is installed.
•Caution - the appliance is mounted on 4 wheels. Caremustbetaken nottohitkitchenwalls or similar hard objects while moving or installing the appliance.
•Parts protected by the manufacturer, agent, or assignee shall not be adjusted by the installer.
•This appliance shall be installed in accordance with the requirements of AS5601, local authorities, gas, electricity and any other relevant statutory regulations.
•This appliance is not intended for use by persons (including children) with reduced physical, sensory or mental capabilities, or lack of experience and knowledge,unlesstheyhavebeengivensupervision or instruction concerning use of the appliance by a person responsible for their safety.
B. DELIVERY AND INSPECTION
DukeManufacturingCo.doeseverythingwithinitspower to insure you received your broiler in good condition. They are strapped down on heavy wooden skids and packedtopreventshippingdamage.Theyhaveallbeen carefully inspected before they were packaged and consigned to the carrier.
Upon delivery of your Duke broiler:
•Look over the shipping container, carefully noting any exterior damage on the delivery receipt, which must also be signed by the driver/ delivery person.
•Unpack and check for any damage, which was not evident on the outside of the shipping container.
Caution: The Broiler is very heavy! Use adequate help for lifting.
7
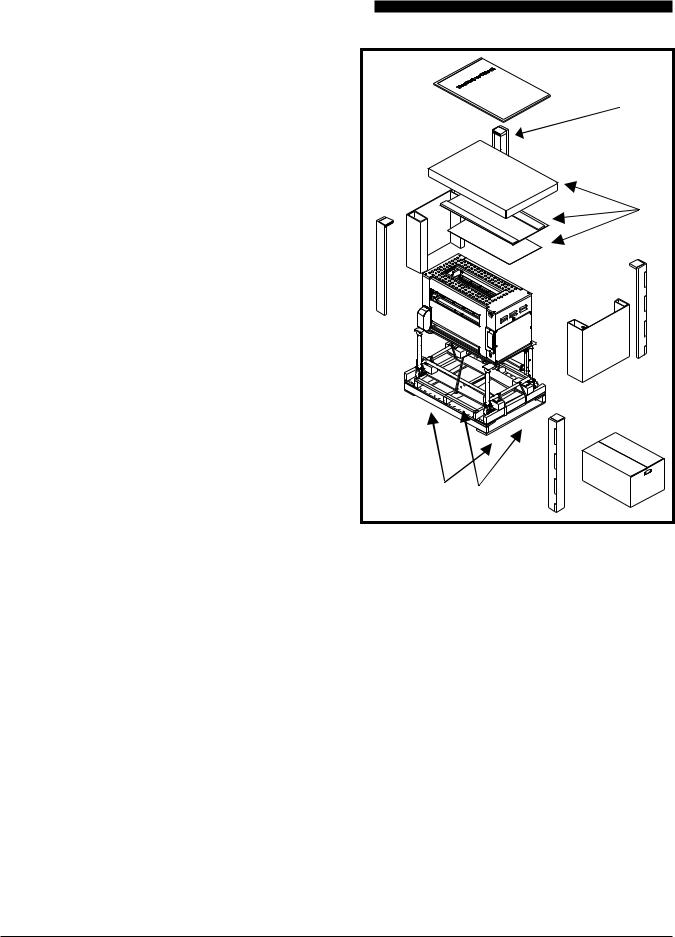
Installation & Operation Manual for Flexible Batch Broiler Australian Units
1.Using a utility knife, cut away plastic wrap (Not shown).
2.Remove Training Material Box.
3.Remove the top cardboard and inner cap
4. Remove cardboard from the corners (4 places).
5.Remove cardboard on the ends (2 places).
6.Remove banding straps (Cut with utility knife or scissors: 5 places).
7.Remove box of attachable parts & accessories from the front.
8.Safely lift one end of broiler and tap block towards center and then sideways to remove. Repeat for remainingblocks. Thisallowscasterstotouchthe pallet.
9.While carefully supporting broiler, slowly roll it off the pallet taking care not to damage the casters.
10.Remove blue tape from broiler panels.
•Checkforconcealeddamage.Thecarriermustbe notified within fifteen (15) days of the delivery of the broiler and the carton, skid and all packaging materials must be retained for inspection.
•Duke Manufacturing Co. cannot assume liability for loss or damage suffered in transit. The carrier assumesfullresponsibilityfordeliveryingoodorder when the shipment was accepted. However, we are prepared to assist you with filing your claim.
|
|
2 |
4 |
|
|
|
|
|
|
|
3 |
5 |
|
|
|
4 |
|
|
|
|
|
|
5 |
|
|
|
4 |
8 |
6 |
|
7 |
|
4 |
8

Installation & Operation Manual for Flexible Batch Broiler
Australian Units
C. BROILER ASSEMBLY
Before assembling and installing the broiler, please check to make sure that all necessary parts are present.
ITEM |
PART NAME |
PART |
|
# |
# |
||
|
|||
|
|
|
|
1 |
PRODUCT PAN SHELF |
175353 |
|
2 |
DISCHARGE CHUTE |
175340 |
|
3 |
DISCHARGE HOOD |
175362 |
|
4 |
DISCHARGE PAN HOLDER |
175358 |
|
5 |
DISCHARGE GREASE PAN |
175357 |
|
6 |
“V” GREASE PAN |
175325 |
|
7 |
MAIN GREASE PAN |
175329 |
|
8 |
LOADER |
175444 |
|
9 |
LOADER TRAY |
175430 |
|
10 |
LOADER BRACKET |
175438 |
|
11 |
DOOR |
175429 |
|
12 |
LOADER RAMP |
175741 |
|
13 |
CATALYST |
175480 |
|
14 |
CATALYST GUARD |
175482 |
|
15 |
SANITATION PAIL |
175842 |
Setup: Install all items as shown below.
Note:Installloaderbracketwith(4)¼-20nuts.Use suppliedextensiontooltoremoveandreinstallnuts. (Nuts are shipped installed on loader mounting studs.)
Loader Install Tool (Included with Broiler Tools Kit)
|
|
I.R. BURNER VALVE |
CONTROLLER |
BOTTOM BURNER VALVE |
|
BOTTOM |
TOP |
TOP |
BURNER |
FRONT I.R. |
REAR I.R. |
MODULE |
BURNER |
BURNER |
|
MODULE |
MODULE |
Control Panel
(For Reference Only)
13 14
11
|
2 |
1 |
|
10 |
|
|
12 |
||
3 |
|
|
||
|
|
9 |
||
|
|
|
|
8
4 |
5 |
6 |
7 |
|
|
|
|
|
15 |
|
|
9

Installation & Operation Manual for Flexible Batch Broiler
Australian Units
OPTIMAL SERVICE PARTS & ACCESSORIES
PARTS KIT – NATURAL GAS (w/ |
|
|
PARTS KIT - NATURALAND PROPANE |
|
175850 |
|
GAS (Burner, Arrestor, Loader, & Burner |
175526 |
|
Controller & Cook Chain) |
|
|||
|
|
Shield) |
|
|
|
|
|
|
|
|
|
|
|
|
PARTS KIT – PROPANE GAS (w/ |
175852 |
|
|
|
Controller & Cook Chain) |
|
|
|
|
|
|
|
|
|
|
|
|
KIT – CE GAS HOSE CONNECTOR |
175831 |
PARTS KIT - NATURALAND PROPANE |
175520 |
|
||
|
|
|
||
GAS (Burner & Flame Arrestor) |
|
|
|
|
|
|
|
|
|
|
|
|
|
|
10
 Loading...