


FOODWARMERS
INSTALLATION
&
OPERATIONS
MANUAL
Duke Manufacturing Co.
2305 N. Broadway St. Louis, MO 63201 800.735.3853 314.231.1130 314.231.5074 fax www.dukemfg.com
219736 |
Page 1 of 32 |
10/27/08 |

219736 |
Page 2 of 32 |
10/27/08 |

TABLE OF CONTENTS |
|
|
|
|
Page |
Receiving and Inspection of Equipment |
|
|
Concealed Damage |
|
4 |
Filing a Claim |
|
4 |
Warning |
|
4 |
General Troubleshooting . |
|
4 |
Safety Precautions |
|
|
Gas Foodwarmers |
|
5 |
Electric Foodwarmers |
|
5 |
General Information |
|
|
Operation Instructions |
|
5 |
Cleaning Instructions |
|
5 |
Assembly Instructions for Aerohot Foodwarmers |
|
6 |
Foodwarmer “Quick Base” Pictorial |
|
7 |
Foodwarmer “Carving Board” Pictorial |
|
8 |
Installation Instructions |
|
|
Aerohot Foodwarmers and Heritage Buffet Hot Food Units |
9 |
|
Operating |
|
|
Aerohot Foodservice and Thurmaduke Foodwarmer |
10 |
|
Installation of the Aerohot Sealed Wells Hot Food Units |
11 |
|
Maintenance of the Aerohot Foodservice and Thurmaduke Foodwarmers |
|
|
Cleaning |
|
12 |
Trouble Shooting Guide |
|
12 |
Wiring Diagram for Aerohot Sealed Well Units |
|
13 |
Parts Diagram and List for Wells |
|
14 |
Gas Water Bath Hot Food Units |
|
|
Clearances |
|
15 |
Gas Connections |
|
15 |
Preheat Instructions |
|
16 |
Lighting Instructions |
|
16 |
Pilot Light Adjustment |
|
16 |
Main Burner Adjustment |
|
16 |
"ADI, "ASI" Installation Instructions |
|
17 |
BM80 - Bottom Mount Hot Food Wells. |
|
18 |
Gas Food Warmers (G, S-SR, T & TD, ASI, B-SR, CC-SR & 300 Series) – General Information |
19 |
|
Operating Instructions – Gas Food Warmers 20 |
|
20 |
Stainless Steel Equipment Care and Cleaning |
|
21 |
Cleaning Procedures for Polyethylene or ABS Rubber Composition Table Tops or Cutting Boards |
24 |
|
Electric Parts List |
|
25 |
Aerohot Foodservice Electric Parts Diagram |
|
27 |
Heritage Buffet Unit Electric Parts Diagram |
|
28 |
Thurmaduke Foodwarmer Electric Parts Diagram |
29 |
|
Gas Parts List |
|
30 |
Aerohot Foodservice Gas Parts Diagram |
|
31 |
Thurmaduke Foodwarmer Gas Parts Diagram |
|
32 |
219736 |
Page 3 of 32 |
10/27/08 |

RECEIVING AND INSPECTION OF THE EQUIPMENT
Even though most equipment is shipped boxed or crated, care should be taken during unloading so the equipment is not damaged while being moved into the building.
Carefully check for any visible signs of damage to the cartons or containers. If evidence of damage exists, the package should be opened immediately and a joint inventory and examination of the contents should be made by you and the driver.
CONCEALED DAMAGE
If a concealed loss or damage is discovered after you have given the carrier a clear delivery receipt, notify the carrier in writing immediately or within ten (10) days from the delivery date. If you phone the carrier, you must follow up the call in writing to protect your rights. You can only improve your position as a claimant by promptly reporting such loss or damage. You should also retain all cartons or containers, including packing material, until an inspection has been made or waived.
FILING A CLAIM
Notation of loss or damage does not constitute the filing of a claim. You should file your claim in writing with the carrier immediately!
Carriers will furnish the necessary form upon request. You should also request an inspection. If a claim is filed by phone, always follow up immediately in writing.
WARNING
Installation of this equipment should be done only by persons qualified or licensed to install electrical equipment.
Adjustments and service work should be performed only by a qualified service technician. Service is available through Duke Authorized Parts & Service Distributors throughout the United States. For a complete listing of these, consult your distributor listing or write to Duke for the name of the nearest distributor.
This equipment is intended for commercial use only. Not for household use.
 Fluorescent Lamps contain Mercury. Dispose of in Accordance to Local Regulations.
GENERAL TROUBLESHOOTING
Always ask and check:
1.Is the unit connected to a live power source?
2.Check circuit breaker.
3.Is power switch on and pilot light glowing?
4.Check rating label. Are you operating the unit on the proper voltage?
219736 |
Page 4 of 32 |
10/27/08 |

GAS FOODWARMERS
FOR YOUR SAFETY
Do not store or use gasoline or other flammable vapors and liquids in the vicinity of this or any other appliance.
WARNING
Improper installation, adjustment, alteration, service or maintenance can cause property damage, injury or death. Read the installation, operating and maintenance instructions thoroughly before installing this equipment.
NOTICE
Due to the availability of parts, this foodwarmer may not have the ability to adjust the gas valve as described in the operations manual. All valves are factory pre-set to provide proper flame height with the type of gas listed on the nameplate.
ELECTRIC FOODWARMERS
CAUTION
To protect from possible severe electrical shock, this appliance is designed to be connected to a properly grounded electrical circuit.
For a cord connected appliance: In order to provide proper grounding, it is essential that the grounding prong of the plug be inserted into a properly grounded receptacle. If you do not know whether a receptacle is properly grounded, consult a licensed electrician.
NEVER insert the plug into a receptacle if the cord is frayed or damaged or if the plug has been altered or damaged.
GENERAL INFORMATION
1.Always clean equipment thoroughly before first use. (See general cleaning instructions.)
2.Check rating label for your model designation & electrical rating.
3.For best results, use stainless steel countertops.
GENERAL OPERATION INSTRUCTIONS
1.All foodservice equipment should be operated by trained personnel.
2.Do not allow your customers to come in contact with any surface labeled "CAUTION HOT".
3.Where applicable: Never pour cold water into dry heated units.
4.Where applicable: Do not cook, warm or hold food directly in liner pans (well pans). Always use steam table pans/insets, etc.
5.Never hold food below 150°F.
GENERAL CLEANING INSTRUCTIONS
1.NEVER clean any electrical unit by immersing it in water. Turn unit off before surface cleaning.
2.Always clean equipment thoroughly before first use. Clean unit daily, except where noted on charts: Use warm, soapy water. Mild cleansers and PLASTIC scouring pads may be used to remove baked-on food and water scale.
3.Turn off electrical units before cleaning or servicing.
219736 |
Page 5 of 32 |
10/27/08 |
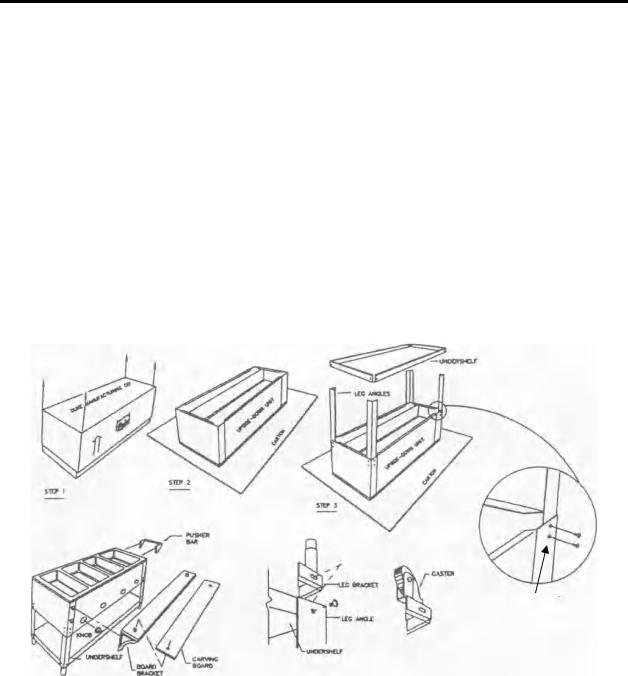
ASSEMBLY INSTRUCTIONS FOR AEROHOT FOODWARMER UNITS
1.Place telescoping carton with printed side up and remove top. Remove foodwarmer from carton, and miscellaneous parts, etc., from heating compartments.
2.Flatten carton top and place it on floor. Place foodwarmer on the carton with top down.
3a. Attach four (4) leg angles to the body by sliding the ends of the leg angles inside the body corners between body and leg plate bracket. Each leg angle is fastened with four bolts already installed, but loose.
b.Attach the undershelf to the other end of the leg angles. Use one bolt to line up and support the undershelf to the leg angles.
c.Starting at one leg angle, remove the bolt and line up with leg or caster bracket to the holes on the undershelf and leg angle. Fasten each with two bolts.
d.Repeat step "C" until all legs or casters are fastened in place.
e.At this point, the unit may be set upright. If the unit has leg brackets it should be leveled by turning the adjustable feet as needed.
f.The cutting board brackets should be attached with the screws already in place.
g.If a pusher bar has been provided, it should be attached with the screws already in place.
h.Push all knobs onto control stems.
AEROHOT & THURMADUKE
[ SEE FOODWARMER
QUICK BASE PICTORIAL
ON PAGE 7 ]
[ SEE CARVING
BOARD PICTORIAL
ON PAGE 8 ]
SCREWS SHIPPED
INSTALLED
BE SURE ALL FASTENERS ARE TIGHTENED AS SECURELY AS POSSIBLE.
Your foodwarmer is now ready to be installed. Please read following Installation Instructions.
IMPORTANT
UNIT IS SHIPPED UNASSEMBLED. TO MEET NATIONAL SANITATION FOUNDATION STANDARDS, THE INSTALLER MUST USE A NSFAPPROVED SILICONE SEALANT TO SEAL THE SEAMS BETWEEN THE UNIT AND ASSEMBLED PARTS
219736 |
Page 6 of 32 |
10/27/08 |

FOOD WARMER QUICK BASE
SCREWS FOR MOUNTING LEG
GUSSETS
1.Mount leg gussets to bottom shelf leaving screws loose.
LEG ANGLE
SLOTS
3.Slide bottom shelf over leg angle so that loose screws seat into leg angle slots. Tighten all screws.
LEG ANGLE
SLOTS
LEG ANGLE
SCREWS
2.Leg angle screws will be shipped installed in the body unit but left loose for easy leg angle insertion. Insert leg between unit and bracket.
4.Unit is ready to be turned right side up.
219736 |
Page 7 of 32 |
10/27/08 |

INSTALLATION OF CARVING BOARD
1.Remove bottom carving board bolts & top center screw.
2.Slide carving board bracket over top bolt ( flat side of bracket to outside edge of warmer.)
3. Replace bottom carving board bolt and tighten. Repeat step 2 & 3 on opposite end of warmer.
4.Remove top bolts from Foodwarmer brackets. Place carving board into bracket slots.
5.Replace top bolts through brackets and carving board and into foodwarmer. Tighten.
6.Insert position pen into corners of carving board and hole of bracket. Secure with nut
7. Place polyboard over position pens.
219736
8.Replace center screw through carving board into warmer. Tighten.
Page 8 of 32 |
10/27/08 |

INSTALLATION INSTRUCTIONS FOR
ELECTRIC AEROHOT FOODWARMERS &
HERITAGE BUFFET HOT FOOD UNITS
GENERAL
This foodwarmer is designed for installation as an independent heavy-duty appliance.
For Heritage Buffet Units: Do not use alcohol or mineral spirits, or products with a high concentration of these solvents, to clean the body panels.
INSTALLATION
Operating temperatures permit safe installation of this foodwarmer within 1" of a combustible wall or partition.
Unit should be set adjusted to desired height, or to align with other equipment before it is permanently connected to electrical supply. For leveling the foodwarmer on an uneven floor or to eliminate rocking, turn the feet of the legs in the proper direction until the desired results are obtained.
ELECTRICAL CONNECTIONS
The voltage and wattage ratings of this foodwarmer are given on the device nameplate. Connect the foodwarmer to a circuit having a voltage and type of current (AC or DC) similar to that stamped on the device nameplate. For movable equipment a proper cord and cap are included for connection to the matching power supply outlet.
For permanent installations, connections to supply line may be made through conduit or armored cable. For supply connections use No. 12 AWG or larger wires suitable for at least 90°C (194°F). Use copper wire for power supply or suitable copper to aluminum wire connector.
Supply connections are made through a knockout in the junction box. The device leads extend into the junction box for making easy connections. After making and taping connections, push excess wire back into junction box and replace cover.
The body of the appliance should be grounded by connecting the ground wire provided in the junction box to a good electrical ground, such as a water pipe, a steam pipe, or a grounded supply conduit.
The foodwarmer is not fused and consequently must be connected to a fused circuit equipped with suitable disconnect means, as required by local code authorities.
219736 |
Page 9 of 32 |
10/27/08 |

OPERATING THE AEROHOT OR THURMADUKE
PREHEAT - To preheat individual sections, turn the switch dial to high for 10 - 20 minutes before the foods are placed in the compartments. Insure that pan openings are covered to prevent loss of heat.
ECONOMY OF OPERATION
WATER IS NOT NECESSARY IN THE AEROHOT FOODWARMER.
IF WATER IS USED, SPILLAGE PANS ARE REQUIRED.
Air. being easier and quicker to heat than water, makes the waterless foodwarmer faster and more economical to operate than a table using water.
Foods can be kept moist by keeping them at the correct temperature. Foods dry out only when excessive temperatures are reached, so when foods tend to dry out, REDUCE HEAT.
If only part of the foodwarmer is needed, the compartment not in use need not be heated. Insulation between the compartments divide the unit into a series of smaller independent foodwarmers.
CARE AND CLEANING
Care should be used to prevent spilling when placing full food containers into the pan openings. Spilled foods that are not removed will dry out and eventually burn, causing odors. The inside of the heating compartments should be wiped out daily and thoroughly cleaned at least once each week.
SWITCH SETTINGS
The most satisfactory switch settings must be determined by experience based on the nature of the foodservice and the type of operation as well as individual preference of the restaurant operator. The proper switch setting necessary to keep foods at the desired temperature will vary dependent upon the frequency of turnover, size of food containers, amount of food in each container, room temperature, location of foodwarmer with respect to range or other heated equipment, air outlets, fans, doors and passageways.
SWITCH DIAL |
RECOMMENDED |
|
||
SETTINGS |
|
|||
TEMPERATURES |
FOODS OR TYPES OF FOODS |
|||
|
|
|||
Covers |
Covers |
|||
(in degrees) |
|
|||
|
|
|
||
ON |
OFF |
|
|
|
|
|
|
|
|
Lo |
2 |
140° - 150°F |
Rolls - Thick Soups |
|
Creamed Foods - Mashed Potatoes |
||||
|
|
|
||
|
|
|
|
|
|
|
|
Roasts* - Short Ribs - Sliced Meats |
|
|
|
|
Baked Ham* - Fish - Vegetables - Cutlets |
|
2-3 |
4-5 |
150° - 170°F |
Stews - Baked Beans - Croquettes |
|
|
|
|
Fried Liver – Fried Potatoes |
|
|
|
|
Fried Chicken Medium Gravies |
|
|
|
|
|
|
|
|
|
Baked Potatoes - Barbecued Ribs |
|
3-4 |
4-6 |
170° - 200°F |
Dressing - Thin Gravies and Soups |
|
|
|
|
||
|
|
|
|
|
* A low perforated rack is recommended to keep roasts and hams off the bottom of the pan. When a rack is used, keep 1" - 2" of thin gravy in the bottom of the pan.
219736 |
Page 10 of 32 |
10/27/08 |
 Loading...