

Page 1

NUCLIAS CONNECT
DNH-100 User Manual
2020 |
Business Class Networking
V 1.00
Page 2

Nuclias Connect Software User Manual
Table of Contents
Introduction ................................................................................................................................................................................. 3
Product Overview ........................................................................................................................................................................ 3
Package Contents ................................................................................................................................................................................................................ 3
System Requirements ........................................................................................................................................................................................................ 3
Hardware Overview .....................................................................................................................................................................4
LED Indicators ....................................................................................................................................................................................................................... 4
Interface Connectors .......................................................................................................................................................................................................... 4
Installation ...................................................................................................................................................................................5
Mounting ................................................................................................................................................................................................................................ 5
Connecting the Controller ...............................................................................................................................................................................................6
Basic Conguration .....................................................................................................................................................................7
Launch Nuclias Connect ................................................................................................................................................................................................... 7
Nuclias Connect Conguration ...................................................................................................................................................9
Wizard ...................................................................................................................................................................................................................................... 9
Dashboard ............................................................................................................................................................................................................................12
Monitor ..................................................................................................................................................................................................................................13
Access Point ...................................................................................................................................................................................................................13
Wireless Client ...............................................................................................................................................................................................................14
Conguration ......................................................................................................................................................................................................................16
Create Prole .................................................................................................................................................................................................................16
Prole Settings ..............................................................................................................................................................................................................19
Firmware Upgrade .......................................................................................................................................................................................................36
SSL Certicate ...............................................................................................................................................................................................................37
Payment Gateway ........................................................................................................................................................................................................38
Report ....................................................................................................................................................................................................................................39
Peak Network Activity ................................................................................................................................................................................................39
Most Active AP ..............................................................................................................................................................................................................40
Hourly Network Activity ............................................................................................................................................................................................41
Daily Network Activity ...............................................................................................................................................................................................42
Log ..........................................................................................................................................................................................................................................43
SNMP Traps ....................................................................................................................................................................................................................43
Syslogs .............................................................................................................................................................................................................................44
System Event Log.........................................................................................................................................................................................................45
Device Log ......................................................................................................................................................................................................................46
System ...................................................................................................................................................................................................................................47
Device Management ..................................................................................................................................................................................................47
User Management .......................................................................................................................................................................................................48
Settings ...........................................................................................................................................................................................................................50
About ...............................................................................................................................................................................................................................61
Appendix ....................................................................................................................................................................................62
Nuclias Connect App ........................................................................................................................................................................................................62
Page 2
Page 3

Nuclias Connect Software User Manual Introduction
Introduction
Nuclias Connect is D-Link’s centralized management solution for Small-to-Medium-Sized Business (SMB) networks. Nuclias
Connect makes it easier to analyze, automate, congure, optimize, scale, and secure your network — delivering the convenience
of an Enterprise-wide management solution, at an SMB price. Nuclias Connect gives you the nancial and technical exibility
to expand from a small network to a larger one (up to 1,000 APs), while retaining a robust and centralized management system.
And with its intuitive Graphical User Interface (GUI), a wealth of enhanced AP features, and a setup wizard that supports 11
languages, Nuclias Connect minimizes the hassle of deployment, conguration, and administration tasks.
The DNH-100 Nuclias Connect Hub is a hardware controller with pre-loaded Nuclias Connect software. It is designed to support
small-to-medium business or enterprise environments by providing network administrators the capability to manage D-Link
DAP series access points through one single platform. The Nuclias Connect Hub can currently manage up to one hundred APs
per unit with the potential to extend to other Nuclias Connect products in future rmware updates.
Product Overview
Package Contents
System Requirements
Package Contents
• DNH-100 Nuclias Connect Hub
• Power Cord
• Rack Mount Kit
• Quick Start Guide
• 16 Gb MicroSD Card (Optional*)
System Requirements
• Computers with Windows®, Macintosh®, or Linux-based operating systems with an installed Ethernet Adapter
• Microsoft Edge, Safari 7, Firefox 28, or Google Chrome 33 and above (for conguration)
Page 3
Page 4
Nuclias Connect Software User Manual Hardware Overview
Hardware Overview
LED Indicators Interface Connectors
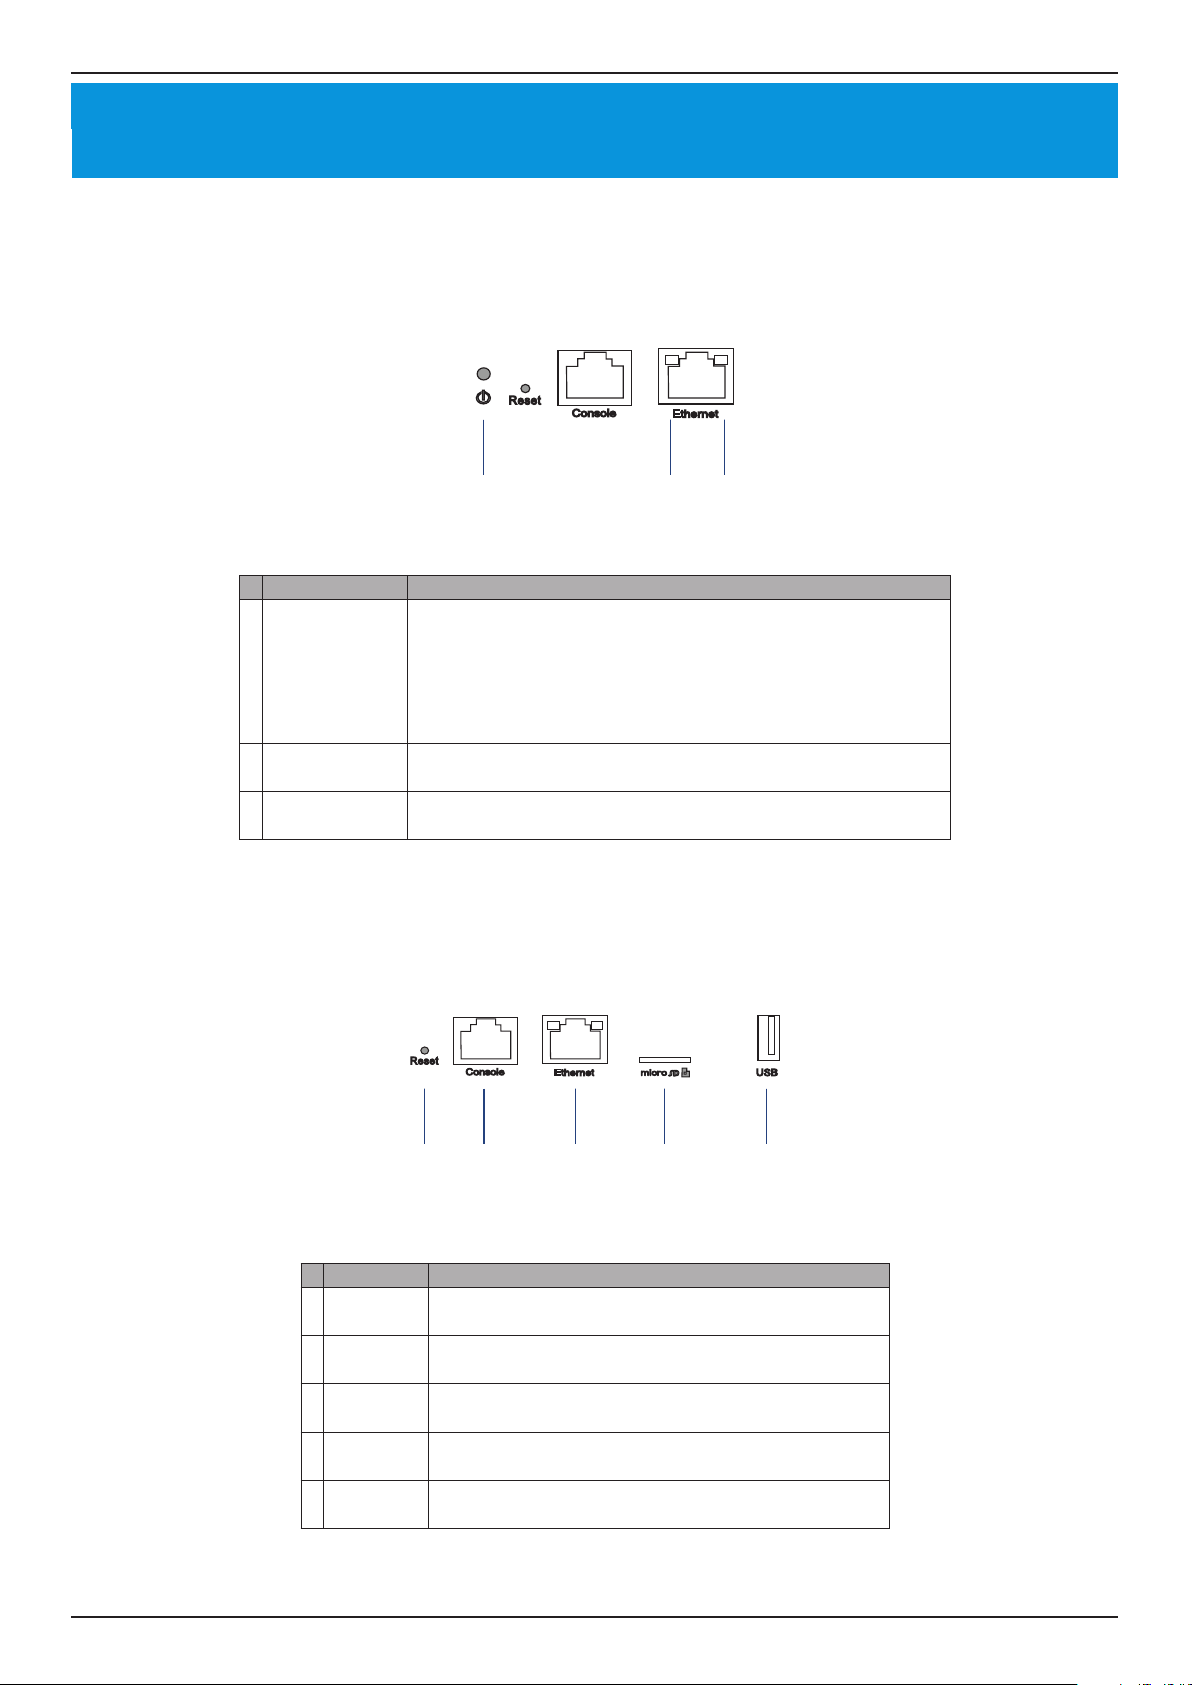
LED Indicators
1 2 3
# LED Description
Solid Green - The device is powered on and ready for use,
and it is in standalone mode.
1 Power
Link Speed
2
(10/100 Mbps)
Link Speed
3
(1000 Mbps)
Blinking Green - The device is booting up.
Solid Orange - The device is connected to Nuclias server
and single sign-on is available for use.
Solid Red - Device is unable to boot .
Solid Green - Port is operating at 10/100 Mbps
Light O - No Link.
Solid Green - Port is operating at 1000 Mbps
Light O - No Link.
Interface Connectors
1 2 3 4 5
# Connector Description
1 Reset
Console
2
Port
Ethernet
3
Port
MicroSD
4
Slot
5 USB Port
Used for rebooting or resetting the device back to
factory default settings.
RJ-45 port to connect the RJ-45 console cable for CLI
management .
Gigabit RJ-45 port for LAN connection.
MicroSD slot for MicroSD card
USB 3.0 Type A port
optional HDD connection).
1,2,3
up to 32 Gb.
2
(provides 5V/1A power for
1
Due to EU regulations the 16 Gb MicroSD card is only included in the WW version.
3
Do not remove the microSD card while the power is on as this may damage your card.
2
Only FAT32 format is supported.
Page 4
Page 5
Nuclias Connect Software User Manual Installation
Installation
Mounting
Connecting the Controller
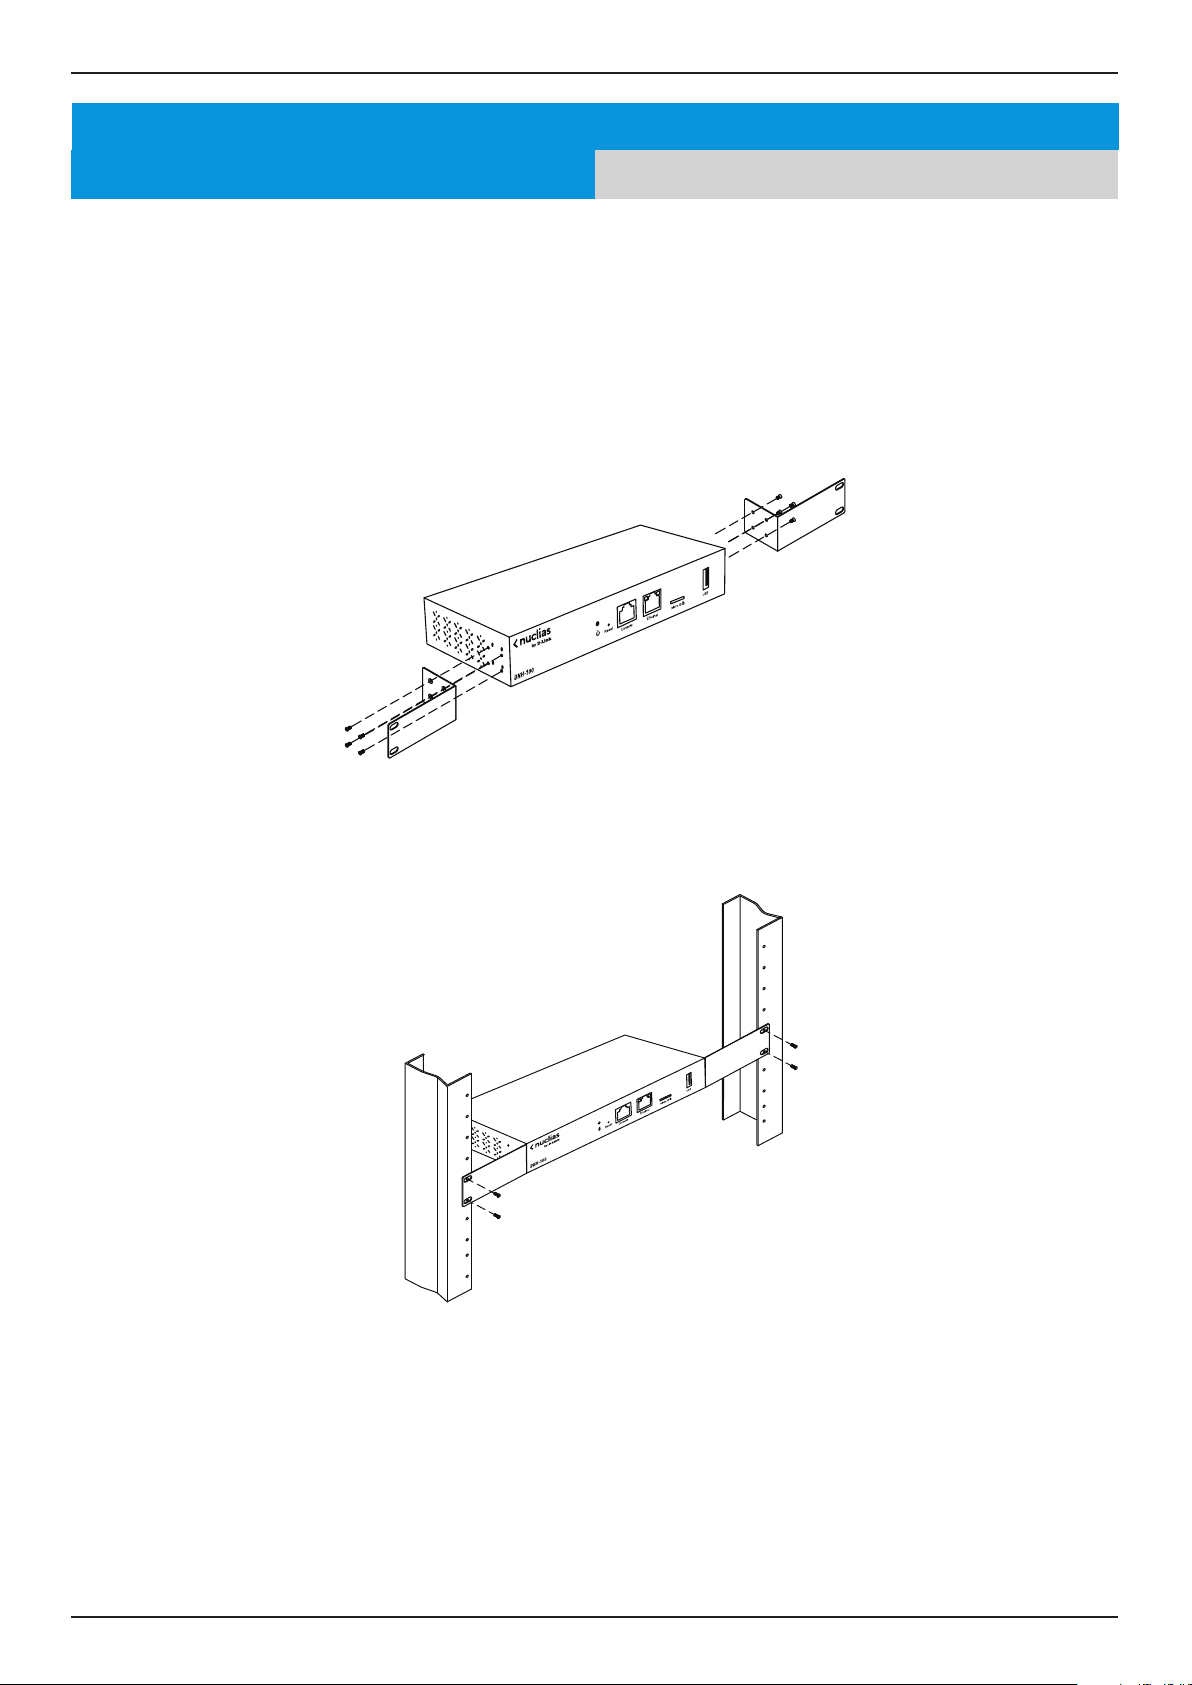
Mounting
The DNH-100 can be mounted in an EIA standard size 19-inch rack, which can be placed in wiring closet with other
equipment.
1. Attach the L-shaped mounting brackets to each side of the chassis as shown in Figure 3 and secure them with
the screws provided.
2. Mount the device in the rack using a screwdriver and the supplied rack-mounting screws.
Page 5
Page 6
Nuclias Connect Software User Manual Installation
Mounting
Connecting the Controller
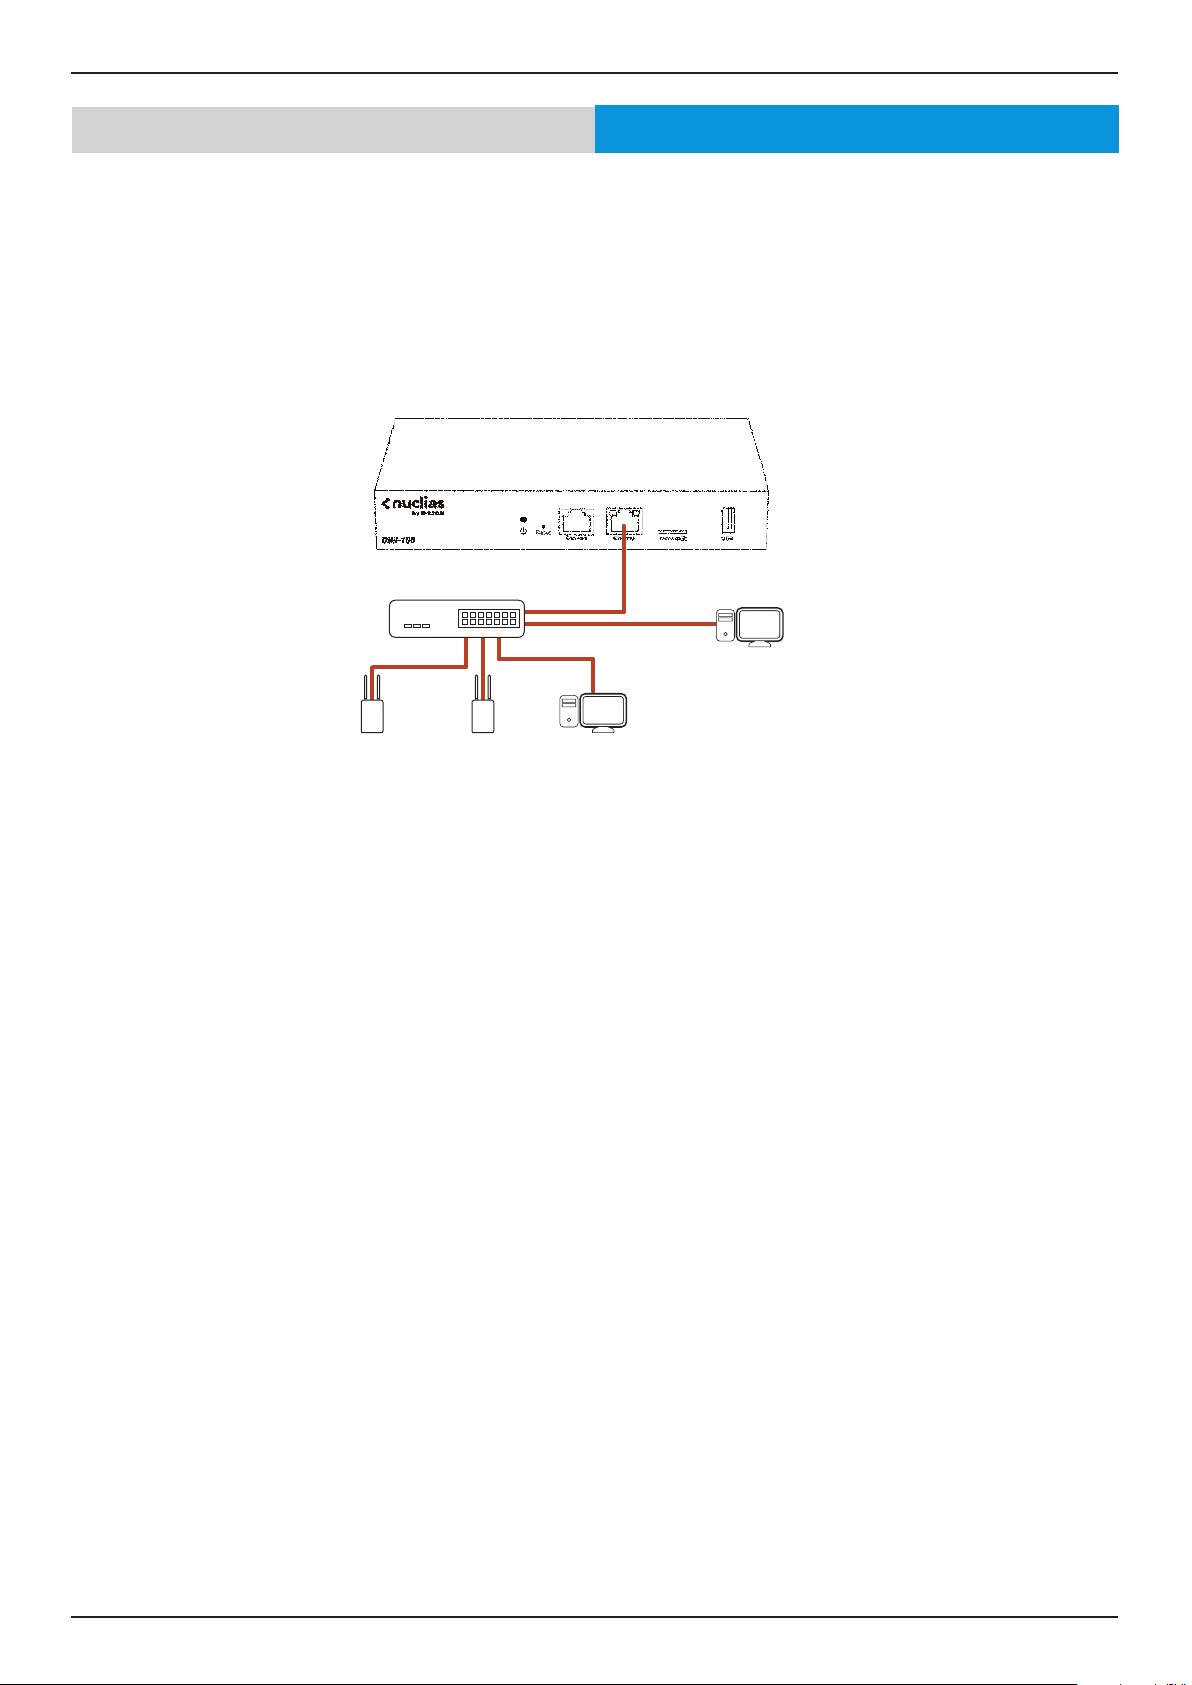
Connecting the Controller
LAN
DHCP Server
Nuclias ConnectAPs Management
Computer
To connect the DNH-100, perform the following procedure:
1. Install the DNH-100 and access points according to the instructions in their documentation. Access points
by default will receive an IP address from the DHCP server.
2. Connect one end of an Ethernet LAN cable to port labeled as Ethernet on the front of the wireless
controller. Connect the other end of the cable to an available RJ-45 port on a switch in the LAN network
segment.
3. Plug one end of the AC power cord into the AC power connector on the back panel of the device. Plug the
other end into an AC power source.
Page 6
Page 7
Nuclias Connect Software User Manual Basic Conguration
Basic Conguration
Launch Nuclias Connect
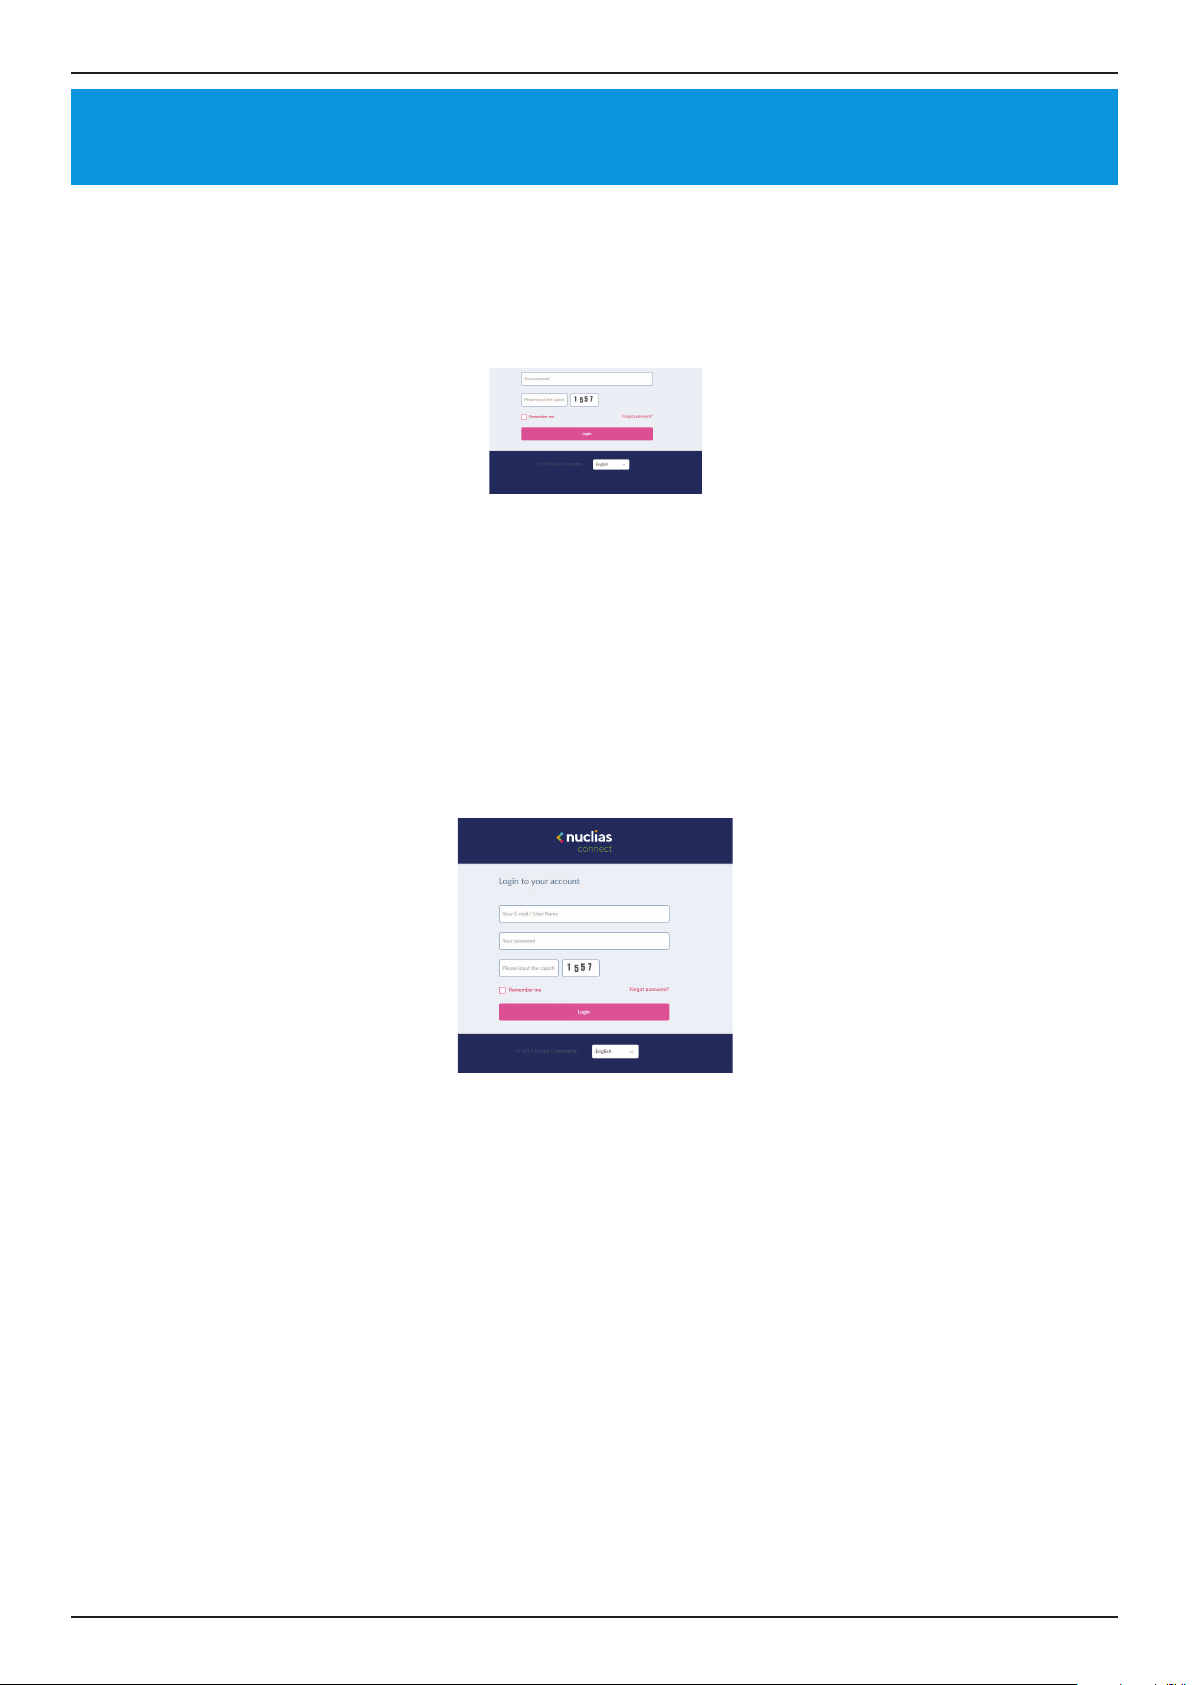
Launch Nuclias Connect
The DNH-100 comes preloaded with Nuclias Connect. Open a web browser from the management computer and enter the IP
address or Domain Name of the DNH-100. The default IP address is https://192.168.0.200.
Note: For initial conguration, the management computer and DNH-100 must be in the same subnet.
The default user name and password of Nuclias Connect is ‘admin’.
Enter the Captcha code as shown on screen.
NOTE:
• The Remember me function can be selected to save the password entry for future use.
• The Forgot password? function provides an option to reset your password in the event that you’ve forgotten your current
password. To use this function, the smtp server and email address must be congured rst.
• The interface supports multilanguage options. By clicking the language drop-down menu, a dierent language can be
selected.
Page 7
Page 8
Nuclias Connect Software User Manual Basic Conguration
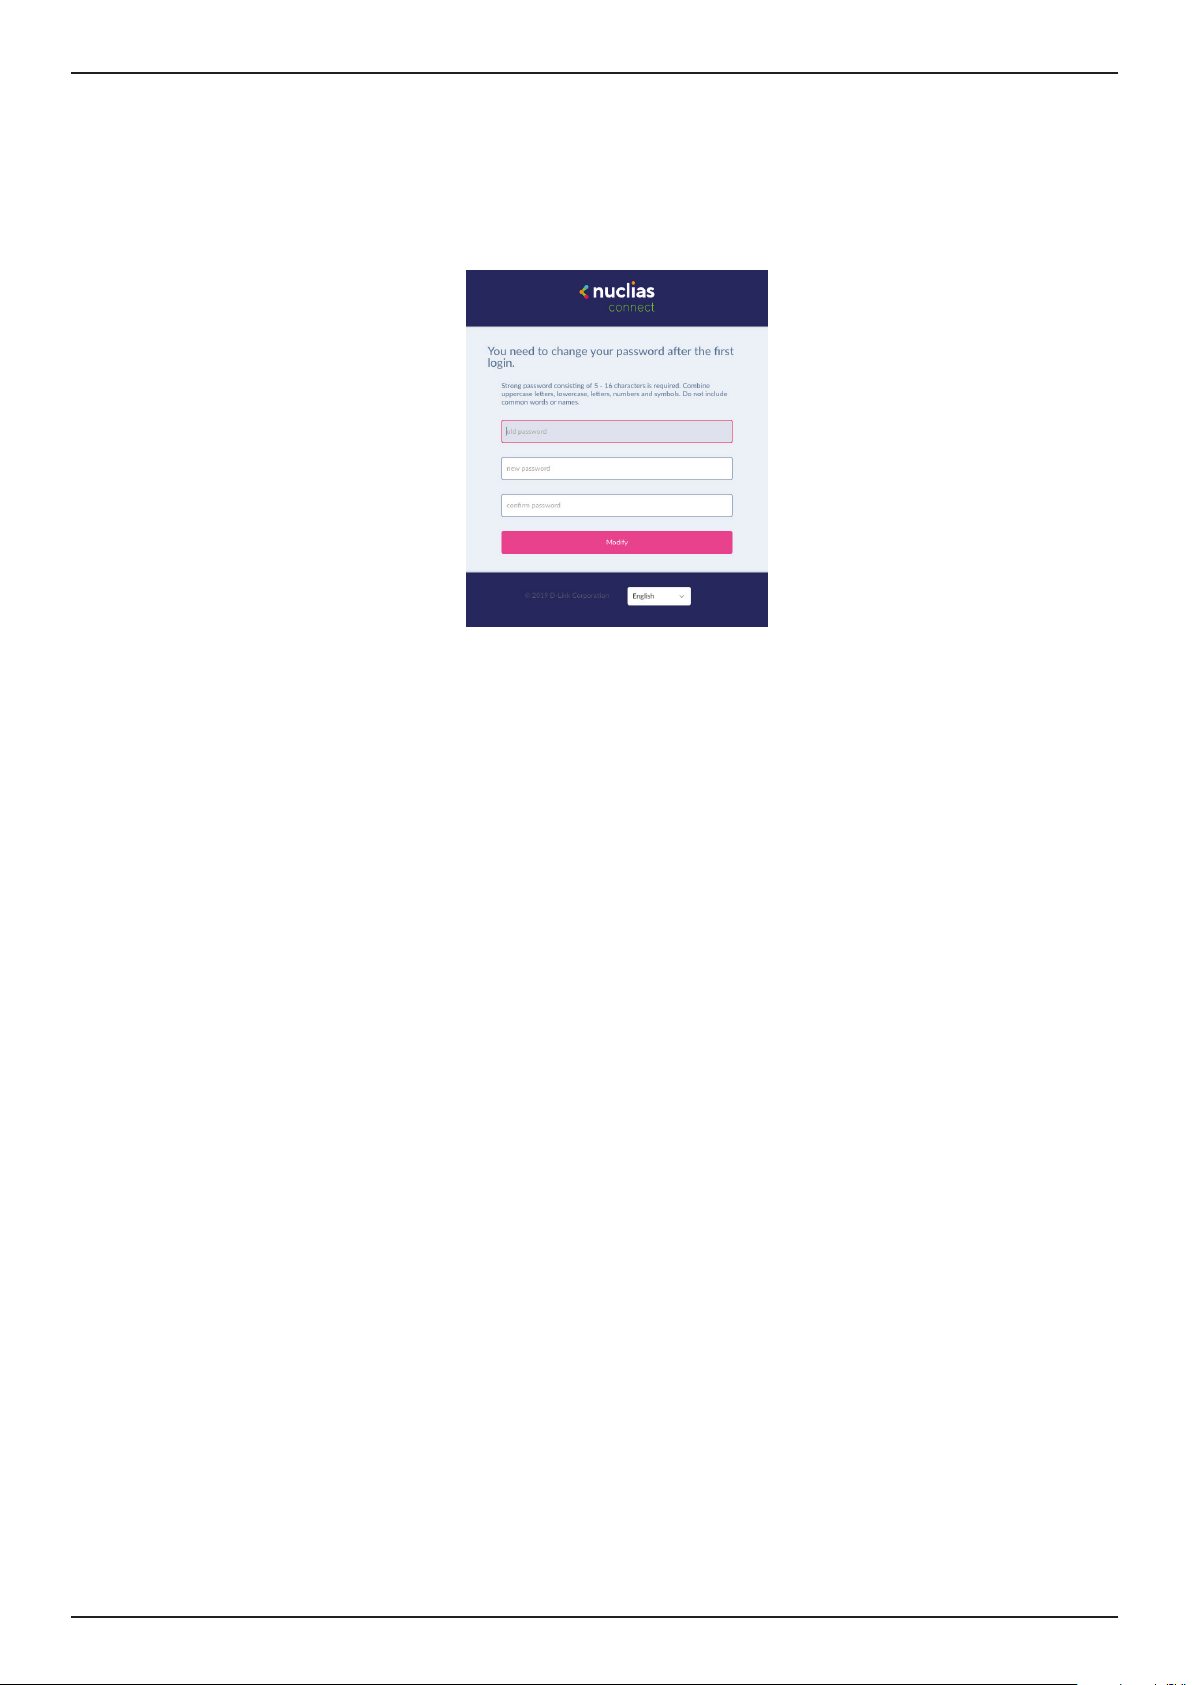
After the web browser opens and connects successfully to the server, a change-password dialog will appear. A change in the
default password is required after the rst login.
When assigning a password, it is recommended to use a strong password. The new password is required to be 5 - 16 characters
in length. By combining uppercase and lowercase characters, numbers and symbols a strong password can be created.
NOTE: Do not include common words or names.
Enter the previous password in the Old Password eld.
In the New Password eld enter the new password.
Enter the same password in the Conrm Password eld to verify the entry.
Click Modify to complete the process.
Page 8
Page 9

Nuclias Connect Software User Manual Nuclias Connect Conguration
Nuclias Connect Conguration
Wizard
A wizard is available to guide you through rst-time setup of the device. If at any time you wish to re-run the wizard you can
click on the
In the Lan Settings section, the device connection parameters can be congured. These settings allow the management
computer to connect to the device.
icon to start the wizard.
Parameter Description
Get Address From Click the drop-down menu to choose whether the
DNH-100 will get an IP address from a DHCP server
or to manually set a static IP address. By default it
is set to Static IP Address. Note: DHCP server is not
recommended.
IP Address If the above is set to Static IP address, specify an IP
address for the DNH-100.
Subnet Mask Specify a subnet mask for the device.
Gateway Specify a gateway mask for the device. (Optional)
Primary DNS Specify a primary DNS for the device. (Optional)
Secondary DNS Specify a secondary DNS for the device. (Optional)
Synchronize Device
Access Address
In the Date and Time section, parameters about the device time and date can be congured. It is recommended that an NTP
server is used; log and schedule settings are depanding on correct time and date congurations.
Parameter Description
Time Zone Click the drop-down menu to select the time zone.
NTP Check to enable use of NTP server(s) to manage
NTP Server 1 Specify the NTP Server’s address.
NTP Server 2 Specify the secondary NTP Server’s address.
Click Save and the device will automatically restart. Re-login to continue with the wizard.
Check to enable the synchronization of the device
access address. If the device access address is dierant
than the LAN IP address and you want to manage
remote APs, this function needs to be disabled.
device’s date and time.
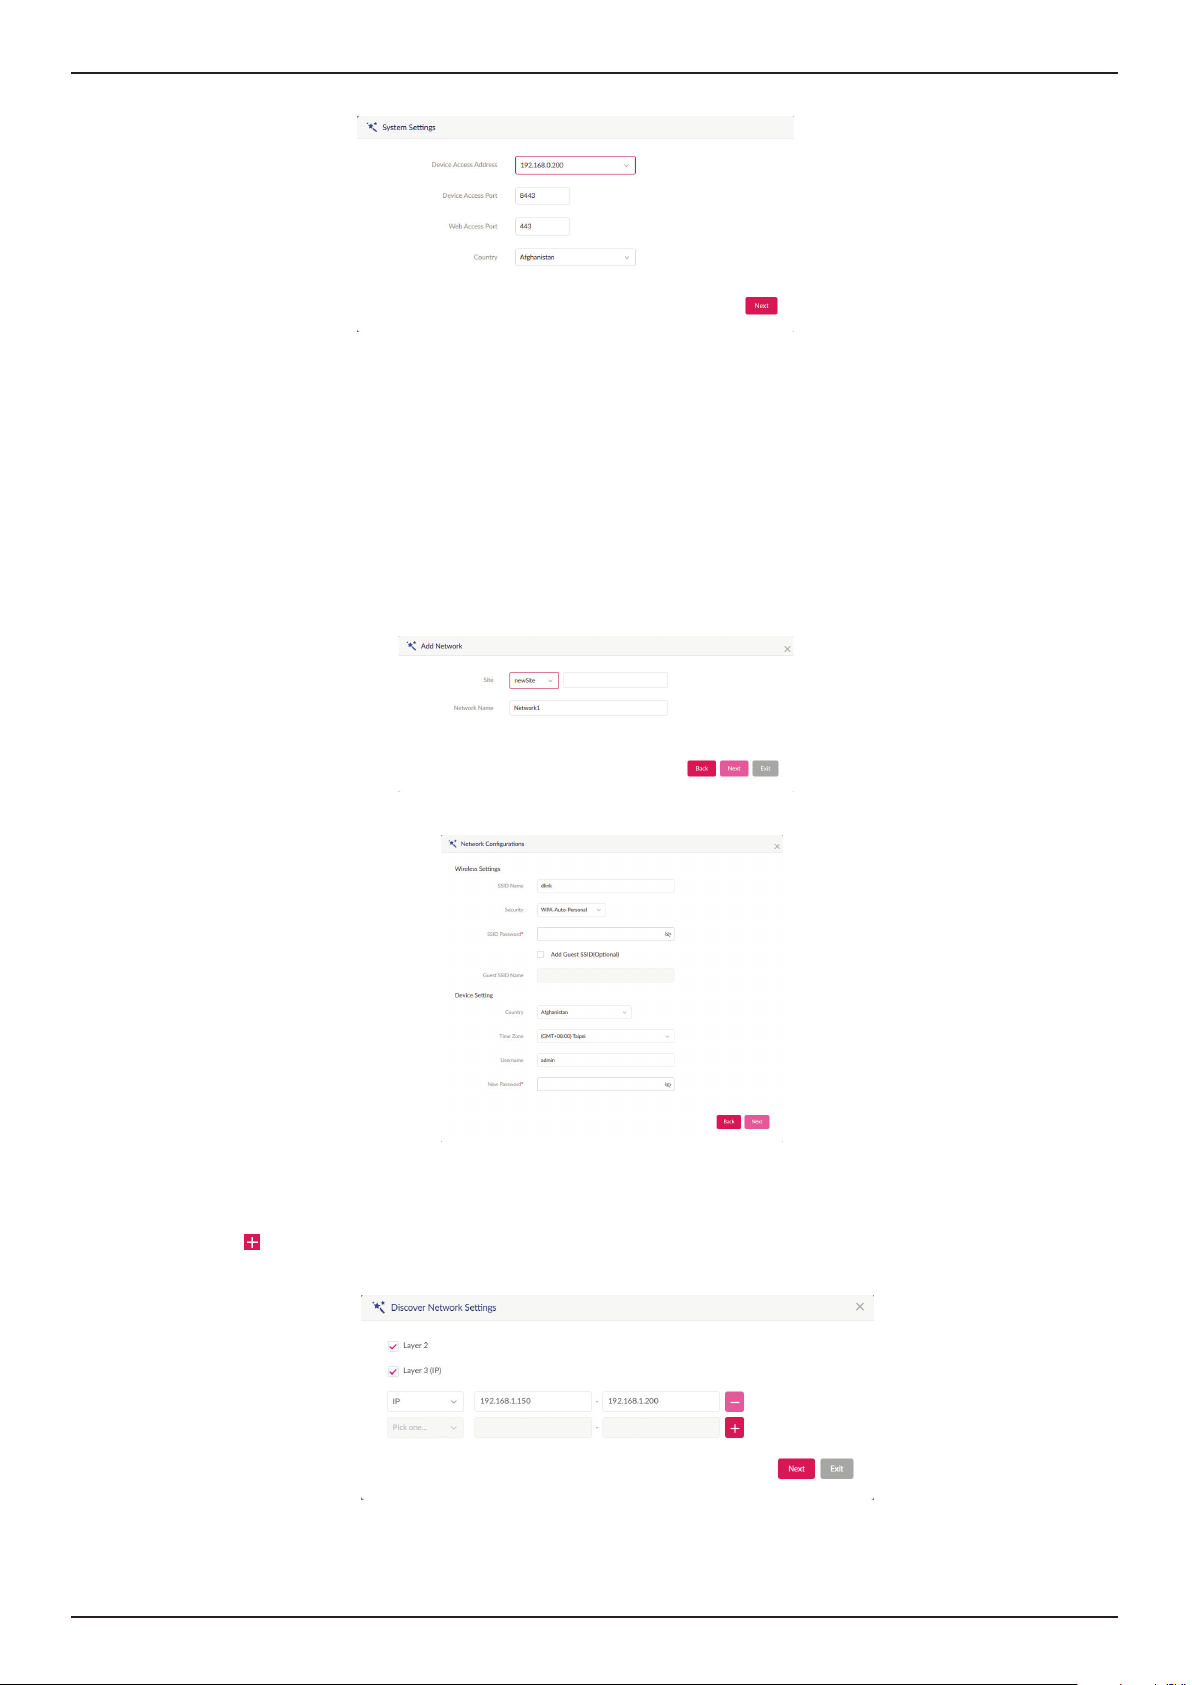
In the System Settings window, congure the following:
Parameter Description
Device Access Address Enter the Nuclias Connect Server application’s IP address.
To manage remote APs, the IP address must be a public
IP address; IP mapping is required for instances behind a
rewall or router.
Device Access Port Enter the Nuclias Connect server application’s listen
port number. The default value is 8443. For remote AP
management behind a rewall or router, the inboud port
must be opened.
Web Access Port The web access ports as dened during the installation.
The values are predened.
Click Next to continue
Page 9
Page 10
Nuclias Connect Software User Manual Nuclias Connect Conguration
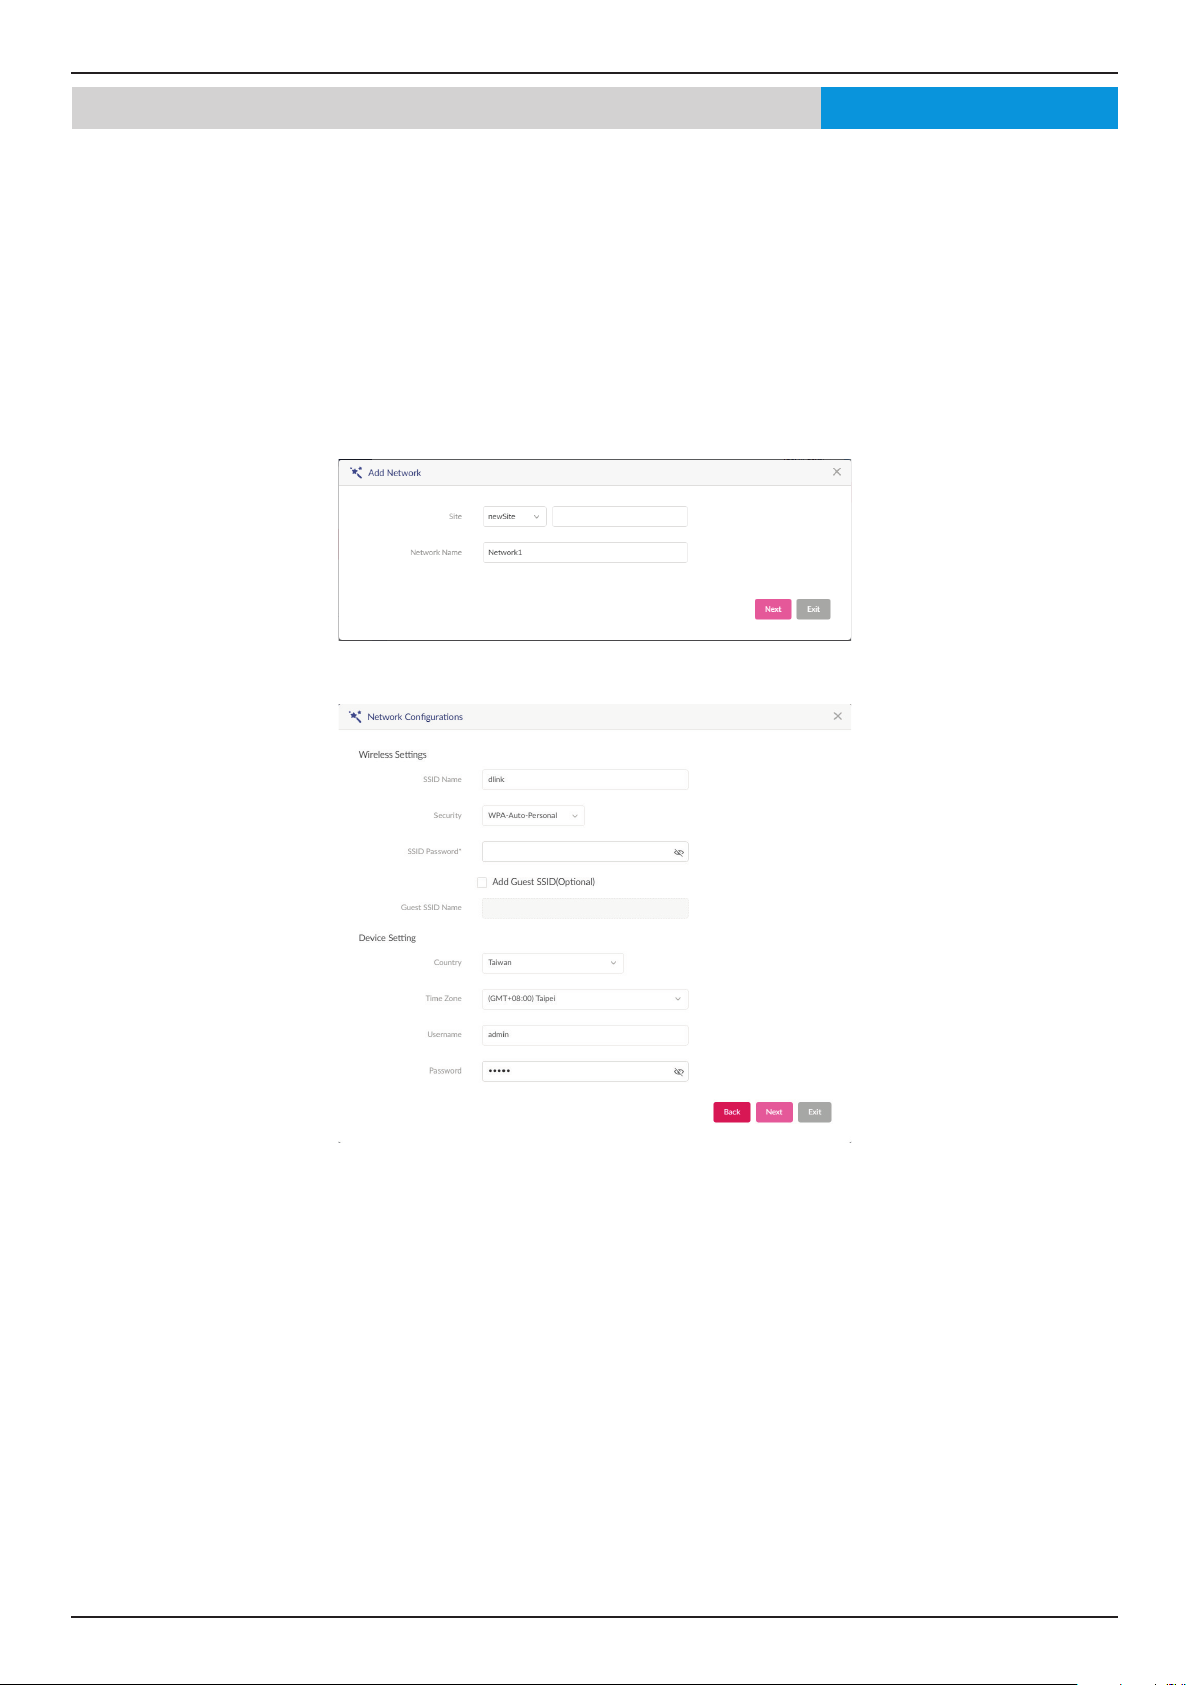
From the Site drop-down menu, selecting an existing site or select newSite and enter the name of the site in the empty eld.
In the Network Name eld, enter the name in which to identify the new network. Click Next to continue or Exit to return to the
previous screen.
The Network Congurations page will appear. Enter the wireless and device settings to dene the network conguration. Click
Next to continue. To return to the previous page, click Back or click Exit to discontinue the conguration process.
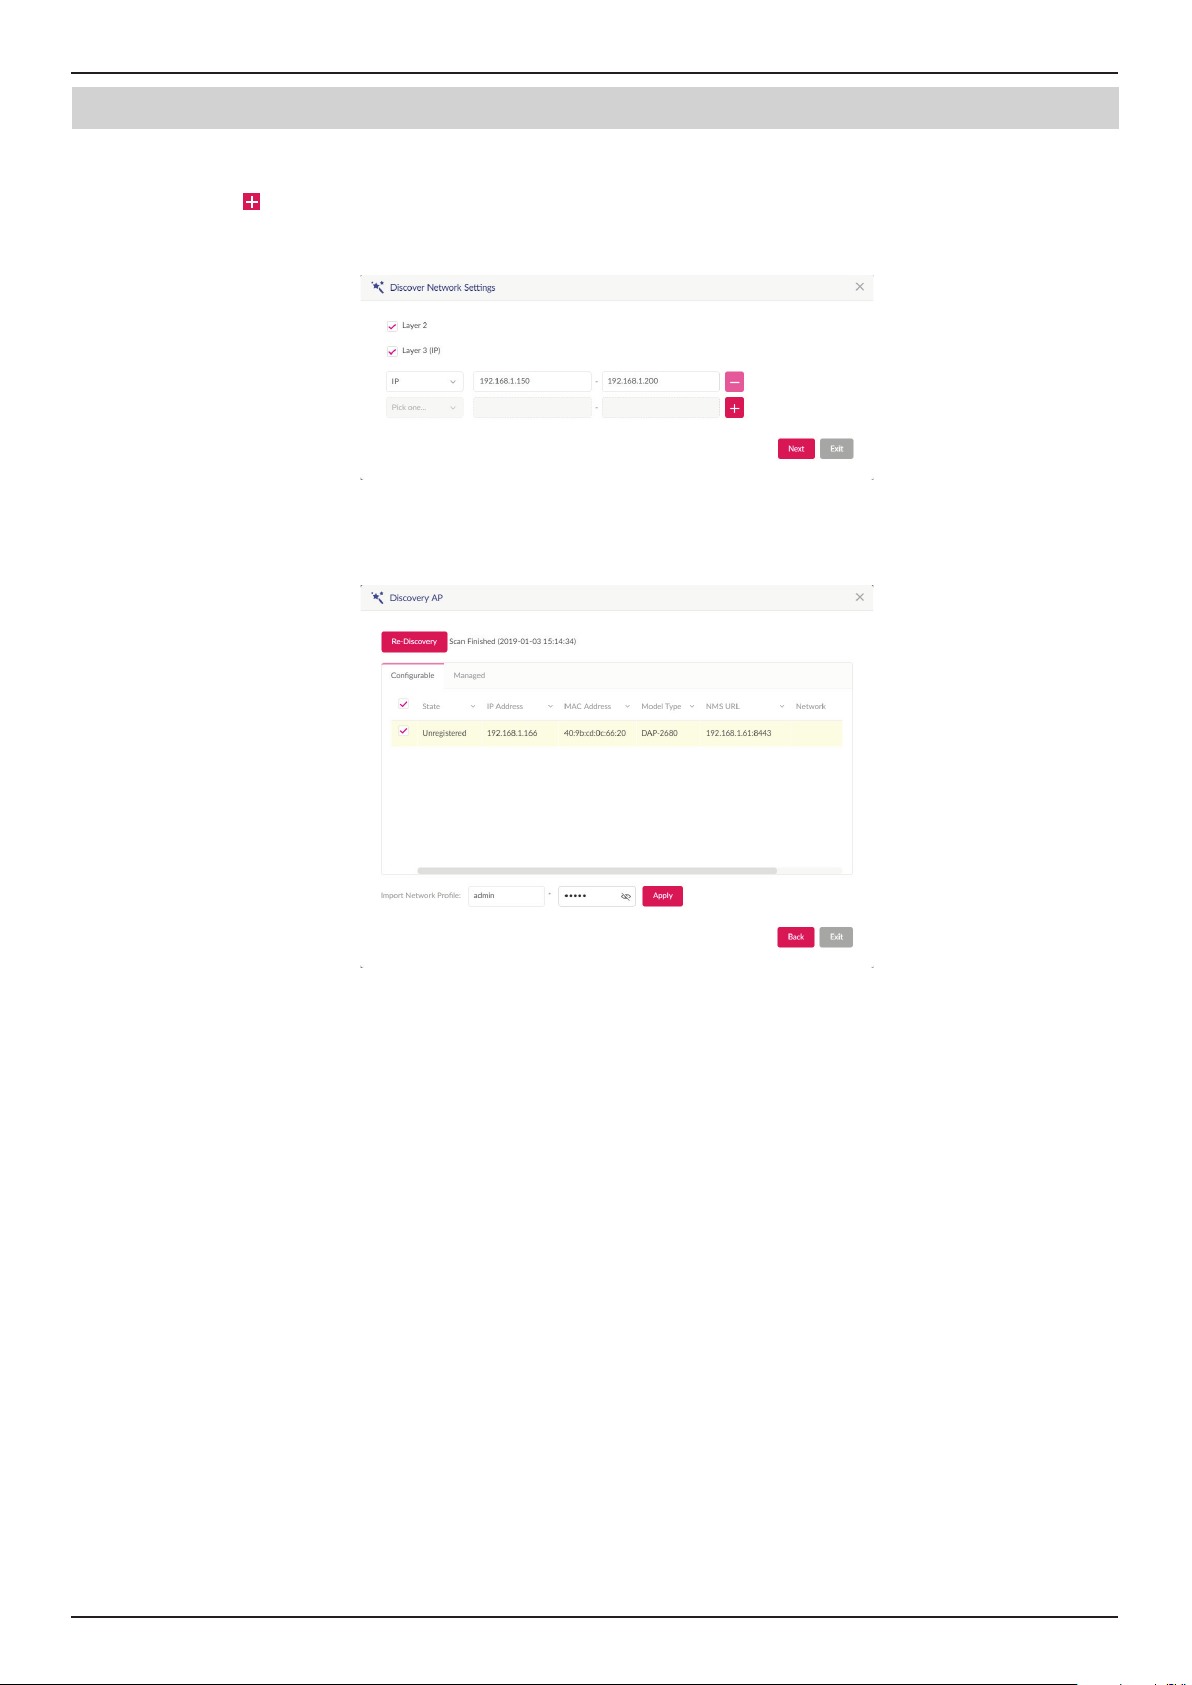
The Discover Network Settings page will appear. Select the data link layer (layer 2 or layer 3) to dene the type of network
in which to nd manageable access points. If Layer 3 is selected, click the drop-down menu to dene either an IP or a prex
segmentation. Click
process.
to add additional IP/prex segments or Next to continue. Click Exit to discontinue the conguration
Page 10
Page 11
Nuclias Connect Software User Manual Nuclias Connect Conguration
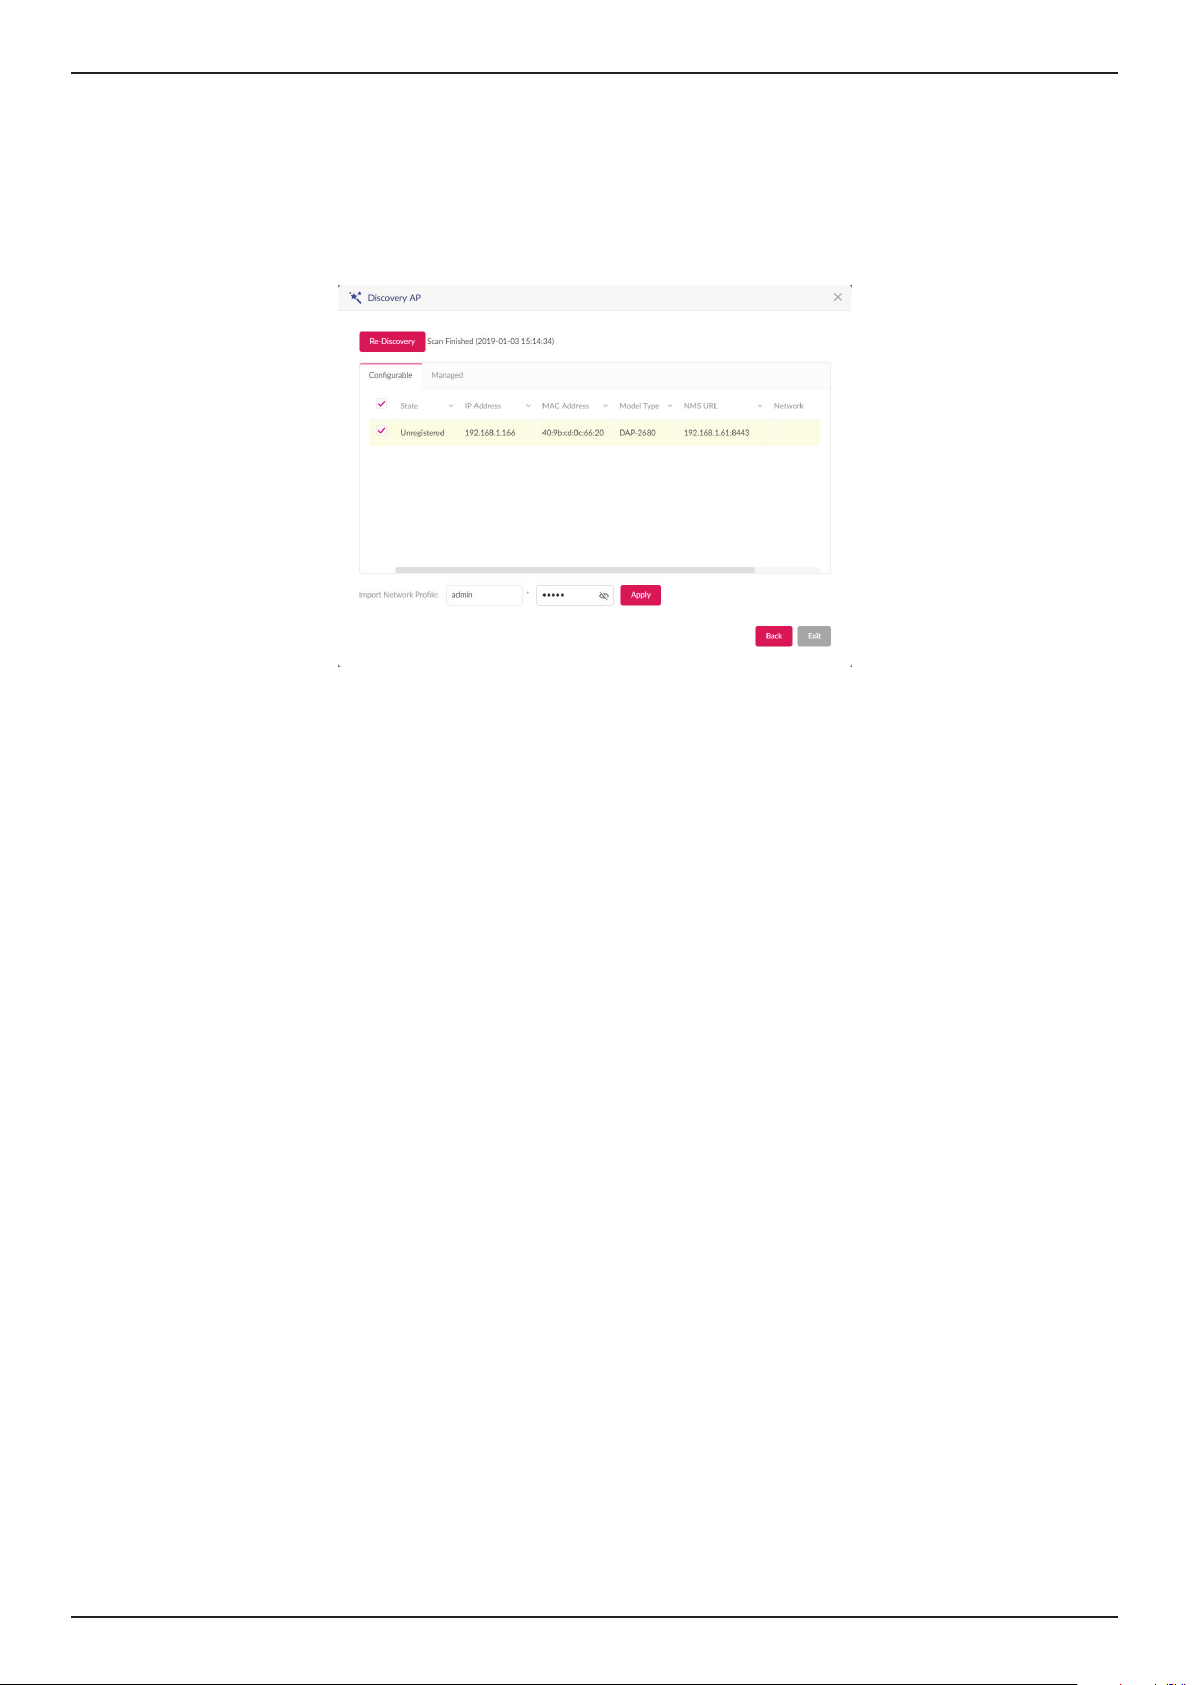
The Start Discovery Page will appear. Click Start Discovery to list all available unmanaged devices. If a device is found, select it
and click Apply to import the network prole. Click on the Managed tab to select already dened devices and add them to this
network.
Page 11
Page 12
Nuclias Connect Software User Manual Nuclias Connect Conguration
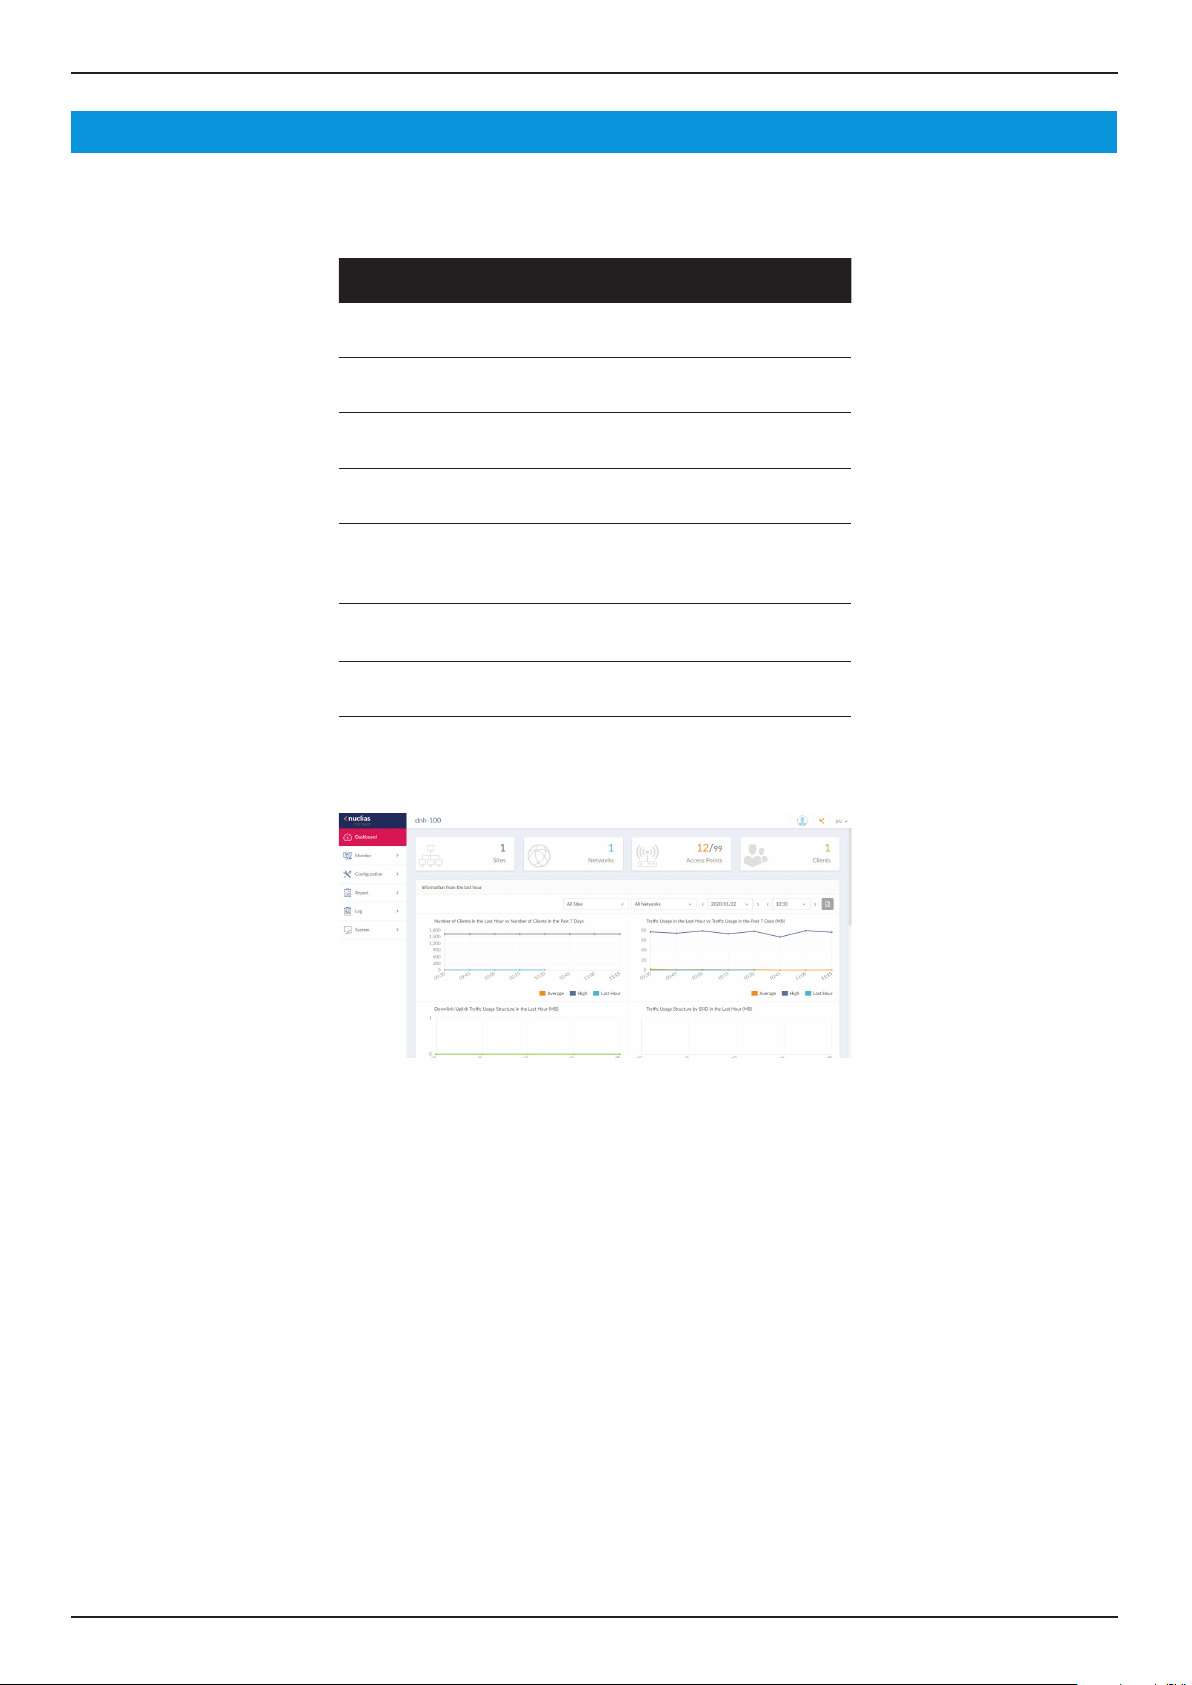
Dashboard
After successfully logging into the server, the Dashboard page will appear. A summary of information of all connected access
points and wireless clients is available on this page.
Block Description
Sites Displays the number of created proles,
also called sites.
Networks Displays the total number of created
networks.
Access Points Displays the total number of available
and online access points.
Clients Displays the total number of wireless
clients connected to the network.
Information
from the Last
Hour
Channel
Utilization
Last Events Displays a shortened log version of the
Displays log information for the number
of clients, trac usage, downlink/uplink
trac usage, and trac usage by SSID.
Displays the utilization rate for both 2.4
and 5 GHz bandwidth.
latest events across all or selected sites.
Page 12
Page 13
Nuclias Connect Software User Manual Nuclias Connect Conguration
Monitor Access PointNuclias
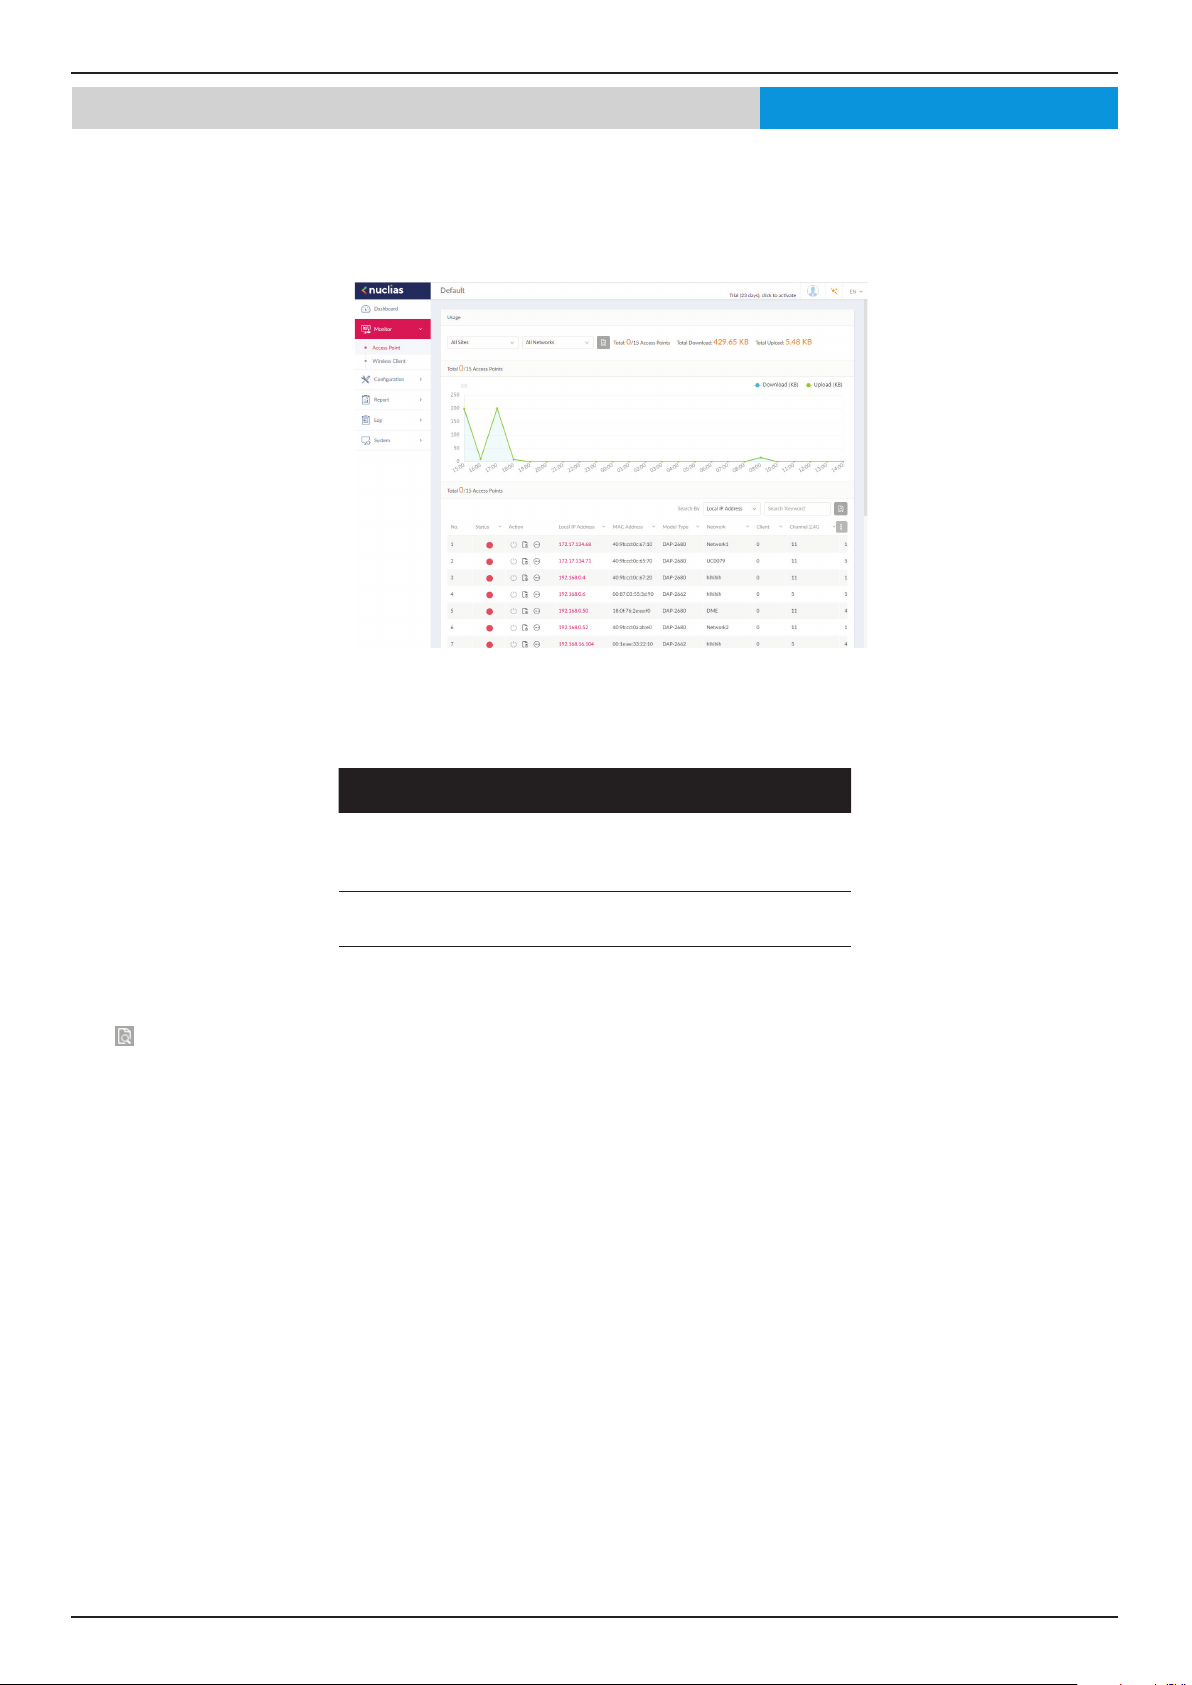
After clicking on Monitor -- > Access Points in the menu, the Usage and Total Access Points frames will appear. On this frame,
you can view a report of all or a selected number wireless clients and networks managed by the application.
Three reports can be generated using Site, Network, or Local IP address.
The following gure represents a typical report. This report can be rened by selecting the a specic Site from the rst dropdown menu, and then selecting the network in the second drop-down menu.
Block Description
Usage Displays a report listing the RX (kB) /
TX (kB) usage for the specied site and
network.
Total X Access
Points
In the Search By drop-down eld, select an attribute (Local IP Address, Local IPv6 Address, NAT IP Address, MAC Address,
Model Type, or FW Version) to specify the search function or enter a keyword related to the target device in the Search eld.
Click
to start the process. Any relevant devices meeting the search criteria will be listed in the frame.
Displays a report listing all detected
wireless clients.
Page 13
Page 14
Nuclias Connect Software User Manual Nuclias Connect Conguration
Nuclias
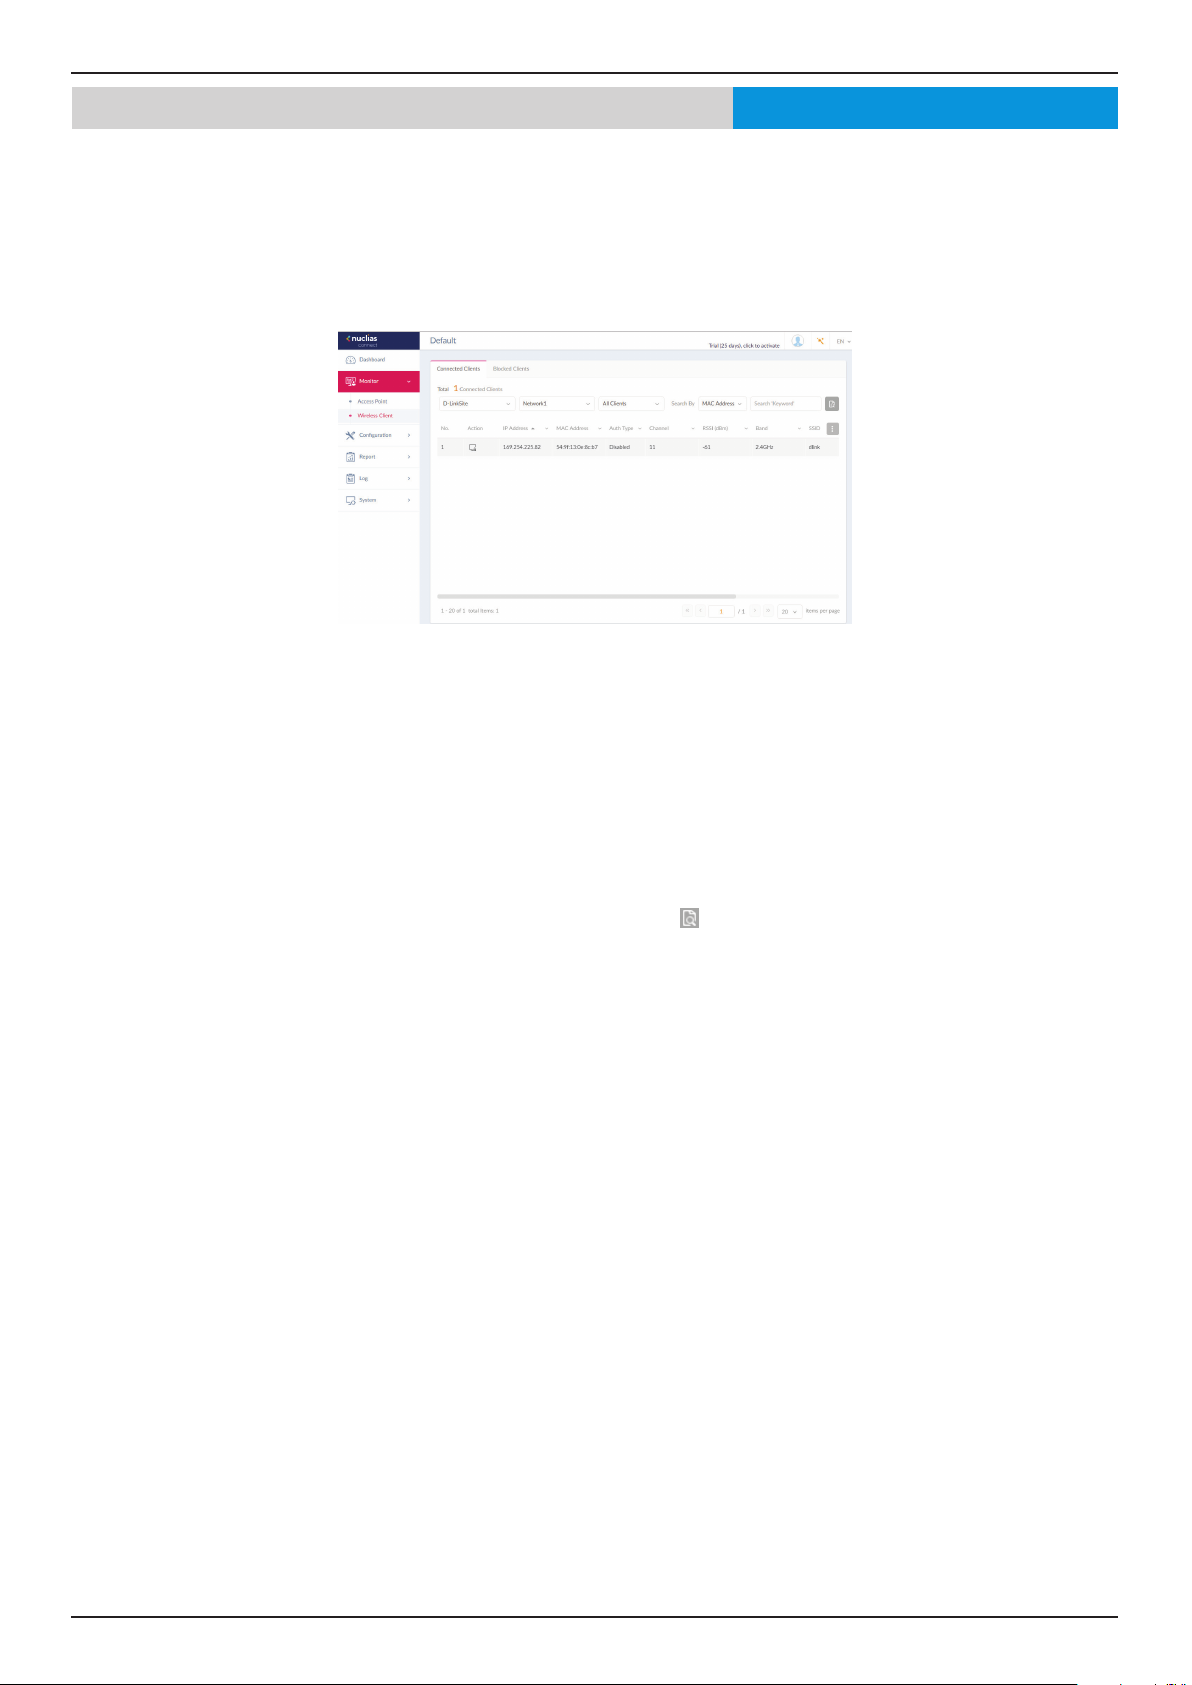
After clicking on Wireless Clients in the menu the Connected Clients frame will show by default. In this frame, you can view a
report of all connected clients managed by the application.
Three association reports can be generated by Site, Network, and Clients.
The following gure represents a typical report. This report can be rened by selecting a specic Site from the rst drop-down
menu, and then selecting a network and client.
This page shows a report that was generated by connected wireless clients. This report can be rened by selecting the date and
time From and To , and then selecting the Type, either By MAC Address or By Alias, and also additionally entering Key Words
in the text box provided.
Monitor Wireless Client Connected Clients
In this report a list of wireless client connections, connected to the access points that are managed by this application, are
displayed. Information such as Network, IP Address, IPv6 Address, MAC Address, Auth Type, OS (only available on captive
portal clients), Upload, Download, Channel, RSSI (dBm), SNR (dB), Band, SSID, AP MAC Address, Trac Usage, Trac
Usage(%), Last Seen, and Uptime is displayed for each wireless client.
In the Search eld, enter a keyword related to the target device and click
the search criteria will be listed in the frame.
to start the process. Any relevant devices meeting
Page 14
Page 15
Nuclias Connect Software User Manual Nuclias Connect Conguration
Nuclias
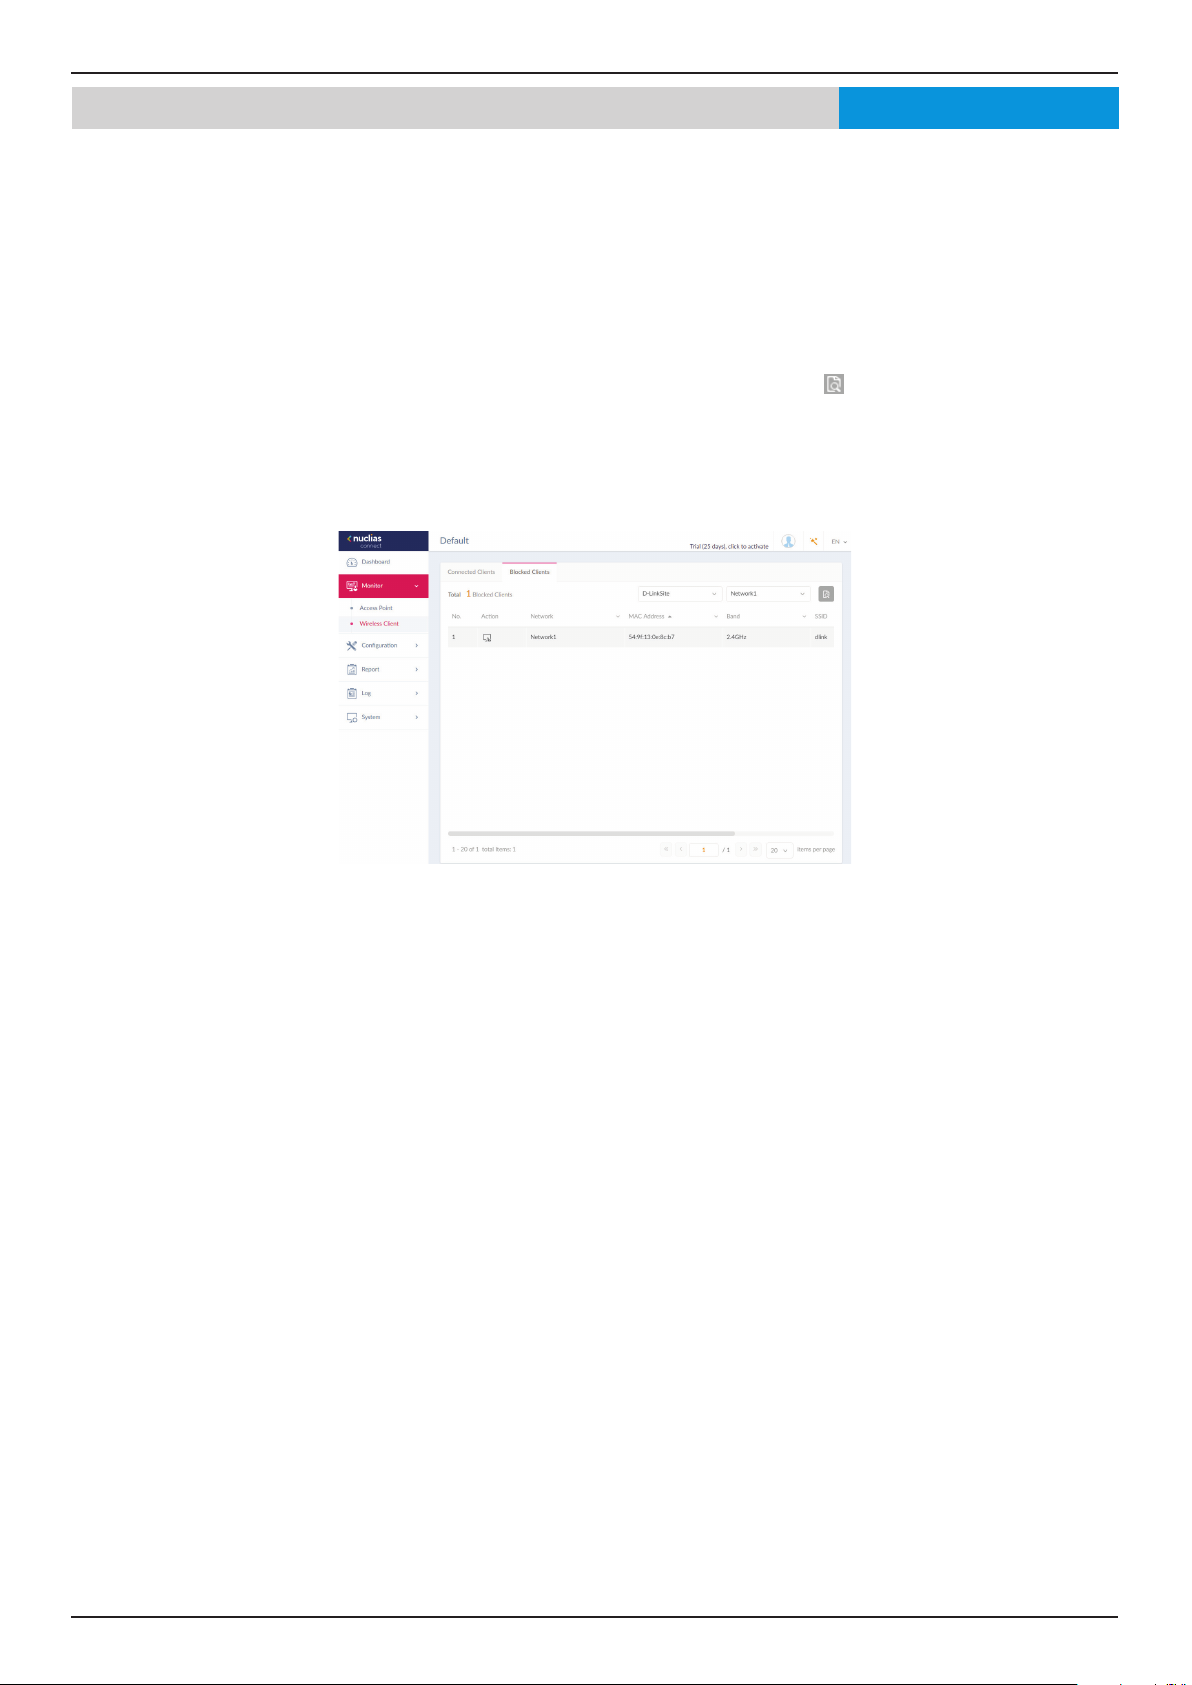
Click on Blocked Clients. In this frame, you can view a report of all blocked clients detected. This report can be generated by
specifying Site and Network criteria.
The following gure represents a typical report. This report can be rened by selecting a specic Site from the rst drop-down
menu, and also then selecting the network.
In this report a list of blocked wireless client connections are displayed.
In the Search eld, click the drop-down menu and select a Site then select a Network. Click
devices meeting the search criteria will be listed in the frame.
The report lists the following information: No., Action, Network, MAC Address, Band, SSID, and Auth. Type.
Monitor Wireless Client Blocked Clients
to start the process. Any relevant
Page 15
Page 16
Nuclias Connect Software User Manual Nuclias Connect Conguration
Nuclias
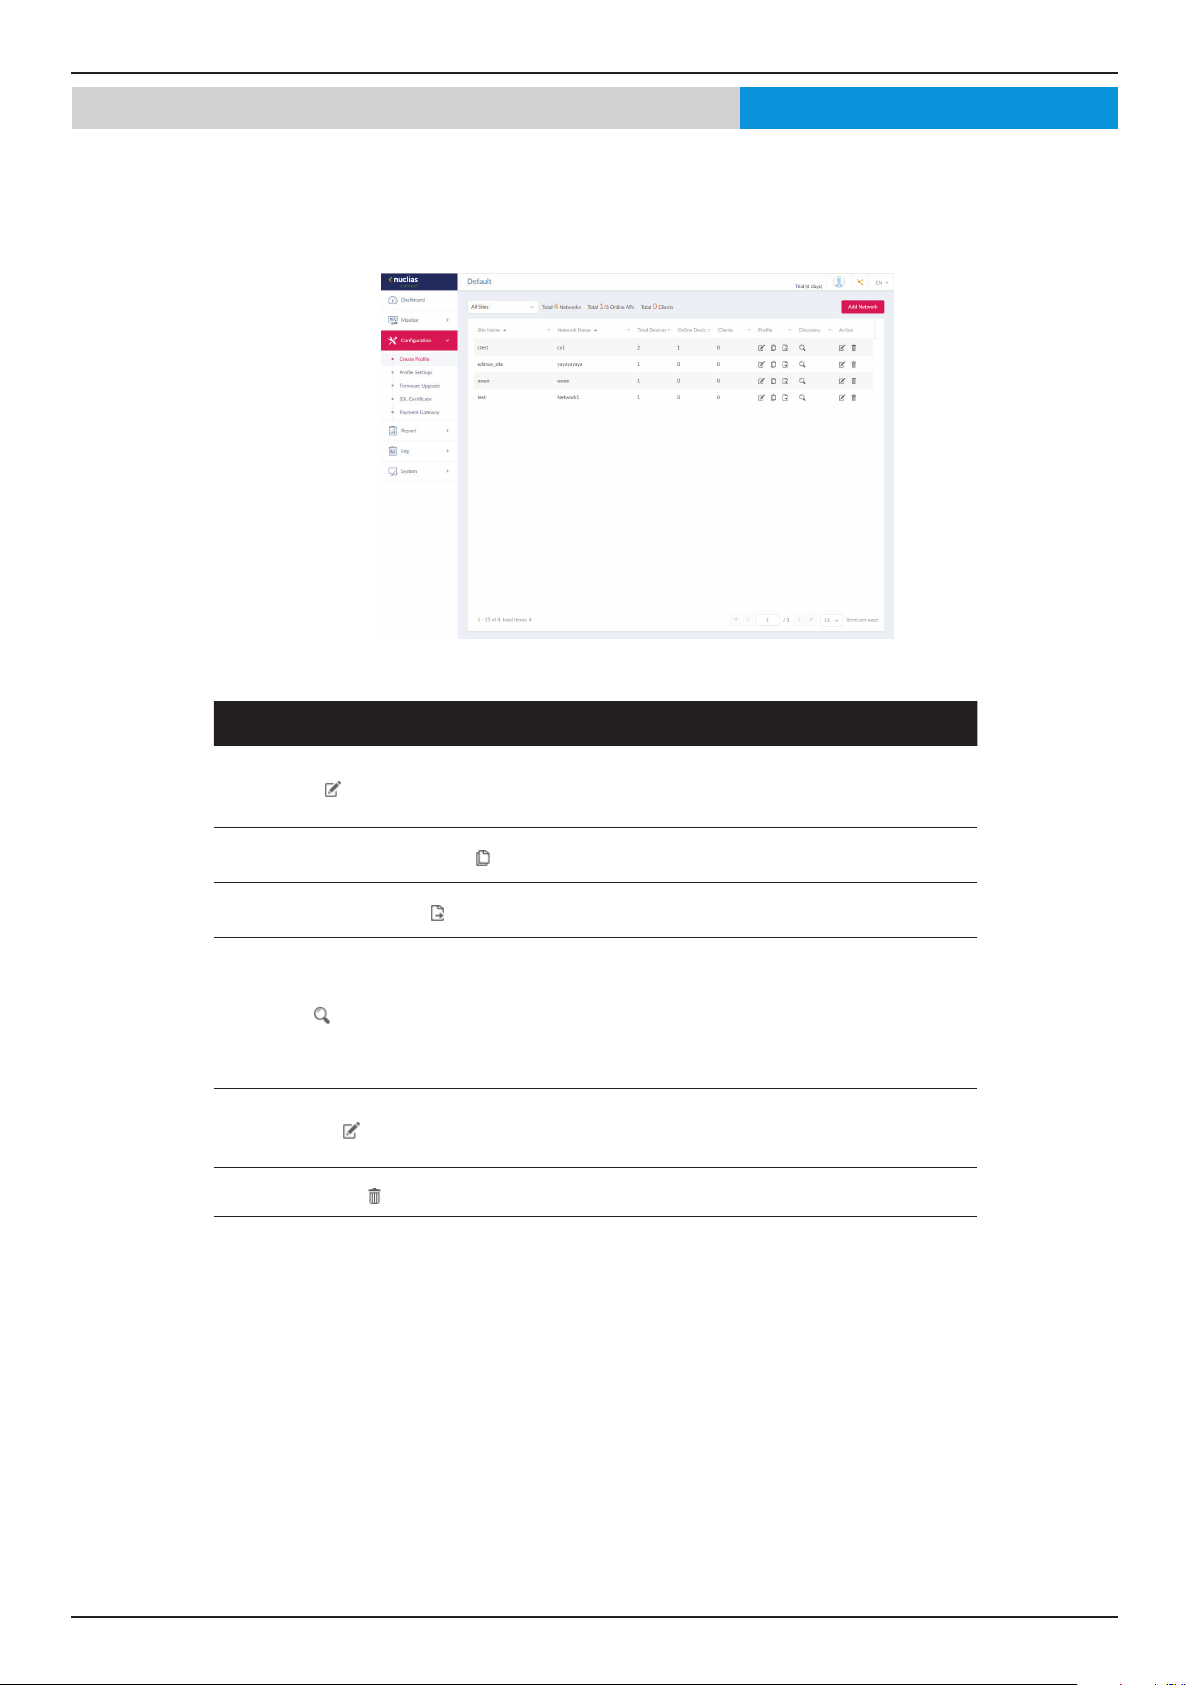
The Create Prole function allows for the creation of new sites and networks.
After clicking on Conguration > Create Prole the Default frame displays listing all available sites and networks, see the
following screen for further information.
Conguration Create Prole
Block Description
Opens site details page, editing is available for selected
Edit Prole
Copy Prole to this Network
Export Network Prole
Discovery
Edit Network
Delete Network
site’s security, access control, and user authentication
settings.
Copies existing prole to a designated site and
network.
Exports selected prole to a le (*.dat) on a local
directory.
Opens the Discovery Network Settings page. From
this page, you can search for devices located on L2
protocol layer or specic IP addresses / Prex subnet
IPs. Once the criteria is dened, click Next. Click
Start Discovery to nd the results (Congurable and
Managed devices) of the search.
Opens the Edit Network page. From this page, you can
edit network settings or migrate to a new or existing
site.
Deletes the selected network conguration.
Page 16
Page 17
Nuclias Connect Software User Manual Nuclias Connect Conguration
Nuclias
Click Add Network to create a new site and/or network.
From the Site drop-down menu, selecting an existing site or select newSite and enter the name of the site in the empty eld.
In the Network Name eld, enter the name in which to identify the new network. Click Next to continue or Exit to return to the
previous screen.
The Network Congurations page will appear. Enter the wireless and device settings to dene the network conguration. Click
Next to continue. To return to the previous page, click Back or click Exit to discontinue the conguration process.
Conguration Create Prole Add Network
Page 17
Page 18
Nuclias Connect Software User Manual Nuclias Connect Conguration
Nuclias
The Discover Network Settings page will appear. Select the data link layer (layer 2 or layer 3) to dene the type of network
in which to nd manageable access points. If Layer 3 is selected, click the drop-down menu to dene either an IP or a prex
segmentation. Click to add additional IP/prex segments or Next to continue. Click Exit to discontinue the conguration
process.
The Start Discovery Page will appear. Click Start Discovery to list all available unmanaged devices. If a device is found, select
it and click Apply to import the network prole. Click on the Managed tab to select already dened devices and add them to
this network.
Conguration Create Prole Add Network
Page 18
Page 19
Nuclias Connect Software User Manual Nuclias Connect Conguration
Nuclias
The Prole Settings function allows for the management of existing networks. Navigate to Conguration > Prole Settings
to view existing sites. Select a site followed by an available network to view all settings that are available for editing: SSID,
VLAN, Bandwidth Optimization, RF Optimization, Schedule, Device Setting, Performance, WLAN Partition, and Wireless
Resources.
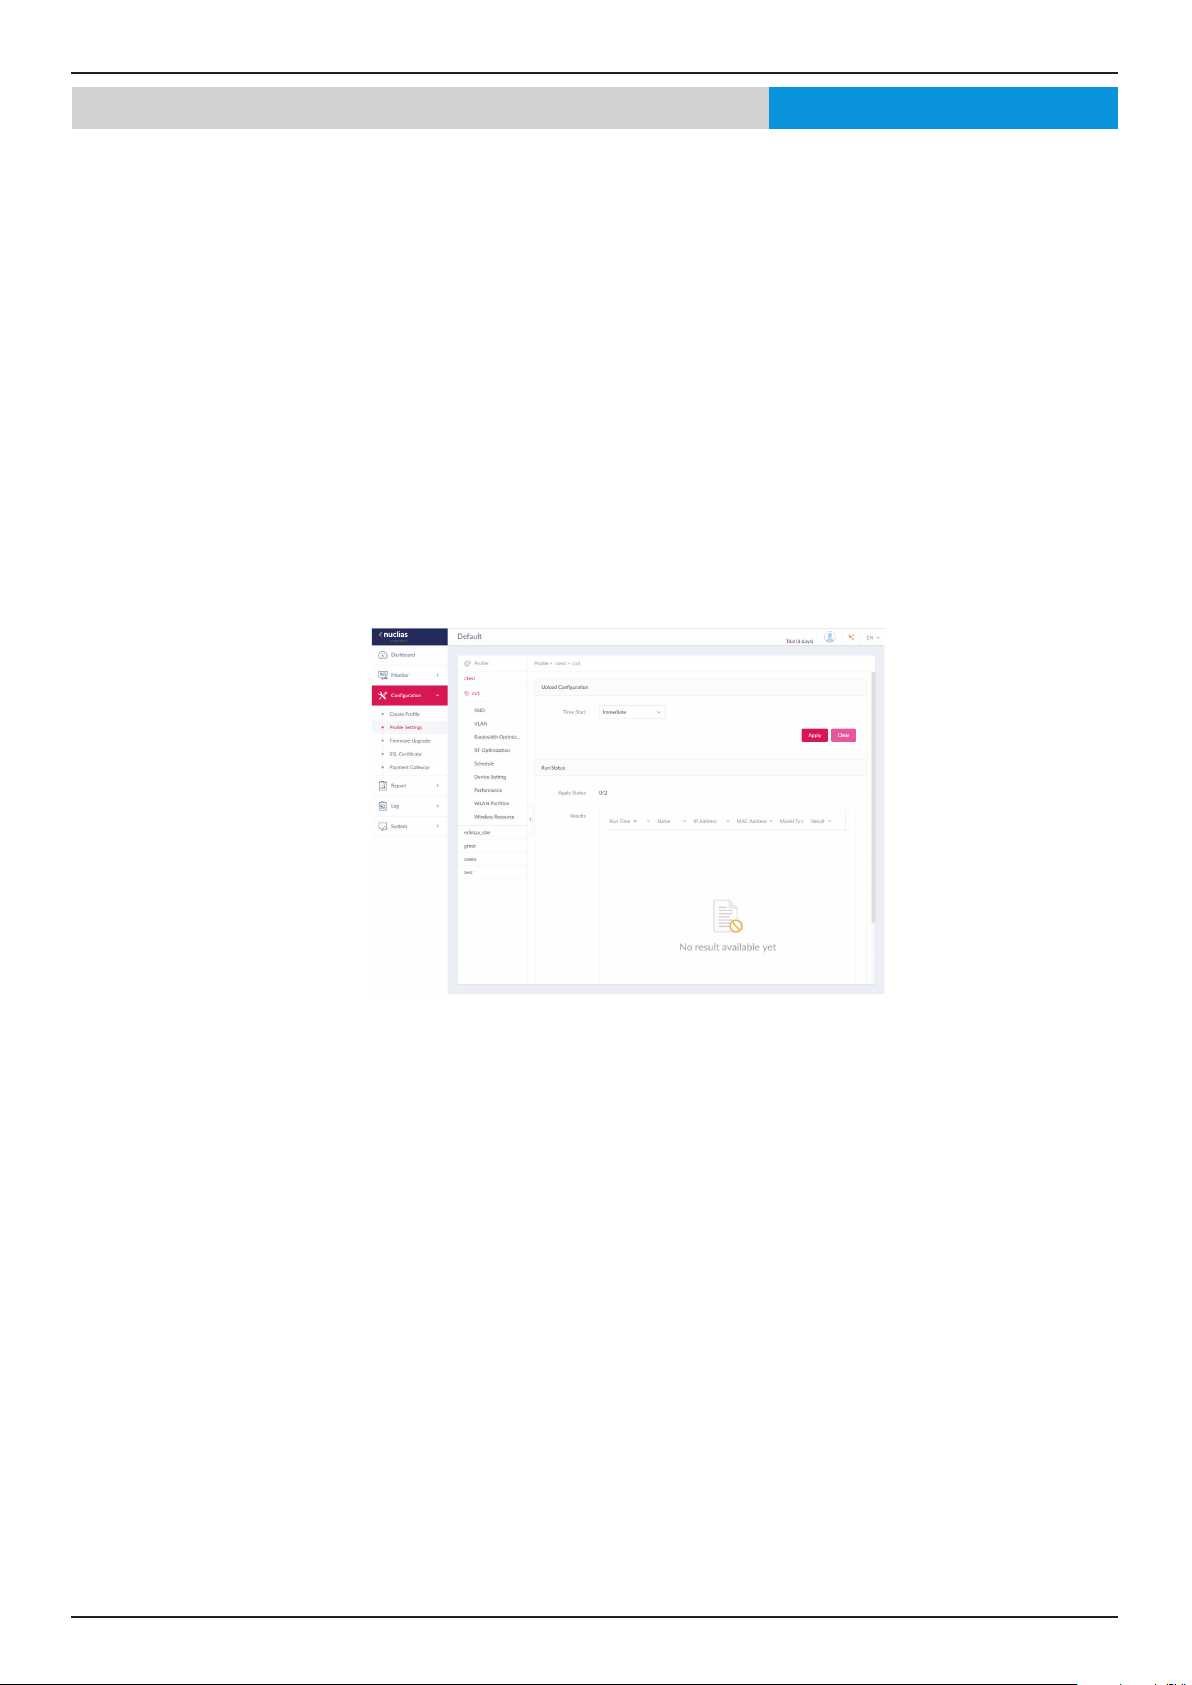
Once a network is selected the following screen will appear. The upload conguration function is available on the Prole
Settings > [Site] > [Network] page.
For any updates to site or network conguration to take eect, the conguration must be uploaded to the access point. Under
the Upload Conguration frame, click the Time Start drop-down menu and select the time (Immediate or Select Time) to
update the conguration to the access point.
If Select Time is selected, set the day and time to upload the conguration. Once the Time Start is dened, click Apply to initiate
the process.
Under the Run Status frame, the status of the upload conguration function will be reported. Once an update is complete, the
results will be displayed in the Results frame.
Conguration Prole Settings
Page 19
Page 20

Nuclias Connect Software User Manual Nuclias Connect Conguration
Conguration Prole Settings SSIDNuclias
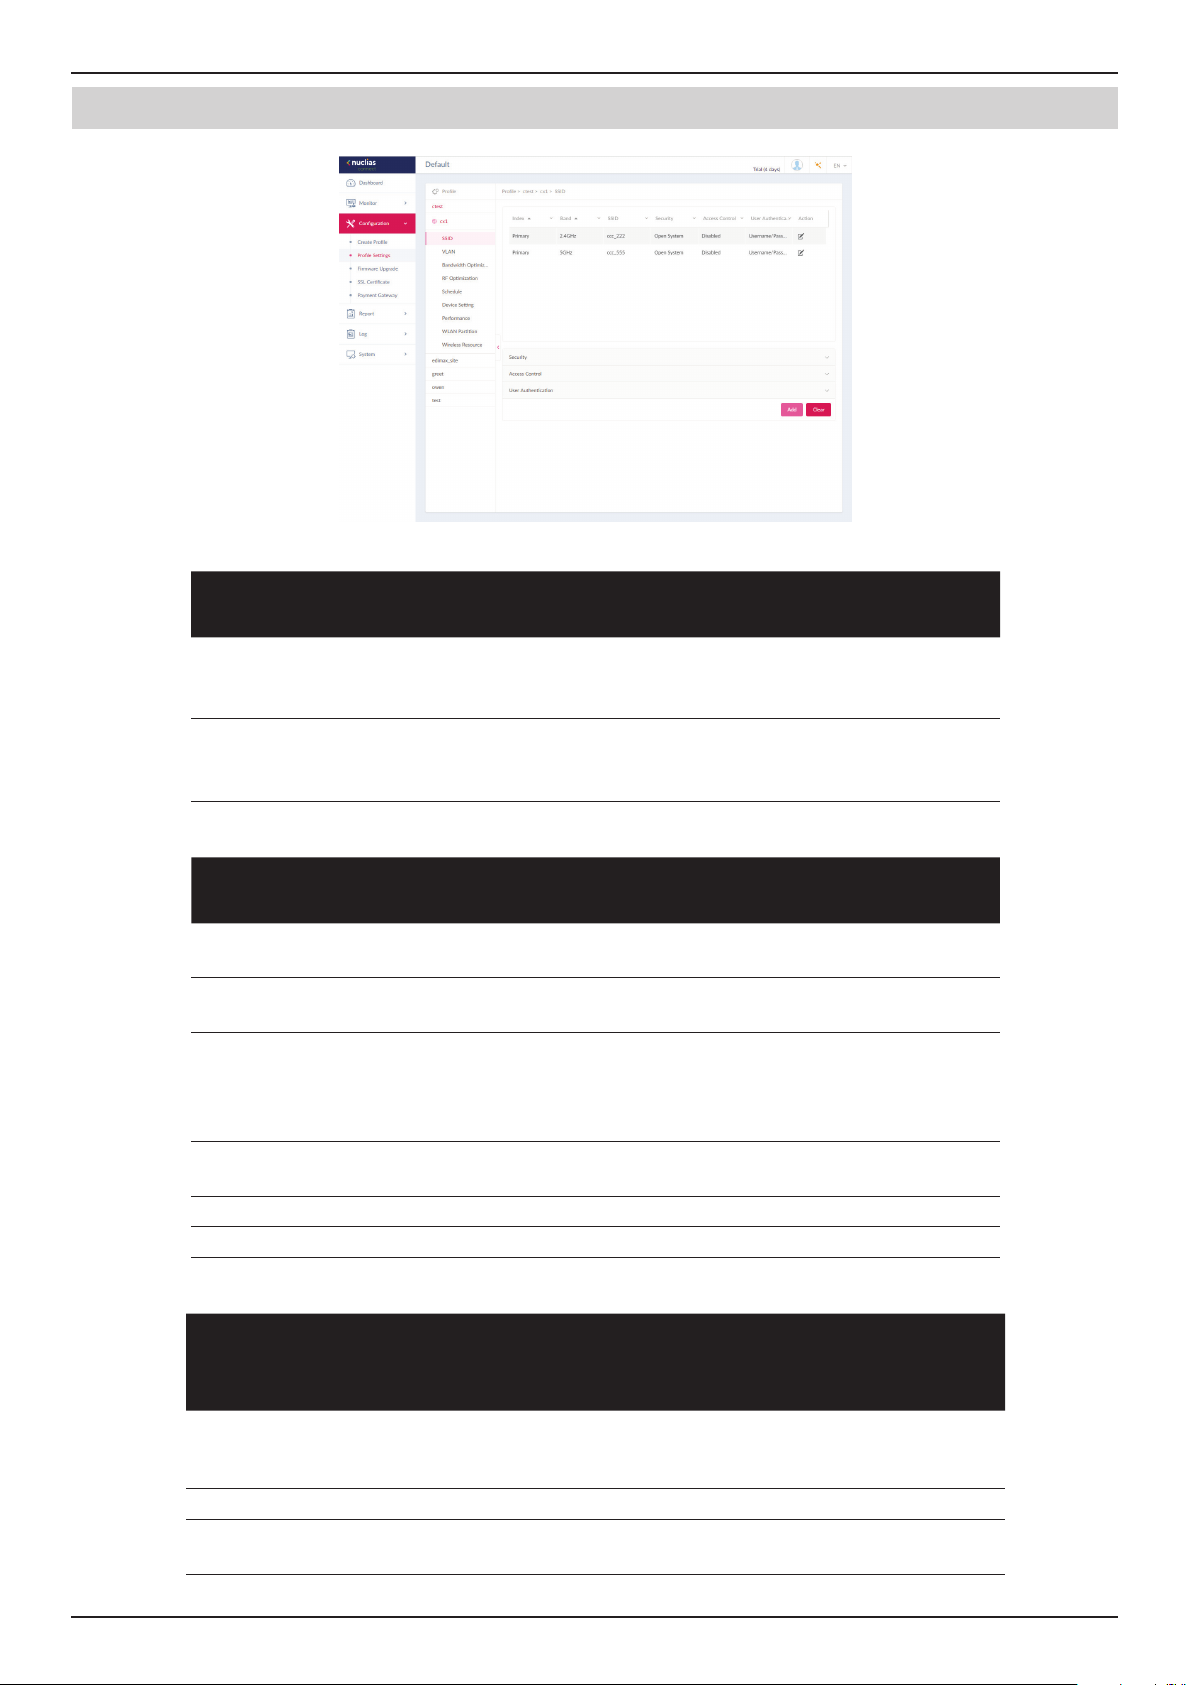
The SSID page displays the congurable parameters of a network’s wireless settings. Navigate to Conguration > Prole
Settings > [Site] > [Network] > SSID to view existing settings.
In the Security section, the following parameters can be congured:
Block Description
Band Click the drop-down menu to select wireless frequency band.
Index Click the drop-down menu to select SSID index (Parameters: Primary,
SSID 1 to SSID 7). To create a new SSID, select the index parameter
rst.
SSID Enter the wireless network name. The SSID must be the same across
all frequencies. In addition, make sure the network name (SSID) on
the selected access point is the same as the dened network name
(SSID) on the Nuclias Connect. For further information, see the access
point Basic > Wireless settings and Advanced Settings > DHCP Server
> Dynamic Pool Settings, to ensure the Domain Name eld reects
the dened network name (SSID) on the Nuclias Connect.
Character Set Click the drop-down menu to select the character set to be used in
the SSID encoding: UTF-8 or GB2312.
SSID Broadcast Click the drop-down menu to enable or disable the wireless SSID
visibility.
WMM (Wi-Fi
Multimedia)
Security Click the drop-down menu to select the wireless security protocol:
Fast Roaming (802.11
4
k/v/r)
Encryption Click the drop-down menu to enable or disable WEP Open System
Key Size Click the drop-down menu to select the WEP key size.
Key Type Click the drop-down menu to select the WEP key type.
Key Index Click the drop-down menu to select the WEP key index.
Key Value Enter the open system WEP encryption key.
Encryption Type Click the drop-down menu to select the encryption type: Auto, AES,
Group Key Update
Interval
Passphrase Enter the secret pass phrase used. The function is only available
RADIUS Server Enter the RADIUS server’s IP address. The function is only available
Click the drop-down menu to enable or disable the Wi-Fi multimedia.
Open System (no pre-shared key required), WPA-Personal, WPA
Enterprise (Radius server required), WPA2-Personal, WPA2-Enterprise
(Radius server required), WPA-Auto-Personal, WPA-Auto-Enterprise
(Radius server required).
Click the drop-down menu to enable or disable fast roaming. This
function is only available for compatible models and specic
software version.
encryption. The function is only available when Security is set as
Open System.
or TKIP.
Enter the WPA group key update interval value.
when Security is WPA-Personal, WPA2-Personal or WPA-Auto-
Personal.
when Security is WPA-Enterprise, WPA2-Enterprise or WPA-Auto-
Enterprise.
Once the settings are updated, the conguration must be uploaded to the access points. See “Prole Settings” on page 19 for
further information.
4 Currently only DAP-2662 and DAP-3666 supports this function.
Page 20
Page 21
Nuclias Connect Software User Manual Nuclias Connect Conguration
Nuclias
Block Description
Port Enter the RADIUS server’s port number. The function is only available
Conguration Prole Settings SSID
when Security is WPA-Enterprise, WPA2-Enterprise or WPA-AutoEnterprise.
RADIUS Secret Enter the RADIUS server’s secret pass phrase. The function is only
available when Security is WPA-Enterprise, WPA2-Enterprise or
WPA-Auto-Enterprise.
In the Access Control section, the following parameters can be congured:
Block Description
Action Click the drop-down menu to select the action that will applied to
the clients.
MAC Address Enter the MAC address of the clients that will be allowed or denied
access and click Add.
Upload MAC Address
List
Action Click on the drop-down menu to enable or disable the IP lter
IP Address Enter the IP address.
Subnet Mask Enter the subnet mask.
In the User Authentication section, the following parameters can be congured:
Click Browser... to select the MAC address le, located on the local
computer, that will be uploaded. Click Upload to update the MAC
address list. Click Download to download the current MAC address
list.
function.
Block Description
Authentication Type Click the drop-down menu to select the authentication type applied
to the wireless client. Note: SLA Login (Click through) is currently
only available for DAP-2662 and DAP-3666.
Idle Timeout (2~1440) Enter the session timeout value.
Enable White List Check the box to enable the white list function. This function is only
available when Authentication Type is Username/Password.
Page 21
Page 22

Nuclias Connect Software User Manual Nuclias Connect Conguration
Block Description
MAC Address Enter the MAC address of the network device that will whitelisted and
click Add to add the address to the white list table. This function is
only available when Authentication Type is Username/Password.
Upload Whitelist File Click Browser... to select the white list le, located on the local
computer, that will be uploaded. Click Upload to update the white
list. Click Download to download the current white list. The function
is only available when Authentication Type is Username/Password.
IPIF Status Click the drop-down menu to enable or disable the use of the IP
interface.
VLAN Group Enter the VLAN group name.
Get IP Address From Click the drop-down menu to select the IP address conguration
setting.
IP Address Enter the IP address of the IP interface.
Subnet Mask Enter the subnet mask of the IP interface.
Gateway Enter the gateway of the IP interface.
DNS Enter the preferred DNS address of the IP interface.
Username Enter the username. The function is only available when
Authentication Type is set as Username/Password.
Password Enter the password and click Add. Click Clear to clear the entered
elds. This function is only available when Authentication Type is
Username/Password.
RADIUS Server Enter the RADIUS server’s IP address. This function is only available
when Authentication Type is Remote RADIUS or MAC Address.
RADIUS Port Enter the RADIUS server’s port number. This function is only available
when Authentication Type is Remote RADIUS or MAC Address.
RADIUS Secret Enter the RADIUS server’s secret. This function is only available when
Authentication Type is Remote RADIUS or MAC Address.
Remote RADIUS Type Enter the RADIUS server’s type. This function is only available when
Authentication Type is Remote RADIUS or MAC Address.
Server Enter the LDAP server’s IP address. This function is only available
when Authentication Type is LDAP.
Port Enter the LDAP server’s port number. This function is only available
when Authentication Type is LDAP.
Authentication Mode Click on the drop-down menu to select the authentication mode.
This function is only available when Authentication Type is LDAP.
Username Enter the administrator’s username that will be able to access and
search the LDAP database. This function is only available when
Authentication Type is LDAP.
Password Enter the administrator’s password that will be able to access and
search the LDAP database. This function is only available when
Authentication Type is LDAP.
Base DN Enter the base domain name of the LDAP database. This function is
only available when Authentication Type is LDAP.
Account Attribute Enter attribute for the account. This function is only available when
Authentication Type is LDAP.
Identity Enter the name of the administrator. This function is only available
when Authentication Type is LDAP.
Page 22
Page 23

Nuclias Connect Software User Manual Nuclias Connect Conguration
Block Description
Server Enter the POP3 server’s IP address. This function is only available
when Authentication Type is POP3.
Port Enter the POP3 server’s port number. This function is only available
when Authentication Type is POP3.
Connection Type Click the drop-down menu to select the connection type. This
function is only available when Authentication Type is POP3.
Passcode List Display the congured front desk user accounts that have been
assigned to this network and have already generated a passcode
from the Web login page. This function is only available when
Authentication Type is Passcode.
External Captive Portal Click the drop-down menu to select HTTP or HTTPS. After selecting,
enter the URL of the website. This function is only available when
Authentication Type is External Captive Portal.
Web Redirection Check the box to enable the website redirection function.
Website Click the drop-down menu to select HTTP or HTTPS. After selecting,
enter the URL of the website.
Choose Template Click the drop-down menu to select the used login style. This function
is only not available when Authentication Type is Web Redirection
Only.
Note:
• Click Preview to preview the selected style.
• Click Upload Login File to upload a new style.
• Click
to delete the selected style.
• Click to download the style template.
In the Hotspot 2.0 section, the following parameters can be congured: Please note that Hotspot 2.0 is only available for
compatible models and specic rmware version.
5
Block Description
Hotspot 2.0 Click the drop-down menu to enable or disable hotspot 2.0.
OSEN Enable OSU Server-only authenticated layer-2 Encryption Network
(OSEN) to indicate that the hotspot uses a OSEN network type.
Allow Cross Connection Choose enable to allow cross connection for
clients.
Manage P2P Choose enable to allow P2P.
DGAF This option congures the Downstream Group Addressed
Forwarding. Choose enable to allow AP to forward downstream
groupaddressed frames.
Proxy APR Choose enable to allow proxy ARP.
L2TIF Choose enable to allow Layer 2 Trac Inspection and Filtering.
Interworking Choose enable to enable the interworking function.
Access Network Type Choose from drop-down menue the access network type.
Internet Choose to enable or disable Internet access for this network.
ASRA Choose enable if the network has Additional Steps required for
Access.
5 Currently only DAP-2662 and DAP-3666 supports this function.
Page 23
Page 24

Nuclias Connect Software User Manual Nuclias Connect Conguration
ESR Choose enable to indicate that emergency services are reachable
through this device.
USEA Choose to enable or disable USEA.
Venue Group Specify group venue belongs to.
Venue Type Specify type of venue.
Venue Name Specify name of venue. Choose from the drop down list a language
used in the name.
HESSID Specify a homogenous extended service set (ESS) ID that can be
used to identify a specic service provider network.
WAN Link Status Set information about the status of the Access Point’s WAN
connection from the drop-down menu.
WAN Symmetric Link Specify state of the WAN link is symmetric (upload and download
speeds are the same).
WAN At Capacity Specify yes if the Access Point or the network is at its max capacity,
or specify no if not.
WAN Metrics DL Speed
(kps)
WAN Metrics UL Speed
(kps)
Network Auth Type Choose from drop-down menu the network authentication type
IP Address Type
Availability
Domain Name List one or more domain names for the entity operating the AP.
Roaming Consortium Add service providers or groups of roaming partners whose security
Nai Realm Specify list of all NAI realms available through the BSS. Click subtract
EAP Method Specify one or more EAP methods and its authentication ID and
RFC 4282 Click on drop-down menue to enable or disable RFC 4282.
3gpp Cellular Network Specify a list of the 3GPP cellular networks available through the AP.
Connection Capability Specify a list of common IP protocols (TCP, UDP, IPsec) and ports
Operator Friendly Name Identies the Hotspot venue operator and choose its language.
OSU SSID Specify OSU SSID name.
OSU Server URI Specify OSU Server URI
OSU Method Specify a list of OSU methods by choosing its language and then
OSU Cong Choose from drop-down menu the OSU Congu.
OSU Language Code Choose a language from the drop-down menu.
OSU Friendly Name Choose a language from the drop-down menu and specify the OSU
OSU Nai Specify the OSU NAI.
The downlink speed of the WAN connection set in kbps. If the
downlink speed is not known, set to 0.
The uplink speed of the WAN connection set in kbps. If the uplink
speed is not known set to 0.
and specify the web-address.
Choose from drop-down menu the IP address version and type
that the Hotspot Operator uses and that would be allocated and
available to a mobile device after it authenticates to the network.
Click Delete icon to delete it from the list.
credentials can be used to connect to a network. Click Delete icon
to delete it from the list.
icon to delete it from the list.
Parameter type. Click Delete icon to delete it from the list.
Spcify the MCC and MNC, then click Add icon. Click Delete icon to
delete it from the list.
(21, 80, 443, 5060), specify its port number and the status of the IP
protocol and click Add. Click Delete icon to delete it from the list.
specifying a method by clicking Add. Click Delete icon to delete it
from the list.
friendly name.
Page 24
Page 25

Nuclias Connect Software User Manual Nuclias Connect Conguration
OSU Service Description Specify a service description for the OSU.
OSU Icon Language Code Specify from drop-down menu the language of the icon.
OSU Icon File Path Specify location of icon le.
OSU Icon File Name Specify icon le name.
OSU Icon Width Specify width of the icon, in pixels.
OSU Icon Height Specify length of the icon, in pixels.
OSU Icon Type Speciy icon le type from the drop-down menu.
Click Add to save the values and update the screen.
Click Clear to reset all settings.
Page 25
Page 26

Nuclias Connect Software User Manual Nuclias Connect Conguration
Nuclias
The VLAN page will show the congurable settings of a network’s virtual LAN subnetwork settings. Navigate to Conguration
> Prole Settings > [Site] > [Network] > VLAN to view existing settings.
Click Save to save the values and update the screen.
The VLAN List tab will show a list of all created VLANs.
Click
Click
to modify an existing VLAN.
to remove an existing VLAN.
Conguration Prole Settings VLAN
Block Description
VLAN Status Click the drop-down menu to enable or
disable VLANs.
In the Port List tab, a list of port assignments will appear. The list indicates the available tagged and untagged ports available
on the access points in the network.
In the columns next to the Port Name entries, the Tag/Untag ID columns will indicate if the port is a tagged member (Tag VID)
or an untagged member (Untag VID) of the VLAN. In the last column the port VLAN ID will show the connected virtual LAN
segment.
In the Add/Edit VLAN tab, we can create a new VLAN and assign untagged ports in that VLAN. After clicking the Modify icon in
the VLAN List tab, you will be re-directed to this tab to modify an existing VLAN.
In the PVID Setting tab, you can view and congure the Port VLAN Identier (PVID) settings for access points and wireless client
in this network.
Once the settings are updated, the conguration must be uploaded to the access points. See “Prole Settings” on page 19 for
further information.
Page 26
Page 27

Nuclias Connect Software User Manual Nuclias Connect Conguration
Nuclias
The Bandwidth Optimization page displays the congurable settings to optimize available bandwidth. Navigate to Conguration
> Prole Settings > [Site] > [Network] > Bandwidth Optimization to view existing settings.
Block Description
Enable Bandwidth
Optimization
Downlink
Bandwidth
Uplink Bandwidth Enter the total uplink bandwidth speed for the access points in the network.
Rule Type Click the drop-down menu to select the rule type.
Band Click the drop-down menu to select the wireless frequency band used in the rule.
SSID Index Click the drop-down menu to select the SSID used in the rule.
Downlink Speed Enter the downlink speed assigned to either each station or the specied SSID.
Uplink Speed Enter the uplink speed assigned to either each station or the specied SSID.
Add Click Add to add the rule into the Bandwidth Optimization
Clear Click Clear to clear the entered rule.
Conguration Prole Settings Bandwidth Optimization
Click the drop-down menu to enable or disable the bandwidth optimization function.
Enter the total downlink bandwidth speed for the access points in the network.
• Allocate an average BW for each station: Optimize bandwidth by averaging the
allocated bandwidth for each client.
• Allocate a maximum BW for each station: Specify the maximum bandwidth for each
connected client, while reserving available bandwidth for additional clients.
• Allocate a dierent BW for 11a/b/g/n station: The weight of 802.11b/g/n and
802.11a/n clients are 10%/20%/70% and 20%/80%. The AP will distribute dierent
bandwidth for 802.11a/b/g/n clients.
• Allocate a specic BW for SSID: All clients share the assigned bandwidth.
Rules.
Click Save to save the values and update the screen.
Once the settings are updated, the conguration must be uploaded to the access points. See “Prole Settings” on page 19 for
further information.
Page 27
Page 28

Nuclias Connect Software User Manual Nuclias Connect Conguration
Nuclias
The RF Optimization page displays the congurable Radio Frequency (RF) settings used on the access points of the wireless
network. Navigate to Conguration > Prole Settings > [Site] > [Network] > RF Optimization to view existing settings.
Block Description
Adjust Frequency Click the drop-down menu to set the rate in hours at
Auto Channel
Adjustment
Auto Power Adjustment Available if Auto Channel Adjustment is enabled. Click the
Click Save to save the values and update the screen.
Conguration
which the RF frequency is adjusted.
Click the Auto RF Optimize radio button to enable the
function to automatically adjust the channel of the client
to avoid RF interference.
radio button to enable the feature to automatically adjust
AP radio power to optimize coverage when interference
is present.
Prole Settings
RF Optimization
Once the settings are updated, the conguration must be uploaded to the access points. See “Prole Settings” on page 19 for
further information.
Page 28
Page 29

Nuclias Connect Software User Manual Nuclias Connect Conguration
Nuclias
The Schedule page displays the wireless schedule settings describing how to specify a schedule for your network. Navigate to
Conguration > Prole Settings > [Site] > [Network] > Schedule to view existing settings.
Parameter Description
Wireless Schedule Click the drop-down menu to enable or disable the wireless schedule function.
Name Enter the name of the schedule rule.
Index Click the drop-down menu to select SSID on which the schedule setting is
SSID Display the SSID name.
Day(s) Click the radio button to select the active days for the schedule.
Time(s) Click the radio button to select the active times for the schedule.
Start Time Enter the hours and minutes of the day. This function is only available when
End Time Enter the hours and minutes of the day. This function is only available when
Over Night Check the box to enable activity overnight.
Add Click Add to add the rule into the schedule.
Clear Click Clear to clear the entered rule.
Conguration Prole Settings Schedule
applied.
• All Week: Enable the rule for the whole week.
• Select Day(s): Species particular day(s) to activate the rule.
• All Day: Enable the rule for the whole day.
• Select Time(s): Species a starting and ending time for the rule.
Time(s) is Select Time(s).
Time(s) is Select Time(s).
Click
Click
Click Save to save the values and update the screen.
Once the settings are updated, the conguration must be uploaded to the access points. See “Prole Settings” on page 19 for
further information.
to modify the desired rule.
to delete the desired rule.
Page 29
Page 30

Nuclias Connect Software User Manual Nuclias Connect Conguration
Nuclias
The Device Settings page allows you to view and congure the login and accessibility settings for access points in this network.
Advanced wireless settings can be congured on this page for both the 2.4GHz and 5GHz frequency bands. Navigate to
Conguration > Prole Settings > [Site] > [Network] > Device Setting to view existing settings.
Parameter Description
Username Enter the administrative username that is used to access the
Password Enter the administrative password that is used to access the
Enable Check the box to enable the console function.
Console Protocol Click the radio button to select the console protocol that is
Time Out Click the drop-down menu to select the active console session
Enable NTP Server Check the box to enable the Network Time Protocol (NTP) server
NTP Server Enter the IP address or domain name of the NTP server.
Select Country Click the drop-down menu to select the country region of APs in
Time Zone Click the drop-down menu to select the time zone.
Enable Daylight Saving Check the box to enable the daylight saving function.
DST Start (24HR) Click the drop-down menu to designate the start date and time
DST End (24HR) Click the drop-down menu to designate the end date and time
DST Oset (minutes) Click the drop-down menu to select DST Oset time.
External Syslog Server Enter the IP address or domain name of the external syslog server.
Conguration Prole Settings Device Setting
conguration settings for all access points in the network.
conguration settings for to all access points in the network.
applied to all access points in the network.
time out value.
function.
the network.
for Daylight Saving Time (DST).
for Daylight Saving Time (DST).
Click Save to save the values and update the screen.
Once the settings are updated, the conguration must be uploaded to the related access points. See “Prole Settings” on page
19 for further information.
Page 30
Page 31

Nuclias Connect Software User Manual Nuclias Connect Conguration
Conguration Prole Settings Performance 2.4GHz/5GHzNuclias
The Performance page allows you to congure the wireless performance for access points on your network. Additionally
advanced wireless settings can be congured on the page for both the 2.4GHz and 5GHz frequency bands. Navigate to
Conguration > Prole Settings > [Site] > [Network] > Device Setting to view existing settings. Click the 2.4GHz or 5GHz tab
to view existing settings.
Parameter Description
Wireless Click the drop-down menu to turn on or o the wireless band for
the network.
Wireless Mode Click the drop-down menu to select the wireless mode used in the
network.
Data Rate Click the drop-down menu to select the wireless data rate. The
function is only available when Wireless Mode is Mixed 802.11g
and 802.11b (2.4GHz) or 802.11a Only (5GHz).
Beacon Interval Enter the beacon interval value. The default value is 100.
DTIM Interval (1-15) Enter the DTIM intterval value. The default value is 1.
WMM (Wi-Fi Multimedia) Click the drop-down menu to enable or disable the Wi-Fi Multimedia
(WMM) function.
ACK Timeout Enter the ACK timeout value. The default value is 48.
Short GI Click the drop-down menu to enable or disable the short GI
function.
IGMP Snooping Click the drop-down menu to enable or disable the IGMP snooping
function.
Multicast Rate Click the drop-down menu to select the multicast rate value.
Multicast Bandwidth
Control
Maximum Multicast
Bandwidth
HT20/40 Coexistence Click the drop-down menu to enable or disable the HT20/40
Change DHCPOFFER
from Multicast to Unicast
RTS Length (256-2346) Enter the RTS length value. The default value is 2346.
Fragment Length (256-
2346)
Channel Width Click the drop-down menu to select the channel width used by the
Click the drop-down menu to enable or disable the multicast
bandwidth control function.
Enter the maximum multicast bandwidth value. The default value
is 100. The function is only available when Multicast Bandwidth
Control is Enabled.
coexistence function.
Click the drop-down menu to allow or deny the transfer of DHCP
oers to unicast function.
Enter the fragment length value. The default value is 2346.
network.
Click Save to save the values and update the screen.
Once the settings are updated, the conguration must be
uploaded to the access points. See “Prole Settings” on page
19 for further information.
Page 31
Page 32

Nuclias Connect Software User Manual Nuclias Connect Conguration
Nuclias
Conguration Prole Settings WLAN Partition
2.4GHz/5GHz
The WLAN Partition page displays the wireless partitioning settings that allows you to enable/disable associated wireless clients
from communicating with each other. Additionally advanced wireless settings can be congured on the page for both the
2.4GHz and 5GHz frequency bands. Navigate to Conguration > Prole Settings > [Site] > [Network] > WLAN Partition. Click
the 2.4GHz or 5GHz tab to view existing settings.
Parameter Description
Link Integrity Click the drop-down menu to enable or disable the wireless link
integrity function.
Ethernet to
WLAN Access
Internal Station
Connection
Click Save to save the values and update the screen.
Click the drop-down menu to enable or disable Ethernet to WLAN
access function.
Click the radio button to enable or disable the membership of the
SSID to the WLAN partition. Select Guest Mode to allow this SSID
to have access to this WLAN partition as a guest.
Once the settings are updated, the conguration must be uploaded to the related access points. See “Prole Settings” on page
19 for further information.
Page 32
Page 33

Nuclias Connect Software User Manual Nuclias Connect Conguration
Nuclias
Conguration Prole Settings Wireless Resource
2.4GHz/5GHz
The Wireless Resource function in Nuclias Connect helps provides real-time RF management of the wireless network. Navigate
to Conguration > Prole Settings > [Site] > [Network] > Wireless Resource. Click the 2.4GHz or 5GHz tab to view existing
settings.
Parameter Description
ACL RSSI
Threshold
Aging Out Use the drop-down menu to select criteria to disconnect wireless
Aging Out Click the drop-down menu to select the aging out mode
RSSI Threshold When RSSI is selected in the Aging out drop-down menu, select
Data Rate Click the drop-down menu to select the data rate connection
Connection Limit Click the radio button to enable or disable the function. Connection
User Limit (0~64) Enter the user connection limit. The default value is 20.
11n Preferred Click the drop-down menu to enable or disable the preferred use
Network
Utilization
Check the box to enable ACL RSSI threshold function and click the
drop-down menu to select the ACL RSSI threshold percentage.
clients. Available options are RSSI and Data Rate.
a value between 10% to 100%. This parameter sets the minimum
RRSI for a wireless clients to respond to a probe. If the determined
value is lower than the specied percentage, the wireless client is
disconnected.
limit. The function is only available when the Aging Out policy is
set to Data Rate.
limit is designed to provide load balancing. This policy allows user
access management on the wireless network. The exact number
is entered in the User Limit eld below. If this function is enabled
and when the number of users exceeds this value, or the network
utilization exceeds the specied percentage, the policy will not
allow further client association.
of 802.11n.
Click the drop-down menu to select the network utilization
percentage.
Click Save to save the values and update the screen.
Once the settings are updated, the conguration must be uploaded to the access points. See “Prole Settings” on page 19 for
further information.
Page 33
Page 34

Nuclias Connect Software User Manual Nuclias Connect Conguration
Nuclias
Conguration Prole Settings Wireless Resource
Airtime Fairness
Airtime Fairness allows you to boost overall network performance. This function sacrices network time from the slowest devices
to boost overall performance of the network.
Note: Devices identied as having slow WiFi speed can be slow from either long physical distances, weak signal strength or older
legacy hardware. Navigate to Conguration > Prole Settings > [Site] > [Network] > Wireless Resource. Click the Airtime
Fairness tab to view the existing setting.
Check the box to enable or disable the airtime fairness function.
Click Save to save the values and update the screen.
Once the settings are updated, the conguration must be uploaded to the related access points. See “Prole Settings” on page
19 for further information.
Page 34
Page 35

Nuclias Connect Software User Manual Nuclias Connect Conguration
Nuclias
Conguration Prole Settings Wireless Resource
Band Steering
Band Steering allows dual-band-capable clients to connect to the less crowded 5GHz network, and leave the 2.4GHz network
available for those clients who support 2.4GHz only.
Navigate to Conguration > Prole Settings > [Site] > [Network] > Wireless Resource. Click on the Band Steering tab to
view the existing setting.
Check the box to enable or disable the wireless band steering function.
Click Save to save the values and update the screen.
Page 35
Page 36

Nuclias Connect Software User Manual Nuclias Connect Conguration
Nuclias
The Firmware Upgrade function allows users to perform a rmware upgrade. This is a useful feature that prevents future bugs
and allows for new features to be added your device. Please go to your local D-Link website to see if there is a newer version
rmware available.
Navigate to Conguration > Firmware Upgrade > [Site] > [Network].
Block Description
Change Click to select a rmware le to upload. Files are model
Time Start Click the drop-down menu to select a specic time or to
Click Apply to save the above conguration settings.
Click Clear to delete the dened settings.
Conguration Firmware Upgrade
specic.
update immediately.
The rmware upgrade status and result can be seen at the bottom of this page. The results can be sorted by Run Time, Name,
IP Address, MAC Address, Model Type and Result.
Page 36
Page 37

Nuclias Connect Software User Manual Nuclias Connect Conguration
Nuclias
The SSL Certicate function provides the means to install an SSL certicate for use on the network. To accomplish this task an
intermediate certicate is required. The intermediate certicate is used to establish the trust of the SSL certicate by binding it
to the Certicate Authority’s root certicate. To complete the certicate trust conguration, the SSL Certicate function requires
the certicate le to be uploaded. Please reboot your APs after you uploaded certicate.
In the Update SSL certicate section, the following parameters can be congured:
Block Description
Upload Certicate From
File
Upload Key From File Click Browser... to select the SSL key le located on the local drive that
Click Upload to initiate the le upload. The upload status and result will appear in the below area.
Conguration SSL Certicate
Click Browser... to select the SSL certicate le located on the drive that
will be uploaded.
will be uploaded.
Page 37
Page 38

Nuclias Connect Software User Manual Nuclias Connect Conguration
Nuclias
The payment gateway is a function that allows e-commerce services within the network. The Payment Gateway page will show
payment settings and options necessary to enable payment services.
Navigate to Conguration > Payment Gateway.
Parameter Description
PayPal Currency Click the drop-down menu to select the currency code for
PayPal Client ID Enter the username for the Paypal account.
PayPal Secret Enter the password for the Paypal account.
Options Enter the duration time in minutes, hours, or days as well as
Click Save to save the values and update the screen.
Conguration Payment Gateway
the Paypal account.
the associated cost for the entry. Click
to enter the option.
Page 38
Page 39
Nuclias Connect Software User Manual Nuclias Connect Conguration
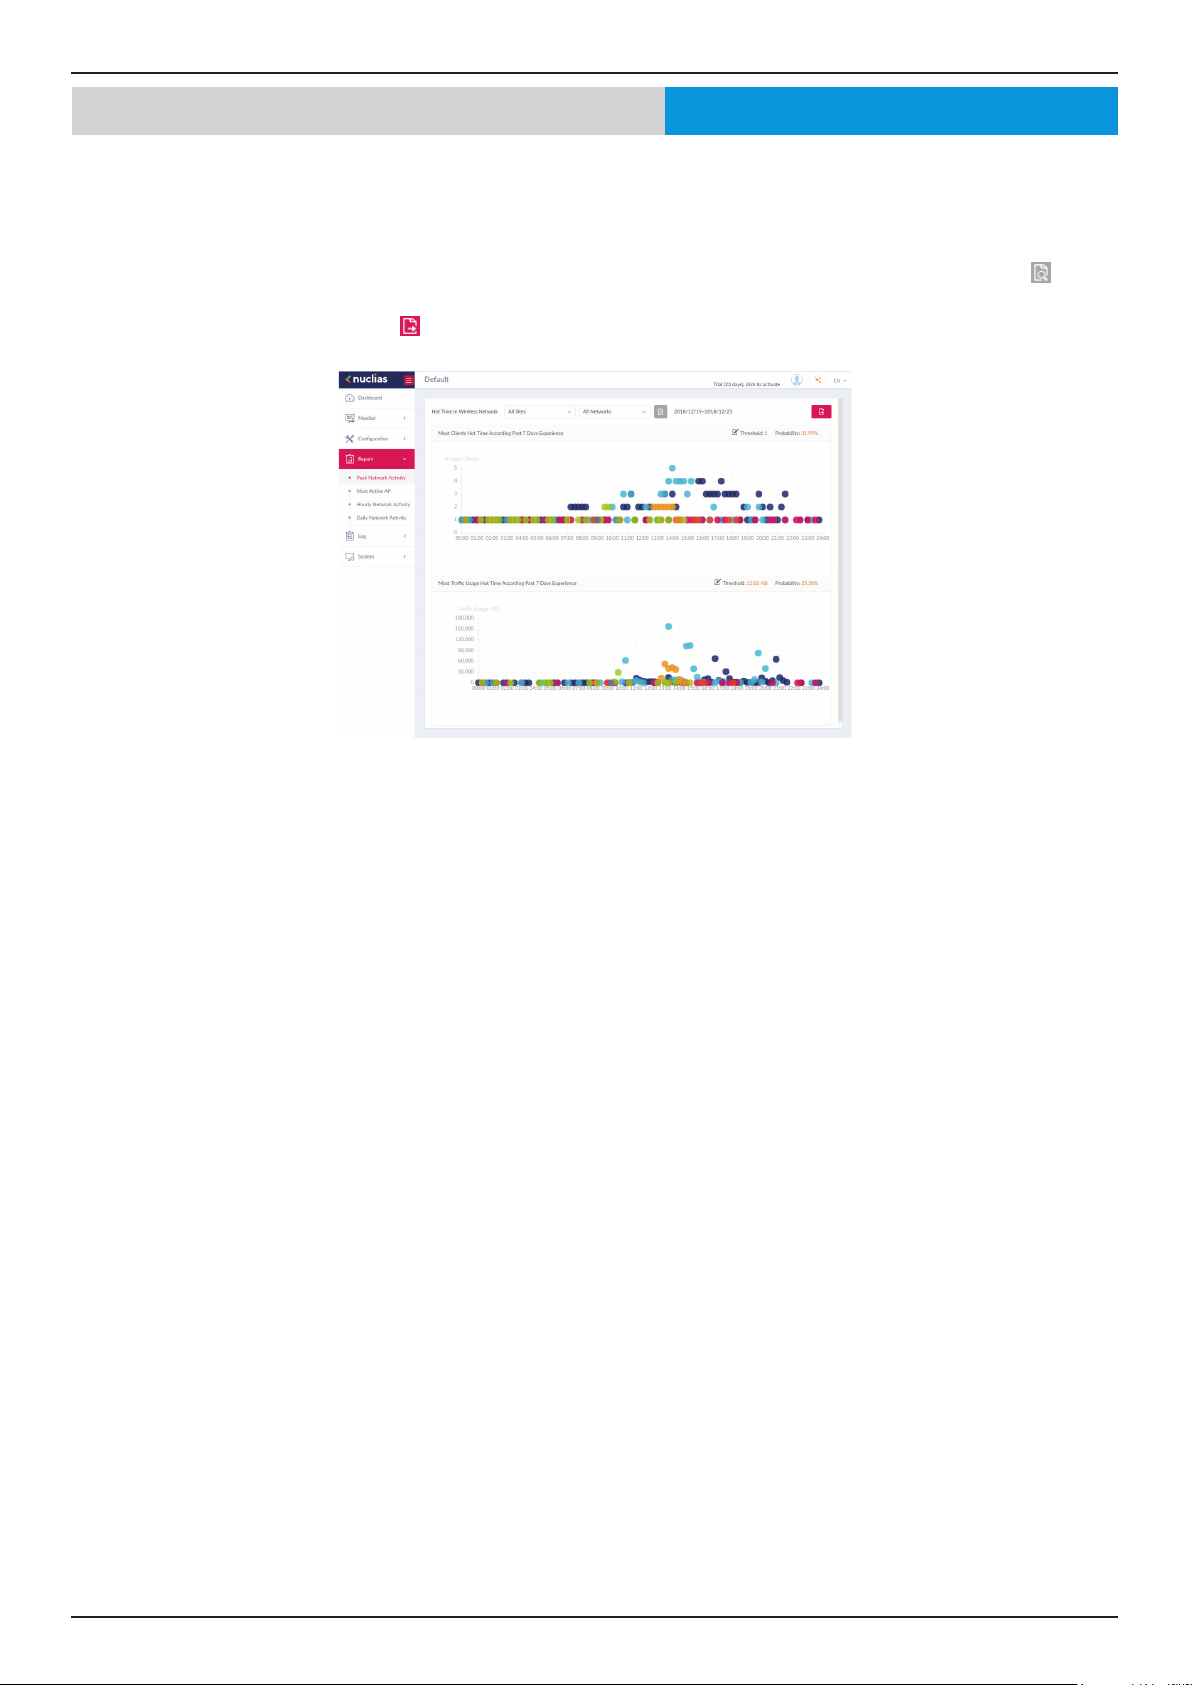
Nuclias
The Peak Network Activity function allows administrators to monitor wireless trac on the network. Wireless activity for all or
specic sites and networks can be displayed according to unique clients and trac usage.
Navigate to Report > Peak Network Activity to view the information.
To view a network activity report, select the site and network from the corresponding drop-down menu and click
the report.
Once a report has been generated click
Report Peak Network Activity
to view
to save the report to a local PDF le.
Page 39
Page 40

Nuclias Connect Software User Manual Nuclias Connect Conguration
Nuclias
To view a specic client’s trac usage, select a client from the most active APs column. Available maps can be edited or deleted
by clicking or . In the Edit Map of Most Active APs page, enter the name of the map name and click the Select AP drop-down
menu to select an AP from a list of available APs. Once dened, click Save to complete the process.
To add a new map, click
map by dragging and dropping an image (supported le formats: *.png,*.jpg; max. size: 10M) or browsing a local folder to select
the image.
To view a network AP active map report, select the date and time then click
Once a report has been generated, click
to open the Create Map of Most Active APs. Enter the map name in the name eld. Customize the
to save the report to a local PDF le.
Report Most Active AP
to view the report.
Page 40
Page 41

Nuclias Connect Software User Manual Nuclias Connect Conguration
Nuclias
The Hourly Network Activity function allows administrators to monitor wireless trac on the network. Wireless activity for all or
specic sites and networks is displayed according to unique clients and trac usage as reported by the hour.
Navigate to Report > Hourly Network Activity to vew the report.
To start a daily report, select the site and network from the corresponding drop-down menu and click
Once a report is has been generated, click
Report Hourly Network Activity
to view the report.
to save the report to a local PDF le.
Page 41
Page 42

Nuclias Connect Software User Manual Nuclias Connect Conguration
Nuclias
The Daily Network Activity function allows administrators to monitor daily wireless trac on the network. Wireless activity is
displayed according to unique clients and daily trac usage.
Navigate to Report > Daily Network Activity to generate and view the report.
To display a specic client’s trac usage, select a site, network, and dene the starting and ending dates of the search. Once the
search parameters are dened, click
Once a report has been generated, click
to view the report.
Report Daily Network Activity
to save the report to a local PDF le.
Page 42
Page 43

Nuclias Connect Software User Manual Nuclias Connect Conguration
Nuclias
The SNMP Traps function allows administrators to view alert messages when events concerning network devices occur.
Navigate to Log > SNMP Traps to generate and view the report.
To start a trap report, select the SNMP version, the event type and dene the period of time to report. Click the drop-down menu
to choose either IP address or Trap Details as report criteria. Fill in the keyword eld and click
Once a report has been generated, click
to save the report to a local PDF le.
Log SNMP Traps
to view the dened report.
Page 43
Page 44

Nuclias Connect Software User Manual Nuclias Connect Conguration
Nuclias
The Syslog function allows administrators to view alert messages for events concerning system logs. Log messages for the
system and captive portals can be viewed here. Navigate to Log > Syslog to view the relevant information.
To start a syslog report, select the event severity, facility system, and dene the period of time to report. Click the drop-down
menu to choose either IP address or Message as report criteria. Fill in the keyword eld and click
report.
Once a report has been generated, click
Log Syslogs Syslog
to view the gengerated
to save the report to a local PDF le.
Page 44
Page 45

Nuclias Connect Software User Manual Nuclias Connect Conguration
Nuclias Log System Event Log
The System Event Log function allows administrators to view alerts that may require attention and necessary action to continue
smooth operation and to prevent failures. Navigate to Log > System Event Log to view the relevant information.
To generate a System Event Log report, select the event severity and dene the period of time to report. Click the drop-down
menu to choose either IP address or Message as report criteria. Fill in the keyword eld and click
to view the generated report.
Once a report has been generated, click
to save the report to a local PDF le.
Page 45
Page 46

Nuclias Connect Software User Manual Nuclias Connect Conguration
Nuclias
The Device Log function allows administrators to view alert messages from an AP’s embedded memory. The system and network
messages includes a time stamp and message type. The log information includes but is not limited to the following items:
synchronize device settings, upgrading rmware, upload conguration, and blocking clients.
Navigate to Log > Device Log to display the function information.
To start a Device Log, select the operation type and dene the period of time to report. Click the drop-down menu to choose
either IP address or Log Details as report criteria. Fill in the keyword eld and click
Once a report has been generated, click
to save the report to a local PDF le.
Log Device Log
to view the generated report.
Page 46
Page 47

Nuclias Connect Software User Manual Nuclias Connect Conguration
Nuclias
The Device Management function allows user to view list of all devices on the network both managed and unmanaged devices.
Navigate to Log > Device Log to view the relevant information.
Click on the relevant tab to view either managed or unmanaged devices.
On the upper right hand corner of each tab is a button that you can use to move devices to Unmanaged, and vice versa. Next
to the Move button in the unmanaged tab, the Delete button the Delete button that can be used to delete a device on the
network.
The list of devices can be sorted by the following criteria: Status, Local IP Address, NAT IP address, MAC Address, Model Type,
HW Version, FW Version, Managed Time, Backup FW Version. The Menu button contains more criteria by which you can add to
the list to view.
System Device Management
Page 47
Page 48

Nuclias Connect Software User Manual Nuclias Connect Conguration
Nuclias
The User Status function allows administrators to view the current status of all registered user proles, edit or delete the prole.
From the page, the Login Status displays the login state of the user; indicates a logged in state, while indicates the user is
logged o.
Navigate to System > User Management to view the relevant information.
To edit a user prole, select a user and click
number as well as the user description are editable from the modications page. As a note, the administrator account cannot
be deleted or have its username and privilege settings modied.
Once you have nished editing user settings, click Save to conrm or Cancel to return to the previous menu.
The following is a list of available user proles and a description of their function.
• Admin: This is operator account and can not be deleted.
• Root admin: Can manage all sites/networks on this server.
• Local admin: Can manage his own network.
• Root user: Can view all sites/networks on this server.
• Local user: Can view his own network
• Front desk user: Can generate and manage passcodes.
System User Management User Status
. The username, password, email, priviledge, priviledge status, location, contact
Page 48
Page 49

Nuclias Connect Software User Manual Nuclias Connect Conguration
Nuclias
The User Privilege function allows administrators to add, view, and authorize/unauthorize users on a selected network.
Navigate to System > User Management and click on the User Privilege tab to display the relevant information.
To add a user to the selected network, click Add User to open the Create User page. In this page enter the new user information.
Fields marked with an asterisk (*) are required to complete the new entry. Once the information is lled in, click Create to save
the new user prole. Alternatively, click Cancel to return to the previous screen without saving.
To authorize or unauthorize an existing user, click an available site and then the target network. The available users for the
network are displayed on the ensuing screen. From the Unauthorized Users column, click the radio box of the target user. Once
a user is selected, click
System User Management User Privilege
to move to the respective column to authorize the user. The same process is used to unauthorize a user.
Page 49
Page 50

Nuclias Connect Software User Manual Nuclias Connect Conguration
Nuclias General
The Settings page displays General, Connection, SMTP, Backup, Firmware Upgrade, System Operation and Single-Sign-On (SSO)
information. The General tab displays customizable system settings, which includes adding a logo and enabling the captcha
feature. Device time and date and live packet interval settings are also available.
In the Customized Setting section, the following parameters can be congured:
Parameter Description
Device Name Enter a description to set the device name.
Logo Click Browser to select a le to be used as the interface
Login Captcha Click the drop-down menu to enable or disable the
In the Lan Settings section, the device connection parameters can be congured. These settings allow the management
computer to connect to the device.
System Settings
logo. A local le can be selected by using the browse
function or by dragging and dropping a le into the
frame. Supported le types include PNG or JPG images.
login Captcha function.
Parameter Description
Get Address From Click the drop-down menu to choose whether the
DNH-100 will get an IP address from a DHCP server
or to manually set a static IP address. By default it
is set to Static IP Address. Note: DHCP server is not
recommended.
IP Address If the above is set to Static IP address, specify an IP
address for the DNH-100.
Subnet Mask Specify a subnet mask for the device.
Gateway Specify a gateway mask for the device. (Optional)
Primary DNS Specify a primary DNS for the device. (Optional)
Secondary DNS Specify a secondary DNS for the device. (Optional)
In the Date and Time section, parameters about the device time and date can be congured. It is recommended that an NTP
server is used; log and schedule settings are depanding on correct time and date congurations.
Parameter Description
Time Zone Click the drop-down menu to select the time zone.
NTP Check to enable use of NTP server(s) to manage
device’s date and time.
NTP Server 1 Specify the NTP Server’s address.
NTP Server 2 Specify the secondary NTP Server’s address.
Copy Your
Computer’s Time
Click to copy your management computer’s time to
use here or manually set the time in the text boxes to
the left of this button.
Page 50
Page 51

Nuclias Connect Software User Manual Nuclias Connect Conguration
System SettingsNuclias General
Click Save to save the values and update the screen.
In the Console Setting section, parameters about a console connection to the DNH-100 can be congured:
Parameter Description
Console Check to enable management through the console
port.
Console Protocol Choose whether to use Telnet or SSH
Timeout Click the drop-down menu to select timeout time (in
min).
In the Device Setting section, the following parameters can be congured:
Parameter Description
Live Packet
Interval
Click Save to save the values and update the screen.
Click the drop-down menu to select the live packet
interval time.
Page 51
Page 52

Nuclias Connect Software User Manual Nuclias Connect Conguration
Nuclias
The Connection tab displays device access address, port, and SSL certicate settings.
Navigate to System > Settings and click the Connection tab to display the relevant information.
In the Connection Setting section, the following parameters can be congured:
Parameter Description
Device Access Address Enter the Nuclias Connect Server application’s IP address.
Device Access Port Enter the Nuclias Connect server application’s listen
Web Access Port The web access ports as dened during the installation.
Click Save to save the values and update the screen.
System Settings Connection
To manage remote APs, the IP address must be a public
IP address; IP mapping is required for instances behind a
rewall or router.
port number. The default value is 8443. For remote AP
management behind a rewall or router, the inboud port
must be opened.
The values are predened.
In the Update SSL Certicate section, the following parameters can be congured:
Parameter Description
Upload Certicate From
File
Upload Key From File Click Browser... to select the SSL key le located on the
Click Save to save the values and update the screen.
Click Browser... to select the SSL certicate le located
on the local drive that will be uploaded.
local drive, that will be uploaded.
Page 52
Page 53

Nuclias Connect Software User Manual Nuclias Connect Conguration
Nuclias
The SMTP tab displays customizable settings for the simple mail transfer protocol (SMTP). This is necessary in order to send
emails on behalf of the system such as reset password validation emails.
Navigate to System > Settings and click on the SMTP tab.
Parameter Description
SMTP Host Enter the SMTP server’s IP address or domain name.
Port Enter the SMTP server’s port number.
From Email Address Enter the sender’s email address.
From Name Enter the sender’s name.
Security Type Click the drop-down menu to select the security type to be
Encoding Type Click the drop-down menu to select the encoding type to
Authentication Click the drop-down menu to select the authentication
Test Email Enter the recipient e-mail address to initiate a test e-mail
System Settings SMTP
used in the e-mail system. The options include None or SSL.
match the supported e-mail client. The options include
UTF-8 or ASC-II.
mechanism during logging supported by the e-mail server.
The options include Anonymous or SMTP Authentication.
through the SMTP conguration. Click Test to start the test
function.
Click Save to save the values and update the screen.
Page 53
Page 54

Nuclias Connect Software User Manual Nuclias Connect Conguration
System Settings BackupNuclias
The Backup tab displays customizable settings for backing up conguration settings or logs.
Navigate to System > Settings and click on the Backup tab to display the function information.
In the Auto Backup Settings section, parameters regarding auto backup can be congured:
Parameter Description
Auto Backup Click on drop-down list to enable or disable auto backup.
External Sylog
Server
Enter the external syslog’s ip address or domain name.
In the Backup Settings section, device conguration and logs can be backed up, downloaded to a local hard drive or USB, or
deleted:
Click
Click
Specify the following parameters from the pop-up window, then click Download to download the le or Cancel to exit from
the operation.
to backup the conguration le or log les.
to download the backup le to either the management computer’s hard drive or a USB drive.
Parameter Description
To Choose either My Hard Disk or USB Storage to download
your backup le to.
All Backup Files A list of all backup les that are available to be downloaded
will be displayed. Select the radio button of the le you
want to download.
Page 54
Page 55

Nuclias Connect Software User Manual Nuclias Connect Conguration
Click
Select which les from the pop-up window you want to delete, then click Delete to conrm your action or Cancel to exit from
the operation.
In the Restore Settings section, device conguration can be restored from local hard drive or USB storage.
to delete the backup conguration les or log les that are stored on the device.
Specify the following parameters then click Restore.
Parameter Description
Upload
Conguration From
File Click on Choose File to select your conguration le’s
Choose either My Hard Disk or USB Storage to upload your
conguration le.
location.
Page 55
Page 56

Nuclias Connect Software User Manual Nuclias Connect Conguration
System Settings Firmware UpgradeNuclias
The Firmware Upgrade tab displays customizable settings to upgrade the rmware of the DNH-100.
Specify the following parameters and then click Apply.
Parameter Description
Upload Firmware
From
File Click on Choose File to select your conguration le’s
FTP Server Specify IP address or domain name of FTP server.
Port Specify port number of FTP server.
Username Specify username.
Password Specify password.
Firmware File Specify the path and lename on the FTP server where the
Choose either My Hard Disk, USB Storage or FTP Server to
upload your rmware le.
location. (Only available if My Hard Disk or USB Storage is
chosen.)
rmware le is located.
Page 56
Page 57

Nuclias Connect Software User Manual Nuclias Connect Conguration
System Settings System OperationNuclias
The System Operation tab allows you the option to reboot, restore to factory default settings, or format the MicroSD card in
the DNH-100.
Click
Click
will remain the same.
Click
proceed.
to Reboot the DNH-100 immediately.
to restore the DNH-100 to factory default settings. If Except IP address is checked, then the device IP address
to format the MicroSD card. Please be aware that you will lose all information on the MicroSD card once you
Page 57
Page 58

Nuclias Connect Software User Manual Nuclias Connect Conguration
System Settings Single-Sign-On (SSO)Nuclias
The Single-Sign-On tab allows you to use a Nuclias Account to access Nuclias Cloud and the Nuclias Connect portal.
If you do not already have a Nuclias account, you can click on Create acount where a browser window will open to a link where
you can create one.
There are three steps in the registration process.
Step 1: Selecting server region and country.
The account is created on the servers within the selected region and the selected country. Your account data will be stored in
the reginoal server based on your selected region and country.
Step 2: Create organization and site.
Once the region and country have been entered, you will see the the user, organization, and site page. Enter the required
information and agree to the Terms of Use and Privacy agreement to enable the account creation button.
Click Create Account to continue.
Page 58
Page 59
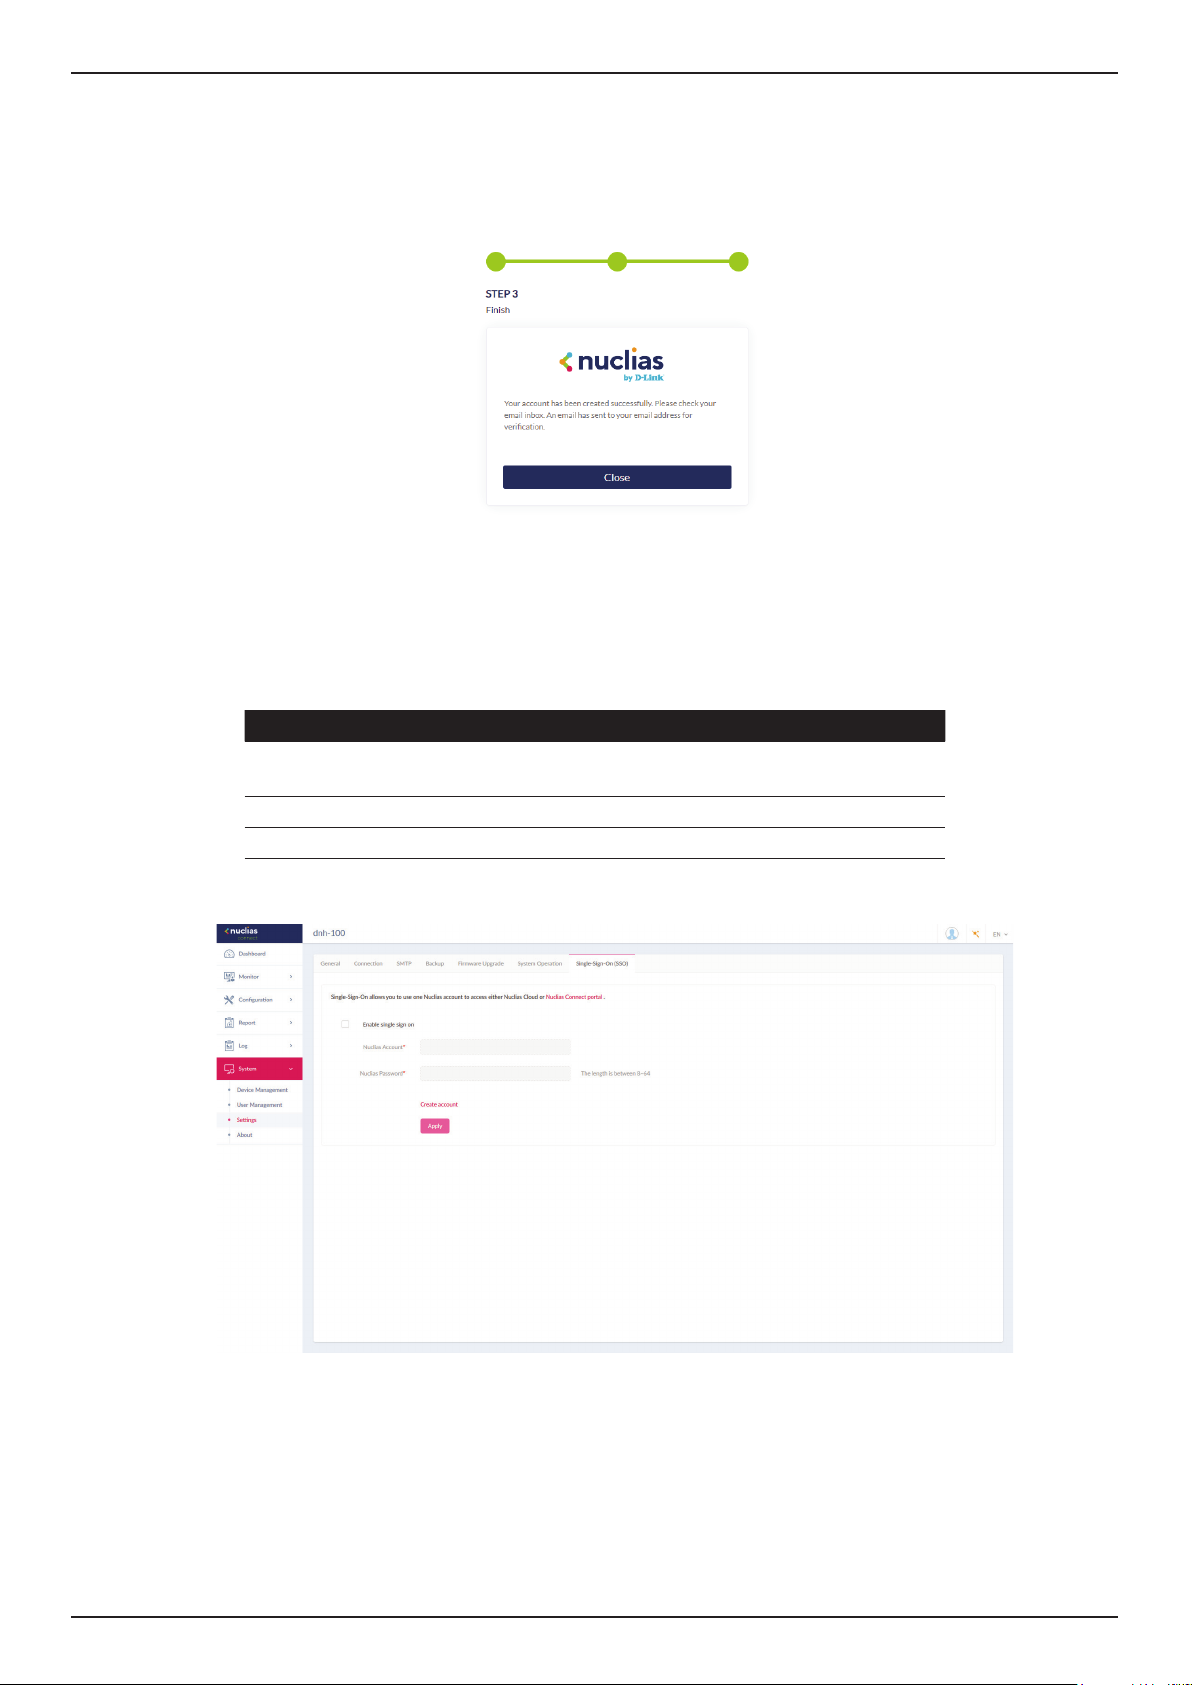
Nuclias Connect Software User Manual Nuclias Connect Conguration
Step 3: Finish the registration.
Click Close to complete the process. The registered account is now available for use. The verication information will be delivered
to the registered email of the account.
Your Nuclias account must be validated before use. You will receive an email from verify@nuclias.com with a verication link
included. Please click on the verication link to activate your Nuclias account.
Once nished, specify the following parameters on the Single-Sign-On page and then click Apply.
Parameter Description
Enable single sign onCheck to enable single-sign-on.
Nuclias Account Enter your Nuclias Account username.
Nuclias Password Enter your Nuclias Account password.
Page 59
Page 60

Nuclias Connect Software User Manual Nuclias Connect Conguration
The Nuclias Connect Portal provides you with a easy way to view and connect to all your Nuclias Connect hubs.
Requirements for use include:
• A Nuclias account
• DNH-100 device(s) with single-sign-on enabled
The portal can be found at: https://connect.nuclias.com/
The Portal provides the following information:
Parameter Description
Number Number of the DNH-100 on the list.
Status Displays whether or not the Nuclias Connect portal can link
to that DNH-100.
Name Name of the Nuclias Connect Hub. You can change this
name by clicking on it then typing on the available text box.
Host Displays both the device IP address and its public IP address.
Sites Number of sites managed by that DNH-100.
Networks Number of networks managed by that DNH-100.
Devices Number of devices managed by that DNH-100.
Clients Number of clients connected to devices managed by that
DNH-100.
Version Firmware version number of that DNH-100.
Actions Click Launch to open the DNH-100 Nuclias Connect
interface. Please note that IP mapping is required for
instances behind a rewall or router. Click Forget to unlink
this DNH-100 from the Nuclias Connect portal. (Forget is
only available when that device is oine.)
Page 60
Page 61

Nuclias Connect Software User Manual Nuclias Connect Conguration
Nuclias
The About page displays system information about the DNH-100 and a list of supported access points.
Navigate to System > About. By default you will see the System Information tab where information about the DNH-100 will
be displayed.
System About
The list can be updated by clicking Update Online. If an update is available, new supported devices will also be displayed.
Page 61
Page 62

Nuclias Connect Software User Manual Appendix
Appendix
Nuclias Connect App
Through the use of the Nuclias Connect App, users can manage sites and network remotely and easily by accessing the tool
through a smart device.
This section provides information on exporting the required network proles from the Nuclias server for managing connected
DAPs. Additional information explaining the functionality of the Nuclias Connect App is also included.
Export Network Proles
To add new access points to Nuclias Connect, you must rst export the required network prole from Nuclias. The network
prole contains the authentication key and the IP address of the controller. Select Conguration and then click the Export (
) icon to export the network prole to your computer.
When access points are located on a public network and you are accessing Nuclias Connect remotely, you must ensure that
Nuclias Connect uses a public IP address or domain name. To verify Nuclias Connect’s IP address, go to System > Settings >
Connection and check the Device Access Address eld.
Page 62
Page 63

Nuclias Connect Software User Manual Appendix
Nuclias Connect App
Discover and Congure APs Using the Nuclias Connect App
The Nuclias Connect App is a wireless access management tool that provides the means to easily manage single or multiple
sites and networks from your smartphone or tablet. With the Nuclias Connect App, you can quickly deploy standalone DAPs to
the Nuclias Connect, scan a network for D-Link access points or congure individual DAPs.
NOTE:
• Before attempting to import a network prole, ensure that you have access to the Nuclias Connect controller.
The Nuclias Connect App is available for both iOS and Android smart devices. The following functions are available:
• Quick Setup: Quickly and easily deploy your standalone DAP to the Nuclias Connect controller.
• Nuclias Connect: Manage your current sites and networks through Nuclias Connect.
• Standalone Access Point: You can change the conguration of individual DAPs and save the conguration prole to be
deployed to multiple DAPs.
Quick Setup
After opening the Nuclias Connect App, the following window will appear (iOS). Tap on Quick Setup to start the setup
process.
The next step is to select an AP provision prole. The prole is used to push to the selected DAPs. Tap Quick Setup to begin the
deployment of a standalone DAP to the Nuclias Connect server.
In the below example the Provision File entry shown is None.
Tap Provision File to display a list of available local proles. If no locally stored prole exists, a pop-up page will appear with
further instructions on how to download a prole.
Tap Download prole in order to specify a connection to the Nuclias Connect controller.
Page 63
Page 64

Nuclias Connect Software User Manual Appendix
Nuclias Connect App
Once a Nuclias Connect controller connection is established, you will see it listed next to the eld Provision File
Tap Provision File to select a local AP provision prole. In the following gure, the entry Nuclias_connect_test_Network132
is available.
After the Select AP Provision le window appears, select an available provision le from local storage and tap Done to
continue.
The process will continue and the App wil return to the previous screen. From the Step 1 page, tap Next to continue.
From this page, you can discover standalone DAPs connected to the L2/L3 wireless network.
Tap the button on the L2 eld to enable discovery on the L2 network.
Tap the button on the L3 eld to enable discovery on the L3 network. Then enter an IP range in the provided From and To
elds. Tap add (
In the IP range elds, specify the starting and ending IP addresses.. Once the range is dened, tap Next to initiate the
discovery process.
) to create a new IP range entry. Tap remove ( ) to delete any dened range entries.
Page 64
Page 65

Nuclias Connect Software User Manual Appendix
Nuclias Connect App
After the scanning the network range, the Step 3 page will list any detected access points.
Tap the radio button next to the DAP to select it. The local provision le that you previously selected will be pushed to the
selected DAP.
Tap Push Provision File to continue.
The DAP login pop-up window displays. The listed IP and MAC address are shown at the top of the window. Conrm the
selection and enter the user name and password with authorization to access the selected DAP.
Tap Apply to continue the login process. The Modify IP Information page will appear. Any listed information can be modied;
see the following gure for further information.
Parameter Description
Cancel Tap to discard any changes and continue
the process.
Done Tap to accept any changes and continue
the process.
Model Name Displays the model name for the listed
DAP device.
MAC Displays the MAC address of the listed
DAP device.
Page 65
Page 66

Nuclias Connect Software User Manual Appendix
Nuclias Connect App
Parameter Description
DHCP Mode Tap to enable or disable the DHCP
mode function. When enabled, the DAP
establishes dynamic IP address settings
with any authorized client connections.
IP Address Tap to designate an IP gateway setting.
Subnet Mask Tap to designate a subnet mask.
Default
Gateway
DNS Tap to designate a DNS setting.
Tap Done or Cancel to continue the process. The provision le will be pushed to the selected DAP device (s). The App will
return to the Step 3 page and will display the status of the Push function. The discovered DAPs lists the state of the push
function with either a successful or failed state. See the following gure for further details.
Tap Finish to complete the process. In the event of a failed process, tap Push Provision File to attempt the function a second
time.
Tap to designate a default gateway
setting.
Page 66
Page 67

Nuclias Connect Software User Manual Appendix
Nuclias Connect App
Nuclias Connect
Nuclias Connect is a wireless access point management tool capable of managing your sites and networks.
Tap Nuclias Connect to connect to a Nuclias Connect server.
If no previous Nuclias Connect controller was paired it will ask you to create a new Nuclias Connect pairing. Tap the add (
button to start the process.
The following page lists the information required to log in to a designated Nuclias Connect controller. Enter the required
information in each eld.
Parameter Description
Specify
Nuclias Connect
URL/IP Address
Enter the secure URL/IP address of the
Nuclias Connect server to pair with the
App.
)
Specify a
reference name
Enter a specic name to easily identify
the paired Nuclias Connect server.
Page 67
Page 68

Nuclias Connect Software User Manual Appendix
Nuclias Connect App
Parameter Description
User name Enter a user name with the authority to
access the Nuclias Connect controller.
Password Enter the password for the referenced
user name with the authority to access
the Nuclias Connect server.
Login Tap Login to initiate the login process.
Tap on Login to initiate the login process.
After a successful login, the pairing will be added to the listing and will be available for future login selection.
Tap on a Nuclias Connect server from the list.
Page 68
Page 69
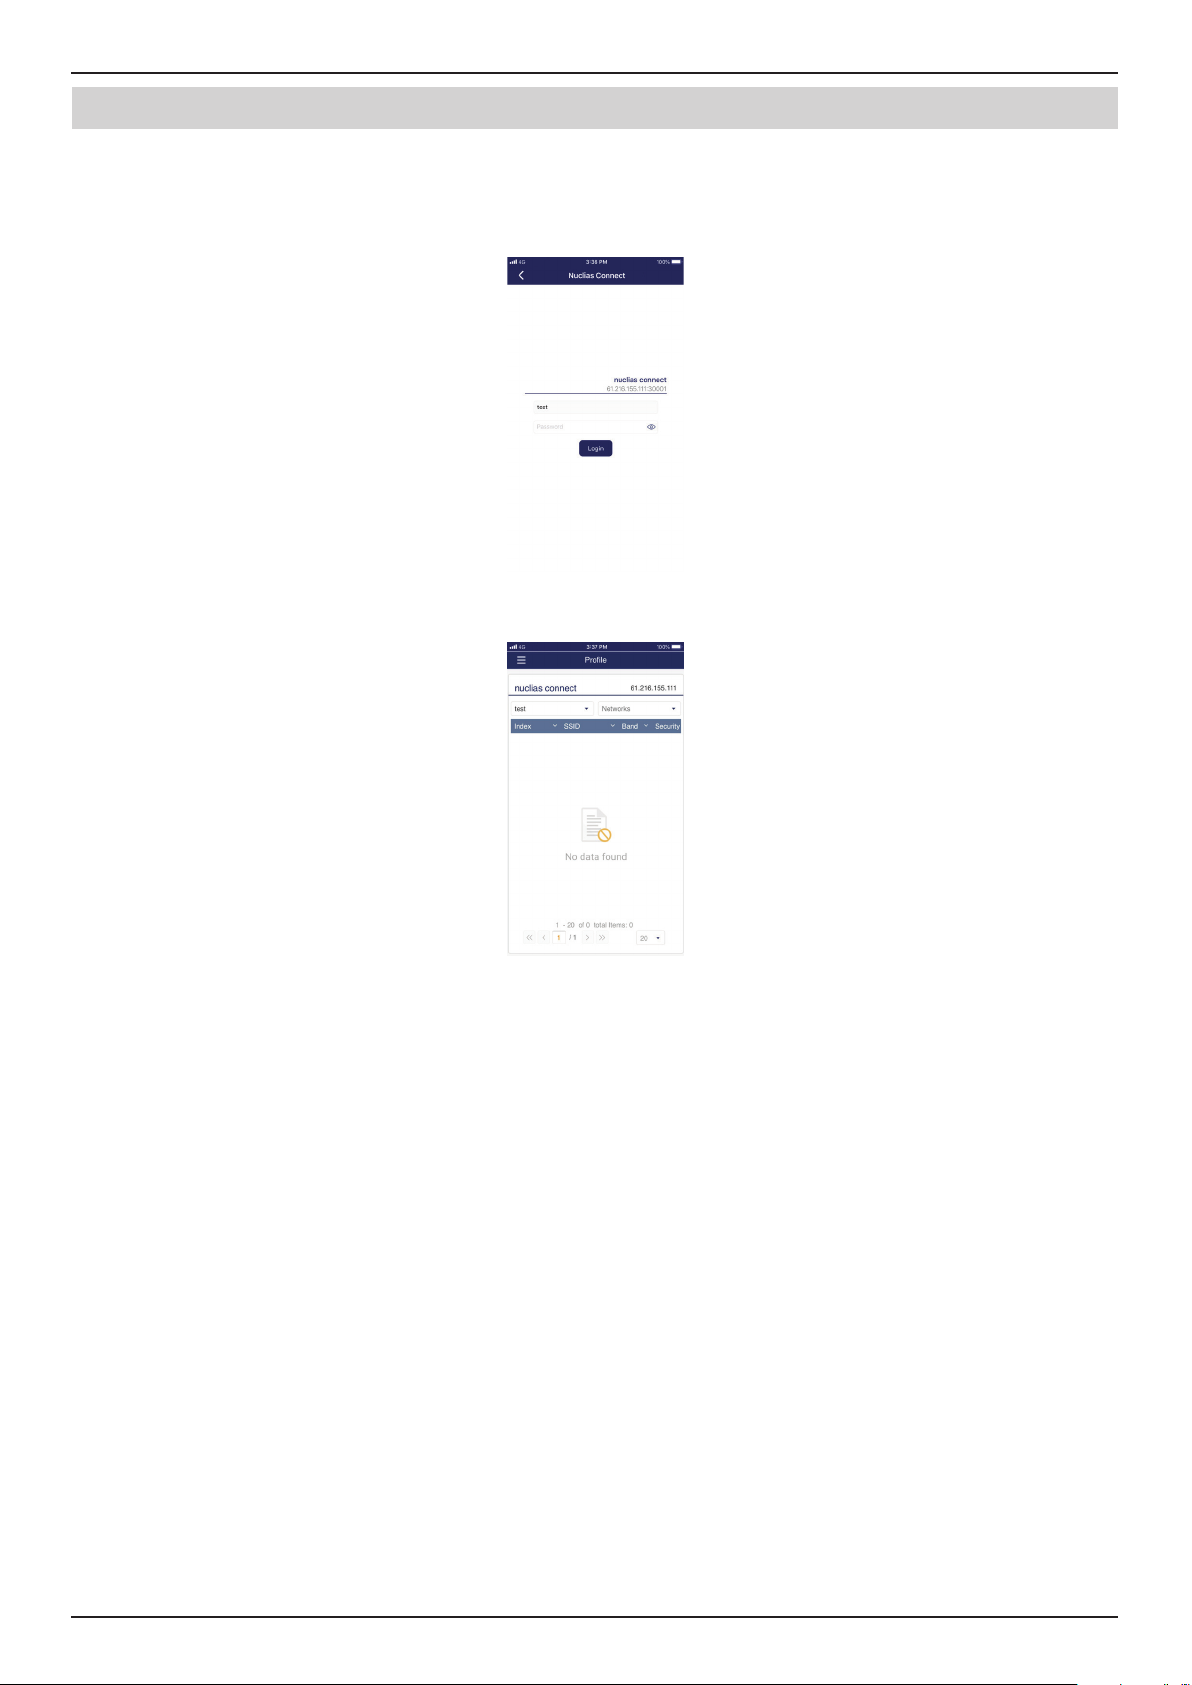
Nuclias Connect Software User Manual Appendix
Nuclias Connect App
The username page will appear. Enter the username and password with authority to access the selected Nuclias Connect server.
Tap Login to initiate the login process.
After the login process is authenticated, the dashboard will appear. The Nuclias Connect dashboard will list any currently
dened sites, networks, access points, and clients.
The Nuclias Connect App is now paired to the Nuclias Connect server. Through the use of the App, proles can be downloaded
to the local device, after which it can be pushed to supported access points.
Page 69
Page 70

Nuclias Connect Software User Manual Appendix
Nuclias Connect App
Standalone Access Point
Discover DAPs
The Discover DAP function allows you to discover any access points in a L2/L3 wireless network.
From this page, you can discover standalone DAPs connected to the L2/L3 wireless network.
Tap to enable discovery on the L2 network.
Tap to enable discovery on the L2 network. Then enter an IP range in the provided From and To elds. Tap add (
new IP range entry. Tap remove (
Once the range is dened, tap Next to initiate the discovery process.
Alternatively, tap Congure Access Point Proles from the bottom of the page to add or delete any local proles. See Congure
Access Point Proles.
After the scanning the network range, the Step 3 page will list any detected access points.
Tap the radio button next to the DAP to select it. The selected local provision le will be pushed to the selected DAP.
Tap Push Provision File to continue.
) to delete any dened range entries.
) to create a
Page 70
Page 71

Nuclias Connect Software User Manual Appendix
Nuclias Connect App
The DAP login pop-up window will appear. The IP and MAC address are shown at the top of the window. Conrm the selection
and enter the user name and password with authorization to access the selected DAP. Tap Apply to continue.
Once a successful login is established, the DAP interface menus will appear. The IP information, Wireless, and Client menus will
be listed as follows.
Parameter Description
Cancel Tap to discard any changes and continue
the process.
Model Name Displays the model name for the listed
DAP device.
MAC Displays the MAC address of the listed
DAP device.
DHCP Mode Tap to enable or disable the DHCP
mode function. When enabled, the DAP
establishes dynamic IP address settings
with any authorized client connections.
IP Address Tap to designate an IP gateway setting.
Subnet Mask Tap to designate a subnet mask.
Default
Gateway
DNS Tap to designate a DNS setting.
Tap to designate a default gateway
setting.
Page 71
Page 72

Nuclias Connect Software User Manual Appendix
Nuclias Connect App
The Wireless settings menu is listed in the following gure.
Parameter Description
Cancel Tap to discard any changes and continue the process.
DAP Displays the model name and IP address of the AP device.
2.4G SSID
SSID-# Tap the slide button to enable or disable the SSID. The # character indicates
the identifying number of the SSID.
SSID Name Tap to change the current name of the SSID.
Security Tap to select a specic security protocol: Open System (default), WPA-
Personal, or WPA-Enterprise.
5G SSID
SSID-# Tap the slide button to enable or disable the SSID. The # character indicates
the identifying number of the SSID.
SSID Name Tap to change the current name of the SSID.
Security Tap to select a specic security protocol: Open System (default), WPA-
Personal, or WPA-Enterprise.
Wireless Information
Radio Band Tap to select a specic radio band: O, 2.4G, 5G, or 2.4G / 5G.
Radio 2.4G
Mode
Radio 5G Mode Tap to select a specic 5G radio mode: Mixed 802.11n, 80211a; 802.11a Only;
Country Code Displays the assigned country designation for the DAP.
Copy & Save Conguration
Apply
Conguration
Save
Conguration
Tap to select a specic 2.4G radio mode: Mixed 802.11n, 80211g and 802.11b;
Mixed 802.11g, 802.11b; 802.11n Only.
802.11n; Mixed 802.11ac.
Tap to select an alternate discovered DAP device to push the current
conguration.
Tap to name and archive the current conguration prole.
Page 72
 Loading...