

Page 1
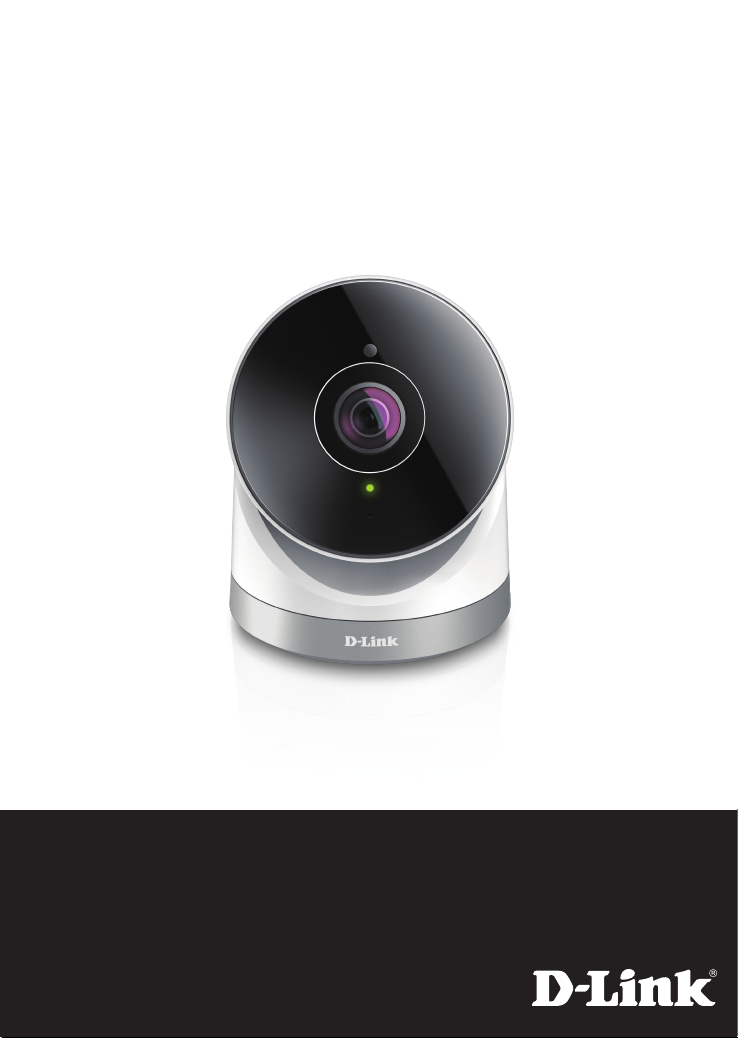
DCS-2670L
Full HD 180-Degree Outdoor Wi-Fi Cam
Quick Install Guide
Page 2

ENGLISH
Package Contents
DCS-2670L Full HD
180-Degree Outdoor
Wi-Fi Cam
Waterproof Cable Connector
Power Adapter
Ethernet Cable
If any of the above items are missing, please contact your reseller.
Mounting Hardware
Quick Install Guide
Minimum Requirements
Mobile Device (to use mydlink Lite app)
• iPhone, iPad, or Android smartphone or tablet
(Refer to the mobile app’s store page to see if your device is compatible)
Network Device and Service
• A wireless router (802.11n/ac) with Internet service
• An e-mail account (required to create a mydlink® account)
For warranty and regulatory information, please visit:
http://support.dlink.com/warranty.aspx (U.S.)
or http://support.dlink.ca/DCS-2670L (Canada)
2
Page 3
Product Overview
Front
ENGLISH
Light Sensor
Camera Lens
Power LED
Microphone
Reset Button
Bottom
Infrared LEDs
Camera Base
microSD Card Slot
*
Baseplate
* Supports microSD/SDXC up to 128GB
3
Page 4
ENGLISH
Setting Up Your Camera
Download the free mydlink Lite app on your smartphone or tablet by
1
scanning the QR code below, or by searching for mydlink Lite in the app
store for your device.
System Requirements: Refer to the mydlink Lite app page on the Apple App Store or Google Play.
Launch the mydlink Lite app, then create a new account or log in to your
2
existing account.
The app will guide you through the rest of the set up process.
3
4
Page 5
Wireless Setup
To connect your camera to your network wirelessly,
follow the instructions below.
Once your camera is set up, select your camera and tap the Settings button.
1
Select “Wi-Fi Setting” and “Enable Wi-Fi connection”.
2
ENGLISH
Select your wireless network and enter your password, then tap Apply.
3
You can now disconnect the Ethernet cable and move the camera to your
4
preferred location.
5
Page 6
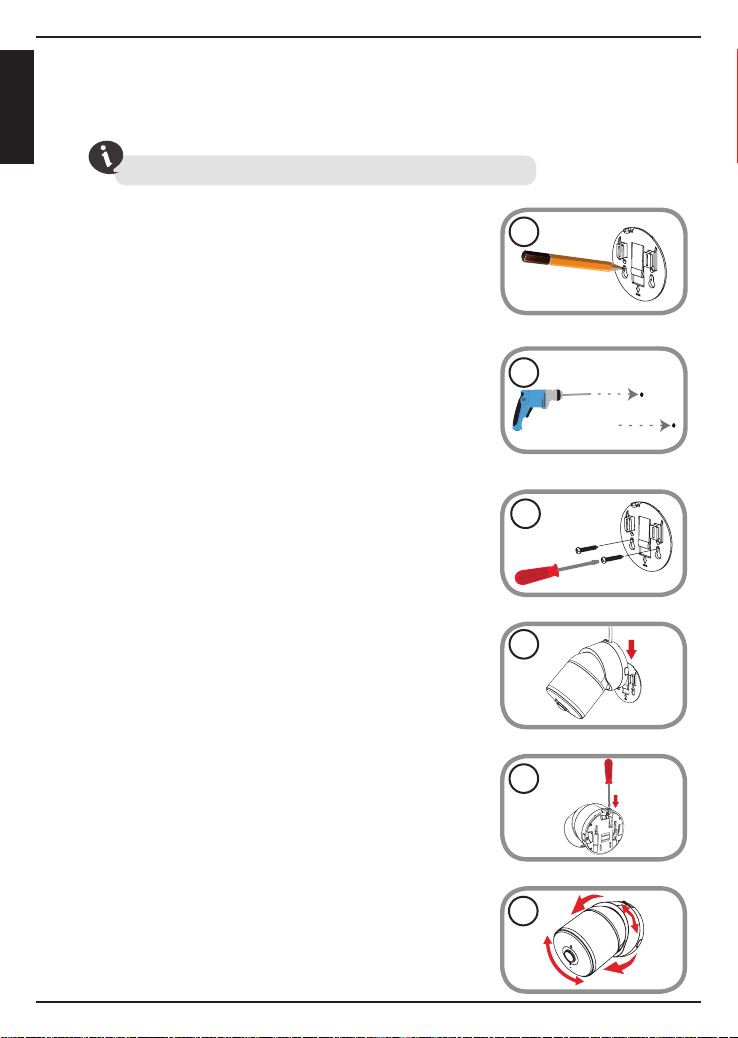
Mount the Camera
Please refer to the steps below to assist you with mounting the camera.
ENGLISH
We suggest that you congure the camera before mounting.
1. Place the baseplate where you want to position the
camera and use a pencil to mark the holes. You can
use the large holes for a removable installation, or
the small holes for a xed one. Make sure the lock
arrow on the plate is pointing down.
2. Depending on the material of the wall or ceiling,
use proper tools to drill holes 25 mm deep with a 6
mm drill bit where you marked. If the wall is made
out of concrete, drill the holes rst, then insert the
plastic anchors to support the screws.
3. Place the baseplate over the holes that are in the
wall. Make sure to align the baseplate holes with the
holes in the wall. Use the supplied screws to attach
the baseplate to the surface of the wall.
4. Place the camera over the baseplate and align the
nub with the hole on the camera. Attach the camera
by sliding it in the direction of the arrow.
1
2
3
4
5. Once the camera is secured to the baseplate, use a
screwdriver to fasten the screw next to the hole at
the back of the camera body.
6. Adjust the angles via the camera body and rotate
the silver base until you achieve your desired
viewing angle.
6
5
6
Page 7
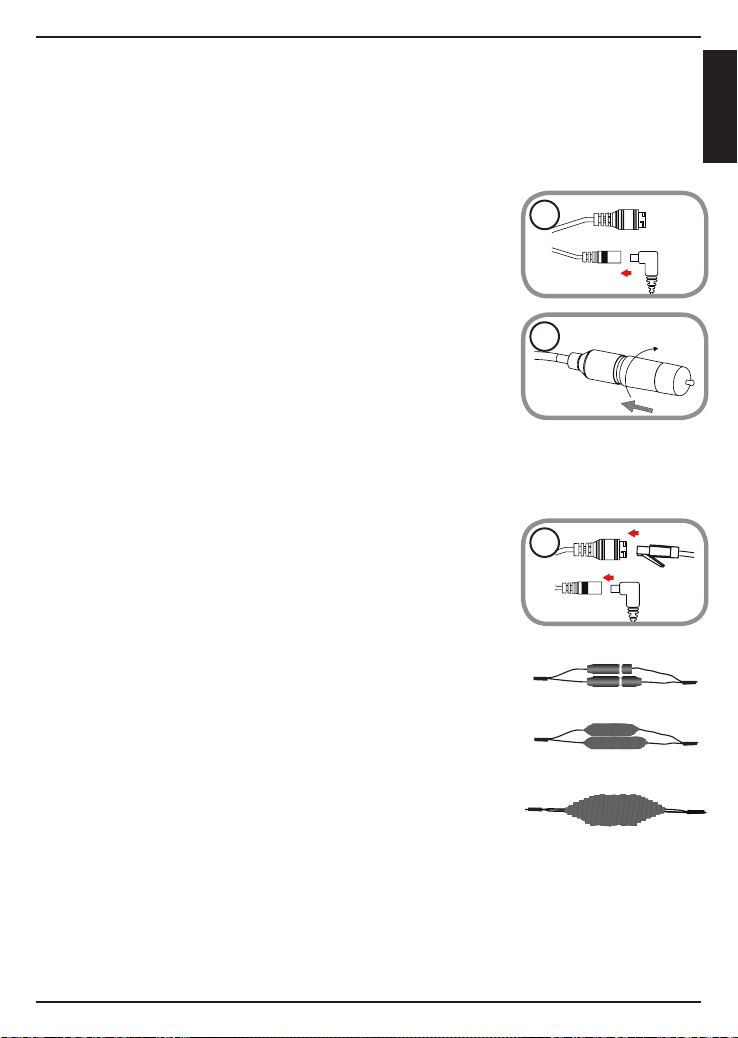
Waterproong the Camera
Waterproong Your Connectors When Using Wi-Fi
After conguring your camera, follow the instructions below to prevent
water from entering the camera's Ethernet and Power Cable connections.
ENGLISH
1. Plug the power adapter into the dongle.
1
2. To waterproof the Ethernet socket, align the cap
according to the thread and twist it clockwise to
seal it.
Waterproong Your Ethernet Connector
If you are using an Ethernet connection, follow the instructions below to
prevent water from entering the camera's Ethernet cable connector.
1. Connect the power and Ethernet cables.
2
1
Using Waterproof Tape
Wind waterproof tape, such as butyl rubber or vinyl
tape, around the individual cables and connectors
in a half-overlapping manner then wrap all the
connectors together. Be sure to cover all of the
connectors and any unsheathed cables.
Note: Butyl rubber tape should be wrapped by stretching the
tape to about twice its length, and wrapping it around the cable.
Failure to stretch the tape suciently will result in insucient
waterproong performance.
Caution: Due to its IP65 rating we recommend that you install your device under a roof or a shelter to
protect the Power and Ethernet connections from water seepage. The cables and connections need to
be located away from all potential water hazards.
7
Page 8
FAQs
1. What can I do if my DCS-2670L is not working correctly?
ENGLISH
• Reset the camera (see next step) and run the setup steps starting
on page 4 again.
• To make sure your hardware is installed correctly, make sure that:
- the power LED is green
- your Internet connection is working
- your router’s LAN & WAN connections are working
- your router supports UPnP
- your camera is on the same network as your mobile device
- both your mobile device and camera have a working Internet connection
• If your camera is still not working, check your router and make sure it
has the latest rmware.
®
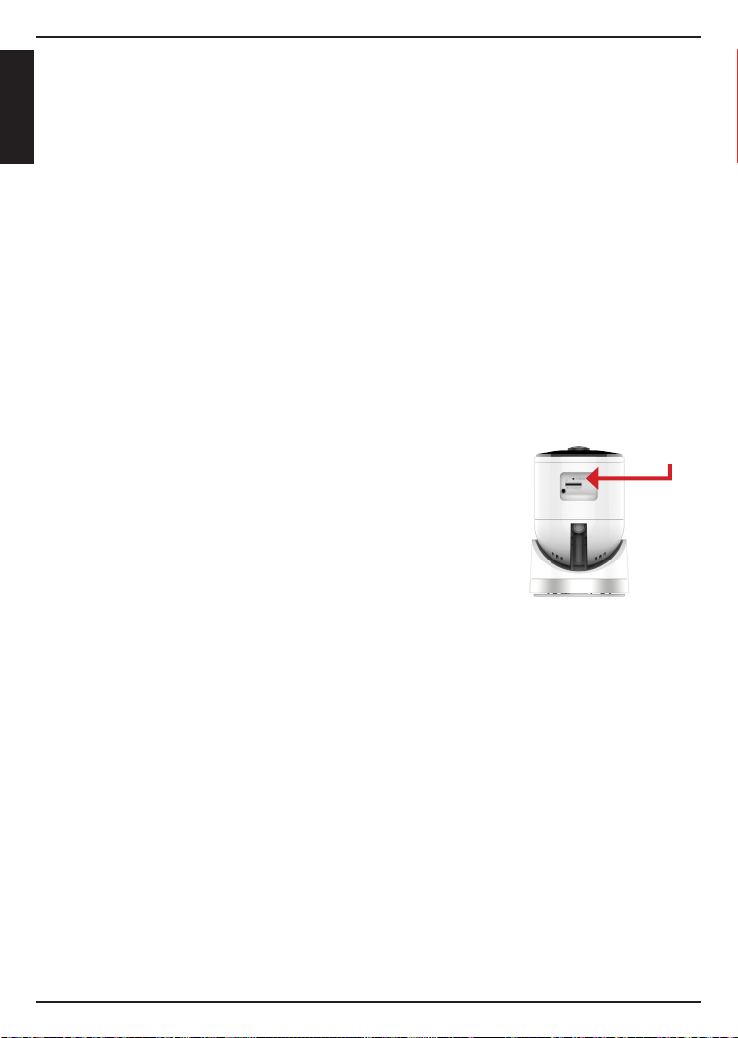
2. What can I do if I forget my password?
If you forget your password, you must reset the
camera. Unfortunately, this process will change
your settings back to factory default. To reset the
camera, locate the reset button underneath the
camera. With the camera powered on, use an
unfolded paper clip to hold the button down for
10 seconds. Run the setup procedure located on
page 4 once the camera restarts.
3. Why is there a white haze when viewing in night vision mode?
When viewing in night vision mode, the IR lights on the camera may be
reecting o a nearby surface. Try repositioning the camera in order to
avoid glare from IR LEDs.
Reset
Button
8
Page 9

Notes
ENGLISH
9
Page 10

ENGLISH
Notes
10
Page 11

Notes
ENGLISH
11
Page 12

Technical Support
This guide is only for initial set up. Please refer to the user manual
and FAQs at http://support.dlink.com/DCS-2670L (U.S.) or http://
support.dlink.ca/DCS-2670L (Canada) for more information. Also
feel free to contact us. U.S. and Canadian customers can contact D-Link
Technical Support through our website.
USA
http://support.dlink.com
Canada
http://support.dlink.ca
Version 1.10(NA)_90x130
May 11, 2017
RMN0102213A
Copyright ©2017 All rights reserved. D-Link and the D-Link logo are registered trademarks of D-Link
Corporation or its subsidiaries. Other trademarks are the property of their respective owners. Maximum
wireless signal rate derived from IEEE Standard 802.11n and 802.11g specications. Actual data throughput
will vary. Network conditions and environmental factors, including volume of network trac, building
materials and construction, and network overhead, lower actual data throughput rate. Environmental
factors will adversely aect wireless signal range. Product specications, size and shape are subject to
change without notice, and actual product appearance may dier from that depicted on the packaging.
Visit dlink.com (US) or dlink.ca (Canada) for more details.
Page 13

DCS-2670L
Caméra extérieur Wi HD intégrale à 180 degrés
Guide d’installation rapide
Page 14

Contenu de la boîte
DCS-2670L Caméra
extérieur Wi HD
intégrale à 180 degrés
Câble connecteur d'étanchéité
FRANÇAIS
Adaptateur secteur
câble Ethernet
Communiquez avec votre revendeur s’il manque
l’un des éléments ci-dessus.
Matériel de montage
Guide d’installation rapide
Exigences minimales
Appareil mobile (pour utiliser l'application mydlink Lite)
• iPhone, iPad, ou smartphone ou tablette Android
(Veuillez vous reporter à la page de l'application mobile pour vérier si
votre appareil est compatible)
Périphérique réseau et service
• Un routeur sans l (802.11n/ac) avec service Internet
• Un compte de messagerie (requis pour créer un compte mydlink®)
Pour la garantie et les informations réglementaires, veuillez visiter:
http://support.dlink.com/warranty.aspx (États-Unis)
ou http://support.dlink.ca/DCS-2670L (Canada)
2
Page 15

Présentation du produit
Avant
FRANÇAIS
Capteur de lumière
Objectif de caméra
Voyant
d’alimentation
Microphone
Bouton de
réinitialisation
Témoins IR
Base de la caméra
Bas
Port de carte
microSD*
Plaque de base
* Prend en charge les cartes microSD/SDXC jusqu’à 128 Go
3
Page 16

1
FRANÇAIS
2
Conguration de votre caméra
Téléchargez l'application gratuite mydlink Lite sur votre smartphone
ou votre tablette en scannant le code QR ci-dessous, ou en recherchant
mydlink Lite dans l'app store de votre appareil.
Conguration système requise: Reportez-vous à la page de l'application mydlink Lite sur l'App Store
d'Apple ou Google Play.
Lancez l'application mydlink Lite, puis créez un compte ou connectezvous à votre compte existant.
L'application vous guidera à travers le reste du processus de conguration.
3
4
Page 17

Conguration sans l
Pour connecter votre caméra à votre réseau sans l,
suivez les instructions ci-dessous.
Une fois que votre caméra est congurée, sélectionnez votre caméra et
1
appuyez sur le bouton paramètres.
Sélectionnez "Wi-Fi Setting" (réglage Wi-Fi) et "Enable Wi-Fi connection"
2
(Activer la connexion Wi-Fi).
FRANÇAIS
Sélectionnez votre réseau sans l et entrez votre mot de passe, puis
3
appuyez sur Apply (Appliquer).
Vous pouvez maintenant déconnecter le câble Ethernet et déplacer la
4
caméra dans votre position préférée.
5
Page 18

Montage de la caméra
Reportez-vous aux étapes ci-dessous pour vous aider à monter la caméra.
Nous suggérons de congurer la caméra avant de la monter.
1. Placez la plaque de base où vous souhaitez
positionner la caméra et utilisez un crayon pour
FRANÇAIS
marquer les trous. Vous pouvez utiliser les grands
trous pour une installation amovible, ou les petits
trous pour un xe. Assurez-vous que la èche de
verrouillage sur la plaque est orientée vers le bas.
2. En fonction du matériau de la paroi ou du plafond,
utilisez les outils appropriés pour percer deux trous
aux endroits où vous avez marqué. Si le mur est fait
de béton, percez d'abord les trous, puis insérez les
chevilles en plastique pour tenir les vis.
3. Lacez la plaque de base sur les trous qui sont dans le
mur. Assurez-vous d'aligner les trous de la plaque de
base avec les trous du mur. Utilisez les vis fournies
pour xer la plaque de base à la surface du mur.
4. Placez la caméra sur la plaque de base et alignez la
fente avec le trou sur la caméra. Fixez la caméra en la
faisant glisser dans le sens de la èche.
5. Une fois que la caméra est xée à la plaque de base,
utilisez un tournevis pour xer la vis à côté de la
prise à l'arrière du corps de la caméra.
1
2
3
4
5
6. Réglez les angles via le corps de la caméra et
faites pivoter la base argentée jusqu'à ce que vous
obteniez votre angle de vue désiré.
6
6
Page 19

Imperméabilisation de la caméra
Imperméabiliser vos connecteurs lorsque vous utilisez Wi-Fi
Après avoir conguré votre caméra, suivez les instructions ci-dessous pour
empêcher l'eau d'entrer dans le câble Ethernet et le câble d'alimentation de la
caméra.
1. Branchez l'adaptateur secteur dans le dongle.
1
FRANÇAIS
2. Pour imperméabiliser la prise Ethernet, alignez
le bouchon selon le fil et tournez-le dans le sens
horaire pour le sceller.
2
Imperméabilisez votre connecteur Ethernet
Si vous utilisez une connexion Ethernet, suivez les instructions ci-dessous pour
empêcher l'eau d'entrer dans le connecteur du câble Ethernet de la caméra.
1. Branchez le câble d'alimentation et le câble Ethernet.
1
Utilisation de bande imperméable
Enveloppez du ruban adhésif étanche tel que du
caoutchouc butyle ou un ruban de vinyle autour des
câbles individuels et les connecteurs d'une manière
de demi-chevauchement puis enveloppez tous les
connecteurs ensemble. Assurez-vous de couvrir tous les
connecteurs et tous les câbles non gainés.
Remarque : Le ruban en caoutchouc butyle doit être enroulé
en étirant le ruban jusqu'à environ deux fois sa longueur et en
l'enveloppant autour du câble. Si vous n'étirez pas susamment le
ruban, vous obtiendrez des performances d'étanchéité insusantes.
Attention : En raison de sa cote IP65, nous vous recommandons d'installer votre caméra sous un
toit ou un abri pour protéger le câble d'alimentation et Ethernet de l'inltration d'eau. Les câbles
et les connexions doivent être situés à l'écart de tous les risques d'eau potentiels.
7
Page 20

Questions fréquentes
1. Que puis-je faire si mon DCS-2670L ne fonctionne pas correctement?
• Réinitialisez la caméra (voir l'étape suivante) et réexécutez les étapes
de conguration à partir de la page 4.
• Pour vous assurer que le matériel est bien installé, vériez les points
suivants:
- Le voyant d'alimentation est vert
FRANÇAIS
-La connexion Internet est établie
-Les connexions LAN et WAN du routeur fonctionnent
-Le routeur prend en charge le protocole UPnP
®
-La camera est sur le même réseau que votre appareil mobile
- L'appareil mobile et la caméra doivent l’un et l’autre avoir une
connexion Internet eective
• Si la caméra ne fonctionne toujours pas, vériez le routeur et assurezvous que la version du microprogramme est la toute dernière.
2. Que dois-je faire si j’oublie mon mot de passe?
Bouton de
réinitialisation
Si vous oubliez votre mot de passe, vous devez
réinitialiser la caméra. Malheureusement, cette
procédure réinitialise tous vos paramètres. Pour
réinitialiser la caméra, localisez le bouton de
réinitialisation situé à l'arrière de l'appareil. Lorsque la
caméra est allumée, utilisez un trombone déplié pour
maintenir le bouton enfoncé pendant 10secondes.
Exécutez la procédure de conguration située à la
page 4, une fois que la caméra redémarre.
3. Pourquoi est-ce qu'il y a une brume blanche lorsque je visionne en
mode vision nocturne?
Lorsque vous visionnez en mode vision nocturne, les lumières infrarouges
de la caméra peuvent être rééchies par une surface proche. Essayez
de repositionner la caméra an d'éviter l'éblouissement des lumières
infrarouges.
8
Page 21

Remarques
FRANÇAIS
9
Page 22

FRANÇAIS
Remarques
10
Page 23

Remarques
FRANÇAIS
11
Page 24

Assistance technique
Ce guide concerne seulement la conguration initiale. Veuillez
vous reporter au manuel d’utilisation au http://support.dlink.com/
DCS-2670L (États-Unis) ou http://support.dlink.ca/DCS-2670L
(Canada) pour de plus amples informations. De plus, n'hésitez pas
à nous contacter. Les clients des États-Unis et du Canada peuvent
contacter le support technique de D-Link via notre site Web.
États-Unis
http://support.dlink.com
Canada
http://support.dlink.ca
Version 1.10 (NA)_90x130
11 mai 2017
RMN0102213A
Copyright ©2017. Tous droits réservés. D-Link et le logo D-Link sont des marques déposées de
D-Link Corporation ou de ses liales. Les autres marques commerciales appartiennent à leurs
propriétaires respectifs. Débit maximum du signal sans l provenant des caractéristiques 802.11n
et 802.11g de la norme IEEE. Le débit de transmission réel des données peut varier. Le surdébit, ainsi
que les conditions du réseau et les facteurs environnementaux, dont l’importance du trac réseau,
les matériaux de construction et la construction, peuvent réduire le débit de transmission réel des
données. Les facteurs environnementaux ont des conséquences négatives sur la portée du signal
sans l. Les caractéristiques du produit, sa taille et sa forme sont soumises à modication sans préavis
et l'apparence réelle du produit peut diérer de celle illustrée sur la boîte. Visitez le site dlink.com
(États-Unis) ou dlink.ca (Canada) pour obtenir plus de renseignements.
 Loading...