


User Manual v1.4
2019.08
 Searching for Keywords
Search for keywords such as “battery” and “install” to find a topic. If you are using Adobe Acrobat Reader to read this document, press Ctrl+F on Windows or Command+F on Mac to begin a search.
 Navigating to a Topic
View a complete list of topics in the table of contents. Click on a topic to navigate to that section.
 Printing this Document
This document supports high resolution printing.
Using this User Manual
Legends
Warning |
Important |
Hints and Tips |
Reference |
Before Use
The following tutorials and manuals have been produced to ensure you make full use of your ROBOMASTERTM S1.
1.Safety Guidelines and Disclaimer
2.Quick Start Guide
3.User Manual
Check to make sure all parts are included and prepare for assembly by reading the RoboMaster S1 Quick Start Guide. Refer to this user manual for more information. Watch all tutorial videos and read the RoboMaster S1 Safety Guidelines and Disclaimer before using for the first time.
Watching the Video Tutorials
Visit the official DJI website https://www.dji.com/robomaster-s1/video or go to the app and enter the Videos page to watch the tutorial videos for assembly and use. You can also assemble the S1 according to the assembly guide in the RoboMaster S1 Quick Start Guide.
Referring to the RoboMaster S1 Programming Guide
The RoboMaster S1 Lab offers hundreds of programming blocks that allow you to access features such as PID control. The RoboMaster S1 Programming Guide provides instructions and examples to help users quickly learn programming techniques for controlling the S1. https://www.dji.com/robomaster-s1/programming-guide
2 © 2019 DJI All Rights Reserved.
Contents
Using this User Manual |
2 |
Legends |
2 |
Before Use |
2 |
Watching the Video Tutorials |
2 |
Referring to the RoboMaster S1 Programming Guide |
2 |
Contents |
3 |
Product Profile |
4 |
Introduction |
4 |
S1 Diagram |
4 |
Preparing |
5 |
Modules and Functions |
10 |
Using the RoboMaster App |
10 |
Omnidirectional Chassis |
13 |
Gimbal |
17 |
Intelligent Controller |
18 |
Blaster |
19 |
Camera |
21 |
Intelligent Battery |
22 |
Speaker |
22 |
S1 LED Indicator Description |
26 |
Gamepad (Not Included) |
27 |
Operating Your S1 |
29 |
Checking Before Use |
29 |
Turning on the Battery |
29 |
Operating the S1 Using a Mobile Device |
29 |
Gameplay |
32 |
Solo Mode |
32 |
Battle |
34 |
Operating the S1 Using a Gamepad |
36 |
Using a PC and RoboMaster Windows Version |
37 |
Lab |
38 |
Appendix |
42 |
Specifications |
42 |
Firmware Update |
45 |
Calibrating the S1 |
45 |
Setting the PWM Ports |
46 |
© 2019 DJI All Rights Reserved. 3

Product Profile
Introduction
The RoboMaster S1 is an educational robot inspired by the DJITM RoboMaster competition. The S1 offers comprehensive control and an immersive driving experience thanks to the omnidirectional chassis, agile Mecanum wheels, flexible gimbal, and stable, low-latency image transmission in first person view (FPV). Users can also target objects and battle other robots with the blaster.
The body of the S1 is covered in armor, and each piece has a hit detection module that can instantly detect physical hits and feed back to the intelligent controller. The blaster provides highlevel accuracy and stability thanks to the 2-axis gimbal while the launch trajectory light gives users a realistic and immersive experience.
The intelligent controller is integrated with multiple systems including a video transmission system, game system, and Scratch programming system. It includes six smart modules, including line recognition, vision marker recognition, person recognition, clapping recognition, gesture recognition, and S1 robot recognition.
The S1 supports Scratch and Python programming. With DJI’s project-based tutorials, users can gradually master programming theory and robotics knowledge.
The S1 also features Solo mode and Battle mode, where users can practice their skills and compete against others. To control the S1, the RoboMaster app can be used on a mobile device, the gamepad, or with a keyboard and mouse.
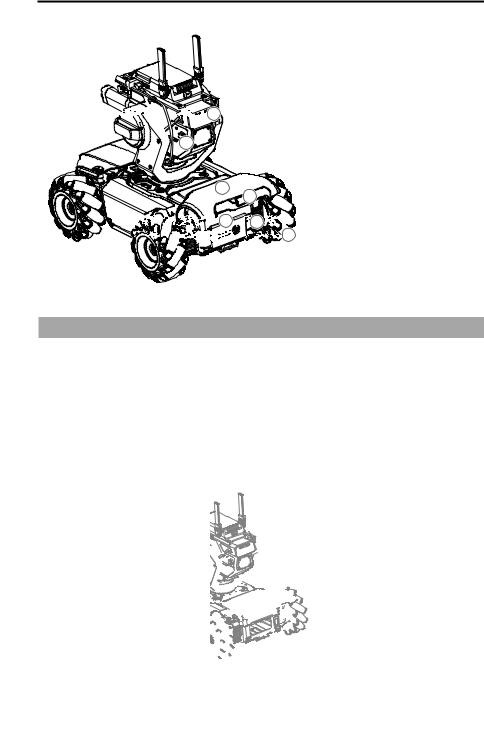
S1 Diagram
|
|
|
14 |
|
|
|
|
|
|
|
|
|
12 |
|
|
|
|
|
|
|
13 |
|
|
|
|
|
|
|
15 |
|
|
|
|
|
|
|
10 |
|
|
9 |
8 |
|
|
|
|
16 |
|
18 |
|
|
21 |
||
|
|
|
|
|
||||
|
|
|
|
|
|
|||
|
17 |
|
19 |
7 |
6 |
|
|
|
|
20 |
|
|
|
|
|||
|
|
11 |
1 |
|
|
|
|
|
|
|
|
|
|
|
|
||
|
|
|
|
|
|
|
|
|
2 |
3 |
|
|
|
5 |
|
|
|
|
|
|
|
|
|
|
|
|
|
|
|
|
|
|
2 |
4. |
Left-Threaded Mecanum Wheel |
|
|
|
|
|
|
5. |
Chassis Left Armor |
|
|
|
|
|
|
|
|
||
|
|
|
4 |
|
|
|
6. |
(built-in Hit Detector) |
|
|
|
|
|
|
|
Chassis Rear Cover |
|
|
1. Chassis |
|
|
|
|
|
7. |
Gimbal |
|
2. Right-Threaded Mecanum Wheel |
|
|
8. |
Wide Infrared Unit |
|||
|
3. Chassis Front Armor (built-in Hit Detector) |
|
9. Gimbal Armor (built-in Hit Detector) |
|||||
4 © 2019 DJI All Rights Reserved.
ROBOMASTER S1 User Manual


 22
22
23 |
24 |
25 |
|


 26
26


 27
27


 4
4
10.Pitch Motor
11.Yaw Motor
12.Intelligent Controller
13.microSD Slot
14.Intelligent Controller Antenna
15.Camera
16.Blaster
17.Launch Trajectory Light
18.Narrow Infrared Unit
19.Speaker
20.Chassis Right Armor
(built-in Hit Detector)
21.Chassis Motion Controller
22.Gel Bead Container
23.Container Eject Button
24.Chassis Rear Armor
(built-in Hit Detector)
25.Rear Armor Release Button
26.Intelligent Battery
27.Battery Eject Button
Preparing
Assembling the S1
Refer to the RoboMaster S1 Quick Start Guide.
Powering On the S1
Follow the steps below to power on the S1:
1.Press the rear armor release button to open the chassis rear armor.
2.Install the intelligent battery into the battery compartment.
3.Press and hold the power button to turn on the battery.
4.Close the chassis rear armor.
4 |
3 |
|
1
2
© 2019 DJI All Rights Reserved. 5
ROBOMASTER S1 User Manual
Downloading the RoboMaster App
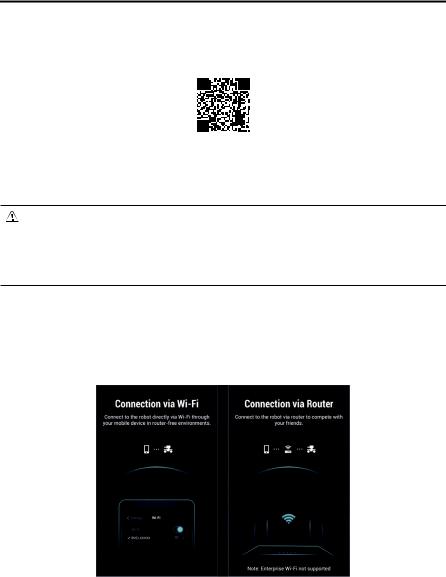
A.Search for the RoboMaster app in the App Store or on Google Play or scan the QR code to download the app on your mobile device.
B.Users can also download the RoboMaster software for Windows from the official DJI website to control the S1 with a keyboard and mouse.
https://www.dji.com/robomaster_app
 Use your DJI account to log in to the RoboMaster app.
 The RoboMaster app supports iOS 10.0.2 or later or Android 5.0 or later.
 The RoboMaster app supports Windows 7 or later.
 Before using the Robomaster app with cellular mobile data, contact your mobile device data provider for the latest data information.
Connecting the S1 and the App
The S1 must be connected to the RoboMaster app in order to use. Users can learn how to connect via Wi-Fi or via a router in the Connection Mode page. Follow the prompts to connect the S1 to the app. Refer to the Connecting section for more information.
6 © 2019 DJI All Rights Reserved.

ROBOMASTER S1 User Manual
Initializing the S1 with the App
Activating the S1
After connecting, use your DJI account to activate the S1 in the RoboMaster app. Activation requires an internet connection.
1. Start activation.
Complete robot initialization to continue use
OnlineActivatioP
Connecttotheinternettoactivateth O U F andreceiveyourwarranSBO
2 MotorAddressinO  ArmorAddressinO
Continue
2. Follow the prompts to complete activation.
 2314
2314
Activated Luke.lu@dji.com
Next
Motor Addressing
Motor addressing is required in the app before using for the first time. Follow the prompts to complete motor addressing.
1. Start Motor Addressing.
Complete robot initialization to continue use
Online Activation
2 Motor Addressing
Performing addressing for all motors to ensure the robot's movement functions work normally.
Armor Addressing
Continue
© 2019 DJI All Rights Reserved. 7
ROBOMASTER S1 User Manual
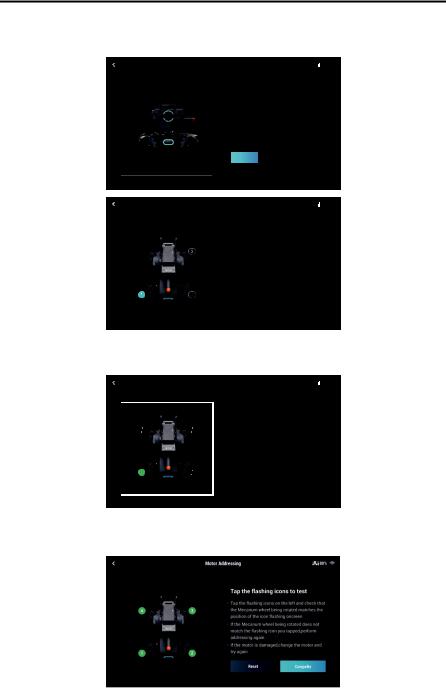
2.Lift the chassis and follow the prompts to rotate the Mecanum wheels in the order shown onscreen until all wheels have been rotated.
|
Motor Addressing |
|
80% |
|
|
|
|
|
|||
|
|
|
|
|
|
Lift up the chassis
Use the Mecanum wheel mounting plate or another load-bearing object to raise the chassis until the wheels are elevated off the ground.
Next
|
Motor Addressing |
|
80% |
|
|
|
|
|
|||
|
|
|
|
|
|
|
|
|
Rotate Mecanum wheels three times in |
|
|
4 |
|
||
|
|
sequence |
|
|
|
|
|
|
|
|
|
|
•Ensuretherobotisfacingyouassho U J |
|
|
|
|
figure.RotatethewheeluntilyouȀUȀI |
|
|
|
|
beepingsounO |
T |
|
|
|
•IftherobotdoesnotmakeabeepinȀPȀF |
|
2 |
checkthecableconnectionsandtryȀ D |
|
||
|
|
|
|
|
3. Tap  to test the Mecanum wheels one by one until all wheels have been tested.
|
Motor Addressing |
|
80% |
|
|
|
|
|
|
Tap the flashing icons to test
|
|
|
•Tap the flashing icons on the left and check that |
|
|
||
|
|
|
the Mecanum wheel being rotated matches the |
|
|
|
position of the icon flashing onscreen |
|
|
|
•If the Mecanum wheel being rotated does not |
|
|
|
match the flashing icon you tapped, perform |
|
|
|
addressing again |
1 |
|
|
•If the motor is damaged, change the motor and |
|
|
try again
4. Motor addressing completed.
8 © 2019 DJI All Rights Reserved.

ROBOMASTER S1 User Manual
Motor addressing is required when a motor is replaced. Open the RoboMaster app, click Settings then System, and select Motor Addressing.
Armor Addressing
Armor addressing is required in the app when using the S1 for the first time. Follow the prompts to complete armor addressing.
1. Start Armor Addressing.
Complete robot initialization to continue use
Online Activation
Motor Addressing
Armor Addressing
Perform addressing for the robot's armor to ensure its hit detection works normally.
Continue
2. Follow the prompts to tap on the armor plates in the order shown onscreen.
|
Armor Addressing |
|
|
80% |
|
|
|
|
|
||||
|
|
|
|
|
|
|
|
|
Tap on each armor plate in the order |
|
|
shown onscreen |
|
|
· Use a screwdriver or other hard object and |
|
|
lightly strike the center of the armor plate |
4 |
|
· When a strike is identified successfully, the |
|
|
armor plate's LED will stop blinking |
· If the LED continues blinking after several strikes, tap Skip
2
Skip
3. Armor addressing completed.
Armor addressing is required when an armor module is replaced. Go to the RoboMaster app, click Settings, then System, and select Armor Addressing.
© 2019 DJI All Rights Reserved. 9
Modules and Functions
Using the RoboMaster App
With the dedicated RoboMaster app, users can access rich educational resources and several gameplay modes. The app can be used with a touchscreen or a gamepad and is available on iOS, Android, and Windows. Users on different platforms can even play together at the same time. Users can also write programs easily and apply them or share with friends instantly using the RoboMaster app. This section uses the RoboMaster app on iOS as an example. The specific interface may vary depending on the device used.
RoboMaster App Main Page
1 2 3 4 5
XXXXXXXX
6 |
7 |
8 |
1.Account
Tap to log in and log out of your account, modify your avatar, name, and gender information. An internet connection is required in order to log in.
2.Media Library
Tap to view videos and photos.
3.Guide
a.Product Support: Tap to enter the official DJI product support page.
b.Maintenance Support: Tap to enter the official DJI Repair Center page.
c.User Manuals: Tap to enter the official DJI user manual download page.
d.Vision Markers: Tap to enter the official Vision Marker download page.
e.Online Support: Tap to talk to the official RoboMaster Series Online Assistance service.
f.Feedback: Tap to fill out a feedback form.
10 © 2019 DJI All Rights Reserved.
ROBOMASTER S1 User Manual
4.Connect
The S1 must be connected with the app. Tap to see a guide on how to connect via Wi-Fi or router.
Connection via Wi-Fi
Users can enter both Solo and Battle mode when connecting via Wi-Fi. Follow the steps below to connect:
(1). Power on the S1 and slide the mode switch on the intelligent controller to  .
.
(2). Run the RoboMaster app, go to Wi-Fi settings on the mobile device, select the Wi-Fi name (RMS1-XXXXXX) shown on the sticker on the body of the S1, and enter the password. The default password is 12341234.
 Settings Wi-Fi
Wi-Fi
CHOOSE A NETWORK…
ROUTER-XXXX
Other…
Go to the Settings and connect to Wi-Fi.
(3). Wait for the S1 and the app to connect. The S1 will emit a sound once connected.
Reseting the Password
Make sure the mode switch on the intelligent controller is slid to the Connection via Wi-Fi position, and press and hold the connect button for five seconds to reset the password.
© 2019 DJI All Rights Reserved. 11
ROBOMASTER S1 User Manual
Connection via Router
Users can enter both Solo and Battle mode when connecting via router.
Follow the steps below to connect:
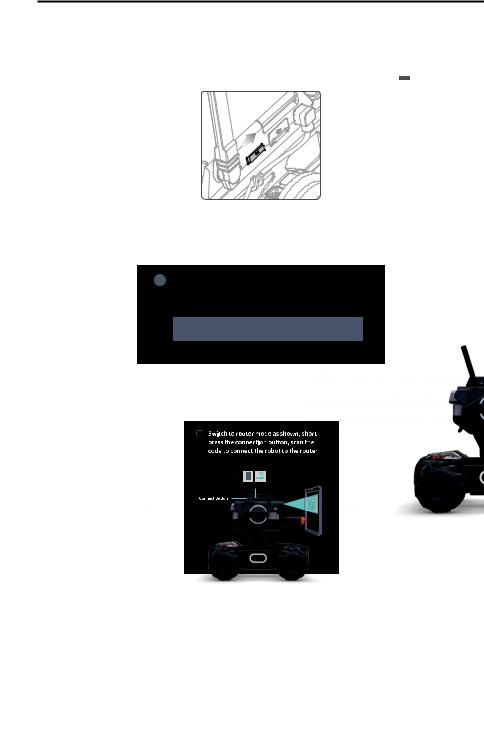
(1). Power on the S1, and slide the mode switch on the intelligent controller to  .
.
(2). Open the RoboMaster app, go to Wi-Fi settings on the mobile device, connect to a router, and input the Wi-Fi password of the router to generate a QR code.
1ConnecttoaroutertogenerateaSȀPȀV
ConnectedtorouterXS 9 Switch
EnterWi-FiPasswo á
(3). Press the connect button on the intelligent controller and use the camera of the S1 to scan the QR code. The S1 will connect to the router automatically.
2
1 
2 |
3 |
|
5.Settings
Robot, Connect, Display, Control, and System can be found in the Settings page.
a.Robot
Users can check the status of each individual component of the S1. When a component is abnormal, the corresponding part will be displayed in red with more detailed information provided on the right side of the screen.
12 © 2019 DJI All Rights Reserved.

ROBOMASTER S1 User Manual
b.Connect
Displays the connection status of the S1. When connected, users can also check the Channel
Display, Wi-Fi Name, Wi-Fi Password, and also modify Wi-Fi information.
c.Display
Users can set the LED Display Color, FPV Hit Point Bar, FPV Screen Adaptation, FPV Gimbal
Angle Readout, Video Resolution, Anti-Flickering, and 3D Quality.
d.Control
Users can set the Speed, Firing Mode, Sight Type, Sight Calibration, Control Mode, Control Sensitivity, Gimbal Gyro Control, Gyro Sensitivity, and Vibration.
e.System
The following can be found under System settings:
Check App Version and set App Language. Set Voice Language and Robot Volume.
Perform Firmware Update, check Firmware Downloaded, and Firmware Version. Perform Armor Addressing, Motor Addressing, and Gimbal and Chassis Calibration. Replay Beginner Guide.
Check SD Card Space Remaining and perform Format SD Card.
Enable GPS Information, DJI Device Information, DJI Product Improvement, and read Terms of Use.
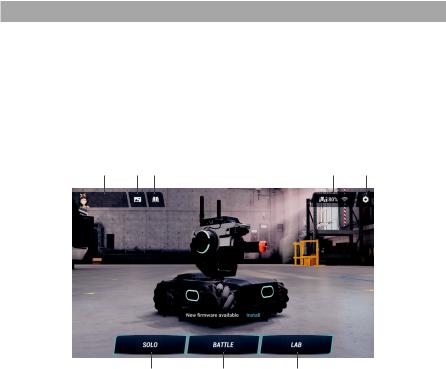
6.Solo
Tap to enter Solo mode. Users can connect either via Wi-Fi or router. Refer to the Gameplay section for more information.
7.Battle
Tap to enter Battle mode. Users can connect either via Wi-Fi or router. When using multiple S1s, users must connect via the same router. Refer to the Gameplay section for more information.
8.Lab
Road to Mastery: Road to Mastery offers project-based courses that enhance users’ understanding of programming languages, from robotics applications to AI technology, with different projects for both beginners and experts.
DIY Programming: Both Scratch and Python are available for programming.
RoboAcademy: RoboAcademy offers a curriculum of videos and programming guides. In-depth videos introduce robotics in simple but fascinating ways, giving users insightful and relevant scientific knowledge. The RoboMaster S1 Programming Guide offers detailed explanations of various blocks and modules, making it easier for users to understand the fundamentals of S1 programming.
Omnidirectional Chassis
Introduction
The S1 chassis is an omnidirectional motion platform based on the Mecanum wheels, which can be used to move forward, traverse, skew, rotate, or a combination of movements at once.
© 2019 DJI All Rights Reserved. 13
ROBOMASTER S1 User Manual
Avoid crashing into any objects at high speed.
Motion Controller
Overview
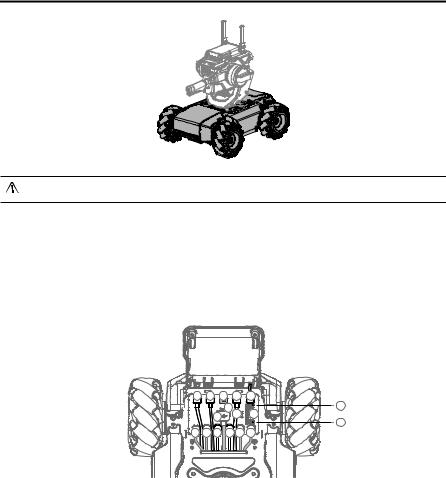
The motion controller is the core module for the S1 chassis movement, providing a rich external module interface for video transmission and connecting the gimbal, battery, armor, and motors. It also integrates an omnidirectional wheel motion control algorithm, power management system, motor management system, and a chassis management system.
1 |
|
1 |
9 |
1 |
1 |
|
|
|
10 |
|
8 |
|
|
2 |
5 |
7 |
|
|
|
|
|
6 |
|
|
|
|
|
|
|
3 |
3 |
4 |
4 |
3 |
3 |
1.CAN Bus Port
CAN Bus port used for armor module connection.
2.Power Port
Power port used for intelligent battery connection. Note that this interface contains the battery management system. Avoid unplugging the power port unless necessary.
3.M BUS Port
Motor port used for motor connection.
4.CAN BUS Port
Gimbal port used for gimbal connection.
5.Micro USB Port
Reserved port.
6.UART Port
Reserved port.
14 © 2019 DJI All Rights Reserved.
ROBOMASTER S1 User Manual
7.PWM Output Port
The S1 motion controller enables the duty cycle to be set through the Scratch or Python program using the PWM output port.
8.S-Bus Port
Reserved port.
9.M0 Port
Reserved port.
10. LED indicator
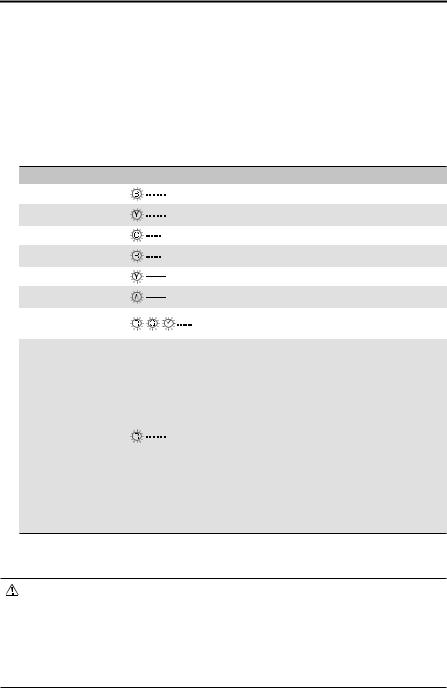
Used to indicate the status of the S1 motion controller.
LED indicator |
Motion controller status |
|
Blinks blue slowly |
Working normally |
|
Blinks yellow slowly |
Running autonomous program |
|
Blinks green quickly |
IMU calibration successful |
|
Blinks red quickly |
IMU calibration failed |
|
Solid yellow |
IMU is calibrating |
|
Solid white |
Firmware updating |
|
Blinks red, green, |
No attitude information input |
|
and blue alternatively |
||
|
||
|
Stop Mode* |
|
|
Stop mode may occur in the following situations: |
|
|
a. Motion controller is disconnected from or cannot |
|
|
communicate with motor. |
|
|
b. S1 cannot move due to the motor hardware |
|
Blinks red slowly |
abnormality. |
|
c. Motion controller cannot communicate with the |
||
|
gimbal. |
d.Motion controller cannot communicate with the remote controller.
e.Abnormal motion controller attitude.
f.Motion controller cannot communicate with the battery.
*Stop mode warning prompts will display in the app, go to Settings then System to check the corresponding error.
 Connect the black and orange cables to the ports of the corresponding color.
 Make sure the motion controller is properly installed before use and the screws on the chassis rear cover are locked.
 After each reinstallation of the motion controller, calibrate the S1 if prompted to do so in the RoboMaster app. Refer to the Gimbal and Chassis Calibration section for more information.
  To avoid dislodging the motion controller when removing the rear chassis cover, lift the cover carefully before removing.
© 2019 DJI All Rights Reserved. 15
 Loading...