


MATRICE 200 V2
Quick Start Guide
v1.0

Matrice 200 V2
The DJITM MATRICETM 200 V2 (M200 V2) is a powerful industrial-grade flight platform with world-class agility and speed, redundant barometers and IMUs for maximum reliability, and smart flight features that make capturing complex shots easy. The aircraft’s visual sensors* enable enhanced hovering precision even when flying indoors or in environments where GNSS is unavailable. The built-in AirSense makes you aware of your surrounding airspace to ensure flight safety. Its airframe design gives it an IP43 Ingress Protection Rating, in accordance with the global IEC 60529 standard. The mechanical design, along with quick-release landing gears and mounted folding arms, makes it easy to transport, store, and prepare for flight. The safety beacons on both the top and the bottom of the aircraft allow the aircraft to be identified at night or in low light conditions. An advanced power management system along with dual batteries ensures power supply and enhances flight safety. Without a payload, the M200 has a flight time of up to 38 minutes with standard batteries (TB55).
The Matrice 200 is compatible with many of DJI’s DGC2.0 connector gimbals.* This manual uses the DJI ZENMUSETM XT 2 as an example to demonstrate the Matrice 200’s remarkable functions.
|
1. FPV Camera |
12. Beacons |
|||
|
2. |
Forward Vision System |
13. |
Aircraft Status Indicators |
|
|
3. DJI Gimbal Connector V2.0 |
14. USB Mode Switch |
|||
|
|
(DGC2.0) |
15. USB Port |
||
|
4. Gimbal and Camera Detach Button |
16. Linking Button andIndicator |
|||
|
5. Frame Arms |
17. Battery Remove Button |
|||
|
6. |
Motors |
18. |
Intelligent Flight Batteries |
|
|
7. |
Propellers |
19. |
Battery Level Indicators |
|
|
8. ESC LEDs |
20. Power Button |
|||
Folded |
9. Transmission Antennas |
21. Downward Vision System |
|||
10. Landing Gear |
22. microSD Card Slot |
||||
|
|||||
11.Upward Infrared Sensor
*The Vision and Infrared Sensing Systems are affected by surrounding conditions. Read the Disclaimer and Safety Guidelines to learn more. Maximum run-time is tested in a lab environment. Performance may vary depending on local conditions.
Gimbals can be purchased separately from the official DJI website.
DO NOT disassemble the aircraft case, otherwise, it will not be covered by the warranty.
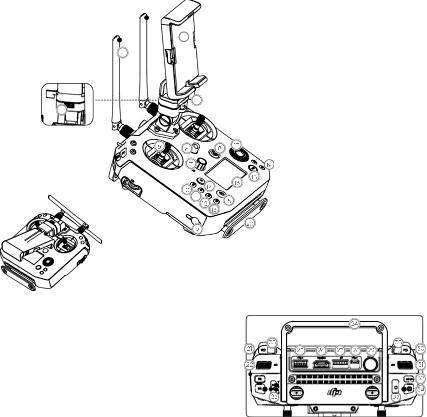
Cendence S Remote Controller
The CendenceTM S remote controller features DJI’s OCUSYNCTM 2.0 technology for a maximum transmission distance of up to 4.3 mi (7 km).* While flying the aircraft, you have a live HD view directly within the DJI Pilot app on your paired device for a precise and responsive flying experience. Dual frequency* support makes the HD video downlink more stable. In Dual Remote Controller Mode, two remote controllers control the aircraft and camera separately, even when they are up to 656 feet (200 m) apart.
The remote controller works with a WB37 Intelligent Battery, which can be fully charged via the charging port in about 2 hours and 24 minutes with the standard charger, or with the Intelligent Battery Charging Hub* in about 1 hour and 11 minutes. The maximum run time of the remote controller is approximately 4 hours.*
|
1. Mobile Device Holder |
||
|
2. |
Antennas |
|
|
3. |
Monitor Mounting Bracket |
|
|
4. |
USB Port (Reserved Port) |
|
1 |
5. |
Control Sticks |
|
|
|||
2 |
6. |
Strap Hook |
|
|
|
|
|
|
7. |
Focal Adjustment Knob |
|
|
8. |
Return-to-Home (RTH) Button |
|
|
9. |
Power Port |
|
|
10. |
EV Setting Button |
|
3 |
11. |
Shutter Setting Button |
|
4 |
12. |
Aperture Setting Button |
|
|
13. |
ISO Setting Button |
|
|
14. |
Pause Button |
|
|
15. Power Button |
||
|
16. |
Remote Control Display |
|
|
17. |
Camera Settings Dial |
|
|
18. Customizable Button Setting Menu |
||
|
19. Customizable Buttons (BA-BH) |
||
|
20. Support Rig |
||
|
21. Left Lever |
||
|
22. Left Dial (Gimbal Pitch) |
||
|
23. Flight Mode Switch |
||
|
24. Handle Bar |
||
|
25. USB Port |
||
|
|
|
(for Mobile Device Connection) |
|
26. |
HDMI A Port (for Video Output) |
|
Folded
27. CAN Bus Port (Extension Port)
28. Micro USB Port
29. SDI Port (for Video Output)
30. Right Lever
31. Right Dial (Gimbal Pan)
32. AF Button (Autofocus)
33. Record Button
34. Shutter Button
35.Customizable Buttons (C1-C4)
*The remote controller can reach its maximum transmission distance (FCC) in an unobstructed area with no electro-magnetic interference at an altitude of about 400 feet (120 meters). The actual maximum transmission distance may be less than the distance mentioned above due to interference in the operating environment, and the actual value will fluctuate according to the strength of interference.
To comply with local regulations, the 5.8 GHz frequency is not available in some countries and regions. For more information about Dual Remote Controller mode, please refer to the user manual.
The Charging Hub can be purchased separately from the official DJI website.
Maximum run time is estimated in a lab environment without supplying power to a smart device or monitor, for reference only.
Using Matrice 200
1. Downloading the DJI Pilot App
Search for DJI Pilot in Google Play Store or scan the QR code below to download the app onto your mobile device.
First-time activation requires your DJI account and an internet connection. |
DJI Pilot App |
|
Internet
DJI Pilot supports Android 4.4 or later.
If using a DJI CrystalSkyTM Monitor, it is recommended to use the built-in DJI Pilot app.
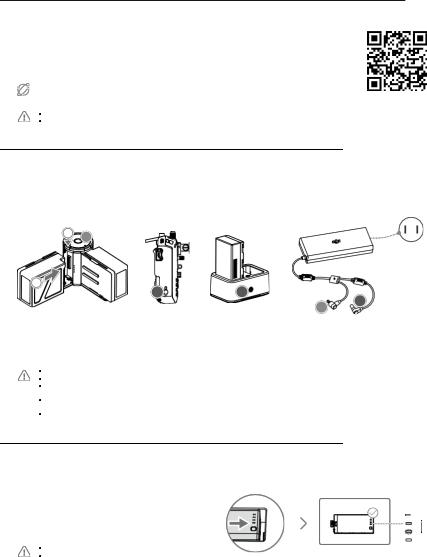
2.Charging the Batteries
 Press the release button and open the corresponding charging port cover.
 Insert the Intelligent Flight Battery into the charging port to begin charging. Be
 sure to press the release button when removing fully charged batteries.
1 |
A |
|
|
|
Power Outlet |
|
100~240 V |
|
(50Hz/60Hz) |
2
|
B |
B |
|
|
B |
|
Charging Time: |
A |
|
Using the WCH2 Charging Hub, |
|
Using the IN2CH Charging Hub, charging time |
2 hours and |
charging time is approximately 1 |
is approximately. |
24 min* |
hour and 11 min (one battery)* |
TB55: 2 hours and 33 min (two batteries)* |
|
|
|
|
*Provided charger |
When charging is complete, the LED lights on the Intelligent Flight Battery will turn off, and the LED on the Charging Hub will turn solid green. When charging is complete, the display on the remote controller will show 100%.
The Charging Hub will sound an alert when the battery has been fully charged. The alert can be turned on or off by toggling the switch under the hub.
Connect the Intelligent Flight Batteries to the aircraft and power them on. If battery temperature is lower than 15°C, the system will auto heat the batteries to maintain a temperature between 15°and 20°C.
Ensure two Intelligent Flight Batteries are charged and discharged simultaneously to prolong their service life and for a better flight experience.
3. Preparing the Remote Controller
Mounting the Remote Controller Battery
Put the battery into the Battery Slot, then slide it to the end |
|
until you hear a click. |
Low |
|
High |
Press the Battery Release Button before removing the battery. Press the Battery Level Button once to check the battery level.
 Loading...