


PHANTOM 4
Quick Start Guide
V1.2
Phantom 4
The DJI Phantom 4 is an extremely smart flying camera able to intelligently track subjects without a separate device, avoid obstacles and fly with a tap of your finger. All while shooting 4K video or 12 megapixel stills.
TapFly and ActiveTrack are two brand new commands in the DJI GO app, unique to the Phantom 4. Now with a simple tap you can fly anywhere visible on your screen or track a moving subject smoothly and easily.
9
 8
8


 7
7
6 


5 |
4 |
10 |
|
||
|
|
3 |
 2
2
11 


 1
1


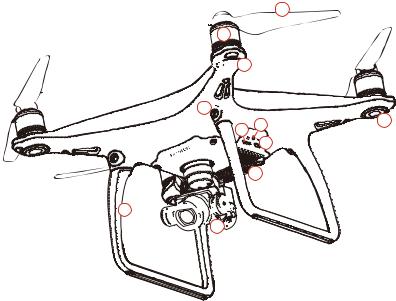
1. |
Gimbal and Camera |
8. |
Motors |
|
|
|
2. |
Vision Positioning System |
9. |
Propellers |
14 |
|
|
3. |
Micro USB Port |
10. |
Aircraft Status Indicators |
|
||
4. |
Camera/Linking Status Indicator |
11. |
Antennas |
|
13 |
|
|
and Link Button |
12. |
Intelligent Flight Battery |
12 |
||
|
|
|||||
5. |
Camera Micro SD Card Slot |
13. |
Power Button |
|
|
|
6. |
Obstacle Sensing System* |
14. |
Battery Level Indicators |
|
|
|
7. |
Front LEDs |
|
|
|
|
|
*The Obstacle Sensing System is affected by surrounding conditions. Read the Disclaimer and Safety Guidelines and watch the tutorials in the DJI GO app or on the official DJI website to learn more.
http://www.dji.com/product/phantom-4

Remote Controller
This powerful remote controller allows you to operate your Phantom 4 up to 3.1 mi (5 km)*, while giving you buttons and dials for exposure, camera tilt, photo capture and video recording.
Built into the remote controller is DJI Lightbridge, which when paired with a compatible mobile device gives you a live HD view from the Phantom’s camera. An internal battery ensures a long battery life and ease of use.
1. |
Power Button |
|
|
|
2. |
Return-to-Home (RTH) Button |
7 |
|
|
3. |
Control Sticks |
|
||
|
|
|||
4. |
Status LED |
8 |
9 |
|
5. |
Battery Level LEDs |
|||
|
||||
|
|
6.Power Port
7.Mobile Device Holder
8.Small Device Positioning Tabs
(for mobile phones) |
3 |
9. Antennas |
|
1 |
|
10. Handle Bar |
|
|
|
|
|
|
|
|
4 |
2 |
10 |
|
|
||
|
|
5 |
|
|
|
|
11.Gimbal Dial
12.Camera Settings Dial
13.Record Button
14.Flight Mode Switch
15.Shutter Button
16.Intelligent Flight Pause Button
17.C1 and C2 Buttons (customizable)
18.USB Port
19.Micro USB Port
6 |
17 |
17 |
|
19 |
18 |
|
|
|
|
||
11 |
|
|
12 |
13 |
14 |
15 |
16 |
Folded
The default flight control is known as Mode 2. The left stick controls the aircraft’s altitude and heading, while the right stick controls its forward, backward, left and right movements. The gimbal dial controls the camera’s tilt.
Left Stick |
Right Stick |
Gimbal Dial |
UP
rwar |
d |
Fo |
|
Down |
|
ft |
u |
|
e |
T |
|
|
r |
|
L |
|
n |
n |
|
R |
u |
|
i |
T |
|
g |
r |
|
h |
|
t |
|
|
|
|
B |
d |
|
ackwar |
t f e L
R
i
g h t
*The remote controller is able to reach its maximum transmission distance in a wide open area with no magnetic interference, and at an altitude of about 400 feet (120 meters).
 Loading...