


 Loading...
DJI DIGITAL FPV SYSTEM
User Manual
v1.0 2019.07

 Searching for Keywords
Search for keywords such as “battery” and “install” to find a topic. If you are using Adobe Acrobat Reader to read this document, press Ctrl+F on Windows or Command+F on Mac to begin a search.
Navigating to a Topic
View a complete list of topics in the table of contents. Click on a topic to navigate to that section.
 Printing this Document
This document supports high resolution printing.
Using This Manual
Warning |
Important |
Hints and |
Reference |
Read Before First Usage
Read the following documents before using the DJITM Digital FPV System:
1.DJI FPV Air Unit Quick Start Guide
2.DJI FPV Remote Controller Quick Start Guide
3.DJI FPV Goggles Quick Start Guide
4.DJI FPV Goggles Disclaimer and Safety Guidelines
5.DJI Digital FPV System User Manual
Watch all the tutorial videos on the official DJI website and read the disclaimer to understand your legal rights and responsibilities. Prepare to use for the first time by reviewing the quick start guides and refer to the user manual for more information. If you have any questions or problems during the installation, maintenance, or use of this product, contact DJI or a DJI authorized dealer.
Video Tutorials
Watch the tutorial videos in the link below, which demonstrate how to use the DJI Digital FPV System safely: http://www.dji.com/fpv/video
Download DJI Assistant 2 (DJI FPV Series)
Download DJI ASSISTANTTM 2 at http://www.dji.com/fpv/downloads
DJI Assistant 2 supports Windows 7 (or later) or Mac OS X 10.11 (or later).
2 © 2019 DJI All Rights Reserved.

Warning
Always stay alert when using the DJI Digital FPV System to control an unmanned aerial vehicle (UAV). Carelessness may result in serious harm to yourself and others.
DJI FPV Air Unit
1.The DJI FPV Air Unit may become hot during or after operation. DO NOT touch the air unit before it cools down.
2.DO NOT use the air unit for an extended period when the temperature is high or there is poor ventilation. Otherwise, the air unit may overheat and enter low-power mode, which will affect its performance. Restart the air unit or wait for it to cool down and exit low-power mode.
3.Make sure that the external power source for the air unit is a lithium battery and within 7.4 - 17.6 V. Otherwise, the air unit may be damaged and may not work properly.
4.DO NOT connect the power cable with the power GND cable directly or plug or unplug the cables when the air unit is powered on. Otherwise, the equipment may be damaged and may not work properly.
5.DO NOT obstruct or twist the antennas of the air unit. Otherwise, the transmission may be affected or blocked.
6.Follow the instructions in the quick start guide or user manual when installing the air unit.
Incorrect installation may cause the air unit to not work properly.
7.Keep all the electronic devices as far away from each other as possible during installation to minimize electromagnetic interference.
8.Make sure that all connections are secure and all parts are working properly.
9.Make sure that there are no other transmitting devices in the surrounding area that may cause interference. DO NOT use the same frequency band as other devices. Otherwise, the transmission of the DJI Digital FPV System will be affected.
DJI FPV Goggles
1.DO NOT throw or drop the product. Otherwise, it may be damaged. If the product is damaged, take it to a DJI Service Center for inspection and repair.
2.Keep the lenses away from direct sunlight to avoid screen burns.
3.Only use official DJI power cables and an external power supply that meet the specification requirements (7.4-17.6 V). Use of improper accessories may lead to product damage, void the warranty, and even property damage and personal injury.
4.The DJI FPV Goggles may become hotter than normal if used for an extended period. If the product overheats, turn off the device as instructed to avoid injury or product damage.
5.DO NOT use or store the DJI FPV Goggles in adverse weather conditions or environments with high levels of humidity or dust.
6.DO NOT attempt to disassemble or modify this product. Unauthorized disassembling or modification will void the product warranty.
7.To avoid damaging the power cable, do not jerk, knot, sharply bend, or abuse the cable in any way. DO NOT expose the cable to sources of heat or liquid. Keep children and animals away from the cable.
3 © 2019 DJI All Rights Reserved.

DJI Digital FPV System User Manual
8.When not using the DJI FPV Goggles, keep the product away from heat, liquid, fire, and direct sunlight.
9.DO NOT use the DJI FPV Goggles if any part or component is broken or damaged. DO NOT attempt to repair any part of the device yourself. If the product is damaged, take it to a DJI Service Center for inspection and repair.
10.Detach and store the antennas from the DJI FPV Goggles when the goggles are not in use. Make sure to store the antennas carefully to avoid damage.
DJI FPV Remote Controller
1.Fully charge the remote controller before each flight.
2.If the remote controller is powered on and has not been used for five minutes, it will vibrate.
Move the control sticks or perform an action to cancel the alert.
3.Make sure the antennas are unfolded and adjusted to the proper position for optimal transmission.
4.Contact DJI Support to repair or replace the antennas if they are damaged. Damaged antennas will greatly decrease performance.
5.If you change the connected device, link the remote controller and the device again.
6.Make sure to power off the aircraft before the remote controller.
7.Fully charge the remote controller every three months.
8.The remote controller will beep and vibrate when the battery level decreases to 10%. Immediately charge the remote controller to prevent it from being damaged due to over discharge for an extended period. Discharge the remote controller to a battery level between 40% and 60% if storing for an extended period.
9.DO NOT cover the air vent or the air intake on the remote controller. Otherwise, the remote controller may overheat, which could affect its performance.
10.DO NOT disassemble the remote controller without the assistance of an authorized DJI dealer. Contact DJI or an authorized DJI dealer to replace components of the remote controller.
4 © 2019 DJI All Rights Reserved.
Contents
Using This Manual |
2 |
Legends |
2 |
Read Before First Usage |
2 |
Video Tutorials |
2 |
Download DJI Assistant 2 (DJI FPV Series) |
2 |
Warning |
3 |
DJI FPV Air Unit |
3 |
DJI FPV Goggles |
3 |
DJI FPV Remote Controller |
4 |
Product Profile |
7 |
Introduction |
7 |
At a Glance |
8 |
Activation |
10 |
DJI FPV Air Unit |
11 |
Introduction |
11 |
Installation and Connection |
11 |
Operating Channel |
12 |
DJI FPV Goggles |
14 |
Introduction |
14 |
Installation and Wearing |
14 |
Power Supply |
15 |
Operation |
16 |
Video Play |
16 |
DJI FPV Remote Controller |
17 |
Introduction |
17 |
Operation |
17 |
Status Indicators and Alarms |
18 |
Stick Adjustment |
19 |
5 © 2019 DJI All Rights Reserved.

DJI Digital FPV System User Manual
Using the DJI Digital FPV System |
21 |
Linking |
21 |
Goggles Main Screen |
25 |
Goggles Settings |
27 |
Flight Controller and Remote Controller Settings |
29 |
Video Recording |
31 |
Updating Firmware |
32 |
Maintenance |
32 |
DJI FPV Goggles |
32 |
DJI FPV Air Unit |
33 |
Specifications |
35 |
6 © 2019 DJI All Rights Reserved.
Product Profile
Introduction
DJI Digital FPV System
The DJI Digital FPV System consists of the DJI FPV Air Unit, DJI FPV Goggles, and DJI FPV Remote Controller, featuring the DJI HD Low Latency FPV Transmission, to provide an integrated video transmission with high definition and low latency for racing flight. The DJI Digital FPV System supports a 5.8 GHz digital video signal and 720p 120fps image transmission, with a transmission range of up to 4 km and a minimum end-to-end latency within 28 ms*. Up to eight fixed channels are supported**, and the enhanced anti-interference ability greatly improves the smoothness and stability of the video transmission. The DJI Digital FPV System integrates a camera, video transmission, display view, and remote control to provide a high-quality racing experience.
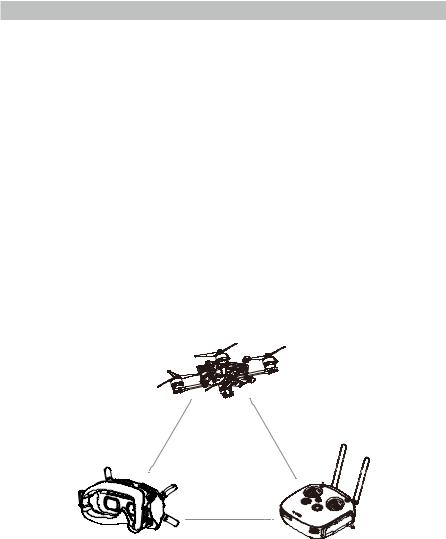
Typical Application Scenario
The DJI FPV Air Unit includes the air unit module and camera, which can be mounted on a racing drone and used with the goggles or a remote controller to transmit video, control signals, and flight controller information wirelessly.
The DJI FPV Goggles are equipped with a high-performance display and support 810p 120fps HD display. When used with a racing drone equipped with the air unit, users can enjoy a first-person view of their aerial experience in real time.
The DJI FPV Remote Controller works with the air unit and goggles, and can be used to control the aircraft and operate the menu screen of the goggles to set parameters.
Air Unit
Goggles |
Remote Controller |
*The end-to-end latency is the total time from camera input to screen display. The DJI Digital FPV System can reach its minimum latency in Low Latency mode (720p 120fps), and achieving maximum transmission distance (FCC) in a wide open area with no electromagnetic interference. The aircraft will fall if the video or control signal is disconnected. Be careful when flying at low altitudes and long distances.
**There are up to eight channels for the DJI Digital FPV System depending on the region (FCC: eight, CE/SRRC: four, MIC: three). Each channel has a bandwidth of 20 MHz. The public channel is 8, which is the default channel when the equipment is powered on. The channel can be changed manually to avoid interference from other devices.
7 © 2019 DJI All Rights Reserved.

DJI Digital FPV System User Manual
At a Glance
DJI FPV Air Unit


 7
7
1 |
4 |
|
2 |
|
|
|
|
|
3 |
5 |
6 |
|
DJI FPV Goggles
1.Antennas
2.Front Cover
3. Channel Adjustment Buttons
4. Channel Display
5. USB-C Port
6. microSD Card Slot
7. Air Intake
8. Interpupillary Distance (IPD) Slider


 9
9
10 |
12 |
 14
14


 13
13 


11 |
15 |
|


 16
16

 17
17 


18

1.MMCX Antenna Ports
2.3-in-1 Port
3.USB-C Port
4.microSD Card Slot
5.Link Button
6.Linking Status Indicator
7.Camera
 1
1
2 |
3 |
4


 5
5 


 6
6


 8
8


 7
7


9.Headband Attachment
10.Foam Padding
11.Lens
12.Air Vent
13.Record Button
14.Back Button
15.5D Button
16.Audio/AV-IN Port
17.Power Port (DC5.5×2.1)
18.Link Button
8 © 2019 DJI All Rights Reserved.

DJI Digital FPV System User Manual
DJI FPV Remote Controller
|
|
|
|
|
1. |
Power Button |
|
|
|
|
|
2. |
C Button (customizable) |
|
|
|
|
|
3. |
Control Sticks |
|
|
9 |
|
11 |
4. |
Lanyard Attachment |
|
|
|
|
5. |
Status LED |
|
|
|
3 |
|
|
||
|
|
|
|
6. |
Battery Level LEDs |
|
|
|
4 |
|
|
||
|
|
1 |
10 |
|
7. |
Simulator PPM Port |
|
|
|
|
|||
|
|
|
|
|
|
|
|
5 |
2 |
|
|
8. |
USB-C Port |
|
|
|
|
|||
8 |
|
6 |
|
|
||
7 |
|
|
|
9. |
SB Switch |
|
|
|
|
|
|
10. SC Switch
11. Antennas
12. |
Left Dial |
|
|
|
13. |
Record Button |
|
|
|
14. |
SA Switch |
12 |
15 |
|
15. |
Right Dial |
|||
|
|
|||
16. |
SD Switch |
13 14 |
16 17 |
|
17. |
Back Button |
|
|
18.Right Stick Adjustment Screw (Horizontal)
19.Right Stick Adjustment Screw (Vertical)
|
20. |
Throttle Stick Adjustment Screws* (Mode 1) |
|
|
|
|||
|
|
a. Ratchet Throttle Adjustment Screw |
|
24 |
|
|||
|
|
b. Smooth Throttle Adjustment Screw |
|
|
||||
|
11 21. |
|
|
|
||||
|
Throttle Stick Adjustment Screws* (Mode 2) |
|
20 |
|
||||
|
|
|
12 |
15 |
|
|
|
|
|
|
a. Smooth Throttle Adjustment Screw |
|
18 |
a b |
22 |
||
|
|
b. Ratchet Throttle Adjustment Screw |
|
|
||||
|
|
|
a |
b |
||||
10 |
|
13 |
14 |
16 |
17 |
|
21 |
|
|
22. |
Left Stick Adjustment Screw (Vertical) |
|
23 |
||||
|
19 |
|
||||||
|
23. |
Left Stick Adjustment Screw (Horizontal) |
|
|
||||
|
|
|
|
|||||
|
24. |
Battery Cover |
|
|
|
|
25 |
|
|
|
|
|
|
|
|
|
|
|
25. |
Battery Cover Lock |
|
|
|
|
|
|
*To choose between a ratchet throttle and a smooth throttle, users must adjust the throttle stick adjustment screw that corresponds to the current control mode. Depending on the control mode, the corresponding vertical stick adjustment screw is unavailable.
9 © 2019 DJI All Rights Reserved.
DJI Digital FPV System User Manual
Activation
When powered on, connect the device to your computer by the USB-C port and run DJI Assistant 2 for activation.
Make sure to activate the device before using for the first time. Otherwise, some functions will be unavailable:
 If the air unit is not activated, its transmission power will be limited (≤25 mW), and the menu screen of the connected goggles cannot be operated.
 If the goggles are not activated, only linking is available and the menu screen cannot be operated. Additionally, the device will also be set in the public channel and cannot be set to other channels after linking. Note that the public channel is easily prone to interference from other transmission devices.
 If the remote controller is not activated, it cannot be used to operate the menu screen of the connected goggles.
10 © 2019 DJI All Rights Reserved.
DJI FPV Air Unit
Introduction
The DJI FPV Air Unit is an advanced video transmission module that supports a 5.8 GHz digital video signal and 720p 120fps image transmission, with a transmission range of up to 4 km and a minimum end-to-end latency within 28 ms. The air unit can be mounted on a racing drone and used with the goggles or remote controller to transmit video, control signals, and flight controller information wirelessly.
Installation and Connection
Air Unit Module
Refer to the illustration below to mount and connect the air unit to a racing drone.
3-in-1 Cable (Power, DJI HDL, UART)
RED: Power (7.4-17.6 V)
BLACK: Power GND
WHITE: UART RX (Connects to Flight Controller OSD TX, 0-3.3 V)
GRAY: UART TX (Connects to Flight Controller OSD RX, 0-3.3 V)
BROWN: Signal GND
YELLOW: DJI HDL (Connects to Flight Controller S.Bus, 0-3.3 V)
An electric soldering iron and soldering tin are required for connection. Make sure that there are no short circuits or open circuits when soldering the cables.
 The air unit may become hot during or after operation. DO NOT touch the air unit before it cools down.
 DO NOT use the air unit for an extended period when the temperature is high or there is poor ventilation. Otherwise, the air unit may overheat and enter low-power mode which will affect the performance.
 Keep the antennas of the air unit at least 40 mm apart. Keep the air unit away from metal objects or carbon fiber frames. Make sure to choose a position where the transmission will not be blocked during flight.
11 © 2019 DJI All Rights Reserved.
DJI Digital FPV System User Manual
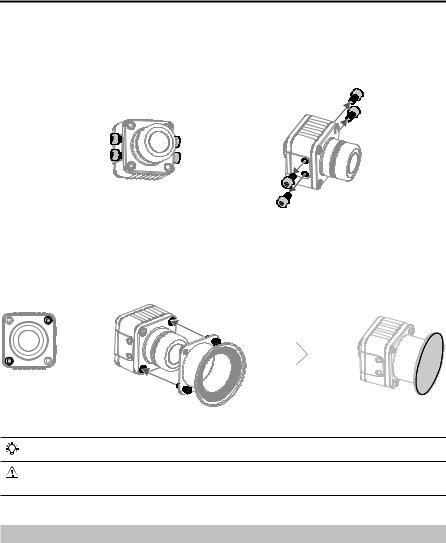
Camera Module
Four M2 screws are attached to both sides of the camera, which can be removed and used to mount the camera to the aircraft frame, and adjust to an appropriate angle based on your requirements.
If you need to mount the lens protector for the camera, follow the steps below.
1.Remove the two screws without glue, mount the lens protector onto the camera, and tighten the two screws.
2.Peel off the adhesive on the protective lens and attach it to the lens protector.
The DJI FPV Lens Protector is sold separately.
Only the two screws without glue can be removed. If you remove the two screws that are glued, the warranty will be voided.
Operating Channel
There are up to eight channels for the air unit depending on the region (FCC: eight, CE/SRRC: four, MIC: three). Each channel has a bandwidth of 20 MHz. The public channel is 8, which is the default channel when the equipment is powered on. The channel can be changed manually to avoid interference from other devices.
Central |
Channel 1 |
Channel 2 |
Channel 3 |
Channel 4 |
Channel 5 |
Channel 6 |
Channel 7 |
Channel 8 |
frequency (MHz) |
||||||||
|
|
|
|
|
|
|
|
|
FCC |
5660 |
5695 |
5735 |
5770 |
5805 |
5878 |
5914 |
5839 |
|
|
|
|
|
|
|
|
|
CE/SRRC |
5735 |
5770 |
5805 |
- |
- |
- |
- |
5839 |
|
|
|
|
|
|
|
|
|
MIC |
5660 |
5700 |
- |
- |
- |
- |
- |
5745 |
|
|
|
|
|
|
|
|
|
12 © 2019 DJI All Rights Reserved.
Loading...