

Denver MT-725TWIN User Manual
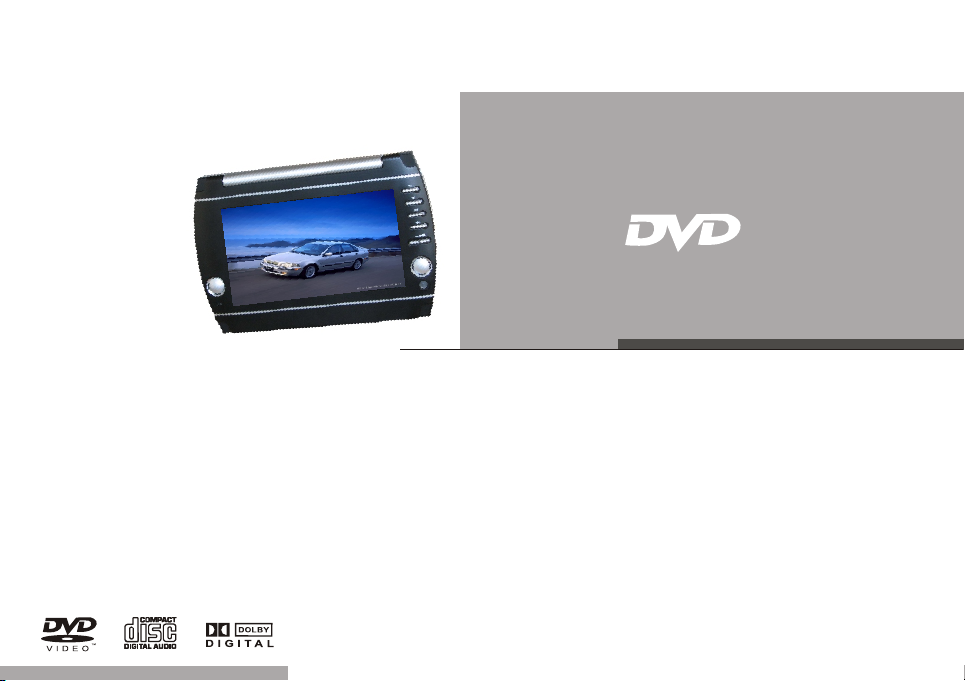
DVD VCD CD JPG
Operating
Instructions
``
7 TWINS PORTABLE TABLET DVD PLAYER

1
PRECAUTIONS........................
CAUTIONS ON USING THIS PLAYER
2
PORTABLE DVD ACCESSORIES............
3
SPECIFICATION........................
4
TYPES OF DISCS PLAYABLE ON THIS
PLAYER................................
PORTABLE DVD SPECIFICATIONS................
MONITOR ACCESSORIES AND SPECIFICATIONS.....
PARTS NAME AND FUNCTION.............
5
FRONT OF THE PLAYER...........
KEYPAD IN THE PLAYER......................
FRONT OF THE MONITOR..........
KEYPAD IN THE MONITOR.....................
BACK OF THE PLAYER............
RIGHT SIDE OF THE PLAYER......
LEFT SIDE OF THE PLAYER.......
TOP OF THE PLAYER............
BACK OF THE MONITOR...........
LEFT SIDE OF THE MONITOR......
REMOTE CONTROL UNIT.......................
USING REMOT E CO NT RO L UN IT. .. .. .. .. ..
6
PRECAUTIONS BEFORE USING REMOTE
CONTROL UNIT.........................
RANGE................................
INSTALL BATTERY FOR REMOTE
CONTROL UNIT..........................
Content
01
04
06
07
07
07
08
09
09
09
10
10
11
11
12
12
13
13
14
16
16
16
17
USING THE BATTERY.......................
7
PRECAUTIONS BEFORE USING
THE BATTERY................................
BATTERY STORAGE................................
BATTERY LIFE...................................
USING THE BATTERY..............................
INSTALLING AND REMOVING THE BATTERY............
RECHARGING THE BATTERY BY USING
AC-DC ADAPTER.............................
CAUTIONS WHEN CHARGING THE BATTERY.............
8
CONNECTING THE PLAYER TO OTHER
COMPONENTS...........................
CONNECTING TO AC-DC ADAPTER....................
CONNECTING EARPHONE............................
CONNECTING TO USB STORAGE......................
CONNECTING TO MEMORY CARD......................
CONNECTING TO A TV SET.........................
CONNECTING TO AN AMPLIFIER.....................
CONNECTING TO AN ACTIVE SPEAKER SYSTEM.........
CONNECTING TO AN AUDIO/VIDEO PLAYER
SYSTEM IF YOU WANT THE UNIT AS A MONITOR.......
CONNECT TO A MONITOR...........................
18
21
18
18
18
18
19
20
20
21
21
22
22
23
24
25
27
26

Content
BASIC OPERATIONS......................
9
TURNING ON/OFF THE MAIN UNIT..............
PLACING DISC............................
PLAYING DISCS..............................
REMOVING DISCS.............................
MODE SETTINGS (BRIGHTNESS/CONTRAST/
COLOR/TFT DISPLAY MODE/TFT REVERSE
MODE/AV OUT/IN MODE)....................
STOPPING THE PLAYING.......................
PAUSING THE DISC...........................
SCANNING FORWARD AND BACKWARD..............
REPEAT PLAYING THE DISC....................
ZOOM PLAYING...............................
PROGRAM PLAYING............................
USING OSD..................................
SELECTING A SUB-TITLE......................
SELECTING AN AUDIO.........................
SELECTING AN ANGLE.........................
PLAYING AUDIO FILES AND JPEG DISC..........
PLAYING THE FILE STORING IN A USB
STORAGE....................................
PLAYING THE FILE STORING IN A
MEMORYCARD.................................
28
28
29
29
29
30
31
31
31
32
32
34
34
33
34
34
35
36
36
10
MAIN UNIT SETTINGS......................
SELECTING A TV SYSTEM..........................
SETTING SCREEN SAVER............................
SELECTING A TV SCALE...........................
SETTING PARENT LOCK............................
SETTING PARENT LOCK LEVEL......................
DEFAULT SETTING................................
SELECTING A OSD LANGUAGE.......................
SELECTING AN AUDIO LANGUAGE....................
SELECTING A SUBTITLE LANGUAGE..................
SELECT A MENU LANGUAGE.........................
TROUBLE SHOOTING.......................
11
37
41
37
37
38
38
39
39
40
40
40
40
Pr ec au ti on s
Thank you for purchasing Portable DVD player. Please read this manual carefully before operating and
reserve it for future reference. It will be helpful to you if you encounter any operational problem.
WARNING:
TO REDUCE THE RISK OF FIRE OR ELECTRIC SHOCK, DO NOT EXPOSE THIS
APPLIANCE TO RAIN OR MOISTURE, DRIPPING OR SPLASHING AND THAT NO
OBJECTS FILLED WITH LIQUIDS, SUCH AS VASES, SHALL BE PLACED ON THE
APPARATUS. DANGEROUS HIGH VOLTAGES ARE PRESENT INSIDE THE
ENCLOSURE. DO NOT OPEN THE CABINET. REFER SERVICING TO QUALIFIED
PERSONNEL ONLY.
1
ATTENTION: TO PREVENT ELECTRIC SHOCK, MATCH WIDE BLADE
LASER:
OF PLUG TO WIDE SLOT, FULLY INSERT.
This Digital Video Disc player employs a Laser System.To ensure proper use of this
product, please read this owner s manual carefully and retain for future reference.
Should the unit require maintenance, contact an authorized service location - see
service procedure.
Use of controls, adjustments or the performance of procedures other than those
specified may result in hazardous radiation exposure.
To prevent direct exposure to laser beam, do not try to open the enclosure.
Visible and invisible laser radiation when open and interlocks defeated.
DO NOT STARE INTO BEAM
LA S E R
Type
Wave length
Output Power
Beam diverge nce
Se mi co nd uc to r la se r GaA IAs
65 0 nm/ 78 0n m
5m W
60 de gr ee
01
CLA SS 1
LA SER PR ODU CT

Pr ec au ti on s
WARNING:
To reduce the risk of fire or electric shock, do not expose this appliance to rain or moisture.
CAUTION:
Use of controls or adjustments or performance of proceduresthose specified may result in hazardous
radiation exposure.
1
! !
RI S K OF E L ECT R I C SH O CK. D O NOT O P ENRI S K OF E L ECT R I C SH O CK. D O NOT O P EN
CAUT I ON
To reduce the risk of electric shock, do not remove cover (or back).
No user serviceable parts inside. Refer servicing to qualified service personnel.
The lightning flash with arrowhead symbol, with in an equilateraltriangle, is intended to
alert user to the presence of uninsulated“dangerous voltage” within the product enclosure
that may beof sufficient magnitude to constitute a risk of electric shock to persons.
The exclamation point within an equilateral triangle is intended to alert the user to the
presence of imporant operating andmaintenance (servicing) instruction in the literature
accompanying the applianc
CAUTION:
IN V I S IBLE L A S E R RA D I A T ION WH E N OPEN A N D
IN T E R LOCK F A I L ED OR D E F EATE D .
AV O I D DIRE C T E X POS U R E T O LAS E R B EAM.
02
Pr ec au ti on s
1
03

Ca ut io ns o n Us in g th is P la ye r
Do not move the player during playback
Duri n g p l a y ba c k , t h e di s c s p in s a t h i gh
spee d , s o d o n o t l if t o r m o ve t h e p l ay e r .
Doin g s o m a y d a m ag e t h e d is c .
Tra n s p or t in g t he p l ay e r
When transporting the player be sure to remove
the disc and turn off the power, then unplug
the power cord .
Pla c e o f i ns t al l at i on
Select a stable place near the TV or stereo system
to which you are going to connect the player.
Do not place the player on top of a TV or color
monitor. Install the player away from cassette
decks or other devices which are easily affected
by magnetic forces.
Do not place objects on top of the player
Do not plac e a n y o b j e c t s o n t o p o f t h e p la y e r .
Turn off the power when not using the player
If the player is connected to your TV but not in
use then switch the power off this will prevent
interference with your normal TV picture.
Noise problems may also be experienced if used
near a radio.
04
Spe c i a l no t e re g ar d in g u se o f
pla y e r i n ve h ic l es
Unit must not be used when the vehicle is
moving at all.
Most countries and states have laws which
prohibit or severely restrict the use of the
player in vehicles while driving.
Do not leave the player or the battery pack in
places where the temperature is extremely
low (about-10℃ or lower) or extremely high
(about 60℃ or higher), such as inside the
passenger cabin or trunk in midsummer.
Doing so may warp the outer case or reduce
the performance or quality
of the battery pack.
Whe n c a r ry i ng o n p la n es
Heed t h e a i r l i ne c o m p an y ' s r ul e s .
Whe n c a r ry i ng i n h os p it a ls
Heed t he h os pital 's r ul es
2

Ca ut io ns o n Us in g th is P la ye r
Whe n u s i ng w i th c a r po w er c a bl e i n ca r s
Plea s e t u r n o n t he e n g i ne a n d t h en c o n n ec t w i t h th e c a r p ow e r c a bl e f o r u si n g .
Cle a n i ng t h e pl a ye r
Normally clean the player using a soft, dry cloth. For tough dirt, apply some neutral detergent
diluted in 5 to 6 parts water to a soft cloth, wring out thoroughly, wipe off the dirt, then wipe
the player with a dry cloth. Note that alcohol, thinner, benzene, insecticides, etc., may cause
the print or coating to peel off. Also avoid leaving rubber or plastic products in contact with
the player for long periods of time, as this may damage the cabinet. When using chemically treated
cloths, read the cloth's instructions carefully. Always unplug the power cord from the power
outlet before cleaning the player.
To clean dirt off the liquid crystal display, wipe the display gently with a soft, dry cloth
(such as an eyeglass cleaning cloth). Note that leaving water droplets on the display for long
periods of time may result in discoloration or stains. For tough dirt,
use a commercially available liquid crystal display cleaner.
Cop y r i gh t s
Unau t h o r i z ed d u p l ic a t i on , b r o ad c a s t, p u b l ic p e r f or m a n ce o r r e n ta l o f d i sc s i s
proh i b i t e d b y la w .
05
2
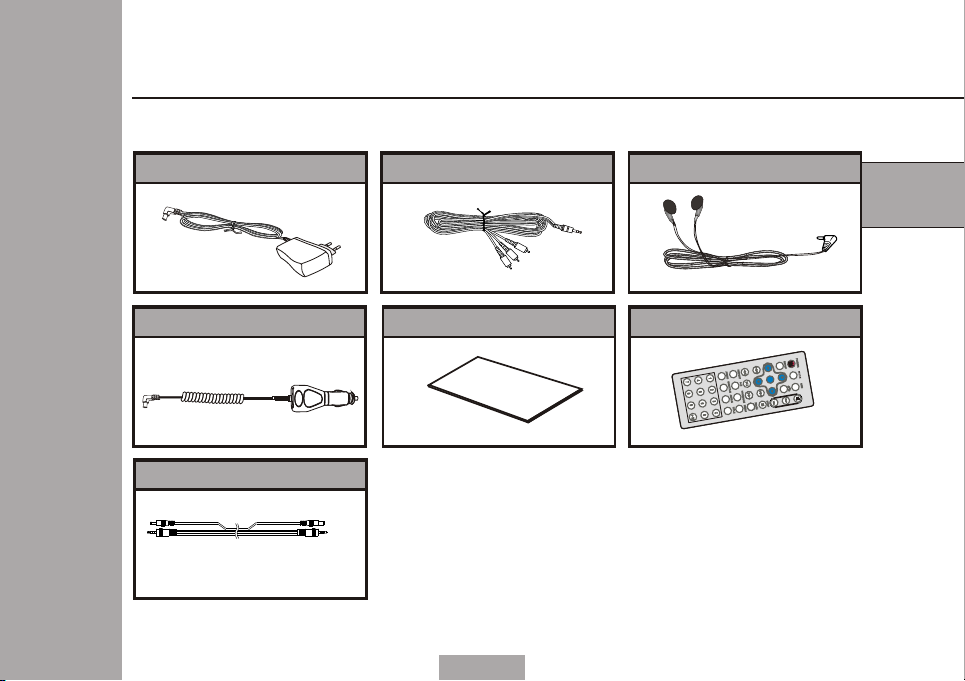
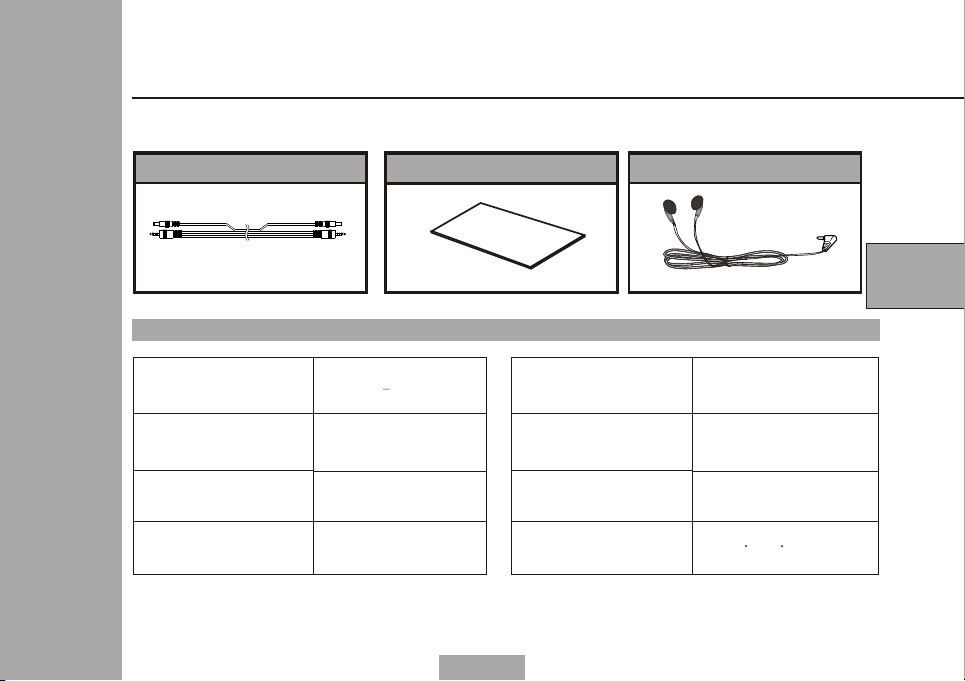
Po rt ab le D VD A cc es so ri es
Afte r u n p a c k in g , c h ec k t h a t al l t h e a cc e s s or i e s l is t e d b el o w a r e in c l u de d .
AC / D C a da p t e r
Ca r p o w e r c a b l e
AC&D C Cab le
AV Ca b l e
Op e r at i n g i ns t r uc t i o ns
O E
P R
A I N
T O
I
N
S
T
R
06
U N
Ear p h o ne
3
Ca r d - t y p e r e m o t e c o n t r o l u n i t
O
C
T
IO
S
K
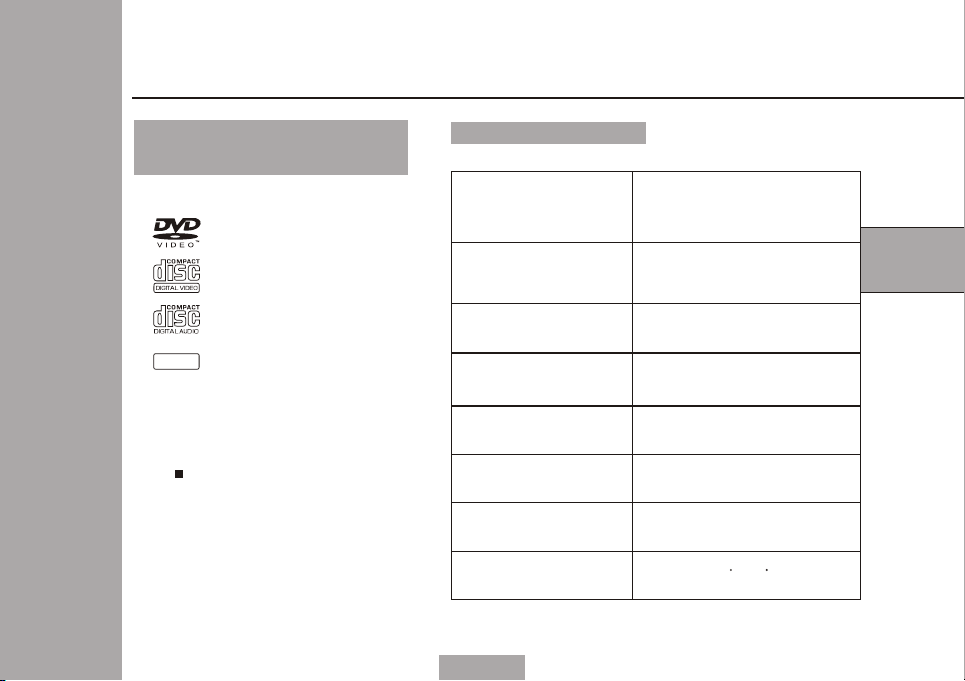
Portable DVD Specifications
The discs listed on the below
can be played on this player
without any adapter
DVDs 8cm/12cm;
Vedio CDs 8cm/12cm;
Audio CDs 8cm/12cm;
J P G
JPG CDs 8cm/12cm.
Noted:
Don't using the disc that is
scratched seriously
Specifications
Disc type
Audio output
Video output
LCD panel
Power
Unit size
Weight
Working
temperature
07
665g
5 C~45 C
CD-DA
JPEG
DVD Video
Video CD
LINE O UT(2 0Hz-2 0k Hz)
Earphone o u t p u t
Vid e o o u t p u t
Video outp u t : 1 . 0 V p p / 7 5 o h m
7 color TFT
``
AC-DC adap t e r 1 2 V / 1 .2A
Rec har ge ab le AA 1 .2 V ba tter y
220 m m X 1 5 0m mX 3 4.5m m
4
Mo ni to r ac ce ss or ie s an d sp ec if ic at io ns
Afte r u n p a c k in g , c h ec k t h a t al l t h e a cc e s s or i e s l is t e d b el o w a r e in c l u de d .
AC&D C Cab le( opt ion al)
Specifications
Audio input
Video input
Power
Earphone o u t p u t
Op e r at i n g i ns t r uc t i o ns ( t h i s ma n u al )
1Vr ms 2 Vr ms
1.0Vpp/7 5 o h m
DC 12V /0 .6A
20Hz -2 0kHz
08
Ear p h o ne (opt iona l)
O
P A
E
R T
I
ON
S
IN
T U
R C T O S
I N
4
LCD panel
Unit size
Weight
Working
temperature
7 color TFT
``
220 m m X 1 5 0m m X3 4.5m m
470g
5 C~45 C
Portable DVD parts name and function
Front of the player
1
2
3
6
1.
TFT cover
2.
LCD display
3.
Speakers
4.
Control keypad
5.
IR receiver window
6.
Pow er LED i ndic ator
LED li gh t: Pow er s wit ch i s on
LED of f: Po wer s wi tch i s of f
7.
Open TFT cover
Pull the part according to the direction
then open the TFT cover.
4
3
5
Keypad of the main unit
7
1.
2.
3.
4.
09
1
Button
Press this to play disc. When press this
in the play mode, pause mode is set. Press
again to resume playback.
Button
Press this to stop play mode
/
Buttons
Using these buttons to scan backward or
forward through the tracks or chapters.
Button
Press these buttons to increase/decrease
the volume when the main unit is in play mode.
2
3
4
5
Monitor parts name and function
Front of the monitor
1
2
4
1.
LCD display
2.
Speakers
3.
Control keypad
4.
Pow er LED i ndic ator
LED li gh t: Pow er s wit ch i s on
LED of f: Po wer s wi tch i s of f
Keypad of the monitor
MUT E
P/P
3
P/P Button
2
1.
2.
MENU Button
3.
MUTE Button
4.
MODE Button
5.
Buttons
M /M +
MEN U
1
Press the button to set BRIGHT or PASTEL
or VIVID or STANDARD or NORMAL.
Press the button to select Brightness,
Contrast,color,then use M-/M+ buttons
to adjust.
Press the button to mute the audio output.
Press the button to select screen NORMAL L
TO R or NORMAL R TO L or REVERSE L TO R or
REVERSE R TO L,then use M-/M+ buttons to adjust .
Press these buttons to increase/decrease
the volume when the monitor is in play mode.
Press these buttons to adjust Brightness,
Contrast,Color.
Press these buttons to adjust screen mode.
2
MOD E
3
M /M +
4
5
5
10
Portable DVD parts name and function
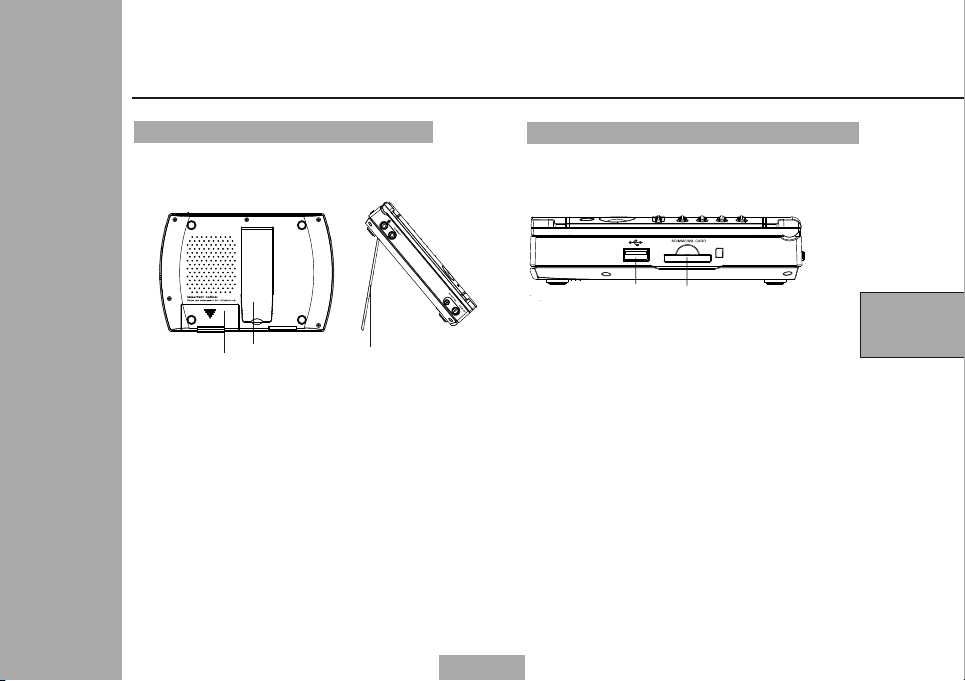
Back of the player
1
2
Support
1.
Pull out the support to the proper
position in order to let the unit
stand.
2.
Battery cover
Open t he ba tter y cov er and pl ace
six re cha rgeab le AA 1 .2V bat ter ies
into i t.
right side of the player
2
1
1
1.
Memo r y c ard soc ke t (op tio na l)
Suit f or SD /MMC/ MS ca rd read er
2.
USB( 1 . 1 ) soc ke t (opti ona l)
conn ect ing USB s tor age
11
5
 Loading...