

Page 1
Contents
PREFACE
Brief Introduction to DVD
Cautions
Features
Compatible Disc Types
Control Button Locations and Explanations
How to use the Remote Control
Connecting to Power Supply
SYSTEM CONNECTIONS
Connected to TV set
Connected to Ordinary Audio System
Connected to Amplifier with Dolby Digital Decoder
Connected to Amplifier with DTS Digital Decoder
Audio/Video In
BASIC OPERATION
Playback
TV System Selection
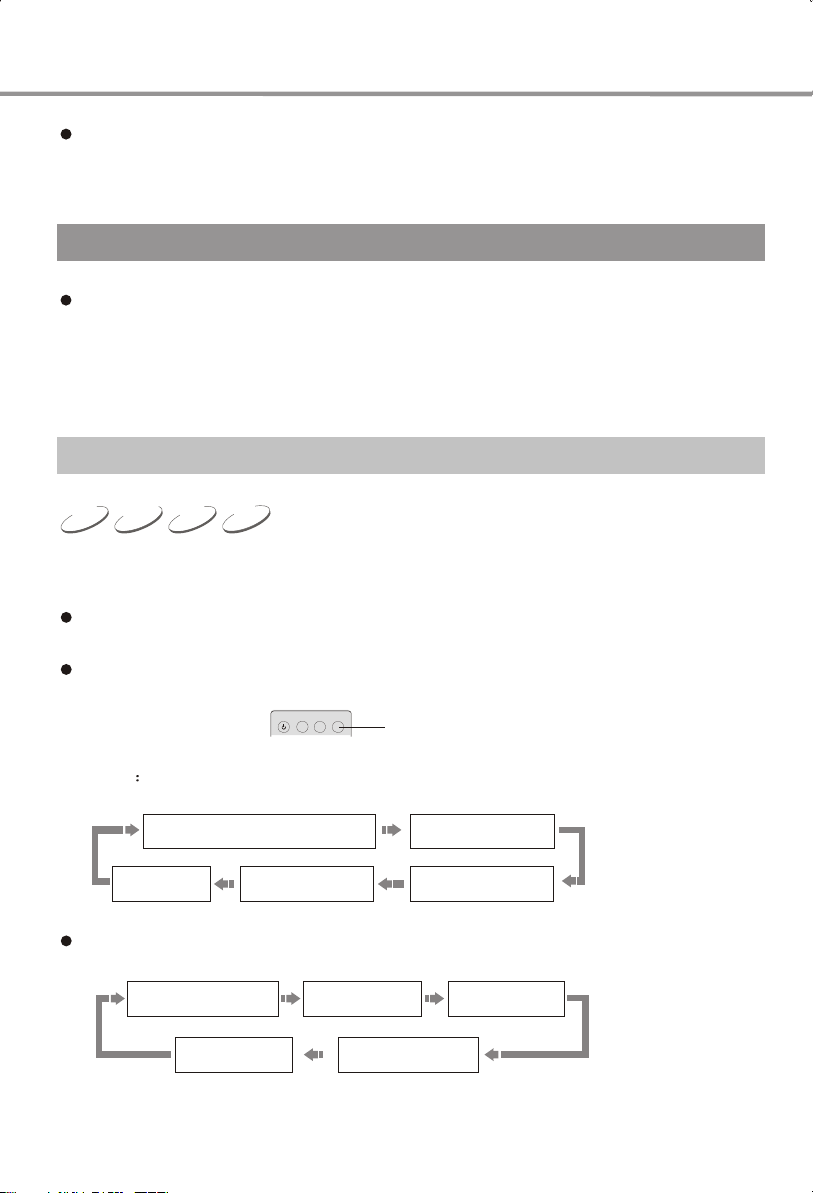
Pause/Step Playback
OSD
KEY/Volume Control
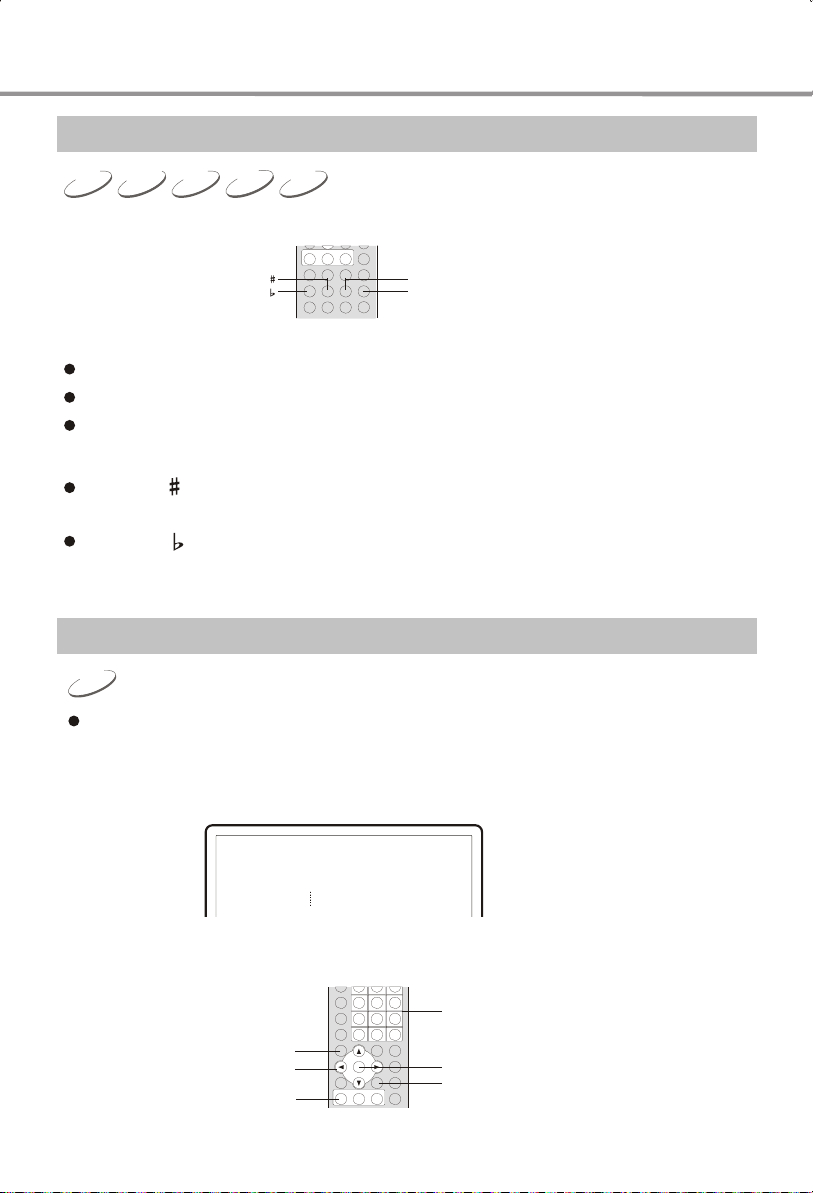
DVD Menu Playback
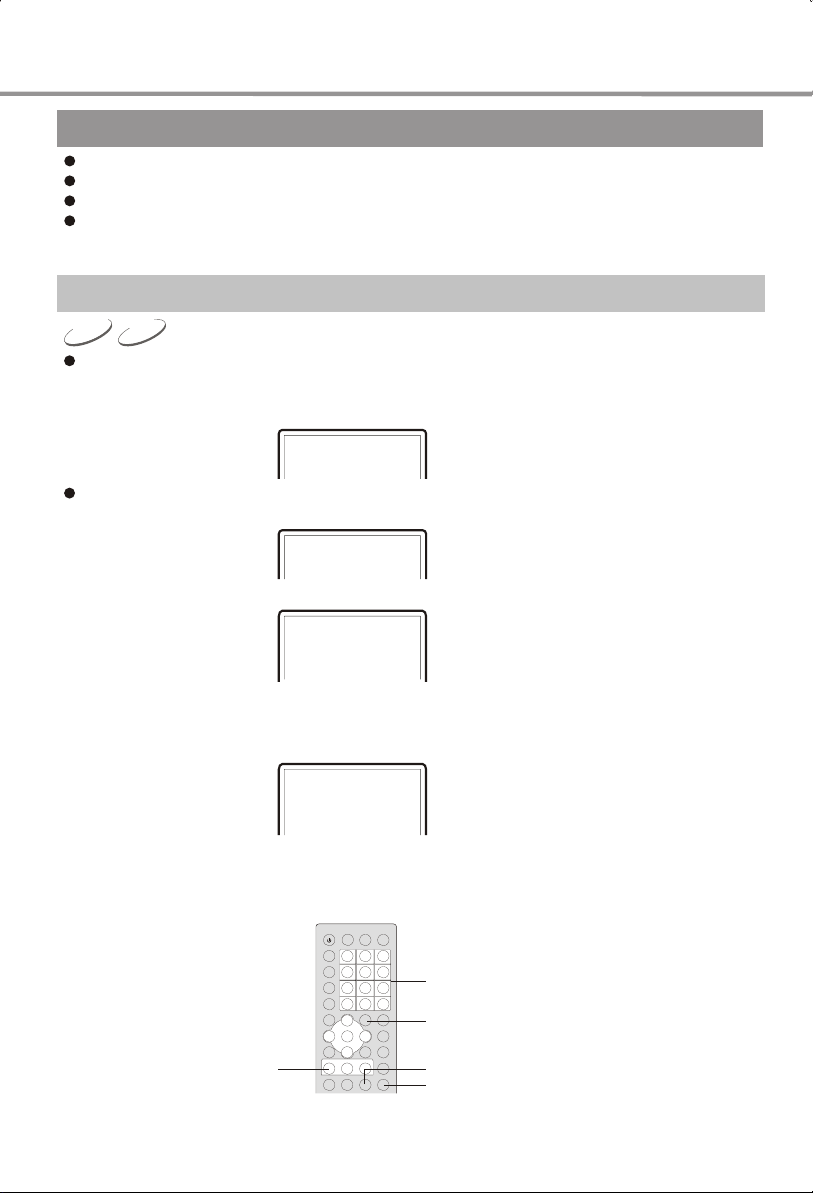
PBC Playback
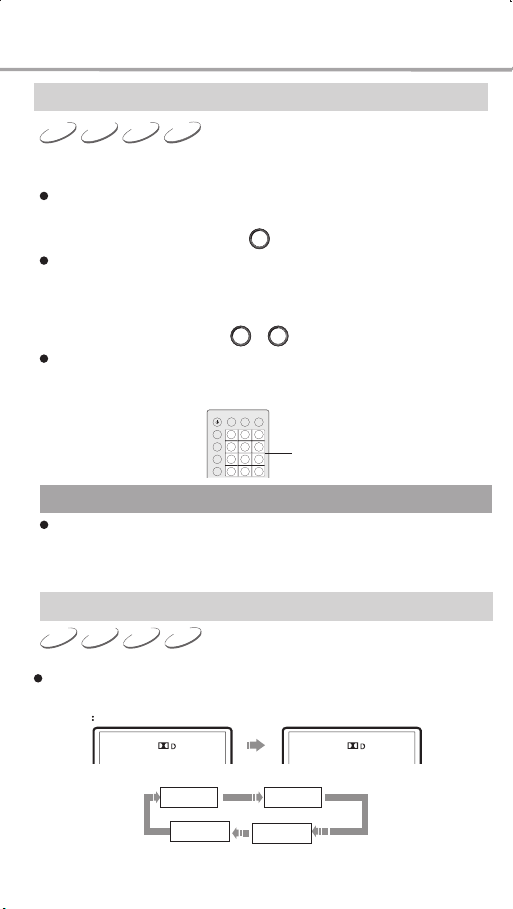
Direct Selection Playback Function by Number Button
Language/Audio Channel Selection
Mute
PLAY OPERATION
Fast Playback
Slow Playbck
Repeat Playback
Repeat the Selected Section
Subtitle Selection
Angle Selection
Playback from the Desired Point
Page 2
Contents
PLAY OPERATION
Power Spectrum Meter(PSM)
Zooming the Displayed Frame
Virtual Keyboard
Disc's Information
MP3 and JPEG File Playing
FUNCTION SETUP
Functions Setup
General Settings
Video Setup
Audio Setup
Initial Setup
Useful notes
OTHERS
Troubleshooting
Specifications
Terms
Language Code List
Page 3
Safety Instructions Page
Danger Symbol
Reminding the user of the dangerous voltage!
Warning Symbol
Reminding the user of the important instructions for
operation and maintenance.
Caution£º
This DVD player contains a laser system.
Read this manual carefully and get familiar with the instruction
before operating.
Please retain this manual in a safe place for future reference.
Please contact your local dealer or our technical service center
for maintenance.
To prevent direct laser radiation, do not attempt to open the
enclosure. Visible laser beam will radiate when the enclosure
is opened or when the interlock device is released. Do not stare
at the laser-beam.
The DVD pick-up is a precision component, so do not open the
disc tray door for an extended period of time in order to prevent
dust.
The TFT display is a delicate device, so do not press it to avoid
damaging to the display.
Never place other things or articles upon the player, otherwise
it may cause improper playback.
is a trademark of DVD Format/Logo Licensing Corporation,
registered in the U.S., Japan and other countries.
This product incorporates copyright protection technology that is
protected by method claims of certain U.S. patents and other intellectual
property rights owned by Macrovision Corporation and other rights
owners. Use of this copyright protection technology must be authorized
by Macrovision Corporation, and is intended for home and other limited
viewing uses only unless otherwise authorized by Macrovision
Corporation. Reverse engineering or disassembly is prohibited.
Any change or modification on this player without express consent of
BBK or its authorized agents may bring great inconvenience to the user.
All images in this manual are sketch illustrations for reference only. The
actual displays are contingent upon discs.
This DVD player is manufactured in accordance with the enterprise
standard Q/BBK81-2003.
Page 4

FCC NOTE:
This equipment has been tested and found to comply with the
limits for a Class B digital device, pursuant to Part 15 of the
FCC Rules. These limits are designed to provide reasonable
protection against harmful interference in a residential
installation. This equipment generates, uses and can radiate
radio frequency energy and, if not installed and used in
accordance with the instructions, may cause harmful interference
to radio communications, However, there is no guarantee that
interference will not occur in a particular installation. If this
equipment does cause harmful interference to radio or television
reception, which can be determined by turning the equipment
off and on, the user is encouraged to try to correct the
interference by one or more of the following measures:
Reorient or relocate the receiving antenna.
Increase the separation between the equipment and receiver.
Connect the equipment into an outlet on a circuit different
from that to which the receiver is connected.
Consult the dealer or an experienced radio/TV technician
for help.
FCC Caution:
To assure continued compliance, follow the attached installation
instructions and use only shielded cables when connecting to
other devices. Also, any changes or modifications not expressly
approved by the party responsible for compliance could void
the user's authority to operate this equipment.
Warning:
To prevent the risk of fire or electric shock, do not expose
this unit to rain or moisture. High voltage components inside.
Do not attempt to open the enclosure. All servicing beyond
those means described in the operating instructions should
be referred to qualified service personnel.
The DVD player contains laser devices the top cover of the
DVD module acts as a protective is radiation dangerous when
the top cover removed or opened. Avoid direct exposure to
beam during service or repair.
Page 5
Safety Instructions
1. Read Instructions-All the safety and operating instructions should be read before the
appliance is operated.
2. Retain Instructions-The safety and operating instructions should be retained for future
reference.
3. Heed Warnings-All warnings on the appliance and in the operating instructions should
be adhered to.
4. Follow Instructions-All operating and use instructions should be followed.
5. Water and Moisture-The appliance should not be used near water-for example, near
a bathtub, washbowl, kitchen sink, laundry tub, in a wet basement, or near a
swimming pool, and the like.
6. Carts and Stands-The appliance should be used only with a cart or stand that is
recommended by the manufacturer.
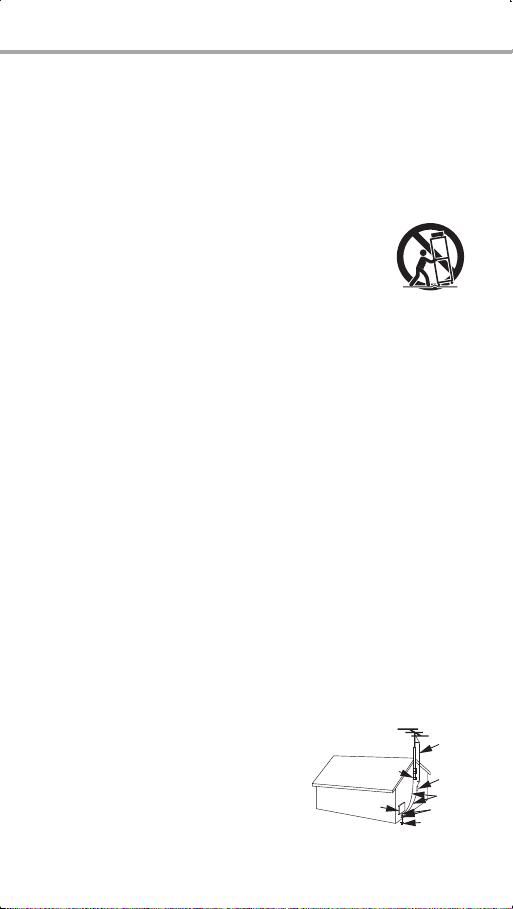
6A. An appliance and cart combination should be moved with care.
Quick stops, excessive force, and uneven surfaces may cause the
appliance and cart combination to overturn.
7. Wall or Ceiling Mounting-The appliance should be mounted to
a wall or ceiling only as recommended by the manufacturer.
8. Ventilation - The appliance should be situated so that its location or position does
not interfere with its proper ventilation. For example, the appliance should not be
situated on a bed, sofa, rug, or similar surface that may block the ventilation
openings; or, placed in a built-in installation, such as a bookcase or cabinet that may
impede the flow of air through the ventilation openings.
9. Heat - The appliance should be situated away from heat sources such as
radiators, heat registers, stoves, or other appliances (including amplifiers)
that produce heat.
10. Power Sources - The appliance should be connected to a power supply only of the
type described in the operating instructions or as marked on the appliance.
11. Grounding or Polarization-Precautions should be taken so that the grounding or
polarization means of an appliance is not defeated.
12. Power - Cord Protection - Power-Supply cords should be routed so that they are not
likely to be walked on or pinched by items placed upon or against them, paying
particular attention to cords at plugs, convenience receptacles, and the point where
they exit from the appliance.
13. Cleaning - The appliance should be cleaned only as recommended by the manufacturer.
14. Power Lines-An outdoor antenna should be located away from power lines.
15. Outdoor Antenna Grounding - If an outside antenna is connected to the receiver, be
sure the antenna system is grounded so as to provide some protection against voltage
surges and built-up static charges. Article 810 of the National Electrical Code,
ANSI/NFPA70, provides information with regard to proper grounding of the mast
and supporting structure, grounding of the lead-in wire to an antenna-discharge unit,
size of grounding conductors, location of antenna-discharge unit, connection to
grounding electrodes, and requirements for the grounding electrode. See Figure A.
16. Nonuse Periods-The power cord of the appliance should be unplugged from the outlet
when left unused for a long period of time.
17. Object and Liquid Entry - Care should be taken so that objects do not fall and liquids
are not spilled into the enclosure through openings.
18. Damage Requiring Service - The appliance should be serviced by qualified service
personnel when:
A. The power-supply cord or the plug has been damaged; or
B. Objects have fallen, or liquid has been spilled into the
appliance; or
C. The appliance has been exposed to rain; or
D. The appliance does not appear to operate normally or
exhibits a
marked change in performance; or
E. The appliance has been dropped, or the enclosure damaged.
19. Servicing-The user should not attempt to service the appliance
beyond that described in the operating instructions. All other
servicing should be referred to qualified service personnel.
FIGURE A
EXAMPLE OF ANTENNA GROUNDING
AS PER NATIONAL
ELECTRICAL CODE
ELECTRIC
SERVICE
EQUIPMENT
NEC -NATIONAL ELECTRICAL CODE
GROUND
CLAMP
ANTENNA
LEAD IN
WIRE
ANTENNA
DISCHARGE UNIT
(NEC SECTION 810-20)
GROUNDING CONDUCTORS
(NEC SECTION 810-21)
GROUND CLAMPS
POWER SERVICE GROUNDING
ELECTRODE SYSTEM
(NEC ART 250, PART H)
Page 6
PREFACE
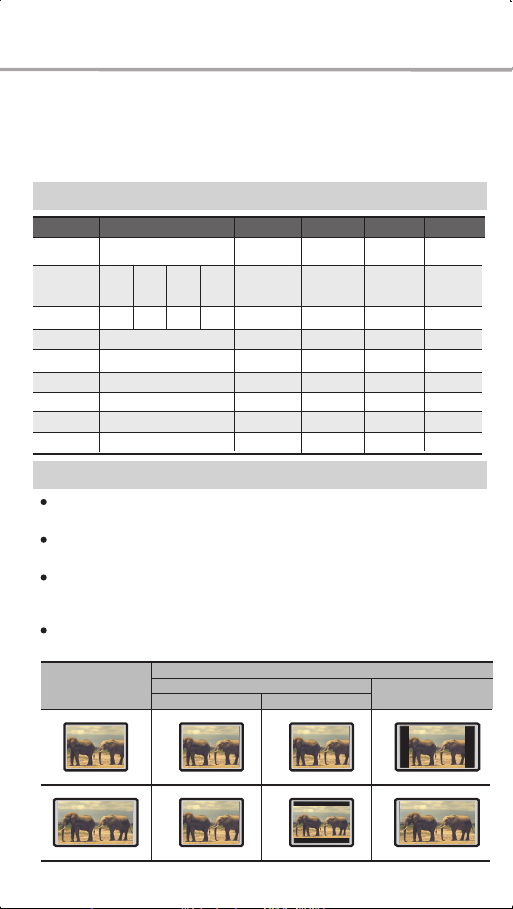
Brief Introduction to DVD
DVD is well known for its extraordinarily large capacity and outstanding audiovideo effects. Its capacity is as high as 4.7-17 GB (approximately 7-26 times the
CD capacity).With 500-line horizontal resolution of picture and Dolby Digital 5.1
Channel surround sound, it brings a new era to the household AV products.
Comparison Between DVD and Other Discs
Doublesided
2 layers
17G
LD
Analog
1 side 60min.
2 sides 120min.
30CM/20CM
430 lines or
more
One
Max. 16 types
Linear PCM
FM modulation
44.1KHz/16bit
TV Screen
4:3
SVCD
Digital/MPEG2
650MB
45min.
12CM/8CM
350 lines or
more
Letterbox
VCD
Digital/MPEG1
650MB
74min.
12CM/8CM
250 lines or
more
44.1KHz
CD
Digital
650MB
74min.
12CM/8CM
Linear PCM
44.1KHz/16bit
16:9
Recording
Method
Capacity
Playback time
Disc Diameter
Horizontal
Resolution
Aspect Ratio
Subtitle
Audio
Sound Quality
DVD
Digital/MPEG2
Singlesided
1 layer
4.7G
133min.
Double-
Single-
sided
sided
1 layer
2 layers
9.4G
8.5G
266min. 484min.
242min.
12CM/8CM
500 lines or more
Multiple
32 types
Dolby Digital/Linear PCM
48KHz,96KHz/16,20,24bit
Function Introduction
Multiple languages and subtitles
DVD disc can support as many as 8 dubbing languages and 32 subtitle languages.
Multiple angles
DVD disc may support as many as 9 camera angles.
Multiple story plots
User can select to play the desired plots (the beginning, development or ending)
of the same disc.
Multiple aspect ratios
Multiple aspect ratios support various TV screens.
Disc Pictures
4:3
Pan-Scan
16:9
1
Page 7
PREFACE
Cautions
ON THIS UNIT
Please remove the power plug form the wall outlet if you do not intend to use
this player for an extended period of time.
Ensure that all connection wires and power supply cords are properly connected
before turning on power.
This player utilizes a switching power supply. Power supply: AC 110V 250V,
50Hz/60Hz.
Before turning on the power, please adjust the volume of its speakers and power
amplifiers to minimum. Adjust the volume as you like only after the normal
playback to avoid damaging to your speakers or amplifiers.
Do not put this player near any high power speaker or put both on the same tableboard so as to avoid any influence on its normal operation due to vibration.
Please put this player at a dry and ventilated area. Do not put it near heat
source, or expose it to direct sunlight, mechanical vibration, humidity or
dust-rich environment, and also do not put it over heat releasing substances.
When moving this player from a cold place to a warm one, or vice versa, the
laser head may have condensation. Then the player will not work properly. In
such a case, please turn the power on for 1-2 hours without loading a disc.
It is allowed to use a small amount of neutral detergent to clean the player.
Never use sandpaper or organic solvent such as alcohol. Or gasoline for cleaning.
ON THE TFT DISPLAY
Please do not heat up the display, neither can you scratch the screen with pointed
objects.
A very small amount of bright or dark spots appear on the display, which is normal
and does not mean any malfunction or defect.
The display should not be the high bright status for an extended period of time.
The efficiency of the display's pixel is above 99.99%. However, there is still
0.01% pixel which may not illuminate normally.
ON BATTERY PACK
This player's battery pack is rechargeable. It should be fully recharged before use.
Please remove the battery pack if you do not intend to use this player for an
extended period of time. (Power is still consumed although this player is turned
off. Therefore, the battery pack may be damaged due to excessive discharging.)
The battery pack can be recharged only when this player is turned off.
Do not dispose of in fire or water. Do not heat the battery pack.
Do not use it in high temperature or near a heat source.
Do not connect the positive and negative polarities with a metal object.
The operating temperature of the battery pack is 0~35
2
Page 8

PREFACE
Features
This player utilizes color TFT LCD and new generation DVD decoding chip
with built-in Dolby Digital / DTS decoders which can bring you to a brand-new
AV entertainment world. The 2-laser super error correction mechanism supports
CD-R.
Brand-new AV Effects
1
7 color TFT LCD.
Composite video and S-Video.
2
Built-in Dolby Digital decoder.
3
Built-in DTS digital decoder.
4
5
DOWNMIX outputs.
Built-in stereo speakers.
6
Hi-Fi stereo headphone output.
7
High Quality Digital Audio
Digital audio optical outputs capable of connecting a power amplifier
with the Dolby Digital or DTS decoder.
2
DTS, Dolby Digital and PCM digital audio outputs can definitely satisfy
audiophiles' high listening requirements.
Numerous Convenient Functions
Screen saver function cautiously protects your LCD and TV.
2
Large capacity solid Li-Ion battery, electronic anti-shock circuits,
convenient for you to watch movies outdoors.
Easy-to-use brand-new GUI and virtual keyboard.
3
4
Multi-angle playback function makes it possible for you to view a scene
from different camera angles.
5
Direct entry to desired scenes (title/chapter/time/track search).
6
Zooming function to zoom up any playing frame.
7
Supports PAL/NTSC systems, no compression to pictures.
8
Multiple aspect ratios to fit various TV sets.
10
Parental control function to protect children from watching inappropriate
discs.
11
Multiple dubbing languages and subtitle languages keep you in the best
entertaining status anytime.
Supports SVCD, VCD, CD, MP3, HDCD, KODAK
PICTURE CD, etc.
3
Page 9
PREFACE
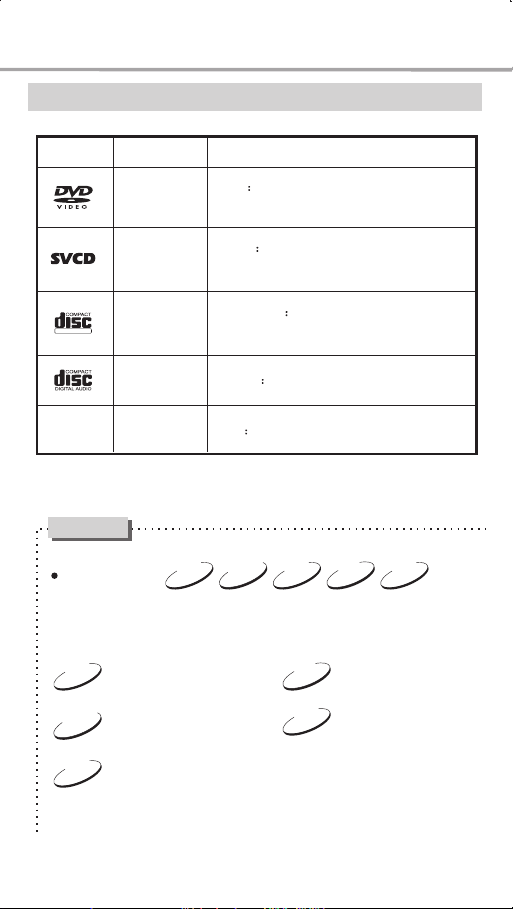
Compatible Disc Types
Types
DIGITAL VIDEO
MP3
Sizes
12cm or 8cm
12cm or 8cm
12cm or 8cm
12cm or 8cm
12cm or 8cm
Recorded Contents
DVD Compressed digital audio+compressed
digital video(dynamic picture)
SVCD Compressed digital audio+
compressed digital video(dynamic picture)
VIDEO CD Compressed digital audio+
compressed digital video(dynamic picture)
CD-DA Digital audio
MP3 Compressed digital audio
NOTES
3
MP
CD
MP
CDVCDSVCDDVD
3
Applies to MP3 disc
Issues related to
These icons on the top banner indicate the disc types that the function described
in this section applies to.
DVD
Applies to DVD disc Applies to CD disc
SVCD
Applies to SVCD disc
VCD
Applies to VCD disc
4
Page 10
PREFACE
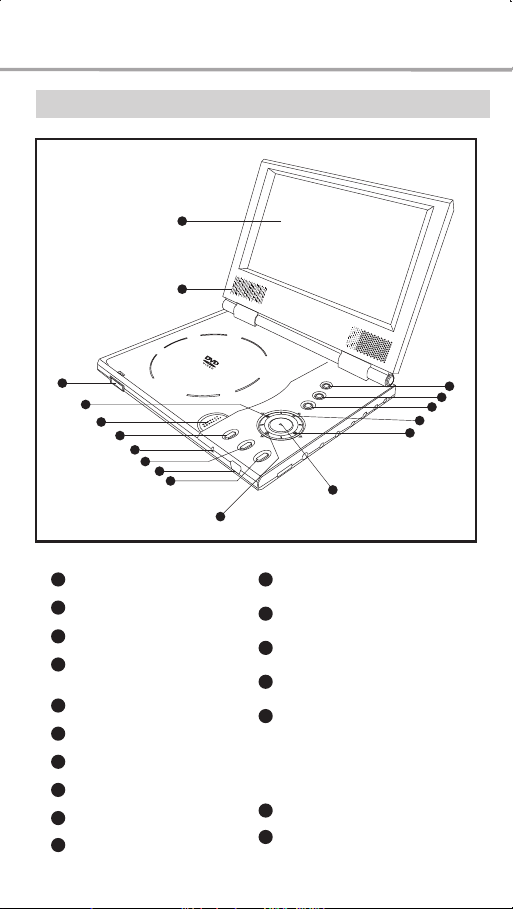
Control Button Locations and Explanations
1
2
3
4
5
6
7
1
Color TFT LCD
2
Speakers
3
Release slide
4
PREV button / LEFT
direction arrow
5
OPEN/CLOSE button
6
SET button
7
Power indicator
8
IMAGE button
9
IR sensor
10
MENU button
17
16
15
14
13
8
9
10
11
11
12
13
14
15
16
17
12
PAUSE button / DOWN
direction arrow
PLAY button / SELECT
button
NEXT button / RIGHT
direction arrow
STOP button / UP direction
arrow
Panel/Switch Button
Press once to switch to Direction
Buttons function
Press twice to switch to Virtual
Keyboard function
Browser Button
POWER switch
5
Page 11
PREFACE
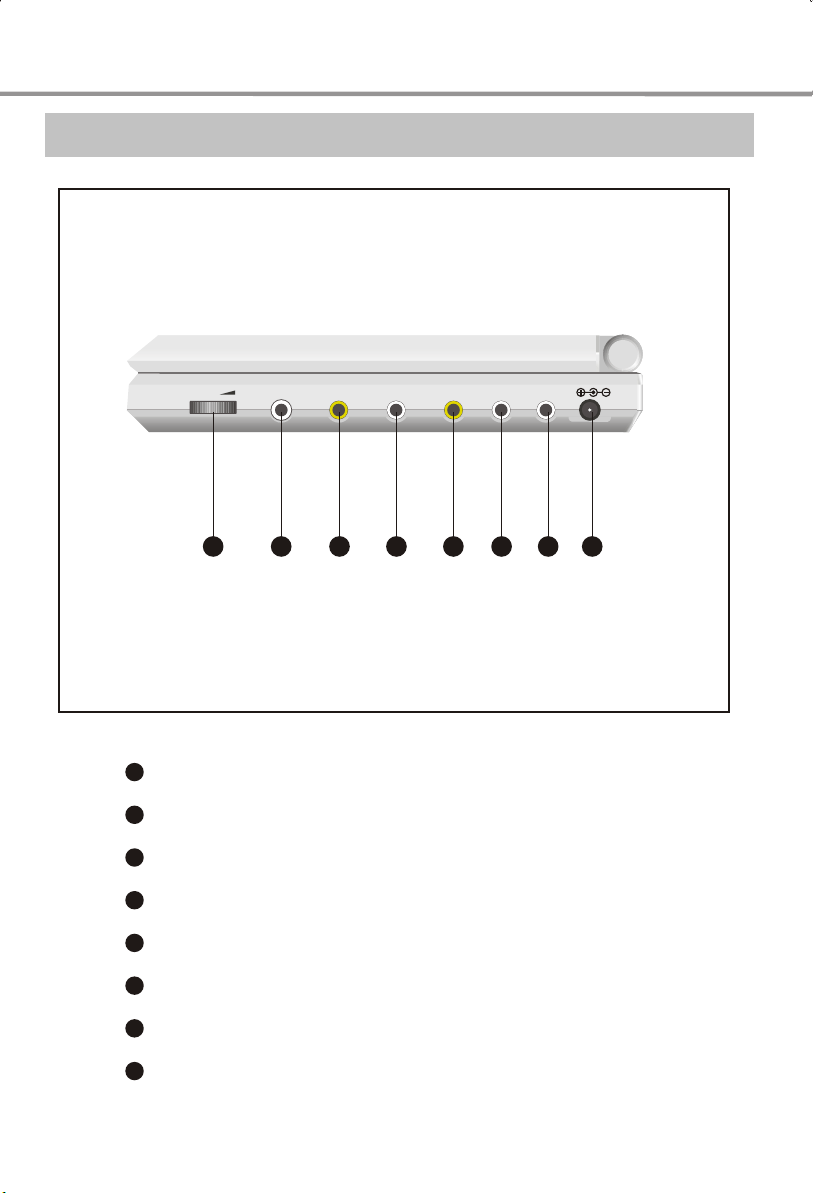
Control Button Locations and Explanations
1
Headphone volume knob
1
Phones jack
2
Audio/Optical Out jack
3
Video Out jack
4
S-Video Out jack
5
Video In jack
6
Audio In jack
7
Power supply socket
8
2 3 4 5 86 7
6
Page 12
PREFACE
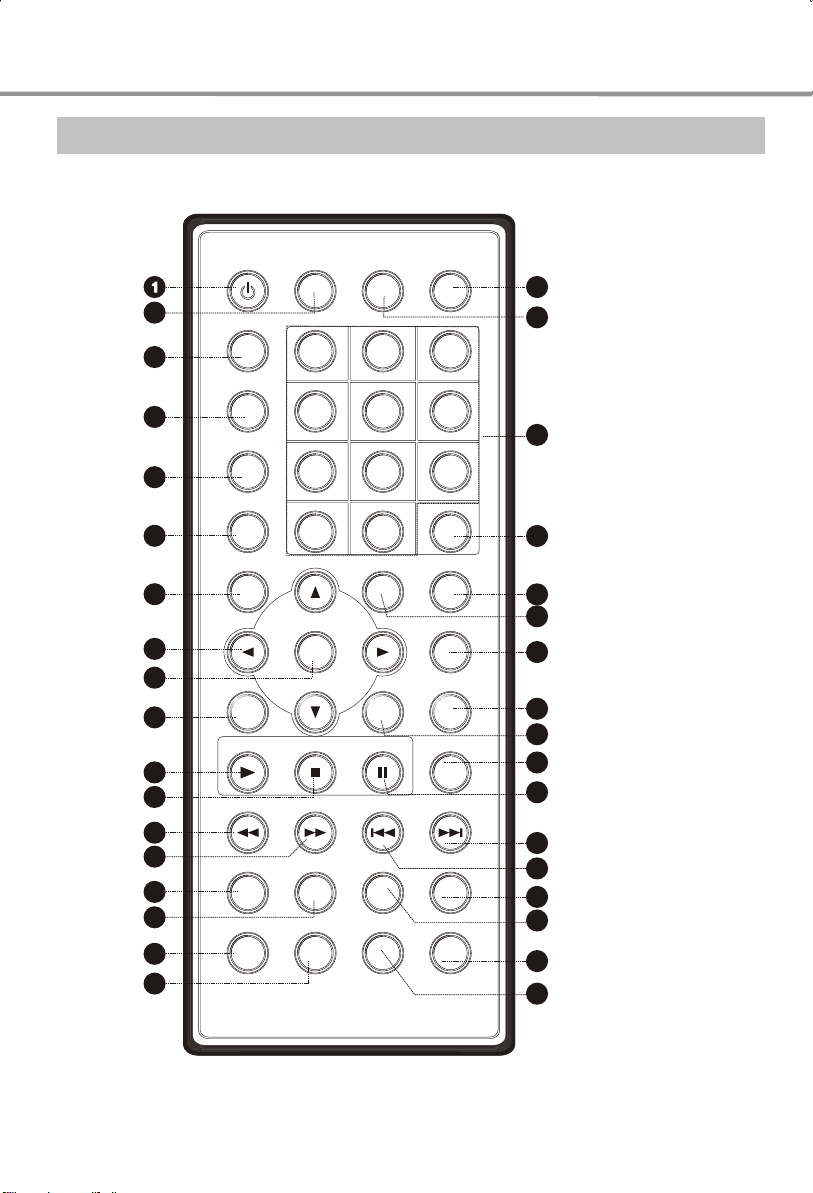
Remote Control Illustration
2
3
35
34
10
11
12
13
14
15
16
17
18
4
5
6
7
8
9
33
32
31
30
29
28
27
26
25
24
23
22
21
20
19
7
Page 13

PREFACE
ILLUSTRATIONS TO THE CONTROLS
19
STANDBY Button
Press once to stand by, Press
twice to play.
2
AUDIO Button
Change the audio language or
audio channel.
3
GOTO button
Play from the desired location.
4
ZOOM Button
Zoom in the displayed frame.
5
ANGLE Button
Change camera angles, MP3/JPEG
playback modes switch.
6
MUTE button
Press once to mute, twice to unmute.
7
TITLE button
DVD titles.
8
CURSOR Buttons
9
SELECT Button
10
SETUP Button
Function setup.
11
PLAY Button
Normal playback.
12
STOP Button
Stop playback.
13
REV Button
Fast backward play.
14
FWD Button
Fast forward play.
15
KEY Button
Fall tone.
16
KEY Button
Rise tone.
17
P/N Button
Switch the TV system between
PAL, NTSC and AUTO.
18
BROWSER
Switch new user interface.
SF Button
Adjusting sound field effects.
EQ Button
20
Adjusting equalization effects.
21
VOLUME-
Decrease volume.
22
VOLUME+
Increase volume.
23
PREV Button
Skip backward.
24
NEXT Button
Skip forward.
25
PAUSE/STEP Button
Pause or play frame by frame.
26
SLOW Button
Slow play.
27
MENU Button
Display DVD menu or open/close
PBC.
28
A-B Button
Repeat the select.
29
REPEAT Button
Repeat play.
30
RETURN Button
Back to the previous menu/
Clearing input numbers.
31
27
PSM Button
Power Spectrum Meter on/off.
32
27
PIC Button
Set video.
33
27
NUMBER Buttons
34
SUBTITLE Button
Change subtitle languages/
Switch JPEG display modes.
35
OSD Button
Display or hide disc information.
8
Page 14
PREFACE
How to use the Remote Control
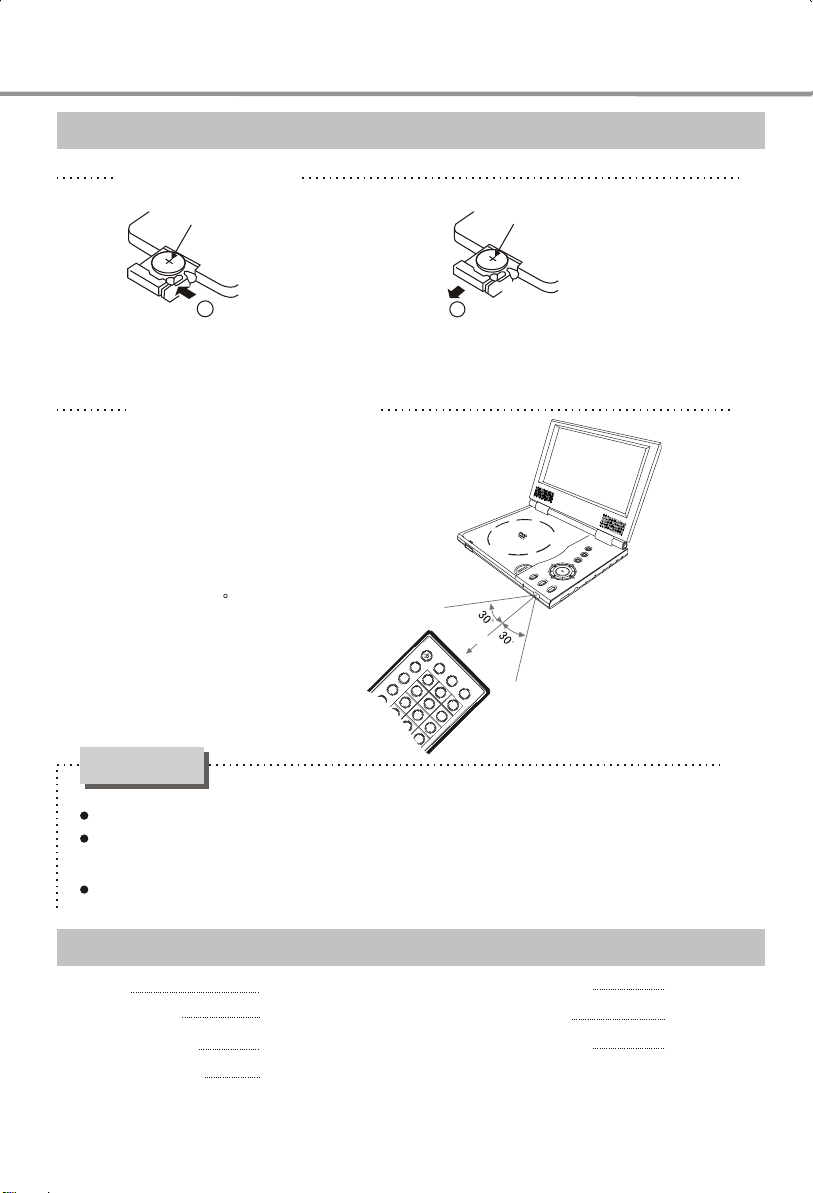
Battery Installation
CR2025
1
Step 1: Push the button toward left.
Using the Remote control
When using the remote control,
the transmitter of the remote
control should be pointed to the
IR sensor on the front panel
within an angle of 30 from the
center and a distance of 3 meters
from the sensor.
Cautions
CR2025
2
Step 2: Pull the battery holder out.
Within about 3m
Never drop the remote control or expose it to moisture.
Never expose the infrared remote sensor on the front panel to direct
sunlight or strong beams.
When the batteries become low, replace them in time.
Accessories
AV cords ¡-
Remote Control
3V Button Battery
Instruction Manual¡-
¡-
1pcs
1pcs
1pcs
1pcs
9
S-VIDEO cord
Battery Pack ¡-
Power Adapter
1pcs
1pcs
1pcs
Page 15
PREFACE
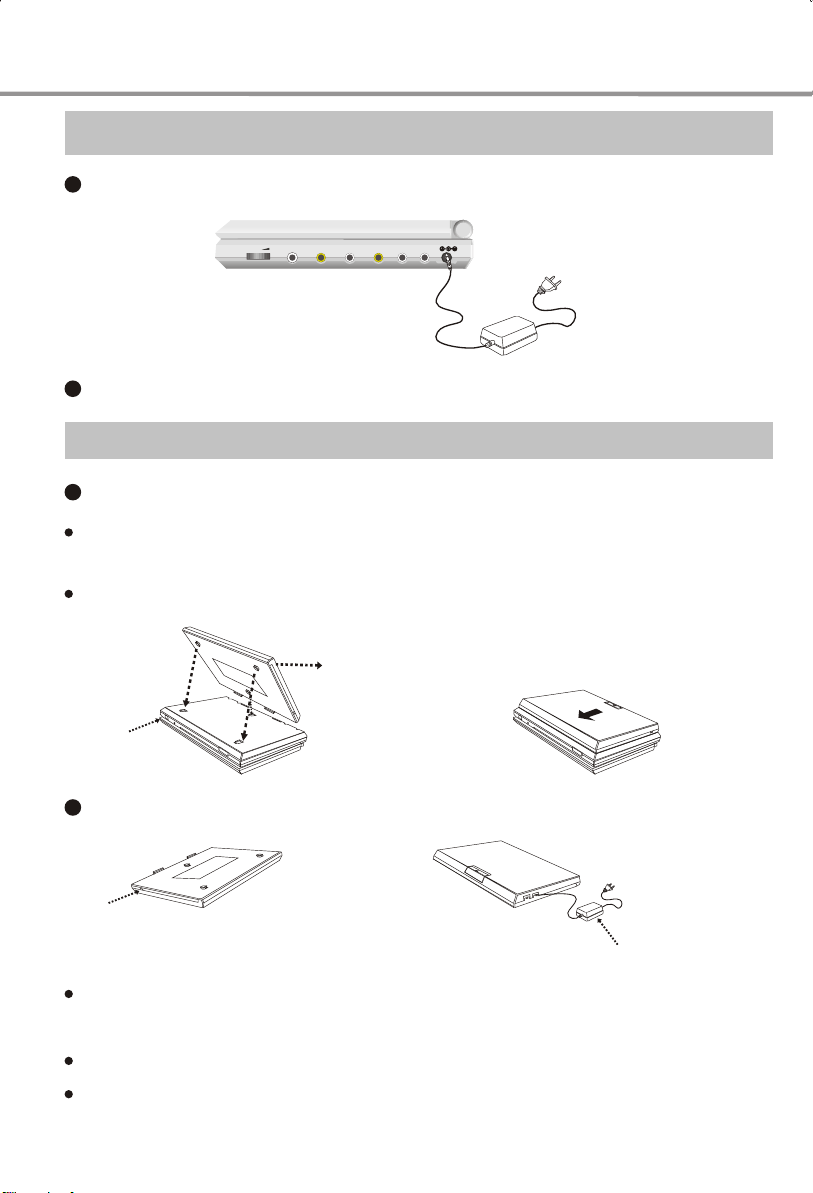
Connecting to Power Supply
1
Connect the output plug of to this player's power adapter.
2
Connect the power adapter to an AC power source.
Installing Battery Pack
Installing Battery Pack
1
Insert the clasps of the battery pack into the holes in the bottom of this player as shown in the
figure.
Slide the battery pack to secure it.
Battery Pack
Portable DVD
Player
2
Recharging Battery Pack
Indicator
Power Adapter
Insert the output plug of the power adapter into the battery pack's power socket. The battery
pack starts being recharged when the indicator flashes in green.
The recharging finishes when the indicator lights up in green.
If the indicator lights up in red, the battery pack has problems and needs repairing.
10
Page 16
SYSTEM CONNECTIONS
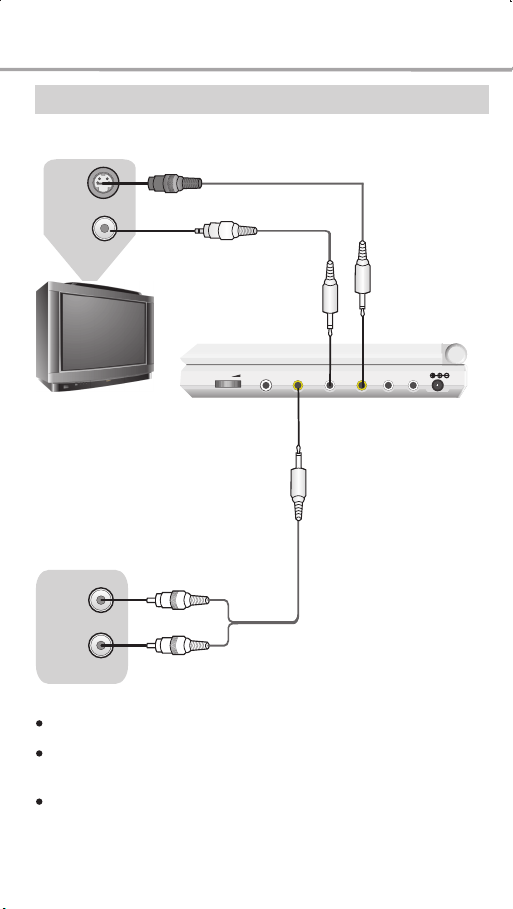
Connected to TV set
S-VIDEO
VIDEO In
S-Video Cord
or
Video Cord
S-Video
Audio In
Audio Cord
Connect this player to the TV set with the video cord.
If your TV set has a S-VIDEO IN connector, use S-VIDEO CORD to
connect the DVD player and TV set.
If the AUDIO OUT of this player is also connected to the TV set, please
connect the AUDIO OUT of this player to the TV AUDIO IN of the same
group as VIDEO IN.
11
Page 17
SYSTEM CONNECTIONS
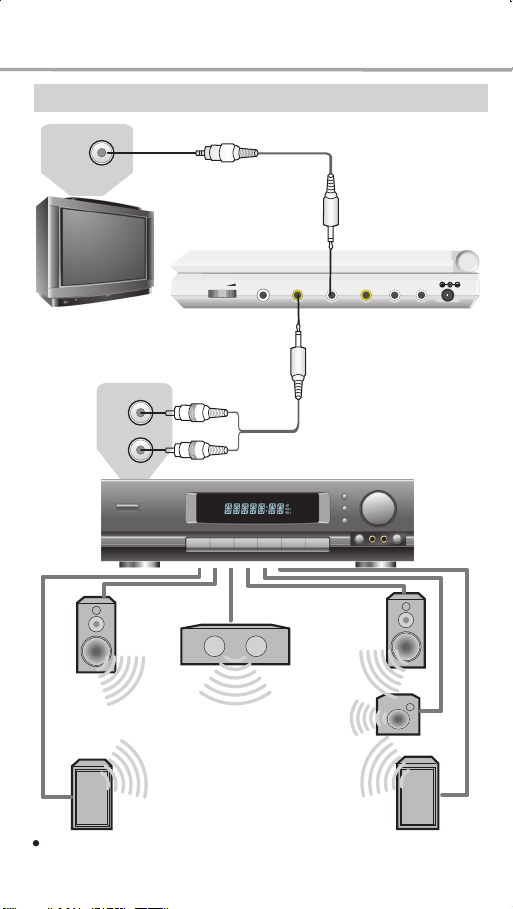
Connected to Ordinary Audio System
Video In
Audio In
Front Left Speaker
Video Cord
Audio Cord
Amplifier equipped with Dolby Pro Logic Surround
Center Speaker
Subwoofer
Front Right
Speaker
Surround Left Speaker Surround Right Speaker
When setting up the speakers please set the Audio mode to "LT/RT"
(Please refer to page 37 for details).
12
Page 18
SYSTEM CONNECTIONS
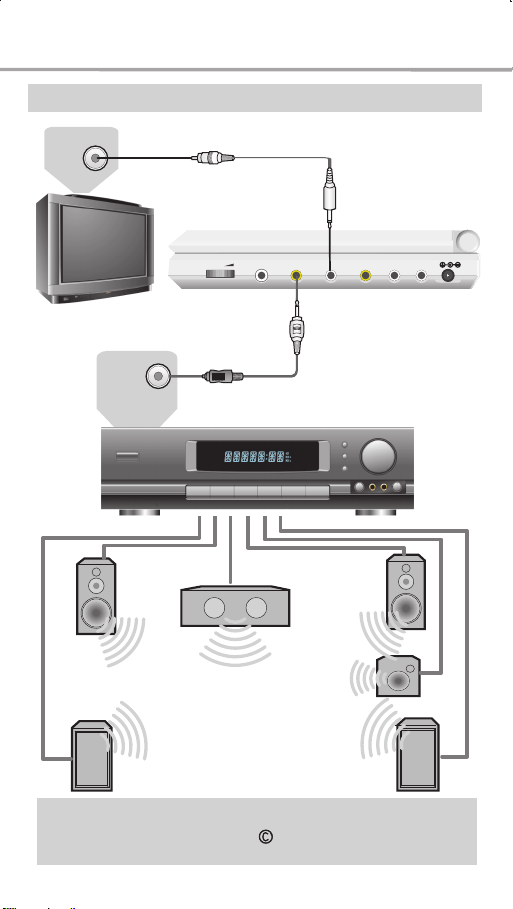
Connected to Amplifier with Dolby Digital Decoder
Video In
Optical In
Front Left Speaker
Video Cord
Optical Cord
Amplifier with Dolby Digital Decoder
Center Speaker
Front Right
Speaker
Subwoofer
Surround Left Speaker Surround Right Speaker
Manufactured under license from Dolby Laboratories. "Dolby"
and the double-D symbol are trademarks of Dolby Laboratories.
Confidential unpublished works. 1992-1997 Dolby Laboratories.
All rights reserved.
13
Page 19
SYSTEM CONNECTIONS
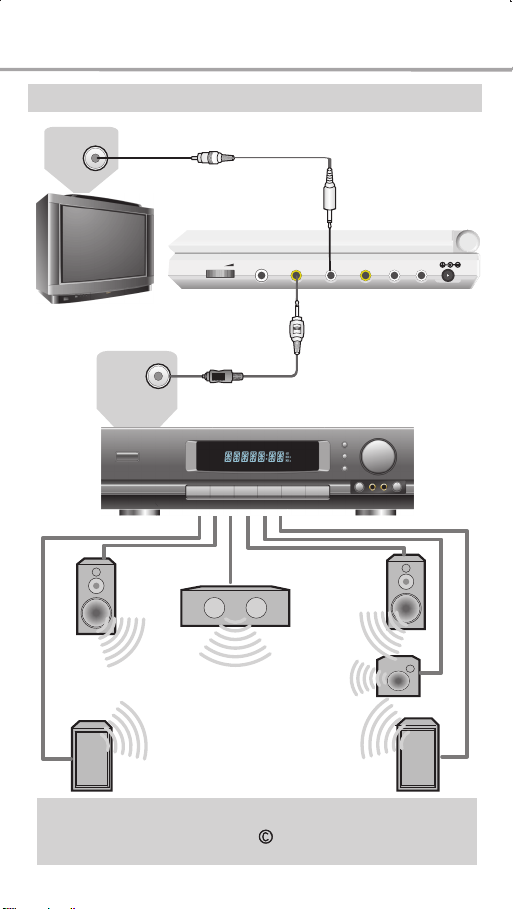
Connected to Amplifier with Dolby Digital Decoder
Video In
Optical In
Front Left Speaker
Video Cord
Optical Cord
Amplifier with Dolby Digital Decoder
Center Speaker
Front Right
Speaker
Subwoofer
Surround Left Speaker Surround Right Speaker
Manufactured under license from Dolby Laboratories. "Dolby"
and the double-D symbol are trademarks of Dolby Laboratories.
Confidential unpublished works. 1992-1997 Dolby Laboratories.
All rights reserved.
13
Page 20
SYSTEM CONNECTIONS
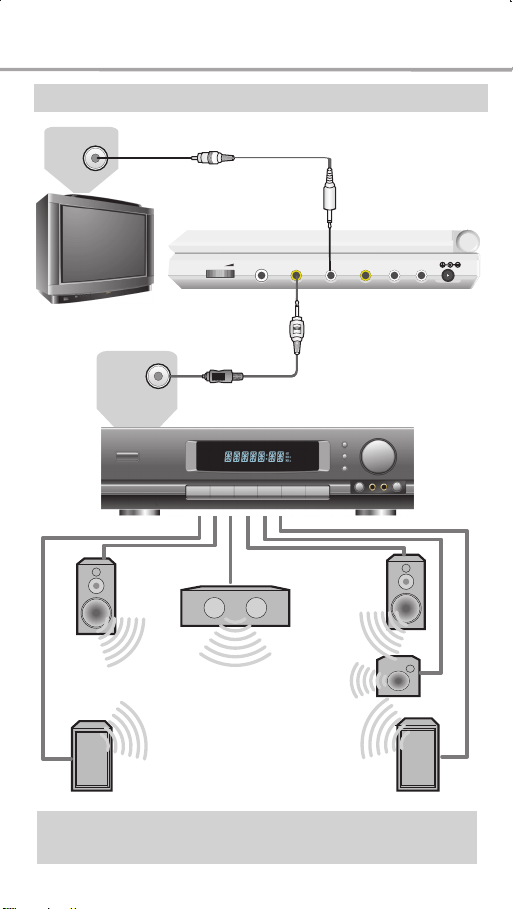
Connected to Amplifier with DTS Digital Decoder
Video In
Optical In
Front Left Speaker
Video Cord
Optical Cord
Amplifier with DTS Digital Decoder
Center Speaker
Front Right
Speaker
Subwoofer
Surround Left Speaker Surround Right Speaker
"DTS" and "DTS Digital Surround" are the trademarks of Digital
Theater Systems, Inc.
14
Page 21
SYSTEM CONNECTIONS
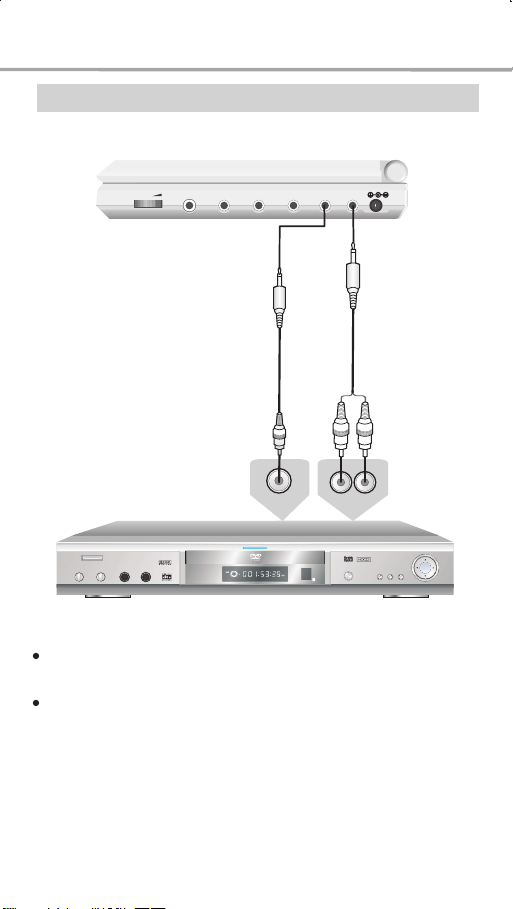
Audio/Video In
Video Cord
Video output
Video Equipment
Connect the video cords to the video out jacks of the video equipment.
Connect the audio cords to the video equipment's audio out jacks which
ought to be in the same group of the audio out jacks.
Audio Cord
Audio output
15
Page 22
BASIC OPERATION
Playback
MP3
CDVCDSVCDDVD
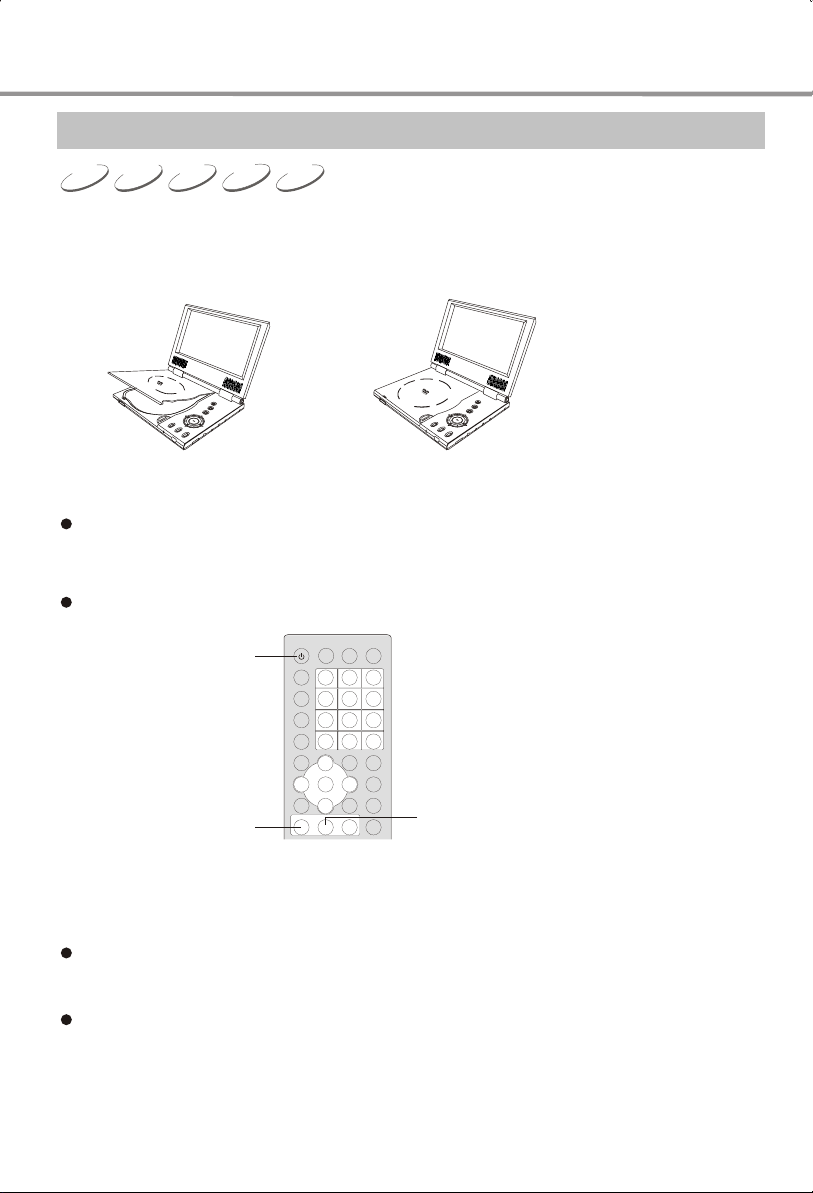
1. Insert the output plug of the power adapter to this player's power socket.
2. Push the release slide to open the top cover. Adjust the TFT LCD angle.
Open Disc Lid
Close Disc Lid
3. Press OPEN/CLOSE to open the disc lid.
Place a disc with label side facing up.
4. Press OPEN/CLOSE to close the disc lid.
This player starts reading the disc.
STANDBY
PLAY
5. Press PLAY to play the disc.
STOP
6. Press STOP to stop playback.
To temporarily stop the disc playback, press STOP. To play again, press PLAY. To stop
the disc playback, press STOP again.
Press STOP when playing a MP3 disc, this player will enter the stop mode.
7. When playback finishes, press POWER to enter the standby mode. If you do
not intend to use this player for an extended period of time, please remove the
plug from the power supply socket.
16
Page 23
BASIC OPERATION
TV System Selection
MP3
CDVCDSVCDDVD
Set the unit system according to the TV set system, in order to match to the TV set.
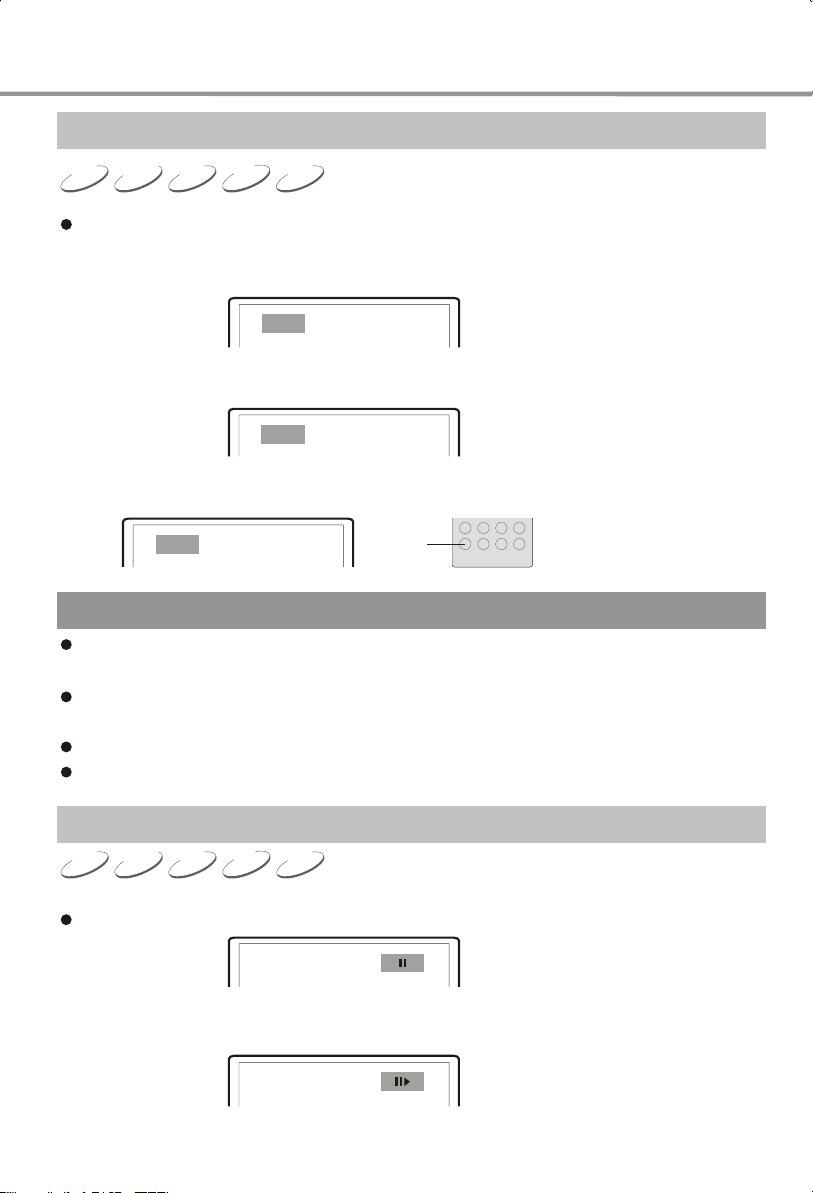
1. Press P/N button to select PAL system if the system of TV set is PAL, display on
TV screen:
PAL
2. Press P/N button to select NTSC system as the unit output system if the system
of TV set is NTSC, display on TV screen:
NTSC
3. Press P/N button to set automatic system when using multi-system TV set,
display on TV screen:
AUTO
P/N
NOTES
No TV systems can be switched when the DVD player is playing a disc; the TV systems are
switchable when the DVD player is in STOP status or no disc is available inside.
Part of functions of certain disc can not be carried out ideally when not in the very system
status.
Suggest you set your unit and TV set system into "AUTO".
The screen system is AUTO.
Pause/Step Playback
MP3
CDVCDSVCDDVD
1. Press PAUSE/STEP button in playback status.
Press PAUSE/STEP button once to pause playback, display on TV screen:
2. Press PAUSE/STEP button in pause mode, each press moves one frame forward.
Press PAUSE/STEP button continuously to step playback.
17
Page 24
BASIC OPERATION
No step playback mode when playing CD and MP3.
3. To restore playback, press the PLAY button.
NOTE
When you set the screen saver mode to ON (See Page 35 for details), the display on TV
screen turns to screen saver status after the picture on TV screen keep still for about 2
minutes ( in mode such as pause mode, stop mode, menu select, set up menu, no disc mode
and so on).
OSD
CDVCDSVCDDVD
1. Press OSD button.
Disc information and operation function hint display on TV screen when in operation.
Press OSD button to display the following function:
OSD
DVD disc
TITLE ELAPSED
TT¡Á¡Á/¡Á¡Á CH¡Á¡Á/¡Á¡Á ¡Á:¡Á¡Á:¡Á¡Á
DISPLAY OFF
CHAPTER REMAIN
¡Á:¡Á¡Á:¡Á¡Á
Super VCD, VCD, CD:
SINGLE ELAPSED
TRACK¡Á¡Á/¡Á¡Á :¡Á¡Á¡Á¡Á
DISPLAY OFF
SINGLE REMAIN
¡Á¡Á:¡Á¡Á
TOTAL REMAIN
¡Á¡Á:¡Á¡Á
TITLE REMAIN
¡Á:¡Á¡Á:¡Á¡Á
CHAPTER ELAPSED
¡Á:¡Á¡Á:¡Á¡Á
TOTAL ELAPSED
¡Á¡Á:¡Á¡Á
18
Page 25
BASIC OPERATION
KEY/Volume Control
3
MP
CDVCDSVCDDVD
1. Press VOLUME button on TV set or Amplifier to adjust volume.
KEY
KEY
VOLVOL+
2. Press VOLUME button on the remote control of this unit.
Press VOLUME+ button to increase volume.
Press VOLUME- button to decrease volume.
The maximum volume is 20.
3. Press KEY button to adjust tone in order to assort your singing tone range.
Press KEY button to increase tone, each press increases tone for 1 level, the maximum
level is 16
Press KEY button to decrease tone, each press decreases tone for 1 level, the minimum
level is 16.
DVD Menu Playback
DVD
Some DVD discs are made with title menu or chapter menu function.
1. Press MENU button to display menu on TV screen for selection, operate
according to the hint of menu and Press NUMBER buttons to select.
ROOT MENU
1.¡-¡-
2.¡-¡-
3.¡-¡-
2. Press CURSOR button to select track you desired, then Press PLAY button or
SELECT button.
NUMBER
TITLE
CURSOR
PLAY
SELECT
MENU
19
Page 26
BASIC OPERATION
NOTES
Press TITLE button to return to title menu.
Press MENU button to return to initial menu.
The return location varies with discs.
To use the Direction Buttons on the panel, please press the Switch Button once to switch to
Direction Buttons function, then press again to exit.
PBC Playback
VCDSVCD
Enjoy PBC alternate function when playing SVCD, VCD2.0 disc with PBC function.
For example: play VCD2.0 disc.
1. Main menu displays on TV screen A:
1.¡-¡-
2.¡-¡-
Press NUMBER button to select. For example: Select main menu 1. The TV screen as
show in B:
1.¡-¡-
2.¡-¡-
2. Submenu displays on TV screen after enter into main menu 1.
1.¡-¡-
2.¡-¡-
3.¡-¡-
4.¡-¡-
5.¡-¡-
3. Press NEXT or PREV button to turn to adjacent page.
4. Press NUMBER buttons to select in submenu. For instance, Press number 5,
the player begin playback with track 5.
1.¡-¡-
2.¡-¡-
3.¡-¡-
4.¡-¡-
5.¡-¡-
5. Press RETURN button to submenu. Press again to return to main menu.
6. Press the MENU button to shut off the PBC and start the sequence playback
function.
PLAY
NUMBER
RETURN
PREV
NEXT
20
Page 27
BASIC OPERATION
Direct Selection Playback Function by Number Buttons
CDVCDSVCDDVD
1. Input disc, after the player begins reading, Press NUMBER buttons
to select track for playback.
Press the NUMBER button 1-9 to directly select the according track if the
track number is below 10. For example, select the seventh track:
7
Press the +10 button and then the NUMBER buttons 0-9 to directly select
the according track. If the track number is above 10(including 10). For
example, select the 16th track:
Press the +10 button twice and then the NUMBER buttons 0-9 to select the
according track if the track number is above 20 (including 20). The rest can
be performed by analogy.
NOTE
When playing VCD or VCD2.0 discs, this function is effective only when
the PBC mode is off. When the PBC mode is on, this functions is void and
you should press the RETURN button to return to the main menu to select
a track.
Language/Audio Channel Selection
CDVCDSVCDDVD
1. Press AUDIO button.
You may select the language you desire when playing multi-language DVD,
SVCD discs with multi-language function.
DVD disc
AUDIO 1/2: ENGLISH AUDIO 1/2: CHINESE
SVCD disc:
AUDIO 1
10 + 6
+10
6
NUMBER
AUDIO 2
AUDIO 4
AUDIO 3
21
Page 28
BASIC OPERATION
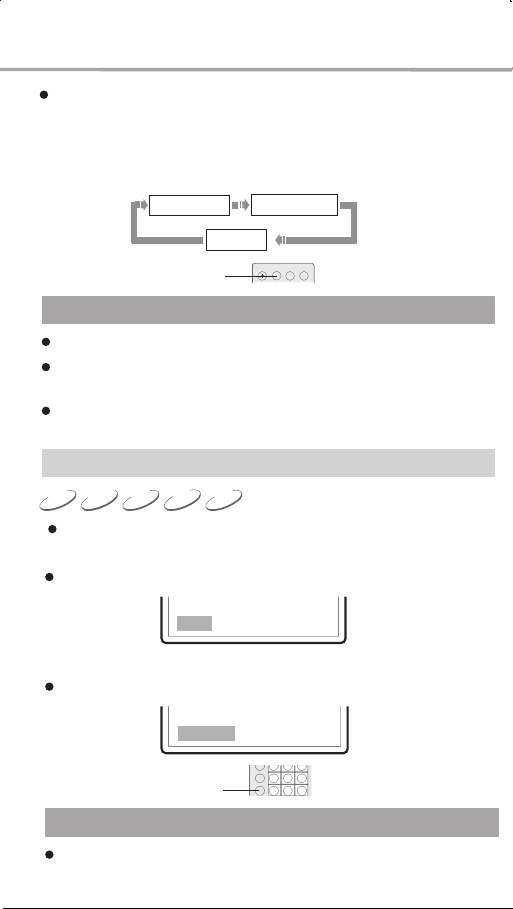
You may select audio output from left or right channel or stereo audio
output when playing multi-channel CD or VCD. Example: to VCD disc,
dubbing is recorded in left audio channel and singing in right channel,
you can select left chanel for dubbing.
VCD,CD discs:
LEFT MONO
NOTES
Language vaires according to different disc recorded.
When playing some dual-language VCD disc, it is possible to select the
language you prefer by pressing AUDIO button.
When playing some DVD discs, the press of LANGUAGE may result in
playing the track from its beginning.
MUTE
CDVCDSVCDDVD
Press MUTE button in playback mode to switch off the audio output.
1. MUTE.
Press the MUTE button and the word of MUTE is displayed on TV screen.
MUTE
STEREO
AUDIO
MP
RIGHT MONO
3
2. Resume audio output.
Press MUTE button again to unmute.
MUTE OFF
MUTE
NOTE
Press MUTE button when it is no audio output.
22
Page 29
PLAY OPERATION
Fast Playback
MP3
CDVCDSVCDDVD
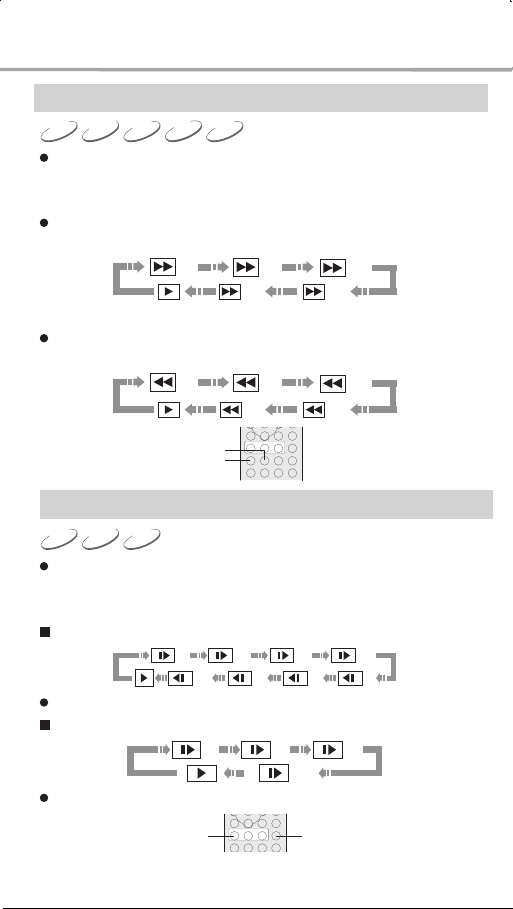
You can select forward, reward, reward playback to search certain point you
desire when playback.
1. Press FWD button then the player starts fast forward playback.
Each Press of FWD button switches the playback speed of DVD, SVCD,
VCD, CD, MP3 disc in the following sequence circularly:
2X
2. Press REV button then the player starts fast reverse playback.
Each press of REV button switches the playback speed of DVD, SVCD,
VCD, CD, MP3 disc in the following sequence circularly:
2X
Slow Playback
VCDSVCDDVD
You may enjoy slow playback according to the following step.
1. Press SLOW button to turn to slow playback mode, the following
displays on TV screen:
DVD Playback
Press PLAY button in slow playback status resumes normal playback.
SVCD, VCD Playback
Press PLAY button in slow playback status to resume normal playback.
FWD
REV
4X
4X
1/8 1/161/2 1/4
1/8 1/4
1/4
1/16
8X
16X32X
8X
16X32X
1/21/16
1/81/2
PLAY
SLOW
23
Page 30
PLAY OPERATION
Repeat Playback
MP3
CDVCDSVCDDVD
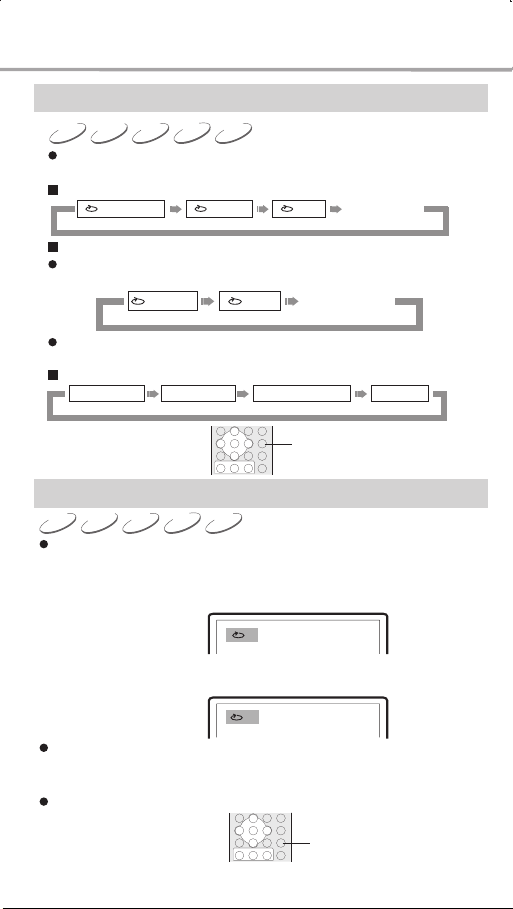
The repeat function enables a title/chapter/track/disc repeated.
1. Each Press of REPEAT button displays on TV screen:
DVD disc:
CHAPTER ALLTITLE
SVCD,VCD,CD discs:
The repeat playback can be performed to SVCD or VCD2.0 only when
the PBC is off and to VCD1.1 or CD whether the PBC is on or off.
TRACK
ALL
The repeat function is not available for SVCD and VCD discs when
PBC is on.
MP3 disc:
SINGLE
REPEAT ONE
REPEAT FOLDER FOLDER
REPEAT OFF
REPEAT OFF
REPEAT
Repeat the Selected Section
MP3
CDVCDSVCDDVD
When playing disc, Press A-B button to repeat playback of certain section
you desire.
1. Under normal playback, Press A-B button at the desired point
(point A) to set the beginning.
Display on TV screen:
2. Under normal playback, Press A-B button at the desired point
(point B) to set the ending.
Display on TV screen:
The player returns to point A automatically to repeat the selected section
(A-B).
3. Press A-B button for the third time.
Normal playback resumes.
A
AB
A-B
24
Page 31

PLAY OPERATION
NOTES
The A-B repeat function is not available for some discs.
Sections can only be selected in the same track in PBC mode.
Subtitle Selection
DVD
1. Press SUBTITLE button.
When playing DVD discs recorded with subtitles of several languages, it
is possible to select subtitle of different languages.
Each press of SUBTITLE button change one subtitle language, and the TV
set screen displays.
The number of the selected subtitle languages is up to 32 for DVD disc, but
it also depends on the contents of the disc
Angle Selection
DVD
1. Press ANGLE button, the TV set screen displays:
2.
Press numbered buttons to select the desired playing angle as you
like.
SUBTITLE
1/4
2/4
3/4
ANGLE
4/4
3. To resume normal playback, Please Press ANGLE button to
default angle.
NOTES
The number of the angles varies with different DVD discs. You can change
as many as they have.
This function only applies to the discs recorded with different angles.
25
Page 32
PLAY OPERATION
Playback from the Desired Point
DVD SVCD VCD CD
Playing DVD disc.
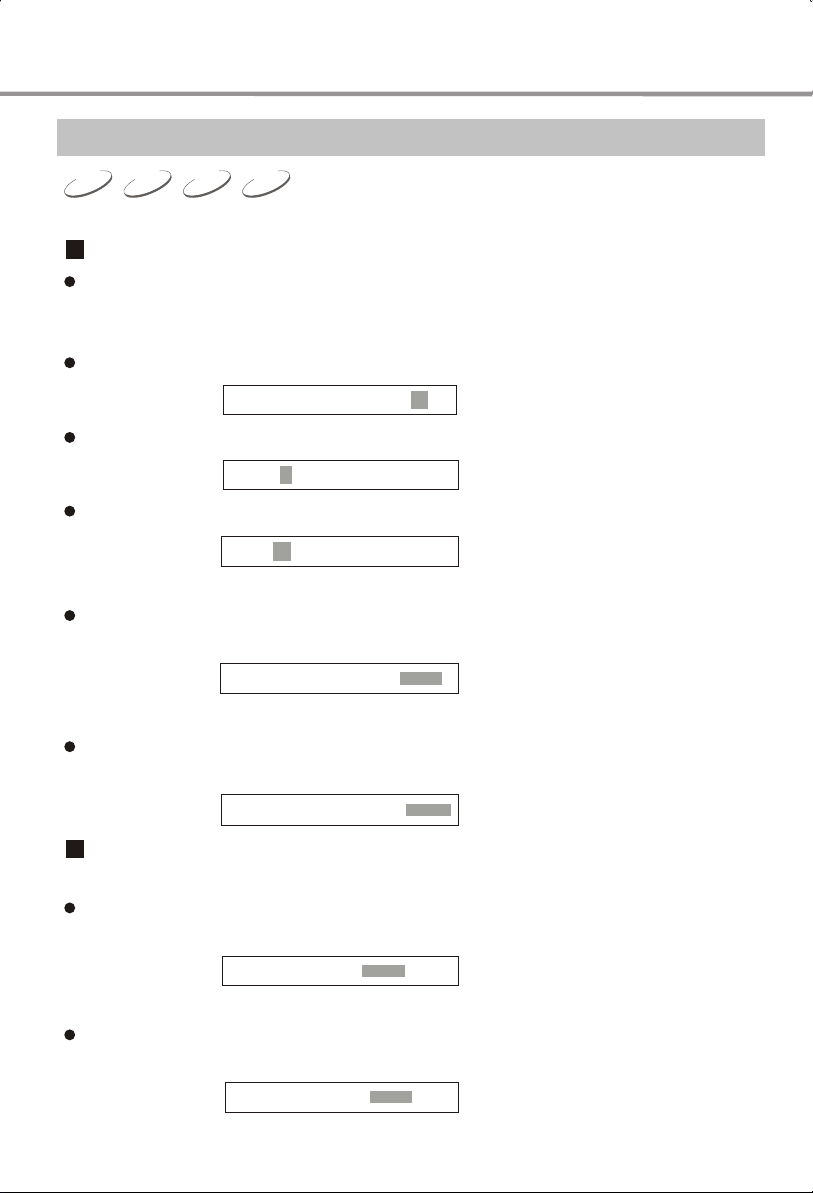
Input the time, title or chapter directly, the content can be found quickly and playback from
the selected point.
1. Title, chapter search. For example, search Chapter 2, Title 6:
Press GOTO button, the TV set screen displays:
TITLE 03/30 CHAPTER /02
Press CURSOR button to lighten the title number, as shown in the figure:
TITLE /30 CHAPTER 01/02
And then Press NUMBER button "6" to select title 6, as shown in the figure:
TITLE 06 /30 CHAPTER 01/02
2. Title time search.
Press the GOTO button until the TV screen displays the following picture. Then Press
the NUMBER buttons to input HOUR, MINUTE and SECOND.
TITLE 06/30 TIME : :
3. Chapter time search.
Press the GOTO button until the TV screen displays the following picture. Then Press
the NUMBER buttons to input HOUR, MINUTE and SECOND.
CHAPTER 01/04 TIME : :
Playing Super VCD, VCD, CD discs.
1. Disc time search.
Press the GOTO button until the TV screen displays the following picture. Then Press
the NUMBER button to input HOUR, MINUTE and SECOND.
DISC GOTO --:--
2. Track time search.
Press the GOTO button until the TV screen displays the following picture. Then Press
the NUMBER buttons to input HOUR, MINUTE and SECOND.
TRACK GOTO --:--
26
Page 33
PLAY OPERATION
3. Select a track.
Press the GOTO button until the TV screen displays the following picture. Then Press the
NUMBER buttons to input the track number.
GOTO
SELECT TRACK --/15
NUMBER
CURSOR
SELECT
Power Spectrum Meter(PSM)
CDVCDSVCDDVD
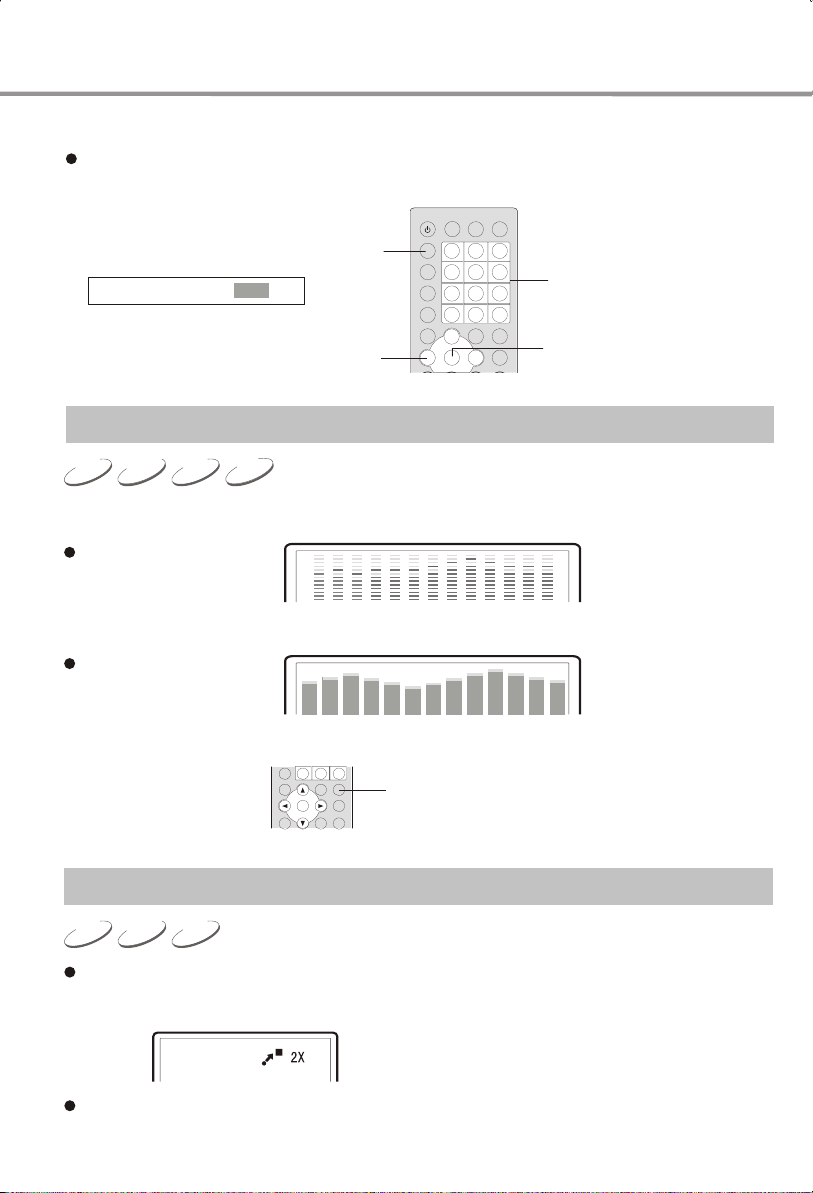
1. Under normal playback, press PSM button to open the Power Spectrum Meter.
Display on TV screen:
2. Press PSM to open the second Power Spectrum Meter
Display on TV screen:
3. Another press on PSM button will close PSM.
PSM
Zooming the Displayed Frame
VCDSVCDDVD
Zoom in/out the player frame.
1. When playing a disc, Press the ZOOM button. The TV screen displays:
The frame is magnified.
27
Page 34
PLAY OPERATION
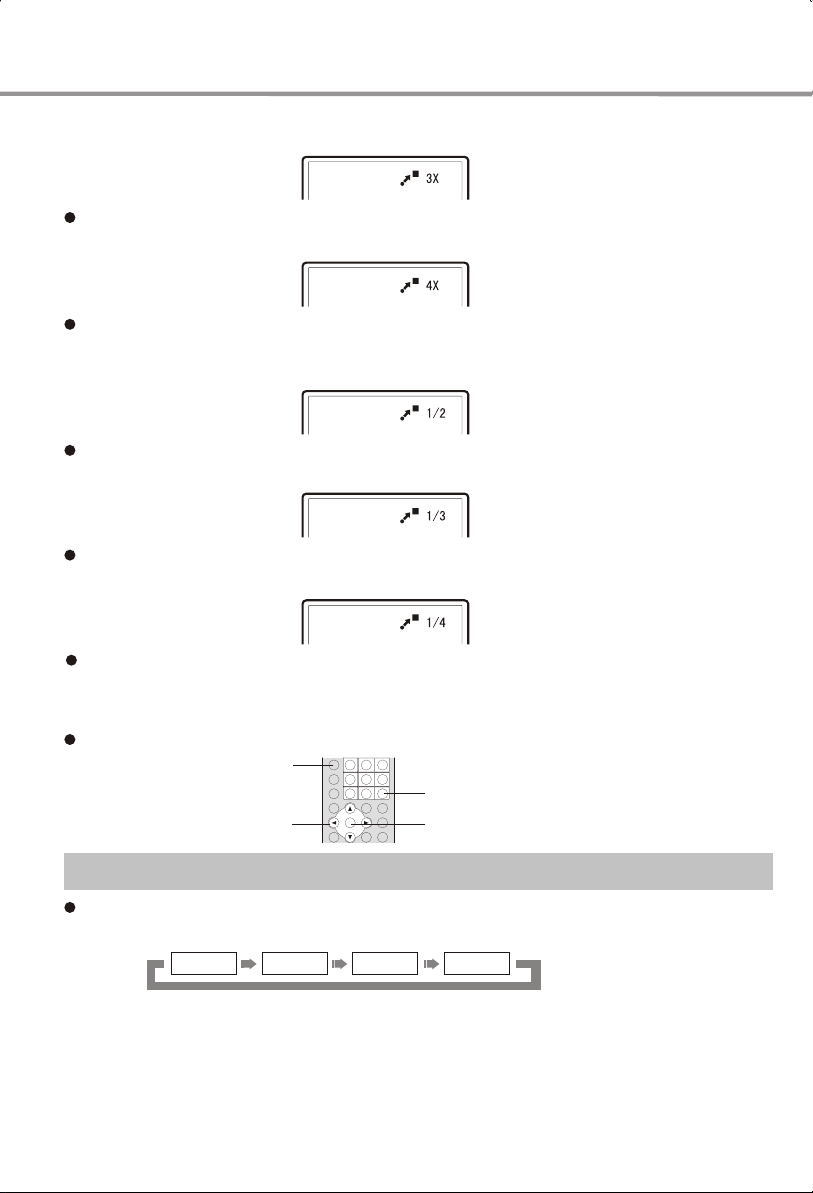
2. Press the ZOOM button again. The TV screen displays:
The frame is magnified more times.
3. Press the ZOOM button again. The TV screen displays:
The frame is magnified for the third time.
4. Press the ZOOM button for the fourth time. The TV screen
displays:
The frame is minified.
5. Press the ZOOM button for the fifth time. The TV screen displays:
The frame is minified again.
6. Press the ZOOM button for the sixth time. The TV screen displays:
The frame is minified for the third time.
7. Press the ZOOM button again, the frame restores normal size.
8. When the fame is magnified, Press the CURSOR buttons to move the frame.
You can enjoy any desired part of the frame.
ZOOM
IMAGE
CURSOR
SELECT
Picture Quality Setting
To adjust the picture's brightness, contrast, hue and saturation.
1. Each press on the Picture Button switches one adjusting item.
Brightness
When screens shows the adjusting items, please press Left button to decrease
2.
the value of the item to adjust, or press Right button to increase the value of the
item to adjust.
Use Picture Button to adjust the picture quality setting; the setting will not be
3.
saved after the unit is Power Off. To save picture quality setting, please set Video
in Setup Menu.
Contrast
Hue
Saturation
28
Page 35
PLAY OPERATION
Virtual Keyboard
The brand-new VIRTUAL KEYBOARD function enables you to perform some easy operations
and configurations when enjoying a movie.
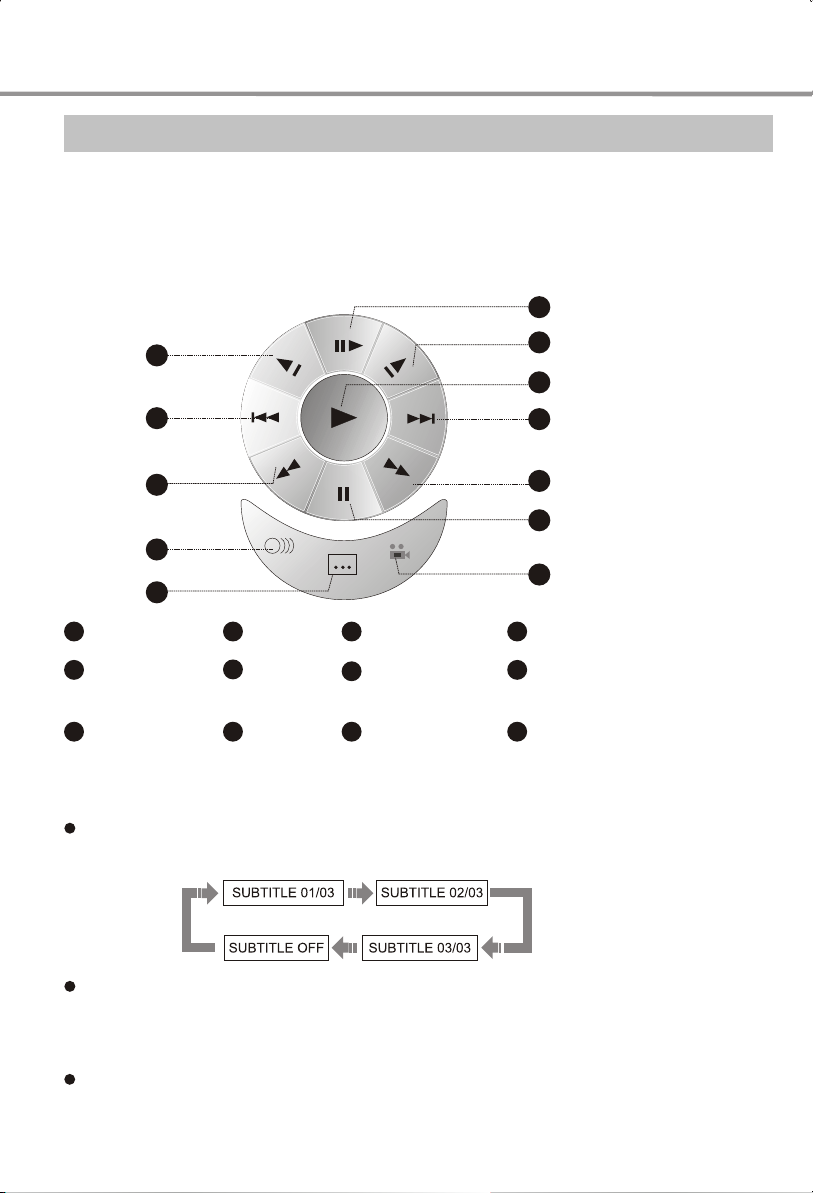
1. PANELPress on the front panel twice, a virtual keyboard will appear on the
screen as shown in the figure.
1
8
9
10
11
12
Step
1 4
2
Forward Slow
Playback
Play
3
Next
5
Fast
Forward
6
Pause
Angle
7
Reverse Slow
8
Playback
9
Prev
2
3
4
5
6
7
10
Fast Reverse
11
Audio
12
Subtitle
2. Use the four direction arrows to select the function you want to set, press
SELECT for verification. For instance: To select SUBTITLE
Press direction arrows to select the subtitle icon. Each press of SELECT switches the
subtitle settings alternately as follows:
This time the front panel NEXT/PREV/PAUSE/STOP buttons correspond to RIGHT/
LEFT/DOWN/UP respectively.
3. To exit the virtual keyboard, press PANEL again.
The virtual keyboard function is applicable to DVD, SVCD or VCD discs only.
29
Page 36
PLAY OPERATION
Browser
The brand-new interface BROWSER enables you to conveniently perform DVD discs' functions
of title, chapter, sound, subtitle, angle, title time, chapter time, repeat play and time display, and
SVCD/VCD discs' functions of track, disc time, track time, repeat play and time display.
For example Playing DVD:
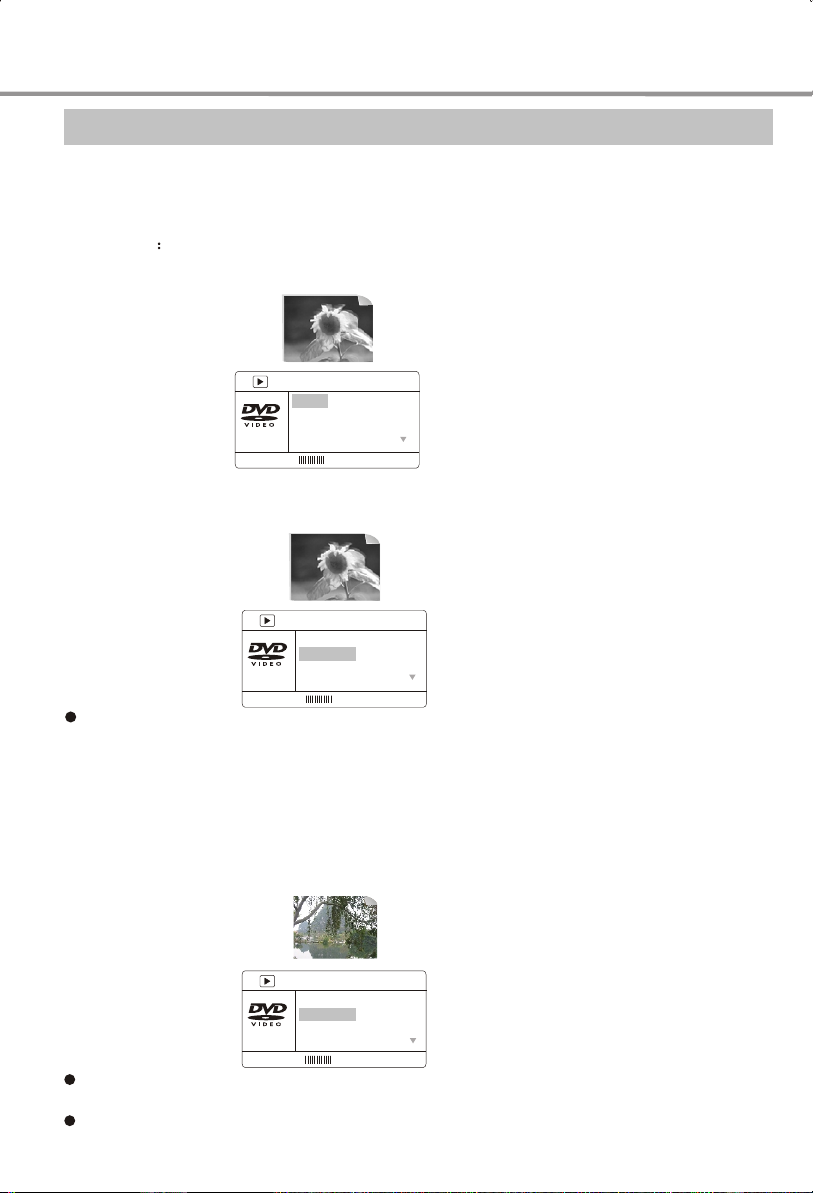
1. Press BROWSER, the screen displays as follows:
MENU
Title 02/04
Chapter 01/05
Audio 5.1ch
Subtitle Off
BITRATE 85 TITLE TIME 0:01:25
2. Press UP/DOWN arrows to select the desired item.
For example, press UP/DOWN arrows to select the desired chapter. Press ENTER for
verification as shown in the figure.
MENU
Title 02/04
Chapter _0/05
Audio 5.1ch
Subtitle Off
If you want to use the navigation keys on the front panel, please press SWITCH and the
switch icon appears on the screen. This time the front panel STOP/NEXT/PAUSE/PREV
buttons correspond to UP/DOWN/RIGHT/LEFT respectively. Press SWITCH again, the
switch icon goes off and the navigation functions are invalid.
BITRATE 85 TITLE TIME 0:01:25
3. Press numbered buttons to select the desired chapter.
For example, press 0 and 4, this player starts playing the fourth chapter as shown in the
following figure.
MENU
Title 02/04
Chapter 04/05
Audio 5.1ch
Subtitle Off
BITRATE 85 TITLE TIME 0:30:35
The input number should be within the optional numbers.
4. To exit the browser interface, press BROWSER again.
The browser is applicable to DVD, SVCD or VCD discs only.
30
Page 37
PLAY OPERATION
MP3 and JPEG File Playing
MP3 utilizes the third layer audio compression mode of the international
standard MPEG with the compression ration as 12:1. Employing MP3, one
disc can record 600-minute music or 170 songs and the sound quality is the
same as CD.
JPEG (Joint Photographic Experts Group) is the most widely used picture
compression and storage format today. Utilizing the high efficiency compression
algorithm
, JPEG compresses the original picture 15 to 20 times with very
excellent picture quality. JPEG is featuring small size data, convenient
application and supported by most picture processing software, so it is very fit
to store photos.
This player's strong decoding capability can decode and play the files with the
above two formats. Thus you can view JPEG images as well as listen to MP3.
00:00 00:00
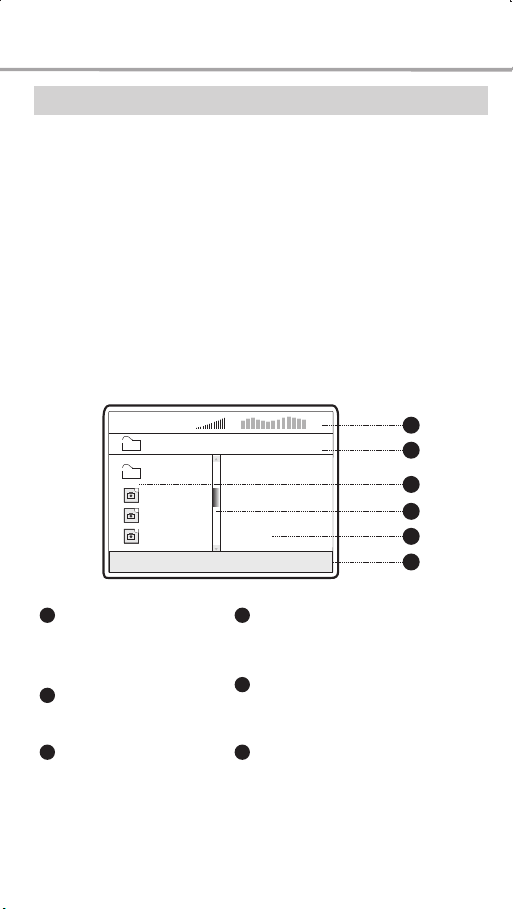
004/369
\PIC\
..
Du000
Du001
Du002
1
Status window
Displays the current status
information.
Directory window
2
Displays the current path.
3
File window.
Displays the current path's
files.
1
2
3
4
5
6
4
Scroll bar window
Indicates the current file's position.
5
Preview window.
JPEG image preview.
6
Information window.
Displays the current operating
prompts.
31
Page 38
PLAY OPERATION
1. Playing MP3 File
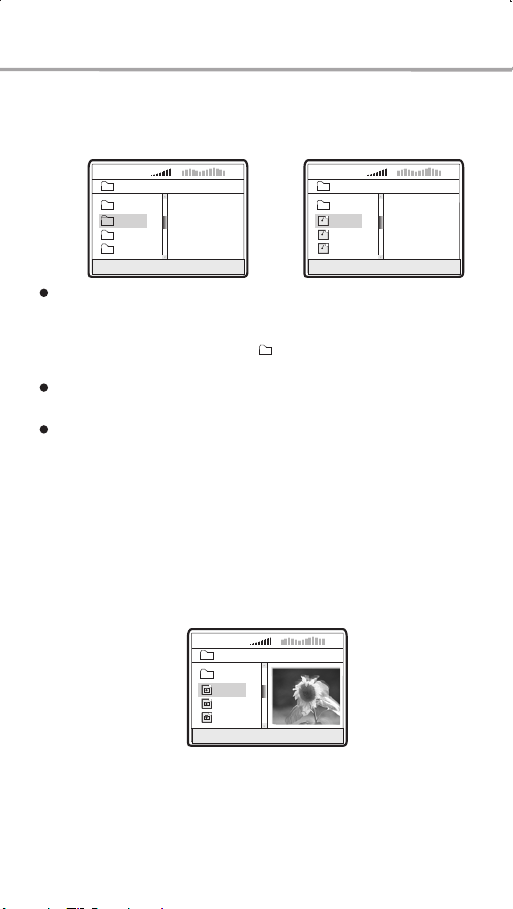
When you insert a MP3 disc, the TV screen displays the operation menu as
shown in Figure A. (The displayed contents vary with the disc.)
00:00 00:00
A:
004/369
\
..
Du000
Du001
Du002
Press UP/DOWN arrows to select the desired directory. Press SELECT for
verification. For example, you select the directory DU000 in Figure A and
press SELECT as shown in Figure B. The window returns back to the
previous directory when you select [ .. ] in the first line or press LEFT
arrow.
Press UP/DOWN arrows in Figure B to select the desired MP3 file. Press
SELECT for verification. This player starts playing MP3 songs.
If you want to use the navigation keys on the front panel, please press
SWITCH and the switch icon appears on the screen. This time the front
panel STOP/NEXT/PAUSE/PREV buttons correspond to UP/DOWN/
RIGHT/LEFT respectively. Press SWITCH again, the switch icon goes off
and the navigation functions are invalid.
2. Playing JPEG File
When you insert a disc with JPEG files, the TV screen displays the operation
menu as shown in the figure. The operating means are the same as operating
MP3 files except that the preview image will appear in the preview window
when selecting a JPEG file.
00:00 00:00
004/369
\
..
Du000
Du001
Du002
·Ö±æÂÊ 640¡Á480
3. Plays a disc with both MP3 and JPEG files
If a disc is composed of both MP3 and JPEG files, you can enjoy both of
them simultaneously. First you can play MP3 songs by following preceding
instructions; then you can enter the directory with JPEG files and view
images by following preceding instructions.
00:00 00:00
B:
004/369
\Du000\
..
CD000
MP3
CD001
MP3
CD002
MP3
32
Page 39
PLAY OPERATION
OTHER BASIC OPERATING MEANS
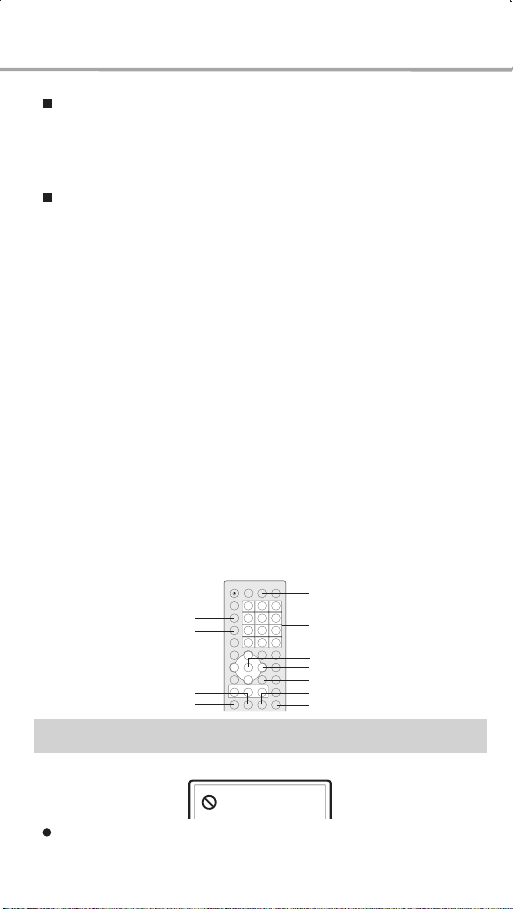
1. Press the PREV or NEXT button to skip to last or next page in the
stop mode.
2.
Press ANGLE to toggle the file playback mode and the directory
playback mode.
JPEG FILES AND FUNCTIONS
1. Press the SUBTITLE button to switch different JPEG display modes
when playing JPEG files. There are 16 optional modes available.
2. When playing JPEG files, Press the ZOOM button to start zooming
in/out function. Press the ZOOM button again to stop zooming in/out
function.
3. When the zooming in/out function is open, Press the FWD button to
magnify the picture. It can magnify the frame twice at most as the
original one. Press the REV button to minify the picture. It can minify
the frame half at most as the original one.
4. When playing JPEG files, Press the STOP button to stop preview
playback function. At the same time, all JPEG files are displayed on
the TV screen. One frame can display up to 12 pictures. The rest
pictures are shown on the next frame. Press the NEXT button to enter
the next frame. Press the PREV button to enter the previous frame.
You can also press the NUMBER buttons or DIRECTION arrow to
select the desired picture. Press the SELECT button to confirm.
5. Press the MENU button to exit preview playback the preview playback
mode.
6. Press the DIRECTION arrow to rotate a picture when playing JPEG
files.
SUBTITLE
ZOOM
ANGLE
FWD
REV
NUMBER
SELECT
CURSOR
MENU
PREV
NEXT
NOTE
1. When the button is invalid, the TV screen displays:
Press the effective button again.
33
Page 40
FUNCTION SETUP
Function Setup
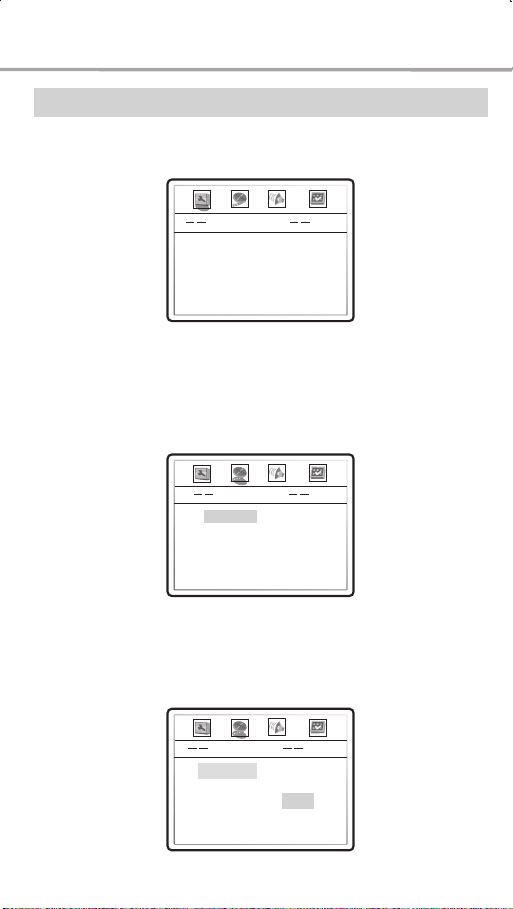
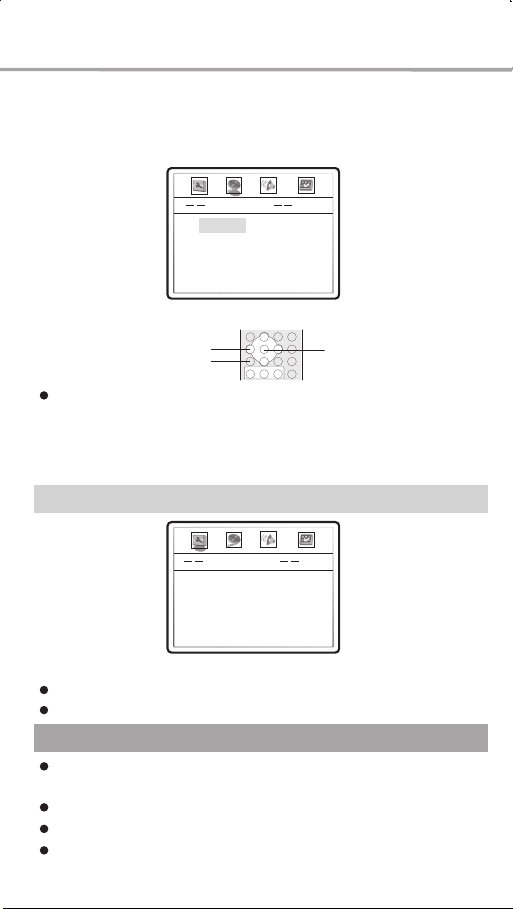
1. Press SETUP button, The TV set screen displays:
General Setup Page
TV Display Wide
OSD Lang Spanish
Screen Saver On
2. Press LEFT/RIGHT arrow to select the desired channel to be
changed.
For example, if you want to set this player's video, please press LEFT/RIGHT
arrows to select VIDEO SETUP PAGE. Press SELECT for verification. The
video setup page displays on the screen.
Video Setup Page
Sharpness
Brightness
Contrast
Hue
Saturation
3. Press UP/DOWN arrow to select the desired item you want to set
and press SELECT.
For example, press UP/DOWN arrows to select SHARPNESS and press
SELECT. The sharpness appears on the screen.
LOW
00
00
00
00
Video Setup Page
Sharpness
Brightness
Contrast
Hue
Saturation
34
High
Medium
Low
Page 41
FUNCTION SETUP
4. Press UP/DOWN arrow to select the desired value. Press SELECT
to confirm it.
For example: Press UP/DOWN arrow to select "Medium", than press SELECT,
the TV screen display:
Video Setup Page
Sharpness
Brightness
Contrast
Hue
Saturation
5. Press SETUP to exit the setup menu.
Medium
00
00
00
00
CURSOR
SETUP
SELECT
If you want to use the navigation keys on the front panel, please press
SWITCH and the switch icon appears on the screen. This time the front
panel STOP/NEXT/PAUSE/PREV buttons correspond to UP/DOWN/
RIGHT/LEFT respectively. Press SWITCH again, the switch icon goes off
and the navigation functions are invalid.
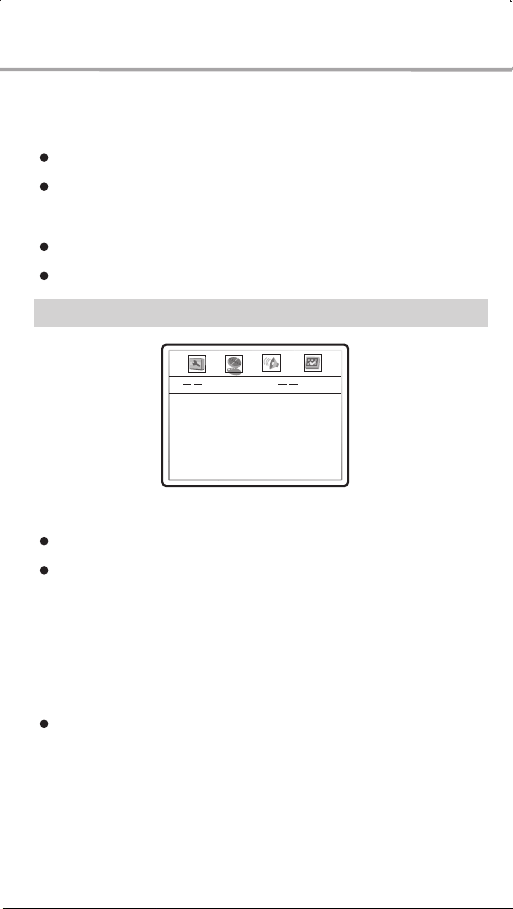
General Settings
General Setup Page
TV Display
OSD Lang
Screen Saver
1. TV Display: To set the aspect ratio of this player's output image.
Optional settings: NORMAL/PANSCAN, NORAM/LETTER BOX, WIDE.
Default: WIDE.
NOTES
The playing effects are contingent upon the disc's recording aspect ratio.
Some discs may not be played according to your selected aspect ratio.
16:9 is only applicable to the 16:9 TV.
Please select the aspect ration in accordance with that of your TV.
The LCD screen is utilizing 16 by 9 aspect ratio only.
35
Wide
Spanish
On
Page 42
FUNCTION SETUP
2. OSD Lang: This item is used to set the prompts language on
the screen.
Optional settings: ENGLISH, SPANISH.
Default: SPANISH.
3. Screen saver: Open or close the screen saver function.
Optional settings: OFF, ON
Default: ON
Video Setup
Video Setup Page
Sharpness
Brightness
Contrast
Hue
Saturation
1. Sharpness: Used to set the sharpness of video outputs.
OPTIONS: High, Medium, Low.
Default: Low.
2. Brightness: Used to set the brightness of video outputs.
3. Contrast: Used to set the contrast of video outputs.
4. HUE: Used to set the chroma of video outputs.
5. Saturation: Used to set the saturation of video outputs.
Brightness, contrast, chroma and saturation adjusting means:
A. Press UP/DOWN arrow in the video setup menu to select the desired item
you want to adjust. Press SELECT button to enter the item's adjustment.
B. Press LEFT/RIGHT arrow to adjust the setting value.
C. After finishing adjustment, press SELECT button to return to the video
setup menu.
36
Low
00
00
00
00
Page 43
FUNCTION SETUP
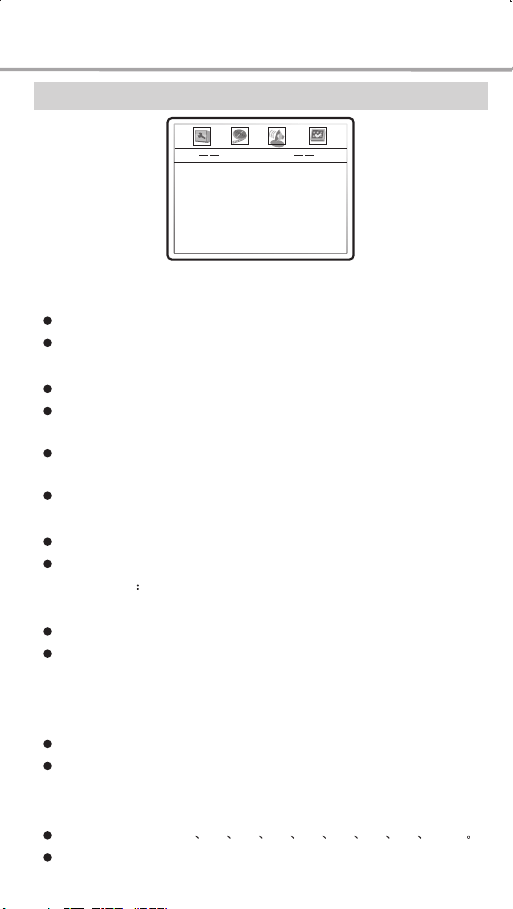
Audio Setup
Audio Setup Page
Audio Mode
EQ Type
Sound Field
SPDIF Output
LPCM Out
Dolby Digital Setup
1.
Audio output mode: To set the audio output mode to make the
multi-channel audio into two-channel outputs.
Optional settings: LT/RT, STEREO, V SURR.
Default: STEREO
2. EQ type: To set EQ modes.
Optional settings: None, ROCK, Pop, Live, Dance, Techno, Classic, Soft.
Default: None.
3. Sound Field: To set different sound field effects.
Optional settings: Off, Concert, Living room, Hall, Bathroom, Cave,
Arena, Church.
Default: Off.
4. SPDIFO utput: To set the bit stream type of the digital output.
Optional settings: SPDIF/RAW, SPDIF/PCM.
Default: SPDIF/RAW.
5. Out
LPCM To set the output frequency of the 96K LPCM
audio data to fit for different power amplifiers.
Optional settings: 48K, 96K.
Default: 48K.
6. Dolby Digital setup:
A.
L+R: To set the output means of the left or right audio when
playing a Dolby disc with separate two-channel audio
Optional settings: Stereo, L-Mono,R-Mono, Mix-Mono.
Default: Stereo.
B.
Dynamic compression: To set the linear compression ratio to get
different compression result.
Optional settings: OFF 1/8 1/4 3/8 1/2 5/8 3/4 7/8 FULL
Default: OFF.
37
Stereo
None
Off
SPDIF/RAW
Page 44
FUNCTION SETUP
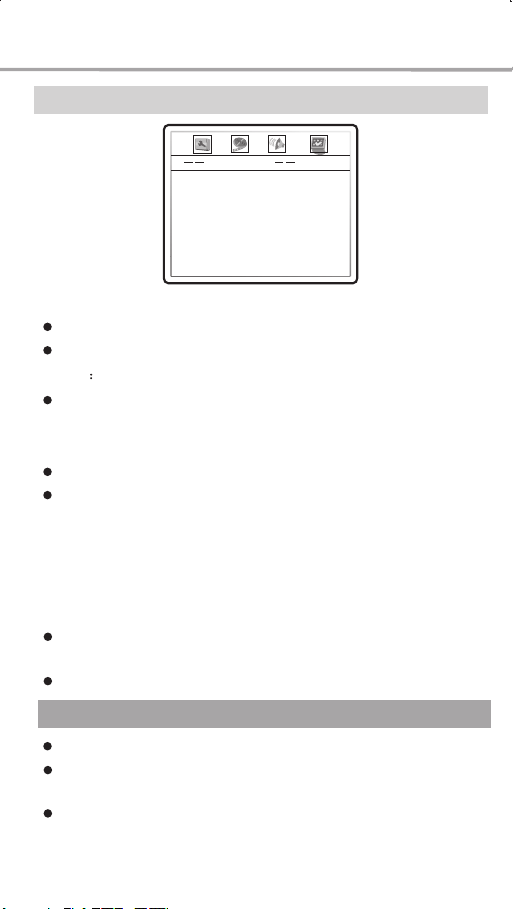
Initial Setup
Preference Page
TV Type
PBC
Audio
Subtitle
Disc Menu
Parental
Password
Default
1. TV TYPE: To set the output video system of this player.
Optional settings: AUTO, NTSC, PAL
Default: PAL.
2. PBC To set the PBC status.
When playing SVCD or VCD2.0 discs, if the PBC is ON, the menu image
displays on the screen and this player enter the PBC mode; if the PBC is
OFF, this player plays the disc by its sequence.
Optional settings: On, Off.
Default: On.
3. AUDIO: To set the preference audio language when playing.
4. SUBTITLE: To set the preference subtitle language when
playing.
5. DISC MENU LANGUAGE: To set the preference disc menu
language when playing.
Optional audio/subtitle/disc menu languages: English, French, Spanish,
Chinese, Japanese, Korean, Russian, Thai, others.
Audio/subtitle/disc menu language default: Spanish.
PAL
On
Spanish
Spanish
Spanish
Off
NOTES
Audio/subtitle/disc menu languages are effective to DVD only.
If the disc does not record your desired language, the player will select the
disc-specified languages to play.
Selecting other languages: Press UP/DOWN ARROW to move the cursor
to OTHER item, press SELECT. Press NUMBER buttons to enter your
desired language codes, then press SELECT.
38
Page 45
FUNCTION SETUP
6. Parental : To set the parental control ratings to prevent children
from watching the restricted contents. (In case the disc supports
this function.)
Optional settings: KID, G, PG, PG-13, PGR, R, NC17, ADULT, OFF.
Default: OFF.
NOTE
When changing the parental control ratings, a password is needed. Refer to
the following password item for detailed settings.
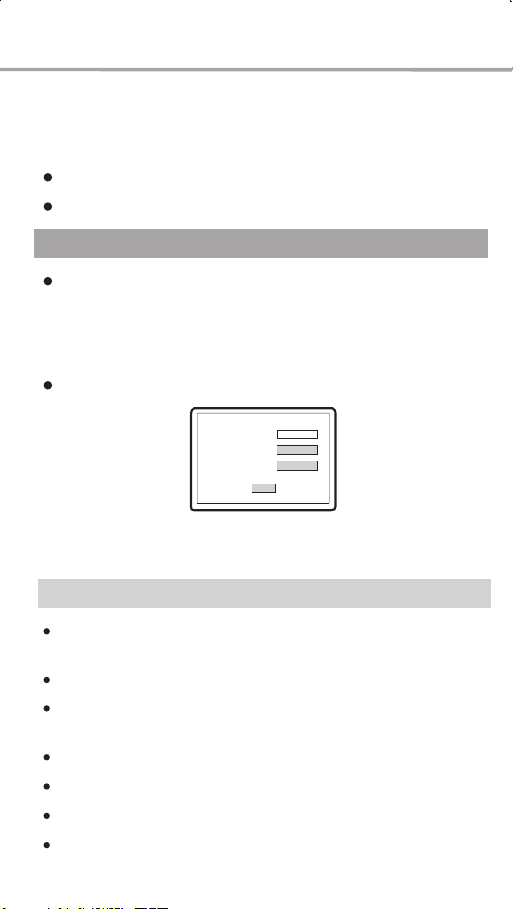
7. PASSWORD: To set a four digit password to enable you to change
the parental control ratings.
Default: 7890.
OLD PASSWORD
NEW PASSWORD
CONFIRM PWD
OK
8. DEFAULT: To restore all settings to the default value except for
the parental control and password settings.
Useful notes
In order to prolong the service life of your player, it is recommended to wait
at least 30 seconds before you turn it on again after switching it off.
Turn off power after operation.
Only use the power supply of the nominal voltage, otherwise the player will
not be operational or even be damaged.
Some functions of the player may not be applicable to some discs.
In case of occasional player halt, please turn it off and turn it on again.
This player cannot play some SVCD discs with the CVD format.
When to use the Audio Output of this unit, please minimize the phone
volume first.
39
Page 46
OTHERS
Troubleshooting
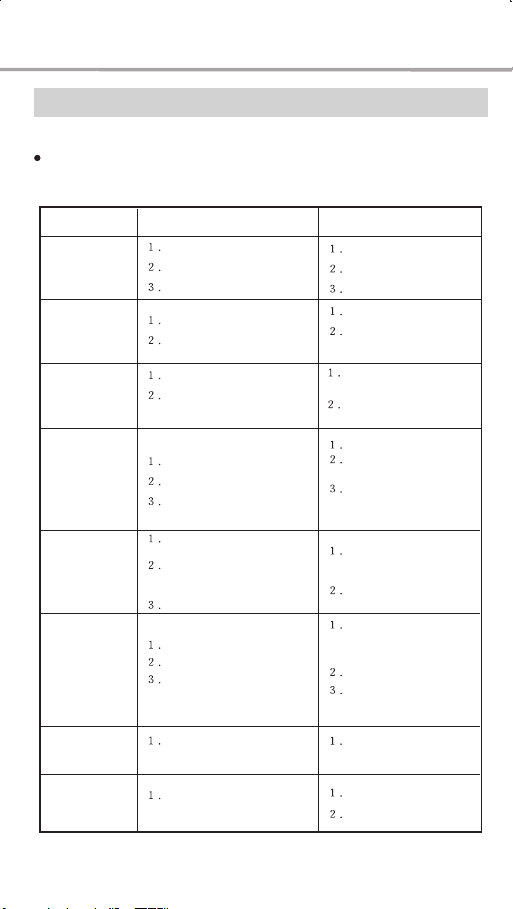
Please check for causes of problems in accordance with the following
chart before contacting any maintenance personnel.
Symptom
No sound
No picture
No color
No disc reading
Remote control
failure
Temporary
function failure
Picture rolling
Too much in
terference strip
es on image
Cause
Signal not properly connected.
Disc warped or dirty.
Player in mute status.
Signal not properly connected.
TV not set for proper system.
TV system not right.
TV set color not properly
adjusted.
No disc in the player.
Disc not properly loaded.
Condensation on the laser head.
Remote control not pointing to
the sensor window.
Remote control's operating
distance more than 8 meters away
from your TV set.
Batteries low.
Mal-fabricated disc used.
Wrong buttons pressed.
Foreign static electricity leaks
inside the enclosure.
TV set system not properly
adjusted.
The rechargeable battery
becomes low
Correction
Connect signal securely.
Clean your disc.
Press MUTE button again.
Connect signal securely.
Reset the AV/TV status of
your TV set.
Press P/N button on the
remote control to set the system.
Readjust color of your TV
set.
Load a disc.
Reload a disc, with the
label side facing up.
Turn on the player, unload
the disc and leave it on for
about one hour.
Use the remote control
properly.
Replace both batteries.
Wait for 5 to 10 seconds
and this player will restore
normal functions.
Press other buttons.
Restart this player after
powering this player off for 1
to 2 minutes.
Readjust system of your
TV set.
Recharge the battery.
Use the power adapter.
40
Page 47
Specifications
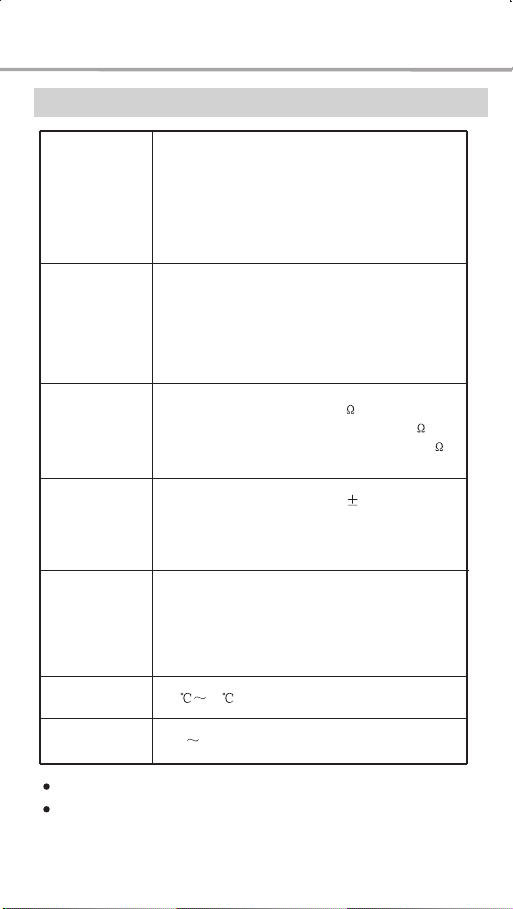
DVD VIDEO
SVCD
Disc Types
Output
VCD1.0, 1.1, 2.0
CD-DA
MP3
Analog audio output Stereo output,
Digital Audio Output Optical Out jack
Component Video Output
S-Video Output Y, C
OTHERS
Headphone output
Video
Characteristics
Audio
Characteristics
General
Specifications
Operating
Temperature
Operating
Humidity
Video Amplitude 1.0Vp-p(75 )
S-Video Output Amplitude Y:1.0Vp-p(75 ),
C:0.286Vp-p(75 )
Frequency 20Hz~20KHz( 1dB)
Signal-to-noise Ratio >90dB
Total harmonic distortion <0.01%
Power Supply DC 9V 2A
Power Consumption 17W
Dimensions 190¡Á142.5¡Á27.5 (mm)
Mass 623g
535
15 75% (no condensation)
Specifications are subject to change without notice.
We do not guarantee that all discs can be played smoothly
due to the disc quality, disc recording quality and recording
format.
41
Page 48
OTHERS
Terms
525/60
A scan system with 525 horizontal lines and 60 interlacing fields (30
frames) per second. Applied by NTSC.
625/50
A scan system with 625 horizontal lines and 50 interlacing fields (25
frames). Applied by PAL and SECAM.
ANALOG
A level theoretically changes infinitely in time and space. As compared
to DIGITAL.
ANGLE
A specific view of a scene recoded from a specific angle in DVD-Video.
When viewing the specific scenes, different angles can be selected.
CD
Abbreviation for Compact Disc. A laser disc storage format developed
by Philips and Sony.
CD-DA
Abbreviation for Compact Disc Digital Audio. The original music CD
format storing audio information as digital PCM data.
CD-R
The extension of the CD format. Data can be recorded once by utilizing
coloring matter subliming technology.
CD-ROM
The extension of the CD-DA format. The computer data is stored in the
digital format.
CHAPTER
Sections of a picture or a music piece on a DVD that are smaller than titles.
A title is composed of several chapters. Each chapter is assigned a chapter
number enabling you to locate the chapter you want.
COMPRESSION
A process which eliminates redundancy of digital data to reduce the
necessary storing or transmitting data size. Lossless compression only
eliminates the enough redundancy to make date restore correctly. Lossy
compression sacrifices the additional data to achieve a larger compression.
CONTRAST
The range between the brightest and the darkest of an image.
DAC£¨Digital-to-analog converter)
A circuit converting the digital data (audio or video) to analog data.
DIGITAL
Expressed by numerals. For example, a computer utilized a group of
discrete numeric values. The analog data can be digitized by sampling.
42
Page 49

OTHERS
Dolby Digital
An audio encoding system developed by Dolby Laboratories and recognized
as the international standards. Dolby Digital is the most common system of
the DVD-Video encoding audio and the normalized audio compression
system of 525/60 (NTSC) CD.
DOWNMIX
Changing multi-channel audio to dual channel stereo audio by utilizing
Dolby Surround processing.
DVD
Abbreviation of Digital Video Disc or Digital Versatile Disc. An audio/video/
data storage system based on 12cm and 8 cm disc.
DVD-R
A DVD version. Data can be recorded once by utilizing coloring matter
subliming technology.
HUE
The color of ray or pixel. The color characteristics are depending on the ray's
main elements' wavelength.
INTERLACE
A scan system. In scanning, the technique of using more than one vertical
scan to reproduce a complete image. In television, 2:1 interlace is used,
giving two vertical scans (fields) per frame; one field scans odd lines, and
one field scans the even lines of the frame.
ISO 9660
An international standard for the file system used in CD-ROM.
Macrovision
A recording protection technology. It alters the signals. The playback looks
normal in most TVs. However, when the recorded materials are played back,
pictures look very distorted and invisible. Macrovision utilizes the
characteristics of the AGC circuit and VCR color synchronous decoding
circuit to interfere recording.
MPEG Moving Pictures Expert Group)
An international committee who established a series of compression stands
of MPEG audio and video.
MULTIANGLE
Various angles for the scene (viewpoints of the video camera) are recorded
on some DVDs.
MULTILANGUAGE
Several languages for the audio track or subtitles in a picture are recorded on
some DVDs.
SATURATION
The color's intensity or brightness.
43
Page 50

OTHERS
SIGNAL-TO-NOISE RATIO
Ratio of pure signals to irrelevant noise like tape noise or video interference.
It is measured by dB. The analog recordings always have noise. The digital
recordings have no noise provided that data are filtered at the front end
without compression.
SURROUND SOUND
There are speakers in front of and behind audiences to create a multi-line
audio system composed of surround simulation and directional audio source
sound fields.
TITLE
The longest section of a picture or a music piece on a DVD; a movie, etc.,
for a picture piece on video software; or an album, etc., for a music piece on
audio software. Each title is assigned a title number enabling you to locate
the title you want.
TRACK
Sections of a picture or a music piece on a CD or VIDEO CD. Each track is
assigned a track number enabling you to locate the track you want.
44
Page 51
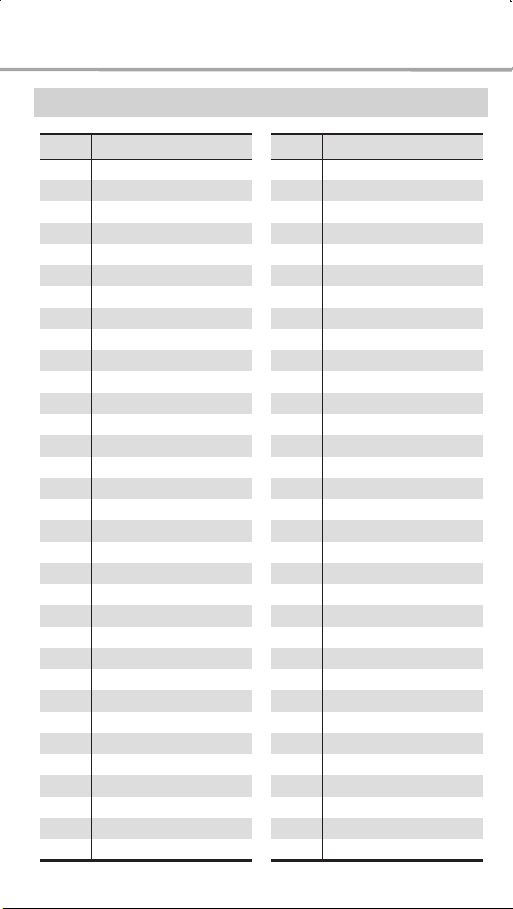
Language Code List
OTHERS
Code
Language Name
6565
6566
6570
6577
6582
6583
6588
6590
6665
6669
6671
6672
6678
6679
6682
6765
6779
6783
6789
6865
6869
6890
6976
6978
6979
6983
6984
6985
7065
7073
7074
7079
7082
Afar
Abkhazian
Afrikaans
Ameharic
Arabic
Assamese
Aymara
Azerbaijani
Bashkir
Byelorussian
Bulgarian
Bihari
Bengali;Bangla
Tibetan
Breton
Catalan
Corsican
Czech
Welsh
Danish
German
Bhutani
Greek
English
Esperanto
Spanish
Estonian
Basque
Persian
Finnish
Fiji
Faroese
French
45
Code
Language Name
7089
7165
7168
7176
7178
7185
7265
7273
7282
7285
7289
7365
7378
7383
7384
7387
7465
7473
7487
7565
7575
7576
7577
7578
7579
7583
7585
7589
7665
7678
7679
7684
7686
Frisian
Irish
Scots Gaelic
Galician
Guarani
Gujarati
Hausa
Hindi
Croatian
Hungarian
Armenian
Interlingua
Indonesian
Icelandic
Iitalian
Hebrew
Japanese
Yiddish
Javanese
Georgian
Kazakh
Greenlandic
Cambodian
Kannada
Korean
Kashmiri
Kurdish
Kirghiz
Latin
Laothian
Lithuanian
Latvian,Lettish
Malagasy
Page 52
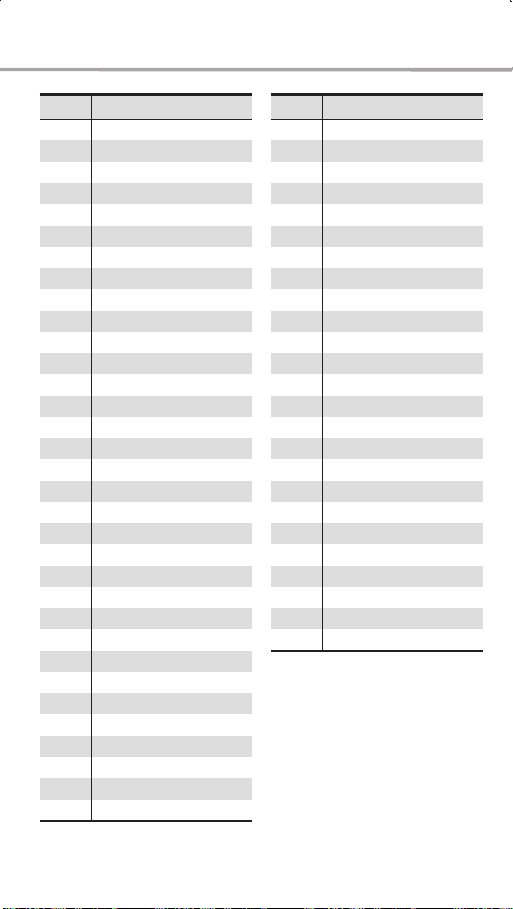
OTHERS
Code
Language Name
7771
7773
7775
7776
7778
7779
7782
7783
7784
7789
7865
7869
7876
7879
7982
8065
8076
8083
8084
8185
8277
8279
8285
8365
8368
8372
8373
8375
8376
8377
8378
8379
8381
Malagasy
Maori
Macedonian
Malayalam
Mongolian
Moldavian
Marathi
Malay
Maltese
Burmese
Nauru
Nepali
Dutch
Norwegian
Oriya
Panjabi
Polish
Pashto,Pushto
Portuguese
Quechua
Rhaeto-Romance
Romanian
Russian
Sanskrit
Sindhi
Serbo-Croatian
Singhalese
Slovak
Slovenian
Samoan
Shona
Somali
Albanian
Code
Language Name
8382
8385
8386
8387
8465
8469
8471
8472
8473
8475
8476
8479
8482
8484
8487
8575
8582
8590
8673
8679
8779
8872
8979
9072
9085
Serbian
Sundanese
Swedish
Swahili
Tamil
Telugu
Tajik
Thai
Tigrinya
Turkmen
Tagalog
Tonga
Turkish
Tatar
Twi
Ukrainian
Urdu
Uzbek
Vietnamese
Volapuk
Wolof
Xhosa
Yoruba
Chinese
Zulu
46
 Loading...