

Page 1
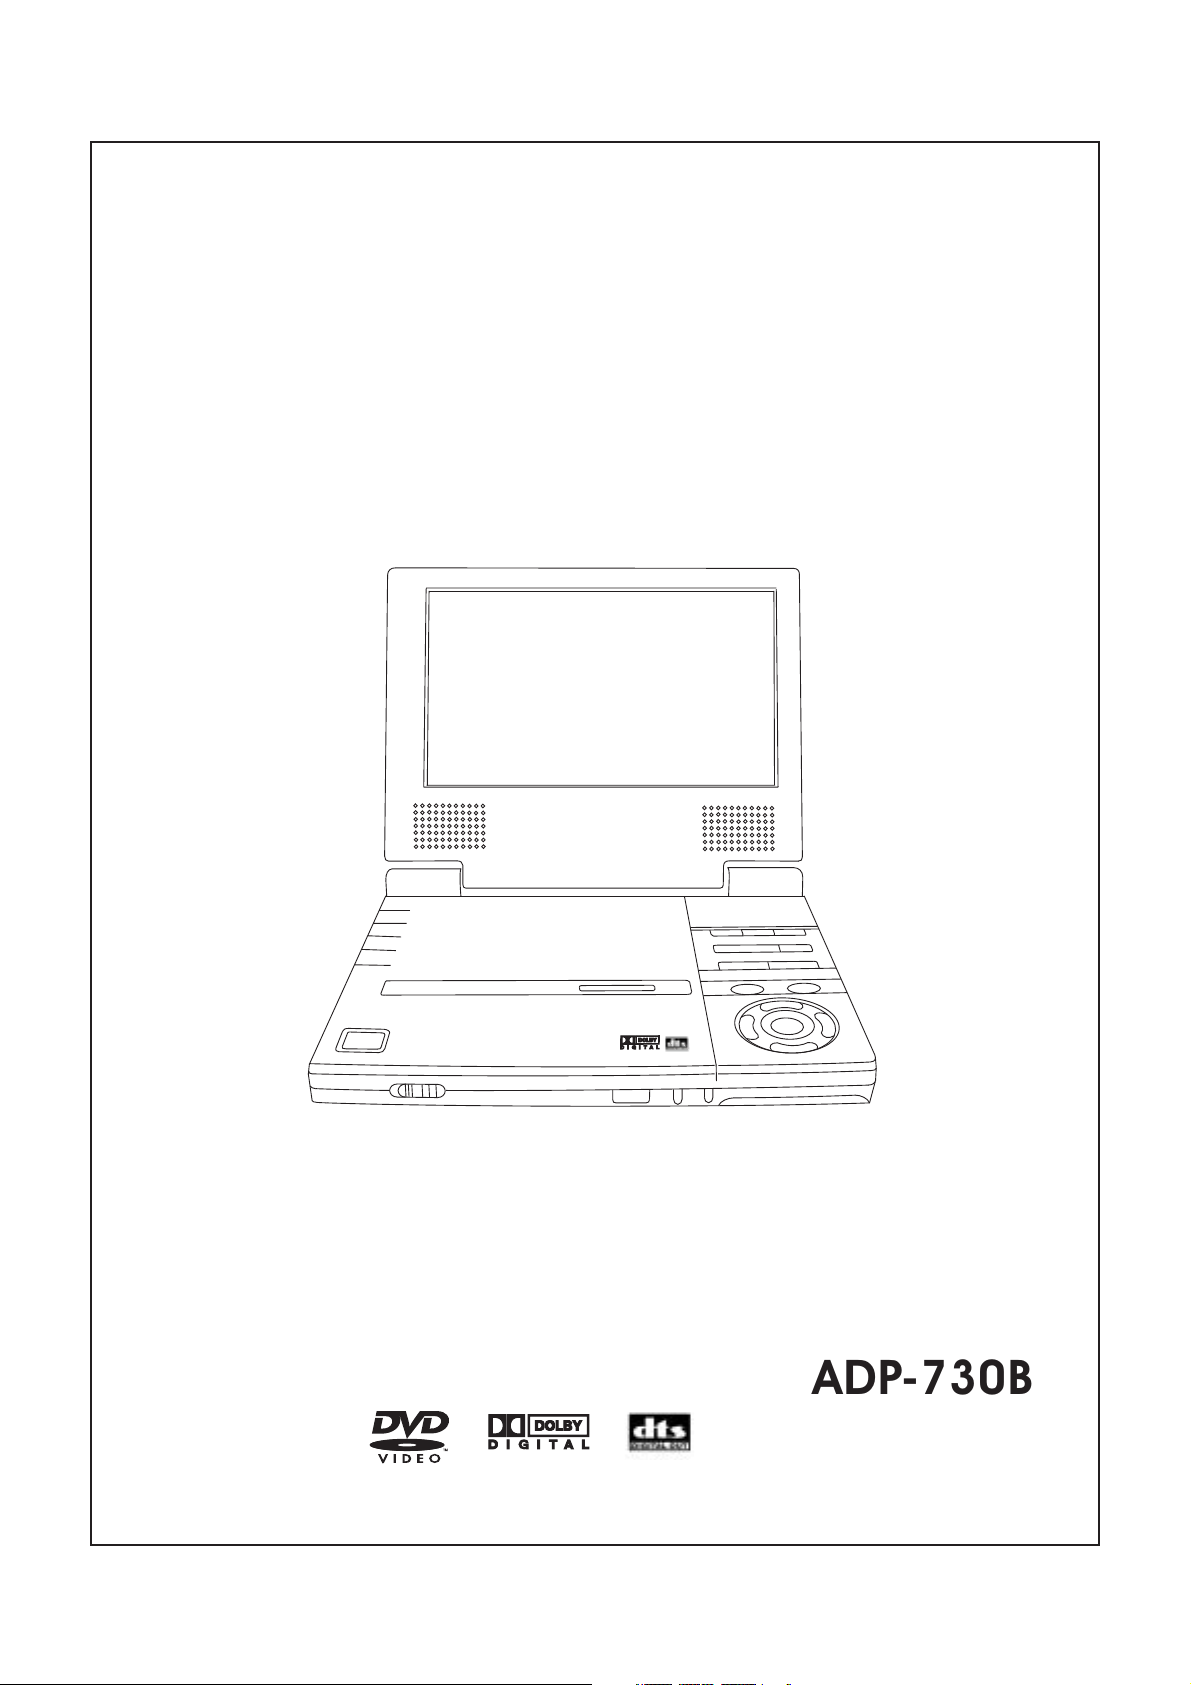
Portable DVD Player
User s Manual’
PORTABLE DVD PLAYER
ADP-730B
Page 2
SAFETY INSTRUCTIONS
CAUTION
RISK OF ELECTRIC SHOCK
RISK OF ELECTRIC SHOCK
CAUTION: TO REDUCE THE RISK OF ELECTRIC SHOCK, DO NOT
REMOVE THE COVER (OR BACK). NO USER-SERVICEABLE PARTS
INSIDE. REFER TO QUALIFIED SERVICE PERSONNEL FOR SERVICING.
Explanation of warning symbols
The lightning flash with arrowhead symbol, within an
equilateral triangle, is intended to alert the user to the presence
of not isolated dangerous voltage within the inside of the
product that may be sufficient magnitude to constitute a risk of
electric shock to persons.
The exclamation point within an equilateral triangle is
intended to alert the user to the presence of important
operating and servicing instructions in the literature
accompanying the appliance.
Read the following instructions carefully
WARNING: TO REDUCE THE RISK OF FIRE, ELECTRIC SHOCK OR
ANNOYING INTERFERENCE, DO NOT EXPOSE THIS APPLIANCE TO RAIN
OR MOISTURE AND ONLY USE THE RECOMMENDED ACCESSORIES.
Read these instructions - When using this unit, basic precautions
outlined in this section should always be followed.
Keep these instructions - Retain this user manual for future
reference.
Heed all warnings - Follow all warning labels on the product, and
the safety instructions in this manual.
Follow all instructions - Adhere to the instructions outlined in this
manual and on the unit.
Clean only with a dry cloth - Unplug the unit before cleaning. Do
not use any liquid or detergents for cleaning.
Do not block any ventilation opening. Install in accordance with
the manufacture's instructions.
Do not install near any heat sources such as radiators, heat
registers, stoves, or other apparatus (including amplifiers) that
produce heat.
Do not defect the safety purpose of the polarized plug. A polarized
plug has two blades with one wider than the other. The wide blade
is provided for your safety. If the provided plug does not fit into
your outlet, consult an electrician for replacement of the obsolete
outlet.
Protect the power cord from being walked on or pinched
particularly at plugs, convenience receptacles, and the point where
they exit from the apparatus.
Only use attachments / accessories specified by the manufacturer.
The apparatus shall not be exposed to dripping or splashing and no
objects filled with liquids, such as vases, shall be placed on the
apparatus.
NOT OPEN
DO NOT OPEN
DO
Use only with the cart, stand, tripod, bracket, or
table specified by the manufacturer, or sold with
the apparatus. When a cart is used, use caution
when moving the cart / apparatus combination to
avoid injury from tip-over.
Unplug this apparatus during lightning storms or
when unused for long periods of time.
Refer all servicing to qualified service personnel. Servicing is
required when the apparatus has been damaged in any way, such
as when the power-supply cord or plug is damaged, liquid has
been spilled, objects have fallen into the apparatus, the apparatus
has been exposed to rain or moisture, or when the unit does not
operate normally, or has been dropped.
Power cord protection - To avoid any malfunctions of the unit
and to protect against electric shock, fire or personal injury,
please observe the following:
a) Hold the plug firmly when connecting or disconnecting the
AC power cord to this unit.
b) Do not connect or disconnect the AC power cord with wet
hands.
c) Keep the AC power cord away from heating appliances.
d) Never put any heavy object on the AC power cord.
e) Do not attempt to repair or reconstruct the AC power cord in
any way.
Remove dust, dirt, etc. on the plug at regular intervals.
If the unit has been dropped or otherwise damaged, turn off the
power and disconnect the AC power cord.
If smoke, odors or noises are emitted from the unit, turn off the
power and disconnect the AC power cord.
Placement - Avoid placing the unit in areas of direct sunlight,
heating radiators, closed automobiles, high temperature (over
°°
35 C (95 F)), high humidity (over 90%), excessive dust,
vibration, impact or where the surface is tilted, as the internal
parts may be seriously damaged.
Non-use periods - When the unit is not used, turn the power off.
When the unit is unused for a long period of time, the unit should
be unplugged from the household AC outlet.
No fingers or other objects inside - Touching internal parts of this
unit is dangerous and may cause serious damage to the unit. Do
not attempt to disassemble the unit.
Do not put any foreign object on the disc tray.
Keep away from water and magnets.
Keep the unit away from flower vases, tubs, sinks, etc. If liquids
are spilled into the unit, serious damage could occur.
Keep magnetic objects, such as speakers, distant from the player.
Stacking - Place the unit in a horizontal position and do not place
anything heavy on it.
Do not place the unit on amplifiers or other equipment which
may become hot.
Condensation - Moisture may form on the lens in the following
cases: a) immediately after a heater has been turned on b) in a
steamy or very humid room c) the unit is moved from a cold
environment to a warm one.
If moisture forms inside this unit, it may not operate properly. In
this case, turn off the power and wait about one hour for the
moisture to evaporate.
Noise interference while a broadcast is being received -
depending on the reception condition of the TV, interference may
appear on the TV screen while you are watching a TV broadcast,
if the unit is switched on. This is not a malfunction of the unit or
the TV. To watch a TV broadcast, turn off this unit.
Caution - Use of controls or adjustments or performance of
procedures other than those specified herein may result in
hazardous radiation exposure.
SAVE THESE INSTRUCTIONS
2
Page 3
IMPORTANT BATTERY SAFETY PRECAUTIONS
Read these instructions carefully before using the battery.
Charging
Charging shall be less than specified 8.4 V.
•
The battery should be charged within the specified temperature of 0~45 C.
•
Discharging
In order to prevent over-discharging, the battery should discharge between 7.2 to 7.8 V.
•
The battery should be discharged within the temperature 0~60 C.
•
°
Storage
°
The battery should be stored within the temperature•
Keep the battery terminals clean while storing.
•
range of 0~60 C.
°
Others
Do not disassemble the cells and battery.
•
Do not use a damaged battery.
•
Do not expose the battery to fire, or throw the battery into a fire. This may cause the battery to explode.
•
Use the specified charger only.
•
Do not touch the battery terminals with metal objects.
•
Keep out of reach of children.
•
If any electrolyte contacts with your hands or clothes, wash it off thoroughly with water.
•
The battery may present a risk of fire or chemical burn if misused.
•
3
Page 4
CONTENTS
4
Page 5
FEATURES
The ADP-730B is a Portable DVD Player with Progressive Scan. It can play your favorite MP3 files or view JPG files
from your digital camera. It s got everything you need to take it out on the open road and when you come back home,
become a part of your home theater system. Now you can start enjoying today s hottest DVD movies with superb
’
TM
Progressive Scan Video with 3:2 pulldown.
Plays DVD, VCD, CD-ROM, MP3, JPG and other
’
disc types.
Component Video, S-Video and Composite Video
Outputs.
Stereo Audio out and Optical digital outputs.
Advanced playback functions: Slow playback, repeat
playback, parental control, MP3 player, JPG player,
screen saver, Zoom In/Out, track selection, on-screen
display and more.
DISC COMPATIBILITY / CARE
Optical disc compatibility
This unit plays DVDs recorded for a particular region.
The region mark on the back of the player must
correspond to that on any DVD discs you wish to play.
Units sold in Europe
marked as shown:
This unit supports CD-R/RW discs recorded with MP3
or JPG files, and VCD format.
MP3 files must be named with the extension .MP3
JPG files must be named with the extension .JPG
JPG images must be saved with standard encoding,
rather than progressive encoding.
Discs created with personal computers may have
“”
problems playing due to differences in recording
software settings, disc formats and other factors.
are coded for Region 2, and
“”
“”
””
Caring for Optical Discs
Hold a disc by the rim or with an index finger in the
central hole. Never touch the signal surface.
Finger prints or stains on the surface of the disc may
cause signal loss.
Use a soft cloth and wipe in a radiating manner from
the center of the disc to the outer rims when cleaning
the disc surface.
Never add labels or adhesive tapes on the discs and be
careful not to scratch or damage the disc surface.
To prevent discs from becoming bent or deformed,
they should be vertically kept in the disc storage case.
To prevent damage, avoid leaving discs in your car,
where they may be subject to direct sunlight and high
temperature.
Do not use any disc accessory to improve the audio
quality, disc protective solutions or lens cleaner. These
products may damage the disc surface.
Labels
Labels
Tape s
Tape s
Labeling Side
Labeling Side
Surface
Surface
5
Page 6
GETTING STARTED
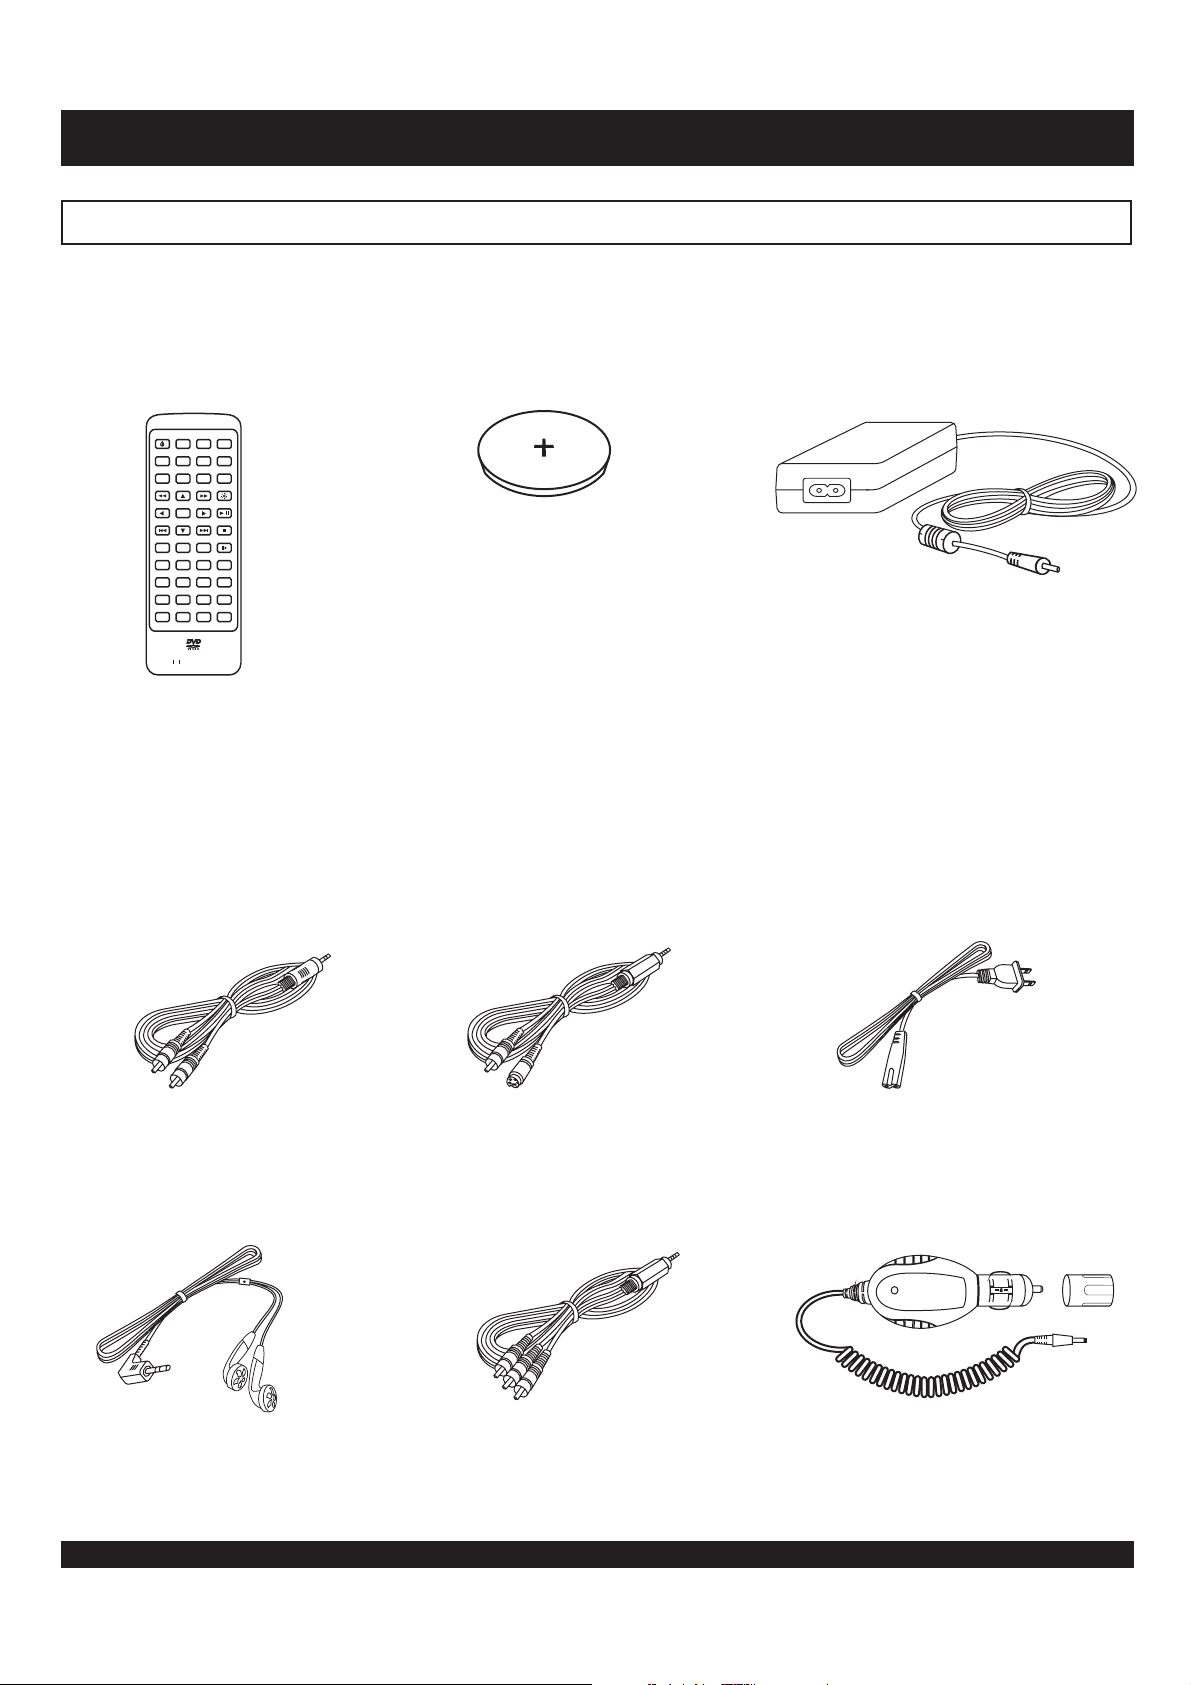
Make sure the package contents are complete
In addition to the DVD player, your package should contain the following accessories. Check the contents of the package carefully, as
some items may be located under the packing foam.
Remote control
/
+
-
TMTM
Stereo Audio Cable
(Analog Stereo)
Remote Control Battery
Composite/S-Video
Video cable
AC Power Converter
Power cord
Earphones
Component Video
Cable (optional)
6
Car Adapter
Page 7
GETTING STARTED
Installing the Battery
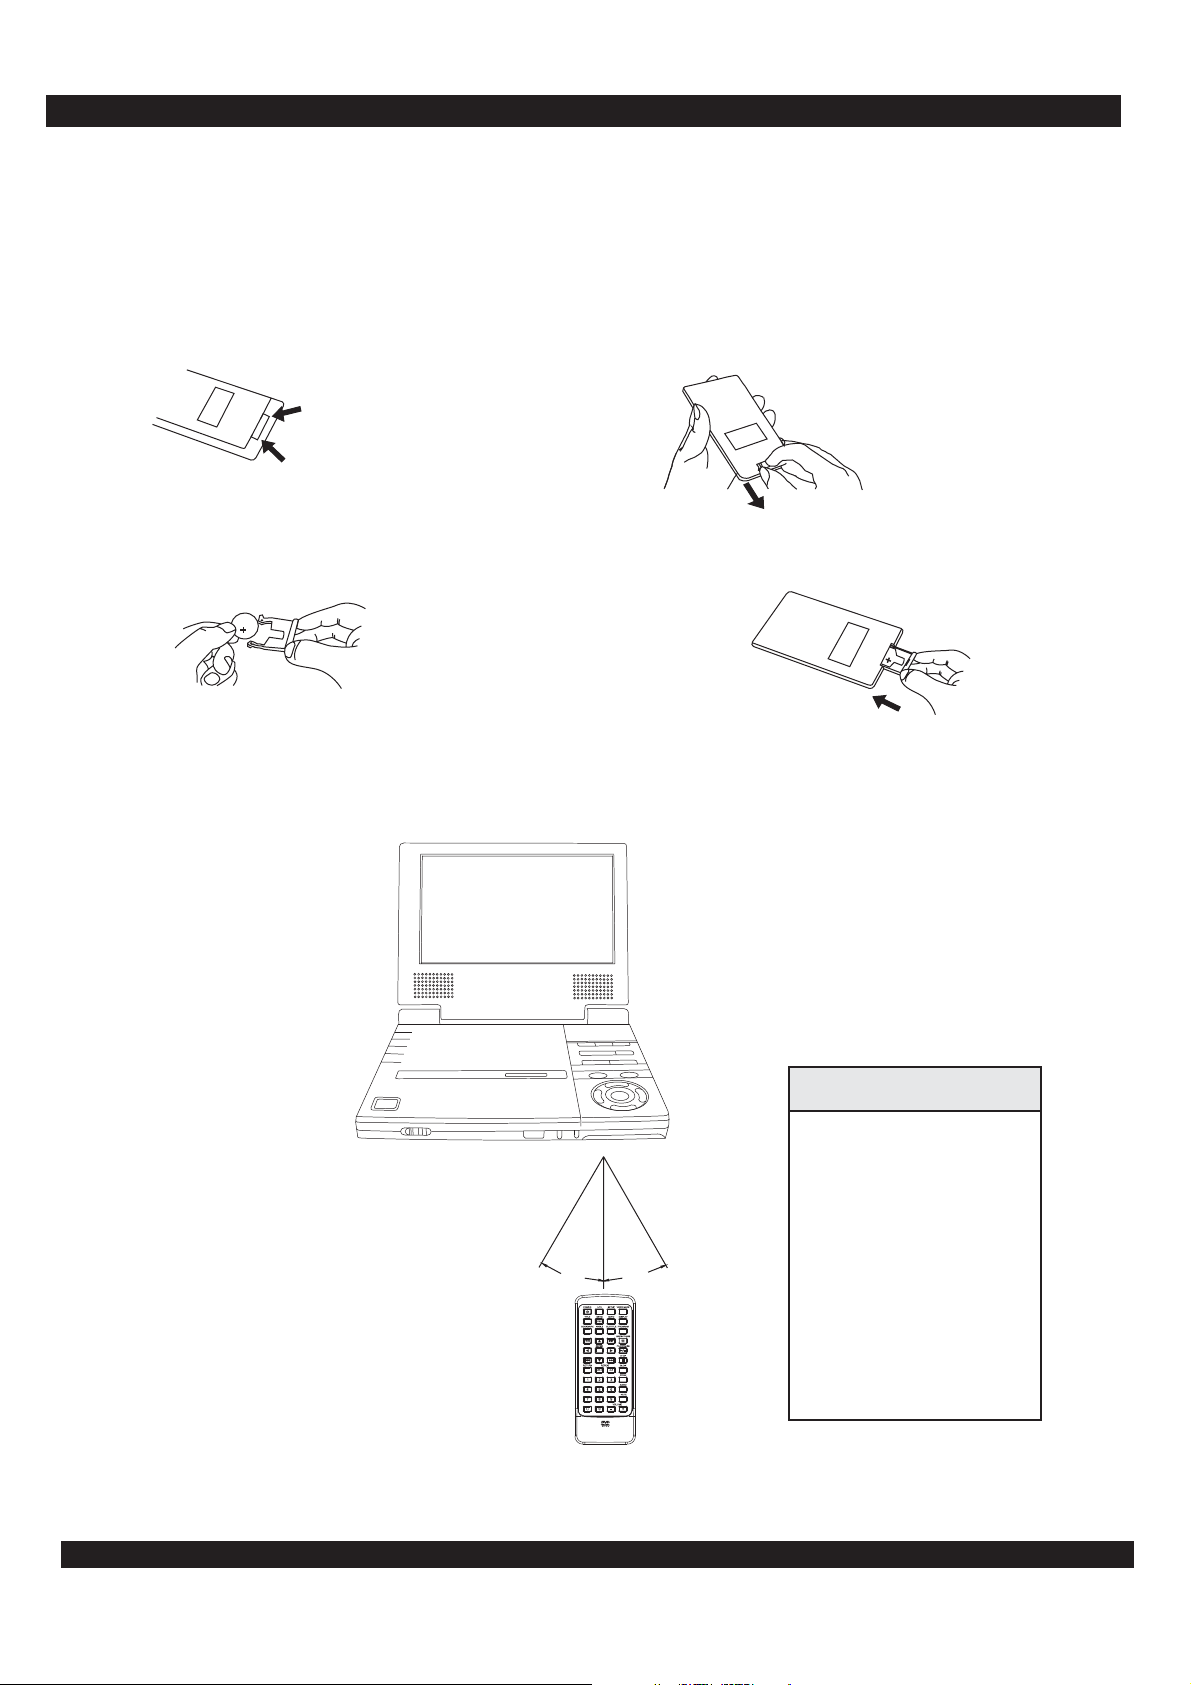
If the remote control only operates when you get closer to the DVD Player, it may indicate that the battery is weak. Please
replace the battery (Lithium battery) simultaneously with a new battery of the same type . Please note the
positive (+) side is facing upwards when the remote is held as shown below.
1. Please become familiar with your remote
controller s battery holder parts below.’
2. Grasp the remote with the underside facing upward. Notice the release
clip to the left and handle to the right. To remove the battery holder, place
pressure on the release clip towards the center of the remote,while pulling
the handle out towards you, as the arrows show.
(CR 2025)
Handle
ReleaseClip
3. Use you thumbnail to squeeze the release clip
inward, while at the same time,pull the Handle out
with your index fingernai.
4. Insert new battery into the holder. Make sure that
positive(+) side is facing upwards. Return the
battery holder back into the remote.
RemoteControl
Bottom
RemoteControl
Bottom
Important Notes about the Battery
If the unit will not be used for an extended length of time, it s wise to remove the battery before storage.
The life of the battery depends on the amount of usage. With typical usage, a battery life of approximately 6 months can
’
be expected.
Operation of Remote Control
When using the Remote control, please aim at
the device's remote control sensor, located on the
front of DVD Player. A 30 degree angle is
recommended for best operation.
R
E
AY
L
P
D
V
D
LE
B
A
T
R
O
P
QuickTips
Make sure no objects
are between the remote
and the player.
Similar remote controls
could interfere with the
function of the player.
°
30
°
30
Make sure not to store
the remote upside
down or with any
objects pressing on the
buttons - this could
drain the battery.
7
Page 8
12
12
REMOTE CONTROL FUNCTIONS
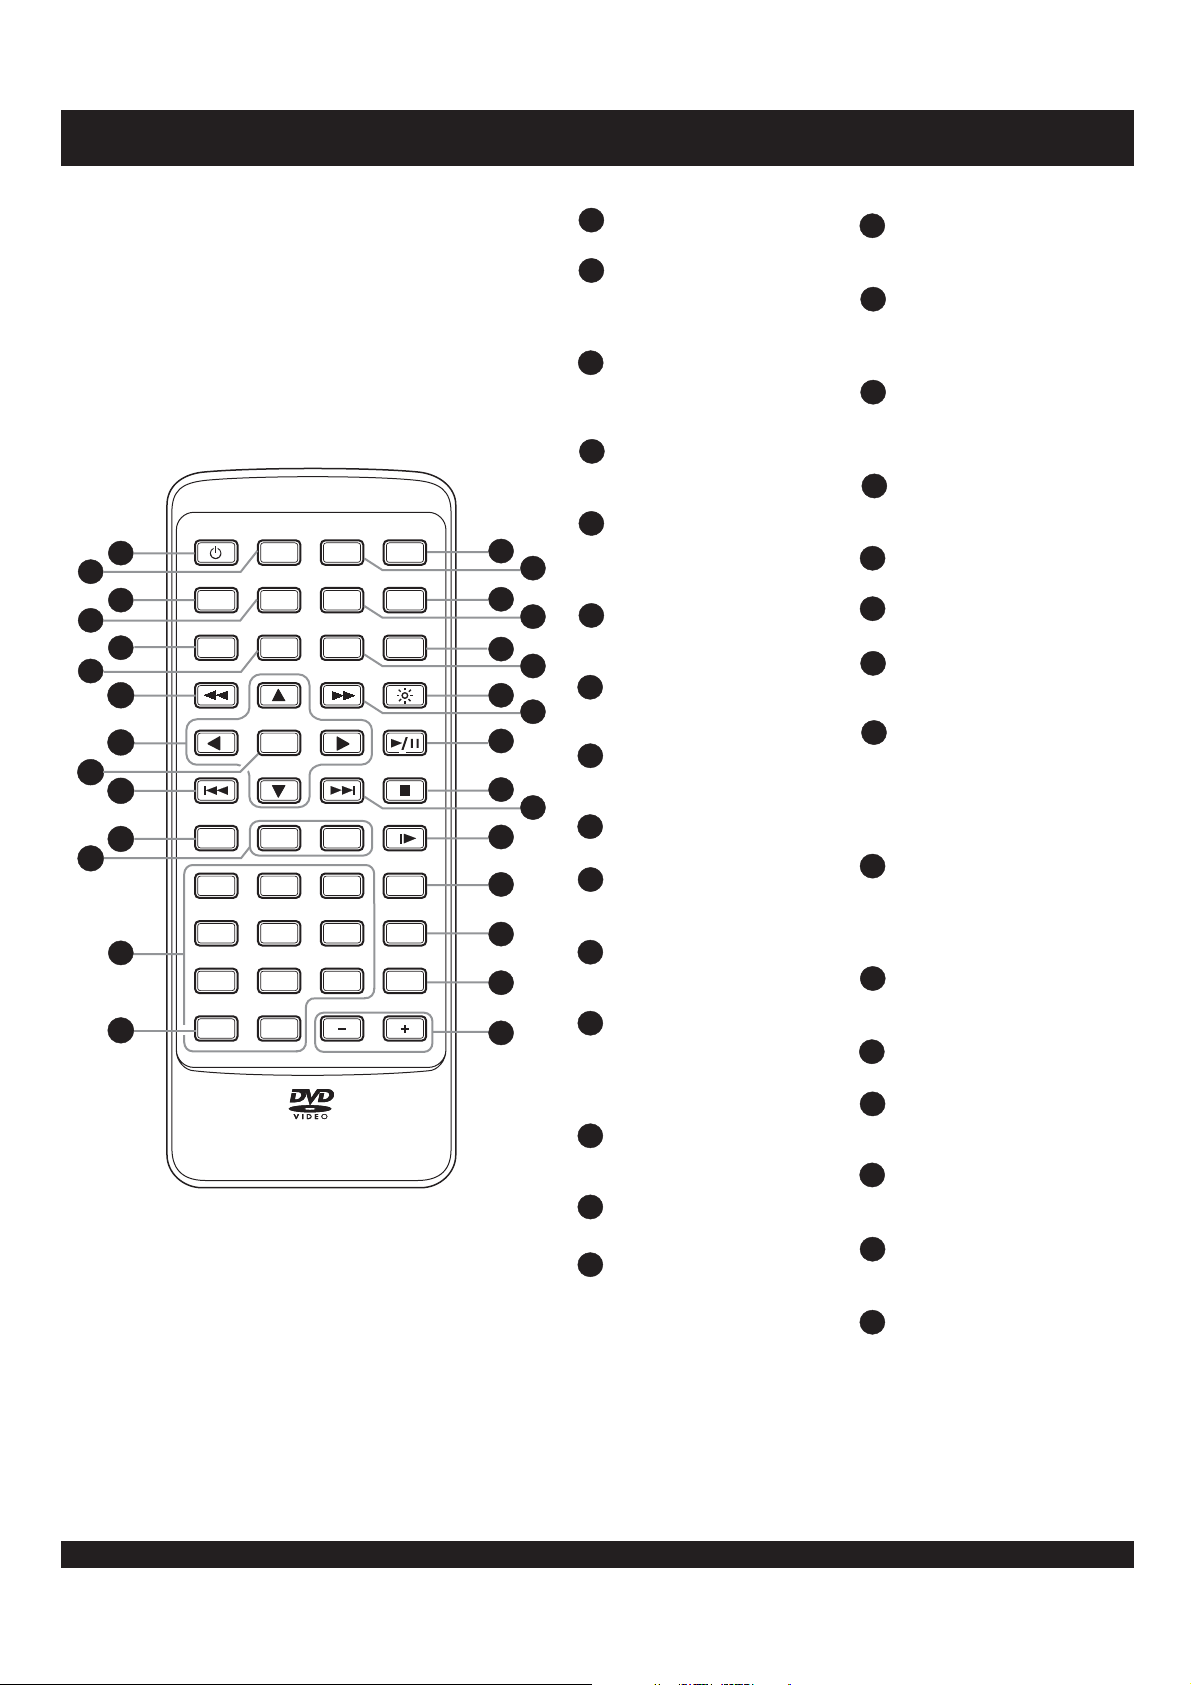
1
POWER
Turns the DVD player on or off.
2
LCD
Press to cycle through and select the
11
display mode you wish, includes full,
zoom, wide, normal or off.
3
TITLE
Accesses Menus on DVD Discs. With
VCD discs, turns the PBC function
On/Off.
4
MENU / PBC
Accesses the Title menu on DVD
Discs.
5
POWER
1
2
3
4
5
6
TITLE
BOOKMARK
MENU
ANGLE
7
8
ENTER
9
10
RETURN
11
13
1/ALL
1
4
7
14
LCD
PBC
2
5
8
0C
REPEAT
SETUP
GOTO
SUBTITLE
A-B
3
6
9
DISPLAY
PROGRAM
BRIGHTNESS
PLAY/PAUSE
VOLUME
STOP
SLOW
ZOOM
AUDIO
MUTE
15
17
19
21
23
24
26
27
28
29
30
21
16
18
20
22
25
MONITOR
BOOKMARK
Press to store the current point on the
disc as a bookmark that can be
accessed quickly without searching.
6
ANGLE
Selects between the multiple angle
views on supported DVD's.
7
FAST REVERSE
Scan in fast reverse on DVD's and
other discs.
8
ARROWS
Use to navigate disc menus, on-screen
setup menu, etc.
9
ENTER
Selects options in menus.
10
SKIP PREVIOUS
Press to skip to the previous chapter or
track.
11
RETURN
Returns to the previous menu
accessed in DVD mode.
12
REPEAT 1/ALL, A-B
Used with DVD discs, 1/ALL repeats
a chapter, title or disc. A-B sets the
beginning and ending of a time
TMTM
segment to repeat.
13
NUMBER KEYS
Use to enter numeric values when
using GOTO and more.
14
CLEAR
Clears input when entering values.
MONITOR
15
Use to switch between selectable video
input / output. Includes regular unit
viewing, unit to external monitor and
MONITOR
composite input from external device.
16
SETUP
Accesses the on-screen Setup Menu
for settings adjustment.
17
DISPLAY
Shows the elapsed time and other
playback information for playback of
disc being played.
18
GOTO
Press to navigate to a specific
chapter. Follow with corresponding
number key.
19
PROGRAM
Create a custom play list of selected
tracks and sequence.
20
SUBTITLE
Selects available subtitles on DVD.
21
BRIGHTNESS
Use to adjust the brightness level.
FAST FORWARD
22
Scan in fast forward on DVD's and
other discs.
23
PLAY/PAUSE
Use to play a disc, chapter or track.
Press to pause audio track play or
video to a still frame. Press again to
advance frame by frame ( DVD ) or
resume playback ( Audio CD ).
24
STOP
Press once to stop current disc play
but holds resume location. Press
again to completely stop play - also
required for some setup functions.
25
SKIP NEXT
Press to skip to the next chapter or
track.
SLOW
26
Press to advance slow.
27
ZOOM
Press to magnify and shrink the
screen with DVD discs.
28
AUDIO
Selects an audio track on DVD or
VCD discs.
29
MUTE
To turn off sound. Press again to turn
sound back on.
30
VOLUME
Press the + key to increase the
volume level and - key to
““
““
decrease.
8
Page 9
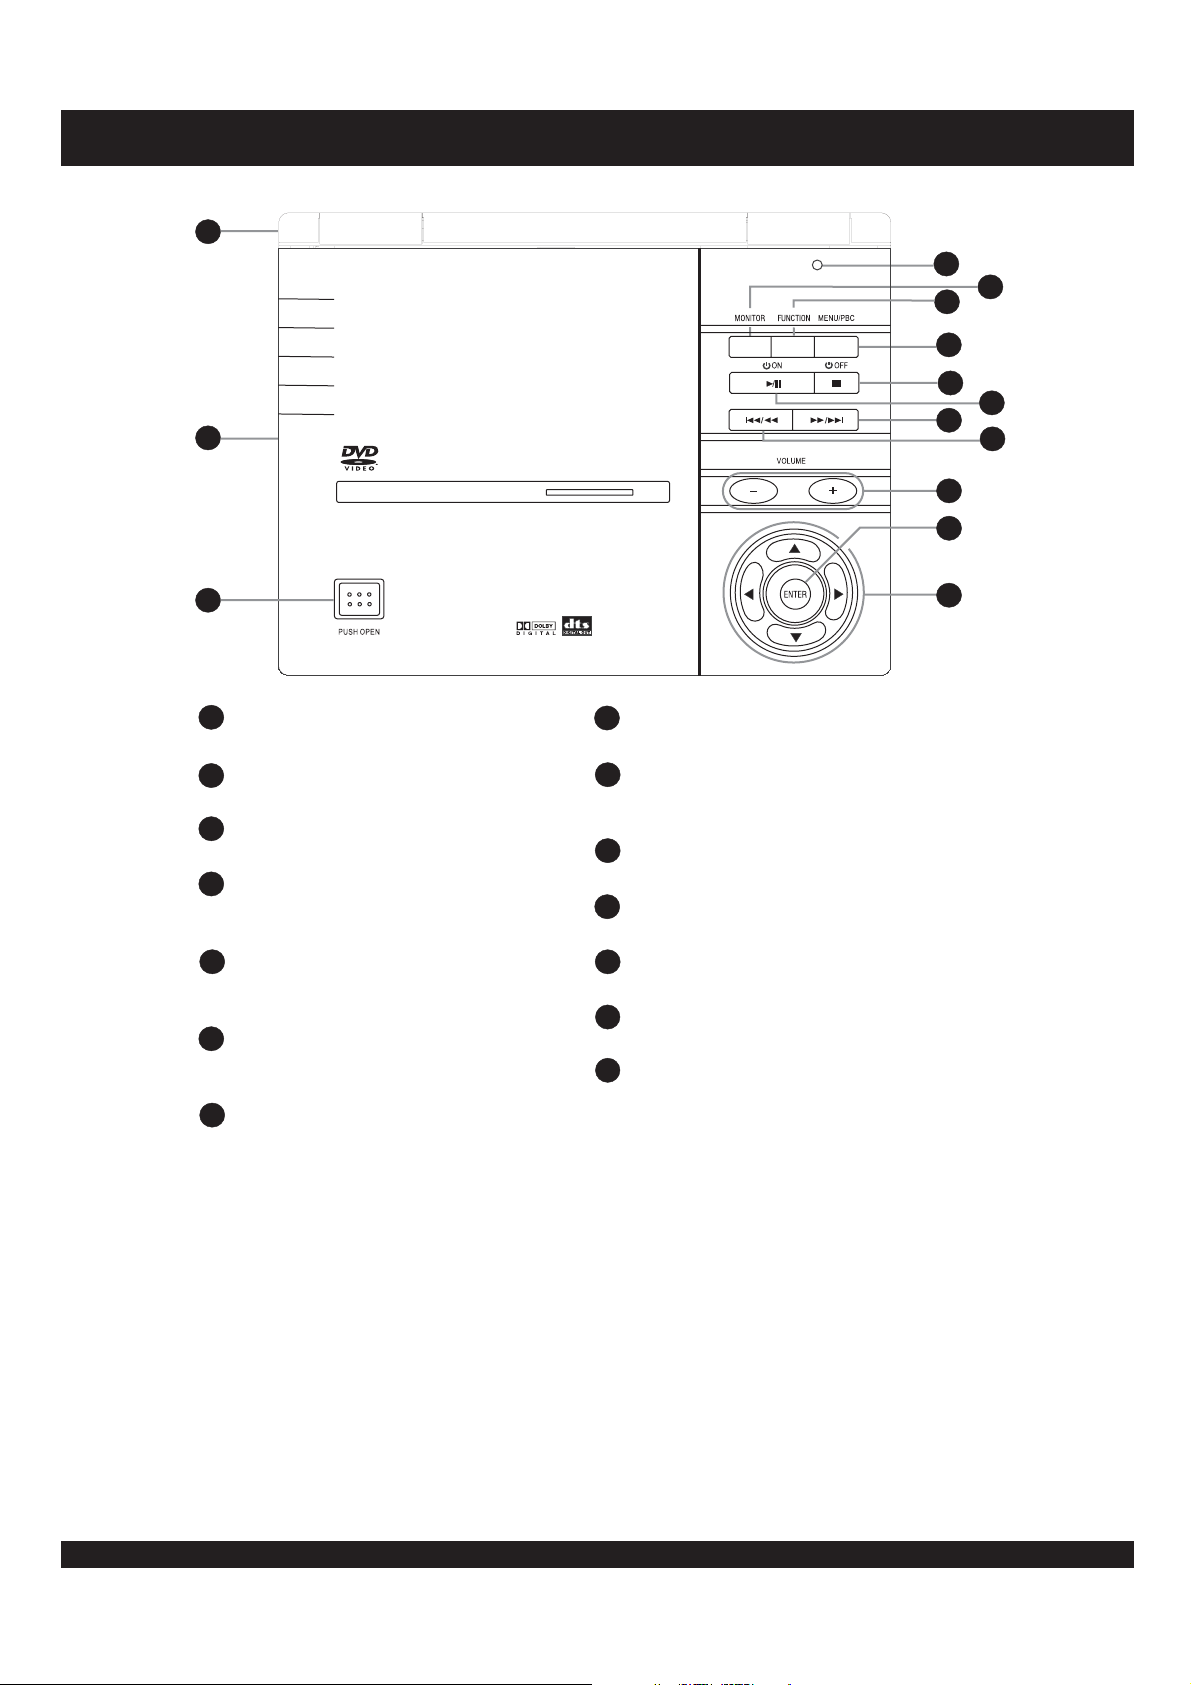
FRONT PANEL FUNCTIONS
1
4
5
6
7
8
9
2
10
11
PORTABLE DVD PLAYER
3
1
LCD SCREEN
The LCD Screen.
DISC DOOR
2
Open disc door to insert discs for playback.
3
DISC DOOR BUTTON
Push to open the disc door.
4
LCD BUTTON
Closing the LCD screen activates this button
turn off the LCD screen.
5
PLAY / PAUSE / ON
Multifunction button controls the play, pause
and power ON function of the unit.
6
PREVIOUS / FAST REVERSE
With optical discs, press to return to the
previous chapter or track.
7
NEXT / FAST FORWARD
With optical discs, press to advance to the
next chapter or track.
8
OFF
Use this button to power OFF the unit.
9
VOLUME
Use the + or - buttons to control the
““ ““
volume level during playback.
10
MONITOR
Change the Audio Video Input / Output mode
11
FUNCTION
Press to enter the Function Menu.
12
MENU / PBC
Accesses the root menu on discs.
13
ENTER
Use to select options in menus.
14
ARROW BUTTONS
Use to navigate disc menus, on-screen setup
menu, etc.
12
13
14
9
Page 10
FRONT PANEL FUNCTIONS
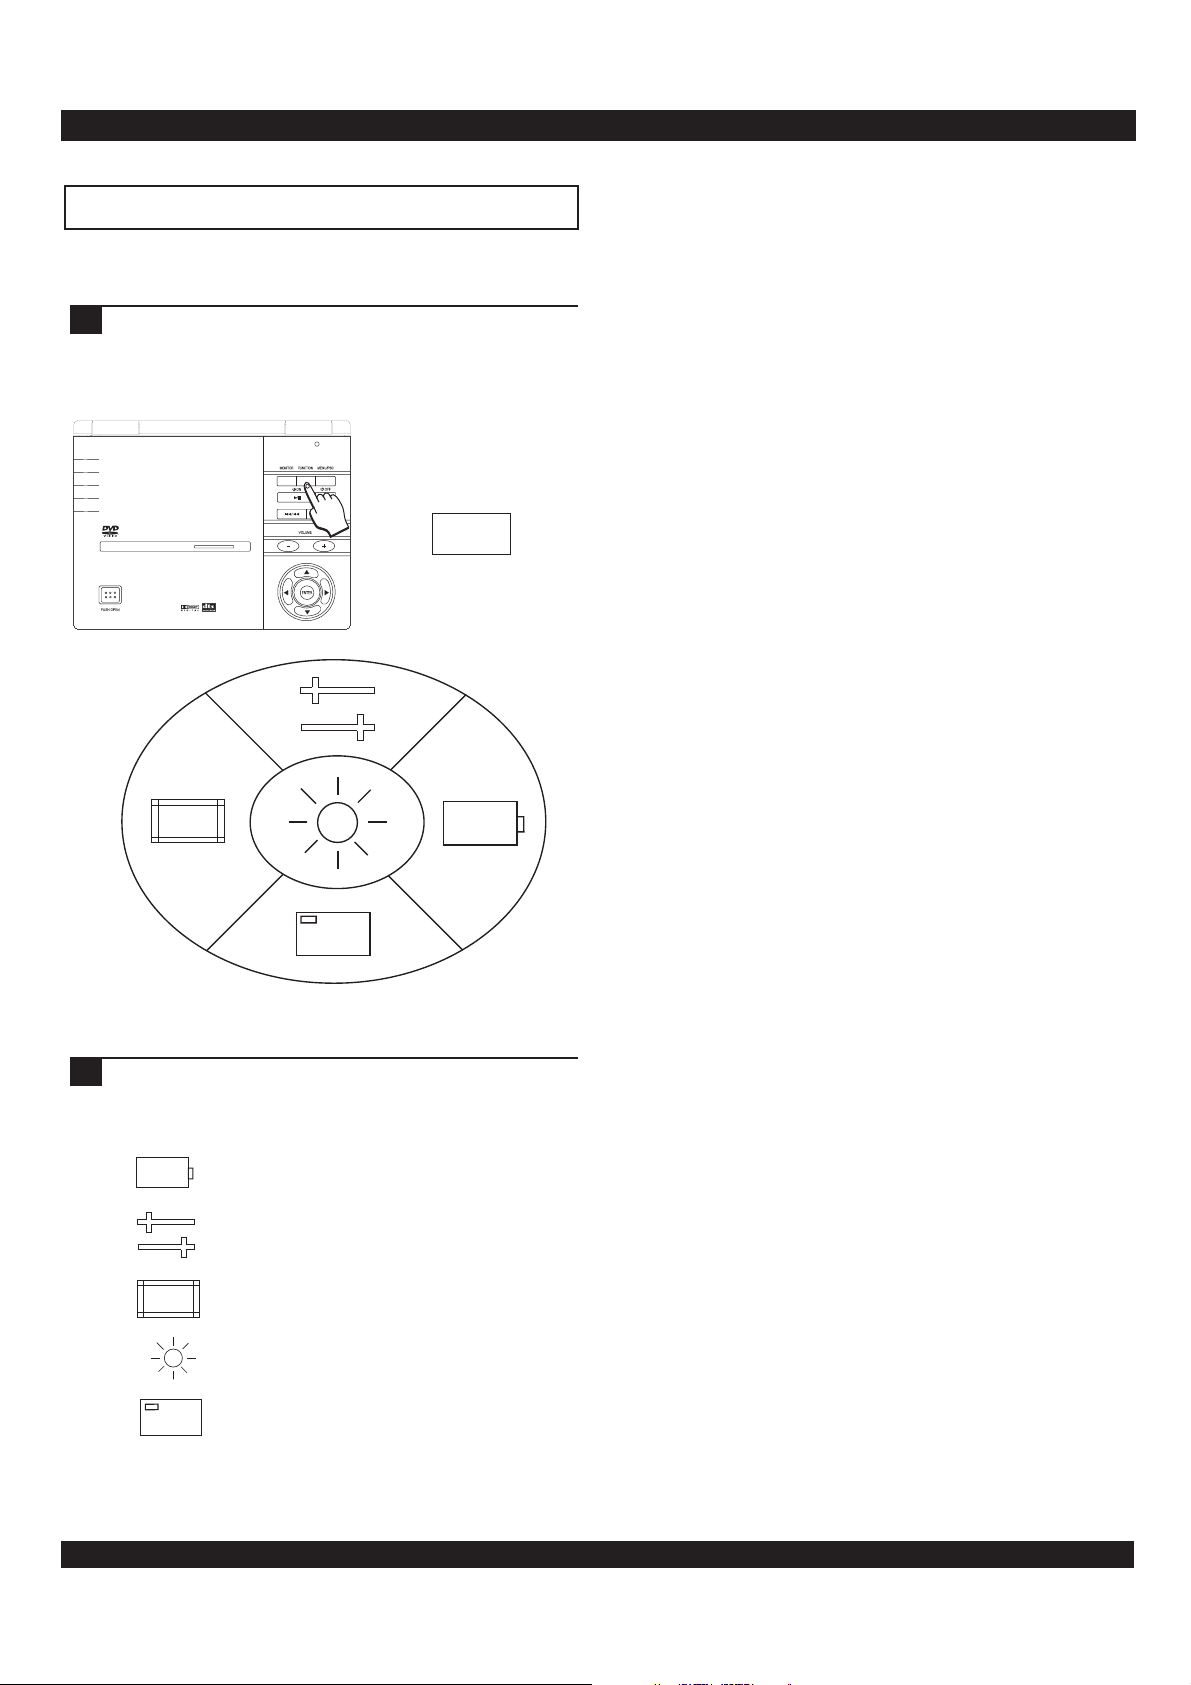
Using the function menu
The Function key - located on the front panel of the unit allows you to access various functions including the Setup
Menu and battery status among others.
1
Press the Function Key on the front panel of the unit
to access the on-screen Function Menu. The
Function menu will automatically disappear from the
screen after 10 seconds of inactivity.
FUNCTION
PORTABLEDVD PL AYER
Function Menu
2
Use the Arrow Keys on the front panel of the unit or
the remote control to navigate the Function Menu.
The available options include ;
- Battery status
- Setup Menu
- LCD Monitor Mode
- Brightness Level Adjustment
- Exit Function Menu
10
Page 11
EXTERNAL BATTERY PACK
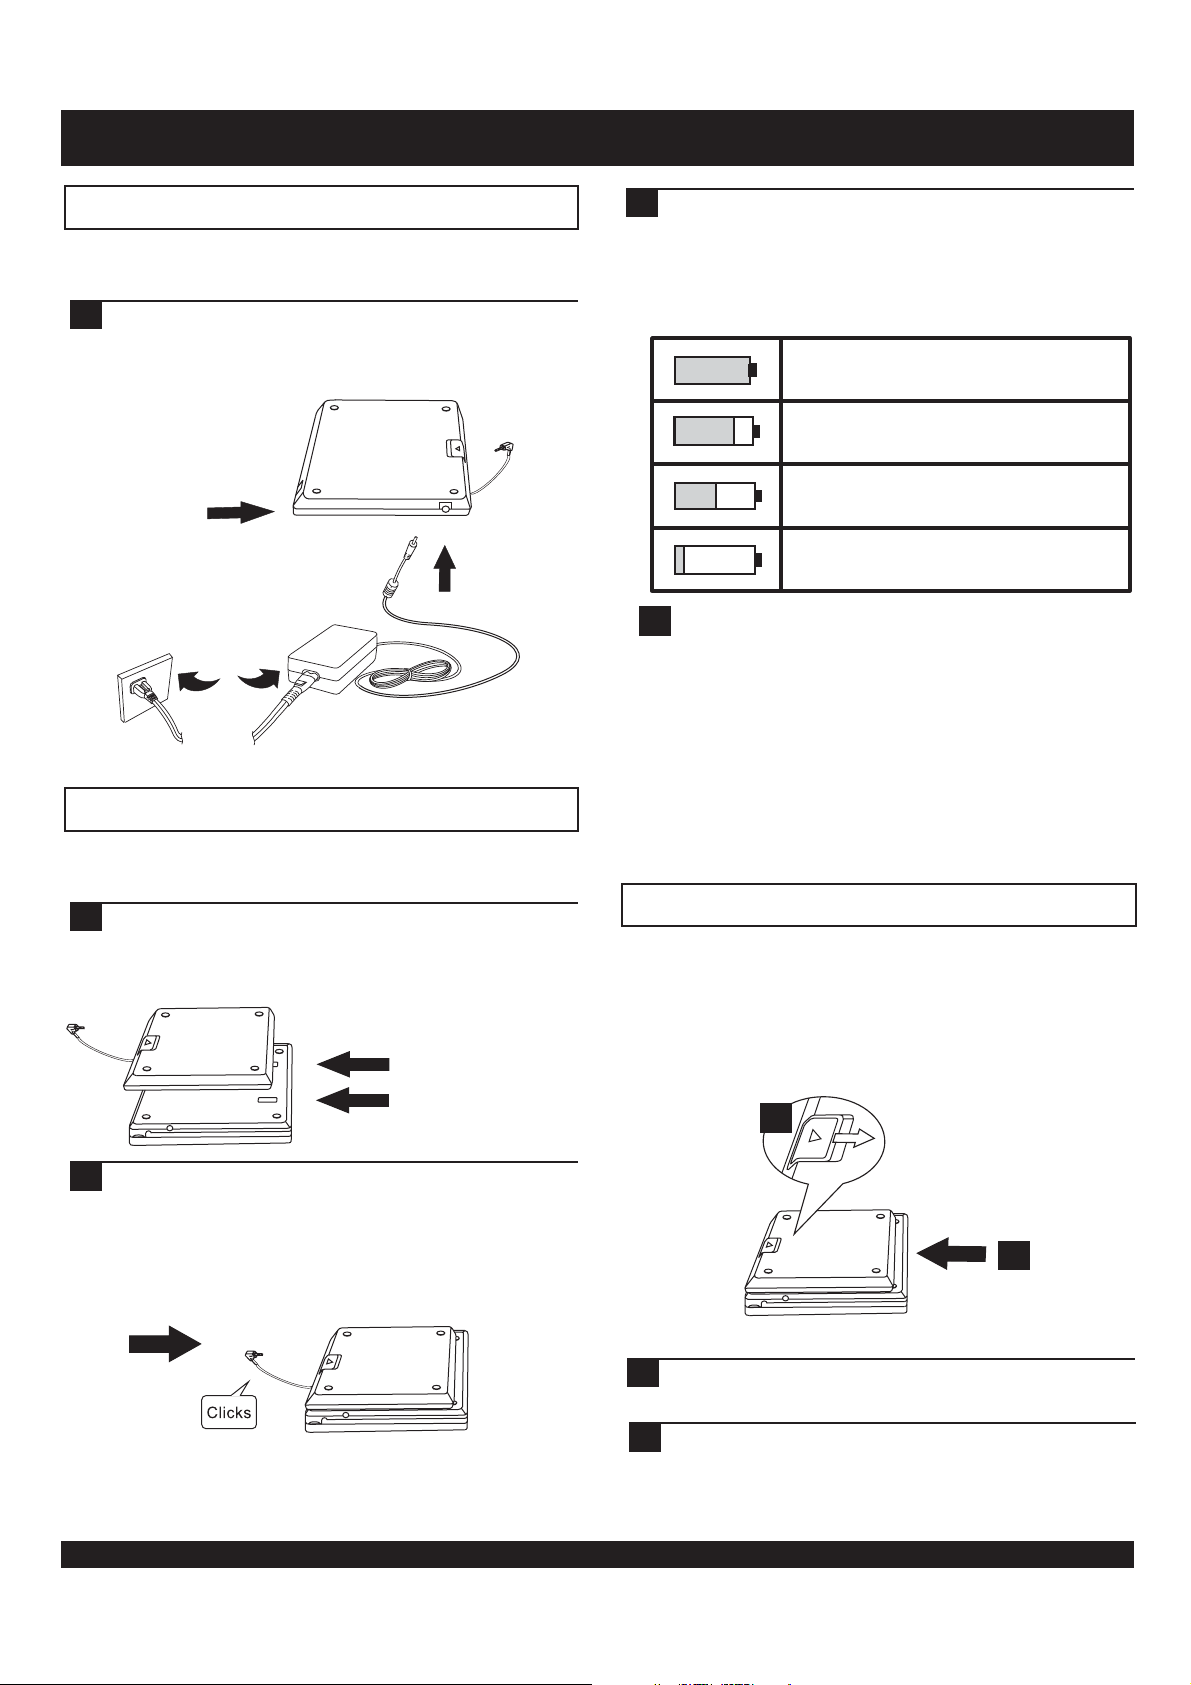
Preparing the battery pack for use
The DVD player comes complete with a battery pack to allow
playback without any AC power source.
1
Before using the battery pack the first time, you must
first charge it. Connect the battery pack to the AC
adapter as shown below. The LED will turn green
when fully charged.
2
Press the Function key on the front panel or the
Display key on the remote control to check the
battery pack status. Use the table below as a guide
to the current battery pack status. If the front panel
power indicator is blinking, the battery pack has less
than 10 minutes of charge remaining.
100%
Fully Charged
BATTERY
PACK
LED
DC IN 9V
Using the battery pack
Attaching the battery pack to the DVD player is an easy few
steps.
1
Turn the unit upside down. Remove the battery
terminal protector ( replace this protector when
battery pack is not used). Align the battery pack s
guides to the unit s slots.
’
DVD PLAYER
SLOTS
’
70%
50%
20%
!
!
Important
Recharge your battery pack when the battery status is
less than 25%.
Unnecessary charging will reduce the battery pack
service lifetime.
When the battery pack is being charged, the LED will
glow red.
After successfully charging the battery pack, the LED will
glow green.
The time to charge the battery pack is normally 3 to 4
hours. Do not charge for more than 8 hours.
Three FourthCharge Reminding
RemainingCharge is getting low
Almost out of Power
Detaching the battery pack
Detach the battery pack from the DVD player if you will be
storing the unit for an extended period of time. The unit will
continue to consume power while the battery pack is attached
and turned off. Over discharge of the battery pack will lead to
reduced service life time. Ensure the unit is turned off before
detaching the battery pack.
1
2
To secure the battery pack to the unit, ensure the
battery pack locks onto the unit. To lock the battery
pack into place, gently slide the battery pack toward
the front on the unit until there is an audible click.
11
2
1
Slide the latch toward the front of the unit. Hold the
tab in this position.
2
Gently slide the battery pack towards the back of the
unit. Lift the battery pack from your unit. Replace
the battery terminal protector back onto the unit.
Page 12
BATTERY PACK
Preparing the battery pack for use
The DVD player comes complete with a battery pack to allow
playback without any AC power source.
1
Before using the battery pack the first time, you must
first charge it. Connect the battery pack to the AC
adapter as shown below. The LED will turn green
when fully charged.
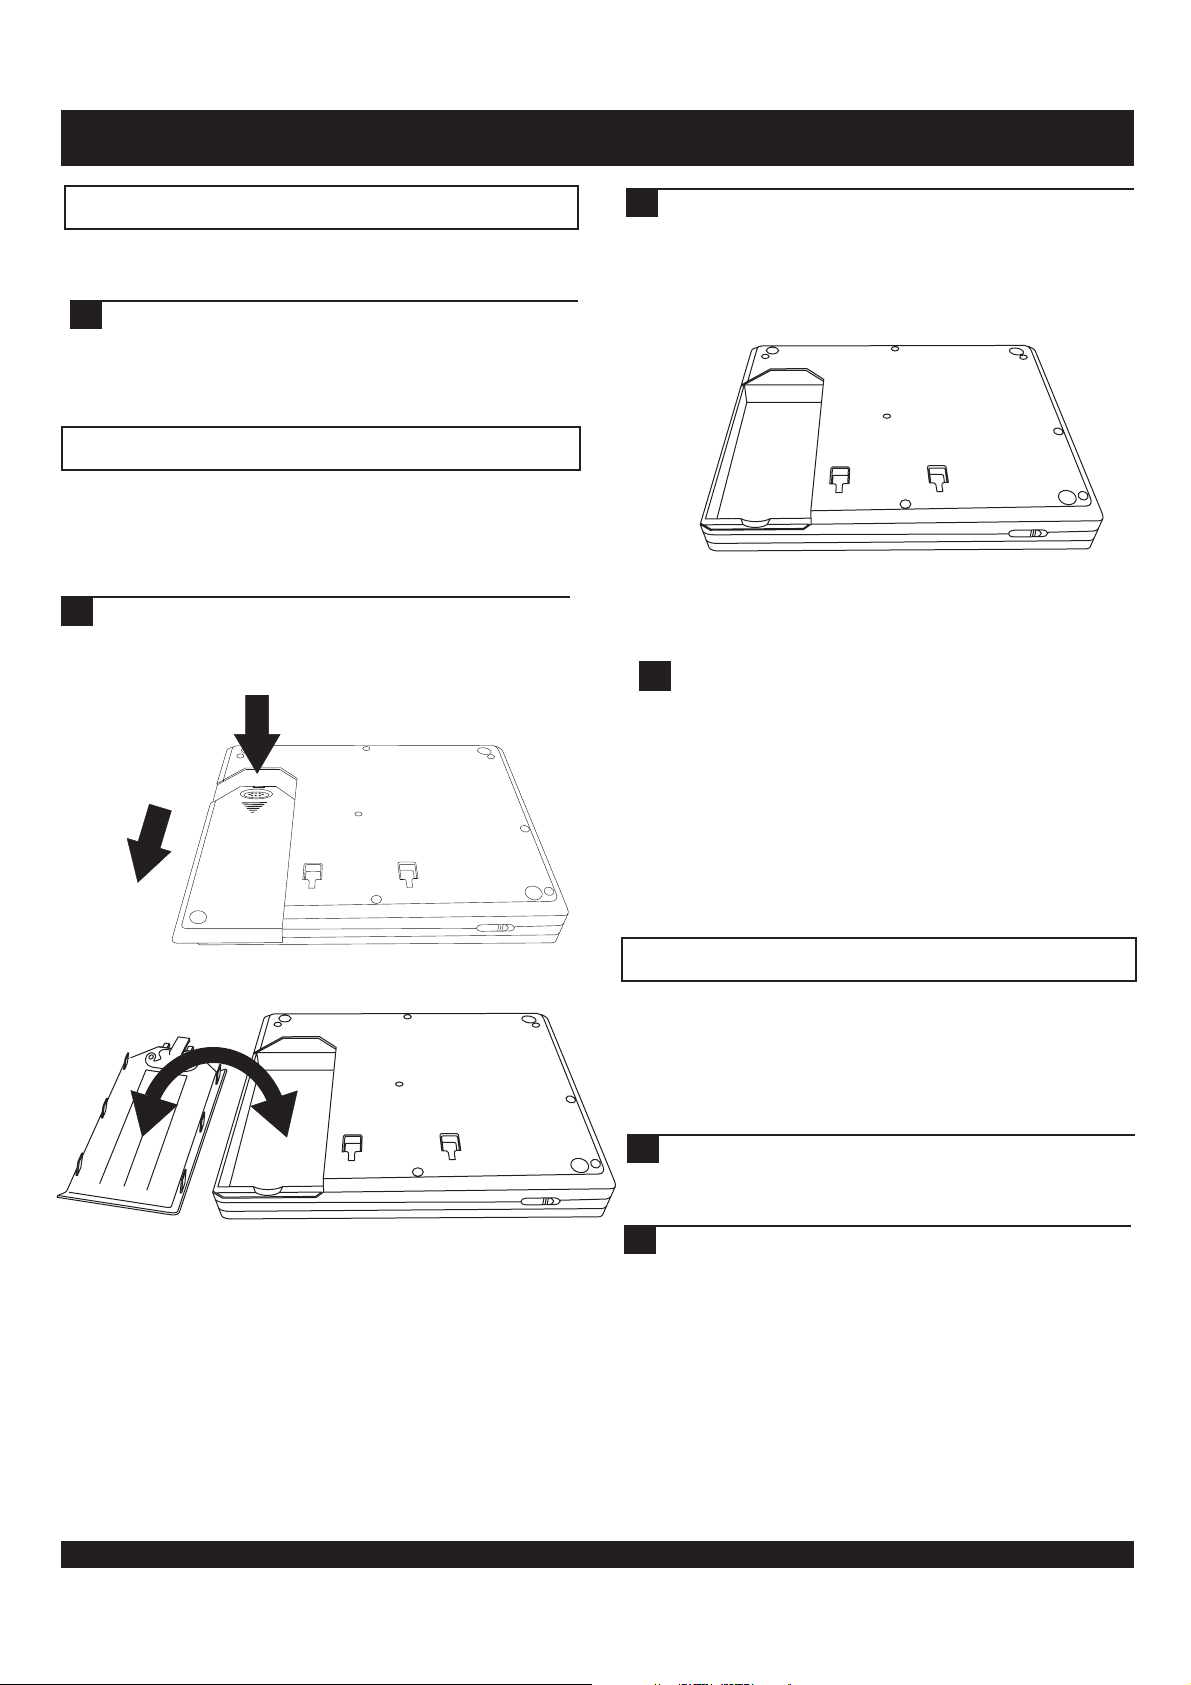
Removing the battery pack
It will be necessary to remove the battery pack from your unit
from time to time.
Turn the DVD player upside down as shown below. To
11
remove the battery door, press the tab to disengage the
lock. Slide the battery door downward.
2
Press the Function key on the front panel or the
Display key on the remote control to check the
battery pack status. Use the table below as a guide
to the current battery pack status. If the front panel
power indicator is blinking, the battery pack has less
than 10 minutes of charge remaining.
!
!
Important
Recharge your battery pack when the battery status is
less than 25%.
Unnecessary charging will reduce the battery pack
service lifetime.
When the battery pack is being charged, the LED will
glow red.
After successfully charging the battery pack, the LED will
glow green.
The time to charge the battery pack is normally 3 to 4
hours. Do not charge for more than 8 hours.
Detaching the battery pack
Detach the battery pack from the DVD player if you will be
storing the unit for an extended period of time. The unit will
continue to consume power while the battery pack is attached
and turned off. Over discharge of the battery pack will lead to
reduced service life time. Ensure the unit is turned off before
detaching the battery pack.
1
Slide the latch toward the front of the unit. Hold the
tab in this position.
2
Gently slide the battery pack towards the back of the
unit. Lift the battery pack from your unit. Replace
the battery terminal protector back onto the unit.
12
Page 13
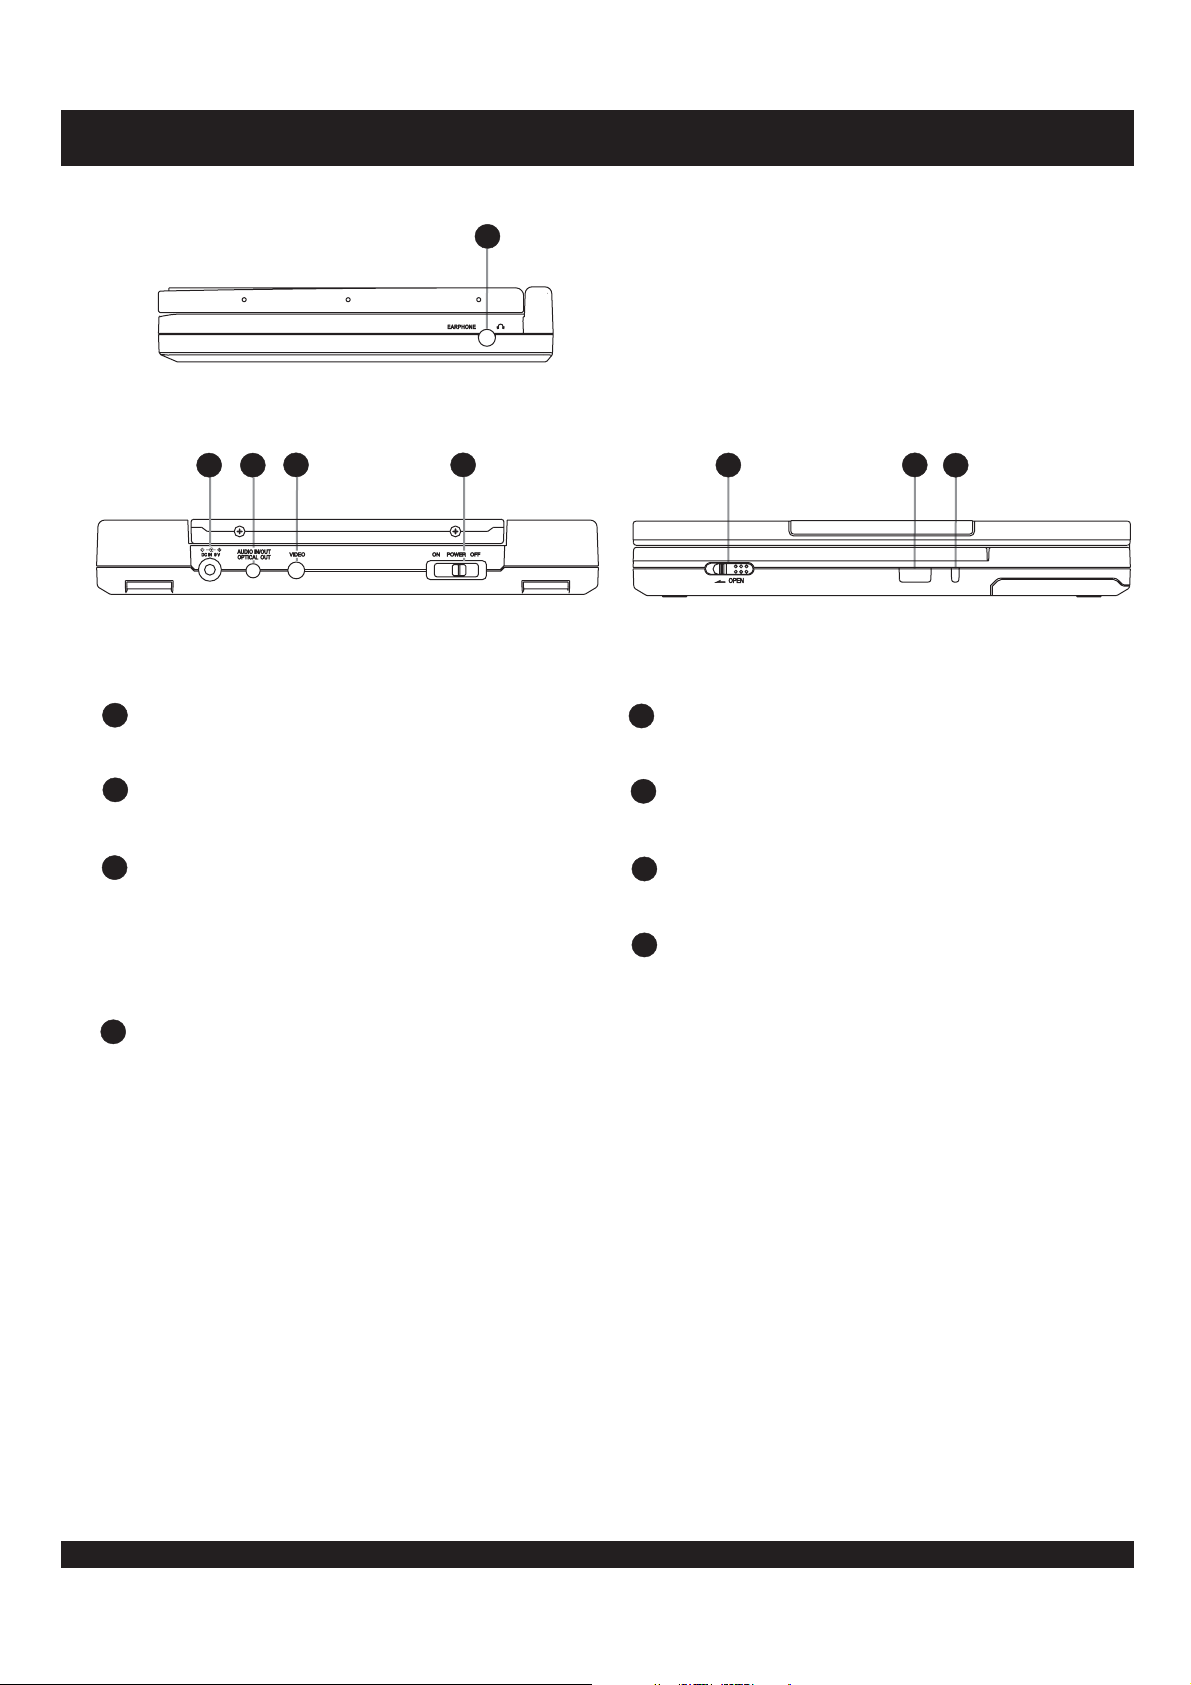
DVD PLAYER CONNECTIONS
Right Side
1
4
3
2
5
Rear Panel
1
EARPHONE JACK
Connect to the included earphones for a private listening
environment.
2
POWER CORD SOCKET - DC IN 9V
Main power socket for the unit. Connect to the car adapter
or AC power adapter.
3
AUDIO IN / OUT - OPTICAL DIGITAL IN / OUT
Use the provided analog stereo INPUT / OUTPUT cable to
make a connection between the unit and an audio output
device. The most common connection made is to a TV. You
can also use a mini - optical cable (not included), to connect
to a receiver or other device with a 5.1 channel decoder.
This is a coded digital signal.
4
VIDEO IN / OUT
Able to support Component, S-Video or Composite video
INPUT / OUTPUT for TVs with matching input. Use the
provided video cables for this connection.
6
7
8
Front Panel
5
POWER SWITCH
Main power to the unit. Must be ‘ON’ to power on the unit
from the top panel or remote control.
6
LCD SCREEN RELEASE LATCH
Slide release hatch in the direction of the arrow to release the
LCD screen locking mechanism.
7
REMOTE CONTROL RECEIVER
The remote control receiver for the unit. Keep the receiver
free from obstructions to allow for proper operation.
8
STATUS LED
The Status LED will change colors when selecting the
various video modes.
13
Page 14
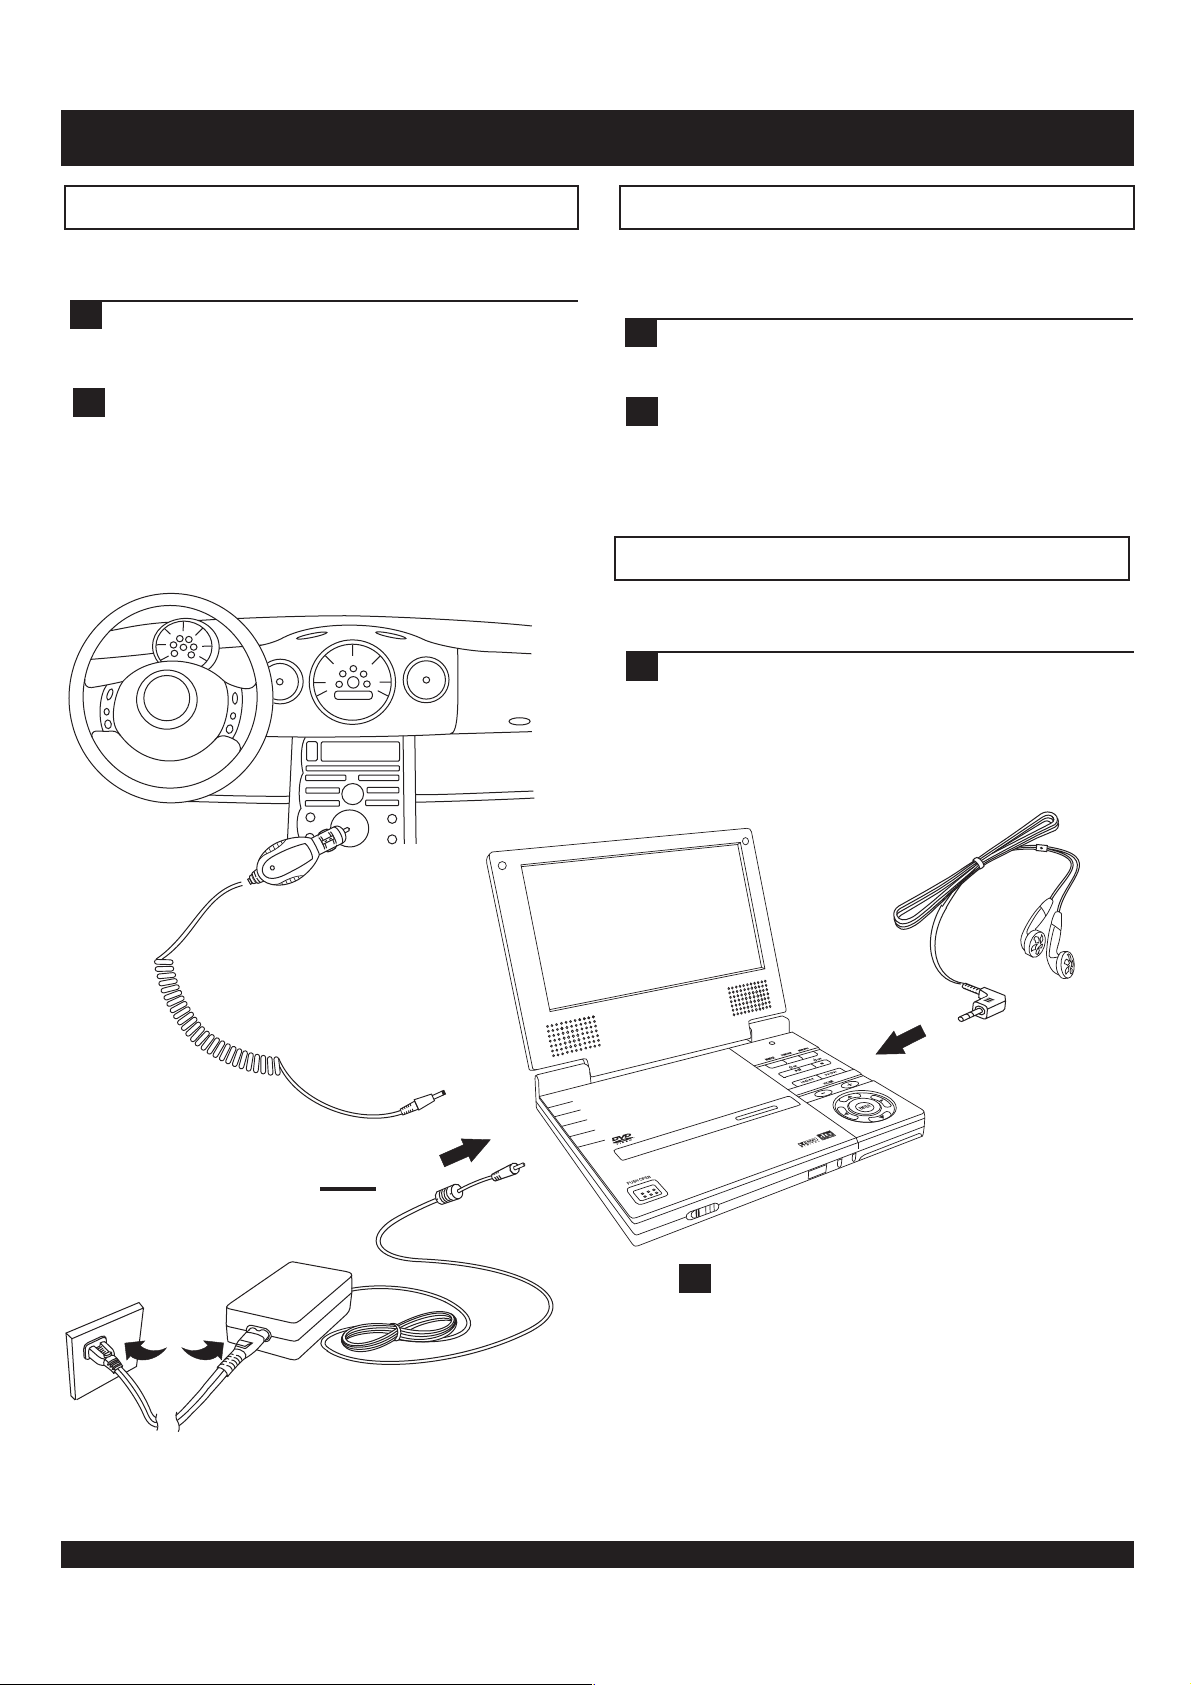
USING DVD PLAYER CONNECTIONS
Using the car adapter
The DVD player comes complete with a car adapter to connect
to your car s power receptacle.’
1
To use the car adapter in your vehicle, simply plug in
the car adapter into the car s power receptacle as
depicted below and the other end into the unit.
!
Important
Do not operate the unit or view the video output while
operating a motor vehicle.
Place the unit in a secure position before operating the
vehicle.
Do not use the car adapter to charge the battery pack.
The car adapter can only be used during playback of
discs.
’
Using the power adapter
The DVD player comes complete with a power adapter to
charge the battery pack or to power the unit when attached to
an AC wall outlet.
1
To use the power adapter, simply connect the
appropriate end into an electrical wall outlet as
depicted below and the other end into the unit.
!
!
Important
Once power is applied, the unit will be in STANDBY Mode.
Unplug from the AC outlet when the unit is in storage.
Remove the battery pack when using the AC adapter.
Using the earphones
The DVD player comes complete with earphones when you
prefer a private listening environment.
1
nsert the earphones into the earphone jack on the
right side of the unit. Adjust the volume level with
the volume + or - keys on the remote control or
front panel to a low output level. Place the earphone
buds into your ear. Increase the volume to your
desired level.
“” “”
12V
OR
AYER
PL
PORTABLEDVD
Theater
!
!
Important
Excessive loud usage of headphones could cause
damage to your hearing.
Turn down the volume before connecting to the
unit, then raise the volume level to your comfort
level.
No sound will come out from the unit s speakers
once the headphones are connected.
’
14
Page 15
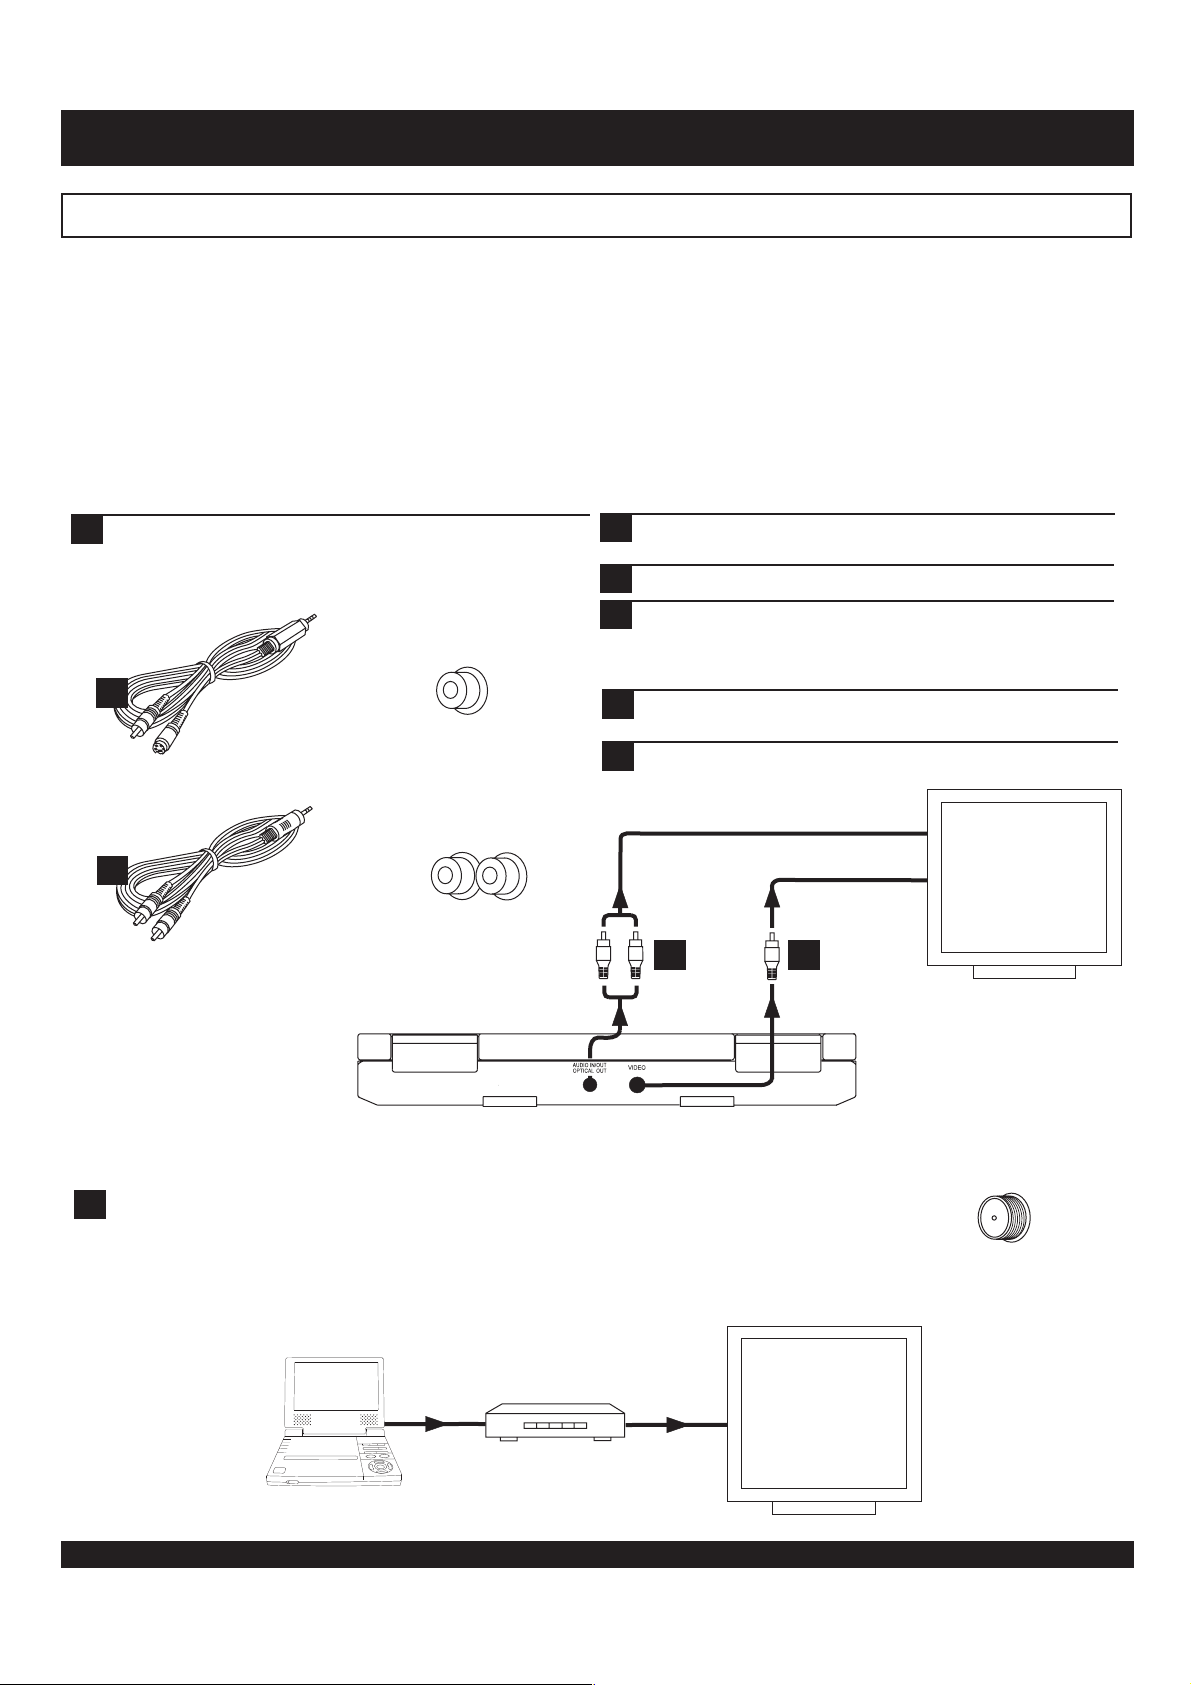
AUDIO / VIDEO CONNECTIONS
Connecting the video output to your TV
In order to use this DVD player with your TV, a few cable connections are necessary. The capabilities of your TV will determine the
connections you can use. There are 3 possible connection types:
Composite Video - The most widely used connection.
S-Video - A higher quality connection that requires the S-Video connector and an S-Video capable TV.
Component Video - The highest quality video connection. Supported on high-end Tvs.
Composite Video (Typical connection)
Use the Composite/S-Video and Stereo Audio cable for connection to TVs with a standard video input as shown below. This is the
most widely used type of connection on Tv s. The composite connector is colored yellow, and is normally accompanied by stereo
audio inputs, colored red and white for stereo channels right and left, respectively.
’
First, use the supplied Composite/S-Video cable to
1
1
connect to the composite video input on your TV. This is
normally a yellow-colored connector that matches the
video output on the back of this unit.
11
Composite / S - Video Cable
11
10
Composite Video
Input Jack
12
Analog Stereo Cable
VIDEO OUTPUT
Stereo Audio
Input Jacks
If you wish to hear sound through the TV, connect the
2
included red and white analog stereo cable.
Turn on the TV and DVD Player.
3
On your TV, select the video input. This is normally done
4
by selecting Video 1 or Video Input with the remote
control. On some TVs, this is done by selecting a
particular channel.
Press the Monitor key on the front panel of the DVD
5
player one time to change the video output mode.
You should now see the DVD players' splash screen on
6
the TV.
R
L
12
“”” ”
””
STEREO AUDIO IN
VIDEO INPUT
V
11
TV with
Composite
Video Input
(Typical
Connection)
Rear Panel
!
Important note for older TV models
If your TV does not have a composite video-in jack like that pictured above, you cannot connect this
unit directly. If this is the case, check to make sure your TV has at least a coaxial connector (used for
antenna/cable TV/VCR/etc.) such as that pictured to the right. If this is case, you can use a
Modulator ’
available at major electronics retailers.
to convert this unit s video out to the coaxial connection on your TV. RF Modulators are
RF Modulator
DVD Player
15
RF
Older TV with
coaxial
antenna/cable
connector
Antenna/cable TV
coaxial connector
on older TVs
Page 16
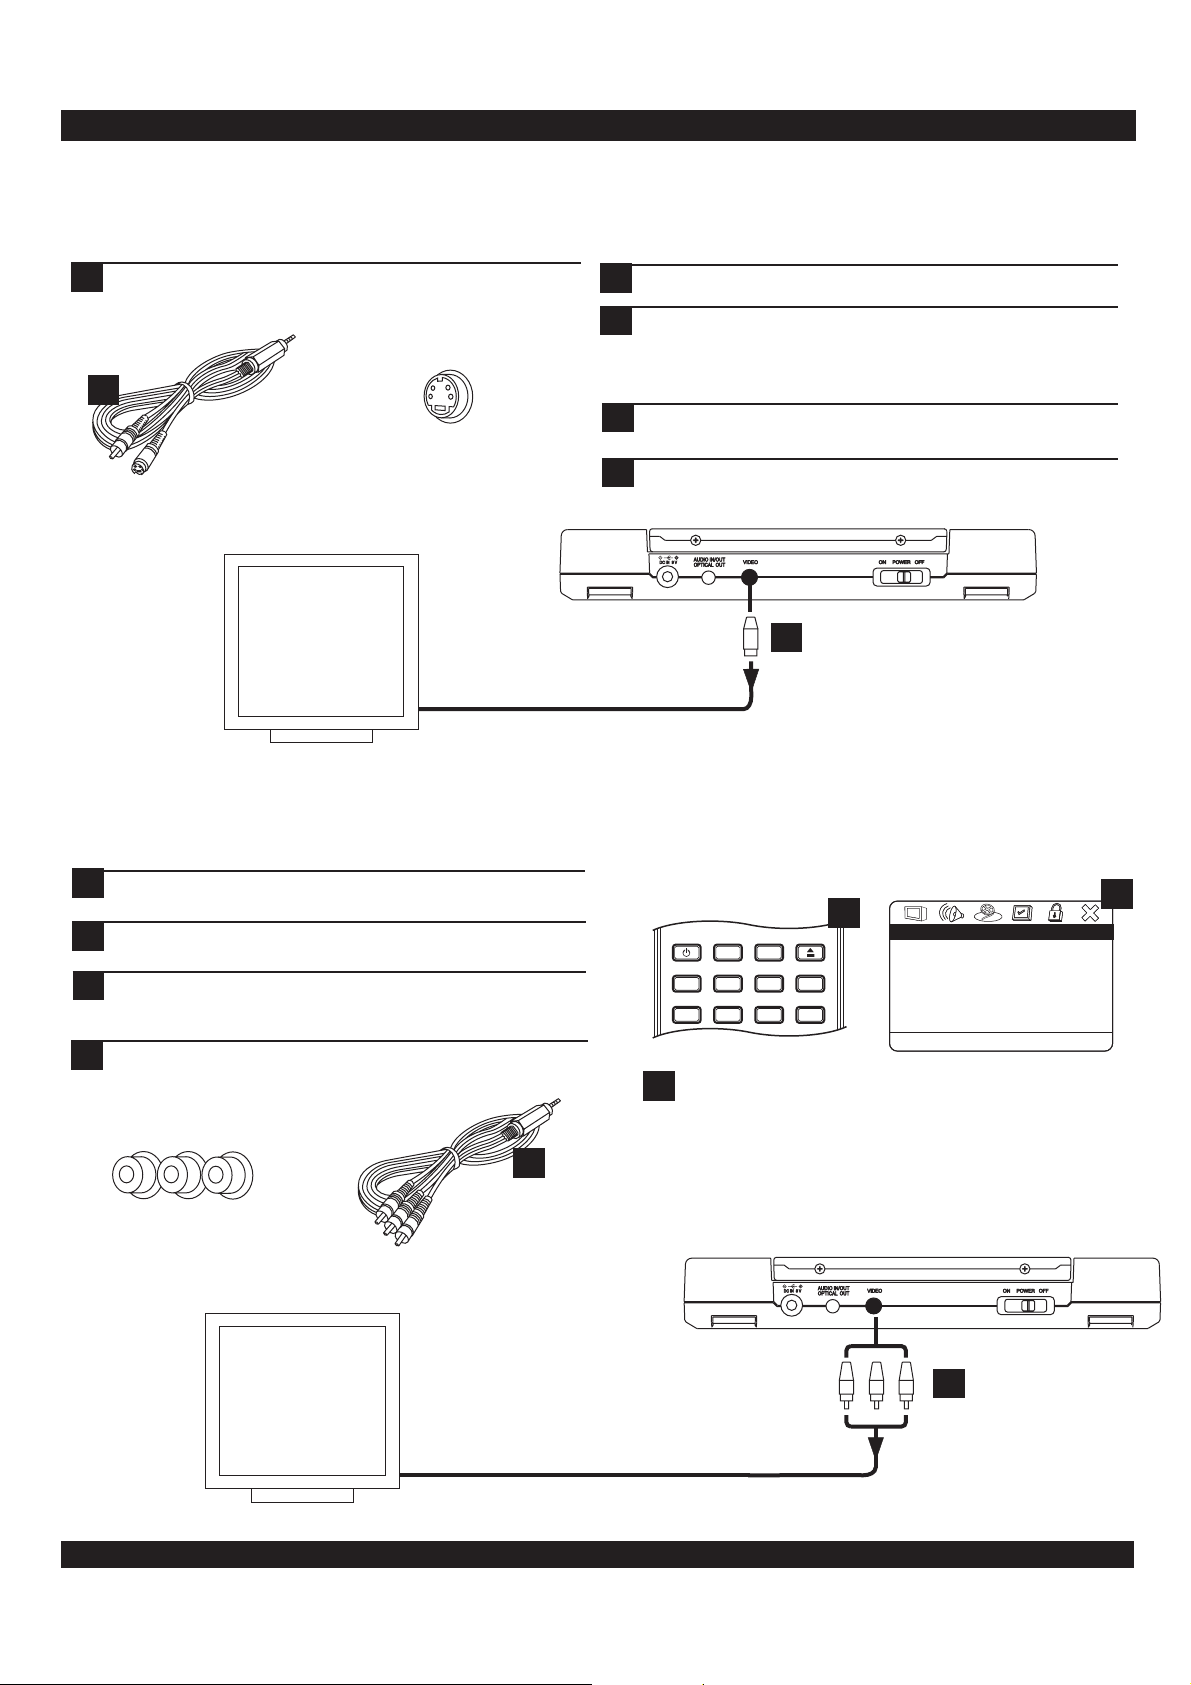
AUDIO / VIDEO CONNECTIONS
S-Video
This is a higher quality connection than standard composite video. The S-Video connector is distinguishable by its 4 pins, as shown
below. If your TV has an S-Video input, it s recommended that you use this type of connection for better picture quality.’
Connect the Composite / S-Video cable to the unit once
1
again. Connect the S-Video connector - black in color to the corresponding input on your TV.
1
S-Video
S-Video Cable
Input Jack
Turn on the DVD Player.
2
On your TV, select the S-Video input. This is normally
3
done by selecting Video 2 or AV2 with the remote
control. On some TVs, this is done by selecting a
particular channel.
Press the Monitor key on the front panel of the DVD
4
player once to change the video output selection.
You should now see the DVD players' splash screen on
5
the TV.
””
“”””
TV with
S-Video Input
S
1
VIDEO
INPUT
Component Video
The highest quality video connection, component video requires separate cables for the Y, Pb/Cb, Pr/Cr signals. To use the
progressive scan option on this unit, you ll need to use the component video output. Using the component video output requires these
steps:
First, use the supplied Composite/S-Video cable to
1
connect to the composite video input on your TV.
Enter the player s Setup Menu by pressing SETUP on the
2
remote control.
Change the VIDEO OUTPUT setting under VIDEO
3
SETTINGS to YUV. If you are using a Progressive Scan
TV, change the TV TYPE to P-SCAN.
Exit SETUP and connect the Component Video cables.
4
4
Select the correct video input on your TV.
Y Pb/Cb Pr/Cr
’
’
POWER
TITLE
BOOKMARK
!
Resetting the video output
If the TV MODE setting in the setup is set to P-SCAN but
you are not using a progressive scan-capable TV, you
4
will loose video. If this happens, reset the video to the
default mode, which is used by most TVs.
To reset the TV MODE, open the disc tray and press
DISPLAY -1-2-3 ontheremote control.
“”
SETUP
LCD
GOTO
MENU
SUBTITLE
ANGLE
Interlaced
DISPLAY
PROGRAM
2
VIDEO MODE
....
....
Video Setup Page
Video Setup Page
Component
Component
TV Mode
TV Mode
Quality
Quality
S -Video
3
Component Video
Input Jacks
Progressive Scan
TV with
Component
Video Input /
capability.
Component
Video Cable
(optional)
16
VIDEO
INPUT
Y Pb Pr
4
Page 17
AUDIO / VIDEO CONNECTIONS
Audio Output Connections
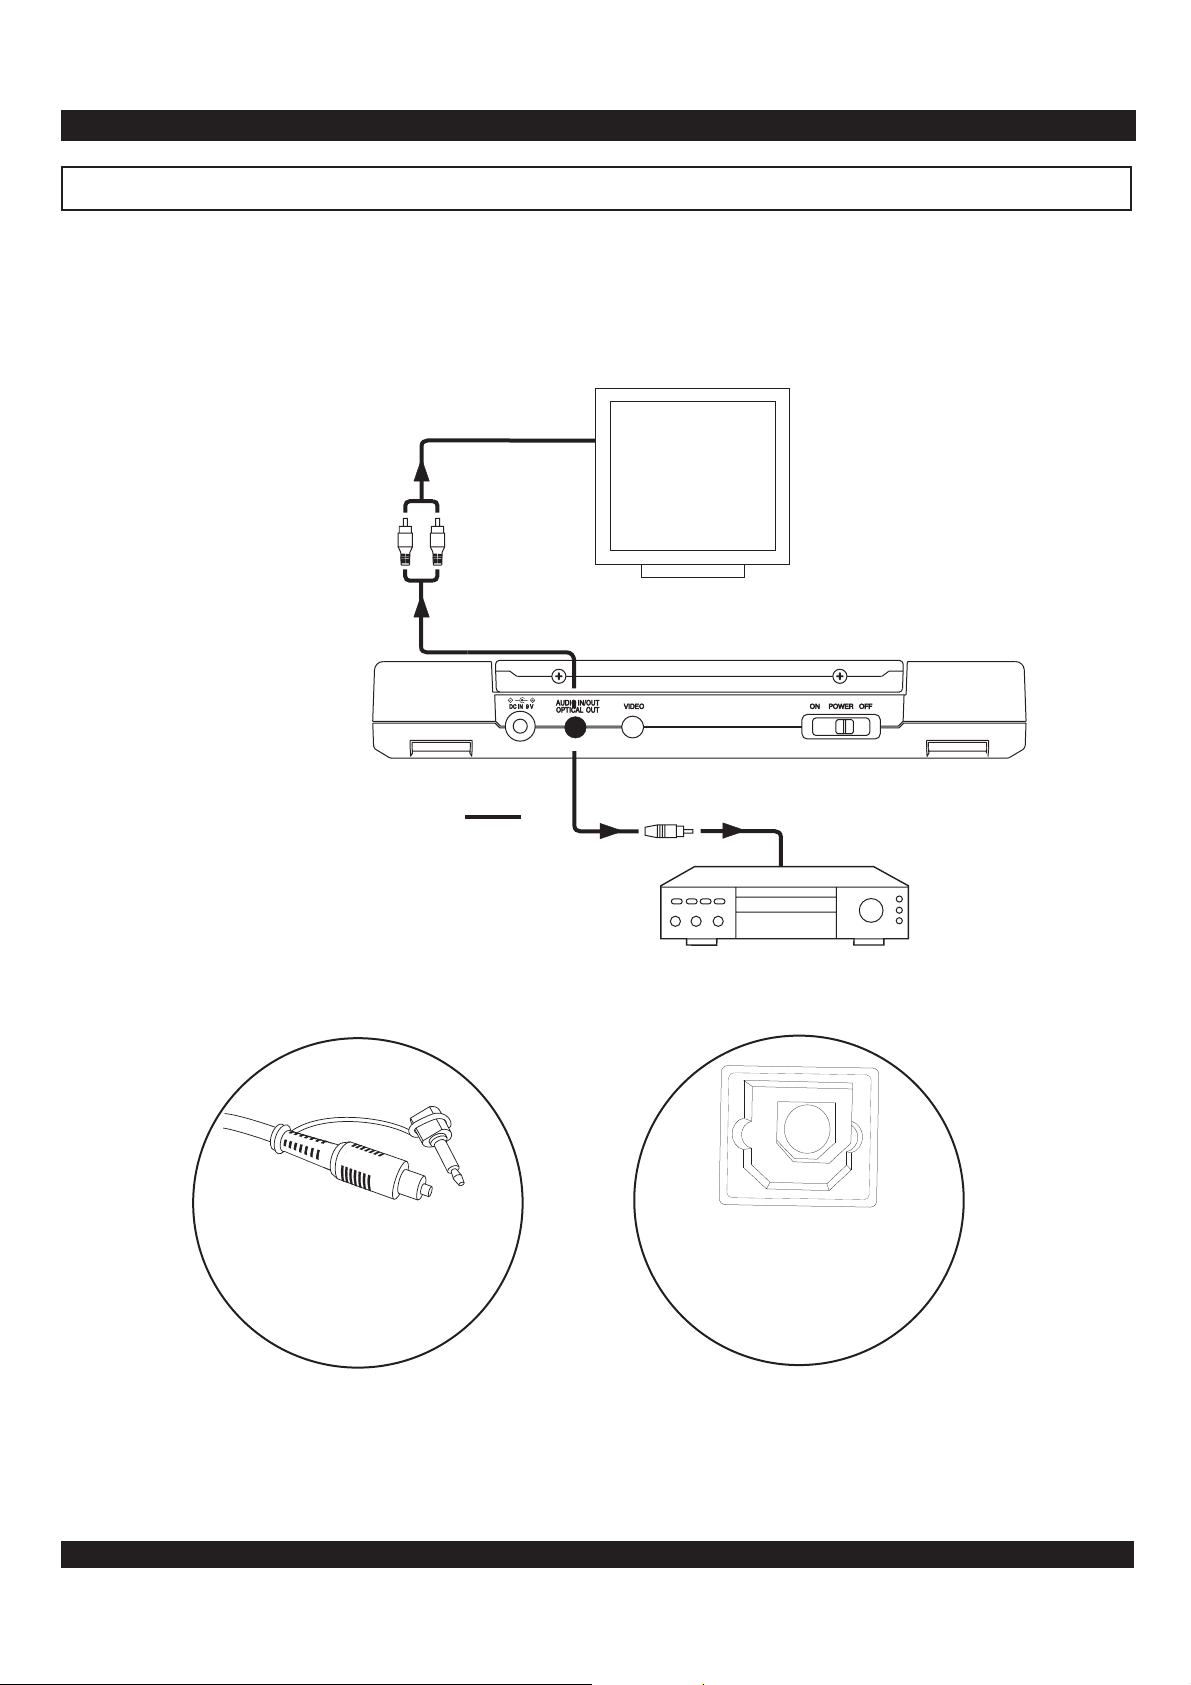
The DVD player features a variety of audio line outputs for connection to a TV or receiver.
Use the included Audio cable to connect the stereo analog audio outputs for connection to a TV or recording equipment.
Or you can use the digital optical audio output to send an encoded digital bit stream to a receiver, suitable for receivers with
Dolby Digital or DTS decoding capability. This output requires a special mini optical digital cable, not included *.
STEREO AUDIO IN
R
L
OR
OPTICAL DIGITAL AUDIO IN
TV, receiver
or recording
equipment
with stereo
audio in
Receiver with Digital
Audio Input
* EXAMPLE OF A
MINI OPTICAL DIGITAL CABLE
(NOT INCLUDED)
* EXAMPLE OF A
MINI OPTICAL DIGITAL
CONNECTOR
ON A STEREO RECEIVER
(NOT INCLUDED)
17
Page 18
AUDIO / VIDEO CONNECTIONSAUDIO / VIDEO CONNECTIONSAUDIO / VIDEO CONNECTIONS
Connecting external audio video source
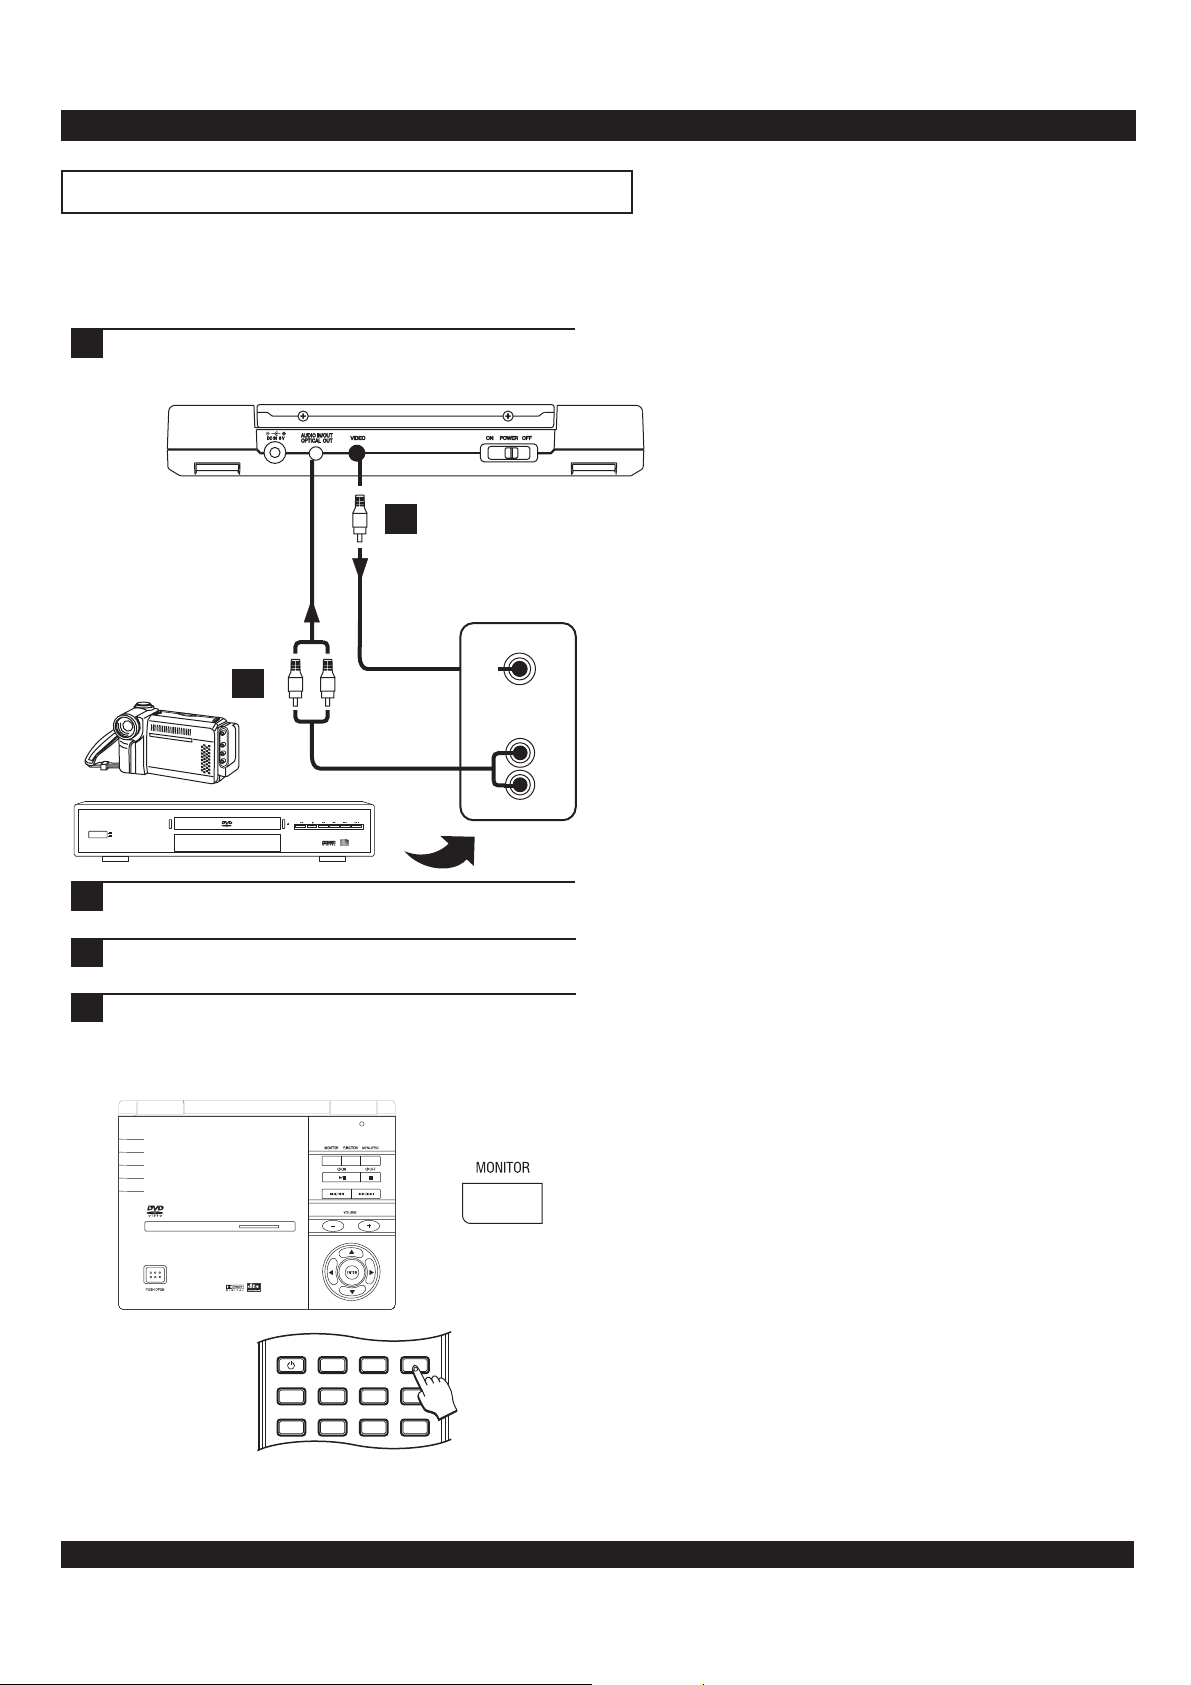
Your DVD player can become an audio video output device using the LCD and speakers - for most camcorders, VCR s, etc.
For example, you can use your camcorder s composite video
’
and analog stereo outputs to connect to the unit for playback.
Use the included Video Cable to connect the Video
1
Output of your output device (Camcorder, etc) to the
unit s Video (Input) connector.’
V
11
L
R
12
’
VIDEO
VIDEO
VIDEO
VIDEO
IN
IN
IN
OUT
STEREO AUDIO IN
STEREO AUDIO IN
STEREO AUDIO IN
STEREO AUDIO OUT
R
R
R
R
(RED)
(RED)
(RED)
(RED)
POWER
ON
OFF
Next, connect the stereo analog audio outputs of the
2
2
external device to the audio input plug of the player.
Turn on the output device, then the DVD player and
3
select output on the Camcorder.
Press the MONITOR key on the front panel or VIDEO
4
MODE key on the remote control two times. The power
indicator will now glow orange to indicate it is now
ready to accept an external device input.
PORTABLEDVD PLAYER
LCD
MENU
ANGLE
SETUP
GOTO
SUBTITLE
MONITOR
DISPLAY
PROGRAM
POWER
TITLE
BOOKMARK
L
L
L
L
(WHITE)
(WHITE)
(WHITE)
(WHITE)
18
Page 19
GETTING STARTED
GETTING STARTED
Powering on and off the unit
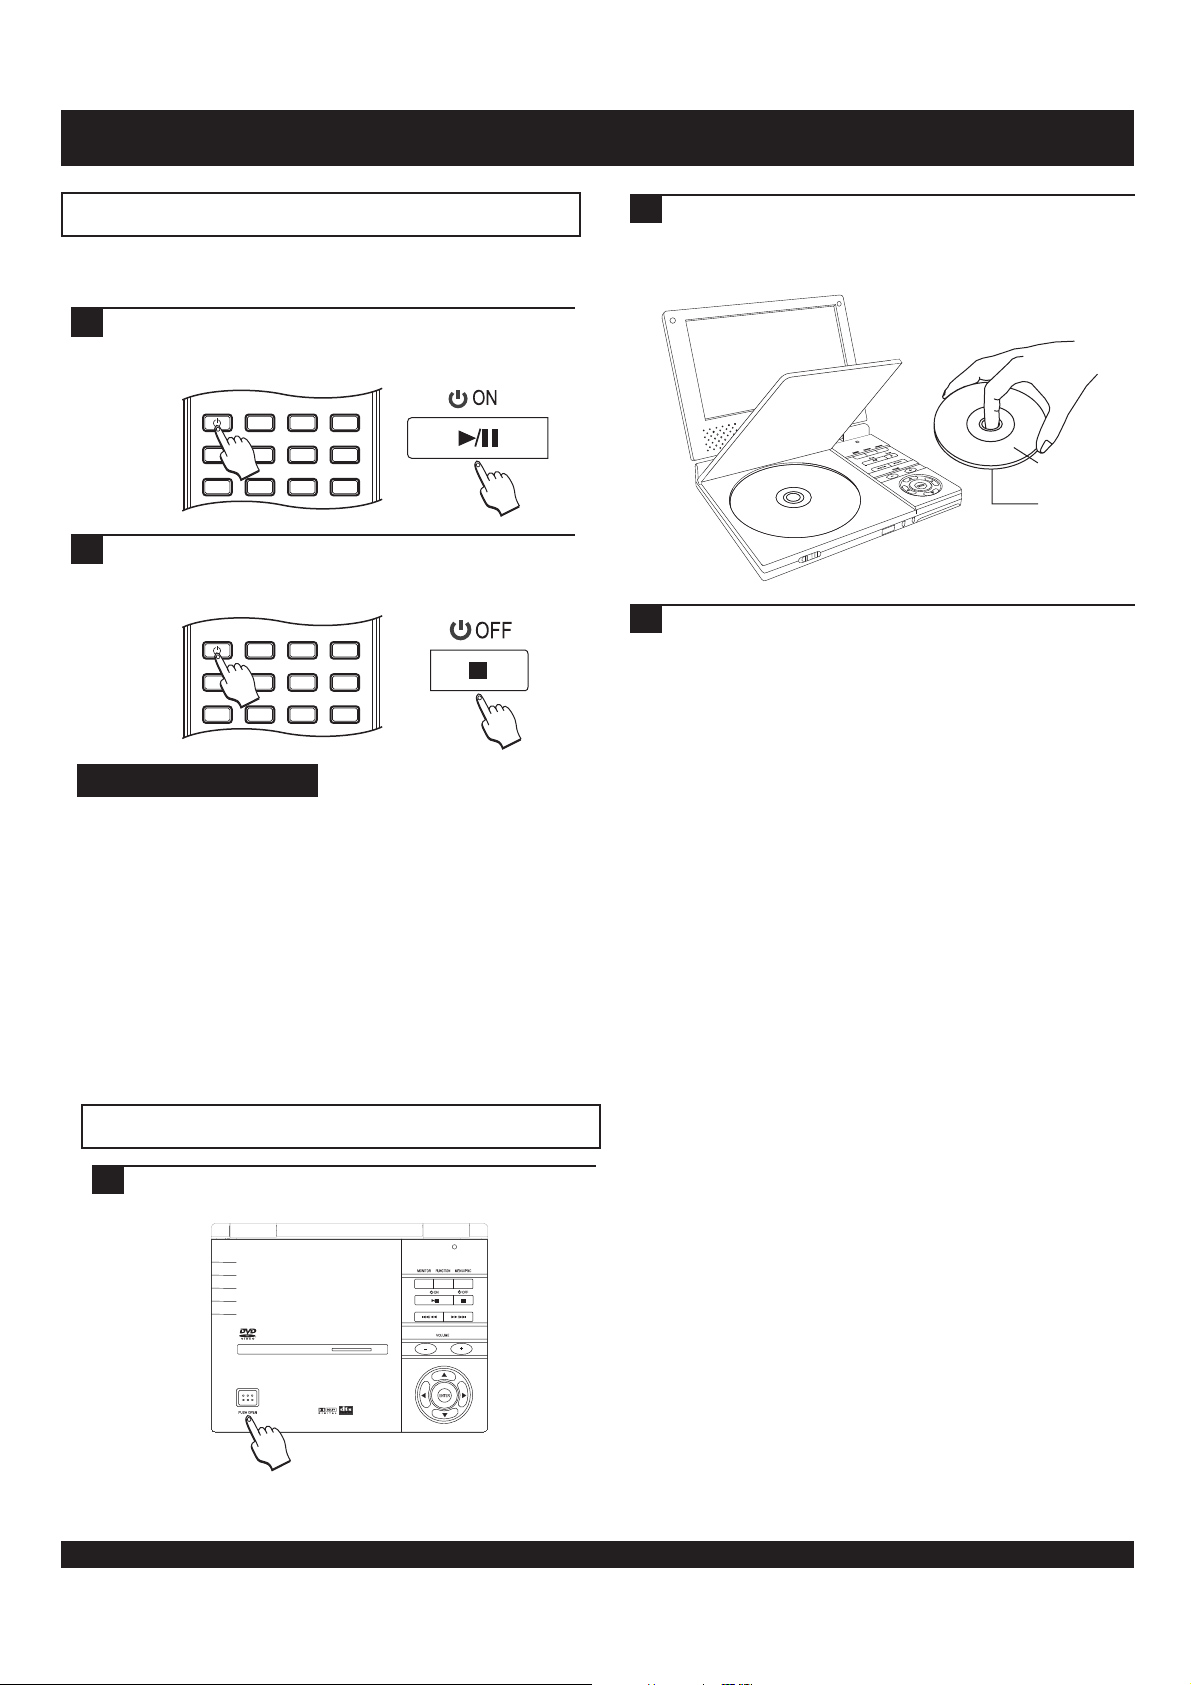
Only after all connections are complete, connect the power
cord and power on the unit.
To power on the unit, press the POWER key on the
1
remote control or the ON key on the front panel of the
unit. The unit is now ready to use.
Insert the disc, being careful not to touch the playing
2
surface. Hold the disc by the sides and with your fore
finger through the hold in the middle and insert gently
into the tray.
LCD
MENU
ANGLE
SETUP
GOTO
SUBTITLE
MONITOR
DISPLAY
PROGRAM
POWER
TITLE
BOOKMARK
To power off the unit, press the POWER key on the
2
remote control or the OFF key on the front panel of the
unit. The unit is now ready to use.
LCD
MENU
ANGLE
SETUP
GOTO
SUBTITLE
MONITOR
DISPLAY
PROGRAM
POWER
TITLE
BOOKMARK
Notes on power states
There are 3 power states for this unit:
OFF - The main power switch is turned off. The unit draws
no power and cannot be turned on by the remote control.
STANDBY - The main power switch has been turned ON,
but the unit has not been taken out of standby by pressing
either the STANDBY key on the remote control or the ON /
STANDBY button on the front panel. The unit draws a
slight amount of power to enable the remote control
receiving circuit.
ON - The main power switch has been turned ON, and
either the STANDBY button on the remote control the
ON / STANDBY button on the front panel has been
pressed. The unit is ready to use.
or
Close the disc tray door and the unit will automatically
3
start playback of the disc.
Labeling Side
Surface
Inserting a disc
Press the PUSH OPEN button on the front panel to open
1
the disc door.
PORTABLEDVD PLAYER
19
Page 20
DVD PLAYER OPERATION
Using disc menus
1
Playing a disc from the root menu“”
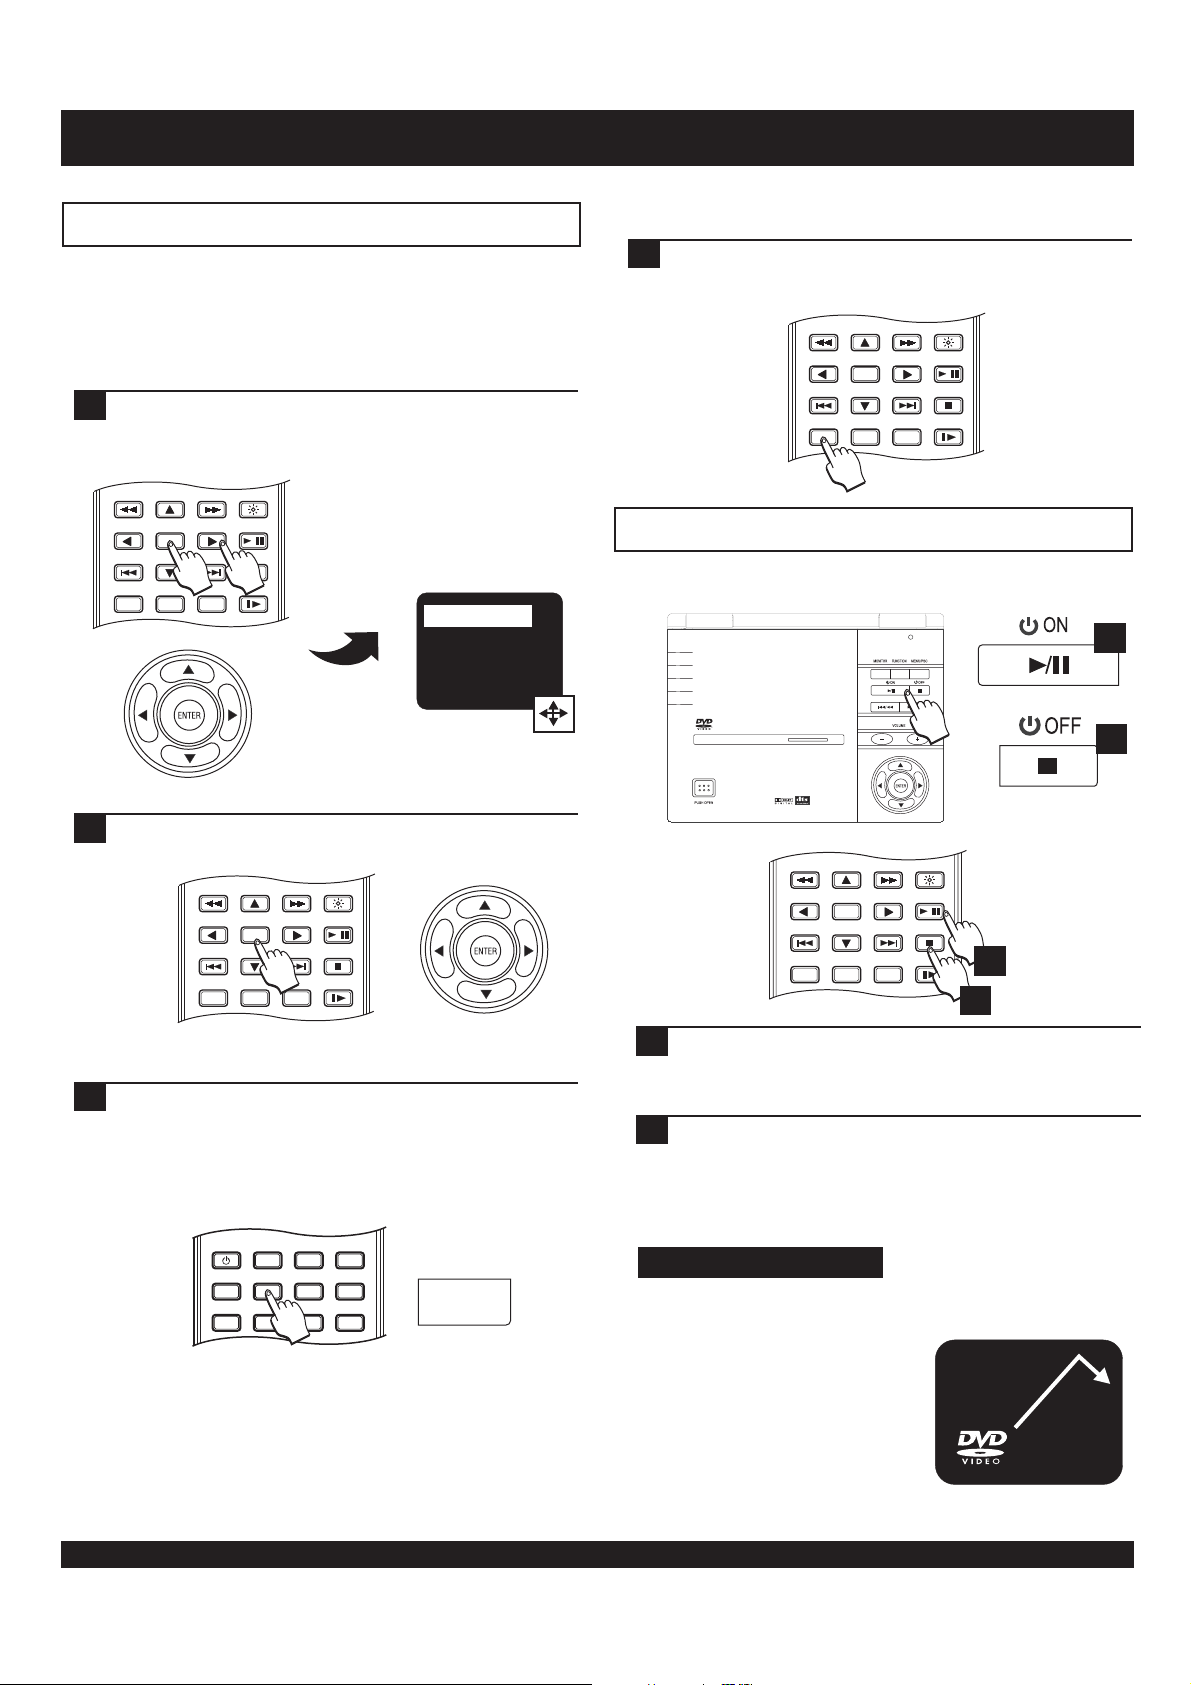
Most DVDs will automatically display a menu after the disc is
inserted. This first menu is the first of possibly many layers, and
is therefore known as the root menu. Notice that the player s
front display shows ROOT when this menu is accessed.
Use the ARROW keys on the remote control or front
1
panel to navigate through the menu to the appropriate
selection to start the movie.
ENTER
RETURN
REPEAT SLOW
A-B
1/ALL
”” ’
BRIGHTNESS
PLAY/ PAUSE
/
STOP
PLAY MOVIE
SPECIAL FEATURES
SCENE SELECTION
AUDIO SETUP
Using the RETURN key
Use the RETURN key to go back to the previous layer of
1
a menu. This function can be quite handy when using
menus with many layers.
BRIGHTNESS
RETURN
ENTER
1/ALL
PLAY/ PAUSE
STOP
REPEAT SLOW
A-B
/
Basic disc playback
Starting, pausing and stopping disc play
PORTABLEDVD PLAYER
1
2
Press the ENTER key on the remote control or the front
2
panel to confirm your selection.
BRIGHTNESS
RETURN
ENTER
1/ALL
PLAY/ PAUSE
STOP
REPEAT SLOW
A-B
/
Accessing a menu after play has started
If you wish to re-enter the menu after disc play has
1
started, use the MENU / PBC Key on the front panel or
the Menu Key on the remote control. Press the MENU
key to exit the menu at any time.
With VCD discs, this button functions as PBC (Playback
Control), enabling or disabling the PBC function.
MONITOR
LCD
MENU
ANGLE
SETUP
GOTO
SUBTITLE
DISPLAY
MENU / PBS
PROGRAM
POWER
TITLE
BOOKMARK
BRIGHTNESS
RETURN
ENTER
1/ALL
PLAY/ PAUSE
STOP
REPEAT SLOW
A-B
/
1
2
PLAY/PAUSE - To begin playback of a disc, press the
1
PLAY/PAUSE key. To freeze playback on a single frame,
press this key again. To resume normal playback,
press the PLAY/PAUSE key again.
STOP - To stop playback of a disc, press STOP. The first
2
time STOP is pressed the location where disc play was
halted is saved, and you can begin playback where you
left off by pressing PLAY/PAUSE. If STOP is pressed
twice, the playback location is reset to the beginning of
the disc.
About the screen saver
When disc playback remains paused for a period of about 3
minutes, the screen saver will load, protecting the television
from screen burn , which could
””
occur if an unusually bright image is
displayed on-screen for an extended
period of time. *Requires the screen
saver to be Enabled in the SETUP
MENU.
TM
20
Page 21

DVD PLAYER OPERATION
Skipping to the next or previous chapter /track
You can advance or skip back through the chapters or tracks on
DVD discs, Audio CDs and other discs with the NEXT and
PREVIOUS buttons on the remote or front panel.
PORTABLEDVD PLAYER
HOLD
BRIGHTNESS
ENTER
RETURN
1/ALL
2
SKIP NEXT - To advance to the next chapter or track,
1
PLAY/ PAUSE
STOP
REPEAT SLOW
A-B
/
1
press the NEXT button on the remote control or front
panel and HOLD for 2 SECONDS.
SKIP PREVIOUS - Press the PREVIOUS button on the
2
remote control or front panel and HOLD the button for 2
SECONDS to skip back to the previous chapter or track.
2 1
Fast Forward and Fast Reverse
You can scan through DVDs, VCDs and other discs in forward
or reverse direction at speeds up to 32X (thirty-two times
normal speed). Fast forward/reverse scanning will only work
disc playback, not when the disc is stopped.during
PORTABLEDVD PLAYER
To use the fast forward/reverse function with the remote
1
control, press the FF or FR key repeatedly to cycle
through all speeds in the desired direction. Available
speeds are 2X, 4X, 8X, 16X or 32X. To resume normal
playback, press the PLAY key.
On the front panel, note that the FF and NEXT functions
2
share the same button, and likewise for the FR and
PREVIOUS functions. To begin FF or FR scanning, press
the corresponding button on the remote control or front
panel. Repeat this procedure to cycle through all
available speeds, and return to normal playback.
Advanced playback
Slow motion playback
This unit supports slow motion playback in forward and reverse
of up to 1/16 normal speed.
BRIGHTNESS
ENTER
RETURN
1/ALL
Press the SLOW MOTION button repeatedly to step
1
through all options for slow playback. With DVDs, you
can choose from 1/2, 1/4, 1/8 or 1/16 speeds in forward
or reverse. VCD discs do not support slow motion
scanning in reverse.
Jumping to a specific chapter or track
You can jump directly to any chapter on DVD discs, or any
track on Music CDs with the NUMBER keys or the GOTO
key.
2
1
5
4
8
7
0C
ZOOM
3
AUDIO
6
MUTE
9
VOLUME
1
+
-
PLAY/ PAUSE
STOP
REPEAT SLOW
A-B
POWER
TITLE
BOOKMARK
/
SETUP
LCD
MENU
ANGLE
GOTO
SUBTITLE
MONITOR
DISPLAY
PROGRAM
2
RETURN
ENTER
2
REPEAT SLOW
A-B
1/ALL
BRIGHTNESS
PLAY/ PAUSE
/
STOP
1
2 1
21
Press the GOTO key and then enter the chapter number
1
you wish to jump to with the NUMBER keys. With VCD
discs, it may require the PBC function to be disabled.
To disable PBC, press the PBC button.
Using the NUMBER keys with VCD discs may require
2
the PBC function to be disabled. To disable PBC, press
the PBC button.
Page 22
DVD PLAYER OPERATION
Repeating a disc, chapter, title or track
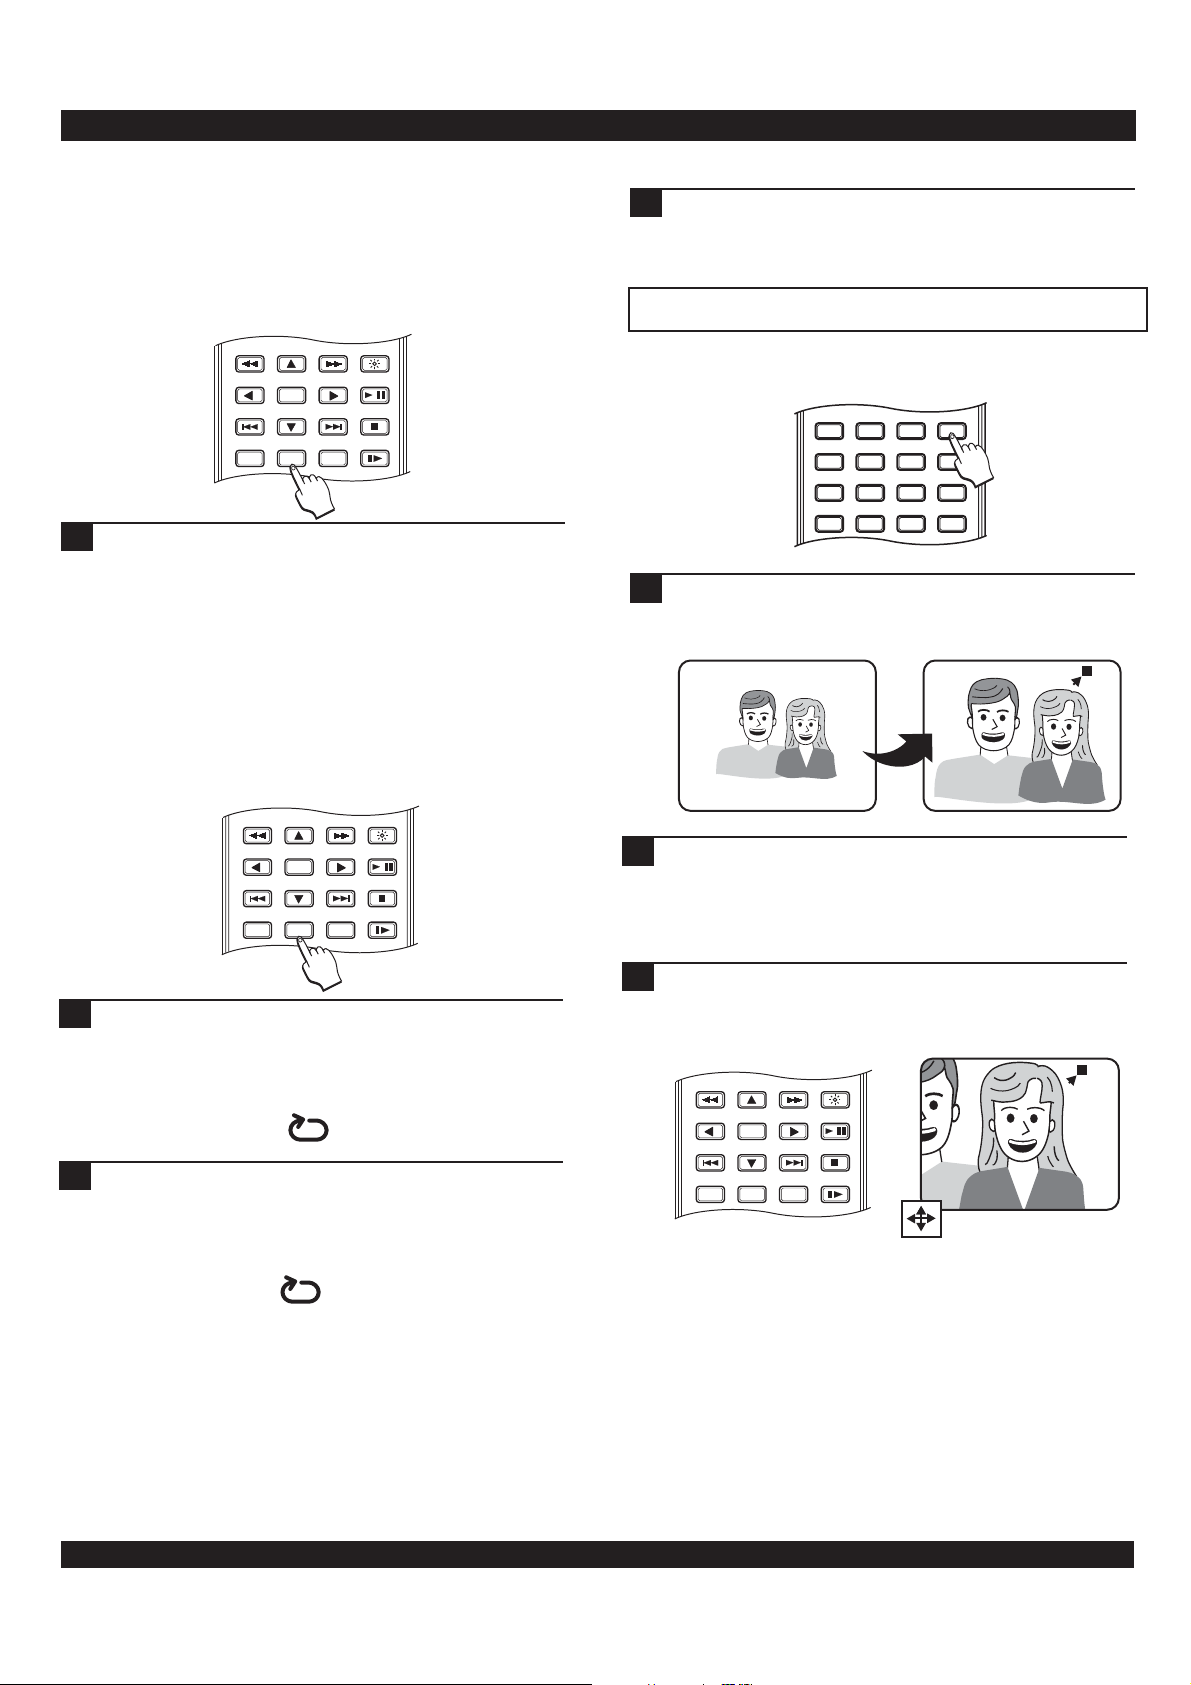
To repeat a segment of a disc, use the REPEAT 1/ALL key. On
DVDs, you can repeat an entire disc, title or chapter. On VCDs,
chapter and disc repeat is supported, but PBC must be disabled
first (Press the PBC key). Audio CDs also allow repeat of
tracks or the entire disc.
BRIGHTNESS
ENTER
RETURN
1/ALL
1
Press REPEAT 1/ALL during disc playback to cycle
through the available options, which are listed onscreen. With DVD discs, you can repeat the current
chapter, title or entire disc. With VCD discs, you can
repeat the current chapter or all chapters (make sure
PBC is disabled before using this feature). Audio CDs
also allow repeat of the current track or entire CD.
PLAY/ PAUSE
STOP
REPEAT SLOW
A-B
/
Repeating a segment you define
Unlike the REPEAT 1/ALL key, which allows you to repeat
segments already defined on a disc, such as tracks and chapters,
the REPEAT A-B key lets you define your own segments to
repeat.
RETURN
ENTER
1/ALL
BRIGHTNESS
PLAY/ PAUSE
STOP
REPEAT SLOW
A-B
/
To cancel repeat and resume normal playback, press
3
REPEAT A-B again. The repeat icon disappears from
the screen.
Using the zoom function
Use the zoom function to zoom in or out during disc playback
or when a frame is paused on-screen.
-
3
6
9
VOLUME
ZOOM
AUDIO
MUTE
+
2
1
5
4
8
7
0C
Press the ZOOM key to magnify the screen by a factor
1
of 2. This is called 2X zoom, and is indicated in the
upper right corner of the screen as shown:
Press the ZOOM key repeatedly to cycle through all the
2
zoom levels. You can enlarge the screen to 2X, 3X or 4X
normal size, or shrink the screen (zoom out) to 1/2,1/3
or 1/4 normal size. To resume normal viewing, press
ZOOM until the zoom indicator disappears.
2X
During playback, when you reach the start of the
1
segment you want to repeat, press the REPEAT A-B
button. The following icon is displayed on-screen,
letting you know that the segment start point has been
saved.
A
When you reach the end of the segment you want to
2
repeat, press the REPEAT A-B button again. The repeat
icon on-screen changes to the following, reporting that
the endpoint of the video segment has been saved. The
segment will now begin repeating.
AB
22
When the image is enlarged ( zoom in ), use the
3
ARROW keys to move around. This will display the
parts of the image that do not appear on-screen when
the image is zoomed in.
BRIGHTNESS
RETURN
ENTER
1/ALL
PLAY/ PAUSE
STOP
REPEAT SLOW
A-B
/
4X
Page 23
DVD PLAYER OPERATION
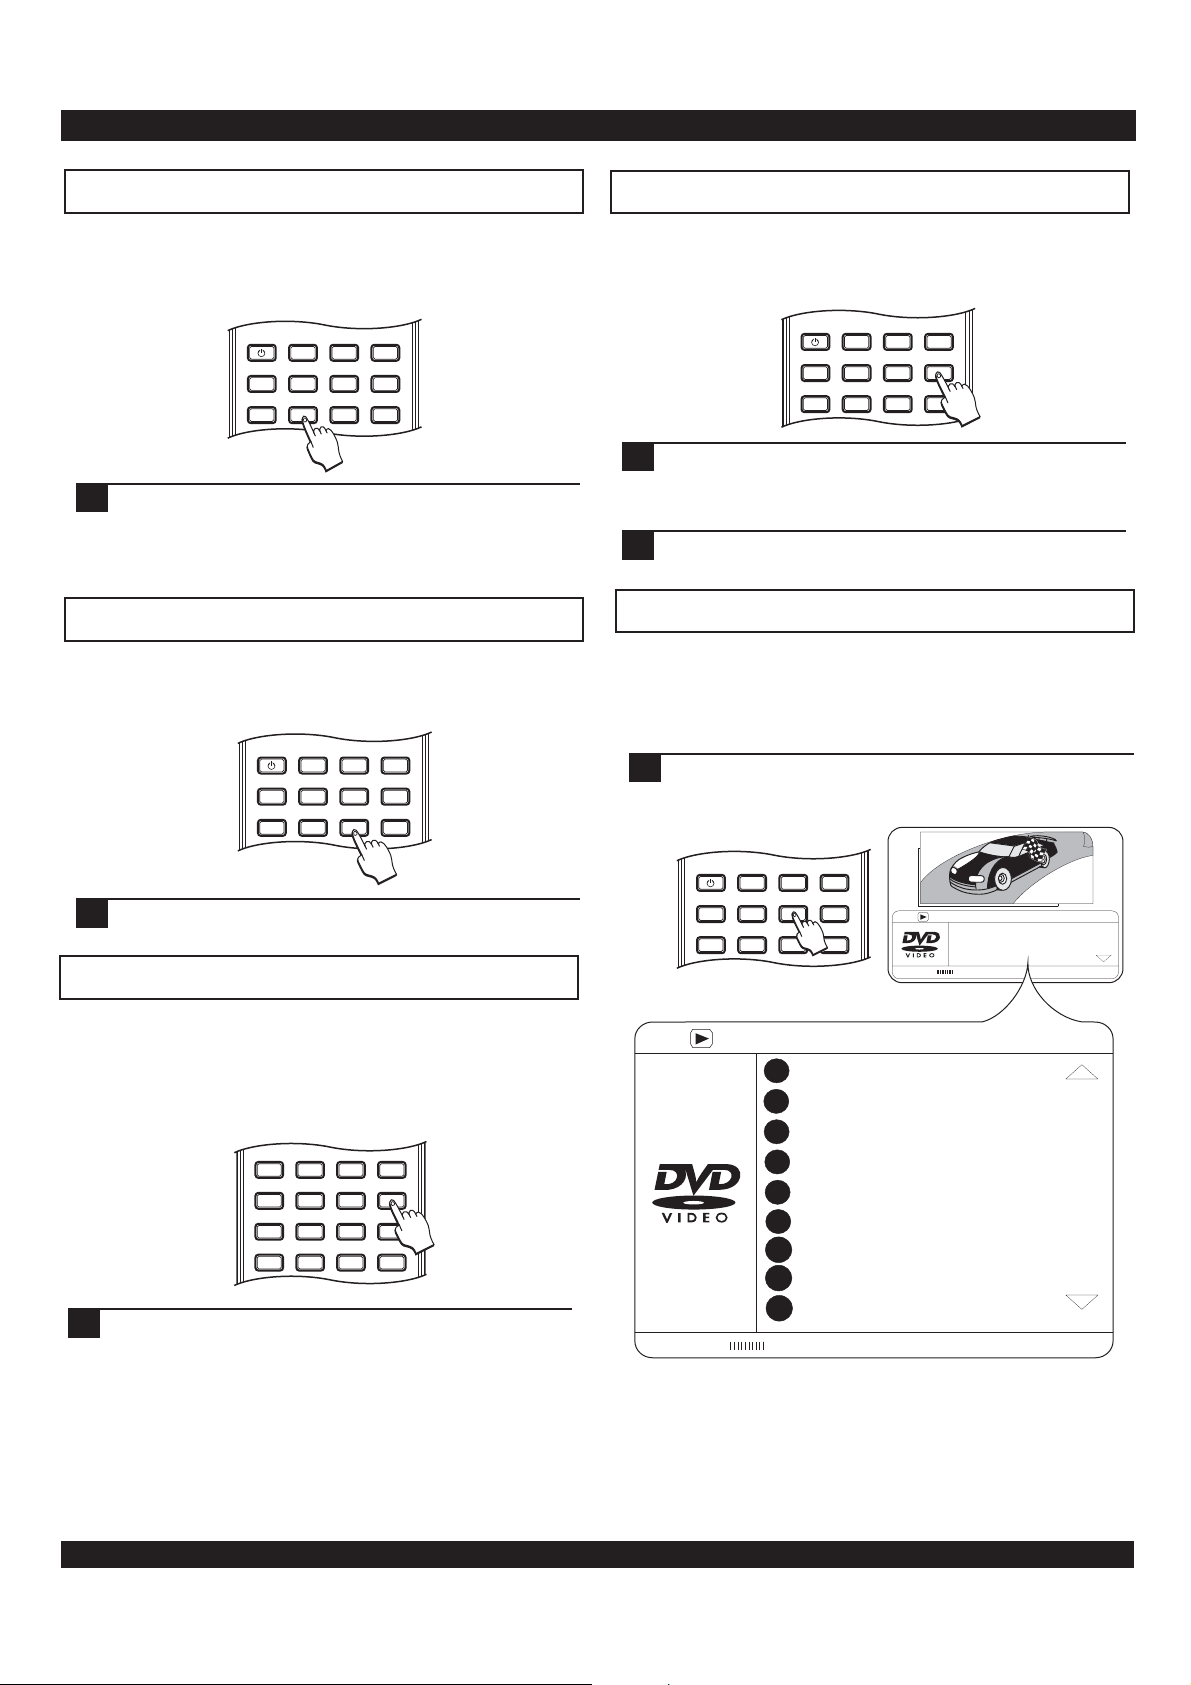
Multi-angle function
Some DVD discs are recorded with multiple viewing angles for
certain scenes. When you are viewing a disc that supports this
feature, you can choose among the available angles on the disc
with the ANGLE key.
MONITOR
LCD
MENU
ANGLE
SETUP
GOTO
SUBTITLE
DISPLAY
PROGRAM
POWER
TITLE
BOOKMARK
Most discs with multi-angle will display an indicator, or
1
angle mark
, that alerts the viewer that multiple angles
are available for the current scene. When this mark
appears on-screen, press the ANGLE button to select
an angle to view.
Subtitles
Most DVD discs include at least one subtitle track in one
language. Subtitles are useful viewing movies in a foreign
language or for hearing-impaired viewers.
MONITOR
LCD
MENU
ANGLE
SETUP
GOTO
SUBTITLE
DISPLAY
PROGRAM
POWER
TITLE
BOOKMARK
Displaying playback information
When playing a DVD, VCD or Music CD, you can display
time-related information about the playback session on-screen
with the DISPLAY key.
MONITOR
LCD
MENU
ANGLE
SETUP
GOTO
SUBTITLE
DISPLAY
PROGRAM
POWER
TITLE
BOOKMARK
During playback, press DISPLAY repeatedly to view
1
information on time remaining and elapsed time for
chapters/tracks on DVDs, VCDs and Music CDs.
To cancel the on-screen display, continue pressing
2
DISPLAY until the screen is clear.
Using the GOTO MENU
The GOTO menu provides you with many ways to jump to a
particular chapter/track or specific time on a disc. It also shows
playback information such as elapsed and remaining time for
tracks, chapters and titles.
Press GOTO to access available options. Use the
1
Number Keys and UP/DOWN Arrows to select options,
and ENTER to confirm and open menus.
Press SUBTITLE during playback repeatedly to view all
1
the available subtitles on a disc or turn subtitles off.
Changing the audio track
Most DVD discs are recorded with multiple audio tracks. These
can contain multiple languages and different audio formats,
such as 5.1 Channel, 2 Channel and DTS. A director s
commentary track - where the director can be heard discussing
the movie - is also common on DVDs.
3
6
9
-
VOLUME
ZOOM
AUDIO
MUTE
+
2
1
5
4
8
7
0C
During playback, press the AUDIO button to cycle
1
through all the available tracks on a DVD or VCD disc.
’
POWER
TITLE
BOOKMARK
Bitrate 54
Bitrate 87
TM
99
Menu
Title 01/18
Title
Chapter
Audio
Subtitle
99
17/51
5.1CH English
English
Title Elapsed 0:40:32
LCD
MENU
ANGLE
SETUP
GOTO
SUBTITLE
MONITOR
DISPLAY
PROGRAM
Menu
1
Title
2
Chapter
Audio
3
Subtitle
4
5
TM
Angle
6
TT Time
CH Time
7
8
Repeat
9
Time Disp.
01/03
04/19
5.1CH English
24
Off
1/1
1:57:24
0:15:21
Off
Time Elapsed
Total Elapsed 0:40:32
23
Page 24
DVD PLAYER OPERATION
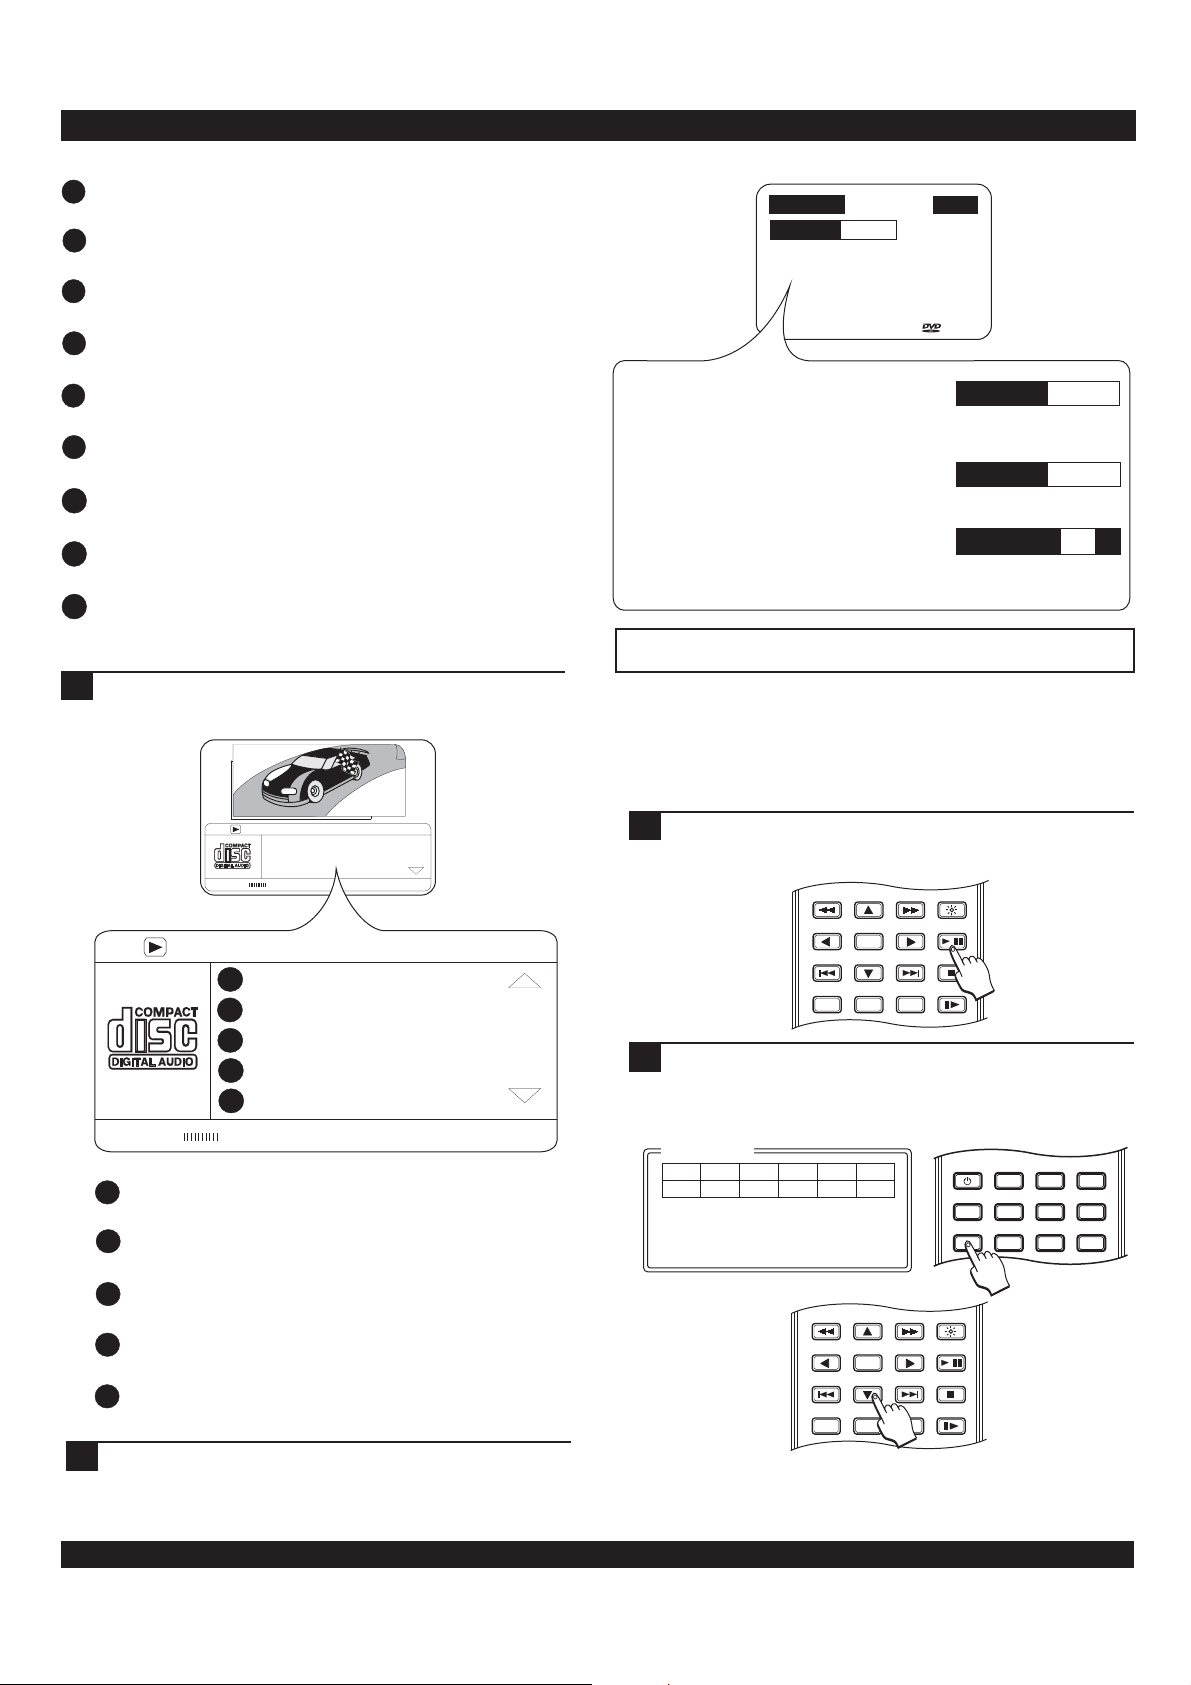
TITLE
1
Use the number keys to enter a Title number to jump to.
2
CHAPTER
Use the number keys to select a chapter to play.
3
AUDIO
Use the arrow keys to select from available audio tracks on the disc.
4
SUBTITLE
Use the arrow keys to select a subtitle option from the disc.
5
ANGLE
Select between multiple angle views on supported DVD s.
6
TT TIME
’
Displays the total track time for the track currently playing.
7
CH TIME
Displays the total time for the chapter currently playing.
8
REPEAT
Use the arrow keys to select a repeat option for repeat playback.
9
TIME DISP.
Use the arrow keys to select a time display option, such as Time
Remaining, or current Playback Time.
2
For VCD discs, the GOTO menu is very similar to the
DVD disc menu.
99
99
DISC GO TO -
Track 06 / 18
DISC GO TO :
:
- ---
03:23
TM
DISC GO TO :
:
- ---
Use the number keys to enter a time
point on the disc to jump to.
TRACK GO TO -
Use the number keys to enter a time to
TRACK GO TO :
:
- ---
jump to within the current track.
SELECT TRACK -
SELECT TRACK :
- -
Use the number keys to enter a track
number to jump to.
Using the bookmark function
Mark a point on the disc to come back to later with the
BOOKMARK feature. For instance, if you see an interesting
scene and would like to watch it again when the DVD movie is
over, add a bookmark. You can add up to twelve bookmarks
which also can be used with VCDs and Audio Compact discs.
/18
Menu
Track 01/01
Disc Time
1:09:24
TrackTime
1:09:24
Repeat
Off
Bitrate 54
TotalElapsed 0:40:32
Menu
1
Track 01/01
2
Bitrate 54
Disc Time
Track Time
3
Repeat
4
5
Time Disp.
6
7
1:09:24
1:09:24
24
Off
Total Elapsed
Total Elapsed 0:40:32
8
TRACK
1
Use the number buttons to enter a title selection from disc.
2
DISC TIME
Displays the total time playable on the disc.
3
TRACK TIME
Displays the total time of the track playing.
4
REPEAT
Use the arrow buttons to select the repeat options from the disc.
5
TIME DISP.
Select among the display options on the disc.
For Audio discs, press the GOTO button repeatedly to
3
cycle through menu options.
Press the PAUSE key to pause playback at the point
1
where you wish to add a bookmark before accessing
the Bookmark Menu.
BRIGHTNESS
ENTER
RETURN
1/ALL
Press the BOOKMARK key to access the bookmark
2
PLAY/ PAUSE
STOP
REPEAT SLOW
A-B
/
menu. Use the ARROW keys to select an available
bookmark location (1 to 12). In this example, we ll
choose the first one.
BOOKMARK
PRESS PLAY KEY TO MARK
RETURN
ENTER
REPEAT SLOW
1/ALL
A-B
POWER
BOOKMARK
BRIGHTNESS
PLAY/ PAUSE
/
STOP
TITLE
LCD
MENU
ANGLE
SETUP
GOTO
SUBTITLE
’
MONITOR
DISPLAY
PROGRAM
24
Page 25
DVD PLAYER OPERATION
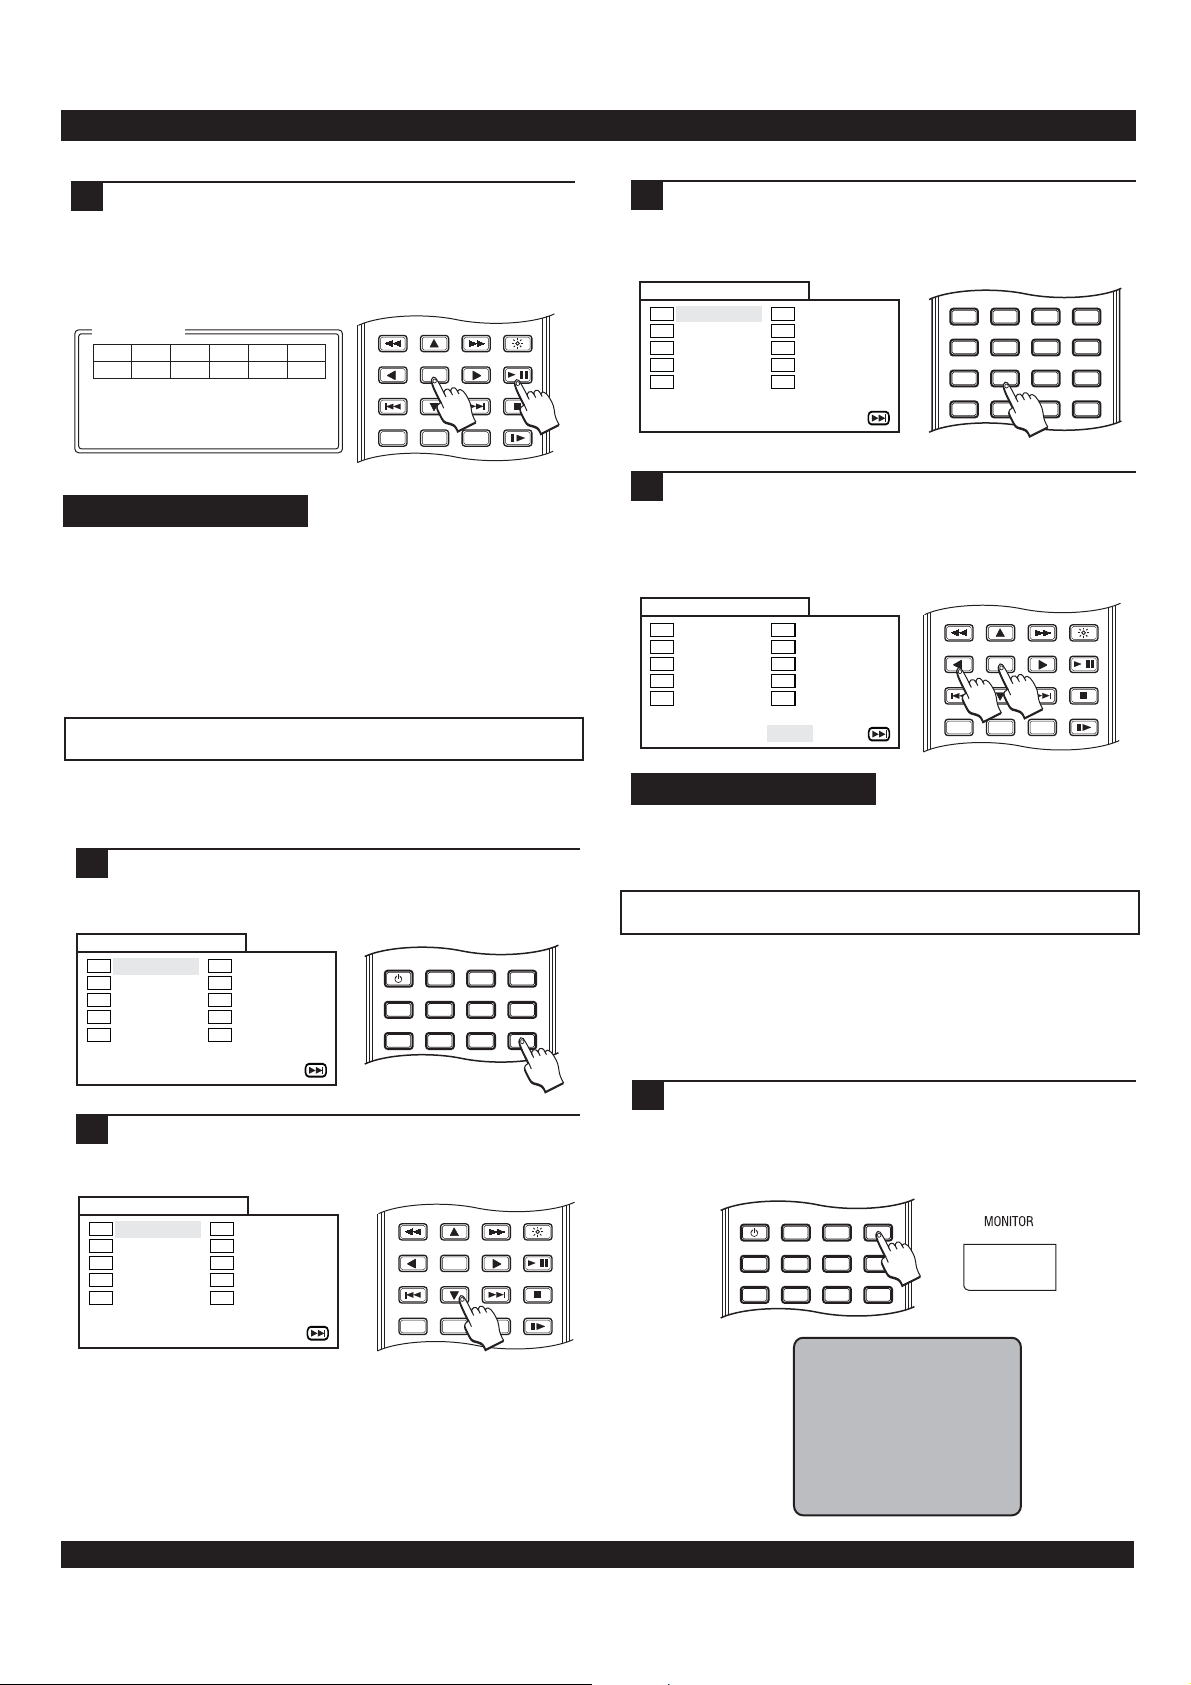
Press PLAY key to save the bookmark location. A play
3
position is saved as a bookmark. Note the track and
time information are stored for the bookmark in
position one. To begin playback, select the bookmark
location and press ENTER or PLAY. Press the
BOOKMARK key to exit the Bookmark Menu.
BOOKMARK
01
ENTER
BRIGHTNESS
PLAY/ PAUSE
TT:19 CH:02 Time 0:09:41
Press Play Key To Play
Press Clear Key To Clean
RETURN
REPEAT SLOW
A-B
1/ALL
Quick Tips
To clear Bookmarks from the menu, navigate to the
position you want to delete and press the C ( CLEAR ) key.
Bookmarks are only active while a particular disc is
loaded. Once power is turned off or the disc is ejected, the
stored Bookmarks will be lost.
You can store up to 12 Bookmark locations.
Program function
STOP
Use the NUMBER keys to enter the track and chapter
3
number you select in each position. In this example,
the Program Menu displays 20 tracks and 17 chapters
to choose from.
PROGRAM : TT (20) / CH (17 )
TT: 08 CH: 15
01
TT: CH:
02
TT: CH:
03
TT: CH:
/
04
TT: CH:
05
EXIT
To begin playback of your program, use the ARROW
4
06
07
08
09
10
TT: CH:
TT: CH:
TT: CH:
TT: CH:
TT: CH:
NEXT
2
1
5
4
8
7
0C
3
6
9
-
VOLUME
ZOOM
AUDIO
MUTE
+
keys to select START from the Program Menu at the
bottom of the screen. Press the ENTER key to start
playback. In this example, track 8 chapter 15 will play
first followed by track 16 chapter 9.
PROGRAM : TT (20) / CH (17 )
TT: 08 CH: 15
01
TT: 16 CH: 09
02
TT: CH:
03
TT: CH:
04
TT: CH:
05
EXIT
06
07
08
09
10
START
TT: CH:
TT: CH:
TT: CH:
TT: CH:
TT: CH:
NEXT
RETURN
ENTER
1/ALL
BRIGHTNESS
PLAY/ PAUSE
STOP
REPEAT SLOW
A-B
/
You can create custom playback programs with this handy
feature. You can program up to 20 chapters and tracks to play
in an order you create.
Press the PROGRAM key to enter the Program Menu.
1
There are 10 locations for adding track and chapter
numbers on each page, with a total of 2 pages.
PROGRAM : TT (20) / CH ( - - )
TT: CH:
01
TT: CH:
02
TT: CH:
03
TT: CH:
04
TT: CH:
05
EXIT
Press the ARROW keys to navigate through the
2
06
07
08
09
10
TT: CH:
TT: CH:
TT: CH:
TT: CH:
TT: CH:
NEXT
POWER
TITLE
BOOKMARK
available program locations (1-10), go to the NEXT
page, or EXIT the Program Menu.
PROGRAM : TT (20) / CH ( - - )
01
02
03
04
05
TT: CH:
TT: CH:
TT: CH:
TT: CH:
TT: CH:
EXIT
06
07
08
09
10
TT: CH:
TT: CH:
TT: CH:
TT: CH:
TT: CH:
NEXT
RETURN
LCD
MENU
ANGLE
ENTER
REPEAT SLOW
1/ALL
SETUP
GOTO
SUBTITLE
A-B
MONITOR
DISPLAY
PROGRAM
BRIGHTNESS
PLAY/ PAUSE
STOP
/
Quick Tips
Programs will be erased when power is turned off or
current disc is ejected.
To enter numbers less than 10, enter them directly.
Video mode function
You can select which video mode you would like to use during
playback. There are three different modes to choose from.
1. Normal disc playback to the LCD screen.
2. Player Audio Video output to external monitor/speaker
3. Audio Video input from external device.
Press the MONITOR key on the remote control or the
1
MONITOR key on the front panel one time to output
audio and video to an external source such as your TV.
You will see a message on the screen as shown below.
LCD
MENU
ANGLE
SETUP
GOTO
SUBTITLE
MONITOR
DISPLAY
PROGRAM
POWER
TITLE
BOOKMARK
25
AV OUTPUT TO EXTERNAL
Page 26
DVD PLAYER OPERATION
Press the MONITOR key or VIDEO MODE key one more
2
time and your unit can now output audio and video
from an external source such as a camcorder or VCR.
The front panel LED will now glow an orange color.
Press the MONITOR key or VIDEO MODE key one more
3
time (a third time) to return to normal playback
capability. The front panel will now glow a green color.
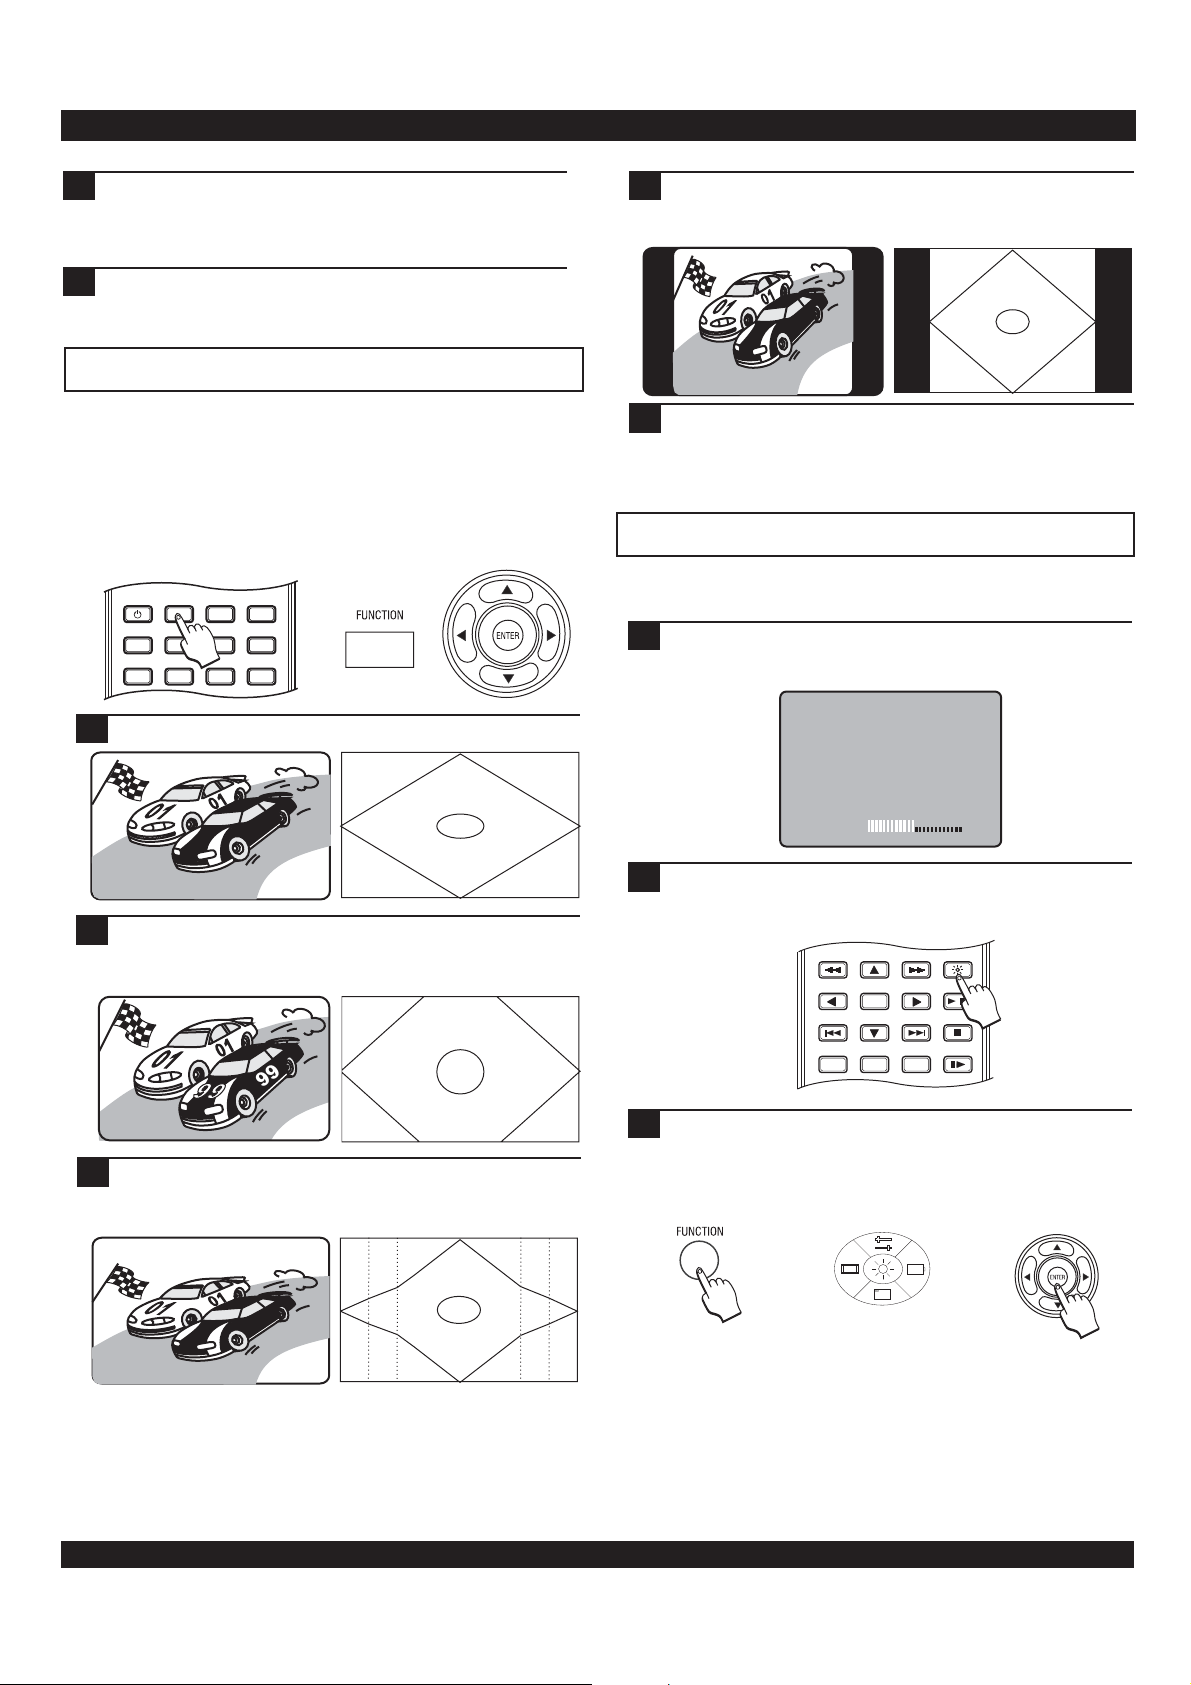
Display mode
You can choose from four display modes for the LCD screen.
1. Full - 16:9 aspect ratio, for movies in wide screen format.
2. Zoom - Vertically extended 4/3 format screen.
3. Wide - Horizontally scaled format.
4. Normal - Convert wide-screen to standard TV or full screen.
5. Off - Turns the LCD screen off.
VIDEO MODE
LCD
MENU
ANGLE
SETUP
GOTO
SUBTITLE
DISPLAY
PROGRAM
POWER
TITLE
BOOKMARK
The default dispaly mode is Full.
1
Press the LCD key on the remote control or the
3
FUNCTION and ARROW keys on the front panel one
time again to change the display mode to Normal.
99
99
Press the LCD key on the remote control or the
4
FUNCTION and ARROW keys on the front panel one
time again to turn off the LCD display. Then one more
time to turn the LCD display on.
Adjusting brightness
You can adjust the brightness level of the LCD display quickly
and easily.
Press the BRIGHTNESS key on the remote control or
1
1
the FUNCTION key on the front panel to enter the onscreen Brightness menu.
99
Press the LCD key on the remote control or the
2
99
FUNCTION and ARROW keys on the front panel one
time to change the display mode to Zoom.
99
Press the LCD key on the remote control or the
3
2
99
FUNCTION and ARROW keys on the front panel one
time again to change the display mode to Wide.
99
99
Brightness
If using the BRIGHTNESS key on the remote control to
2
12
enter the Brightness menu, press the brightness key
repeatedly to adjust the brightness level.
BRIGHTNESS
ENTER
RETURN
1/ALL
The Brightness menu can also be accessed a second
3
PLAY/ PAUSE
STOP
REPEAT SLOW
A-B
/
way. Press the FUNCTION key on the front panel. The
Function menu will appear. Press the ENTER key to
enter the on - screen Brightness menu. Press the
ENTER key repeatedly to adjust the Brightness level.
FUNCTION MENU
26
Page 27
PLAYING MP3 MUSIC FILES
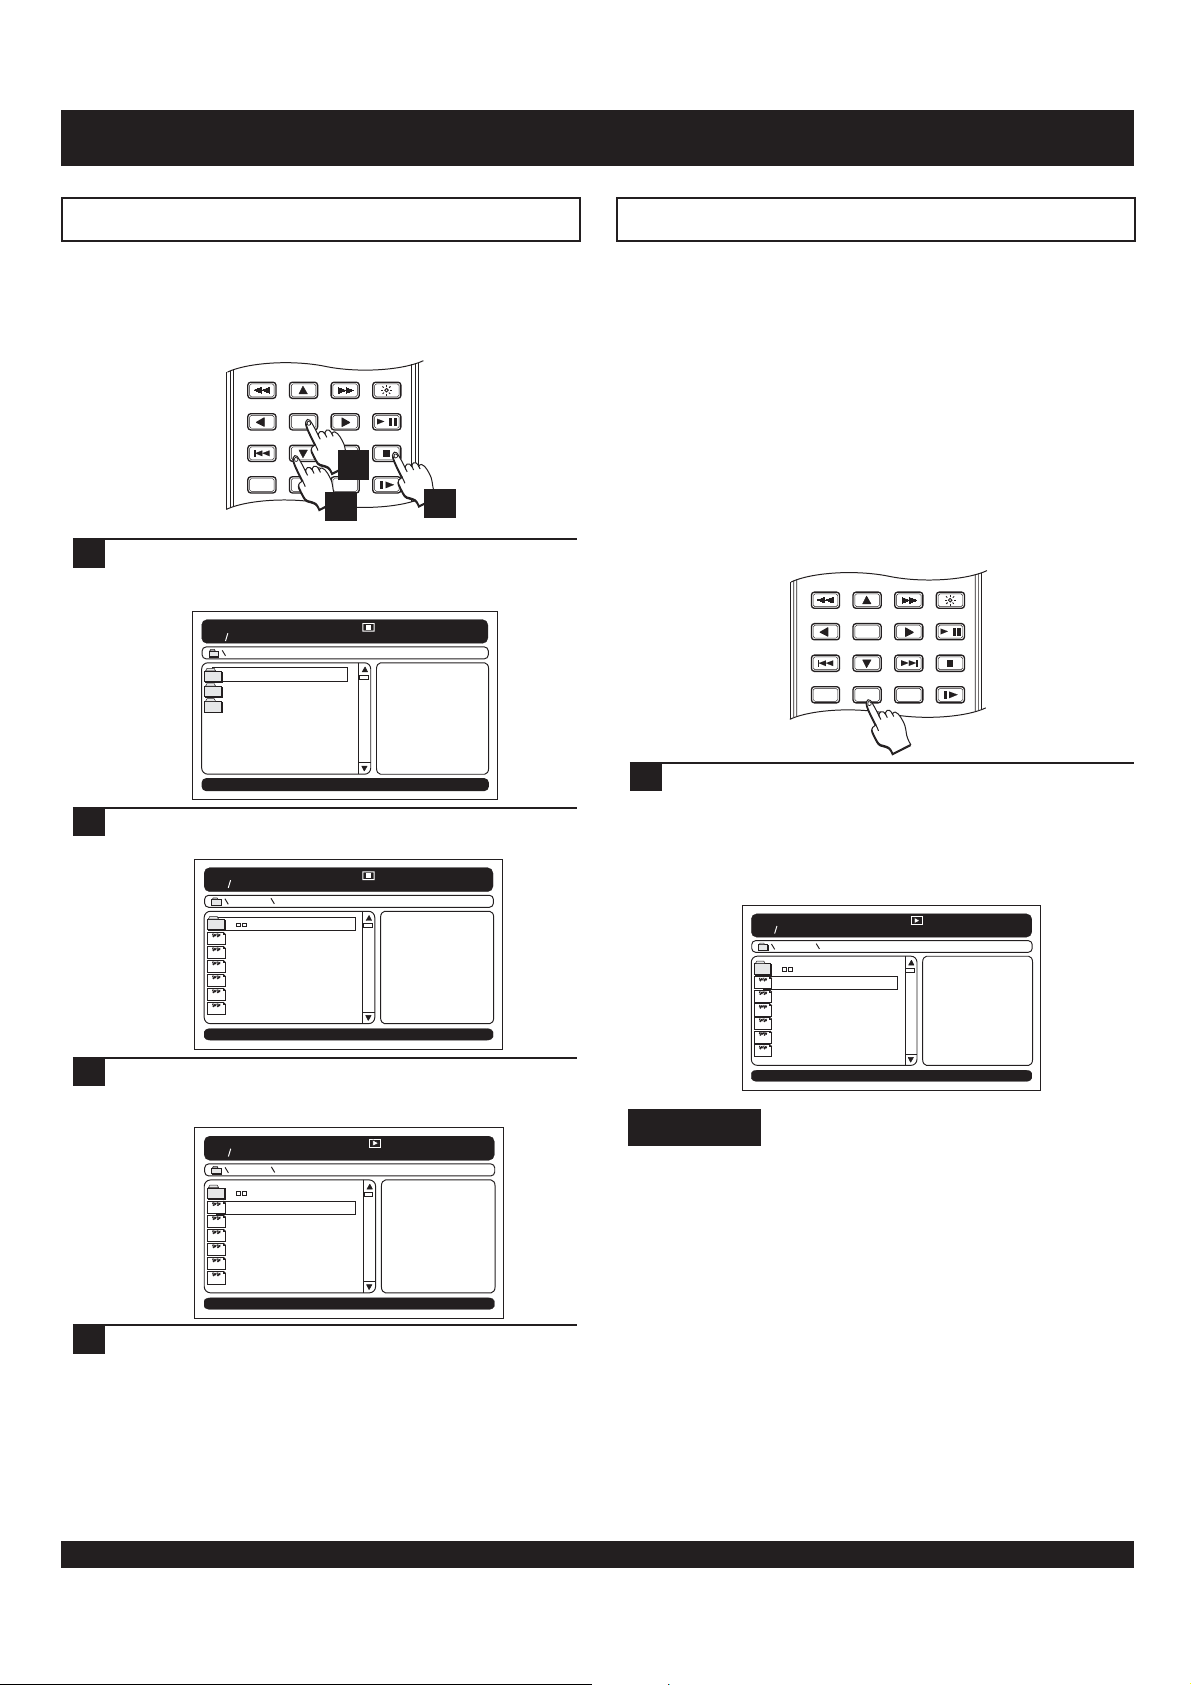
The MP3 navigator
When you insert a disc containing MP3 files, the player will
launch the MP3 navigator - an on-screen interface for playing
MP3 music files. The MP3 navigator provides options for
playback of MP3 files, including repeat and random modes.
BRIGHTNESS
ENTER
RETURN
1/ALL
Insert a disc containing MP3 files. The MP3 navigator
1
appears on screen. In this example, our MP3 disc
contains 3 directories.
00:00 00:00
001 003
ROCK
CLASSICAL
JAZZ
Press ENTER to open the first directory. The files in the
2
directory are now listed on-screen.
00 : 00 00 : 00
001 025
ROCK
11 0'CLOCK TICK TOCK
MP3
ANOTHER DAY
MP3
MYSTERIOUS WAYS
MP3
PRIDE
MP3
BULLET THE BLUE SKY
MP3
PEACE ON EARTH
MP3
Use the DOWN ARROW key to move to the file list.
3
Press ENTER to begin playback.
PLAY/ PAUSE
REPEAT SLOW
2
A-B
3
128
STOP
/
4
Setting repeat and playback options
You can select from a variety of playback options with the
PLAY MODE function. The play mode determines which of
your MP3 files will play, and the order they will play back in.
The following play modes are available.
SINGLE - Plays a single file, then stops.
REPEAT ONE - Repeats a single file continuously.
FOLDER - Plays files continuously in a selected folder.
REPEAT FOLDER - Repeats all MP3 files in the selected
folder continuously.
RANDOM - Continuous playback of the files in a folder
using a random selection process.
SHUFFLE - Plays all files in a folder using a random order
and stops.
BRIGHTNESS
ENTER
RETURN
1/ALL
To select a play mode, press the REPEAT 1/ALL button
1
repeatedly until you reach your desired setting. The
current play mode is shown in the lower left corner of
the screen and will disappear after a few seconds. To
check the status of your play mode, press the DISPLAY
button.
00:00 00:00
001 025
ROCK
11 0'CLOCK TICK TOCK
MP3
ANOTHER DAY
MP3
MYSTERIOUS WAYS
MP3
PRIDE
MP3
BULLET THE BLUE SKY
MP3
PEACE ON EARTH
MP3
Single
128
PLAY/ PAUSE
STOP
REPEAT SLOW
A-B
/
00:00 00:00
001 025
ROCK
11 0'CLOCK TICK TOCK
MP3
ANOTHER DAY
MP3
MYSTERIOUS WAYS
MP3
PRIDE
MP3
BULLET THE BLUE SKY
MP3
PEACE ON EARTH
MP3
Press STOP to end playback.
4
128
27
MP3 notes
MP3 files must be stored on discs with the extension
“” ” ”
MP3 , such as song1.mp3 , otherwise the files will not be
recognized.
CD-R/RW discs containing MP3 files should be in
ISO/9660, Mode 1, Closed Session format for best
compatibility.
Page 28
PLAYING MP3 MUSIC FILES
2
More MP3 functions
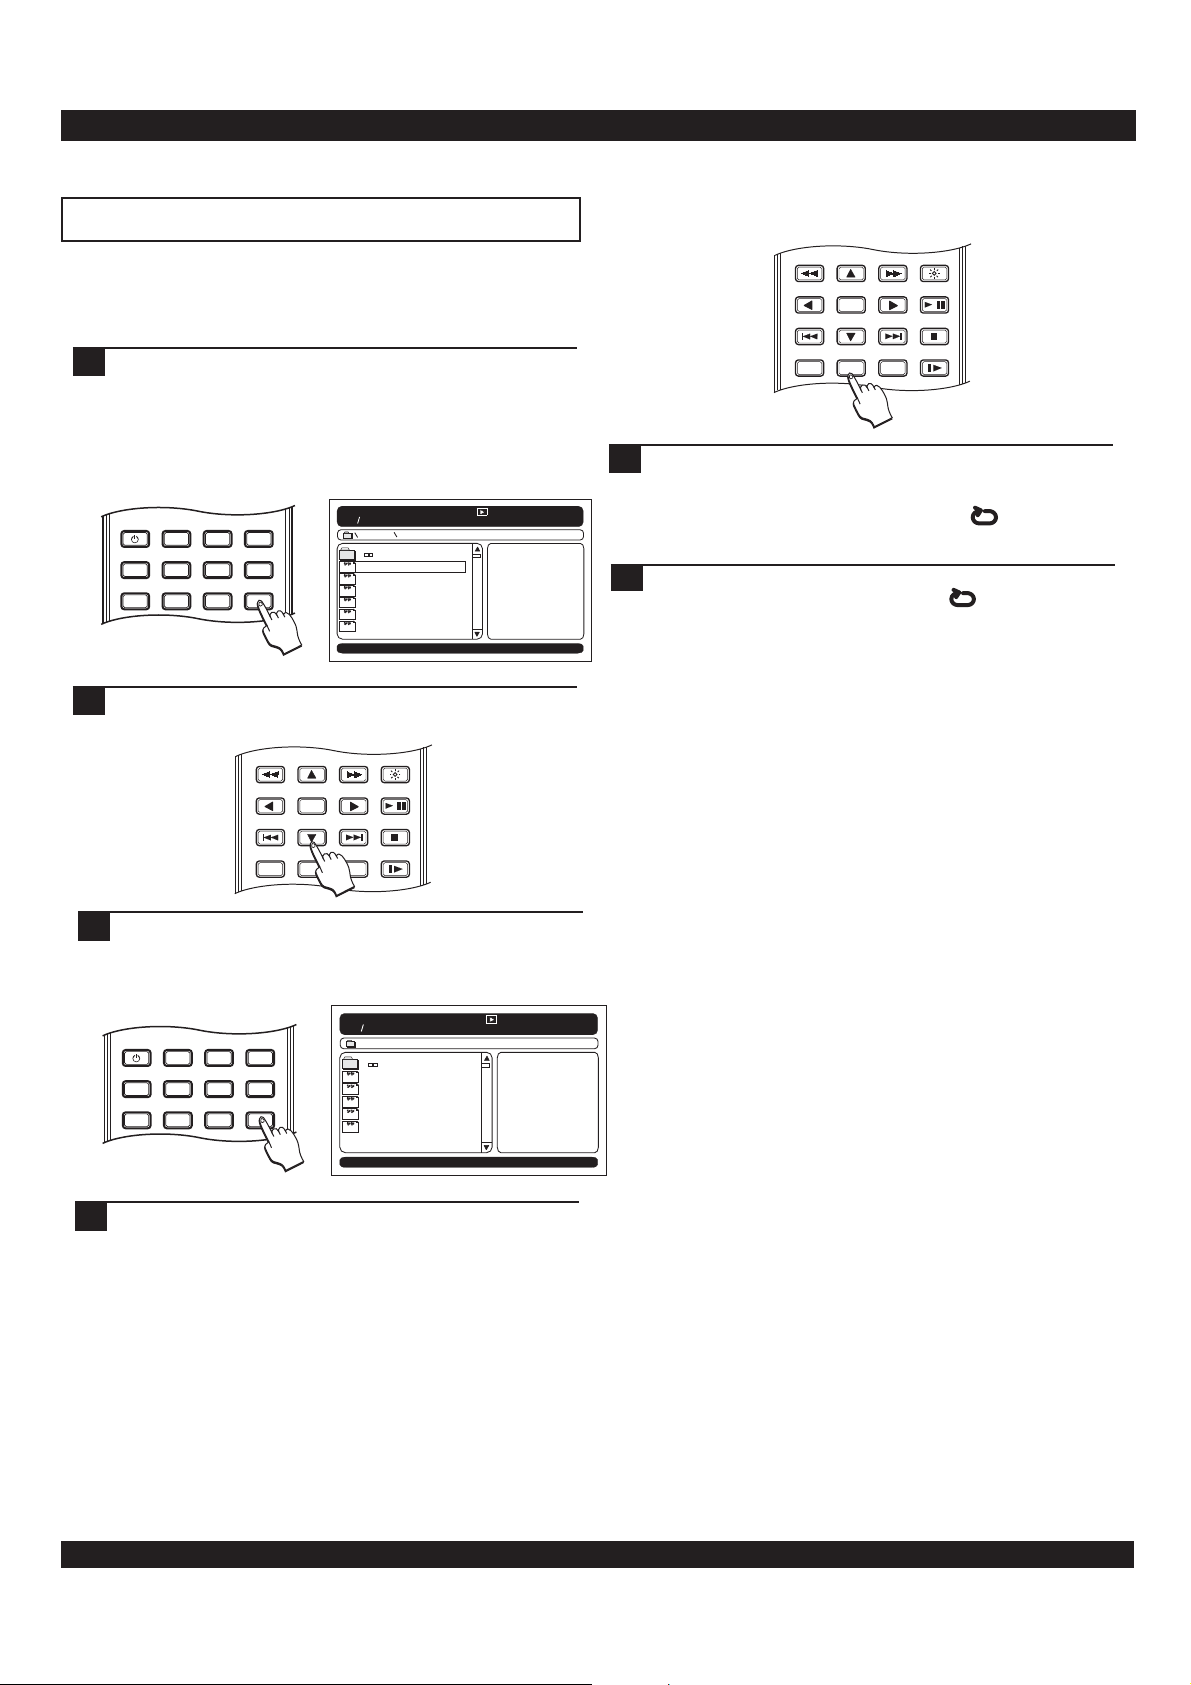
You can play your MP3 files in a variety of ways. You can
create a custom playlist of your favorite files or play just
specific segments of a file.
Insert a disc containing MP3 files. The MP3 navigator
1
appears on screen. To view the MP3 files on the disc,
press the PROGRAM button, no folder information is
provided on this list, and all the MP3 files on the disc
will be listed. "Filelist" will appear in the bottom left
hand corner for a few seconds.
STOP
128
/
00:00 00:00
LCD
MENU
ANGLE
SETUP
GOTO
SUBTITLE
DISPLAY
PROGRAM
RETURN
POWER
TITLE
BOOKMARK
Use the DOWN ARROW key to move to the file list.
Use the DOWN ARROW key to move to the file list.
2
2
Press BOOKMARK to select files to include in your
Press BOOKMARK to select files to include in your
playlist.
playlist.
VIDEO MODE
001 025
MP3
MP3
MP3
MP3
MP3
MP3
ENTER
REPEAT SLOW
A-B
1/ALL
ROCK
11 0'CLOCK TICK TOCK
ANOTHER DAY
MYSTERIOUS WAYS
PRIDE
BULLET THE BLUE SKY
PEACE ON EARTH
Filelist
BRIGHTNESS
PLAY/ PAUSE
You can also select to replay a segment of an MP3 file by using
the REPEAT A-B button.
BRIGHTNESS
ENTER
RETURN
1/ALL
To select a segment, while listening to an MP3 file,
1
when you arrive at the starting point that you would like
to mark as the beginning of your repeating segment,
press the A-B button. You will see the symbol.
When you reach the end of the segment, simply press
22
the REPEAT A-B button again. The symbol will
now be displayed. The segment will now be
continuously repeated. To end play, press the STOP
button.
PLAY/ PAUSE
STOP
REPEAT SLOW
A-B
/
A
AB
Press PROGRAM again to view your "Playlist", the list
3
of MP3 files you have created for playback. To begin
playback of your playlist, press ENTER.
00 : 00 00 : 00
LCD
MENU
ANGLE
SETUP
GOTO
SUBTITLE
DISPLAY
PROGRAM
POWER
TITLE
BOOKMARK
Press STOP to end playback. To return to the Folder
4
MONITOR
001 025
BACK IN BLACK
MP3
ANOTHER DAY
MP3
MYSTERIOUS WAYS
MP3
LA BAMBA
MP3
HAPPY BIRTHDAY
MP3
128
list, press PROGRAM.
28
Page 29
VIEWING JPG IMAGES ON YOUR TV
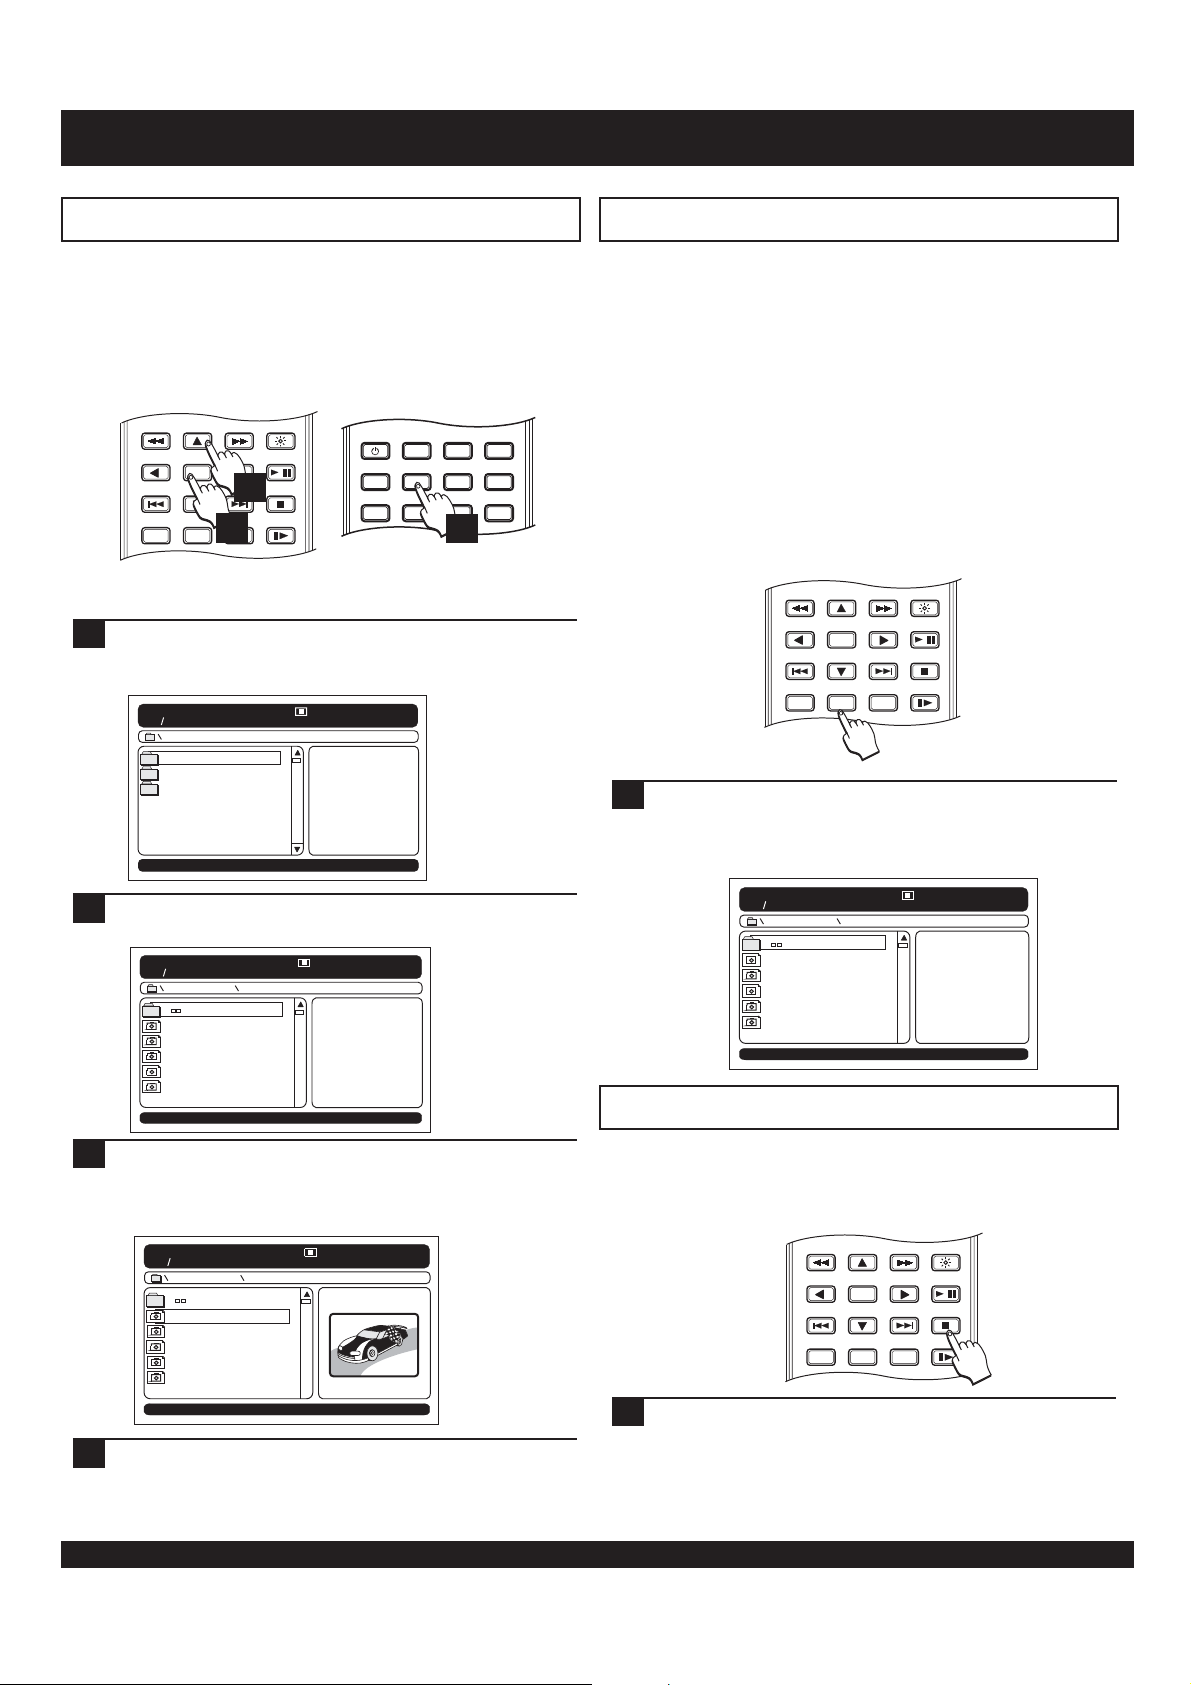
Viewing a JPG slide show
You can view JPG picture files stored on CD-R/RW discs
individually or in slide show mode on your TV. JPG is the
standard format for pictures stored on digital cameras, the
Internet and many other applications.
BRIGHTNESS
ENTER
RETURN
1/ALL
Insert a disc containing JPG files. The JPG navigator
1
PLAY/ PAUSE
STOP
3
REPEAT SLOW
2
A-B
/
POWER
TITLE
BOOKMARK
appears on screen. In this example, our disc contains 3
directories of picture files.
00:00 00:00
001 003
CAR RACES
MY GRADUATION
VACATION
LCD
MENU
ANGLE
SETUP
GOTO
SUBTITLE
4
MONITOR
DISPLAY
PROGRAM
Slide show options
You can select from a variety of JPG display options with the
PLAY MODE function. The play mode determines the order of
display, as well as which files will be included in the slide
show. The following play modes are available:
SINGLE - Displays a single file.
REPEAT ONE - Displays a single file.
REPEAT FOLDER - Repeats all files from the selected
folder continuously.
RANDOM - Continuous playback of the files in a folder
using a random selection process.
SHUFFLE - Displays all files in a folder using a random
order and stops.
FOLDER - Displays all files one time in the folder.
BRIGHTNESS
ENTER
RETURN
1/ALL
1
To select a play mode, press the REPEAT 1/ALL button
repeatedly until you reach your desired setting. The
current play mode is shown in the lower right corner of
the screen for a few seconds.
PLAY/ PAUSE
STOP
REPEAT SLOW
A-B
/
Press ENTER to open the first directory. The files in the
2
directory are now listed on-screen.
00:00 00:00
001 003
CAR RACES
THE START
ACTION 1
ACTION 2
TURN #1
THE FINISH
Use the UP / DOWN ARROW keys to select a file. Press
3
ENTER to begin playing a slide show of all the files on
the disc, starting with the selected file. The selected
file will appear in the preview box on the right.
00 : 00 00 : 00
001 003
CAR RACES
THE START
ACTION 1
ACTION 2
TURN #1
THE FINISH
To exit the slide show and return to the JPG navigator,
4
99
99
press MENU.
00 : 00 00 : 00
001 003
NEW PUPPY
AT THE PARK
SLIPPER CHEW
SLEEPING
PLAYING BALL
WET NOSE
Advanced JPG functions
Viewing thumbnails of your JPG pictures
Thumbnails are smaller sized versions of your JPG files that
allow you to preview many files on a single page.
BRIGHTNESS
ENTER
RETURN
1/ALL
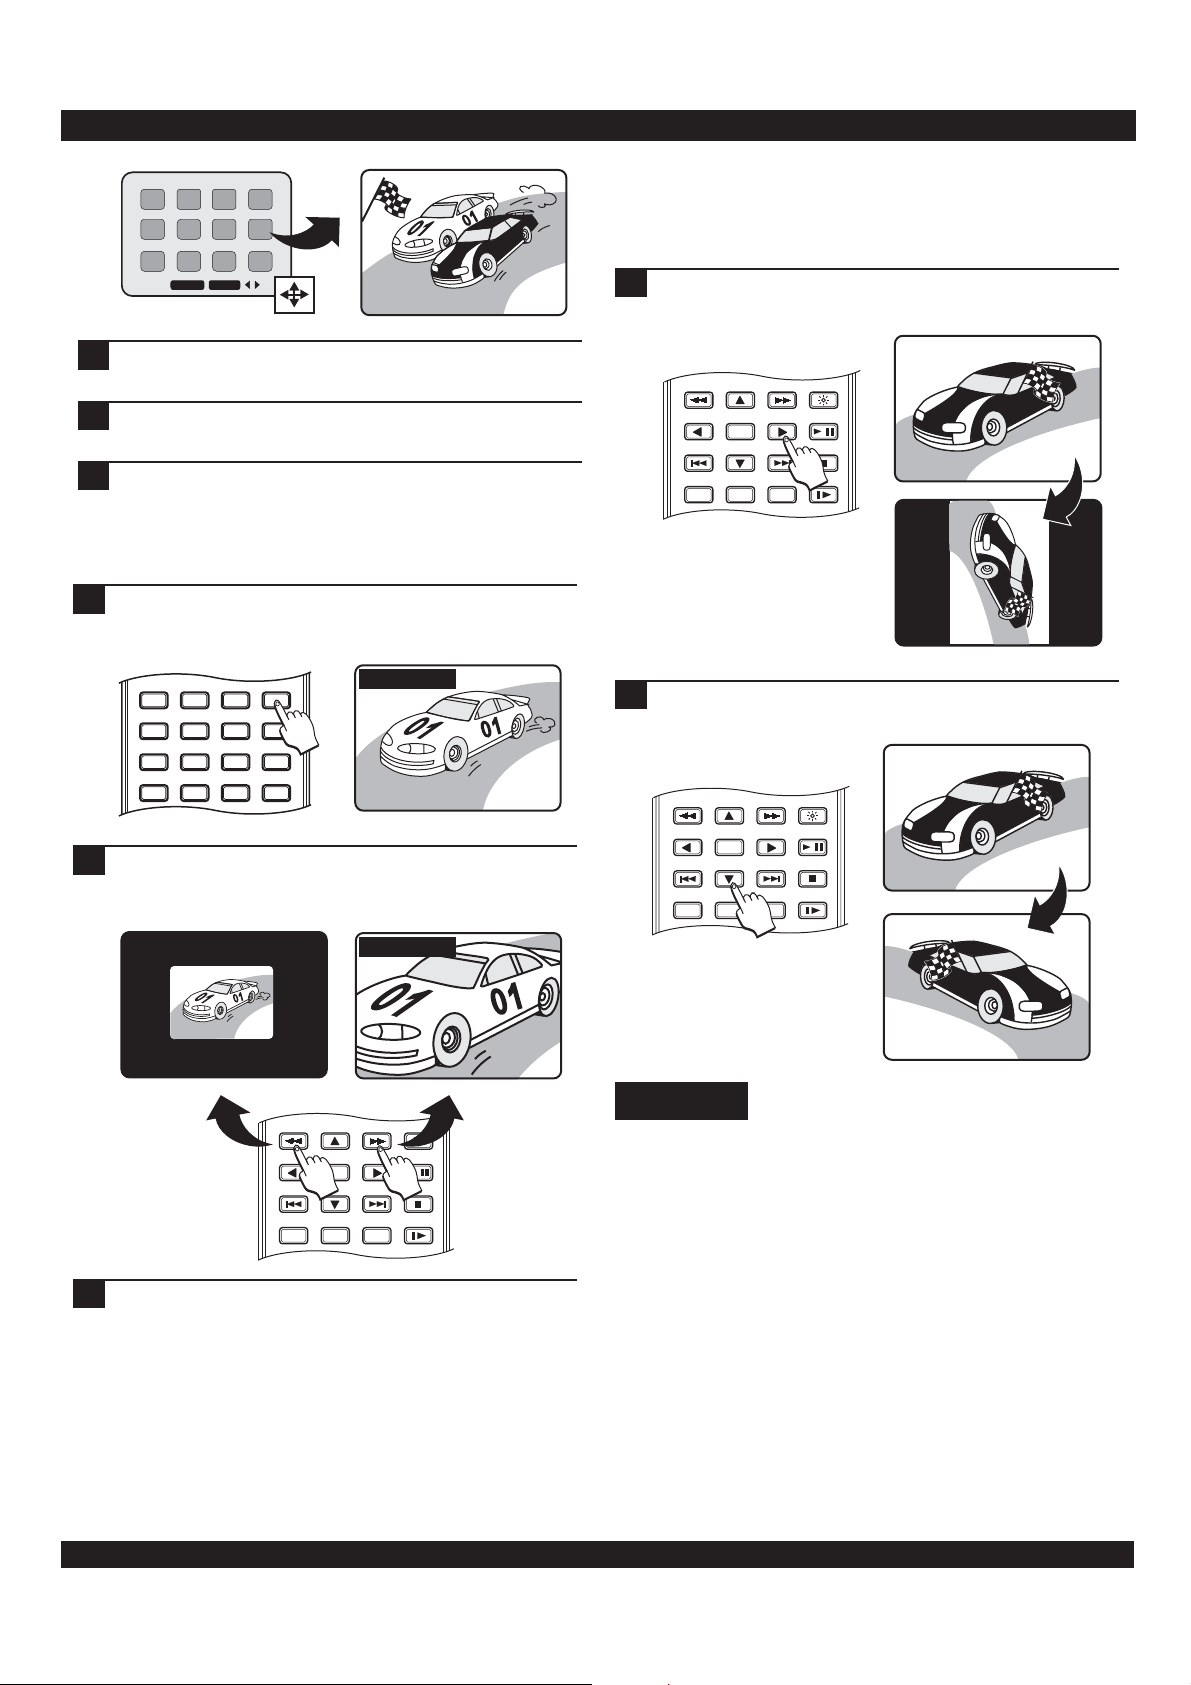
During slide show playback, press the STOP key at any
1
time to see a thumbnail preview of your JPG files. A
maximum of twelve images are shown on each screen.
PLAY/ PAUSE
STOP
REPEAT SLOW
A-B
/
1
29
Page 30
VIEWING JPG IMAGES ON YOUR TV
99
Use the PREVIOUS / NEXT keys to navigate to the next
2
or previous screen of thumbnails.
Use the ARROW KEYS to navigate the thumbnail
3
screen, moving to the image you wish to display.
Press ENTER to display the file on screen.
4
Using the zoom function with JPGs
You can zoom in or out on JPG images.
While the picture is displayed, press the ZOOM key. The
1
zoom status is shown in the upper left of the screen.
The starting value is 100% normal size.
99
Rotating and flipping JPG images
While a JPG is displayed, you can rotate the image or flip it
horizontally or vertically.
To rotate an image in the clockwise direction, press the
1
RIGHT ARROW key.
BRIGHTNESS
RETURN
ENTER
1/ALL
PLAY/ PAUSE
STOP
REPEAT SLOW
A-B
/
Press the LEFT ARROW
to rotate the image
counter-clockwise.
99
99
99
99
ZOOM 100%
-
3
6
9
VOLUME
ZOOM
AUDIO
MUTE
+
2
1
5
4
8
7
0C
Press the FF key to zoom in and the FR key to zoom
2
out. You can zoom in up to 200%, and out to 50% of the
original image size.
ZOOM 50%
RETURN
ZOOM 200%
ENTER
REPEAT SLOW
A-B
1/ALL
BRIGHTNESS
PLAY/ PAUSE
/
STOP
To flip the image horizontally, press the DOWN ARROW
2
key.
ENTER
RETURN
REPEAT SLOW
A-B
1/ALL
To flip the image
BRIGHTNESS
PLAY/ PAUSE
/
STOP
99
99
99
vertically, press the UP
ARROW key.
JPG notes
JPG files must be stored on discs with the extension
JPG , such as picture1.jpg , otherwise the files will not
“” ” ”
be recognized.
You can have a maximum of 250 files or folders.
CD-R/RW discs containing JPG files should be in
ISO/9660, Mode 1, Closed Session format for best
99
To resume normal viewing, press the PLAY button. Or,
3
to return to the thumbnails preview screen, press STOP.
30
Page 31
THE DVD PLAYER SETUP MENU
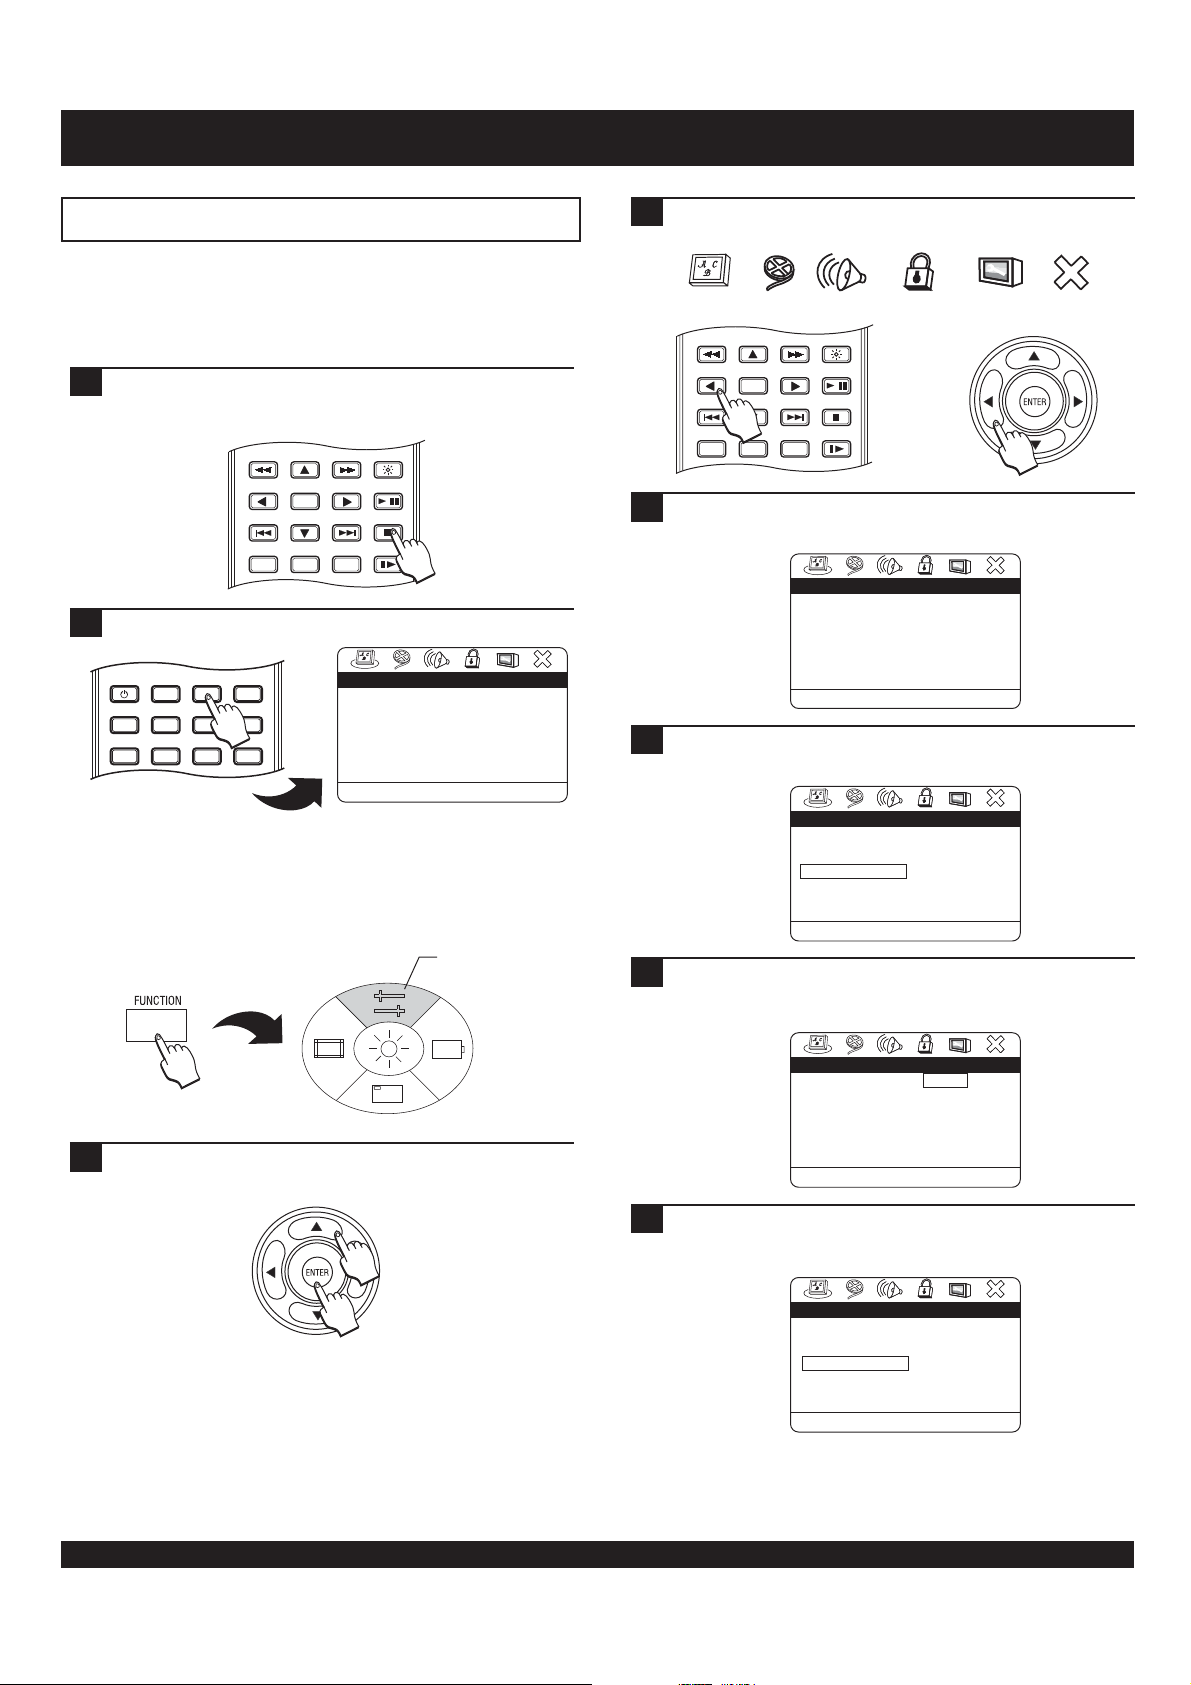
Using the SETUP MENU
The SETUP MENU is where you can configure various settings
related to the functionality of your portable DVD Player. Items
such as the type of TV you’re using, which languages you
prefer, parental control levels and more.
Though the SETUP MENU can be accessed during disc
1
playback, you must press the STOP key twice to have
access to all options.
BRIGHTNESS
ENTER
RETURN
1/ALL
Press SETUP to enter the SETUP MENU.
2
VIDEO MODE
LCD
MENU
ANGLE
SETUP
GOTO
SUBTITLE
DISPLAY
PROGRAM
POWER
TITLE
BOOKMARK
OR
If the remote control is not handy, press the FUNCTION
button on the front panel of the player to bring up the
FUNCTION MENU.
PLAY/ PAUSE
STOP
REPEAT SLOW
A-B
....
....
Video Setup Page
Language Setup Page
OSD Language ENG
Disc Menu
Audio
Subtitle
Go to language setup page
/
2x
ENG
ENG
Off
SETUP MENU
Use the LEFT/RIGHT ARROW keys on the remote
4
control or front panel to select a page:
GENERALAUDIOVIDEOLANGUAGE SECURITY EXIT
BRIGHTNESS
ENTER
RETURN
1/ALL
For this example, we select the LANGUAGE SETUP
5
PLAY/ PAUSE
STOP
REPEAT SLOW
A-B
/
OR
page to set the default subtitle language to SPANISH.
....
....
Video Setup Page
Language Setup Page
OSD Language ENG
Disc Menu
Audio
Subtitle
Go to language setup page
Use the DOWN ARROW key to select SUBTITLE from the
6
ENG
ENG
Off
LANGUAGE SETUP page.
....
....
Video Setup Page
Language Setup Page
OSD Language ENG
Disc Menu
Audio
Subtitle
Set the subtitle language
Press the RIGHT ARROW key to enter the SUBTITLE
5
7
ENG
ENG
Off
Spanish
Portuguese
Italian
Swedish
Danish
Others
Off
submenu language list. Use the UP/DOWN ARROWS to
select SPANISH from the list. Press ENTER to confirm.
Then press the UP ARROW key to select the SETUP
3
MENU option and press ENTER.
31
....
....
Video Setup Page
Language Setup Page
OSD Language ENG
Disc Menu
Audio
Subtitle
Spanish subtitle
The SUBTITLE selection will be changed to SPANISH
5
8
ENG
ENG
Off
Spanish
Portuguese
Italian
Swedish
Danish
Others
Off
and will now appear on the LANGUAGE Menu. Press
the SETUP button to exit the SETUP Menu.
....
....
Video Setup Page
Language Setup Page
OSD Language ENG
Disc Menu
Audio
Subtitle
Set the subtitle language
ENG
ENG
SPA
Page 32
THE DVD PLAYER SETUP MENU
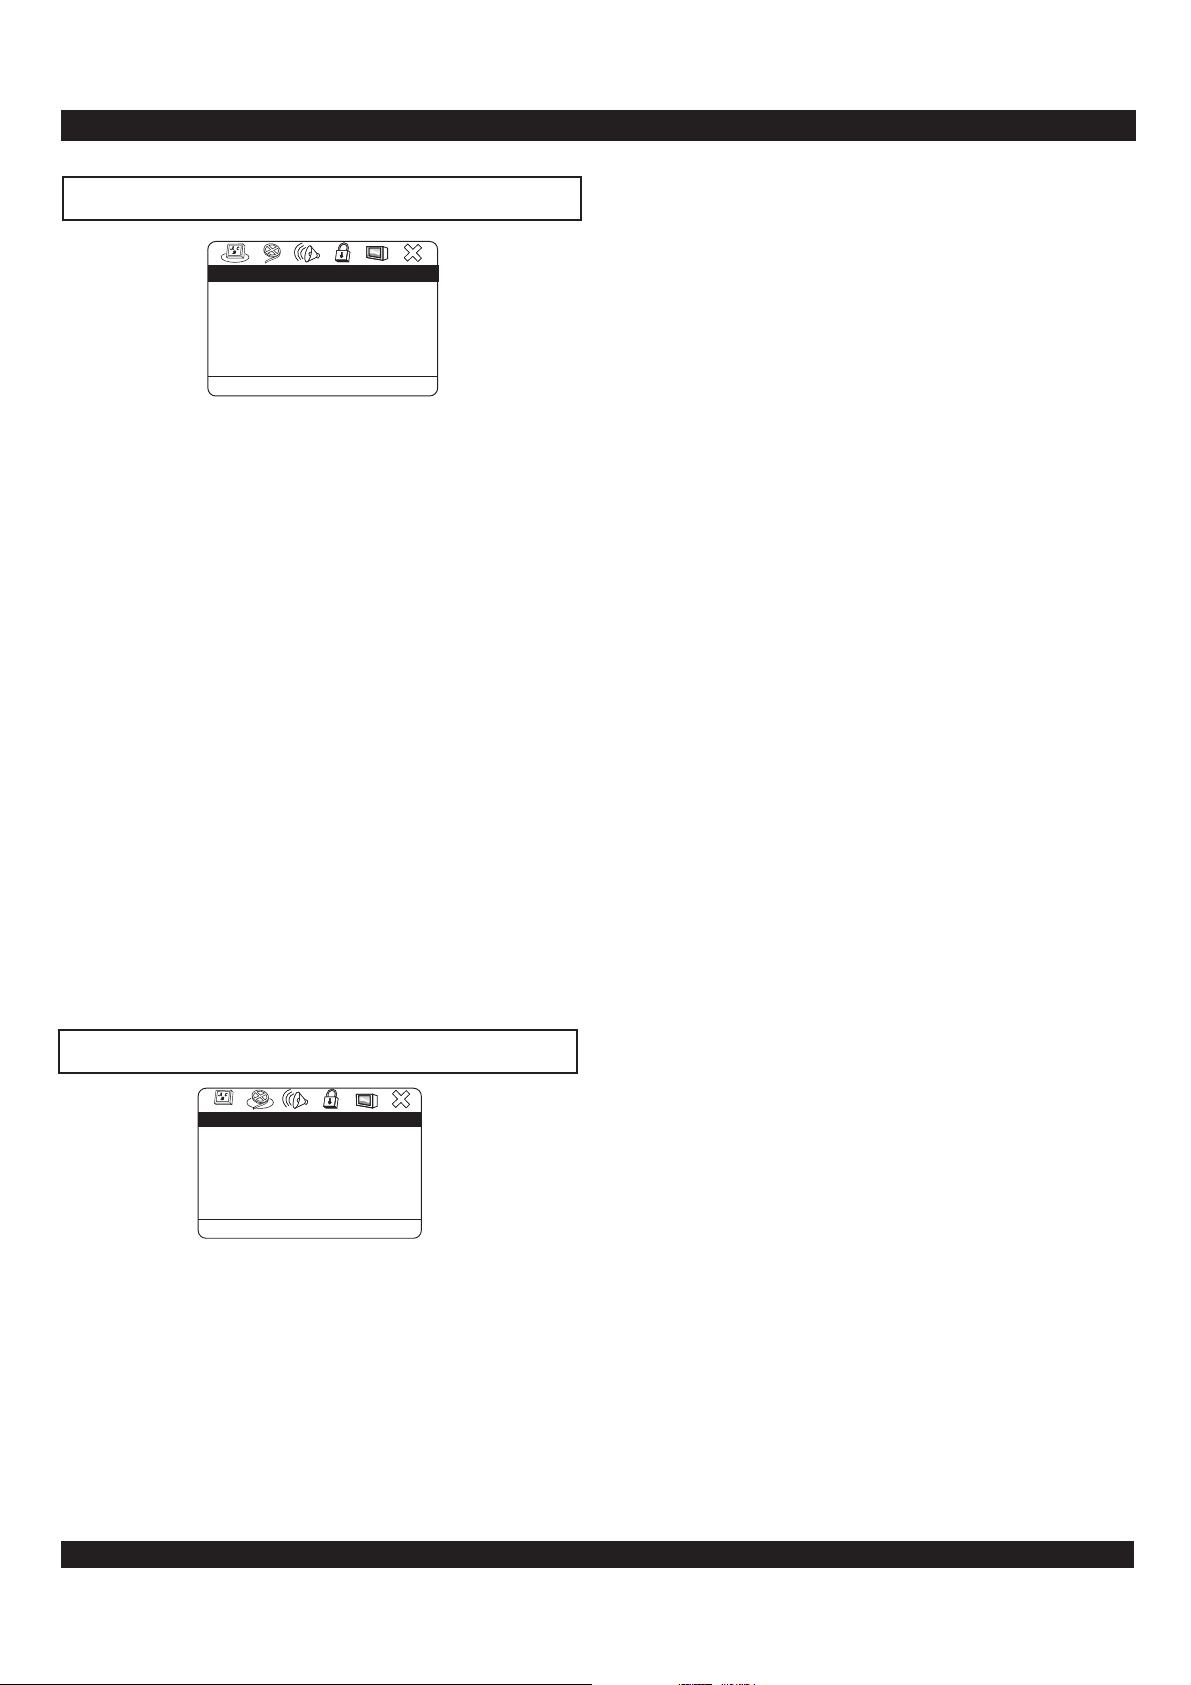
The LANGUAGE SETUP PAGE
....
....
Video Setup Page
Language Setup Page
OSD Language ENG
Disc Menu
Audio
Subtitle
Go to language setup page
ENG
ENG
Off
OSD LANGUAGE
Default setting:
Sets the language of the SETUP MENU. Changing this setting
to your native language will make using the SETUP MENU
much easier.
ENGLISH
DISC MENU
Default setting:
Sets the default language for discs containing multiple menu
languages. This setting is only applicable to discs that contain
a menu in the language you choose, otherwise the default
menu on the disc will be used.
ENGLISH
AUDIO
Default setting:
Sets the default language for discs containing multiple
language tracks. This setting is only applicable to discs that
offer the language specified. Unsupported discs will play the
default language on the disc.
ENGLISH
SUBTITLE
Default setting:
For discs that support multiple subtitle languages. Set the
default subtitle language you would like to see. This setting is
only applicable to discs that support the language you specify,
otherwise the default subtitle track on the disc will be shown.
Off
The VIDEO SETUP PAGE
....
....
Video Setup Page
Video Setup Page
TV Display
TV Type
Video Output
Video Mode
P - Scan Mode
Video Quality
Go to video setup page
TV DISPLAY
Default setting:
You can setup your DVD Player to work with normal and wide
screen televisions. If you are using a wide screen TV, set this
option to to match the aspect ratio of your TV.
When used with a normal TV (4:3 aspect ratio), the
NORMAL/PS4:3
display, where a movie is clipped on the sides to fit into the TV
screen. The setting will enable the
WIDE
WIDE 16:9
setting results in the typical “Pan & Scan”
NORMAL/LB4:3
Wide
NTSC
S-VI
Auto
“Letterbox” format, where the movie is presented in wide
screen format with black lines at the top and bottom of the
screen. Note: The and usually will have no effect,
PS4:3 LB4:3
since very few movies support both options. DVDs are generally
recorded with either PS or LB and do not allow switching
between the two.
TV TYPE
Default setting:
Your DVD Player will work with TVs based on the NTSC and
PAL standards, as well as TVs designed to function with both
standards, or “Multi” models. NTSC is the standard TV system
used in the USA, Canada, Japan and many other countries. The
PAL TV system is used in Europe, Africa and the Middle East,
among other places. Refer to your TV’s documentation to make
sure which model you have.
NTSC
VIDEO OUTPUT
Default setting:
After pressing the monitor key to output audio and video to an
external source, the function can be activated.
S-VIDEO:
COMPOSITE VIDEO. The setting is used with
composite and S - Video connections.
YUV:
video out and progressive scan. To activate the component
video outputs, you must first connect the unit using the
COMPOSITE VIDEO connector and cable in order to enter
SETUP and change this setting. Next, connect the unit using
the COMPONENT VIDEO cables and unplug the
COMPOSITE video cable. Adjust the TV’s Video Input
setting to correspond to the COMPONENT Input.
S-VI
A higher quality picture than standard
S - Video
This setting is used for TVs supporting component
VIDEO MODE
Default setting:
Most TVs scan only half the lines of an image in one pass. This
scanning method is known as “interlaced” mode, as the odd and
even lines are interlaced together in alternate scans. Progressive
scan, or , is a scanning method offered on high-end
TVs. Progressive scan TVs scan all the lines of an image in one
pass, creating a more film-like quality to DVD movies.
Note: This setting is only available when the
setting is set to . This is because all progressive scan TVs
require component video inputs. If this setting is inadvertently
set to , reset the video to by opening
P-SCAN INTERLACED
the disc tray and pressing on the remote
control.
INTERLACE
P-SCAN
VIDEO OUTPUT
YUV
DISPLAY -1-2-3
P - SCAN MODE
Default setting:
3:2 is for NTSC - Converts 24 frame/sec film to 30
FILM
frame/sec NTSC video. 2:2 is for PAL - Converts 24
frame/sec film to 25 frame/sec PAL video. switches
automatically between the modes depending on the disc
inserted. Note : this option can be selected only while the Video
Mode is set to P-Scan.
AUTO
VIDEO
AUTO
32
Page 33
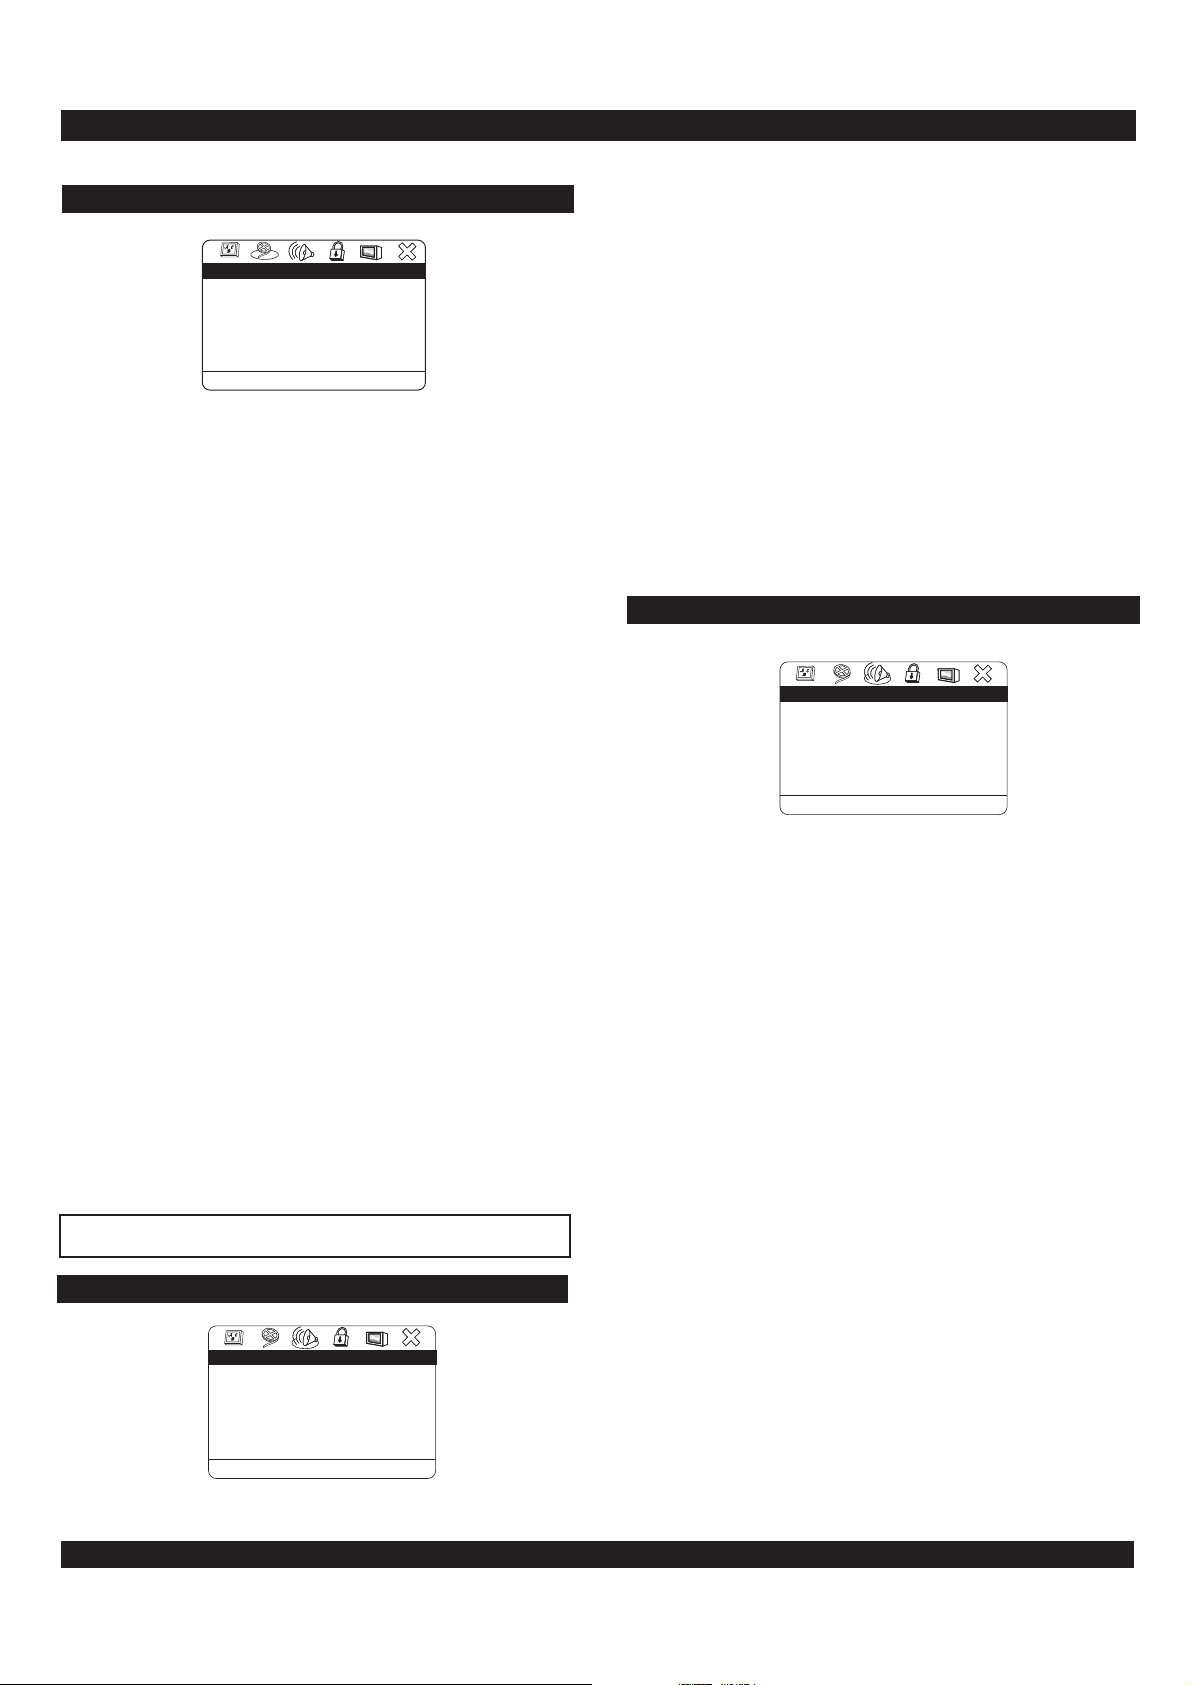
THE DVD PLAYER SETUP MENU
VIDEO QUALITY SETUP
....
....
Video Setup Page
Video Quality Setup
Sharpness
Brightness
Contrast
Gamma
Hue
Saturation
Luma Delay
Set the picture sharpness
Mid High
Medium
00
Low
00
None
00
00
1T
SHARPNESS
Default setting:
Sharpness controls the fine details of an image
Mid
BRIGHTNESS
Default setting:
Brightness is the intensity of light emitted, select the level
desired.
00
CONTRAST
Default setting:
Contrast is the difference from the highest white level to the
highest black level, select the desired level.
00
GAMMA
Default setting:
This setting will affect the middle range gray tones without
dramatically affecting the shadows and highlights for the DVD
player.
None
HUE
Default setting:
Hue is a specific color wavelength, for example - flesh tones,
select your desired level.
00
SATURATION
Default setting:
Select the saturation - the intensity of color in a video picture setting for the DVD player.
00
LUMA DELAY
Default setting:
1T 0T
Select or for the Luma delay setting. Luma, or
luminance, is the overall brightness.
0T
The AUDIO SETUP PAGE
SPEAKER SETUP
.
.
..
Audio Setup PageAudio Setup Page
Speaker Setup
SPDIF Setup
Dual Mono
Dynamic
Sound Setup
HDCD
Go to speaker setup page
....
STR
SPEAKER SETUP
Default setting:
Since most DVD discs feature Dolby 5.1 channel soundtracks,
you'll need to use the options: and The STR
setting should be used for most Televisions and Stereo
equipment. Generally, the LT/RT option should be used only
with Dolby Pro Logic receivers capable of decoding this type of
signal. The setting should be used with any two
speaker systems . Selecting
your own audio setup.
STR
Virt Surround
LT/RT STR.
will allow you to personalize
OFF
Post DRC
Default setting:
Select or or stay with the default setting of . This
Auto ON, Off
setting controls the difference between the maximum and
minimum acceptable signal level.
Off
SPDIF SETUP
.
.
..
SPDIF Setup Page
SPDIF Output
CD
Dolby Digital
DTS
MPEG
PCM Channel
LPCM Out 48K
Set the SPDIF output
SPDIF OUTPUT
Default setting:
SPDIF (Sony/Philips Digital InterFace) refers to the digital
audio format used by most consumer electronics equipment. If
you are using the Stereo Audio Outputs, leave SPDIF set to
. If you wish to use the Digital Outputs, change this
OFF
setting to . The setting is used with receivers capable of
Dolby Digital 5.1 or DTS 5.1 channel decoding, while the
setting is reserved for two channel equipment.
SPDIF On
On On
CD
Default setting:
SPDIF ( Sony / Phillips Digital InterFace ) refers to the digital
audio format used by most consumer electronics equipment. If
you are using the Stereo Audio Output, leave this setting at
. Generally, the setting is used with receivers
PCM RAW
capable of Dolby Digital 5.1 or DTS 5.1 channel decoding,
while the setting is reserved for two channel equipment.
Select if you are using stereo audio outputs.
Off
DOLBY DIGITAL
Default setting:
SPDIF ( Sony / Phillips Digital InterFace ) refers to the digital
audio format used by most consumer electronics equipment. If
you are using the Stereo Audio Output, change this setting to
. Generally, the setting is used with receivers
PCM RAW
capable of Dolby Digital 5.1 or DTS 5.1 channel decoding,
while the setting is reserved for two channel equipment.
Select if you are using stereo audio outputs.
Off
SPDIF PCM
PCM
RAW
PCM
....
On SPDIF Off
SPDIF On
PCM
RAW
RAW
PCM
L/R
Off
33
Page 34
THE DVD PLAYER SETUP MENU
DTS
Default setting:
SPDIF ( Sony / Phillips Digital InterFace ) refers to the digital
audio format used by most consumer electronics equipment. If
you are using the Stereo Audio Output, change this setting to
PCM RAW
. Generally, the setting is used with receivers
capable of Dolby Digital 5.1 or DTS 5.1 channel decoding,
while the setting is reserved for two channel equipment.
Select if you are using stereo audio outputs.
Off
RAW
PCM
MPEG
Default setting:
If you are using the Stereo Audio Output, leave this setting at
PCM RAW
. Generally, the setting is used with receivers
capable of Dolby Digital 5.1 or DTS 5.1 channel decoding,
while the setting is reserved for two channel equipment.
Off
Select if you are using stereo audio outputs.
PCM
PCM
PCM CHANNEL
Default setting:
When connecting the unit to a receiver capable of supporting a
six speaker system, use this option to configure each pair of
speakers. is used for configuration of the left and
right front speakers. designates configuration
for the left and right satellite speakers.
subwoofer )
SPDIF L / R
SPDIF L/R
SPDIF LS/LR
SPDIF C/LFE ( or
is for the center speaker and subwoofer.
LPCM Out
Default setting:
Select from or for this selection.
48K
48K 96K
DUAL MONO
Default setting:
These settings are generally for CDs or VCDs that offer only
Mono audio tracks. In this case, the option will
function as normal stereo, while the and
will send the mono output to only one speaker.
will send the same mono output to both speakers.
STEREO
STEREO
L-MONO R-MONO
MIX-MONO
DYNAMIC
Default setting:
‘Dynamic Range Compression’ makes watching a movie at
low volumes more enjoyable by boosting the quieter sounds
while suppressing the louder sounds. This reduction in the
difference between the low and high audio levels is known as
“compression”. You can adjust the level of this compression
OFF FULL
from to , using the UP/DOWN ARROW buttons.
Off
SOUND SETUP
SOUND PRESET
Default setting:
Choose from a variety of equalization presets that simulate
popular environments for listening to music.
NONE
BASS BOOST
Default setting:
When set to , the low frequency range is increased.
Off
ON
SUPER BASS
Default setting:
When set to , the low frequency range is increased.
Off
ON
TREBLE BOOST
Default setting:
When set to , the high frequency range is increased.
Off
ON
HDCD SETUP
.
...
HDCD Setup Page
Sample Rate
Set the sample rate
Off
Off
44.1K
88.2K
..
HDCD
Default setting:
Choose from two different Khz settings for HDCD.
Off
The PASSWORD SETUP PAGE
....
....
Video Setup Page
Security Setup Page
Password On
Change Psw
Parental
Go ToSecurity Setup Page
PASSWORD
Default setting: Off
Here is where you can set an additional password to the default
factory password. The procedures to change an existing
password or enter a new password are the same - you must enter
the OLD PASSWORD, then key in your new password twice to
confirm. If you are entering a new password, or replacing a
password you have forgotten, use the factory default password
of 1379 as the OLD PASSWORD. If you are changing a
previously entered password, you may enter that value as the old
password.
Off
........
Sound Setup Page
Sound Preset
Bass Boost
Super Bass
Treble Boost
Go to sound setup page
None
Off
Off
Off
None
Rock
Pop
Live
Dance
Techno
Classic
Soft
34
Page 35
THE DVD PLAYER SETUP MENU
CHANGE PASSWORD
Default setting:
Select this option when making changes or creating a new
password. Ensure that PASSWORD MODE is set to On. Select
Change
password (use the factory password 1379), then to enter and also
to confirm your New Password (the factory password cannot be
deleted or changed). The user password and the factory
password can now both be used. You can change the user
password at any time after entering a valid password. The user
password is useful for allowing others - for example a babysitter
- temporary access to Parental Control settings.
N/A
and you will be prompted to enter the current valid
PARENTAL
Default setting:
The Parental Lock allows you to limit the use of your DVD
Player to only those DVD discs that do not exceed the rating
you specify. When the Parental Control is set, DVD discs that
support this feature will play only after the password has been
entered. However, typically only discs produced by major
entertainment companies support Parental Control. You can
choose from eight levels of Parental Control, corresponding to
the standard rating system in the USA. You will need to enter a
valid password before making changes to Parental Control
settings. The factory password - 1379 - will always be a valid
password. You can also use a New Password which you can
create. Please refer to the Password section for further
instructions.
!
Note on parental security
Remember to keep in mind that the key to the Parental
Control feature is the factory default password of 1379.
Consequently, your player may not be secure if this manual is
accessible by your children.
Off
The GENERAL SETUP PAGE
....
General Setup Page
Angle Mark
Captions
Screen Saver
PBC
Memory
Version
Default
Go to General Setup Page
On
Off
Off
On
Off
CAPTIONS
Default setting:
Setting CAPTIONS to will display captions when Close
Caption supporting discs are used. If you don’t wish to
automatically enable captions, set this option to .
Off
On
Off
SCREEN SAVER
Default setting:
Protect your portable player’s LCD or TV’s cathode-ray tube
from “screen burn” that could result from a static image being
displayed for a prolonged period. The Screen Saver will
automatically start within a few minutes of video inactivity. To
enable this function, set this option to .
Off
On
PBC
Default setting:
Video CD’s with PBC ( Playback Control ) contain menus on
the disc which enable easy access to the contents of the disc.
Select if you wish to disable this feature.
Off
On
MEMORY
Default setting:
Allows you to restart a DVD movie from the last place played
at a future time provided the DVD player continues to be in
Stand-By mode. If you desire this feature to be enabled, set
this option to
Off
On.
VERSION
Displays information about the unit’s Firmware and Hardware
versions. This information may be asked for by Tech Support
for trouble-shooting purposes.
DEFAULT
If you would like to return all settings of your DVD Player’s
Setup to the factory defaults, choose .
DEFAULT - RESET
This will reset all values for General, Audio, Video and
Language settings, with the exception of the Parental Control
and Password. After all, the Parental Control and Password
features would be of little use if your kids could simply clear
The EXIT SETUP PAGE
....
....
Video Setup Page
Video Setup Page
ANGLE MARK
Default setting:
Requires disc to support the multi-angle feature, the Angle
Mark continuously displays the current angle you’re viewing
on screen. Setting ANGLE MARK to will cancel
continuous display, and the current angle will be displayed onscreen for just a few seconds after an angle change.
On
Off
Exit Setup Menu
Press "Enter" on the remote control to exit the Setup Menu.
3235
Page 36

TROUBLESHOOTING
The Player Does Not Power On
The AC Power cord may be loose or not plugged in. Make sure the power cord is secure in the AC socket.
The Battery Pack may be unattached. Make sure the Battery Pack is attached to the unit firmly.
The Power of the Battery Pack may be exhausted. Recharge the Battery Pack.
The unit may be in Standby Mode. Turn the unit on with the remote POWER button or PLAY/PAUSE/ENTER Button on
the player.
There must be a pause between powering the unit down and back on of a few seconds.
Remove Battery Pack or AC Adapter to RESET the player.
A Specific Disc Does Not Play
The disc may be dirty. Try cleaning the disc.
Make sure the disc is not in upside-down
The region code of the disc may not match that of the player. In this case, the disc cannot be used.
Disc may not be industry standard.
The Remote Control Does Not Function
Make sure you re aiming the remote directly at the player s remote sensor, located in the front display.
Make sure there are no obstacles between the remote and the player.
The batteries may be drained. Try changing the batteries in the remote.
You could be using the remote too far away. Try within 4 meters of the player.
Relocate the player to test if these is interference.
Subtitles not shown
Press Remote Control Subtitle button to turn it on.
Subtitles display only recorded on DVDs.
’’
The Picture Appears Stretched or Squeezed
The LCD Mode you are in may be wrong for the movie your re watching. Try changing the LCD setting to suit the movie s
aspect ratio (Standard or Widescreen).
The Video Aspect Ratio may be set wrong for your Television type.
Enter the Setup Menu and select the Video Menu. Try changing the ASPECT setting to 4:3 PS (Pan&Scan) if you are
using a standard TV, or 16:9 WS if your TV is a Wide-Screen type.
’’
No Sound from TV or Speakers
Once you close the unit s Disc Cover, the unit is still running, but No Sound comes out.
Disc is Dirty or Damaged. Clean the Disc or change to another one.
Volume Control is set to Minimum. Raise up the Volume.
Headphones are connected. Pull out the Headphones.
If you are using a Digital Receiver, check the Dolby/DTS setting in the player s Setup Menu .
Make sure the audio cables connecting the DVD player to your TV or receiver are secure.
The movie is paused. There is no sound during Pause or Search modes.
’
’
No Image on the Built-in Screen
Power isn t on. Turn on the Power.’
Video Mode setting may be in Video output to external monitor mode. Press VIDEO MODE Button to change to Normal
player operation.
Make sure the player is not in LCD Off Mode.
Distorted Picture when Connected to a VCR
This Player is built with Macrovision copy-protection. This will distort the signal when used with VCRs. Connect the player
directly to the TV.
37
Page 37

SPECIFICATIONS
Playable Discs
DVD, Audio CD, VCD, CD-R, CD-RW
TV Systems Supported
NTSC, PAL, P-SCAN
Laser
Semiconductor Laser, wavelength 650nm
Frequency Response (Digital Audio)
DVD Linear Sound: 48kHz sampling 4Hz to 22kHz
96kHz sampling 4Hz to 44kHz
Audio CD: 4Hz to 20kHz
Signal-to-Noise Ratio (Digital Audio)
More than 65dB
Audio dynamic range (Digital Audio)
Less than 75dB
Harmonic Distortion (Digital Audio)
Less than 0.015%
Wow and Flutter
Less than 0.001% (W.PEAK)
±
Connections
Component Video Out: (Y) 1.0Vpp (75 Ohm), Negative Sync, (Pb)/(Pr) .7 Vpp (75 Ohm)
S-Video Out: Mini DIN 4-Pin (75 Ohm)
Video In / Out: One Pin Jack, 1Vpp (75 Ohm)
Analog Audio In / Out: Two Pin Jacks, 2.0VRMS (470 Ohm)
Operating Conditions
5 C to 35 C (41 F to 95 F), Operation Status: Horizontal
°°°°
Power Supply
AC 100~240V, 60Hz
DC 10V, 2A
Power Switching Adapter
Input: AC 100~240V 50/60Hz 0.41A
Output: DC 10V, 2A
Power Consumption
Normal Mode: 12W
Standby Mode: 0.3W
Dimensions
5.51" (W) x 7.32" (H) x 1.02" (D)
(140mm x 186mm x 26mm)
Weight
1.47 lbs. (670 g.)
*Note: Design and specifications are subject to change without notice.
*Specifications subject to change without notice.
28
38
 Loading...