

Denon DN-S3500 Owners Manual

TABLE TOP SINGLE CD / MP3 PLAYER
DN-S3500
OPERATING INSTRUCTIONS
BEDIENUNGSANLEITUNG
MODE D’EMPLOI
ISTRUZIONI PER L’USO
INSTRUCCIONES DE OPERACION
GEBRUIKSAANWIJZING
BRUKSANVISNING
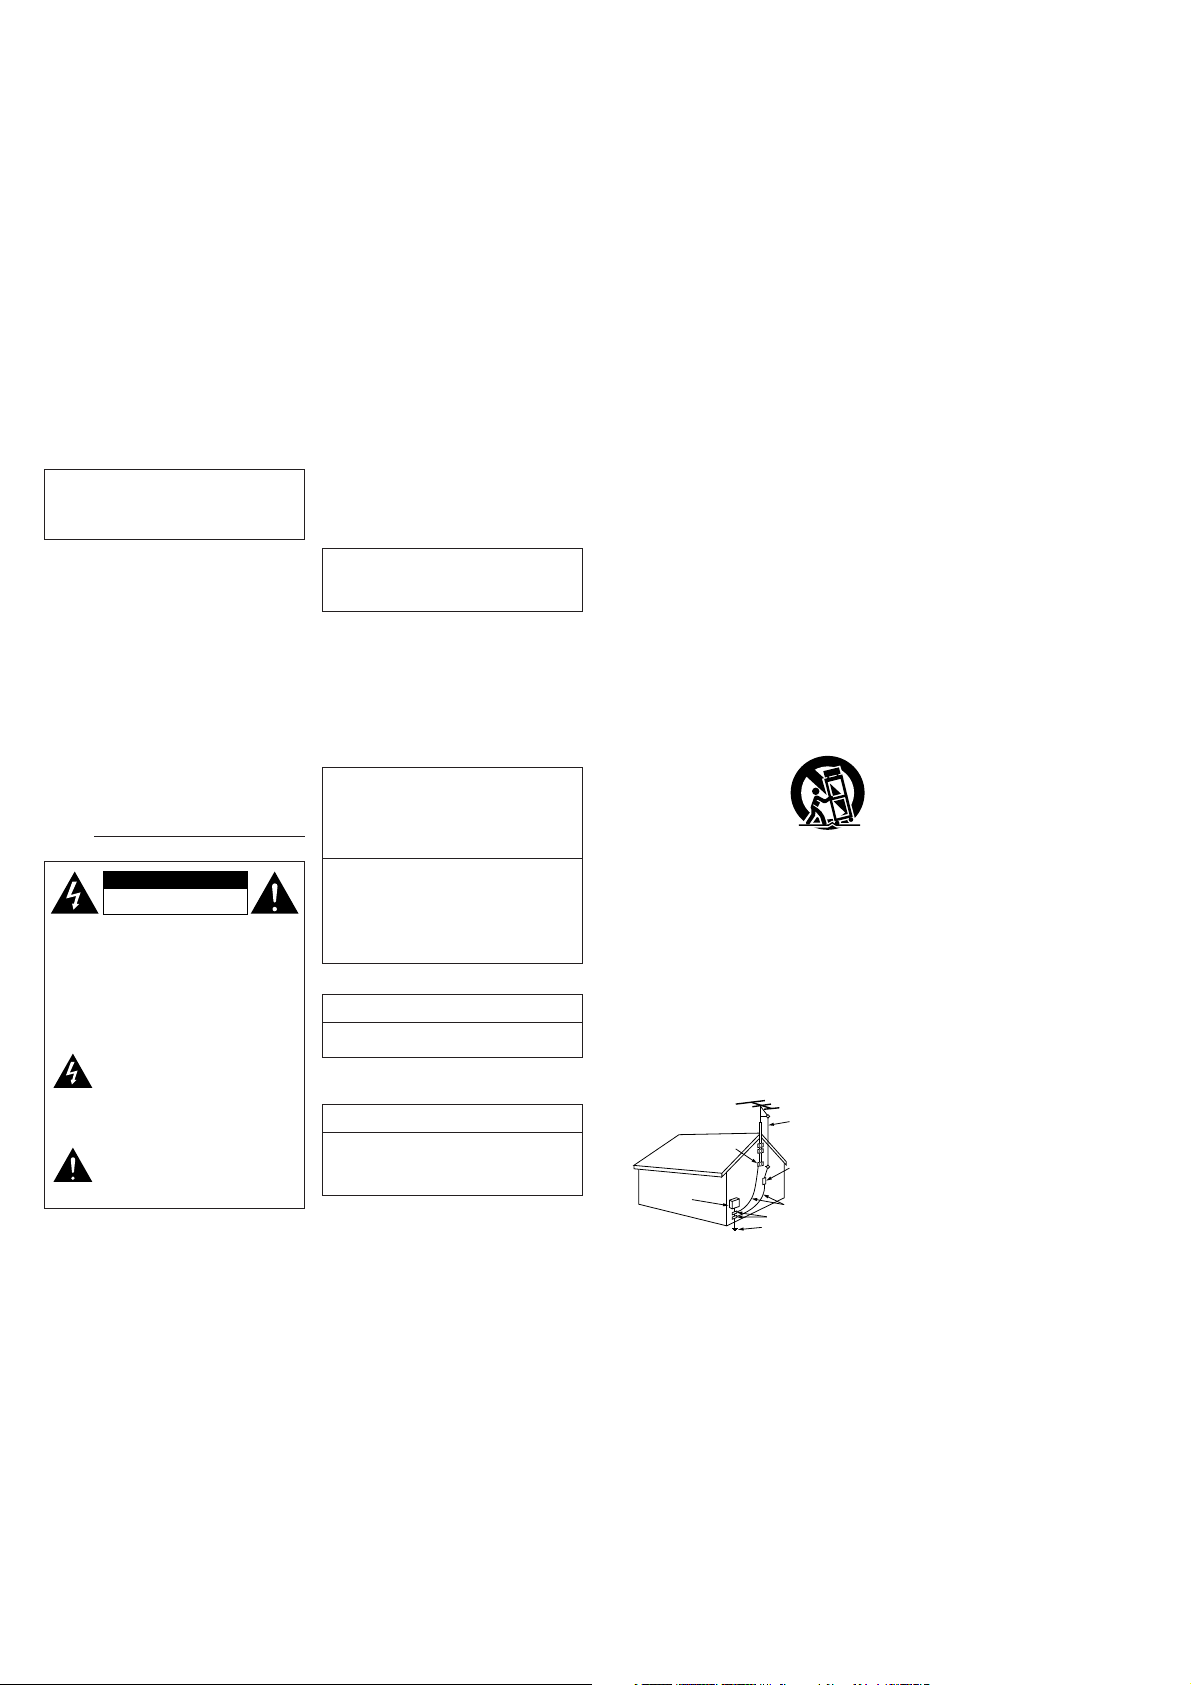
IMPORTANT TO SAFETY
WARNING:
TO PREVENT FIRE OR SHOCK HAZARD, DO
NOT EXPOSE THIS APPLIANCE TO RAIN OR
MOISTURE.
CAUTION
1. Handle the power supply cord carefully
Do not damage or deform the power supply cord. If
it is damaged or deformed, it may cause electric
shock or malfunction when used. When removing
from wall outlet, be sure to remove by holding the
plug attachment and not by pulling the cord.
2. Do not open the rear cover
In order to prevent electric shock, do not open the
top cover.
If problems occur, contact your DENON DEALER.
3. Do not place anything inside
Do not place metal objects or spill liquid inside the
system.
Electric shock or malfunction may result.
Please, record and retain the Model name and serial
number of your set shown on the rating label.
Model No. DN-S3500
Serial No.
CAUTION
RISK OF ELECTRIC SHOCK
DO NOT OPEN
CAUTION:
TO REDUCE THE RISK OF ELECTRIC SHOCK,
DO NOT REMOVE COVER (OR BACK). NO
USER-SERVICEABLE PARTS INSIDE. REFER
SERVICING TO QUALIFIED SERVICE
PERSONNEL.
The lightning flash with arrowhead
symbol, within an equilateral triangle, is
intended to alert the user to the
presence of uninsulated “dangerous
voltage” within the product’s enclosure
that may be of sufficient magnitude to
constitute a risk of electric shock to
persons.
The exclamation point w thin an equilateral
triangle is intended to alert the user to the
presence of important operating and
maintenance (servicing) instructions in the
literature accompanying the appliance.
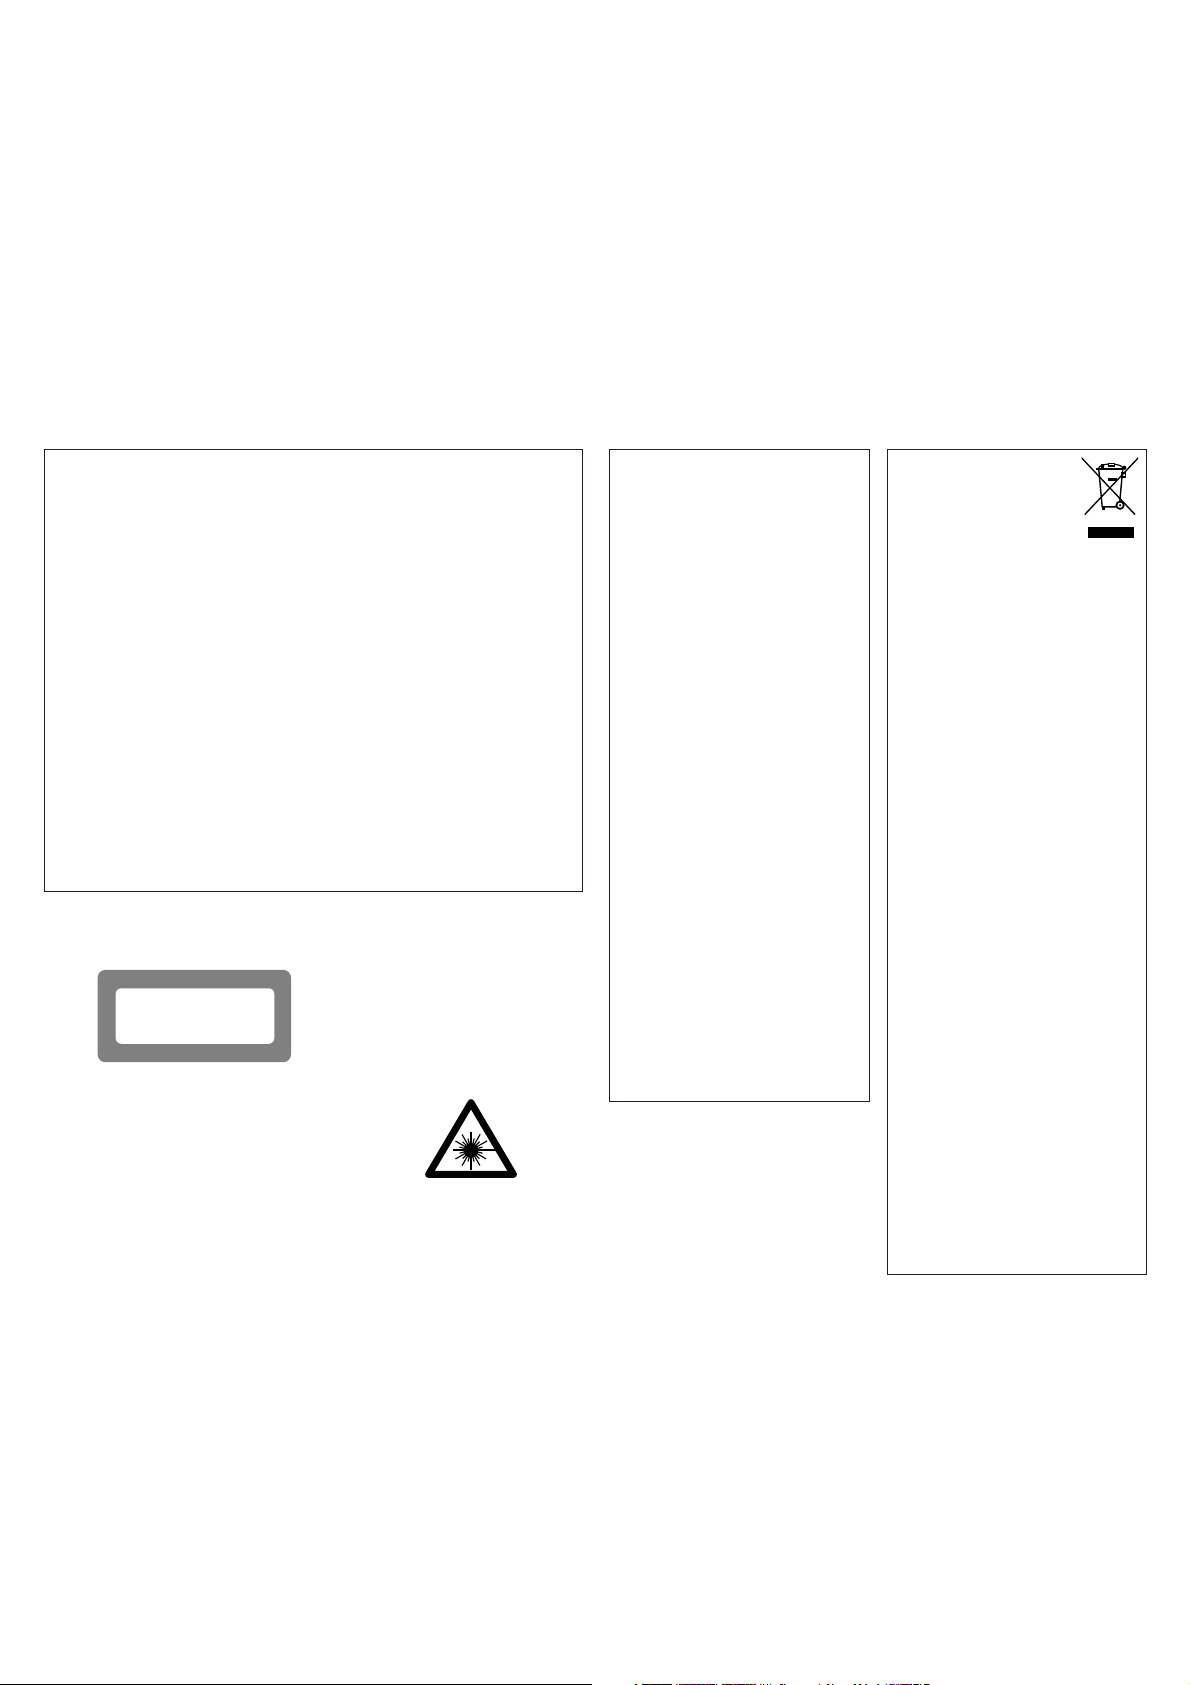
NOTE:
This CD player uses the semiconductor laser. To allow
you to enjoy music at a stable operation, it is
recommended to use this in a room of 5°C (41°F) ~
35°C (95°F).
LABELS (for U.S.A. model only)
THIS PRODUCT COMPLIES WITH DHHS RULES 21
CFR SUBCHAPTER J APPLICABLE AT DATE OF
MANUFACTURE.
CAUTION:
USE OF CONTROLS OR ADJUSTMENTS OR
REFOR-MANCE OF PROCEDURES OTHER THAN
THOSE SPECIFIED HEREIN MAY RESULT IN
HAZARDOUS RADIATION EXPOSURE.
THE COMPACT DISC PLAYER SHOULD NOT BE
ADJUSTED OR REPAIRED BY ANYONE EXCEPT
PROPERLY QUALIFIED SERVICE PERSONNEL.
This device complies with Part 15 of the FCC Rules.
Operation is subject to the following two
conditions: (1) This device may not cause harmful
interference, and (2) this device must accept any
interference received, including interference that
may cause undesired operation.
This Class B digital apparatus meets all requirements
of the Canadian Interference-Causing Equipment
Regulations.
Cet appareil numérique de la classe B respecte
toutes les exigences du Règlement sur le matériel
brouilleur du Canada.
CERTIFICATION
• FOR CANADA MODEL ONLY
CAUTION
TO PREVENT ELECTRIC SHOCK, MATCH WIDE
BLADE OF PLUG TO WIDE SLOT, FULLY INSERT.
• POUR LES MODELE CANADIENS
UNIQUEMENT
ATTENTION
POUR ÉVITER LES CHOCS ÉLECTRIQUES,
INTERODUIRE LA LAME LA PLUS LARGE DE LA
FICHE DANS LA BORNE CORRESPONDANTE DE
LA PRISE ET POUSSER JUSQU’ AU FOND.
1. Read Instructions – All he safety and operating instructions
SAFETY INSTRUCTIONS
should be read before he p oduct is operated.
2. Retain Instructions – The safety and operating instructions
should be retained for future reference.
3. Heed Warnings – All warnings on the p oduct and in the
operating instructions should be adhered to.
4. Follow Instructions – All operating and use instructions
should be followed.
5. Cleaning – Unplug his product from the wall outlet before
cleaning. Do not use liquid cleaners or ae osol cleaners.
6. Attachments – Do not use attachments not recommended
by he product manufacturer as they may cause hazards.
7. Water and Moisture – Do not use his product near water –
for example, near a bath tub, wash bowl, kitchen sink, or
laundry tub; in a wet basement; or near a swimming pool;
and he like.
8. Accessories – Do not place his p oduct on an unstable cart,
stand, tripod, bracket, or table. The product may fall,
causing serious inju y to a child or adult, and serious
damage to he product. Use only wi h a cart, stand, tripod,
bracket, or table recommended by the manufacturer, or
sold w th he p oduct. Any mounting of he p oduct should
follow he manufacturer’s instructions, and should use a
mounting accesso y
recommended by he
manufacturer.
9. A product and cart
combination should be
moved w th care. Quick
stops, excessive force,
and uneven surfaces may
cause the product and cart
combination to overturn.
10. Ventilation – Slots and openings in the cabinet are provided
for ventilation and to ensure reliable operation of the
p oduct and to p otect it from overheating, and hese
openings must not be blocked or covered. The openings
should never be blocked by placing he p oduct on a bed,
sofa, rug, or o her similar surface. This product should not
be placed in a built-in installation such as a bookcase or rack
unless p oper ventilation is provided or the manufacturer’s
instructions have been adhered to.
11. Power Sou ces – This product should be operated only
f om the type of power source indicated on he marking
label. If you are not sure of he type of power supply to
your home, consult your product dealer or local power
company. For p oducts intended to operate from batte y
power, or o her sources, refer to the operating instructions.
12. G ounding or Polarization – This p oduct may be equipped
wi h a polarized alternating-current line plug (a plug having
one blade wider han he other). This plug will fit into the
power outlet only one way. This is a safety feature. If you
are unable to insert he plug fully into the outlet, t y
reversing the plug. If the plug should still fail to fit, contact
your electrician to replace your obsolete outlet. Do not
defeat the safety purpose of the polarized plug.
FIGURE A
EXAMPLE OF ANTENNA GROUNDING
AS PER NAT ONAL
ELECTRICAL CODE
GROUND
CLAMP
ELECTRIC
SERVICE
EQUIPMENT
NEC - NATONAL ELECTRICAL CODE
ANTENNA
LEAD IN
WIRE
ANTENNA
DSCHARGE UNIT
(NEC SECTION 810-20)
GROUNDING CONDUCTORS
(NEC SECTON 810 21)
GROUND CLAMPS
POWER SERVICE GROUNDING
ELECTRODE SYSTEM
(NEC ART 250 PART H)
13. Power-Cord P otection – Power-supply cords should be
routed so that they are not likely to be walked on or pinched
by items placed upon or against them, paying particular
attention to cords at plugs, convenience receptacles, and
he point where hey exit from the p oduct.
15. Outdoor Antenna G ounding – If an outside antenna or
cable system is connected to he product, be sure the
antenna or cable system is grounded so as to provide some
p otection against voltage surges and built-up static
charges. Article 810 of he National Electrical Code,
ANSI/NFPA 70, p ovides information wi h rega d to p oper
g ounding of the mast and supporting structure, g ounding
of he lead-in wire to an antenna discharge unit, size of
g ounding conductors, location of antenna-discha ge unit,
connection to g ounding elect odes, and requirements for
he g ounding electrode. See Figure A.
16. Lightning – For added protection for this p oduct during a
lightning storm, or when it is left unattended and unused
for long periods of time, unplug it from the wall outlet and
disconnect he antenna or cable system. This will prevent
damage to the p oduct due to lightning and power-line
surges.
17. Power Lines – An outside antenna system should not be
located in he vicinity of overhead power lines or o her
electric light or power circuits, or where it can fall into such
power lines or circuits. When installing an outside antenna
system, extreme care should be taken to keep from
touching such power lines or ci cuits as contact wi h them
might be fatal.
18. Overloading – Do not overload wall outlets, extension
cords, or integral convenience receptacles as his can result
in a risk of fire or electric shock.
19. Object and Liquid Ent y – Never push objects of any kind
into this product hrough openings as they may touch
dange ous voltage points or short-out parts that could
result in a fire or electric shock. Never spill liquid of any
kind on the product.
20. Servicing – Do not attempt to service his product yourself
as opening or removing covers may expose you to
dange ous voltage or o her hazards. Refer all servicing to
qualified service personnel.
21. Damage Requiring Service – Unplug his p oduct from the
wall outlet and refer servicing to qualified service personnel
under he following conditions:
a) When he power-supply cord or plug is damaged,
b) If liquid has been spilled, or objects have fallen into the
product,
c) If the p oduct has been exposed to rain or water,
d) If he p oduct does not operate normally by following
the operating instructions. Adjust only hose controls
that are covered by he operating instructions as an
improper adjustment of other controls may result in
damage and will often require extensive work by a
qualified technician to restore the p oduct to its normal
operation,
e) If the produc has been d opped or damaged in any way,
and
f) When he pr oduct exh bits a distinct change in
performance – his indicates a need for service.
22. Replacement Parts – When replacement parts are required,
be sure he service technician has used replacement parts
specified by the manufacturer or have the same
characteristics as he original par t. Unau horized
substitutions may result in fire, electric shock, or o her
hazards.
23. Safety Check – Upon completion of any service or repairs
to his p oduct, ask he service technician to perform safety
checks to determine that the p oduct is in proper operating
condition.
24. Wall or Ceiling Mounting – The product should be mounted
to a wall or ceiling only as recommended by the
manufacturer.
25. Heat – The p oduct should be situated away f om heat
sou ces such as radiators, heat registers, stoves, or o her
p oducts (including amplifiers) hat produce heat.
• DECLARATION OF CONFORMITY
We declare under our sole responsibility that this
product, to which this declaration relates, is in
conformity with the following standa ds:
EN60065, EN55013, EN55020, EN61000-3-2 and
EN61000-3-3.
Following the provisions of 73/23/EEC, 89/336/EEC
and 93/68/EEC Directive.
• ÜBEREINSTIMMUNGSERKLÄRUNG
Wir erklären unter unserer Verantwortung, daß
dieses Produkt, auf das sich diese Erklärung
bezieht, den folgenden Standards entspricht:
EN60065, EN55013, EN55020, EN61000-3-2 und
EN61000-3-3.
Entspricht den Verordnungen der Direktive
73/23/EEC, 89/336/EEC und 93/68/EEC.
• DECLARATION DE CONFORMITE
Nous déclarons sous notre seule responsabilité
que l’appareil, auquel se réfère cette déclaration,
est conforme aux standards suivants:
EN60065, EN55013, EN55020, EN61000-3-2 et
EN61000-3-3.
D’après les dispositions de la Directive 73/23/EEC,
89/336/EEC et 93/68/EEC.
• DICHIARAZIONE DI CONFORMITÀ
Dichiariamo con piena responsabilità che questo
prodotto, al quale la nostra dichiarazione si riferisce,
è conforme alle seguenti normative:
EN60065, EN55013, EN55020, EN61000-3-2 e
EN61000-3-3.
In conformità con le condizioni delle direttive
73/23/EEC, 89/336/EEC e 93/68/EEC.
QUESTO PRODOTTO E’ CONFORME
AL D.M. 28/08/95 N. 548
CLASS 1 LASER PRODUCT
LUOKAN 1 LASERLAITE
KLASS 1 LASERAPPARAT
,,
CLASS 1
LASER
PRODUCT
ADVARSEL: USYNLIG LASERSTRÅLING VED ÅBNING, NÅR
VAROITUS! LAITTEEN KÄYTTÄMINEN MUULLA KUIN TÄSSÄ
VARNING– OM APPARATEN ANVÄNDS PÅ ANNAT SÄTT ÄN I DENNA
SIKKERHEDSAFBRYDERE ER UDE AF FUNKTION.
UNDGÅ UDSAETTELSE FOR STRÅLING.
KÄYTTÖOHJEESSA MAINITULLA TAVALLA SAATTAA
ALTISTAA KÄYTTÄJÄN TURVALLISUUSLUOKAN 1
YLITTÄVÄLLE NÄKYMÄMTTÖMÄLLE LASERSÄTEILYLLE.
BRUKSANVISNING SPECIFICERATS, KAN ANVÄNDAREN
UTSÄTTAS FÖR OSYNLIG LASERSTRÅLNING SOM
ÖVERSKRIDER GRÄNSEN FÖR LASERKLASS 1.
,
• DECLARACIÓN DE CONFORMIDAD
Declaramos bajo nuestra exclusiva responsabilidad
que este producto al que hace referencia esta
declaración, está conforme con los siguientes
estándares:
EN60065, EN55013, EN55020, EN61000-3-2 y
EN61000-3-3.
Siguiendo las provisiones de las Directivas
73/23/EEC, 89/336/EEC y 93/68/EEC.
• EENVORMIGHEIDSVERKLARING
Wij verklaren uitsluitend op onze verantwoordelijkheid
dat dit produkt, waarop deze verklaring betrekking
heeft, in overeenstemming is met de volgende
normen:
EN60065, EN55013, EN55020, EN61000-3-2 en
EN61000-3-3.
Volgens de bepalingen van de Richtlijnen 73/23/EEC,
89/336/EEC en 93/68/EEC.
• ÖVERENSSTÄMMELSESINTYG
Härmed intygas helt på eget ansvar att denna
produkt, vilken detta intyg avser, uppfyller följande
standa der:
EN60065, EN55013, EN55020, EN61000-3-2 och
EN61000-3-3.
Enligt stadgarna i direktiv 73/23/EEC, 89/336/EEC
och 93/68/EEC.
,
CAUTION:
• To completely disconnect this product from the
mains, disconnect the plug from the wall socket
outlet.
When setting up this product, make sure that the
AC outlet you are using is easily acceptable.
VORSICHT:
• Um dieses Gerät vollständig von der
Stromve sorgung abzutrennen, trennen Sie bitte
den Netzstecker von der Wandsteckdose ab.
Stellen Sie bei der Aufstellung dieses Gerätes
sicher, dass die zu verwendende WechselstromSteckdose leicht zugänglich ist.
PRECAUTION:
• Pour déconnecter complètement ce produit du
courant secteur, débranchez la prise de la prise
murale.
Lors de l’installation de ce produit, assurez-vous
que la prise CA que vous utilisez est compatible.
ATTENZIONE:
• Per scollegare definitivamente questo prodotto
dalla rete di alimentazione elettrica, togliere la
spina dalla relativa presa.
Durante l’installazione, assicura si che la presa in
CA utilizzata sia facilmente raggiungibile.
PRECAUCIÓN:
• Para desconectar completamente este producto
de la alimentación eléctrica, desconecte el
enchufe del enchufe de la pared.
Al ajustar este producto, asegúrese de que la
toma de salida de CA que esté utilizando sea
fácilmente aceptable.
VOORZICHTIGHEID:
• Om de voeding van dit product volledig te
onderbreken moet de stekker uit het stopcontact
wo den getrokken.
Let er bij het plaatsen van dit product op dat het
te gebruiken stopcontact goed bereikbaar is.
FÖRSIKTIHETSMÅTT:
• Koppla loss stickproppen från eluttaget för att
helt skilja produkten från nätet.
Vid installationen av produkten ska du se till att
eluttaget den ansluts till är nära utrustningen.
A NOTE ABOUT RECYCLING:
This p oduct’s packaging materials are
recyclable and can be reused. Please
dispose of any materials in acco dance
w th your local recycling regulations.
When discarding the unit, comply with
your local rules or regulations.
Batteries should never be th own away or
incinerated but disposed of in acco dance with your local
regulations concerning chemical wastes.
ÜBER DAS RECYCLING:
Das Ve packungsmaterial dieses Produktes ist für das
Recycling geeignet und kann wieder verwendet werden.
Bitte entsorgen Sie alle Materialien in Abhängigkeit von
Ihren örtlichen Vorschriften über das Recycling.
Falls das Gerät entso gt werden muss, beachten Sie die
örtlichen Vorschriften und Gesetze. Die Batterien dürfen
nicht ve brannt und auch nicht in den Hausmüll
geworfen; bitte geben Sie die Batterien gemäß örtlichen
Bestimmungen an den Sammelstellen oder
Sondermüllplätzen ab.
UNE REMARQUE CONCERNANT LE RECYCLAGE:
Les matériaux d’emballage de ce produit sont
recyclables et peuvent être réutilisés. Veuillez disposer
de tout matériau conformément aux réglements de
recylage locaux. Quand l’appareil est mis au rancart,
suivez le règle local ou le loi concernant.
Les piles ne doivent jamais être jetées ou incinérées,
mais mises au rebut conformément aux réglements
locaux concernant les déchets chimiques.
NOTA RELATIVA AL RICICLAGGIO:
I materiali di imballaggio di questo prodotto sono
riutilizzabili e riciclabili. Smaltire i materiali conformemente
alla normative locale sul riciclaggio. Per smaltire l
osservare la normativa in vigore nel luogo di utilizzo.
Non gettare le batterie, né incenerirle, ma smaltirle
conformemente alla normativa locale sui rifiuti chimici.
ACERCA DEL RECICLAJE:
Los materiales de embalaje de este producto son
reciclables y se pueden volver a utilizar. Disponga de
estos materiales siguiendo los reglamentos de reciclaje
de su localidad. Cuando se deshaga de la unidad, cumpla
con las reglas o reglamentos locales.Las pilas nunca
deberán tirarse ni incinerarse.
Deberá disponer de ellas siguiendo los reglamentos de
su locali-dad relacionados con los desperdicios químicos.
EEN AANTEKENING WAT BETREFT HET RECYCLEREN:
Het inpakmateriaal van dit product is recycleerbaar en kan
opnieuw gebruikt worden. Er wordt verzocht om zich van
elk afvalmateriaal te ontdoen volgens de plaatselijke
voorschriften. Volg voor het wegdoen van de speler de
voorschriften voor de verwijdering van wit- en bruingoed op.
Batterijen mogen nooit wo den weggegooid of verbrand,
maar moeten volgens de plaatselijke voorschriften
betreffende chemisch afval worden verwijde d.
EN KOMMENTAR OM ÅTERVINNING:
P oduktens emballage är återvinningsbart och kan
återanvändas. Kassera det enligt lokala
återvinningsbestämmelser. När du kasserar enheten ska
du göra det i överensstämmelse med lokala regler och
bestämmelser.
Batterier får absolut inte kastas i soporna eller brännas.
Kassera dem enligt lokala bestämmelser för kemiskt
avfall.
’
unità,
NOTE ON USE / HINWEISE ZUM GEBRAUCH /
OBSERVATIONS RELATIVES A L’UTILISATION / NOTE SULL’USO
NOTAS SOBRE EL USO / ALVORENS TE GEBRUIKEN / OBSERVERA
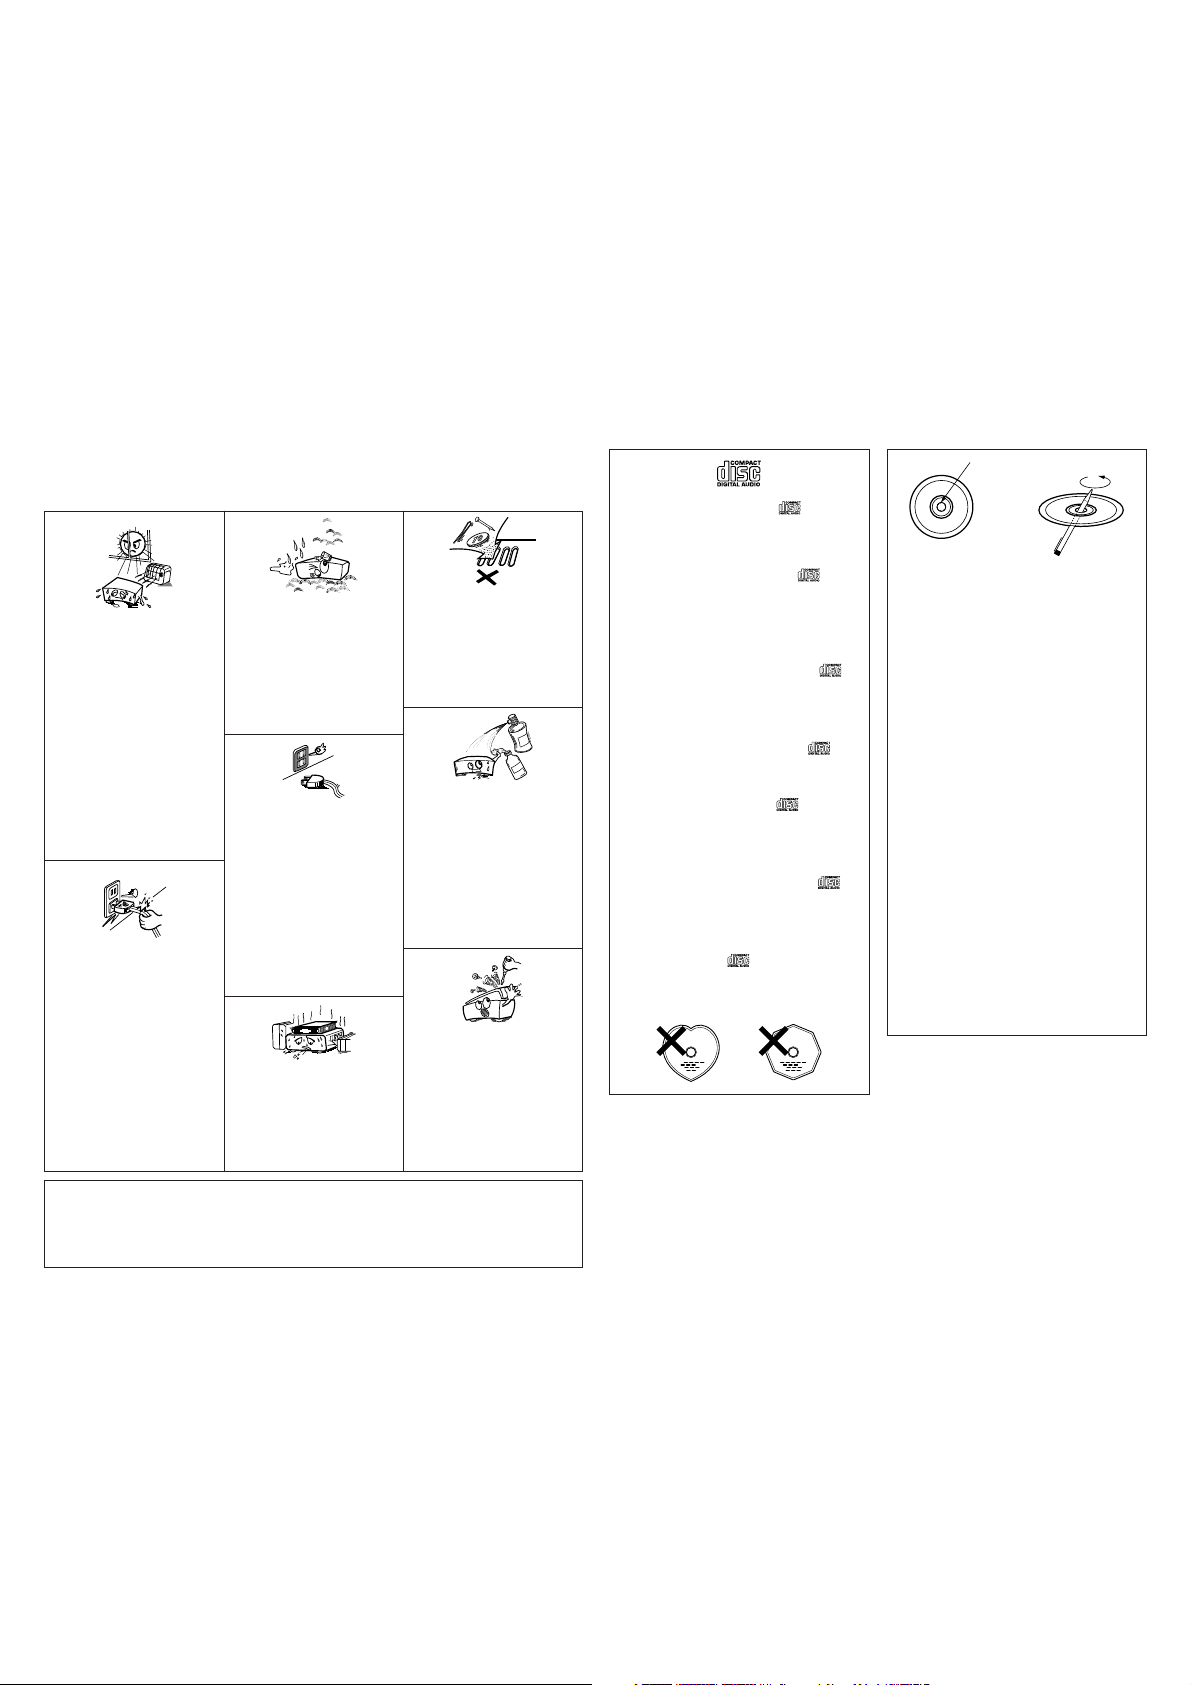
• Keep he apparatus free from moisture,
water, and dust.
• Avoid high temperatures.
A low for suf icient heat dispersion when
installed in a rack.
• Vermeiden Sie hohe Temperaturen.
Beachten Sie, daß eine ausreichend
Luftzirkulation gewährleistet wird, wenn
das Gerät auf ein Regal gestellt wird.
• Eviter des températures élevées
Tenir compte d’une dispersion de chaleur
suf isante lors de l’installation sur une
étagère.
• Evitate di esporre l’unità a temperature alte.
Assicuratevi che ci sia un’adeguata
dispersione del calore quando installate
l’unità in un mobile per componenti audio.
• Evite altas temperaturas
Permite la su iciente dispersión del calor
cuando está instalado en la consola.
• Vermijd hoge temperaturen.
Zorg voor een degelijk hitteafvoer indien het
apparaat op een rek wordt geplaatst.
• Undvik höga temperaturer.
Se ill att det inns möjlighet ill god
värmeavledning vid montering i ett rack.
• Handle the power cord carefully.
Hold he plug when unplugging the cord.
• Gehen Sie vorsichtig mit dem Netzkabel
um.
Halten Sie das Kabel am Stecker, wenn Sie
den Stecker herausziehen.
• Manipuler le cordon d’alimenta ion avec
précaution.
Tenir la prise lors du débranchement du
cordon.
• Manneggiate il ilo di alimentazione con
cura.
Agite per la spina quando scollegate il cavo
dalla presa.
• Maneje el cordón de energía con cuidado.
Sostenga el enchufe cuando desconecte el
cordón de energía.
• Hanteer het netsnoer voorzichtig.
Houd het snoer bij de stekker vast wanneer
deze moet worden aan- of losgekoppeld.
• Hantera nätkabeln varsamt.
Håll i kabeln när den kopplas från el-uttaget.
CAUTION
• Minimum distances around the apparatus for
sufficient ventilation.
• The ventilation should not be impeded by covering
the ventilation openings with items, such as
newspapers, table-cloths, curtains, etc..
• Halten Sie das Gerät von Feuchtigkeit,
Wasser und Staub fern.
• Protéger l’appareil contre l’humidité, l’eau
et lapoussière.
• Tenete l’unità lontana dall’umidità,
dall’acqua e dalla polvere.
• Mantenga el equipo libre de humedad, agua
y polvo.
• Laat geen voch igheid, water of stof in het
apparaat binnendringen.
• Utsätt inte apparaten för fukt, vatten och
damm.
• Unplug the power cord when not using the
apparatus for long periods of time.
• Wenn das Gerät eine längere Zeit nicht
verwendet werden soll, trennen Sie das
Netzkabel vom Netzstecker.
• Débrancher le cordon d’alimentation
lorsque l’appareil n’est pas u ilisé pendant
de longues périodes.
• Disinnestate l ilo di alimentazione quando
avete l’intenzione di non usare il ilo di
alimentazione per un lungo periodo di
tempo.
• Desconecte el cordón de energía cuando no
u ilice el equipo por mucho iempo.
• Neem al ijd het netsnoer uit het
stopkontakt wanneer het apparaat
gedurende een lange periode niet wordt
gebruikt.
• Koppla ur nätkabeln om apparaten inte
kommer att användas i lång id.
* (For apparatuses wi h ven ila ion holes)
• Do not obstruct the ven ila ion holes.
• Die Belüftungsöffnungen dürfen nicht
verdeckt werden.
• Ne pas obstruer les trous d’aération.
• Non coprite i fori di ven ilazione.
• No obstruya los orificios de ventilación.
• De ven ilatieopeningen mogen niet worden
beblokkeerd.
• Täpp inte till ven ila ionsöppningarna.
• No naked flame sources, such as lighted candles,
should be placed on the apparatus.
• Attention should be drawn to the environmental
aspects of battery disposal.
• The use of apparatus in tropical and/or moderate
climates.
• Do not let foreign objects into he apparatus.
• Keine fremden Gegenstände in das Gerät
kommen lassen.
• Ne pas laisser des objets étrangers dans
l’appareil.
• E’ importante che nessun oggetto è inserito
all’interno dell’unità.
• No deje objetos extraños dentro del equipo.
• Laat geen vreemde voorwerpen in dit
apparaat vallen.
• Se ti l att främmande föremål inte tränger in
i apparaten.
• Do not let insec icides, benzene, and
hinner come in contact with the apparatus.
• Lassen Sie das Gerät nicht mit Insek iziden,
Benzin oder Verdünnungsmitteln in
Berührung kommen.
• Ne pas mettre en contact des insec icides,
du benzène et un diluant avec l’appareil.
• Assicuratevvi che l’unità non venga in
contatto con insetticidi, benzolo o solventi.
• No permita el contacto de insec icidas,
gasolina y diluyentes con el equipo.
• Laat geen insektenverdelgende middelen,
benzine of verfverdunner met dit apparaat
in kontakt komen.
ill att inte insektsmedel på spraybruk,
Se
•
bensen och hinner kommer i kontakt med
apparatens hölje.
• Never disassemble or modify the apparatus
in any way.
• Versuchen Sie niemals das Gerät
auseinander zu nehmen oder auf jegliche
Art zu verändern.
• Ne jamais démonter ou modifier l’appareil
d’une manière ou d’une autre.
• Non smontate mai, nè modi icate l’unità in
nessun modo.
• Nunca desarme o modifique el equipo de
ninguna manera.
• Nooit dit apparaat demonteren of op andere
wijze modifiëren.
• Ta inte isär apparaten och försök inte bygga
om den.
• Use compact discs hat include he mark.
CD’s w th special shapes (heart-shaped CD’s, octagonal
CD’s etc ) cannot be played on this set.
Attempting to do so may damage the set. Do not use
such CD’s.
• Benutzen Sie Compact Discs, die das Zeichen
tragen.
Speziell geformte CD’s (herzförmige CDs, achteckige
CDs, usw ) können auf dieser Anlage nicht abgespielt
we den.
Der Versuch derartige CDs abzuspielen kann die Anlage
beschädigen. Verzichten Sie auf die Benutzung solcher
CDs.
• Utiliser des disques compacts portant le logo .
Des CD avec des formes spéciales CD en forme de
coeur, des CD octogonaux, etc ) ne peuvent pas être lus
sur cet appareil.
Le fait de l’essayer, risque d’endommager le lecteur. Ne
pas utiliser de tels CD.
• Utilizzare compact disc contrassegnati con .
Non è poss bile eseguire in questa unità CD con forme
speciali CD a forma di cuore, ottagonali, ecc ), poiché
possono danneggiare il p odotto. Non utilizzare tali CD.
• Use discos compactos con la marca .
En este equipo no es pos ble reproducir CDs con formas
especiales CDs con forma de corazón, CDs octagonales,
etc ).
Si intenta hacerlo, el equipo podrá resultar dañado. No
use este tipo de CDs.
• Gebruik compact discs voorzien van het logo .
CD’s met speciale vormen (bijv. CD’s in de vorm van een
hart, ach hoekige CD’s, enz ) kunnen met dit toestel niet
wo den afgespeeld.
Wanneer u dit toch probeert, zal u het toestel
beschadigen. Speel dergelijke CD’s dus niet af.
• Använd CD-skivor med -märket.
Specialformade CD-skivor (hjärtformade, åttkantiga, m m)
går inte att spela på den här apparaten.
Utrustningen kan skadas om du försöker göra detta.
Använd inte CD-skivor av denna typ.
Residue
Rückstand
Résidu
Residuo
Residuos
Oneffenheid
Disc
Plastrester
• The disc may not play normally if there is residue
along the edges of the center hole.
• When using new discs in particular, use a pen, etc.,
to remove the residue.
• Die Disk kann nicht normal abgespielt werden, wenn
sich ein Rückstand entlang der Mittellochenden
befindet.
• Insbesondere, wenn Sie neue Disks benutzen, dann
entfernen Sie mit einem Stift, etc. den Rückstand.
• Le disque peut ne pas être lu normalements s’il y a
un résidu le long des bord du t ou central.
• Lors de l’utilisation de nouveaux disques en
particulier, utiliser un stylo à bille, etc., pour enlever
le résidu.
• Il disco non viene eseguito in modo corretto se sono
presenti residuo ai bordi del foro centrale.
• Quando si utilizzano dischi nuovi, utilizzare una penna
o uno strumento simile, per rimuovere i residui.
• El disco no puede ser reproducido normalmente
debido a la terminación deficiente de los bordes del
agujero central.
• Para quitar estos residuos de material,
especialmente cuando vaya a re producir discos
nuevos, utilice un bolígrafo, o algo similar.
• Het is mogelijk dat de disc niet normaal wordt
weergegeven als de randen van het middengat van
de schijf oneffenheden vertonen.
• Verwijder vooral bij gebruik van nieuwe discs de
oneffenheden met een pen of iets dergelijks.
• Det kan uppstå fel vid CD-avspelningen om det finns
plastrester kvar i mitthålet.
• Tänk på att bort dessa med en penna, e d, särskilt
om CD-skivan är ny.
DEUTSCH FRANCAIS ITALIANO ESPAÑOL NEDERLANDS SVENSKAENGLISH
S
F
CLR
OOP
R
SE
CH
R GE
K
JUST
PITCH/
OL
CUE
CT
SC
OOP
/
E
CH
!7
!6
@3
#7
$5
$1
$2
$3
$4
!0
o
u i #8#8 #9#9 $0$0 $6$6 #6#6 #4#4 #1#1
#2
#5
#3
#0
@9
@8
@7
@6
@5
!4
@4
!3
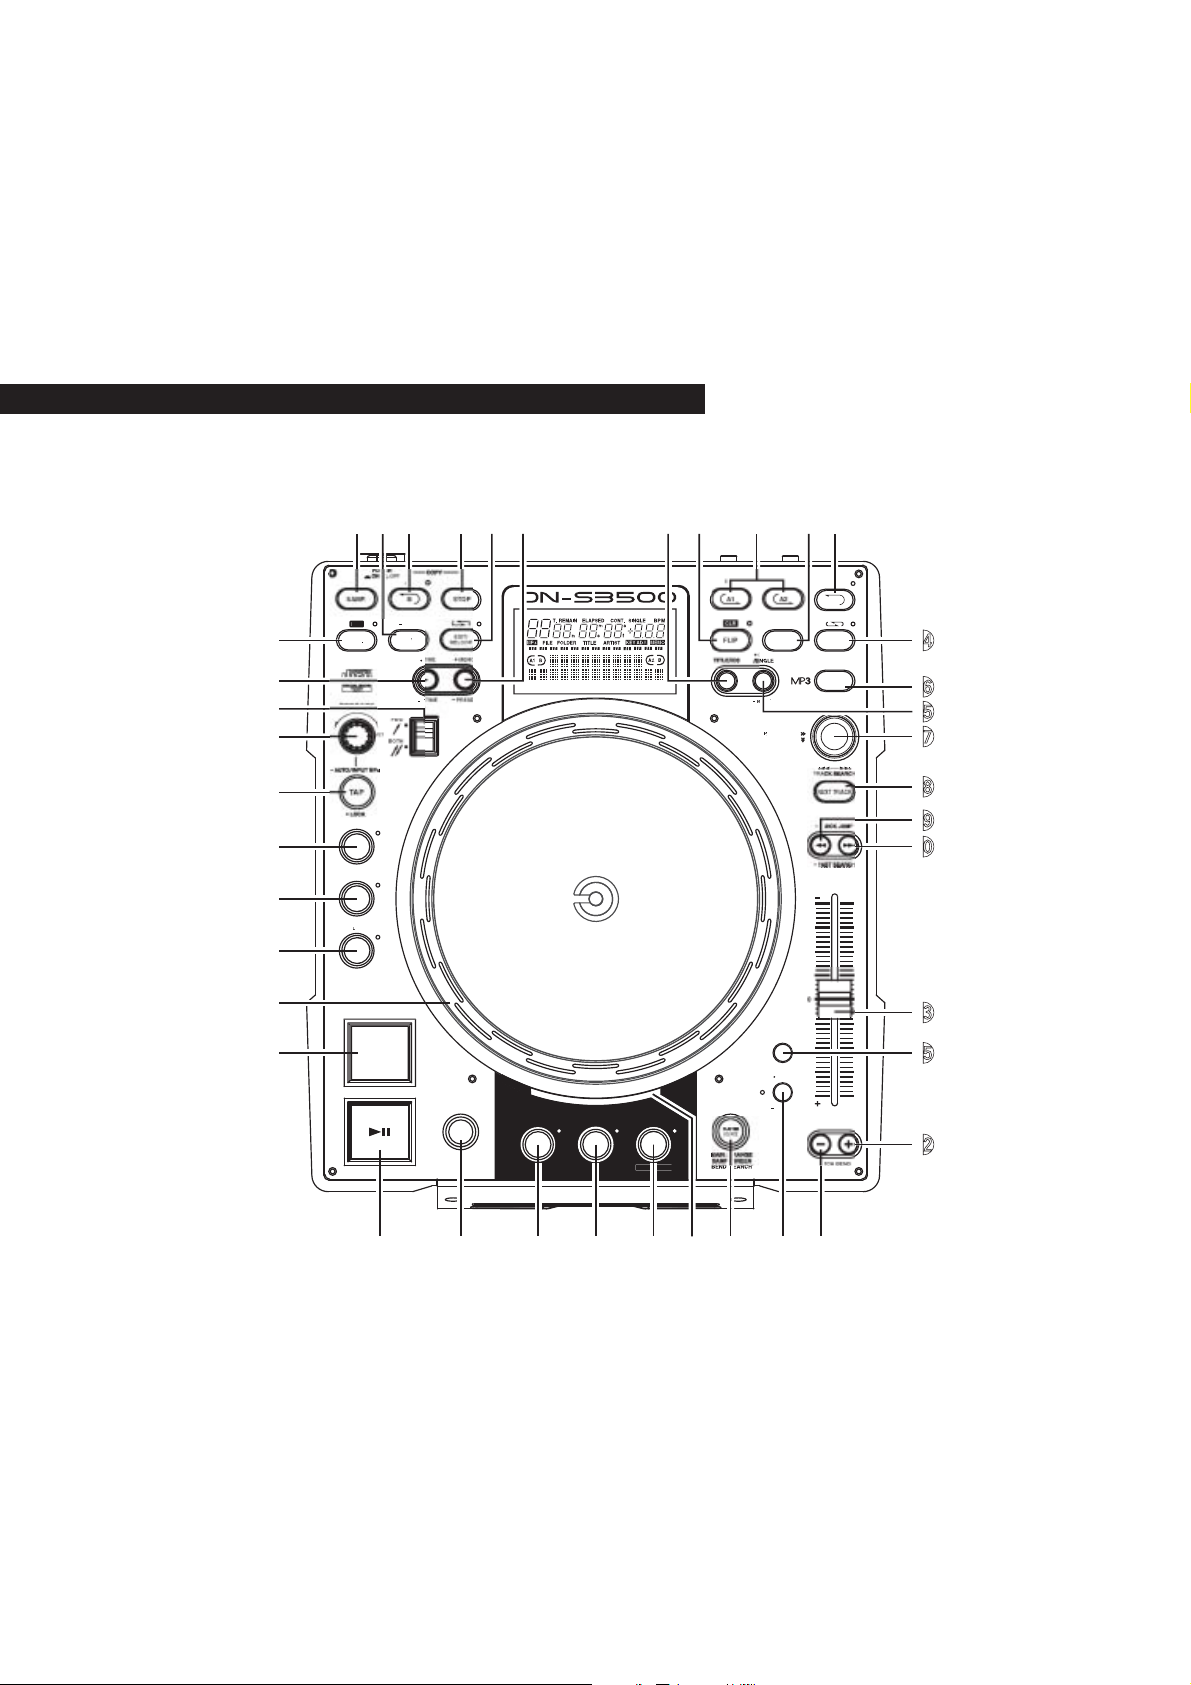
TOP PANEL DIAGRAM / OBERES BEDIENFELD-SCHEMA / SCHEMA DU PANNEAU SUPERIEUR / SCHEMA PANNEAU SUPERIEUR
DIAGRAMA DEL PANEL SUPERIOR / OVERZICHT VAN BOVENPANEEL / BILD ÖVER ÖVERSTA PANELEN
!7
@1@1!8!8@0@0!9!9@4
!6
@3
#7
$5
@2@2!1!1!2!2!5!5!3
EX T
REL
FILESEAR
MOD
PUSHONOF
!4
@6
@5
@7
$1
$2
$3
$4
!0
ECHO/L
FLANGE
@8
@9
#0
#3
EY AD
DI
EJE
BR KE DUMP REV R
PIT
#5
#2
FRONT PANEL DIAGRAM / VORDERES BEDIENFELD-SCHEMA /
q
POWER ON OFF
DIGITAL OUT
L
R
LINE OUTFADER IN OUT
M MO
r e y t w
SCHEMA DU PANNEAU AVANT / SCHEMA PANNEAU AVANT / DIAGRAMA DEL PANEL
FRONTAL / OVERZICHT VAN VOORPANEEL / FRONTPANELEN
REAR PANEL DIAGRAM / HINTERES ANSCHLUSSFELD-SCHEMA /
SCHEMA DU PANNEAU ARRIERE / SCHEMA PANNEAU ARRIERE / DIAGRAMA DEL PANEL
POSTERIOR / OVERZICHT VAN ACHTERPANEEL / BAKPANELEN
• This unit can display text information on he display when
playing CD text discs which contain text information in
English category.
The CD text disc includes the mark shown at he right.
NOTE:
• This unit can provide a text display of the following
types of characters. O her types of characters will
result in “ ” being displayed.
• Alphabet
ABCDEFGHIJKLMNOPQRSTUVWXYZ
abcdefghijklmnopqrstuvwxyz
• Numbers
0123456789
• Symbols
SPACE
• Bei der Wiedergabe von CD-Textdiscs, die
Funktionstasten in englischer Kategorie en halten, kann
dieses Gerät auf dem Display Funktionstasten anzeigen.
Die CD-Textdiscs sind mit dem rechts da gestellten Logo
versehen.
HINWEIS:
• Dieses Gerät kann aus den nachfolgend aufgeführten
Zeichenarten bestehende Texte anzeigen Bei anderen
Zeichenarten wi d “ ” angezeigt.
• Alphabet
ABCDEFGHIJKLMNOPQRSTUVWXYZ
abcdefghijklmnopqrstuvwxyz
• Zahlen
0123456789
• Symbole
SPACE
• Cet appareil peut afficher les textes d’information lors de
la lecture de CD qui comportent ces textes, dans la
catégorie anglaise.
Les CD avec texte se repèrent à la marque indiquée à
d oite.
REMARQUE:
• Cet appareil permet l’affichage de textes composés
avec les types de caractère suivants. Tous les autres
types de caractère seront affichés ainsi “ ”.
• Alphabétiques
ABCDEFGHIJKLMNOPQRSTUVWXYZ
abcdefghijklmnopqrstuvwxyz
• Chiffres
0123456789
• Symboles
SPACE
• Quest’unità può visualizzare dei testi sul display durante
la riproduzione di CD che contengono dei testi in inglese.
Il disco CD con testi include il ma chio mostrato qui a
destra.
NOTA:
• Quest’unità è in grado di fornire una visualizzazione dei
testi usando i seguenti tipi di caratteri. Altri tipi di
caratteri causeranno la visualizzazione dell’indicazione
“ ”.
• Alfabeto
ABCDEFGHIJKLMNOPQRSTUVWXYZ
abcdefghijklmnopqrstuvwxyz
• Numeri
0123456789
• Simboli
SPACE
• Esta unidad puede mostrar información de texto en la
pantalla cuando se rep oducen discos CD de Texto que
contengan información de texto en la categoría de Inglés.
Los discos CD de Texto incluyen la marca indicada a la
derecha.
NOTA:
• Esta unidad puede mostrar visualizaciones de texto de
los siguientes tipos de caracteres.Ot os tipos de
caracteres harán que se visualice “ ”.
• Alfabeto
ABCDEFGHIJKLMNOPQRSTUVWXYZ
abcdefghijklmnopqrstuvwxyz
• Números
0123456789
• Símbolos
SPACE
• Dit toestel kan tekstinformatie op het display tonen bij
het weergeven van CD-Text discs met tekstinformatie in
de categorie Engels.
Een CD-Text disc is voorzien van het logo rechts.
OPMERKING:
• Dit toestel kan de volgende tekens als tekst
weergeven. Voor andere types van tekens verschijnt
“ ” op het display.
• Alfabet
ABCDEFGHIJKLMNOPQRSTUVWXYZ
abcdefghijklmnopqrstuvwxyz
• Getallen
0123456789
• Symbolen
SPACE
• Denna apparat kan visa text på displayen när du spelar
CD-textskivor innehållande information på engelska.
CD text-skivor bär märket som anges på höger sida.
OBSERVERA:
• Apparaten kan visa text med följande teckentyper. För
övriga tecken kommer “ ” att visas.
• Alfabetiska
ABCDEFGHIJKLMNOPQRSTUVWXYZ
abcdefghijklmnopqrstuvwxyz
• Siff or
0123456789
• Symboler
SPACE

ENGLISH
– TABLE OF CONTENTS –
z Main features .....................................................1
x Installing the platter, the scratch disc and the
slipmat / Connections........................................ 2
c Part names and functions ........................... 3 ~ 5
v Compact discs ................................................... 6
b Basic operation.............................................. 6, 7
n Next Track.......................................................... 8
m Scratch............................................................... 9
. B trim................................................................10
⁄0 Sampler ............................................................11
⁄1 Auto BPM Counter/Effector .......................12, 13
⁄2 MP3 playback .............................................13, 14
⁄3 Platter effect.....................................................15
⁄4 Memo (Custom setting memory).....................16
⁄5 Preset ...............................................................17
⁄6 Specifications ...................................................18
, Seamless loop/Hot start/Stutter .................. 9, 10
• ACCESSORIES
Check that the following parts are included in addition to the main unit:
q Operating instructions ........................................1
w Connection cords for signal output (RCA) ..........1
e Aluminum platter ................................................1
r Slip Mat...............................................................1
t Scratch disc ........................................................1
1
MAIN FEATURES
Congratulations on your new purchase of the DNS3500. The DN-S3500 table top single CD/MP3 player
is equipped with a variety of advanced features,
functions and rich performance for unlimited
creativeness and showmanship.
Professional Structure and parts
1. Active Motor Platter
When playback is started, the Platter turns, feels
and reacts in the same way as with an analog
turntable.
The active Platter consists of the Motor-driven
Platter, Slip Mat and Scratch Disc just like an analog
turntable for true vinyl emulation. Beats can be
matched and scratching or cueing can be performed
with the same feeling as an analog turntable.
2. High Torque Direct Drive Motor
Denon’s all new in house design Direct Drive
Motor with brushless construction delivers a
powerful start up to que of 2.5 kg-cm, enabling
the platter to instantly reach full rotation speed
within 0.5 sec.
3. 33/45 R.P.M
You can adjust the platter speed to spin at 33 or
45 rpm, depending on your preference.
Features and Functions
With the implementation of a powerful DSP and la ge
memory capacity allows for many new controlling
features such as:
1. SCRATCH
Thanks to the active Platter and Scratch Disc, the
Scratch sound is comparable to analog turntables.
Furthermore, the Main Track and Samples can be
selected as the Scratch sound source at the touch
of a button.
y Adaptor unit ........................................................1
• Scratch Disc adaptor (Adaptor (1)) ...................2
• 7”reco d adaptor (Adaptor (2)) .........................1
• Fixing Plate.......................................................1
• Screw (< head) ................................................3
2. MP3 PLAY BACK
It is possible to play MP3 and view files created in
the specified format found on page 13.
Files can be searched for easily either manually, or
by scanning or using a number of file search
functions (File search, File/Folder sea ch, Artist
name search, Title name search, File name
search).
3. NEXT TRACK RESERVE
The next track can be selected while continuing to
play the current track for a seamless transition.
4. CROSS FADE
In conjunction with the Next Track feature, the
DN-S3500 can perform a smooth internal cross
fade when transitioning to the new track.
5. HOT START and STUTTER
The Hot Start function lets you start playback
immediately from a set point decided by you. Up
to two points can be set using the A1 and A2
buttons. The loaded Hot Starts can also be used
to “Stutter” those same points. When in Stutter
mode, momentary audio is triggered according to
the length of time of which these buttons are held
down and released.
6. SEAMLESS LOOP
With this function, any section on a disc can be
played repeatedly between A & B points with no
break in sound or limit in length. The DN-S3500
has a variety of looping options such as Exit,
Reloop and dual looping.
7. SAMPLER
On-board digital Sampler can record up to 15
seconds CD quality sound at 44.1kHz sampling
frequency. You can seamlessly loop this sample or
play it backwards (REVERSE). The pitch and
output level of a sample can be adjusted
independently.
The B point can be easily set or changed exactly
the same way as you would use with the A-B
Seamless Loop function.
The CD Seamless loop can be easily copied to
Sampler. This adds a whole new level of
CD/Sample remixing.
8. B TRIM
The B points for the Seamless Loop and the
Sampler can easily be adjusted using the Scratch
Disc. Adjustments can be made in real-time while
playing the live loop.
9. AUTO BPM COUNTER, BPM LOCK, MANUAL
TAP, and MANUAL BPM INPUT
In addition to the Auto BPM counter and Manual
Tap function, the DN-S3500 is also equipped with
a Lock function for temporarily locking the Auto
BPM counter. A Manual BPM Input function is
available too for inputting the known BPM value
directly by a Rotary knob, so the BPM setting can
be made easily.
10. ON BOARD EFFECT’S
Seven types of effectors are included.
ECHO/LOOP:
The ECHO and LOOP functions can be
selected. Looping for the feedback time (ECHO
LOOP) is possible by setting the feedback
number to “MAX”.
FLANGER:
The feedback time and feedback gain can be
selected.
FILTER:
One of three filters (LOW PASS, MID PASS and
HIGH PASS) can be selected and Individually
adjusted.
11. PLATTER MODE
Analog turntable-like playback can be simulated
using three Platter effects.
BRAKE:
Simulates a winding-down sound of a turntable
coming to a full stop slowly. (Slowing-down
time can be adjusted.)
DUMP:
Plays the sound backwards while continuing in
a forward motion without losing “elapse time”
when you return back to normal play.
REVERSE:
(Reverse) Plays the sound and spins the platter
backwards until you return to normal play.
1
ENGLISH
12. MEMO (CD & MP3)
Various settings such as Cue Point, Hot Start, A-B
Loop, BPM, Pitch and Key Adjust can be saved to
the internal non-volatile memory for later recall.
Up to 5000 points are available.
In Addtion, memo data can be transferred into the
DN-S3500 from an another DN-S3500, DN-S5000,
DN-S3000 or DN-D9000.
13. PITCH/KEY ADJUST
PITCH:
Playback speed is adjusted with PITCH slider.
Adjustable pitch ranges are +/– 4, 10, 16, 24,
50, 100% (selectable live).
KEY ADJUST:
Keeps the original key even if the pitch playing
speed is changed with the PITCH slider.
14. DIGITAL OUT
The digital output for Main provides a true 100%
digital signal without any restrictions or limitations
regardless of pitch change or mode setting.
15. FADER START
The DN-S3500 FADER START controls are compatible
with our mixers and most other brand mixers.
16. SHOCKPROOF MEMORY
20 seconds of shock-proof memory guards
against audible interruptions due to external
mechanical shocks such as bumps or other ha d
vibrations, which is especially helpful for the
mobile DJ as well as for nightclub-installed
applications.
17. PRESETS
It is possible to customise the machine to your
preference by saving your favourite setting to
internal memory. For items found in the presets,
please see page 17.
18. CD TEXT
19. CD-R/RW Play Back
This player can play CD-R/RW discs, but only if
they are finalized. Note however that depending
on the reco ding quality, the player may not be
able to play some finalized CD-R/RW discs.
20. Power on Play
The player can be set so that playback in the relay
mode starts when the power is turned on.
21. Plug Ins
From time to time, we will add new exciting
features or improve upon the current ones by free
firmware Plug Ins.
Please visit to www
have the latest firmware ve sion.
.denondj.com ensure you
ENGLISH
2
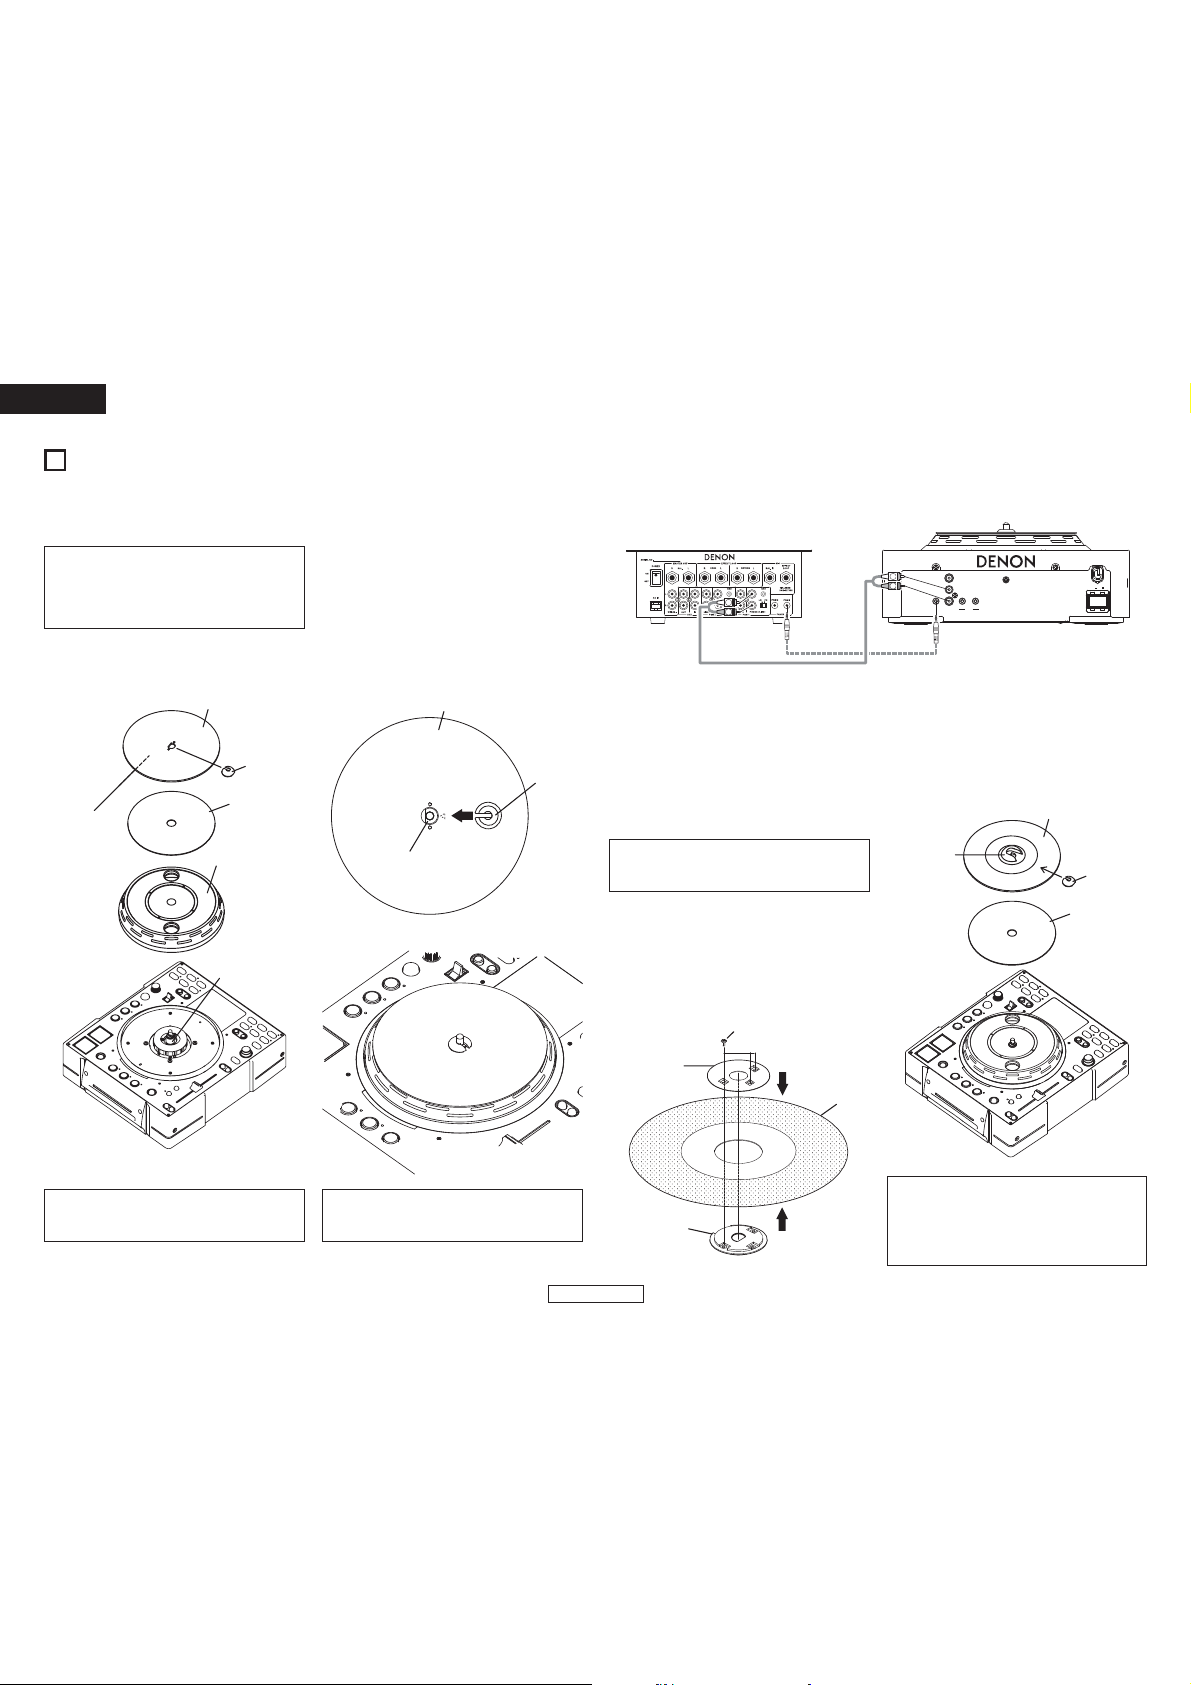
INSTALLING THE PLATTER, THE SCRATCH DISC AND
THE SLIPMAT / CONNECTIONS
(1) INSTALLING THE PLATTER, THE SCRATCH DISC and THE SLIPMAT
• Accessories
q Aluminum Platter ..............................................1
w Scratch Disc ......................................................1
e Slip Mat ............................................................1
r Adaptor (1) ....................................................... 2
Fig. 1
(Groove side
DOWN)
(One is for spare parts.)
Scratch Disc
Adaptor (1)
Slip Mat
Platter
Taper Boss
(Motor Unit)
1. Install the Platter on the taper boss of the motor.
2. Install the Slip Mat on the Platter.
3. Insert D hole of the Scratch Disc on the D shaft of
the Motor.
NOTE: The printed face is located on the Slip Mat
side.
4. Insert the Adaptor acco ding to the direction of the
arrow.
NOTE: Please note the direction of insertion.
Fig. 2
Scratch Disc
D shaft
Fig. 3
Adaptor (1)
(2) CONNECTIONS
1. Turn off the POWER switch.
2. Connect the RCA pin cords between the DN-S3500 outputs and inputs of your mixer.
3. If your mixer has Fader Start function such as our DENON Mixer, connect FADER jack to the mixer using 3.5
mm stereo mini cord.
DN-X300
L
R
Fig. 2
Adaptor (2)
DGI AL UT
L
R
LNE O TF ER N UT
FADER
P WER ON OFF
M MO
7” (17cm) Disc
Adaptor (1)
Slip Mat
LINE
FADER
PGM 1
OUT
L
R
LINE1
(3) INSTALLATION
Please set up DN-S3500 horizontally.
(4) INSTALLING THE 7” (17cm) RECORD ADAPTOR
Your own 7” (17cm) vinyl record can be installed on this product by using the provided adaptor.
This original design grants you the freedom to use your favorite vinyl record for that ultimate analog turntable
feel.
*Make sure the record used is flat and not warped.
• 7” (17cm) record adaptor accessories
q Adaptor (2) ........................................................1
w Screw (< head) ............................................... 3
e Fixing Plate .......................................................1
1. Set Adaptor (2) in the hole of 7” record.
2. Fix Plate with 3 screws. (< head).
3. Insert D hole of the Adaptor (2) on the D shaft of the
Motor.
4. Insert the Adaptor (1) on the Adaptor (2).
Fig. 1
Screw (< head)
CAUTIONS:
• Do not touch the motor unit.
• Do not turn on the power without Platter.
NOTE:
Please note the fall of Platter when you move DNS3500 after Platter is set.
2
ENGLISH
Fixing Plate
Adaptor (2)
7” (17 cm) reco d
NOTE:
Depending on the RECORD you choose, friction
with the Slipmat may not be enough, which can
cause an undesired drag sound.
If so, use a different record that’s thicker or
heavier.
ENGLISH
3
PART NAMES AND FUNCTIONS
(1) Front panel
q Disc loading slot
• Load the disc slowly, and release it once the
DN-S3500 starts grabbing the disc in.
NOTE:
Please clean the dirt of the label side of a disc
and start loading of the disc.
Dirty discs can cause the loading rolle s to slip
upon insertion.
CAUTIONS:
• Do not load discs when the power is turned
off.
• Do not try to forcibly remove a disc once the
DN-S3500 has started to grab the disc.
• Do not load more than once disc at a time or
insert anything other than discs.
Otherwise the loading mechanism may be
damaged.
(2) Rear panel
w POWER button (¢ON £OFF)
• Push this button to turn power on and off.
CAUTION:
• Do not turn off the power while a disc is
loading or being ejected. Otherwise the
loading mechanism may be damaged.
e Analog output jacks
(LINE OUT)
• This is unbalanced RCA output jacks.
• Audio signals outputs.
r Fader start jack
• Use this when your mixer has the Fader Start
function.
t Digital output jack
• Digital data is available from this jack.
• Use 75 1/ohms pin cord for connection.
• We recommend you use braided wire type
shielded cable.
NOTE:
The playback level after analog conversion is set
to –6dB below the usual level to avoid digital
distortion.
y Memo jack (MEMO IN/OUT)
• Use this when you transfer the Memo data from
an another DN-S3500, DN-S3000, DN-S5000 or
DN-D9000.
(3) Top panel
CAUTION:
• Note that there are many buttons working two
different function selected by short time pushing
or long pushing (1 second or more). The mark
indicates short time push function and mark
indicates long time push function.
u PLAY/PAUSE button (13)
• This button will start or pause playback.
• Push once to start playback, once again to
pause playback, and once more to resume
playback.
i DISC EJECT button
• Push this button to eject the disc.
• The disc will not eject during playback.
Stop playback before pushing this button.
o CUE button
• Pushing this button in play mode will force the
track back to the position which playback
started. While in search mode, it makes new
Cue point. (Cue)
• In Cue mode, by pushing the CUE button makes
a Stutter sound from the Cue point. This is
called Stutter play. (Stutter)
!0 Platter/Scratch Disc
Use this vinyl scratch disc for manual search,
Pitch Bend and Scratch operations.
• Platter:
The Platter spins when playback of the source
select Scratch mode button is in the Main or
Sampler position and in play mode.
• Scratch Disc:
When the Scratch Disc is turning, Scratch
playback of the source selected (Main or
Sampler) starts.
NOTE:
The Platter does not spin when the Scratch
mode is set to the BEND/SEARCH mode.
CAUTIONS:
• Do not forcibly try to stop the Platter when it
is turning. Otherwise the moving Platter
mechanism may be damaged.
• If a problem with Platter rotation arises
when the Platter is turning, the Platter stops
turning and the pause mode is set.
!1 FLIP/CLR button
• FLIP:
Use this to select operating mode of A1 and A2
buttons, from Hot Start mode and Stutter mode.
The display will indicate “H/S” or “STR”.
• A1, A2 CLR:
If the A1 or A2 button is pushed while pushing
the FLIP button, you can clear the selected A
point.
By holding down just the FLIP button for more
than 1 sec, you can clear A1 and A2 points all at
once.
!2 A1, A2 button
• Using this button you can create a starting point
for Hot Start, Seamless Loop and Stutter.
!3 B button
• Use this to set the B point to create a Seamless
Loop after the A point has been set.
!4 EXIT/RELOOP button
• Use this to exit or return back again to the
Seamless loop playback. You can add variety to
looping with this function.
!5 B TRIM button
• When the button is pressed during playback,
the *B TRIM MODE is selected. *Only when a
seamless LOOP is set.
In the standby and pause modes, only the B
TRIM MODE can be selected.
!6 (SAMP) REV/CLR button
• (SAMP) REV:
Use this to select the sample play direction
forwa d and reverse. When select reverse REV
LED lights up.
• (SAMP) CLR:
If the SAMP button is pushed while pushing the
SAMP REV button, you can clear the SAMP
data.
Or, by holding down just the SAMP REV button
for more than 1 sec.
!7 SAMP button
• Push this button to reco d or play the Sampler
sound.
!8 (SAMP) B button
• Use this to set the Sampler loop B point.
!9 (SAMP) EXIT/RELOOP
• Use this to turn the Sampler Loop mode on and
off. Also acts as EXIT/RELOOP button for
Sampler Loop to exit or reloop.
3
ENGLISH
@0 (SAMP) STOP button
• Push this button while in Sampler record or
playback, Sampler to stop recording or playback.
• When the Sampler is in the stop status, the
STOP button can be used for Stutter playback.
@1
(SAMP) PITCH/VOL., B TRIM button
• PITCH/VOL.:
When this button is pressed, the SAMPLER
PITCH is selected. When pressed again, the
SAMPLER LEVEL is selected.
Pitch of Sampler and output level of Sampler
playback can be adjusted with the
PARAMETERS knob.
• B TRIM:
When this button is pressd for more than 0.5
sec, the Sampler B TRIM mode is selected.
@2 TITLE/ID3 button
• CD TEXT:
When there is CD text data, the CD text data is
displayed automatically or when the TITLE
button is pressed.
If no TEXT is available, the display will indicate
“No TEXT”.
• MP3:
When an MP3 file has ID-3 tag data, the title,
artist name and album name are selected and
displayed each time the TITLE button is
pressed.
@3 TIME, T.TIME button
• TIME:
A short push will display mode changes
between ELAPSED TIME and REMAIN TIME.
• T.TIME:
A long push, will display mode changes between
TRACK TIME and DISC TIME. (for CDDA)
• So, you can select display mode from four
modes, TRACK ELAPSED, TRACK REMAIN,
DISC ELAPSED and DISC REMAIN.
@4 MEMO, PRESET button
• MEMO:
The memo mode starts when this button is
pushed once, while in the Cue mode.
• PRESET:
When this button is pushed for more than 1 sec,
the PRESET mode menu is displayed.
The machine status must be in, CUE, PAUSE or
No Disc mode before entering the preset mode.

ENGLISH
@5 CONT./SINGLE, RELAY button
• CONT./SINGLE:
A short tap of this button will toggle between 3
possible END modes for playback.
CONT. (continue: plays all tracks) SINGLE (stops
playing and ReCUE’s back to your original set
point), PLAYLOCK-see below.
• SINGLE PLAY LOCK:
SINGLE PLAY LOCK can be selected by
PRESET. When SINGLE PLAY LOCK is selected,
track selection during playback is disabled. This
prevents playback from stopping when the
Track Select Knob is turned accidentally during
playback. Play ending mode is the same as
single.
• RELAY:
You can turn on and off RELAY PLAY mode.
Relay playback is possible when two DNS3500s are connected by the MEMO in/out
jacks.
@6 FILE SEARCH MODE button
• MP3 DISC only:
When pushing this knob the file search
selection mode can be selected with the
PARAMETERS knob.
@7 TRACK/PARAMETERS knob
• TRACK:
When PARAMETERS LED is on, turn this knob
to select tracks.
By pushing this knob down while turning, the
tracks will change by 10 tracks at a time.
• PARAMETERS:
When the PARAMETER LED is flashing, turn
this knob to select and change the parameter
for items found in the Platter effects, Memo,
and Preset data, etc.
@8 NEXT TRACK button
•
If this button is pushed during playback, the NEXT
TRACK mode will be selected. The next track can
be selected with the PARAMETERS knob.
@9 FAST SEARCH (6)
QUICK JUMP button
#0 FAST SEARCH (7)
QUICK JUMP button
• QUICK JUMP:
When one of these buttons is tapped shortly,
the playback position jumps approximately 10
seconds in the forward (
direction. The jump time can be changed in the
preset mode.
• FAST SEARCH:
When one of these buttons is pressed and held
in, the disc is fast-searched in the forward (
6) direction.
or reverse (
7) or reve se (6)
#1 PITCH BEND – button
#2 PITCH BEND + button
• Pushing these buttons will change main playing
speed temporarily.
• While pushing PITCH BEND + button, the
playing speed increases and speed decreases
while pushing PITCH BEND – button.
• When these buttons are release, the playing
speed returns to the previous speed.
#3 Pitch Slider
• Use this slider to adjust playing speed faster or
slower.
#4 PITCH, RANGE button
• Push this button to set the PITCH mode on and
off.
• RANGE:
Push this button for more than 1 sec to select
the pitch range. The pitch range can be selected
with the PARAMETERS knob from ±4, 10, 16,
24, 50 or 100%.
#5 KEY ADJUST button
• Push this button to set the KEY ADJUST mode
on and off.
#6 PLATTER SOURCE button
Select the source for Scratch playback and the
manual sea ch/bend mode.
• MAIN:
This button lights up orange.
Manipulate the Main Track sound.
• SAMP.:
This button lights up green only if a sample is
loaded.
Manipulate the Sampler sound via the scratch
disc.
• BEND/SEARCH:
When this button is pushed again, the
BEND/SEARCH mode is selected.
When the Scratch Disc selector is set to
BEND/SEARCH during playback, it works as the
pitch bend function by turning the scratch disc.
When Scratch Disc is turned in the pause or
standby mode, it functions as the manual
search function. In Manual search, you can
move the CUE point around by one frame at a
time (1/75 second) with an audible frame-repeat
sound, da-da-da-da.
7)
#7 SCRATCH direction select lever
Select the Scratch play direction.
• BOTH:
When the Scratch Disc is turned, the Scratch
sound is heard in both stroke directions.
• FWD:
When the Scratch Disc is turned, the Scratch
sound is heard in the forward direction only.
#8 BRAKE button
• Push this button to set the BRAKE.
#9 DUMP button
• Push this button to set the DUMP.
$0 REVERSE button
• Push this button to set the REVERSE.
$1 TAP, LOCK, AUTO, INPUT BPM
button
• TAP:
When you push this button repeatedly, the Auto
mode turns off and starts measuring your Beats
Per Minute (BPM) by tapping.
• LOCK:
When this button is pressed once while the
auto BPM counter is operating, the data
measured by the auto BPM counter is locked.
• AUTO:
When pushing the TAP button for 1 second,
activates AUTO BPM mode.
The measured BPM is displayed in the character
section of the display.
• INPUT BPM:
When the TAP button is pressed and held in for
more than 2 seconds, the BPM input mode is
set and the BPM value can be input directly with
the EFFECTS knob. When the tap button is
pressed again, the BPM input mode is turned
off and set.
NOTE:
If you select a new track, AUTO BPM mode
turns on automatically.
$2 ECHO/LOOP button
• The ECHO and ECHO LOOP functions can be
selected. The feedback time and feedback ratio
can be selected. Looping for the feedback time
(ECHO LOOP) is possible by setting the
feedback number to “MAX”.
4
ENGLISH
$3 FLANGER button
• The feedback time and feedback gain can be
selected.
$4 FILTER button
• One of three filters (LOW PASS, MID PASS and
HIGH PASS) can be selected.
$5 EFFECTS knob
• Use this knob to set parameters of the internal
effector.
$6 PLATTER LED
• This vibrant blue bar provides platter modes at a
glance such as, Scratch Memory, Pitch Bend,
Frame Sea ch and Loaded Disc.
ENGLISH
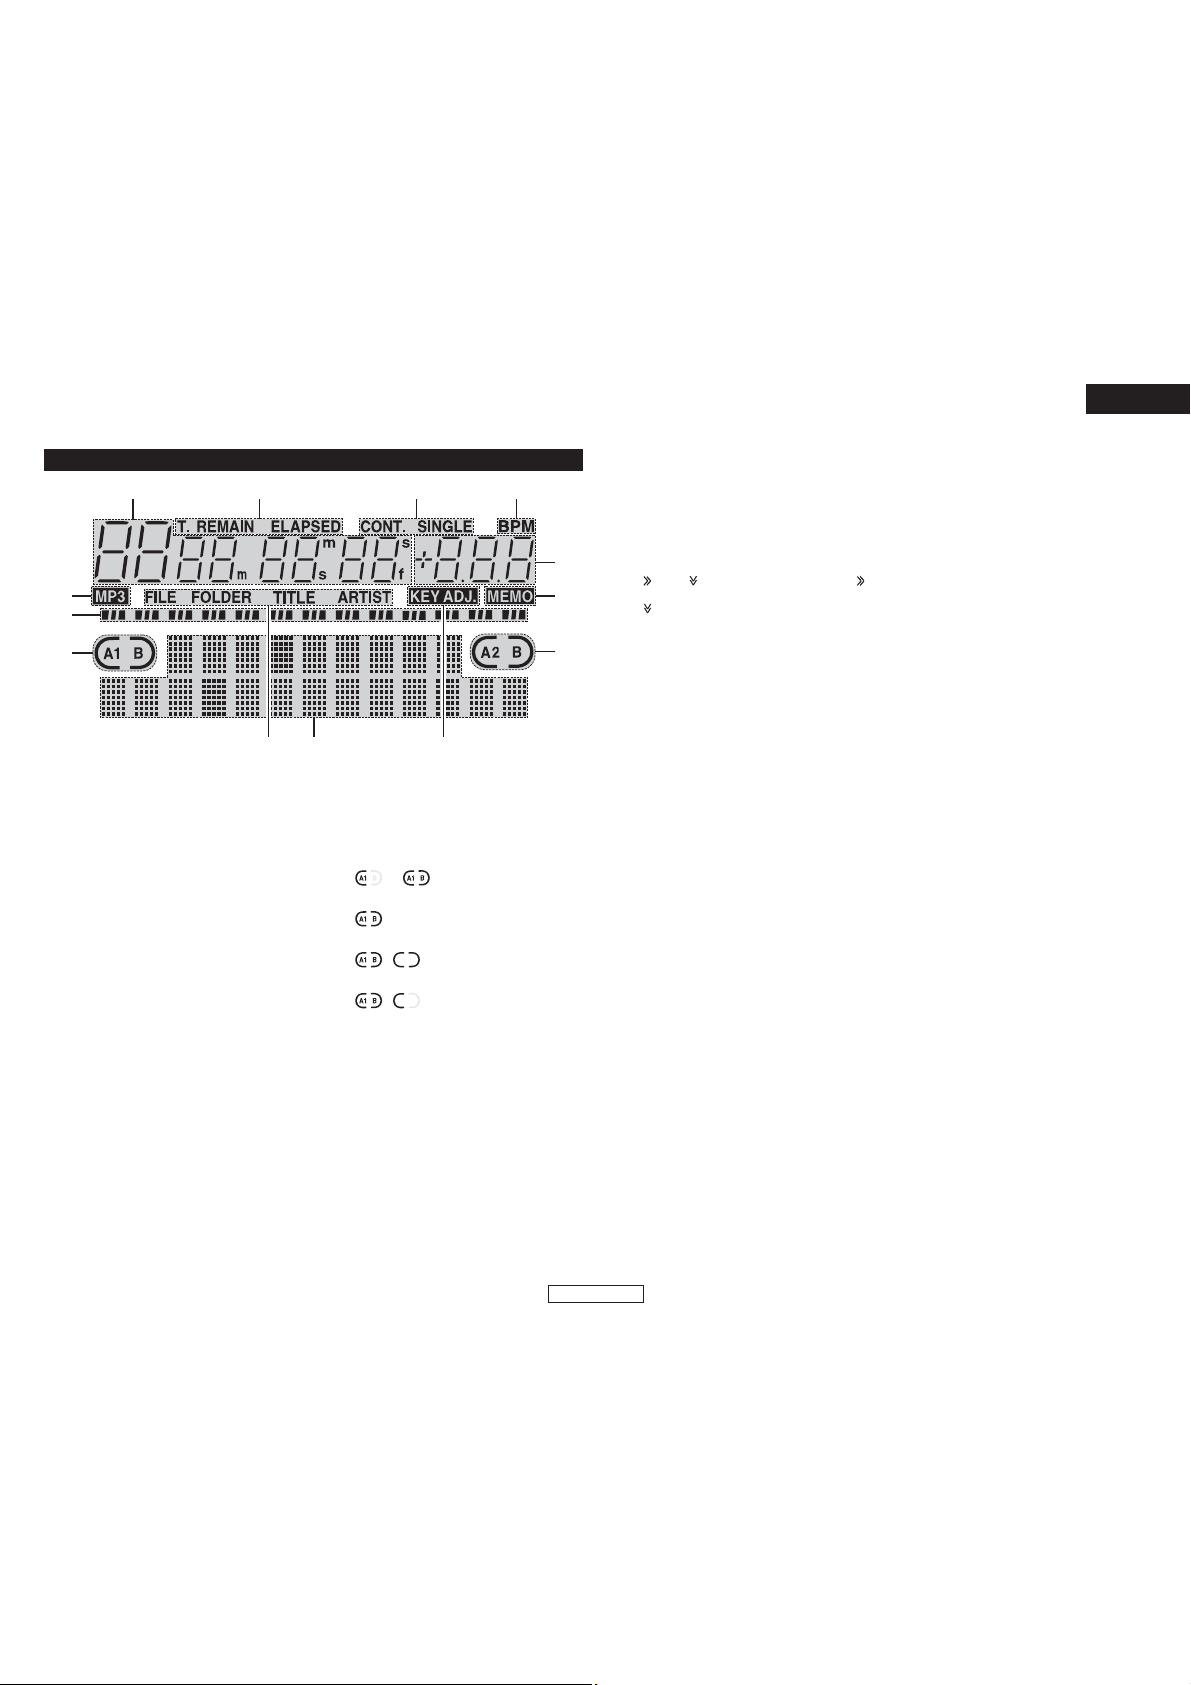
(4) Display
q w e r
t
o
y
q Track, minute, second and frame
displays
• These displays indicate current position
information.
w Time mode indicators
• When the TIME button is pushed, the Time
mode indicator switches as follows:
ELAPSED:
Track’s elapsed time is displayed.
REMAIN:
Track’s remaining time is displayed.
T. ELAPSED:
The total elapsed time of disc is displayed.
T. REMAIN:
The total remaining time of disc is displayed.
e Play mode indicators
• When SINGLE indicator lights up, playback will
finish at end of current track.
• When CONT. indicator lights up, playback
continues until the end of the disc.
r BPM indicator
• Lights up when the BPM is displayed on the
pitch display.
t MP3 indicator
• Lights up when an MP3 disc is detected.
!0iu
y Loop mode indicators
• DN-S3500 has Loop mode indicators which
consist of A , B and two arrows. A and B marks
indicate A and B points have been set.
• Two arrows indicate loop setting mode as
follows.
or Left arrow only on:
Hot Start mode
Both arrows on:
Seamless Loop mode
, Both arrows flashing:
Seamless Loop Playing
, Left arrow on, right flashing:
Exit play from Seamless Loop
u MP3 file search mode indicators
FILE:
FILE indicator appears in the display, when in
the FILE name search mode.
FOLDER:
FOLDER indicator appears in the display,
when in the FILE & FOLDER name search
mode.
TITLE:
TITLE indicator appea s in the display, when
in the TITLE name search mode.
ARTIST:
ARTIST indicator appears in the display, when
in the ARTIST name search mode.
i Character display
• You can select the mode or function using
PARAMETERS knob following the short
message which is displayed on the character
display area.
• The character display indicates the operation,
mode name, data, etc., and displays such guide
!2
!1
y
messages as “Push/Play” means if “YES”,
push PARAMETERS knob. The display indicates
and marks sometime, note that
mark says you to turn PARAMETERS knob and
marks says to push PARAMETERS knob.
• The PARAMETERS LED flashes when you can
use PARAMETER knob, otherwise this knob
used for Track Selection.
o Play Position indicators
• Play position indicator:
The 30 dots indicate a visual track position
marker during normal play. The 10 Orange dots
indicate the play position during the reverse play
mode.
• End of Message:
When the time remaining to the end of the track
is less than the specified time, the EOM (End Of
Message) play position indicator flashes along
with the remaining time, notifying of the track
end.
✽ The EOM time can be set in the presets.
!0 KEY ADJ. indicator
• KEY ADJ. indicator appears in the display when
the Key Adjust mode is ON.
!1 MEMO indicator
• MEMO indicator appea s in the display when
there is a memo setting found for the current
playing track or the track at which the Cue
standby mode is currently set.
!2 Pitch display
• This indicator display the playback speed (pitch).
5
ENGLISH
ENGLISH
4
COMPACT DISCS
1. Precautions on handling compact discs
• Do not allow fingerprints, oil or dust to get on the surface of the disc.
If the disc is dirty, wipe it off with a soft dry cloth.
• Do not use benzene, thinner, water, record spray, electrostatic-proof chemicals, or silicone-treated cloths to
clean discs.
Always handle discs carefully to prevent damaging the surface; in particular when removing a disc from its
•
case or returning it.
• Do not bend the disc.
• Do not apply heat.
• Do not enlarge the hole in the center of the disc.
• Do not write on the label (printed side) with a hard-tipped implement such as a pencil or ball point pen.
• Condensation will form if a disc is brought into a warm area from a colder one, such as outdoors in winter.
Do not attempt to dry the disc with a hair dryer, etc.
2. Precautions on storage
• After playing a disc, always unload it from the player.
• Always store the disc in the jewel case to protect from dirt or damage.
• Do not place discs in the following areas:
(1) Areas exposed to direct sunlight for a considerable time.
(2) Areas subject to accumulation of dust or high humidity.
(3) Areas affected by heat from indoor heate s, etc.
5
BASIC OPERATION
Play and pause
•
Each push of the u PLAY/PAUSE (13) button
switches between playback and pause. PLAY/PAUSE
13
) button illuminates solid green during playback
(
and flashs in pause.
• When the u PLAY/PAUSE (13) button is pushed
during play, the DN-S3500 pauses playback at that
point. Push u PLAY/PAUSE (
and playback resumes.
• When the Platter mode is set to MAIN, the Platter
turns when the Main Track is played. When the
rotation of the Scratch Disc is stopped by your hand,
the sound pauses, and when your hand is released
playback resumes.
13) button once again
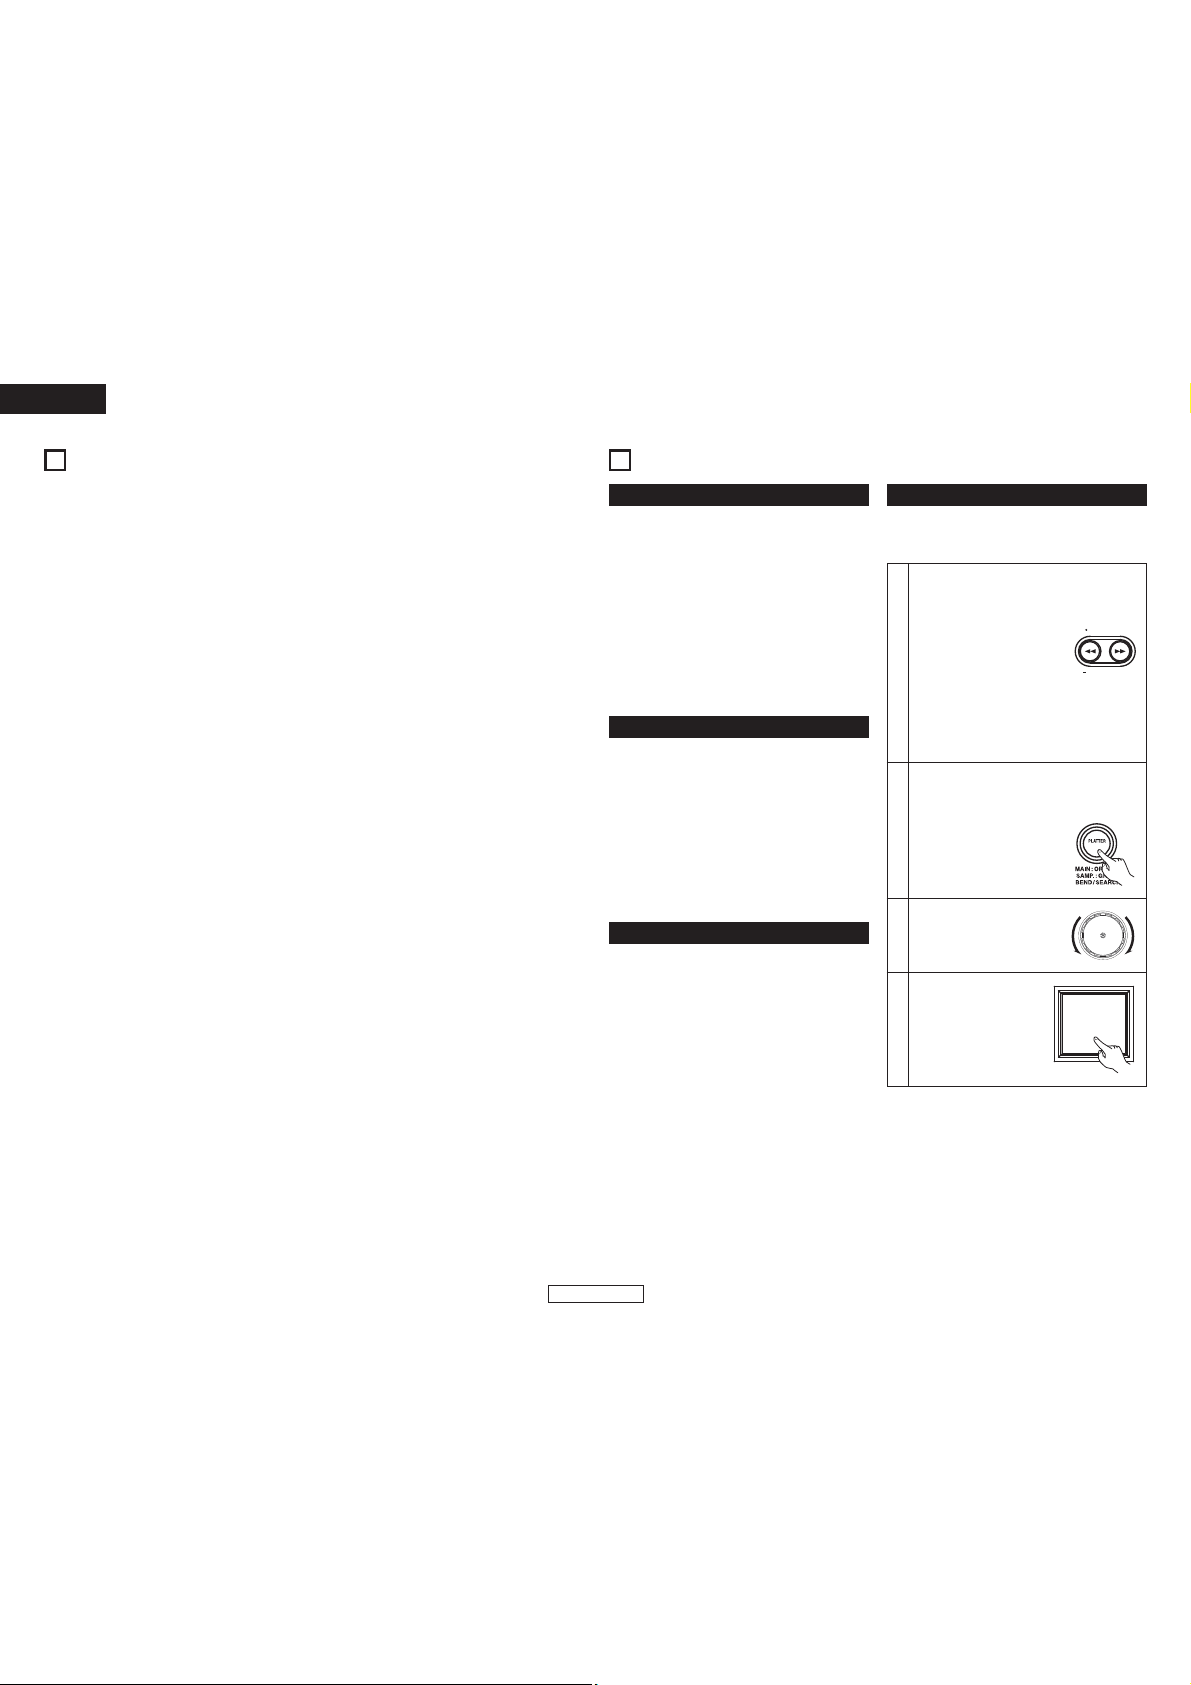
Play and Cue
• When the o CUE button is pushed during playback,
the track stops and returns to the original position of
which playback started from, the (Cue point). This
function is also called Back-Cue. With the Back-Cue
function, you can start from exactly same position.
The o CUE button illuminates solid red when DNS3500 is ready to start playback.
• You can set and change Cue point as follows.
• When you started playback.
• Track select finished.
• manual sea ch.
Select the track
• Turn the @7 TRACK knob.
• By pushing @7 TRACK knob down while turning, the
tracks will increment 10 at a time.
Move the Cue point
•
If you would like to start playback other from the
beginning of the track, you can move the Cue Point
using fast Search or the manual frame sea ch function.
You can move to the approximate playback
start position by @9 or #0 FAST SEARCH
buttons.
QUICK JUMP
• If the FAST SEARCH button is
tapped shortly, the playback
position jumps about 10
1
seconds.
The jump time can be selected in the preset
mode from 10, 20, 30 or 60 sec.
FAST SEARCH
• When the FAST SEARCH button is pressed
and held in, the disc is fast-sea ched.
When the !0 Scratch Disc is turned in the
pause, Cue or frame repeat mode, it works as
the manual frame search function.
Push the #6 PLATTER SOURCE
button to set !0 Scratch Disc to
2
search mode. The PLATTER
SOURCE button LEDs will turn
off and the display will indicate
“FRAME Search”.
Turn the !0 Scratch Disc to
change Cue point. You can hear
3
the short sound of the current
Cue point.
After you have found your
preferred Cue point, push
the o CUE button then a
new Cue point is set.
4
QUICK JUMP
FAST SEARCH
SOURCE
CUE
6
ENGLISH
ENGLISH
S
F
OOP
/
E
CH
0
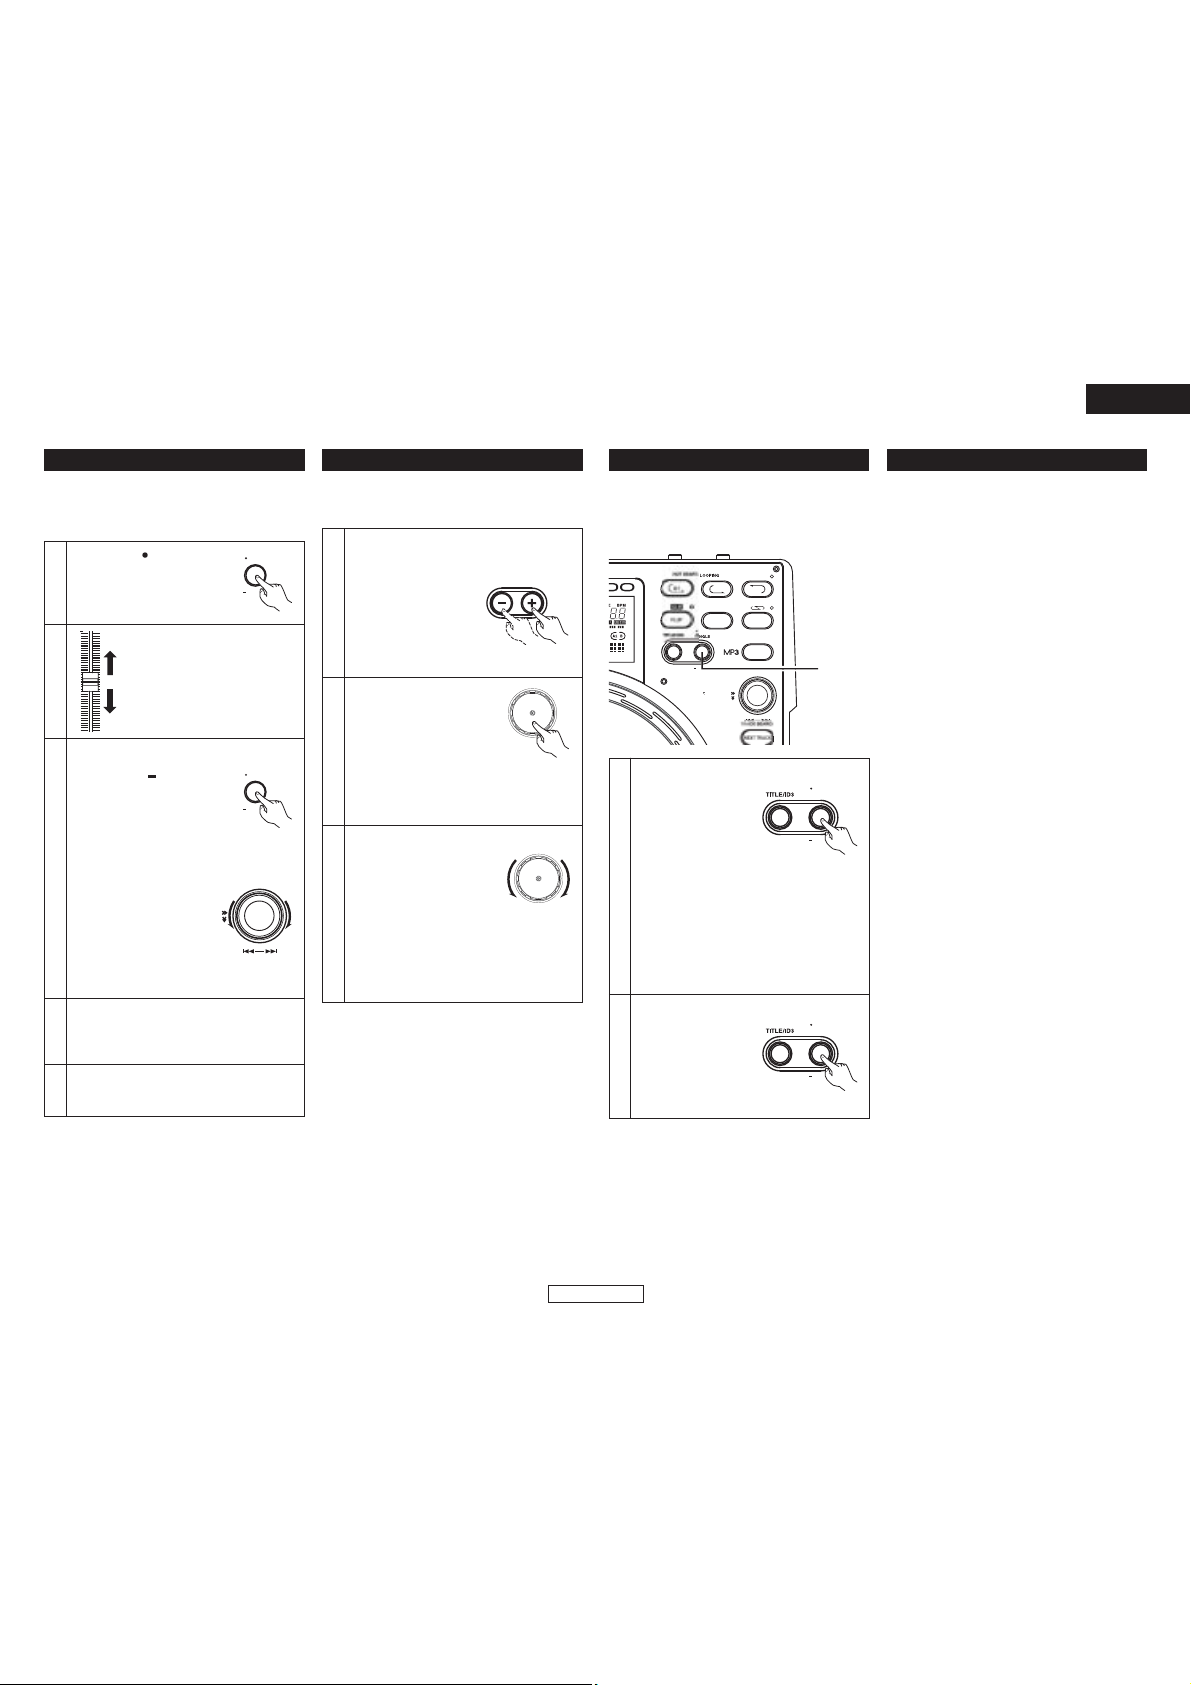
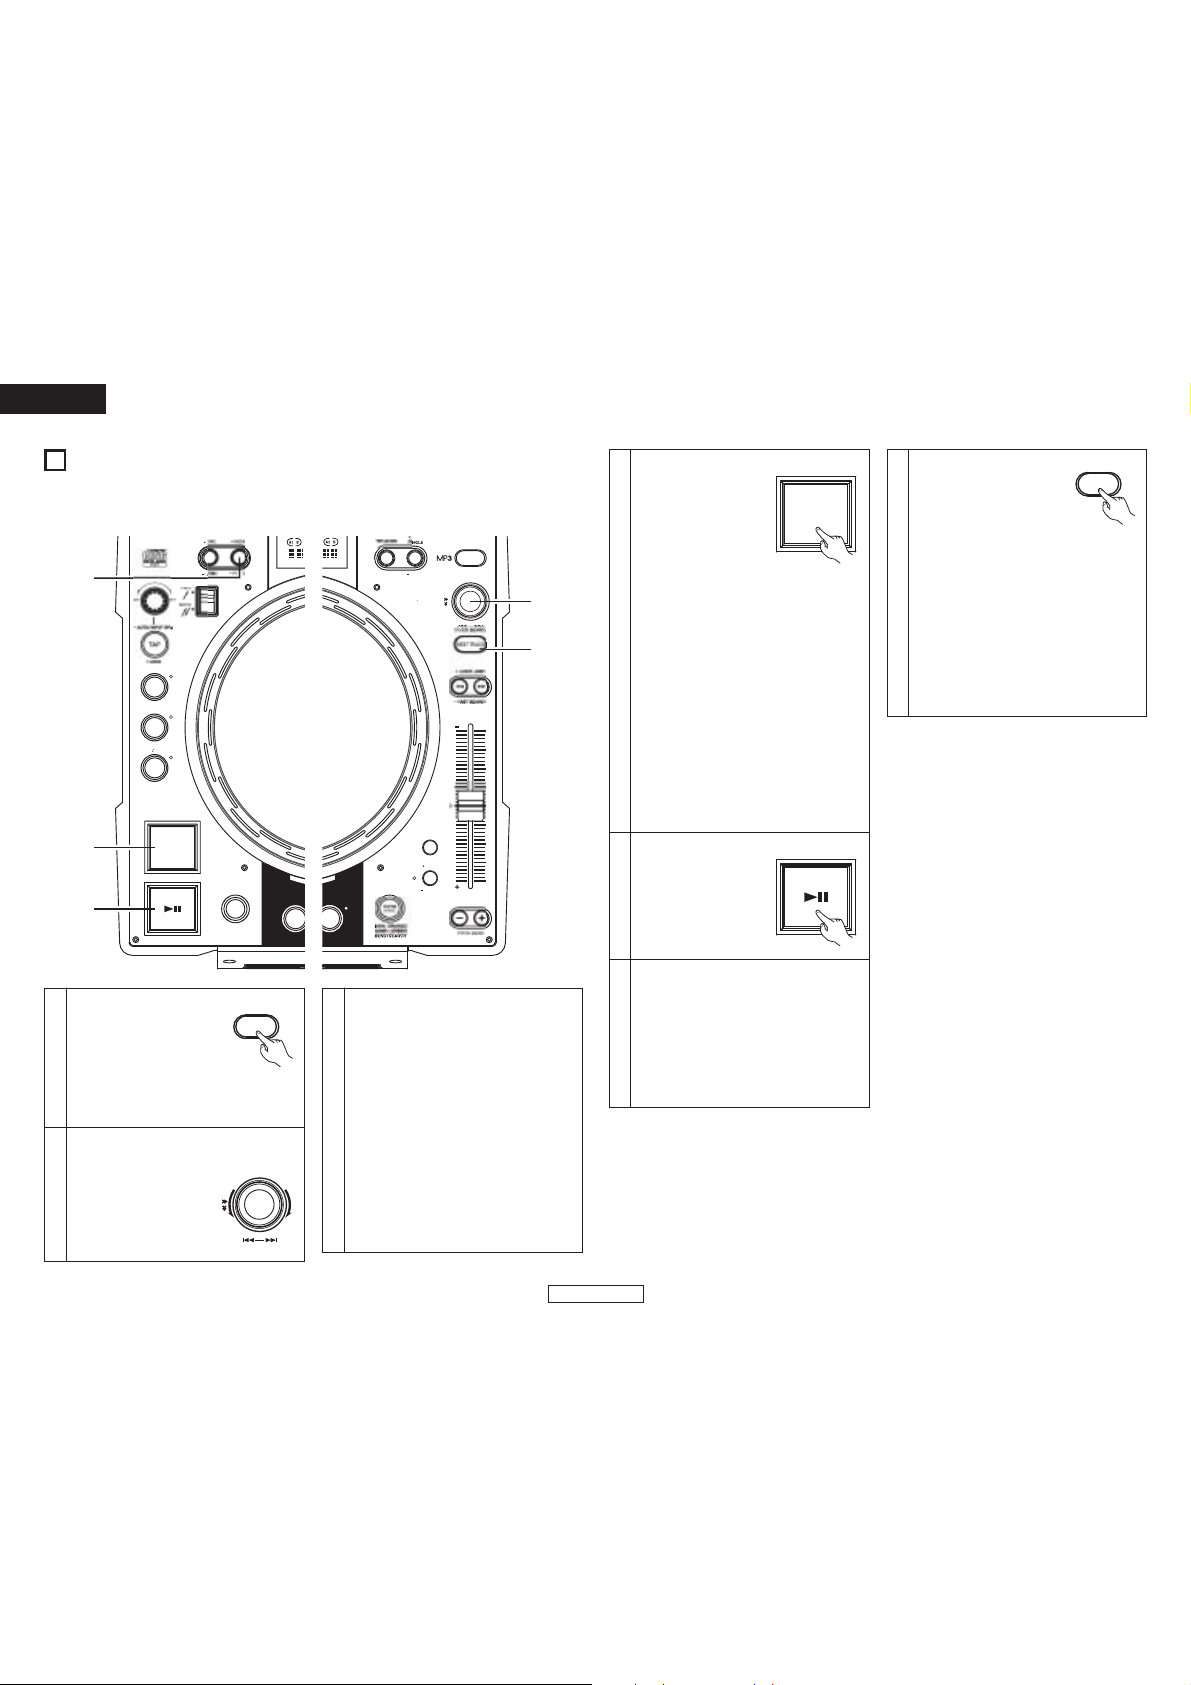
Adjusting the pitch and Key Adjust
• With the Pitch slider you can adjust the playback
speed (Pitch).
• If you would not prefer to change key of sound, use
the Key Adjust function.
Push the #4 PITCH button to
PITCH LED lights up.
1
Pitch decreases
Move the #3 Pitch Slider to adjust
2
the pitch. The current pitch setting
is displayed on the display.
Pitch increases
DN-S3500 has six pitch ranges, 4%, 10%,
16%, 24%, 50% and 100%.
When the #4 RANGE button
is pushed for more than 1 sec,
the pitch range can be selected
with the @7 PARAMETERS knob.
• When the @7 PARAMETERS knob is pushed
the pitch range is entered and the pitch range
3
selection mode is cancelled.
PARAMETERS
PUSH ON OFF
NOTE:
Only a max of 16% range for MP3 discs.
KEY ADJUST ON
When the #5 KEY ADJUST button is pushed,
4-1
the Key Adjust function is turned on and lights
up “KEY ADJ.” in the display.
KEY ADJUST OFF
When the #5 KEY ADJUST button is pushed
4-2
again, the Key Adjust function is turned off.
PITCH
RAN
PITCH
RAN
TRACK SEARCH
Pitch Bend
• With PITCH BEND function you can change pitch
temporary. DN-S3500 has two ways for this function
PITCH BEND buttons and Scratch Disc.
PITCH BEND +/– buttons
• Push the #1 PITCH BEND – or #2 + button for
momentary change of pitch.
While holding these
buttons down, the pitch
1
continues to change up
to the limitation.
• After releasing the
PITCH BEND buttons,
playback pitch returns to slider setting.
When the Platter sou ce is set
to MAIN and the Platter is
turning, playback of the Main
source can be slowed
temporarily by lightly pressing
2
!0 Scratch Disc or PLATTER.
In addition, playback can be quickened
temporarily by pushing Scratch Disc or
PLATTER in the direction in which the Platter is
turning.
Scratch Disc
When the Platter source is
•
set to BEND, the playback
speed can be changed by
turning !0 Scratch Disc during
playback. The display will
3
indicate “Pitch Bend” during this mode.
• The pitch increases gradually when the
Scratch Disc is turned clockwise and
decreases when turned counterclockwise.
• When you stop turning the Scratch Disc, the
playing speed returns to the previous pitch.
P T D
Relay playback
• Relay Play function is a useful mode to continue
playback between two DN-S3500s.
• Connect the MEMO IN/OUT terminals between two
DN-S3500s.
EXIT
REL
FLESEAR
MOD
q, w
PUSHON/OF
Start Relay Play
q Push the RELAY
button for more than
1 sec to enable
Relay play mode.
You can set Relay
play mode as below.
• In the single play mode, when the one
1
player’s playback reaches end of track,
another DN-S3500 starts playing.
• In the continuous play mode, when all
tracks on one player are finished, another
DN-S3500 starts.
• The discs in two DN-S3500s can be
played alternately by setting both DNS3500 to the relay play mode.
Stop Relay Play
w When the RELAY
button is pushed for
more than 1 sec
2
while in the relay
play mode, the relay
play mode is turned
off.
CONT
SINGLE
REL
CONT
SINGLE
REL
Power on play
• When “POWER ON PLAY” is set to “ON” at “⁄5
PRESET (10)”, playback starts from the first track on
the disc when the power is turned on.
7
ENGLISH
ENGLISH
T
TECHO/LOOP
R
BRAKE
E
CT
SC
r, i
t
e
S
F
CH
GE
UST
E
CH
q, y
w, u
6
NEXT TRACK
• It’s now possible to select the beginning of the next track to be played while continuing playback of the current
track without interrupting playback.
*Crossfade can also be used for a smooth transition.
FILESEAR
MOD
PUSHONOF
FLANGE
U
Enter Next Track mode
q When the NEXT TRACK
button is pushed during
playback, the NEXT TRACK
1
function is turned on.
• When this mode is set,
CUE button blink.
• When the button is pushed again, the
NEXT TRACK mode is turned off.
Select the track
w Turn the PARAMETERS knob and select for
the next track to be played.
-1
2
PARAMETERS
PUSH ON OFF
D
EJE
NEXT TRACK
TRACK SEARCH
Select the MEMO
(Next track Memo function)
e The CUE point of MEMO can be selected
2-2
EY ADJ
PIT
RAN
as the NEXT TRACK start point.
• When the NEXT TRACK happens to be
one where a MEMO has been previously
memorized, the MEMO indicator lights
up.
• If the MEMO button is pushed at this
time, the CUE point is memorized as the
NEXT TRACK & point to be selected.
• The MEMO will be canceled if another
track is selected by the PARAMETERS
knob or the MEMO button is pushed
again.
NOTE:
MP3 files with Memo’s are not supported
for this function.
8
ENGLISH
Track search start
r
When the CUE button is
pushed after selecting
the track, current
playback continues as
the next track is
searched for and the
standby mode is set.
When the standby
mode is set, the CUE button lights up and
the PLAY/PAUSE button flashes.
•
During this time, if a loop of 6 seconds or
less is actively looping, it will continue to
3
loop until PLAY is ultimately pressed.
If a loop is over 6 sec, you must first EXIT
from the loop in o der to enter Next Tr
mode.
• The time display indicates the remaining
playback time for data in the memory
after CUE is pressed.
NOTE:
The amount of time for which playback of
the currently continuing track can be
continued is a maximum of 10 seconds
from the time searching for the next track
starts.
Next Track playback start
When the PLAY/PAUSE
t
button is pushed, the
current playback is
4
stopped and playback
of the next track starts.
Next Track cross fade
✽ The currently playing track can be faded
out when starting to play a different track.
The fade out time can be selected at ⁄5
PRESET “(3) Next Track”.
5
• If the PLAY/PAUSE button is not pushed
after standing by at the next track,
playback of the next track starts once all
of the currently playing playback data has
been played.
CUE
Next Track Auto mode
y When the NEXT TRACK
button is pushed during
playback, the NEXT TRACK
function is turned on.
Press the PARAMETERS knob for 2 secouds,
u
then the NEXT TRACK AUTO mode is set.
Playback mode is set to the CONT. mode.
6
i When the CUE button is pressed, the NEXT
TRACK AUTO mode is started.
In the NEXT TRACK mode, the NEXT TRACK
button flashes.
NOTE:
If Playback is interrupted during this mode
by Pause, Cue, Hot Start or track change,
the Next Tr Auto Mode is cancelled and
normal playback resumes.
NEXT TRACK
ENGLISH
F
RAMETER
S
R
T
M
V
OOP
/
E
CH
S
F
T
OOP
R
SE
CH
GE
UST
E
CT
SC
q
w
e
7
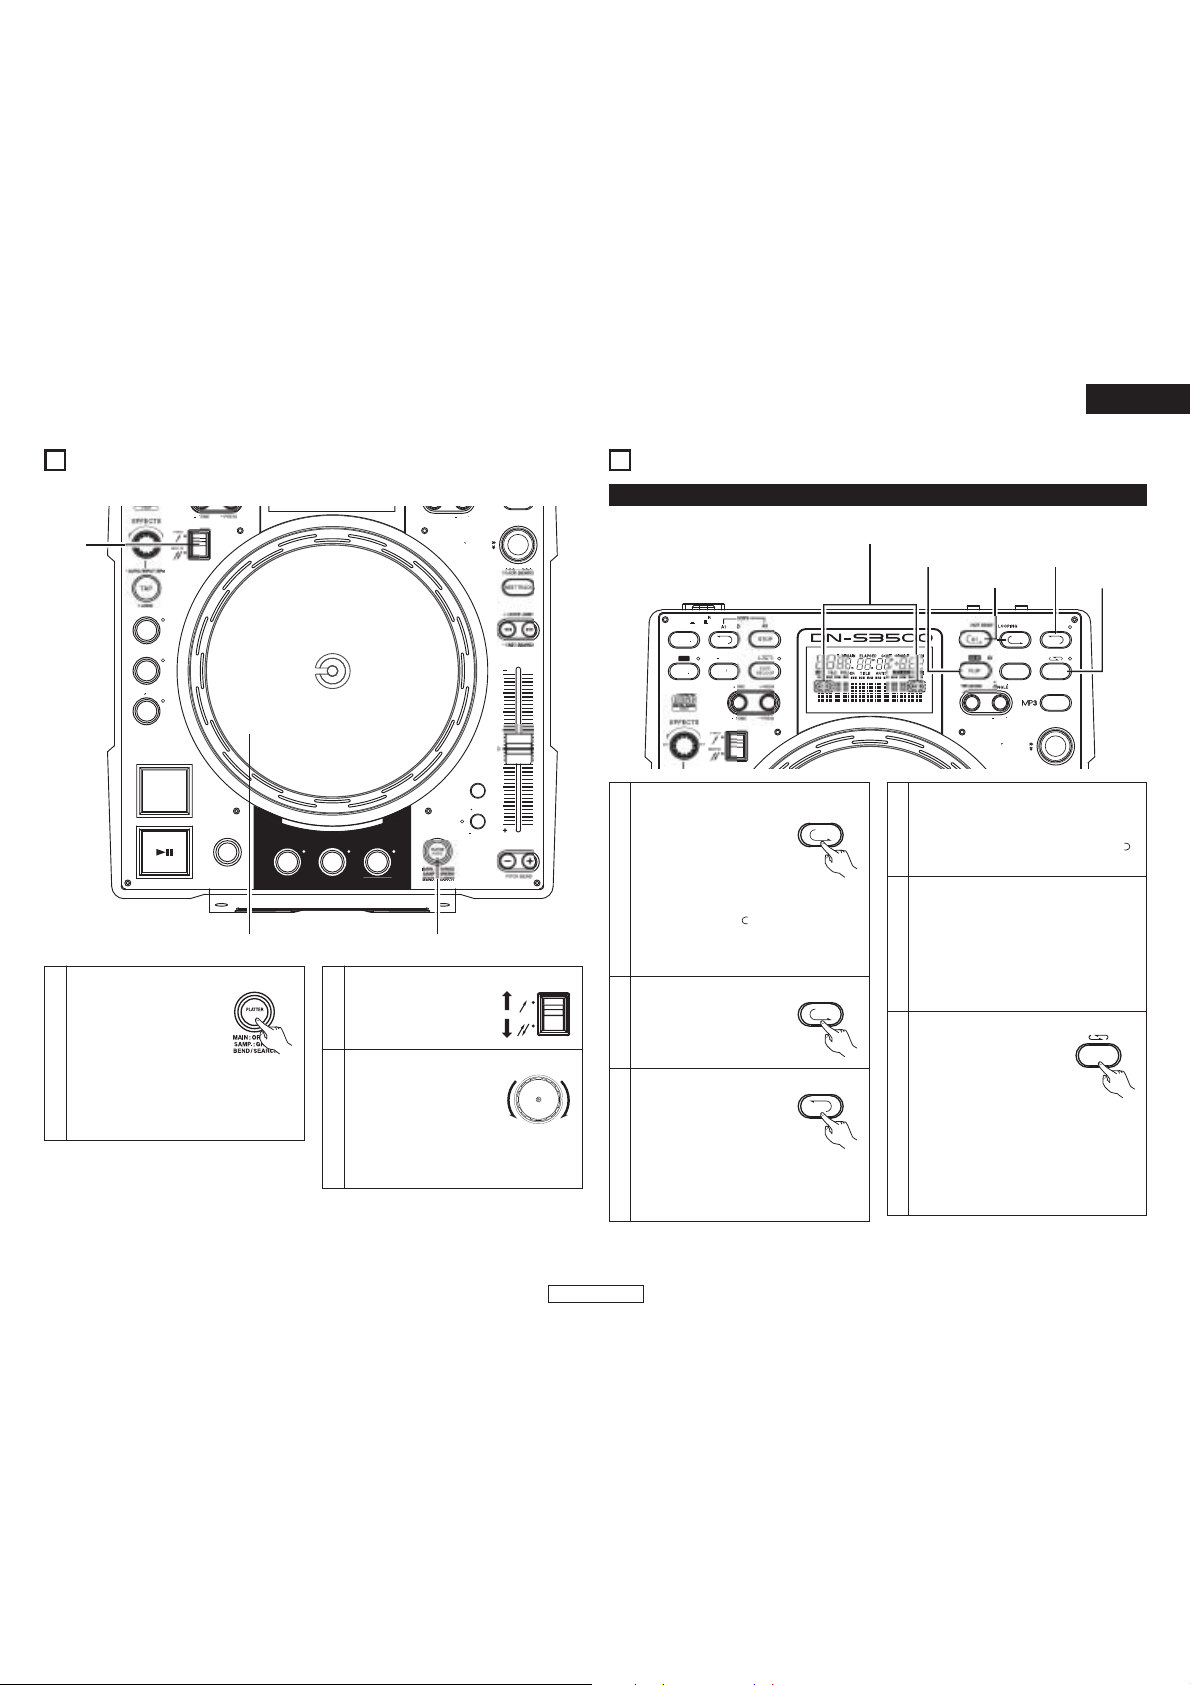
SCRATCH
You can Scratch in CD or Sampler mode.
ECHO/L
FLANGE
U
D
EJE
Select Platter source
q
Select the source to be
scratched using the PLATTER
SOURCE button.
1
MAIN: The PLATTER SOURCE button
lights up in orange.
SAMPLER: The PLATTER SOURCE button
lights up in green.
(Only when a sample is loaded)
BRAKE DUMP REVER
SOURCE
PUSHONOF
EY ADJ
PIT
RAN
Select Scratch direction
w Select the direction for
2
scratching using the
SCRATCH direction select
lever.
Scratch Disc
e When MAIN is selected as
the Scratch mode and
Scratch Disc is turned by
3
hand, the Main Track (CD)
is being scratched.
When SAMPLER is selected as the Scratch
mode and Scratch Disc is turned by hand,
the sample is being scratched.
8
SEAMLESS LOOP/HOT START/STUTTER
Seamless Loop/Hot Start/Stutter (A1, A2 buttons)
Operation display (refer to the
section describing the display)
t, y e, y
F
A
L
Setting the A point
(loading the Hot Start data)
q Push the A1 or A2 button to
set the A point. (Hot Start
data loading starts.)
• A1 and A2 buttons can be
1
used separately for each
Hot Start.
When an A point is set, the corresponding
•
A button and “ ” display lights up and
that button is set to the Hot Start mode.
• The BPM is set independently for each
Hot Start automatically.
Starts Hot Start
w
When A1 or A2 button is
pushed, Hot Start playback
2
starts from the corresponding
A point.
Setting the B point for Seamless Loop
e When the B button is
pushed after setting the A
point or after starting Hot
start playback, the B point is
3-1
set and Seamless Loop
playback starts from the A
point.
• The B button works with respect to the A
point.
A1
A1
B
3-2
Playing Seamless Loops
4
Exit/Reloop
r In Seamless Loop playback,
5
q, w, y r
EXIT
REL
FLESEAR
MOD
PUSHONOFF
• If the B button is pushed during Seamless
Loop playback or after EXIT playback, the
B point moves to the point at which the
button was pushed.
• When the B point is set, the B and “ ”
indicators light up in the display.
• When the B point for A1 is detected after
playback started from A1 point, playback
returns to A1 point with seamless. While
A1 to B looping, B point for A2 is ignored.
• When the B point for A2 is detected after
playback started from A2 point, playback
returns to A2 point with seamless. While
A2 to B looping, B point for A1 ignored.
you can force exit or return
to the loop.
EXIT:
During Seamless Loop
playback, push the EXIT/RELOOP button to
exit from loop. DN-S3500 continues
playback after the B point.
RELOOP:
When the EXIT/RELOOP button is pushed
after exit the loop, Seamless Loop playback
resumes from the A point instantly.
EXIT/
RELOOP
9
ENGLISH
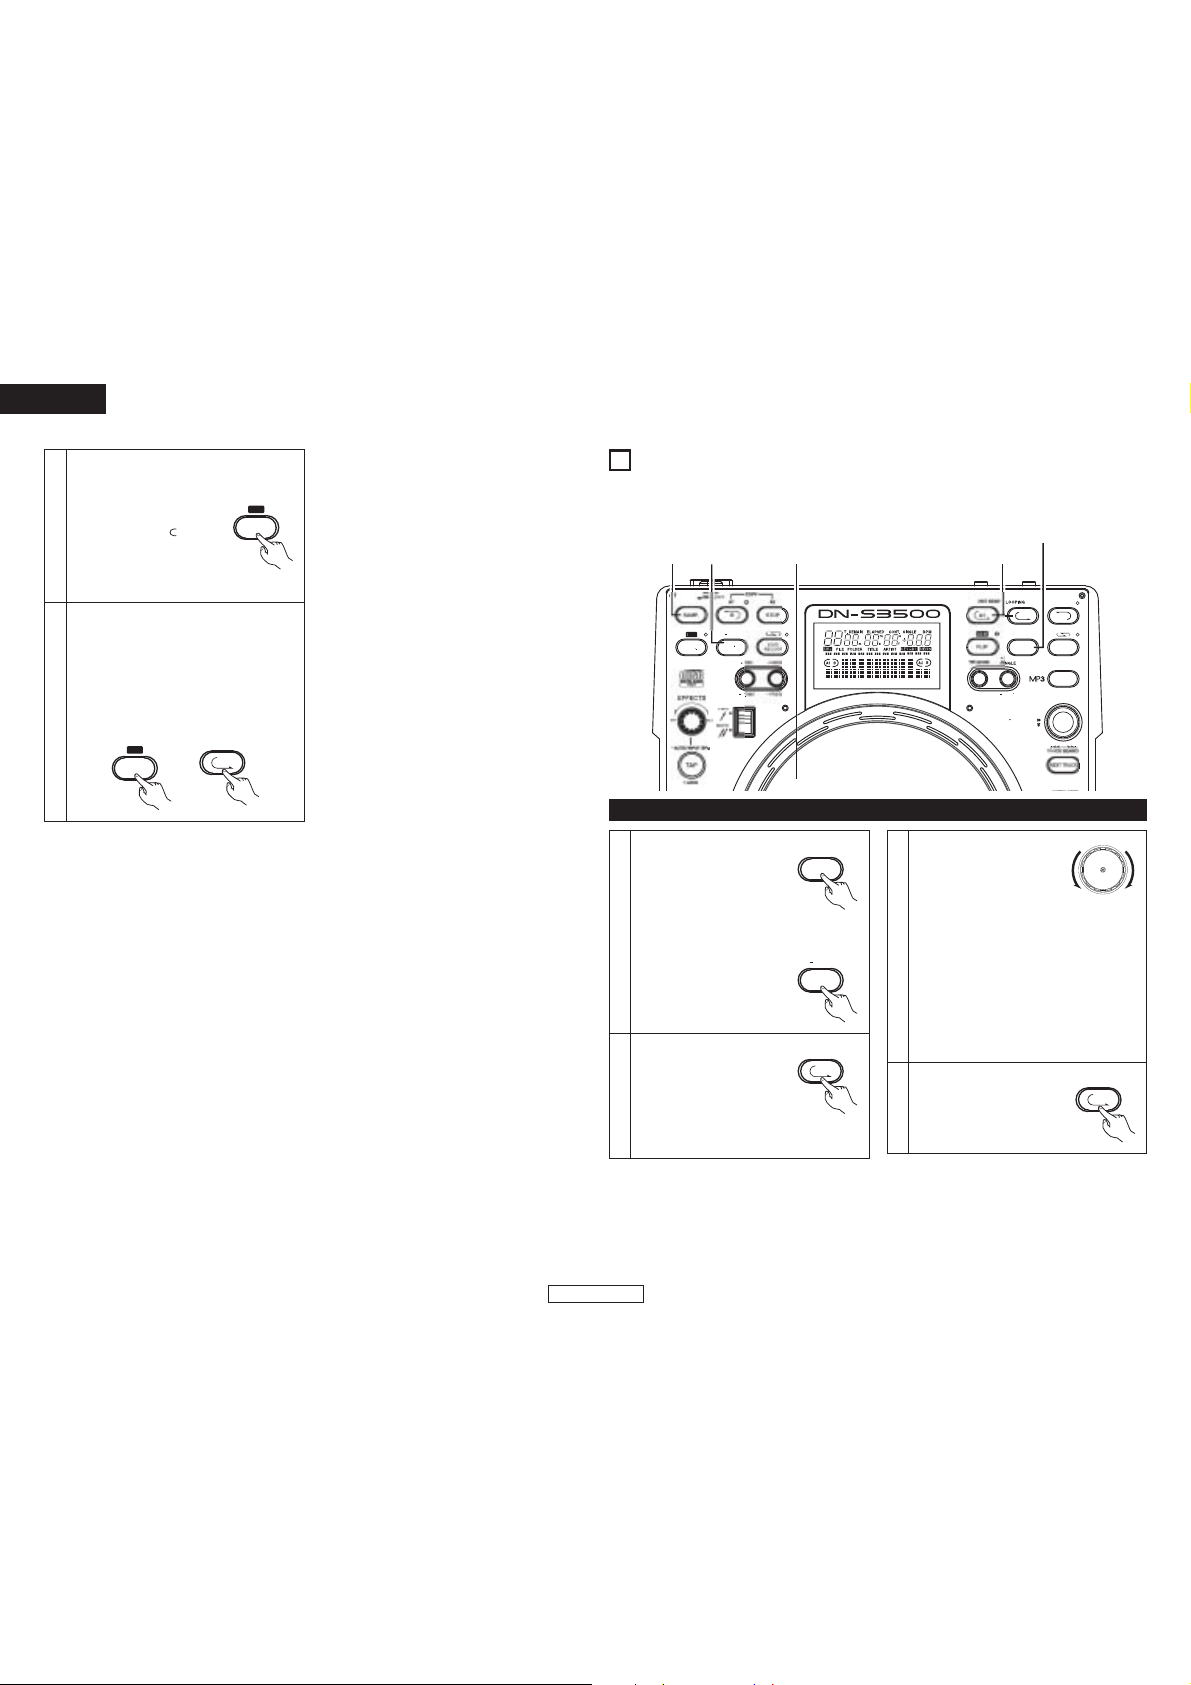
ENGLISH
RAMETER
S
R
T
OOP
/
E
CH
A
Y
Stutter
• A1 and A2 points can be also used for
Stutter playback.
t To enable stutter playback,
push FLIP button for A1/A2
6
buttons, then “ ” display
turns off.
Press the FLIP button to
switch between the Hot
Start/Seamless Loop and Stutter modes.
Clear the A1/A2 point
y While pressing the FLIP/(CLR) button, push
the A1 or A2 button to clear the
corresponding A and B points.
Or push the FLIP button for more than 1
sec to clear both A1 and A2 points at once.
Quickly pressing the “FLIP” button first
7
and then A1, A2 or B buttons will clear
these points individually.
CLR
FLIP
A1
9
B TRIM
• The Seamless Loop and Sampler B points can be fine-adjusted using the Scratch Disc.
CLR
FLIP
• Trim the points during loop playback as a rehearsal.
r q
L
e w, r
PUSHON/OFF
q
REL
FLESEAR
MOD
EXT
B Trim
Seamless Loop:
q When the B TRIM button is
pressed during seamless
loop playback, the B TRIM
mode is turned on.
To cancel B TRIM mode,
press the B TRIM button again.
1
Sampler Loop:
q When the PITCH/VOL.
button is pressed for more
than 0.5 sec during Sampler
Loop playback, the B TRIM
mode is turned on.
Select B point
w
The A button illumination
automatically flashes for the
last loop created or
2
accessed.
•
Press button A1 or A2.
The loop whose B point is to be adjusted is
selected.
B TRIM
B TR M
PITCH/VOL
A1
Trim B point
e Turn Scratch Disc slowly to
move the B point 1 frame
at a time.
• Range for trimming B point is limited as
follows.
B point for Loop:
3
Between 5 frames after A point and
disc end.
B point for Sampler:
Between 5 frames after A point and
Sampler end.
*MP3
Between 5 frames after A point and file
end.
Save the B point
r Push the A or SAMP button
again to save new B point,
4
and the unit automatically
exits from the B Trim mode.
A1
10
ENGLISH
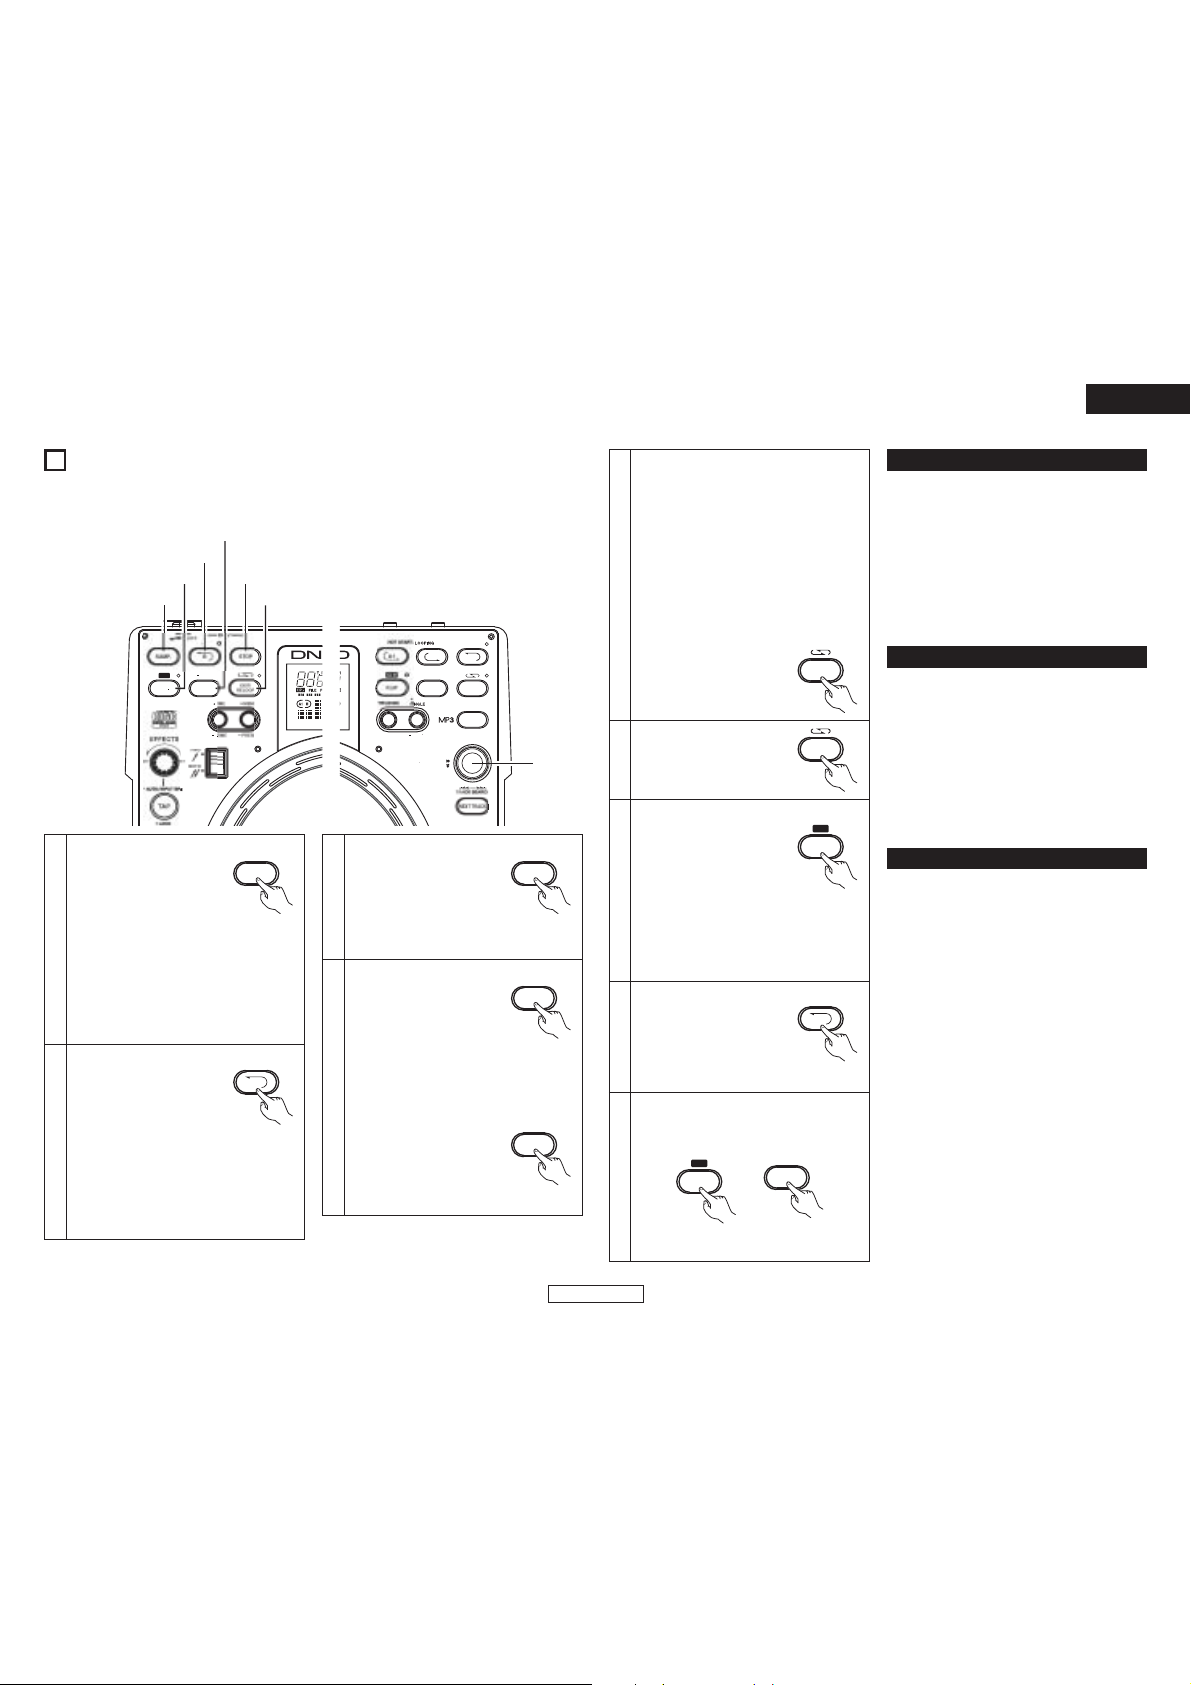
ENGLISH
R
L
ENGLISH
Exit and Reloop
u
The EXIT/RELOOP button
6
can be used same as
Seamless Loop function.
Reverse Play
i You can play the Sampled
sound in reverse by pushing
the REV button. In reve se
play mode REV LED lights
up and the platter spins
7
backwards.
• Reverse playback will take affect when
you push the SAMP button after reverse
mode has been turned on. To return to
normal forwa d playback, push the REV
button once again.
Moving Sampler B point
o When the B button is
pushed during Sampler
8
playback, the B point
moves to the point at which
the button was pushed, and
loop playback from point A starts.
Clearing the Sampler data
!0 During the Sampler stop mode, press the
REV/(CLR) button, while pushing the SAMP
button to clear the Sampler.
9
CLR
REV
• Or, by pushing the REV/(CLR) button for
more than. 1 sec, you can clear Sampler.
11
SAMP
EX T/
RELOOP
CLR
REV
Adjust pitch
The Sampler playback pitch can be adjusted.
!1 Push the PITCH/VOL. button, the pitch input mode
is set, PARAMETERS LED flashes and the current
settings are displayed on the character display.
• Start Sampler playback.
!2 Turning the PARAMETERS knob can change the
pitch.
When pushing down and turning the PARAMETERS
✽
knob, you can change the pitch range 10 times
faster.
Adjust sound level
The Sampler playback sound level can be adjusted.
!3 Push the PITCH/VOL. button again when the pitch
input mode, the sound level input mode is set,
PARAMETERS LED flashes and the current
settings are displayed on the character display.
• Start Sampler playback.
!4 Turning the PARAMETERS knob can change the
output sound level.
!5 Push the PITCH/VOL. button again to turn the
sound level input mode off.
B
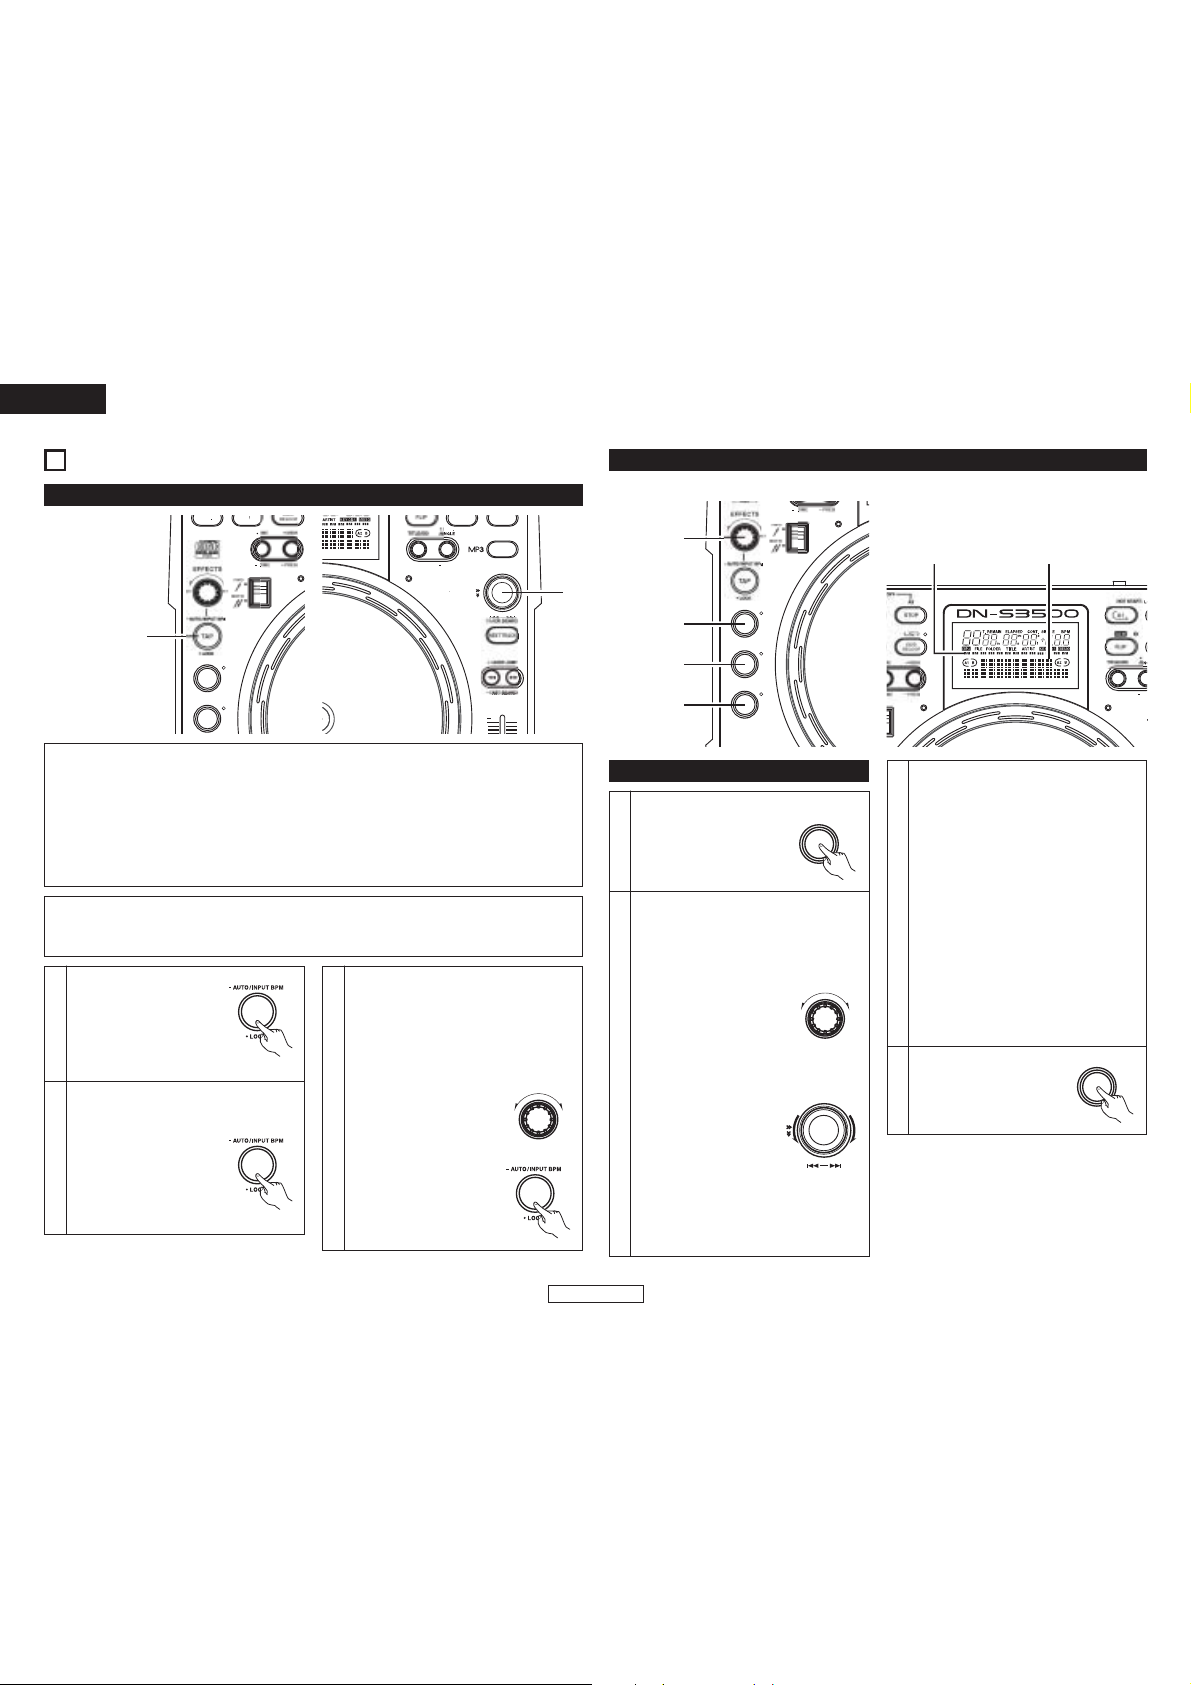
ENGLISH
T
OOP
R
q, w, e, t
S
OOP
E
CH
r
OOP
R
T
11
AUTO BPM COUNTER/EFFECTOR
AUTO BPM COUNTER
REL
ILESEAR
MOD
PUSHONOFF
ECHO/L
FLANGE
AUTO BPM COUNTER
Beats per minute (BPM) of a track is measured automatically and displayed during playback or in Cue
standby mode.
Measured BPM values are synchronized with the effector parameters such as:(ECHO/LOOP and FLANGER
time)
• When Auto BPM COUNTER is off, pushing the TAP button for 1 second, reactivates the AUTO BPM
COUNTER to turn back on.
• If you change or select a new track, the old BPM is cleared and the Auto BPM Counter starts to detect
the new track automatically.
NOTE:
AUTO BPM COUNTER might not me able to be measured correctly according to the type of music.
*If this happens, please use the TAP feature.
BPM LOCK
The data measured by the
auto BPM counter is locked.
q Push the TAP button once
1
while auto BPM counter is
operating.
“BPM Lock” is displayed for 1 second.
TAPPING
The interval when the TAP button is pushed
repeatedly is measured and BPM is calculated.
w When you push the TAP
button, the auto BPM
2
counter turns off.
Push the TAP button
repeatedly about 5~10
times according to the
beat.
TAP
TAP
MANUAL INPUT
The known BPM can be dialed in directly by the
numerical value.
e The BPM manual input mode is available
when the TAP button is pushed for more
than 2 sec. “Manual In” is displayed is the
character display.
r You can input BPM value
directly with the EFFECTS
3
knob.
t When the TAP button is
pushed again, the BPM
manual input mode is
saved and the BPM is
locked to that value for
that Track.
DRY WET
EFFECTS
TAP
EFFECTOR
One of the 7 effects can be selected.
w, t, i
q, e
r, y
u, o
ECHO/LOOP
ECHO/LOOP ON
q When the ECHO/LOOP
button is pressed, the
1-1
echo/loop function is turned
on.
Set the parameters
w The echo/loop parameters can be selected
with EFFECTS knob and PARAMETERS
knob.
Echo Feedback number:
Turn the EFFECTS knob.
*1 The Echo Feedback
number is displayed in
the playback position
indicators.
Echo Time:
Turn the PARAMETERS knob.
1-2
*2 The Echo time is displayed in the
character display.
• When the EFFECTS knob is pressed, the
parameter display is swited to the normal
display.
• To return to the parameter display, press
or turn the EFFECTS knob.
12
ENGLISH
ECHO/L
FLANGE
PARAMETERS
PUSH ON/OFF
ECHO/LOOP
EFFECTS
DRY WET
TRACK SEARCH
*1
*3
*5
Select the LOOP mode
When the feedback number is set to the
maximum, loop playback with the specified
time begins. Other tracks can be selected or
the disc can be replaced for seamless play.
ECHO LOOP FADE OUT
• The parameter mode is turned off while the
echo loop is playing when the back cue or
NEXT TRACK is selected at the parameter
selection mode.
1-3
• When the new track is selected and playback
is started, echo loop playback stops by fade
out. An echo loop playback and a normal
playback can be smoothly replaced.
• The disc can also be ejected during Echo
Loop and replaced with a new disc without
interrupting the sound. Once a new track is
selected and PLAY is pushed, the echo loop
starts to automatically fade out.
ECHO/LOOP OFF
e If the ECHO/LOOP button
is pressed again, the
1-4
echo/loop function is turned
off.
•
ECHO LOOP mode can be used in many ways for
advanced remixing. For example, during ECHO LOOP
you can shorten the original feedback time to chop
the beats in half each time the PARAMETERS knob is
turned counter clockwise. Once the minimun
feedback time of 1/8 (or other) is reached, you can
push down the PARAMETERS knob to instantly return
back to the original ECHO LOOP sound. For even
more creative control, the Pitch Slider and Key Adjust
are functional with ECHO LOOP after it has been set.
*2
*4
*6
ECHO/LOOP

ENGLISH
FLANGER
FLANGER ON
r When the FLANGER button
is pressed, the flanger
2-1
function is turned on.
Set the parameters
t The flanger parameters can be selected
with EFFECTS knob and PARAMETERS
knob.
FLANGER Gain:
Turn the EFFECTS knob.
The FLANGER gain is
*3
displayed in the playback
position indicators.
FLANGER Time:
Turn the PARAMETERS knob.
2-2
*4 The FLANGER time is displayed in the
charactor display.
PARAMETERS
PUSH ON OFF
• When the EFFECTS knob is pressed, the
parameter display is swited to the normal
display.
• To return to the parameter display, press
or turn the EFFECTS knob.
FLANGER OFF
y If the FLANGER button is
pressed again, the flanger
2-3
function is turned off.
FLANGER
EFFECTS
DRY WET
TRACK SEARCH
FLANGER
FILTER
FILTER ON
u When the FILTER button is
pressed, the filter function
3-1
is turned on.
Select the parameters
i The filter paramete s can be selected with
EFFECTS knob and PARAMETERS knob.
Filter Frequency:
Turn the EFFECTS knob.
The Filter frequency is
*5
displayed in the playback
position indicators.
Filter types:
Turn the PARAMETERS knob.
3-2
*6 The Filter types is displayed in the
character displayed.
PARAMETERS
PUSH ON OFF
• When the EFFECTS knob is pressed, the
parameter display is swited to the normal
display.
• To return to the parameter display, press
or turn the EFFECTS knob.
FILTER OFF
o If the FILTER button is
pressed again, the filter
3-3
function is turned off.
FILTER
EFFECTS
DRY WET
TRACK SEARCH
FILTER
12
MP3 PLAYBACK
The DN-S3500 can playback MP3 files via CD-R/RW media made according to the following conditions.
* MP3 disc’s made by formats other than below settings cannot be played back on our system.
* In most cases, you can find the below settings within the properties of your burners PC software.
Please refer to your manual or contact your software vendor for assistance regarding these settings.
NOTES:
• Depending on the type of MP3 encoding or writing software, with some files noise may be generated or
it may not be possible to play the file.
• Recordings you make are for your personal use and should not be used in ways infringing upon the
copyright holder as per copyright laws.
MP3 FORMAT
Disc Format
MP3 Format
Disc Writing Method
note #1 Cannot playback files in a folder located further from the specified Folder/directory hierarchical level.
note #2 The number of total folders is not limited, while the number of total files is limited.
note #3 If the number of files exceeds 999, the unit can play first 999 files, and no further files are recognized.
Display
• The elapsed file playing time and the remaining file
playing time (for C.B.R files only) can be selected.
The file name display, folder name display and ID-3 tag
•
of (title/artist name/album name) can be displayed.
Each time the @2 TITLE button is pushed, the file and
folder name display, title display, artist name display
or album name display are selected.
NOTE:
Title, Artist and Album name utillzes the data of ID-3
tag.
It is not data of a file name.
If no ID-3 tag is found, the display will indicate “No
Data”.
Applicable file extensions
ISO9660
Joliet
Romeo
CD-ROM sector format
Folder/directory hierarchical level
Max. number of Folders
Max. number of files
MPEG-1
ID-3 Tag
Encording
NOTE: .m3u Play List are not supported.
Disc at Once and Track at Once
Multi Session
NOTE: Packet Write is not supported.
Play, Pause and Cue
• Like with a normal CD, it is possible to play, pause,
back-cue, etc.
• Pitch range, 4%, 10%, 16%
NOTE:
When you back cue V.B.R encoded files, the start
position returns to the head of file 00:00 00 rather
than where music is detected.
.mp3 .MP3 .mP3 .Mp3
Level 1(max. 8/”8.3” character style)
Level 2 (max. 31/30 character style)
max. 64/64 character style
max. 64/64 character style
mode-1 only
max. 8 levels down (* note #1)
No limit (* note #2)
max. 999 files (* note #3)
Audio Layer-3 32-320kbps, f/s 44.1kHz
V1 0, V1.1, V2 2, V2.3, V2.4
C.B.R , V.B.R
If the 1st session is CDDA ,you can
playback only CDDA track. If the 1st session
is MP3,you can playback only MP3 file.
13
ENGLISH

ENGLISH
Select the file
Select the file search modes
For MP3 discs, the file sea ch modes
described below can be selected by pushing
the @6 FILE SEARCH MODE button.
1
The file search mode is selected by turning
•
the @7 PARAMETERS knob and set by pushing
the knob.
File search (File.NO)
• When the @7 track select knob is turned, file
searching is performed in the order of the file
numbe s.
2
• When the @7 track select knob is pushed in
and turned, file searching is performed 10
files at a time.
File/Folder search (Folder)
• When the @7 track select knob is turned, file
searching is performed in the order of the file
numbe s.
3
• When the @7 track select knob is pushed in
and turned, folder searching is performed in
the order of the folder numbe s.
Artist name search (Artist)
Title name search (Title)
If the artist name or title name is recorded in
the file name as described below, it is possible
to sea ch in alphabetical order of artist or title
names.
• When recorded in order of artist name and
title name (Artist - title, (Artist)(Title),
[Artist][Title]) and with “-”, “()” or “[]”
between artist names and title names, it is
possible to search artist names and title
names in alphabetical order.
NOTES:
• These name search functions cannot be
selected unless the file names are recorded
in the specified format.
4
• Title and artist name use the data of a file
name. It is not data of ID-3 tag.
• When the artist name search or title name
search mode is selected and the @7 track
select knob is pressed in while turned, name
search is performed in the alphabetical o der
of the names.
• If the @7 track select knob is turned after
searching in alphabetical o der is finished, file
searching is performed in the order of the file
numbe s from the name with the selected
letter.
• If the o CUE button is pushed after file
searching, the searched file is searchedfor
and the standby mode is set.
File name search (File_Name)
Files can be searched for by file name in
alphabetical order.
• When the file name search function is
selected and the @7 track select knob is
pushed in while turned, the file names are
search in alphabetical order.
• If the @7 track select knob is turned after
5
searching in alphabetical o der is finished, file
searching is performed in the order of the file
numbers from the file name with the
selected letter.
• If the o CUE button is pushed after selecting
the file, the selected file is searched for and
the standby mode is set.
NOTE:
When the file name dose not correspond to the format
of 4, file name search is selected.
Manual search & Fast search
For only C.B.R files, manual searching and fast
searching can be performed.
NOTES:
• With manual searching and fast searching, it is only
possible to search within the selected file.
• Manual searching in the reverse direction is possible
up to the point 10 seconds before the point at which
searching starts.
• The searching speed may vary according to the file’s
compression rate, etc.
Scratch
Scratch playback is possible in the same way as with
normal CDs.
NOTE:
Scratching (back spinning) in the reverse direction is
possible up to the point 10 seconds before the point at
which reverse playback was started.
Seamless Loop/Hot start/Stutter
For only C.B.R files, hot starting, seamless loop
playback and stuttering can be performed in the same
way as with normal CDs.
NOTE:
The A and B points for the seamless loop must both
be set within the same file.
Platter Effect
Platter effect is supported in the same way as with
normal CDs.
NOTE:
Reverse playback is performed for a maximum of 10
seconds, after which playback returns to normal.
Memo
Memo is supported in the same way as with normal
CDs.
NOTES:
• Next track Memo function is not supported.
• MEMO CALL may not be completed according to
the file condition.
BPM ID3 Tag
If an MP3 file contains BPM ID3 Tag information, the
DN-S3500 will automatically read and LOCK the BPM
data accordingly. You can always return back to AUTO
BPM mode by pushing the TAP button for more than
1 sec.
NOTE:
May not be compatible with some software based
systems.
14
ENGLISH
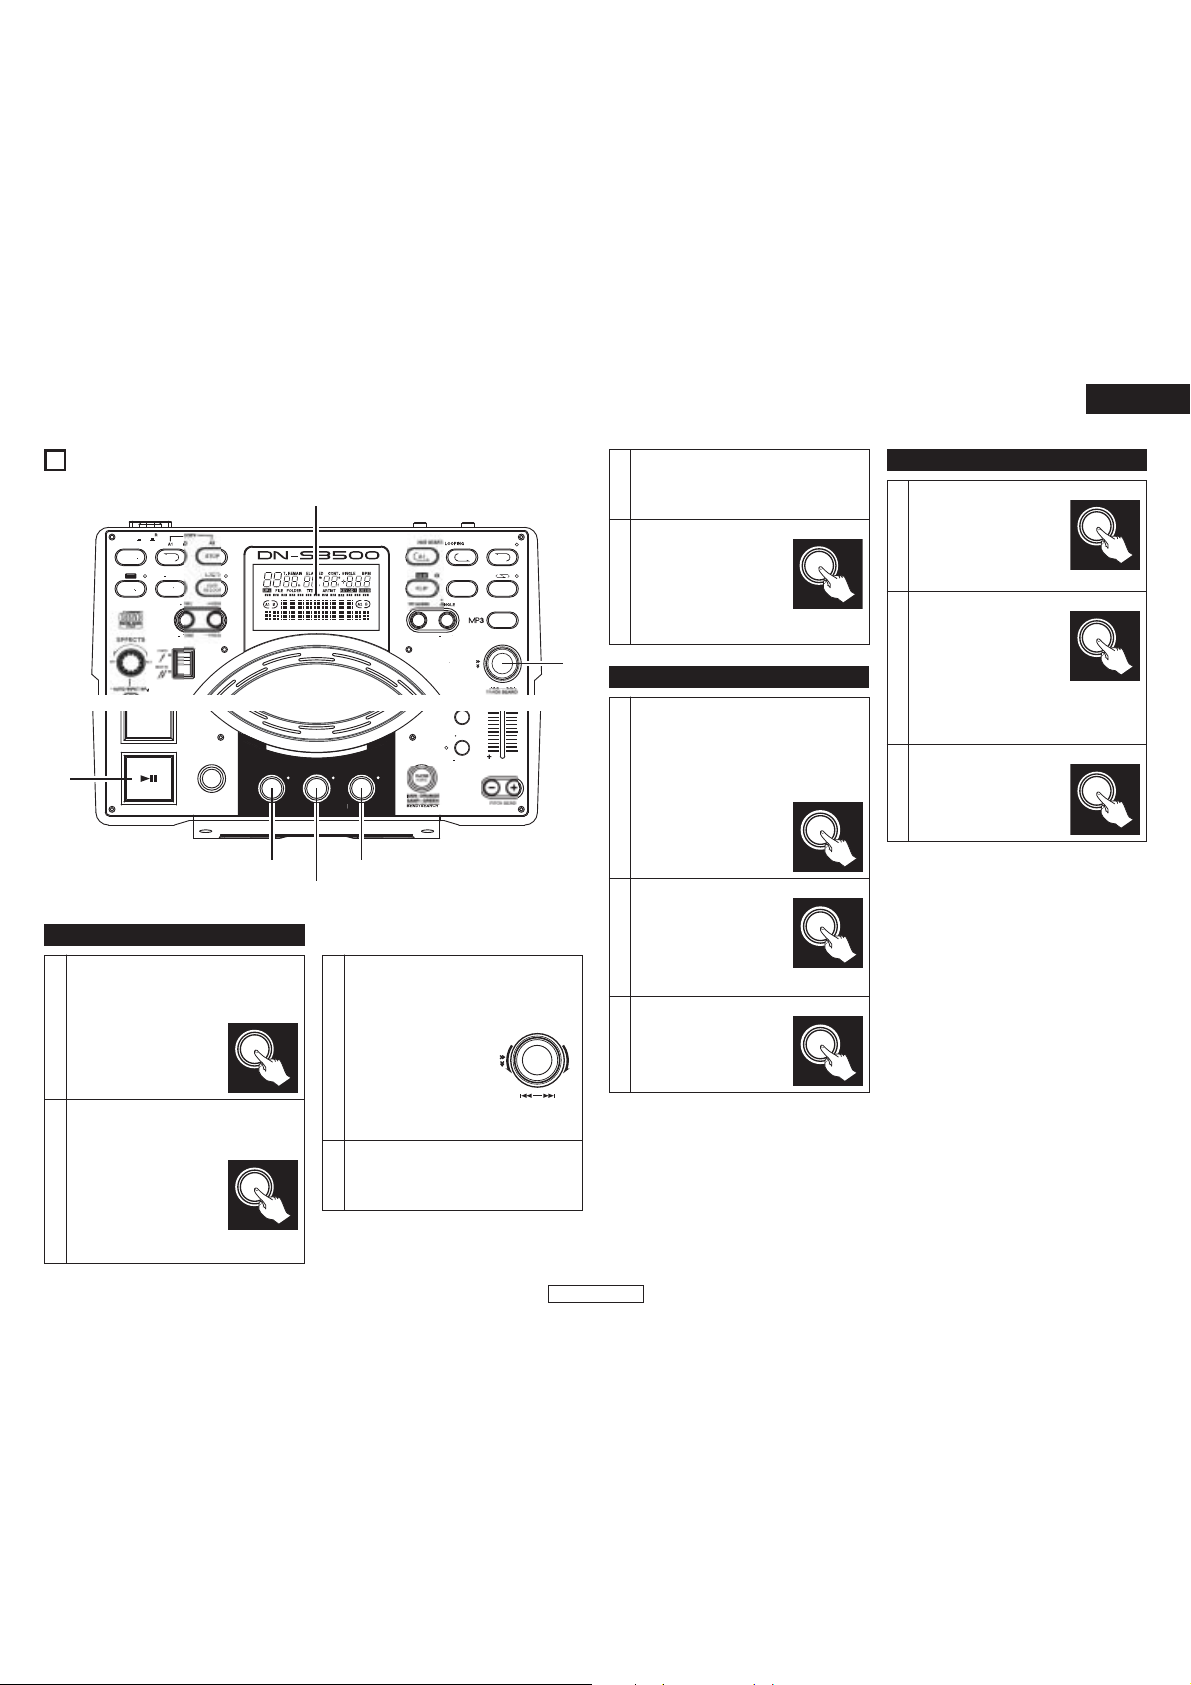
ENGLISH
REVER
BRAK
F
S
F
R
M
V
V
OOP
/
E
CH
w
*1, *2
BR KE DUMP
SE
CH
GE
E
CT
SC
y, u
r, t
q, e
★1
★2
REVER
BRAK
BRAK
DUM
13
PLATTER EFFECT
F
A
L
U
DI
EJE
BRAKE
BRAKE
Simulates a winding-down sound of a turntable
coming to a full stop slowly.
Set the BRAKE mode
1-1
q The BRAKE function can be
turned on by pushing the
BRAKE button.
Select the BRAKE time
When the BRAKE turn on, the PARAMETERS
and BRAKE LED flashes and parameter are
displayed.
If you use with default settings,
there is a 3 second time out of
1-2
inactivity for the BRAKE button
once selected and PARAMETERS
knob if adjusted. After 3 seconds,
and exits out of the BRAKE
menu.
EXIT
REL
FILESEAR
MOD
PUSHONOF
PIT
RAN
REV R
w The BRAKE time can be selected with the
PARAMETERS knob.
• When the PARAMETERS knob is pushed, the
time is entered and the BRAKE time
selection mode is cancelled.
1-2
*1 BRAKE time is displayed on play position
indicator.
PARAMETERS
PUSH ON OFF
Start the BRAKE
★1 The BRAKE is activated when the
1-3
PLAY/PAUSE (
during playback.
13) button is pushed
TRACK SEARCH
15
ENGLISH
Stop the BRAKE
★2 The BRAKE mode can be cancelled by
1-4
pressing the PLAY/PAUSE (
again during this effect.
BRAKE mode off
e When the BRAKE button is
pressed, the BRAKE time
selection mode is set. If the
1-5
BRAKE button is pressed
again during this time, the
BRAKE functions is turned
off.
DUMP
DUMP
Reverse playback is performed for the
specified time. Plays the sound backwards
while continuing in a forwa d motion without
losing “elapsed time” when you return back to
normal (forward) play.
2-1
Start the DUMP playback
r The DUMP function can be
turned on and Dump
playback start by pushing
the DUMP button during
playback.
DUMP EFFECT
• Each push of the DUMP
button switches between
DUMP playback and normal
2-2
playback.
• The reverse play turns off
when the Hot Start or stutter is started.
DUMP mode off
t If the DUMP button is
pressed when in the DUMP
2-3
mode, the DUMP mode is
turned off.
13) button
DUM
DUM
REVERSE
Start the REVERSE playback
y The REVERSE function can
be turned on and reve se
3-1
playback start by pushing
the REVERSE button during
playback.
• The platter rotates counter clock wise.
REVERSE EFFECT
• Each push of the REVERSE
button switches between
reverse playback and normal
playback.
3-2
*2 Play position indicator lights
up in orange during reverse playback.
• The reverse play turns off when the Hot Start
or stutter is started.
REVERSE mode off
u If the REVERSE button is
pressed when in the
3-3
REVERSE MODE, the
reverse mode is turned off.
REVER
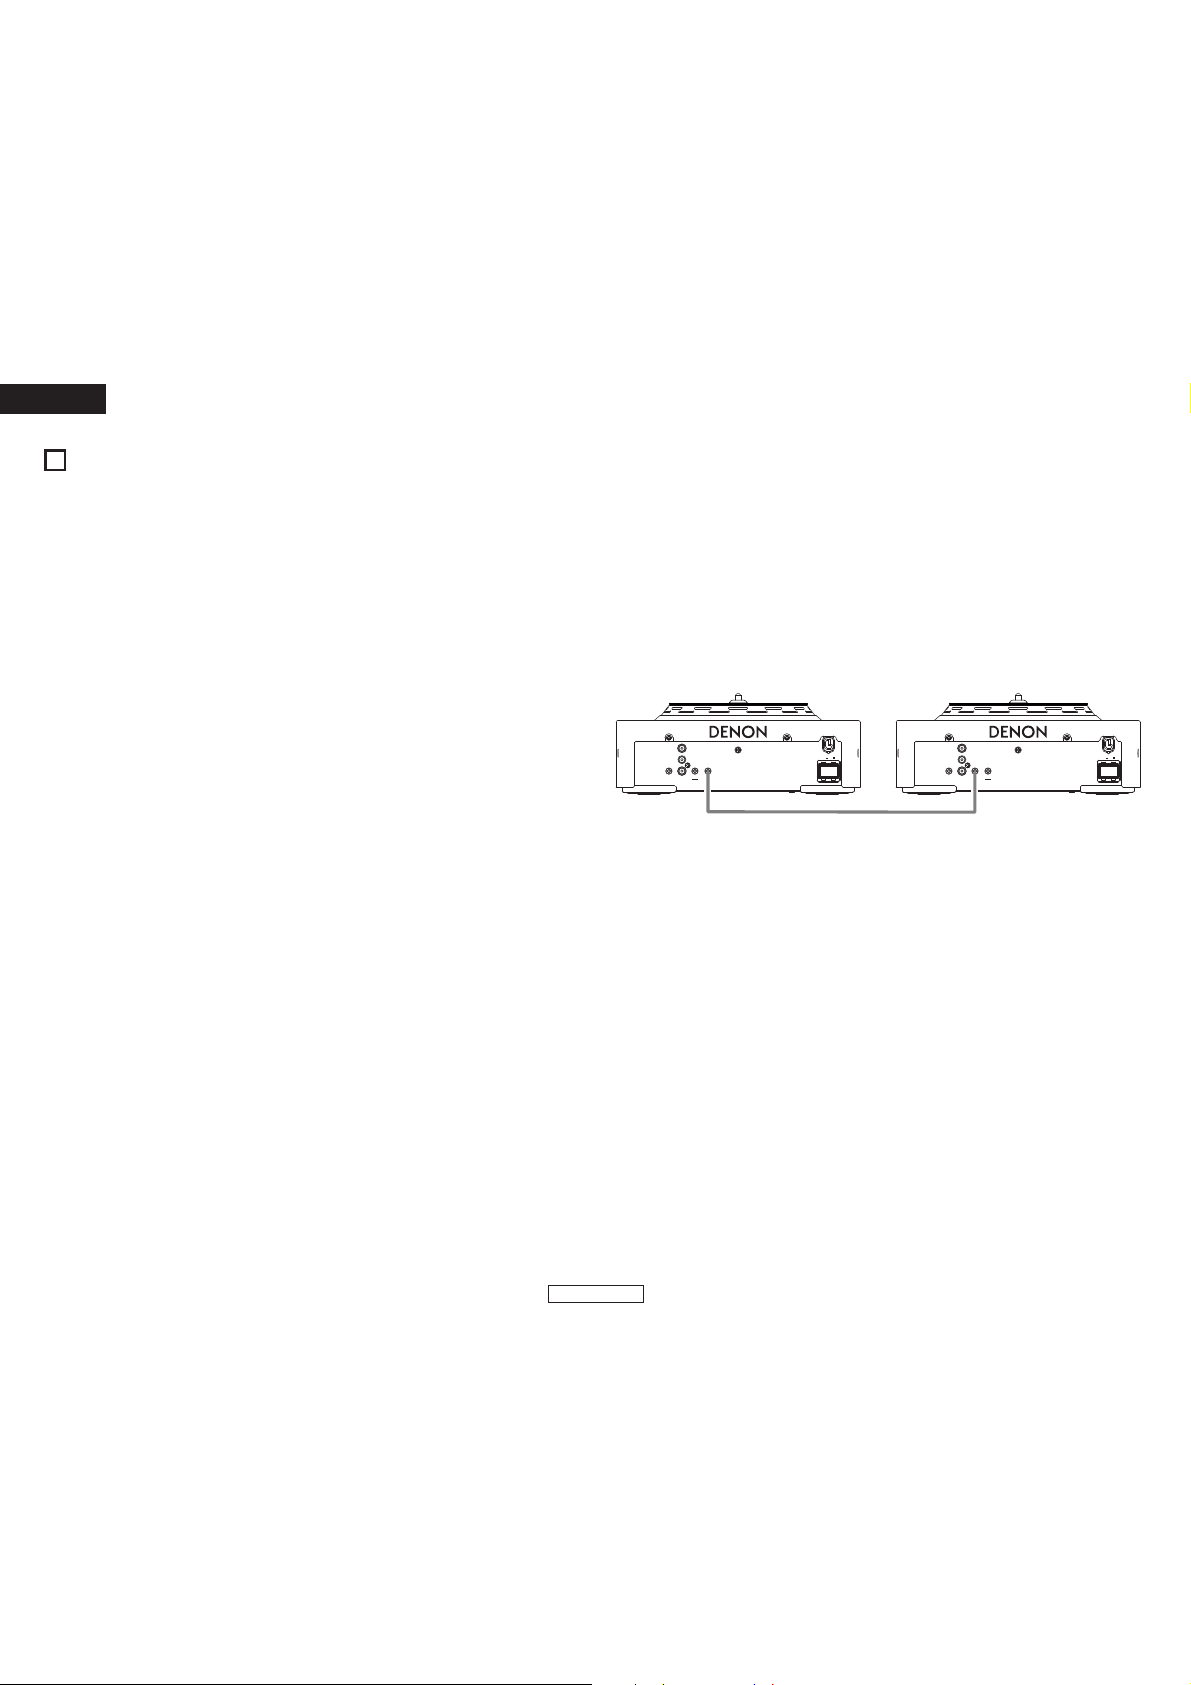
ENGLISH
P O WE R ON O F
DG T L OU
L
R
LNE OUT AD R N
MEM
P O WE R ON O F
DG T L OU
L
R
LNE OUT AD R O T
EM
14
MEMO (Custom Setting Memory)
The setting information can be stored in the non-volatile memory. The stored information can be called out of the
memory at later time, making it easy to prepare for your mixing.
1. About MEMO
• Up to 5000 memo points can be stored to internal memory for later recall.
The number of tracks on a particular CD only limits the amount of memo points available per that disc.
Example: If your CD has 22 tracks, you can only save up to 22 memos. (1 memo group per track.)
CAUTION:
5000 is the maximum possible number of tracks that can be stored to memory.
However, to simplify the MEMO operations, the memory system manages each 500 MEMO data package
as a minimum unit (the total 5000 memory capacity divided into 10 package units). When you want to clear
just one MEMO data in the 1 MEMO CLEAR mode, the unit will erase the memo information but not the
internal memo allocation number. Accordingly, depending on conditions, the number of tracks that can be
stored in the memory may be fewer than 5000.
Once you reached 5000 stored points, you will see a message that says “MEMO FULL!”. At this time you
will need to “delete” old data to make room for new memo points. Therefore the oldest 500 memo points
will be deleted and become clear.
The MEMO indicator on the display lights up when a track for which data is stored in the memory is selected.
•
2. MEMO ITEMS
The following items are max to be stored under 1 memory bank:
q Cue point
w A1 and B1 points, A2 and B2 points
e Playing pitch, pitch on/off, Key Adjust on/off setting
r BPM data (Cue, A1 and A2 points)
3. MEMO MODE SELECT
q Push the @4 MEMO button during Cue mode to enter MEMO mode.
w Turn the @7 PARAMETERS knob to select the various MEMO modes from as follows.
Memo Set (default), Memo Call, Memo Clr
Depending on conditions, some modes cannot be selected.
e Push the @4 MEMO button again to exit MEMO mode.
(1) Storing data in the memory [Memo Set]
• After making the settings to be stored in memory, then push o CUE button.
• When the MEMO indicator in the display is off during Cue mode, push @4 MEMO button to enable
Memo set function.
• If the MEMO indicator lights up, it is necessary to clear existing Memo before storing a new Memo.
• At last push @7 PARAMETERS knob to save. You can see “Complete!” message and the MEMO
indicator lights up.
MEMO FULL
If the memory is full and no more data can be stored, “Memo Full!” and “Delete 500?” message appears.
•
• In this case, you need to clear memory of First 500s Memo (number 1 to 500) at a time to make space
for new memos.
• To make space, push @7 PARAMETERS knob while “Delete 500?” message is displayed.
• “Delete OK?” message appears then push @7 PARAMETERS knob again to execute clearing.
• After the first 500s Memo (number 1 to 500) are cleared, number after 501 Memo are renumbered as
new 1, 2, 3…(now you have new 500 empty space.).
(2) MEMO CALL [Memo Call]
When the CD includes tracks that DN-S3500 has Memo is inserted, the MEMO indicator flashes for 5 seconds.
•
•
To call out the Memo data, select the track that you made a MEMO. Then the MEMO indicator lights up.
• Push the @4 MEMO button to enable Memo call function.
• When the @7 PARAMETERS knob is pushed in the Memo call mode, all the data stored in the memory
is loaded. DN-S3500 goes to standby mode at the called Cue point.
• When the playing pitch is loaded from the Memo with PITCH LED flashes, playing Pitch is locked until
Pitch Slider comes same Pitch. While playing Pitch is locked, PITCH LED keeps flashing.
NOTE:
MEMO CALL of MP3 files may not be completed according to the file condition.
(3) 1 MEMO CLEAR [Memo Clr]
• To clear one Memo data, select the track that you stored a MEMO. Then the MEMO indicator lights up.
• Push the @4 MEMO button to enable Memo clear function.
• When the @7 PARAMETERS knob is pushed in MEMO CLEAR mode, the Memo data is cleared and the
MEMO indicator on the display turns off.
ALL MEMO CLEAR
• All memory data can be cleared.
• For instructions, see “⁄5 PRESET (14) MEMO ALL CLEAR”.
4. Copying all MEMO
• The MEMO data can be copied between DN-S3500s or DN-S3500 and DN-D9000 or DN-S3500 and DNS3000 or DN-S3500 and DN-S5000.
• For instructions, see “⁄5 PRESET (15) MEMO ALL COPY”.
5. Sharing the memo data
• The MEMO data of two DN-S3500 or DN-S3500 and DN-S3000 or DN-S3500 and DN-S5000 can be
compared when the DN-S3500s are connected by the MEMO in/out jacks.
DN-S3500-1 DN-S3500-2
MEMO OUT jack
3 5 mm stereo mini co d
NOTES:
• The MEMO data of the two DN-S3500 units is checked when the disc is loaded.
• When other models (DN-S5000, DN-S3000 and DN-D9000) use the pitch data of DN-S3500, the pitch data
might be different according to the difference of the data format.
MEMO IN jack
16
ENGLISH
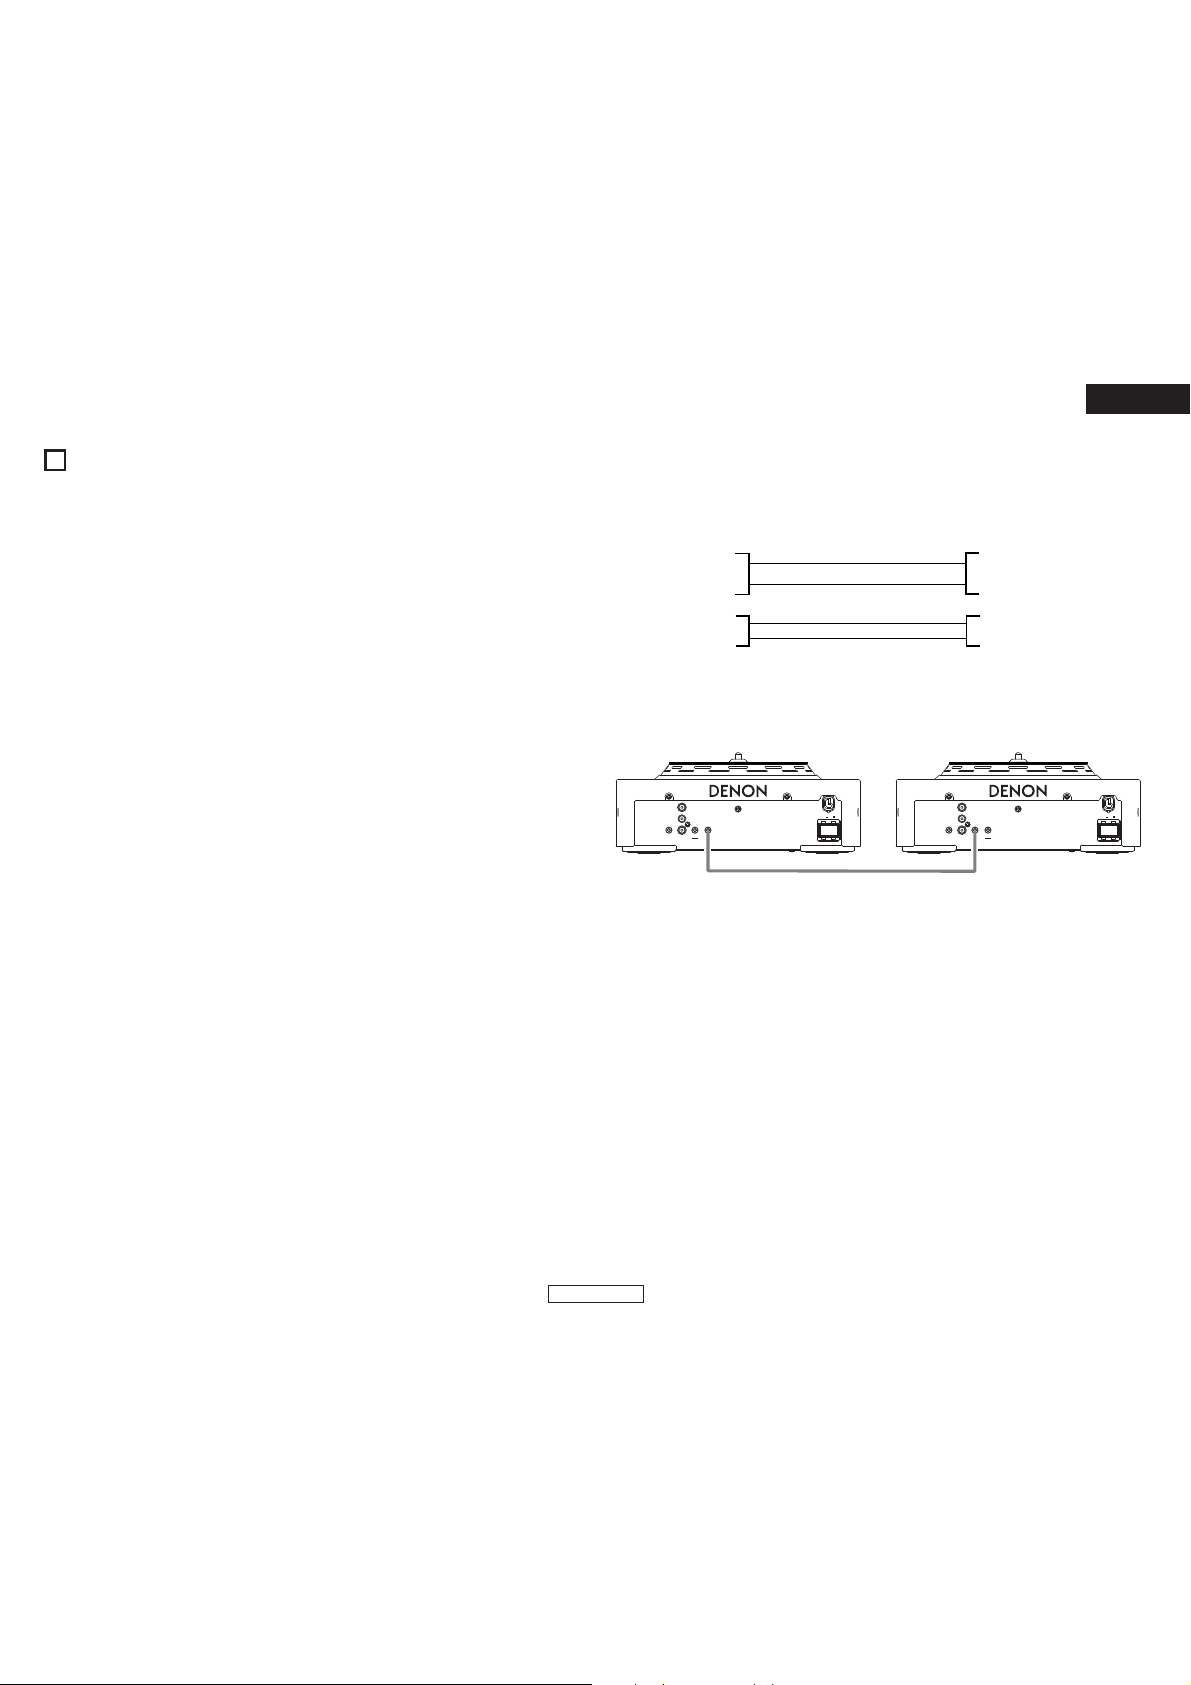
ENGLISH
P O WE N OF
DG T L OU
L
R
LNE OUT AD R N
MEM
P O WE N OF
DG T L OU
L
R
LNE OUT AD R O T
EM
15
PRESET
1. Preset mode
q The preset mode is available when @4 PRESET button is pushed for more than 1 sec while the DN-S3500
is in Cue, pause or no disc mode.
w Turn the @7 PARAMETERS knob to select the preset item.
e After selecting an item, push the @7 PARAMETERS knob to select the preset data.
r To change other Preset items, repeat these steps.
t Push the @4 PRESET, o CUE or u PLAY / PAUSE (
2. Preset items and data
The “*” mark next to the data indicates the default value.
(1)
Cue Mode : DENON* (When the playback is started durnig the Play Pause mode, the Cue point is set.) /
Other (When the Cue button is pushed during the Play Pause mode, the Cue point is set.)
13) button to exit from the Preset mode.
(2) Auto Cue : Auto Cue level search on/off. (ON* / OFF)
(3) Next Tr Time : OFF / 1sec / 2sec* / 3sec
Select the time for fading out the currently playing track when playback of a new track is started with
the next track function.
(4) Platter Speed : 33rpm* / 45rpm
Select the rotational speed on the platter.
(5) 3/4 Effect : OFF* / ON
You can use 3/4 beat effects when you select the Echo & Flanger parameter for the effector.
6) Jump Time : 10sec* / 20sec / 30sec / 1min
Select the jump time of Quick Jump.
(7) Pitch Range : ±4% / ±10%* / ±16% / ±24%
Select the playing pitch range when the power is turned on.
8) EOM Time : Track end warning message alert time.
(OFF / 10sec* / 15sec / 20sec / 30sec / 60sec / 90sec)
(9) Fader Mode (FADER START MODE) : Play / Cue* / P / Pause
Select 2-line type (Play and Cue) or 1 line type (Play and Pause).
(10) Power On Play : ON / OFF*
Playback starts when the power is turned on if a disc is loaded.
(11) Pitch : Pitch ON* / Key AdjON (KEY ADJUST ON) / Pitch OFF
Select the pitch mode when the power is turned on.
(12) Play Mode (SINGLE / CONTINUOUS / SINGLE PLAY LOCK) : Single / Cont. / Play Lock*
Select the play mode when the power is turned on.
(13) Time Mode : Elapsed* / Remain / T.Elapsed / T.Remain
Select the time mode when the power is turned on.
(14) MEMO ALL CLEAR :
Clear all MEMO data in the non-volatile memory.
q To clear all MEMO data, push the PARAMETERS knob.
• “Memo Clr?” flashes in the character display.
w Push the PARAMETERS knob again and select “Yes” to execute clearing all MEMO data.
• “Now Clearing!” is displayed on the character display while clearing.
e Once clearing is completed, “Complete!” is displayed.
(15) MEMO ALL COPY :
Copy all MEMO data from the master unit of DN-S3500 (or DN-S3000 DN-S5000, DN-D9000) to the
slave unit of DN-S3500 (or DN-S3000 DN-S5000, DN-D9000) when both unit are connected by the
normal 3.5 mm min stereo Cable. (See diagram for the cable.)
NOTE: Be sure CD player have no discs inside.
A straight cable used:
MEMO OUT
DN-S3500
MEMO IN
DN-S3500
• Using the 3.5 mm cable, connect the MEMO terminals between two DN-S3500 units or between one
DN-D9000 and one DN-S3500 unit or between one DN-S5000 and one DN-S3500 unit or between one
DN-S3000 and one DN-S3500 unit.
• Copying can be performed using the DN-S3500 and DN-D9000 or the DN-S3500 and DN-S3000 or the
DN-S3500 and DN-S5000 in the same way as when using two units of the DN-S3500.
DN-S3500-1 DN-S3500-2
MEMO OUT jack
3 5 mm stereo mini co d
• Perform the copying operation as below on the slave unit of DN-S3500.
q To start copying, push the PARAMETERS knob and select “YES”. Now “Memo Copy?” messages
flashes on the character display.
w Push the PARAMETERS knob again to confirm. Now “Copy OK?” is displayed.
e Push the PARAMETERS knob once again, and the unit starts copying when the MEMO data are
received from the master unit. “Now Copying” is displayed.
• If the master unit and the slave unit are not connected properly or the DN-2600F is not prepared
to start sending data, “Not Connect” is displayed on the character display.
r When copying is completed correctly, “Complete!” is displayed.
• “Copy Error” is displayed on the character display if copying was not completed correctly.
• “Not connect” is displayed on the charactor display if it is not possible to communicate normally.
In this case, try the above procedure again.
• The copied MEMO data are added to the highest number area of the slave DN-S3500 unit.
DN-S3500 (MEMO IN)
DN-S3000 (X’EFFECT IN)
DN-S5000 (X’EFFECT IN)
DN-S3500 (MEMO OUT)
DN-D9000 (X’EFFECT)
MEMO IN jack
(16) Version No. : The DN-S3500’s software version is displayed. (SYSTEM / DSP)
(17) PRESET INITIALIZE : Set all the preset data back to the factory defaults.
q To clear the PRESET data, push the PARAMETERS knob.
“Preset Int?” flashes on the character display.
w Push the PARAMETERS knob again.
“Preset Initial!” is displayed on the character display while data clearing.
e Once clearing is completed, “Complete!” is displayed.
17
ENGLISH
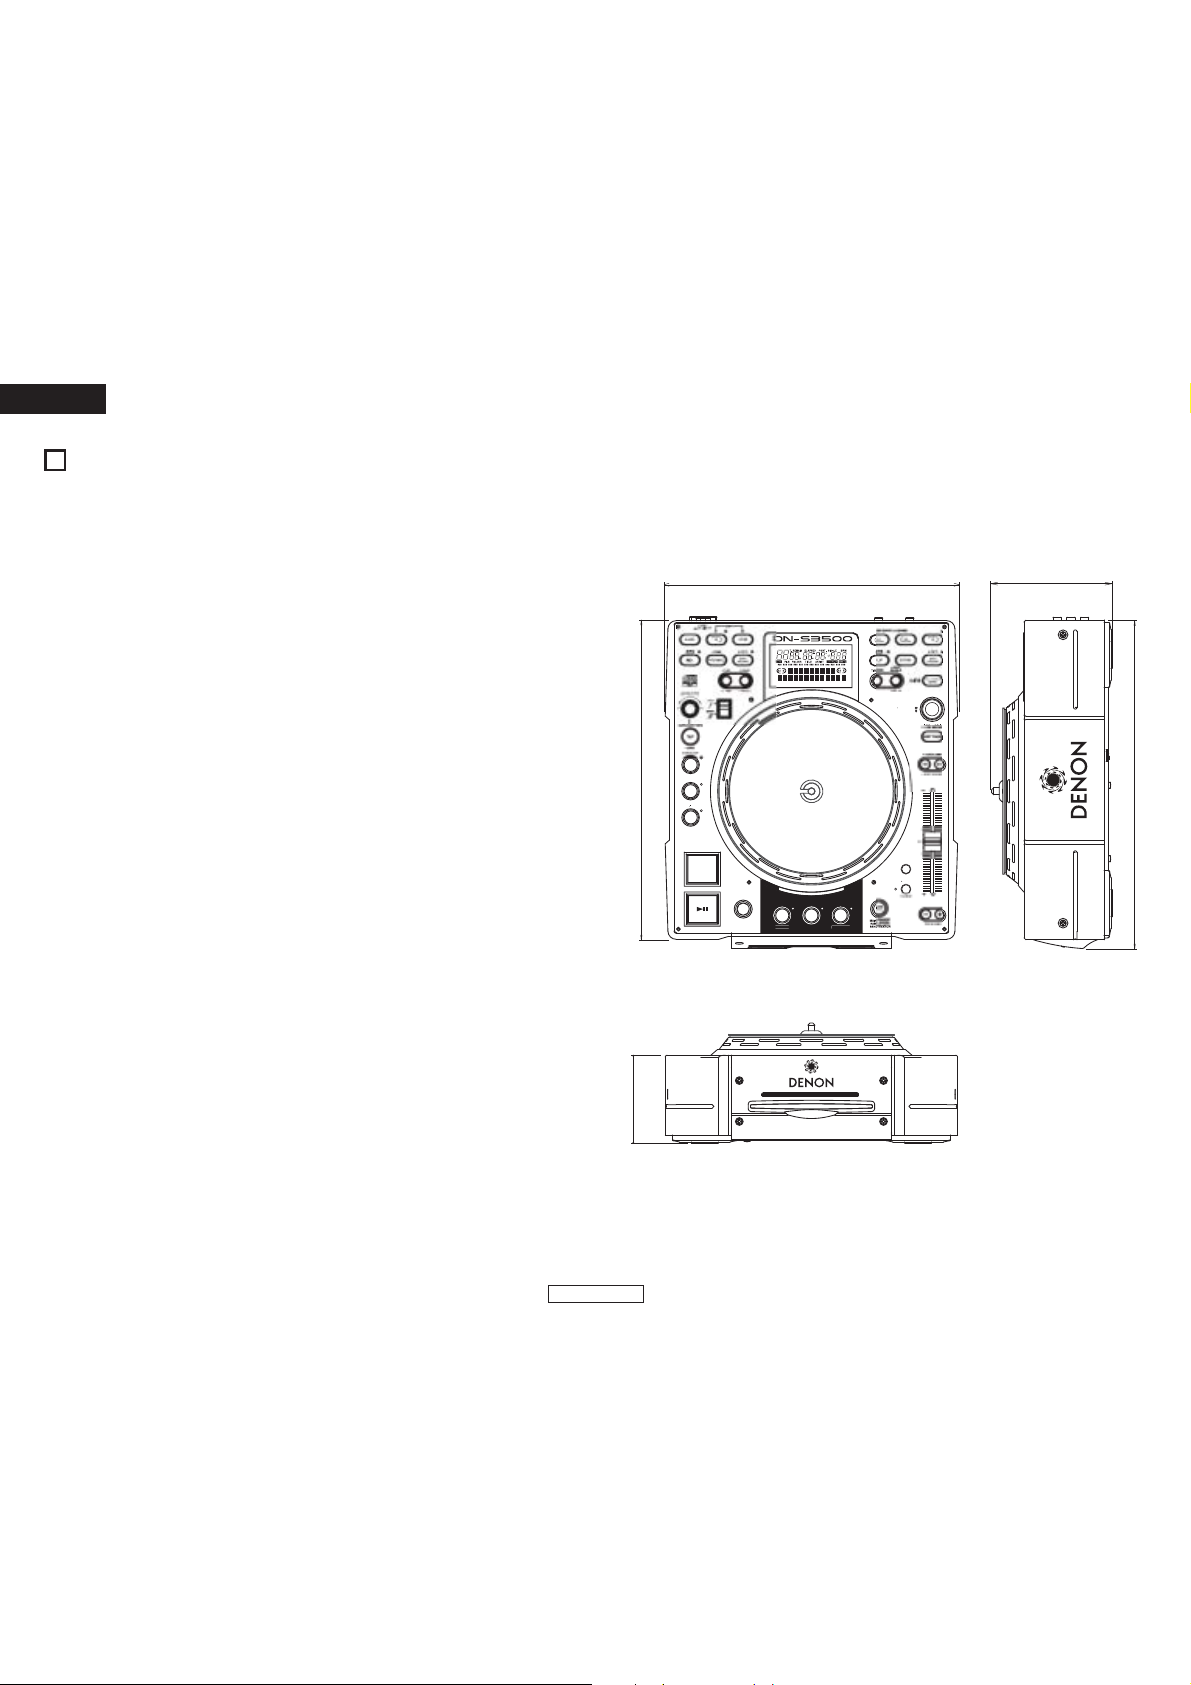
ENGLISH
S
/O F
R
SE
H
UST
JEC
SC
16
SPECIFICATIONS
GENERAL
Type: Compact disc player
Disc type: Standard compact discs (12 cm discs), CD-TEXT
Dimensions: Player unit: 300 (W) x 124 (H) x 334 (D) mm
Installation: Table top type
Mass: Player unit: 5.5 kg (12 lbs 02 oz)
Power supply: U.S.A., Canada and Taiwan R.O.C. models: 120 V AC ±10%, 60 Hz
Power consumption: 19 W
Environmental conditions: Operational temperature: 5 to 35°C (41 to 95°F)
Motor: Direct-Drive
AUDIO SECTION
Main out, Monitor out
Quantization: 16-bit linear per channel
Sampling frequency: 44.1 kHz at normal pitch
Oversampling rate: 8 times
Total harmonic distortion: 0 01% or less
Signal to noise ratio: 90 dB or more
Channel separation: 85 dB or more
Frequency response: 20 to 20,000 Hz
Analog output
Output level: 2 0 V r.m s.
Load impedance: 10 k1/kohms or more
Digital output
Signal format: IEC958-Type
Output level: 0.5 Vp-p 75 1/ohms
FUNCTIONS
Instant start: Within 20 msec.
Variable pitch: ±4% (0 02% pitch), ±10% (0 05% pitch), ±16% 0.1% pitch)
Pitch bend: Cue Mode: “DENON” (Preset item (2))
Sampler
Sampling: 44.1 kHz
Length: 15 sec.
Output level: 2 0 V r.m s. (Variable / –14 ~ +6 dB)
Variable pitch: ±24% (0.1% pitch)
Search precision: 1/75 sec. (1 subcode frame)
Max. scan speed: Over 20 times normal speed
Max. MEMO memory steps: 5000 steps
✽ Specifications and design are subject to change without notice for purpose of improvement.
CD-R, CD-RW discs
NOTE: Finalized CD-R or CD-RW discs can be played back in this unit.
However, according to recording quality, some CD-R/RW discs
cannot be played.
11”13/16 (W) x 4”7/8 (H) x 13”5/32 (D)
European models: 230 V AC ±10%, 50 Hz
Operational humidity: 25 to 85% (no condensation)
Storage temperature: –20 to 60°C (4 to 140°F)
Brushless DC motor
Turntable Speeds: 33-1/3 rpm, 45 rpm
Starting To que: 2.5 kg-cm (2.2 lb-in)
II
±24% (0.1% pitch), ±50% (0.5% pitch), ±100% (1.0% pitch)
Button Function Pitch range ± 4% ~ ± 24%: ±32%
Platter Function ±20% of current pitch
Cue Mode: “Other” (Preset item (2))
Both Button &
Platter Function ±20% of current pitch
Pitch range ±50% ~ ±100%: ±99%
18
ENGLISH
124
334
327
300
PUSHON
FLANGE
EY AD
IT
D
DUMP REVER
90

DEUTSCH
– INHALT –
z Hauptmerkmale ..................................................1
x Installation der Platte, der Scratch-Disc und des
Gleituntersatzes / Anschlüsse ........................... 2
c
Bezeichnung der teile und deren funktionen
v CD-Platten ......................................................... 6
b Allgemeiner betrieb ....................................... 6, 7
n Nächster Titel..................................................... 8
m Scratch............................................................... 9
, Seamless Loop/Hot Start/Stutter ................ 9, 10
. B Trim ...............................................................10
⁄0 Sampler ............................................................11
⁄1 Autom. BPM-Zähler/Effector ......................12, 13
.. 3 ~ 5
⁄2 MP3-wiedergabe ........................................13, 14
⁄3 Platter Effect.....................................................15
⁄4 Memo (Anwendereinstellungs-Speicher) .........16
⁄5 Preset ...............................................................17
⁄6 Technische daten..............................................18
• ZUBEHÖR
Stellen Sie sicher, daß die nachfolgend aufgeführten Zubehörteile dem Hauptgerät beiliegen:
q Bedienungsanleitung ..........................................1
w Anschlußkabel für den Signalausgang (RCA) .....1
e Aluminiumplatte ..................................................1
r Gleitunte satz......................................................1
t Scratch-Disc ........................................................1
1
HAUPTMERKMALE
Herzlichen Glückwunsch zum Kauf Ihres neuen DNS3500. Der als Tischgerät zu verwendende DN-S3500
Einzel-CD/MP3-Player verfügt über eine Reihe von
verbesserten Merkmalen, Funktionen und erstklassige
Leistung für unbegrenzte Kreativität und Showmanship.
Professionelle Anordnung und Bauteile
1. Aktivmotor-Platter
Wenn die Wiede gabe gestartet wi d, dreht sich
die Speicherplatte auf dieselbe Art und Weise wie
ein analoger Plattenteller; sie fühlt sich zudem so
an und reagiert dem entsprechend.
Die Aktiv-Platte besteht aus einer moto betriebenen
Platte, einem Gleituntersatz und einer Scratch-Disc,
wie bei einem analogen Plattenspieler für echte
Emulation. Die Beats können angepasst werden
und das Scratchen kann mit dem gleichen Feeling
wie bei einem analogen Plattenteller durchgeführt
werden.
2. Direktantriebsmotor mit hohem Drehmoment
Das neue betriebsinterne Design des
Direktantriebsmotors von Denon ohne Bürsten
liefert einen leistungsstarken Anlaufdrehmoment
von 2,5 kg-cm, wodurch die Platte inne halb von
0,5 Sek. die volle Drehgeschwindigkeit erreicht.
3. 33/45 R.P.M
Sie können die Plattengeschwindigkeit je nach
Wunsch auf 33 oder 45 U/min. einstellen.
Merkmale und Funktionen
Das Vo handensein eines leistungsstarken DSPs und
die große Speicherkapazität ermöglichen zahlreiche
neue Steuerungsfunktionen wie beispielsweise:
1. SCRATCH
Dank des aktiven Platters und der Scratch-Disc ist
der erzielte Scratch-Sound mit dem von analogen
Plattentellern vergleichbar.
Darüber hinaus können der Haupttitel und die
Samples mit einem Tastendruck als ScratchSound-Quelle ausgewählt werden.
y Adaptereinheit ....................................................1
• Scratch-Disc-Adapter (Adapter (1))...................2
• 7”-Schallplatten-Adapter (Adapter (2)) .............1
• Fixieren der Platte ............................................1
• Schraube (<-Kopf)............................................3
2. MP3-WIEDERGABE
Es ist möglich. MP3-Dateien wiedergeben zu
lassen, die in dem auf Seite 13 aufgeführten
speziellen Format erstellt wurden.
Sie können entweder manuell oder du ch
Scannen oder die Verwendung einer ganzen
Anzahl von Datei-Suchfunktionen (Dateisuche,
Datei-/Ordnersuche, Interpretennamen-Suche,
Titelnamen-Suche, Dateinamen-Suche) nach
Dateien suchen.
3. RESERVIERUNG NÄCHSTER TITEL
Der nächste Titel kann ausgewählt we den,
während der gegenwärtige Titel für einen
nahtlosen Übe gang weiterhin wiedergegeben
wird.
4. CROSS FADE
Zusätzlich zur Funktion Nächster Titel ist der DNS3500 auch in der Lage, beim Übe gang zum
nächsten Titel ein sanftes internes Crossfading
durchzuführen.
5. HOT START und STUTTER
Mit der Hot Start-Funktion können Sie die
Wiede gabe von einem von Ihnen spezifizierten
Punkt sofort starten. Unter Verwendung der A1und A2-Tasten können bis zu zwei Punkte
eingestellt werden. Die geladenen Hot Starts
können auch für das “Stutter” dieser selben
Punkte verwendet werden. Im aktivierten StutterModus wi d der Ton entsprechend der Dauer, in
der diese Tasten gedrückt und losgelassen
we den, vorübe gehend ausgegeben.
6. SEAMLESS LOOP
Mit dieser Funktion kann jeder Abschnitt eines Track
ohne Tonunte brechung oder Längenbegrenzung
wiede holt wiedergegeben werden. Der DN-S3500
verfügt über die verschiedensten Looping-Optionen,
wie beispielsweise Exit, Reloop und Dual-Loop.
7. SAMPLER
Der digitale Onboard-Sampler kann bis zu 15
Sekunden in CD-Klangqualität mit einer
Abtastfrequenz von 44,1 kHz aufnehmen. Sie
können diese Sample nahtlos du chlaufen
(Seamless Loop) oder rückwärts wiedergeben
lassen (REVERSE). Der Tonhöhen- und
Ausgangspegel der Samples kann unabhängig
eingestellt werden.
Der B-Punkt kann exakt auf die gleiche Weise wie
bei der A-B-Seamless Loop-Funktion einfach
eingestellt oder geändert werden.
Die Seamless Loop kann ganz einfach in den
Sampler kopiert werden.
8. B TRIM
Die B-Punkte für die Seamless Loop und den
Sampler können mithilfe der Scratch-Disc einfach
eingestellt werden. Die Einstellungen können
während der Wiedergabe des Live-Loops in
Echtzeit durchgeführt werden.
9. AUTOM. BPM-ZÄHLER, BPM-SPERRE,
MANUELL-TAP, und MANUELLER BPMEINGANG
Neben einem automatischen BPM-Zähler und der
manuellen Tap-Funktion ist der DN-S3500 ferner
mit einer Sperrfunktion für das vorübergehende
Sperren des automatischen BPM-Zählers
ausgestattet. Darüber hinaus ist eine manuelle
BPM-Eingangsfunktion verfügbar, um bekannte
BPM-Werte direkt über einen Drehschalter
einzugeben, damit die BPM-Einstellung auf
einfache Art und Weise durchgeführt werden
kann.
10. ON-BORD-EFFEKTE
Sieben Effektortypen sind verfügbar.
ECHO/LOOP:
Die ECHO- und LOOP-Funktionen können
ausgewählt werden. Das Looping für die
Feedback-Zeit (ECHO LOOP) ist durch die
Einstellung der Feedback-Nummer auf “MAX”
verfügbar.
FLANGER:
Die Feedback-Zeit und die FeedbackVerstärkung können ausgewählt werden.
FILTER:
Sie können hre Auswahl aus drei Filtern (LOW
PASS, MID PASS und HIGH PASS) treffen und
diese einzeln einstellen.
11. PLATTER MODE
Die einem analogen Plattenteller entsprechende
Wiedergabe kann unter Verwendung von vier
Platter-Effekten simuliert werden.
BRAKE:
Simuliert den Winding-Down-Sound eines
Vinyl-Plattentellers bis zu einem langsamen
vollständigen Stopp. (Die Verlangsamungszeit
kann eingestellt werden.)
DUMP:
Spielt den Sound rückwärts ab, während die
Vorwärtsbewegung beibehalten wird, ohne
“ve striche Zeit” zu verlieren, wenn Sie die
normale Wiede gabe fortsetzen.
REVERSE:
(Reverse) Gibt den Sound rückwärts wieder, bis
die normale Wiedergabe wiede hergestellt wird.
1
DEUTSCH
12. MEMO (CD & MEMO)
Die verschiedensten Einstellungen wie SuchlaufPunkt, Hot Start, A-B Loop, BPM, Tonhöhe und
Tasteneinstellung können im internen, nicht
flüchtigen Speicher für ein späteres Abrufen
gespeichert werden. Bis zu 5000 Einstellpunkte
können verwaltet werden.
Zusätzlich dazu können Speicherdaten von einem
anderen DN-S3500, DN- S5000, DN-S3000 oder
DN-D9000 zum DN-S3500 übertragen we den.
13. PITCH/KEY ADJUST
PITCH:
Die Wiedergabegeschwindigkeit wird mit dem
PITCH-Slider eingestellt. Einstellbare PitchBereiche sind +/– 4, 10, 16, 24, 50, 100% (live
auswählbar).
KEY ADJUST:
Hält die Original-Tonart aufrecht, auch wenn die
Pitch-Wiedergabegeschwindigkeit mit dem
PITCH-Slider geändert wird.
14. DIGITAL OUT
Der digitale Ausgang für die Hauptleitung liefert
unabhängig von der Tonhöhen-Änderung oder der
Modus-Einstellung ohne irgendwelche
Einschränkungen oder Beschränkungen ein
natürliches, 100% digitales Signal.
15. FADER START
Die DN-S3500 FADER START-Steuerungen sind
mit unseren Mischern und den meisten Mischern
anderer Hersteller kompatibel.
16. SHOCKPROOF MEMORY
20 Sekunden des stoßfesten Speichers schützt
gegen Tonunterbrechungen aufgrund von
externen mechanischen Stößen, wie Rucke oder
andere starke Vibrationen, was für mobile DJs
sowie für Nightclub-Anwendungen nützlich ist.
17. PRESETS
Es ist möglich, das Gerät an hre Wünsche
anzupassen, in dem Sie hre bevorzugten
Einstellungen im internen Speicher ablegen. Für
Punkte, die in den Presets gefunden we den
können, siehe Seite 17.
18. CD TEXT
19. CD-R/RW-Wiedergabe
Dieser Player ist in der Lage, CD-R/RW-Discs
wiederzugeben - dies alle dings nur, wenn die Discs
zuvor finalisiert wurden. Nehmen Sie aber bitte zur
Kenntnis, dass der Player je nach Aufnahmequalität
u. U. nicht in der Lage ist, bestimmte finalisierte CDR/RW-Discs wiederzugeben.
20. Wiedergabe bei Einschaltung
Der Player kann so eingestellt werden, dass die
Wiede gabe im Verzögerungsmodus startet,
wenn die Stromversorgung eingeschaltet wird.
21. Plug Ins
Von Zeit zu Zeit werden wir neue, aufregende
Funktionen hinzufügen oder die vo handenen
du ch die kostenlose Firmware Plug Ins
verbessern.
Besuchen Sie uns unter www
sich zu vergewissern, dass Sie die neueste
Firmwareversion haben.
.denondj com, um
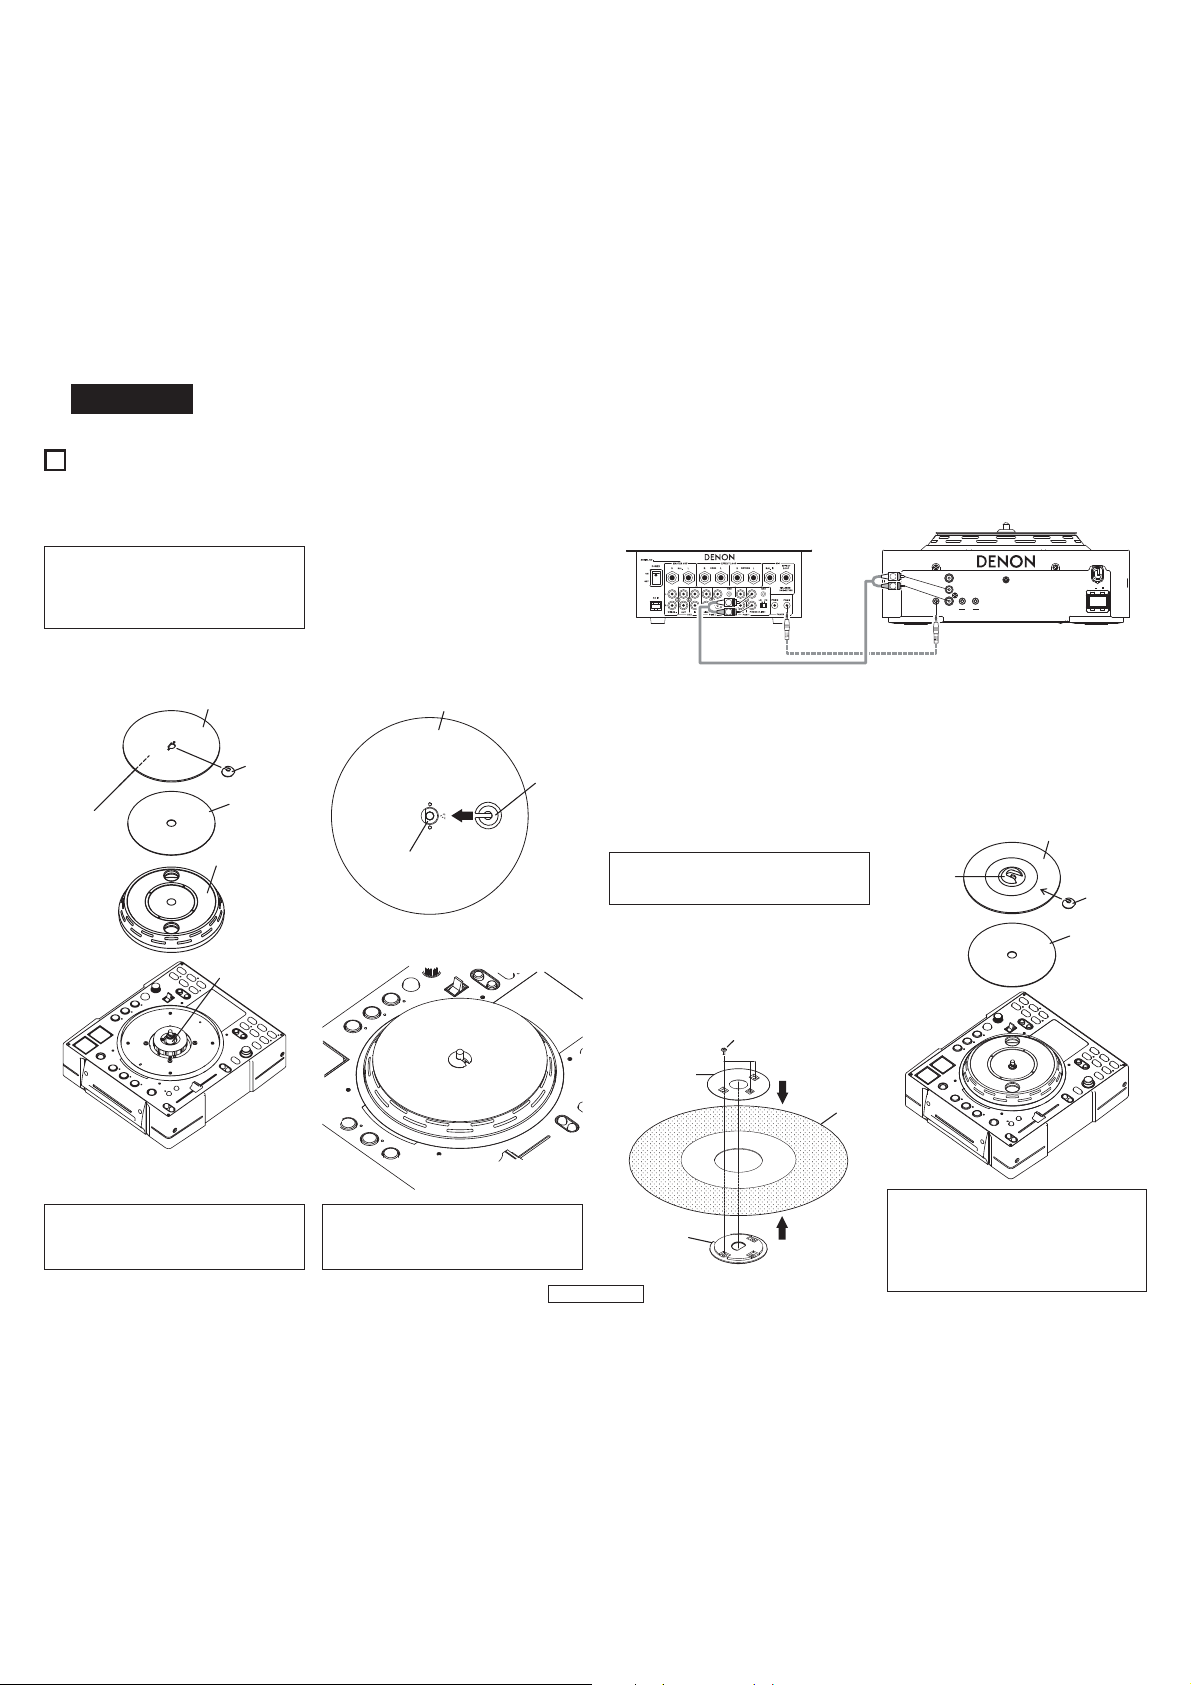
DEUTSCH
2
INSTALLATION DER PLATTE, DER SCRATCH-DISC UND
DES GLEITUNTERSATZES / ANSCHLÜSSE
(1) INSTALLATION DER PLATTE, DER SCRATCH-DISC und DES GLEITUNTERSATZES
• Zubehor
q Aluminiumplatte ...............................................1
w Scratch-Disc ......................................................1
e Gleitunte satz....................................................1
r Adapter (1) ....................................................... 2
Abbildung 1
(Groove-Side
DOWN)
(Einer dient als E satz.)
Scratch-Disc
Adapter (1)
Gleituntersatz
Platte
Kegelnocken
(Motoreinheit)
1. Installieren Sie die Platte auf dem Kegelnocken des
Moto s.
2. Installieren Sie den Gleituntersatz auf der Platte.
3. Setzen Sie Loch D der Scratch-Disc auf den DSchaft des Motors.
HINWEIS: Die bedruckte Seite weist zur Gleituntersatz-
Seite.
4. Setzen Sie den Adapter in Pfeilrichtung ein.
HINWEIS: Bitte achten Sie auf die Einsatzrichtung.
Abbildung 2
Scratch-Disc
Adapter (1)
D-Schaft
Abbildung 3
(2) ANSCHLÜSSE
1. Schalten Sie den POWER-Schalter aus.
2. Schließen Sie Cinch-Steckerkabel zwischen den Ausgängen des DN-S3500 und Eingängen Ihres Mixer an.
3. Wenn Ihr Mischer mit der Fader Start-Funktion ausgestattet ist, wie unser DENON-Mischer, schließen Sie die
FADER-Buchse mithilfe eines 3,5mm Stereominikabels am Mischer an.
DN-X300
L
LINE
FADER
PGM 1
OUT
L
R
LINE1
(3) INSTALLATION
Stellen Sie den DN-S3500 bitte horizontal auf.
(4) INSTALLATION DER 7” (17cm)-PLATTENADAPTOR
Unter Verwendung des im Lieferumfang enthaltenen Adapters kann Ihre eigene 7” (17 cm)-Vinylplatte auf
diesem Gerät installiert werden.
Dieses Originaldesign garantiert hnen die Freiheit einer Verwendung hrer Lieblings-Vinylplatten für das
ultimative analoge Plattenteller-Feeling.
*Stellen Sie sicher, dass die zu verwendende Platte flach und nicht verbogen ist.
• 7” (17cm)-Plattenadapter-Zubehö
q Adapter (2) ........................................................1
w Schraube (<-Kopf) ........................................... 3
e Fixieren der Platte.............................................1
Setzen Sie den Adapter (2) in das Loch der 7”-Platte ein.
1.
2. Fixieren Sie die Platte mit 3 Schrauben. (<-Kopf).
Setzen Sie Loch D des Adapters (2) auf den D-Schaft
3.
des Motors ein.
DGI AL UT
R
LNE O TF ER N UT
FADER
Abbildung 2
Adapter (2)
L
R
M MO
P WER ON OFF
7” (17 cm)-Disc
Adapter (1)
Gleituntersatz
4. Setzen Sie den Adapter (1) auf den Adapter (2).
ACHTUNGE:
• Berühren Sie die Motoreinheit nicht.
• Schalten Sie die Stromversorgung ohne Platte
nicht ein.
HINWEIS:
Bitte beachten Sie die Neigung der Platte, wenn
Sie den DN-S3500 bewegen, nachdem die Platte
eingesetzt wo den ist.
Abbildung 1
Fixieren der Platte
2
DEUTSCH
Adapter (2)
Schraube (<-Kopf)
7” (17cm)-Platte
HINWEIS:
Je nach gewählter RECORD, ist die Haftung mit
der Gleitmatte vielleicht nicht ausreichend,
wodurch ein ungewünschtes Schleifgeräusch
verursacht werden kann.
Sollte dies so sein, verwenden Sie eine andere
Schallplatte, die dicker oder schwerer ist.
DEUTSCH
3
BEZEICHNUNG DER TEILE UND DEREN FUNKTIONEN
(1) Bedienfeld
q Disc-Ladeschlitz
• Legen Sie die Disc langsam ein und lassen Sie
sie los, wenn der DN-S3500 die Disc einzieht.
HINWEIS:
Bitte beseitigen Sie eventuelle Verschmutzungen
von der beschrifteten Seite der Disc und legen
Sie die Disc ein.
Die Verschmutzungen könnten ein Verrutschen
der Disc-Laderolle verursachen.
ACHTUNGE:
• Legen Sie keine Discs ein, wenn die
Stromversorgung ausgeschaltet ist.
• Versuchen Sie nicht, die Disc mit Gewalt
heraus zu ziehen, wenn der DN-S3500 damit
begonnen hat, die Disc einzuziehen.
• Legen Sie nicht mehr als eine Disc zurzeit
ein und legen Sie keine anderen
Gegenstände als Discs ein.
Anderenfalls könnte der Lademechanismus
beschädigt werden.
(2) Hinteres Anschlussfeld
w POWER-Taste (¢ON £OFF)
• Drücken Sie diese Taste, um den Strom ein- und
auszuschalten.
ACHTUNG:
• Schalten Sie die Stromverso gung nicht aus,
während eine Disc eingezogen oder
ausgeworfen wird. Anderenfalls könnte der
Lademechanismus beschädigt werden.
e Analoge Ausgangsbuchsen
(LINE OUT)
• Hierbei handelt es sich um nicht-symmetrische
Cinch-Ausgangsbuchsen.
• Audiosignal-Ausgänge.
r Faderstart-Buchse
• Verwenden Sie diese Ausgänge mit einem 3,5
mm-Stereo-Minikabel, wenn hr Mischgerät
über eine Fader-Startfunktion verfügt.
t Digital-Ausgangsbuchse
• An dieser Buchse sind Digitaldaten verfügbar.
• Verwenden Sie für die Anschlüsse 75 1/Ohm
Steckerkabel.
• Wir empfehlen hnen die Verwendung eines
umflochtenen, abgeschirmten Drahtkabels.
HINWEIS:
Der Wiedergabepegel wird nach der analogen
Konvertierung auf –6 dB unte halb dem
gewöhnlichen Pegel eingestellt, um eventuelle
Digitalstörungen zu vermeiden.
y Memo-Buchse (MEMO IN/OUT)
•
Verwenden Sie diese Buchse, um Memodaten
von einem anderen Gerät, DN-S3500, DN-S3000,
DN-S5000 oder DN-D9000, zu übertragen.
(3) Oberes Bedienfeld
ACHTUNG:
• Beachten Sie dabei, dass viele Tasten zwei
verschiedene Funktionen erfüllen, die durch
kurzes Antippen oder langes Drücken (1 Sekunde
oder länger) gewählt werden können. Das
Zeichen steht für die Funktion bei kurzem
Antippen und das Zeichen steht für die
Funktion bei langem Drücken.
u PLAY/PAUSE-Taste (13)
• Mit dieser Taste wird die Wiedergabe gestartet
oder unterbrochen.
• Drücken Sie sie einmal, um die Wiedergabe zu
starten; drücken Sie sie noch einmal, um die
Wiedergabe zu unterbrechen und noch einmal,
um die Wiedergabe fortzusetzen.
i DISC EJECT-Taste
• Drücken Sie diese Taste, um sich die Disc
auswerfen zu lassen.
• Während der Wiede gabe lässt sich die Disc
nicht auswerfen. Stoppen Sie die Wiedergabe
vor dem Drücken dieser Taste.
o CUE-Taste
• Wenn diese Taste im Wiedergabe-Modus
gedrückt wird, wi d der Track zu der Position
zurückgeschaltet, an der die Wiedergabe
gestartet worden ist. Im Suchmodus wird ein
neuer Cue-Punkt erstellt. (Cue)
• Im Cue-Modus wird bei Drücken der CUE-Taste
ein Stutter-Sound ab dem Cue-Punkt
ausgegeben. Dies wi d STUTTER PLAY
genannt. (Stutter)
!0 Platter/Scratch Disc
Verwenden Sie diese Vinyl-Scratch-Disc für die
manuelle Suche, für gleitende
Tonhöhenve schiebungs- und Scratching-Betriebe.
• Platter:
Der Platter dreht sich, wenn sich die
Scratchmodus-Taste bei der Wiedergabe der
ausgewählten Quelle in der Haupt- oder
Samplerposition und wenn sich das Gerät im
Wiedergabe-Modus befindet.
• Scratch Disc:
Wenn sich die Scratch-Disc dreht, wi d die
Scratch-Wiede gabe der ausgewählten Quelle
(Haupt oder Sampler) gestartet.
HINWEIS:
Der Platter dreht sich nicht, wenn der ScratchModus in den BEND/SEARCH-Modus eingestellt
wurde.
ACHTUNGE:
• Versuchen Sie nicht, den Platter mit Gewalt
anzuhalten, wenn Sie sich dreht.
Anderenfalls könnte der Platter
Antriebsmechanismus beschädigt werden.
• Wenn bei dem sich drehenden Platter ein
Problem mit der Platterdrehung auftaucht,
hört der Platter auf sich zu drehen und der
Pause-Modus wird eingestellt.
!1 FLIP/CLR-Taste
• FLIP:
Wählen Sie mit dieser Taste die Betriebsart der
A1- und A2- Taste für den Hot Start- Modus und
Stutter-Modus aus. Das Display zeigt “H/S”
oder “STR” an.
• A1, A2 CLR:
Wenn die FLIP-Taste gedrückt wird, während
die FLIP-Taste gedrückt gehalten wird, können
Sie den ausgewählten A-Punkt löschen.
Wenn nur die FLIP-Taste länger als 1 Sek.
gedrückt wird, können Sie die A1- und A2Punkte gleichzeitig löschen.
!2 A1, A2-Taste
• Du ch Verwendung dieser Taste können Sie
einen Startpunkt für den Hot Start, für Seamless
Loop und für Stutter erstellen.
!3 B-Taste
• Verwenden Sie diese Funktion, um den B-Punkt
für das E stellen eines Seamless Loops
einzustellen, nachdem bereits ein A-Punkt
eingestellt wurde.
!4 EXIT/RELOOP-Taste
• Verwenden Sie diese Option zum Verlassen
oder kehren Sie zur Seamless Loop-Wiedergabe
zurück. Mit dieser Funktion können Sie dem
Looping eine Variation hinzufügen.
!5 B TRIM-Taste
• Wenn diese Taste während der Wiedergabe
gedrückt wird, wird der *B TRIM MODE
ausgewählt. *Nur, wenn eine nahtlose LOOP
eingestellt ist.
In den Standby- und Pause-Modi kann nur der B
TRIM MODE ausgewählt we den.
!6 (SAMP) REV/CLR-Taste
• (SAMP) REV:
Wählen Sie mit dieser Taste die Betriebsart der
A1- und A2- Taste für den Hot Start- Modus und
Stutter-Modus aus. Die REV-LED leuchtet im
Hot Start-Modus auf.
• (SAMP) CLR:
Wenn die SAMP-Taste während des Drückens
der SAMP REV-Taste gedrückt wird, können Sie
die SAMP-Daten löschen.
Dies können Sie auch du ch Gedrückthalten der
SAMP REV-Taste für mindestens 1 Sekunde
erzielen.
3
DEUTSCH
!7 SAMP-Taste
• Drücken Sie diese Taste, um Töne vom Sampler
aufzunehmen oder wiederzugeben.
!8 (SAMP) B-Taste
• Verwenden Sie diese Taste, um den B-Punkt für
den Sampler Loop einzustellen.
!9 (SAMP) EXIT/RELOOP
• Schalten Sie mit dieser Taste den Sampler LoopModus ein und aus. Funktioniert auch als
EXIT/RELOOP-Taste für das Deaktivieren und
Wiede herstellen des Sampler Loop-Modus.
@0 (SAMP) STOP-Taste
• Du ch Drücken dieser Taste, während sich das
Gerät im Sampler-Aufnahme- oder WiedergabeModus befindet, wird die Sampler-Aufnahmeoder Wiedergabe gestoppt.
• Wenn die Sampler-Wiedergabe stoppt, kann sie
für die Stutter-Wiedergabe verwendet werden.
@1
(SAMP) PITCH/VOL., B TRIM-Taste
• PITCH/VOL.:
Wenn diese Taste gedrückt wird, wird
SAMPLER PITCH ausgewählt. Wenn die Taste
erneut gedrückt wird, wird SAMPLER LEVEL
ausgewählt.
Die Sampler-Tonhöhe und der Ausgangspegel
der Sampler-Wiedergabe kann mit dem
PARAMETERS-Knopf eingestellt werden.
• B TRIM:
Wenn diese Taste länger als 0,5 Sek. gedrückt
wird, wird der Sampler B TRIM MODE
ausgewählt.
@2 TITLE/ID3-Taste
• CD TEXT:
Wenn CD-Textdaten vo handen sind, we den
die CD-Textdaten automatisch angezeigt, oder
wenn diese Taste gedrückt wird.
Falls keinerlei TEXT verfügbar ist, wird “No
TEXT” auf dem Display angezeigt.
• MP3:
Wenn eine MP3-Datei über ID-3 Tag-Daten
verfügt, werden eine Interpretenname und ein
Albumname ausgewählt und bei jedem Drücken
dieser Taste angezeigt.
@3 TIME, T.TIME-Taste
• TIME:
Ein kürzeres Drücken der Taste führt zu einer
Umschaltung der Modi zwischen ELAPSED
TIME und REMAIN TIME.
• T.TIME:
Du ch langes Drücken wird der Anzeige-Modus
zwischen TRACK TIME und DISC TIME
umgeschaltet.
• Auf diese Weise können Sie den AnzeigeModus aus vier Modi, TRACK ELAPSED, TRACK
REMAIN, DISC ELAPSED und DISC REMAIN,
auswählen.

DEUTSCH
@4 MEMO, PRESET-Taste
• MEMO:
Der Memo-Modus startet, wenn diese Taste im
Cue-Modus ein einziges Mal gedrückt wird.
• PRESET:
Wenn diese Taste für mindestens 1 Sekunde
gedrückt wird, wird das PRESET-Modusmenü
angezeigt.
Der Gerätestatus muss CUE, PAUSE oder No Disc
sein, bevor Sie in den Voreinstellungsmodus
umschalten können.
@5 CONT./SINGLE, RELAY-Taste
• CONT./SINGLE:
Kurzes Antippen beendet den Wiede gabe-Modus
zwischen CONT. (Fortsetzung: Wiedergabe anderer
Tracks) und SINGLE (stoppen der Wiede gabe und
Rückwärtssuchlauf kehrt zurück zu Ihrem
Einstellpunkt.).
• SINGLE PLAY LOCK:
Durch PRESET kann der Modus SINGLE PLAY
LOCK ausgewählt we den. Zu diesem Zeitpunkt
wird die Auswahl bei Drücken der Taste
getroffen. Wenn SINGLE PLAY LOCK
ausgewählt wurde, ist die Titelauswahl während
der Wiedergabe deaktiviert. Dies ve hindert ein
Stoppen der Wiedergabe, wenn der
Titelauswahl-Knopf aus Versehen während der
Wiedergabe gedreht wird. Der WiedergabeEndmodus entspricht dem Einfach-Modus.
• RELAY:
Sie können den RELAY PLAY-Modus ein- und
ausschalten.
Die Relaiswiedergabe ist möglich, wenn zwei
DN-S3500-Einheiten via MEMO angeschlossen
sind.
@6 FILE SEARCH MODE-Taste
• Nur bei MP3-DISCS:
Wenn dieser Knopf gedrückt wird, kann der
Datei-Suchauswahlmodus mithilfe des
PARAMETERS-Knopfes ausgewählt we den.
@7 TRACK/PARAMETERS-Knopf
• TRACK:
Wenn die PARAMETERS LED leuchtet, drehen
Sie diesen Knopf, um Tracks auszuwählen.
Durch Drücken dieses Knopfes während des
Drehens verändern sich die Titel um jeweils 10
Titel zugleich.
• PARAMETERS:
Wenn die PARAMETER LED blinkt, drehen Sie
diesen Knopf, um die Parameter für die in den
Platter Effect-, Programm-, Memo- und PresetDaten, usw. gefundenen Punkte auszuwählen
und zu ändern.
@8 NEXT TRACK-Taste
• Wenn diese Taste während der Wiedergabe
gedrückt wird, wird der NEXT TRACK-Modus
ausgewählt. Der nächste Titel kann mit dem
PARAMETERS-Knopf ausgewählt werden.
@9 FAST SEARCH (6)
QUICK JUMP-Taste
#0 FAST SEARCH (7)
QUICK JUMP-Taste
• QUICK JUMP:
Wenn eine dieser Tasten kurz gedrückt wird,
springt die Wiedergabe-Position um etwa 10
Sekunden in Vorwärts (
6)-Richtung. Die Sprungzeit kann im
(
Voreinstellungsmodus umgeschaltet werden.
• FAST SEARCH:
Wenn eine dieser Tasten gedrückt gehalten
wird, wird die Disc in Vorwärts (
6) Richtung schnell durchsucht.
Rückwärts (
7)- oder Rückwärts
#1 PITCH BEND – -Taste
#2 PITCH BEND + -Taste
• Das Drücken dieser Tasten führt zu einer
vorübergehenden Umschaltung der HauptWiedergabegeschwindigkeit.
• Durch Drücken der Taste PITCH BEND + nimmt
die Wiedergabegeschwindigkeit zu; du ch
Drücken der Taste PITCH BEND – nimmt die
Wiedergabegeschwindigkeit ab.
• Wenn Sie die Taste loslassen, wird die zuvor
eingestellte Wiede gabegeschwindigkeit
wiede hergestellt.
#3 Pitch Slider
• Verwenden Sie diesen Schieber, um die
Wiedergabegeschwindigkeit einzustellen.
• Die Wiede gabegeschwindigkeit verringert sich,
wenn der Schieber nach oben geschoben wird,
und e höht sich, wenn er nach unten geschoben
wird.
#4 PITCH, RANGE-Taste
• Drücken Sie diese Taste, um den PITCH-Modus
einzustellen.
• RANGE:
Drücken Sie diese Taste länger als 1 Sekunde,
um den Pitch-Bereich einzustellen. Der PitchBereich kann mithilfe des PARAMETERSKnopfes zwischen ±4, 10, 16, 24, 50 oder 100%
ausgewählt werden.
#5 KEY ADJUST-Taste
• Drücken Sie diese Taste, um den KEY ADJUSTModus einzustellen.
7) oder
#6 PLATTER SOURCE-Taste
Wählen Sie die Quelle für die Scratch-Wiedergabe
und den Manuellen Such-/Bend-Modus aus.
• MAIN:
Diese Taste leuchtet orange.
Bearbeiten Sie den Haupttitel-Sound.
• SAMP.:
Diese Taste leuchtet nur grün, wenn ein Sample
geladen ist.
Bearbeiten Sie den Sampler-Titelsound.
• BEND/SEARCH:
Wenn diese Taste erneut gedrückt wird, wird
der BEND/SEARCH-Modus ausgewählt.
Wenn die Scratch-Disc-Auswahl während der
Wiedergabe auf BEND/SEARCH eingestellt
wird, arbeitet sie als Funktion zur gleitenden
Tonhöhenverschiebung.
Wenn die Scratch Disc im Pause- oder StandbyModus gedreht wird, a beitet diese Funktion als
manuelle Suchfunktion. Die manuelle Suche beginnt
zu a beiten, und Sie können den CUE-Punkt jeweils
um einen Rahmen zugleich (1/75-Sekunde) mit
einem hörbaren Rahmenwiede holungs-Klang dada-da-da) verschieben.
#7 SCRATCH-Richtungs-Auswahlhebel
Wählen Sie die Scratch-Wiedergaberichtung aus.
• BOTH:
Wenn die Scratch-Disc gedreht wi d, wird der
Scratch-Sound in beide Richtungen ausgegeben.
• FWD:
Wenn die Scratch-Disc gedreht wird, wi d der
Scratch-Sound nur in Vorwärtsrichtung
ausgegeben.
#8 BRAKE-Taste
•
Drücken Sie diese Taste, um BRAKE einzustellen.
#9 DUMP-Taste
•
Drücken Sie diese Taste, um DUMP einzustellen.
$0 REVERSE-Taste
• Drücken Sie diese Taste, um den REVERSEModus einzustellen.
$1 TAP, LOCK, AUTO, INPUT BPM-
Taste
• TAP:
Wenn Sie diese Taste wiede holt drücken, wi d
der Auto-Modus ausgeschaltet und misst die
Beats Pro Minute (BPM) durch Tapping.
• LOCK:
Wenn diese Taste einmal betätigt wird, während
der autom. BPM-Zähler in Betrieb ist, werden
die vom autom. BPM-Zähler gemessenen Daten
gesperrt.
• AUTO:
Wenn Sie die TAP-Taste 1 Sekunde lang
drücken, wird der AUTO BPM-Modus aktiviert.
Der gemessene BPM wird im Zeichenbereich
des Displays angezeigt.
• INPUT BPM:
Wenn die TAP-Taste gedrückt und länger als 2
Sekunden gedrückt gehalten wird, wird der
BPM-Eingabemodus eingestellt, und der BPMWert kann mit dem EFFECTS-Knopf direkt
eingegeben werden. Wenn die TAP-Taste
erneut gedrückt wi d, der BPM-Eingabemodus
wird ausgeschaltet und eingestellt.
HINWEIS:
Falls Sie einen neuen Track auswählen, wird der
AUTO BPM-Modus automatisch eingeschaltet.
$2 ECHO/LOOP-Taste
•
Die ECHO- und ECHO LOOP-Funktionen können
ausgewählt werden. Die Feedback-Zeit und das
Feedback-Ve hältnis können ausgewählt
werden. Das Looping für die Feedback-Zeit
(ECHO LOOP) ist durch die Einstellung der
Feedback-Nummer auf “MAX” verfügbar.
$3 FLANGER-Taste
•
Die Feedback-Zeit und die Feedback-Verstärkung
können ausgewählt werden.
$4 FILTER-Taste
• Sie können Ihre Auswahl aus drei Filtern (LOW
PASS, MID PASS und HIGH PASS) treffen.
$5 EFFECTS-Knopf
• Verwenden Sie diesen Knopf, um die Parameter
des internen Effektors einzustellen.
$6 PLATTER LED
•
Diese schwingende blaue Leiste liefert PlattenModi auf einen Blick, wie Scratch-Speicher,
Tonhöhenbeugung, Rahmensuche und geladene
Disc.
4
DEUTSCH
DEUTSCH
(4) Display
q w e r
t
o
y
q Track, Minute, Sekunde und
Rahmenanzeigen
•
Auf diesen Anzeigen erscheinen die gegenwärtigen
Positionsinformationen.
w Zeitmodus-Anzeigen
• Wenn die TIME-Taste gedrückt wird, wird die
Zeitmodus-Anzeige wie folgt umgeschaltet:
ELAPSED:
Die verstrichene Zeit des Tracks wird angezeigt.
REMAIN:
Die restliche Zeit des Tracks wird angezeigt.
T. ELAPSED:
Die gesamte verstrichene Wiedergabezeit
der Disc wird angezeigt.
T. REMAIN:
Die gesamte verbleibende Wiedergabezeit
der Disc wird angezeigt.
e Wiedergabemodus-Anzeigen
• Wenn die SINGLE-Anzeige aufleuchtet, wird die
Wiedergabe am Ende des gegenwärtig
abgespielten Tracks beendet.
• Wenn die CONT-Anzeige aufleuchtet, wird die
Wiedergabe fortgesetzt.
r BPM-Anzeige
• Leuchtet, wenn BPM im Pitch-Display angezeigt
wird.
t MP3-Anzeige
• Leuchtet, wenn eine MP3-Disc erkannt wird.
!0iu
y Loop-Modusanzeigen
•
Der DN-S3500 verfügt über Loop-Modusanzeigen,
die aus A, B und zwei Pfeilen bestehen. Die A- und
B-Markierungen zeigen an, dass A- und B-Punkte
eingestellt wurden.
• Die beiden Pfeile zeigen den LoopEinstellungsmodus wie folgt an.
oder Nur linker Pfeil wird angezeigt:
Hot Start-Modus
Beide Pfeile werden angezeigt:
Seamless Loop-Modus
, Beide Pfeile blinken:
Seamless Loop-Wiedergabe
, Linker Pfeil wi d angezeigt, rechter
Pfeil blinkt:
Seamless Loop-Wiedergabe wird beendet
u MP3-Dateisuche-Modusanzeigen
FILE:
Die FILE-Anzeige wi d angezeigt, wenn sich
das Gerät im FILE-Namensuche-Modus
befindet.
FOLDER:
Die FOLDER-Anzeige wird angezeigt, wenn
sich das Gerät im FILE & FOLDERNamensuche-Modus befindet.
TITLE:
Die TITLE-Anzeige wird angezeigt, wenn sich
das Gerät im TITLE-Namensuche-Modus
befindet.
ARTIST:
Die ARTIST-Anzeige wi d angezeigt, wenn
sich das Gerät im ARTIST-NamensucheModus befindet.
i Zeichendisplay
•
Sie können den Modus oder die Funktion mithilfe
des PARAMETERS-Knopfes auswählen, indem
Sie der kurzen Meldung folgen, die im ZeichenDisplaybereich angezeigt wi d.
• Das Zeichendisplay zeigt die Bedienung, die
Modusbezeichnung, Daten, usw. sowie
Anleitungen an, wie “Push/Play”, was
!2
!1
y
folgendes bedeutet: “YES”, drücken Sie den
PARAMETERS-Knopf.
Bei den Display und -Zeichen beachten,
dass das -Zeichen bedeutet, dass Sie den
PARAMATERS-Knopf drehen müssen und dass
das -Zeichen bedeutet, dass Sie auf den
PARAMETERS-Knopf drücken müssen.
• Die PARAMETERS-LED blinkt, wenn Sie den
PARAMETER-Knopf betätigen, ansonsten wird
dieser Knopf für das Auswählen von Tracks
verwendet.
o Wiedergabepositions-Anzeigen
• Wiedergabepositions-Anzeige:
Die 30 Punkte zeigen während der normalen
Wiedergabe eine visuelle TitelPositionsmarkierung an. Die 10 orangefarbenen
Punkte zeigen während des RückwärtsWiedergabemodus die Wiedegabeposition an.
• Ende Nachricht:
Wenn die restliche Zeit am Ende des Tracks
geringer sein sollte als die angegebene Zeit, blinkt
die EOM (End Of Message) (Ende Nachricht)
Wiede gabepositions-Anzeige zusammen mit der
restlichen Zeit und zeigt somit das Ende des
Tracks an.
✽ Die EOM-Zeit kann in den Voreinstellungen
eingestellt werden.
!0 KEY ADJ.-Anzeige
• Wenn der Tasteneinstellungsmodus auf ON
gestellt wurde, wird die KEY ADJ -Anzeige auf
dem Display angezeigt.
!1 MEMO-Anzeige
• Die MEMO-Anzeige wird auf dem Display
angezeigt, wenn eine Memo-Einstellung für den
gegenwärtig wiederzugebenden Titel gefunden
wurde, bei dem der Suche-Standby-Modus im
Moment eingestellt ist.
!2 Pitch-Display
•
Diese Anzeige zeigt die Wiedergabegeschwindigkeit
Tonhöhe) an.
5
DEUTSCH
DEUTSCH
4
CD-PLATTEN
1. Vorsichtsmaßnahmen zur Handhabung von CD-Platten
• Achten Sie darauf, daß weder Fingerabdrücke, Öl oder Staub auf die Oberfläche der CD-Platte gelangen.
Wenn die CD-Platte verschmutzt ist, beseitigen Sie den Schmutz mit einem weichen trockenen Tuch.
• Verwenden Sie für die Reinigung von CD-Platten niemals Benzin, Farbverdünner, Wasser, Schallplattenspray,
elektrostatisch-sichere Chemikalien oder silikonbehandelte Tücher.
• Handhaben Sie CD-Platten stets sorgfältig, um Beschädigungen der Oberfläche zu vermeiden. Besondere
Vorsicht sollten Sie beim Herausnehmen der CD-Platte aus h-rer dazugehörigen Box und beim Hereinlegen
in die Box walten lassen.
• Dehnen Sie CD-Platten nicht.
• Führen Sie den CD-Platten keine Hitze zu.
• Vergrößern Sie nicht das Loch in der Mitte der CD-Platte.
• Beschriften Sie nicht das Etikett (bedruckte Seite) mit einem hartschreibenden Stift wie einem Bleistift oder
Kugelschreiber.
• Zu einer Taubildung auf der CD-Platte kommt es dann, wenn das Gerät vom Warmen ins Kalte gebracht wird,
wie z.B. im Winter nach draußen. Ve suchen Sie nicht, die CD-Platte mit einem Haarfön o ä. zu trocknen.
2. Vorsichtsmaßnahmen zur Aufbewahrung von CD-Platten
• Nehmen Sie die CD-Platte nach der Wiedergabe stets aus dem CD-Spieler heraus.
• Bewahren Sie die CD-Platte stets in ihrer dazugehörigen Box auf, um sie vor Verschmutzung und
Beschädigungen zu schützen.
• Bewahren Sie CD-Platten niemals an folgenden Orten auf:
(1) An Orten, an denen sie über einen beträchtlichen Zeitraum hinweg direkter Sonnenstrahlung ausgesetzt
sind.
(2) An Orten mit hoher Staubansammlung oder hoher Luftfeuchtigkeit.
(3) An Orten, die durch Wärme von Innenheizungen beeinträchtigt sind.
5
ALLGEMEINER BETRIEB
Wiedergabe und Pause
•
Bei jeder Betätigung der u PLAY/PAUSE-Taste (13)
wird zwischen Wiede gabe und Pause umgeschaltet.
Die PLAY/PAUSE-Taste (
Wiedergabe in einem kräftigen Grün und blinkt im
Pause-Modus.
• Wenn die u PLAY/PAUSE-Taste (13) während der
Wiede gabe gedrückt wird, unterbricht der DNS3500 die Wiedergabe an dieser Stelle. Wenn Sie
die u PLAY/PAUSE-Taste (
drücken, wird die Wiedergabe fortgesetzt.
• Wenn der Scratch-Modus auf MAIN eingestellt ist,
dreht sich bei Wiedergabe des Main Tracks der
Platter. Wenn die Rotation des Scratch Disc durch
Aufdrücken des Fingers gestoppt wird, wi d der
Pause-Modus eingestellt; wenn der Finger die Disc
freigibt, wird die Wiedergabe fortgesetzt.
13
) leuchtet während der
13) noch einmal
Wiedergabe und Cue
• Wenn die o CUE-Taste während der Wiedergabe
gedrückt wi d, stoppt der Titel und kehrt zur
ursprünglichen Position zurück, von der aus die
Wiedergabe gestartet wurde, zum so genannten
Cue-Punkt. Diese Funktion wird als Back-Cue
bezeichnet. Mit der Back-Cue-Funktion können Sie
die Wiedergabe vom genau gleichen Punkt aus
starten.
Die o CUE-Taste leuchtet im einem kräftigen Rot,
wenn der DN-S3500 bereit ist die Wiedergabe zu
starten.
• Sie können Cue-Punkt wie folgt einstellen und
ändern.
• Wenn Sie die Wiedergabe gestartet haben.
• Track-Auswahl beendet.
• Manual Sea ch.
Track auswählen
• Drehen Sie den @7 TRACK-Knopf.
• Durch Drücken des @7 TRACK-Knopfes während des
Drehens verändern sich die Titel um jeweils 10 Titel
zugleich.
Verschieben Sie den Cue-Punkt
• Wenn Sie die Wiede gabe vom Anfang eines Titels
aus starten möchten, müssen Sie den Cue-Punkt
mithilfe der Schnellsuche oder der manuellen
Suchfunktion ve schieben.
Sie können mit den @9 oder #0 FAST SEARCHTasten zur etwaigen Wiedergabe-Startposition
gelangen.
QUICK JUMP
Wenn die FAST SEARCH-Taste
•
kurz gedrückt wi d, springt die
Wiedergabeposition um etwa
10 Sekunden weiter.
1
Die Sprungzeit kann im Voreinstellungsmodus
zwischen 10, 20, 30 oder 60 Sekunden
ausgewählt werden.
FAST SEARCH
• Wenn die FAST SEARCH-Taste gedrückt
gehalten wird, wird die Disc schnell
durchsucht.
Wenn die Scratch-Disc !0 im Pause-, Cue- oder
Rahmenwiede holungsmodus gedreht wird,
arbeitet sie als manuelle Suchfunktion.
Drücken Sie die #6 PLATTER
SOURCE-Taste, um die !0
2
Scratch-Disc in den
Suchmodus zu schalten. Die
LEDs der PLATTER SOURCETaste schaltet sich aus.
Drehen Sie die !0 Scratch-
Disc, um den Cue-Punkt zu
ändern. Sie können den kurzen
3
Klang des gegenwärtigen
Suchpunktes hören.
Nachdem Sie hren
bevorzugten Cue-Punkt
festgelegt haben, die o
CUE-Taste drücken, damit
4
ist der neue Cue-Punkt
eingestellt.
QUICK JUMP
FAST SEARCH
SOURCE
CUE
6
DEUTSCH
 Loading...