


The Operating Manual for DENON AV Receiver/Amplifier firmware update. |
Page 1 / 18 |
The Operating Manual for
DENON AV Receiver/Amplifier firmware update.
“DENON Flash Rom Writer Compact Version.”
Model Name: |
AVR5805/AVC-A1XV |
Version: |
AVCA1XV: FWCV_AVCA1XV_V0006 |
|
AVR5805: FWCV_AVR5805_V0006 |
|
2005-11-15 |
Date: |
DENON
D&M Holdings, INC.
D&M Holdings, INC.
FWCV0006_manual.doc

The Operating Manual for DENON AV Receiver/Amplifier firmware update. Page 2 / 18
Index
1. |
Preparations before starting the operation: ......................................... |
3 |
||||
|
1.1 |
Preparation for the Personal Computer: ........................................... |
3 |
|||
|
1.2 |
Preparations for |
the cables. ..................................................... |
|
3 |
|
|
1.2.1 |
In case of |
updating using |
R-S232C connection. .............................. |
3 |
|
|
1.2.2 |
In case of updating using |
Ethernet connection. ............................. |
4 |
||
|
1.3 |
Connection diagram. .............................................................. |
|
4 |
||
|
1.3.1 |
In case of updating using |
RS-232C connection. .............................. |
4 |
||
|
1.3.2 |
In case of updating using |
Ethernet connection. ............................. |
4 |
||
|
1.4 |
Install the DENON Flash ROM Writer Compact version. .............................. |
5 |
|||
2. |
Firmware update procedure. (In case of updating using RS232C connection.). .......... |
6 |
||||
|
2.1 |
Notice: .......................................................................... |
|
|
6 |
|
2.2Set the AV Receiver/Amplifier into the firmware update mode. .....................6
|
2.3 |
Run the DENON Flash ROM Writer Compact version. .................................. |
6 |
|
2.4 |
Communication check. ............................................................. |
6 |
|
2.5 |
Start the firmware update. ....................................................... |
7 |
|
2.6 |
Complete the firmware update. .................................................... |
7 |
3. |
Firmware update procedure. (In case of updating using Ethernet connection.). ........ |
8 |
|
|
3.1 |
Notice: .......................................................................... |
8 |
3.2In case of direct connection without hub using cross cable. ......................9
|
3.2.1 |
Setup the IP address PC and the AV Receiver/Amplifier ...................... |
9 |
|
3.2.2 |
How to setup the fixed IP address of the AV Receiver/ Amplifier............. |
9 |
|
3.2.3 |
Power on the AV Receiver/Amplifier. ........................................ |
9 |
|
3.2.4 |
Run the DENON Flash ROM Writer Compact version. ............................ |
10 |
|
3.2.5 |
Communication check. ....................................................... |
10 |
|
3.2.6 |
Start the firmware update. ................................................. |
11 |
|
3.2.7 |
Complete the firmware update. .............................................. |
11 |
|
3.3 In case of Ethernet HUB or Router(without DHCP server ability).................... |
12 |
|
|
3.3.1 |
Setup the IP address PC and the AV Receiver/Amplifier ...................... |
12 |
|
3.3.2 |
How to setup the fixed IP address of the AV Receiver/ Amplifier............. |
12 |
|
3.3.3 |
Power on the AV Receiver/Amplifier. ........................................ |
12 |
|
3.3.4 |
Run the DENON Flash ROM Writer Compact version. ............................ |
13 |
|
3.3.5 |
Communication check. ....................................................... |
13 |
|
3.3.6 |
Start the firmware update. ................................................. |
14 |
|
3.3.7 |
Complete the firmware update. .............................................. |
14 |
|
3.4 In case of Router connection(with DHCP Server). .................................. |
15 |
|
|
3.4.1 |
Setup the IP address PC and the AV Receiver/Amplifier ...................... |
15 |
|
3.4.2 |
How to setup the auto IP address of the AV Receiver/Amplifier............... |
15 |
|
3.4.3 |
Power on the AV Receiver/Amplifier. ........................................ |
15 |
|
3.4.4 |
Confirm IP Address of the AV Receiver/Amplifier. ........................... |
15 |
|
3.4.5 |
Run the DENON Flash ROM Writer Compact version. ............................ |
16 |
|
3.4.6 |
Communication check. ....................................................... |
16 |
|
3.4.7 |
Start the firmware update. ................................................. |
17 |
|
3.4.8 |
Complete the firmware update. .............................................. |
17 |
4. |
Specific update mode................................................................ |
18 |
|
D&M Holdings, INC.
FWCV0006_manual.doc
The Operating Manual for DENON AV Receiver/Amplifier firmware update. |
Page 3 / 18 |
1. Preparations before starting the operation:
1.1 Preparation for the Personal Computer: Minimum hardware and software requirements:
Type |
PC/AT compatible |
|
|
CPU |
Intel Pentium/Celeron300MHz or faster |
|
|
RAM |
128MB or more |
|
|
Free hard disc space |
25MB or more |
|
|
OS |
Windows XP Home Edition / Professional SP1 or more |
|
|
Display resolution |
Super VGA (800x600) or more. |
|
|
Port. |
Serial COM port (D-Sub 9pin)[Recommendation] |
|
or ETHERNET port(RJ-45) |
|
|
Communication speed |
RS-232C:115,200bps |
|
ETHERNET:10BASE-T/100BASE-TX |
|
|
1.2Preparations for the cables.
1.2.1In case of updating using R-S232C connection.
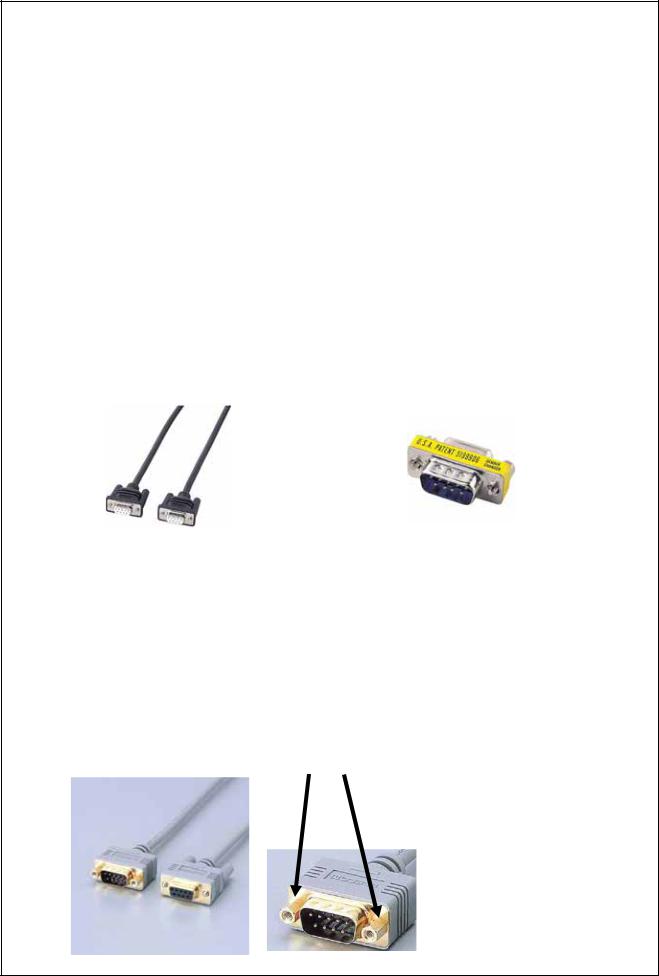
Serial Straight Cable for RS-232C consisting of D-Sub 9P(female) and D-Sub 9P(female) cable. D-Sub 9P(male) and D-Sub 9P(male) Gender Changer.
D-Sub 9P(female) and D-Sub 9P(female) |
|
Gender Changer |
cable |
|
D-Sub 9P(male) and D-Sub 9P(male) |
|
|
|
Note: There is the RS-232C(Male and Female) 9P cable like the following picture on the market. Then you don’t need to use Gender Changer.
However, Please confirm a nut part. If you can't remove the nut part, then you can't use this cable.
Because, AV Receiver/Amplifier RS-232C port also has the nut. You can not insert cable as physical conflict.
D&M Holdings, INC.
FWCV0006_manual.doc

The Operating Manual for DENON AV Receiver/Amplifier firmware update. |
Page 4 / 18 |
1.2.2In case of updating using Ethernet connection. There are two methods.
a)10BASE-T/100BASE-TX Ethernet cross cable x 1pcs.
b)10BASE-T/100BASE-TX Ethernet straight cable x 2pcs and 10BASE-T/100BASE-TX Ethernet HUB or Router.
1.3Connection diagram.
1.3.1In case of updating using RS-232C connection.
Connect the RS-232C cable between RS-232C port of PC and RS-232C port on front panel of AV Receiver/Amplifier.
|
|
RS-232C |
|
AV Receiver |
|
|
Straight cable. |
|
|
|
|
|
|
|
PC |
|
|
|
/Amplifier. |
|
|
|
||
|
|
|
|
|
|
|
Front Panel |
|
|
|
|
|
1.3.2 In case of updating using Ethernet connection. You can select the following 2 methods.
a)Connect the Ethernet cross cable between Ethernet port of PC and Ethernet port of AV Receiver/Amplifier.
|
|
|
|
AV Receiver |
PC |
|
Ethernet cross cable |
|
/Amplifier. |
|
|
|
||
|
|
|
|
|
|
|
|
|
|
b)Connect the Ethernet straight cable between Ethernet port of PC and Ethernet port of Hub (or Router). And connect the Ethernet straight cable between Ethernet port of Hub (or Router) and Ethernet port of AV Receiver/Amplifier.
|
|
|
|
|
HUB |
|
|||||||
|
|
|
|
|
|
or |
|
||||||
|
|
|
|
Router |
|
||||||||
|
|
|
|
|
|
|
|
|
|
|
|
|
|
PC |
|
|
|
|
|
|
|
|
|
|
|
|
AV Receiver |
|
|
|
|
|
|
|
|
|
|
|
|
||
|
|
|
|
|
|
|
|
|
|
|
|
/Amplifier. |
|
|
|
|
|
|
|
|
|
|
|
|
|
||
|
|
Ethernet |
|
|
|
|
|
Ethernet |
|
|
|||
|
|
|
|
|
|
|
|
||||||
|
|
straight |
|
|
|
|
|
straight |
|
||||
|
|
cable |
|
|
|
|
|
cable |
|
||||
|
|
|
|
|
|
|
|||||||
D&M Holdings, INC.
FWCV0006_manual.doc

The Operating Manual for DENON AV Receiver/Amplifier firmware update. |
Page 5 / 18 |
1.4Install the DENON Flash ROM Writer Compact version.
(1)Execute the“FWCV_AVR5805_V0006_SETUP.exe”or the“FWCV_AVCA1XV_V0006_SETUP.exe”.
(2)Install utility according to message.
(3)After installed, you can see the‘DENON FWCV_AVR5805_V0006’icon
or the‘DENON FWCV_AVCA1XV_V0006’icon on desktop.
DENON
FWCV_AVCA1
XV_V0006
D&M Holdings, INC.
FWCV0006_manual.doc

The Operating Manual for DENON AV Receiver/Amplifier firmware update. |
Page 6 / 18 |
2. Firmware update procedure. (In case of updating using RS232C connection.).
2.1 Notice:
Please keep the following notice for firmware update.
a)Keep the PC environment refer to 1.1.
b)Avoid the communication cable from the electrical noise source. (e.g. telephone cable, AC line, a fluorescent light)
c)Don’t remove cable during update.
d)Don’t turn off the power during update.
e)Don’t run other PC application during update.
f)Stop the resident program on PC.
g)Stop the screen saver ability on PC.
h)Stop the power save ability on PC.
i)In case of laptop PC, Use the AC adaptor.
2.2Set the AV Receiver/Amplifier into the firmware update mode.
Operate the following. The AV Receiver/ Amplifier goes to the firmware update mode.
1)Keep to push the 'SURROUND PARAMETER' button and the 'TONE CONTROL' button on the AV Receiver/Amplifier simultaneously. And turn on the power switch of
the AV Receiver/Amplifier.
2)Confirm the power indicator is green. If the power indicator is red, Make the power indicator green pushing the ON/STANDBY button.
2.3Run the DENON Flash ROM Writer Compact version.
Run the‘DENON FWCV_AVR5805_V0006’or the‘DENON FWCV_AVCA1XV_V0006’on desktop of PC.
DENON
FWCV_AVCA1
XV_V0006
2.4Communication check.
1)Select the ”RS-232C”.
2)Select the serial port number of PC.
3)Click the “Check communication” button.
(1)
(2)
(3)
D&M Holdings, INC.
FWCV0006_manual.doc
 Loading...