

Page 1

Using your oven
Model : DOD328*
99627854_GB.qxd 17/06/04 13:50 Page 1
Page 2
Throughout this manual,
indicates safety recommendations,
indicates advice to help you make the
best use of your oven
Introduction P.3
LOWER OVEN
Your oven
How it works P.4
Accessories P.5
Safety recommendations P.7
How to install your oven
Electrical connections P.8
Installation and Changing cables P.8
Dimensions for installation use P.9
How to use your oven
The oven programmer P.10
How to set the clock P.11
How to cook straightaway P.12
How to programme the cooking P.12-14
Cooking using the grill P.15
How to use the timer P.15
Cooking methods P.16
Looking after your oven P.18
Changing a bulb P.18
Troubleshooting P.18
UPPER OVEN
How to cook straightaway P.19
Cooking using the grill P.19
Cooking methods P.19
Changing a bulb P.20
2
Contents
99627854_GB.qxd 17/06/04 13:50 Page 2
Page 3

3
Introduction
Dear Customer,
Thank you for buying a DE DIETRICH oven.
Our design staff have produced a new generation of kitchen equipment, to
make everyday cooking a pleasure.
You will find that the clean lines and modern look of your DE DIETRICH oven
blends in perfectly with your kitchen décor. It is easy to use and performs to a
high standard.
DE DIETRICH also makes a range of products that will enhance your kitchen
such as hobs, extractor hoods, built-in dishwashers, microwave ovens and
refrigerators. There are models to complement your new DE DIETRICH oven.
Of course, we make every effort to ensure that our products meet all your
requirements, and our Customer Relations department is at your disposal, to
answer all your questions and to listen to all your suggestions (see back cover
of manual).
De Dietrich is certain that by setting new standards of excellence by which
comparisons can be made, customers will find that De Dietrich appliances offer
a better and more exciting way of living.
The DE DIETRICH name.
99627854_GB.qxd 17/06/04 13:50 Page 3
Page 4
4
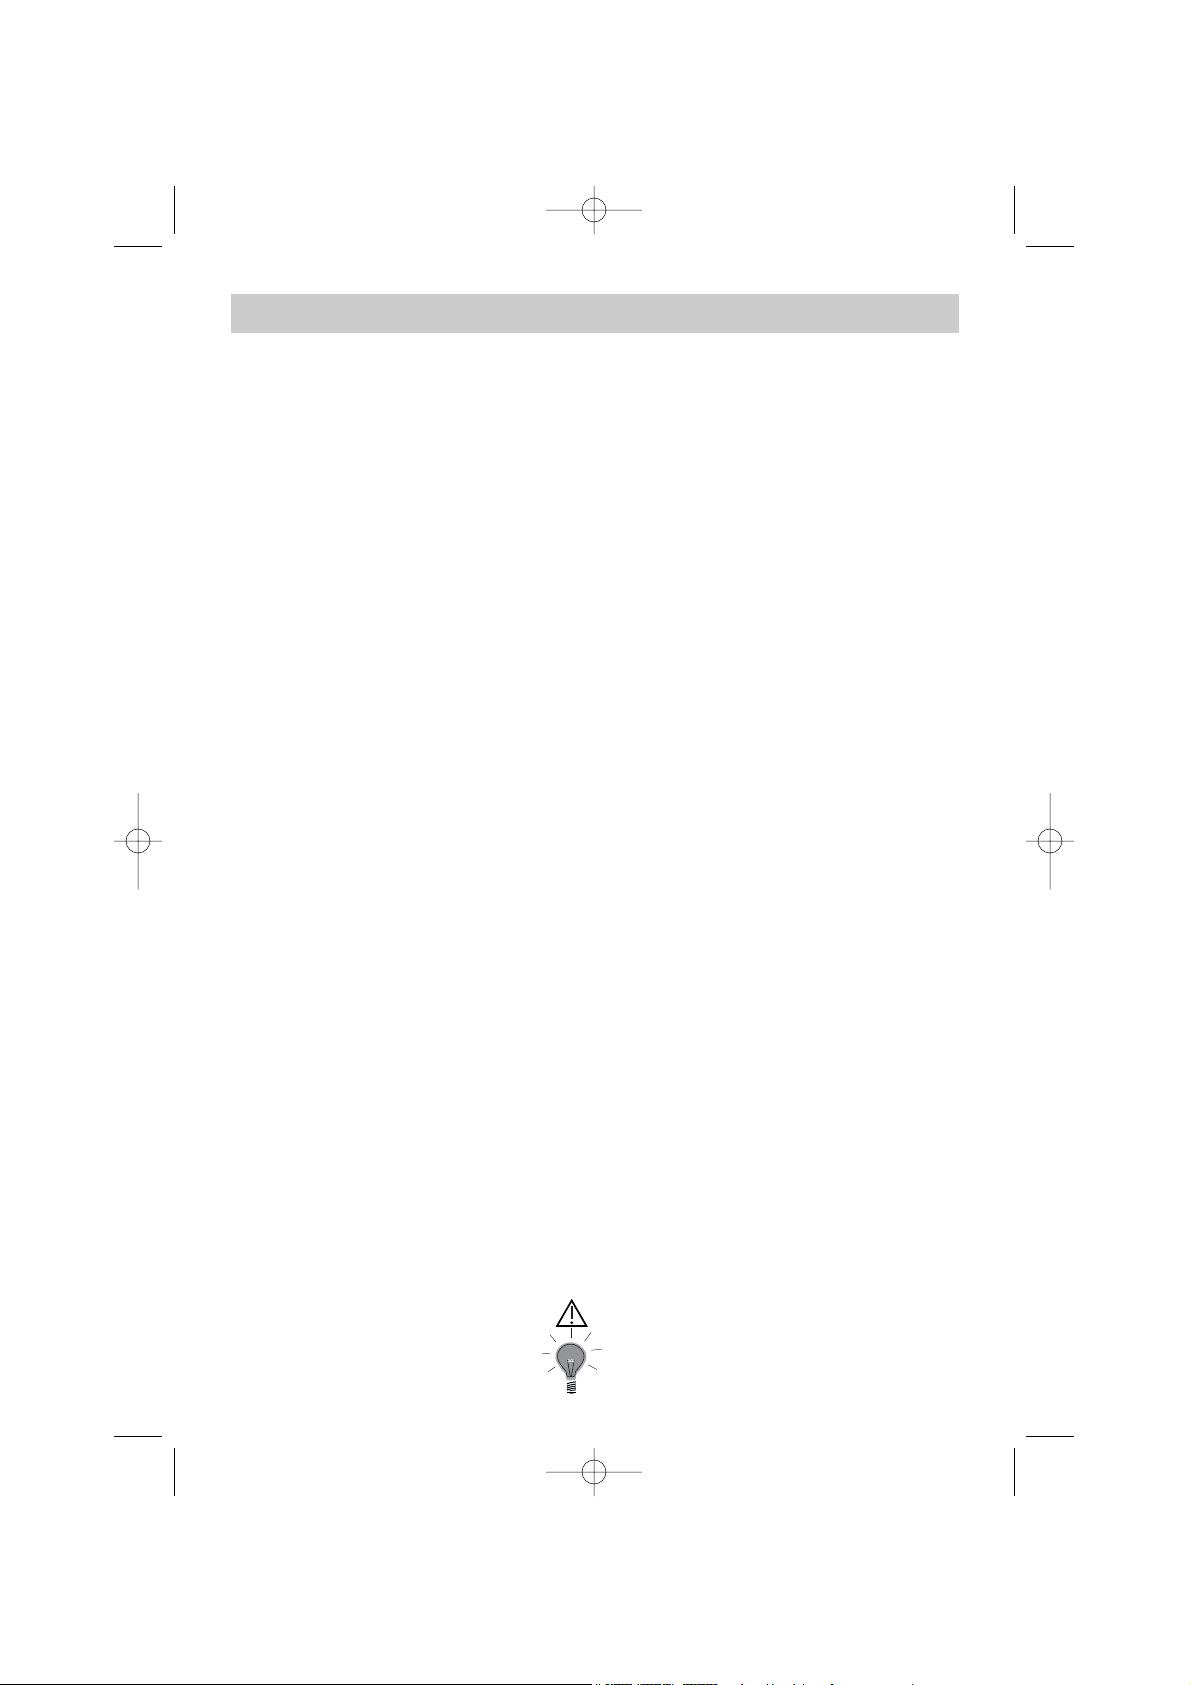
Your oven
1
3
5
SET
55
75
100
125
150
180
210
240
50
100
150
200
250
1
3
4
5
1
2
3
4
Thermostat
Programme selector
Lower oven programmer
Light
Rail positions
OVEN FEATURES
Lower oven
Upper oven
2
1
2
4
5
99627854_GB.qxd 17/06/04 13:50 Page 4
Page 5
5
A
ccessories
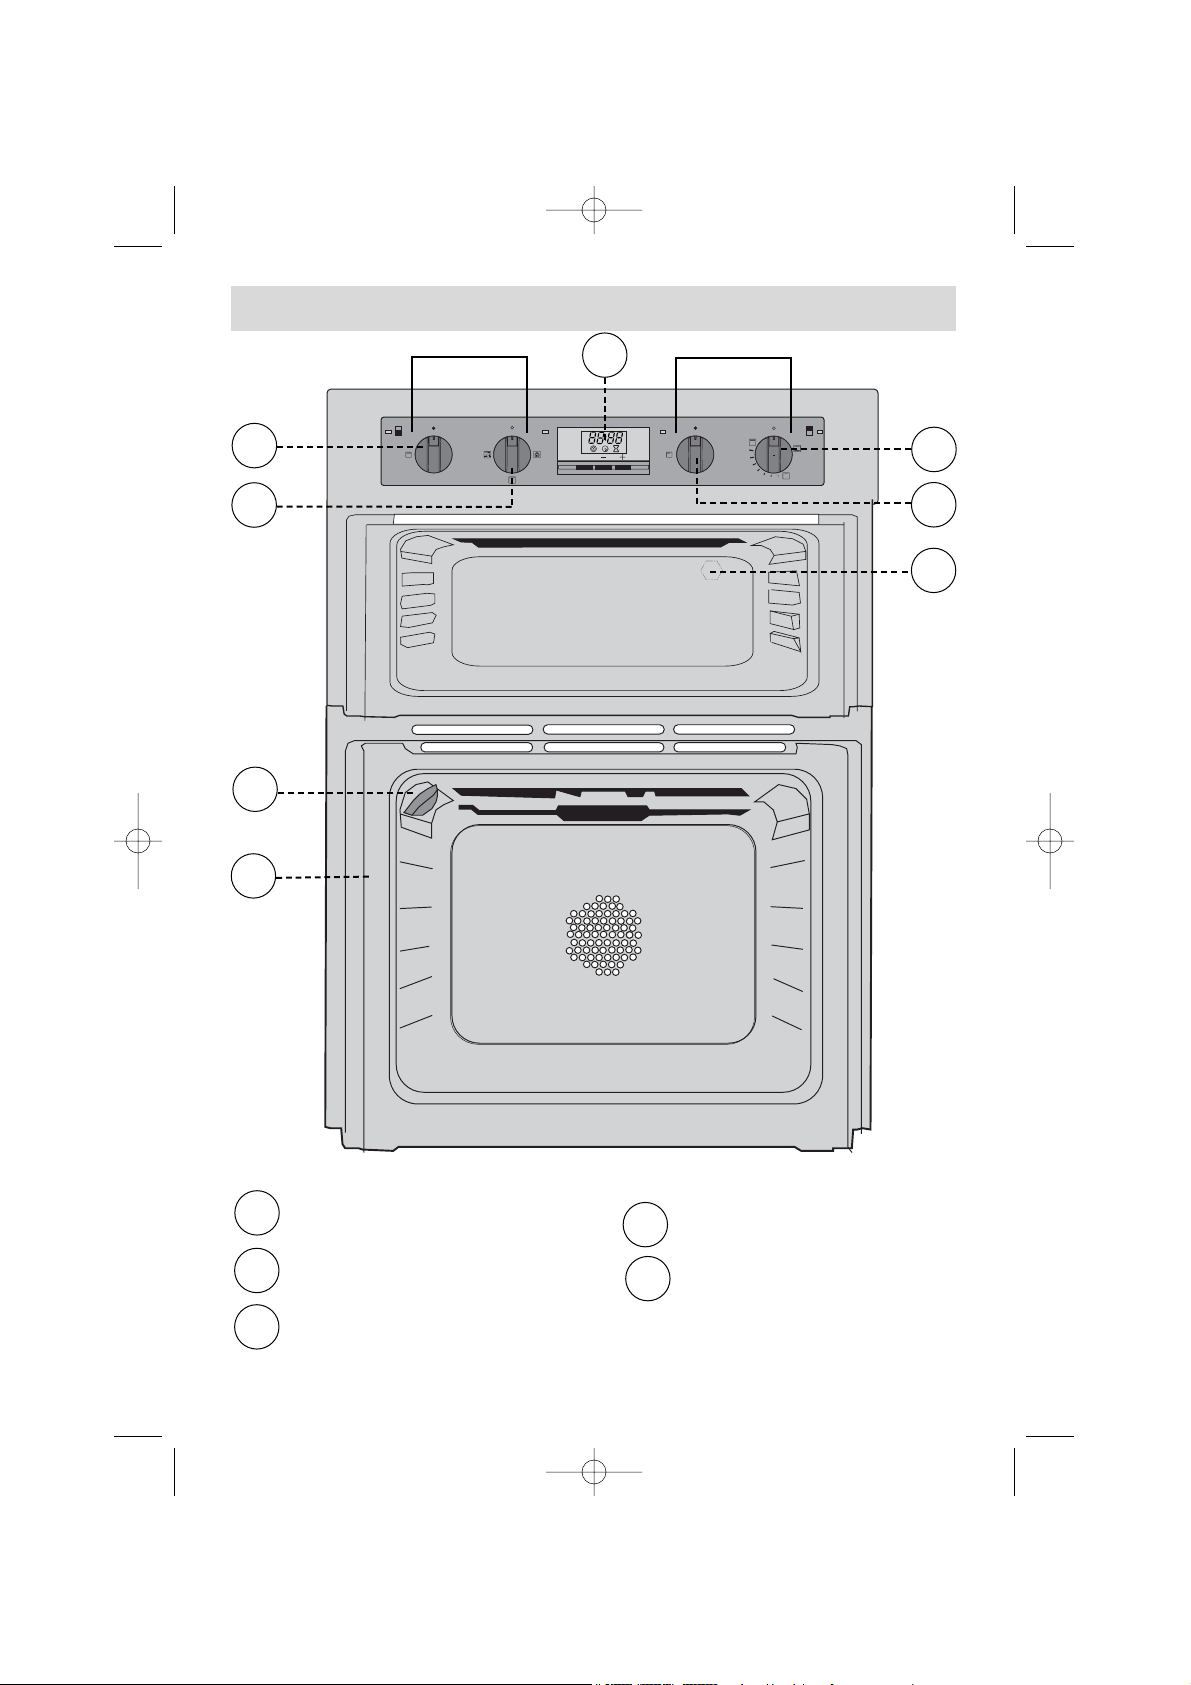
Flat rack
Food can either be placed on the shelf in a dish
or cake tin for cooking or browning.
BACK
FRONT
The arched anti-drop safety
shelf
This is used in the same way as the flat shelf.
Its shape has been carefully designed to enable
you to position your dish between two runner
levels.
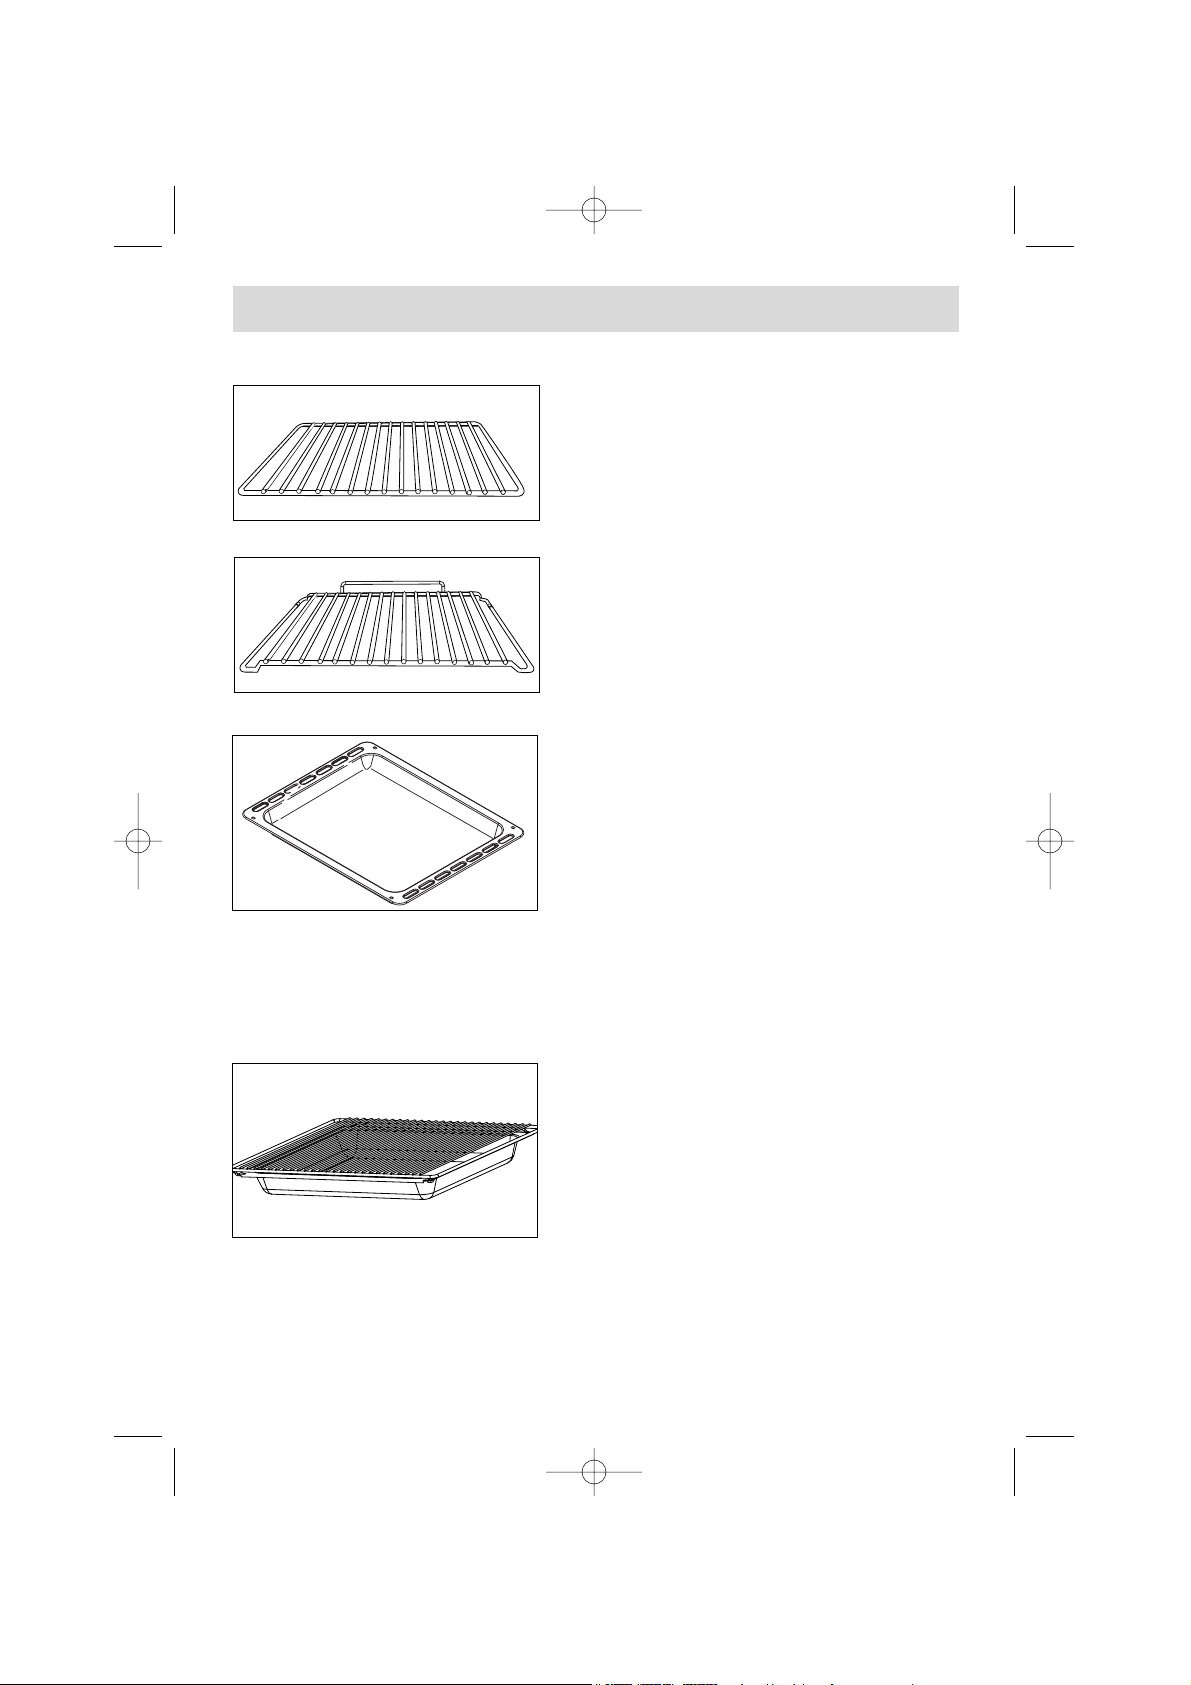
(to be used in the lower oven cavity)
Inserted in the runners under the shelf, this pan catches cooking juices and fat
from grilled food. It can also be used half filled with water as a double boiler.
Joints should not be cooked in this tray uncovered because fat could spit all over
the oven sides.
Multi-purpose baking tray
(
cake tray or dripping pan)
This tray has a raised edge and can be used
for baking pastries (choux buns, meringues,
small cakes, flaky pasties, etc).
Hollow dish + shelf
(
dripping pan)
Inserted under the shelf, this pan catches
cooking juices and fat from grilled food. It can
also be used half filled with water as a double
boiler. Joints should not be cooked in this tray
uncovered because fat could spit all over the
oven sides.
99627854_GB.qxd 17/06/04 13:50 Page 5
Page 6

6
99627854_GB.qxd 17/06/04 13:50 Page 6
Page 7

7
Safety recommendations
Please read these instructions before installing and using your oven.
The oven has been designed for domestic use only for cooking food. No asbestos
has been used in its construction.
USING FOR THE FIRST TIME:
Before you use your oven for the first time, leave it empty and, with the door
closed, turn it on to maximum temperature and let it heat up for 15 minutes. This
"runs the oven in". During this time there may be some smell from the mineral
wool that insulates the oven and there could be some smoke. This is perfectly
normal.
NORMAL USE:
- Always close the door properly. The oven is fitted with a seal designed
to work with a closed door.
- Never lean or let anyone sit on the oven door when it is open.
- When using the grill with the door partly open, the accessible
parts or surfaces can get hot. Always keep children at a safe distance.
- When the oven is on it will get hot. Take care not to touch the heating
elements inside the oven.
- Always protect your hands with oven gloves or something similar when
removing food, accessories or containers from the oven.
- Do not line your oven with kitchen foil. The metal will increase the heat
produced and could ruin the food and damage the enamel.
Always check that the oven is off before you clean the inside.
Ensure that the function selector is returned to 0 to re-use your
oven.
99627854_GB.qxd 17/06/04 13:50 Page 7
Page 8

8
• The supply cable (H05 RR-F, H05 RN-F or H05 W-F) must be long enough to allow
the oven to rest on the floor in front of its housing.
With the oven sitting on the floor and disconnected:
• Open the trapdoor at the bottom right hand side at the back of the oven by
removing the 2 screws and swinging the door away.
• Remove the sheath from each wire in the new cable up to 12 mm.
• Twist the ends carefully together.
• Unscrew the terminal screws and remove the wires that need changing.
• Pass the new cable through the wire clamp to the right of the terminals.
• Connect the wires up in accordance with the markings on the terminals.
• Make sure all wires are trapped under the screws.
• The brown wire (live) going to terminal marked L.
• The green and yellow wire (earth) going to the one marked .
• The blue wire (neutral) going to the terminal marked N.
• Tighten the screws and check, by tugging on each wire, that they are firmly
connected.
• Tighten the clamp to hold the cable.
• Close the trapdoor using the two screws.
Installation and /or Changing cables
We cannot accept any liability in the event of an accident resulting
from non-existent or faulty earthing.
The electrical connections are made before the oven
is installed in its housing.
• Before connecting your oven, make sure you are
using the correct size cable. The cross-section should
be the same as the cable connected to the oven. The
fuse for your installation must conform to the table
shown opposite.
• Where the oven is connected using a separate plug
and socket this must be accessible after the oven has
been installed.
• Where the appliance is not connected to the mains
electricity supply by a plug, an omnipolar cutout
device (with a contacts gap of at least 3 mm) must be
fitted on the supply side of the connection to meet µ
requirements.
• The oven must be connected using a standard
power cable for which the number of conductors is
dependent upon the type of connection required and
in conformity with the table shown below.
How to install your oven
➀
➁
③
T
N
L
E
E
N
L 1
L 2
E
N2
L 1
L 2
N1
Electrical connections
min.
network voltage connection diameter fuse
of cable
➀ 230V- 50Hz 1 L + N 4 mm² 32 A
➁ 400V 2N-50Hz 2 L + N 1,5 mm² 16 A
④ 230V 2N-50Hz 2 L + N 1,5 mm² 16 A
99627854_GB.qxd 17/06/04 13:50 Page 8
5
4
5
4
2
3
3
1
2
1
5
4
2
3
1
Page 9

9
How to install your oven
If you are unsure about fitting this oven yourself please use a
qualified electrician.
Dimensions for installation use
Your oven works at its best and produces excellent results when cooking and
cleaning itself, if its air circulation is not compromised:
• The oven must be centred in the unit so that there is a minimum distance of
5 mm between it and the surrounding unit.
• The housing unit or its outer surface must be capable of withstanding heat.
• To ensure the oven rests firmly in the housing, screw it to the housing unit using
the holes on the side uprights provided (see diagram).
To do this:
1) Remove the rubber stoppers masking the fixing holes.
2) To prevent the housing unit splintering, drill two holes 3 mm in diameter in the wall of the
housing unit opposite the fixing holes.
3) Attach the oven using the two screws.
4) Conceal the hole using the rubber stoppers. (These also help to cushion the
closing of the oven door).
(*) If the housing unit is open at the back, the gap must not be more
than 70 mm.
875 mini
5
5
888
875
875
870
595
545
20
50
50
20
99627854_GB.qxd 17/06/04 13:50 Page 9
Page 10

10
H
ow to use your lower oven
1.
The oven programmer
1
2
3
4
5
6
Time and duration display
Cooking time indicator
Cooking finished indicator
Independent timer display
Cooking time selector
Time adjustment buttons
1
2
3
4
5
6
99627854_GB.qxd 17/06/04 13:50 Page 10
SET
Page 11

11
How to use your lower oven
a) When the oven is first switched
on at the mains
• The display blinks.
• Press on the + and - buttons until the correct time is
shown (Keeping a finger on the button, rather than
tapping it, is quicker)
• Press button SET to confirm the time.
The example shows 12.30
b) Altering the clock
• Press on both + and - buttons together for a few
seconds until the display blinks.
• Adjust the time using the + and - buttons.
• Confirm the time by pressing SET.
2. H
ow to set the clock
If you forget to confirm the time by pressing button SET, the oven will
do it automatically after a few seconds.
99627854_GB.qxd 17/06/04 13:50 Page 11
SET
SET
SET
SET
SET
SET
Page 12

12
How to use your lower oven
The timer display only shows the time of day. It should not be blinking.
• Choose the cooking method :
Turn the dial until it is indicating your choice.
Example: position " ".
• Choose the cooking temperature
Turn the dial to the temperature recommended for
the food you are cooking.
Example: 210° temperature mark.
When you have done both these the oven heats up and
the temperature light glows.
3. How to cook straightaway
4. How to programme the cooking
a) To start right away:
• Choose the cooking method.
Turn the dial until it is indicating your choice
Example: position
"",
• Choose the cooking temperature.
Turn the dial (thermostat) to the temperature
recommended for the food you are cooking.
Example: 210° temperature mark.
• Choose the cooking time.
Press once on the SET button. The clock shows
0:00 and the cooking time symbol blinks. You can now
instruct the oven how long to cook for.
Press the + and - buttons until your chosen time is
shown.
The example shows 30 minutes.
99627854_GB.qxd 17/06/04 13:50 Page 12
55
75
240
210
240
210
SET
SET
100
125
150
180
55
75
100
125
150
180
Page 13

13
How to use your lower oven
The count-down starts as soon as you stop
pressing the + and - buttons.
• The oven heats up and the temperature light
glows.
The cooking time symbol glows steadily and the
time of day is displayed again.
When the cooking time is over (the pre-program-
med time ends),
- The oven switches off,
- The cooking time symbol goes out,
- he display shows 0:00
- The oven gives a series of bleeps for several minutes.
To stop the bleeper, press any button on the oven front. The time is displayed
again.
b) Delayed start
(choice of cooking end time).
• Set the temperature and select the cooking
method.
Example: position
""
210° temperature mark.
• Now press once on the SET button.
The cooking time at 0H00 and the associated
symbol both blink to show that setting is now
possible. Cooking time can be set up to 23h59.
• Press the
+ and - buttons to enter the length of
time the food is to cook for.
The example shown is 25 minutes
As soon as you press the
+ button the blinking
stops.
• Press the SET button until the end of cooking time
blinks with its associated symbol.
Adjustment is now possible.
• Set the end of cooking time required by pressing
the
+ or - buttons.
Example shown : end of cooking
at 1 pm (13:00).
99627854_GB.qxd 17/06/04 13:51 Page 13
SET
SET
55
75
240
210
SET
100
125
150
180
SET
SET
SET
Page 14

14
It is possible to :
- Change the cooking time at any moment.
- Consult the remaining cooking time at any moment by
pressing on the "SET" button
- Cancel the programmed cooking cycle at any moment by holding
the "SET" button pressed in until you hear a beep
.
Caution: At this point, in both of the previous cases your oven will
now start heating.
To turn off the heat, set the thermostat and the function
selector to "0".
The end of cooking is automatically recorded after a few seconds.
Following these operations, the heating of the oven is delayed so that cooking
ends at the set time (e.g. : 13h00).
When the cooking starts the end of cooking symbol is off.
When the cooking time is over (the pre-programmed time
ends),
- The oven switches off,
- The cooking time symbol goes out,
- The display shows 0:00
- The oven gives a series of bleep for several
minutes.
To stop the bleeping, press any of the buttons on the
panel. The time of day will then be displayed again.
How to use your lower oven
99627854_GB.qxd 17/06/04 13:51 Page 14
SET
SET
Page 15

15
Your oven is also equipped with a timer which operates
fully independently of the oven, making it possible to
"count down" a chosen amount of time. In this case, the
"count down" on the display takes priority over displaying
the time and date.
• Press several times on the “SET” button until the timer
indicator and the corresponding display start flashing.
7. How to use the timer
• Set the chosen time by pressing the + or - buttons.
Adjustment is in 30-second increments and the time displayed
is in minutes/seconds.
Holding the button pressed in makes it possible to rapidly
scroll through the times.
The countdown begins several seconds after adjustment
has been carried out and is permanently visible on the display.
When the timer has finished counting down the chosen
time, it issues a series of beeps (displaying 0:00). You can
turn off the beeps by pressing once on the button of your
choice.
It is possible to modify or cancel the programmed timer setting
at any time.
6.
Cooking using the grill (unventilated)
• Turn the function selector and set it to one of the
“grill” settings.
• Turn the thermostat knob to the position.
• You can switch off the cooking cycle by turning the
function selector back to the "0" position.
For the ventilated grill with spit, adjust the thermostat
knob to the temperatures shown in the cooking guide.
99627854_GB.qxd 17/06/04 13:51 Page 15
55
75
240
210
SET
100
125
150
180
SET
SET
Page 16

16
Turbo grill +
Rotisserie
Cooking is done
alternately by the top
element and by the
fan.
Reheating is not
required.
Poultry and juicy or
crisp roast meat
joints are cooked on
all sides.
The spit continues to
operate until the
door is opened.
Place the dripping
pan on the bottom
shelf setting.
Symbol
Feature
Description
8. Lower oven cooking modes
F
an oven
A heater element at
the back of the oven
and the fan help cook
the food.
Oven rapidly
reaches the
selected temperature.
Some dishes can
start off in the cold
oven.
D
ouble grill
Cooking is carried
out by the upper
element.
The double grill
covers the full
surface of the oven
shelf.
Recommended for all
poultry or roasts cooked
on the spit
To seal or thoroughly cook
legs of lamb and beef rib
roasts.
To keep fish steaks nice
and juicy.
Recommendations
Recommended to prevent
meat drying out, and
for cooking vegetables
and fish and food
placed on up to 3
shelves.
Pastries, flake pastry, etc.
Recommended for grilling
cutlets, sausages,
slices of bread and
Mediterranean prawns
placed on the oven shelf.
99627854_GB.qxd 17/06/04 13:51 Page 16
Page 17

17
Always allow the oven to cool down before attempting to remove the
panels. Check the cooking selector is at OFF.
Side panels (1)
Undo the rail clip (2) at the front by lifting it up
(
Diagram A
). Pull the rail unit toward you, lifting it
slightly to unclip the rear catch (
Diagram B
). Pull it out
of the 2 holes (3) of the catalytic panels and the oven
casing. Remove the catalytic panel (1). Reverse
operations to replace panel
and rail unit.
Back panel
(4)
Undo and remove the screw
(5) at the top of the back
panel. Tip the panel towards
you so you can remove it
from the oven case. Reverse this operation to replace
the panel.
Maintaining and cleaning your lower oven
Changing the catalytic panels (depending on model)
Cleaning the inside the oven area
The oven features continuous cleaning (depending on the model) and comprises
an oven chamber fitted with removable liners covered with a special enamel
(catalytic enamel) to give it its self-cleaning properties. As they appear, the stains
and soiling spread and get trapped in the microporosities of the enamel. These
stains are oxidised on both sides and gradually disappear. Self-cleaning enamel
is particularly suited to fatty foods but not to sugars. It is for this reason that the
base liner (which tends to suffer more from sugar staining) is not coated with an
enamel of this type.
We strongly recommend that you :
- Do not rub or scrub the surface using a metal brush or sharp items.
- Do not attempt to clean using commercial scouring products.
- When cooking grilled meat, the walls suffer major spattering from fat, but their
temperature may not always be sufficient to completely remove this during the
cooking cycle.
To overcome this problem leave the oven on for 20 to 30 minutes at the highest
temperature possible after you have finished cooking.
If marks still remain, they will diminish over subsequent cooking cycles.
1
3
4
2
5
Always check that the oven is off before you clean the inside.
99627854_GB.qxd 17/06/04 13:51 Page 17
B
A
Page 18

18
• The light bulb is housed in the ceiling of your oven.
a) Unscrew the protective shade (see
diagram).
b) Pull the bulb out.
A halogen bulb is used:
- 25 W
- 220-240 V
- 300°C
c) Change the bulb, replace the shade
and switch your oven back on at the
mains.
Warning! Switch off the power at the main switch before
attempting to change the bulb. Leave the oven to cool if necessary.
Changing a bulb
bulb fitting
unscrew
cover
How to use your lower oven
T
roubleshooting
If you're not sure that your oven is working properly, it doesn't necessarily
mean that there's a problem.
In all cases, check the following points:
If you realize that..
Possible causes What should you do?
The oven isn't heating.
The light inside the oven isn't
working.
• The lamp is unusable.
• The oven isn't connected to the
power supply or the fuse has
blown.
- Change the bulb.
- Connect to power supply or
change fuse.
The cooling fan keeps working
after the oven is turned off.
• The fan can keep working for up
to an hour after the oven switches
off if is over 125ºC.
• If it has not stopped after 1 hour
- Open the door to help the oven
cool down more quickly.
- Contact the After-Sales Service.
• The oven isn't connected to the
power supply.
• The fuse has blown.
• The temperature selected is too
low.
- Connect to power supply.
- Change the fuse, checking that it is
16A.
- Increase the temperature
selected.
99627854_GB.qxd 17/06/04 13:51 Page 18
Page 19

How to use your upper oven
The timer display only shows the time of day. It should not
be blinking.
• Choose the cooking method:
Turn the dial until it is indicating your choice.
Example: position " ".
• Choose the cooking temperature
Turn the dial to the temperature recommended for
the food you are cooking.
Example: 210 temperature mark.
When you have done both these the oven heats up and
the temperature light glows.
1. How to cook straightaway
2. Cooking using the grill
• Turn the function selector and set it to one of the “grill” settings (double grill, single grill).
• Turn the thermostat knob to the position.
• You can switch off the cooking cycle by turning the function
selector back to the “0” position.
Grilling should only be carried out with the door closed.
The walls of the upper oven are covered with normal enamel, the oven is best used :
- With a thermostat setting of 50 to 250 for dishes which cause little or no
spitting or soiling, such as small and large cakes, etc.
- For grilling dishes that don't make any grease splashes (toasted sandwi-
ches, etc.).
- For browning dishes (pasta, caramel creams, etc.).
Symbol Feature
Description
Recommendations
3. Upper oven cooking modes
C
onventional oven
The food is cooked by
top and bottom
elements.
Pre-heating is
sometimes
necessary to reach
the required
temperature.
Recommended to keep
white meat, fish
and vegetables
juicy and succulent.
The double grill
covers the full
surface of the oven
shelf.
The single grill is
equally efficient, but
covers a smaller
area.
Adjustable
grill
Cooking is
carried out by
the upper
element.
Recommended for
grilling cutlets,
sausages, slices
of bread and
Mediterranean
prawns placed on
the oven shelf.
19
99627854_GB.qxd 17/06/04 13:51 Page 19
50
100
250
250
150
200
50
100
150
200
Page 20

How to use your upper oven
20
• The light bulb is housed in the ceiling of your oven.
a) Unscrew the protective shade (see
diagram).
b) Unscrew the bulb in the same
direction.
A bulb is used:
- 15 W
- 220-240 V
- 300°C
- E 14 screw-fitting bulb
c) Change the bulb, replace the shade
and switch your oven back on at the
mains.
C hanging a bulb
bulb fitting
unscrew
cover
It is easier to unscrew the shade and bulb if you wear a rubber
glove.
Warning! Switch off the power at the main switch before
attempting to change the bulb. Leave the oven to cool if necessary.
99627854 06/04
99627854_GB.qxd 17/06/04 13:51 Page 20
 Loading...