

Page 1
WASHING MACHINE
Owner’s Manual............................1 - 10
OWNER’S MANUAL
MANUEL DU PROPRIÉTAIRE
MANUAL DEL PROPIETARIO
MACHINE À LAVER
Manuel du propriétaire.................11 - 20
LAVADORA DE ROPA
Manual del propietario.................21 - 30
MODEL • MODÈLE • MODELO
DWM030WDB-6
www.Danby.com
DANBY PRODUCTS LIMITED, ONTARIO, CANADA N1H 6Z9
DANBY PRODUCTS INC., FINDLAY, OHIO, USA 45840
2019.03.13
Page 2

Welcome
Welcome to the Danby family. We are proud of our quality products and we believe in
dependable service. We suggest that you read this owner’s manual before plugging in your new
appliance as it contains important operation information, safety information, troubleshooting and
maintenance tips to ensure the reliability and longevity of your appliance.
Visit www.Danby.com to access self service tools, FAQs and much more. For additional assistance
call 1-800-263-2629.
Note the information below; you will need this information to obtain service under warranty.
You must provide the original purchase receipt to validate your warranty and receive service.
Model Number: _________________________________________________
Serial Number: _________________________________________________
Date of Purchase: _______________________________________________
Need Help?
Before you call for service, here are a few things you can do to help us serve you better.
Read this owner’s manual:
It contains instructions to help you use and maintain your appliance properly.
If you receive a damaged appliance:
Immediately contact the retailer or builder that sold you the appliance.
Save time and money:
Check the troubleshooting section at the end of this manual before calling. This section
will help you solve common problems that may occur.
1-800-26- Danby
(1-800-263-2629)
1
Page 3

Important Safety Information
READ AND FOLLOW ALL SAFETY INSTRUCTIONS
SAFETY INSTRUCTIONS
WARNING: To reduce the risk of fi re, electric shock
or injury to persons when using this appliance,
follow basic safety precautions, including the
following:
• Do not wash articles that have been previously
cleaned in, washed in, soaked in or spotted
with gasoline, dry-cleaning solvents or other
fl ammable or explosive substances as they give
off vapors that could ignite or explode.
• Do not add gasoline, dry-cleaning solvents or
other fl ammable or explosive substances to the
wash water as they give off vapors that could
ignite or explode.
• Under certain conditions, hydrogen gas may
be produced in a hot water system that has not
been used for 2 weeks or more. HYDROGEN
GAS IS EXPLOSIVE. If the hot water system has
not been used for such a period, turn on all hot
water faucets and let the water fl ow for several
minutes before using the washing machine. This
will release any accumulated hydrogen gas.
Do not smoke or use an open fl ame during this
process.
• Do not reach into the appliance if the tub or
agitator is moving.
• Do not install or store this appliance where it will
be exposed to the weather.
• Do not tamper with the controls.
• Do not repair or replace any part of the
appliance or attempt any servicing unless
specifi cally recommended in the user
maintenance instructions or in published user
repair instructions that you understand and have
the skills to carry out.
• Do not operate the appliance when the water
pressure is lower than 14 PSI or higher than 70
PSI to avoid damage to the inlet system.
GROUNDING INSTRUCTIONS
This appliance must be grounded. Grounding
reduces the risk of electrical shock by providing an
escape wire for the electrical current.
This appliance has a cord that has a grounding
wire with a 3-prong plug. The power cord must be
plugged into an outlet that is properly grounded.
If the outlet is a 2-prong wall outlet, it must be
replaced with a properly grounded 3-prong wall
outlet. The serial rating plate indicates the voltage
and frequency the appliance is designed for.
WARNING - Improper use of the grounding
plug can result in a risk of electric shock.
Consult a qualifi ed electrician or service agent
if the grounding instructions are not completely
understood, or if doubt exists as to whether the
appliance is properly grounded.
Do not connect your appliance to extension
cords or together with another appliance in the
same wall outlet. Do not splice the power cord.
Do not under any circumstances cut or remove the
third ground prong from the power cord. Do not
use extension cords or ungrounded (two prongs)
adapters.
If the power supply cord is damaged, it must be
replaced by the manufacturer, its service agent or
similar qualifi ed person in order to avoid hazard.
Any questions concerning power or grounding
should be directed toward a certifi ed electrician.
DANGER: Risk of child entrapment. Children must
be supervised around this appliance. Ensure that the
lid is removed before discarding this appliance.
This appliance is not intended for use by persons
(including children) whose physical, sensory or
mental capabilities may be different or reduced,
or who lack experience or knowledge, unless such
persons receive supervision or training to operate
the appliance by a person responsible for their
safety.
SAVE THESE INSTRUCTIONS!
2
Page 4
INSTALLATION INSTRUCTIONS
LOCATION
• Two people should be used when moving the
appliance.
• Remove interior and exterior packaging prior to
installation. Ensure that you do not discard the
noise proof plate that is packaged on top of the
appliance.
• Wipe the outside of the appliance with a soft,
dry cloth and the inside with a lukewarm wet
cloth. Do not spray the appliance with water.
• Place the appliance on a level fl oor that is strong
enough to support it when it is fully loaded,
in a room that has convenient access to a
water supply and drain, has low moisture and
humidity and does not freeze in winter.
• Do not place the appliance on carpeted fl ooring
as this can block the lower ventilation openings.
FEATURES
1. Lid
2. Control panel
3. Adjustable foot
4. Water inlet
5. Drain hose
6. Power cord
7. Water pump fi lter
8. Rollers
1
2
4
5
• Keep the appliance away from heat sources and
out of direct sunlight. Excessive heat or sunlight
can deform or discolour the appliance.
• This appliance is intended for household use
only. It is not designed for outside installation,
including anywhere that is not temperature
controlled such as garages, porches, vehicles,
etc, because water lines may freeze.
• This appliance is intended for free-standing
installation only and is not intended to be
built into a cabinet or counter. Building in this
appliance can cause it to malfunction.
3
6
7
7
8
LEVELING INSTRUCTIONS
It is important that the appliance is level to help
avoid unbalanced loads and excessive noise.
The leveling foot is located on the front right side of
the appliance. There is a solid foot on the front left
side of the appliance and there are two rollers on
the back.
1. Turn the leveling foot counter-clockwise until
the top of the foot is touching the bottom of the
cabinet.
2. Slowly turn the leveling foot clockwise until the
appliance is level.
3
Page 5

INSTALLATION INSTRUCTIONS
ACCESSORIES AND PREPARATION
You will need the following tools to install the
washer:
• Wrench
• Pliers
• Screwdriver
Ensure that all provided accessories are present
and accounted for:
1. One water supply hose
2. One quick connect adapter
3. One noise proof plate
4. One screw
1
3
WATER SUPPLY
The water supply faucet must fi t standard 3/4”
(19.05 mm) female garden hose couplings. Do not
use slip-on or clamp-on connections as the water
pressure may cause them to leak.
Tighten all connections by hand until they are snug
and then tighten them another quarter turn with a
wrench to ensure they are secure.
Check all connections for leaks before using
the appliance. If leaks are detected, it may be
necessary to add a rubber washer or Tefl on tape to
the connection.
The water inlet hose should always be connected to
a cold water supply.
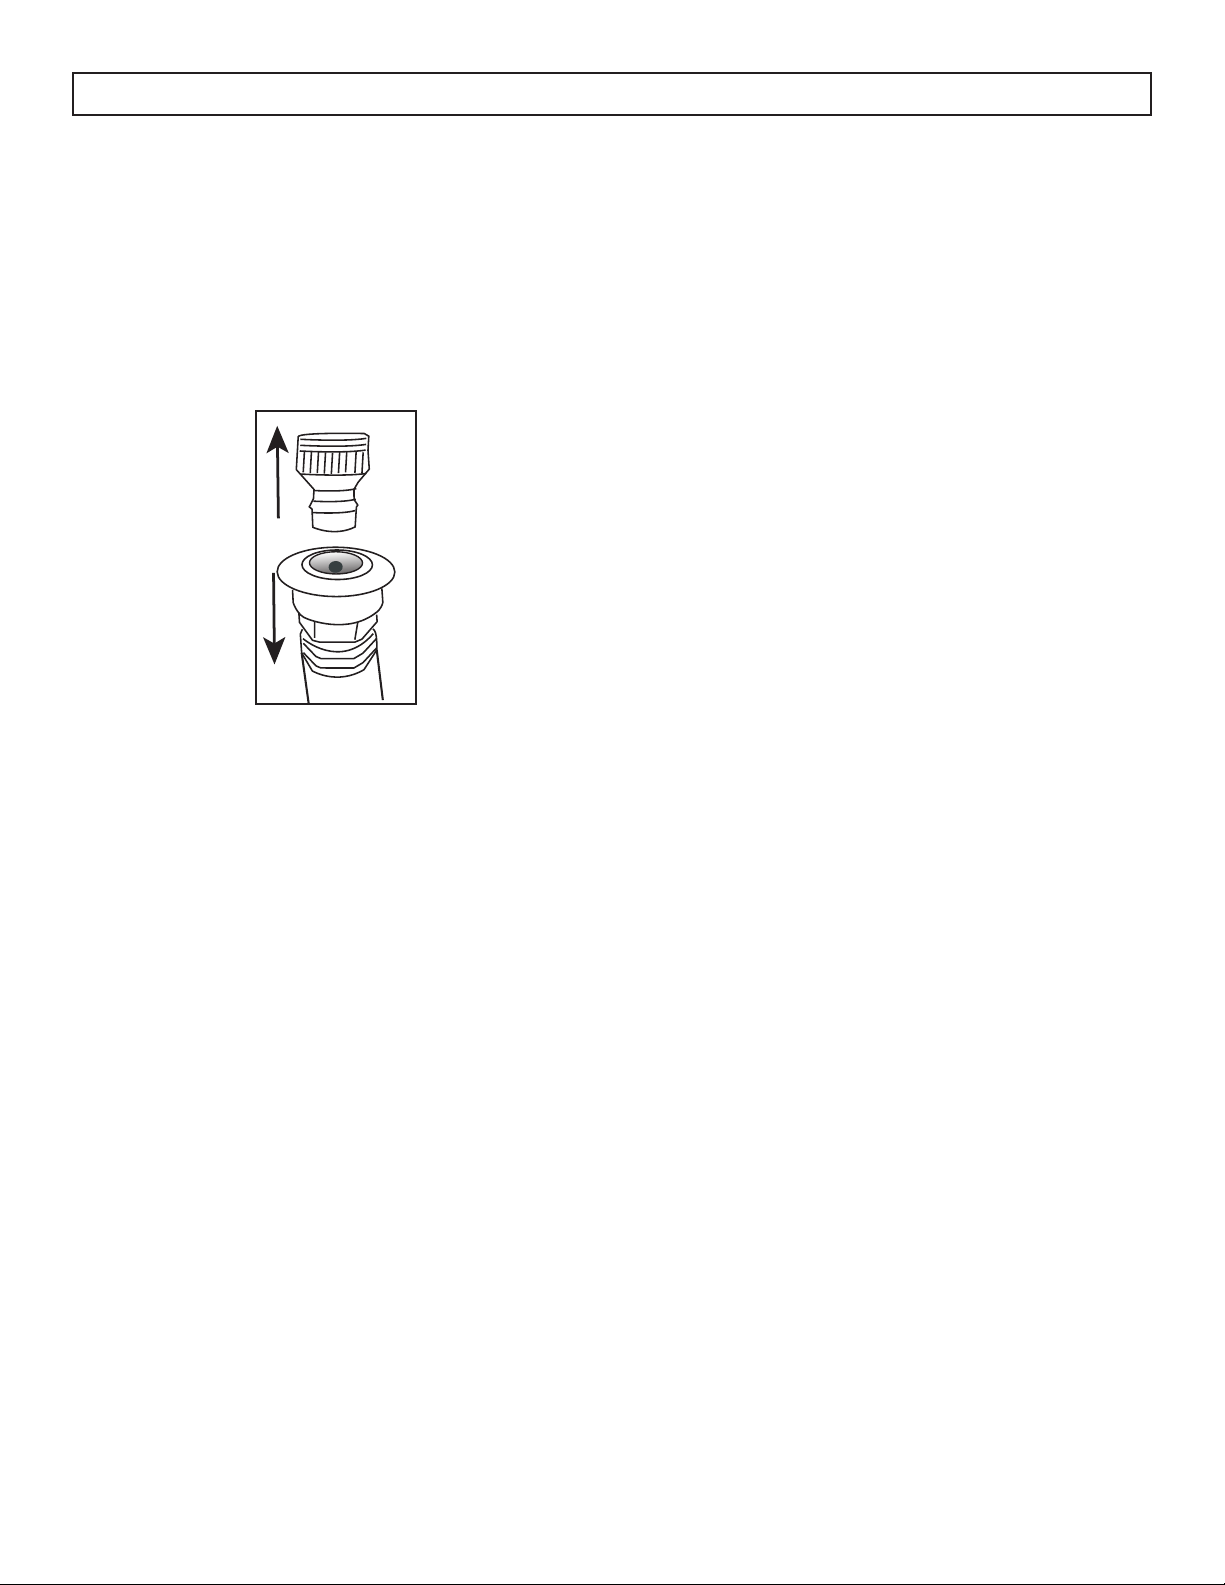
Using the quick connect assembly
2
4
NOISE PROOF PLATE INSTALLATION
The noise proof plate will help to muffl e excessive
noise from the appliance during agitation. Follow
the steps below to install the noise proof plate.
1. Remove the noise proof plate from the
packaging. It will be shipped on top of the
appliance at the top of the box.
2. Slide the noise proof plate into the channel in
the base of the appliance and secure with the
provided screw.
The quick connect assembly can be used to connect
the appliance to a kitchen or bathroom faucet to
provide water to the appliance.
A breakdown of the quick connect assembly is
below.
1. Quick connect assembly
2. Rubber washer
3. Faucet adapter
4. White locking collar
5. Water inlet hose
2
1
3
4
5
4
Page 6
INSTALLATION INSTRUCTIONS
Connecting the quick connect to the water supply
Remove the aerator from the faucet before attaching
the faucet adapter.
Pull down on the locking collar and pull up on the
faucet adapter to remove the adapter from the
assembly and then install the adapter on the faucet.
DRAIN HOSE INSTALLATION
The drain hose will arrive pre-attached to the
appliance. During operation of the appliance, the
drain hose should be directed toward a sink or
drain to catch the discarded water as it exits the
appliance.
When running the drain hose to a drain, ensure that
there are no bends in the hose as this can cause a
blockage and impede the drain function.
The drain hose can be directed upward toward a
sink or bucket but ensure that the hose does not rise
more than 100 cm (39 in) from the ground as this
can impact the drain function.
Turn on the faucet to check for leaks at the
connection before continuing. If leaks are present,
it may be necessary to wrap the faucet adapter or
the faucet with Tefl on tape before connecting the
adapter to the faucet.
Pull down on the locking collar and push the quick
connect assembly onto the bottom of the faucet
adapter. Release the locking collar to attach the
quick connect to the faucet.
Attach one end of the water inlet hose to the quick
connect assembly. Place the other end of the hose
in the sink and turn on the water supply to clear the
hose of any dust. When the water runs clear, turn
off the water supply and connect the hose to the
water inlet connection on the top of the appliance.
5
Page 7

OPERATING INSTRUCTIONS
CONTROL PANEL
1. Program button: Press this button to select the
desired wash program: heavy, gentle, normal,
rapid, soak.
2. Water level button: Press this button to choose
the desired water level: small, medium, large.
3. Wash button: Press this button to select the
washing time.
4. Display panel: The display will show the
estimated minutes remaining in the current cycle.
5. Rinse button: The rinse cycle will run for 10
minutes. Press this button to select how many
times the rinse cycle will run.
6. Spin button: Press this button to select the spin
cycle time.
DETERGENT
This appliance is designed for high effi ciency
powder detergent. It is recommended to use 1/4 to
1/2 of the amount of detergent recommended by
the detergent manufacturer. Remember to reduce
the amount of detergent if the load is small or lightly
soiled or if the water supply is very soft water.
Detergent can be placed directly into the washer
tub. Do not pour liquid bleach directly onto the
wash load as this can damage fabric.
7. Start/pause button
• Press this button to start a chosen program.
• Press this button during operation to pause a
program.
• Press this button to restart a program that has
been paused.
8. Power button: Press this button to turn the
appliance on or off.
O
R
N
M
L
T
N
E
G
Y
V
A
E
H
E
PROGRAM
1
A
L
R
A
P
I
D
S
O
A
K
2
LOAD
SIZE
PRESET
REMAIN
(MIN)
3
TIME
4
WASH RINSE SPIN
5
6
8
7
6
Page 8

OPERATING INSTRUCTIONS
PROGRAM SELECTION
Use the instructions below to choose the desired
program.
1. Press the program button to choose the wash
program.
• Heavy: For heavily soiled clothing.
• Gentle: For delicate clothing.
• Normal: For normally soiled clothing.
• Rapid: For small loads or lightly soiled
clothing.
• Soak: For stained clothing.
2. Press the water level button to choose the water
level.
• Large: For a full load.
• Medium: For a half load.
• Small: For a small load.
3. Press the wash button to choose the length of the
wash program, between 0 and 15 minutes.
4. The rinse cycle will run for 10 minutes. Press the
rinse button to choose how many times the rinse
cycle will run, between 0 and 4 times.
FUNCTION INSTRUCTION
Prior to starting a new program, check the
following:
• The drain hose is in the correct position.
• There are no leaks in the inlet hose when the
faucet is turned on.
• The power cord is properly plugged into a three
prong grounded outlet.
• All coins and loose items have been removed
from clothing.
• Place clothing into the washing machine. Drop
items loosely into the tub. Do not pack items
tightly. Items must be able to move freely through
the wash water for best cleaning results.
• Follow the instructions to set the desired wash
program.
• Close the door and press the start/pause button
to begin the desired program.
5. Press the spin button to choose the length of the
spin program, between 0 and 9 minutes.
6. Press the start/pause button to begin the wash
program. The estimated time remaining will
show on the display panel. The program can be
paused at any time by pressing this button.
• A wash program can be paused once it is in
operation by pressing the start/pause button.
• The appliance will not operate if the door is
open.
• When a program is fi nished, an alarm will
sound.
7
Page 9

CARE & MAINTENANCE
CLEANING
Before performing any cleaning or maintenance,
ensure that the water inlet hose has been
disconnected and that the power cord has been
unplugged.
Clean the outside of the appliance with a warm,
damp cloth. Avoid using detergents or chemicals as
this can damage or discolor the cabinet.
LINT FILTER
The lint fi lter is on the interior of the wash tub and
should be cleaned approximately every 10 cycles.
Remove the lint fi lter from the tub, open it and
remove any lint that has accumulated. It can be
rinsed under cold water but do not use detergents or
chemicals. Ensure that the lint fi lter is replaced in the
appliance before beginning a new program.
VINEGAR RINSE
A rinse of vinegar and water can be run through the
washing machine to remove any stains on the inner
tub or any lingering odors.
Place 1/2 cup of vinegar in the washing machine
and choose the highest water level. Allow the
appliance to run a full wash program with no
laundry to remove stains and odors.
ERROR CODES
E1 - No water fl ow
• Check that the water source is turned on.
• Check the water pressure.
• Check that the water inlet fi lter screen is clean.
• Check that the drain hose is installed correctly.
E2 - Lid is open
• Check that the lid is completely closed.
PUMP FILTER
The pump fi lter is on the back of the appliance and
should be cleaned once a month. Remove the fi lter
from the rear of the appliance and rinse it under
cold water. Ensure the pump fi lter is replaced in the
appliance before beginning a new program.
WATER INLET
The water inlet may require periodic cleaning to
remove debris or hard water build up. Ensure the
water inlet hose has been disconnected from the
appliance. Remove the fi lter screen from the inlet
valve and remove any debris or hard water build
up. The fi lter screen can be rinsed under cold
water to remove any build up. Ensure that the fi lter
screen is replaced in the water inlet valve before
reattaching the water inlet hose.
E3 - Load is unbalanced
• Ensure that the laundry load is balanced.
E4 - Drain valve malfunction
• Check if the drain is clogged.
• The drain motor may not be operating
correctly.
E5 - Water level sensor malfunction
• Contact a service technician.
8
Page 10
TROUBLESHOOTING
Danby Consumer Care: 1-800-263-2629
Hours of operation:
Monday to Thursday 8:30 am - 6:00 pm Eastern Standard Time
Friday 8:30 am - 4:00 pm Eastern Standard Time
Information in this manual is subject to change without notice.
PROBLEM POSSIBLE CAUSE
Washer does not operate • Not plugged in.
• The circuit breaker tripped or a blown fuse.
• The lid is not closed.
• The water source is not turned on.
No water or insuffi cient water supply • The water source is not turned on.
• The water inlet hose is bent.
• The fi lter screen in the water inlet is clogged.
The washing machine does not drain • The drain hose is bent.
• There is a problem with the drain pump.
Washing machine vibrates or is too noisy • The washer is not level.
• The washing machine is touching another object.
• The laundry load is not balanced.
Washing machine does not spin • The lid is not closed.
• The washer is not level.
Water fi lling and draining at the same
time
Cabinet leaking from bottom • Tub is overloaded
• Ensure drain hose is elevated 0.7 m to 1.2 m off the
fl oor; if the drain hose is too low it can cause water to
siphon out of the appliance as it fi lls
• Water level is too high for the amount of washing
9
Page 11

LIMITED “IN HOME” WARRANTY
LIMITED IN-HOME APPLIANCE WARRANTY
This quality product is warranted to be free from manufacturer’s defects in material and workmanship, provided that the unit is used under the normal operating
This quality product is warranted to be free from manufacturer’s defects in material and workmanship, provided that the unit is used
conditions intended by the manufacturer.
under the normal operating conditions intended by the manufacturer.
This warranty is available only to the person to whom the unit was originally sold by Danby Products Limited (Canada) or Danby Products Inc. (U.S.A.) (hereafter
This warranty is available only to the person to whom the unit was originally sold by Danby Products Limited (Canada) or Danby
“Danby”) or by an authorized distributor of Danby, and is non-transferable.
Products Inc. (U.S.A.) (hereafter “Danby”) or by an authorized distributor of Danby, and is non-transferable.
TERMS OF WARRANTY
Plastic parts are warranted for thirty (30) days from the date of purchase, with no extensions provided.
Plastic parts, are warranted for thirty (30) days only from purchase date, with no extensions provided.
First 12 months
First Year
To obtain service
To obtain
Service
Boundaries of
in-home service
During the first twelve (12) months, any functional parts of this product found to be defective, will be repaired or
replaced, at warrantor’s option, at no charge to the original purchaser.
During the rst twelve (12) months, any functional parts of this product found to be defective, will be repaired or replaced, at warrantor’s
option, at no charge to the ORIGINAL purchaser.
Contact the dealer where the unit was purchased, or contact the nearest authorized Danby service depot, where
service must be performed by a qualified service technician. If service is performed on the unit by anyone other
Danby reserves the right to limit the boundaries of “In Home Service” to the proximity of an Authorized Service Depot. Any app liance
than an authorized service depot, all obligations of Danby under this warranty shall be void.
requiring service outside the limited boundaries of “In Home Service” , it will be the consumer’s responsibility to transport the appliance (at
their own expense) to the original retailer (point of purchase) or a service depot for repair. See “Boundaries of In Home Serv ice” below.
Danby reserves the right to limit the boundaries of “In Home Service” to the proximity of an authorized service
Contact your dealer from whom your unit was purchased, or contact your nearest authorized Danby service depot, where service
depot. Any appliance requiring service outside the limited boundaries of “In Home Service”, will be the consumer’s
must be performed by a qualied service technician.
responsibility to transport at their own expense to the original point of purchase or a service depot for repair. If the
If service is performed on the units by anyone other than an authorized service depot, or the unit is used for commercial appli cation, all
appliance is installed in a location that is 100 kilometers (62 miles) or more from the nearest service center, it must
obligations of Danby under this warranty shall be void.
be delivered to the nearest authorized Danby Service Depot by the purchaser.
TERMS OF WARRANTY
Boundaries of
In Home Service
If the appliance is installed in a location that is 100 kilometers (62 miles) or more from the nearest service center your unit must be
Transportation charges to and from the service location are not protected by this warranty and are the
delivered to the nearest authorized Danby Service Depot, as service must only be performed by a technician qualied and certif ied for
responsibility of the purchaser.
warranty service by Danby. Transportation charges to and from the service location are not protected by this warranty and are t he
Nothing within this warranty shall imply that Danby will be responsible or liable for any spoilage or damage to food or other
contents of this appliance, whether due to any defect of the appliance, or its use, whether proper or improper.
responsibility of the purchaser.
Nothing within this warranty shall imply that Danby will be responsible or liable for any spoilage or damage to food or other c ontents of this appliance, whether due
to any defect of the appliance, or its use, whether proper or improper.
Save as herein provided, by Danby, there are no other warranties, conditions, representations or guarantees, express or implied, made
or intended by Danby or its authorized distributors and all other warranties, conditions, representations or guarantees, including any
warranties, conditions, representations or guarantees under any Sale of Goods Act or like legislation or statute is hereby expressly
Save as herein provided, Danby, there are no other warranties, conditions, representations or guarantees, express or implied, m ade or intended by Danby or its
excluded. Save as herein provided, Danby shall not be responsible for any damages to persons or property, including the unit itself,
authorized distributors and all other warranties, conditions, representations or guarantees, including any warranties, conditio ns, representations or guarantees
howsoever caused or any consequential damages arising from the malfunction of the unit and by the purchase of the unit, the
under any Sale of Goods Act or like legislation or statue is hereby expressly excluded. Save as herein provided, Danby shall no t be responsible for any damages
purchaser does hereby agree to indemnify and hold harmless Danby from any claim for damages to persons or property caused by
to persons or property, including the unit itself, howsoever caused or any consequential damages arising from the malfunction o f the unit and by the purchase of
the unit.
the unit, the purchaser does hereby agree to indemnify and hold harmless Danby from any claim for damages to persons or propert y caused by the unit.
No warranty or insurance herein contained or set out shall apply when damage or repair is caused by any of the following:
No warranty or insurance herein contained or set out shall apply when damage or repair is caused by any of the following:
1) Power failure.
2) Damage in transit or when moving the appliance.
1) Power failure.
3) Improper power supply such as low voltage, defective house wiring or inadequate fuses.
2) Damage in transit or when moving the appliance.
4) Accident, alteration, abuse or misuse of the appliance such as inadequate air circulation in the room or abnormal operating
3) Improper power supply such as low voltage, defective house wiring or inadequate fuses.
conditions (ie. extremely high or low room temperature).
4) Accident, alteration, abuse or misuse of the appliance such as inadequate air circulation in the room or abnormal operating con ditions
5) Use for commercial or industrial purposes (ie. If the appliance is not installed in a domestic residence).
6) Fire, water damage, theft, war, riot, hostility, acts of God such as hurricanes, floods etc.
7) Service calls resulting in customer education.
8) Improper Installation (ie. Building-in of a free standing appliance or using an appliance outdoors that is not approved for outdoor
application, including but not limited to: garages, patios, porches or anywhere that is not properly insulated or climate controlled).
Proof of purchase date will be required for warranty claims; retain bills of sale. In the event that warranty service is required, present
Proof of purchase date will be required for warranty claims; so, please retain bills of sale. In the event warranty service is required, present this document to our
the proof of purchase to our authorized service depot.
AUTHORIZED SERVICE DEPOT.
(extremely high or low room temperature).
5) Use for commercial or industrial purposes (ie. If the appliance is not installed in a domestic residence).
6) Fire, water damage, theft, war, riot, hostility, acts of God such as hurricanes, oods etc.
7) Service calls resulting in customer education.
8) Improper Installation (ie. Building-in of a free standing appliance or using an appliance outdoors that is not approved for out door application).
EXCLUSIONS
EXCLUSIONS
GENERAL PROVISIONS
GENERAL PROVISIONS
Danby Products Limited
Danby Products Limited
PO Box 1778, Guelph, Ontario, Canada N1H 6Z9
PO Box 1778, Guelph, Ontario, Canada N1H 6Z9
Telephone: (519) 837-0920 FAX: (519) 837-0449
Telephone: (519) 837-0920 FAX: (519) 837-0449
Warranty Service
Warranty Service
In-home
In Home
1-800-263-2629
1-800-263-2629
04/17
04/09
Danby Products Inc.
PO Box 669, Findlay, Ohio, U.S.A. 45840
Telephone: (419) 425-8627 FAX: (419) 425-8629
PO Box 669, Findlay, Ohio, U.S.A. 45840
Telephone: (419) 425-8627 FAX: (419) 425-8629
Danby Products Inc.
Page 12

Bienvenue
Bienvenue à la famille Danby. Nous sommes fi ers de la qualité de nos produits et nous croyons
en le service fi able. Nous vous suggérons de lire ce manual d’utilisation avant de brancher
votre nouvel appareil car il contient des informations inportantes sur l’utilisation, la sécurité, le
dépannage et la maintenance, afi n d’assurer la fi abilité et la longévité de votre appareil.
Visitez www.Danby.com pour accéder aux outils d’autoservice, aux FAQ et bien plus encore. Pour
obtenir de l’aide supplémentaire, composez 1-800-263-2629.
Notez les informations ci-dessous; Vous aurez besoin de cette information pour obtenir un
service sous garantie.
Vous devez fournir le reçu d’achat original pour valider votre garantie et recevoir le service.
Numéro de modèle: _____________________________________________
Numéro de serie: _______________________________________________
Date d’achat: __________________________________________________
Besoin d’assistance?
Avant d’appeler pour service, voici quelques choses que vous pouvez faire pour nous
aider à mieux vous servir.
Lire ce manuel du propriétaire:
Il contient des instructions pour vous aider à utiliser et à maintenir votre appareil
correctement.
Si vous recevez un appareil endommagé:
Contactez immédiatement le revendeur ou l’entrepreneur qui vous a vendu l’appareil.
Gagnez du temps et de l’argent:
Avant d’appeler pour service, consultez la section de dépannage à la fi n de ce manuel.
Cette section vous aidera à résoudre les problèmes courants pouvant survenir.
1-800-26- Danby
(1-800-263-2629)
11
Page 13

Consignes de sécurité importantes
LIRE ET SUIVRE TOUTES LES INSTRUCTIONS DE SÉCURITÉ
CONSIGNES DE SÉCURITÉ
ATTENTION: Pour réduire le risque d’incendie,
d’électrocution ou de blessures lors de l’utilisation
de cet appareil, suivez les consignes de sécurité de
base, y compris les suivantes:
• Ne lavez pas les produits préalablement
nettoyés, lavés, imprégnés d’essence, de solvants
pour le nettoyage à sec ou d’autres substances
infl ammables ou explosives, car ils éliminent les
vapeurs qui pourraient s’enfl ammer ou exploser.
• N’ajoutez pas d’essence, de solvants de
nettoyage à sec ou d’autres substances
infl ammables ou explosives à l’eau de lavage
car elles dégagent des vapeurs qui pourraient
s’enfl ammer ou exploser.
• Sous certaines conditions, un gaz hydrogène
peut être produit dans un système d’eau chaude
qui n’a pas été utilisé pendant 2 semaines ou
plus. LE GAZ À L’HYDROGÈNE EST EXPLOSIF.
Si le système d’eau chaude n’a pas été utilisé
pendant une telle période, allumez tous les
robinets à eau chaude et laissez l’eau s’écouler
pendant plusieurs minutes avant d’utiliser
la machine à laver. Cela libérera tout gaz
hydrogène accumulé. Ne pas fumer ou utiliser
une fl amme nue pendant ce processus.
• Ne placez pas dans l’appareil si la baignoire ou
l’agitateur bouge.
• Ne pas installer ou stocker cet appareil là où il
sera exposé aux intempéries.
• Ne manipulez pas les commandes.
• Ne réparez pas ou ne remplacez aucune partie
de l’appareil ou ne tentez pas d’entretien, à
moins d’être spécifi quement recommandé dans
les instructions d’entretien de l’utilisateur ou
dans les instructions de réparation d’utilisateur
publiées que vous comprenez et possédez les
compétences à effectuer.
• Ne faites pas fonctionner l’appareil lorsque
la pression de l’eau est inférieure à 14 PSI ou
supérieure à 70 MPa pour éviter d’endommager
le système d’entrée.
Cet appareil n’est pas destiné à être utilisé par
des personnes (y compris des enfants) dont les
capacités physiques, sensorielles ou mentales
peuvent être différentes ou réduites, ou qui ont de
l’expérience ou des connaissances, à moins que
ces personnes ne soient surveillées ou formées
pour faire fonctionner l’appareil par une personne
responsable de leur sécurité.
INSTRUCTIONS DE MISE À LA TERRE
Cet appareil doit être mis à la terre. La mise à
la terre réduit le risque de choc électrique en
fournissant un fi l d’échappement pour le courant
électrique.
Cet appareil dispose d’un cordon doté d’un fi l
de mise à la terre avec une fi che à 3 broches. Le
cordon d’alimentation doit être branché sur une
prise correctement mise à la terre. Si la sortie
est une prise murale à 2 broches, elle doit être
remplacée par une prise murale à 3 broches
correctement mise à la terre. La plaque signalétique
en série indique la tension et la fréquence
auxquelles l’appareil est conçu.
ATTENTION - Une utilisation incorrecte de la fi che
de mise à la terre peut entraîner un risque de choc
électrique. Consultez un électricien qualifi é ou
un agent de service si les instructions de mise à
la terre ne sont pas complètement comprises, ou
s’il existe un doute quant à savoir si l’appareil est
correctement mis à la terre.
Ne connectez pas votre appareil aux rallonges
ou avec un autre appareil dans la même prise
murale. Ne pas épisser le cordon d’alimentation. En
aucun cas, couper ou retirer la troisième broche du
cordon d’alimentation. N’utilisez pas de cordons de
prolongement ou d’adaptateurs sans mise à la terre
(deux broches).
Si le cordon d’alimentation est endommagé, il doit
être remplacé par le fabricant, son agent de service
ou une personne qualifi ée similaire afi n d’éviter tout
risque.
Toute question concernant l’alimentation électrique
ou la mise à la terre devrait être dirigée vers un
électricien agréé.
DANGER: Risque de piégeage des enfants. Les
enfants doivent être surveillés autour de cet
appareil. Assurez-vous que le couvercle est retiré
avant de jeter cet appareil.
GARDEZ CES INSTRUCTIONS!
12
Page 14

INSTRUCTIONS D’INSTALLATION
EMPLACEMENT
• Deux personnes doivent être utilisées lors du
déplacement de l’appareil.
• Enlevez l’emballage intérieur et extérieur avant
l’installation. Assurez-vous de ne pas jeter la
plaque antibruit qui est emballée sur l’appareil.
• Essuyez l’extérieur de l’appareil avec un chiffon
doux et sec et l’intérieur avec un chiffon humide
et tiède. Ne pas pulvériser l’appareil avec de
l’eau.
• Placez l’appareil sur un sol suffi samment solide
pour le supporter lorsqu’il est entièrement
chargé, dans une pièce permettant un accès
facile à un point d’eau, un faible taux d’humidité
et le taux d’humidité ne gèlent pas en hiver.
• Ne placez pas l’appareil sur un sol recouvert
de moquette car cela pourrait obstruer les
ouvertures de ventilation inférieures.
CARACTÉRISTIQUES
1. Couvercle
2. Panneau de contrôle
3. Pied réglable
4. Arrivée d’eau
5. Tuyau de drainage
6. Cordon d’alimentation
7. Filtre de pompe à eau
8. Patin à roulettes
1
2
4
5
• Tenez l’appareil à l’écart des sources de chaleur
et des rayons directs du soleil. Une chaleur
excessive ou la lumière du soleil peut déformer
ou décolorer l’appareil.
• Cet appareil est destiné à un usage domestique
uniquement. Il n’est pas conçu pour une
installation à l’extérieur, y compris dans les
endroits où la température n’est pas contrôlée,
tels que les garages, les porches, les véhicules,
etc., car les conduites d’eau risquent de geler.
• Cet appareil est conçu uniquement pour une
installation autonome et n’est pas destiné à être
intégré dans une armoire ou un comptoir. La
construction de cet appareil peut entraîner un
dysfonctionnement.
3
6
7
7
8
INSTRUCTIONS DE NIVEAU
Il est important que l’appareil soit de niveau pour
éviter les charges non équilibrées et le bruit excessif.
Le pied de nivellement est situé sur le côté avant
droit de l’appareil. Il y a un pied solide sur le côté
avant gauche de l’appareil et il y a deux rouleaux à
l’arrière.
1. Tournez le pied de nivellement dans le sens
antihoraire jusqu’à ce que le haut du pied
touche le bas de l’armoire.
2. Tournez lentement le pied de nivellement dans le
sens des aiguilles d’une montre jusqu’à ce que
l’appareil soit à niveau.
13
Page 15

INSTRUCTIONS D’INSTALLATION
ACCESSOIRES ET PRÉPARATION
Vous aurez besoin des outils suivants pour installer
la laveuse:
• Clé
• Pinces
• Tournevis
Assurez-vous que tous les accessoires fournis sont
présents et pris en compte:
1. Un tuyau d’alimentation en eau
2. Un adaptateur de connexion rapide
3. Une plaque anti-bruit
4. Une vis
1
3
APPROVISIONNEMENT EN EAU
Le robinet d’alimentation en eau doit être adapté
aux raccords femelles standard de tuyau de jardin
de 3/4 po (19,05 mm). N’utilisez pas de raccords
à glissière ou à pince car la pression de l’eau
pourrait provoquer une fuite.
Serrez toutes les connexions à la main jusqu’à
ce qu’elles soient bien ajustées, puis serrez-les
d’un quart de tour avec une clé pour vous assurer
qu’elles sont bien en place.
Vérifi ez toutes les connexions pour les fuites avant
d’utiliser l’appareil. Si des fuites sont détectées,
il peut être nécessaire d’ajouter une rondelle en
caoutchouc ou du ruban téfl on au raccord.
Le tuyau d’arrivée d’eau doit toujours être raccordé
à une alimentation en eau froide.
Utilisation de l’assemblage à connexion rapide
Le raccord rapide peut être utilisé pour connecter
l’appareil à un robinet de cuisine ou de salle de
bain afi n d’alimenter l’appareil en eau.
2
4
INSTALLATION DE PLAQUE ANTI-BRUIT
La plaque antibruit aidera à atténuer le bruit
excessif de l’appareil pendant l’agitation. Suivez les
étapes ci-dessous pour installer la plaque antibruit.
1. Retirez la plaque anti-bruit de l’emballage. Il
sera expédié sur le dessus de l’appareil en haut
de la boîte.
2. Faites glisser la plaque antibruit dans le canal
situé à la base de l’appareil et fi xez-la à l’aide
des vis fournies.
Une ventilation de la connexion rapide est présentée
ci-dessous.
1. Assemblage rapide
2. Une rondelle en caoutchouc
3. Adaptateur de robinet
4. Collier de verrouillage blanc
5. Tuyau d’arrivée d’eau
2
1
3
4
14
5
Page 16

INSTRUCTIONS D’INSTALLATION
Connecter le branchement rapide à l’alimentation
en eau
Retirez l’aérateur du robinet avant de brancher
l’adaptateur de robinet.
Tirez sur le collier de verrouillage et tirez
sur l’adaptateur de robinet pour le retirer de
l’assemblage, puis installez l’adaptateur sur le
robinet.
INSTALLATION DU TUYAU DE VIDANGE
Le tuyau de vidange arrivera pré-attaché à
l’appareil. Pendant le fonctionnement de l’appareil,
le tuyau de vidange doit être dirigé vers un évier
ou un drain pour récupérer l’eau qui s’écoule de la
sortie de l’appareil.
Lorsque vous faites passer le tuyau d’évacuation à
une évacuation, assurez-vous qu’il ne soit pas plié,
car cela pourrait provoquer un blocage et gêner la
fonction d’évacuation.
Le tuyau de vidange peut être dirigé vers le haut
en direction d’un évier ou d’un seau, mais veillez
à ce que le tuyau ne s’élève pas à plus de 100 cm
du sol, car cela pourrait avoir une incidence sur la
fonction de vidange.
Ouvrez le robinet pour vérifi er s’il y a des fuites
au niveau de la connexion avant de continuer. S’il
y a des fuites, il peut être nécessaire d’envelopper
l’adaptateur de robinet ou le robinet avec du ruban
téfl on avant de connecter l’adaptateur au robinet.
Tirez le collier de verrouillage vers le bas et poussez
l’ensemble de connexion rapide sur la partie
inférieure de l’adaptateur de robinet. Relâchez le
collier de verrouillage pour fi xer le raccord rapide
au robinet.
Fixez une extrémité du tuyau d’arrivée d’eau
à l’assemblage à connexion rapide. Placez
l’autre extrémité du tuyau dans l’évier et ouvrez
l’alimentation en eau pour débarrasser le tuyau
de toute poussière. Lorsque l’eau est claire, fermez
l’alimentation en eau et branchez le tuyau sur le
raccord d’arrivée d’eau situé en haut de l’appareil.
15
Page 17

INSTRUCTIONS D’UTILISATION
PANNEAU DE CONTRÔLE
1. Bouton de programme: Appuyez sur cette
touche pour sélectionner le programme de
lavage souhaité: lourd, doux, normal, rapide,
trempage.
2. Bouton de niveau d’eau: Appuyez sur ce
bouton pour choisir le niveau d’eau souhaité:
petit, moyen, grand.
3. Bouton de lavage: Appuyez sur ce bouton pour
sélectionner le temps de lavage.
4. Panneau d’affi chage: L’affi cheur indiquera
le nombre de minutes restant dans le cycle en
cours.
5. Bouton de rinçage: Le cycle de rinçage durera
10 minutes. Appuyez sur ce bouton pour
sélectionner combien de fois le cycle de rinçage
sera exécuté.
DÉTERGENT
Cet appareil est conçu pour les détergents en
poudre à haute effi cacité. Il est recommandé
d’utiliser 1/4 à 1/2 de la quantité de détergent
recommandée par le fabricant du détergent.
N’oubliez pas de réduire la quantité de détergent
si la charge est petite ou légèrement sale ou si
l’alimentation en eau est très douce.
Le détergent peut être placé directement dans la
cuve de la laveuse. Ne versez pas d’eau de Javel
directement sur la charge de lavage car cela
pourrait endommager le tissu.
6. Bouton de rotation: Appuyez sur ce bouton
pour sélectionner la durée du cycle d’essorage.
7. Bouton de démarrage / pause
• Appuyez sur ce bouton pour lancer le
programme choisi.
• Appuyez sur cette touche pendant le
fonctionnement pour mettre en pause un
programme.
• Appuyez sur ce bouton pour redémarrer un
programme qui a été mis en pause.
8. Bouton marche: Appuyez sur ce bouton pour
allumer ou éteindre l’appareil.
O
R
N
M
L
T
N
E
G
Y
V
A
E
H
E
PROGRAM
1
A
L
R
A
P
I
D
S
O
A
K
2
LOAD
SIZE
PRESET
REMAIN
(MIN)
WASH RINSE SPIN
3
4
5
TIME
8
7
6
16
Page 18

INSTRUCTIONS D’UTILISATION
SÉLECTION DE PROGRAMME
Suivez les instructions ci-dessous pour choisir le
programme souhaité.
1. Appuyez sur le bouton de programme pour
choisir le programme de lavage.
• Lourd: Pour les vêtements très sales.
• Doux: Pour les vêtements délicats.
• Normal: Pour les vêtements normalement
sales.
• Rapide: Pour les petites charges ou les
vêtements peu sales.
• Tremper: Pour les vêtements tachés.
2. Appuyez sur le bouton du niveau d’eau pour
choisir le niveau d’eau.
• Large: Pour un chargement complet.
• Moyen: Pour une demi-charge.
• Petit: Pour un petit chargement.
3. Appuyez sur le bouton de lavage pour choisir la
durée du programme de lavage, entre 0 et 15
minutes.
4. Le cycle de rinçage durera 10 minutes. Appuyez
sur le bouton de rinçage pour choisir combien
de fois le cycle de rinçage sera exécuté, entre 0
et 4 fois.
5. Appuyez sur le bouton d’essorage pour choisir
la durée du programme d’essorage, entre 0 et 9
minutes.
6. Appuyez sur le bouton démarrage/pause
pour lancer le programme de lavage. La durée
estimée restante s’affi chera sur le panneau
d’affi chage. Le programme peut être interrompu
à tout moment en appuyant sur ce bouton.
INSTRUCTION DE FONCTION
Avant de démarrer la machine à laver, vérifi ez les
points suivants:
• Le tuyau de vidange est dans la bonne position.
• Il n’y a pas de fuite dans le tuyau d’arrivée
lorsque le robinet est ouvert.
• Le cordon d’alimentation est correctement
branché dans une prise à la terre à trois
broches.
• Toutes les pièces de monnaie et les objets en
vrac ont été retirés des vêtements.
• Placez les vêtements dans la machine à laver.
Déposez des objets dans la baignoire. Ne pas
emballer les articles étroitement. Les articles
doivent pouvoir circuler librement dans l’eau
de lavage pour obtenir les meilleurs résultats de
nettoyage.
• Suivez les instructions pour défi nir le programme
de lavage souhaité.
• Fermez le couvercle et appuyez sur le bouton
démarrage / pause pour lancer le programme
souhaité.
• Un programme de lavage peut être suspendu
une fois qu’il est en marche en appuyant sur le
bouton démarrage / pause.
• L’appareil ne fonctionnera pas si le couvercle est
ouvert.
• Lorsqu’un programme est terminé, une alarme
retentit.
17
Page 19

SOINS ET ENTRETIEN
NETTOYAGE
Avant de procéder à tout nettoyage ou entretien,
assurez-vous que le tuyau d’arrivée d’eau a été
débranché et que le cordon d’alimentation est
débranché.
Nettoyez l’extérieur de l’appareil avec un chiffon
chaud et humide. Évitez d’utiliser des détergents
ou des produits chimiques car cela pourrait
endommager ou décolorer le boîtier.
FILTRE À CHARPIE
Le fi ltre à peluches se trouve à l’intérieur de la
cuve de lavage et doit être nettoyé environ tous
les 10 cycles. Retirez le fi ltre à charpie de la
baignoire, ouvrez-le et enlevez les peluches qui se
sont accumulées. Il peut être rincé à l’eau froide
mais n’utilisez ni détergents ni produits chimiques.
Assurez-vous que le fi ltre à peluches est remplacé
dans l’appareil avant de commencer un nouveau
programme.
VINAIGRE RINÇAGE
Un rinçage de vinaigre et d’eau peut courir
à travers la machine à laver pour éliminer les
taches sur la baignoire intérieure ou toute odeur
persistante.
Placez 1/2 tasse de vinaigre dans la machine à
laver et choisissez le niveau d’eau le plus élevé.
Laissez l’appareil exécuter un programme complet
de lavage et rinçage et de lavage sans lessive pour
éliminer les taches et les odeurs.
CODES D’ERREUR
E1 - Pas de débit d’eau
• Vérifi ez que la source d’eau est allumée.
• Vérifi ez la pression de l’eau.
• Vérifi ez que le tamis du fi ltre d’entrée d’eau
est propre.
FILTRE DE POMPE
Le fi ltre de la pompe se trouve à l’arrière de
l’appareil et doit être nettoyé une fois par mois.
Retirez le fi ltre à l’arrière de l’appareil et rincez-le à
l’eau froide. Assurez-vous que le fi ltre de la pompe
est remplacé dans l’appareil avant de commencer
un nouveau programme.
ARRIVÉE D’EAU
L’entrée d’eau peut nécessiter un nettoyage
périodique pour éliminer les débris ou
l’accumulation d’eau dure. Assurez-vous que
le tuyau d’arrivée d’eau a été débranché de
l’appareil. Retirez le fi ltre de la vanne d’admission
et enlevez tout débris ou toute accumulation d’eau
dure. La crépine peut être rincée à l’eau froide pour
éliminer toute accumulation. Assurez-vous que le
tamis du fi ltre est replacé dans la vanne d’arrivée
d’eau avant de reconnecter le tuyau d’arrivée
d’eau.
E2 - Le couvercle est ouvert
• Vérifi ez que le couvercle est complètement
fermé.
E3 - La charge est déséquilibrée
• Assurez-vous que la charge de linge est
équilibrée.
E4 - Dysfonctionnement de la soupape de vidange
• Vérifi ez si le drain est bouché.
• Le moteur de vidange ne fonctionne peut-être
pas correctement.
E5 - Dysfonctionnement du capteur de niveau
d’eau
• Contacter un technicien de service.
18
Page 20

DÉPANNAGE
Danby soins du consommateur: 1-800-263-2629
Heures d’ouverture:
Lundi à Jeudi 8 h 30 à 18 h, heure normale de l’Est
Vendredi de 8 h 30 à 16 h, heure normale de l’Est
Les informations contenues dans ce manuel sont sujettes à modifi cation sans préavis.
PROBLÈME CAUSE POSSIBLE
La laveuse ne fonctionne pas • Pas branché.
• Le disjoncteur a déclenché ou un fusible souffl é.
• Le couvercle n’est pas fermé.
• La source d’eau n’est pas allumée.
Pas d’eau ni
d’approvisionnement
insuffi sant en eau
La machine à laver ne draine
pas
La machine à laver vibre ou
est trop bruyante
La machine à laver ne tourne
pas
Remplissage et vidange
d’eau en même temps
Cabinet qui fuit du fond • La baignoire est surchargée
• La source d’eau n’est pas allumée.
• Le tuyau d’entrée d’eau est plié.
• L’écran du fi ltre à l’entrée d’eau est bouché.
• Le tuyau de vidange est plié.
• Il y a un problème avec la pompe de vidange.
• La laveuse n’est pas au niveau.
• La machine à laver touche un autre objet.
• La charge de la lessive n’est pas équilibrée.
• Le couvercle n’est pas fermé.
• La laveuse n’est pas au niveau.
• Assurez-vous que le tuyau de vidange est élevé de 0,7 m à 1,2 m du
sol; Si le tuyau de vidange est trop bas, il peut provoquer l’évacuation
de l’eau de l’appareil car il remplit
• Le niveau d’eau est trop élevé pour la quantité de lavage
19
Page 21

GARANTIE LIMITÉE « À DOMICILE »
LIMITED IN-HOME APPLIANCE WARRANTY
Cet appareil de qualité est garanti exempt de tout vice de matière première et de fabrication, s’il est utilisé dans les conditions
This quality product is warranted to be free from manufacturer’s defects in material and workmanship, provided that the unit is used under the normal operating
normales recommandées par le fabricant.
conditions intended by the manufacturer.
Cette garantie n’est offerte qu’à l’acheteur initial de l’appareil vendu par Danby Products Limited (Canada) ou Danby Products Inc.
This warranty is available only to the person to whom the unit was originally sold by Danby Products Limited (Canada) or Danby Products Inc. (U.S.A.) (hereafter
(É.-U.) (ci-après « Danby ») ou par l’un de ses distributeurs agréés et elle ne peut être transférée.
“Danby”) or by an authorized distributor of Danby, and is non-transferable.
CONDITIONS
Les pièces en plastique sont garanties pendant trente (30) jours seulement à partir de la date de l’achat, sans aucune prolongation
prévue.
Plastic parts, are warranted for thirty (30) days only from purchase date, with no extensions provided.
Premiers 12 mois
First Year
Pendant les premiers douze (12) mois, toutes les pièces fonctionnelles de ce produit qui s’avèrent défectueuses
seront réparées ou remplacées, selon le choix du garant, sans frais à l’acheteur initial.
During the rst twelve (12) months, any functional parts of this product found to be defective, will be repaired or replaced, at warrantor’s
TERMS OF WARRANTY
option, at no charge to the ORIGINAL purchaser.
Pour bénéficier
du service
To obtain
Service
Limites de l’entretien
à domicile
Boundaries of
In Home Service
S’adresser au détaillant qui a vendu l’appareil, ou à la station technique agréée de service la plus proche, où
les réparations doivent être effectuées par un technicien qualifié. Si les réparations sont effectuées par
Danby reserves the right to limit the boundaries of “In Home Service” to the proximity of an Authorized Service Depot. Any app liance
quiconque autre que la station de service agréée où à des fins commerciales, toutes les obligations de Danby
requiring service outside the limited boundaries of “In Home Service” , it will be the consumer’s responsibility to transport the appliance (at
en vertu de cette garantie seront annulées.
their own expense) to the original retailer (point of purchase) or a service depot for repair. See “Boundaries of In Home Serv ice” below.
Contact your dealer from whom your unit was purchased, or contact your nearest authorized Danby service depot, where service
Danby se réserve le droit de limiter les limites de « Service au domicile » à proximité d'un dépôt de service
must be performed by a qualied service technician.
agréé. Pour tout appareil nécessitant le service hors des limites de "Service à domicile" il sera la responsabilité
If service is performed on the units by anyone other than an authorized service depot, or the unit is used for commercial appli cation, all
du consommateur de transporter à ses frais au point d'achat d’origine ou un dépôt de service pour la réparation.
obligations of Danby under this warranty shall be void.
Si l'appareil est installé à plus de 100 kilomètres (62 milles) du centre de service le plus proche, il doit être livré
à l'atelier de réparation autorisé par Danby le plus proche, car l'entretien doit uniquement être réalisé par un
If the appliance is installed in a location that is 100 kilometers (62 miles) or more from the nearest service center your unit must be
technicien qualifié et certifié pour effectuer un entretien couvert par la garantie de Danby.
delivered to the nearest authorized Danby Service Depot, as service must only be performed by a technician qualied and certif ied for
warranty service by Danby. Transportation charges to and from the service location are not protected by this warranty and are t he
Les frais de transport entre votre domicile et le lieu de l'entretien ne sont pas couverts par la présente garantie
responsibility of the purchaser.
et doivent être acquittés par l'acheteur.
Aucune partie de la garantie ne prévoit implicitement que le fabricant sera tenu responsable des dommages subis par les aliments ou
Nothing within this warranty shall imply that Danby will be responsible or liable for any spoilage or damage to food or other c ontents of this appliance, whether due
d’autres types de contenu, qu’ils soient causés par la défectuosité de l’appareil ou par son usage adéquat ou inadéquat.
to any defect of the appliance, or its use, whether proper or improper.
EXCLUSIONS
En vertu de la présente, il n’existe aucune autre garantie, condition ou représentation, qu’elle soit exprimée ou tacite, de façon
Save as herein provided, Danby, there are no other warranties, conditions, representations or guarantees, express or implied, m ade or intended by Danby or its
manifeste ou intentionnelle, par Danby ou ses distributeurs agréés. De même, sont exclues toutes les autres garanties, conditions ou
authorized distributors and all other warranties, conditions, representations or guarantees, including any warranties, conditio ns, representations or guarantees
représentations, y compris les garanties, conditions ou représentations en vertu de toute loi régissant la vente de produits ou de toute
under any Sale of Goods Act or like legislation or statue is hereby expressly excluded. Save as herein provided, Danby shall no t be responsible for any damages
autre législation ou règlement semblable. En vertu de la présente, Danby ne peut être tenue responsable en cas de blessures
to persons or property, including the unit itself, howsoever caused or any consequential damages arising from the malfunction o f the unit and by the purchase of
corporelles ou de dégâts matériels, y compris à l’appareil, quelle qu’en soit les causes. Danby ne peut pas être tenue responsable
the unit, the purchaser does hereby agree to indemnify and hold harmless Danby from any claim for damages to persons or propert y caused by the unit.
des dommages indirects dus au fonctionnement défectueux de l’appareil. En achetant l’appareil, l’acheteur accepte de tenir sans
reproche et de dégager Danby de toute responsabilité en cas de réclamation pour toute blessure corporelle ou tout dégât matériel
causé par cet appareil.
No warranty or insurance herein contained or set out shall apply when damage or repair is caused by any of the following:
La garantie ou assurance ci-dessus ne s’applique pas si les dégâts ou réparations sont dus aux cas suivants :
1) Power failure.
1) Panne de courant.
2) Damage in transit or when moving the appliance.
2) Dommages subis pendant le transport ou le déplacement de l’appareil.
3) Improper power supply such as low voltage, defective house wiring or inadequate fuses.
3) Alimentation électrique incorrecte (tension faible, câblage défectueux, fusibles incorrects).
4) Accident, alteration, abuse or misuse of the appliance such as inadequate air circulation in the room or abnormal operating con ditions
4) Accident, modification, emploi abusif ou incorrect de l’appareil tel qu'une circulation d'air inadéquate dans la pièce ou des
conditions de fonctionnement anormales (température extrêmement élevée ou basse).
5) Utilisation dans un but commercial ou industriel (à savoir, si l'appareil n'est pas installé dans un domicile résidentiel).
6) Incendie, dommages causés par l’eau, le vol, la guerre, une émeute, des hostilités, ou en cas de force majeure (ouragan,
inondation, etc.).
7) Visites d’un technicien pour expliquer le fonctionnement de l’appareil au propriétaire.
8) Installation inappropriée (par exemple, encastrement d'un appareil autoportant, ou utilisation extérieure d'un appareil non conçu à
Proof of purchase date will be required for warranty claims; so, please retain bills of sale. In the event warranty service is required, present this document to our
cet effet, y compris, mais sans s'y limiter : les garages, les patios, les porches ou ailleurs, qui ne sont pas correctement isolés ou
AUTHORIZED SERVICE DEPOT.
climatisés).
(extremely high or low room temperature).
5) Use for commercial or industrial purposes (ie. If the appliance is not installed in a domestic residence).
6) Fire, water damage, theft, war, riot, hostility, acts of God such as hurricanes, oods etc.
7) Service calls resulting in customer education.
8) Improper Installation (ie. Building-in of a free standing appliance or using an appliance outdoors that is not approved for out door application).
EXCLUSIONS
GENERAL PROVISIONS
CONDITIONS GÉNÉRALES
La preuve de la date d'achat sera requise pour les réclamations de garantie; conserver la facture de vente. Dans le cas où un service
de garantie est requis, présentez la preuve d'achat à notre dépôt de service agréé.
Warranty Service
In-home
Service sous garantie
Danby Products Limited
Danby Products Limited
PO Box 1778, Guelph, Ontario, Canada N1H 6Z9
PO Box 1778, Guelph, Ontario, Canada N1H 6Z9
Telephone: (519) 837-0920 FAX: (519) 837-0449
Téléphone : (519) 837-0920 Télécopieur : (519) 837-0449
Service au domicile
1-800-263-2629
1-800-263-2629
02/18
04/09
Danby Products Inc.
PO Box 669, Findlay, Ohio, U.S.A. 45840
PO Box 669, Findlay, Ohio, U.S.A. 45840
Téléphone : (419) 425-8627 Télécopieur : (419) 425-8629
Telephone: (419) 425-8627 FAX: (419) 425-8629
Danby Products Inc.
Page 22

Bienvenido
Bienvenido a la familia Danby. Estamos orgullosos de nuestros productos de calidad y creemos
en el servicio fi able. Sugerimos que lea este manual del propietario antes de conectar el nuevo
aparato ya que contiene información importante sobre la operación, información de seguridad,
solución de problemas y consejos de mantenimiento para garantizar la fi abilidad y longevidad de
su electrodoméstico.
Visite www.Danby.com para acceder a herramientas de autoservicio, preguntas frecuentes y
mucho más. Para asistencia adicional, llame al 1-800-263-2629.
Tenga en cuenta la información siguiente; Necesitará esta información para obtener un servicio
bajo garantía.
Debe proporcionar el recibo de compra original para validar su garantía y recibir servicio.
Número de modelo: _____________________________________________
Número de serie: _______________________________________________
Fecha de compra: _______________________________________________
Necesitas ayuda?
Antes de llamar al servicio, aquí hay algunas cosas que puede hacer para ayudarnos a
servirle mejor.
Lea este manual del propietario:
Contiene instrucciones para ayudarle a usar y mantener su aparato correctamente.
Si recibe un aparato dañado:
Inmediatamente póngase en contacto con el minorista o el constructor que le vendió el
aparato.
Ahorre tiempo y dinero:
Consulte la sección de solución de problemas al fi nal de este manual antes de llamar. Esta
sección le ayudará a resolver problemas comunes que pueden ocurrir.
1-800-26- Danby
(1-800-263-2629)
21
Page 23

Importantes Instrucciones de Seguridad
LEA Y SIGA TODAS LAS INSTRUCCIONES DE SEGURIDAD
INSTRUCCIONES DE SEGURIDAD
ADVERTENCIA: Para reducir el riesgo de incendio,
choque eléctrico o lesiones a personas al usar
este aparato, siga las precauciones básicas de
seguridad, incluyendo las siguientes:
• No lave artículos que hayan sido previamente
limpiados, lavados, empapados o manchados
con gasolina, disolventes de limpieza en seco
u otras sustancias infl amables o explosivas, ya
que emiten vapores que podrían encenderse o
explotar.
• No agregue gasolina, solventes de limpieza en
seco u otras sustancias infl amables o explosivas
al agua de lavado, ya que emiten vapores que
podrían encenderse o explotar.
• Bajo ciertas condiciones, se puede producir gas
hidrógeno en un sistema de agua caliente que
no se ha utilizado durante 2 semanas o más.
EL GAS DE HIDRÓGENO ES EXPLOSIVO. Si
el sistema de agua caliente no se ha utilizado
durante este período, encienda todos los
grifos de agua caliente y deje que el agua
fl uya durante varios minutos antes de usar
la lavadora. Esto liberará cualquier gas de
hidrógeno acumulado. No fume ni use una
llama abierta durante este proceso.
• No introduzca la mano en el aparato si la tina o
el agitador están en movimiento.
• No instale ni guarde este aparato en lugares
expuestos a la intemperie.
• No manipule los controles.
• No repare ni reemplace ninguna parte
del aparato ni intente realizar ningún
mantenimiento a menos que se recomiende
específi camente en las instrucciones de
mantenimiento del usuario o en las instrucciones
de reparación publicadas del usuario que
entienda y tenga las habilidades para llevar a
cabo.
• No haga funcionar el aparato cuando la
presión del agua sea inferior a 14 PSI o
superior a 70 MPa para evitar daños en el
sistema de entrada.
Este aparato no está diseñado para ser usado por
personas (incluyendo niños) cuyas capacidades
físicas, sensoriales o mentales pueden ser
diferentes o reducir, o que carecen de experiencia
o conocimiento, a menos que dichas personas
reciban supervisión o entrenamiento para operar
el aparato por una persona responsable de su la
seguridad.
INSTRUCCIONES DE CONEXIÓN A TIERRA
Este aparato debe estar conectado a tierra. La
puesta a tierra reduce el riesgo de descarga
eléctrica proporcionando un cable de escape para
la corriente eléctrica.
Este aparato tiene un cable que tiene un cable de
conexión a tierra con un enchufe de 3 clavijas. El
cable de alimentación debe estar enchufado en
un tomacorriente que esté debidamente conectado
a tierra. Si el tomacorriente es un tomacorriente
de dos clavijas, debe ser reemplazado por un
tomacorriente de pared de 3 clavijas correctamente
conectado a tierra. La placa de características en
serie indica el voltaje y la frecuencia para la que
está diseñado el artefacto.
ADVERTENCIA - El uso incorrecto del enchufe de
conexión a tierra puede ocasionar un riesgo de
descarga eléctrica. Consulte a un electricista o
agente de servicio califi cado si las instrucciones de
conexión a tierra no se entienden completamente o
si existe duda sobre si el aparato está debidamente
conectado a tierra.
No conecte el aparato a los cables de extensión ni
con otro aparato en la misma toma de corriente.
No empalme el cable de alimentación. No corte
ni quite en ningún caso la tercera clavija de tierra
del cable de alimentación. No utilice cables de
extensión ni adaptadores sin conexión a tierra (dos
clavijas).
Si el cable de alimentación está dañado, debe
ser reemplazado por el fabricante, su agente de
servicio o persona califi cada similar para evitar
riesgos.
Cualquier pregunta relacionada con el poder o
conexión a tierra debe dirigirse a un electricista
certifi cado.
PELIGRO: Riesgo de atrapamiento de niños. Los
niños deben ser supervisados alrededor de este
aparato. Asegúrese de retirar la tapa antes de
desechar este aparato.
¡GUARDA ESTAS INSTRUCCIONES!
22
Page 24

INSTRUCCIONES DE INSTALACIÓN
UBICACIÓN
• Se deben usar dos personas al mover el
aparato.
• Retire el embalaje interior y exterior antes de la
instalación. Asegúrese de no desechar la placa
a prueba de ruido que se incluye en la parte
superior del dispositivo.
• Limpie el exterior del aparato con un paño
suave y seco y el interior con un paño tibio y
húmedo. No rocíe el aparato con agua.
• Coloque el aparato en un piso nivelado que
sea lo sufi cientemente resistente como para
sostenerlo cuando esté completamente cargado,
en una habitación que tenga un acceso
conveniente al suministro de agua y al desagüe,
tenga poca humedad y no se congele en
invierno.
CARACTERISTICAS
1. Tapa
2. Panel de control
3. Pie ajustable
4. Entrada de agua
5. Manguera de drenaje
6. Cable de alimentación
7. Filtro de bomba de agua
8. Rodillos
1
2
4
5
• No coloque el aparato sobre pisos alfombrados
ya que esto puede bloquear las aberturas de
ventilación inferiores.
• Mantenga el aparato alejado de fuentes de
calor y de la luz solar directa. El calor excesivo
o la luz solar pueden deformar o decolorar el
aparato.
• Este aparato está destinado únicamente
para uso doméstico. No está diseñado para
instalación en el exterior, incluso en lugares que
no estén controlados por la temperatura, como
garajes, porches, vehículos, etc., porque las
líneas de agua pueden congelarse.
• Este aparato está diseñado solo para instalación
independiente y no está diseñado para ser
incorporado en un gabinete o mostrador.
Construir en este aparato puede causar un mal
funcionamiento.
3
6
7
7
8
INSTRUCCIONES DE NIVELACIÓN
Es importante que el aparato esté nivelado para
evitar cargas desequilibradas y ruido excesivo.
El pie de nivelación se encuentra en la parte frontal
derecha del aparato. Hay un pie sólido en el lado
frontal izquierdo del aparato y hay dos rodillos en
la parte posterior.
1. Gire el pie nivelador hacia la izquierda hasta
que la parte superior del pie toque la parte
inferior del gabinete.
2. Gire lentamente el pie nivelador hacia la
derecha hasta que el aparato esté nivelado.
23
Page 25

INSTRUCCIONES DE INSTALACIÓN
ACCESSORIES AND PREPARATION
Necesitará las siguientes herramientas para
instalar la lavadora:
• Llave inglesa
• Alicates
• Destornillador
Asegúrese de que todos los accesorios provistos
estén presentes y se tengan en cuenta:
1. Una manguera de suministro de agua.
2. Un adaptador de conexión rápida
3. Una placa a prueba de ruido
4. Un tornillo
1
3
SUMINISTRO DE AGUA
El grifo de suministro de agua debe ajustarse a
acoplamientos de manguera de jardín hembra
estándar de 3/4 pulgada (19.05 mm). No utilice
conexiones deslizantes o con abrazaderas ya que
la presión del agua puede causar fugas.
Apriete todas las conexiones con la mano hasta que
queden ajustadas y luego apriételas un cuarto de
vuelta con una llave para asegurarse de que estén
seguras.
Revise todas las conexiones para detectar fugas
antes de usar el aparato. Si se detectan fugas,
puede ser necesario agregar una arandela de
goma o una cinta de tefl ón a la conexión.
La manguera de entrada de agua siempre debe
estar conectada a un suministro de agua fría.
Usando el conjunto de conexión rápida
El ensamble de conexión rápida se puede usar
para conectar el electrodoméstico a una llave de
la cocina o el baño para proporcionar agua al
electrodoméstico.
2
4
INSTALACIÓN DE LA PLACA A PRUEBA DE
RUIDO
La placa a prueba de ruido ayudará a amortiguar
el ruido excesivo del aparato durante la agitación.
Siga los pasos a continuación para instalar la placa
a prueba de ruido.
1. Retire la placa de protección contra el ruido del
embalaje. Se enviará en la parte superior del
aparato en la parte superior de la caja.
2. Deslice la placa a prueba de ruido en el canal
en la base del aparato y asegúrela con los
tornillos provistos.
A continuación se muestra un desglose del conjunto
de conexión rápida.
1. Montaje de conexión rápida
2. Lavadora de caucho
3. Adaptador de grifo
4. Collar de bloqueo blanco
5. Manguera de entrada de agua
2
1
3
4
24
5
Page 26

INSTRUCCIONES DE INSTALACIÓN
Conexión de la conexión rápida al suministro de
agua.
Retire el aireador del grifo antes de colocar el
adaptador del grifo.
Tire hacia abajo del collarín de bloqueo y tire hacia
arriba del adaptador del grifo para extraer el
adaptador del conjunto y luego instale el adaptador
en el grifo.
INSTALACION DE MANGUERAS DE DRENAJE
La manguera de desagüe llegará pre-conectada al
aparato. Durante el funcionamiento del aparato,
la manguera de desagüe debe dirigirse hacia
un fregadero o desagüe para recoger el agua
desechada cuando sale del aparato.
Cuando corra la manguera de desagüe a un
desagüe, asegúrese de que no haya dobleces en la
manguera ya que esto puede causar un bloqueo e
impedir la función de desagüe.
La manguera de drenaje puede dirigirse hacia
arriba hacia un fregadero o cubeta, pero asegúrese
de que la manguera no se levante a más de 100 cm
(39 pulgadas) del suelo ya que esto puede afectar
la función de drenaje.
Abra la llave para verifi car que no haya fugas
en la conexión antes de continuar. Si hay fugas,
puede ser necesario envolver el adaptador del grifo
o el grifo con cinta de tefl ón antes de conectar el
adaptador al grifo.
Tire hacia abajo del collar de bloqueo y empuje el
conjunto de conexión rápida en la parte inferior del
adaptador del grifo. Suelte el collarín de bloqueo
para conectar la conexión rápida al grifo.
Conecte un extremo de la manguera de entrada
de agua al conjunto de conexión rápida. Coloque
el otro extremo de la manguera en el fregadero y
abra el suministro de agua para eliminar el polvo
de la manguera. Cuando el agua salga clara, cierre
el suministro de agua y conecte la manguera a la
conexión de entrada de agua en la parte superior
del aparato.
25
Page 27

INSTRUCCIONES DE OPERACIÓN
PANEL DE CONTROL
1. Botón de programa: Presione este botón para
seleccionar el programa de lavado deseado:
pesado, suave, normal, rápido, remojo.
2. Botón de nivel de agua: Presione este botón
para elegir el nivel de agua deseado: pequeño,
mediano, grande.
3. Botón de lavado: Pulse este botón para
seleccionar el tiempo de lavado.
4. Panel de visualización: La pantalla mostrará los
minutos estimados restantes en el ciclo actual.
5. Botón de enjuague: El ciclo de enjuague
durará 10 minutos. Presione este botón para
seleccionar cuántas veces se ejecutará el ciclo
de enjuague.
DETERGENTE
Este aparato está diseñado para detergentes en
polvo de alta efi ciencia. Se recomienda utilizar
de 1/4 a 1/2 de la cantidad de detergente
recomendada por el fabricante del detergente.
Recuerde reducir la cantidad de detergente si la
carga es pequeña o está ligeramente sucia o si el
suministro de agua es muy suave.
El detergente se puede colocar directamente en la
tina de la lavadora. No vierta blanqueador líquido
directamente sobre la carga de lavado ya que esto
puede dañar la tela.
6. Botón de giro: Presione este botón para
seleccionar el tiempo del ciclo de centrifugado.
7. Botón de inicio / pausa
• Presione este botón para iniciar un programa
elegido.
• Presione este botón durante la operación
para pausar un programa.
• Presione este botón para reiniciar un
programa que ha sido pausado.
8. Botón de encendido: Pulse este botón para
encender o apagar el aparato.
O
R
N
M
L
T
N
E
G
Y
V
A
E
H
E
PROGRAM
1
A
L
R
A
P
I
D
S
O
A
K
2
LOAD
SIZE
PRESET
REMAIN
(MIN)
3
TIME
4
WASH RINSE SPIN
5
6
8
7
26
Page 28

INSTRUCCIONES DE OPERACIÓN
SELECCION DE PROGRAMA
Utilice las instrucciones a continuación para elegir
el programa deseado.
1. Pulse el botón de programa para elegir el
programa de lavado.
• Pesado: Para ropa muy sucia.
• Suave: Para ropa delicada.
• Normal: Para ropa normalmente sucia.
• Rápido: Para cargas pequeñas o ropa
ligeramente sucia.
• Remojo: Para ropa manchada.
2. Presione el botón de nivel de agua para elegir
el nivel de agua.
• Grande: Para una carga completa.
• Medio: Para media carga.
• Pequeño: Para una carga pequeña.
3. Presione el botón de lavado para elegir la
duración del programa de lavado, entre 0 y 15
minutos.
4. El ciclo de enjuague durará 10 minutos.
Presione el botón de enjuague para elegir
cuántas veces se ejecutará el ciclo de enjuague,
entre 0 y 4 veces.
5. Presione el botón de giro para elegir la
duración del programa de giro, entre 0 y 9
minutos.
6. Presione el botón de inicio / pausa para
comenzar el programa de lavado. El tiempo
estimado restante se mostrará en el panel de
visualización. El programa se puede pausar en
cualquier momento presionando este botón.
INSTRUCCION DE FUNCION
Antes de encender la lavadora, verifi que lo
siguiente:
• La manguera de drenaje está en la posición
correcta.
• No hay fugas en la manguera de entrada
cuando el grifo está abierto.
• El cable de alimentación está enchufado
correctamente en un tomacorriente con conexión
a tierra de tres clavijas.
• Todas las monedas y objetos sueltos han sido
retirados de la ropa.
• Coloque la ropa en la lavadora. Coloque los
artículos sueltos en la tina. No empaque los
artículos apretadamente. Los artículos deben
poder moverse libremente a través del agua
de lavado para obtener mejores resultados de
limpieza.
• Siga las instrucciones para confi gurar el
programa de lavado deseado.
• Cierre la tapa y presione el botón de inicio /
pausa para comenzar el programa deseado.
• Un programa de lavado se puede pausar una
vez que esté en funcionamiento presionando el
botón de inicio / pausa.
• El aparato no funcionará si la tapa está abierta.
• Cuando un programa termina, suena una
alarma.
27
Page 29

CUIDADO Y MANTENIMIENTO
LIMPIEZA
Antes de realizar cualquier limpieza o
mantenimiento, asegúrese de que la manguera de
entrada de agua se haya desconectado y que el
cable de alimentación esté desenchufado.
Limpie el exterior del aparato con un paño tibio y
húmedo. Evite el uso de detergentes o productos
químicos, ya que esto puede dañar o decolorar el
gabinete.
Filtro de tinta
El fi ltro de pelusas está en el interior de la tina de
lavado y debe limpiarse aproximadamente cada
10 ciclos. Retire el fi ltro de pelusas de la bañera,
ábralo y retire cualquier pelusa que se haya
acumulado. Se puede enjuagar con agua fría,
pero no use detergentes ni productos químicos.
Asegúrese de reemplazar el fi ltro de pelusa en el
aparato antes de comenzar un nuevo programa.
FILTRO DE BOMBA
ENJUAGUE DE VINAGRE
Un enjuague de vinagre y agua se puede ejecutar a
través de la lavadora para eliminar las manchas en
la tina interior o cualquier olor persistente.
Coloque 1/2 taza de vinagre en la lavadora y
elija el nivel de agua más alto. Permita que el
aparato ejecute un programa completo de lavado
y enjuague y centrifugado sin lavado para eliminar
manchas y olores.
CÓDIGOS DE ERROR
E1 - Sin fl ujo de agua
• Compruebe que la fuente de agua esté
encendida.
• Compruebe la presión del agua.
• Compruebe que la pantalla del fi ltro de
entrada de agua esté limpia.
• Compruebe que la manguera de desagüe
está instalada correctamente.
El fi ltro de la bomba está en la parte posterior del
aparato y debe limpiarse una vez al mes. Retire el
fi ltro de la parte posterior del aparato y enjuáguelo
con agua fría. Asegúrese de reemplazar el fi ltro
de la bomba en el aparato antes de comenzar un
nuevo programa.
ENTRADA DE AGUA
La entrada de agua puede requerir una
limpieza periódica para eliminar los residuos
o la acumulación de agua dura. Asegúrese de
que la manguera de entrada de agua se haya
desconectado del aparato. Retire la rejilla del fi ltro
de la válvula de entrada y elimine cualquier residuo
o acumulación de agua dura. La rejilla del fi ltro
se puede enjuagar con agua fría para eliminar
cualquier acumulación. Asegúrese de volver a
colocar la rejilla del fi ltro en la válvula de entrada
de agua antes de volver a colocar la manguera de
entrada de agua.
E2 - La tapa esta abierta
• Compruebe que la tapa esté completamente
cerrada.
E3 - La carga esta desequilibrada
• Asegúrese de que la carga de la ropa esté
equilibrada.
E4 - Mal funcionamiento de la válvula de drenaje
• Compruebe si el desagüe está obstruido.
• Es posible que el motor de drenaje no esté
funcionando correctamente.
E5 - Mal funcionamiento del sensor de nivel de
agua
• Póngase en contacto con un técnico de
servicio.
28
Page 30

SOLUCIÓN DE PROBLEMAS
Danby cuidado del consumidor: 1-800-263-2629
Horas de operación:
Lunes a Jueves 8:30 am - 6:00 pm Hora estándar del este
Viernes 8:30 am - 4:00 pm Hora estándar del este
La información de este manual está sujeta a cambios sin previo aviso.
PROBLEMA CAUSA POSIBLE
La lavadora no funciona • No enchufado.
• El disyuntor ha disparado o un fusible quemado.
• La tapa no está cerrada.
• La fuente de agua no está encendida.
No hay agua o suministro
insufi ciente de agua
La lavadora no drena • La manguera de desagüe está doblada.
La lavadora vibra o es
demasiado ruidosa
La lavadora no gira • La tapa no está cerrada.
• La fuente de agua no está encendida.
• La manguera de entrada de agua está doblada.
• La pantalla del fi ltro en la entrada de agua está obstruida.
• Hay un problema con la bomba de desagüe.
• La lavadora no está nivelada.
• La lavadora está tocando otro objeto.
• La carga de la ropa no es equilibrada.
• La lavadora no está nivelada.
Relleno y drenaje de agua al
mismo tiempo
Gabinete fugas desde abajo • La bañera está sobrecargada
• Asegúrese de que la manguera de desagüe esté elevada de 0,7 m
a 1,2 m del suelo; Si la manguera de desagüe es demasiado baja,
puede causar que el agua salga del aparato a medida que se llena
• El nivel de agua es demasiado alto para la cantidad de lavado
29
Page 31

GARANTÍA LIMITADA “A DOMICILIO”
LIMITED IN-HOME APPLIANCE WARRANTY
Este producto de calidad está garantizado contra defectos de fabricación, incluyendo partes y mano de obra, siempre y
This quality product is warranted to be free from manufacturer’s defects in material and workmanship, provided that the unit is used under the normal operating
cuando la unidad se utilice bajo las condiciones normales de funcionamiento para las que fue diseñado.
conditions intended by the manufacturer.
Esta garantía está solamente disponible para la persona que haya comprado originalmente esta unidad directamente de Danby
This warranty is available only to the person to whom the unit was originally sold by Danby Products Limited (Canada) or Danby Products Inc. (U.S.A.) (hereafter
Products Limited (Canada) o Danby Products Inc. (U.S.A.) (en adelante “Danby”) o uno de sus distribuidores
“Danby”) or by an authorized distributor of Danby, and is non-transferable.
autorizados, y no es transferible.
CONDICIONES DE LA GARANTÍA
Las piezas plásticas, se autorizan por treinta (30) días solamente a partir de la fecha de la compra, sin las extensiones
proporcionadas.
Plastic parts, are warranted for thirty (30) days only from purchase date, with no extensions provided.
Primeros 12 meses
First Year
Para obtener
servicio
To obtain
Service
Límites del servicio
técnico a domicilio
Boundaries of
In Home Service
Durante los primeros doce (12) meses, cualquier parte en buen estado de este producto que resulte defectuosa,
During the rst twelve (12) months, any functional parts of this product found to be defective, will be repaired or replaced, at warrantor’s
incluyendo cualquier sistema sellado, será reparado o reemplazado, a opción del
option, at no charge to the ORIGINAL purchaser.
fabricante, sin cargo para el comprador ORIGINAL.
Comuníquese con el distribuidor donde haya comprado la unidad, o llame al Taller de Servicio Autorizado más
cercano, donde debe ser reparada por un técnico calificado. Si esta unidad es reparada en otro lugar que no
Danby reserves the right to limit the boundaries of “In Home Service” to the proximity of an Authorized Service Depot. Any app liance
sea un Taller de Servicio Autorizado, o si la unidad se utiliza para aplicaciones comerciales, Danby no se hará
requiring service outside the limited boundaries of “In Home Service” , it will be the consumer’s responsibility to transport the appliance (at
responsable de ninguna forma y la garantía será anulada.
their own expense) to the original retailer (point of purchase) or a service depot for repair. See “Boundaries of In Home Serv ice” below.
Contact your dealer from whom your unit was purchased, or contact your nearest authorized Danby service depot, where service
Danby se reserva el derecho de limitar la cobertura de "Servicio en Domicilio" sujeto a la proximidad de un
must be performed by a qualied service technician.
Taller de Servicio Autorizado. Para todo artefacto que requiera servicio fuera del área limitada de "Servicio en
If service is performed on the units by anyone other than an authorized service depot, or the unit is used for commercial appli cation, all
Domicilio", el cliente será responsable por transportar dicho artefacto hasta el Taller de Servicio Autorizado
obligations of Danby under this warranty shall be void.
mas cercano. Si el electrodoméstico está instalado en un lugar que se encuentra a 100 kilómetros (62 millas)
o más del centro de servicios más cercano, se debe llevar la unidad al Centro de servicios Danby autorizado
If the appliance is installed in a location that is 100 kilometers (62 miles) or more from the nearest service center your unit must be
más cercano, ya que dicho servicio sólo puede realizarlo un técnico calificado y certificado por Danby para
delivered to the nearest authorized Danby Service Depot, as service must only be performed by a technician qualied and certif ied for
prestar servicios de garantía.
warranty service by Danby. Transportation charges to and from the service location are not protected by this warranty and are t he
responsibility of the purchaser.
Los cargos por transporte desde y hacia el lugar en que se efectúe el servicio técnico no están cubiertos por
esta garantía y son de responsabilidad del comprador.
TERMS OF WARRANTY
Nothing within this warranty shall imply that Danby will be responsible or liable for any spoilage or damage to food or other c ontents of this appliance, whether due
Nada dentro de esta garantía implica que Danby será responsable por cualquier daño que hayan sufrido los alimentos u otros
to any defect of the appliance, or its use, whether proper or improper.
contenidos de este aparato, ya sea debido a un defecto del aparato, o su uso, adecuado o inadecuado.
EXCLUSIONS
Save as herein provided, Danby, there are no other warranties, conditions, representations or guarantees, express or implied, m ade or intended by Danby or its
Salvo lo aquí indicado por Danby, no existen otras garantías, condiciones o representaciones, explícitas o implícitas, concretas o
authorized distributors and all other warranties, conditions, representations or guarantees, including any warranties, conditio ns, representations or guarantees
intencionales por parte de Danby o sus distribuidores autorizados y todas las demás garantías, condiciones o representaciones,
under any Sale of Goods Act or like legislation or statue is hereby expressly excluded. Save as herein provided, Danby shall no t be responsible for any damages
incluyendo cualquier garantía, condiciones o representaciones bajo cualquier Acta de Venta de Productos o legislación o estatuto
to persons or property, including the unit itself, howsoever caused or any consequential damages arising from the malfunction o f the unit and by the purchase of
similar, quedan de esta forma expresamente excluidas. Salvo lo aquí indicado, Danby no serán responsables por ningún daño a
the unit, the purchaser does hereby agree to indemnify and hold harmless Danby from any claim for damages to persons or propert y caused by the unit.
personas o bienes, incluyendo la propia unidad, sin importar su causa, o de ningún daño indirecto causado por el desperfecto de la
unidad, y al comprar esta unidad, el comprador acepta por la presente, indemnizar y proteger a Danby contra cualquier reclamo
por daños a personas o bienes causados por la unidad.
EXCLUSIONES
GENERAL PROVISIONS
No warranty or insurance herein contained or set out shall apply when damage or repair is caused by any of the following:
1) Power failure.
No se considerará ninguna de estas garantías o seguros cuando el daño o la necesidad de reparación sea el producto de los
2) Damage in transit or when moving the appliance.
siguientes casos:
3) Improper power supply such as low voltage, defective house wiring or inadequate fuses.
1) Falla del suministro eléctrico.
2) Daños en tránsito o durante el transporte de la unidad.
4) Accident, alteration, abuse or misuse of the appliance such as inadequate air circulation in the room or abnormal operating con ditions
3) Alimentación incorrecta, como bajo voltaje, instalación eléctrica defectuosa o fusibles inadecuados.
4) Accidente, modificación, abuso o uso incorrecto del artefacto, tal como insuficiente ventilación del ambiente o condiciones de
operación anormales (temperatura ambiente extremadamente alta o baja).
5) Utilización comercial o industrial (v.g., si el electrodoméstico no está instalado en una vivienda particular).
6) Incendio, daños por agua, robo, guerra, disturbios, hostilidades, actos de fuerza mayor como huracanes, inundaciones, etc.
7) Pedidos de servicio debido a desinformación del usuario.
8) Instalación inadecuada (v.g., instalación empotrada de un electrodoméstico diseñado como unidad independiente o uso de un
Proof of purchase date will be required for warranty claims; so, please retain bills of sale. In the event warranty service is required, present this document to our
electrodoméstico al aire libre que no esté aprobado para dicho fin, incluyendo pero no limitado a: garajes, patios, porches o en
AUTHORIZED SERVICE DEPOT.
cualquier lugar que no esté bien aislado o controlado por el clima).
(extremely high or low room temperature).
5) Use for commercial or industrial purposes (ie. If the appliance is not installed in a domestic residence).
6) Fire, water damage, theft, war, riot, hostility, acts of God such as hurricanes, oods etc.
7) Service calls resulting in customer education.
8) Improper Installation (ie. Building-in of a free standing appliance or using an appliance outdoors that is not approved for out door application).
CONDICIONES GENERALES
Se requerirá una prueba de la fecha de compra para reclamaciones de garantía; Retener las facturas de venta. En el caso de que se
requiera servicio de garantía, presente el comprobante de compra a nuestro depósito de servicio autorizado.
Warranty Service
In-home
Servicio de Garantía
Danby Products Limited
PO Box 1778, Guelph, Ontario, Canada N1H 6Z9
Danby Products Limited
Telephone: (519) 837-0920 FAX: (519) 837-0449
PO Box 1778, Guelph, Ontario, Canada N1H 6Z9
Telephone: (519) 837-0920 FAX: (519) 837-0449
Servicio en Domicilio
1-800-263-2629
1-800-263-2629
04/17
04/09
PO Box 669, Findlay, Ohio, U.S.A. 45840
Telephone: (419) 425-8627 FAX: (419) 425-8629
Telephone: (419) 425-8627 FAX: (419) 425-8629
PO Box 669, Findlay, Ohio, U.S.A. 45840
Danby Products Inc.
Danby Products Inc.
Page 32

MODEL • MODÈLE • MODELO
DWM030WDB-6
Printed in China
Imprimé en Chine
Impreso en China
Danby Products Limited, Guelph, ON, Canada N1H 6Z9
Danby Products Inc., Findlay, Ohio, USA 45840
 Loading...