

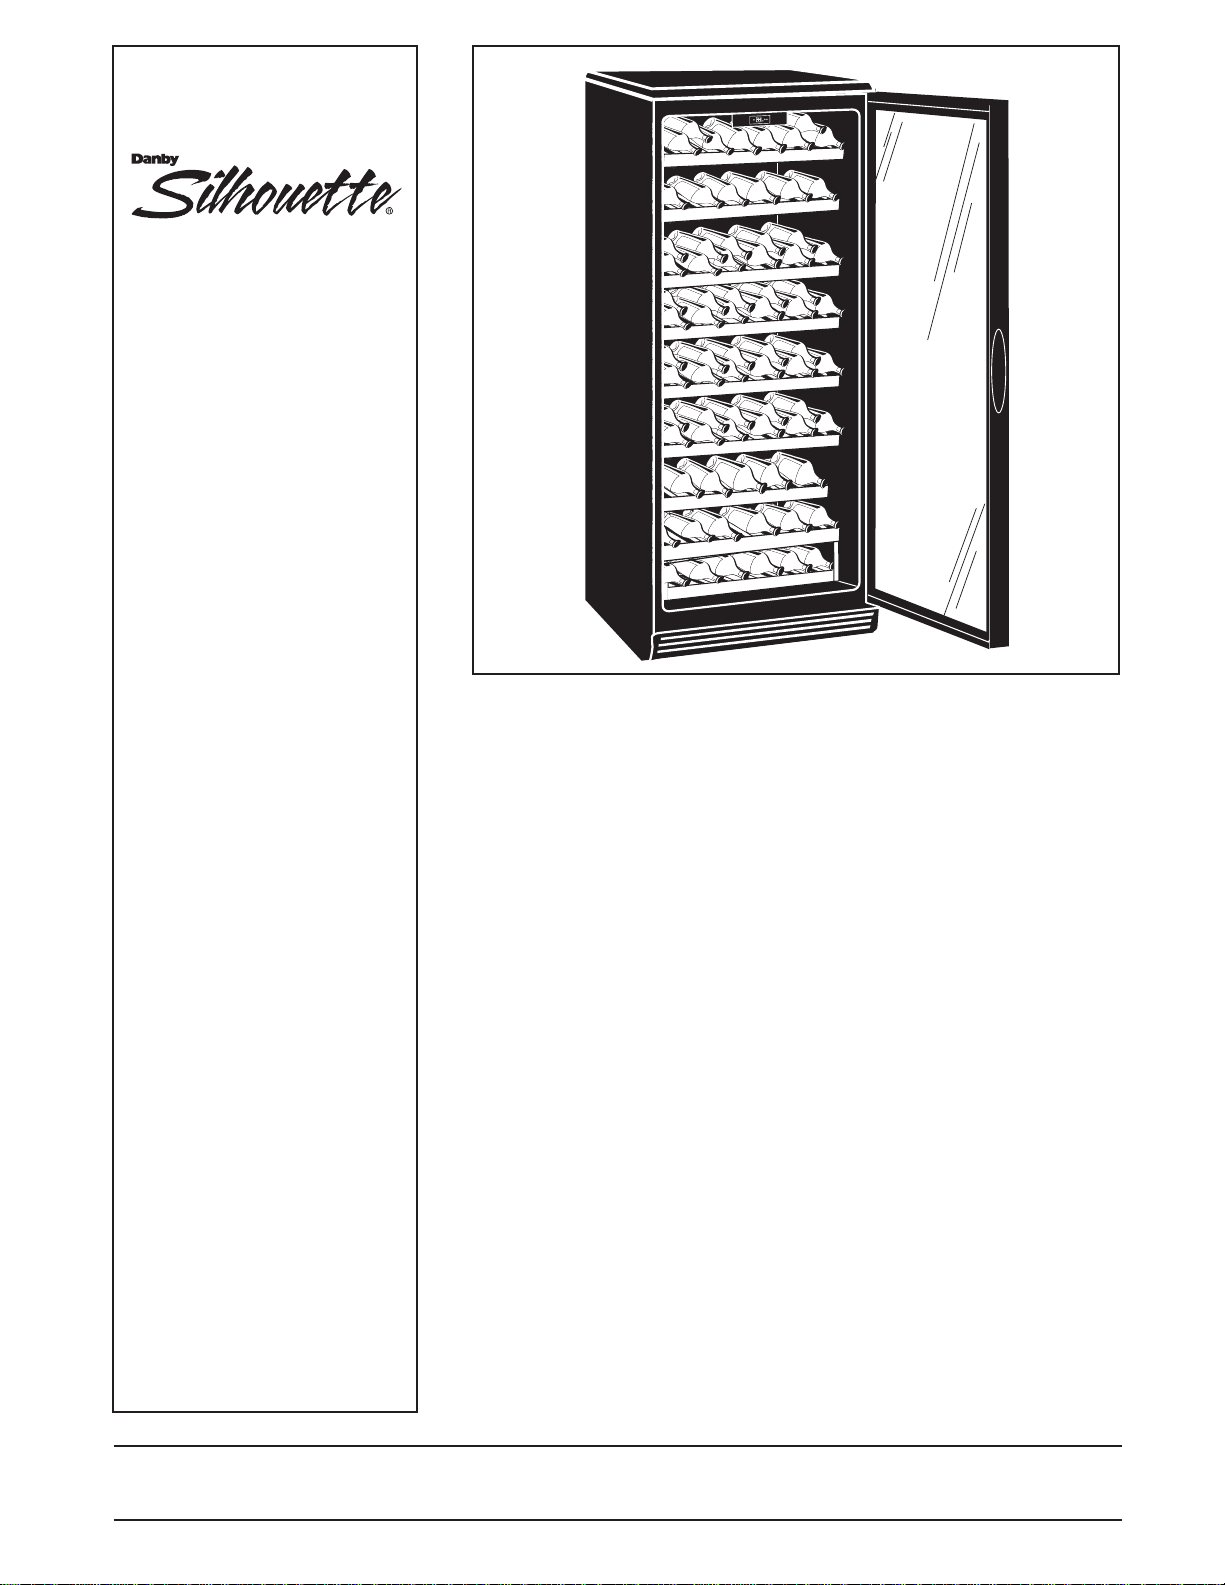
OWNER’S MANUAL
MANUEL D'UTILISATION
MANUAL DEL PROPIETARIO
Model • Modèle • Modelo
DWC612BLP
CAUTION:
Read and follow all safety rules and
operating instructions before first
use of this product.
PRÉCAUTION:
Veuillez lire attentivement les
consignes de sécurité et les
instructions d'utilisation avant
l'utilisation initiale de ce produit.
PRECAUCIÓN:
Lea y observe todas las reglas de
seguridad y las instrucciones de
operación antes de usar este
producto por primera vez.
WINE COOLER
Owner’s Manual . . . . . . . . . . . . . . . . . . . . . . .1-4
• Safety Instructions
• Installation
• Operation
• Care and Maintenance
REFROIDISSEUR DE VIN
Manuel d'utilisation . . . . . . . . . . . . . . . . . . . . .5-8
• Consignes de sécurité
• Installation
• Fonctionnement
• Soins et entretien
REFRIGERADOR PARA VINOS
Manual del propietario . . . . . . . . . . . . . . . . .9-12
• Instrucciones de seguridad
• Instalación
• Operación
• Cuidado y Mantenimiento
Danby Products Limited, PO Box 1778, Ontario, Canada N1H 6Z9
Danby Products Inc., PO Box 669, Findlay, Ohio, USA 45839-0669
DWC612BL.01.13.03
LIMITED PRODUCT WARRANTY
This quality product is warranted to be free from manufacturer’s defects in material and workmanship, provided that the unit is used under the normal operating
conditions intended by the manufacturer.
This warranty is available only to the person to whom the unit was originally sold by Danby or by an authorized distributor of Danby, and is non-transferable.
TERMS OF WARRANTY
Plastic parts (ie. evaporator door, door rails, covers and trays are warranted for thirty (30) days only from purchase date, with no extensions provided.
First Two Years During the first two (2) years , any electrical parts of this product found to be defective, including any sealed system units, will be repaired
or replaced, at warrantor’s option, at no charge to the ORIGINAL purchaser. Consumable parts (ie. light bulbs) are not warranted or
guaranteed for any length of time.
Third Through During the next three years (3) any part of the sealed system found to be defective (consisting of compressor, condenser, evaporator,
Fifth Year dryer and all related tubing) will be replaced without charge. The purchaser shall pay for all labour and return freight during this three
year (3) period for repair or replacement of any sealed system components. Any unit being diagnosed as non-functional due to sealed
system failure and warranting an exchange during the existing three (3) years will be subject to an appropriate depreciation or user fee,
including any and all freight charges being levied against the consumer.
To obtain Service Danby reserves the right to limit boundaries of “In Home Service” due to the proximity of an Authorized Service Depot. Any appliance
requiring service outside the limited boundaries of “In Home Service”, it will be the customer’s responsibility to transport the appliance to
the closest Authorized Service Depot at their own expense. Contact your dealer from whom your unit was purchased, or contact your
nearest authorized Danby service depot, where service must be performed by a qualified service technician. If service is performed on
the units by anyone other than an authorized service depot, or the unit is used for commercial application, all obligations of Danby under
this warranty shall be at an end.
The following clause refers to single and double door refrigerators, supplied with or without a separate freezer section. Nothing within this warranty shall imply that
Danby will be responsible or liable for any spoilage or damage to food or other contents of this appliance, whether due to any defect of the appliance, or its use,
whether proper or improper.
EXCLUSIONS
Save as herein provided, Danby Products Limited (Canada) or Danby Products Inc. (U.S.A.), there are no other warranties, conditions, representations or
guarantees, express or implied, made or intended by Danby Products Limited or its authorized distributors and all other warranties, conditions, representations or
guarantees, including any warranties, conditions, representations or guarantees under any Sale of Goods Act or like legislation or statue is hereby expressly
excluded. Save as herein provided, Danby Products Limited (Canada) or Danby Products Inc. (U.S.A), shall not be responsible for any damages to persons or
property, including the unit itself, howsoever caused or any consequential damages arising from the malfunction of the unit and by the purchase of the unit, the
purchaser does hereby agree to indemnify and save harmless Danby Products Limited from any claim for damages to persons or property caused by the unit.
GENERAL PROVISIONS
No warranty or insurance herein contained or set out shall apply when damage or repair is caused by any of the following:
1) Power Failure.
2) Damage in transit or when moving the appliance.
3) Improper power supply such as low voltage, defective house wiring or inadequate fuses.
4) Accident, alteration, abuse or misuse of the appliance such as inadequate air circulation in the room or abnormal operating conditions,
(extremely high or low room temperature).
5) Use for commercial or industrial purposes.
6) Fire, water damage, theft, war, riot, hostility, acts of God such as hurricanes, floods etc.
7) Service calls resulting in customer education.
Proof of purchase date will be required for warranty claims; so, please retain bills of sale. In the event warranty service is required, present this document to our
AUTHORIZED SERVICE DEPOT.
Danby Products Limited
PO Box 1778, 5070 Whitelaw Road,
Guelph, Ontario, Canada N1H 6Z9
Telephone: (519) 837-0920 FAX: (519) 837-0449
Danby Products Inc.
PO Box 669, 101 Bentley Court,
Findlay, Ohio, U.S.A. 45839-0669
Telephone: (419) 425-8627 FAX: (419) 425-8629
12/02
Warranty Service
With-In Canada With-In United State
In Home In Home
1
Remove the exterior and interior packings, wipe the outside thoroughly with a
soft dry cloth and the inside with a wet, lukewarm cloth. Avoid placing the
cabinet in a narrow recess or near any heat source, direct sunlight, or moisture.
Let air circulate freely around the cabinet. Keep the rear of the wine cooler 5
inches away from the wall.
Location
1. Select a place with a strong, level floor.
2. Allow 5 inches of space between the back of the wine cooler and any adjacent
wall.
3. Avoid direct sunlight and heat. Direct sunlight may affect the acrylic coating.
Heat sources nearby will cause higher electricity consumption.
To avoid vibration, the cabinet must be set level. To start the wine cooler, turn
the temperature control to the position corresponding to the desired cooling.
The wine cooler temperature will vary depending on the quantity of bottles
stored and on the frequency with which the door is opened.
To turn “OFF” the wine cooler permanently, you must disconnect the power cord
from the electrical outlet. There is no “Off” position (setting) available on the
electronic control panel. When the wine cooler is not to be used for a long
period of time, disconnect the plug and leave the door partially open.
NOTE: Wait 3 to 5 minutes before restarting if operation has been interrupted.
Interior Light
The operation of the interior light is "manually" controlled and does not operate
with the opening or closing of the door. To operate the light; manually press
the “light” key pad located on the electronic control panel NOTE: Leaving the
interior light on for extended time periods, will increase the internal temperature
of the cabinet
Defrosting
Your wine cooler is designed with an “Auto-Cycle” defrost system. What is Auto
Cycle defrost?
The refrigerated surfaces of the fresh food compartment defrost automatically,
during the “off” cycle of the cold control. (thermostat) Defrost water from the
fresh food compartment is disposed of automatically, by means of being
channeled onto a drip tray located on the compressor. Heat transfer from the
compressor causes the defrost water to evaporate.
ELECTRONIC CONTROL OPERATION;
The electronic LED display on this wine cooler is programmed to display
(independently) the following temperature (only) information.
"INTERNAL CABINET TEMPERATURE: This setting is represented by a
"steady" state (non-flashing) LED display and is the normal (LED) default setting
during operation.
SET OPERATING TEMPERATURE: This setting is represented by a "flashing"
LED display and can only be programmed (SET) by pressing and releasing
either of the +/- (temperature) keys during operation. NOTE: The set
temperature can only be adjusted/set while the LED is in "flashing" mode.
ATTENTION
GROUNDING INSTRUCTIONS
This appliance must be grounded. In
the event of an electrical short circuit,
grounding reduces the risk of electrical shock by providing
an escape wire for the electrical current. This appliance is
equipped with a cord having a grounding wire with a
grounding plug. The plug must be plugged into an outlet
that is properly installed and grounded.
WARNING - Improper use of the
grounding plug can result in a risk of electric shock.
Consult a qualified electrician or serviceman if the
grounding instructions are not completely understood, or if
the doubt exists as to whether the appliance is properly
grounded.
DO NOT USE AN EXTENSION CORD
Use an exclusive wall outlet. Do not connect your wine
cooler to extension cords or together with any other
appliance in the same wall outlet. Do not splice the cord.
IMPORTANT WARNING
An empty wine cooler is a very dangerous attraction to
children. Remove either the gasket, latches, lids or doors
from unused appliances, or take some other action that
will guarantee it harmless.
DON’T WAIT! DO IT NOW!
2
SAFETY INSTRUCTIONS
INSTALLATION INSTRUCTIONS
OPERATION
SPECIAL INSTRUCTIONS
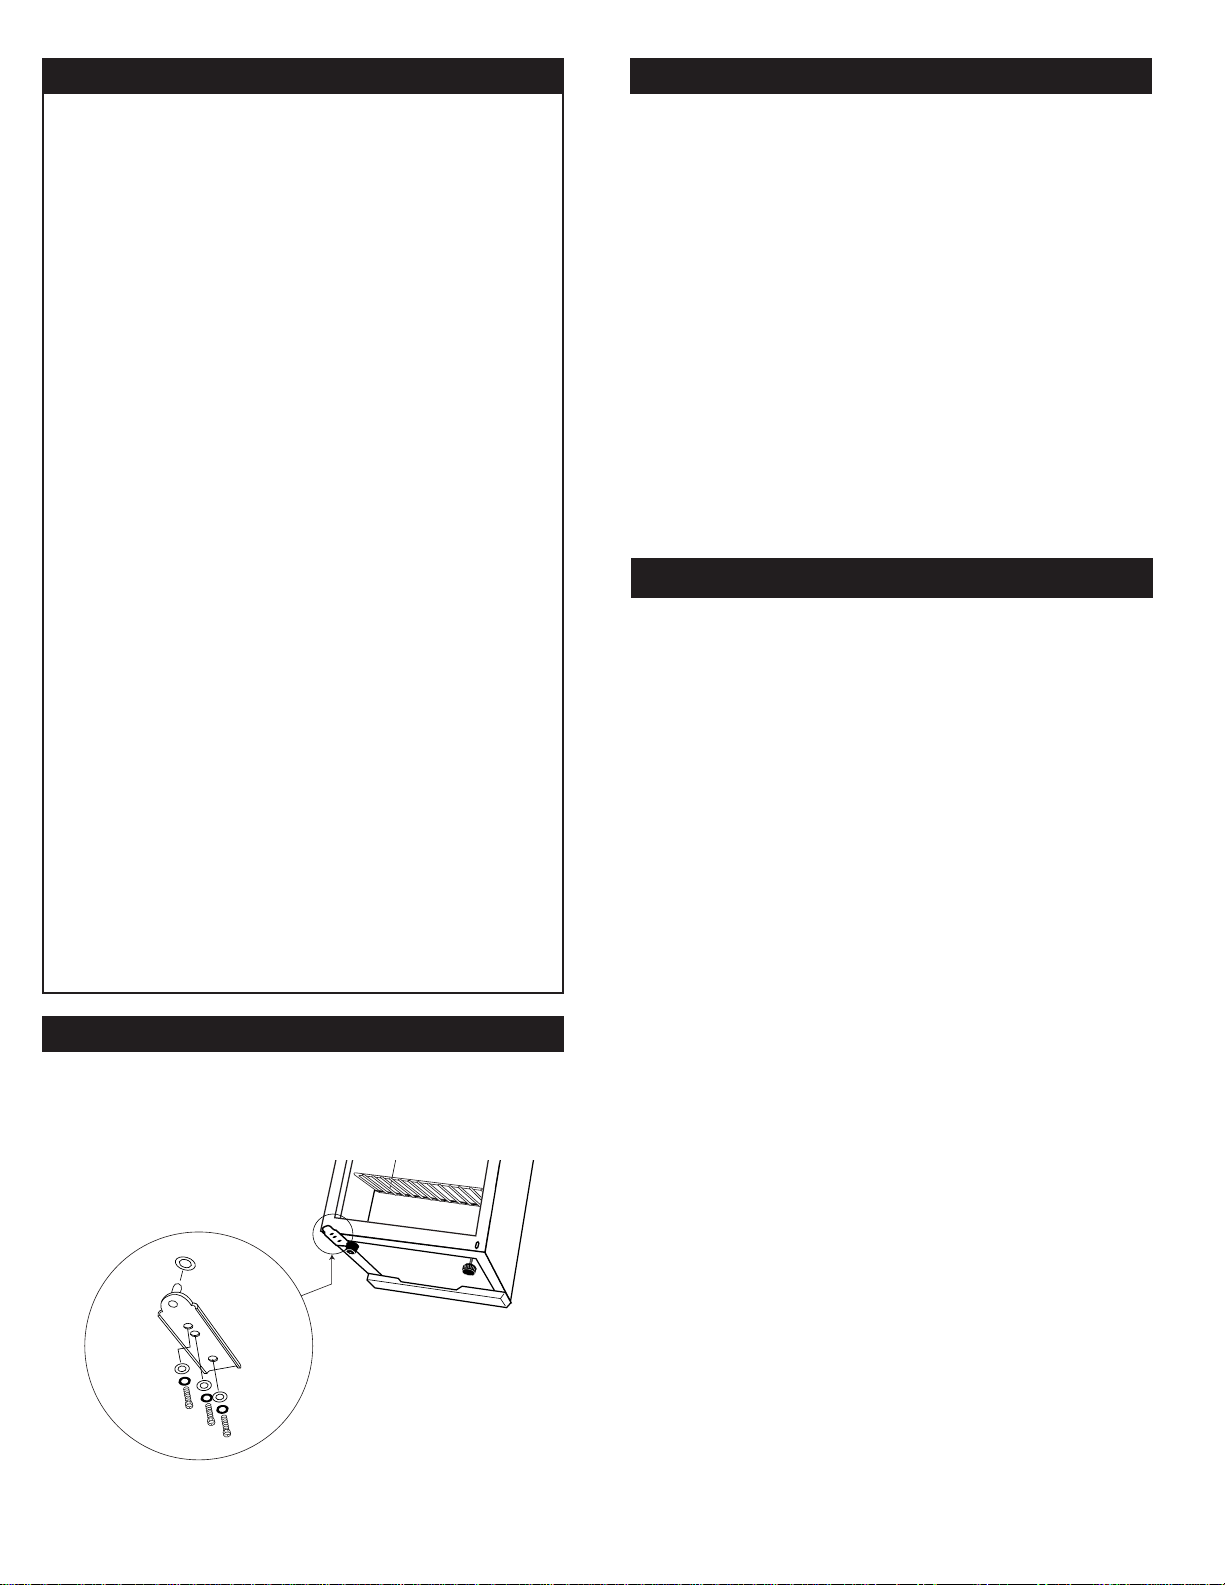
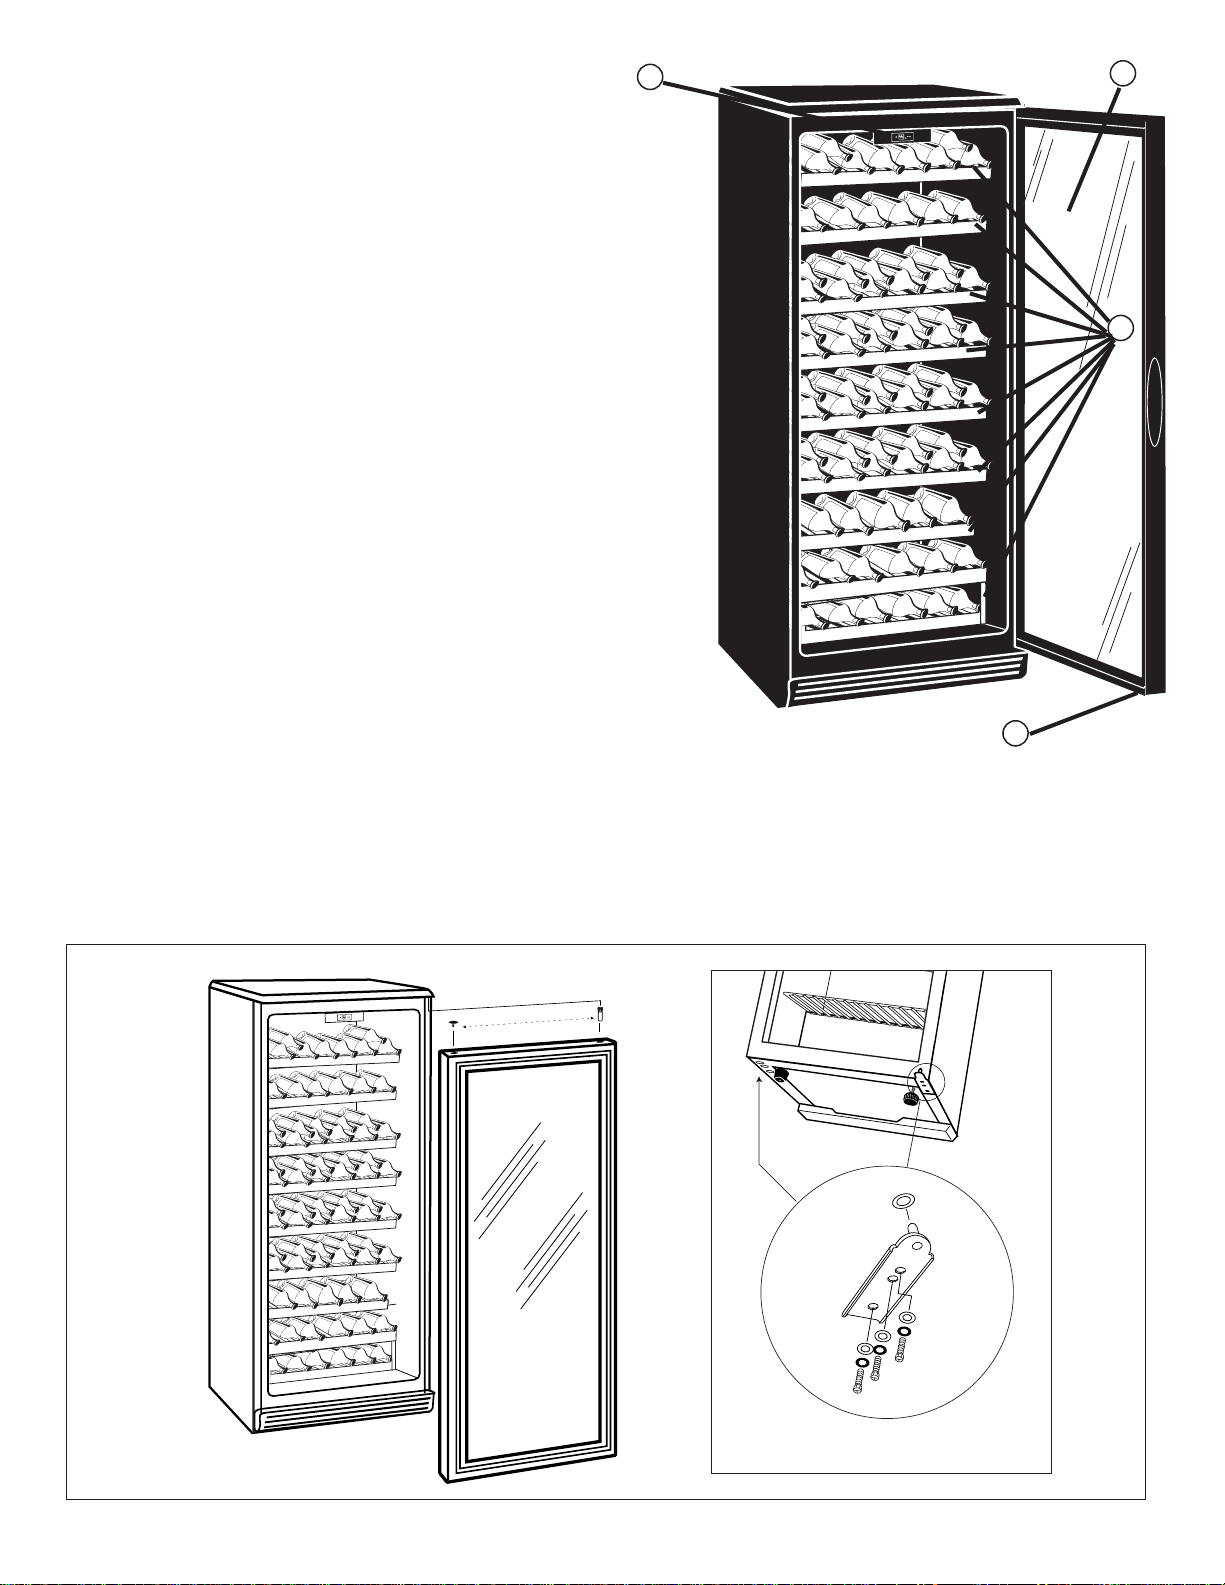
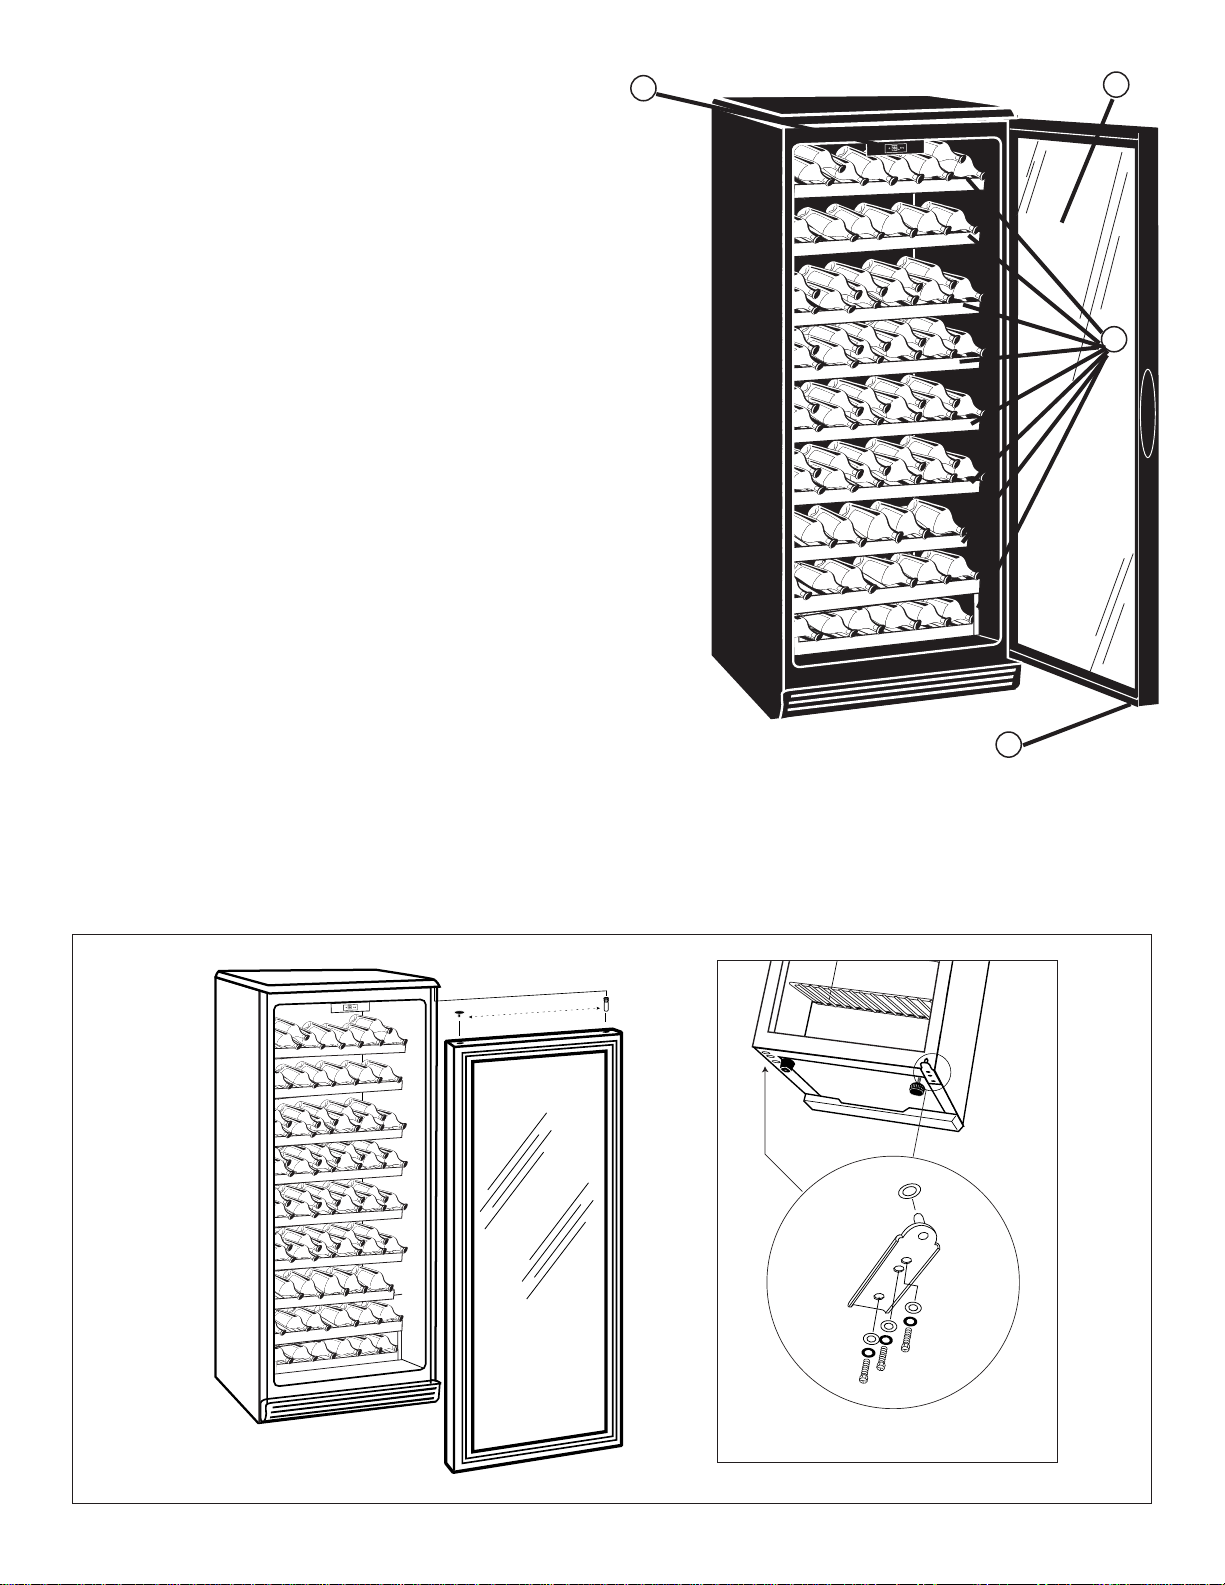
You must remove the bottom door support on the bottom left
hand side of the unit before you can open the door. (See Fig. A)
FIG. A

DEFAULT SETTINGS: When the unit is first connected to a 120V/60Hz power
supply, (and/or in the event of a power failure) temperature settings
automatically revert to the following default settings;
The LED default setting for the internal (cabinet) temperature is the "real time"
(ambient) temperature measured at the time the unit is connected or power is
restored.
The LED default setting for the set operating temperature is 50ºF / 10ºC. (after
a power failure has occurred, the previously set temperature is automatically
erased and will have to be re-set)
The LED default setting for temperature selection (ºF/ºC) is ºF. (Farenheight
Scale)
SETTING OPERATING TEMPERATURE: To set/change the operating
temperature;
1. Press and release either of the +/- (temperature) keys.
The LED display will temporarily reveal the (flashing) set temperature for
approximately 5 seconds. (If you fail to set/change the operating temperature
within this 5 second period, the LED will automatically revert back and display
the internal (cabinet) temperature.
2. Each depression of the +/- key (during flashing mode) will increase the
temperature
incrementally by 1º (Temperature ranges between 43ºF ~ 57ºF / 6ºC ~ 14ºC)
3. Each depression of the +/- key (during flashing mode) will decrease the
temperature
incrementally by 1º (Temperature ranges between 43ºF ~ 57ºF / 6ºC ~ 14ºC)
The operating temperature will "flash" in the LED display for approximately 5
seconds after the selection is made, then revert back to display the internal
(cabinet) temperature.
TEMPERATURE SELECTION (ºF/ºC): This unit can display temperatures on
the "Farenheight" or "Celsius" scale. Press the temperature selector keypad to
alternate between ºF/ºC scale. The "blue" indicator light adjacent to the
corresponding mode will illuminate to signify the selection made.
Cleaning
To clean the inside, use a soft cloth and a solution of a tablespoon of baking
soda to one quart of water, or a mild soap suds solution, or some mild
detergent. Clean the wooden wine racks (shelves) using a lightly dampened
cloth then dry throughly with a soft cloth. Clean the outside with a soft damp
cloth and some mild detergent or appliance cleaner.
Vacation Time
For short vacation periods, leave the electronic controls at their usual settings.
During longer absences,
(a) remove bottles,
(b) disconnect from electrical outlet,
(c) clean the wine cooler thoroughly,
(d) leave door open to avoid possible formations of condensate, mold or odors.
Power Failure
Most power failures are corrected within an hour or two and will not affect the
internal temperature of your wine cooler. Try and minimize the number of door
openings while the power is off. During power failures of longer duration, take
steps to protect your wine.When power is restored, the previously “set”
operating temperature is automatically erased and must be re-programmed.
(See Setting Operating Temperature)
If You Move
Remove or securely fasten down all loose items inside the wine cooler. To
avoid damaging the leveling screws, turn them all the way into the base.
Light Bulb Replacement
To replace the interior light bulb;
Remove the screw holding the light bulb cover, remove cover. Unscrew light
bulb. Replace light bulb.
NOTE: This aplliance uses a standard 40 watt appliance bulb only.
(available at most local hardware stores) Replacement bulb should not
exceed 40watt rating.
Replace light bulb cover. Re-install screw to secure cover.
Cabinet bonderized and acrylic-enameled according to the most modern
electrostatic spraying techniques. High-density polyurethane thermal
insulation. Magnetic door closure gasket.
3
CARE & MAINTENANCE
4
Wine Racks:
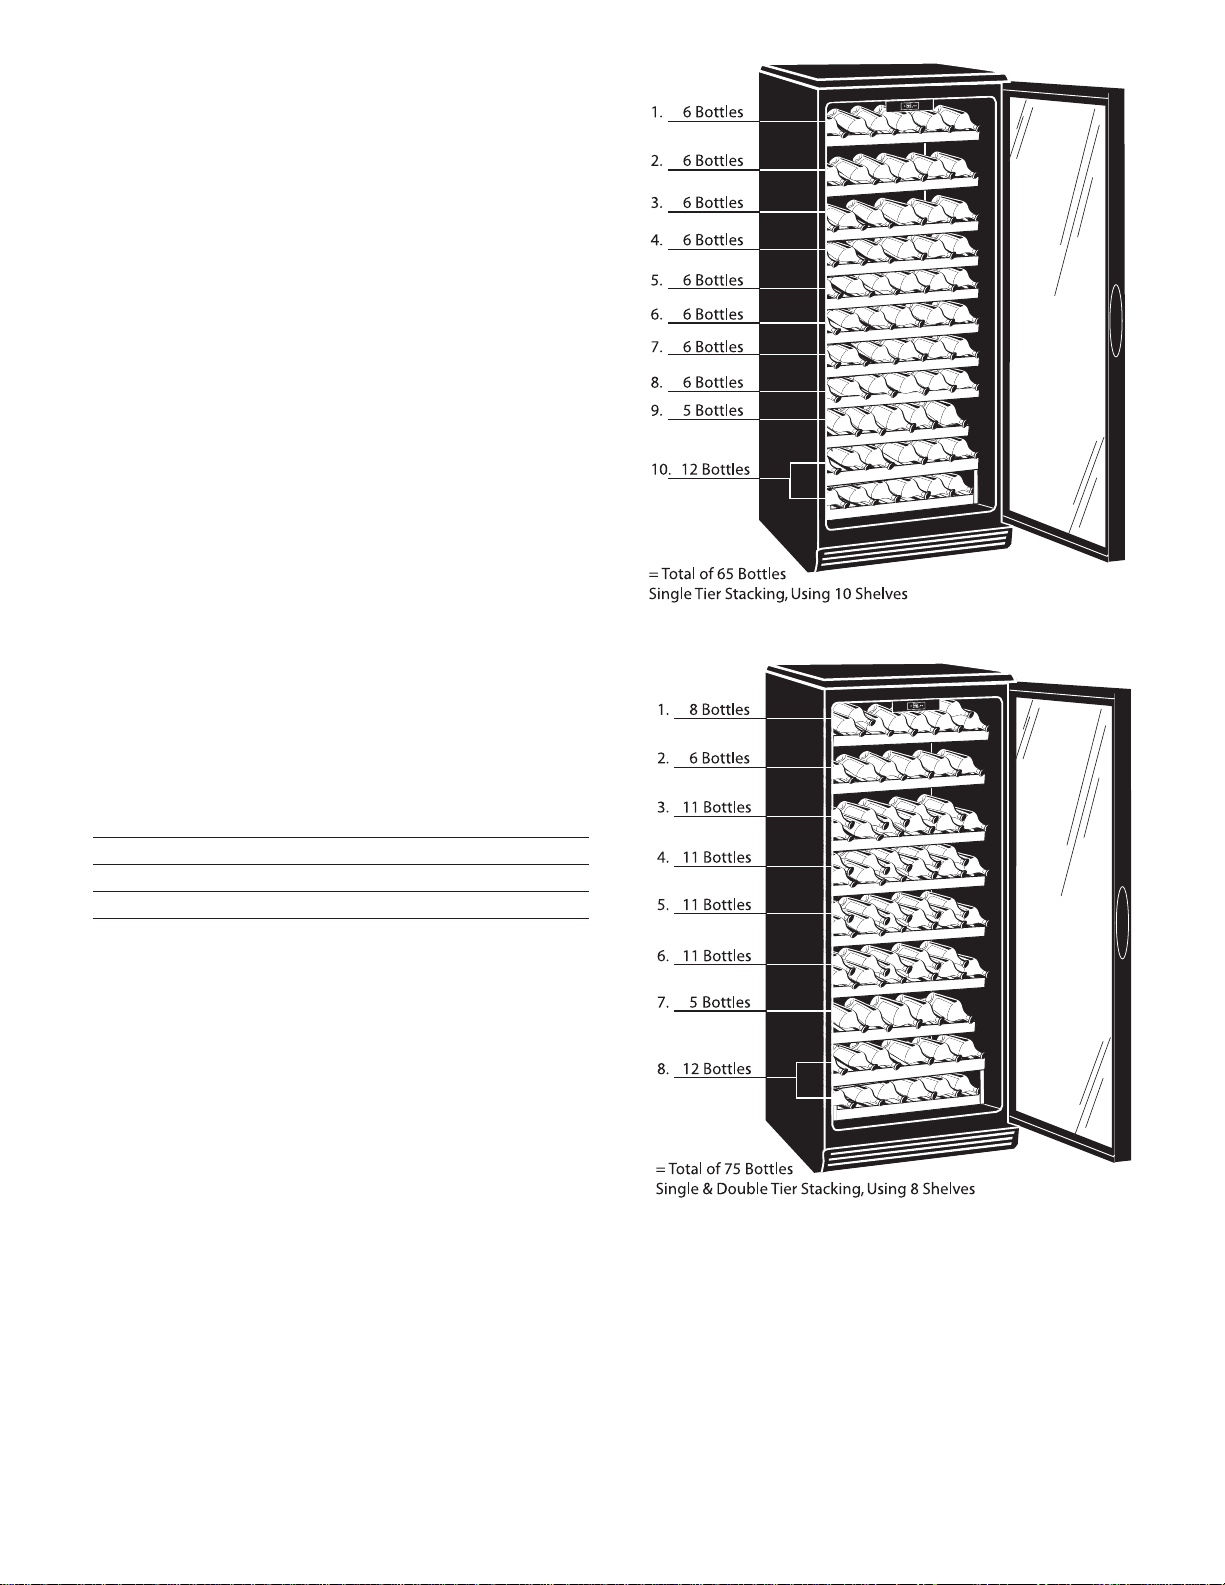
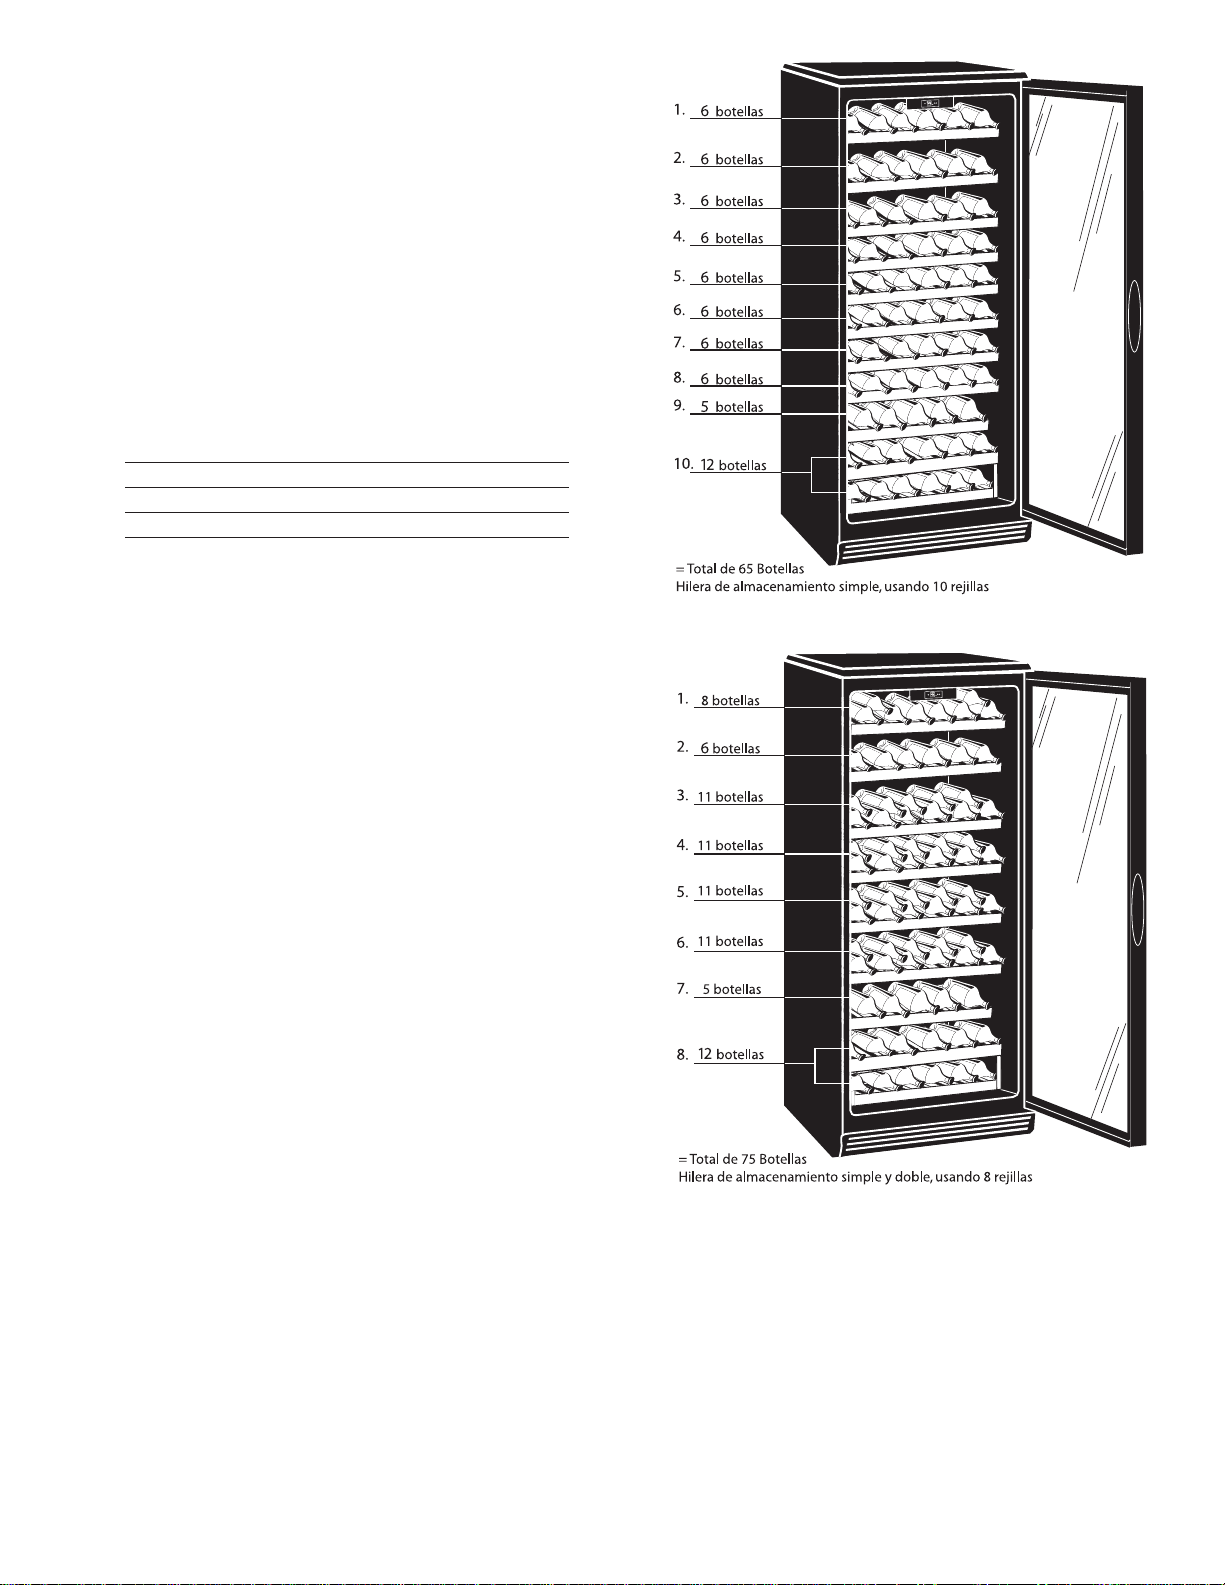
This unit is equipped with the following wine racks;
• 8 Wooden Racks (Flat) 6pcs 750ml bottles per shelf.
• 1 Wooden Rack (Off-Set) 5pcs 750ml bottles per shelf.
•1 Wooden Rack (Layered) 6pcs x 2 750ml bottles per shelf.
Total Capacity: = 65 Bottles based on “single” tier stacking. (See Fig. 1)
NOTE: It is possible to increase the bottle capacity of your wine cooler by
eliminating 2 “flat” racks and adjusting the 4 middle shelves to accomodate
“double” tier stacking.
Total Capacity = 75 Bottles based on “double) tier stacking. (See Fig. 2)
Some Important Rules for the Correct Use
of the Wine Cooler
• Beverages should be stored in sealed bottles.
•Don’t overload the cabinet.
•Don’t open the door unless necessary.
•Should the wine cooler be stored without use for long periods it is suggested,
after a careful cleaning, to leave the door ajar to allow the air to circulate inside
the cabinet in order to avoid possible formations of condensate, mold or odors.
• DO NOT cover shelves with aluminum foil or any other shelf covering material
which may prevent air circulation.
Recommended Temperatures for Chilling Wine
Dry Wines: 9˚C / 48.2˚F - 14˚C / 57.2˚F
Rosé Wines: 10˚C / 50˚F
Red Wines: 13˚C / 55.4˚F - 14˚C / 57.2˚F
Sparkling Wines: 9˚C / 48.2˚F
Technical and Structural Operation Features
Cabinet bonderized and acrylic-enameled according to the most
modern electrostatic spraying techniques. High-density
polyurethane thermal insulation. Magnetic door closure gasket.
1. ELECTRONIC TEMPERATURE CONTROLS: (External
front mounted controls) For controlling the temperature
inside the wine cooler. Turns the motor on/off as soon as
the temperature rises /falls above/below the desired cooling
level.
2. PLASTIC COATED CANTILEVER SHELVES: Odor
resistant, rustproof, and removable for easy cleaning.
3. MAGNETIC GASKET: Tight fitting door seal keeps all the
cooling power locked inside. No hooks or latches.
4. TEMPERED GLASS DOOR & INTERIOR LIGHT: Allows
easy interior visibility.
DOOR REVERSAL INSTRUCTIONS
R
4
3
1
2
5

GARANTIE LIMITÉE
Cet appareil de qualité est garantie exempt de tout vice de matière première et de fabrication, s’il est utilisé dans les conditions normales recommandées par le
fabricant.
Cette garantie n’est offerte qu’à l’acheteur initial de l’appareil vendu par Danby ou par l’un des ses distributeurs agréés et elle ne peut être transférée.
CONDITIONS
Pièces en plastique (la porte de l’évaporateur, gardes de porte, couvercle et bacs sont couverts par une garantie sans extension de 30 jours de la date d’achat.
Deuxième années Pendant la deuxième (2) année, toutes pièces électriques de ce produit s’avèrent défectueuses, y compris les unités ayant des systèmes
obturés, seront réparées ou remplacées, selon le choix du garant, sans frais à l’acheteur INITIAL. Les autres pièces courantes (par ex.,
les ampoules) ne sont couvertes par aucune garantie.
De la Troisième à Pendant les prochaines trois (3) années, les pièces s’avèrent défectueuses (y compris le: compresseur, condensateur, évaporateur,
la cinquième années sécheuse, et tous leurs boyaux) seront remplacés sans frais. L’acheteur est responsable envers tous les frais de main-d’oeuvre et de
transport pendant cette période de trois (3) ans pour la réparation et le rechange sur tous les composants du système obturé. Toute unité
de diagnositique inadéquate due à un vice du système obturé et qui exige une unité de rechange pendant ces trois (3) ans subira un taux
de dépréciation convenable ou à un frais pour l’acheteur. Ceci inclut tous les frais de transport qui seront imposés contre l’acheteur.
Pour bénéficier du Danby réserve le droit de limiter le rayon du “Service au domicile” selon la proximité d’un dépot de service autorisé. Le client sera
service sous garantie responsable pour le transport et tous les frais d’expédition de tout appareil exigeant le service en dehors des limites du “Service au
domicile” au dépot de service autorisé le plus proche. S’adresser au détaillant qui a vendu l’appareil, ou à la station technique agréée de
service la plus proche, où les réparations doivent être effectuées par un technicien qualifié. Si les réparations sont effectuées par
quiconque autre que la station de service agréée où à des fins commerciales, toutes les obligations de Danby en vertu de cette garantie
seront nulles et non avenues.
L’article suivante se reporte aux réfrigérateurs à porte simple ou double, avec ou sans une section de congélation. Cette garantie indique en aucun temps la
responsabilité de Danby de l’avarie ou dommage de la nourriture ou autre contenu, soit par les vices de l’appareil, ou soit par l’utilisation convenable ou inexacte.
EXCLUSIONS
En vertu de la présente, il n’existe aucune autre garantie, condition ou représentation, qu’elle soit exprimée ou tacite, de façon manifeste ou intentionnelle, par
Danby Products Limitée (Canada) ou Danby Products Inc. (E.- U. d’A.) ou ses distributeurs agréés. De même, sont exclues toutes les autres garanties, conditions
ou représentations, y compris les garanties, conditions ou représentations en vertu de toute loi régissant la vente de produits ou de toute autre législation ou
règlement semblables.
En vertu de la présente, Danby Products Limitée (Canada) ou Danby Products Inc. (E.- U. d’A.) ne peut être tenue responsable en cas de blessures corporelles ou
des dégâts matériels, y compris à l’appareil, quelle qu’en soit les causes. Danby ne peut pas être tenue responsable des dommages indirects dus au
fonctionnement défectueux de l’appareil. En achetant l’appareil, l’acheteur accepte de mettre à couvert et de dégager Danby Products Limitée de toute
responsabilité en cas de réclamation pour toute blessure corporelle ou tout dégât matériel causé par cet appareil.
CONDITIONS GÉNÉRALES
La garantie ou assurance ci-dessus ne s’applique pas si les dégâts ou réparations sont dus aux cas suivants:
1) Panne de courant;
2) Dommage subis pendant le transport ou le déplacement de l’appareil;
3) Alimentation électrique incorrecte (tension faible, câblage défectueux, fusibles incorrects);
4) Accident, modification, emploi abusif ou incorrect de l’appareil;
5) Utilisation dans un but commercial ou industriel;
6) Incendie, dommage causés par l’eau, vol, guerre, émeute, hostilités, cas de force majeure (ouragan, inondation, etc.);
7) Visites d’un technicien pour expliquer le fonctionnement de l’appareil au propriétaire.
Une preuve d’achat doit être présentée pour toute demande de réparation sous garantie. Prière de garder le reçu. Pour faire honorer la garantie, présenter ce
document à la station technique agréée ou s’adresser à:
Danby Products Limitée
PO Box 1778, 5070 Whitelaw Road,
Guelph, Ontario, Canada N1H 6Z9
Téléphone: (519) 837-0920 Télécopieur: (519) 837-0449
Danby Products Inc.
PO Box 669, 101 Bentley Court,
Findlay, Ohio, U.S.A. 45839-0669
Telephone: (419) 425-8627 FAX: (419) 425-8629
01/03
Service sous-garantie
Canada E.-U. d’A
Domicile Domiciler
6

Enlever les emballages extérieures et intérieures. Essuyer
complètement l’extérieur avec un linge doux sec et l’intérieur avec un
linge humide tiède. Il ne faut jamais situer l’appareil dans un recoin
étroit ou proche d’une source d’air chaud, au soleil direct ou à
l'humidité. L’air doit circuler à l’entour de l’appareil. Éloigner le
refroidisseur de vin au moins 5 pouces
du mur.
Emplacement
1. Choisir une place qui a un plancher fort et à niveau.
2. Éloigner l’appareil de 5 pouces des murs arrière et de côté.
3. Éviter les rayons de soleil et la chaleur directs qui peuvent affecter
la surface en acrylique. Les sources de chaleur rapprochées
augmentent la consommation d’énergie.
Pour arrêter le cabinet à vins de façon permanente, débranchez le
cordon d’alimentation électrique de la prise de courant. Il n’y a
pas de position «OFF» sur le tableau de commande électronique.
Lorsque le cabinet à vins n’est pas utilisé pendant une longue
période, débranchez la prise de courant et laissez la porte
partiellement ouverte.
Lumière intérieure
La lumière intérieure est contrôlée manuellement; elle n’est pas
contrôlée par l’ouverture ou la fermeture de la porte. Pour allumer
la lumière, appuyez sur le bloc de commande de l’ampoule
électrique située sur le tableau de commande électronique.
NOTA : Lorsque la lumière reste allumée pendant de longues
périodes, elle fait augmenter la température à l’intérieur du cabinet
FONCTIONNEMENT DE LA COMMANDE ÉLECTRONIQUE
L’afficheur électronique à DEL du cabinet à vins est programmé pour afficher
(indépendamment) les renseignements ci-dessous sur la température
(uniquement).
TEMPÉRATURE INTERNE DU CABINET : Ce réglage est représenté par un
affichage non clignotant à DEL; c’est la valeur normale par défaut lorsque le
cabinet est en marche.
RÉGLAGE DE LA TEMPÉRATURE DE FONCTIONNEMENT : Ce réglage
est représenté par un affichage à DEL clignotant; la programmation ne peut
être faite qu’en appuyant à plusieurs reprises sur les touches de température
+/- pendant que le cabinet est en marche. NOTA : La température
demandée ne peut être ajustée/réglée que lorsque la DEL clignote.
RÉGLAGES PAR DÉFAUT : Lorsque vous branchez le cabinet pour la
première fois dans une prise d’alimentation électrique de 120 V/60 Hz (vous
devrez également le faire en cas de panne d’électricité), les réglages de
température passeront automatiquement aux réglages par défaut suivants :
Le réglage par défaut de la DEL pour la température interne du
cabinet est la température ambiante réelle mesurée au moment où le
ATTENTION
MISE À LA TERRE
Cet appareil doit être mis à la terre. En cas de courtcircuit, la mise à la terre réduit les risques de décharge
électrique en fournissant un échappatoire au courant
électrique. L’appareil est muni d’un cordon électrique
comprenant un fil de mise à la terre et une fiche de terre.
Branchez la fiche dans une prise de courant correctement
installée et mise à la terre.
Avertissement - Consultez un électricien ou un
technicien qualifié si vous ne comprenez pas bien les
instructions de mise à la terre ou si vous avez un doute
quelconque sur la bonne mise à la terre de l’appareil.
N’UTILISER JAMAIS DE FIL DE RALLONGE
S’il est possible, brancher le refroidisseur de vin à son
propre circuit. Ainsi, les autres appareils ou la surcharge
des lampes du domicile ne peuvent pas surcharger et
interrompre le courant électrique. Une connexion
desserrée peut se doubler à un autre appareil dans la
même prise murale.
PRÉCAUTION IMPORTANTE
Un refroidisseur de vin vide est une attraction dangereuse
aux enfants. Enlever les joints étanches, les loquets, les
couvercles ou les portes des appareils qui ne sont pas
utiliser, ou faites de soit que l’appareil ne présente aucun
danger.
N’ATTENDEZ PAS!
FAITES-LE IMMÉDIATEMENT!
7
CONSIGNES DE SÉCURITÉ
INSTRUCTIONS SPECIALES
FONCTIONNEMENT
INSTRUCTION INSTALLATION
Il faut enlever le support de la porte en bas qui se trouve en bas
à gauche de l'appareil avant que vous puissiez ouvrir la porte
(Fig. A)
FIG. A

cabinet est branché ou au moment où l’alimentation est rétablie.
Le réglage par défaut de la DEL pour les températures d’utilisation
est établi à 50 ºF / 10 ºC. (Après une panne d’électricité, les réglages
de température que vous aviez établis sont automatiquement
supprimés et vous devrez les rétablir)
Le réglage de la température à DEL (ºF/ºC) est fait en ºF (échelle
Fahrenheit).
RÉGLAGE DE LA TEMPÉRATURE D’UTILISATION : Pour
régler/changer la température d’utilisation, procédez comme suit :
1. Appuyez à plusieurs reprises sur les touches +/- (température)
jusqu’à ce que vous parveniez à la température désirée.
L’afficheur à DEL indiquera temporairement (clignotement) la
température demandée pendant 5 secondes environ. Si vous ne
réglez/changez pas la température d’utilisation au cours de cette
période de 5 secondes, la DEL reviendra automatiquement à
l’affichage de la température à l’intérieur du cabinet.
2. Chaque fois que vous appuyez sur la touche
+/- (alors que la
DEL clignote) vous augmentez la température de 1 º (gamme de
températures allant de 43 ºF ~ 57 ºF / 6 ºC ~ 14 ºC).
3. Chaque fois que vous appuyez sur la touche
+/- (alors que la
DEL clignote) vous réduisez la température de 1 º (gamme de
températures allant de 43 ºF ~ 57 ºF / 6 ºC ~ 14 ºC).
La température d’utilisation clignote sur l’afficheur à DEL pendant 5
secondes environ une fois que la sélection est faite avant de revenir
à la température interne du cabinet.
SÉLECTION DE LA TEMPÉRATURE (ºF/ºC) : Ce cabinet peut
afficher les températures en degrés «Fahrenheit» ou «Celsius».
Appuyez sur le clavier des températures pour passer d’une échelle à
l’autre. Le voyant indicateur «bleu» adjacent au mode
correspondant s’allume pour indiquer l’échelle choisie.
Entretien
Pour nettoyer l’intérieur du cabinet, utilisez un chiffon doux et une
solution composée d’une cuillère à soupe de poudre à pâte diluée
dans une pinte d’eau ou une solution d’eau et de savon doux ou un
détergent doux. Nettoyez les supports en porte-à-faux pour le vin à
l’aide d’un chiffon légèrement humecté puis séchez-les à l’aide d’un
chiffon doux. Nettoyez l’extérieur du cabinet à l’aide d’un chiffon
doux et d’un détergent doux ou d’un produit de nettoyage des
appareils électroménagers.
Pendant les vacances
Si vous prenez des vacances d’un mois ou moins, ne touchez pas à
la commande du thermostat. Pendant les vacances plus prolongées:
(a) enlever tous les bouteilles,
(b) débrancher l’appareil,
(c) nettoyer tout le refroidisseur de vin,
(d) laisser la porter ouverte pour éviter les mauvais odeurs.
Pannes de courant
La plupart des pannes de courant sont corrigées en une heure ou
deux, ce qui ne devrait pas avoir d’incidence sur la température
intérieure du cabinet à vins. Essayez de minimiser le nombre fois où
la porte du cabinet est ouverte pendant les pannes d’électricité.
Pendant les pannes d’électricité de plus longue durée, faites le
nécessaire pour protéger votre vin. Lorsque l’alimentation électrique
est rétablie, les réglages de température que vous aviez établis sont
automatiquement effacés et vous devrez refaire la programmation
(voir la rubrique «Réglage de la température»)
Déménagement
Enlever ou immobiliser toutes les pièces amovibles à l’intérieur du
refroidisseur de vin. Serrer les vis à nivellement à la base afin de ne
pas les endommager.
Remplacement de l’ampoule électrique
Remplacement de l’ampoule située à l’intérieur du cabinet :
Retirez la vis retenant le couvre-ampoule; retirez le couvercle.
Dévissez l’ampoule. Installez la nouvelle ampoule.
NOTA : Cet appareil utilise uniquement des ampoules ordinaires de
40 W pour les appareils électroménagers. Ces ampoules sont
vendues dans la plupart des quincailleries. L’ampoule de rechange
ne doit pas avoir une puissance de plus de 40 W.
Remettez le couvre-ampoule. Réinstallez la vis qui retient le
couvercle.
Étagères cantilever
Ce modèle est équipé avec les étagères cantilever suivantes:
• une étagère plate regulière pour le réfrigérateur
• 3 étagères courbées pour le vin
• une étagère courbée échelonnée en bas -non-cantilever
Note: L'étagère courbée amovible pour le vin et l'étagère plate
amovible sont interchangeables. Si vous voulez acheter des étagères
plates suplémentaires il faut les commander séparément en
appellant le département des pièces de Danby au 1-800-26-DANBY
Importantes consignes de sécurité pour
l’utilisation du refroidisseur de vin
• Ranger les breuvages dans des contenants étanches.
• Ne jamais surchargé l’appareil.
• Ouvrir la porte seulement si nécessaire.
• Pour un rangement prolongé de l’appareil, il est suggéré de laver
l’appareil, de laisser la porte ouverte afin de fournir une circulation
d’air à l’intérieur du meuble et d’éviter le développement de
condensation, de moisi et d’odeurs.
• Ne jamais recouvrir les clayettes du compartiment de papier
d’aluminium ou autres matériaux car ceci peut empêcher la
circulation d’air.
8
SOINS ET ENTRETIEN

9
Supports à vins:
L’appareil contient les supports suivants :
* 8 supports en bois (plats) 6 bouteilles de 750 ml par tablette
* 1 support en bois (décalé) 5 bouteilles de 750 ml par tablette
* 1 support en bois (étagé) 6 x 2 bouteilles de 750 ml par
tablette
Capacité totale : 65 bouteilles lorsque les bouteilles sont cordées
à raison d’un seul rang par étage (voir la Fig. 1)
NOTA : Il est possible d’augmenter la contenance de votre cabinet
à vins en éliminant 2 supports plats et en ajustant les tablettes du
milieu de façon à pouvoir corder les bouteilles à raison de deux par
étage.
Capacité totale : 75 bouteilles lorsque les bouteilles sont cordées
en double rangée (voir la Fig. 2).
Températures recommandées pour le refroidissement de vin
Vin sec: 9˚C / 48.2˚F - 14˚C / 57.2˚F
Vin rosé: 10˚C / 50˚F
Vin rouge: 13˚C / 55.4˚F - 14˚C / 57.2˚F
Vin pétillant: 9˚C / 48.2˚F
Caractéristiques Techniques et de Construction
Thermostat pour réglage automatique de la température. Meuble
laminé et émaillé selon les techniques de peinture au pistolet les
plus modernes. Isolation thermique en polyuréthanne de haute
densité et joint étanche magnétique de porte.
1. COMMANDE ÉLECTRONIQUE DE LA TEMPÉRATURE :
(Commande installée sur l’extérieur, à l’avant) Contrôle de
température à l’intérieur du cabinet à vins. Coupe ou met
en marche le moteur dès que la température dépasse (n
plus ou en moins)le niveau de température désiré
2. CLAYETTES PLASTIFIÉES CANTILEVER: Résistent aux
odeurs et à la rouille. Amovibles pour faciliter l'entretien.
3. OINT ÉTANCHE MAGNÉTIQUE: Le joint étanche empêche
l'air frais de s'échapper.
4. PORTE EN VERRE TREMPÉ ET LAMPE INTÉRIEURE:
Visibilité claire d'intérieur.
INSTRUCTIONS POUR LE RENVERSEMENT DE LA PORTE
R
10
4
3
1
2

GARANTÍA LIMITADA DEL PRODUCTO
Se garantiza que este producto de calidad se encuentra libre de defectos de fabricación en material y mano de obra, siempre que la unidad se use bajo las condiciones de
funcionamiento normales propuestas por el fabricante.
Esta garantía se encuentra disponible solamente para la persona a quien Danby o un distribuidor autorizado de Danby vendió originalmente esta unidad, y no se puede
transferir.
TÉRMINOS DE LA GARANTÍA
Las partes plásticas (por ej. la puerta del evaporador, las guías de las puertas, las tapas y bandejas están garantizadas por treinta (30) días solamente desde la fecha de
compra, sin prórrogas.
Primero 2 años Durante el primer año (2), todas las partes eléctricas de este producto que se encuentren defectuosas, incluyendo todas las unidades selladas del
sistema, se repararán o cambiarán, a opción del garante, sin cargo alguno para el comprador ORIGINAL. Las partes que se consumen (por ej.
lámparas) no están garantizadas por ningún período de tiempo.
Segundo por Durante los siguientes tres años (3) toda parte del sistema sellado que se encuentre defectuosa (compuesto del compresor, condensador,
quintos años evaporador, secador y todas las tuberías asociadas) se cambiarán sin cargo alguno. El comprador pagará por toda la mano de obra y flete de regreso
durante este período de tres años (3) para reparar o cambiar cualquiera de los componentes sellados del sistema. Toda unidad que se diagnostique
como no funcional debido a una falla del sistema sellado y a la que corresponda un cambio durante los tres años (3) existentes, estará sujeta a una
depreciación correspondiente o cuota de usuario, incluyendo cualquiera y todos los costos de flete que se le exijan al consumidor.
Para obtener Comuníquese con su representante en donde compró la unidad, o con el departamento de servicio autorizado de Danby más cercano, en donde un
servicio técnico de servicio competente efectuará la reparación. Si cualquier otro departamento que no sea el autorizado lleva a cabo el servicio de
reparaciones en las unidades o si la unidad se usa para una aplicación comercial, todas las obligaciones de Danby bajo esta garantía se verán
terminadas.
La siguiente cláusula se refiere a refrigeradores de una puerta o de dos puertas suministrados con o sin una sección de congelador separada. Nada dentro de esta garantía
implica que Danby será responsable por cualquier daño que hayan sufrido los alimentos u otros contenidos de este aparato, ya sea debido a un defecto del aparato, o su uso,
adecuado o inadecuado.
EXCLUSIONES
Con excepción de lo que se especifica en la presente, Danby Products Limited (Canada) o Danby Products Inc. (U.S.A.), no existe ninguna otra garantía, condición o
representación, explícita o implícita, hecha o pretendida por Danby Products Limited o sus distribuidores autorizados, y toda otra garantía, condición o representación,
incluyendo toda garantía, condición o representación bajo la Ley de Venta de Artículos, u otra legislación o estatuto similar, queda por la presente excluida. Con excepción de o
que se especifica en la presente, Danby Products Limited (Canada) o Danby Products Inc. (U.S.A.) no será responsable de ningún perjuicio a personas o propiedad, incluyendo
la unidad misma, de cualquier manera que se hubiese causado, ni de ningún perjuicio resultante del malfuncionamiento de la unidad y, con la compra de la unidad, el comprador
por la presente acuerda indemnizar y exonerar a Danby Products Limited de todo reclamo por daños y perjuicios a personas o propiedad causados por la unidad.
ESTIPULACIONES GENERALES
Ninguna garantía o seguro contenido en la presente o determinado por la presente corresponderá cuando el perjuicio o la reparación hayan sido causados por cualquiera de las
siguientes causas:
1) Corte de corriente
2) Daño en tránsito o cuando se estaba moviendo el aparato
3) Corriente eléctrica inadecuada como baja tensión, conexiones defectuosas en la casa o fusibles inadecuados.
4) Accidente, alteración, abuso o mal uso del aparato como circulación inadecuada de aire en la habitación o condiciones de funcionamiento anormales (temperaturas
de la habitación demasiado altas o bajas).
5) Uso para fines comerciales o industriales.
6) Incendio, daños causados por agua, robo, guerras, insurrecciones, hostilidades, actos de fuerza mayor como huracanes, inundaciones, etc.
7) Llamadas para recibir servicio que resulte en la educación del cliente.
Prueba de la fecha de compra será necesaria para los reclamos sobre garantía; de modo que tenga la bondad de guardar la boleta de venta. En caso que se requiera un
servicio bajo garantía, presente este documento a nuestro DEPARTAMENTO DE SERVICIO AUTORIZADO.
Danby Products Limited
PO Box 1778, 5070 Whitelaw Road,
Guelph, Ontario, Canada N1H 6Z9
Telephone: (519) 837-0920 FAX: (519) 837-0449
Danby Products Inc.
PO Box 669, 101 Bentley Court,
Findlay, Ohio, U.S.A. 45839-0669
Telephone: (419) 425-8627 FAX: (419) 425-8629
Servicio de Garantía
Dentro del Dentro de los
Canadá Estados Unidos
En el hogar En el hogar
11
01/03

Saque los embalajes exteriores e interiores, limpie bien el exterior
con un paño suave seco, y el interior con un paño húmedo y tibio.
Evite colocar la caja en un hueco estrecho o cerca de una fuente
de calor, luz de sol directa, o lugar húmedo. Deje que el aire
circule libremente alrededor de la caja. Mantenga la parte
posterior del refrigerador para vinos a 5 pulgadas de la pared.
Ubicación
1. Seleccione un lugar con un piso fuerte y nivelado.
2. Deje cinco pulgadas de espacio entre la parte posterior del
refrigerador para vinos y toda pared contigua.
3. Evite la luz directa del sol o calor. La luz directa del sol puede
afectar la capa de acrílico. Las fuentes de calor en su
proximidad provocarán un consumo mayor de electricidad.
Para apagar el refrigerador para vinos debe desenchufarlo, ya que el
panel de control no cuenta con posición de apagado. Cuando no vaya
a usar el refrigerador para vinos durante un mucho tiempo,
desenchúfelo y deje la puerta entreabierta.
Luz interior
La operación de la luz interior es manual y no se activa al abrir y cerrar
la puerta. Para encender la luz, oprima el interruptor ubicado en el
panel electrónico de control.
NOTA: El dejar la luz interior encendida durante mucho tiempo eleva la
temperatura interior del gabinete.
Descongelación
Su refrigerador para vinos está diseñado con un sistema de
descongelación “Auto-Cycle”. ¿Qué es la descongelación Auto Cycle?
Las superficies refrigeradas del compartimiento de comida fresca se
descongelan de forma automática cuando se detiene el ciclo del
control de refrigeración (termostato). El agua descongelada de dicho
compartimiento se elimina de forma automática por medio de un
conducto que desemboca en una bandeja ubicada sobre el compresor.
El calor que despide el compresor hace que el agua descongelada se
evapore.
OPREACIÓN DEL CONTROL ELECTRÓNICO;
La pantalla electrónica LED de este refrigerador para vinos está
programado para mostrar (de forma independiente) la siguiente
información sobre la temperatura (únicamente).
TEMPERATURA INTERIOR DEL GABINETE: Este valor se
representa por medio de una indicación “fija” (no titilante) en la pantalla
LED y es la configuración (LED) preprogramada normal durante la
operación.
CONFIGURACIÓN DE LA TEMPERATURA DE OPERACIÓN: Esta
configuración se representa mediante una indicación “titilante” en la
pantalla LED y sólo se la puede programar (SET) oprimiendo y
soltando las teclas (de temperatura)
+/- durante la operación.
NOTA: La temperatura programada sólo se puede ajustar/ programar
mientras la pantalla LED está titilando.
CONFIGURACIÓN PREPROGRAMADA: La primera vez que
enchufe la unidad a un tomacorriente de 120V/60Hz (y/ o en caso
de un corte de energía), la configuración de la temperatura regresa
de forma automática a los siguientes valores preprogramados;
La configuración preprogramada de la LED para la selección de la
temperatura (ºF/ºC) está en º F. (Escala Fahrenheit)
ATENCIÓN
INSTRUCCIONES PARA
LA CONEXIÓN A TIERRA
Este aparato electrodoméstico debe estar conectado a
tierra. En caso de un cortocircuito eléctrico, la conexión a
tierra reduce el riesgo de choque eléctrico proporcionando
un cable de escape para la corriente eléctrica. Este
aparato viene equipado con un cordón que posee un
cable a tierra con un enchufe de conexión a tierra. Este
enchufe debe estar enchufado en un tomacorriente
instalado correctamente y conectado a tierra.
ADVERTENCIA - El uso inadecuado del enchufe de
conexión a tierra puede resultar en un riesgo de choque
eléctrico. Consulte con un electricista o persona de
reparaciones competente si no comprende bien las
instrucciones de conexión a tierra o si existe alguna duda
sobre si el aparato está conectado a
tierra correctamente.
NO USE UN CORDÓN DE
PROLONGACIÓN ELÉCTRICA
Use un tomacorriente de pared exclusivo. No conecte
su refrigerador para vinos a cordones de prolongación
eléctrica o junto a cualquier otro electrodoméstico en el
mismo tomacorriente de pared. No empalme el cordón.
ADVERTENCIA IMPORTANTE:
Un refrigerador para vinos vacío es una atracción muy
peligrosa para los niños. Saque todas las juntas, pestillos,
tapas o la puerta de todo electrodoméstico que no esté en
uso, o tome alguna medida para asegurar que no
presente peligro.
¡NO ESPERE, HÁGALO AHORA MISMO!
INSTRUCCIONES DE SEGURIDAD
INSTRUCCIONES SPECIALES
OPERACIÓN
12
INSTRUCCIONES DE INSTALACIÓN
Es necesario quitar el suporte de la puerta inferior que se
encuentra más bajo a la izquierda de la unidad antes de que Ud.
pueda abrir la puerta (Figura A)
FIG. A

13
CONFIGURACIÓN DE LA TEMPERATURA DE OPERACIÓN:
Para configurar/ cambiar la temperatura de operación;
1. Oprima y suelte una de las teclas
+/- (de temperatura).
La pantalla LED mostrará (titilará) durante alrededor de 5 segundos
la temperatura programada. (Si no programa/ cambia la
temperatura de operación en esos 5 segundos, la pantalla LED
vuelve a mostrar de manera automática la temperatura interior (del
gabinete).
2. Cada vez que oprima la tecla
+/- (mientras la pantalla titile), la
temperatura aumentará de a 1º (La temperatura va desde los 43º
F/ 6° C hasta los 57º F /14º C)
3. Cada vez que oprima la tecla
+/- (mientras la pantalla titile), la
temperatura disminuirá de a 1º (La temperatura va desde los 43º
F/ 6° C hasta los 57º F / 14º C)
La temperatura de operación “titilará” en la pantalla LED durante
alrededor de 5 segundos después de haber hecho la selección, y
luego volverá a mostrar la temperatura interior (del gabinete).
SELECCIÓN DE LA TEMPERATURA (º F/º C): Esta unidad puede
mostrar las temperaturas en escala "Fahrenheit" o "Celsius".
Oprima el panel de selección de temperatura para cambiar entre
las escalas º F/º C. La luz indicadora “azul” ubicada junto al modo
correspondiente se encenderá para mostrar la selección.
Limpieza
Para limpiar el interior, utilice un trapo suave y una solución de una
cucharada de sopa de bicarbonato de sodio disuelta en un cuarto de
agua, o un jabón o detergente suave. Limpie los estantes voladizos
con un trapo húmedo y luego séquelos con un trapo suave. Limpie la
superficie exterior con un trapo suave húmedo y algún detergente
suave o líquido de limpieza especial.
Período de vacaciones
Para períodos cortos de vacaciones, deje los controles en sus
graduaciones corrientes. Durante ausencias más largas;
(a) saque todos los alimentos,
(b) desconecte el refrigerador del tomacorriente,
(c) limpie bien el refrigerador para vinos,
(d) deje la puerta abierta para evitar la formación de condensación,
moho u olores.
Corte de energía
La mayoría de los cortes de energía se solucionan en una o dos horas
y no afectan la temperatura interior de su refrigerador. Trate de abrir la
puerta lo menos posible mientras no haya energía. Durante los cortes
de mayor duración, tome las precauciones necesarias para proteger su
vino. Al volver la energía, la temperatura de operación programada se
borra por lo que deberá volver a programarla. (Ver configuración de la
temperatura de operación)
Si ud. se muda
La máyoria de las fallas de corriente son corregidas dentro de una
o dos horas y no afectarán la temperatura interna de su congelador
de vinos. Trate y minimize el número de veces que abre la puerta
del congelador durante largos periodos de fallas de corriente para
proteger sus vinos. Cuando la electricidad se haya reestablecido,
el regulador de temperatura debe ser re-programado
(Ver Ajuste funcional de temperatura)
Reemplazo de la bombilla de luz
Para reemplazar la bombilla de luz, saque los tornillos que sostienen la
cubierta de la bombilla y remueva dicha cubierta. Saque la bombilla de
luz y reemplácela.
NOTA: Este electrodoméstico utiliza solo bombillas especiales de 40
vatios (disponibles en la mayoría de las ferreterías locales). La
bombilla nueva no debe ser de más de 40 vatios. Vuelva a colocar la
cubierta y a ajustar sus tornillos para asegurarla.
CUIDADO Y MANTENIMIENTO
14
Estantes para vinos:
Esta unidad está equipada con los siguientes estantes para vinos:
* 8 estantes de madera (chatos) 6 botellas de 750ml por estante.
* 1 estante de madera (no paralelo) 5 botellas de 750ml por estante.
* 1 estante de madera (escalonado) 6 pares de botellas de 750ml
por estante.
Capacidad total: = 65 botellas si se las ubica en hileras simples.
(Ver Fig. 1)
NOTA: Para aumentar la capacidad de almacenamiento de su
refrigerador para vinos puede eliminar dos estantes “chatos” y
ajustar los cuatro estantes del medio para ubicar sus botellas en
hileras dobles.
Capacidad total = 75 botellas si se las ubica en hileras dobles.
(Ver Fig. 2)
Temperaturas recomendadas para enfriar vinos
Vinos secos: 9˚C / 48.2˚F - 14˚C / 57.2˚F
Vinos rosados: 10˚C / 50˚F
Vinos tintos: 13˚C / 55.4˚F - 14˚C / 57.2˚F
Vinos espumosos: 9˚C / 48.2˚F
Características técnicas y estructurales
del funcionamiento
Una compartimiento interior bonderizado y esmaltado en acrílico de
acuerdo a las técnicas más modernas de atomización electrostática.
Aislamiento térmico de poliuretano de alta densidad. Junta de
cierre magnético para la puerta.

1. CONTROLES ELECTRÓNICOS DE TEMPERATURA:
(Controles montados sobre la cara frontal externa) Para
controlar la temperatura interior del refrigerador para vinos.
Enciende y apaga el motor en cuanto la temperatura supera
o es menor al nivel de refrigeración deseado.
2. ESTANTES REVESTIDOS DE PLÁSTICO DE VIGA
VOLADIZA: Resistentes a los olores, inoxidables y
desmontables para una limpieza fácil.
3. JUNTA MAGNÉTICA: Un cierre ajustado de la puerta que
mantiene toda la potencia de enfriamiento encerrada en el
refrigerador. Sin ganchos ni pestillos.
4. PUERTA DE VIDRIO TEMPLADO Y LUZ INTERIOR:
Permite la visibilidad del compartmiento interior.
R
INSTRUCCIONES PARA CAMBIAR EL SENTIDO EN QUE SE ABRE LA PUERTA
15
4
3
1
2

WINE COOLER
The model number of your wine cooler is found on the serial
plate located on the back, top left-hand corner of the refrigerator.
All repair parts available for purchase or special order when you
visit your nearest service depot. To request service and/or the
location of the service depot nearest you, call the toll free number
listed to the left in Canada and the U.S.
When requesting service or ordering parts, always provide the
following information:
• Product Type
•Model Number
•Part Number
• Part Description
REFROIDISSEUR DE VIN
Le numéro de modèle de votre refroidisseur de vin se trouve sur
la plaque d'identification qui se trouve sur le coin du haut gauche
de l'arrière du réfrigérateur.
Toutes les pièces de rechange sont disponibles immédiatement
ou peuvent être commandées de votre Centre de Service
régional. Pour obtenir le service et/ou le Centre de Service le
plus proche, téléphonez le numéro sans-frais indiqué à gauche
pour le Canada et les États-Unis.
Ayez les informations suivantes à la portée de la main lors de la
commande de pièces ou service:
•Genre de produit
• Numéro de modèle
• Numéro de pièce
• Description de la pièce
REFRIGERADOR PARA VINOS
El número del modelo de su refrigerador para vinos se encuentra
en la placa de serie ubicada en el ángulo posterior superior
izquierdo del refrigerador.
Todas las piezas de repuesto se encuentran disponibles para la
compra o por pedido especial cuando Ud. visite su departamento
de servicio más cercano. Para solicitar servicio y/o la ubicación
del departamento de servicio más cercano, llame al número de
marcando gratis que aparece a la izquierda en el Canadá y en
los E.U.
Cuando solicite servicio o encargue repuestos, siempre
proporcione la siguiente información:
• Tipo de producto
• Número de modelo
• Número del repuesto
• Descripción del repuesto
Danby Products Limited, PO Box 1778, Ontario, Canada N1H 6Z9
Danby Products Inc., PO Box 669, Findlay, Ohio, USA 45839-0669
Model • Modèle • Modelo
DWC612BLP
For service, contact
your nearest service depot or call:
1-800-26D-anby
to recommend a depot in
your area.
Pour obtenir le service, consultez
votre succursale régionale de
service ou téléphonez:
1-800-26D-anby
qui vous recommandera un
centre régional.
Para sevicio, communíquese con
su departamento de servicios más
cercano o llame al:
1-800-26D-anby
para que le recomienden un
departamento de servicios
en su zona.
Printed in China (P.R.C.)
 Loading...