


WINE COOLER
REFROIDISSEUR À VIN
ENFRIADOR DE VINO
OWNER’S USE AND CARE GUIDE
GUIDE D’UTILISATION ET D'ENTRETIEN
GUÍA DE UTILIZACIÓN Y CUIDADO PARA EL PROPIETARIO
MODEL • MODÈLE • MODELO
DWC018A1BDB
DANBY PRODUCTS LIMITED, ONTARIO, CANADA N1H 6Z9
DANBY PRODUCTS INC., FINDLAY, OHIO, USA 45840
2017.03.24

TO OBTAIN WARRANTY SERVICE YOU MUST PROVIDE A VALID PROOF OF PURCHASE.
PLEASE STAPLE YOUR RECEIPT TO THIS PAGE FOR FUTURE REFERENCE.
POUR OBTENIR LE SERVICE SUR GARANTIE VOUS DEVEZ FOURNIR UNE PREUVE D’ACHAT
VALIDE. VEUILLEZ AGRAFER VOTRE REÇU À CETTE PAGE POUR RÉFÉRENCE FUTURE.
PARA OBTENER SERVICIO DE GARANTÍA, DEBE PROVEER UN RECIBO ORIGINAL. POR
FAVOR ENGRAPE SU RECIBO A ÉSTA PÁGINA EN CASO QUE NECESITE HACER UN
RECLAMO.
IMPORTANT - GROUNDING METHOD
This product is factory equipped with a power supply cord that has a three-pronged grounded
plug. It must be plugged into a mating grounding type receptacle in accordance with the National
Electrical Code and applicable local codes and ordinances. If the circuit does not have a grounding
type receptacle, it is the responsibility and obligation of the customer to exchange the existing
receptacle in accordance with the National Electrical Code and applicable local codes and
ordinances. The third ground prong should not, under any circumstances, be cut or removed.
Never use the cord, the plug or the appliance when they show any sign of damage. Do not use your
appliance with an extension cord unless it has been checked and tested by a qualifi ed electrician or
electrical supplier. Improper connection of the grounding plug can result in risk of fi re, electric shock
and/or injury to persons associated with the appliance. Check with a qualifi ed service representative
if in doubt that the appliance is properly grounded.
IMPORTANT - MÉTHODE POUR LA MISE À LA TERRE
Ce produit arrive d’origine avec un cordon d’alimentation équipé d’une prise à trois fi ches. Il doit
être branché dans une prise avec une fi che de mise à la terre en conformité avec le Code National
de l’Électricité et les codes et règles locales applicables. Si le prise murale n’a pas de mise à la de
terre, il est de la responsabilité et l’obligation du client de changer la prise existante pour la rendre
conforme aux Codes Nationaux de l’Électricité, aux codes et règles locaux applicables. La fi che de
la mise à la terre ne doit pas, en aucune circonstance, être coupée ou retirée. Si vous apercevez
des signes de dommage, n’utilisez jamais le cordon d’alimentation, la prise ou l’appareil. N’utilisez
jamais l’appareil avec une rallonge sauf si elle a été vérifi ée et testée par un électricien qualifi é ou un
fournisseur de matériel électrique. Une fi che de mise à la terre mal branchée peut entraîner un risque
d’incendie, de choc électrique ou de blessures aux personnes qui utilisent l’appareil. Si vous n’êtes
pas certain que l’appareil est correctement mis à la terre, consultez un préposé du service qualifi é.
IMPORTANTE - MÉTODO DE CONEXIÓN A TIERRA
Este producto viene equipado con un cable eléctrico que tiene un enchufe de tres patas con
conexión a tierra. Este debe colocarse en una toma de corriente con conexión a tierra de acuerdo con
el Código nacional de electricidad y códigos y ordenanzas locales correspondientes. Si el circuito no
cuenta con una toma de corriente con conexión a tierra, es responsabilidad y obligación del cliente
sustituir la toma de corriente actual de acuerdo con el Código nacional de electricidad y códigos y
ordenanzas locales correspondientes. Bajo ninguna circunstancia se debe cortar o eliminar la tercera
pata de conexión a tierra.Nunca utilice el cable, el enchufe o el artefacto cuando muestre un signo de
daño visible. No utilice el artefacto con una extensión salvo que un proveedor eléctrico o electricista
califi cado la inspeccione y la pruebe. Una instalación inadecuada de la conexión a tierra puede dar
como resultado un riesgo de incendio, descarga eléctrica o lesiones a las personas asociadas con el
artefacto. Verifi que con un representante califi cado de servicio en caso de dudas sobre si el artefacto
tiene una buena conexión a tierra.

CONTENTS * TABLE DES MATIÈRES * ÍNDICE
WINE COOLER
Owner’s Use and Care Guide ...............................................1 - 10
• Welcome
• Important Safety Information
• Installation Instructions
• Features
• Operation
• Care and Maintenance
• Troubleshooting
• Warranty
REFROIDISSEUR A VIN
Guide d’utilisation et soin de propriètaire ............................11 - 20
• Bienvenue
• Consignes de Sécurité Importantes
• Instructions d’installation
• Caracteristiques
• Opération
• Soins et Entretien
• Dépannage
• Garantie
ENFRIADOR DE VINO
Guía de utilización y cuidado para el propietario.................21 - 30
• Bienvenido
• Instrucciones de Seguridad Importantes
• Instrucciones de instalación
• Caracteristicas
• Operación
• Cuidado y Mantenimiento
• Diagnosticos de Problemas
• Garantia
Read and follow all safety rules and operating instructions
before fi rst use of this product.
Veuillez lire attentivement les consignes de sécurité et les intructions
d’utilisation avant l’utilisation intiale de ce produit.
Lea y observe todas las relgas de seguridad y las instrucciones de
operación antes de usar este producto por la primera vez.
Welcome
Welcome to the Danby family. We are proud of our quality products, and we believe in dependable service. We suggest
that you read this Owner’s Manual before plugging in your new appliance as it contains important operational information,
safety information, troubleshooting and maintenance tips to ensure the reliability and longevity of your appliance.
Visit www.Danby.com to access self-service tools, FAQs and much more. For additional assistance call 1-800-263-2629.
Note the information below; you will need this information to obtain service under warranty.
To receive service, you must provide the original receipt.
Model Number:
Serial Number:
Date of Purchase:
NEED HELP?
Before you call for service, here are a few things you can do to help
us serve you better:
Read this Owner’s Use and Care Guide:
It contains instructions to help you use and maintain your
appliance properly.
If you received a damaged appliance:
Immediately contact the retailer (or builder) that sold you the
appliance.
Save time and money:
Check the Troubleshooting section at the end of the guide before calling. This section helps you solve common problems that may occur.
If you do need service, you can relax, knowing help is only a phone
call away.
1-800-26-
(1-800-263-2629)
1

Important Safety Information
READ AND FOLLOW ALL SAFETY INSTRUCTIONS
IMPORTANT WARNING
DANGER: Risk of child entrapment. Before you throw away your old wine cooler:
• Take off doors or remove the gasket.
• Leave the shelves in place so that children may not easily climb in.
DON’T WAIT! DO IT NOW!
ELECTRICAL REQUIREMENTS
To avoid installation or operation diffi culties, read these instructions thoroughly.
• This appliance must be grounded. Connect only to a properly grounded outlet. See “Grounding
Instructions” section.
• Do not operate this appliance if it has a damaged power cord or plug, if it is not working properly,
or if the appliance has been damaged or dropped. If the power cord is damaged it must be
replaced by the manufacturer, its service agent or similarly qualifi ed person to avoid hazard.
• Never allow children to operate, play with, or crawl inside the appliance.
• Never clean appliance parts with fl ammable fl uids. The fumes can create a fi re hazard or
explosion.
• Do not store or use gasoline or any other fl ammable vapors or liquids in the vicinity of this or any
other appliance. The fumes can create a fi re hazard or explosion.
• Do not splice the power cord that is equipped with this appliance.
• Keep power cord away from heated surfaces.
• Do not immerse power cord, plug or the appliance itself in water.
• Do not use this product near water for example, in a wet basement, laundry room or near a sink.
• Do not use corrosive chemicals or vapors in this appliance.
• Use this appliance only for its intended use, as described in this manual.
• Do not store open containers in this appliance.
• See door surface cleaning instructions in the Care and Maintenance section of this manual.
• Do not cover or block any openings on the appliance.
• Do not store perishable food items such as (but not limited to) meats and dairy products in your
wine cooler. This appliance does not get cold enough to be food safe.
• This appliance is intended for household use only. Do not operate or store this appliance outdoors.
• This appliance should be serviced only by qualifi ed service personnel. Contact the nearest
authorized service facility for examination, repair or adjustment.
SAVE THESE INSTRUCTIONS!
2

Important Safety Information
READ AND FOLLOW ALL SAFETY INSTRUCTIONS
GROUNDING INSTRUCTIONS
This appliance is equipped with a cord having a grounding wire with a grounding plug. The plug must
be plugged into an outlet that is properly installed and grounded. This appliance must be grounded.
In the event of an electrical short circuit, grounding reduces the risk of electric shock by providing an
escape wire for the electric current.
WARNING - Improper use of the grounding plug can result in a risk of electric shock. Consult a
qualifi ed electrician or service agent if the grounding instructions are not completely understood, or if
doubt exists as to whether the appliance is properly grounded.
If the outlet is a standard 2-prong wall outlet, it is your personal responsibility and obligation to have it
replaced with a properly grounded 3-prong wall outlet.
For best operation, plug this appliance into its own electrical outlet to prevent fl ickering of lights,
blowing of fuse or tripping of circuit breaker
DO NOT USE AN EXTENSION CORD
Use an exclusive 115V wall outlet. Do not connect your appliance to extension cords or together with
another appliance in the same wall outlet. Do not splice the cord. Do not under any circumstances
cut or remove the third (ground) prong from the power cord. Do not use and adapter plug with this
appliance.
SAFETY REQUIREMENTS
Ensure that component parts shall be replaced with like components and that servicing shall be done
by factory authorized service personnel, so as to minimize the risk of possible ignition due to incorrect
parts or improper service.
This appliance must be grounded. In the event of an electrical short circuit, grounding reduces the
risk of electrical shock by providing an escape wire for the electrical current. The serial rating plate
indicates the voltage and frequency the appliance is designed for.
Risk of fi re or explosion due to puncturing of refrigerant tubing. Do not use sharp objects to aid in
defrost. Please handle with care. Keep fl ammable materials and vapors such as gasoline away from
the refrigerator. Use nonfl ammable cleaner.
Disposal of this unit should be in accordance with federal and local regulations.
This appliance is not intended for use by persons (including children) whose physical, sensory or
mental capabilities may be different or reduced, or who lack experience or knowledge, unless such
persons receive supervision or training to operate the appliance by a person responsible for their
safety.
WARNING: Keep ventilation openings, in the appliance enclosure or in the built-in structure, clear of
obstruction.
WARNING: Do not use mechanical devices or other means to accelerate the defrosting process,
other than those recommended by the manufacturer.
WARNING: Do not damage the refrigerant circuit.
WARNING: Do not use electrical appliances inside the food storage compartments of the appliance,
unless they are of the type recommended by the manufacturer.
SAVE THESE INSTRUCTIONS!
3

Important Safety Information
READ AND FOLLOW ALL SAFETY INSTRUCTIONS
FOR YOUR SAFETY
• Two people should be used when moving the wine cooler.
• Remove interior and exterior packaging prior to installation.
• Before connecting the appliance to a power source, let it stand upright for approximately 4
hours; this will reduce the possibility of a malfunction in the cooling system from handling during
transportation.
• Place your wine cooler on a fl oor that is strong enough to support it when it is fully loaded. To level
your wine cooler, adjust the front leveling leg at the bottom of the unit.
• Locate the wine cooler away from direct sunlight and sources of heat (stove, heater, radiator,
etc.). Direct sunlight and heat sources may increase electrical consumption. Extreme cold ambient
temperatures may also cause the unit to perform improperly.
• Avoid locating the unit in moist areas.
• Plug the wine cooler into an exclusive, properly installed-grounded wall outlet. Do not under
any circumstances cut or remove the third (ground) prong from the power cord. Any questions
concerning power and/or grounding should be directed toward a certifi ed electrician or an
authorized service centre.
• Do not cover shelves with aluminum foil or any other material which may prevent air circulation.
• In order for the cabinet to remain effi cient do not over load it.
• Do not open the door unless necessary.
• Should the wine cooler be stored without use for long periods, it is suggested, after careful
cleaning, to leave the door ajar. This will allow air to circulate inside the cabinet in order to avoid
possible formations of condensation, mold and odors.
IMPORTANT WARNING
Risk of fi re or explosion due to puncturing of refrigerant tubing. Do not use sharp opjects
to aid in defrost. Please handle with care. Keep fl ammable materials and vapors such as
gasoline away from the unit. Use nonfl ammable cleaner.
Disposal of this unit should be in accordance with federal and local regulations.
SAVE THESE INSTRUCTIONS!
4
Installation Instructions
LOCATION
• Select a location with a strong, level fl oor.
• Remove the exterior and interior packaging.
• Wipe the outside thoroughly with a soft, dry cloth and the inside with a wet, lukewarm cloth.
• Avoid placing the unit in a narrow recess or near any heat source, direct sunlight or moisture.
• Let air circulate freely around the cabinet.
• Keep the rear and sides of the wine cooler at least 12.7 cm (5 inches) away from all adjacent
walls.
• DO NOT use this appliance outdoors. This appliance is intended for household use only. Do not
attempt to operate or store this appliance outdoors.
• DO NOT build this unit into an enclosure. This appliance is designed for a free-standing
application only and is not intended to be built-in.
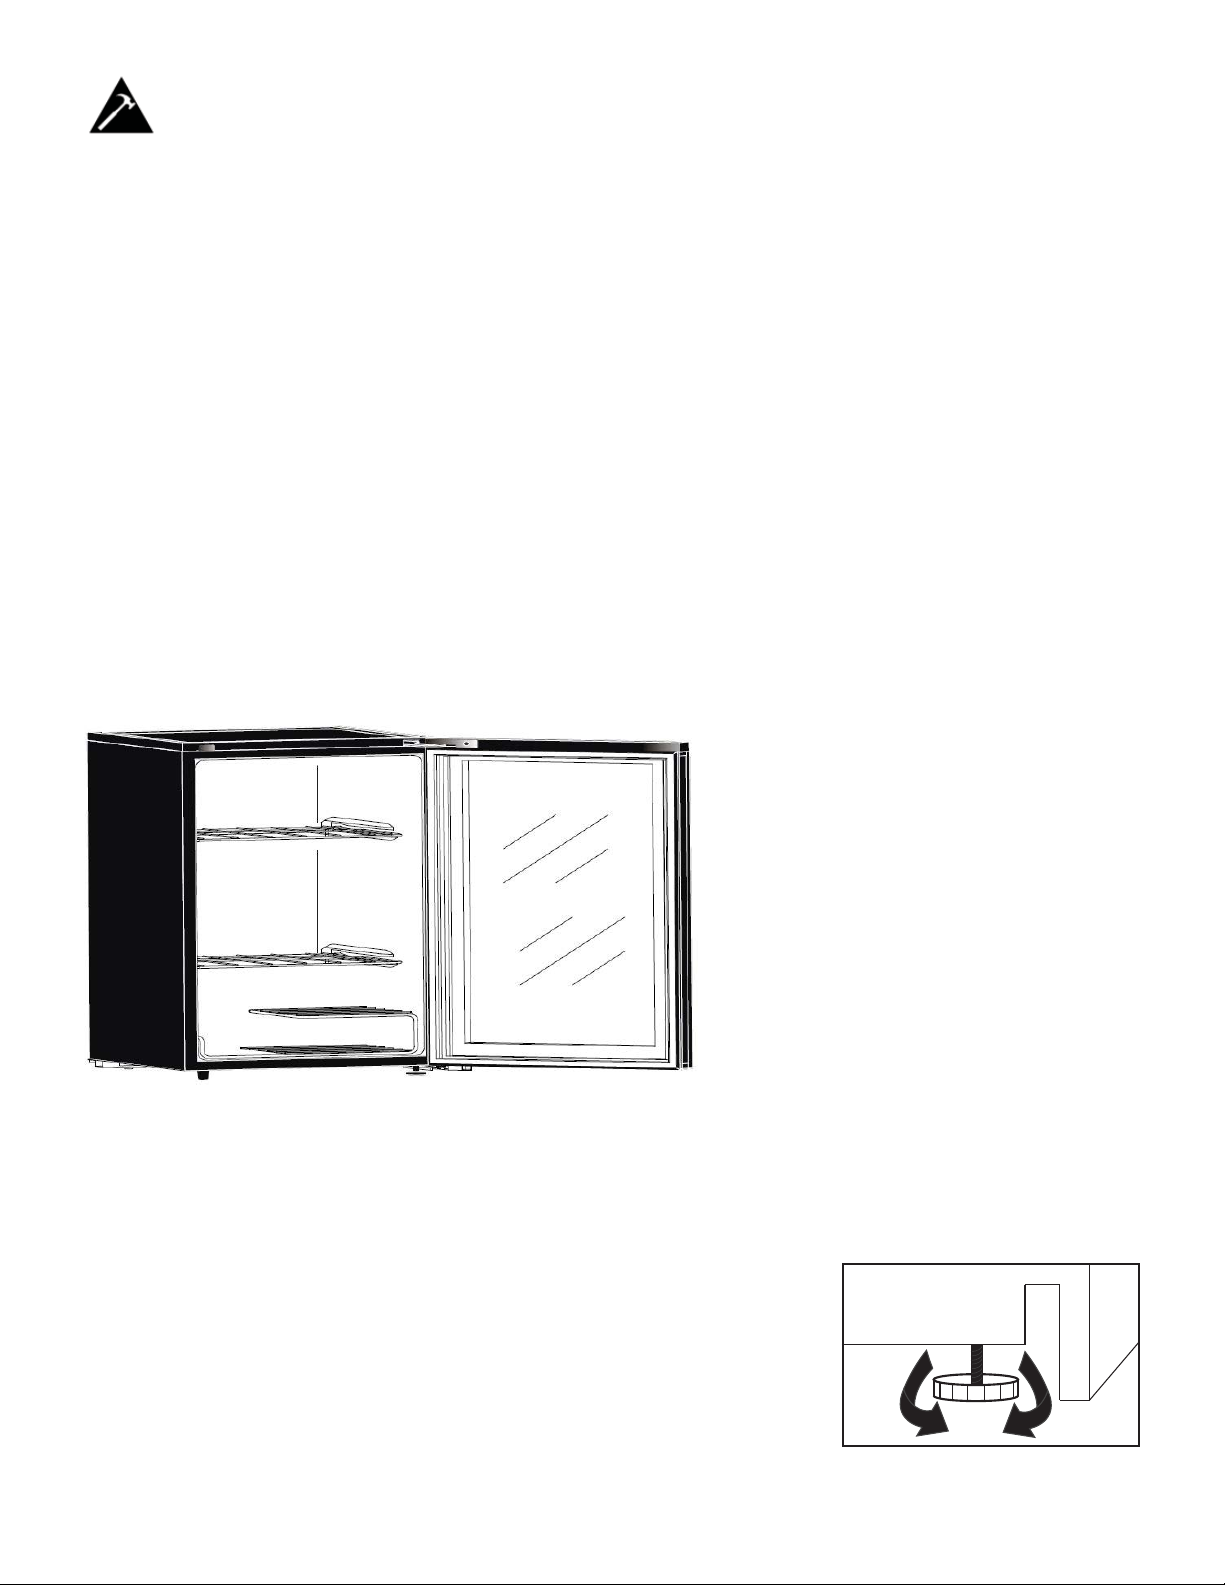
FEATURES
1. Tempered glass door: tinted for UV
protection while still allowing for easy
interior viewing.
2. Magnetic Door Gaskets: Tight fi tting
seals retain all the cooling power and
humidity levels.
3. Leveling Legs
4. Plastic coated shelves: Odor
resistant, rustproof and removable for
easy cleaning.
5. Thermostat dial: externally mounted
rear wall thermostat. Controls the
temperature inside the wine cooler.
6. Interior light (not shown): illuminates
the compartment.
LEVELING INSTRUCTIONS
Beneath the wine cooler there is leveling leg on the hinge side of the
unit. It is important that your wine cooler is level. To level the unit:
Fig A
1. Move the wine cooler to its fi nal location.
2. Turn the leveling leg clockwise as far as it will go, until the top of
the foot is touching the bottom of the chassis.
3. Slowly turn the leveling leg counter-clockwise until the unit is level.
5
Raises
the Leg
(lowers
the unit)
Lowers
the Leg
(raises
the unit)

Operating Instructions
SETTING THE TEMPERATURE
The temperature of the wine cooler is controlled by adjusting the thermostat control knob on the back
of the unit. To achieve maximum cooling temperature quickly:
• Turn the temperature control knob clockwise to the widest, darkest part of the graduated blue
control dial.
• Allow the unit to run at this setting for 3 - 4 hours.
• When maximum cooling is achieved, turn the temperature control knob to the middle position on
the graduated blue control dial, as per Fig. A.
• To turn the wine cooler off, turn the control knob to the “0” position, as per Fig. B. If the wine cooler
will not be used for an extended period of time, it is recommended to unplug the unit and leave the
door partially open to avoid possible formation of odors inside the unit.
Note: Wait 3 - 5 minutes before restarting the unit if operation has been interrupted.
Note: On the graduated blue dial, the thicker, darker blue indicates colder temperatures and the
thinner, lighter blue indicates warmer temperatures. The wine cooler temperature will vary depending
on the quantity of bottles stored in the unit and the frequency that the door is opened.
INTERIOR LIGHT
To manually operate the interior light, press the light switch situated on the right side of the interior
light housing on the ceiling of the unit. This will allow the light to remain on while the door is closed.
Note: The light will default to off. It can be turned on to run continually. Due to energy effi ciency
requirements for a wine cooler in this size, there is no option to have the light turn on when the door
opens.
DEFROST
This unit is equipped with an automatic defrost function and does not require manual defrosting.
Defrost water from the unit is channeled into a drip tray located above the compressor. Heat transfer
from the compressor causes the defrost water to evaporate.
SHELF INSTRUCTIONS
To remove a shelf from its locked position, lift the rear of the shelf
upward and then slide the shelf out of the unit.
To replace the shelf, ensure it is resting securely on the support
brackets and then push inward until the shelf locks into place.
6
Operating Instructions
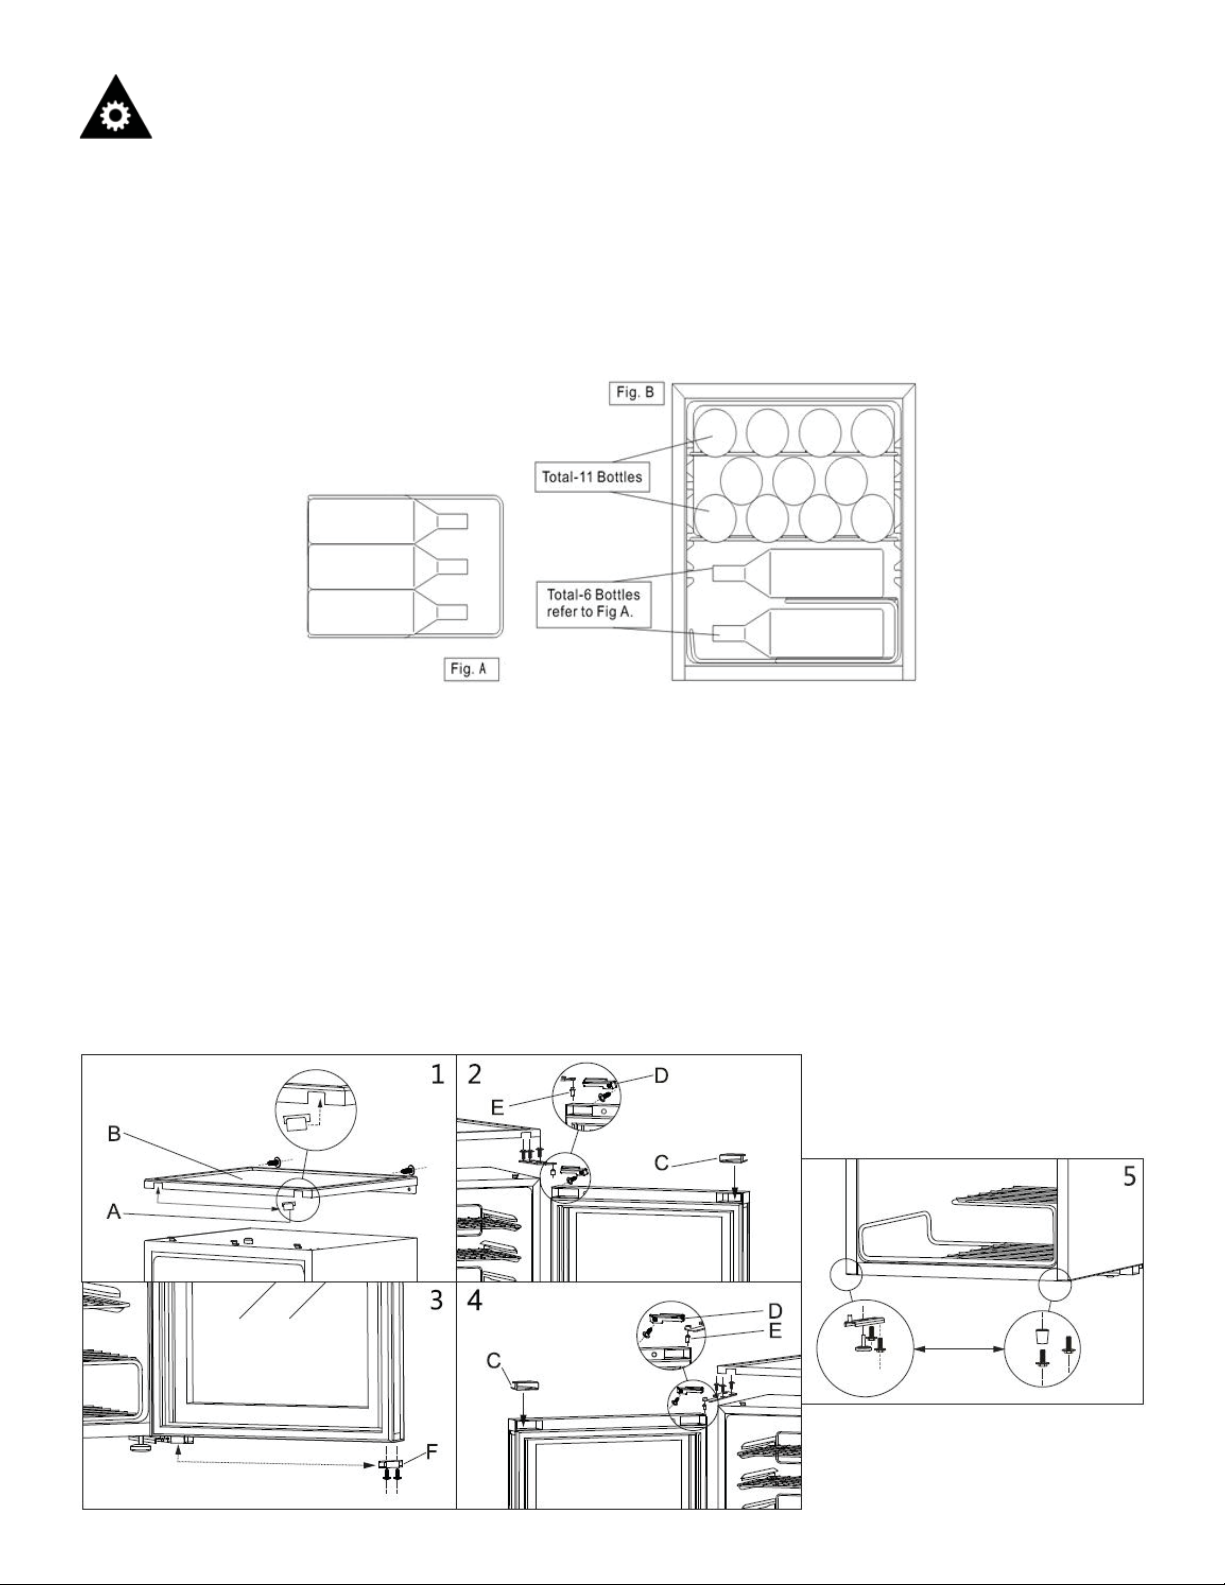
WINE STORAGE
The maximum capacity of this unit is 17 750 ml wine bottles, when stocked as per these instructions.
1. Place 4 bottles on the two top shelves.
2. Place 3 bottles staggered on top of the four bottles on the second shelf.
3. Place 3 bottles on each shelf of the bottom two tiered shelf as per Fig. A.
4. Maximum storage capacity is displayed in Fig. B.
DOOR REVERSAL INSTRUCTIONS
1. Remove the 3 screws from the back of the worktop, lift the back of the worktop slightly and pull the
worktop forward to remove the worktop. Figure 1.
2. Remove the left or right door strip cover (depending on which side you are moving the door to)
and the left or right hinge cover, then remove the 2 upper hinge screws and remove the upper
hinge. Loosen the upper door spindle and remove the door assembly. Figure 2.
3. Remove the hinge pin from the door, move it to the other side of the door. Figure 3.
4. Install the upper door spindle to the opposite side of the upper hinge, place the upper hinge onto
the other side of the cabinet, install the door strip cover and the hinge cover. Figure 4.
5. Loosen the adjustable foot and remove the 2 screws around it. Remove the 2 bottom hinge
screws, remove the bottom hinge. Reinstall the foot and 2 screws where the bottom hinge used to
be. Install the bottom hinge where the foot used to be. Figure 5.
6. Make necessary adjustments to the upper and bottom hinge, reinstall the worktop.
7

Care and Maintenance
CLEANING
• To clean the inside of the unit, use a soft cloth and a solution of a tablespoon of baking soda to
one quart of water or a mild soap solution or some mild detergent.
• Wash removable shelves in a mild detergent solution, then dry and wipe with a soft cloth.
• Clean the outside with a soft, damp cloth and some mild detergent.
NOTE: Do not use cleaners containing ammonia or alcohol on the wine cooler. Ammonia or alcohol
can damage the appearance of the appliance.
NOTE: Never use any commercial or abrasive cleaners or sharp objects on any part of the wine
cooler.
POWER FAILURE
Most power failures are corrected within a few hours and should not affect the temperature of your
appliance if you minimize the number of times the door is opened. If the power is going to be off for
a longer period of time, you need to take the proper steps to protect your contents. In the event of a
power failure, wait 3 to 5 minutes before restarting.
VACATION
• Short vacations: Leave the wine cooler operating during vacations of less than three (3) weeks.
• Long vacations: If the appliance will not be used for several months, remove all items and turn
off the appliance. Clean and dry the interior thoroughly. To prevent odor and mold growth, leave
the door open slightly, blocking it open if necessary.
ENERGY SAVING TIP
The unit should be located in the coolest area of the room, away from heat producing appliances, and
out of direct sunlight.
MOVING YOUR WINE COOLER
• Remove all items.
• Securely tape down all loose items (shelves) inside your appliance.
• Turn the adjustable leg up to the base to avoid damage.
• Tape the door shut.
• Be sure the appliance stays secure in the upright position during transportation. Also protect the
outside of the appliance with a blanket or similar item.
DISPOSING OF YOUR WINE COOLER
This product may not be treated as regular household waste, it should be taken to the appropriate
waste collection point for recycling of electrical components. For information on local waste collection
points, contact your local waste removal agency or government offi ce.
8

Troubleshooting
Occasionally, a problem may arise that is minor in nature, and a service call may not be necessary.
Use this troubleshooting guide for a possible solution. If the unit continues to operate improperly, call
an authorized service depot or Danby’s Toll Free Number 1-800-263-2629 for assistance.
Problem Possible Cause What to do
No power • A fuse in your home may be
blown or the circuit breaker
tripped.
• Power surge.
• Replace fuse or reset circuit breaker.
• Unplug the wine cooler, wait a few
seconds and then plug it back in
Cabinet temperature
is too high.
Condensation on
the cabinet, doors or
fl oor.
Wine cooler runs
continuously.
• Plug not fully inserted into
the wall outlet.
• Temperature setting.
• Door not shut properly or
opened excessively.
• Recently added a large
quantity of warm bottles to
the cabinet.
• High humidity conditions in
the home.
• Door not shut properly or
opened excessively.
• Temperature set too cold.
• Door is not closed.
• Make sure the 3-prong plug is fully
inserted into the outlet.
• Verify the temperature control setting.
Adjust if neccessary.
• Ensure that the door is fully closed
and that the gasket is sealing against
the cabinets. Open the doors only as
needed and for short periods of time.
• Limit the quantity of warm bottles
being introduced to the cabinet at the
same time. Attempt to stagger the
load introduction if possible.
• The condensation will subside once
humidity conditions return to normal.
• Ensure that the door is fully closed
and that the gasket is sealing. against
the cabinets. Open the door only as
needed and for short periods of time
• Adjust temperature to warmer setting.
• Close door securely.
• Door opened too long or too
often.
• Close proximity to heat
source or direct sunlight.
9
• Minimize door opening duration and
frequency.
• Do not place unit close to heat
sources or direct sunlight.

LIMITED IN-HOME APPLIANCE WARRANTY
LIMITED IN-HOME APPLIANCE WARRANTY
This quality product is warranted to be free from manufacturer’s defects in material and workmanship, provided that the unit is used under the normal operating
This quality product is warranted to be free from manufacturer’s defects in material and workmanship, provided that the unit is
conditions intended by the manufacturer.
used under the normal operating conditions intended by the manufacturer.
This warranty is available only to the person to whom the unit was originally sold by Danby Products Limited (Canada) or Danby Products Inc. (U.S.A.) (hereafter
This warranty is available only to the person to whom the unit was originally sold by Danby Products Limited (Canada) or
“Danby”) or by an authorized distributor of Danby, and is non-transferable.
Danby Products Inc. (U.S.A.) (hereafter “Danby”) or by an authorized distributor of Danby, and is non-transferable.
TERMS OF WARRANTY
Plastic parts, are warranted for thirty (30) days only from purchase date, with no extensions provided.
Plastic parts, are warranted for thirty (30) days only from purchase date, with no extensions provided.
12 months
First Year
To obtain
service
To obtain
Service
Boundaries of
Boundaries of
in-home service
In Home Service
During the first twelve (12) months, any functional parts of this product found to be defective, will be
repaired or replaced, at warrantor’s option, at no charge to the ORIGINAL purchaser.
During the rst twelve (12) months, any functional parts of this product found to be defective, will be repaired or replaced, at warrantor’s
option, at no charge to the ORIGINAL purchaser.
Danby reserves the right to limit the boundaries of “In Home Service” to the proximity of an Authorized
Service Depot. Any appliance requiring service outside the limited boundaries of “In Home Service” ,it
Danby reserves the right to limit the boundaries of “In Home Service” to the proximity of an Authorized Service Depot. Any app liance
will be the consumer’s responsibility to transport the appliance (at their own expense) to the original
requiring service outside the limited boundaries of “In Home Service” , it will be the consumer’s responsibility to transport the appliance (at
retailer (point of purchase) or a service depot for repair. See “Boundaries of In Home Service” below.
their own expense) to the original retailer (point of purchase) or a service depot for repair. See “Boundaries of In Home Serv ice” below.
Contact your dealer from whom your unit was purchased, or contact your nearest authorized Danby
Contact your dealer from whom your unit was purchased, or contact your nearest authorized Danby service depot, where service
service depot, where service must be performed by a qualified service technician. If service is performed
must be performed by a qualied service technician.
on the units by anyone other than an authorized service depot, or the unit is used for commercial
If service is performed on the units by anyone other than an authorized service depot, or the unit is used for commercial appli cation, all
application, all obligations of Danby under this warranty shall be void.
obligations of Danby under this warranty shall be void.
If the appliance is installed in a location that is 100 kilometres (62 miles) or more from the nearest
If the appliance is installed in a location that is 100 kilometers (62 miles) or more from the nearest service center your unit must be
service centre your unit must be delivered to the nearest authorized Danby Service Depot, as service
delivered to the nearest authorized Danby Service Depot, as service must only be performed by a technician qualied and certif ied for
must only be performed by a technician qualified and certified for warranty service by Danby. Transpor-
warranty service by Danby. Transportation charges to and from the service location are not protected by this warranty and are t he
tation charges to and from the service location are not protected by this warranty and are the responsi-
responsibility of the purchaser.
bility of the purchaser.
TERMS OF WARRANTY
Nothing within this warranty shall imply that Danby will be responsible or liable for any spoilage or damage to food or other c ontents of this appliance, whether due
Nothing within this warranty shall imply that Danby will be responsible or liable for any spoilage or damage to food or other
to any defect of the appliance, or its use, whether proper or improper.
contents of this appliance, whether due to any defect of the appliance, or its use, whether proper or improper.
EXCLUSIONS
EXCLUSIONS
Save as herein provided, by Danby, there are no other warranties, conditions, representations or guarantees, express or
Save as herein provided, Danby, there are no other warranties, conditions, representations or guarantees, express or implied, m ade or intended by Danby or its
implied, made or intended by Danby or its authorized distributors and all other warranties, conditions, representations or
authorized distributors and all other warranties, conditions, representations or guarantees, including any warranties, conditio ns, representations or guarantees
guarantees, including any warranties, conditions, representations or guarantees under any Sale of Goods Act or like legislation
under any Sale of Goods Act or like legislation or statue is hereby expressly excluded. Save as herein provided, Danby shall no t be responsible for any damages
or statute is hereby expressly excluded. Save as herein provided, Danby shall not be responsible for any damages to persons
to persons or property, including the unit itself, howsoever caused or any consequential damages arising from the malfunction o f the unit and by the purchase of
or property, including the unit itself, howsoever caused or any consequential damages arising from the malfunction of the unit
the unit, the purchaser does hereby agree to indemnify and hold harmless Danby from any claim for damages to persons or propert y caused by the unit.
and by the purchase of the unit, the purchaser does hereby agree to indemnify and hold harmless Danby from any claim for
damages to persons or property caused by the unit.
No warranty or insurance herein contained or set out shall apply when damage or repair is caused by any of the following:
1) Power failure.
No warranty or insurance herein contained or set out shall apply when damage or repair is caused by any of the following:
1) Power failure.
2) Damage in transit or when moving the appliance.
2) Damage in transit or when moving the appliance.
3) Improper power supply such as low voltage, defective house wiring or inadequate fuses.
3) Improper power supply such as low voltage, defective house wiring or inadequate fuses.
4) Accident, alteration, abuse or misuse of the appliance such as inadequate air circulation in the room or abnormal operating con ditions
4) Accident, alteration, abuse or misuse of the appliance such as inadequate air circulation in the room or abnormal operating
conditions (extremely high or low room temperature).
5) Use for commercial or industrial purposes (i.e., If the appliance is not installed in a domestic residence).
6) Fire, water damage, theft, war, riot, hostility, acts of God such as hurricanes, floods etc.
7) Service calls resulting in customer education.
8) Improper Installation (i.e., building-in of a free standing appliance or using an appliance outdoors that is not approved for
outdoor application). Proof of purchase date will be required for warranty claims; so, please retain bills of sale. In the event
Proof of purchase date will be required for warranty claims; so, please retain bills of sale. In the event warranty service is required, present this document to our
warranty service is required, present this document to our AUTHORIZED SERVICE DEPOT.
AUTHORIZED SERVICE DEPOT.
(extremely high or low room temperature).
5) Use for commercial or industrial purposes (ie. If the appliance is not installed in a domestic residence).
6) Fire, water damage, theft, war, riot, hostility, acts of God such as hurricanes, oods etc.
7) Service calls resulting in customer education.
8) Improper Installation (ie. Building-in of a free standing appliance or using an appliance outdoors that is not approved for out door application).
GENERAL PROVISIONS
GENERAL PROVISIONS
Danby Products Limited
Danby Products Limited
PO Box 1778, Guelph, Ontario, Canada N1H 6Z9
PO Box 1778, Guelph, Ontario, Canada N1H 6Z9
Telephone: (519) 837-0920 FAX: (519) 837-0449
Telephone: (519) 837-0920 FAX: (519) 837-0449
Warranty Service
Warranty Service
In-home
In-home
1-800-263-2629
1-800-263-2629
07/14
04/09
Danby Products Inc.
PO Box 669, Findlay, Ohio, U.S.A. 45840
Telephone: (419) 425-8627 FAX: (419) 425-8629
PO Box 669, Findlay, Ohio, U.S.A. 45840
Telephone: (419) 425-8627 FAX: (419) 425-8629
Danby Products Inc.

Bienvenue
Bienvenue dans la famille Danby. Nous sommes fiers de la qualité de nos produits et nous croyons en le service fiable.
Nous vous suggérons de lire ce manuel d’utilisation avant de brancher vontre nouvel appareil car il contient des informations
importantes sur l’utilisation, la sécurité, le dépannage at la maintenance, afin d’assurer la fiabilité at la longévité de votre
appareil. Visitez www.Danby.com pour accéder aux outils d’autoservice, aux FAQ et bien plus encore. Pour obtenir de l’aide
supplémentaire, composez le 1-800-263-2629.
Veuillez noter les informations ci-dessous; ces renseignements seront nécessaires si votre appareil a besoin
d’entretien ou pour les demandes de renseignements généraux. Pour bénéficier d’une opération de maintenance ou de dépannage, le reçu original sera exigé.
Numéro de modèle :
Numéro de serie :
Date d’achat :
BESOIN D’ASSISTANCE ?
Veuillez trouver quelques conseils avant de faire appel à nos
services, cela nous aidera à mieux vous servir :
Lisez ce guide :
Il comprend des instructions pour l’utilisation et l’entretien
adapté de votre appareil.
Si votre nouvel appareil est endommagé :
Contactez immédiatement le revendeur (ou le fabricant).
Gagnez du temps et de l’argent :
Avant de faire appel à nos services, consultez à nouveau
la section « Dépannage ». Cette section vous aidera à
résoudre des problèmes courants.
Si une réparation est nécessaire, ne vous inquiétez pas, la
solution est au bout du fil.
1-800-26-
(1-800-263-2629)
11

Consignes de sécurité importantes
LIRE ET SUIVRE TOUTES LES INSTRUCTIONS DE SÉCURITÉ
AVERTISSEMENT IMPORTANT
DANGER: Risque de piégeage d’enfant. Avant de jeter votre vieux refroidisseur de vin:
• Enlever les portes.
• Laissez les étagères en place afi n que les enfants ne grimpent pas facilement.
N’ATTENDEZ PAS! FAIS LE MAINTENANT!
CONDITIONS ÉLECTRIQUES
Pour éviter toute diffi culté d’installation ou de fonctionnement, lisez attentivement ces
instructions.
• Cet appareil doit être mis à la terre. Branchez le seulement dans une prise correctement mise à la
terre.
• Ne faites pas fonctionner cet appareil s’il a un cordon ou fi che électrique endommagé ou si
l’appareil a été endommagé ou échappé. Si le cordon d’alimentation est endommagé, il doit être
remplacé par le fabricant, son agent de service ou une personne qualifi ée pour éviter tout risque.
• N’épissez pas le cordon électrique.
• Ne permettez jamais à un enfant de faire fonctionner l’appareil, de jouer avec ou de ramper à
l’intérieur.
• Ne nettoyez jamais de pièces de l’appareil avec un liquide infl ammable. Les vapeurs peuvent
constituer un risque d’incendie ou provoquer une explosion.
• N’entreposez et n’utilisez pas d’essence ou d’autres liquides ou vapeurs infl ammables à proximité
de cet appareil ou de tout autre appareil. Les vapeurs peuvent constituer un risque d’incendie ou
provoquer une explosion. Gardez le cordon électrique éloigné des sources de chaleur.
• N’immersez pas le cordon ou sa fi che dans aucun liquide.
• N’utilisez pas cet appareil près de bassins d’eau, par exemple dans un sous-sol détrempé, près
d’une piscine ou d’un évier.
• N’utilisez pas de produits chimiques ou vapeurs corrosives dans/près de cet appareil.
• N’utilisez cet appareil que pour les fi ns aux quelles il est conçu comme indiqué dans ce guide.
• Entreposez le vin dans des bouteilles scellées seulement.
• Référez-vous aux instructions de nettoyage du fi ni de la porte se trouvant au chapitre de Soins et
nettoyage de ce guide.
• Ne recouvrez pas ou n’obstruez aucune ouverture de l’appareil.
• Ne placez pas les articles périssables de nourriture dans votre appareil. (Par exemple, les viandes
et les produits laitiers). Cet appareil n’est pas assez froid pour être sécuritaire pour les aliments.
• Cet appareil est conçu pour un usage domestique à l’intérieur seulement. N’entreposez ni
n’utilisez pas cet appareil à l’extérieur.
• Cet appareil ne devrait être réparé que par du personnel qualifi é. Pour tout examen, réparation ou
réglage, contactez votre centre de service le plus rapproché.
SAUVE CES INSTRUCTIONS!
12

Consignes de sécurité importantes
LIRE ET SUIVRE TOUTES LES INSTRUCTIONS DE SÉCURITÉ
MISE À LA TERRE
Cet appareil doit être mis à la terre. Dans l’éventualité d’un court-circuit, la mise à la terre procure un
chemin direct contournement du courant pour prévenir l’électrocution des manipulateurs de l’appareil.
L’appareil est muni d’un cordon électrique comprenant un fi l de mise à la terre et une fi che de terre.
Branchez la fi che dans une prise de courant correctement installée et mise à la terre.
AVERTISSEMENT - Une fi che de mise à la terre mal branchée peut entraîner un risque d’incendie,
de choc électrique ou de blessures aux personnes qui utilisent l’appareil. Si vous n’êtes pas certain
que l’appareil est correctement mis à la terre, consultez un préposé du service qualifi é.
Si la prise murale est un prise à 2 branches, c’est votre obligation, et la responsabilité vous en
incombe, de la faire remplacer par une prise à trois branches adéquatement mise à la terre. Pour
un meilleur rendement et pour éviter que les ampoules d’éclairage de la résidence soient affectées
d’un affaissement de tension, ou que le fusible ou disjoncteur du circuit ne grille ou ne se déclenche,
dédiez un circuit individuel d’alimentation à la machine à glaçons.
N’UTILISEZ JAMAIS DE FIL DE RALLONGE
Brancher l’appareil à son propre curcuit de 115V. N’utilisez pas de rallonge électrique pour brancher
votre appareil. Ne branchez pas l’appareil à une prise femelle multiple qui sera également utilisée
pour d’autres appareils électriques. N’épissez pas le cordon électrique. N’utilisez pas d’adaptateur de
fi che avec cet appareil. N’utilisez pas de cordon de rallonge avec cet appareil.
EXIGENCES DE SÉCURITÉ
Assurez-vous que les composants doivent être remplacés par des composants similaires et que
l’entretien doit être effectué par le personnel de maintenance agréé en usine, afi n de minimiser le
risque d’allumage dû à des pièces incorrectes ou à un mauvais entretien.
Cet appareil doit être mis à la terre. En cas de court-circuit électrique, la mise à la terre réduit le
risque de choc électrique en fournissant un fi l d’échappement pour le courant électrique. La plaque
signalétique en série indique la tension et la fréquence pour lesquelles l’appareil est conçu.
Risque d’incendie ou d’explosion dû à la perforation des tuyaux de réfrigérant. N’utilisez pas d’objets
tranchants pour faciliter le dégivrage. Veuillez manipuler avec précaution. Garder les matériaux
et les vapeurs infl ammables tels que l’essence à l’écart du réfrigérateur. Utiliser un nettoyant non
infl ammable.
L’élimination de cet appareil doit être conforme aux règlements fédéraux et locaux.
Cet appareil n’est pas destiné à être utilisé par des personnes (y compris des enfants) dont les
capacités physiques, sensorielles ou mentales peuvent être différentes ou réduites, ou qui manquent
d’expérience ou de connaissances, sauf si ces personnes reçoivent une supervision ou une formation
pour faire fonctionner l’appareil par une personne responsable de leur sécurité.
AVERTISSEMENT: Veillez à ce que les ouvertures de ventilation, dans l’enceinte de l’appareil ou
dans la structure intégrée, ne soient pas obstruées.
AVERTISSEMENT: N’utilisez pas de dispositifs mécaniques ou d’autres moyens pour accélérer le
processus de dégivrage, autres que ceux recommandés par le fabricant.
AVERTISSEMENT: Ne pas endommager le circuit frigorigène.
AVERTISSEMENT: N’utilisez pas d’appareils électriques à l’intérieur des compartiments de l’appareil,
sauf s’ils sont du type recommandé par le fabricant.
SAUVE CES INSTRUCTIONS!
13

Consignes de sécurité importantes
LIRE ET SUIVRE TOUTES LES INSTRUCTIONS DE SÉCURITÉ
POUR VOTRE SÉCURITÉ
• Deux personnes devraient être utilisées lorsque vous déplacez le refroidisseur de vin.
• Retirer l ‘emballage intérieur et extérieur avant l’ installation.
• Avant de brancher l ‘appareil à une source d’ alimentation, laissez - le reposer verticalement
pendant environ 4 heures; Cela réduira la possibilité d’un mauvais fonctionnement dans le
système de refroidissement de la manipulation pendant le transport.
• Placez votre refroidisseur de vin sur un plancher qui est assez fort pour le soutenir quand il est
complètement chargé. Pour niveler votre refroidisseur de vin, réglez la jambe de nivellement avant
au bas de l’appareil.
• Localisez le refroidisseur de vin à l’abri de la lumière directe du soleil et des sources de chaleur
(poêle, radiateur, etc.). La lumière directe du soleil et les sources de chaleur peuvent augmenter
la consommation électrique. Des températures ambiantes extrêmes peuvent également provoquer
un dysfonctionnement de l’appareil.
• Évitez de placer l’appareil dans des endroits humides.
• Branchez le refroidisseur à vin dans une prise murale exclusive, correctement installée. Ne jamais
couper ou retirer la troisième broche (mise à la terre) du cordon d’alimentation. Toute question
concernant l’alimentation et / ou la mise à la terre doit être adressée à un électricien agréé ou à un
centre de service agréé.
• Ne couvrez pas les étagères avec du papier d’aluminium ou tout autre matériau qui pourrait
empêcher la circulation d’air.
• Pour que l’armoire reste effi cace, ne la surchargez pas.
• N’ouvrez pas la porte si nécessaire.
• Si le refroidisseur de vin est conservé sans utilisation pendant de longues périodes, il est suggéré,
après un nettoyage soigneux, de laisser la porte entrebâillée. Cela permettra à l’air de circuler à
l’intérieur de l’armoire afi n d’éviter les formations possibles de la condensation, les moisissures et
les odeurs.
AVERTISSEMENT IMPORTANT
Risque d’incendie ou d’explosion dû à la perforation des tuyaux de réfrigérant. N’utilisez pas
d’objets opaques pour faciliter le dégivrage. Veuillez manipuler avec précaution. Gardez les
matériaux et les vapeurs infl ammables tels que l’essence à l’écart de l’appareil. Utiliser un
nettoyant non infl ammable.
L’élimination de cet appareil doit être conforme aux règlements fédéraux et locaux.
SAUVE CES INSTRUCTIONS!
14

Instructions d’installation
EMPLACEMENT
• Choisir un endroit avec un plancher solide et au niveau.
• Retirer l’emballage extérieur et intérieur.
• Essuyez l’extérieur à fond avec un chiffon doux et sec et à l’intérieur avec un chiffon humide et
tiède.
• Évitez de placer l’appareil dans un évidement étroit ou à proximité d’une source de chaleur, de la
lumière directe du soleil ou de l’humidité.
• Laissez l’air circuler librement autour de l’armoire.
• Gardez l’arrière et les côtés du refroidisseur de vin à au moins 12,7 cm (5 pouces) de tous les
murs adjacents.
• NE PAS utiliser cet appareil à l’extérieur. Cet appareil a été conçu pour usage domestique
seulement. Ne pas faire fonctionner ou entreposer cet appareil à l’extérieur.
• NE PAS incorporer cet appareil dans une armoire. Cet appareil est conçu pour une utilisation
autonome seulement et n’est pas prévu pour être encastré.
CARACTÉRISTIQUES
1. Portes En Verre Trempé: Teinté pour protéger
contre les rayons UV tout en permettant de voir
facilement le contenu du cabinet.
2. Joint Étanche Magnétique: Le joint étanche
permet de conserver le niveau de température et
d’humidité à l’intérieur du cabinet.
3. Pied Ajustable
4. Étageres Plastifi ées: Résistent auxodeurs et à
la rouille. Amovibles pour faciliter l’entretien.
5. Contôles Électroniques de la Température:
(contrôles installés à l’avant, à l’extérieur du
cabinet)Ces commandes contrôlent la température
à l’intérieur du cabinet à vins.
6. Lumière Intérieures (non illustré): Illumine le
compartiment.
INSTRUCTIONS DE NIVEAU
Sous le refroidisseur de vin il ya la jambe de nivellement sur le côté
de charnière de l’unité. Il est important que votre refroidisseur de vin
soit de niveau. Pour niveler l’unité:
Fig A
1. Déplacez le refroidisseur de vin à son emplacement fi nal.
2. Tournez la jambe de nivellement dans le sens des aiguilles d’une
montre aussi loin que possible, jusqu’à ce que le haut du pied
touche le bas du châssis.
3. Tournez lentement la jambe de nivellement dans le sens inverse
des aiguilles d’une montre jusqu’à ce que l’unité soit à niveau.
15
Raises
the Leg
(lowers
the unit)
Lowers
the Leg
(raises
the unit)

Consignes d’utilisation
RÉGLER LA TEMPÉRATURE
La température du refroidisseur de vin est contrôlée en réglant le bouton de contrôle du thermostat à
l’arrière de l’appareil. Pour obtenir une température maximale de refroidissement rapide:
• Tourner le bouton de réglage de la température dans le sens des aiguilles d ‘une montre sur la
partie la plus large et la plus foncée du cadran bleu gradué.
• Laissez l ‘appareil fonctionner pendant 3 à 4 heures.
• Lorsque le refroidissement maximal est atteint, tournez le bouton de contrôle de la température
sur la position médiane sur la molette bleue graduée, comme illustré à la Fig. A.
• Pour éteindre le refroidisseur de vin, tournez le bouton de commande sur la position “0”, comme
indiqué sur la Fig. B. Si le refroidisseur à vin n’est pas utilisé pendant une longue période, il est
recommandé de débrancher l’appareil et de laisser la porte partiellement ouverte pour éviter la
formation d’odeurs à l’intérieur de l’appareil.
Remarque: Attendre 3 à 5 minutes avant de redémarrer l’appareil si l’opération a été interrompue.
Remarque: Sur le cadran bleu gradué, le bleu plus épais et plus foncé indique des températures
plus froides et le bleu plus clair et plus clair indique des températures plus chaudes. La température
du refroidisseur de vin varie en fonction de la quantité de bouteilles stockées dans l’appareil et de la
fréquence d’ouverture de la porte.
LUMIÈRE INTÉRIOR
Pour actionner manuellement l’éclairage intérieur, appuyez sur le commutateur situé sur le côté droit
du boîtier de l’éclairage intérieur sur le plafond de l’appareil. Ceci permettra à la lumière de rester
allumée pendant que la porte est fermée.
Remarque: Le voyant s’éteint par défaut. Il peut être activé pour fonctionner continuellement. En
raison des exigences d’effi cacité énergétique pour un refroidisseur de vin dans cette taille, il n’y a
aucune option pour avoir la lumière allument quand la porte s’ouvre.
DÉGIVRAGE
Cet appareil est équipé d’une fonction de dégivrage automatique et ne nécessite pas de dégivrage
manuel. L’eau de dégivrage de l’unité est canalisée dans un bac d’égouttement situé au-dessus du
compresseur. Le transfert de chaleur du compresseur entraîne l’évaporation de l’eau de dégivrage.
INSTRUCTIONS DE L’ÉTAGÈRE
Pour enlever une tablette de la position verrouillée, incline
l’étagère et tire à l’extérieur.
Pour réinstaller, assurez l’étagère se repose sur les supports et
poussée la tablette vers l’intérieur jusqu’à cequ’elle soit verrouillée
en place.
16

Consignes d’utilisation
ENTREPOSAGE DES VINS
La capacité maximale de cet appareil est de 17 bouteilles de 750 ml de vin, quand stocké selon ces
instructions.
1. Placez 4 bouteilles sur les deux étagères supérieures.
2. Placez 3 bouteilles échelonnées sur le dessus des quatre bouteilles sur la deuxième étagère.
3. Placez 3 bouteilles sur chaque étagère de la tablette inférieure à deux étages comme Fig. A.
4. La capacité maximale de stockage est affi chée à la Fig. B.
Total-11 bouteilles
Total - 6 bouteilles
INSTRUCTIONS DE L’INVERSION DE PORTE
1. Retirez les 3 vis de l’arrière du plan de travail, soulevez légèrement l’arrière du plan de travail et tirez le
plan de travail vers l’avant pour retirer le plan de travail. Figure 1.
2. Retirez le couvercle de porte gauche ou droit (en fonction du côté vers lequel vous déplacez la porte)
et le couvercle de charnière gauche ou droit, puis retirez les 2 vis de charnière supérieures et retirez la
charnière supérieure. Desserrez la broche de porte supérieure et retirez l’ensemble de porte. Figure 2.
3. Retirez la goupille de charnière de la porte, le déplacer à l’autre côté de la porte. Figure 3.
4. Installez la broche supérieure de la porte sur le côté opposé de la charnière supérieure, placez la charnière
supérieure de l’autre côté de l’armoire, installez le couvercle de la porte et le couvercle de la charnière.
Figure 4.
5. Desserrer le pied réglable et enlever les 2 vis autour de lui. Retirez les 2 vis de charnière inférieure, retirez
la charnière inférieure. Réinstallez le pied et les 2 vis où était autrefois la charnière inférieure. Installez la
charnière inférieure où se trouvait le pied. Figure 5.
6. Effectuez les réglages nécessaires sur la charnière supérieure et inférieure, réinstallez le plan de travail.
17

Soins et entretien
NETTOYAGE
• Pour nettoyer l’intérieur de l’unité, utilisez un chiffon doux et une solution d’une cuillère à soupe de
bicarbonate de soude à un quart d’eau ou une solution de savon doux ou un détergent doux.
• Lavez les tablettes amovibles dans une solution détergente douce, puis séchez et essuyez avec
un chiffon doux.
• Nettoyez l’extérieur avec un chiffon doux et humide et un peu de détergent doux.
REMARQUE : N’utilisez pas de produits nettoyants comprenant de l’ammoniaque ou de l’alcool sur
l’appareil. L’ammoniaque ou l’alcool peuvent altérer le fi ni de l’appareil.
REMARQUE : N’utilisez jamais de nettoyant industriels sur aucune partie de votre appareil.
PANNE DE COURANT
La plupart des pannes de courant ne durent que quelques heures et ne devraient pas modifi er
la température de votre l’appareil si vous réduisez au maximum le nombre de fois où la porte est
ouverte. Si le courant reste coupé pendant une longue période. il faut prendre des mesures de
protection du contenu de l’appareil.
VACANCES
• Courtes vacances : Laissez le unité fonctionner pendant les vacances durant moins de trois (3)
semaines.
• Longues vacances : Si l’unité ne doit pas être utilisé pendant plusieurs mois, retirez tout ce qu’il
contient et mettez-le hors tension. Nettoyez et asséchez à fond l’intérieur. Pour éviter les odeurs
et le développement de moisissures, laissez la porte entrouverte, la coincer au besoin.
CONSEIL RELATIF AUX ÉCONOMIES D’ÉNERGIE
Le refroidisseur de vin devrait être installé dans l’endroit le plus frais de la pièce, loin des sources de
chauffage et des rayons directs du soleil.
DÉPLACEMENT DE VOTRE REFROIDISSEUR DE VIN
• Retirez tout ce qu’il contient.
• Immobilisez avec du ruban-cache tout ce qui est mobile (tablettes) dans l’appareil.
• Tournez la patte réglable pour la relever dans la base et éviter tout dommage.
• Maintenez la porte fermée avec du ruban-cache.
• Assurez-vous que le refroidisseur de vin reste bien en position verticale pendant son transport.
Protégez aussi l’extérieur du l’appareil avec une couverture ou l’équivalent.
ÉLIMINATION DE VOTRE REFROIDISSEUR DE VIN
Ce produit ne doit pas être traité comme un déchet domestique ordinaire, il doit être transporté
au point de collecte approprié pour le recyclage des composants électriques. Pour obtenir des
renseignements sur les points de collecte des déchets locaux, communiquez avec votre agence
locale de traitement des déchets ou avec le bureau du gouvernement.
18

Dépannage
Parfois, il peut arriver qu’un problème mineur survienne et qu’il ne soit pas nécessaire de faire appel
à un réparateur. Servez-vous de ce guide de dépannage pour déterminer la cause possible du
problème. Si l’appareil continue de mal fonctionner, appelez un centre de réparation agréé ou encore
le numéro gratuit 1-800-263-2629 de Danby pour obtenir de l’aide.
Problème Cause possible Ce qu’il faut faire
L’appareil n’est
pas alimenté.
• Un fusible de votre panneau de
distribution peut être grillé ou le
disjoncteur déclenché.
• Remplacez le fusible ou réarmez le
disjoncteur.
La température
dans le cabinet
est trop haute.
L’eau de
condensation
sur le coffret,
les portes ou
plancher.
Le réfrigérateur
fonctionne
constamment.
• Surtension.
• La fi che n’est pas complètement
insérée dans la prise murale.
• Réglage de la température.
• Les portes ne sont pas fermées
correctement, ou sont ouvertes
trop souvent.
• Stocké une grande quantité
de bouteilles chaudes dans le
cabinet.
• Niveau d’humidité élevé dans la
maison.
• Les portes ne sont pas fermées
correctement ou sont ouvertes
trop souvent.
• La température programmée est
trop froide.
• La porte n’est pas fermée.
• Débranchez le refroidisseur de vin et
attendez quelques secondes. Puis
rebranchez-le.
• Assurez-vous que la fi che à 3
branches du refroidisseur de vin est
complètement insérée dans la prise.
• Vérifi ez que la température est
correctement réglée. Ajustez-la en
utilisant le panneau de commande, si
c’est nécessaire.
• Assurez-vous que les portes sont
fermées et que les joint étanches sont
contre le coffret. Ouvrez les portes
seulement quand nécessaire.
• Limitez la quantité de bouteilles
chaudes qui sont stockées dans le
cabinet en même temps.. Essayez
d’introduire progressivement des
charge chaudes si possible (ex. ne
chargez pas plus de 6 bouteilles
chaudes à la fois- trois par cabinet)
• La formation de l’eau de condensation
s’arrêtera quand le niveau d’humidité
retournera à un niveau normal.
• Assurez-vous que les portes sont
fermées et que les joint étanches sont
contre le coffret. Ouvrez les portes
seulement quand nécessaire.
• Programmez le bouton de réglage de
la température au réglage chaud.
• Fermez bien la porte.
• La porte a été ouverte trop
longtemps ou trop souvent.
• L’appareil est près d’une source
de chaleur ou est exposé à la
lumière directe du soleil.
19
• Réduisez le nombre d’ouvertures de la
porte ainsi que leur durée.
• Ne placez pas l’appareil à proximité
de sources de chaleur ou exposé à la
lumière directe du soleil.

LIMITED IN-HOME APPLIANCE WARRANTY
This quality product is warranted to be free from manufacturer’s defects in material and workmanship, provided that the unit is used under the normal operating
conditions intended by the manufacturer.
Cet appareil de qualité est garanti exempt de tout vice de matière première et de fabrication, s’il est utilisé dans les conditions
This warranty is available only to the person to whom the unit was originally sold by Danby Products Limited (Canada) or Danby Products Inc. (U.S.A.) (hereafter
normales recommandées par le fabricant.
“Danby”) or by an authorized distributor of Danby, and is non-transferable.
Cette garantie n’est offerte qu’à l’acheteur initial de l’appareil vendu par Danby Products Limited (Canada) ou Danby Products
Inc. (E.- U.A.) (ci-après « Danby ») ou par l’un des ses distributeurs agréés et elle ne peut être transférée.
Plastic parts, are warranted for thirty (30) days only from purchase date, with no extensions provided.
Les pièces en plastique sont garanties pendant trente (30) jours seulement à partir de la date de l’achat, sans aucune prolongation prévue.
First Year
Premiers 12 mois
To obtain
Pour bénéficier
Service
du service
Limites de l’entre-
Boundaries of
tien à domicile
In Home Service
APPAREIL ÉLECTROMÉNAGER À DOMICILE
During the rst twelve (12) months, any functional parts of this product found to be defective, will be repaired or replaced, at warrantor’s
Pendant les premiers douze (12) mois, toutes les pièces fonctionnelles de ce produit qui s’avèrent
option, at no charge to the ORIGINAL purchaser.
défectueuses seront réparées ou remplacées, selon le choix du garant, sans frais à l’acheteur INITIAL.
Danby reserves the right to limit the boundaries of “In Home Service” to the proximity of an Authorized Service Depot. Any app liance
Le client sera responsable pour le transport et tous les frais d’expédition de tout appareil exigeant le
requiring service outside the limited boundaries of “In Home Service” , it will be the consumer’s responsibility to transport the appliance (at
service au dépot de service autorisé le plus proche. S’adresser au détaillant qui a vendu l’appareil, ou à
their own expense) to the original retailer (point of purchase) or a service depot for repair. See “Boundaries of In Home Serv ice” below.
la station technique agréée de service la plus proche, où les réparations doivent être effectuées par un
Contact your dealer from whom your unit was purchased, or contact your nearest authorized Danby service depot, where service
technicien qualifié. Si les réparations sont effectuées par quiconque autre que la station de service
must be performed by a qualied service technician.
agréée où à des fins commerciales, toutes les obligations de Danby en vertu de cette garantie seront
If service is performed on the units by anyone other than an authorized service depot, or the unit is used for commercial appli cation, all
annulées.
obligations of Danby under this warranty shall be void.
Si l'appareil est installé à plus de 100 kilomètres (62 milles) du centre de service le plus proche, il doit
If the appliance is installed in a location that is 100 kilometers (62 miles) or more from the nearest service center your unit must be
être livré à l'atelier de réparation autorisé par Danby le plus proche, car l'entretien doit uniquement être
delivered to the nearest authorized Danby Service Depot, as service must only be performed by a technician qualied and certif ied for
réalisé par un technicien qualifié et certifié pour effectuer un entretien couvert par la garantie de Danby.
warranty service by Danby. Transportation charges to and from the service location are not protected by this warranty and are t he
Les frais de transport entre votre domicile et le lieu de l'entretien ne sont pas couverts par la présente
responsibility of the purchaser.
garantie et doivent être acquittés par l'acheteur.
GARANTIE LIMITÉE SUR
TERMS OF WARRANTY
CONDITIONS
Aucune partie de la garantie ne prévoit implicitement que le fabricant sera tenu responsable des dommages subis par les
Nothing within this warranty shall imply that Danby will be responsible or liable for any spoilage or damage to food or other c ontents of this appliance, whether due
aliments ou d’autres types de contenu, qu’ils soient causés par la défectuosité de l’appareil ou par son usage adéquat ou
to any defect of the appliance, or its use, whether proper or improper.
inadéquat.
EXCLUSIONS
Save as herein provided, Danby, there are no other warranties, conditions, representations or guarantees, express or implied, m ade or intended by Danby or its
En vertu de la présente, il n’existe aucune autre garantie, condition ou représentation, qu’elle soit exprimée ou tacite, de façon
authorized distributors and all other warranties, conditions, representations or guarantees, including any warranties, conditio ns, representations or guarantees
manifeste ou intentionnelle, par Danby ou ses distributeurs agréés. De même, sont exclues toutes les autres garanties,
under any Sale of Goods Act or like legislation or statue is hereby expressly excluded. Save as herein provided, Danby shall no t be responsible for any damages
conditions ou représentations, y compris les garanties, conditions ou représentations en vertu de toute loi régissant la vente
to persons or property, including the unit itself, howsoever caused or any consequential damages arising from the malfunction o f the unit and by the purchase of
de produits ou de toute autre législation ou règlement semblables. En vertu de la présente, Danby ne peut être tenue respons-
the unit, the purchaser does hereby agree to indemnify and hold harmless Danby from any claim for damages to persons or propert y caused by the unit.
able en cas de blessures corporelles ou des dégâts matériels, y compris à l’appareil, quelle qu’en soit les causes. Danby ne
peut pas être tenue responsable des dommages indirects dus au fonctionnement défectueux de l’appareil. En achetant
l’appareil, l’acheteur accepte de mettre à couvert et de dégager Danby de toute responsabilité en cas de réclamation pour
No warranty or insurance herein contained or set out shall apply when damage or repair is caused by any of the following:
toute blessure corporelle ou tout dégât matériel causé par cet appareil.
EXCLUSIONS
GENERAL PROVISIONS
1) Power failure.
CONDITIONS GÉNÉRALES
2) Damage in transit or when moving the appliance.
La garantie ou assurance ci-dessus ne s’applique pas si les dégâts ou réparations sont dus aux cas suivants :
3) Improper power supply such as low voltage, defective house wiring or inadequate fuses.
1) Panne de courant.
4) Accident, alteration, abuse or misuse of the appliance such as inadequate air circulation in the room or abnormal operating con ditions
2) Dommage subis pendant le transport ou le déplacement de l’appareil.
3) Alimentation électrique incorrecte (tension faible, câblage défectueux, fusibles incorrects).
4) Accident, modification, emploi abusif ou incorrect de l’appareil tel qu'une circulation d'air inadéquate dans la pièce ou des
conditions de fonctionnement anormales (température extrêmement élevée ou basse).
5) Utilisation dans un but commercial ou industriel (à savoir, si l'appareil n'est pas installé dans un domicile résidentiel).
6) Incendie, dommages causés par l’eau, vol, guerre, émeute, hostilités, cas de force majeure (ouragan, inondation, etc.).
7) Visites d’un technicien pour expliquer le fonctionnement de l’appareil au propriétaire.
Proof of purchase date will be required for warranty claims; so, please retain bills of sale. In the event warranty service is required, present this document to our
8) Installation inappropriée (par exemple, encastrement d'un appareil autoportant, ou utilisation extérieure d'un appareil non
AUTHORIZED SERVICE DEPOT.
conçu à cet effet). Une preuve d’achat doit être présentée pour toute demande de réparation sous garantie. Prière de garder
le reçu. Pour faire honorer la garantie, présenter ce document à la station technique agréée ou s’adresser à :
(extremely high or low room temperature).
5) Use for commercial or industrial purposes (ie. If the appliance is not installed in a domestic residence).
6) Fire, water damage, theft, war, riot, hostility, acts of God such as hurricanes, oods etc.
7) Service calls resulting in customer education.
8) Improper Installation (ie. Building-in of a free standing appliance or using an appliance outdoors that is not approved for out door application).
Warranty Service
Service sous garantie
In-home
Service au domicile
Danby Products Limited
Danby Products Limited
PO Box 1778, Guelph, Ontario, Canada N1H 6Z9
PO Box 1778, Guelph, Ontario, Canada N1H 6Z9
Téléphone : (519) 837-0920 Télécopieur: (519) 837-0449
Telephone: (519) 837-0920 FAX: (519) 837-0449
1-800-263-2629
1-800-263-2629
03/14
04/09
Danby Products Inc.
PO Box 669, Findlay, Ohio, U.S.A. 45840
Téléphone: (419) 425-8627 Télécopieur: (419) 425-8629
PO Box 669, Findlay, Ohio, U.S.A. 45840
Telephone: (419) 425-8627 FAX: (419) 425-8629
Danby Products Inc.

Bienvenido
Bienvenido a la familia Danby. Estamos orgullosos de nuestros productos de alta calidad y creemos en el servicio confiable. Usted lo podrá apreciar en este manual fácil de usar, y lo escuchará enlas voces amistosas de nuestro departa-
mento de servicio al consumidor. Sobre todo, usted apreciará estas ventajas cada vez que use su unidad.
Visite www.Danby.com para acceder a herramientas de autoservicio, preguntas frecuentes y mucho más. Para asistencia
adicional, llame al 1-800-263-2629.
Por favor escriba la siguiente información; esta información será necesaria si su inidad requiere servicio o para
hacer consultas generales. Para recibir servicio técnico debe sonstrar el recibo original.
Número de modelo:
Número de serie:
Fecha de la compra:
NECESITA AYUDA
Antes de solicitar servicio, hay algunas cosas que puede hacer para
ayudarnos a servirle mejor:
Lea este manual:
Contiene instrucciones que lo ayudarán a mantener correctamente su
unidad.
Si usted recibe un artefacto dañado:
Llame inmediatamente al distribuidor (o constructor) que se lo
vendió.
Ahorre tiempo y dinero:
Lea la sección de Diagnóstico de problemas antes de llamar. Esta
sección le ayudará a resolver problemas comunes que pudieran
ocurrir.
Si necesita asistencia, no se preocupe y llámenos.
1-800-26-
(1-800-263-2629)
21

Importantes Instrucciones de Seguridad
LEA Y SIGA TODAS LAS INSTRUCCIONES DE SEGURIDAD
¡ADVERTENCIA IMPORTANTE!
PELIGRO: Riesgo de atrapamiento de niños. Antes de tirar su refrigerador de vino viejo:
• Quite las puertas.
• Deje los estantes en su lugar para que los niños no pueden subir fácilmente en.
¡NO ESPERE, HAGALO AHORA MISMO!
REQUISITOS ELÉCTRICOS
Para evitar difi cultades de instalación o funcionamiento, lea estas instrucciones a fondo.
• Este aparato debe estar conectado a tierra. Conecte sólo a una toma de corriente con conexión a
tierra adecuada. Consulte la sección “Instrucciones de puesta a tierra”.
• No utilice este aparato si tiene un cable o enchufe dañado, si no funciona correctamente o si
el aparato ha sufrido daños o se ha caído. Si el cable de alimentación está dañado, debe ser
reemplazado por el fabricante, su agente de servicio o persona califi cada para evitar riesgos.
• Nunca permita que los niños operen, jueguen o se arrastren dentro del aparato.
• Nunca limpie las partes del aparato con líquidos infl amables. Los humos pueden crear un riesgo
de incendio o explosión.
• No almacene ni utilice gasolina u otros vapores o líquidos infl amables cerca de este o de
cualquier otro aparato. Los humos pueden crear un riesgo de incendio o explosión.
• No empalme el cable de alimentación que esté equipado con este aparato.
• Mantenga el cable de alimentación alejado de superfi cies calientes.
• No sumerja el cable de alimentación, el enchufe o el propio aparato en agua.
• No utilice este producto cerca del agua, por ejemplo, en un sótano húmedo, lavandería o cerca de
un fregadero.
• No utilice productos químicos corrosivos ni vapores en este aparato.
• Utilice este aparato sólo para el uso previsto, tal y como se describe en este manual.
• Almacene las bebidas en recipientes sellados solamente.
• Vea las instrucciones de limpieza de la superfi cie de la puerta en la sección de Cuidado y
Mantenimiento de este manual.
• No cubra ni bloquee las aberturas del aparato.
• No almacene productos alimenticios perecederos como (pero no limitado a) carnes y productos
lácteos en su refrigerador de vino. Este aparato no se enfría lo sufi ciente como para ser seguro
para los alimentos.
• Este aparato está diseñado para uso doméstico solamente. No utilice ni guarde este aparato al
aire libre.
• Este aparato debe ser reparado solamente por personal de servicio cualifi cado. Póngase en
contacto con el centro de servicio autorizado más cercano para su examen, reparación o ajuste.
¡GUARDE ESTAS INSTRUCCIONES!
22

Importantes Instrucciones de Seguridad
LEA Y SIGA TODAS LAS INSTRUCCIONES DE SEGURIDAD
INSTRUCCIONES DE CONEXIÓN A TIERRA
Este aparato está equipado con un cable que tiene un cable de conexión a tierra con un enchufe
de conexión a tierra. El enchufe debe estar enchufado en un tomacorriente que esté correctamente
instalado y conectado a tierra. Este aparato debe estar conectado a tierra. En caso de un cortocircuito
eléctrico, la puesta a tierra reduce el riesgo de descarga eléctrica proporcionando un cable de escape
para la corriente eléctrica.
ADVERTENCIA - El uso incorrecto del enchufe de conexión a tierra puede ocasionar un riesgo de
descarga eléctrica. Consulte a un electricista o agente de servicio califi cado si las instrucciones de
conexión a tierra no se entienden completamente o si existe duda sobre si el aparato está debidamente
conectado a tierra.
Si el tomacorriente es un tomacorriente de pared estándar de 2 clavijas, es su responsabilidad personal
y la obligación de tenerlo reemplazado con un enchufe de pared de 3 clavijas debidamente conectado a
tierra.
Para el mejor funcionamiento, enchufe este aparato en su propia toma de corriente para evitar el
parpadeo de luces, soplado de fusible o disparo del interruptor automático
NO UTILICE UN CABLE DE EXTENSIÓN
Utilice un enchufe de pared exclusivo de 115V. No conecte el aparato a los cables de extensión ni con
otro aparato en la misma toma de corriente. No empalme el cable. No corte ni quite en ningún caso la
tercera clavija (tierra) del cable de alimentación. No utilice ni enchufe adaptador con este aparato.
REQUERIMIENTOS DE SEGURIDAD
Asegúrese de que los componentes se sustituirán por componentes similares y que el servicio deberá
ser realizado por el personal de servicio autorizado de fábrica, para minimizar el riesgo de un posible
encendido debido a piezas incorrectas o un servicio inadecuado.
Este aparato debe estar conectado a tierra. En caso de un cortocircuito eléctrico, la conexión a tierra
reduce el riesgo de choque eléctrico proporcionando un cable de escape para la corriente eléctrica. La
placa de características en serie indica el voltaje y la frecuencia para la que está diseñado el artefacto.
Riesgo de incendio o explosión debido a la perforación de tuberías de refrigerante. No utilice objetos
afi lados para ayudar en el desescarche. Por favor, manejese con precaución. Mantenga los materiales y
vapores infl amables como la gasolina lejos del refrigerador. Utilice un limpiador no infl amable.
La eliminación de esta unidad debe estar de acuerdo con las regulaciones federales y locales.
Este aparato no está diseñado para ser utilizado por personas (incluyendo niños) cuyas capacidades
físicas, sensoriales o mentales sean diferentes o reducidas, o que carezcan de experiencia o
conocimiento, a menos que dichas personas reciban supervisión o entrenamiento para operar el
aparato por una persona responsable de su uso. la seguridad.
ADVERTENCIA: Mantenga las aberturas de ventilación, en la caja del aparato o en la estructura
incorporada, sin obstrucciones.
ADVERTENCIA: No use dispositivos mecánicos u otros medios para acelerar el proceso de
descongelación, que no sean los recomendados por el fabricante.
ADVERTENCIA: No dañar el circuito de refrigerante.
ADVERTENCIA: No utilice electrodomésticos dentro de los compartimientos de alimentos del aparato, a
menos que sean del tipo recomendado por el fabricante.
¡GUARDE ESTAS INSTRUCCIONES!
23

Importantes Instrucciones de Seguridad
LEA Y SIGA TODAS LAS INSTRUCCIONES DE SEGURIDAD
POR TU SEGURIDAD
• Se deben utilizar dos personas al mover el enfriador de vino.
• Retire el embalaje interior y exterior antes de la instalación.
• Antes de conectar el aparato a una fuente de alimentación, deje reposar durante
aproximadamente 4 horas; Esto reducirá la posibilidad de un mal funcionamiento en el sistema de
enfriamiento debido a la manipulación durante el transporte.
• Coloque su enfriador de vino en un piso que es lo sufi cientemente fuerte como para soportarlo
cuando está completamente cargado. Para nivelar su enfriador de vinos, ajuste la pierna de
nivelación delantera en la parte inferior de la unidad.
• Ubique el enfriador de vino lejos de la luz directa del sol y fuentes de calor (estufa, calentador,
radiador, etc.). La luz solar directa y las fuentes de calor pueden aumentar el consumo eléctrico.
Las temperaturas ambientales extremadamente frías también pueden causar que la unidad
funcione incorrectamente.
• Evite ubicar la unidad en áreas húmedas.
• Enchufe el enfriador de vino en un enchufe de pared exclusivo, debidamente instalado. No corte
ni quite en ningún caso la tercera clavija (tierra) del cable de alimentación. Cualquier pregunta
relacionada con la alimentación y / o conexión a tierra debe dirigirse a un electricista certifi cado
oa un centro de servicio autorizado.
• No cubra los estantes con papel de aluminio ni ningún otro material que pueda impedir la
circulación del aire.
• Para que el gabinete se mantenga efi ciente, no lo cargue demasiado.
• No abra la puerta a menos que sea necesario.
• Si el enfriador de vino se almacena sin uso durante largos períodos de tiempo, se sugiere,
después de una limpieza cuidadosa, dejar la puerta entreabierta. Esto permitirá que el aire circule
dentro del gabinete para evitar posibles formaciones de condensación, moho y olores.
ADVERTENCIA IMPORTANTE
Riesgo de incendio o explosión debido a la perforación de tuberías de refrigerante. No utilice
operaciones opacas para ayudar en el desescarche. Por favor, manejese con precaución.
Mantenga los materiales y vapores infl amables como la gasolina lejos de la unidad. Utilice un
limpiador no infl amable.
La eliminación de esta unidad debe estar de acuerdo con las regulaciones federales y locales.
¡GUARDE ESTAS INSTRUCCIONES!
24

Instrucciones de Instalación
UBICACIÓN
• Seleccione una ubicación en un piso fuerte y nivelado.
• Retire el embalaje exterior e interior.
• Limpie el exterior completamente con un paño suave y seco y el interior con un paño húmedo y
tibio.
• Evite colocar la unidad en un hueco estrecho o cerca de cualquier fuente de calor, luz solar
directa o humedad.
• Deje que el aire circule libremente alrededor del gabinete.
• Mantenga la parte trasera y laterales del enfriador de vino a por lo menos 12,7 cm (5 pulgadas)
de distancia de todas las paredes adyacentes.
• NO
• NO incorpore este artefacto en un recinto. Este artefacto está diseñado solo para usarlo de
CARACTERISTICAS
utilice este artefacto al aire libre. Este artefacto solo debe utilizarse para uso doméstico.
No intente hacer funcionar ni guardar este artefacto al aire libre.
manera independiente y no está destinado para estar “empotrado”.
1. Puerta de vidrio templado: Teñida para
protegerla de los rayos UV a la vez que
permite ver el interior.
2. Empaquetaduras de la puerta
magnética: Los sellos que cierran
perfectamente retienen todo el poder de
enfriamiento y los niveles de humedad.
3. Pata de nivelación
4. Repisas con recubrimiento de plástico:
Resistentes a los olores, inoxidables y
desmontables para limpiarlas fácilmente.
5. Control del termostato: (Termostato en
montado en la parte exterior de la pared
posterior) Para controlar la
temperatura en e interior del enfriador de
vinos.
6. Luz interior (no se ilustra): Ilumina el
compartimiento.
INSTRUCCIONES DE NIVELACIÓN
Debajo del refrigerador de vino hay pierna niveladora en el lado de la
bisagra de la unidad. Es importante que su refrigerador de vino esté
nivelado. Para nivelar la unidad:
Fig A
1. Mueva el refrigerador de vino a su ubicación fi nal.
2. Gire la pierna de nivelación en el sentido de las manecillas del
reloj hasta el tope, hasta que la parte superior del pie toque la
parte inferior del chasis.
3. Gire lentamente la pata niveladora en sentido antihorario hasta
que la unidad esté nivelada.
25
Raises
the Leg
(lowers
the unit)
Lowers
the Leg
(raises
the unit)

Instrucciones operadoras
AJUSTE DE LA TEMPERATURA
La temperatura del enfriador de vinos se controla ajustando la perilla de control del termostato en la
parte posterior de la unidad. Para lograr la máxima temperatura de enfriamiento rápidamente:
• Gire la perilla de control de la temperatura en el sentido de las agujas del reloj a la parte más
ancha y oscura del dial de control azul graduado.
• Deje que la unidad funcione en este ajuste durante 3 a 4 horas.
• Cuando se alcanza el máximo de refrigeración, gire la perilla de control de temperatura a la
posición central en el dial de control azul graduado, como se muestra en la Fig. A.
• Para apagar el refrigerador de vino, gire la perilla de control a la posición “0”, como se muestra
en la Fig. B. Si no se utiliza el enfriador de vino durante un período de tiempo prolongado, se
recomienda desconectar la unidad y dejar la puerta parcialmente abierta para evitar la posible
formación de olores dentro de la unidad.
Nota: Espere de 3 a 5 minutos antes de reiniciar la unidad si se ha interrumpido la operación.
Nota: En el dial azul graduado, el azul más grueso y más oscuro indica temperaturas más frías y
el azul más fi no, más claro indica temperaturas más calientes. La temperatura del enfriador de vino
variará dependiendo de la cantidad de botellas almacenadas en la unidad y de la frecuencia con que
se abre la puerta.
LUZ INTERIOR
Para accionar manualmente la luz interior, presione el interruptor situado en el lado derecho de la
carcasa de luz interior en el techo de la unidad. Esto permitirá que la luz permanezca encendida
mientras la puerta está cerrada.
Nota: La luz se apagará por defecto. Se puede encender para funcionar continuamente. Debido a los
requisitos de efi ciencia energética para un enfriador de vino en este tamaño, no hay opción para que
la luz se encienda cuando la puerta se abre.
DESCONGELAMIENTO
Esta unidad está equipada con una función de descongelación automática y no requiere
descongelación manual. El agua de descongelación de la unidad se canaliza en una bandeja de
goteo situada por encima del compresor. La transferencia de calor desde el compresor hace que el
agua de descongelación se evapore.
INSTRUCCIONES SOBRE LOS ESTANTES
Para quitar la parilla de su posición fi ja, levante la parte posterior
de la parrilla y luego saque la parrilla de la unidad deslizándola,
Para volver a instalarla, asegúrese de que la repisa esté segura
sobre las ménsulas de soporte y empuje la parrilla hacia adentro
hasta que se fi je en su lugar.
26

Instrucciones operadoras
ALMACENAMIENTO DE VINO
La capacidad máxima de esta unidad es 17 botellas de vino de 750 ml, cuando se almacena según
estas instrucciones.
1. Coloque 4 botellas en los dos estantes superiores.
2. Coloque 3 botellas escalonadas en la parte superior de las cuatro botellas en el segundo estante.
3. Coloque 3 botellas en cada estante del fondo inferior de dos niveles por Fig. A.
4. La capacidad máxima de almacenamiento se muestra en la Fig. B.
Total - 11 botellas
Total - 6 botellas
INSTRUCCIONES DE REVERSIÓN DE LA PUERTA
1. Retire los tres (3) tornillos de la parte posterior de la encimera, levante un poco la parte posterior de la encimera y
empújela hacia adelante; de esta forma, sacará la encimera. Consulte la Figura 1.
2. Retire la cubierta de la tira de la puerta izquierda o derecha (según a qué lado moverá la puerta) y la cubierta de la
bisagra izquierda o derecha. Luego, retire los dos (2) tornillos de la bisagra superior y retire la bisagra superior. Afl oje
el perno superior de la puerta y retire el ensamblaje de la puerta. Consulte la Figura 2.
3. Retire el perno de la bisagra de la puerta y páselo al otro lado de la puerta. Consulte la Figura 3.
4. Instale el perno superior de la puerta hacia el lado opuesto de la bisagra superior, coloque la bisagra superior en el
otro lado del gabinete, instale la cubierta de la tira de la puerta y la cubierta de la bisagra en el lado opuesto de donde
las retiró. Consulte la Figura 4.
5. Afl oje la pata ajustable y retire los dos (2) tornillos que la rodean. Retire los dos (2) tornillos de la bisagra inferior y
6. retire la bisagra inferior. Vuelva a colocar la pata y los dos (2) tornillos donde estaba la bisagra inferior. Instale la
bisagra inferior donde estaba la pata. Consulte la Figura 5.
7. Haga los ajustes necesarios en la bisagra superior y la bisagra inferior, vuelva a instalar la encimera siguiendo los
8. pasos para sacarla a la inversa.
27

Cuidado y Mantenimiento
LIMPIANDO
• Para limpiar el interior de la unidad, use un paño suave y una solución de una cucharada de
bicarbonato de soda a un cuarto de galón de agua o una solución de jabón suave o un poco de
detergente suave.
• Lave los estantes removibles en una solución de detergente suave, luego seque y limpie con un
paño suave.
• Limpie el exterior con un paño suave y húmedo y un poco de detergente suave.
NOTA: No use limpiadores que contengan amoniaco o alcohol en el enfriador de vino. El amoníaco o el
alcohol pueden dañar el aspecto del aparato.
NOTA: Nunca utilice limpiadores comerciales o abrasivos ni objetos afi lados en ninguna parte del refrigerador
de vino.
FALLO DE ALIMENTACIÓN
La mayoría de las fallas de alimentación se corrigen en pocas horas y no deben afectar la temperatura de
su aparato si minimiza el número de veces que se abre la puerta. Si la energía va a estar apagada por un
período de tiempo más largo, usted necesita tomar las medidas apropiadas para proteger su contenido. En
caso de una falla de alimentación, espere de 3 a 5 minutos antes de reiniciar.
VACACIONES
• Vacaciones cortas: Deje el refrigerador de vino funcionando durante las vacaciones de menos de tres (3)
semanas.
• Largas vacaciones: Si el aparato no va a ser utilizado durante varios meses, retire todos los artículos
y apague el aparato. Limpie y seque el interior a fondo. Para evitar el olor y el moho, deje la puerta
ligeramente abierta, bloqueándola si es necesario.
CONSEJO DE AHORRO ENERGÉTICO
La unidad debe estar ubicada en la zona más fresca de la habitación, lejos de los aparatos que producen calor
y fuera de la luz directa del sol.
MOVIENDO EL REFRIGERADOR DE VINO
• Quite todos los elementos.
• Asegure fi rmemente todos los artículos sueltos (estantes) dentro de su electrodoméstico.
• Gire la pierna ajustable hasta la base para evitar daños.
• Cinta la puerta cerrada.
• Asegúrese de que el aparato permanezca seguro en posición vertical durante el transporte. También
proteja el exterior del aparato con una manta o artículo similar.
ELIMINACIÓN DEL REFRIGERADOR DE VINO
Este producto no puede ser tratado como un residuo doméstico normal, debe ser llevado al punto de recogida
de residuos apropiado para el reciclaje de componentes eléctricos. Para obtener información sobre los puntos
de recogida de residuos locales, póngase en contacto con la agencia local de eliminación de residuos o con la
ofi cina gubernamental.
28

Solución Sugerida
Ocasionalmente, puede surgir algún problema de menor importancia y no será necesario llamar al
servicio técnico. Utilice esta guía de solución de problemas para obtener una posible solución. Si la
unidad continúa funcionando incorrectamente, llame al servicio técnico autorizado o al número gratuito
de Danby 1-800-263-2629 para obtener asistencia.
Problemas Posibles causas de problemas Qué hacer
No hay energía. • Se puede haber quemado
un fusible o el disyuntor se
disparó.
• Subida de tensión eléctrica.
• Reemplace el fusible o reinicie
el disyuntor.
• Desconecte el enfriador de vino, espere
unos segundos y luego enchúfelo
nuevamente.
La temperatura
del gabinete
es muy alta.
Condensación
en el gabinete,
puertas o piso.
• El enchufe no se insertó
completamente en el
tomacorriente de la pared.
• Confi guración de la
temperatura.
• La puerta no cierra
correctamente o está muy
abierta.
• Las luces interiores están
encendidas.
• Últimamente se agregó una
gran cantidad de botellas
tibias al gabinete.
• Condiciones altas de
humedad en la casa.
• Asegúrese de que el enchufe de
3 patas esté totalmente insertado en el
tomacorriente.
• Verifi car la confi guración del control de
temperatura. Ajustar si fuera necesario.
• Asegúrese de que la puerta esté
completamente cerrada y que la junta esté
sellada con los gabinetes. Abra las puertas
únicamente cuando sea necesario y por
períodos cortos de tiempo.
• Las luces interiores están destinadas para
iluminar temporalmente los gabinetes para
fi nes de visualización. No están diseñadas
para dejarlas encendidas por largos
períodos de tiempo.
• Limite la cantidad de botellas tibias que
se introducen en el gabinete al mismo
tiempo. Intente llenar la carga de manera
escalonada si fuera posible.
• La condensación deberá desaparecer
una vez que las condiciones de humedad
regresen a la normalidad.
El refrigerador
funciona
continuamente.
• La puerta no cierra
correctamente o está muy
abierta.
• Se estableció una
temperatura demasiado baja.
• La puerta no está cerrada.
• La puerta se abrió demasiado
tiempo o demasiadas veces.
• Gran proximidad a una fuente
de calor o a la luz solar
directa.
29
• Asegúrese de que la puerta esté
totalmente cerrada y que la unión esté
sellada con los gabinetes. Abra las puertas
únicamente cuando sea necesario y por
períodos cortos de tiempo.
• Fije el control de la temperatura en la
graduación de mayor temperatura.
• Cierre bien la puerta.
• Minimice la cantidad de veces que abre la
puerta y su duración.
• No ubique la unidad cerca de fuentes de
calor ni de la luz solar directa.

GARANTÍA LIMITADA PARA
LIMITED IN-HOME APPLIANCE WARRANTY
ELECTRODOMÉSTICO
This quality product is warranted to be free from manufacturer’s defects in material and workmanship, provided that the unit is used under the normal operating
conditions intended by the manufacturer.
Este producto de calidad está garantizado contra defectos de fabricación, incluyendo partes y mano de obra, siempre y cuando
la unidad se utilice bajo las condiciones normales de funcionamiento para las que fue diseñado.
This warranty is available only to the person to whom the unit was originally sold by Danby Products Limited (Canada) or Danby Products Inc. (U.S.A.) (hereafter
Esta garantía está solamente disponible para la persona que haya comprado originalmente esta unidad directamente de
“Danby”) or by an authorized distributor of Danby, and is non-transferable.
Danby Products Limited (Canada) o Danby Products Inc. (U.S.A.) (en adelante “Danby”) o uno de sus distribuidores autorizados, y no es transferible.
Plastic parts, are warranted for thirty (30) days only from purchase date, with no extensions provided.
Las piezas plásticas, se autorizan por treinta (30) días solamente a partir de la fecha de la compra, sin las extensiones
proporcionadas.
First Year
Primeros 12 meses
To obtain
Service
Para obtener
servicio
Boundaries of
In Home Service
Límites del servicio
técnico a domicilio
Nothing within this warranty shall imply that Danby will be responsible or liable for any spoilage or damage to food or other c ontents of this appliance, whether due
to any defect of the appliance, or its use, whether proper or improper.
Nada dentro de esta garantía implica que Danby será responsable por cualquier daño que hayan sufrido los alimentos u otros
contenidos de este aparato, ya sea debido a un defecto del aparato, o su uso, adecuado o inadecuado.
During the rst twelve (12) months, any functional parts of this product found to be defective, will be repaired or replaced, at warrantor’s
option, at no charge to the ORIGINAL purchaser.
Durante los primeros 12 meses, cualquier parte en buen estado de este producto que resulte defectuosa, incluyendo cualquier sistema sellado, será reparado o reemplazado, a opción del fabricante, sin
cargo para el comprador ORIGINAL.
Danby reserves the right to limit the boundaries of “In Home Service” to the proximity of an Authorized Service Depot. Any app liance
requiring service outside the limited boundaries of “In Home Service” , it will be the consumer’s responsibility to transport the appliance (at
Danby se reserva el derecho de limitar la cobertura de "Servicio en Domicilio" sujeto a la proximidad de
their own expense) to the original retailer (point of purchase) or a service depot for repair. See “Boundaries of In Home Serv ice” below.
un Taller de Servicio Autorizado. Para todo artefacto que requiera servicio fuera del área limitada de
Contact your dealer from whom your unit was purchased, or contact your nearest authorized Danby service depot, where service
"Servicio en Domicilio", el cliente será responsable por transportar dicho artefacto hasta el Taller de
must be performed by a qualied service technician.
Servicio Autorizado mas cercano. Consulte "Límites del servicio técnico a domicilio", a continuación.
If service is performed on the units by anyone other than an authorized service depot, or the unit is used for commercial appli cation, all
Comuníquese con el distribuidor donde haya comprado la unidad, o llame al Taller de Servicio Autoriza-
obligations of Danby under this warranty shall be void.
do más cercano, donde debe ser reparada por un técnico calificado. Si esta unidad es reparada en otro
lugar que no sea un Taller de Servicio Autorizado, o si la unidad se utiliza para aplicaciones comercia-
If the appliance is installed in a location that is 100 kilometers (62 miles) or more from the nearest service center your unit must be
les, Danby no se hará responsable de ninguna forma y la garantía será anulada.
delivered to the nearest authorized Danby Service Depot, as service must only be performed by a technician qualied and certif ied for
Si el electrodoméstico está instalado en un lugar que se encuentra a 100 kilómetros (62 millas) o más
warranty service by Danby. Transportation charges to and from the service location are not protected by this warranty and are t he
del centro de servicios más cercano, se debe llevar la unidad al Centro de servicios Danby autorizado
responsibility of the purchaser.
más cercano, ya que dicho servicio sólo puede realizarlo un técnico calificado y certificado por Danby
para prestar servicios de garantía. Los cargos por transporte desde y hacia el lugar en que se
efectúe el servicio técnico no están cubiertos por esta garantía y son de responsabilidad del comprador.
CONDICIONES DE LA GARANTÍA
Save as herein provided, Danby, there are no other warranties, conditions, representations or guarantees, express or implied, m ade or intended by Danby or its
authorized distributors and all other warranties, conditions, representations or guarantees, including any warranties, conditio ns, representations or guarantees
Salvo lo aquí indicado por Danby, no existen otras garantías, condiciones o representaciones, explícitas o implícitas, concre-
under any Sale of Goods Act or like legislation or statue is hereby expressly excluded. Save as herein provided, Danby shall no t be responsible for any damages
tas o intencionales por parte de Danby o sus distribuidores autorizados y todas las demás garantías, condiciones o repre-
to persons or property, including the unit itself, howsoever caused or any consequential damages arising from the malfunction o f the unit and by the purchase of
sentaciones, incluyendo cualquier garantía, condiciones o representaciones bajo cualquier Acta de Venta de Productos o
the unit, the purchaser does hereby agree to indemnify and hold harmless Danby from any claim for damages to persons or propert y caused by the unit.
legislación o estatuto similar, quedan de esta forma expresamente excluidas. Salvo lo aquí indicado, Danby no serán responsables por ningún daño a personas o bienes, incluyendo la propia unidad, sin importar su causa, o de ningún daño indirecto
causado por el desperfecto de la unidad, y al comprar esta unidad, el comprador acepta por la presente, indemnizar y
proteger a Danby contra cualquier reclamo por daños a personas o bienes causados por la unidad.
No warranty or insurance herein contained or set out shall apply when damage or repair is caused by any of the following:
1) Power failure.
2) Damage in transit or when moving the appliance.
No se considerará ninguna de estas garantías o seguros cuando el daño o la necesidad de reparación sea el producto de los
3) Improper power supply such as low voltage, defective house wiring or inadequate fuses.
siguientes casos:
1) Falla del suministro eléctrico.
4) Accident, alteration, abuse or misuse of the appliance such as inadequate air circulation in the room or abnormal operating con ditions
2) Daños en tránsito o durante el transporte de la unidad.
3) Alimentación incorrecta, como bajo voltaje, instalación eléctrica defectuosa o fusibles inadecuados.
4) Accidente, modificación, abuso o uso incorrecto del artefacto, tal como insuficiente ventilación del ambiente o condiciones
de operación anormales (temperatura ambiente extremadamente alta o baja).
5) Utilización comercial o industrial (v.g., si el electrodoméstico no está instalado en una vivienda particular).
6) Incendio, daños por agua, robo, guerra, disturbios, hostilidades, actos de fuerza mayor como huracanes, inundaciones, etc.
7) Pedidos de servicio debido a desinformación del usuario.
Proof of purchase date will be required for warranty claims; so, please retain bills of sale. In the event warranty service is required, present this document to our
8) Instalación inadecuada (v.g., instalación empotrada de un electrodoméstico diseñado como unidad independiente o uso de
AUTHORIZED SERVICE DEPOT.
un electrodoméstico al aire libre que no esté aprobado para dicho fin).
(extremely high or low room temperature).
5) Use for commercial or industrial purposes (ie. If the appliance is not installed in a domestic residence).
6) Fire, water damage, theft, war, riot, hostility, acts of God such as hurricanes, oods etc.
7) Service calls resulting in customer education.
8) Improper Installation (ie. Building-in of a free standing appliance or using an appliance outdoors that is not approved for out door application).
TERMS OF WARRANTY
EXCLUSIONS
EXCLUSIONES
GENERAL PROVISIONS
CONDICIONES GENERALES
Para acceder a la garantía se solicitará un comprobante de compra; por lo tanto, guarde su recibo. En caso de necesitar
servicio de garantía, presente ese documento al TALLER DE SERVICIO AUTORIZADO.
Warranty Service
In-home
Servicio de Garantía
Danby Products Limited
Danby Products Limited
PO Box 1778, Guelph, Ontario, Canada N1H 6Z9
PO Box 1778, Guelph, Ontario, Canada N1H 6Z9
Telephone: (519) 837-0920 FAX: (519) 837-0449
Telephone: (519) 837-0920 FAX: (519) 837-0449
Servicio en Domicilio
1-800-263-2629
1-800-263-2629
04/09
07/13
Danby Products Inc.
PO Box 669, Findlay, Ohio, U.S.A. 45840
Telephone: (419) 425-8627 FAX: (419) 425-8629
Telephone: (419) 425-8627 FAX: (419) 425-8629
PO Box 669, Findlay, Ohio, U.S.A. 45840
Danby Products Inc.

NOTES / REMARQUES / NOTAS :
__________________________________________________________________________________________
__________________________________________________________________________________________
__________________________________________________________________________________________
__________________________________________________________________________________________
__________________________________________________________________________________________
__________________________________________________________________________________________
__________________________________________________________________________________________
__________________________________________________________________________________________
__________________________________________________________________________________________
__________________________________________________________________________________________
__________________________________________________________________________________________
__________________________________________________________________________________________
__________________________________________________________________________________________
__________________________________________________________________________________________
__________________________________________________________________________________________
__________________________________________________________________________________________
__________________________________________________________________________________________
__________________________________________________________________________________________
__________________________________________________________________________________________
__________________________________________________________________________________________
__________________________________________________________________________________________
__________________________________________________________________________________________

WINE COOLER REFROIDISSEUR À VIN
All repair parts are available for purchase or special
order when you visit your nearest service depot. To
request service and/or the location of the service depot
nearest you, call the TOLL FREE number.
When requesting service or ordering parts, always provide the following information:
• Product Type
• Model Number
• Part Number
• Part Description
ENFRIADOR DE VINO
Todas las piezas de reparación disponibles para la compra o la orden especial cuando usted visita su depósito
más cercano del servicio. Para pedir servicio y/o la localización del depósito del servicio lo más cerca posible
usted, llama Danby gratis.
Al pedir servicio o pidiendo piezas, proporcione siempre
la información siguiente:
• Tipo de producto
• Número de modelo
• Número de pieza
• Descripción de la parte
Toutes les pièces de rechange ou commandes spéciales sont disponibles à votre centre de service régional
autorisé. Pour obtenir le service et/ou la localité de
votre centre de service régional, signalez le NUMÉRO
D’APPEL SANS FRAIS.
Ayez les renseignements suivants à la portée de la main
lors de la commande de pièce ou service:
• Type de produit
• Numéro de modèle
• Numéro de pièce
• Description de la pièce
1-800-26-
(1-800-263-2629)
Printed in China
Imprimé en Chine
Impreso en China
MODEL • MODÈLE • MODELO
DWC018A1BDB
Danby Products Limited, Guelph, ON, Canada N1H 6Z9
Danby Products Inc., Findlay, Ohio, USA 45840
 Loading...