


Danby DCR122BSLDD User Manual
Model • Modèle • Modelo
DCR122WDD - DCR122BLDD - DCR122BSLDD
COMPACT REFRIGERATOR
RÉFRIGÉRATEUR COMPACT
REFRIGERADOR COMPACTO
Owner’s Use and Care Guide
Guide d’utilisation et soins de Propriètaire
Manual de Instructions pare el Uso y Cuidado de su Unidad
•
•
•
V5.01.11 DM

COMPACT REFRIGERATOR
Owner’s Use and Care Guide
• Safety Instructions
• Installation Instructions
• Features
• Operating Instructions
• Care and Maintenance
• Troubleshooting
• Warranty
RÉFRIGÉRATEUR COMPACT
Guide d’utiliser et soin de propriètaire
• Consignes de sécurité
• Consignes de Installation
• Caracteristiques
• Opération
• Soins et entretien
• Dépannage
• Garantie
REFRIGERADOR COMPACTO
Guía para utilizar y cuidar del Proprietario
• Instruciónes de Seguridad Importantes
• Instrucciones d’instalación
• Caracteristicas
• Instruciónes Operadoras
• Limpieza y Mantenimiento
• Solución Sugeridad
• Garantia
2-8
9-15
CONTENTS
16-22
CAUTION
Read and follow all safety rules and
operating instructions before first use of this
product.
Veuillez lire attentivement les consignes de
sécurité et les instructions d’utilisation avant
l’utilisation initiale de ce produit.
PRECAUTION
Lea y observe todas las reglas de seguridad y
las instrucciones de operación antes de usar
este producto por primera vez.
PRECAUCION
1

READ ALL SAFETY INFORMATION BEFORE USING
SAVE THESE INSTRUCTIONS
IMPORTANT SAFETY INFORMATION
ELECTRICAL REQUIREMENTS
This appliance must be grounded. In the event of an electrical short circuit, grounding reduces the risk of electrical
shock by providing an escape wire for the electrical
current.
This appliance is equipped with a cord having a grounding
wire with a grounding plug. The plug must be plugged into an
outlet that is properly installed and grounded.
DO NOT USE AN EXTENSION CORD
Use an exclusive wall outlet. Do not connect your refrigerator to extension cords or together with any other appliance
in the same wall outlet. Do not splice the cord.
IMPORTANT WARNING:An empty refrigerator is a very
dangerous attraction to children. Remove either the gasket,
latches, lids or doors from unused appliances, or take some
other action that will guarantee it harmless.
DANGER: Risk of Child Entrapment! Before you throw
away your old refrigerator/freezer:
• Take off the doors.
• Leave the shelves in place so that children may not easily
climb inside.
DON’T WAIT! DO IT NOW!
INSTALLATION INSTRUCTIONS
Remove exterior and interior packaging, wipe the outside
thoroughly with a soft dry cloth and the inside with a wet, lukewarm cloth. Avoid placing the unit in a narrow recess or near
any heat source, direct sunlight, or moisture. Let air circulate
freely around the unit. Keep the rear of the refrigerator 5
inches away from the wall.
Location
1) Select a place with a level floor.
2) Allow 5 inches of space between the back of the refrigera-
tor and any adjacent wall.
3) Avoid direct sunlight and heat. Direct sunlight may affect
the acrylic coating. Heat sources
nearby will cause higher electricity consumption.
4) Avoid damp places. Too much moisture in the air will
cause frost to form very quickly on the evaporator, and
your refrigerator will have to be defrosted more
frequently.
LOCATION
Improper use of the grounding plug can result in a risk of
electric shock. Consult a qualified electrician or serviceman
if the grounding instructions are not completely understood,
or if doubt exists as to whether the appliance is properly
grounded.
WARNING
2
INSTALLATION INSTRUCTIONS
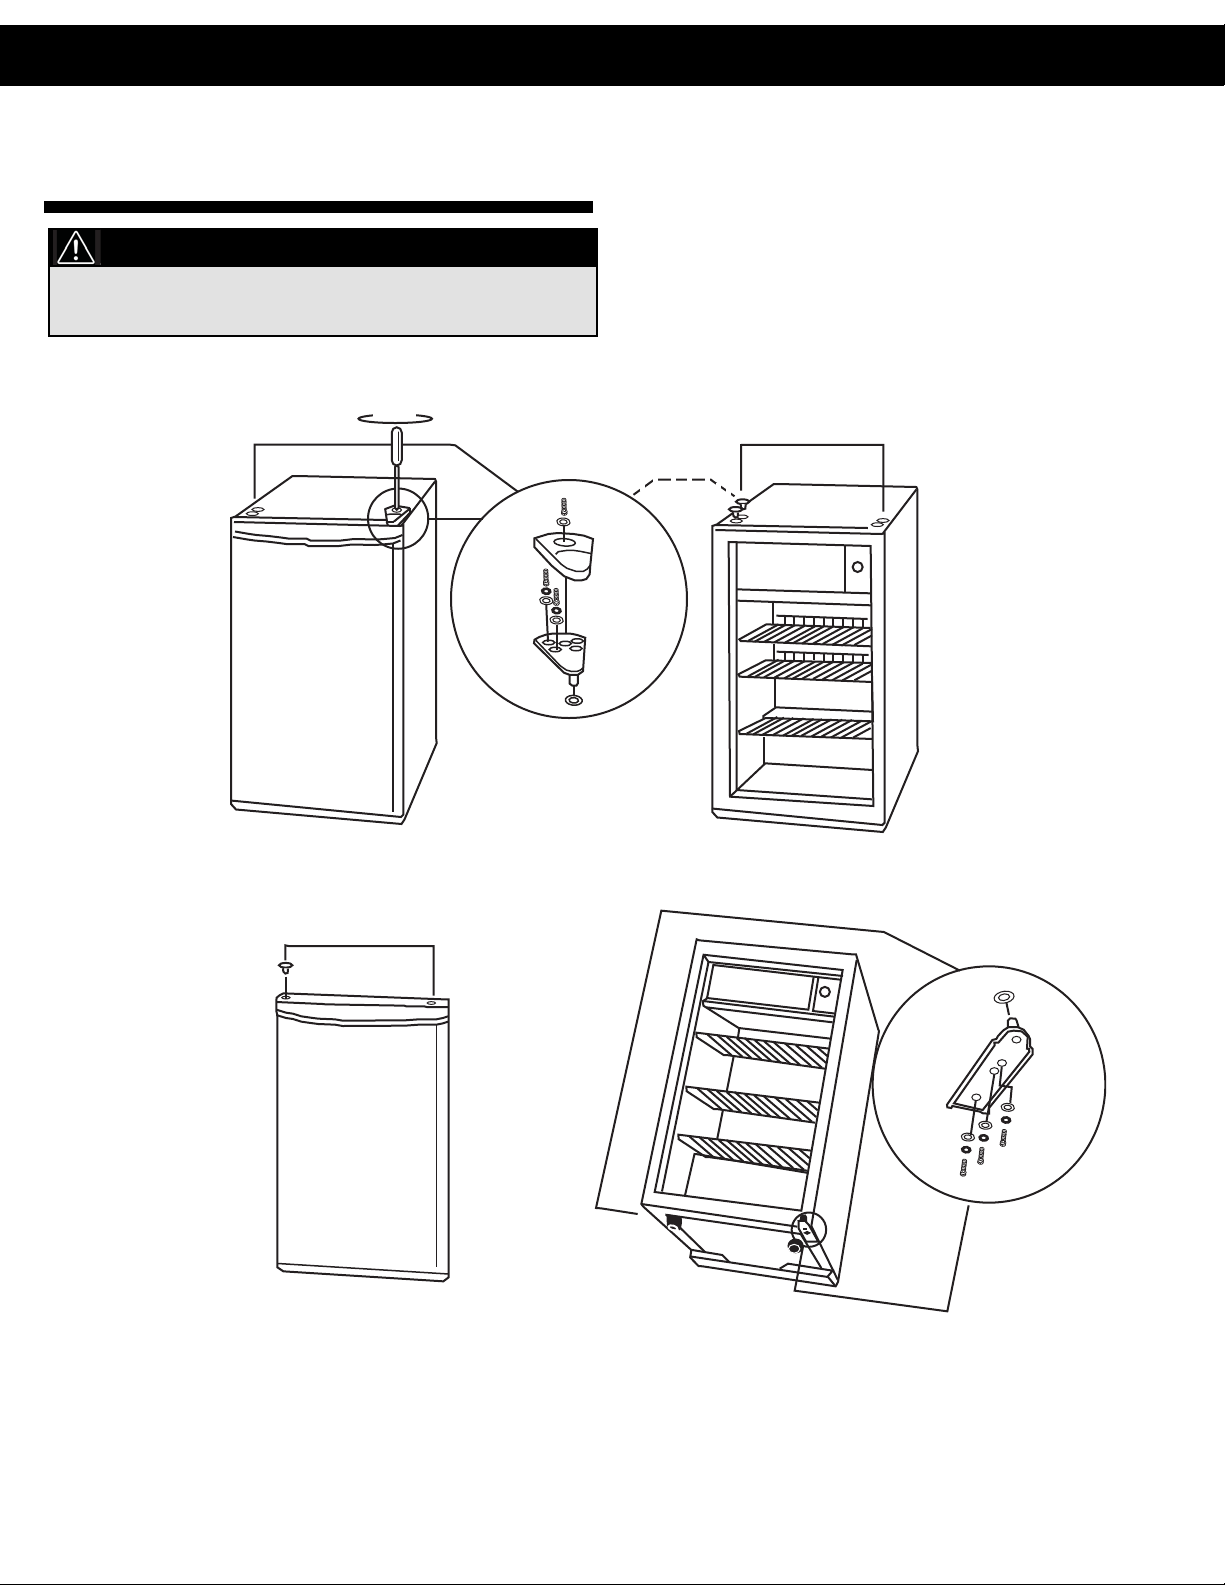
DOOR REVERSAL
INSTRUCTIONS
If you find the direction of opening the door on your
appliance inconvenient, you can change it by following
the steps shown in the below diagrams.
To avoid personal injury to yourself and/or property, we
recommend someone assist you during the door reversal
process.
CAUTION
A B
C
Fig. 4
3
A B
Fig. 1
Fig. 2
Fig. 3
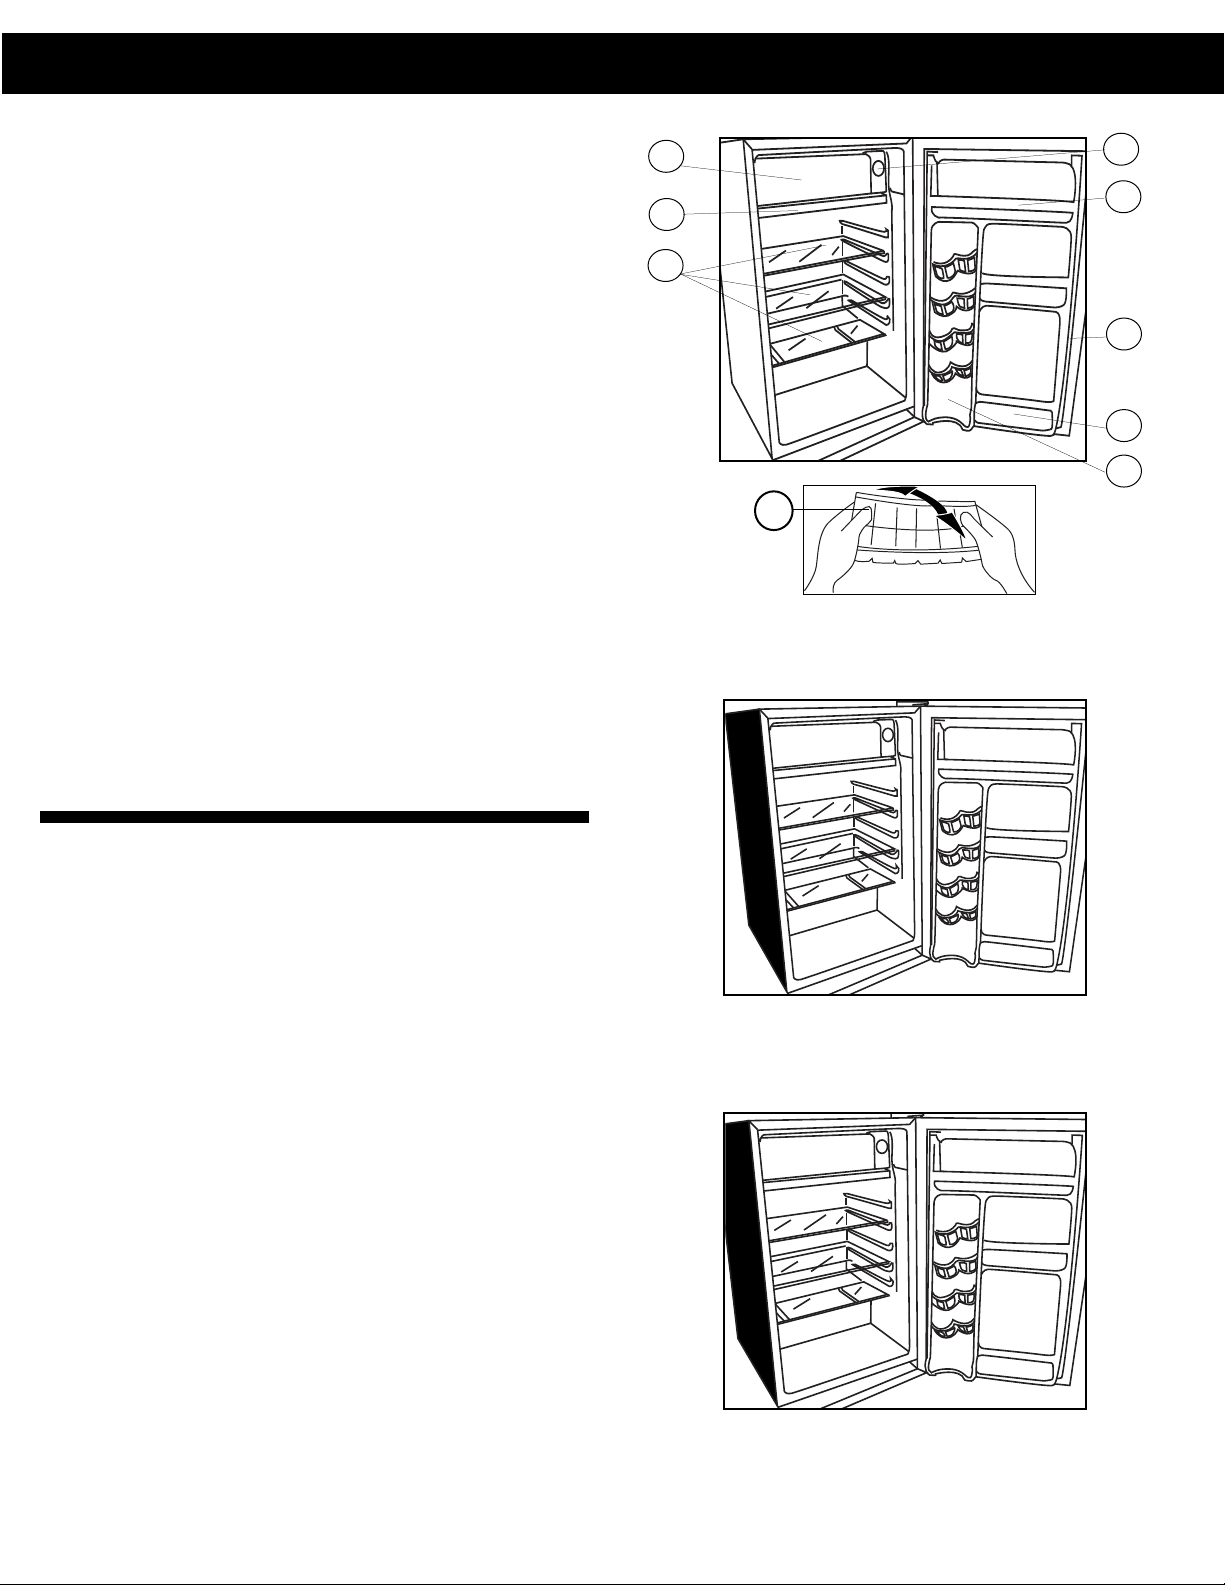
FEATURES
1) THERMOSTAT DIAL: For controlling the temperature
inside the refrigerator; the compressor activates as
soon as the temperature rises above the desired level.
2) FREEZER COMPARTMENT WITH FREEZER DOOR:
Separate freezer section holds ice cube tray and small
items.
3) ICE CUBE TRAY: Ice cubes are easily removed
from tray.
4) GLASS SHELVES
5) DRIP TRAY: Catches the water that drips off the
evaporator when defrosting.
6) MAGNETIC GASKET: Tight fitting door seal keeps all
the cooling power locked inside. No hooks or latches.
7) BOTTLE RACK: For tall, medium, and large bottles,
cans or jars.
8) CANSTORTMDoor Liner: Holds 355mL cans of pop,
juice, or beer.
9) EGG TRAY
Ice cube tray is flexible. Twist tray to remove ice cubes. If the
ice cube tray is frozen hard to the evaporator surface, run a
little water over the tray. Never use a knife or other metal
instrument to remove ice cube tray as this may damage the
evaporator.
ICE CUBE TRAY
5
1
2
4
6
7
8
9
3
DCR122BLDD
DCR122BSLDD
4

OPERATING INSTRUCTIONS
To start the refrigerator, turn the temperature control knob to
the position corresponding to the desired cooling (on the
graduated blue dial) in Fig. A. The refrigerator temperature
will vary depending on the quantity of the food stored, and on
the frequency with which the door is opened.
To turn the control to the “OFF” position, rotate the control
knob to the “0” setting. After defrosting and if the refrigerator
has been left out of use for some time, set the control to
maximum for 2 to 3 hours before turning to the desired position. If the refrigerator is not to be used for long time periods, disconnect the plug and leave the door partially open.
This will help reduce the mold/mildew from accumulating
inside the refrigerator cabinet.
TEMPERATURE SELECTION
To avoid vibration, the unit must be set level. This is accomplished by adjusting the (1) front leveling leg located under the
refrigerator. The temperature of the refrigerator is controlled by setting the thermostat knob to a desired setting.
Fig. A
CARE AND MAINTENANCE
DEFROSTING
This refrigerator is equipped with a “Push Button”
(semi-automatic) defrost thermostat system. To
activate the defrost cycle, simply push (in) the red defrost
button located in the center of the control knob/dial (do not
turn the control knob/dial to zero/off). The defrost cycle is initiated immediately. When defrosting is complete, the “Push
Button” will release (pop-out) automatically and resume normal operating conditions at the same temperature setting.
NOTE: If the “Push Button” is activated (pushed-in)
accidentally, it will not be possible to “manually”
pull-out the push button (deactivate the defrost cycle). You
must let the defrost cycle run its course. (or) Apply (hold) a
dishcloth soaked in hot water against the thermostat capillary
line and bracket, located on the underside of the freezer
compartment. The heat transfer from the dish cloth will cause
a temperature rise on the thermostat capillary (sensing line),
causing the internal contacts to close. This will resume normal operating conditions. It may take several minutes and/or
repeat applications before the push button will release.
Defrosting of your refrigerator should take place
whenever ice build-up inside the freezer compartment reaches 1/4” (6mm) thick. Defrosting may take a few hours,
depending on the amount of accumulated ice and ambient
indoor temperature. To speed up the defrosting process,
remove all frozen foods from the freezer section. Leaving the
door partially ajar for a short period of time will also speed up
the process.
Important: You must remember to close the refrigerator door
before the defrost cycle terminates and normal operating
conditions resume automatically. The drip tray should be in
position directly below the freezer compartment to catch condensed water during defrosting.
Note: Never use sharp or pointed instruments to
remove ice from the freezer compartment. The freezer
compartment contains refrigerated gas lines and if
accidentally punched/pierced, will render the
refrigerator inoperable and void the manufacturers warranty.
DO NOT ALLOW THE REFRIGERATOR TO CONTINUE
OPERATION IF THE FREEZER COMPARTMENT IS
PIERCED.
After defrosting is complete, set the control to maximum for 2
to 3 hours before returning to the desired position. When the
refrigerator is not to be used for a long period of time, disconnect the appliance from the electrical supply and leave the
door partially open. This will help to reduce mold and mildew
build-up.
Note: Wait 3 to 5 minutes before attempting to restart the
refrigerator if operation has been interrupted.
5

CARE AND MAINTENANCE
CLEANING
To clean the inside, use a soft cloth and a mixture of one
tablespoon of baking soda to one quart of water. Other
cleaning options are a mild soap suds solution, or mild detergent. Wash glass shelves in a mild detergent solution, then
dry and wipe with a soft cloth. Clean the outside with a soft
damp cloth and some mild detergent or appliance cleaner.
POWER FAILURE
Most power failures are corrected within an hour or two and
will not affect your refrigerator temperatures. However, you
should minimize the number of door openings while the
power is off. During power failures of longer duration, take
steps to protect your food by placing dry ice on top of
packages.
IF YOU MOVE
Remove or securely fasten down all loose items inside the
unit. To avoid damaging the leveling legs, turn them all the
way into the base.
VACATION TIME
For short vacation periods, leave the control knob at its normal setting. During longer absences:
(a) remove all foods.
(b) disconnect power cord from electrical outlet.
(c) clean the refrigerator thoroughly, including drip tray
(defrost pan).
(d) leave door open to avoid possible formations of conden-
sate, mold or odors.
Some Important Rules for the Correct Use of the
Refrigerator
• Never place hot foods in the refrigerator.
• Never place spoiled foods in the unit.
• Don’t overload the unit.
• Don’t open the door unless necessary.
• Should the refrigerator be stored without use for long
periods, it is suggested, after a careful cleaning, to leave
the door ajar to allow the air to circulate inside the unit in
order to avoid the possibility of condensation, mold or
odors.
FOOD STORAGE SUGGESTIONS
Fresh Food Compartment
• Never cover food compartment shelves with aluminum foil
or any other shelf covering material which may prevent air
circulation.
• Always remove porous store wrapping paper from meats,
poultry and fish. Meats should be wrapped individually and
placed in a dish for storage. Wrap fish and poultry in foil or
heavy waxed paper. Most fish should be used the same
day of purchase. Packaged meats such as ham, bacon,
dried beef, or frankfurter, store best in their original packages.
• Allow warm foods to cool to room temperature before placing them in the refrigerator.
• Always cover open dishes of food, especially leftovers.
Use leftovers within 2 or 3 days.
6

TROUBLESHOOTING
Occasionally, a problem is minor and a service call may not be necessary- use this troubleshooting guide for a possible
solution. If the unit continues to operate improperly, call an authorized service depot or Danby’s Toll Free Number
1-800-263-2629 for assistance.
PROBLEM POSSIBLE CAUSE SOLUTION
1) Does not work.
• No power to unit.
• Power cord is unplugged.
• Wrong voltage is being used.
• Check connection of power
cord to power source.
• Plug in unit.
• Use proper voltage.
2) Refrigerator runs
continuously.
• Temperature set too low.
• Door is not closed.
• Hot food inserted.
• Door opened too long or too
often.
• Close proximity to heat
source or direct sunlight.
• Set temperature control to
warmer setting
• Close door securely.
• Be sure food is at room
temperature before inserting.
• Minimize door openings/
duration.
• Do not place unit close to
heat sources or direct
sunlight.
3) Internal temperature not
cold enough.
• No power to unit.
• Power cord is unplugged.
• Temperature set too high.
• Door is not closed.
• Hot food inserted.
• Door opened too long or too
often.
• Air flow obstruction.
• Wrong voltage is being used.
• Close proximity to heat
source or direct sunlight.
• Check connection of power
cord to power source.
• Plug in unit.
• Check setting and increase
as needed.
• Close lid securely.
• Be sure that food is at room
temperature.
• Minimize door openings/
duration.
• Allow room for air to
circulate around unit.
• Use proper voltage.
• Do not place unit close to
heat sources or direct
sunlight.
PROBLEM
POSSIBLE CAUSE
POSSIBLE SOLUTION
7
 Loading...