


OWNER’S MANUAL
MANUEL DU PROPRIÉTAIRE
MANUAL DEL PROPIETARIO
MICROWAVE
Owner’s Manual...........................1 - 12
MICRO ONDE
Manuel du propriétaire................13 - 24
MICROONDA
Manual del propietario................25 - 36
MODEL • MODÈLE • MODELO
DMW07A4WDB
DMW07A4BDB
DMW09A2WDB
DMW09A2BDB
DMW09A2BSSDB
DANBY PRODUCTS LIMITED, ONTARIO, CANADA N1H 6Z9
DANBY PRODUCTS INC., FINDLAY, OHIO, USA 45840
2017.07.24
Welcome
Welcome to the Danby family. We are proud of our quality products and we beleive in
dependable service. We suggest that you read this owner’s manual before plugging in your new
appliance as it contains important operation information, safety information, troubleshooting and
maintenance tips to ensure the reliability and longevity of your appliance.
Visit www.Danby.com to access self service tools, FAQs and much more. For additional assistance
call 1-800-263-2629.
Note the information below; you will need this information to obtain service under warranty.
You must provide the original purchase receipt to validate your warranty and receive service.
Model Number: _________________________________________________
Serial Number: _________________________________________________
Date of Purchase: _______________________________________________
Need Help?
Before you call for service, here are a few things you can do to help us serve you better.
Read this owner’s manual:
It contains instructions to help you use and maintain your appliance properly.
If you receive a damaged appliance:
Immediately contact the retailer or builder that sold you the appliance.
Save time and money:
Check the troubleshooting section at the end of this manual before calling. This section
will help you solve common problems that may occur.
1-800-26- Danby
(1-800-263-2629)
1

Important Safety Information
READ AND FOLLOW ALL SAFETY INSTRUCTIONS
RADIO FREQUENCY INTERFERENCE
This equipment generates and uses ISM frequencies
and if not installed and used properly in strict
accordance with the manufacturer’s instructions,
it may cause interference to radio and television
reception. It has been type-tested and found to
comply with limits for ISM Equipment pursuant
to Part 18 of FCC Rules, which are designed
to provide reasonable protection against such
interference in a residential installation.
However, there is no guarantee that interference will
not occur in particular installations. If this equipment
does cause interference to radio or television
reception, which can be determined by turning
the equipment off and on, the interference can be
corrected by one or more of the following methods:
• Reorient the receiving antenna of radio or
television.
• Move the microwave oven away from the
receiver.
• Plug the microwave into a different outlet so that
microwave and receiver are on different branch
circuits.
The manufacturer is not responsible for any
radio or TV interference caused by unauthorized
modifi cation of this appliance. It is the responsibility
of the user to correct such interference.
AVOID POSSIBLE EXPOSURE TO EXCESSIVE
MICROWAVE ENERGY
GROUNDING INSTRUCTIONS
This appliance must be grounded. In the event of an
electrical short circuit, grounding reduces the risk of
electrical shock by providing an escape wire for the
electrical current.
This appliance is equipped with a cord that has a
grounding wire with a grounding plug. The power
cord must be plugged into an outlet that is properly
grounded. If the outlet is a standard 2-prong wall
outlet, it is your responsibility to have it replaced
with a properly grounded 3-prong wall outlet.
The serial rating plate indicates the voltage and
frequency the appliance is designed for.
WARNING - Improper use of the grounding
plug can result in a risk of electric shock.
Consult a qualifi ed electrician or service agent
if the grounding instructions are not completely
understood, or if doubt exists as to whether the
appliance is properly grounded.
DO NOT USE AN EXTENSION CORD
Do not connect your appliance to extension cords
or together with another appliance in the same wall
outlet. Do not splice the power cord. Do not under
any circumstances cut or remove the third ground
prong from the power cord.
If the power supply cord is damaged, it must be
replaced by the manufacturer, its service agent or
similar qualifi ed person in order to avoid hazard.
• Do not attempt to operate the appliance with the
door open as this can result in harmful exposure
to microwave energy. Do not tamper with or
attempt to defeat the safety locks.
• Do not place any object between the front face
and the door or allow soil or cleaner residue to
accumulate on the sealing surfaces.
• Do not operate the appliance if it is damaged.
The door must close properly and there must be
no damage to the hinges, latches, door, door
seals or sealing surfaces.
SAVE THESE INSTRUCTIONS!
SAFETY REQUIREMENTS
Ensure that component parts are replaced with like
components and that servicing is done by factory
authorized service personnel, to minimize the risk of
possible ignition due to incorrect parts or improper
service.
Children should be supervised to ensure that they
do not play with the appliance.
Do not cover or block any ventilation openings in
this appliance.
2

Important Safety Information
READ AND FOLLOW ALL SAFETY INSTRUCTIONS
SAFETY REQUIREMENTS
This appliance is specifi cally designed to heat,
cook or dry food. It is not designed for industrial or
laboratory use.
Do not store or use this appliance outdoors. Do not
use this appliance near water.
Do not overcook food. Carefully watch the
appliance when it is in use.
Remove wire twist-ties before placing items in the
appliance.
Do not use the appliance for storage purposes. Do
not leave items inside the appliance when not in
use.
Do not heat oil or fat for deep frying as it is diffi cult
to control the temperature of oil in a microwave.
Pierce foods with thick skins such as potatoes,
squash and apples before cooking.
SAFETY - SUPERHEATED LIQUID
Liquids are able to be overheated beyond the
boiling point without appearing to be boiling
due to the surface tension of the liquid. Visible
bubbling will not always be present when the liquid
is removed from the appliance. This could result
in very hot liquids suddenly boiling over when a
utensil or other item such as a tea bag is inserted
into the liquid.
To reduce the risk of injury:
• Do not overheat liquids. Do not heat any liquid
for more than 2 minutes per cup.
• Stir liquids before and halfway through heating.
• Do not use straight-sided containers with narrow
necks as this can cause a build up of steam.
• Superheated liquid can begin to spontaneously
boil when removed from the microwave.
After heating, allow the liquid to stand in the
microwave for 30 seconds before removing.
• Use extreme care when inserting a utensil or
other item into hot liquids.
Some items such as whole eggs or sealed containers
have the possibility of exploding when heated and
should not be placed in this appliance.
Cooking utensils may become hot because of heat
transferred from heated food. Pot holders may be
required.
Only use thermometers which are specifi cally
designed for use in microwaves.
Do not operate any heating or cooking appliance
beneath this appliance.
Ensure that the glass tray and rollers are in the
correct position before use to avoid possible spills.
Do not operate this appliance when it is empty as
this will increase the heat around the magnetron
and can damage the appliance or cause a fi re.
If items inside the appliance should ignite, keep the
door closed, turn the appliance off and disconnect
the power cord.
The contents of milk bottles and baby food jars
should be stirred or shaken and the temperature
checked before serving in order to avoid burns.
Do not defrost frozen beverages, especially
carbonated beverages, in this appliance as they
could explode.
Hot foods and steam can cause burns. Be careful
when opening any container than has been heated
in the appliance. Direct the opening away from
hands and face to avoid burns.
SAFETY - ARCING
Arcing refers to sparks inside the microwave while it
is in operation. Arcing is caused by:
• Metal or foil inside the appliance.
• Recycled paper towels being used inside the
appliance, as these can contain small pieces of
metal.
If arcing is present, stop operation and remove any
metal or paper towels from the appliance.
SAVE THESE INSTRUCTIONS!
3

INSTALLATION INSTRUCTIONS
OPERATING INSTRUCTIONS
INSTALLATION
• Remove all packing materials from the inside
and outside of the appliance. Do not remove the
cardboard mica sheet covering the magnetron.
• Check the appliance for damage before using,
such as a misaligned or bent door, damaged
door seals, broken or loose door hinges or
latches, or dents inside the cavity or on the door.
If there is any damage to the appliance, do not
use it, return it to its point of purchase or contact
consumer care.
• The appliance must be placed on a fl at, stable
surface that is able to hold its weight and
the heaviest food likely to be placed in the
appliance.
• Do not use this appliance where heat, moisture
or high humidity are generated.
• Do not clean this appliance with or use near
combustible materials.
• Allow 20 cm of space above the appliance,
10 cm at the back of the appliance and 5
cm on both sides for proper air fl ow around
the appliance. Do not block any ventilation
openings on the appliance.
• Do not operate the appliance without the glass
tray, roller support and shaft in their correct
positions.
COOKING TECHNIQUES
To achieve the best results when cooking in this
appliance, follow the suggestions below.
STIRRING
Stir foods while cooking to distribute heat evenly.
Food at the outside of the dish absorbs more energy
and will heat more quickly so stir from the outside of
the dish toward the center.
ARRANGEMENT
Arrange unevenly shaped foods thicker, meatier
parts toward the outside of the turntable so they
receive more heat. To prevent overcooking, place
delicate items toward the center of the turntable.
SHIELDING
Delicate foods can be shielded with narrow strips
of aluminum foil to prevent overcooking. Use only
small amounts of foil as this can cause arcing and
damage to the appliance.
TURNING
Turn food over midway through cooking to expose
all parts to the microwave energy. This is important
with large items and meat.
STANDING
Foods cooked in a microwave build up internal
heat and continue to cook for a few minutes after
heating stops. Let foods stand to complete cooking,
especially meats and liquids. All liquids should be
allowed to stand for a few minutes after cooking
and should be shaken or stirred before consuming.
ADDING MOISTURE
Microwave energy is attracted to water molecules.
Food that is uneven in moisture content should be
covered and allowed to stand after cooking to allow
the heat to disperse evenly. Add a small amount of
water to dry food to help it cook.
4

OPERATING INSTRUCTIONS
COOKING UTENSILS GUIDE
Certain utensils are inappropriate for use in a
microwave. See below for more information on
which utensils are recommended, which should only
have limited use and which are not recommended.
RECOMMENDED
Microwave Browning Dish: Used to brown the
exterior of small food items. Follow the directions
provided with the browning dish.
Microwavable Plastic Wrap: Used to retain steam.
Leave a small opening to avoid a build up of steam.
Do not place directly on food.
Glass and Ceramic Bowls and Dishes: Use for
heating or cooking.
Paper Plates and Cups: Use for short term heating
at low temperatures. Do not use recycled paper as
they can contain metal and could ignite.
Paper Towels and Napkins: Use for short term
heating and covering. They can absorb excess
moisture and prevent splattering. Do not use
recycled paper towels as they can contain metal
and could ignite.
Wax Paper: Use as a cover to prevent splattering.
Thermometers: Only use those that are labeled
“microwave safe” and follow all directions.
Check the food in several places. Conventional
thermometers can be used once the food has been
removed from the microwave.
LIMITED USE
Aluminum Foil: Use narrow strips to prevent
overcooking of exposed areas. Using too much foil
can cause arcing and damage the appliance. Keep
a distance of at least 1 inch (2.6 cm) between the
foil and the inside of the appliance.
Ceramic, Porcelain and Stoneware: Only use if
they are labeled “microwave safe”.
Plastic: Only use if labeled “microwave safe”.
NOT RECOMMENDED
Glass Jars and Bottles: Regular glass is too thin to
be used in a microwave. It can shatter and cause
damage or injury.
Paper Bags: These are a fi re hazard and could
ignite. The only exception is popcorn bags, which
are designed for microwave use.
Styrofoam Plates and Cups: These can melt and
leave an unhealthy residue on food.
Plastic Storage and Food Containers: These can
melt and ignite.
Metal Utensils: These can cause arcing and
damage to the appliance. Remove all metal before
operation.
Note: To check if a dish is safe for use in the
microwave, place the empty dish in the appliance
and microwave on high for 30 seconds. If the dish
becomes very hot, it should not be used.
5

OPERATING INSTRUCTIONS
FEATURES
1. Door Safety Lock System
2. Oven Window
3. Roller Ring
4. Shaft
5. Door Release Button (Note: Some models may
have a handle instead of a door release button.)
6. Control Panel
7. Mica Sheet (Do Not Remove)
8. Glass Tray
Note: Images in this manual are for instructional
purposes only. The actual shape of your appliance
may vary based on the model number.
CONTROL PANEL
1. Display: Shows cooking time, power level and
clock time.
2. Auto Cook Menus: Used to set auto cook
programs.
3. Clock Button: Used to set the current time.
4. Power/Hold Button: Used to select the power
level. Press and hold this button for 3 seconds to
enter mute mode.
5. Time Cook: Used to set cook time at 100%
power level.
6. Timer: Used to set the timer function.
7. Speed Defrost: Used to set the defrost function
based on time entered.
8. Defrost by Weight: Used to set the defrost
function based on weight.
9. Cook by Weight: Used to set the cook time
based on weight.
10. Start/Stop: Used to start or pause a cooking
program.
11. Add 30 Seconds Button: Used to add 30
seconds to the cooking time.
12. Reset Button: Used to clear all previous settings.
Press and hold this button for 3 seconds to set
the child lock function.
6
OPERATING INSTRUCTIONS
FIRST TIME USE
When the appliance is plugged in for the fi rst time,
the display will show “1:01”.
When setting the cook timer, the appliance will
return to standby mode if there is no input within 25
seconds.
During operation:
• Press the Start/Stop button to pause the
functioning.
• Press the Start/Stop button again to resume
functioning.
• Press the Reset button to cancel the cooking
program.
The appliance will beep at the end of a cooking
program and will continue to beep every 2 minutes
until a button is pressed or the door is opened.
SETTING THE CLOCK
MICROWAVE COOKING
To set a cooking power and time:
1. Press the Power/Hold button repeatedly until
the desired cooking level is set, as per the below
chart. If 100% cooking power is desired, only
press the Power/Hold button once.
Press Power/Hold Button Cooking Power
Once 100% (P100)
Twice 90% (P-90)
3 Times 80% (P-80)
4 Times 70% (P-70)
5 Times 60% (P-60)
6 Times 50% (P-50)
7 Times 40% (P-40)
8 Times 30% (P-30)
9 Times 20% (P-20)
10 Times 10% (P-10)
11 Times 0% (P-00)
The clock can be set as a 12 hour clock or a 24
hour clock.
To set the current time:
1. Press the Clock button once to choose a 12 hour
clock. Press the Clock button again to choose a
24 hour clock.
2. Use the number pad to enter the current time.
3. Press the Clock button to confi rm.
During operation, press the Clock button to see the
current time.
TIMER FUNCTION
To set the timer function:
1. Press the Timer button, “TIMER” and “ENTER”
will show on the display and “:” will fl ash.
2. Use the number pad to enter the desired time to
run the microwave.
3. Press the Start/Stop button to begin operation.
2. User the number pad to enter the desired
cooking time.
3. Press the Start/Stop button to begin operation.
ADD 30 SECONDS FUNCTION
When the appliance is not in operation, pressing
the Add 30 SEC button will run the appliance for 30
seconds at 100% power level. This button can be
pressed multiple times, each press will add a further
30 seconds to the cooking time.
EXPRESS COOK
When the appliance is not in operation, press the
number pad from 1 to 6 and the appliance will run
between 1 and 6 minutes at 100% cooking power.
7

OPERATING INSTRUCTIONS
AUTO COOK
The Auto Cook buttons can be used to set automatic
cooking functions for the below food types.
POPCORN
1. Press the Popcorn button. This will automatically
set the cook time for a 3.5 oz. bag of popcorn.
2. Press the Start/Stop button to begin operation.
To change the preset time:
1. Press the Popcorn button twice. “ENTER TIME”
will appear on the display.
2. Use the number pad to enter the desired cook
time. This new time setting will be used every
time the Popcorn button is pressed. If the
appliance looses power, this time will need to be
reprogrammed.
3. Press the Start/Stop button to begin operation.
POTATO
BEVERAGE
For a 5 - 7 oz. serving size:
1. Press the Beverage button.
2. Use the number pad from 1 - 4 to enter the
number of cups.
3. Press the Start/Stop button to begin operation.
For a 9 - 11 oz. serving size:
1. Press the Beverage button twice.
2. Use the number pad from 1 - 4 to enter the
number of cups.
3. Press the Start/Stop button to begin operation.
Do not overheat liquids. Do not heat any liquid for
more than 2 minutes per cup. After heating, allow
the liquid to stand in the microwave for 30 seconds
before removing from the appliance.
FROZEN DINNER
For one or two small 7 - 9 oz. dinners:
For a 4 - 6 oz. serving of potatoes:
1. Press the Potato button.
2. Press the Start/Stop button to begin operation.
PIZZA
To reheat a slice of pizza:
1. Press the Pizza button once.
2. Press the Start/Stop button to begin operation.
To heat a whole frozen pizza:
1. Press the Pizza button twice.
2. Press the Start/Stop button to begin operation.
1. Press the Frozen Dinner button.
2. Use the number pad to indicate whether 1 or 2
dinners will be cooked.
3. Press the Start/Stop button to begin operation.
For one or two large 10 - 12 oz. dinners:
1. Press the Frozen Dinner button twice.
2. Use the number pad to indicate whether 1 or 2
dinners will be cooked.
3. Press the Start/Stop button to begin operation.
REHEAT
1. Press the Reheat button.
2. Press the Start/Stop button to begin operation.
8
OPERATING INSTRUCTIONS
COOK BY WEIGHT
1. Press the Cook By Weight button.
2. Press number 1, 2 or 3 to indicate what type
of meat will be cooked, as per the below chart.
Meat must be defrosted and at refrigerated
temperature.
Code Type Maximum Weight
1 Beef 6 lbs.
2 Mutton 6 lbs.
3 Pork 5 lbs. 4 oz.
3. Use the number pad to enter the weight of the
meat that will be cooked. Weight must be in
pounds and ounces.
4. Press the Start/Stop button to confi rm.
During operation the appliance will pause and beep
to indicate that the meat should be turned over.
Press the Start/Stop button to resume operation. Let
meat stand a few minutes before carving.
SPEED DEFROST
1. Press the Speed Defrost button.
2. Use the number pads to enter the desired
defrosting time.
3. Press the Start/Stop button to confi rm.
During operation the appliance will pause and
beep to indicate that the food should be turned over
or stirred. Press the Start/Stop button to resume
operation.
MUTE FUNCTION
Press and hold the Power/Hold button for 3
seconds to enter mute mode, which will silence all
sound from the appliance.
While in mute mode, press and hold the Power/
Hold button for 3 seconds to unmute the appliance.
SETTING THE CHILD LOCK
DEFROST BY WEIGHT
The defrosting time and power level are adjusted
automatically once the weight is entered.
1. Press the Defrost By Weight button.
2. Use the number pad to enter the weight of the
food that will be defrosted. Weight must be in
pounds and ounces. Maximum weight is 6 lbs.
3. Press the Start/Stop button to confi rm.
During operation the appliance will pause and
beep to indicate that the food should be turned over
or stirred. Press the Start/Stop button to resume
operation.
To set the child lock, while the unit is in standby
mode, press and hold the Reset button for 3
seconds. The appliance will beep to indicate that the
child lock is activated. While locked, the appliance
cannot be used.
To cancel the child lock, press and hold the Reset
button for 3 seconds. The appliance will beep to
indicate that the child lock has been deactivated.
9

CARE AND MAINTENANCE
CLEANING
Turn off and unplug the appliance before
performing any cleaning.
The inside of the appliance should be cleaned with
a warm, damp cloth and mild detergents. Do not
allow food splatters to build up on the inside of the
appliance as this can affect the effi ciency of the
microwave and if suffi ciently dirty, can ignite and
cause fi re.
The outside of the appliance should be cleaned with
a warm, damp cloth. To avoid damage to internal
components, do not allow any water to drip into the
ventilation openings.
Clean the door and window on both sides, the door
seals and the adjacent parts frequently with a damp
cloth to remove any spills or splatters. Do not use
abrasive cleaners.
Do not allow the control panel to become wet. If
necessary, clean the control panel with a damp
cloth and then wipe dry.
The glass tray can be removed and cleaned in
warm water and mild detergent or can be placed in
a dishwasher.
The roller ring and oven fl oor should be cleaned
regularly to avoid excessive noise or spilling. The
roller ring can be cleaned in warm water and mild
detergent or can be placed in a dishwasher. Ensure
that the roller ring and glass tray are replaced in the
proper position to avoid noise or spilling.
MAINTENANCE
To remove odors from the microwave:
1. Combine a cup of water with the juice and skin
of one lemon in a microwavable bowl.
2. Microwave on full power for 5 minutes.
3. Wipe the inside of the appliance and glass tray
and roller ring thoroughly with a warm, damp
cloth.
MICA SHEET
Inside the appliance there is a cardboard mica
sheet protecting the magnetron. Do not remove this
from the appliance as exposing the magnetron to
food splatters can cause arcing or fi re. If it becomes
dirty, the mica sheet can be cleaned with a warm
cloth.
DISPOSAL
This product should not be treated as ordinary
household waste, it should be transported to the
appropriate collection point for the recycling of
electrical components. For information on local
waste collection points, contact your local waste
disposal agency or government offi ce.
10

TROUBLESHOOTING
Danby Consumer Care: 1-800-263-2629
Hours of operation:
Monday to Thursday 8:30 am - 6:00 pm Eastern Standard Time
Friday 8:30 am - 4:00 pm Eastern Standard Time
Information in this manual is subject to change without notice.
PROBLEM POSSIBLE CAUSE
No power • A fuse may be blown or the circuit breaker tripped
• Plug not fully inserted into the wall outlet
Arcing or sparking during operation • Metallic items were left in the appliance during operation
• The appliance is being operated while empty
• Spilled food has built up inside the appliance or on the
mica sheet
Unevenly cooked food • Food was not completely defrosted before cooking
• Cooking time or power level were insuffi cient
• Food was not turned or stirred during cooking
Overcooked food • The power level or cooking time were too high
Undercooked food • Food was not completely defrosted before cooking
• Cooking time or power level were insuffi cient
• Food was not turned or stirred during cooking
• Ventilation openings are blocked
Poor Defrosting • Defrosting time or power level were insuffi cient
• Food was not turned or stirred during defrosting
11

LIMITED IN-HOME APPLIANCE WARRANTY
LIMITED “CARRY IN” WARRANTY
This quality product is warranted to be free from manufacturer’s defects in material and workmanship, provided that the unit is used under the normal operating
conditions intended by the manufacturer.
This quality product is warranted to be free from manufacturer’s defects in material and workmanship, provided that the unit is used
under the normal operating conditions intended by the manufacturer.
This warranty is available only to the person to whom the unit was originally sold by Danby Products Limited (Canada) or Danby Products Inc. (U.S.A.) (hereafter
This warranty is available only to the person to whom the unit was originally sold by Danby Products Limited (Canada) or Danby
“Danby”) or by an authorized distributor of Danby, and is non-transferable.
Products Inc. (U.S.A.) (hereafter “Danby”) or by an authorized distributor of Danby, and is non-transferable.
TERMS OF WARRANTY
TERMS OF WARRANTY
Plastic parts are warranted for thirty (30) days from the date of purchase, with no extensions provided.
Plastic parts, are warranted for thirty (30) days only from purchase date, with no extensions provided.
First 12 months
First Year
During the first twelve (12) months, any functional parts of this product found to be defective, will be repaired or
During the rst twelve (12) months, any functional parts of this product found to be defective, will be repaired or replaced, at warrantor’s
replaced, at warrantor’s option, at no charge to the original purchaser.
option, at no charge to the ORIGINAL purchaser.
To obtain service
To obtain
Service
Contact the dealer where the unit was purchased, or contact the nearest authorized Danby service depot, where
service must be performed by a qualified service technician. If service is performed on the unit by anyone other
Danby reserves the right to limit the boundaries of “In Home Service” to the proximity of an Authorized Service Depot. Any app liance
than an authorized service depot, all obligations of Danby under this warranty shall be void.
requiring service outside the limited boundaries of “In Home Service” , it will be the consumer’s responsibility to transport the appliance (at
their own expense) to the original retailer (point of purchase) or a service depot for repair. See “Boundaries of In Home Serv ice” below.
It is the responsibility of the purchaser to transport the appliance to the nearest authorized service depot.
Contact your dealer from whom your unit was purchased, or contact your nearest authorized Danby service depot, where service
must be performed by a qualied service technician.
Transportation charges to and from the service location are not protected by this warranty and are the responsibility of the purchaser.
If service is performed on the units by anyone other than an authorized service depot, or the unit is used for commercial appli cation, all
obligations of Danby under this warranty shall be void.
Nothing within this warranty shall imply that Danby will be responsible or liable for any spoilage or damage to food or other
Boundaries of
contents of this appliance, whether due to any defect of the appliance, or its use, whether proper or improper.
In Home Service
Save as herein provided, by Danby, there are no other warranties, conditions, representations or guarantees, express or implied, made
or intended by Danby or its authorized distributors and all other warranties, conditions, representations or guarantees, including any
warranties, conditions, representations or guarantees under any Sale of Goods Act or like legislation or statute is hereby expressly
Nothing within this warranty shall imply that Danby will be responsible or liable for any spoilage or damage to food or other c ontents of this appliance, whether due
excluded. Save as herein provided, Danby shall not be responsible for any damages to persons or property, including the unit itself,
to any defect of the appliance, or its use, whether proper or improper.
howsoever caused or any consequential damages arising from the malfunction of the unit and by the purchase of the unit, the
purchaser does hereby agree to indemnify and hold harmless Danby from any claim for damages to persons or property caused by
the unit.
Save as herein provided, Danby, there are no other warranties, conditions, representations or guarantees, express or implied, m ade or intended by Danby or its
authorized distributors and all other warranties, conditions, representations or guarantees, including any warranties, conditio ns, representations or guarantees
under any Sale of Goods Act or like legislation or statue is hereby expressly excluded. Save as herein provided, Danby shall no t be responsible for any damages
No warranty or insurance herein contained or set out shall apply when damage or repair is caused by any of the following:
to persons or property, including the unit itself, howsoever caused or any consequential damages arising from the malfunction o f the unit and by the purchase of
1) Power failure.
the unit, the purchaser does hereby agree to indemnify and hold harmless Danby from any claim for damages to persons or propert y caused by the unit.
2) Damage in transit or when moving the appliance.
3) Improper power supply such as low voltage, defective house wiring or inadequate fuses.
4) Accident, alteration, abuse or misuse of the appliance such as inadequate air circulation in the room or abnormal operating
conditions (ie. extremely high or low room temperature).
No warranty or insurance herein contained or set out shall apply when damage or repair is caused by any of the following:
5) Use for commercial or industrial purposes (ie. If the appliance is not installed in a domestic residence).
1) Power failure.
6) Fire, water damage, theft, war, riot, hostility, acts of God such as hurricanes, floods etc.
2) Damage in transit or when moving the appliance.
7) Service calls resulting in customer education.
3) Improper power supply such as low voltage, defective house wiring or inadequate fuses.
8) Improper Installation (ie. Building-in of a free standing appliance or using an appliance outdoors that is not approved for outdoor
4) Accident, alteration, abuse or misuse of the appliance such as inadequate air circulation in the room or abnormal operating con ditions
application, including but not limited to: garages, patios, porches or anywhere that is not properly insulated or climate controlled).
If the appliance is installed in a location that is 100 kilometers (62 miles) or more from the nearest service center your unit must be
delivered to the nearest authorized Danby Service Depot, as service must only be performed by a technician qualied and certif ied for
warranty service by Danby. Transportation charges to and from the service location are not protected by this warranty and are t he
EXCLUSIONS
responsibility of the purchaser.
EXCLUSIONS
GENERAL PROVISIONS
GENERAL PROVISIONS
(extremely high or low room temperature).
Proof of purchase date will be required for warranty claims; retain bills of sale. In the event that warranty service is required, present
5) Use for commercial or industrial purposes (ie. If the appliance is not installed in a domestic residence).
the proof of purchase to our authorized service depot.
6) Fire, water damage, theft, war, riot, hostility, acts of God such as hurricanes, oods etc.
7) Service calls resulting in customer education.
8) Improper Installation (ie. Building-in of a free standing appliance or using an appliance outdoors that is not approved for out door application).
Proof of purchase date will be required for warranty claims; so, please retain bills of sale. In the event warranty service is required, present this document to our
AUTHORIZED SERVICE DEPOT.
Danby Products Limited
Danby Products Limited
PO Box 1778, Guelph, Ontario, Canada N1H 6Z9
PO Box 1778, Guelph, Ontario, Canada N1H 6Z9
Telephone: (519) 837-0920 FAX: (519) 837-0449
Telephone: (519) 837-0920 FAX: (519) 837-0449
Warranty Service
Warranty Service
In-home
Carry In
1-800-263-2629
1-800-263-2629
04/17
04/09
Danby Products Inc.
PO Box 669, Findlay, Ohio, U.S.A. 45840
Telephone: (419) 425-8627 FAX: (419) 425-8629
PO Box 669, Findlay, Ohio, U.S.A. 45840
Telephone: (419) 425-8627 FAX: (419) 425-8629
Danby Products Inc.

Bienvenue
Bienvenue à la famille Danby. Nous sommes fi ers de la qualité de nos produits et nous croyons
en le service fi able. Nous vous suggérons de lire ce manual d’utilisation avant de brancher
votre nouvel appareil car il contient des informations inportantes sur l’utilisation, la sécurité, le
dépannage et la maintenance, afi n d’assurer la fi abilité et la longévité de votre appareil.
Visitez www.Danby.com pour accéder aux outils d’autoservice, aux FAQ et bien plus encore. Pour
obtenir de l’aide supplémentaire, composez 1-800-263-2629.
Notez les informations ci-dessous; Vous aurez besoin de cette information pour obtenir un
service sous garantie.
Vous devez fournir le reçu d’achat original pour valider votre garantie et recevoir le service.
Numéro de modèle: _____________________________________________
Numéro de serie: _______________________________________________
Date d’achat: __________________________________________________
Besoin d’assistance?
Avant d’appeler pour service, voici quelques choses que vous pouvez faire pour nous
aider à mieux vous servir.
Lire ce manuel du propriétaire:
Il contient des instructions pour vous aider à utiliser et à maintenir votre appareil
correctement.
Si vous recevez un appareil endommagé:
Contactez immédiatement le revendeur ou l’entrepreneur qui vous a vendu l’appareil.
Gagnez du temps et de l’argent:
Avant d’appeler pour service, consultez la section de dépannage à la fi n de ce manuel.
Cette section vous aidera à résoudre les problèmes courants pouvant survenir.
1-800-26- Danby
(1-800-263-2629)
13

Consignes de sécurité importantes
LIRE ET SUIVRE TOUTES LES INSTRUCTIONS DE SÉCURITÉ
INTERFÉRENCE AUX FRÉQUENCES RADIO
ÉLECTRIQUES
Cet appareil génère et utilise des fréquences radio
ISM et, s’il n’est pas installé et utilisé correctement
en stricte conformité avec les instructions du
fabricant, il peut causer des interférences au
niveau de la réception des appareils de radio et de
télévision. Il a été testé et s’est avéré conforme aux
limites relatives aux équipements ISM, telles que
défi nies à la partie 18 des règles de la FCC, qui
fournissent les balises d’une protection raisonnable
contre ces interférences dans une installation
résidentielle.
Cependant, rien ne garantit que des interférences
ne se produiront pas dans des installations
particulières. Si cet appareil produit des
interférences avec la réception de la radio ou de la
télévision, ce qui peut être vérifi é en éteignant et en
allumant l’appareil, l’interférence peut être corrigée
en appliquant l’une ou plusieurs des méthodes
suivantes :
• Réorienter l’antenne de réception de la radio ou
de la télévision.
• Déplacer le four à micro-ondes loin du
récepteur.
• Brancher le four à micro-ondes dans une
prise différente, afi n que les micro-ondes et
le récepteur se trouvent sur des circuits de
dérivation différents.
Le fabricant n’est pas responsable des interférences
radio ou TV causées par une modifi cation non
autorisée de cet appareil. Il incombe à l’utilisateur
de corriger ces interférences.
ÉVITER UNE POSSIBLE EXPOSITION A UNE
ENERGIE EXCESSIVE DES MICRO-ONDES
• Ne pas tenter de faire fonctionner l’appareil
lorsque la porte est ouverte, car cela peut
entraîner une exposition nocive à l’énergie
des micro-ondes. Ne pas trafi quer ou tenter
d’annuler les verrous de sécurité.
• Ne placer aucun objet entre la face avant et la
porte et tenir les surfaces d’étanchéité propres
en évitant que des salissures ou des résidus de
produit nettoyant s’y accumulent.
• Ne pas faire fonctionner l’appareil s’il est
endommagé. La porte doit être fermée
correctement et il ne doit y avoir aucun
dommage aux charnières, aux verrous, à la
porte, aux joints de porte ou aux surfaces
d’étanchéité.
INSTRUCTIONS DE MISE À LA TERRE
Cet appareil doit être mis à la terre. En cas de
courtcircuit, la mise à la terre réduit les risques de
décharge électrique en fournissant un échappatoire
au courant électrique.
Cet appareil est équipé d’un cordon doté d’un fi l
de mise à la terre avec une fi che de mise à la terre.
Le cordon d’alimentation doit être branché sur une
prise correctement mise à la terre. Si la sortie est
une prise murale à 2 broches standard, il est de
votre responsabilité de la remplacer par une prise
murale à 3 broches correctement mise à la terre. La
plaque signalétique en série indique la tension et la
fréquence auxquelles l’appareil est conçu.
AVERTISSEMENT - Une fi che de mise à la terre mal
branchée peut entraîner un risque d’incendie, de
choc électrique ou de blessures aux personnes qui
utilisent l’appareil. Si vous n’êtes pas certain que
l’appareil est correctement mis à la terre, consultez
un préposé du service qualifi é.
N’UTILISER JAMAIS DE FIL DE RALLONGE
Ne connectez pas votre appareil aux rallonges ou
avec un autre appareil dans la même prise murale.
Ne pas épisser le cordon d’alimentation. Ne coupez
ou retirez en aucun cas la troisième broche du
cordon d’alimentation.
Si le cordon d’alimentation est endommagé, il doit
être remplacé par le fabricant, son agent de service
ou une personne qualifi ée similaire afi n d’éviter tout
risque.
EXIGENCES DE SÉCURITÉ
Assurez-vous que les composants sont remplacés
par des composants similaires et que l’entretien
est effectué par le personnel de service autorisé en
usine, afi n de minimiser le risque d’allumage possible en raison de pièces incorrectes ou d’un mauvais
service.
Les enfants doivent être surveillés pour s’assurer
qu’ils ne jouent pas avec l’appareil.
Ne pas couvrir ni bloquer les ouvertures de
ventilation dans cet appareil.
GARDER CES INSTRUCTIONS!
14

Consignes de sécurité importantes
LIRE ET SUIVRE TOUTES LES INSTRUCTIONS DE SÉCURITÉ
EXIGENCES DE SÉCURITÉ
Cet appareil est spécialement conçu pour chauffer,
cuire ou sécher les aliments. Il n’est pas conçu pour
une utilisation industrielle ou de laboratoire.
Ne pas entreposer ou utiliser cet appareil à
l’extérieur. Ne pas utiliser cet appareil près de l’eau.
Ne pas trop cuire de la nourriture. Surveillez
attentivement l’appareil lorsqu’il est utilisé.
Retirer les attaches de fi l avant de placer des
éléments dans l’appareil.
N’utilisez pas l’appareil à des fi ns de stockage.
Ne laissez pas d’articles à l’intérieur de l’appareil
lorsqu’il n’est pas utilisé.
Ne pas chauffer l’huile ou la graisse pour la friture
car il est diffi cile de contrôler la température de
l’huile dans un micro-ondes.
Percez les aliments avec des peaux épaisses telles
que les pommes de terre, la courge et les pommes
avant de cuisiner.
SÉCURITÉ - LIQUIDE SURCHAUFFÉ
Les liquides peuvent être surchauffés au-delà du
point d’ébullition sans que cela soit apparent, en
raison de la tension superfi cielle du liquide. Le
bouillonnement visible occasionné par l’ébullition
n’est donc pas toujours présent, lorsque le liquide
est retiré de l’appareil. Une brusque ébullition
pourrait donc se déclencher, lorsqu’un ustensile ou
un autre objet, tel un sachet de thé, est inséré dans
le liquide surchauffé.
Pour réduire le risque de blessure :
• Ne pas surchauffer les liquides. Ne pas chauffer
aucun liquide pendant plus de 2 minutes par
tasse.
• Incorporer les liquides avant ou à mi-chemin du
chauffage.
• N’utilisez pas de récipients à surfaces rectilignes
et à cols étroits, car cela peut entraîner une
accumulation de vapeur.
• Le liquide surchauffé peut commencer à entrer
en ébullition spontanément, lorsqu’il est retiré du
four à micro-ondes. Après le chauffage, laissez
le liquide reposer dans le four à micro-ondes
pendant 30 secondes.
• Soyez particulièrement prudent lorsque vous
insérez un ustensile ou tout autre objet dans des
liquides chauds.
Certains articles tels que des œufs entiers ou
des récipients scellés ont la possibilité d’exploser
lorsqu’ils sont chauffés et ne doivent pas être placés
dans cet appareil.
Les ustensiles de cuisine peuvent devenir chaud
en raison de la chaleur transférée des aliments
chauffés. Les porte-pot peuvent être nécessaires.
N’utilisez que des thermomètres spécialement
conçus pour être utilisés dans les micro-ondes.
N’utilisez aucun appareil de chauffage ou de
cuisson sous cet appareil.
Assurez-vous que le plateau en verre et les rouleaux
sont en position correcte avant d’utiliser pour éviter
d’éventuels déversements.
Ne faites pas fonctionner cet appareil lorsqu’il
est vide car cela augmentera la chaleur autour
du magnétron et peut endommager l’appareil ou
provoquer un incendie.
Si les éléments à l’intérieur de l’appareil doivent
être allumés, fermez la porte, éteignez l’appareil et
débranchez le cordon d’alimentation.
Le contenu des bouteilles de lait et des pots
d’aliments pour bébés doit être secoué ou remué et
la température doit être vérifi ée avant l’utilisation,
afi n d’éviter les brûlures.
Ne pas décongeler les boissons congelées, en
particulier les boissons gazeuses, dans cet appareil
car elles pourraient exploser.
Les aliments chauds et la vapeur peuvent causer des
brûlures. Soyez très prudent lorsque vous ouvrez
un récipient qui a été chauffé dans l’appareil. Afi n
d’éviter les brûlures, dirigez l’ouverture à l’écart des
mains et du visage.
SÉCURITÉ - PRODUCTION D’ÉTINCELLES
La production d’étincelles à l’intérieur du four à
micro-ondes pendant qu’il fonctionne est causée
par:
• Métal ou feuille d’aluminium à l’intérieur de
l’appareil.
• Essuie-tout recyclés, contenant de petits
morceaux de métal, utilisés à l’intérieur de
l’appareil.
Lorsque vous constatez la présence d’étincelles,
arrêtez l’appareil et retirez-en les objets métalliques
ou les essuie-tout.
GARDER CES INSTRUCTIONS!
15

INSTRUCTIONS D’INSTALLATION
CONSIGNES D’UTILISATION
INSTALLATION
• Retirez tous les matériaux d’emballage de
l’intérieur et de l’extérieur de l’appareil. Ne
retirez pas la feuille de mica en carton couvrant
le magnétron.
• Vérifi ez si l’appareil est endommagé avant
de l’utiliser, comme une porte mal alignée ou
pliée, des joints d’étanchéité endommagés, des
charnières ou des verrous ou des verrous de la
porte défectueux ou défectueux, ou des bosses
à l’intérieur de la cavité ou sur la porte. En cas
de dommages à l’appareil, ne l’utilisez pas, le
retourner à son point de vente ou contactez le
service consommateur.
• L’appareil doit être placé sur une surface
plane et stable qui peut contenir son poids et
la nourriture la plus lourde susceptible d’être
placée dans l’appareil.
• N’utilisez pas cet appareil lorsque de la chaleur,
de l’humidité ou de l’humidité élevée sont
générés.
• Ne pas nettoyer cet appareil avec ou à
proximité de matériaux combustibles.
TECHNIQUES DE CUISSON
Pour obtenir les meilleurs résultats lors de la cuisson
dans cet appareil, suivez les suggestions ci-dessous.
MÉLANGER
Mélanger les aliments pendant la cuisson pour
répartir uniformément la chaleur. La nourriture à
l’extérieur du plat absorbe plus d’énergie et chauffe
plus rapidement, puis remuez de l’extérieur du plat
vers le centre.
ARRANGEMENT
Disposez des aliments de forme inégale plus épais,
des pièces plus légères vers l’extérieur du plateau
tournant afi n qu’ils reçoivent plus de chaleur. Pour
éviter de trop cuire, placez des objets délicats vers
le centre du plateau tournant.
COUVRANT
Les aliments délicats peuvent être protégés avec des
bandes étroites de papier d’aluminium pour éviter
la surcouche. N’utilisez que de petites quantités
de papier car cela peut provoquer des arcs et des
dommages à l’appareil.
• Prévoyez 20 cm d’espace au-dessus de
l’appareil, 10 cm à l’arrière de l’appareil et 5
cm des deux côtés pour un débit d’air correct
autour de l’appareil. Ne bloquez aucune
ouverture de ventilation sur l’appareil.
• Ne faites pas fonctionner l’appareil sans le
plateau en verre, le support de rouleau et l’arbre
dans leurs positions correctes.
TOURNANT
Faire passer les aliments au milieu de la cuisson
pour exposer toutes les pièces à l’énergie des microondes. Ceci est important pour les gros objets et la
viande.
REPOS
Les aliments cuits dans un micro-ondes augmentent
la chaleur interne et continuent à cuire quelques
minutes après le chauffage. Laissez reposer les
aliments pour terminer la cuisson, en particulier les
viandes et les liquides. Tous les liquides doivent être
laissés au repos pendant quelques minutes après la
cuisson et doivent être secoués ou agités avant de
consommer.
AJOUTER L’HUMIDITÉ
L’énergie des micro-ondes est attirée par les
molécules d’eau. Les aliments qui sont inégaux dans
la teneur en humidité doivent être couverts et laisser
reposer après la cuisson pour permettre à la chaleur
de se disperser uniformément. Ajoutez une petite
quantité d’eau à la nourriture sèche pour l’aider à
cuire.
16

CONSIGNES D’UTILISATION
GUIDE DES USTENSILES DE CUISINE
Certains ustensiles sont inappropriés pour une
utilisation dans un micro-ondes. Voir ci-dessous
pour plus d’informations sur les ustensiles
recommandés, qui ne devraient avoir qu’une
utilisation limitée et qui ne sont pas recommandés.
RECOMMANDÉ
Plat de brunissement à micro-ondes: Utilisé pour
brunir l’extérieur des petits produits alimentaires.
Suivez les instructions fournies avec le plat
brunissant.
Enveloppement en plastique à micro-ondes: Utilisé
pour retenir la vapeur. Laissez une petite ouverture
pour éviter une accumulation de vapeur. Ne placez
pas directement sur les aliments.
Bols et plats en verre et en céramique: Utiliser pour
le chauffage ou la cuisson.
Plaques et tasses en papier: Utilisé pour un
chauffage à court terme à basse température.
Ne pas utiliser de papier recyclé car ils peuvent
contenir du métal et pourraient s’enfl ammer.
Serviettes en papier et serviettes de table: Utilisé
pour un chauffage et un revêtement à court terme.
Ils peuvent absorber l’excès d’humidité et éviter
les éclaboussures. N’utilisez pas de papier recyclé
car ils peuvent contenir du métal et pourraient
s’enfl ammer.
Papier ciré: Utiliser comme couverture pour éviter
les éclaboussures.
Thermomètres: Utilisez uniquement ceux qui sont
étiquetés «Va au four à micro-ondes» et suivez
toutes les instructions. Vérifi ez la nourriture à
plusieurs endroits. Les thermomètres conventionnels
peuvent être utilisés une fois que les aliments ont été
retirés du micro-ondes.
USAGE LIMITÉ
Feuille d’aluminium: Utilisez des bandes étroites
pour éviter la surcoupe des zones exposées.
L’utilisation de trop de papier d’aluminium peut
provoquer des arcs et endommager l’appareil.
Gardez une distance d’au moins 1 pouce (2,6 cm)
entre la feuille et l’intérieur de l’appareil.
Céramique, porcelaine et les pots de grès: Utilisez
uniquement si elles sont étiquetées «Va au four à
micro-ondes».
Plastic: Utilisez uniquement si elles sont étiquetées
«Va au four à micro-ondes».
NON RECOMMANDÉ
Bocaux et bouteilles en verre: Le verre régulier est
trop fi n pour être utilisé dans un micro-ondes. Il peut
se briser et causer des dommages ou des blessures.
Sacs en papier: Ce sont des risques d’incendie et
peuvent s’enfl ammer. La seule exception concerne
les sacs à popcorn, conçus pour l’utilisation des
micro-ondes.
Plaques et tasses en styromousse: Ceux-ci peuvent
fondre et laisser un résidu malsain sur les aliments.
Récipients en plastique et pots de nourriture: Ils
peuvent fondre et s’enfl ammer.
Ustensiles en métal: Cela peut provoquer des arcs
et des dommages à l’appareil. Retirez tout le métal
avant l’opération.
Remarque: Pour vérifi er si un plat est sécurisé pour
une utilisation au four micro-ondes, placez le plat
vide dans l’appareil et micro-ondes en haut pendant
30 secondes. Si le plat devient très chaud, il ne doit
pas être utilisé.
17

CONSIGNES D’UTILISATION
CARACTÉRISTIQUES
1. Système de verrouillage de porte
2. Fenêtre du four
3. Anneau de rouleau
4. Arbre tournant
5. Bouton de déverrouillage de porte (Remarque:
Certains modèles peuvent avoir une poignée au
lieu d’un bouton de déverrouillage de porte.)
6. Panneau de contrôle
7. Feuille de mica (Ne pas enlever)
8. Plateau en verre
Remarque: Les images dans ce manuel sont
uniquement à des fi ns d’enseignement. La forme
réelle de votre appareil peut varier selon le numéro
de modèle.
PANNEAU DE CONTRÔLE
1. Affi cher: Shows cooking time, power level and
clock time.
2. Menus de cuisson automatique: Used to set
auto cook programs.
3. Bouton d’horloge: Used to set the current time.
4. Puissance/Tenir: Utilisé pour sélectionner le
niveau de puissance. Appuyez et maintenez ce
bouton enfoncé pendant 3 secondes pour entrer
en mode muet.
5. Temps de cuisson: Utilisé pour régler le temps
de cuisson à 100% du niveau de puissance.
6. Minuterie: Utilisé pour régler la minuterie.
7. Décongélation rapide: Utilisé pour défi nir le
dégivrage en fonction de l’heure saisie.
8. Décongeler par poids: Utilisé pour régler le
dégivrage en fonction du poids.
9. Cuire en poids: Utilisé pour régler le temps de
cuisson en fonction du poids.
10. Commencer/Arrêter: Utilisé pour commencer ou
arrêter un programme de cuisson.
11. Ajouter +30 sec: Utilisé pour ajouter 30
secondes au temps de cuisson.
12. Bouton de réinitialiser: Utilisé pour effacer
tous les paramètres précédents. Appuyez
et maintenez ce bouton enfoncé pendant 3
secondes pour régler la fonction de verrouillage
des enfants.
18

CONSIGNES D’UTILISATION
PREMIÈRE UTILISATION
Lorsque l’appareil est branché pour la première
fois, l’écran affi che “1:01”.
Lorsque vous réglez la minuterie de cuisson,
l’appareil revient en mode veille s’il n’y a pas
d’entrée dans les 25 secondes.
Pendant l’opération:
• Appuyez sur le bouton Commencer/Arrêter
pour interrompre le fonctionnement.
• Appuyez à nouveau sur le bouton Commencer/
Arrêter pour reprendre le fonctionnement.
• Appuyez sur le bouton Réinitialiser pour annuler
le programme de cuisson.
L’appareil émet un bip à la fi n d’un programme de
cuisson et continuera à sonner toutes les 2 minutes
jusqu’à ce qu’un bouton soit enfoncé ou que la
porte s’ouvre.
CUISSON À MICRO-ONDES
Pour régler la puissance et temps de cuisson:
1. Appuyez plusieurs fois sur le bouton Puissance/
Tenir jusqu’à ce que le niveau de cuisson désiré
soit réglé, selon le graphique ci-dessous. Si l’on
veut 100% de puissance de cuisson, appuyez
sur le bouton Puissance/Tenir une fois.
Appuyez sur le bouton
Puissance/Tenir
Une fois 100% (P100)
Deux fois 90% (P-90)
3 fois 80% (P-80)
4 fois 70% (P-70)
5 fois 60% (P-60)
6 fois 50% (P-50)
7 fois 40% (P-40)
8 fois 30% (P-30)
9 fois 20% (P-20)
Puissance de
cuisson
RÉGLAGE DE L’HORLOGE
L’horloge peut être confi gurée comme une horloge
de 12 heures ou une horloge de 24 heures.
Pour défi nir l’heure actuelle:
1. Appuyez une fois sur le bouton Horloge pour
choisir une horloge de 12 heures. Appuyez à
nouveau sur la touche Horloge pour choisir une
horloge de 24 heures.
2. Utilisez le pavé numérique pour entrer l’heure
actuelle.
3. Appuyez sur le bouton Horloge pour confi rmer.
Pendant le fonctionnement, appuyez sur le bouton
Horloge pour voir l’heure actuelle.
FONCTION TIMER
Pour régler la fonction de la minuterie:
4. Appuyez sur le bouton Minuterie, “TIMER” et
“ENTER” s’affi chent à l’écran et “:” clignotent.
5. Utilisez le pavé numérique pour entrer l’heure
désirée pour exécuter le micro-ondes.
6. Appuyez sur le bouton Commencer/Arrêter
pour commencer l’opération.
10 fois 10% (P-10)
11 fois 0% (P-00)
2. Utilisez le pavé numérique pour entrer le temps
de cuisson désiré.
3. Appuyez sur le bouton Commencer/Arrêter
pour commencer l’opération.
AJOUTER 30 SECONDS FONCTION
Lorsque l’appareil n’est pas en service, appuyez sur
le bouton Ajouter +30 SEC pour faire fonctionner
l’appareil pendant 30 secondes à 100% du
niveau de puissance. Ce bouton peut être pressé à
plusieurs reprises, chaque pression ajoutera encore
30 secondes au temps de cuisson.
CUISSON EXPRESS
Lorsque l’appareil n’est pas en service, appuyez
sur le pavé numérique de 1 à 6 et l’appareil
fonctionnera entre 1 et 6 minutes à 100% de
puissance de cuisson.
19

CONSIGNES D’UTILISATION
CUISSON AUTOMATIQUE
Les boutons de cuisson automatique peuvent
être utilisés pour régler les fonctions de cuisson
automatiques pour les types d’aliments ci-dessous.
MAÏS SOUFFLÉ
1. Appuyez sur le bouton Maïs Souffl é. Cela
réglera automatiquement le temps de cuisson
pour un 3,5 oz. sac de maïs souffl é.
2. Appuyez sur le bouton Commencer/Arrêter
pour commencer l’opération.
Pour modifi er le temps prédéfi ni:
1. Appuyez deux fois sur le bouton Maïs Souffl e.
“ENTER TIME” apparaît sur l’affi chage.
2. Utilisez le pavé numérique pour entrer le
temps de cuisson désiré. Ce nouveau réglage
de l’heure sera utilisé chaque fois que vous
appuyez sur le bouton Maïs Souffl e. Si
l’appareil manque d’alimentation, cette fois
devra être reprogrammée.
3. Appuyez sur le bouton Commencer/Arrêter
pour commencer l’opération.
BOISSON
Pour 5 à 7 oz. portion:
1. Appuyez sur le bouton Boisson.
2. Utilisez le pavé numérique de 1 à 4 pour entrer
le nombre de tasses.
3. Appuyez sur le bouton Commencer/Arrêter
pour commencer l’opération.
Pour un 9 - 11 oz. portion:
1. Appuyez deux fois sur le bouton Boisson.
2. Utilisez le pavé numérique de 1 à 4 pour entrer
le nombre de tasses.
3. Appuyez sur le bouton Commencer/Arrêter
pour commencer l’opération.
Ne surchauffez pas les liquides. Ne pas chauffer
aucun liquide pendant plus de 2 minutes par tasse.
Après le chauffage, laissez le liquide rester pendant
30 secondes avant de retirer l’appareil.
DÎNER SURGELÉ
Pour une ou deux petites 7 - 9 oz. dîners:
POMME DE TERRE
Pour 4 à 6 oz. Portion de pommes de terre:
1. Appuyez sur le bouton Pommes de Terre.
2. Appuyez sur le bouton Commencer/Arrêter
pour commencer l’opération.
PIZZA
Pour réchauffer une tranche de pizza:
1. Appuyez une fois sur le bouton Pizza.
2. Appuyez sur le bouton Commencer/Arrêter
pour commencer l’opération.
Pour chauffer une pizza entière congelée:
1. Appuyez deux fois sur le bouton Pizza.
2. Appuyez sur le bouton Commencer/Arrêter
pour commencer l’opération.
1. Appuyez sur le bouton Dîner Surgelé.
2. Utilisez le pavé numérique pour indiquer si 1 ou
2 dîners seront cuits.
3. Appuyez sur le bouton Commencer/Arrêter
pour commencer l’opération.
Pour un ou deux grands 10-12 oz. dîners:
1. Appuyez deux fois sur le bouton Dîner Surgelé.
2. Utilisez le pavé numérique pour indiquer si 1 ou
2 dîners seront cuits.
3. Appuyez sur le bouton Commencer/Arrêter
pour commencer l’opération.
RÉCHAUFFER
1. Appuyez sur le bouton Réchauffer.
2. Appuyez sur le bouton Commencer/Arrêter
pour commencer l’opération.
20

CONSIGNES D’UTILISATION
CUIRE EN POIDS
1. Appuyez sur le bouton Cuire en Poids.
2. Appuyez sur les numéros 1, 2 ou 3 pour
indiquer quel type de viande sera cuit, selon
le tableau ci-dessous. La viande doit être
décongelée et à température réfrigérée.
Code Type Poids maximal
1 Boeuf 6 livres
2 Mouton 6 livres
3 Porc 5 livres 4 onces
3. Utilisez le pavé numérique pour entrer le poids
de la viande qui sera cuite. Le poids doit être en
livres et en onces.
4. Appuyez sur le bouton Commencer/Arrêter
pour confi rmer.
Pendant le fonctionnement, l’appareil s’arrête
et sonne pour indiquer que la viande doit être
retournée. Appuyez sur le bouton Commencer/
Arrêter pour reprendre l’opération. Laisser reposer
la viande quelques minutes avant la sculpture.
DÉCONGÉLATION RAPIDE
1. Appuyez sur le bouton de Décongélation
Rapide.
2. Utilisez les touches numériques pour entrer le
temps de dégivrage souhaité.
3. Appuyez sur le bouton Commencer/Arrêter
pour confi rmer.
Pendant le fonctionnement, l’appareil s’arrête et
émet un bip pour indiquer que les aliments doivent
être retournés ou agités. Appuyez sur le bouton
Commecner/Arrêter pour reprendre l’opération.
FONCTION MUTE
Appuyez et maintenez enfoncé le bouton
Puissance/Tenir pendant 3 secondes pour entrer
en mode muet, ce qui va faire taire tous les sons de
l’appareil.
En mode muet, maintenez le bouton Puissance/
Tenir enfoncé pendant 3 secondes pour désactiver
l’appareil.
DEGIVRAGE EN POIDS
Le temps de dégivrage et le niveau de puissance
sont réglés automatiquement lorsque le poids est
entré.
1. Appuyez sur le bouton Degivrage en Poids.
2. Utilisez le pavé numérique pour entrer le
poids de la nourriture qui sera décongelée. Le
poids doit être en livres et en onces. Le poids
maximum est de 6 lb.
3. Appuyez sur le bouton Commencer/Arrêter
pour confi rmer.
Pendant le fonctionnement, l’appareil s’arrête et
émet un bip pour indiquer que les aliments doivent
être retournés ou agités. Appuyez sur le bouton
Commencer/Arrêter pour reprendre l’opération.
RÉGLAGE DE LA VERROUILLAGE DES
ENFANTS
Pour régler le verrouillage enfant, pendant
que l’appareil est en mode veille, appuyez et
maintenez le bouton Réinitialiser pendant 3
secondes. L’appareil émet un bip pour indiquer
que le verrouillage enfant est activé. Tout en étant
verrouillé, l’appareil ne peut pas être utilisé.
Pour annuler le verrouillage enfant, maintenez le
bouton Réinitialiser enfoncée pendant 3 secondes.
L’appareil émet un bip pour indiquer que le
verrouillage enfant a été désactivé.
21

SOINS ET ENTRETIEN
NETTOYAGE
Éteignez et débranchez l’appareil avant de
procéder à un nettoyage.
L’intérieur de l’appareil doit être nettoyé avec un
chiffon chaud et humide et des détergents doux.
Ne laissez pas les éclaboussures de nourriture
s’accumuler à l’intérieur de l’appareil, car cela
peut affecter l’effi cacité du micro-ondes et, si
suffi samment sale, peut s’allumer et provoquer un
incendie.
L’extérieur de l’appareil doit être nettoyé avec un
chiffon chaud et humide. Pour éviter d’endommager
les composants internes, ne laissez aucune eau
s’écouler dans les ouvertures de ventilation.
Nettoyez la porte et la fenêtre des deux côtés,
les joints de la porte et les parties adjacentes
souvent avec un chiffon humide pour éliminer les
déversements ou les éclaboussures. Ne pas utiliser
de nettoyants abrasifs.
Ne laissez pas le panneau de commande se
mouiller. Si nécessaire, nettoyer le panneau de
commande avec un chiffon humide, puis essuyer.
Le bac en verre peut être enlevé et nettoyé dans de
l’eau tiède et un détergent doux ou peut être placé
dans un lave-vaisselle.
La bague de roulement et le plancher du four
doivent être nettoyés régulièrement afi n d’éviter
un bruit ou un renversement excessif. L’anneau à
rouleaux peut être nettoyé dans de l’eau tiède et un
détergent doux ou peut être placé dans un lavevaisselle. Assurez-vous que la bague de roulement
et le plateau en verre sont remplacés dans la bonne
position pour éviter le bruit ou le renversement.
ENTRETIEN
Pour éliminer les odeurs du micro-ondes:
1. Mélangez une tasse d’eau avec le jus et la peau
d’un citron dans un bol à micro-ondes.
2. Micro-ondes à pleine puissance pendant 5
minutes.
3. Essuyez complètement l’intérieur de l’appareil,
le plateau en verre et l’anneau à rouleaux avec
un chiffon chaud et humide.
FEUILLE DE MICA
À l’intérieur de l’appareil, il y a une feuille de
carton en mica protégeant le magnétron. Ne retirez
pas cela de l’appareil car l’exposition du magnétron
aux éclaboussures de nourriture peut provoquer un
arc ou un incendie. Si elle devient sale, la feuille de
mica peut être nettoyée avec un chiffon chaud.
DISPOSITION
Ce produit ne doit pas être considéré comme un
ordures ménagères, il doit être transporté vers le
point de collecte approprié pour le recyclage des
composants électriques. Pour plus d’informations sur
les points locaux de collecte des déchets, contactez
votre agence locale d’élimination des déchets ou
votre bureau gouvernemental.
22

DÉPANNAGE
Danby soins du consommateur: 1-800-263-2629
Heures d’ouverture:
Lundi à Jeudi 8 h 30 à 18 h, heure normale de l’Est
Vendredi de 8 h 30 à 16 h, heure normale de l’Est
Les informations contenues dans ce manuel sont sujettes à modifi cation sans préavis.
PROBLEM POSSIBLE CAUSE
Aucune puissance • Un fusible peut être souffl é ou le disjoncteur a déclenché
• Branchement pas complètement inséré dans la prise murale
Arracher ou étinceler pendant
l’opération
Aliments cuits de façon inégale • La nourriture n’a pas été complètement décongelée avant
Aliments trop cuit • Le niveau de puissance ou le temps de cuisson étaient trop
Aliments non cuits • La nourriture n’a pas été complètement décongelée avant
• Les articles métalliques ont été laissés dans l’appareil
pendant l’opération
• L’appareil fonctionne alors qu’il est vide
• Les aliments renversés ont été construits à l’intérieur de
l’appareil ou sur la feuille de mica
de cuisiner
• Le temps de cuisson ou le niveau de puissance étaient
insuffi sants
• La nourriture n’a pas été tournée ou agitée pendant la
cuisson
élevés
de cuisiner
• Le temps de cuisson ou le niveau de puissance étaient
insuffi sants
• La nourriture n’a pas été tournée ou agitée pendant la
cuisson
• Les ouvertures de ventilation sont bloquées
Mauvaise décongélation • Le temps de dégivrage ou le niveau de puissance étaient
insuffi sants
• La nourriture n’a pas été tournée ou agitée pendant le
dégivrage
23

LIMITED IN-HOME APPLIANCE WARRANTY
GARANTIE LIMITÉE “EN ATELIER”
This quality product is warranted to be free from manufacturer’s defects in material and workmanship, provided that the unit is used under the normal operating
Cet appareil de qualité est garanti exempt de tout vice de matière première et de fabrication, s’il est utilisé dans les conditions normales
conditions intended by the manufacturer.
recommandées par le fabricant.
This warranty is available only to the person to whom the unit was originally sold by Danby Products Limited (Canada) or Danby Products Inc. (U.S.A.) (hereafter
Cette garantie n’est offerte qu’à l’acheteur initial de l’appareil vendu par Danby Products Limited (Canada) ou Danby Products Inc.
“Danby”) or by an authorized distributor of Danby, and is non-transferable.
(E.- U.A.) (ci-après « Danby ») ou par l’un des ses distributeurs agréés et elle ne peut être transférée.
CONDITIONS
Les pièces en plastique sont garanties pendant trente (30) jours seulement à partir de la date de l’achat, sans aucune prolongation
Plastic parts, are warranted for thirty (30) days only from purchase date, with no extensions provided.
prévue.
TERMS OF WARRANTY
Premiers 12 mois
First Year
Pour obtenir un
To obtain
service
Service
Pendant les premiers douze (12) mois, toutes les pièces fonctionnelles de ce produit qui s’avèrent défectueuses
During the rst twelve (12) months, any functional parts of this product found to be defective, will be repaired or replaced, at warrantor’s
seront réparées ou remplacées, selon le choix du garant, sans frais à l’acheteur initial.
option, at no charge to the ORIGINAL purchaser.
Contactez le revendeur où l'appareil a été acheté ou contactez le dépôt de service Danby autorisé le plus
Danby reserves the right to limit the boundaries of “In Home Service” to the proximity of an Authorized Service Depot. Any app liance
proche, où le service doit être effectué par un technicien de service qualifié. Si le service est effectué sur
requiring service outside the limited boundaries of “In Home Service” , it will be the consumer’s responsibility to transport the appliance (at
l'appareil par une personne autre qu'un dépôt de service autorisé, toutes les obligations de Danby en vertu de
their own expense) to the original retailer (point of purchase) or a service depot for repair. See “Boundaries of In Home Serv ice” below.
cette garantie seront annulées.
Contact your dealer from whom your unit was purchased, or contact your nearest authorized Danby service depot, where service
must be performed by a qualied service technician.
Il est de la responsabilité de l'acheteur de transporter l'appareil vers le dépôt de service agréé le plus proche.
If service is performed on the units by anyone other than an authorized service depot, or the unit is used for commercial appli cation, all
Les frais de transport entre votre domicile et le lieu de l'entretien ne sont pas couverts par la présente garantie et doivent être
acquittés par l'acheteur.
Boundaries of
In Home Service
Aucune partie de la garantie ne prévoit implicitement que le fabricant sera tenu responsable des dommages subis par les aliments ou
d’autres types de contenu, qu’ils soient causés par la défectuosité de l’appareil ou par son usage adéquat ou inadéquat.
En vertu de la présente, il n’existe aucune autre garantie, condition ou représentation, qu’elle soit exprimée ou tacite, de façon
Nothing within this warranty shall imply that Danby will be responsible or liable for any spoilage or damage to food or other c ontents of this appliance, whether due
to any defect of the appliance, or its use, whether proper or improper.
manifeste ou intentionnelle, par Danby ou ses distributeurs agréés. De même, sont exclues toutes les autres garanties, conditions ou
représentations, y compris les garanties, conditions ou représentations en vertu de toute loi régissant la vente de produits ou de toute
autre législation ou règlement semblables. En vertu de la présente, Danby ne peut être tenue responsable en cas de blessures
corporelles ou des dégâts matériels, y compris à l’appareil, quelle qu’en soit les causes. Danby ne peut pas être tenue responsable
Save as herein provided, Danby, there are no other warranties, conditions, representations or guarantees, express or implied, m ade or intended by Danby or its
des dommages indirects dus au fonctionnement défectueux de l’appareil. En achetant l’appareil, l’acheteur accepte de mettre à
authorized distributors and all other warranties, conditions, representations or guarantees, including any warranties, conditio ns, representations or guarantees
couvert et de dégager Danby de toute responsabilité en cas de réclamation pour toute blessure corporelle ou tout dégât matériel
under any Sale of Goods Act or like legislation or statue is hereby expressly excluded. Save as herein provided, Danby shall no t be responsible for any damages
causé par cet appareil.
to persons or property, including the unit itself, howsoever caused or any consequential damages arising from the malfunction o f the unit and by the purchase of
obligations of Danby under this warranty shall be void.
If the appliance is installed in a location that is 100 kilometers (62 miles) or more from the nearest service center your unit must be
delivered to the nearest authorized Danby Service Depot, as service must only be performed by a technician qualied and certif ied for
warranty service by Danby. Transportation charges to and from the service location are not protected by this warranty and are t he
responsibility of the purchaser.
EXCLUSIONS
EXCLUSIONS
the unit, the purchaser does hereby agree to indemnify and hold harmless Danby from any claim for damages to persons or propert y caused by the unit.
CONDITIONS GÉNÉRALES
La garantie ou assurance ci-dessus ne s’applique pas si les dégâts ou réparations sont dus aux cas suivants:
1) Panne de courant.
No warranty or insurance herein contained or set out shall apply when damage or repair is caused by any of the following:
2) Dommage subis pendant le transport ou le déplacement de l’appareil.
1) Power failure.
3) Alimentation électrique incorrecte (tension faible, câblage défectueux, fusibles incorrects).
4) Accident, modification, emploi abusif ou incorrect de l’appareil tel qu'une circulation d'air inadéquate dans la pièce ou des
2) Damage in transit or when moving the appliance.
conditions de fonctionnement anormales (température extrêmement élevée ou basse).
3) Improper power supply such as low voltage, defective house wiring or inadequate fuses.
5) Utilisation dans un but commercial ou industriel (à savoir, si l'appareil n'est pas installé dans un domicile résidentiel).
4) Accident, alteration, abuse or misuse of the appliance such as inadequate air circulation in the room or abnormal operating con ditions
6) Incendie, dommages causés par l’eau, vol, guerre, émeute, hostilités, cas de force majeure (ouragan, inondation, etc.).
7) Visites d’un technicien pour expliquer le fonctionnement de l’appareil au propriétaire.
8) Installation inappropriée (par exemple, encastrement d'un appareil autoportant, ou utilisation extérieure d'un appareil non conçu à
cet effet, y compris, mais sans s'y limiter: les garages, les patios, les porches ou ailleurs qui ne sont pas correctement isolés ou
climatisés).
(extremely high or low room temperature).
5) Use for commercial or industrial purposes (ie. If the appliance is not installed in a domestic residence).
6) Fire, water damage, theft, war, riot, hostility, acts of God such as hurricanes, oods etc.
7) Service calls resulting in customer education.
GENERAL PROVISIONS
8) Improper Installation (ie. Building-in of a free standing appliance or using an appliance outdoors that is not approved for out door application).
La preuve de la date d'achat sera requise pour les réclamations de garantie; Conserver les factures de vente. Dans le cas où un
Proof of purchase date will be required for warranty claims; so, please retain bills of sale. In the event warranty service is required, present this document to our
service de garantie est requis, présentez la preuve d'achat à notre dépôt de service agréé.
AUTHORIZED SERVICE DEPOT.
Danby Products Limited
Danby Products Limited
PO Box 1778, Guelph, Ontario, Canada N1H 6Z9
PO Box 1778, Guelph, Ontario, Canada N1H 6Z9
Téléphone : (519) 837-0920 Télécopieur: (519) 837-0449
Telephone: (519) 837-0920 FAX: (519) 837-0449
Warranty Service
Service sous garantie
In-home
En Atelier
1-800-263-2629
1-800-263-2629
04/17
04/09
Danby Products Inc.
PO Box 669, Findlay, Ohio, U.S.A. 45840
Téléphone: (419) 425-8627 Télécopieur: (419) 425-8629
PO Box 669, Findlay, Ohio, U.S.A. 45840
Telephone: (419) 425-8627 FAX: (419) 425-8629
Danby Products Inc.

Bienvenido
Bienvenido a la familia Danby. Estamos orgullosos de nuestros productos de calidad y nos beleive
en servicio confi able. Sugerimos que lea este manual del propietario antes de conectar el nuevo
aparato ya que contiene información importante sobre la operación, información de seguridad,
solución de problemas y consejos de mantenimiento para garantizar la fi abilidad y longevidad de
su electrodoméstico.
Visite www.Danby.com para acceder a herramientas de autoservicio, preguntas frecuentes y
mucho más. Para asistencia adicional, llame al 1-800-263-2629.
Tenga en cuenta la información siguiente; Necesitará esta información para obtener un servicio
bajo garantía.
Debe proporcionar el recibo de compra original para validar su garantía y recibir servicio.
Número de modelo: _____________________________________________
Número de serie: _______________________________________________
Fecha de compra: _______________________________________________
Necesitas ayuda?
Antes de llamar al servicio, aquí hay algunas cosas que puede hacer para ayudarnos a
servirle mejor.
Lea este manual del propietario:
Contiene instrucciones para ayudarle a usar y mantener su aparato correctamente.
Si recibe un aparato dañado:
Inmediatamente póngase en contacto con el minorista o el constructor que le vendió el
aparato.
Ahorre tiempo y dinero:
Consulte la sección de solución de problemas al fi nal de este manual antes de llamar. Esta
sección le ayudará a resolver problemas comunes que pueden ocurrir.
1-800-26- Danby
(1-800-263-2629)
25

Importantes Instrucciones de Seguridad
LEA Y SIGA TODAS LAS INSTRUCCIONES DE SEGURIDAD
INTERFERENCIA DE RADIO FRECUENCIA
Este equipo genera y usa frecuencias en la
banda ISM (Industrial, Scientifi c and Medical) y
si no se instala y se usa estrictamente de acuerdo
a las instrucciones del fabricante, este aparato
puede causar interferencia en la recepción de sus
equipos de radio y televisión. Este aparato se ha
comprobado que cumple con los límites establecidos
para equipo ISM y esta en conformidad con la
Parte 18 de las normas de la FCC, Los cuales
están diseñados para proporcionar una protección
razonable contra tales interferencias en una
instalación domestica y de uso residencial.
Sin embargo, no hay garantía que la interferencia
no ocurrirá en ciertas instalaciones. Si este equipo
causa interferencia en la recepción de señales de
radio o televisión, la cual pudiera determinarse
encendiendo y apagando el equipo, la interferencia
puede corregirse por uno o mas de los siguientes
métodos:
• Reoriente la antena receptora de radio o
televisión.
• Aleje el horno de microondas de la antena
receptora.
• Conecte el microondas en una clavija/enchufe
diferente, de modo que el microondas y el
equipo receptor estén en diferentes circuitos
eléctricos.
El fabricante no será responsable por cualquier
interferencia de radio o televisión causada por
cualquier modifi cación no autorizada a este
electrodoméstico, En todo caso será responsabilidad
del usuario corregir dicha interferencia.
LA CONECIÓN A TIERRA
Este artefacto debe ser conectado a tierra. En
caso de un corto circuito eléctrico, la conexión a
tierra reduce el riesgo de una descarga eléctrica
proporcionando un cable de retorno para la
corriente eléctrica.
Este aparato está equipado con un cable que
tiene un cable de tierra con un enchufe de
conexión a tierra. El cable de alimentación debe
estar enchufado en un tomacorriente que esté
debidamente conectado a tierra. Si el tomacorriente
es un tomacorriente estándar de 2 clavijas, es su
responsabilidad reemplazarlo por un tomacorriente
de 3 clavijas con conexión a tierra adecuada. La
placa de características en serie indica el voltaje y
la frecuencia para la que está diseñado el artefacto.
ADVERTENCIA - El uso inadecuado del enchufe
de conexión a tierra puede resultar en un riesgo
de choque eléctrico. Consulte con un electricista
o persona de reparaciones competente si no
comprende buen las instrucciones de conexión a
tierra o si existe alguna duda sobre si el aparato
está conectado a tierra correctament.
NO UTILICE CABLES DE EXTENSIÓN
No conecte el aparato a los cables de extensión ni
con otro aparato en la misma toma de corriente.
No empalme el cable de alimentación. No corte ni
quite en ningún caso la tercera clavija de tierra del
cable de alimentación.
EVITE LA POSIBLE EXPOSICION A USO
EXCESSIVO DE ENERGIA DE MICRONDAS
• No intente hacer funcionar este electrodoméstico
con la puerta abierta, este puede causar daños
por la exposición de energía de microondas.
No intente manipular o engañar los seguros de
seguridad.
• No coloque ningún objeto entre la cara frontal
del aparato y la puerta or permita que se
acumule tierra o residuos de productos de
limpieza en las superfi cies que permiten el
sellado.
• No ponga a funcionar este electrodoméstico
si esta dañado. La puerta debe de cerrar
de manera correcta y no deberá de haber
bisagras, agarraderas, seguros os superfi cies de
sellado en mal estado o dañadas.
¡GUARDE ESTAS INSTRUCCIONES!
Si el cable de alimentación está dañado, debe
ser reemplazado por el fabricante, su agente de
servicio o persona califi cada similar para evitar
riesgos.
REQUERIMIENTOS DE SEGURIDAD
Asegúrese de que los componentes se
reemplazarán por componentes similares y que el
mantenimiento se hará por personal de servicio
autorizado de fábrica, para minimizar el riesgo de
encendido debido a piezas incorrectas o servicio
inadecuado.
Los niños deben ser supervisados para asegurar
que no jueguen con el electrodoméstico.
No cubra ni bloquee las aberturas de ventilación de
este aparato.
26

Importantes Instrucciones de Seguridad
LEA Y SIGA TODAS LAS INSTRUCCIONES DE SEGURIDAD
REQUERIMIENTOS DE SEGURIDAD
Utilice este aparato sólo para el uso previsto, tal y
como se describe en este manual. Este aparato está
diseñado específi camente para calentar, cocinar
o secar alimentos. No está diseñado para uso
industrial o de laboratorio.
No guarde o use este aparato en el exterior. No
utilice este aparato cerca del agua.
No cocine demasiado los alimentos. Observe
atentamente el aparato cuando esté en uso.
Retire las ataduras de alambre antes de colocar los
artículos en el aparato.
No utilice el aparato para almacenamiento. No
deje objetos dentro del aparato cuando no estén en
uso.
No caliente aceite o grasa para freír, ya que es
difícil controlar la temperatura del aceite en un
microondas.
SEGURIDAD – LIQUIDOS SUPER-CALENTADOS
Los líquidos pueden ser sobre-calentados mas allá de su
punto de ebullición si que asi parezca debido la tensión
de la superfi cie del liquido en cuestión. Burbujas visibles
no siempre estarán presentes cuando el recipiente con
liquido es retirado del aparato microondas. Esto podría
resultar en líquidos muy calientes y repentinamente
hervir cuando un utensilio u otro artículo como una
bolsa de té se introduce en el líquido.
Para reducir el riesgo de alguna lesión o daño:
• No sobrecaliente líquidos, no caliente ningún liquido
por más de 2 minutos por cada taza o recipiente.
• Agitar el liquido antes y durante el calentamiento.
• No utilice recipientes con lados rectos o con cuello
estrechos ya que esto pude causar acumulación de
vapor.
• Un liquido súper-calentado puede espontáneamente
comenzar a hervir cuando este es retirado del
microondas. Después del calentamiento, Deje que el
liquido permanezca en por espacio de 30 segundos
antes de retirarlo del microondas.
• Mantenga extreme cuidado cuando introduzca
algún utensilio o algún otro objeto dentro de un
liquido caliente.
Pierce los alimentos con pieles gruesas como
patatas, calabaza y manzanas antes de cocinar.
Algunos artículos tales como huevos enteros o
recipientes sellados tienen la posibilidad de explotar
cuando se calientan y no deben ser colocados en
este aparato.
Los utensilios de cocina pueden calentarse debido
al calor transferido de los alimentos calentados.
Pueden ser necesarios titulares de maceta.
Utilice únicamente termómetros diseñados
específi camente para su uso en microondas.
No utilice ningún aparato de calefacción o cocción
debajo de este aparato.
Asegúrese de que la bandeja de vidrio y los rodillos
estén en la posición correcta antes de usarlos para
evitar posibles derrames.
No opere este aparato cuando esté vacío, ya que
esto aumentará el calor alrededor del magnetrón y
puede dañar el aparato o provocar un incendio.
Si los elementos dentro del aparato se encienden,
mantenga la puerta cerrada, apague el aparato y
desconecte el cable de alimentación.
El contenido de botellas de leche o frascos con comida
para bebe debe de batirse o agitarse y verifi car
la temperatura antes de ser servidos para evitar
quemaduras.
No descongele bebidas congeladas, especialmente
aquellas que puedan contener gas (bebidas
carbonatadas) ellas podrían explotar en este
electrodoméstico.
Comidas calientes y vapor pueden causar quemaduras.
Tenga cuidado al abrir cualquier recipiente o
contenedor que haya sido calentado en el microondas.
Manteniéndolos lo mas retirado posible de sus manos y
cara para evitar quemaduras.
SEGURIDAD – CHISPAS Y RUIDOS
Chispas y ruidos dentro del microondas cuando este esta
en funcionamiento, pueden ser causados por:
• Metal o aluminio dentro del horno microondas/
electrodoméstico.
• Toallas de papel recicladas que hayan sido usadas
dentro del electrodoméstico que pudieran contener
pequeñas partículas de metal.
Si chispas y ruidos llegasen a ocurrir,o presentarse,
detenga inmediatamente la operación y funcionamiento
de su horno, luego retire cualquier objeto de metal o
toallas de papel del electrodoméstico.
¡GUARDE ESTAS INSTRUCCIONES!
27

INSTRUCCIONES DE INSTALACIÓN
INSTRUCCIONES DE OPERACIÓN
INSTALACIÓN
• Retire todos los materiales de embalaje del
interior y del exterior del aparato. No retire la
hoja de mica de cartón que cubre el magnetrón.
• Compruebe si el aparato está dañado antes
de usarlo, como una puerta desalineada
o doblada, sellos dañados de la puerta,
bisagras o pestillos de la puerta rotos o sueltos
o abolladuras dentro de la cavidad o en la
puerta. Si hay algún daño en el aparato, no
lo utilice, devuélvalo a su punto de compra o
póngase en contacto con el consumidor.
• El aparato debe colocarse sobre una superfi cie
plana y estable que sea capaz de sostener su
peso y el alimento más pesado que pueda ser
colocado en el aparato.
• No utilice este aparato donde se genere calor,
humedad o humedad elevada.
• No limpie este aparato con o cerca de
materiales combustibles.
• Deje 20 cm de espacio por encima del aparato,
10 cm en la parte posterior del aparato y 5 cm
en ambos lados para un fl ujo de aire adecuado
alrededor del aparato. No obstruya las
aberturas de ventilación del aparato.
• No opere el aparato sin la bandeja de vidrio,
el soporte del rodillo y el eje en sus posiciones
correctas.
TÉCNICAS DE COCCIÓN
Para obtener los mejores resultados al cocinar en
este aparato, siga las siguientes sugerencias.
REVOLVIENDO
Revuelva los alimentos mientras cocina para
distribuir el calor uniformemente. Alimentos en el
exterior de la antena absorbe más energía y se
calienta más rápidamente para agitar desde el
exterior del plato hacia el centro.
ARREGLO
Organizar los alimentos de forma irregular, más
gruesos, partes más caras hacia el exterior de la
plataforma giratoria para que reciban más calor.
Para evitar que se queme demasiado, coloque
los artículos delicados hacia el centro de la mesa
giratoria.
ESCUDO
Los alimentos delicados pueden ser protegidos con
tiras estrechas de papel de aluminio para evitar la
cocción excesiva. Utilice sólo pequeñas cantidades
de papel de aluminio ya que esto puede provocar
arcos y dañar el aparato.
TORNEADO
Convierte los alimentos a la mitad de la cocción
para exponer todas las partes a la energía de
microondas. Esto es importante con los artículos
grandes y la carne.
REPOSEN
Los alimentos cocinados en un microondas
acumulan calor interno y continúan cocinando
durante unos minutos después de que se detenga
la calefacción. Deje que los alimentos reposen
para completar la cocción, especialmente carnes
y líquidos. Todos los líquidos deben dejarse
reposar durante unos minutos después de la
cocción y deben ser sacudidos o revueltos antes de
consumirlos.
AÑADIR HUMEDAD
La energía de la microonda se atrae a las moléculas
de agua. Los alimentos que son desiguales en el
contenido de humedad deben ser cubiertos y dejar
reposar después de cocinar para permitir que el
calor se dispersen uniformemente. Añadir una
pequeña cantidad de agua para secar los alimentos
para ayudar a cocinar.
28

INSTRUCCIONES DE OPERACIÓN
GUÍA DE UTENSILIOS DE COCINA
Ciertos utensilios son inadecuados para su uso
en un microondas. Vea a continuación para más
información sobre qué utensilios se recomiendan,
que sólo deben tener un uso limitado y que no se
recomiendan.
RECOMENDADO
Plato para dorar en el microondas: Se utiliza para
dorar el exterior de los alimentos pequeños. Siga
las instrucciones proporcionadas con el plato de
dorado.
Envoltura de plástico para microondas: Se utiliza
para retener el vapor. Deje una pequeña abertura
para evitar una acumulación de vapor. No coloque
directamente sobre los alimentos.
Tazones y platos de vidrio y cerámica: Uso para
calentar o cocinar.
Platos y tazas de papel: Utilice para calentar a
corto plazo a bajas temperaturas. No utilice papel
reciclado ya que pueden contener metal y podrían
encenderse.
Toallas de papel y servilletas: Utilizar para
calefacción y cubrimiento a corto plazo.
Pueden absorber el exceso de humedad y
evitar salpicaduras. No utilice toallas de papel
recicladas ya que pueden contener metal y podrían
encenderse.
Papel encerado: Utilizar como tapa para evitar
salpicaduras.
USO LIMITADO
Papel de aluminio: Utilice tiras estrechas para
evitar la cocción excesiva de las áreas expuestas.
Utilizar demasiada lámina puede provocar arcos y
dañar el aparato. Mantenga una distancia de por
lo menos 1 pulgada (2,6 cm) entre la lámina y el
interior del aparato.
Cerámica, porcelana y gres: Úselo sólo si están
etiquetados como “seguros para microondas”.
El plastico: Utilice solamente si está marcado como
“seguro para microondas”.
NO RECOMENDADO
Tarros y botellas de vidrio: El vidrio regular es
demasiado delgado para ser utilizado en un
microondas. Puede romperse y causar daños o
lesiones.
Bolsas de papel: Estos son un peligro de incendio
y podrían encenderse. La única excepción son las
bolsas de palomitas de maíz, que están diseñados
para uso de microondas.
Placas y tazas de espuma de poliestireno: Estos
pueden derretirse y dejar un residuo poco saludable
en los alimentos.
Almacenamiento de plástico y contenedores de
alimentos: Estos pueden fundir y encender.
Utensilios de metal: Pueden producirse arcos y
daños en el aparato. Retire todo el metal antes de
la operación.
Termómetros: Utilice solamente aquellos que están
etiquetados como “seguros para microondas” y
siga todas las instrucciones. Compruebe la comida
en varios lugares. Los termómetros convencionales
se pueden utilizar una vez que los alimentos se han
retirado del microondas.
Nota: Para comprobar si un plato es seguro para
su uso en el microondas, coloque el plato vacío en
el aparato y el microondas en la parte alta durante
30 segundos. Si el plato se pone muy caliente, no
debe utilizarse.
29
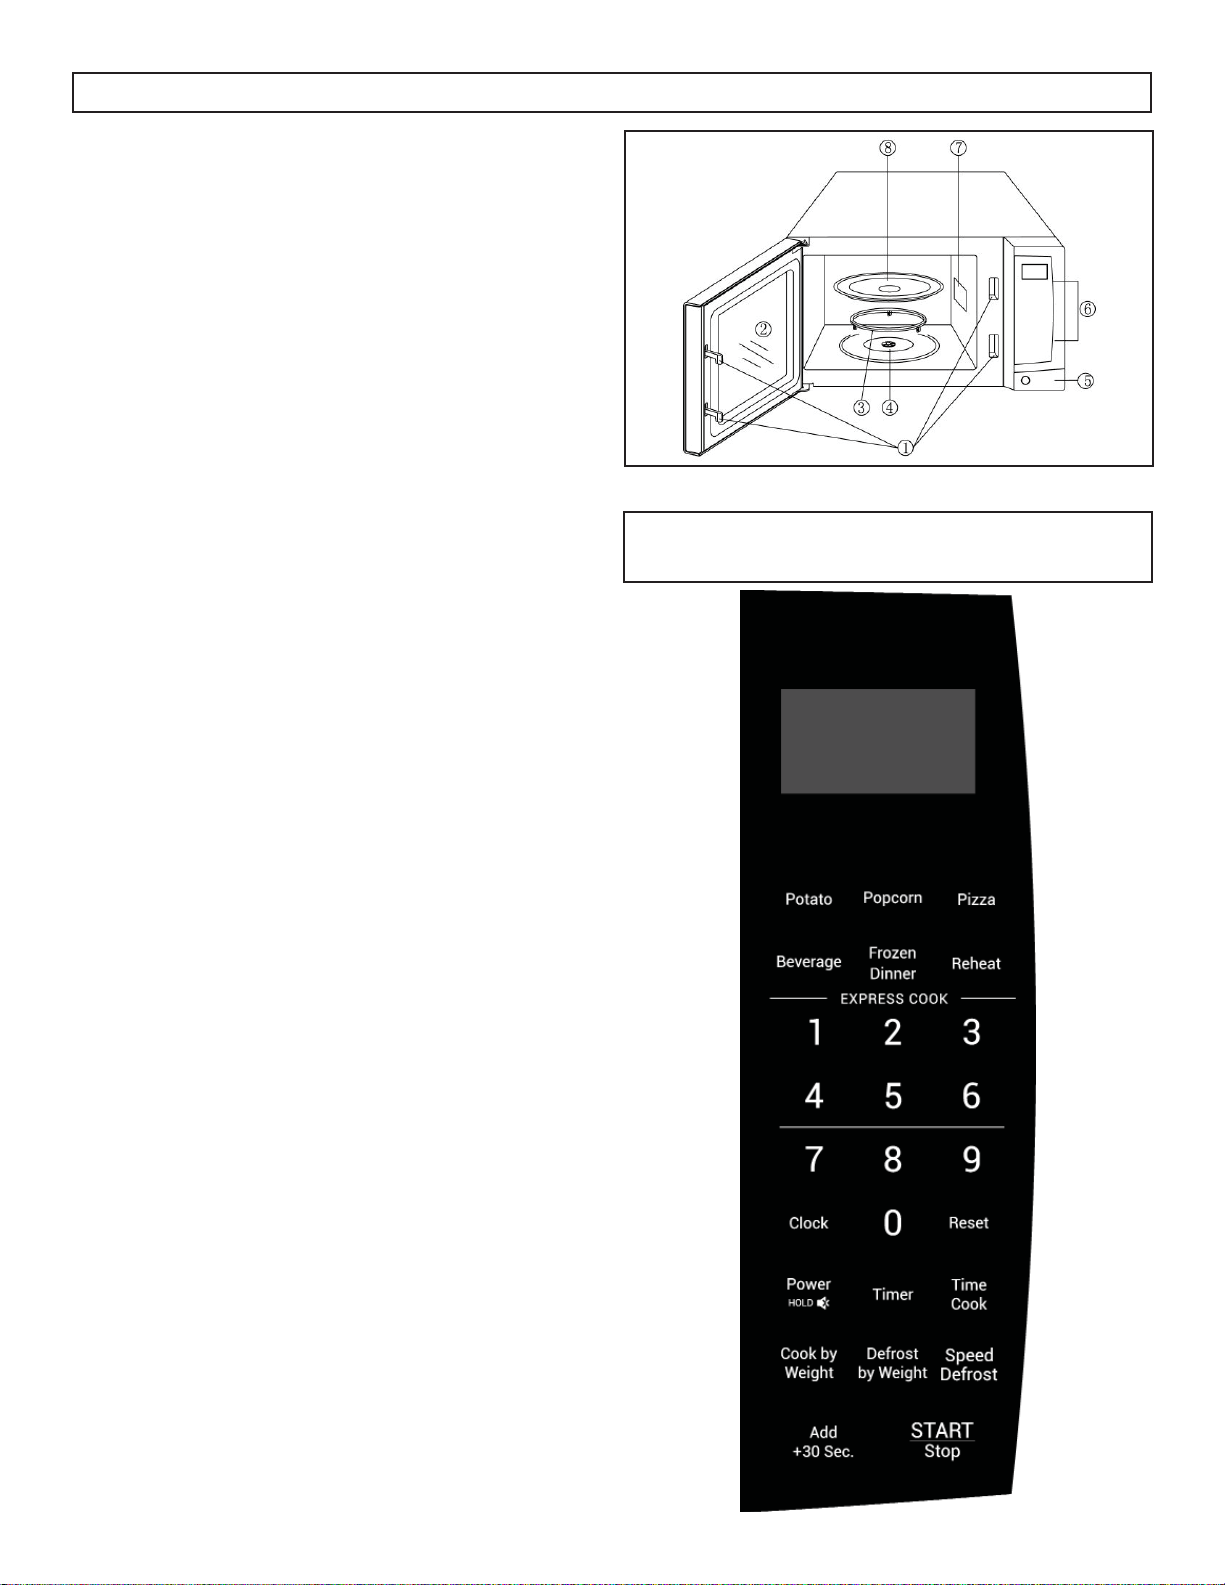
INSTRUCCIONES DE OPERACIÓN
CARACTERISTICAS
1. Sistema de bloqueo de seguridad de la puerta
2. Ventana del horno
3. Anillo de rodillos
4. Eje
5. Botón de liberación de la puerta (Nota: Algunos
modelos pueden tener un mango en lugar de un
botón de liberación de la puerta.)
6. Panel de control
7. Mica hoja (No quitar)
8. Bandeja de vidrio
Nota: Las imágenes de este manual son sólo para
fi nes educativos. La forma real de su aparato
puede variar según el número de modelo.
PANEL DE CONTROL
1. Pantalla de visualización: Muestra el tiempo de
cocción, el nivel de potencia y la hora del reloj.
Nota: Una versión española del panel de control
no está disponible actualmente.
2. Menús de cocción automática: Se utiliza para
confi gurar programas de cocción automática.
3. Botón del reloj: Se utiliza para ajustar la hora
actual.
4. Botón de encendido/retención: Se utiliza para
seleccionar el nivel de potencia. Mantenga
pulsado este botón durante 3 segundos para
entrar en el modo de silencio.
5. Cocinero de tiempo: Se utiliza para ajustar
el tiempo de cocción al 100% del nivel de
potencia.
6. Botón temporizador: Se utiliza para ajustar la
función del temporizador.
7. Descongelamiento velocidad: Se utiliza para
ajustar la función de descongelación según el
tiempo introducido.
8. Descongelar por peso: Se utiliza para ajustar la
función de descongelación en función del peso.
9. Cocinar por peso: Se utiliza para ajustar el
tiempo de cocción basado en el peso.
10. Inicio/parada: Se utiliza para iniciar o pausar
un programa de cocción.
11. Botón para agregar 30 segundos: Se utiliza
para añadir 30 segundos al tiempo de cocción.
12. Botón de reinicio: Se utiliza para borrar todos
los ajustes anteriores. Mantenga pulsado este
botón durante 3 segundos para confi gurar la
función de bloqueo infantil.
30

INSTRUCCIONES DE OPERACIÓN
USO PRIMERO
Cuando el aparato esté enchufado por primera vez,
la pantalla mostrará “1:01”.
Al confi gurar el temporizador de cocción, el
aparato volverá al modo de espera si no hay
entrada en 25 segundos.
Durante la operación:
• Pulse el botón Inicio/parada para detener el
funcionamiento.
• Presione nuevamente el botón Inicio/parada
para reanudar el funcionamiento.
• Pulse el botón Reinicio para cancelar el
programa de cocción.
El aparato emitirá un pitido al fi nal de un programa
de cocción y continuará emitiendo un pitido cada 2
minutos hasta que se presione un botón o se abra
la puerta.
COCCIÓN DE MICROONDAS
Para ajustar la potencia y el tiempo de cocción:
1. Presione repetidamente el botón Encendido/
retención hasta que se ajuste el nivel de cocción
deseado, como se indica en la siguiente tabla.
Si se desea una potencia de cocción de 100%,
sólo presione el botón Power / Hold una vez.
Presione el botón
Encendido/retención
Una vez 100% (P100)
Dos veces 90% (P-90)
3 veces 80% (P-80)
4 veces 70% (P-70)
5 veces 60% (P-60)
6 veces 50% (P-50)
7 veces 40% (P-40)
8 veces 30% (P-30)
9 veces 20% (P-20)
Potencia de
cocinar
AJUSTE DEL RELOJ
El reloj se puede confi gurar como un reloj de 12
horas o un reloj de 24 horas.
Para ajustar la hora actual:
1. Pulse el botón Reloj una vez para elegir un reloj
de 12 horas. Pulse de nuevo el botón Reloj para
elegir un reloj de 24 horas.
2. Utilice el teclado numérico para introducir la
hora actual.
3. Pulse el botón Reloj para confi rmar.
Durante el funcionamiento, pulse el botón Reloj
para ver la hora actual.
FUNCIÓN DEL TEMPORIZADOR
Para confi gurar la función del temporizador:
1. Presione el botón Temporizador, “TIMER”
y “ENTER” aparecerán en la pantalla y “:”
parpadeará.
2. Utilice el teclado numérico para introducir el
tiempo deseado para ejecutar el microondas.
3. Presione el botón Inicio/parada para comenzar
la operación.
10 veces 10% (P-10)
11 veces 0% (P-00)
2. Utilice el teclado numérico para introducir el
tiempo de cocción deseado.
3. Pulse el botón Inicio/parada para iniciar la
operación.
AÑADIR 30 SEGUNDOS FUNCIÓN
Cuando el aparato no esté en funcionamiento,
al presionar el botón Añadir 30 SEC, el aparato
funcionará durante 30 segundos a un nivel de
potencia del 100%. Este botón se puede pulsar
varias veces, cada vez que se presione, se añadirán
otros 30 segundos al tiempo de cocción.
COCINA EXPRESS
Cuando el aparato no esté en funcionamiento,
presione el botón numérico de 1 a 6 y el aparato
funcionará entre 1 y 6 minutos con una potencia de
cocción del 100%.
31

INSTRUCCIONES DE OPERACIÓN
COCCIÓN AUTOMÁTICA
Los botones Cocción automática se pueden
utilizar para confi gurar las funciones de cocción
automática para los tipos de alimentos siguientes.
PALOMITAS DE MAIZ
1. Presione el botón Palomitas de maiz. Esto
automáticamente establecerá el tiempo de
cocción para un 3.5 oz. bolsa de palomitas de
maiz.
2. Presione el botón Inicio/parada para comenzar
la operación.
Para cambiar la hora preestablecida:
1. Pulse dos veces el botón Palomitas de maíz.
“ENTER TIME” aparecerá en la pantalla.
2. Utilice el teclado numérico para introducir el
tiempo de cocción deseado. Este nuevo ajuste
de tiempo se usará cada vez que se presione el
botón Palomitas de maíz. Si el aparato pierde
energía, esta vez tendrá que reprogramarse.
3. Presione el botón Inicio/parada para comenzar
la operación.
BEBIDA
Para un 5 - 7 oz. tamaño de la porción:
1. Presione el botón Bebida.
2. Utilice el teclado numérico de 1 a 4 para
introducir el número de copas.
3. Presione el botón Inicio/parada para comenzar
la operación.
Para un 9 - 11 oz. tamaño de la porción:
1. Presione el botón Bebida dos veces.
2. Utilice el teclado numérico de 1 a 4 para
introducir el número de copas.
3. Presione el botón Inicio/parada para comenzar
la operación.
No sobrecaliente los líquidos. No caliente ningún
líquido durante más de 2 minutos por taza.
Después de calentar, deje que el líquido se pare
en el microondas durante 30 segundos antes de
retirarlo del aparato.
CENA CONGELADA
Para uno o dos pequeños 7 - 9 oz. cenas:
PATATA
Para un 4 - 6 oz. porción de patatas:
1. Pulse el botón Patata.
2. Presione el botón Inicio/parada para comenzar
la operación.
PIZZA
Para recalentar una rebanada de pizza:
1. Presione el botón Pizza una vez.
2. Presione el botón Inicio/parada para comenzar
la operación.
Para calentar una pizza congelada entera:
1. Presione el botón Pizza dos veces.
2. Presione el botón Inicio/parada para comenzar
la operación.
1. Presione el botón Cena congelada.
2. Utilice el teclado numérico para indicar si se
cocinarán 1 o 2 cenas.
3. Presione el botón Inicio/parada para comenzar
la operación.
Para uno o dos grandes 10 - 12 oz. cenas:
1. Presione el botón Cena congelada dos veces.
2. Utilice el teclado numérico para indicar si se
cocinarán 1 o 2 cenas.
3. Presione el botón Inicio/parada para comenzar
la operación.
RECALENTAR
1. Presione el botón Recalentar.
2. Presione el botón Inicio/parada para comenzar
la operación.
32

INSTRUCCIONES DE OPERACIÓN
COCINAR POR PESO
1. Presione el botón Cocinar por Peso.
2. Oprima el número 1, 2 o 3 para indicar qué
tipo de carne se cocinará, como se indica en la
siguiente tabla. La carne debe descongelarse ya
temperatura refrigerada.
Código Tipo Peso máximo
1 Carne de vaca 6 libras
2 Carne de cordero 6 libras
3 Cerdo 5 libras 4 onzas
3. Utilice el teclado numérico para introducir el
peso de la carne que se cocinará. El peso debe
ser en libras y onzas.
4. Presione el botón Inicio/parada para confi rmar.
Durante el funcionamiento, el aparato hará una
pausa y un pitido para indicar que la carne debe
ser vuelta. Presione el botón Inicio/parada para
reanudar el funcionamiento. Deje reposar la carne
unos minutos antes de tallar.
DESCONGELAMIENTO VELOCIDAD
1. Pulse el botón Descongelamiento velocidad.
2. Utilice las teclas numéricas para introducir el
tiempo de descongelación deseado.
3. Presione el botón Inicio/parada para confi rmar.
Durante el funcionamiento, el aparato hará
una pausa y un pitido para indicar que los
alimentos deben ser dados vuelta o agitados.
Presione el botón Inicio/parada para reanudar el
funcionamiento.
FUNCIÓN MUDO
Mantenga presionado el botón Inicio/parada
durante 3 segundos para entrar en el modo mudo,
lo cual silenciará todo el sonido del aparato.
Mientras esté en el modo mudo, mantenga
presionado el botón Inicio/parada durante 3
segundos para silenciar el aparato.
CONFIGURACIÓN DEL BLOQUEO PARA
NIÑOS
DESCONGELAR POR PESO
El tiempo de descongelación y el nivel de potencia
se ajustan automáticamente una vez que se
introduce el peso.
1. Pulse el botón Descongelar por peso.
2. Utilice el teclado numérico para introducir el
peso del alimento que se descongelará. El peso
debe ser en libras y onzas. El peso máximo es
de 6 libras.
3. Presione el botón Inicio/parada para confi rmar.
Durante el funcionamiento, el aparato hará
una pausa y un pitido para indicar que los
alimentos deben ser dados vuelta o agitados.
Presione el botón Inicio/parada para reanudar el
funcionamiento.
Para confi gurar el bloqueo de niños, mientras
la unidad esté en modo de espera, mantenga
presionado el botón de Reinicio durante 3
segundos. El aparato emitirá un pitido para indicar
que el bloqueo para niños está activado. Mientras
está bloqueado, el aparato no puede utilizarse.
Para cancelar el bloqueo de niños, mantenga
presionado el botón de Reinicio durante 3
segundos. El aparato emitirá un pitido para indicar
que el bloqueo para niños ha sido desactivado.
33

CUIDADO Y MANTENIMIENTO
LIMPIEZA
Apague y desenchufe el aparato antes de realizar
cualquier limpieza.
El interior del aparato se debe limpiar con un
paño húmedo y suave y detergentes suaves. No
permita que salpicaduras de alimentos se acumulen
en el interior del aparato, ya que esto puede
afectar la efi ciencia del microondas y, si está lo
sufi cientemente sucio, puede encenderse y provocar
un incendio.
El exterior del aparato se debe limpiar con un
paño húmedo y caliente. Para evitar daños a los
componentes internos, no permita que gotee agua
en las aberturas de ventilación.
Limpie la puerta y la ventana de ambos lados, los
sellos de la puerta y las partes adyacentes con
frecuencia con un paño húmedo para eliminar
cualquier derrame o salpicaduras. No utilice
limpiadores abrasivos.
No permita que el panel de control se moje. Si es
necesario, limpie el panel de control con un paño
húmedo y luego séquelo.
La bandeja de cristal se puede quitar y limpiar en
agua tibia y detergente suave o se puede colocar
en un lavaplatos.
El anillo de rodillos y el piso del horno deben
limpiarse regularmente para evitar ruidos o
derrames excesivos. El anillo de rodillos se puede
limpiar en agua tibia y detergente suave o se puede
colocar en un lavavajillas. Asegúrese de que el
anillo de rodillos y la bandeja de vidrio se cambien
en la posición adecuada para evitar ruidos o
derrames.
MANTENIMIENTO
Para eliminar los olores del microondas:
1. Combine una taza de agua con el jugo y la piel
de un limón en un tazón microwavable.
2. Cocinar a plena potencia durante 5 minutos.
3. Limpie completamente el interior del aparato y
la bandeja de vidrio y el anillo de rodillos con
un paño húmedo y caliente.
HOJA DE MICA
Dentro del aparato hay una hoja de mica de cartón
que protege el magnetrón. No lo quite del aparato,
ya que exponer el magnetrón a las salpicaduras
de alimentos puede causar arcos o incendios. Si se
ensucia, la hoja de mica se puede limpiar con un
paño caliente.
DISPOSICIÓN
Este producto no debe ser tratado como un desecho
doméstico ordinario, debe ser transportado al
punto de recogida apropiado para el reciclaje de
componentes eléctricos. Para obtener información
sobre los puntos de recogida de residuos
locales, póngase en contacto con la agencia
local de eliminación de residuos o con la ofi cina
gubernamental.
34

SOLUCIÓN SUGERIDA
Danby cuidado del consumidor: 1-800-263-2629
Horas de operación:
Lunes a Jueves 8:30 am - 6:00 pm Hora estándar del este
Viernes 8:30 am - 4:00 pm Hora estándar del este
La información de este manual está sujeta a cambios sin previo aviso.
PROBLEM POSSIBLE CAUSE
Ninguna energía • Se puede quemar un fusible o disparar el disyuntor
• El enchufe no está completamente insertado en la toma de
corriente
Arco o chispas durante la operación • Se dejaron artículos metálicos en el aparato durante el
funcionamiento
• El aparato está funcionando mientras está vacío
• Los alimentos derramados se han acumulado dentro del
aparato o en la hoja de mica
Alimentos cocinados de forma pareja • La comida no estaba completamente descongelada antes
de cocinar
• El tiempo de cocción o el nivel de potencia eran
insufi cientes
• La comida no se dio vuelta o se removió durante la cocción
Alimentos sobrecocidos • El nivel de potencia o el tiempo de cocción fueron
demasiado altos
Alimentos poco cocidos • La comida no estaba completamente descongelada antes
de cocinar
• El tiempo de cocción o el nivel de potencia eran
insufi cientes
• La comida no se dio vuelta o se removió durante la cocción
• Las aberturas de ventilación están bloqueadas
Encasa descongelación • El tiempo de descongelación o el nivel de potencia eran
insufi cientes
• Los alimentos no se revolvieron o revolvieron durante la
descongelación
35

GARANTÍA LIMITADA “ACARREADO SOLAMENTE”
Este producto de calidad está garantizado contra defectos de fabricación, incluyendo partes y mano de obra, siempre y cuando la
This quality product is warranted to be free from manufacturer’s defects in material and workmanship, provided that the unit is used under the normal operating
unidad se utilice bajo las condiciones normales de funcionamiento para las que fue diseñado.
conditions intended by the manufacturer.
Esta garantía está solamente disponible para la persona que haya comprado originalmente esta unidad directamente de Danby
This warranty is available only to the person to whom the unit was originally sold by Danby Products Limited (Canada) or Danby Products Inc. (U.S.A.) (hereafter
Products Limited (Canada) o Danby Products Inc. (U.S.A.) (en adelante “Danby”) o uno de sus distribuidores autorizados, y no es
“Danby”) or by an authorized distributor of Danby, and is non-transferable.
transferible.
Las piezas plásticas, se autorizan por treinta (30) días solamente a partir de la fecha de la compra, sin las extensiones
Plastic parts, are warranted for thirty (30) days only from purchase date, with no extensions provided.
proporcionadas.
LIMITED IN-HOME APPLIANCE WARRANTY
CONDICIONES DE LA GARANTÍA
TERMS OF WARRANTY
Primeros 12 meses
First Year
To obtain
Para obtener servicio
Service
Durante los primeros doce (12) meses, cualquier parte en buen estado de este producto que resulte defectuosa,
During the rst twelve (12) months, any functional parts of this product found to be defective, will be repaired or replaced, at warrantor’s
incluyendo cualquier sistema sellado, será reparado o reemplazado, a opción del fabricante, sin cargo para
option, at no charge to the ORIGINAL purchaser.
el comprador original.
Danby reserves the right to limit the boundaries of “In Home Service” to the proximity of an Authorized Service Depot. Any app liance
Póngase en contacto con el distribuidor donde adquirió el electrodoméstico o póngase en contacto con el
requiring service outside the limited boundaries of “In Home Service” , it will be the consumer’s responsibility to transport the appliance (at
centro de servicio autorizado más cercano de Danby, donde el servicio debe ser realizado por un técnico
their own expense) to the original retailer (point of purchase) or a service depot for repair. See “Boundaries of In Home Serv ice” below.
cualificado. Si el servicio es realizado por cualquier persona que no sea un depósito de servicio autorizado,
Contact your dealer from whom your unit was purchased, or contact your nearest authorized Danby service depot, where service
todas las obligaciones de Danby bajo esta garantía serán nulas.
must be performed by a qualied service technician.
Es responsabilidad del comprador transportar el aparato al centro de servicio autorizado más cercano.
If service is performed on the units by anyone other than an authorized service depot, or the unit is used for commercial appli cation, all
obligations of Danby under this warranty shall be void.
Los cargos de transporte desde y hacia el lugar de servicio no están protegidos por esta garantía y son responsabilidad del
comprador.
Boundaries of
In Home Service
Nada dentro de esta garantía implica que Danby será responsable por cualquier daño que hayan sufrido los alimentos u otros
contenidos de este aparato, ya sea debido a un defecto del aparato, o su uso, adecuado o inadecuado.
Nothing within this warranty shall imply that Danby will be responsible or liable for any spoilage or damage to food or other c ontents of this appliance, whether due
Salvo lo aquí indicado por Danby, no existen otras garantías, condiciones o representaciones, explícitas o implícitas, concretas o
to any defect of the appliance, or its use, whether proper or improper.
intencionales por parte de Danby o sus distribuidores autorizados y todas las demás garantías, condiciones o representaciones,
incluyendo cualquier garantía, condiciones o representaciones bajo cualquier Acta de Venta de Productos o legislación o estatuto
similar, quedan de esta forma expresamente excluidas. Salvo lo aquí indicado, Danby no serán responsables por ningún daño a
Save as herein provided, Danby, there are no other warranties, conditions, representations or guarantees, express or implied, m ade or intended by Danby or its
personas o bienes, incluyendo la propia unidad, sin importar su causa, o de ningún daño indirecto causado por el desperfecto de la
authorized distributors and all other warranties, conditions, representations or guarantees, including any warranties, conditio ns, representations or guarantees
unidad, y al comprar esta unidad, el comprador acepta por la presente, indemnizar y proteger a Danby contra cualquier reclamo
under any Sale of Goods Act or like legislation or statue is hereby expressly excluded. Save as herein provided, Danby shall no t be responsible for any damages
por daños a personas o bienes causados por la unidad.
to persons or property, including the unit itself, howsoever caused or any consequential damages arising from the malfunction o f the unit and by the purchase of
the unit, the purchaser does hereby agree to indemnify and hold harmless Danby from any claim for damages to persons or propert y caused by the unit.
No se considerará ninguna de estas garantías o seguros cuando el daño o la necesidad de reparación sea el producto de los
siguientes casos:
1) Falla del suministro eléctrico.
No warranty or insurance herein contained or set out shall apply when damage or repair is caused by any of the following:
2) Daños en tránsito o durante el transporte de la unidad.
1) Power failure.
3) Alimentación incorrecta, como bajo voltaje, instalación eléctrica defectuosa o fusibles inadecuados.
4) Accidente, modificación, abuso o uso incorrecto del artefacto, tal como insuficiente ventilación del ambiente o condiciones de
2) Damage in transit or when moving the appliance.
operación anormales (temperatura ambiente extremadamente alta o baja).
3) Improper power supply such as low voltage, defective house wiring or inadequate fuses.
5) Utilización comercial o industrial (v.g., si el electrodoméstico no está instalado en una vivienda particular).
4) Accident, alteration, abuse or misuse of the appliance such as inadequate air circulation in the room or abnormal operating con ditions
6) Incendio, daños por agua, robo, guerra, disturbios, hostilidades, actos de fuerza mayor como huracanes, inundaciones, etc.
7) Pedidos de servicio debido a desinformación del usuario.
8) Instalación inadecuada (v.g., instalación de un electrodoméstico independiente o uso de un aparato al aire libre que no esté
aprobado para aplicaciones en exteriores, incluyendo pero no limitado a: garajes, patios, porches o cualquier lugar que no esté bien
aislado o controlado por el clima).
Se requerirá una prueba de la fecha de compra para reclamaciones de garantía; conservar las facturas de venta. En el caso de que
se requiera servicio de garantía, presente el comprobante de compra a nuestro depósito de servicio autorizado.
Proof of purchase date will be required for warranty claims; so, please retain bills of sale. In the event warranty service is required, present this document to our
(extremely high or low room temperature).
5) Use for commercial or industrial purposes (ie. If the appliance is not installed in a domestic residence).
6) Fire, water damage, theft, war, riot, hostility, acts of God such as hurricanes, oods etc.
7) Service calls resulting in customer education.
8) Improper Installation (ie. Building-in of a free standing appliance or using an appliance outdoors that is not approved for out door application).
If the appliance is installed in a location that is 100 kilometers (62 miles) or more from the nearest service center your unit must be
delivered to the nearest authorized Danby Service Depot, as service must only be performed by a technician qualied and certif ied for
warranty service by Danby. Transportation charges to and from the service location are not protected by this warranty and are t he
responsibility of the purchaser.
EXCLUSIONES
EXCLUSIONS
CONDICIONES GENERALES
GENERAL PROVISIONS
AUTHORIZED SERVICE DEPOT.
Danby Products Limited
PO Box 1778, Guelph, Ontario, Canada N1H 6Z9
Danby Products Limited
Telephone: (519) 837-0920 FAX: (519) 837-0449
PO Box 1778, Guelph, Ontario, Canada N1H 6Z9
Telephone: (519) 837-0920 FAX: (519) 837-0449
Warranty Service
In-home
Servicio de Garantía
Acarreado Solamente
1-800-263-2629
1-800-263-2629
04/17
04/09
PO Box 669, Findlay, Ohio, U.S.A. 45840
Telephone: (419) 425-8627 FAX: (419) 425-8629
Telephone: (419) 425-8627 FAX: (419) 425-8629
PO Box 669, Findlay, Ohio, U.S.A. 45840
Danby Products Inc.
Danby Products Inc.

NOTES / REMARQUES / NOTAS :
__________________________________________________________________________________________
__________________________________________________________________________________________
__________________________________________________________________________________________
__________________________________________________________________________________________
__________________________________________________________________________________________
__________________________________________________________________________________________
__________________________________________________________________________________________
__________________________________________________________________________________________
__________________________________________________________________________________________
__________________________________________________________________________________________
__________________________________________________________________________________________
__________________________________________________________________________________________
__________________________________________________________________________________________
__________________________________________________________________________________________
__________________________________________________________________________________________
__________________________________________________________________________________________
__________________________________________________________________________________________
__________________________________________________________________________________________
__________________________________________________________________________________________
__________________________________________________________________________________________
__________________________________________________________________________________________
__________________________________________________________________________________________

MODEL • MODÈLE • MODELO
DMW07A4WDB
DMW07A4BDB
DMW09A2WDB
DMW09A2BDB
DMW09A2BSSDB
Printed in China
Imprimé en Chine
Impreso en China
Danby Products Limited, Guelph, ON, Canada N1H 6Z9
Danby Products Inc., Findlay, Ohio, USA 45840
 Loading...