

Page 1
Chin-Up Bar - TR-1433
Drążek rozporowy - TR-1433
Húzódzkodó rúd - TR-1433
Drog za dvigovanje telesa - TR-1433
Hrazda do dveří - TR-1433
Hrazda na dvere - TR-1433
Türreck - TR-1433
INSTRUCTIONS FOR USE
1
Page 2

Instructions for use
List of contents .................................................................................................................... 4
Technical Specifications .................................................................................................... 4
Conventional use ............................................................................................................... 4
Safety information about installation ............................................................................... 4
Safety information about usage ....................................................................................... 5
Mounting of Door Bar ....................................................................................................... 5
Tools required ....................................................................................................... 5
Bolting of safety caps in door frame .................................................................. 6
Opening and locking ........................................................................................................ 6
Training advice .................................................................................................................. 6
Exercises ............................................................................................................................. 7
Care, Storage .................................................................................................................... 8
Disposal .............................................................................................................................. 8
3 Years Warranty .............................................................................................................. 8
Instrukcja obsługi
Zakres dostawy ................................................................................................................. 9
Dane techniczne ................................................................................................................ 9
Przeznaczone do określonego użytkowania .................................................................. 9
Wskazówki bezpieczeństwa do montaż ........................................................................ 9
Wskazówki bezpieczeństwa do użytkowania ............................................................ 10
Montaż drążka do drzwi ............................................................................................... 10
Lista narzędzi .................................................................................................... 10
Przymocowanie nakładek bezpieczeństwa w futrynie .................................. 11
Otwieranie i blokowanie ................................................................................................ 11
Wskazówki treningowe ................................................................................................... 11
Ćwiczenie ......................................................................................................................... 12
Pielęgnacja, przechowywanie ...................................................................................... 13
Uwagi odnośnie recyklingu ........................................................................................... 13
3 lata gwarancji ............................................................................................................. 13
Használati útmutató
A csomag tartalma ......................................................................................................... 14
Műszaki Adatok ............................................................................................................. 14
Rendeltetésszerű használat ........................................................................................... 14
Biztonsági útmutató az összeszereléshez .................................................................... 14
Biztonsági útmutató a használathoz ............................................................................. 15
Az ajtóba szerelhető nyújtó szerelése ............................................................................15
Szükséges szerszámok ..................................................................................... 15
A biztonsági kupakok ajtókerethez való csavarozása .................................. 16
Oldás és rögzítés ............................................................................................................ 16
Edzési útmutató .................................................................................................................16
Gyakorlatok ..................................................................................................................... 17
Ápolás, tárolás ................................................................................................................ 18
Tudnivalók a hulladékkezelésről ................................................................................... 18
3 év garancia ................................................................................................................. 18
Navodilo za uporabo
Obseg dobave ............................................................................................................... 19
Tehnični podatki .............................................................................................................. 19
Namen uporabe ............................................................................................................. 19
Varnostni napotki za montažo ...................................................................................... 19
Varnostni napotki za uporabo ....................................................................................... 20
Montaža droga za vratni podboj .................................................................................. 20
Seznam orodja .................................................................................................. 20
Privijanje varnostnih pokrovčkov v vratni ......................................................... 21
2
Page 3

Odpiranje in blokiranje ................................................................................................... 21
Napotki za vadbo ........................................................................................................... 21
Vaja .................................................................................................................................. 22
Nega, vzdrževanje ........................................................................................................ 23
Napotki za odlaganje v smeti ....................................................................................... 23
3 leta garancije ...................................................................................................... 23 - 24
Návod k obsluze
Rozsah dodávky ............................................................................................................. 25
Technické Údaje ............................................................................................................. 25
Použití ke stanovenému účelu ........................................................................................ 25
Bezpečnostní upozornění pro montáž .......................................................................... 25
Bezpečnostní upozornění pro používání ...................................................................... 26
Montáž hrazdy ................................................................................................................. 26
Potřebné nástroje .............................................................................................. 26
Přišroubování bezpečnostních koncovek na rám dveří ................................. 27
Otevření a zablokování ................................................................................................. 27
Pokyny pro trénink .......................................................................................................... 27
Cvičení ............................................................................................................................. 28
Ošetřování a skladování ................................................................................................ 29
Pokyny k likvidaci ........................................................................................................... 29
3 roky záruka .................................................................................................................. 29
Návod na obsluhu
Rozsah dodávky ............................................................................................................. 30
Technické Údaje ............................................................................................................. 30
Štandardné použitie ....................................................................................................... 30
Bezpečnostné pokyny pri montáž ................................................................................. 30
Bezpečnostné pokyny pri používaní .............................................................................. 31
Montáž dverovej hrazdy .................................................................................................31
Zoznam nástrojov .............................................................................................. 31
Priskrutkovanie bezpečnostných čiapočiek na rám dverí ............................. 32
Otvorenie a aretácia ...................................................................................................... 32
Pokyny pre cvičenie ........................................................................................................ 32
Cvičenie ........................................................................................................................... 33
Ošetrovanie, skladovanie .............................................................................................. 34
Pokyny k likvidácii .......................................................................................................... 34
3 roky záruka .................................................................................................................. 34
Lieferumfang .................................................................................................................... 35
Technische Daten ............................................................................................................ 35
Bestimmungsgemäße Verwendung ............................................................................... 35
Sicherheitshinweise zur Montage .................................................................................. 35
Sicherheitshinweise zur Benutzung ............................................................................... 36
Montage des Türrecks ................................................................................................... 36
Werkzeugliste .................................................................................................. 36
Verschraubung der Sicherheitskappen im Türrahmen .................................. 37
Öffnen und Arretieren .................................................................................................... 37
Trainingshinweise ............................................................................................................ 37
Übungen .......................................................................................................................... 38
Pflege, Lagerung ............................................................................................................. 39
Hinweise zur Entsorgung ............................................................................................... 39
3 Jahre Garantie ............................................................................................................ 39
Bedienungsanleitung
3
Page 4

Read through the instruction manual carefully before use.
Make sure you keep the instructions for future reference!
Failure to follow the safety instructions could lead to serious injury.
List of contents
1 x Instructions for use
1 x Chin-Up Bar
2 x Screws and safety caps for bolting in door frame
Technical Specifications
Overall weight: 1235 g
For doorframes between 70 cm and 92 cm
Max. load: 100 kg
Conventional use
This item is a sporting goods article for installation in door frames with a max. width of 92 cm,
and not suitable for professional training and gymnastics exercises. It is not suitable for children
under 14 years of age because children are not able to evaluate the potential dangers. In addition, the doorframe exercise bar contains small parts which could be swallowed by children.
For household use only, not suitable for therapeutic purposes!
Safety information about installation
- This product is only designed to be used in conjunction with safety caps that
are securely fastened to the door frame.
This product should only be used when the colour identification window display is completely
green.
- The max. unscrewing width of 92 cm is marked on both the end bars; please do not unscrew
them any further.
- The door gym must be mounted by an adult and then inspected for stability.
- CAUTION! The door frame may be damaged during installation. Paint traces or damage of
the door frame may occur when tightened too fast.
- The rubber surfaces of the end caps should always be fully seated on the door frame.
- Use screws to attach the door bar to the doorframe for increased stability.
- Please check the condition of the door frame. The gym is suitable for door frames with a
minimum width of 70 cm and a maximum width of 92 cm. Please ensure that the wall behind
the door frame is made from brick or concrete so that the pressure can be distributed across
the wall and provide sufficient stability! Please do not mount the door gym in plastic, aluminium
or wooden door frames with a wall thickness of less than 7 mm as such frames are not stable
enough.
- The gym bar must always be mounted straight and centred. Inspect the gym in order to ensure
that it has not tilted.
- Do not fix to door frames situated close to stairs.
4
Page 5

Safety information about usage
- The use of this article is carried out at your own risk.
- This article must only be used by people who are familiar with the safety information.
- Check that the article is securely fixed (wedged) before each use.
- This product should only be used when the colour identification window display is completely
green.
- Do not load the article with more than a total load of 100 kg.
- Before each use, check again that the article is securely fixed, using pulling and shaking
movements.
- Not suitable for the attachment of dynamic accessories, for example, swings.
- Do not carry out any exercises in which your head points to the floor.
- Do not swing on the bar!
- The article must always be used by only one person at a time.
- The article is only suitable for private use.
- The article must only be used under adult supervision, and must not be used as a toy.
- Check gym equipment for damage and wear and tear before starting every training session.
If you find damage, you should no longer use the equipment.
- If you have health problems, ask your doctor before you use the item. If during the exercises
you should feel unwell or experience discomfort, stop the exercises immediately and seek
medical advice!
- Pregnant women should only carry out the training programme after consultation with their
doctor.
- Carry out the exercises with sufficient space between you and any objects or other people that
nobody can be injured.
- Keep the operating instructions in the vicinity of the training apparatus. These will serve as a
reference for the main exercises.
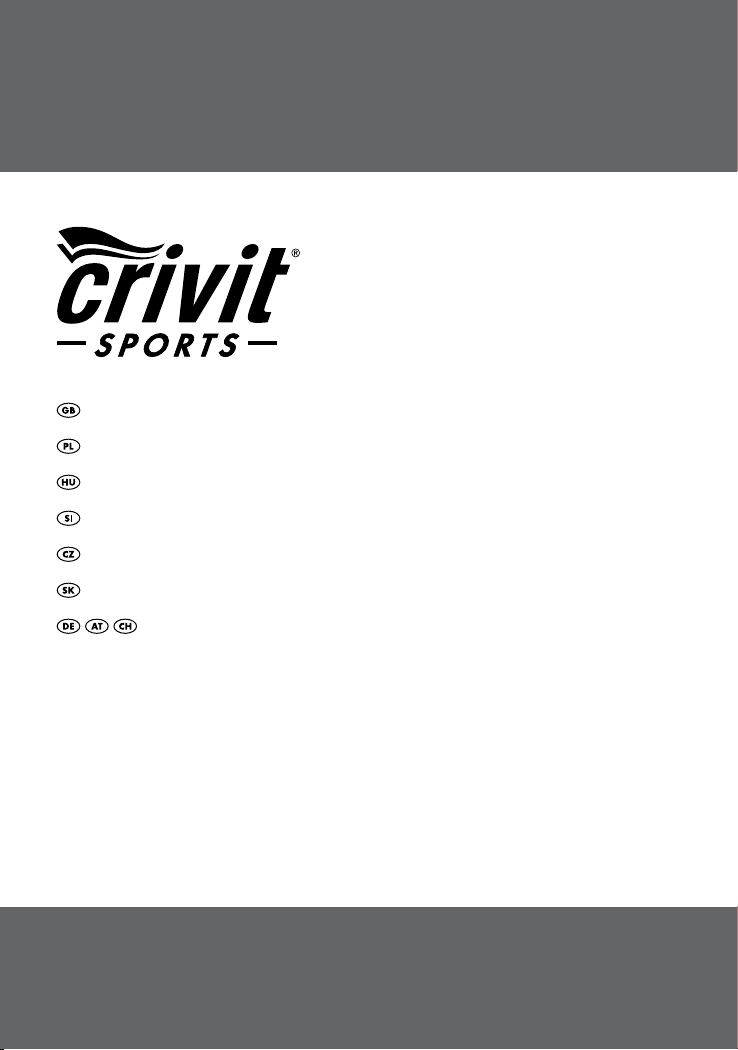
Mounting of Door Bar
fig. 1
out
Tools required
To screw the door exercise bar into the doorframe, you will need a crosshead screwdriver and a
suitable corresponding drill.
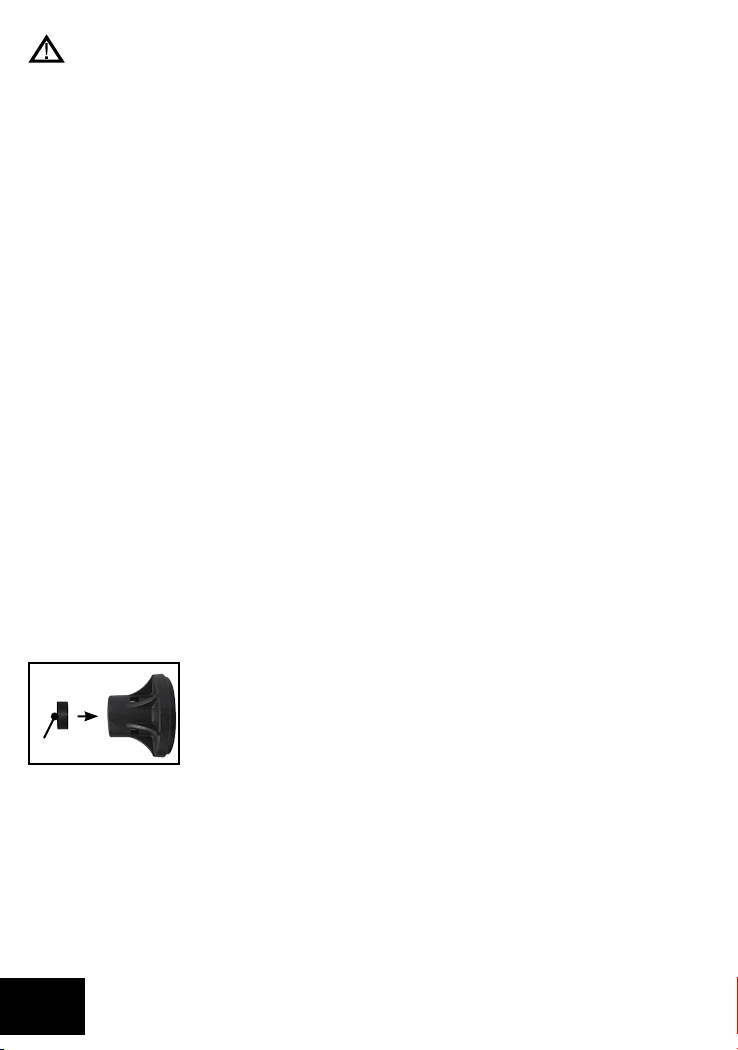
Note:
A rubber ring is located inside each end cap. What if the rubber ring
comes out of the end cap during installation or removal? Simply replace
into the end cap as shown in fig. 1. The smooth side labelled „out“ should
be facing the open end of the end cap.
5
Page 6
Bolting of safety caps in door frame (fig. 2)
fig. 2
← 70-92 cm →
half-round screw. Please ensure that the holes are at the same height so that the bar sits horizontally as the ideal use and stability is otherwise restricted. Then mount the bar.
Caution: This will cause permanent damage to
your doorframe because of the drilled holes!
The door bar must be bolted firmly into the
door frame with the enclosed bolting material.
The bolting provides a higher standard of safety during training and is required (obligatory).
Please note the following: Pre-drill the two holes with a
small drill (1 - 2 mm) to alleviate the screwing in. Then attach the safety caps by screwing them in firmly using the
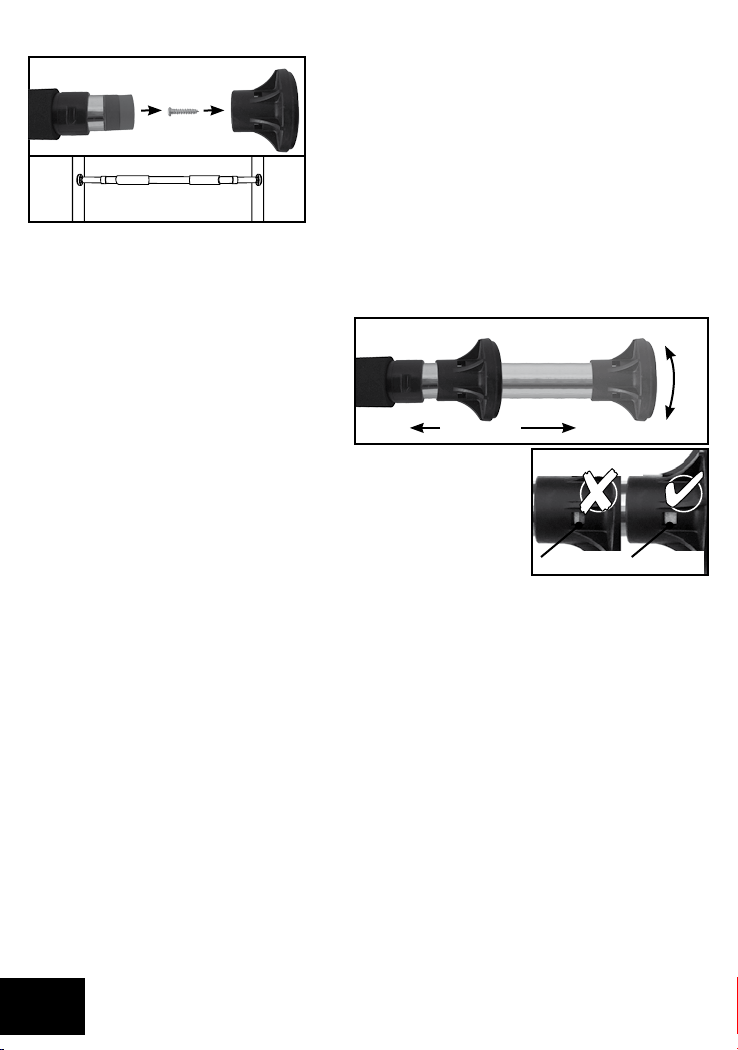
Opening and locking
Lock in place the ends of the door bars in the
fig. 3
mounted safety caps. The indicated turning
direction applies when the central bar is held
firm and the ends are turned as indicated
(fig. 3). Once the bar is lightly fixed into
Open Lock in position
the doorframe, only the central part can be
turned and the turning direction is reversed.
Tighten the door exercise bar until it can no longer be moved when a
tugging load is applied (Note that a deformation of the doorframe may
occur despite following the instructions correctly)!
Warning! The colour identification window display must
be completely green (fig. 4).
fig. 4
Open
Lock in position
GreenGreen/Red
Training advice
- The following exercises are only a selection of those possible. You can find more in
appropriate specialist publications.
- Wear comfortable sports clothing and trainers.
- Warm up before each training session. Walking or running on the spot, stretching and gentle
expansion exercises are suitable as a warm-up.
- Carry out the exercises at an even pace. Breathe evenly. Adhere to the movement sequence
and do not overestimate your ability. Breathe out when your muscles are contracting and
breathe in when your muscles are relaxed.
- Breath in when pulling up and breath out when lowering.
- When pulling up, do not create momentum using your hips.
Advice! If you develop medical complaints or feel unwell, stop the exercise
immediately and seek medical advice.
6
Page 7
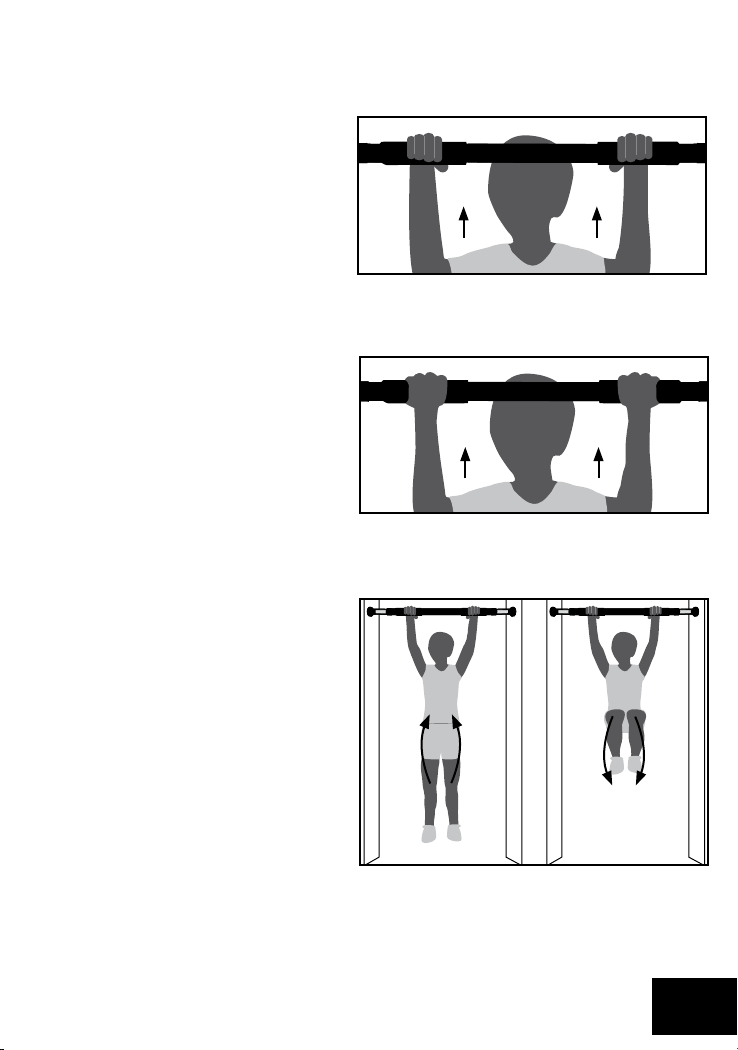
Exercices
For optimal results, carry out 3 – 5 sets with 7 – 20 repetitions per exercise. This training should
be repeated 2 – 3 times per week.
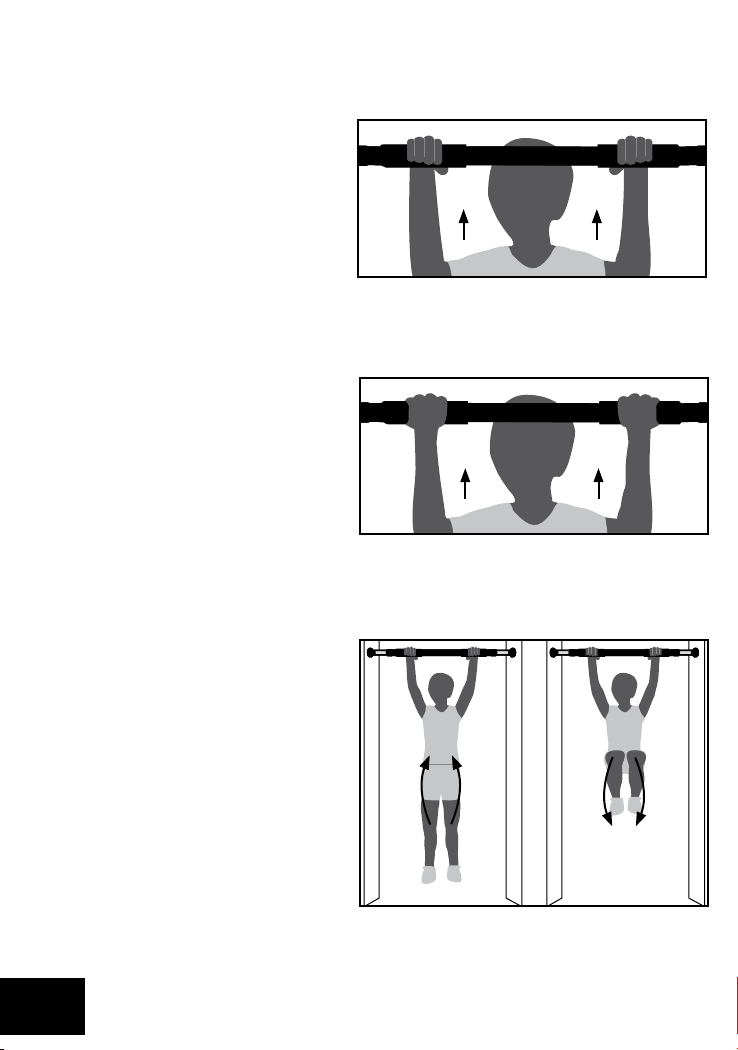
Pull-ups exercise 1 using
overhand grip
For strengthening of the arms,
shoulders and back muscles
Grasp the door bar from the top with your
hands a little more than shoulder width apart.
Pull up with your arms until your chin is at
the same height as the door bar. Then slowly
lower yourself until your arms are still slightly
bent. The legs can be bent while doing this.
Pull-ups exercise 2 using
underhand grip
For strengthening of the arm
and breast muscles
Grasp the door bar from behind with your
hands a little less than shoulder width apart.
Pull up with your arms until your chin is at
the same height as the door bar. Then slowly
lower yourself until your arms are still slightly bent.
The legs can be bent while doing this.
Leg raises using overhand grip
For strengthening of the
stomach muscles
Grasp the door bar from the top with your
hands a little more than shoulder width apart.
Pull your knees up slowly until your knees are
at pelvis height. The legs should be bent at
the knee to 90 degrees and closed. Hold the
position for several seconds and then lower
your legs in a controlled manner again.
7
Page 8

Care, Storage
Please do not forget that regular care and maintenance contribute to the safety and preservation
of the article. Always keep the article in a clean, dry room at a constant temperature.
IMPORTANT! Clean only with water. Never use caustic cleaning products. Wipe dry with a cloth.
Disposal
Please dispose of the product and packaging in an environmentally friendly manner, separating
different materials for recycling as required! Dispose of this item through an authorised disposal
company or through your local waste disposal facilities - ask your local authority for information if
further guidance is required. Ensure that you comply with all regulations currently in force.
3 Years Warranty
The product was manufactured with the greatest care and regular testing. This product comes with
a 3-year warranty as of the date of purchase. Please keep the receipt.
The warranty only covers material and production errors and will not cover improper or inappropriate handling. Your legal rights, in particular statutory rights are not restricted with this warranty.
In the event of a warranty matter, please contact us free of charge via our service-hotline or send
us an email. In any case, we will be more than happy to provide you with personal advice. In the
event of a warranty matter, defect parts can be shipped cash on delivery to the indicated serviceaddress in coordination with our service-colleagues. Subsequently you will promptly receive a
new or repaired part free of charge.
The warranty period will not be extended due to any repairs based on warranty, statutory
guarantee or fair dealing. This also applies to replaced and repaired parts. Any repairs required
after the warranty has expired are chargeable.
IAN: 66184
Service-address
Product hotline 00800-88080808 (Mon.-Fri. 10am – 4pm, free phone)
PSB LOGISTICS MANAGEMENT LTD • Unit B3 Site b
The Bowman Centre Arncott, OX25 1NZ Oxon
gb@nws-service.com
8
- www.nws-service.com -
Page 9
Przed użyciem przeczytaj dokładnie instrukcję obsługi. Zachowaj ją konie cznie
w celu późniejszego przeczytania!
Nieprzestrzeganie wskazówek dotyczących bezpieczeństwa może
być przyczyną poważnych obrażeń
Zakres dostawy
1 x Instrukcja obsługi
1 x Drążek rozporowy
2 x Śruby i nakładki bezpieczeństwa w celu dośrubowania w futrynie
Dane techniczne
Ciężar całkowity: 1235 g
do ramy drzwiowej: 70 cm – 92 cm
Obciążenie: maks. 100 kg
Przeznaczone do określonego użytkowania
Artykuł ten to sprzęt sportowy do zamontowywania w ramie drzwi z max. szer. 92 cm, a który
nie jest przeznaczony do profesjonalnego treningu i ćwiczeń gimnastycznych.
Produkt nie jest przeznaczony dla dzieci poniżej 14 roku życia, ponieważ nie są one w stanie
ocenić potencjalnych zagrożeń. Poza tym Türreck zawiera elementy, które dzieci mogą połknąć.
Przeznaczony jedynie do domowego użytku, a nie w celach terapeutycznych!
Wskazówki bezpieczeństwa do montaż
- Z artykułu można korzystać jedynie w połączeniu z nakrętkami
bezpieczeństwa które przykręcone są do ram drzwi!
Z artykułu można korzystać jedynie wtedy, jeżeli okienko z identyfikatorem koloru jest
całkowicie zielone!
- Maksymalna szerokość rozkręcenia wynosząca 92 cm jest zaznaczona na obydwu drążkach
końcowych - nie należy wykręcać dalej.
- Montaż musi zostać przeprowadzony przez osobę dorosłą, która następnie musi sprawdzić
mocne zamocowanie.
- Uwaga! Rama drzwi może w trakcie montażu zostać uszkodzona. Zbyt silne dokręcanie może
spowodować uszkodzenia farby lub ramy.
- Końce drążka należy zablokować w umocowanych nakładkach bezpieczeństwa.
- Montaż za pomocą śrub w futrynie drzwiowej oferuje wyższą wytrzymałość.
- Proszę sprawdzić właściwości futryny drzwi. Drążek gimnastyczny nadaje się do futryn drzwi
o szerokości, co najmniej 70 cm i maksymalnie 92 cm. Proszę sprawdzić, czy ściana za
futryną drzwi wykonana jest z betonu lub cegieł, aby nacisk mógł rozłożyć się na ścianie i
aby zapewniona była wystarczająca stabilność! Jeżeli futryna drzwi wykonana jest z tworzy wa sztucznego, aluminium lub drewna i ma grubość ścianek poniżej 7 mm, nie należy
montować drążka, gdyż futryna w takim przypadku nie będzie najprawdopodobniej
wystarczająco stabilna.
- Drążek gimnastyczny musi być montowany zawsze prosto i w środku. Sprawdzić, czy drążek
nie jest zakleszczony.
- Nie mocować we futrynach w pobliżu schodów.
9
Page 10
Wskazówki bezpieczeństwa do użytkowania
- Korzystanie z artykułu odbywa się na własną odpowiedzialność.
- Z niniejszego artykułu mogą korzystać tylko osoby, które zapoznały się ze wskazówkami
dotyczącymi bezpieczeństwa.
- Przed każdym użyciem należy sprawdzić mocowanie (zaciśnięcie).
- Z artykułu można korzystać jedynie wtedy, jeżeli okienko z identyfikatorem koloru jest
całkowicie zielone!
- Nie wolno przekraczać maks. obciążenia drążka 100 kg!
- Przed każdym użyciem sprawdzić raz jeszcze wytrzymałość przez zdecydowane
„pociągnięcie“ i „wstrząśnięcie“ drążka.
- Nie nadaje się do mocowania elementów dynamicznych, jak np. huśtawki.
- Nie wykonywać żadnych ćwiczeń z głową skierowaną do dołu.
- Nie kołysać się!
- Artykuł może być używany tylko przez jedną osobę.
- Artykuł przeznaczony jest wyłącznie do użytku prywatnego.
- Produkt można stosować tylko pod nadzorem osób dorosłych i nie należy używać go
jako zabawki.
- Przed każdym treningiem należy skontrolować urządzenie do treningu pod względem
uszkodzeń i zużycia. Przy stwierdzonych uszkodzeniach nie wolno korzystać z urządzenia.
- W przypadku problemów zdrowotnych skonsultuj się z lekarzem, zanim zaczniesz korzystać
z produktu. Jeśli podczas ćwiczeń nastąpi pogorszenie samopoczucia lub pojawią się
dolegliwości, przerwij natychmiast ćwiczenia i skonsultuj się z lekarzem!
- Kobiety w ciąży mogą uczestniczyć w treningu tylko po konsultacji ze swoim lekarzem.
- Prowadź ćwiczenia w odpowiednim odstępie od przedmiotów i innych osób, tak żeby nikt nie
odniósł obrażeń.
- Przechowuj niniejszą instrukcję zawsze w pobliżu przyrządu treningowego. To pozwala
sprawdzać ćwiczenia główne.
Montaż drążka do drzwi
rys. 1
out
Lista narzędzi
Do przykręcenia w ramie drzwiowej potrzebny jest śrubokręt krzyżakowy oraz
odpowiednie wiertło.
Wskazówka: Na każdej nakładce końcowej znajduje się gumowy
pierścień. W razie gdy podczas montażu lub demontażu gumowy
pierścień spadnie z nakładki końcowej. Należy go ponownie wetknąć na
nakładkę końcową jak jest pokazane na rys. 1. Gładka strona z napisem
„out“ wskazuje przy tym otwarty koniec nakładki.
10
Page 11

Przymocowanie nakładek bezpieczeństwa w futrynie (rys. 2)
rys. 2
← 70-92 cm →
dziurki (1-2 mm), aby ułatwić wkręcanie. Następnie przykręcić nakładki bezpieczeństwa do
śruby z półokrągłą główką. Należy zwrócić uwagę, żeby dziurki znajdowały się na tej samej
wysokości, aby drążek wisiał równo. W innym przypadku ograniczone jest optymalne użycie i
stabilność. Następnie zamontować drążek.
Uwaga: W ten sposób dojdzie do trwałego
uszkodzenia ramy drzwiowej na skutek
wywierconych otworów! Drążek do drzewi
należy przymocować przy pomocy dostarczonego materiału mocującego do framugi.
Umocowanie oferuje wyższe bezpieczeństwo
podczas treningu i jest niezbędne.
Przy montażu należy zwrócić uwagę na następujące
czynności: przed umocowaniem należy wywiercić małe
Otwieranie i blokowanie
Gumowe powierzchnie i końcówki muszą
zawsze całkowicie przylegać do framugi.
rys. 3
Wskazany kierunek obrotu obowiązuje,
jeśli środek drążka zostanie przytrzymany,
a końcówki przekręcone jak pokazano na
rysunku (rys. 3). Z chwilą, kiedy drążek
Otwieranie Blokowanie
zostanie lekko zamocowany w ramie, można
przekręcić tylko część środkową a kierunek obrotu ulegnie zmianie. Dokręć drążek drzwiowy tak mocno, żeby nie można go było
przesunąć nawet przy gwałtownym pociągnięciu (Zwróć uwagę, że
może dojść do odkształcenia ramy drzwiowej mimo obsługi zgodnej
z instrukcją)! Uwaga! Wskaźnik identyfikatora koloru musi
być całkowicie zielony (rys. 4).
rys. 4
Otwieranie
Blokowanie
ZielonyZielony/Czerwony
Wskazówki treningowe
- Poniższe ćwiczenia są jedynie przykładami. Więcej ćwiczeń znajdą Państwo we właściwej
fachowej literaturze.
- Nosić wygodną odzież i obuwie sportowe.
- Przed każdym treningiem przeprowadź odpowiednią rozgrzewkę. Chodzenie lub bieg w
miejscu, stretching oraz lekkie ćwiczenia rozciągające to idealne sposoby na rozgrzewkę
- Ćwiczenia muszą być wykonywane w równomiernym tempie, ze spokojnym oddechem.
Proszę przestrzegać przebiegów cykli i nie przekraczać swoich możliwości. Podczas
naprężania mięśni wydychać powietrze, podczas ich rozluźniania – wdychać je.
- Przy podciąganiu do góry nałeży wydychać, przy opuszczaniu wdychać powietrze
- Przy podciąganiu do góry nie wykonywać rozmachu z bioder.
Uwaga: W razie dolegliwości lub złego samopoczucia należy natychmiast
przerwać ćwiczenie i skontaktować się z lekarzem.
11
Page 12
Ćwiczenie
Optymalny wynik ćwiczeń można osiągnąć przez wykonywanie 3 do 5 serii ćwiczeń po
7 do 20 powtórzeń każda. Takie ćwiczenia należy powtarzać 2 do 3 razy w tygodniu.
Podciąganie wariant 1 z
uchwytem górnym
W celu wzmocnienia mięśni
przedramion, ramion i pleców
Chwycić drążek od góry na szerokość ramion. Podciągnąć się na ramionach do góry,
tak aby broda znajdowała się na wysokości
drążka. Następnie powoli opuszczać się
na dół, tak aby ramiona były jeszcze lekko
zgięte. Nogi można podwinąć lekko do góry.
Podciąganie wariant 2 z
uchwytem dolnym
W celu wzmocnienia mięści ramion i
mięśni piersiowych
Chwycić drążek z dołu na szerokość mniejszą
od szerokości ramion. Podciągnąć się na ramionach do góry, tak aby broda znajdowała
się na wysokości drążka. Następnie powoli
opuszczać się na dół, tak aby ramiona były
jeszcze lekko zgięte. Nogi można podwinąć
lekko do góry.
Podnoszenie nóg z uchwytem
górnym
W celu wzmocnienia mięści brzuca
Chwycić drążek od góry na szerokość
większą niż szerokość ramion.
Podciągnąć kolana powoli do góry, tak aby
kolana znalazły się na wysokości bioder.
Nogi należy zgiąć w kolanach o 90 ° i
złączyć razem. Utrzymać pozycję przez kilka
sekund i powoli opuszczać nogi na dół.
12
Page 13

Pielęgnacja, przechowywanie
Prosimy nie zapominać, że regularna konserwacja i pielęgnacja przyczynia się do
bezpieczeństwa i zachowania artykułu. Artykuł przechowywać zawsze suchy i czysty w
pomieszczeniu o wyregulowanej temperaturze.
WAŻNE! Czyścić jedynie wodą, nigdy przy pomocy ostrych środków czyszczących.
Na końcu wysuszyć przy pomocy szmatki do czyszczenia.
Uwagi odnośnie recyklingu
Opakowanie i artykuł usunąć zgodnie z przepisami o ochronie środowiska!
Artykuł oddać do utylizacji w autoryzowanym zakładzie oczyszczania i przetwarzania
odpadów lub do odpowiedniej jednostki w gminie. Prosimy stosować się do aktualnie
obowiązujących przepisów.
3 lata gwarancji
Produkt został wyprodukowany z dużą starannością i pod ciągłą kontrolą. Otrzymują Państwo na
ten produkt 3 lata gwarancji od daty zakupu. Prosimy o zachowanie paragonu.
Gwarancja obowiązuje jedynie w razie wad materiałowych i fabrycznych, przy nieodpowiedniej
obsłudze przepada. Państwa ustawowe prawa, w szczególności prawa do gwarancji, nie
zostaną ograniczone tą gwarancją.
W razie gwarancji należy się z nami skontaktować telefonicznie przez bezpłatny numer naszej
Service-Hotline lub mailowo. W każdym przypadku otrzymają Państwo osobistą pomoc.
W przypadku gwarancji można wysyłać nieodpłatnie uszkodzone elementy na nasz adres
serwisowy po wcześniejszym porozumieniu z naszym pracownikiem. Bezzwłocznie otrzymają
Państwo bezpłatnie z powrotem nowy lub naprawiony element.
Czas gwarancji nie jest przedłużany w razie ewentualnych napraw w oparciu o gwarancję lub
naprawę poza gwarancyjną. Obowiązuje to również przy wymienionych lub naprawionych
elementach. Po upływie gwarancji zaistniałe naprawy są płatne.
IAN: 66184
Adres Service
Infolinia ds. Produktu 00800-4911384
(poniedziałek - piątek w godzinach 10 - 16, bezpłatnie)
Bogusław Możdżonek • ul.Jawirskiego 21B / 28 • 05-520 Konstancin - Jeziorna
pl@nws-service.com
- www.nws-service.com -
13
Page 14

Használat előtt figyelmesen olvassa el az útmutatót és a későbbiekben
felmerülő kérdései esetére őrizze meg!
A biztonsági utasítások figyelmen kívül hagyása súlyos
sérülésekhez vezethet
A csomag tartalma
1 Használati útmutató
1 Húzódzkodó rúd
2 Csavar biztonsági kupakkal az ajtókeretbe való csavarozáshoz
Műszaki Adatok
Teljes tömeg: 1235 g
Megfelelő ajtókeret méret: 70 cm - 92 cm
Teherbírás: max. 100 kg
Rendeltetésszerű használat
A termék egy max. 92 cm széles ajtókeretben rögzíthető sporteszköz, ami nem alkalmas
professzionális edzéshez és gimnasztikai gyakorlatokhoz. Nem alkalmas 14 év alatti gyerekek
számára, mert a gyerekek nem tudják felmérni a lehetséges veszélyeket.
Ezen kívül a húzódzkodó apró alkatrészeket is tartalmaz, amelyeket a gyermekek lenyelhetnek.
Csak otthoni használatra, terápiás célokra nem alkalmas!
Biztonsági útmutató az összeszereléshez
- A terméket kizárólag az ajtókeretbe csavarozott biztonsági végekkel szabad
használni!
A termék használata előtt várja meg, míg a színindikáció teljesen zöldet mutat!
- A 92 cm maximális távolságot a rúd mindkét végén megjelöltük. Kérjük, ennél tovább ne
húzza ki.
- A szerelést egy felnőtt végezze, és ellenőrizze a megfelelő stabilitást.
- Figyelem! Szerelés közben az ajtókeret károsodhat. A túl szoros rögzítés színnyomokat vagy
egyéb károsodásokat okozhat.
- Állítsa be az ajtókeretbe szerelhető nyújtó végeit a rögzített biztonsági kupakokban
- Az ajtótokba csavarozott húzódzkodó rúd nagyobb stabilitást nyújt.
- Kérjük, ellenőrizze az ajtókeret állapotát. A húzódzkodó min. 70 cm, max. 92 cm széles
ajtókeretekhez használható. Kérjük győződjön meg róla, hogy beton- vagy téglafalba
építették az ajtókeretet, mert csak így biztosított a megfelelő stabilitás! 7 mm-nél keskenyebb
falba épített műanyag, alumínium vagy fa ajtókeretbe ne szerelje fel a húzódzkodó rudat, mert
a keret valószínűleg nem lesz elég stabil.
- Ügyeljen a húzódzkodó vízszintes és centrikus rögzítésére. Ellenőrizze, hogy a húzódzkodó
rúd végein található végzáró gumifelületek teljesen felfeküdjenek az ajtókeret felületére.
- Ne használja lépcsők közelében lévő ajtókeretben.
14
Page 15

Biztonsági útmutató a használathoz
- A terméket mindenki saját felelősségére használhatja.
- A terméket használni csak a biztonsági utasítások ismeretében szabad.
- A nyújtó rögzítését (megfeszülését) minden használat előtt ellenőrizni kell.
- A termék használata előtt várja meg, míg a színindikáció teljesen zöldet mutat!
- A terméket nem szabad 100 kg-nál nagyobb súllyal terhelni.
- A feszességet minden használat előtt a terméken húzó és rázó mozgásokkal ellenőrizni kell.
- Nem alkalmas mozgó részek (például hinta) tartására.
- A gyakorlatok végzése közben a fej soha nem irányulhat a föld felé.
- Ne végezzen lengéseket!
- A terméket egyszerre mindig csak egy személy használhatja.
- A termék csak magán célú használatra alkalmas.
- A termék nem játékszer, csak felnőtt felügyelete mellett használható.
- Az edzés megkezdése előtt mindig ellenőrizze a nyújtót rongálódások és kopás szempont jából. Ne használja tovább a megrongálódott eszközt.
- Egészségügyi gondok esetén a termék használata előtt kérje ki orvosa tanácsát.
Azonnal hagyja abba a gyakorlást, ha közben rosszullétet érez vagy egyéb panasza van, és
forduljon orvoshoz!
- Várandós állapotban csak az orvos beleegyezésével szabad az edzést végezni.
- A gyakorlatokat más személyektől és tárgyaktól kellő távolságban végezze, hogy senki ne
sérülhessen meg.
- A használati utasítást tartsa az edzőkészülék közelében. A fontosabb gyakorlatok leírása
ebben található.
Az ajtóba szerelhető nyújtó szerelése
1. ábra
out
Szükséges szerszámok
Az ajtókeretbe történő csavarozáshoz szüksége lesz egy kereszthornyos csavarhúzóra és egy
hozzá megfelelő fúróra.
Tudnivaló:
A végkupakokban egy-egy gumigyűrű van. Kiesik a gumigyűrű össze- vagy
szétszerelésnél a végkupakból? Tolja azt mint az 1. ábra mutatja ismét a
végkupakba. Ennek során a sima oldal az „out“ felirattal mutat a kupak
nyitott vége felé.
15
Page 16

A biztonsági kupakok ajtókerethez való csavarozása (2. ábra)
2. ábra
← 70-92 cm →
becsavarozás mekönnyítésére. Csavarozza a biztonsági kupakokat a félgömbfejű csavarokkal
szorosan oda. Kérjük ügyeljen arra, hogy a furatok azonos magasságban legyenek a nyújtó
vízszintes helyzete érdekében, más esetben az optimális használat és a szilárdság nem biztosított.
Ezután szerelje fel a nyújtót.
Figyelem: A fúrt lyukakkal az ajtókeretben
maradandó rongálást okoz! Az ajtókeretbe
szerelhető nyújtót a mellékelt csavarozási
anyaggal szorosan az ajtókerethez kell csavarozni. A csavarozás nagyobb biztonságot
kínál az edzés folyamán és feltétlenül szükséges.
Ennek során kérjük vegye figyelembe a következőket:
Készítsen egy kis fúróval (1 – 2 mm) két furatot a
Oldás és rögzítés
A végkupakok gumifelületeinek mindig teljesen fel kell feküdniük az ajtókeretre.
3. ábra
Az ábrázolt forgásirányhoz a középső rudat
meg kell tartani, és a végeket kell a mutatott
irányba elfordítani (3. ábra). Miután a rúd
Nyitás Rögzítés
egy kissé belefeszült a keretbe, át lehet térni a
középső rúd forgatására, ekkor a forgásirány
ellenkező lesz.
A nyújtót olyan erősen húzza meg, hogy az már a lökésszerű, hirtelen
terhelésre se mozduljon meg (Ne feledje, hogy az ajtókeret még
rendeltetésszerű használat esetén is deformálódhat)!
Figyelem! A színindikációnak tiszta zöldnek kell lennie
(lásd 4. ábra)
4. ábra
Nyitás
Rögzítés
ZöldZöld/Piros
Edzési útmutató
- Az alábbi gyakorlatok csak egy kis válogatást jelentenek, további gyakorlatokat az idevágó
szakirodalomban találhat.
- Viseljen kényelmes sportruházatot és tornacipőt.
- Edzés előtt mindig melegítsen be. Bemelegítésnek megfelelő a helyben járás vagy futás,
nyújtógyakorlatok és könnyű hajlítások.
- A gyakorlatokat egyenletes tempóban végezze. Lélegezzen nyugodtan. Tartsa magát a leírt
mozgássorokhoz, és ne becsülje túl magát! Az izmok megfeszítésekor lélegezzen ki, és az
izmok ellazításakor lélegezzen be.
- Felhúzódzkodáskor lélegezzen ki, leengedéskor be.
- Csípőből ne vegyen lendületet a felhúzódzkodáshoz.
Utasítás: Panasz vagy rosszullét esetén azonnal hagyja abba az edzést és
forduljon orvosához.
16
Page 17

Gyakorlatok
Az optimális eredmény eléréséhez a gyakorlatokat 3 - 5 sorozatban, 7 - 20 ismétléssel végezze,
hetente kétszer – háromszor.
Húzódzkodás 1. változat
felsőfogással
A kar-, váll- és hátizomzat erősítésére
A nyújtót fogja meg felsőfogással, a vállszélességnél kissé tágabban. Húzódzkodjon fel
karerővel, amíg az álla el nem éri a nyújtó
magasságát. Ezután lassan ereszkedjen le,
amíg a karjai még kissé be vannak hajlítva.
A lábakat behajlíthatja.
Húzódzkodás 2. változat
alsófogással
A kar- és mellizomzat erősítésére
A nyújtót fogja meg hátulról a vállszélességnél
kissé szűkebben. Húzódzkodjon fel karerővel,
amíg az álla el nem éri a nyújtó magasságát.
Ezután lassan ereszkedjen le, amíg a karjai
még kissé be vannak hajlítva.
A lábakat behajlíthatja.
Lábemelés felsőfogással
A hasizom erősítésére
A nyújtót fogja meg felsőfogással, a vállszélességnél kissé tágabban. Most a térdeket húzza
fel lassan, a medence-magasságig.
A lábai legyenek térdben 90°-al behajlítva,
és összezárva. Maradjon ebben a helyzetben
néhány másodpercig, majd lassan engedje le
ismét a lábait.
17
Page 18

Ápolás, tárolás
Kérjük ne felejtse el, hogy a rendszeres karbantartás és tisztítás hozzájárul a termék
biztonságának és élettartamának megőrzéséhez. A terméket mindig tisztán és szárazon, egy
állandó hőmérsékletű helyiségben tárolja.
FONTOS! Csak vízzel tisztítsa, soha ne erős ápolószerekkel. Ezt követõen egy tisztítókendővel
törölje szárazra.
Tudnivalók a hulladékkezelésről
Kérjük, hogy a terméket és a csomagolást a környezetet kímélve, fajta szerint válogatva kezelje!
A terméket csak engedélyezett hulladékkezelő üzemen, vagy a kommunális szemétfeldolgozón
keresztül semmisítse meg. Vegye figyelembe az érvényes előírásokat.
3 év garancia
Ezen termék gyártása nagy gondossággal és folyamatos ellenőrzés mellett történt. Ön a termékre
három év garanciát kap a vásárlás időpontjától. Kérjük őrizze meg a pénztárblokkot.
A garancia csak anyag- és gyártási hibákra érvényes, visszaélésszerű vagy szakszerűtlen kezelés
esetén teljesen megszűnik. Az Ön törvényes jogait, kiváltképpen a szavatosságra vonatkozó
jogait, ez a garancia nem korlátozza.
Garanciális esetben kérjük forduljon hozzánk ingyenes szerviz-forróvonalunk vagy e-mail
útján. Minden esetben személyes fogunk Önnek tanácsot adni. Garanciális esetben szervizmunkatársainkkal történő egyeztetés mellett a meghibásodott alkatrészeket bérmentesítve a
megjelölt szerviz-címre küldheti. Akkor Ön azonnal egy új vagy megjavított alkatrészt kap vissza
ingyen.
A garanciális időt garancia, törvényes szavatosság vagy kulantéria alapján történő esetleges
javítások nem hosszabbítják meg. Ez a pótolt vagy megjavított alkatrészekre is érvényes. A
garancia lejárta után felmerülő javítások költségeit Önnek kell fedezni.
IAN: 66184
Szerviz Cím
Termék hotline 00800-88080808 (H-P 10 - 16 óráig, díjmentes)
H.I.D. Sport Kft • Mester ut. 10a • H-5000 Szolnok
hu@nws-service.com
18
- www.nws-service.com -
Page 19

Pred uporabo skrbno preberite navodila za uporabo. Obvezno jih shranite
za poznejšo morebitno ponovno branje!
Neupoštevanje varnostnih navodil lahko pripelje do resnih poškodb.
Obseg dobave
1 x Navodilo za uporabo
1 x Drog za dvigovanje telesa
2 x Vijak in varnostni pokrovčki za privitje na vratni podboj
Tehnični podatki
Skupna teža: 1235 g
za vratno ogrodje od: 70 cm – 92 cm
Obremenitev: maks. 100 kg
Namen uporabe
Izdelek je športna naprava za montažo na vratni podboj z maks. širino do 92 cm, ni primeren
za profesionalni trening in gimnastične vaje. Ni primeren za otroke mlajše od 14 let, ker otroci ne
morejo presoditi potencialne nevarnosti. Razen tega drog za med vrata vsebuje majhne dele, ki
jih otroci lahko pogoltnejo. Samo za domačo uporabo, ni primerno za terapevtske namene!
Varnostni napotki za montažo
- Izdelek lahko uporabite samo skupaj z varnostnima kapicama, ki ju privijete
na pokončni stranici podboja vrat!
Izdelek lahko uporabite samo, ko je okence z barvnim indikatorjem popolnoma zeleno!
- Maksimalna raztezna širina 92 cm je označena na koncih droga, več kot 92 cm ni dovoljeno
razširiti.
- Montažo naj izvaja odrasla oseba. Preverite trdnost.
- Pozor! Pri montaži lahko poškodujete podboj. Če premočno privijate, lahko na podboju
ostanejo sledi barve ali poškodb.
- Gumijaste površine končnih pokrovčkov se morajo vedno popolnoma prilegati vratnemu
podboju.
- Montaža z vijačenjem v vratni podboj nudi večjo čvrstost.
- Prosimo preverite stanje podboja. Drog je primeren za podboj minimalne širine 70 cm in
maksimalne širine 92 cm. Preverite, če je stena, v katero je montiran podboj, grajena iz betona
ali zidakov, saj se pritisk na steno lahko porazdeli in zagotavlja zadostno stabilnost. Če je
podboj iz umetne mase, aluminija ali lesa debeline manj kot 7 mm, droga ne smete montirati,
ker podboj verjetno ni dovolj stabilen.
- Drog vedno montirajte naravnost in na sredino. Preverite robove droga.
- Ne nameščajte na podboj v bližini stopnic.
19
Page 20

Varnostni napotki za uporabo
- Uporaba izdelka na lastno odgovornost.
- Ta proizvod lahko uporabljajo samo osebe, ki so seznanjene z varnostnimi navodili.
- Pred vsako uporabo preverite pritrditev (zapahnitev).
- Izdelek lahko uporabite samo, ko je okence z barvnim indikatorjem popolnoma zeleno!
- Proizvod ne obremenite z več kot skupno 100 kg.
- Pred vsako uporabo predhodno preverite trdnost proizvoda in sicer na tak način, da z
odločnimi kretnjami čvrsto „potegnete“ in „stresete“.
- Izdelek ni primeren za pritrditev dinamičnih delov kot so npr. gugalnice.
- Ne izvajajte vaj z glavo usmerjeno proti tlem.
- Ne gugajte se!
- Proizvod lahko vedno uporablja samo ena oseba.
- Proizvod je primeren samo za privatno uporabo.
- Proizvod se lahko uporablja samo ob nadzoru odraslih in ne kot igračka.
- Pred vsako uporabo preverite morebitne poškodbe in obrabo naprave za trening.
V kolikor najdete poškodbe, naprave več ne smete uporabljati
- Pri zdravstvenih težavah se pred uporabo proizvoda posvetujte s svojim zdravnikom.
V kolikor med vajami nastopi slabo počutje in težave, takoj prekinite z vajami in se posvetujte s
svojim zdravnikom!
- Nosečnice lahko izvajajo trening samo po dogovoru s svojim zdravnikom.
- Vaje izvajajte s toliko razdalje do predmetov in drugih oseb, da nobeden ne bo mogel biti
poškodovan.
- Navodila za uporabo shranite v bližini naprave za trening. Navodila služijo kot priročnik
glavnih vaj.
Montaža droga za vratni podboj
sl. 1
out
Seznam orodja
Za pritrditev z vijaki v vratno ogrodje potrebujete križni izvijač in temu primeren sveder.
Napotek:
V zaključnih kapicah se nahaja po en gumijast obroček. V kolikor bi
gumijasti obroček pri montaži ali demontaži padel iz zaključne kapice?
Ga ponovno namestite v zaključno kapico, kot je prikazano na sliki1.
Gladka stran z napisom „out“ pri tem kaže proti odprtemu delu kapice.
20
Page 21

Privijanje varnostnih pokrovčkov v vratni (sl. 2)
sl. 2
← 70-92 cm →
polkrožnim vijakom. Pazite, da sta luknji na enaki višini tako, da drog leži vodoravno, sicer sta
optimalna uporaba in čvrstost vprašljiva. Nato montirajte drog.
Pozor: S tem trajno poškodujete svoje vratno
ogrodje z izvrtinami!
Vratni podboj morate s priloženim vijačnim
materialom močno priviti v vratni podboj.
Vijačenje zagotavlja večjo varnost med
treningom in je nujno potrebno.
Pri tem upoštevajte naslednje: Z majhnim vrtalnikom
(1 – 2 mm) predhodno izvrtajte dve luknji, da bi olajšali
privijanje. Nato močno privijte varnostne pokrovčke s
Odpiranje in blokiranje
Oba konca droga vpnite v pritrjena varnostna pokrovčka. Prikazana smer vitja velja, ko
sl. 3
se srednja palica drži in se konca vrtita kot je
prikazano (sl. 3).
Takoj, ko je palica rahlo fiksirana v ogrod-
Odpreti Blokirati
ju, se lahko obrača samo srednji del in se
smer vitja obrne. Vratni drog pritrdite tako
trdno, dokler se sam ob sunkoviti obremenitvi ne bo več mogel gibati
(Upoštevajte, da lahko pride do deformacije vratnega ogrodja kljub
pravilnem ravnanju)!
Pozor! Barvni indikator mora biti popolnoma zelen (sl. 4).
sl. 4
Odpreti
Blokirati
ZelenaZelena/Rdeča
Napotki za vadbo
- Sledeče vaje predstavljajo le izbor vaj. Nadaljnje vaje najdete v strokovni literaturi.
- Nosite udobna športna oblačila in športne copate.
- Pred vsakim treningom se ogrejte. Hodite ali tecite na mestu, stretching in lahke vaje raztezanja
so primerne za ogrevanje.
- Vaje izvajajte z enakomernim tempom. Mirno dihajte. Držite se navodil za izvajanje gibov in
ne precenjujte svojih zmogljivosti. Ko napnete mišice izdihnite, ko jih sprostite, vdihnite.
- Pri dvigu izdihnite in pri spustu vdihnite.
- Pri dvigu si ne pomagajte s sunkom iz kolkov
Opozorilo: Pri poškodbah ali če se ne počutite dobro, takoj končajte z vajami in
se obrnite na vašega zdravnika.
21
Page 22

Vaja
Optimalen učinek dosežete, če izvajate 3 do 5 vaj in vsako ponovite 7 do 20 krat. To urjenje
ponavljate 2 do 3 krat na teden.
Dvigovanje na drogu Varianta 1 z
dlanmi obrnjenimi stran od Vas
Za krepitev muskulature rok, ramen
in hrbta
Drog primite tako, da dlani gledajo stran od
vas. Razmak med dlanema naj bo nekoliko
širši od širine ramen. Z rokama se dvignite,
dokler z Vašo brado ne dosežete višine
droga. Nato se počasi spustite, roki naj na
najnižji točki ostaneta rahlo upognjenji.
Nogi lahko pri tem upognete.
Dvigovanje na drogu Varianta 2 z
dlanmi obrnjenimi k sebi
Za krepitev muskulature rok in prsi
Drog primite tako, da dlani gledajo proti vam.
Razmak med dlanema naj bo nekoliko ožji od
širine ramen. Z rokama se dvignite, dokler z
Vašo brado ne dosežete višine droga.
Nato se počasi spustite, roki naj na najnižji
točki ostaneta rahlo upognjenji.
Nogi lahko pri tem upognete.
Dvigovanje nog v položaju z
dlanmi obrnjenimi stran od vas
Za krepitev trebušne muskulature
Drog primite tako, da bodo dlani gledajo
stran od vas. Razmak med dlanema naj bo
nekoliko širši od ramen. Počasi dvignite koleni,
dokler z njima ne dosežete višine medenice.
Nogi sta v kolenskem sklepu pokrčeni za
90°, nogi držite skupaj. V tem položaju nogi
zadržite nekaj sekund, nato jih kontrolirano
spustite.
22
Page 23

Nega, vzdrževanje
Prosimo nikoli ne pozabite, da redno vzdrževanje in nega prispevata k ohranitvi izdelka.
Suh in čist izdelek vedno hranite v temperiranem prostoru.
VAŽNO! Čistite samo z vodo, nikoli z ostrimi čistilnimi sredstvi. Nato ga obrišite do suhega s
čistilno krpo.
Napotki za odlaganje v smeti
Embalažo in proizvod odložite v skladu z varovanjem okolja! Proizvod lahko v smeti odložite pri
pooblaščenem podjetju za odlaganje ali pri Vaši občinski komunalni službi. Upoštevajte trenutno
veljavne predpise.
3 leta garancije
Izdelek je bil izdelan z veliko skrbnostjo in pod stalnim nadzorom. Za ta izdelek dobite 3 leta
garancije od dneva nakupa. Prosimo, shranite račun.
Garancija velja samo za napake na materialu in proizvodne napake in ne velja v primeru
zlorabe ali nepravilne uporabe. Vaših zakonskih pravic, še posebej pravic glede odgovornosti za
stvarne in pravne napake, ta garancija ne omejuje.
V primeru uveljavljanja garancije nas prosimo pokličite na našo brezplačno telefonsko številko
servisa ali nam pišite na naš elektronski naslov. Deležni boste osebne obravnave. V primeru
garancije boste lahko na podlagi dogovora z našimi sodelavci na servisu pokvarjene dele
nefrankirano poslali na navedeni naslov servisnega mesta. Nato boste nemudoma brezplačno
prejeli nov ali popravljen del.
Garancijski čas se zaradi morebitnih popravil na osnovi garancije, zakonske odgovornosti za
stvarne in pravne napake izpolnitve ali kulantnosti ne podaljša. To velja tudi za nadomestne ali
popravljene dele. Morebitna popravila po izteku garancije so plačljiva.
IAN: 66184
Service Naslov
Telefonska vroča linija 00800-88080808 (pon.–pet. 10 - 16 h, brezplačno)
Deutsch-Slowenische Industrie- und Handelskammer • Tomšičeva 3 • SI-1000 Ljubljana
si@nws-service.com
- www.nws-service.com -
23
Page 24

Garancijski list
1. S tem garancijskim listom jamčimo DELTA-SPORT HANDELSKONTOR GMBH, da bo
izdelek v garancijskem roku ob normalni in pravilni uporabi brezhibno deloval in se
zavezujemo, da bomo ob izpolnjenih spodaj navedenih pogojih odpravili morebitne
pomanjkljivosti in okvare zaradi napak v materialu ali izdelavi oz. po svoji presoji
izdelek zamenjali ali vrnili kupnino.
2. Garancijski rok za proizvod je 3 lega od dneva nabave.
3. Kupec je dolžan okvaro javiti pooblaščenemu servisu oz. se informirati o nadaljnih
postopkih na zgoraj navedeni telefonski številki. Svetujemo vam, da pred tem natančno
preberete navodila o sestavi in uporabi izdelka.
4. Kupec je dolžan pooblaščenemu servisu predložiti garancijski list in račun, kot potrdilo
in dokazilo o nakupu.
5. V primeru, da proizvod popravlja nepooblaščeni servis ali oseba, kupec ne more
uveljavl jati zahtevkov iz te garancije.
6. Vzroki za okvaro oz. nedelovanje izdelka morajo biti lastnosti stvari same, in ne
vzroki, ki so zunaj proizvajalčeve oz. prodajalčeve sfere. Kupec ne more uveljavljati
zahtevkov iz te garancije, če se ni držal priloženih navodil za sestavo in uporabo
izdelka ali, če je izdelek kakorkoli spremenjen ali nepravilno vzdrževan.
7. Jamčimo servisiranje in rezervne dele za dobo, ki je minimalno zahtevana s strani
zakono daje.
8. Obrabni deli oz. potrošni material so izvzeti iz garancije.
9. Vsi potrebni podatki za uveljaljanje garancije se nahajajo na dveh ločenih dokumentih
(garancijski list, račun).
Prodajalec: Lidl d.o.o.k.d., Žeje pri Komendi 100, SI-1218 Komenda
24
Page 25

Před použitím si pozorně přečtěte návod k obsluze. Bezpodmínečně ho uschovejte pro
pozdější nahlédnutí!
Nedodržení bezpečnostních pokynů může vést k vážným poraněním.
Rozsah dodávky
1 x Návod k obsluze
1 x Hrazda do dveří
2 x Šroub a bezpečnostní koncovky pro přišroubování na rám dveří
Technické Údaje
Celková hmotnost: 1235 g
Určeno pro dveřní zárubeň: 70 cm – 92 cm
Zatížení: maximálně 100 kg
Použití ke stanovenému účelu
Tento výrobek je sportovní nářadí určené k montáži do dveřních rámů, s maximální. šířkou 92 cm,
které není vhodné pro profesionální trénink a gymnastická cvičení. Není vhodný pro děti mladší
14 let, protože děti neumí odhadnout potenciální nebezpečí. Kromě toho se dveřní hrazda skládá
z malých části, které by děti mohly spolknout. Vhodné jen pro používání doma, nevhodné k
léčebným aplikacím!
Bezpečnostní upozornění pro montáž
- Zboží smí být použito pouze s bezpečnostními kryty našroubovanými na rám
dveří!
Zboží smí být použito pouze tehdy, je-li okénko pro barevnou indikaci kompletně zelené!
- Na obou koncích tyče je označena maximální šířka vytočení 92 cm, prosíme, dále již
nevytáčet.
- Je třeba, aby montáž prováděla dospělá osoba a následně je třeba zkontro lovat pevnost
upevnění.
- Pozor! Při montáži může dojít k poškození dveřního rámu. Při příliš těsném dotažení se na
dveřním rámu mohou objevit stopy barvy nebo poškození.
- Aretujte konce hrazdy do připevněných bezpečnostních hlavic.
- Montáž pomocí šroubů do dveřního rámu zajišťuje zvýšenou pevnost.
- Zkontrolujte, prosím, kvalitu dveřního rámu. Hrazda je vhodná pro dveřní rám, který je široký
minimálně 70 cm a maximálně 92 cm. Zkontrolujte, prosím, zda je zeď za dveřním rámem z
betonu nebo cihel, aby se na zeď mohl rozložit tlak a byla tak zaručena dostatečná stabilita!
Pokud je dveřní rám z plastu, hliníku nebo dřeva o tloušťce menší než 7 mm, hrazdu, prosím,
nemontujte, protože lze předpokládat, že rám nebude v tomto případě dostatečně stabilní.
- Montáž tyče hrazdy musí vždy probíhat osově souměrně a v přímé pozici. Zkontrolujte hrazdu,
zda nedošlo ke zkrutu.
- Neupevňujte na dveřní rám v blízkosti schodů.
25
Page 26

Bezpečnostní upozornění pro používání
- Používání výrobku probíhá na vlastní nebezpečí.
- Tento výrobek smí používat jen osoby seznámené s bezpečnostními pokyny.
- Před každým použitím je nutné přezkoušet upevnění (uchycení).
- Zboží smí být použito pouze tehdy, je-li okénko pro barevnou indikaci kompletně zelené!
- Výrobek celkově nezatěžujte více než 100 kg.
- Před každým použitím znovu překontrolujte upevnění tím, že s výrobkem „zalomcujete“.
- Není vhodné pro upevňování dynamických částí, jako např. houpaček.
- Neprovádějte žádná cvičení, při nichž hlava směřuje k zemi.
- Není dovoleno houpání!
- Výrobek smí být používán vždy pouze jednou osobou.
- Výrobek je vhodný pouze pro privátní účely.
- Výrobek se smí používat pouze pod dohledem dospělých a nikoli jako hračka.
- Kontrolujte tréninkové nářadí před začátkem každého tréninku, jestli není poškozené nebo
opotřebované.V případě poškození ho již nepoužívejte.
- Při zdravotních problémech se před použitím výrobku zeptejte svého lékaře. Pokud se během
cvičení projeví nevolnost nebo potíže, cvičení ihned přerušte a poraďte se s lékařem!
- Těhotné by měly provádět trénink pouze po poradě se svým lékařem.
- Cvičení provádějte s takovým odstupem od předmětů a jiných osob, aby nemohl být nikdo
poraněn.
- Návod k použití uložte do blízkosti tréninkového přípravku. Slouží pro vyhledávání důležitých
cviků
Montáž hrazdy
obr. 1
out
Potřebné nástroje
Pro našroubování do zárubně dveří potřebujete křížový šroubovák a vhodný odpovídající vrták
Poznámka:
V každé koncovce se nachází gumový kroužek. Vypadl gumový kroužek
při montáži nebo demontáži z koncovky? Nasaďte ho zase do koncovky podle obr.1. Hladká strana s nápisem „out“ má ukazovat směrem k
otevřené straně koncovky.
26
Page 27

Přišroubování bezpečnostních koncovek na rám dveří (obr. 2)
obr. 2
← 70-92 cm →
pevně bezpečnostní koncovky pomocí šroubů s půlkulatou hlavou. Prosíme, dbejte na to, aby byly
otvory ve stejné výšce a hrazda připevněná vodorovně. V opačném případě je ovlivněná pevnost
přichycení a není zajištěné optimální použití hrazdy. Nakonec namontujte hrazdu.
Upozornění: Vyvrtáním otvorů natrvalo
poškodíte rám Vašich dveří! Hrazda musí být
přišroubovaná pomocí přiloženého materiálu
pevně na rám dveří. Přišroubování poskytuje během tréninku vyšší bezpečnost a je
nezbytně nutné.
Prosíme, dbejte při montáži na následující postup:
Předvrtejte si nejdříve malým vrtákem (1 – 2 mm) dva
otvory pro snadnější přišroubování. Potom přišroubujte
Otevření a zablokování
Gumové plochy koncovek musí úplně přiléhat
na rám dveří. Označený směr otáčení platí
obr. 3
tak, že když držíte středovou tyč, otáčíte
konci podle tohoto označení (obr. 3).
Jakmile tyč lehce zafixujete do zárubně dveří,
Otevírání Aretace
lze otáčet pouze středovou tyčí, přičemž směr
otáčení je nyní obrácený. Hrazdu mezi dveře
utáhněte natolik, aby se s ní nedalo pohnout trhavými pohyby (Dejte
pozor na to, aby přes řádné zacházení nemohlo dojít k deformaci
rámu dveří)! Pozor! Barevná indikace musí být kompletně
zelená (obr. 4).
obr. 4
Otevírání
Aretace
ZelenáZelená/Červená
Pokyny pro trénink
- Následující cvičení představují pouze výběr. Další cviky naleznete v příslušné odborné
literatuře.
- Vezměte si pohodlné sportovní oblečení a sportovní obuv.
- Před každým tréninkem se rozehřejte. Pro zahřátí se hodí chození nebo běh na místě, strečink
nebo lehké cviky na protažení.
- Cvičení provádějte rovnoměrným tempem. Dýchejte klidně. Držte se pokynů pro pohyb a
nepřeceňujte se. Vydechujte při napínání svalů, při uvolňování svalů se nadechujte.
- Při vytahování se nahoru vydechněte a při spouštění se nadechněte.
- Při vytahování si nepomáhejte pohybem boků.
Upozornění: V případě zdravotních potíží nebo nevolnosti cvičení,
prosím, ihned ukončete a kontaktujte svého lékaře.
27
Page 28

Cvičení
Optimálního úspěchu dosáhnete, když budete během cvičení provádět 3 až 5 sérií vždy
se 7 až 20 opakováními. Tato tréninková jednotka by se měla opakovat 2 až 3krát týdně.
Shyby, varianta 1 s uchopením
hrazdy shora
Na posilování svalstva paží, ramen
a zad
Uchopte dveřní hrazdu shora s rozpětím rukou
poněkud širším než je šířka Vašich ramen.
Vytáhněte se rukama nahoru až se dostane
Vaše brada do výše hrazdy. Potom se spusťte
zase pomalu dolů až jsou Vaše ruce jen mírně
ohnuté. Přitom můžete pokrčit nohy.
Shyby, varianta 1 s uchopením
hrazdy ze zdola
Na posilování paží a hrudního
svalstva
Uchopte dveřní hrazdu ze zdola s rozpětím
rukou poněkud menším než je šířka Vašich
ramen. Vytáhněte se rukama nahoru až se
dostane Vaše brada do výše hrazdy. Potom se
spusťte zase pomalu dolů až jsou Vaše ruce
jen mírně ohnuté. Přitom můžete pokrčit nohy.
Zvedání nohou při uchopením
hrazdy shora
Na posilování břišního svalstva
Uchopte dveřní hrazdu shora s rozpětím rukou
poněkud širším než je šířka Vašich ramen.
Nyní táhněte kolena nohou pomalu nahoru
až do výšky Vašich boků. Přitom mají být obě
nohy ohnuté v kolenou, v úhlu 90° a kolena
přitisknutá k sobě. Setrvejte v této poloze
několik vteřin a potom zase spusťte nohy
kontrolovaně dolů.
28
Page 29

Ošetřování a skladování
Prosíme, nezapomínejte, že pravidelná údržba a čistění přispívají k bezpečnosti a uchování
artiklu na dlouhou dobu. Artikl skladujte v suché, čisté a vytápěné místnosti.
DŮLEŽITÉ! Čistit jen vodou, nepoužívat drhnoucí čistící prostředky. Nakonec vytřít hadrem do
sucha.
Pokyny k likvidaci
Obal a výrobek prosím roztřiďte a ekologicky zlikvidujte! Výrobek zlikvidujte prostřednictvím
uznávaného likvidačního podniku nebo vašeho komunálního sběrného střediska Dodržujte
aktuálně platné předpisy.
3 roky záruka
Produkt byl vyrobený s velkou pečlivostí a byl během výroby neustále kontrolovaný. Dostáváte na
něj tři roky záruku od dne zakoupení. Uschovejte si pokladní stvrzenku.
Záruka platí na chyby výroby nebo materiálu a zaniká v případě nedovoleného nebo
neodborného zacházení s výrobkem. Záruka neomezuje Vaše zákonná práva ani práva ze
záruky.
Jestliže chcete uplatnit nárok ze záruky kontaktujte nás přes naší bezplatnou servisní horkou
linku nebo emailem. V každém případě Vám osobně poradíme. V případě záruky je možné, po
dohodě s pracovníkem našeho servisu, zaslat závadné součástky bezplatně na uvedenou adresu.
Okamžitě obdržíte zpátky nový nebo opravený díl.
Opravy během záruční doby, na základě zákonného ručení nebo v rámci kulanční likvidace
neprodlužují záruku. Toto platí i pro nahrazené nebo opravené díly. Po uplynutí záruční doby
provádíme opravy za úhradu.
IAN: 66184
Adresa služby
Hotline výrobku 00800-142025 (po. - pá. 10 - 16 hod., zdarma)
Firma BOHEMIA Troppau • Masarykova 342/39 • CZ-74601 Opava
cz@nws-service.com
- www.nws-service.com -
29
Page 30

Pred použitím si starostlivo prečítajte návod na použitie. Odložte ho pre
prípad, že by ste ho potrebovali prečítať ešte raz!
Nedodržanie bezpečnostných pokynov môže viesť k vážnym
poraneniam
Rozsah dodávky
1 x Návod na obsluhu
1 x Hrazda na dvere
2 x Skrutka a bezpečnostné čiapočky na priskrutkovanie na rám dverí
Technické Údaje
Celková hmotnosť: 1235 g
pre zárubne dverí: 70 cm – 92 cm
Zaťaženie: max.: 100 kg
Štandardné použitie
Tento artikel je športový nástroj, ktorý sa montuje na rám dverí s maximálnou. šírkou 92 cm,
hrazda nie je vhodná pre profesionálny tréning a gymnastické cvičenia. Nie je vhodný pre deti
mladšie ako 14 rokov, pretože deti nedokážu posúdiť potencionálne nebezpečenstvá. Okrem
toho obsahuje hrazda do dverí malé časti, ktoré by mohli deti prehltnúť. Iba pre domáce použitie,
nevhodné pre terapeutické účely!
Bezpečnostné pokyny pri montáž
- Výrobok sa smie používať len v spojení s bezpečnostnými násadami
priskrutkovanými v dverovom ráme!
Výrobok sa smie používať len vtedy, keď je viditeľné celé zelené indikačné okienko!
- Maximálna dĺžka vytočenia 92 cm je označená na obidvoch koncoch tyče, prosím ďalej
nevytáčajte.
- Montáž smie vykonať len dospelá osoba a následne musí skontrolovať pevnosť umiestnenia
hrazdy.
- Pozor! Zárubňa dverí sa môže pri montáži poškodiť. V prípade silného dotiahnutia sa môžu na
zárubni dverí vyskytnúť stopy farby alebo poškodenia.
- Konce dverovej hrazdy aretujte v upevnených bezpečnostných čiapočkách
- Montážou priskrutkovaním do rámu dverí možno dosiahnuť vyššiu pevnosť.
- Preverte prosím stav zárubne dverí. Hrazda je vhodná na montáž do zárubne dverí s min.
šírkou 70 cm a s max. šírkou 92 cm. Preverte prosím, či je stena za zárubňou dverí postavená
z betónu alebo tehál, aby sa mohol tlak rozložiť na stenu a aby bola zabezpečená
dostatočná stabilita! Ak je zárubňa dverí zhotovená z plastu, hliníka alebo dreva s menšou
hrúbkou steny ako 7 mm, hrazdu nemontujte, keďže zárubňa v takomto prípade nebude
pravdepodobne dostatočne stabilná.
- Tyč musí byť namontovaná vždy rovno a v strede. Skontrolujte, či hrazda nie je stočená.
- Hrazdu neupevňujte na zárubňu dverí v blízkosti schodov.
30
Page 31

Bezpečnostné pokyny pri používaní
- Použitie výrobku je na vlastné nebezpečenstvo.
- Tento výrobok smú používať len osoby, ktoré boli oboznámené s bezpečnostnými pokynmi.
- Pred každým použitím skontrolujte upevnenie (zablokovanie).
- Výrobok sa smie používať len vtedy, keď je viditeľné celé zelené indikačné okienko!
- Výrobok nezaťažujte s viac ako 100 kg.
- Pred každým použitím ešte raz skontrolujte pevnosť a to „poťahovaním“ a „potriasaním“
výrobku.
- Výrobok nie je vhodný na pripojenie dynamických častí, ako napr. hojdačky.
- Nevykonávajte cvičenia, pri ktorých smeruje hlava k zemi.
- Nekníšte sa!
- Výrobok smie používať vždy len jedna osoba.
- Výrobok je určený len pre súkromné použitie.
- Výrobok sa smie používať len pod dozorom dospelej osoby a nie ako hračka.
- Tréningový nástroj skontrolujte pred začatím každého tréningu, všímajte si, či nie je poškodený
a opotrebovaný. Ak zistíte poškodenie, nástroj nepoužite.
- Ak máte zdravotné problémy, pred použitím výrobku najskôr konzultujte svojho lekára. Ak sa
počas cvičenia vyskytne nevoľnosť alebo ťažkosti, cvičenie ihneď prerušte a konzultujte svojho
lekára.
- Tehotné ženy by mali vykonávať tréning len po konzultácii so svojím lekárom.
- Návod k používaniu nechávajte v blízkosti tréningového prístroja. Slúži potom na vyhľadanie
hlavných cvičení.
Montáž dverovej hrazdy
obr. 1
out
Zoznam nástrojov
Pre skrutkové spojenie na zárubni dverí potrebujete krížový skrutkovač a vhodný vrták.
Upozornenie:
V každom koncovom uzávere sa nachádza gumený prúžok. Pri montáži
alebo demontáži vypadol gumený prúžok z koncového uzáveru? Opäť ho
zastrčte do koncového uzáveru ako je zobrazené na obr. 1. Hladká strana
s nápisom „out“ pritom ukazuje na otvorený koniec uzáveru.
31
Page 32

Priskrutkovanie bezpečnostných čiapočiek na rám dverí (obr. 2)
obr. 2
← 70-92 cm →
zaskrutkovanie. Potom pevne dotiahnite bezpečnostné čiapočky so skrutkou s polguľovou
hlavou. Dbajte na to, aby boli otvory v rovnakej výške, hrazda musí byť upevnená horizontálne,
v opačnom prípade by sa nedala optimálne používať a zhoršila by sa aj jej pevnosť. Hrazdu
potom namontujte.
Pozor: Zárubňu dverí natrvalo poškodíte
navŕtanými dierami! Dverovú hrazdu je
potrebné pomocou priloženého materiálu na
priskrutkovanie pevne priskrutkovať na rám
dverí. Bezpečnosť počas tréningu je vďaka
priskrutkovaniu vyššia, fixácia hrazdy priskrutkovaním je nutná.
Pritom majte na pamäti tento postup: Tenkým vrtákom
(1 - 2 mm) najskôr vyvŕtajte dva otvory, takto si uľahčíte
Otvorenie a aretácia
Gumové plochy koncových čiapočiek musia
na ráme dverí vždy dokonale priliehať.
obr. 3
Vyznačený smer otáčania platí, ak držíme
strednú tyč a konce sa otáčajú vo
vyznačenom smere (obr. 3).
Otvoriť Aretovať
Akonáhle sa tyč na zárubni trochu zafixuje,
možno otáčať prostrednou časťou a smer
otáčania sa zmení. Hrazdu na dvere utiahnite natoľko, aby sa ňou
ani pri trhavom zaťažení nedalo hýbať (vezmite do úvahy, že napriek
riadnej manipulácii môže dôjsť k deformácii zárubne dverí)!
Upozornenie! Zelené indikačné okienko musí byť viditeľné
celé (obr. 4).
obr. 4
Otvoriť
Aretovať
ZelenýZelený/Červená
Pokyny pre cvičenie
- Nasledovné cvičenia predstavujú len jednu voľbu. Ďalšie cvičenia nájdete v príslušnej
odbornej literatúre.
- Noste pohodlný športový odev a cvičky.
- Pred každým tréningom sa nahrejte. Na zahriatie sa hodia chôdza alebo beh na mieste,
strečing a ľahké naťahovacie cviky.
- Cvičenia vykonávajte v rovnakom tempe a obojstranne. Dýchajte pokojne. Rešpektujte
pohybové postupy tréningových pokynov a nepreceňujte sa. Pri napätých svaloch vydychujte,
pri uvoľnených svaloch sa nadychujte.
- Pri vyťahovaní sa nahor vydychujte a pri spúšťaní sa nadol sa nadýchnite.
- Pri vyťahovaní sa nahor nemykajte bedrami.
Upozornenie: V prípade ťažkostí alebo nevoľnosti cvičenie okamžite ukončite a
kontaktujte vášho lekára.
32
Page 33

Cvičenie
Optimálny výsledok dosiahnete cvičením 3 až 5 súborov cvikov so 7 až 20 opakovaniami na
jeden tréning. Táto tréningová jednotka by sa mala opakovať 2 až 3 razy týždenne.
Zhyby - variant 1 úchop
nadhmatom
Na posilnenie svalstva rúk,
pliec a chrbta
Dverovú hrazdu uchopte zhora trochu širšie,
ako je šírka Vašich pliec. Rukami sa vytiahnite nahor tak, aby ste sa bradou dostali na
úroveň hrazdy. Nakoniec sa opäť pomaly
spustite, ruky majte však mierne zohnuté.
Nohy môžete pritom zohnúť.
Zhyby - variant 2 úchop
podhmatom
Na posilnenie svalstva rúk a
prsného svalstva
Dverovú hrazdu uchopte zozadu trochu užšie,
ako je šírka Vašich pliec. Rukami sa vytiahnite nahor tak, aby ste sa bradou dostali na
úroveň hrazdy. Nakoniec sa opäť pomaly
spustite, ruky majte však mierne zohnuté.
Nohy môžete pritom zohnúť.
Dvíhanie nôh pri úchope
nadhmatom
Na posilnenie brušného svalstva
Dverovú hrazdu uchopte zhora trochu širšie,
ako je šírka Vašich pliec. Kolená teraz pomaly
dvíhajte nahor až na úroveň panvy. Nohy sú
pritom v kolene zohnuté pod 90° uhlom a
sú spojené. V tejto polohe niekoľko sekúnd
vydržte a nohy potom kontrolovane opäť
spustite nadol.
33
Page 34

Ošetrovanie, skladovanie
Majte vždy na pamäti, že pravidelnou údržbou a čistením prispievate k zvýšeniu bezpečnosti
a predĺženiu doby životnosti výrobku. Výrobok skladujte vždy suchý a čistý v temperovanej
miestnosti.
DÔLEŽITÉ UPOZORNENIE! Výrobok čistite len vodou, nikdy nie drsnými prostriedkami na
ošetrovanie. Výrobok nakoniec utrite dosucha handričkou.
Pokyny k likvidácii
Obal a tovar zlikvidujte, prosím, adekvátne životnému prostrediu a roztriedený podľa druhu!
Tovar zlikvidujte prostredníctvom podniku schváleného na likvidáciu odpadu alebo
prostredníctvom vašej komunálnej správy obce. Dodržiavajte aktuálne platné predpisy.
3 roky záruka
Produkt bol vyrobený s maximálnou zodpovednosťou a pod neustálou kontrolou. Na tento
produkt sa vzťahuje trojročná záruka platná od dátumu kúpy. Pokladničný lístok si odložte.
Záruka sa vzťahuje len na materiálové a výrobné chyby a v prípade nesprávneho alebo
neodborného použitia zaniká. Vaše zákonné práva, najmä záručné práva nie sú touto zárukou
obmedzené.
V prípade zistenia nedostatku v záruke sa s nami spojte prostredníctvom našej bezplatnej
servisnej horúcej linky alebo prostredníctvom e-mailu. V každom prípade Vám osobne poradíme.
V záruke môžete znehodnotené diely po dohovore s našimi servisnými pracovníkmi bezplatne
zaslať na uvedenú servisnú adresu. My Vám potom okamžite a bezplatne zašleme nový alebo
opravený diel.
Záručná doba sa v dôsledku výkonu opráv na základe záruky, zákonného záručného plnenia
alebo ochoty nepredlžuje. Toto sa vzťahuje aj na náhradné a opravené diely.
Opravy uplatnené po uplynutí záručnej doby sú spoplatnené.
IAN: 66184
Adresa služby
Hotline výrobku 00800-88080808 (pon - pia 10 - 16 hod. bezplatne)
Delta-Sport c/o Rhenus Logistics s.r.o. • Trnavská cesta 104 • SK-821 01 Bratislava
sk@nws-service.com
34
- www.nws-service.com -
Page 35

Lesen Sie vor dem Gebrauch die Bedienungsanleitung sorgfältig durch.
Bewahren Sie sie unbedingt für späteres Nachlesen auf!
Das Nichtbefolgen der Sicherheitshinweise kann zu ernsthaften
Verletzungen führen.
Lieferumfang
1 x Bedienungsanleitung
1 x Türreck
2 x Schraube und Sicherheitskappe für Verschraubung im Türrahmen
Technische Daten
Gesamtgewicht: 1235 g
für Türrahmen von: 70 cm - 92 cm
max. Belastung: 100 kg
Bestimmungsgemäße Verwendung
Dieser Artikel ist ein Sportgerät zur Montage in Türrahmen mit max. Breite von 92 cm, der nicht
für professionelles Training und gymnastische Übungen geeignet ist. Der Artikel ist nicht für Kinder
unter 14 Jahren geeignet, da Kinder die potentiellen Gefahren nicht einschätzen können.
Außerdem enthält der Artikel Kleinteile, die von Kindern verschluckt werden können.
Nur für den Heimgebrauch, nicht für therapeutische Zwecke geeignet!
Sicherheitshinweise zur Montage
- Der Artikel darf nur in Verbindung mit den im Türrahmen verschraubten
Sicherheitskappen verwendet werden!
Der Artikel darf nur verwendet werden, wenn das Farbindikationsfenster komplett grün zeigt!
- Die max. Ausdrehweite von 92 cm ist an beiden Endstangen markiert, bitte nicht weiter
ausdrehen.
- Die Montage ist durch einen Erwachsenen durchzuführen und im Anschluss auf Festigkeit zu
kontrollieren.
- Achtung! Der Türrahmen kann bei der Montage beschädigt werden. Bei zu festem Anziehen
können Farbspuren oder Beschädigungen am Türrahmen auftreten.
- Die Gummiflächen der Endkappen müssen immer vollständig auf dem Türrahmen aufliegen.
- Die Montage mit Verschraubung im Türrahmen bietet eine höhere Festigkeit.
- Bitte überprüfen Sie die Beschaffenheit des Türrahmens. Der Artikel ist für Türrahmen
geeignet, die mind. 70 cm und max. 92 cm breit sind. Bitte überprüfen Sie, ob die Wand hinter
dem Türrahmen aus Beton oder Ziegeln ist, damit der Druck sich auf die Wand verteilen kann
und eine ausreichende Stabilität gegeben ist!
Wenn der Türrahmen aus Kunststoff, Aluminium oder Holz mit einer Wandstärke von weniger
als 7 mm ist, bitte nicht montieren, da die Rahmen in diesem Fall voraussichtlich nicht stabil
genug sind.
- Die Montage des Artikels muss immer gerade und mittig erfolgen. Überprüfen Sie den Artikel
auf Verkantungen.
- Nicht an Türrahmen in der Nähe von Treppen befestigen.
35
Page 36

Sicherheitshinweise zur Benutzung
- Die Benutzung des Artikels geschieht auf eigene Gefahr.
- Dieser Artikel darf nur von Personen verwendet werden, die mit den Sicherheitshinweisen
vertraut sind.
- Vor jedem Gebrauch ist die Befestigung (Verklemmung) zu prüfen.
- Der Artikel darf nur verwendet werden, wenn das Farbindikationsfenster komplett grün zeigt!
- Den Artikel nicht mit mehr als insgesamt 100 kg belasten.
- Vor jedem Gebrauch nochmals die Festigkeit durch feste „Zieh“- und „Rüttel“- Bewegungen
am Artikel kontrollieren.
- Nicht geeignet zum Anbringen dynamischer Teile, wie z.B. Schaukeln.
- Keine Übungen durchführen, bei denen der Kopf zum Boden zeigt.
- Nicht schwingen!
- Der Artikel darf immer nur von einer Person verwendet werden.
- Der Artikel ist nur für die private Nutzung geeignet.
- Der Artikel darf nur unter Aufsicht Erwachsener und nicht als Spielzeug verwendet werden.
- Kontrollieren Sie das Trainingsgerät vor jedem Trainingsbeginn auf Schäden und Verschleiß.
Sollten Sie Schäden feststellen, benutzen Sie das Gerät nicht mehr.
- Bei gesundheitlichen Problemen fragen Sie Ihren Arzt, bevor Sie den Artikel verwenden.
Treten während der Übungen Unwohlsein oder Beschwerden auf, brechen Sie die Übungen
sofort ab und konsultieren Sie einen Arzt!
- Schwangere sollten das Training nur nach Absprache mit ihrem Arzt durchführen.
- Führen Sie Übungen mit so viel Platz zu Gegenständen und anderen Personen durch, dass
niemand verletzt werden kann.
- Bewahren Sie die Bedienungsanleitung in der Nähe des Trainingsgerätes auf.
Dieses dient zum Nachschlagen der Hauptübungen.
Montage des Türrecks
Abb. 1
out
Werkzeugliste
Zur Verschraubung im Türrahmen benötigen Sie einen Kreuzschlitz-Schraubendreher und einen
entsprechend geeigneten Bohrer.
Hinweis
In den Endkappen befindet sich jeweils ein Gummiring. Sollte der Gummiring bei der Montage oder Demontage aus der Endkappe fallen, stecken
Sie Ihn wie in der Abb. 1 gezeigt wieder in die Endkappe. Die glatte Seite
mit der Beschriftung „out“ zeigt dabei zum offenen Ende der Kappe.
36
Page 37

Verschraubung der Sicherheitsendkappen im Türrahmen (Abb. 2)
Abb. 2
← 70-92 cm →
das Einschrauben zu erleichtern. Schrauben Sie dann die Sicherheitskappen mit der Halbrundkopfschraube fest an. Bitte beachten Sie, dass die Löcher in derselben Höhe sind, so dass das
Reck horizontal sitzt, da sonst der optimale Gebrauch und die Festigkeit beeinträchtigt werden.
Danach das Reck montieren.
Achtung: Hierdurch beschädigen Sie Ihren
Türrahmen durch die gebohrten Löcher dauerhaft! Das Türreck muss mit dem beigelegten
Verschraubungsmaterial fest im Türrahmen
verschraubt werden. Die Verschraubung bietet
während des Trainings eine höhere Sicherheit
und ist zwingend erforderlich.
Dabei beachten Sie bitte Folgendes: Bohren Sie mit
einem kleinen Bohrer (1 - 2 mm) die zwei Löcher vor, um
Öffnen und Arretieren
Arretieren Sie die Enden des Türrecks in den
befestigten Sicherheitskappen. Die gezeigte
Abb. 3
Drehrichtung gilt, wenn die Mittelstange
gehalten wird und die Enden wie gezeigt
gedreht werden (Abb. 3). Sobald die Stange
Öffnen Arretieren
im Rahmen leicht fixiert ist, kann nur der
Mittelteil gedreht werden und die Drehrichtung kehrt sich um. Ziehen Sie das Türreck so fest an, bis es sich selbst
bei ruckartiger Belastung nicht mehr bewegen lässt (Beachten Sie, dass
eine Verformung des Türrahmens trotz ordnungsgemäßer Handhabung
erfolgen kann)!
Achtung! Die Farbindikationsanzeige muss komplett grün
anzeigen (Abb. 4)
Abb. 4
Öffnen
Arretieren
GrünGrün/Rot
Trainingshinweise
- Die nachfolgenden Übungen stellen nur eine Auswahl dar. Weitere Übungen finden Sie in
einschlägiger Fachliteratur.
- Tragen Sie bequeme Sportkleidung und Turnschuhe.
- Wärmen Sie sich vor jedem Training auf. Gehen oder Laufen auf der Stelle, Stretching und
leichte Dehnübungen eignen sich als Warm Up.
- Führen Sie die Übungen mit gleichmäßigem Tempo durch. Atmen Sie ruhig. Halten Sie sich an
die Bewegungsabläufe und überschätzen Sie sich nicht. Atmen Sie bei Muskelanspannung
aus, bei Muskelentspannung ein.
- Atmen Sie beim hochziehen aus und beim herablassen ein.
- Holen Sie beim hochziehen keinen Schwung aus der Hüfte.
HINWEIS: Bei Beschwerden oder Unwohlsein beenden Sie bitte sofort die
Übungen und kontaktieren Ihren Arzt.
37
Page 38

Übungen
Einen optimalen Erfolg erzielen Sie, wenn Sie 3 bis 5 Sätze mit jeweils 7 bis 20 Wiederholungen
pro Übung durchführen. Diese Trainingseinheit sollte 2 bis 3 mal pro Woche wiederholt werden.
Klimmzüge Variante 1
mit Obergriff
Zur Kräftigung der Arm-, Schulterund Rückenmuskulatur
Greifen Sie das Türreck von hinten etwas
enger als Schulterbreit.
Ziehen Sie sich mit den Armen nach oben,
bis sich Ihr Kinn auf Türreckhöhe befindet.
Anschließend lassen Sie sich wieder langsam
ab, bis die Arme noch leicht gebeugt sind.
Die Beine können Sie dabei anwinkeln.
Klimmzüge Variante 2
mit Untergriff
Zur Kräftigung der Arm- und
Brustmuskulatur
Greifen Sie das Türreck von oben etwas mehr
als Schulterbreit.
Ziehen Sie sich mit den Armen nach oben, bis
sich Ihr Kinn auf Türreckhöhe befindet.
Anschließend lassen Sie sich wieder langsam
ab, bis die Arme noch leicht gebeugt sind.
Die Beine können Sie dabei anwinkeln.
Beinheben mit Obergriff
Zur Kräftigung der Bauchmuskulatur
Greifen Sie das Türreck von oben etwas mehr
als Schulterbreit.
Ziehen Sie nun die Knie langsam nach oben,
bis sich Ihre Knie auf Beckenhöhe befinden.
Die Beine sind dabei im Kniegelenk um 90°
angewinkelt und geschlossen.
Halten Sie die Position für einige Sekunden
und senken Sie die Beine dann kontrolliert
wieder ab.
38
Page 39

Pflege, Lagerung
Bitte vergessen Sie nie, dass eine regelmäßige Wartung und Reinigung zur Sicherheit und
Erhaltung des Artikels beitragen. Den Artikel immer trocken und sauber in einem temperierten
Raum lagern.
WICHTIG! Nur mit Wasser reinigen, nie mit scharfen Pflegemitteln. Anschließend mit einem
Reinigungstuch trockenwischen.
Hinweise zur Entsorgung
Verpackung und Artikel bitte umweltgerecht und sortenrein entsorgen! Entsorgen Sie den Artikel
über einen zugelassenen Entsorgungsbetrieb oder über Ihre kommunale Gemeindeverwaltung.
Beachten Sie die aktuell geltenden Vorschriften.
3 Jahre Garantie
Das Produkt wurde mit großer Sorgfalt und unter ständiger Kontrolle produziert. Sie erhalten auf
dieses Produkt drei Jahre Garantie ab Kaufdatum. Bitte bewahren Sie den Kassenbon auf.
Die Garantie gilt nur für Material- und Fabrikationsfehler und entfällt bei missbräuchlicher oder
unsachgemäßer Behandlung. Ihre gesetzlichen Rechte, insbesondere die Gewährleistungsrechte,
werden durch diese Garantie nicht eingeschränkt.
Im Garantiefall setzen Sie sich bitte über unsere kostenlose Service-Hotline oder per E-Mail mit
uns in Verbindung. Wir werden Sie in jedem Fall persönlich beraten. Im Garantiefall können
in Absprache mit unseren Service-Mitarbeitern defekte Teile unfrei an die aufgeführte ServiceAdresse geschickt werden. Sie erhalten dann unverzüglich ein neues oder repariertes Teil
kostenlos zurück.
Die Garantiezeit wird durch etwaige Reparaturen aufgrund der Garantie, gesetzlicher
Gewährleistung oder Kulanz nicht verlängert. Dies gilt auch für ersetzte und reparierte Teile.
Nach Ablauf der Garantie anfallende Reparaturen sind kostenpflichtig.
IAN: 66184
Service-Adresse
Produkt-Hotline 00800-88080808 (Mo.- Fr., 10:00 - 16:00 Uhr, gebührenfrei)
NWS-Service • Wragekamp 6 • D-22397 Hamburg
de@nws-service.com
A.Hofer • Loebersdorfer Str. 42 • AT-2560 Berndorf
at@nws-service.com
Atlantic Forwarding Ltd. • Mühlemattstr. 22, C.P. No. 131 • 4104 Oberwil BL, Switzerland
ch@nws-service.com
www.nws-service.com
39
Page 40

Version: 09/2011
40
Származási hely/Vyrobeno v/Vyrobené v: Kína/Čína/Číne
Gyártja/Výrobce/Výrobca:
Delta-Sport HanDelSkontor GmbH
Wragekamp 6 • D-22397 Hamburg
 Loading...