

Page 1

Chin-Up Bar with Resistance Bands - TF-1321
Drążek rozporowy z taśmami do ćwiczeń - TF-1321
Húzódzkodó rúd edzőszalagokkal - TF-1321
Drog za med vrata z vadbenimi trakovi - TF-1321
Hrazda do dveří s posilovacími pásy - TF-1321
Dverová hrazda s tréningovými pásmi - TF-1321
Türreck mit Trainingsbändern - TF-1321
INSTRUCTIONS FOR USE
Page 2

Instructions for use
List of contents .................................................................................................................... 4
Conventional use ............................................................................................................... 4
Safety information about installation ............................................................................... 4
Safety information about usage ....................................................................................... 5
Technical Specifications .................................................................................................... 5
Opening and locking .........................................................................................................6
Installation with safety brackets ........................................................................................ 6
Tools required .................................................................................................................... 6
Bolting of safety caps in door frame ................................................................................ 7
Training advice .................................................................................................................. 7
Exercises ........................................................................................................................ 7 - 8
Advice on disposal ............................................................................................................ 9
Care and storage .............................................................................................................. 9
3 Year guarantee .............................................................................................................. 9
Instrukcja obsługi
Zakres dostawy ............................................................................................................... 10
Przeznaczone do określonego użytkowania ................................................................ 10
Wskazówki bezpieczeństwa do montaż ...................................................................... 10
Wskazówki bezpieczeństwa do użytkowania ............................................................. 11
Dane techniczne .............................................................................................................. 11
Otwieranie i blokowanie ................................................................................................ 12
Montaż z uchwytem bezpieczeństwa ............................................................................ 12
Lista narzędzi ................................................................................................................... 12
Przymocowanie nakładek bezpieczeństwa w futrynie ................................................ 13
Wskazówki treningowe ................................................................................................... 13
Ćwiczenie ................................................................................................................. 13 - 14
Uwagi odnośnie recyklingu ............................................................................................ 15
Pielęgnacja, magazynowanie ........................................................................................ 15
3-letnia gwarancja .......................................................................................................... 15
Használati útmutató
A csomag tartalma .......................................................................................................... 16
Rendeltetésszerű használat ............................................................................................. 16
Biztonsági útmutató az összeszereléshez ..................................................................... 16
Biztonsági útmutató a használathoz .............................................................................. 17
Műszaki Adatok .............................................................................................................. 17
Oldás és rögzítés ............................................................................................................. 18
Szerelés biztonsági kengyellel ........................................................................................ 18
Szükséges szerszámok .................................................................................................... 18
A biztonsági kupakok ajtókerethez való csavarozása ................................................ 19
Edzési útmutató .................................................................................................................19
Gyakorlatok ............................................................................................................. 19 - 20
Tudnivalók a hulladékkezelésről .................................................................................... 21
Tisztítás, tárolás ................................................................................................................ 21
3 év garancia .................................................................................................................. 21
Navodilo za uporabo
Obseg dobave ................................................................................................................ 22
Namen uporabe .............................................................................................................. 22
Varnostni napotki za montažo ....................................................................................... 22
Varnostni napotki za uporabo ........................................................................................ 23
Tehnični podatki ............................................................................................................... 23
Odpiranje in blokiranje ................................................................................................... 24
2
Page 3

Montaža varnostne prečke ..............................................................................................24
Seznam orodja ................................................................................................................ 24
Privijanje varnostnih pokrovčkov v vratni ............................................................. 24 - 25
Napotki za vadbo ........................................................................................................... 25
Vaja ........................................................................................................................... 25 - 26
Napotki za odlaganje v smeti ........................................................................................ 26
Vzdrževanje, skladiščenje .............................................................................................. 26
3 lega garancije .............................................................................................................. 27
Návod k obsluze
Rozsah dodávky .............................................................................................................. 28
Použití ke stanovenému účelu ......................................................................................... 28
Bezpečnostní upozornění pro montáž ........................................................................... 28
Bezpečnostní upozornění pro používání ....................................................................... 29
Technické Údaje .............................................................................................................. 29
Otevření a zablokování .................................................................................................. 30
Montáž se zajišťovacími třmeny ......................................................................................30
Potřebné nástroje ............................................................................................................. 30
Přišroubování bezpečnostních koncovek na rám dveří ................................................ 31
Pokyny pro trénink .......................................................................................................... 31
Cvičení ...................................................................................................................... 31 - 32
Pokyny k likvidaci ............................................................................................................ 33
Údržba, skladování ......................................................................................................... 33
Záruka 3 roky .................................................................................................................. 33
Návod na obsluhu
Rozsah dodávky .............................................................................................................. 34
Štandardné použitie ........................................................................................................ 34
Bezpečnostné pokyny pri montáž .................................................................................. 34
Bezpečnostné pokyny pri používaní .............................................................................. 35
Technické Údaje .............................................................................................................. 35
Otvorenie a aretácia ....................................................................................................... 36
Montáž s poistným strmeňom ..........................................................................................36
Zoznam nástrojov ............................................................................................................ 36
Priskrutkovanie bezpečnostných čiapočiek na rám dverí ............................................. 37
Pokyny pre cvičenie ......................................................................................................... 37
Cvičenie .................................................................................................................... 37 - 38
Pokyny k likvidácii ........................................................................................................... 39
Údržba, skladovanie ....................................................................................................... 39
3-Ročná záruka ................................................................................................................ 39
Lieferumfang ..................................................................................................................... 40
Bestimmungsgemäße Verwendung ................................................................................ 40
Sicherheitshinweise zur Montage ...................................................................................40
Sicherheitshinweise zur Benutzung ................................................................................ 41
Technische Daten ............................................................................................................. 41
Öffnen und Arretieren ..................................................................................................... 42
Montage der Sicherheitsbügel ........................................................................................42
Werkzeugliste .................................................................................................................. 42
Verschraubung der Sicherheitskappen im Türrahmen .................................................. 43
Trainingshinweise ............................................................................................................. 43
Übungen ................................................................................................................... 43 - 44
Hinweise zur Entsorgung ................................................................................................ 45
Pflege, Lagerung .............................................................................................................. 45
3 Jahre Garantie ..............................................................................................................45
Bedienungsanleitung
3
Page 4

Read through the instruction manual carefully before use.
Make sure you keep the instructions for future reference!
Failure to follow the safety instructions could lead to serious injury.
List of contents
1 x Door-mounted bar 2 x safety brackets 1 x Instructions for use
2 x expanders 2 x screws and plastic rings for screwing into the doorframe
Conventional use
This item is a sporting goods article for installation in door frames with a max. width of
98 cm, and not suitable for professional training and gymnastics exercises.
The expanders serve to expand and strengthen various muscle groups.
It is not suitable for children under 14 years of age because children are not able to evaluate the potential dangers. In addition, the doorframe exercise bar contains small parts
which could be swallowed by children.
Safety information about installation
- The max. unscrewing width of 98 cm is marked on both the end bars; please do
not unscrew them any further.
- The door gym must be mounted by an adult and then inspected for stability.
- Caution! The door frame may be damaged during installation.
Paint traces or damage of the door frame may occur when tightened
too fast.
- The entire rubber surface at the ends of the gym must be positioned on the door frame.
- Use screws to attach the door bar to the doorframe for increased stability.
- Caution! For safety reasons the exercises with the expanders are only
permitted when the article is screwed into the doorframe and when
used in conjunction with the safety brackets.
- Please check the condition of the door frame. The gym is suitable for door frames
with a minimum width of 72 cm and a maximum width of 98 cm. Please ensure that
the wall behind the door frame is made from brick or concrete so that the pressure can
be distributed across the wall and provide sufficient stability! Please do not mount the
door gym in plastic, aluminium or wooden door frames with a wall thickness of less
than 7 mm as such frames are not stable enough.
- The gym bar must always be mounted straight and centred. Inspect the gym in order
to ensure that it has not tilted.
- Do not fix to door frames situated close to stairs.
4
Page 5

Safety information about usage
- The use of this article is carried out at your own risk.
- This article must only be used by people who are familiar with the safety information.
- Check that the article is securely fixed (wedged) before each use.
- Do not load the article with more than a total load of 100 kg.
- Before each use, check again that the article is securely fixed, using pulling and
shaking movements.
- Not suitable for the attachment of dynamic accessories, for example, swings.
- Do not carry out any exercises in which your head points to the floor.
- Do not swing on the bar!
- The article must always be used by only one person at a time.
- The article is only suitable for private use.
- The article must only be used under adult supervision, and must not be used as a toy.
- Before you start each training session, check the apparatus for damage or wear and
tear. If you find, for example, cracks in the synthetic parts or in the cords, stop using the
apparatus. When you are checking please pay special attention to the elastic cords.
- If you have health problems, ask your doctor before you use the item. If during the
exercises you should feel unwell or experience discomfort, stop the exercises imme
diately and seek medical advice!
- Pregnant women should only carry out the training programme after consultation with
their doctor.
- Carry out the exercises with sufficient space between you and any objects or other
people that nobody can be injured.
- Always keep the expanders under tension and take care that they do not slip down!
- Always return the expanders to their starting position, slowly and under tension.
- The expanders are to be employed exclusively for use in connection with the door
exercise bar. The expanders must not be attached to any other item.
- The maximum stretched length of the expanders is 185 cm.
- Do not pull the expanders beyond the maximum stretched length of 185 cm.
- Never pull the expanders in the direction of your face and never wind them around
your head, neck or chest.
- Do not use the expanders for other purposes, for example, as a tether, a towrope or
similar.
- Keep the operating instructions in the vicinity of the training apparatus. These will serve
as a reference for the main exercises.
Technical Specifications
Overall weight: 1700 g
For doorframes between 72 cm and 98 cm
Stretching length: 120cm 140cm 160cm 185cm
Force: 32N 45N 48N 56N
5
Page 6
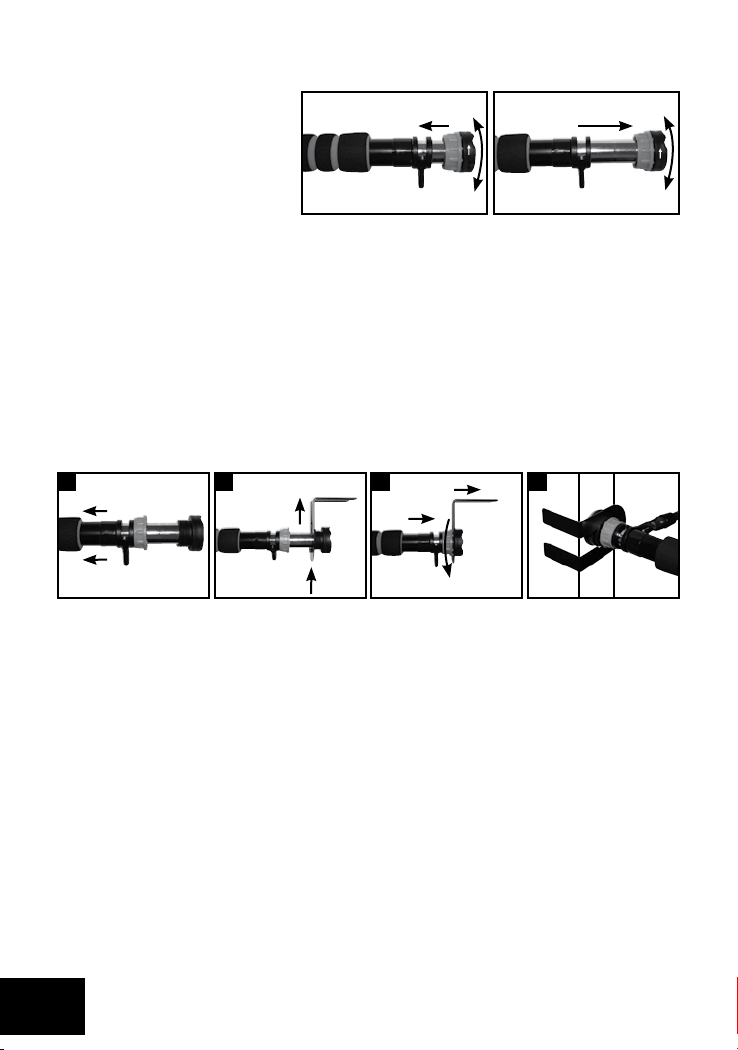
Opening and locking
The indicated turning direction
applies when the central bar is
held firm and the ends are turned
as indicated. Once the bar is
lightly fixed into the doorframe,
only the central part can be
turned and the turning direction
is reversed. Tighten the door exercise bar until it can no longer be moved when a tugging
load is applied (Note that a deformation of the doorframe may occur despite following
the instructions correctly)! The rubber surfaces at the ends of the door exercise bar must
always rest completely on the sides of the doorframe.
Open
Lock in position
Lock in positionOpen
Open
Lock in position
Installation with safety brackets
Caution! The use of the safety brackets is absolutely essential for exercises with the
expanders.
- Be careful when locking the door exercise bar into the doorframe that the brackets are
positioned directly opposite the direction in which the expanders will be pulled
(Illustration D).
B DA C
- Unscrew the red cap (Illustration A).
- Place the supplied safety brackets on the door exercise bar (Illustration B).
- Screw the safety brackets on to the black end cap and screw both parts back together.
Do not screw up tightly because the safety brackets must be able to turn freely for later
installation into the doorframe. Insert the end cap with the safety bracket back onto the
door exercise bar (Illustration C).
- After locking the door exercise bar into the doorframe, tighten the screws of the safety
brackets firmly.
Tools required
To screw the door exercise bar into the doorframe, you will need a crosshead screwdriver
and a suitable corresponding drill.
6
Page 7
Bolting of safety caps in door frame
Caution: This will cause permanent damage to
your doorframe because of the drilled holes!
The door bar must be bolted firmly into the door frame with the
enclosed bolting material. The bolting provides a higher standard
of safety during training and is required (obligatory).
Please note the following: Pre-drill the two holes with a small drill
(1 - 2 mm) to alleviate the screwing in. Then attach the safety caps by screwing them in
firmly using the half-round screw. Please ensure that the holes are at the same height so
that the bar sits horizontally as the ideal use and stability is otherwise restricted.
Then mount the bar.
←72-98 cm→
Training advice
- The following exercises are only a selection of those possible. You can find more in
appropriate specialist publications.
- Wear comfortable sports clothing and trainers.
- Warm up before each training session. Walking or running on the spot, stretching and
gentle expansion exercises are suitable as a warm-up.
- Carry out the exercises at an even pace. Breathe evenly. Adhere to the movement
sequence and do not overestimate your ability. Breathe out when your muscles are
contracting and breathe in when your muscles are relaxed.
Advice! If you develop medical complaints or feel unwell, stop the
exercise immediately and seek medical advice.
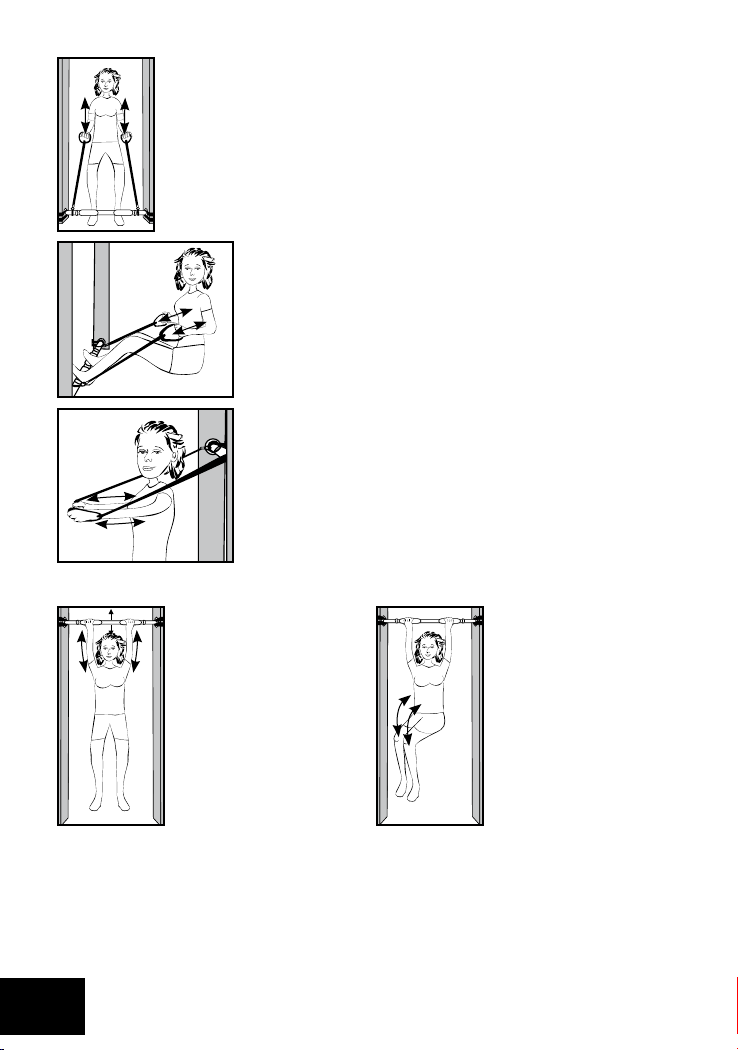
Exercices
For optimal results, carry out 3 – 5 sets with 7 – 20 repetitions per exercise.
This training should be repeated 2 – 3 times per week.
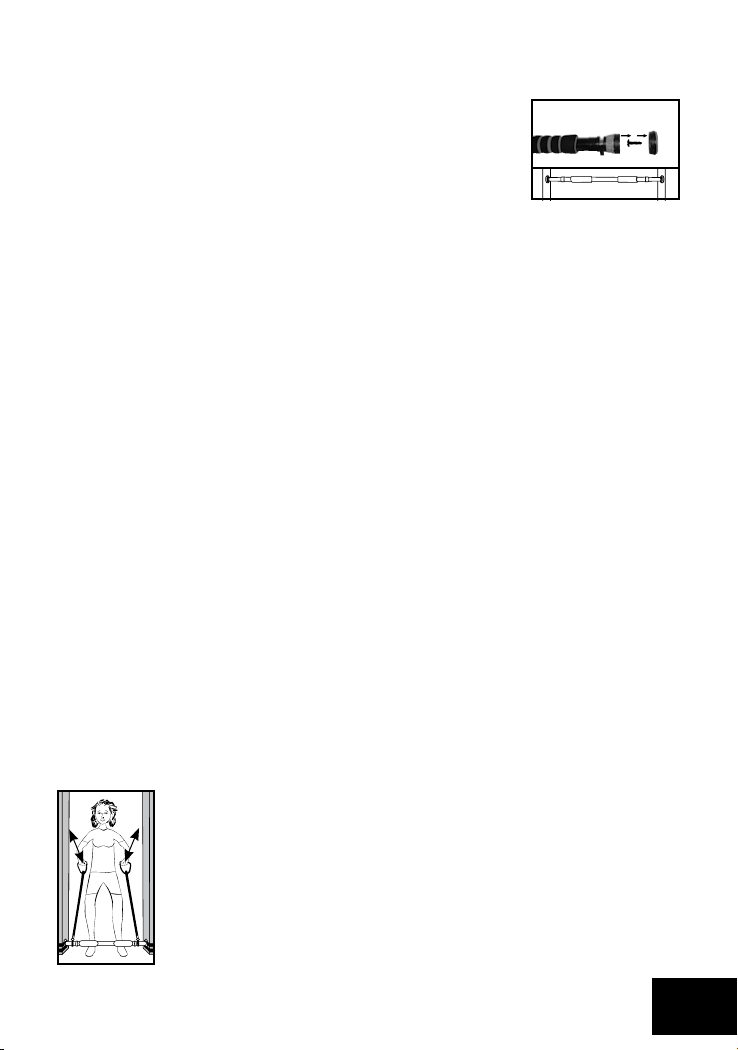
Exercises using the door exercise bar with the expanders
Caution! These expander exercises must only be carried out when the
article is screwed into the doorframe and with the use of the safety
brackets (see Page 6).
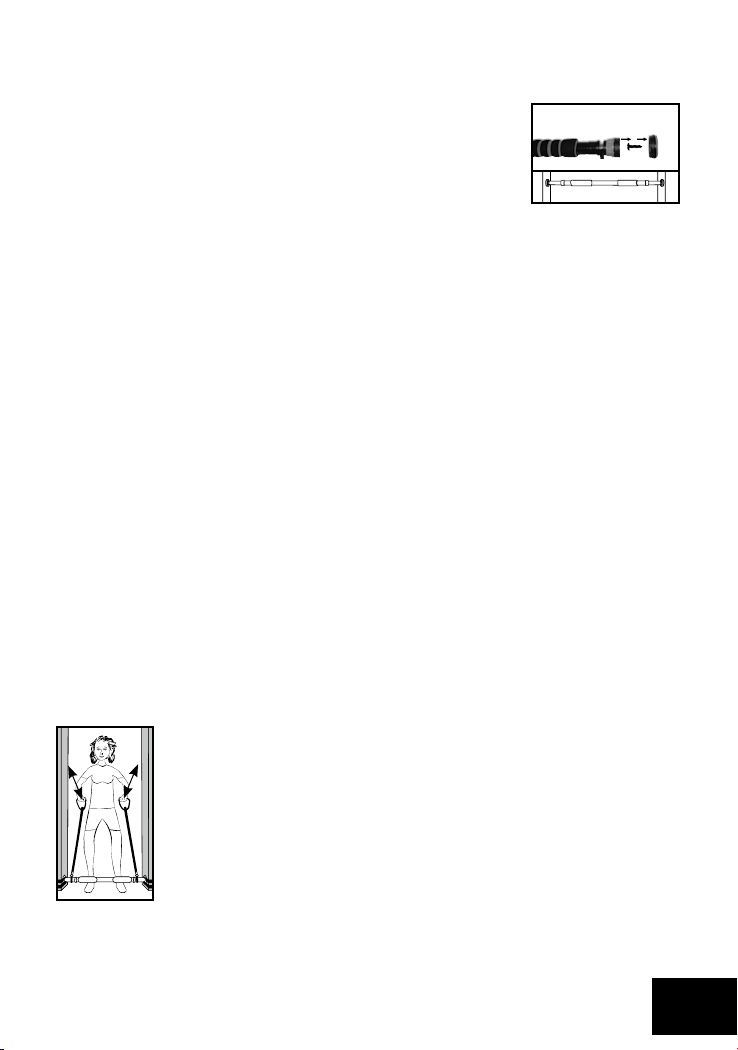
Shoulders
Mount the door exercise bar in the indicated position in the lower part of
the doorframe. Stand directly in front of the door exercise bar, keeping
your upper body upright. Hold the handles at hip height. With your arms
in front of your body, pull the expanders vertically upwards to chest
height. Whilst doing this, point your elbows outwards.
Finally, lower the expanders back down to the level of your hips.
7
Page 8
Biceps
Mount the door exercise bar in the indicated position in the lower part of
the doorframe. Stand upright in front of the door exercise bar, with your
knees slightly bent. Your upper arms must be in contact with the sides of
your body, your back straight, and your lower arms holding the expanders tense. Pull your lower arms against the resistance of the expanders
up to your shoulder joints.
Back
Mount the door exercise bar in the indicated position in the
lower part of the doorframe. Sit down on the floor with your
back straight. With your knees slightly bent, hold the expanders at knee height. Now pull the expanders with your arms
raised up to chest height. During this exercise your shoulder
blades should be pulled toward each other and your back
should always remain straight.
Upper body
Mount the door exercise bar in the indicated position at shoulder height. Stand upright, with your back to the door exercise
bar, and your legs apart to the width of your hips. Hold the
expanders in front of your chest gently in tension. Now push
your arms forwards in a controlled movement. During this
exercise your back must always remain straight.
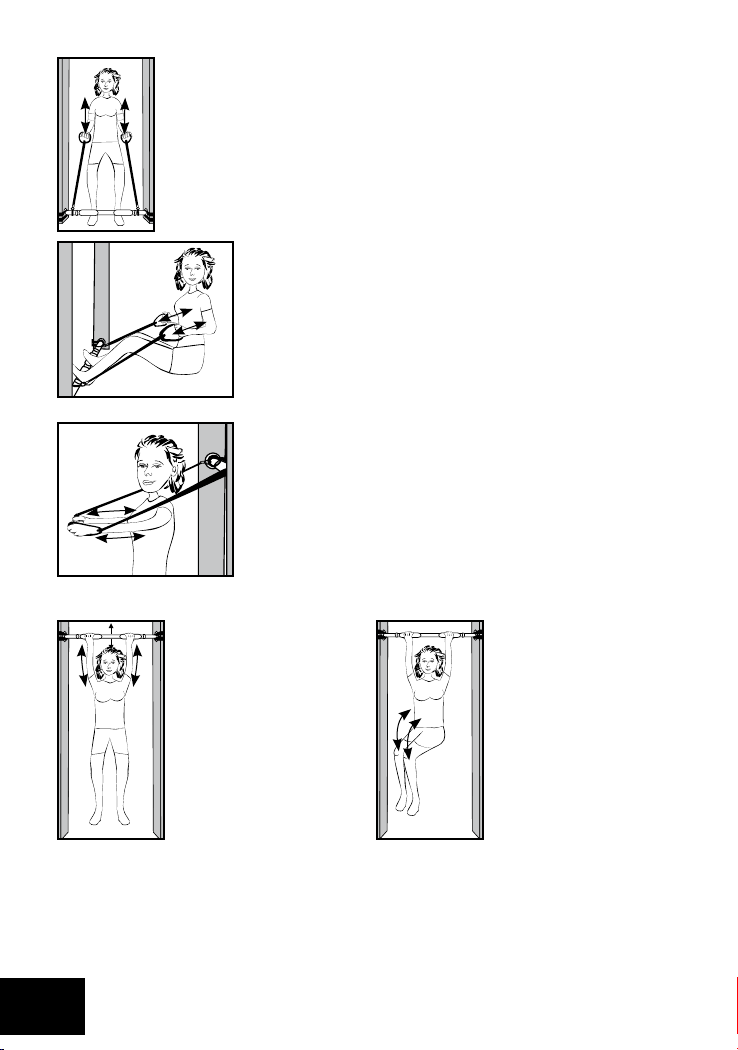
Exercises with the door exercise bar, without the expanders
Strengthening the
arms and chest
Pull-ups: Suspend yourself
from the bar, holding it
from underneath, keeping
the upper part of the body
stretched. Now pull yourself up with arms until you
can look over the bar.
Stretching the hips
and knee
Hold the bar from underneath, with the elbows at
an angle and the arms
fully extended. Slowly pull
one knee towards your
body, keeping your legs
together.
8
Page 9

Advice on disposal
Please dispose of the packaging and the article in an environmentally-friendly way, and
separated into types of material! Dispose of this item through an authorised disposal
company, or through your local authority waste disposal amenity.
Be sure to comply with the current, valid regulations.
Care and storage
Please remember that regular maintenance and cleaning of the product contributes to the
safety and maintenance of your door gym. Always store the article in a clean, dry place
at room temperature. Never clean with abrasive cleaning materials, only wipe clean with
a dry cleaning cloth.
3 Year guarantee
This product was manufactured under constant quality controls. We guarantee that it is
free from manufacturing and material defects. The guarantee claim is not valid for normal
wear and tear and is invalid in case of misuse.
Should you however have cause for complaint, please contact the free phone service hotline, visit our website, or send us an e-mail. You will receive personal advice in all cases.
During the guarantee period, you can arrange with our service staff that you send the
faulty component(s) to the stated service address. We will immediately replace or repair
the component, and send it back to you.
Please retain the till receipt. Describe the nature of your complaint, and we will do our
best to find a satisfactory solution as soon as possible.
IAN: 56462
Product hotline 00800-88080808 (Mon.-Fri. 10am – 4pm, free phone)
PSB LOGISTICS MANAGEMENT LTD • UNIT B3 SITE B
THE BOWMAN CENTRE ARNCOTT, OX25 1NZ OXON
gb@nws-service.com
www.nws-service.com
9
Page 10

Przed użyciem przeczytaj dokładnie instrukcję obsługi. Zachowaj ją konie cznie
w celu późniejszego przeczytania!
Nieprzestrzeganie wskazówek dotyczących bezpieczeństwa może
być przyczyną poważnych obrażeń
Zakres dostawy
1 x Drążek rozporowy 2 x uchwyt bezpieczeństwa 1 x Instrukcja obsługi
2 x ekspander 2 x śruba i pierścienie z tworzywa sztucznego do przykręcenia do
ramy drzwiowej
Przeznaczone do określonego użytkowania
Artykuł ten to sprzęt sportowy do zamontowywania w ramie drzwi z max. szer. 98 cm,
a który nie jest przeznaczony do profesjonalnego treningu i ćwiczeń gimnastycznych.
Ekspandery służą do rozciągania i wzmacniania różnych grup mięśniowych. Produkt nie
jest przeznaczony dla dzieci poniżej 14 roku życia, ponieważ nie są one w stanie ocenić
potencjalnych zagrożeń. Poza tym Türreck zawiera elementy, które dzieci mogą połknąć.
Wskazówki bezpieczeństwa do montaż
- Maksymalna szerokość rozkręcenia wynosząca 98 cm jest zaznaczona na obydwu
drążkach końcowych - nie należy wykręcać dalej.
- Montaż musi zostać przeprowadzony przez osobę dorosłą, która następnie musi
sprawdzić mocne zamocowanie.
- Uwaga! Rama drzwi może w trakcie montażu zostać uszkodzona.
Zbyt silne dokręcanie może spowodować uszkodzenia farby lub
ramy.
- Powierzchnie gumowe na końcach drążka muszą zawsze całkowicie przylegać do
futryny drzwi.
- Montaż za pomocą śrub w futrynie drzwiowej oferuje wyższą wytrzymałość.
- Uwaga! Ćwiczenia z ekspanderem ze względów bezpieczeństwa można
wykonywać tylko wtedy, gdy artykuł jest przykręcony do ramy drzwio wej oraz z zastosowaniem uchwytu bezpieczeństwa.
- Proszę sprawdzić właściwości futryny drzwi. Drążek gimnastyczny nadaje się do
futryn drzwi o szerokości, co najmniej 72 cm i maksymalnie 98 cm. Proszę sprawdzić,
czy ściana za futryną drzwi wykonana jest z betonu lub cegieł, aby nacisk mógł
rozłożyć się na ścianie i aby zapewniona była wystarczająca stabilność! Jeżeli futryna
drzwi wykonana jest z tworzywa sztucznego, aluminium lub drewna i ma grubość
ścianek poniżej 7 mm, nie należy montować drążka, gdyż futryna w takim przypadku
nie będzie najprawdopodobniej wystarczająco stabilna.
- Drążek gimnastyczny musi być montowany zawsze prosto i w środku.
Sprawdzić, czy drążek nie jest zakleszczony.
- Nie mocować we futrynach w pobliżu schodów.
10
Page 11

Wskazówki bezpieczeństwa do użytkowania
- Korzystanie z artykułu odbywa się na własną odpowiedzialność.
- Z niniejszego artykułu mogą korzystać tylko osoby, które zapoznały się ze
wskazówkami dotyczącymi bezpieczeństwa.
- Przed każdym użyciem należy sprawdzić mocowanie (zaciśnięcie).
- Nie wolno przekraczać maks. obciążenia drążka 100 kg!
- Przed każdym użyciem sprawdzić raz jeszcze wytrzymałość przez zdecydowane
„pociągnięcie“ i „wstrząśnięcie“ drążka.
- Nie nadaje się do mocowania elementów dynamicznych, jak np. huśtawki.
- Nie wykonywać żadnych ćwiczeń z głową skierowaną do dołu.
- Nie kołysać się!
- Artykuł może być używany tylko przez jedną osobę.
- Artykuł przeznaczony jest wyłącznie do użytku prywatnego.
- Produkt można stosować tylko pod nadzorem osób dorosłych i nie należy używać go
jako zabawki.
- Sprawdzaj przyrządy treningowe przed każdym rozpoczęciem treningu pod
względem uszkodzeń i zużycia. W przypadku zauważenia np. pęknięć na
elementach z tworzywa sztucznego lub na linkach nie korzystaj z urządzenia.
Podczas kontroli zwróć szczególną uwagę na linki gumowe.
- W przypadku problemów zdrowotnych skonsultuj się z lekarzem, zanim zaczniesz
korzystać z produktu. Jeśli podczas ćwiczeń nastąpi pogorszenie samopoczucia lub
pojawią się dolegliwości, przerwij natychmiast ćwiczenia i skonsultuj się z lekarzem!
- Kobiety w ciąży mogą uczestniczyć w treningu tylko po konsultacji ze swoim lekarzem.
- Prowadź ćwiczenia w odpowiednim odstępie od przedmiotów i innych osób, tak żeby
nikt nie odniósł obrażeń.
- Utrzymuj ekspandery zawsze rozciągnięte i uważaj, aby się nie poślizgnąć!
- Prowadź ekspandery do pozycji wyjściowej zawsze powoli i przy naprężeniu.
- Ekspandery należy stosować wyłącznie razem z drążkiem drzwiowym.
Ekspanderów nie wolno mocować na żadnych innych przedmiotach.
- Maksymalna długość rozciągania ekspanderów wynosi 185 cm.
- Nie przeciągaj ekspanderów powyżej maksymalnej długości rozciągania 185 cm.
- Nigdy nie rozciągaj ekspanderów w kierunku twarzy i nie okręcaj ich nigdy wokół
głowy, szyi, ani klatki piersiowej.
- Nie stosuj ekspanderów do innych celów np. jako liny napinającej, liny holowniczej itp.
- Przechowuj niniejszą instrukcję zawsze w pobliżu przyrządu treningowego.
To pozwala sprawdzać ćwiczenia główne.
Dane techniczne
Ciężar całkowity: 1700g
do ramy drzwiowej: 72 cm – 98 cm
Długość rozciągnięcia: 120cm 140cm 160cm 185cm
Siła: 32N 45N 48N 56N
11
Page 12

Otwieranie i blokowanie
Wskazany kierunek obrotu
obowiązuje, jeśli środek drążka
Otwieranie
zostanie przytrzymany, a
końcówki przekręcone jak
pokazano na rysunku.
Z chwilą, kiedy drążek zostanie
lekko zamocowany w ramie,
można przekręcić tylko część środkową a kierunek obrotu ulegnie zmianie.
Dokręć drążek drzwiowy tak mocno, żeby nie można go było przesunąć nawet przy
gwałtownym pociągnięciu (Zwróć uwagę, że może dojść do odkształcenia ramy
drzwiowej mimo obsługi zgodnej z instrukcją)! Powierzchnie gumowe na końcach
drążka muszą zawsze przylegać całkowicie do ramy drzwiowej.
Otwieranie
Blokowanie
Blokowanie
Otwieranie
Blokowanie
Montaż z uchwytem bezpieczeństwa
Uwaga! Bezwzględnie wymagane jest zastosowanie uchwytu bezpieczeństwa podczas
ćwiczeń z ekspanderem.
- Podczas mocowania drążka w ramie drzwiowej zwróć uwagę, aby uchwyty zostały
umieszczone przeciwnie do kierunku naciągania ekspandera (rys. D).
B DA C
- Odkręć czerwoną nasadkę (rys. A).
- Nałóż dołączony uchwyt bezpieczeństwa na drążek drzwiowy (rys. B).
- Następnie wsuń uchwyt bezpieczeństwa na nasadkę końcową i ponownie połącz
oba elementy śrubami. Nie dokręcaj połączenia śrubowego do końca, ponieważ
uchwyt bezpieczeństwa musi się swobodnie obracać w celu zamontowania w ramie
drzwiowej. Następnie nałóż ponownie nasadkę końcową z uchwytem
bezpieczeństwa na drążek drzwiowy (rys. C).
- Po zamocowaniu drążka w ramie drzwiowej dokręć mocno złącze śrubowe uchwytu
bezpieczeństwa.
Lista narzędzi
Do przykręcenia w ramie drzwiowej potrzebny jest śrubokręt krzyżakowy oraz
odpowiednie wiertło.
12
Page 13
Przymocowanie nakładek bezpieczeństwa w futrynie
Uwaga: W ten sposób dojdzie do trwałego
uszkodzenia ramy drzwiowej na skutek
wywierconych otworów!
Drążek do drzewi należy przymocować przy pomocy
dostarczonego materiału mocującego do framugi.
Umocowanie oferuje wyższe bezpieczeństwo podczas treningu i
jest niezbędne. Przy montażu należy zwrócić uwagę na następujące czynności: przed
umocowaniem należy wywiercić małe dziurki (1-2 mm), aby ułatwić wkręcanie.
Przy montażu należy zwrócić uwagę na następujące czynności: przed umocowaniem należy
wywiercić małe dziurki (1-2 mm), aby ułatwić wkręcanie. Następnie przykręcić nakładki
bezpieczeństwa do śruby z półokrągłą główką. Należy zwrócić uwagę, żeby dziurki
znajdowały się na tej samej wysokości, aby drążek wisiał równo. W innym przypadku
ograniczone jest optymalne użycie i stabilność. Następnie zamontować drążek.
←72-98 cm→
Wskazówki treningowe
- Poniższe ćwiczenia są jedynie przykładami. Więcej ćwiczeń znajdą Państwo we
właściwej fachowej literaturze.
- Nosić wygodną odzież i obuwie sportowe.
- Przed każdym treningiem przeprowadź odpowiednią rozgrzewkę. Chodzenie lub bieg w
miejscu, stretching oraz lekkie ćwiczenia rozciągające to idealne sposoby na rozgrzewkę
- Ćwiczenia muszą być wykonywane w równomiernym tempie, ze spokojnym oddechem.
Proszę przestrzegać przebiegów cykli i nie przekraczać swoich możliwości.
Podczas naprężania mięśni wydychać powietrze, podczas ich rozluźniania – wdychać je.
Uwaga: W razie dolegliwości lub złego samopoczucia należy natychmiast
przerwać ćwiczenie i skontaktować się z lekarzem.
Ćwiczenie
Optymalny wynik ćwiczeń można osiągnąć przez wykonywanie 3 do 5 serii ćwiczeń po
7 do 20 powtórzeń każda. Takie ćwiczenia należy powtarzać 2 do 3 razy w tygodniu.
Ćwiczenia z drążkiem i ekspanderem
Uwaga! Ćwiczenia z ekspanderem można wykonywać tylko wtedy, gdy
artykuł jest przykręcony do ramy drzwiowej oraz z zastosowaniem uchwytu
bezpieczeństwa (zobacz strona 12).
Ramiona
Zamocuj drążek drzwiowy w przedstawionej pozycji w dolnej części
ramy drzwiowej. Stań w wyprostowanej pozycji bezpośrednio przed
drążkiem drzwiowym. Trzymaj uchwyty na wysokości bioder.
Pociągnij ekspandery rękami przed sobą, aż na wysokość klatki piersiowej pionowo do góry. Łokcie powinny być skierowane na zewnątrz.
Następnie opuścić ekspandery ponownie na wysokość bioder.
13
Page 14
Biceps
Zamocuj drążek drzwiowy w przedstawionej pozycji w dolnej części
ramy drzwiowej. Stań wyprostowany przed drążkiem drzwiowym,
ugnij lekko nogi. Ramiona przylegają do ciała, plecy wyprostowane,
przedramiona utrzymują naprężone ekspandery. Przezwyciężając opór
ekspanderów pociągnij przedramiona do stawu barkowego.
Plecy
Zamocuj drążek drzwiowy w przedstawionej pozycji w dolnej
części ramy drzwiowej. Usiądź na podłodze utrzymując plecy
wyprostowane. Nogi lekko ugięte, chwycić ekspandery na
wysokości kolan. Pociągnij teraz ekspandery rękami aż na
wysokość klatki piersiowej. Łopatki zostaną ściągnięte a plecy
pozostają zawsze wyprostowane.
Górna część ciała
Zamocuj drążek drzwiowy w przedstawionej pozycji na
wysokości ramion. Stań wyprostowany, plecami do drążka
drzwiowego, nogi rozsunięte na szerokość bioder.
Utrzymuj lekko naprężone ekspandery przed klatką
piersiową. Prowadź teraz ręce kontrolowanym ruchem do
przodu. Plecy pozostają ciągle wyprostowane.
Ćwiczenia z drążkiem bez ekspandera
Wzmacnianie ramion
i klatki piersiowej
Podciągi: należy zaczepić
się dłońmi na drążku z
wyprostowaną górną
częścią ciała, chwytając
od spodu. Podciągnąć się
teraz na ramionach do
góry, aż oczy znajdą się
ponad drążkiem.
Rozciąganie bioder i
kolan
Chwycić drążek od tyłu
(od spodu). Zgiąć kolana i
wyprostować ramiona na
całą długość. Podciągnąć
kolana powoli do ciała,
trzymając przy tym nogi
złączone ze sobą.
14
Page 15

Uwagi odnośnie recyklingu
Opakowanie i artykuł usunąć zgodnie z przepisami o ochronie środowiska!
Artykuł oddać do utylizacji w autoryzowanym zakładzie oczyszczania i przetwarzania
odpadów lub do odpowiedniej jednostki w gminie. Prosimy stosować się do aktualnie
obowiązujących przepisów.
Pielęgnacja, magazynowanie
Proszę pamiętać, że regularna konserwacja i czyszczenie przyczyniają się do
zapewnienia bezpieczeństwa i trwałości drążka gimnastycznego.
Artykuł ten należy przechowywać w miejscu suchym i czystym w temperaturze
pokojowej. Nie czyścić nigdy przy pomocy ostrych środków czyszczących, wystarczy
tylko przetrzeć na sucho czystą ściereczką.
3-letnia gwarancja
Niniejszy produkt został wyprodukowany z zachowaniem stałej kontroli jakości.
Gwarantujemy, że jest on wolny od wad produkcyjnych i materiałowych.
Roszczenia gwarancyjne nie dotyczą normalnego zużycia i niewłaściwego
obchodzenia się z produktem.
Gdyby zaistniał jednak powód do reklamacji, prosimy o skorzystanie z bezpłatnej
infolinii serwisowej, z adresu na stronie internetowej, bądź wysłanie maila.
Otrzymają Państwo indywidualną poradę. W okresie objętym gwarancją można
również, po konsultacji z naszym doradcą serwisowym, wysłać uszkodzone części na
podany adres serwisowy na koszt odbiorcy. Niezwłocznie otrzymają Państwo bezpłatnie
nową lub naprawioną część .
Prosimy o zachowanie paragonu zakupu. Prosimy o opisanie powodu Państwa reklamacji. Tak szybko, jak to możliwe spróbujemy znaleźć zadawalające rozwiązanie.
IAN: 56462
Infolinia ds. Produktu 00800-4911384
(poniedziałek - piątek w godzinach 10 - 16, bezpłatnie)
Bogusław Możdżonek • ul.Jawirskiego 21B / 28 • 05-520 Konstancin - Jeziorna
pl@nws-service.com
www.nws-service.com
15
Page 16

Használat előtt figyelmesen olvassa el az útmutatót és a későbbiekben
felmerülő kérdései esetére őrizze meg!
A biztonsági utasítások figyelmen kívül hagyása súlyos
sérülésekhez vezethet
A csomag tartalma
1 Húzódzkodó 2 db biztonsági kengyel 1 Használati útmutató
2 db expander 2 db csavar és műanyag gyűrű az ajtókeretbe csavarozáshoz
Rendeltetésszerű használat
A termék egy max. 98 cm széles ajtókeretben rögzíthető sporteszköz, ami nem alkalmas
professzionális edzéshez és gimnasztikai gyakorlatokhoz. Az expander különböző izomcsoportok nyújtására, erősítésére szolgál. Nem alkalmas 14 év alatti gyerekek számára, mert a
gyerekek nem tudják felmérni a lehetséges veszélyeket.
Ezen kívül a húzódzkodó apró alkatrészeket is tartalmaz, amelyeket a gyermekek
lenyelhetnek.
Biztonsági útmutató az összeszereléshez
- A 98 cm maximális távolságot a rúd mindkét végén megjelöltük. Kérjük, ennél
tovább ne húzza ki.
- A szerelést egy felnőtt végezze, és ellenőrizze a megfelelő stabilitást.
- Figyelem! Szerelés közben az ajtókeret károsodhat. A túl szoros
rögzítés színnyomokat vagy egyéb károsodásokat okozhat.
- Ellenőrizze, hogy a húzódzkodó rúd végein található végzáró gumifelületek
teljesen felfeküdjenek az ajtókeret felületére.
- Az ajtótokba csavarozott húzódzkodó rúd nagyobb stabilitást nyújt.
- Figyelem! Biztonsági okokból az expanderrel gyakorlatokat végezni
csak a termék ajtókeretbe csavarozása és a biztonsági kengyel
használata mellett szabad.
- Kérjük, ellenőrizze az ajtókeret állapotát. A húzódzkodó min. 72 cm, max. 98 cm
széles ajtókeretekhez használható. Kérjük győződjön meg róla, hogy beton- vagy
téglafalba építették az ajtókeretet, mert csak így biztosított a megfelelő stabilitás!
7 mm-nél keskenyebb falba épített műanyag, alumínium vagy fa ajtókeretbe ne
szerelje fel a húzódzkodó rudat, mert a keret valószínűleg nem lesz elég stabil.
- Ügyeljen a húzódzkodó vízszintes és centrikus rögzítésére. Ellenőrizze, hogy a
húzódzkodó rúd végein található végzáró gumifelületek teljesen felfeküdjenek az
ajtókeret felületére.
- Ne használja lépcsők közelében lévő ajtókeretben.
16
Page 17

Biztonsági útmutató a használathoz
- A terméket mindenki saját felelősségére használhatja.
- A terméket használni csak a biztonsági utasítások ismeretében szabad.
- A nyújtó rögzítését (megfeszülését) minden használat előtt ellenőrizni kell.
- A terméket nem szabad 100 kg-nál nagyobb súllyal terhelni.
- A feszességet minden használat előtt a terméken húzó és rázó mozgásokkal
ellenőrizni kell.
- Nem alkalmas mozgó részek (például hinta) tartására.
- A gyakorlatok végzése közben a fej soha nem irányulhat a föld felé.
- Ne végezzen lengéseket!
- A terméket egyszerre mindig csak egy személy használhatja.
- A termék csak magán célú használatra alkalmas.
- A termék nem játékszer, csak felnőtt felügyelete mellett használható.
- Minden edzés előtt ellenőrizze, hogy nincs-e az eszközön sérülés vagy kopás.
Ne használja többé az eszközt, ha például a műanyag részeken vagy a kötélen
repedéseket vesz észre. Fordítson különös gondot a gumikötél ellenőrzésére.
- Egészségügyi gondok esetén a termék használata előtt kérje ki orvosa tanácsát.
Azonnal hagyja abba a gyakorlást, ha közben rosszullétet érez vagy egyéb panasza
van, és forduljon orvoshoz!
- Várandós állapotban csak az orvos beleegyezésével szabad az edzést végezni.
- A gyakorlatokat más személyektől és tárgyaktól kellő távolságban végezze, hogy
senki ne sérülhessen meg.
- Az expandert mindig fogja jól húzáskor és ügyeljen, nehogy kicsússzon!
- Az expandert mindig lassan és feszesen tartva vezesse vissza a kiinduló helyzetbe.
- Az expandert csakis az ajtóra szerelt nyújtóval együtt szabad használni.
Az expandert más tárgyakhoz nem szabad rögzíteni.
- Az expander legfeljebb 185 cm-re nyújtható.
- Az expander húzásakor a 185 cm-es legnagyobb megengedett nyúlást ne lépje túl.
- Az arc irányába soha ne húzza az expandert, az expandert fejre, nyakra vagy mellre
tekerni nem szabad.
- Más célra (feszítőkötél, vontatókötél és hasonlók) ne használja az expandert.
- A használati utasítást tartsa az edzőkészülék közelében. A fontosabb gyakorlatok
leírása ebben található.
Műszaki Adatok
Teljes tömeg: 1700 g
Megfelelő ajtókeret méret: 72 cm - 98 cm
Nyúláshossz: 120cm 140cm 160cm 185cm
Erő: 32N 45N 48N 56N
17
Page 18

Oldás és rögzítés
Az ábrázolt forgásirányhoz a
középső rudat meg kell tartani,
és a végeket kell a mutatott
irányba elfordítani. Miután a rúd
egy kissé belefeszült a keretbe,
át lehet térni a középső rúd
forgatására, ekkor a forgásirány
ellenkező lesz. A nyújtót olyan erősen húzza meg, hogy az már a lökésszerű, hirtelen
terhelésre se mozduljon meg (Ne feledje, hogy az ajtókeret még rendeltetésszerű
használat esetén is deformálódhat)! A nyújtó két végén lévő gumifelületnek teljesen fel
kell feküdnie az ajtókeretre.
Nyitás
Rögzítés
RögzítésNyitás
Nyitás
Rögzítés
Szerelés biztonsági kengyellel
Figyelem! A biztonsági kengyel használata az expanderes gyakorlatok esetén feltétlenül
szükséges.
- A nyújtónak az ajtókeretben történő rögzítésekor ügyeljen arra, hogy a kengyelt az
expander húzási irányával szemben helyezze el (D kép).
B DA C
- A piros kupakot csavarja le (A kép).
- Helyezze fel a csomagban talált kengyelt a nyújtóra (B kép).
Végül húzza a biztonsági kengyelt a fekete zárókupakra, és a két részt ismét csavarja
össze. Ne húzza meg teljesen szorosra, mert a biztonsági kengyelnek még szabadon
mozgathatónak kell lennie az ajtókeretbe történő szereléskor. Végül helyezze vissza a
zárókupakot a rászerelt kengyellel a nyújtóra (C kép).
- A biztonsági kengyelt húzza rá szorosan, miután a nyújtót az ajtókeretben rögzítette.
Szükséges szerszámok
Az ajtókeretbe történő csavarozáshoz szüksége lesz egy kereszthornyos csavarhúzóra és
egy hozzá megfelelő fúróra.
18
Page 19

A biztonsági kupakok ajtókerethez való csavarozása
Figyelem: A fúrt lyukakkal az ajtókeretben
maradandó rongálást okoz!
Az ajtókeretbe szerelhető nyújtót a mellékelt csavarozási
anyaggal szorosan az ajtókerethez kell csavarozni.
A csavarozás nagyobb biztonságot kínál az edzés folyamán és
feltétlenül szükséges. Ennek során kérjük vegye figyelembe a
következőket: Készítsen egy kis fúróval (1 – 2 mm) két furatot a becsavarozás
mekönnyítésére. Csavarozza a biztonsági kupakokat a félgömbfejű csavarokkal
szorosan oda. Kérjük ügyeljen arra, hogy a furatok azonos magasságban legyenek a
nyújtó vízszintes helyzete érdekében, más esetben az optimális használat és a szilárdság
nem biztosított. Ezután szerelje fel a nyújtót.
←72-98 cm→
Edzési útmutató
- Az alábbi gyakorlatok csak egy kis válogatást jelentenek, további gyakorlatokat az
idevágó szakirodalomban találhat.
- Viseljen kényelmes sportruházatot és tornacipőt.
- Edzés előtt mindig melegítsen be. Bemelegítésnek megfelelő a helyben járás vagy
futás, nyújtógyakorlatok és könnyű hajlítások.
- A gyakorlatokat egyenletes tempóban végezze. Lélegezzen nyugodtan.
Tartsa magát a leírt mozgássorokhoz, és ne becsülje túl magát! Az izmok
megfeszítésekor lélegezzen ki, és az izmok ellazításakor lélegezzen be.
Utasítás: Panasz vagy rosszullét esetén azonnal hagyja abba az edzést
és forduljon orvosához.
Gyakorlatok
Az optimális eredmény eléréséhez a gyakorlatokat 3 - 5 sorozatban, 7 - 20 ismétléssel
végezze, hetente kétszer – háromszor.
Expanderes gyakorlatok a nyújtóval
Figyelem! Az expanderrel ezeket a gyakorlatokat csak a termék
ajtókeretbe csavarozása és a biztonsági kengyel használata mellett
szabad végezni (lásd 18. oldal).
Váll
Az ábrázolt helyzetben rögzítse a nyújtót az ajtókeret alsó részén.
Egyenes felsőtesttel álljon közvetlenül a nyújtó elé. Tartsa a markolatot
csípőmagasságban. A karokkal húzza az expandert függőlegesen felfelé
a törzs előtt egészen mellmagasságig. A könyök közben kifelé mutat.
Végül engedje vissza az expandert csípőmagasságba.
19
Page 20

Bicepsz
Az ábrázolt helyzetben rögzítse a nyújtót az ajtókeret alsó részén.
Álljon egyenesen a nyújtó elé, lábak enyhén hajlítva.
A felkar a törzshöz ér, a hát egyenes, alkarjával tartsa feszesen
az expandert. Húzza alkarját az expander ellenállása ellenében
a vállízülethez.
Hát
Az ábrázolt helyzetben rögzítse a nyújtót az ajtókeret alsó
részén. Egyenes háttal üljön a talajra. Lábak enyhén meghajlítva, az expandert térdmagasságban fogja meg.
Most húzza az expandert karjaival egészen mellmagasságig.
Eközben a lapockák összehúzódnak, a hát végig egyenes.
Felsőtest
Az ábrázolt helyzetben rögzítse a nyújtót vállmagasságban. Álljon fel egyenesen, háttal a nyújtónak, a lábak
csípőszélességű terpeszben. Tartsa az expandert mell előtt
kicsit feszesen. Most tolja karjait irányított mozdulattal előre.
Hát végig egyenes.
Expander nélküli gyakorlatok a nyújtóval
Kar- és mellizom
erősítése
Húzódzkodás: Fogja meg
a rudat alsó fogással,
nyújtott felsőtesttel.
Húzza fel magát addig,
hogy átlásson a rúd felett.
Csípő és térd nyújtása
Fogja meg a rudat hátulról
(alsó fogás). A karjait
nyújtva tartva húzza fel
térdeit lassan a testéhez,
zárt lábbal.
20
Page 21

Tudnivalók a hulladékkezelésről
Kérjük, hogy a terméket és a csomagolást a környezetet kímélve, fajta szerint válogatva
kezelje! A terméket csak engedélyezett hulladékkezelő üzemen, vagy a kommunális
szemétfeldolgozón keresztül ártalmatlanítsa. Vegye figyelembe az érvényes előírásokat.
Tisztítás, tárolás
Kérjük, soha ne feledkezzen meg arról, hogy a rendszeres karbantartás és tisztítás
hozzájárul a húzódzkodó rúd hosszútávú és biztonságos használatához. A terméket
mindig tisztán és szárazon, fűtött helyiségben tárolja. Soha ne tisztítsa súroló hatású
tisztítószerekkel, csak egy száraz ruhával törölje tisztára.
3 év garancia
A terméket folyamatos minőség-ellenőrzés mellett gyártjuk. Garantáljuk, hogy mentes az
anyag- és gyártási hibáktól. A garancia nem vonatkozik a normális elhasználódásra, és
szakszerűtlen kezelés esetén megszűnik.
Amennyiben Önnek mégis oka lenne panaszra, forduljon az ingyenes szerviz-vonalunkhoz, a honlapunkhoz, vagy írjon egy e-mailt. Minden esetben személyes tanácsadást
nyújtunk Önnek. A garanciaidő alatt a meghibásodott alkatrészeket a szervizmunkatársunkkal való egyeztetés után, nem ingyenesen, a megadott szervizcímre lehet beküldeni.
Ön a legrövidebb időn belül egy új vagy javított alkatrészt kap ingyen vissza.
Kérjük, őrizze meg a pénztárblokkot. Írja le panasza okát. Megpróbálunk, amilyen
gyorsan csak lehetséges, kielégítő megoldást találni.
IAN: 56462
Termék hotline 00800-88080808 (H-P 10 - 16 óráig, díjmentes)
H.I.D. Sport Kft • Mester ut. 10a • H-5000 Szolnok
hu@nws-service.com
www.nws-service.com
21
Page 22

Pred uporabo skrbno preberite navodila za uporabo. Obvezno jih shranite
za poznejšo morebitno ponovno branje!
Neupoštevanje varnostnih navodil lahko pripelje do resnih poškodb.
Obseg dobave
1 x Drog za med vrata 2 x varnostna prečka 1 x Navodilo za uporabo
2 x ekspander 2 x vijak in plastični obročki za pritrditev z vijaki v vratno ogrodje
Namen uporabe
Izdelek je športna naprava za montažo na vratni podboj z maks. širino do 98 cm, ni
primeren za profesionalni trening in gimnastične vaje. Ekspanderja služita raztezanju in
krepitvi različnih mišičnih skupin. Ni primeren za otroke mlajše od 14 let, ker otroci ne
morejo presoditi potencialne nevarnosti. Razen tega drog za med vrata vsebuje majhne
dele, ki jih otroci lahko pogoltnejo.
Varnostni napotki za montažo
- Maksimalna raztezna širina 98 cm je označena na koncih droga, več kot 98 cm ni
dovoljeno razširiti.
- Montažo naj izvaja odrasla oseba. Preverite trdnost.
- Pozor! Pri montaži lahko poškodujete podboj. Če premočno privijate,
lahko na podboju ostanejo sledi barve ali poškodb.
- Gumijasta površina na koncu droga mora vedno v celotni ležati na podboju.
- Montaža z vijačenjem v vratni podboj nudi večjo čvrstost.
- Pozor! Vaje z ekspanderjem so iz varnostnih razlogov dovoljene samo s
pritrditvijo izdelka v vratno ogrodje z uporabo varnostne prečke.
- Prosimo preverite stanje podboja. Drog je primeren za podboj minimalne širine 72 cm
in maksimalne širine 98 cm. Preverite, če je stena, v katero je montiran podboj,
grajena iz betona ali zidakov, saj se pritisk na steno lahko porazdeli in zagotavlja
zadostno stabilnost. Če je podboj iz umetne mase, aluminija ali lesa debeline manj kot
7 mm, droga ne smete montirati, ker podboj verjetno ni dovolj stabilen.
- Drog vedno montirajte naravnost in na sredino. Preverite robove droga.
- Ne nameščajte na podboj v bližini stopnic.
22
Page 23

Varnostni napotki za uporabo
- Uporaba izdelka na lastno odgovornost.
- Ta proizvod lahko uporabljajo samo osebe, ki so seznanjene z varnostnimi navodili.
- Pred vsako uporabo preverite pritrditev (zapahnitev).
- Proizvod ne obremenite z več kot skupno 100 kg.
- Pred vsako uporabo predhodno preverite trdnost proizvoda in sicer na tak način, da z
odločnimi kretnjami čvrsto „potegnete“ in „stresete“.
- Izdelek ni primeren za pritrditev dinamičnih delov kot so npr. gugalnice.
- Ne izvajajte vaj z glavo usmerjeno proti tlem.
- Ne gugajte se!
- Proizvod lahko vedno uporablja samo ena oseba.
- Proizvod je primeren samo za privatno uporabo.
- Proizvod se lahko uporablja samo ob nadzoru odraslih in ne kot igračka.
- Preverite naprave za trening pred vsakim začetkom treninga zaradi morebitnih škod in
obrabe. V kolikor bi npr. zaznali razpoke v delih iz umetne snovi ali na vrveh, napravo
ne uporabljajte več. Pri preverjanju prosimo posvetite posebno pozornost gumijasti vrvi.
- Pri zdravstvenih težavah se pred uporabo proizvoda posvetujte s svojim zdravnikom.
V kolikor med vajami nastopi slabo počutje in težave, takoj prekinite z vajami in se
posvetujte s svojim zdravnikom!
- Nosečnice lahko izvajajo trening samo po dogovoru s svojim zdravnikom.
- Vaje izvajajte s toliko razdalje do predmetov in drugih oseb, da nobeden ne bo mogel
biti poškodovan.
- Ekspander vedno držite na nategu in pazite na to, da vam ne spodrsne!
- Ekspander vedno počasi in pod napetostjo vrnite v izhodiščno pozicijo.
- Ekspanderja sta namenjena izključno uporabi v povezavi z vratnim drogom.
Ekspanderja ne smeta biti pritrjena na nikakršne druge predmete.
- Maksimalna vlečna dolžina ekspanderja znaša 185 cm.
- Ne povlecite ekspanderja čez maksimalno vlečno dolžino od 185 cm.
- Nikoli ne vlecite ekspanderja v smeri obraza in ju nikoli ne ovijte okoli glave, vratu ali prsi.
- Nikoli ne uporabljajte ekspaderja v druge namene kot npr. kot napenjalno vrv, vlečno
vrv ali podobno.
- Navodila za uporabo shranite v bližini naprave za trening. Navodila služijo kot
priročnik glavnih vaj.
Tehnični podatki
Skupna teža: 1700g
za vratno ogrodje od: 72 cm – 98 cm
Dolžina razteza: 120cm 140cm 160cm 185cm
Moč: 32N 45N 48N 56N
23
Page 24

Odpiranje in blokiranje
Prikazana smer vitja velja, ko se
srednja palica drži in se konca
vrtita kot je prikazano.
Takoj, ko je palica rahlo fiksirana
v ogrodju, se lahko obrača samo
srednji del in se smer vitja obrne.
Vratni drog pritrdite tako trdno,
dokler se sam ob sunkoviti obremenitvi ne bo več mogel gibati (Upoštevajte, da lahko
pride do deformacije vratnega ogrodja kljub pravilnem ravnanju)! Gumijaste površine na
koncih droga morajo vedno popolnoma nalegati na vratno ogrodje.
Odpreti
Blokirati
BlokiratiOdpreti
Odpreti
Blokirati
Montaža varnostne prečke
Pozor! Uporaba varnostne prečke je nujno potrebna pri vajah z ekspanderjem.
- Pri blokiranju vratnega droga v vratno ogrodje pazite na to, da so prečke nameščene
nasproti vlečni smeri ekspanderja (slika D).
B DA C
- Odvijte rdeč pokrov (slika A).
- Postavite dobavljeno varnostno prečko na vratni drog (slika B).
- Takoj nato potisnite varnostno prečko na črn končni pokrov in ponovno privijte oba
dela. Vijake ne privijte do konca, ker mora varnostna prečka biti prosto vrtljiva za
poznejšo montažo v vratno ogrodje. Takoj nato zataknite končni pokrov z varnostno
prečko ponovno na vratni drog (slika C).
- Po blokiranju vratnega droga v vratno ogrodje trdno zategnite vijake vratne prečke.
Seznam orodja
Za pritrditev z vijaki v vratno ogrodje potrebujete križni izvijač in temu primeren sveder.
Privijanje varnostnih pokrovčkov v vratni
Pozor: S tem trajno poškodujete svoje vratno ogrodje
z izvrtinami!
Vratni podboj morate s priloženim vijačnim materialom močno
priviti v vratni podboj. Vijačenje zagotavlja večjo varnost med
treningom in je nujno potrebno.
←72-98 cm→
24
Page 25

Pri tem upoštevajte naslednje: Z majhnim vrtalnikom ( 1 – 2 mm) predhodno izvrtajte dve
luknji, da bi olajšali privijanje. Nato močno privijte varnostne pokrovčke s polkrožnim vijakom. Pazite, da sta luknji na enaki višini tako, da drog leži vodoravno, sicer sta optimalna
uporaba in čvrstost vprašljiva. Nato montirajte drog.
Napotki za vadbo
- Sledeče vaje predstavljajo le izbor vaj. Nadaljnje vaje najdete v strokovni literaturi.
- Nosite udobna športna oblačila in športne copate.
- Pred vsakim treningom se ogrejte. Hodite ali tecite na mestu, stretching in lahke vaje
raztezanja so primerne za ogrevanje.
- Vaje izvajajte z enakomernim tempom. Mirno dihajte. Držite se navodil za izvajanje
gibov in ne precenjujte svojih zmogljivosti. Ko napnete mišice izdihnite, ko jih sprostite,
vdihnite.
Opozorilo: Pri poškodbah ali če se ne počutite dobro, takoj končajte z
vajami in se obrnite na vašega zdravnika.
Vaja
Optimalen učinek dosežete, če izvajate 3 do 5 vaj in vsako ponovite 7 do 20 krat.
To urjenje ponavljate 2 do 3 krat na teden.
Vaje z vratnim drogom z ekspanderjem
Pozor! Te vaje z ekspanderjem se lahko izvajajo samo s pritrditvijo
proizvoda z vijaki v vratno ogrodje in ob uporabi varnostne prečke
(glej stran 24).
Ramena
Pritrdite vratni drog v prikazano pozicijo v spodnji del vratnega ogrodja.
Z izravnanim zgornjim delom telesa se postavite pred vratni drog.
Ročaje držite v višini kolkov. Povlecite ekspander z rokami pred telesom
do višine prsi navpično navzgor. Pri tem komolci kažejo navzven.
Nato ekspander ponovno spustite na višino kolkov
Biceps
Pritrdite vratni drog v prikazano pozicijo v spodnji del vratnega ogrodja.
Z izravnanim zgornjim delom telesa in rahlo upognjenimi nogami se
postavite pred vratni drog. Nadlahti sta ob telesu, hrbet je izravnan,
podlahti držita ekspander v napetosti. Povlecite podlahti proti uporu
ekspanderja do ramen.
25
Page 26

Hrbet
Pritrdite vratni drog v prikazano pozicijo v spodnji del
vratnega ogrodja. Z izravnanim hrbtom se vsedite na tla.
Z rahlo upognjenimi nogami ekspander držite v višini kolen.
Sedaj povlecite ekspander z rokami do višine prsi.
Pri tem sta lopatici skrčeni in hrbet ostaja izravnan.
Zgornji del telesa
Pritrdite vratni drog v prikazano pozicijo v višini ramen.
Postavite se izravnano, z rokami proti vratnemu drogu, z nogami narazen v širini kolkov. Držite ekspander pred prsmi v rahli
napetosti. Sedaj potisnite roke s kontrolirano kretnjo naprej.
Hrbet pri tem ostaja izravnan.
Vaje z vratnim drogom brez ekspanderja
Krepitev rok in prsi
Dviganje na drogu:
s sponjim prijemom in
raztegnjenim telesom
se obesite na drog.
Sedaj se z rokami
potegnite navzgor, da
pogledate preko droga.
Raztezanje kolkov in
kolen
S spodnjim prijemom
objemite drog z zadnje
strani. Skrčite kolena in
popolnoma raztegnite
roke. Počasi potegnite
kolena k sebi in pri tem
držite noge skupaj.
Napotki za odstranitev v smeti
Embalažo in proizvod odstanite v skladu z varovanjem okolja! Proizvod lahko v smeti
odstranite pri pooblaščenem podjetju za odlaganje ali pri Vaši občinski komunalni službi.
Upoštevajte trenutno veljavne predpise.
Vzdrževanje, skladiščenje
Ne pozabite, da redno vzdrževanje in čiščenje vplivata na varnost in ohranitev vašega
droga. Proizvod hranite v suhem in čistem ter ogrevanem prostoru. Za čiščenje ne
uporabljajte agresivnih čistil, ampak proizvod obrište s suho krpo.
26
Page 27

3 lega garancije
Ta izdelek je bil narejen ob trajni kontroli kakovosti. Zagotavljamo vam, da je brez napak
pri izdelavi in v materialu. Pravica iz garancije ne velja za normalno obrabo in odpade
pri nepravilnem ravnanju z izdelkom.
Če imate kljub temu razlog za reklamacijo, pokličite brezplačno servisno telefonsko
pomoč, prek spletnega naslova ali nam napišite e-pošto. V vsakem primeru vam bomo
osebno svetovali. V garancijskem roku lahko - po dogovoru z našimi sodelavcem v servisu
– pokvarjene dele pošljete nefrankirano na naveden naslov servisa. Nemudoma boste
dobili vrnjen nov ali popravljen del.
Shranite račun o nakupu. Opišite razlog reklamacije. Poizkusili bomo kar najhitreje najti
zadovoljivo rešitev.
IAN: 56462
Telefonska vroča linija 00800-88080808 (pon.–pet. 10 - 16 h, brezplačno)
Janko Sitar • Arharjeva 14 • SI-1000 Ljubljana
si@nws-service.com
www.nws-service.com
Garancijski list
1. S tem garancijskim listom jamčimo DELTA-SPORT HANDELSKONTOR GMBH, da
bo izdelek v garancijskem roku ob normalni in pravilni uporabi brezhibno deloval in se
zavezujemo, da bomo ob izpolnjenih spodaj navedenih pogojih odpravili morebitne
pomanjkljivosti in okvare zaradi napak v materialu ali izdelavi oz. po svoji presoji izdelek
zamenjali ali vrnili kupnino.
2. Garancijski rok za proizvod je 3 lega od dneva nabave.
3. Kupec je dolžan okvaro javiti pooblaščenemu servisu oz. se informirati o nadaljnih
postopkih na zgoraj navedeni telefonski številki. Svetujemo vam, da pred tem natančno
preberete navodila o sestavi in uporabi izdelka.
4. Kupec je dolžan pooblaščenemu servisu predložiti garancijski list in račun, kot potrdilo
in dokazilo o nakupu.
5. V primeru, da proizvod popravlja nepooblaščeni servis ali oseba, kupec ne more
uveljavljati zahtevkov iz te garancije.
6. Vzroki za okvaro oz. nedelovanje izdelka morajo biti lastnosti stvari same, in ne vzroki,
ki so zunaj proizvajalčeve oz. prodajalčeve sfere. Kupec ne more uveljavljati zahtevkov
iz te garancije, če se ni držal priloženih navodil za sestavo in uporabo izdelka ali, če je
izdelek kakorkoli spremenjen ali nepravilno vzdrževan.
7. Jamčimo servisiranje in rezervne dele za dobo, ki je minimalno zahtevana s strani
zakonodaje.
8. Obrabni deli oz. potrošni material so izvzeti iz garancije.
9. Vsi potrebni podatki za uveljaljanje garancije se nahajajo na dveh ločenih dokumentih
(garancijski list, račun).
Prodajalec: Lidl d.o.o.k.d., Žeje pri Komendi 100, SI-1218 Komenda
27
Page 28

Před použitím si pozorně přečtěte návod k obsluze. Bezpodmínečně ho
uschovejte pro pozdější nahlédnutí!
Nedodržení bezpečnostních pokynů může vést k vážným poraněním.
Rozsah dodávky
1 x Hrazda do dveří 2 x zajišťovací třmen 1 x Návod k obsluze
2 x expandér 2 x šroub a plastový kroužek pro zašroubování do zárubně dveří
Použití ke stanovenému účelu
Tento výrobek je sportovní nářadí určené k montáži do dveřních rámů, s maximální.
šířkou 98 cm, které není vhodné pro profesionální trénink a gymnastická cvičení.
Expandéry slouží k protahování a posilování různých skupin svalů.
Není vhodný pro děti mladší 14 let, protože děti neumí odhadnout potenciální nebezpečí.
Kromě toho se dveřní hrazda skládá z malých části, které by děti mohly spolknout.
Bezpečnostní upozornění pro montáž
- Na obou koncích tyče je označena maximální šířka vytočení 98 cm, prosíme, dále již
nevytáčet.
- Je třeba, aby montáž prováděla dospělá osoba a následně je třeba zkontro lovat
pevnost upevnění.
- Pozor! Při montáži může dojít k poškození dveřního rámu.
Při příliš těsném dotažení se na dveřním rámu mohou objevit stopy
barvy nebo poškození.
- Pryžové plochy na koncích hrazdy musí vždy zcela doléhat dveřní rám.
- Montáž pomocí šroubů do dveřního rámu zajišťuje zvýšenou pevnost.
- Pozor! Cviky s expandérem jsou z bezpečnostních důvodů dovoleny
pouze na výrobku zašroubovaném do zárubně dveří a za použití
zajišťovacího třmenu.
- Zkontrolujte, prosím, kvalitu dveřního rámu. Hrazda je vhodná pro dveřní rám, který je
široký minimálně 72 cm a maximálně 98 cm. Zkontrolujte, prosím, zda je zeď za
dveřním rámem z betonu nebo cihel, aby se na zeď mohl rozložit tlak a byla tak
zaručena dostatečná stabilita! Pokud je dveřní rám z plastu, hliníku nebo dřeva o
tloušťce menší než 7 mm, hrazdu, prosím, nemontujte, protože lze předpokládat, že
rám nebude v tomto případě dostatečně stabilní.
- Montáž tyče hrazdy musí vždy probíhat osově souměrně a v přímé pozici.
Zkontrolujte hrazdu, zda nedošlo ke zkrutu.
- Neupevňujte na dveřní rám v blízkosti schodů.
28
Page 29

Bezpečnostní upozornění pro používání
- Používání výrobku probíhá na vlastní nebezpečí.
- Tento výrobek smí používat jen osoby seznámené s bezpečnostními pokyny.
- Před každým použitím je nutné přezkoušet upevnění (uchycení).
- Výrobek celkově nezatěžujte více než 100 kg.
- Před každým použitím znovu překontrolujte upevnění tím, že s výrobkem
„zalomcujete“.
- Není vhodné pro upevňování dynamických částí, jako např. houpaček.
- Neprovádějte žádná cvičení, při nichž hlava směřuje k zemi.
- Není dovoleno houpání!
- Výrobek smí být používán vždy pouze jednou osobou.
- Výrobek je vhodný pouze pro privátní účely.
- Výrobek se smí používat pouze pod dohledem dospělých a nikoli jako hračka.
- Tréninkové přípravky kontrolujte před každým zahájením tréninku z hlediska poškození
a opotřebení. Pokud byste našli např. trhlinky na plastových částech nebo na lankách,
zařízení již nepoužívejte. Zvláštní pozornost zaměřte prosím na gumové lanko.
- Při zdravotních problémech se před použitím výrobku zeptejte svého lékaře.
Pokud se během cvičení projeví nevolnost nebo potíže, cvičení ihned přerušte a
poraďte se s lékařem!
- Těhotné by měly provádět trénink pouze po poradě se svým lékařem.
- Cvičení provádějte s takovým odstupem od předmětů a jiných osob, aby nemohl být
nikdo poraněn.
- Expandéry udržujte stále v tahu a dávejte pozor, abyste z nich nesklouzli!
- Expandéry pouštějte do výchozí pozice vždy pomalu a napnuté.
- Expandéry se používají výlučně ve spojení s hrazdou mezi dveře. Expandéry nesmíte
připevňovat k žádným jiným předmětům.
- Maximální délka natažení expandérů činí 185 cm.
- Expandéry nenatahujte přes maximální délku 185 cm.
- Expandéry nikdy nevytahujte proti obličeji a nikdy si je neomotávejte kolem hlavy,
krku nebo hrudníku.
- Expandéry nepoužívejte k jiným účelům, např. jako kotvící nebo vlečné lanko či
podobně.
- Návod k použití uložte do blízkosti tréninkového přípravku. Slouží pro vyhledávání
důležitých cviků
Technické Údaje
Celková hmotnost: 1700g
Určeno pro dveřní zárubeň: 72 cm – 98 cm
Délka roztažení: 120cm 140cm 160cm 185cm
Síla: 32N 45N 48N 56N
29
Page 30

Otevření a zablokování
Označený směr otáčení platí tak,
Otevírání
že když držíte středovou tyč,
otáčíte konci podle tohoto
označení. Jakmile tyč lehce
zafixujete do zárubně dveří, lze
otáčet pouze středovou tyčí,
přičemž směr otáčení je nyní obrácený. Hrazdu mezi dveře utáhněte natolik, aby se s ní
nedalo pohnout trhavými pohyby (Dejte pozor na to, aby přes řádné zacházení nemohlo
dojít k deformaci rámu dveří)! Gumové plošky na koncích hrazdy musí stále zcela přiléhat
na dveřní zárubeň.
Otevírání
Aretace
Aretace
Otevírání
Aretace
Montáž se zajišťovacími třmeny
Pozor! Používání zajišťovacích třmenů je při cvičeních s expandérem požadováno jako
nezbytné.
- Při zablokování hrazdy do dveřní zárubně dbejte na to, aby třmen byl umístěn proti
směru tahu expandéru (Obrázek D).
B DA C
- Vytočte červenou čepičku (Obrázek A).
- Společně dodávané zajišťovací třmeny nasaďte na hrazdu do dveří (Obrázek B).
- Návazně posuňte zajišťovací třmen na černou koncovou krytku a obě části znovu
sešroubujte. Šroubení neutahujte na pevno, protože zajišťovací třmeny musí být volně
otočné pro pozdější montáž do zárubně dveří. Nakonec nastrčte koncovou krytku se
zajišťovacím třmenem opět na dveřní hrazdu (Obrázek C).
- Po zablokování hrazdy do zárubně dveří šroubení zajišťovacího třmenu pevně
dotáhněte.
Potřebné nástroje
Pro našroubování do zárubně dveří potřebujete křížový šroubovák a vhodný odpovídající
vrták.
30
Page 31

Přišroubování bezpečnostních koncovek na rám dveří
Upozornění: Vyvrtáním otvorů natrvalo poškodíte
rám Vašich dveří!
Hrazda musí být přišroubovaná pomocí přiloženého materiálu
pevně na rám dveří. Přišroubování poskytuje během tréninku vyšší
bezpečnost a je nezbytně nutné.
Prosíme, dbejte při montáži na následující postup: Předvrtejte si
nejdříve malým vrtákem (1 – 2 mm) dva otvory pro snadnější přišroubování.
Potom přišroubujte pevně bezpečnostní koncovky pomocí šroubů s půlkulatou hlavou.
Prosíme, dbejte na to, aby byly otvory ve stejné výšce a hrazda připevněná vodorovně.
V opačném případě je ovlivněná pevnost přichycení a není zajištěné optimální použití
hrazdy. Nakonec namontujte hrazdu.
←72-98 cm→
Pokyny pro trénink
- Následující cvičení představují pouze výběr. Další cviky naleznete v příslušné
odborné literatuře.
- Vezměte si pohodlné sportovní oblečení a sportovní obuv.
- Před každým tréninkem se rozehřejte. Pro zahřátí se hodí chození nebo běh na místě,
strečink nebo lehké cviky na protažení.
- Cvičení provádějte rovnoměrným tempem. Dýchejte klidně. Držte se pokynů pro
pohyb a nepřeceňujte se. Vydechujte při napínání svalů, při uvolňování svalů se
nadechujte.
Upozornění: V případě zdravotních potíží nebo nevolnosti cvičení,
prosím, ihned ukončete a kontaktujte svého lékaře.
Cvičení
Optimálního úspěchu dosáhnete, když budete během cvičení provádět 3 až 5 sérií vždy
se 7 až 20 opakováními. Tato tréninková jednotka by se měla opakovat 2 až 3krát týdně.
Cviky s hrazdou do dveří a s expandérem
Pozor! Cviky s expandérem smíte provádět pouze s našroubovaným
výrobkem do dveřního rámu a použitím zajišťovacích třmenů
(viz strana 30).
Posilování ramen
Upevněte hrazdu do dveří do znázorněné polohy v dolní části rámu
dveří. Postavte se tělem kolmo přímo před hrazdu. Držte držadla ve výšce
boků. Expandéry vytahujte pažemi před tělem kolmo vzhůru až do výše
prsou. Lokty přitom směřují ven. Na to spustíte expandéry znovu zpátky
na úroveň boků.
31
Page 32

Bicepsy
Upevněte hrazdu do dveří do znázorněné polohy v dolní části rámu
dveří. Postavte se vzpřímeně před hrazdu, nohy lehce pokrčené.
Paže přiléhají k tělu, záda jsou rovná, předloktí udržují expandéry
napjaté. Přitahujte předloktí proti odporu expandéru k ramennímu kloubu.
Záda
Upevněte hrazdu do dveří do znázorněné polohy v dolní
části rámu dveří. Posaďte se se vzpřímenými zády na podlahu.
Nohy lehce pokrčeny, expandér uchopte ve výši kolen.
Nyní přitahujte expandér pažemi až do výše prsou.
Dochází při tom ke stahování lopatek, přičemž záda zůstávají
stále rovná.
Horní část těla
Upevněte hrazdu do dveří do znázorněné polohy ve výši
ramen. Postavte se zpříma, zády k hrazdě, nohy v šíři boků.
Držte expandéry lehce napnuté před hrudí. Nyní tlačte paže
kontrolovaným pohybem dopředu. Záda jsou přitom stále
rovná.
Cviky s hrazdou do dveří bez expandéru
Posilování paží a
prsních svalů
Shyby: Zavěste se
podhmatem a se
vzpřímenou horní částí
těla na tyč. Nyní se
přitáhněte pažemi nahoru
tak vysoko, že budete mít
tyč pod úrovní očí.
Protahování boků a
kolen
Uchopte tyč zezadu
(podhmat). Ohněte kolena
a paže mějte zcela napjaté po celé délce.
Pomalu přitáhněte kolena
k tělu a mějte přitom nohy
u sebe.
32
Page 33

Pokyny k likvidaci
Obal a výrobek prosím roztřiďte a ekologicky zlikvidujte! Výrobek zlikvidujte
prostřednictvím uznávaného likvidačního podniku nebo vašeho komunálního
sběrného střediska Dodržujte aktuálně platné předpisy.
Údržba, skladování
Nezapomeňte, prosím, že pravidelná údržba a čištění přispívá k bezpečnosti a zachovalosti dveřního rámu. Výrobek vždy skladujte v suchu a čistotě ve vyhřívaném prostoru.
Nečistěte jej ostrými čisticími prostředky, jen jej otřete suchou čisticí utěrkou.
Záruka 3 roky
Tento výrobek byl vyroben za permanentní kontroly kvality. Zaručujeme vám, že se na
něm nevyskytují výrobní, ani materiálové závady. Nárok na záruku se nevztahuje na
běžné opotřebení a nesprávné zacházení. Pokud budete mít důvod k reklamaci, obraťte
se na bezplatnou servisní linku, na adresu uvedenou webu nebo nám pošlete e-mail.
V každém případě vám osobně poradíme. Během záruční doby je možno po dohodě s
naším servisním pracovníkem bezplatně zaslat závadné díly na uvedenou adresu servisu.
Obratem pak obdržíte nový nebo opravený díl bezplatně nazpět. Uschovejte si pokladní
doklad. Popište důvod vaší reklamace. Pokusíme se co nejrychleji najít uspokojivé řešení.
IAN: 56462
Hotline výrobku 00800-142025 (po. - pá. 10 - 16 hod., zdarma)
Firma BOHEMIA Troppau • Masarykova 342/39 • CZ-74601 Opava
cz@nws-service.com
www.nws-service.com
33
Page 34

Pred použitím si starostlivo prečítajte návod na použitie. Odložte ho pre
prípad, že by ste ho potrebovali prečítať ešte raz!
Nedodržanie bezpečnostných pokynov môže viesť k vážnym
poraneniam
Rozsah dodávky
1 x Dverová hrazda 2 x poistný strmeň 1 x Návod na obsluhu
2 x expander 2 x skrutka a krúžky z umelej hmoty pre skrutkové spoje na
zárubňu dverí
Štandardné použitie
Tento artikel je športový nástroj, ktorý sa montuje na rám dverí s maximálnou. šírkou
98 cm, hrazda nie je vhodná pre profesionálny tréning a gymnastické cvičenia.
Expandery slúžia na rozpínania a posilňovanie rôznych svalových skupín.
Nie je vhodný pre deti mladšie ako 14 rokov, pretože deti nedokážu posúdiť potencionálne
nebezpečenstvá. Okrem toho obsahuje hrazda do dverí malé časti, ktoré by mohli deti
prehltnúť.
Bezpečnostné pokyny pri montáž
- Maximálna dĺžka vytočenia 98 cm je označená na obidvoch koncoch tyče, prosím
ďalej nevytáčajte.
- Montáž smie vykonať len dospelá osoba a následne musí skontrolovať pevnosť
umiestnenia hrazdy.
- Pozor! Zárubňa dverí sa môže pri montáži poškodiť. V prípade
silného dotiahnutia sa môžu na zárubni dverí vyskytnúť stopy farby
alebo poškodenia.
- Gumové plochy na koncoch hrazdy musia vždy celkom doliehať na zárubňu dverí!
- Montážou priskrutkovaním do rámu dverí možno dosiahnuť vyššiu pevnosť.
- Pozor! Cvičenia s expanderom sú z bezpečnostných dôvodov dovolené
len s priskrutkovaním výrobku na zárubňu dverí a s použitím poistného
strmeňa.
- Preverte prosím stav zárubne dverí. Hrazda je vhodná na montáž do zárubne
dverí s min. šírkou 72 cm a s max. šírkou 98 cm. Preverte prosím, či je stena za
zárubňou dverí postavená z betónu alebo tehál, aby sa mohol tlak rozložiť na stenu
a aby bola zabezpečená dostatočná stabilita! Ak je zárubňa dverí zhotovená z
plastu, hliníka alebo dreva s menšou hrúbkou steny ako 7 mm, hrazdu nemontujte,
keďže zárubňa v takomto prípade nebude pravdepodobne dostatočne stabilná.
- Tyč musí byť namontovaná vždy rovno a v strede. Skontrolujte, či hrazda nie je
stočená.
- Hrazdu neupevňujte na zárubňu dverí v blízkosti schodov.
34
Page 35

Bezpečnostné pokyny pri používaní
- Použitie výrobku je na vlastné nebezpečenstvo.
- Tento výrobok smú používať len osoby, ktoré boli oboznámené s bezpečnostnými
pokynmi.
- Pred každým použitím skontrolujte upevnenie (zablokovanie).
- Výrobok nezaťažujte s viac ako 100 kg.
- Pred každým použitím ešte raz skontrolujte pevnosť a to „poťahovaním“ a
„potriasaním“ výrobku.
- Výrobok nie je vhodný na pripojenie dynamických častí, ako napr. hojdačky.
- Nevykonávajte cvičenia, pri ktorých smeruje hlava k zemi.
- Nekníšte sa!
- Výrobok smie používať vždy len jedna osoba.
- Výrobok je určený len pre súkromné použitie.
- Výrobok sa smie používať len pod dozorom dospelej osoby a nie ako hračka.
- Pred každým tréningom skontrolujte tréningové prístroje, či nie sú poškodené alebo
opotrebené. Ak by ste na častiach z umelej hmoty alebo na lanách našli napr. trhliny,
potom už prístroj nepoužite. Pri kontrole venujte mimoriadnu pozornosť gumeným lanám.
- Ak máte zdravotné problémy, pred použitím výrobku najskôr konzultujte svojho lekára.
Ak sa počas cvičenia vyskytne nevoľnosť alebo ťažkosti, cvičenie ihneď prerušte a
konzultujte svojho lekára.
- Tehotné ženy by mali vykonávať tréning len po konzultácii so svojím lekárom.
- Cvičenie robte v dostatočnej vzdialenosti od predmetov a iných osôb tak, aby sa nikto
nemohol zraniť.
- Expanderov sa držte vždy za držadlo a dávajte pozor, aby ste sa nezošmykli!
- Expandery vracajte do východiskovej polohy vždy pomaly a pod napätím.
- Expandery používajte výlučne spolu s hrazdou do dverí. Expandery sa nesmú
pripevniť na žiaden iný predmet.
- Maximálna dĺžka napnutia je 185 cm.
- Trakov ne raztegujte čez maksimalno vlečno dolžino 185 cm.
- Expandery neťahajte nikdy smerom k tvári a nikdy ich neomotajte okolo hlavy, hrdla
alebo hrude.
- Expandery nepoužívajte na iné účely, ako napr. ako napínacie lano, ťažné lano a. pod.
- Návod k používaniu nechávajte v blízkosti tréningového prístroja. Slúži potom na
vyhľadanie hlavných cvičení.
Technické Údaje
Celková hmotnosť: 1700g
pre zárubne dverí: 72 cm – 98 cm
Naťahovacia dĺžka: 120cm 140cm 160cm 185cm
Sila: 32N 45N 48N 56N
35
Page 36

Otvorenie a aretácia
Vyznačený smer otáčania platí,
ak držíme strednú tyč a konce sa
otáčajú vo vyznačenom smere.
Akonáhle sa tyč na zárubni
trochu zafixuje, možno otáčať
prostrednou časťou a smer
otáčania sa zmení.
Hrazdu na dvere utiahnite natoľko, aby sa ňou ani pri trhavom zaťažení nedalo hýbať
(vezmite do úvahy, že napriek riadnej manipulácii môže dôjsť k deformácii zárubne
dverí)! Gumové plochy na koncoch hrazdy musia vždy úplne priliehať na zárubni dverí.
Otvoriť
Aretovať
AretovaťOtvoriť
Otvoriť
Aretovať
Montáž s poistným strmeňom
Pozor! Pri cvičeniach s expanderom je nutné používať poistné strmene.
- Pri aretácii hrazdy na zárubňu dverí dbajte na to, aby sa strmene umiestnili proti smeru
ťahu expandera (obrázok D).
B DA C
- Odkrúťte červený uzáver (obrázok A).
- Dodané poistné strmene nasaďte na hrazdu na dvere (obrázok B).
- Nakoniec posuňte poistný strmeň na čierny koncový uzáver a obidve časti znovu
zoskrutkujte. Skrutkové spojenie pevne utiahnite, pretože poistné strmene musia byť
voľne otočné pre neskoršiu montáž na zárubňu dverí. Nakoniec nasuňte koncový
uzáver s poistným strmeňom znovu na zárubňu dverí (obrázok C).
- Po aretácii hrazdy na dvere na zárubňu dverí pevne utiahnite skrutkové spojenie
poistného strmeňa.
Zoznam nástrojov
Pre skrutkové spojenie na zárubni dverí potrebujete krížový skrutkovač a vhodný vrták.
36
Page 37

Priskrutkovanie bezpečnostných čiapočiek
na rám dverí
Pozor: Zárubňu dverí natrvalo poškodíte navŕtanými
dierami !
Dverovú hrazdu je potrebné pomocou priloženého materiálu
na priskrutkovanie pevne priskrutkovať na rám dverí.
Bezpečnosť počas tréningu je vďaka priskrutkovaniu vyššia,
fixácia hrazdy priskrutkovaním je nutná. Pritom majte na pamäti
tento postup: Tenkým vrtákom (1 - 2 mm) najskôr vyvŕtajte dva otvory, takto si uľahčíte
zaskrutkovanie. Potom pevne dotiahnite bezpečnostné čiapočky so skrutkou s polguľovou
hlavou. Dbajte na to, aby boli otvory v rovnakej výške, hrazda musí byť upevnená
horizontálne, v opačnom prípade by sa nedala optimálne používať a zhoršila by sa
aj jej pevnosť. Hrazdu potom namontujte.
←72-98 cm→
Pokyny pre cvičenie
- Nasledovné cvičenia predstavujú len jednu voľbu. Ďalšie cvičenia nájdete v príslušnej
odbornej literatúre.
- Noste pohodlný športový odev a cvičky.
- Pred každým tréningom sa nahrejte. Na zahriatie sa hodia chôdza alebo beh na
mieste, strečing a ľahké naťahovacie cviky.
- Cvičenia vykonávajte v rovnakom tempe a obojstranne. Dýchajte pokojne.
Rešpektujte pohybové postupy tréningových pokynov a nepreceňujte sa.
Pri napätých svaloch vydychujte, pri uvoľnených svaloch sa nadychujte.
Upozornenie: V prípade ťažkostí alebo nevoľnosti cvičenie okamžite
ukončite a kontaktujte vášho lekára.
Cvičenie
Optimálny výsledok dosiahnete cvičením 3 až 5 súborov cvikov so 7 až 20
opakovaniami na jeden tréning. Táto tréningová jednotka by sa mala
opakovať 2 až 3 razy týždenne.
Cvičenia na hrazde s expanderom
Pozor! Tieto cvičenia sa smú vykonávať len ak je výrobok priskrutkovaný na zárubni dverí a zabezpečený strmeňom (viď strana 36).
Ramená
Hrazdu na dvere upevnite v znázornenej polohe v dolnej časti zárubne.
So vzpriamenou hornou časťou tela sa postavte priamo pred hrazdu.
Rukoväte držte vo výške bokov. Ťahajte expandre rukami pred telom až
do výšky hrude kolmo nahor. Lakte pritom smerujú von.
Expandre potom spustite znovu do výšky bokov
37
Page 38

Biceps
Hrazdu na dvere upevnite v znázornenej polohe v dolnej časti zárubne.
Postavte sa vzpriamene pred hrazdu, nohy ľahko ohnuté. Ramená sú pri
tele, chrbát je vzpriamený, predlaktia držia expandery napnuté.
Predlaktia ťahajte proti odporu expandera až k ramennému kĺbu.
Chrbát
Hrazdu na dvere upevnite v znázornenej polohe v dolnej
časti zárubne. So vzpriameným chrbtom sa posaďte na zem.
Nohy ľahko ohnuté, expandre chyťte vo výške kolien.
Teraz ťahajte expandre rukami až do výšky hrude.
Pritom sa stiahnu lopatky a chrbát ostáva vzpriamený.
Horná časť chrbta
Hrazdu na dvere upevnite v znázornenej polohe vo výške
pliec. Postavte sa vzpriamene chrbtom k hrazde, nohy sú od
seba na šírku bokov. Expandre držte ľahko napnuté pred
hruďou. Teraz stlačte ramená kontrolovaným pohybom
dopredu. Chrbát pritom vždy zostáva vzpriamený.
Cvičenia s hrazdou na dvere bez expanderov
Posilňovanie ramien
a hrude
Zdvihy: Uchopte zdola
hrazdu a zaveste sa s vystretou hornou časťou tela.
Teraz sa pažami vyťahujte
nahor tak, aby ste videli
ponad tyč.
Naťahovanie bokov
a kolien
Chyťte tyč zozadu
(spodné uchopenie).
Zohnite kolená a ruky
držte po celej dĺžke natiahnuté. Kolená pomaly
priťahujte k telu a nohy
pritom držte spolu.
38
Page 39

Pokyny k likvidácii
Obal a tovar zlikvidujte, prosím, adekvátne životnému prostrediu a roztriedený podľa
druhu! Tovar zlikvidujte prostredníctvom podniku schváleného na likvidáciu odpadu alebo
prostredníctvom vašej komunálnej správy obce. Dodržiavajte aktuálne platné predpisy.
Údržba, skladovanie
Nikdy prosím nezabudnite, že pravidelná údržba a čistenie prispieva k bezpečnosti a
zachovaniu vašej hrazdy do dverí. Výrobok vždy skladujte v suchu a čistote vo vyhrievanom priestore. Nečistite ho ostrými prostriedkami určenými na údržbu, len ho vytrite do
sucha handrou na čistenie.
3-Ročná záruka
Tento výrobok bol vyrobený pod dohľadom permanentnej kontroly kvality. Preto vám
zaručujeme fakt, že produkt je bez výrobných a materiálových chýb. Nárok na uplatnenie si záruky neplatí pri bežnom opotrebovaní a záruka padá pri neodbornom zaobchádzaní.
Ak by ste však predsa len mali dôvod na reklamáciu, obráťte sa na našu bezplatnú
servisnú linku, na webovú adresu nám napíšte e-mail. V každom prípade vám osobne
poradíme. Počas záručnej doby je možné chybné dielce hry po dohovore s naším
servisným pracovníkom odoslať neofrankovaným spôsobom na uvedenú adresu servisu.
Potom bezodkladne dostanete späť zadarmo nový alebo opravený dielec.
Uschovajte si, prosím, pokladničný blok. Popíšte dôvod vašej reklamácie.
My sa pokúsime tak rýchlo, ako je to len možné, nájsť uspokojujúce riešenie.
IAN: 56462
Hotline výrobku 00800-88080808 (pon - pia 10 - 16 hod. bezplatne)
Delta-Sport c/o Rhenus • Trnavská cesta 104 • SK-821 01 Bratislava
sk@nws-service.com
www.nws-service.com
39
Page 40

Lesen Sie vor dem Gebrauch die Bedienungsanleitung sorgfältig durch.
Bewahren Sie sie unbedingt für späteres Nachlesen auf!
Das Nichtbefolgen der Sicherheitshinweise kann zu ernsthaften
Verletzungen führen.
Lieferumfang
1 x Türreck 2 x Sicherheitsbügel 1 x Bedienungsanleitung
2 x Expander 2 x Schraube und Kunststoffringe für Verschraubung im Türrahmen
Bestimmungsgemäße Verwendung
Dieser Artikel ist ein Sportgerät zur Montage in Türrahmen mit max. Breite von 98 cm,
das nicht für professionelles Training geeignet ist.
Die Expander dienen dem Dehnen und Kräftigen unterschiedlicher Muskelgruppen.
Der Artikel ist nicht für Kinder unter 14 Jahren geeignet, da Kinder die potentiellen
Gefahren nicht einschätzen können. Außerdem enthält der Artikel Kleinteile, die von
Kindern verschluckt werden können.
Sicherheitshinweise zur Montage
- Die max. Ausdrehweite von 98 cm ist an beiden Endstangen markiert,
bitte nicht weiter ausdrehen.
- Die Montage ist durch einen Erwachsenen durchzuführen und im Anschluss
auf Festigkeit zu kontrollieren.
- Achtung! Der Türrahmen kann bei der Montage beschädigt werden.
Bei zu festem Anziehen können Farbspuren oder Beschädigungen am
Türrahmen auftreten.
- Die Gummiflächen an den Enden des Artikels müssen immer vollständig auf
dem Türrahmen aufliegen.
- Die Montage mit Verschraubung im Türrahmen bietet eine höhere Festigkeit.
- Achtung! Die Übungen mit Expander sind aus Sicherheitsgründen nur
mit Verschraubung des Artikels im Türrahmen und mit Verwendung
der Sicherheitsbügel erlaubt.
- Bitte überprüfen Sie die Beschaffenheit des Türrahmens. Der Artikel ist für Türrahmen
geeignet, die mind. 72 cm und max. 98 cm breit sind. Bitte überprüfen Sie, ob die
Wand hinter dem Türrahmen aus Beton oder Ziegeln ist, damit der Druck sich auf die
Wand verteilen kann und eine ausreichende Stabilität gegeben ist! Wenn der Tür rahmen aus Kunststoff, Aluminium oder Holz mit einer Wandstärke von weniger als
7 mm ist, bitte nicht montieren, da die Rahmen in diesem Fall voraussichtlich nicht stabil
genug sind.
- Die Montage des Artikels muss immer gerade und mittig erfolgen.
Überprüfen Sie den Artikel auf Verkantungen.
- Nicht an Türrahmen in der Nähe von Treppen befestigen.
40
Page 41

Sicherheitshinweise zur Benutzung
- Die Benutzung des Artikels geschieht auf eigene Gefahr.
- Dieser Artikel darf nur von Personen verwendet werden, die mit den
Sicherheitshinweisen vertraut sind.
- Vor jedem Gebrauch ist die Befestigung (Verklemmung) zu prüfen.
- Den Artikel nicht mit mehr als insgesamt 100 kg belasten.
- Vor jedem Gebrauch nochmals die Festigkeit durch feste „Zieh“- und
„Rüttel“- Bewegungen am Artikel kontrollieren.
- Nicht geeignet zum Anbringen dynamischer Teile, wie z.B. Schaukeln.
- Keine Übungen durchführen, bei denen der Kopf zum Boden zeigt.
- Nicht schwingen!
- Der Artikel darf immer nur von einer Person verwendet werden.
- Der Artikel ist nur für die private Nutzung geeignet.
- Der Artikel darf nur unter Aufsicht Erwachsener und nicht als Spielzeug verwendet werden.
- Kontrollieren Sie die Trainingsgeräte vor jedem Trainingsbeginn auf Schäden und
Verschleiß. Sollten Sie z.B. Risse in den Kunststoffteilen oder an den Seilen erkennen,
benutzen Sie das Gerät nicht mehr. Richten Sie bei der Kontrolle bitte ein besonderes
Augenmerk auf die Gummiseile.
- Bei gesundheitlichen Problemen fragen Sie Ihren Arzt, bevor Sie den Artikel
verwenden. Treten während der Übungen Unwohlsein oder Beschwerden auf, brechen
Sie die Übungen sofort ab und konsultieren Sie einen Arzt!
- Schwangere sollten das Training nur nach Absprache mit ihrem Arzt durchführen.
- Führen Sie Übungen mit so viel Platz zu Gegenständen und anderen Personen durch,
dass niemand verletzt werden kann.
- Halten Sie die Expander immer auf Zug und achten Sie darauf, nicht abzurutschen!
- Führen Sie die Expander immer langsam und unter Spannung in die Ausgangsposition
zurück.
- Die Expander sind ausschließlich für den Gebrauch in Verbindung mit dem Türreck zu
verwenden. Die Expander dürfen an keinen anderen Gegenständen befestigt werden.
- Die maximale Strecklänge der Expander beträgt 185 cm.
- Ziehen Sie die Expander nicht über die maximale Strecklänge von 185 cm.
- Ziehen Sie die Expander niemals in Richtung Gesicht und wickeln Sie diese niemals um
Kopf, Hals oder Brust.
- Benutzen Sie die Expander nicht für andere Zwecke (z.B. als Spannseil,
Abschleppseil oder Ähnliches).
- Bewahren Sie die Bedienungsanleitung in der Nähe des Trainingsgerätes auf.
Dieses dient zum Nachschlagen der Hauptübungen.
Technische Daten
Gesamtgewicht: 1700 g
für Türrahmen von: 72 cm - 98 cm
Strecklänge: 120cm 140cm 160cm 185cm
Kraft: 32N 45N 48N 56N
41
Page 42

Öffnen und Arretieren
Öffnen
Öffnen
Arretieren
Öffnen
Die gezeigte Drehrichtung gilt,
wenn die Mittelstange gehalten
wird und die Enden wie gezeigt
gedreht werden. Sobald die
Arretieren
Arretieren
Stange im Rahmen leicht fixiert
ist, kann nur der Mittelteil gedreht werden und die Drehrichtung kehrt sich um. Ziehen Sie
das Türreck so fest an, bis es sich selbst bei ruckartiger Belastung nicht mehr bewegen
lassen (Beachten Sie, dass eine Verformung des Türrahmens trotz ordnungsgemäßer
Handhabung erfolgen kann)! Die Enden des Recks müssen immer vollständig auf dem
Türrahmen aufliegen.
Montage mit Sicherheitsbügel
Achtung! Die Verwendung der Sicherheitsbügel ist bei Übungen mit dem Expander
zwingend erforderlich.
- Achten Sie bei der Arretierung des Türrecks im Türrahmen darauf, dass die Bügel
entgegen der Expanderzugrichtung platziert werden (Bild D).
A B DC
- Drehen Sie die orange farbige Kappe ab (Bild A).
- Setzen Sie die mitgelieferten Sicherheitsbügel auf das Türreck (Bild B).
- Anschließend schieben Sie den Sicherheitsbügel auf die schwarze Endkappe und
verschrauben die beiden Teile wieder. Ziehen Sie die Verschraubung nicht fest an, da
die Sicherheitsbügel für die spätere Montage im Türrahmen frei drehbar sein müssen.
Abschließend stecken Sie die Endkappe mit Sicherheitsbügel wieder auf das Türreck
(Bild C).
- Nach der Arretierung des Türrecks im Türrahmen ziehen Sie die Verschraubung des
Sicherheitsbügels fest an.
Werkzeugliste
Zur Verschraubung im Türrahmen benötigen Sie einen Kreuzschlitz-Schraubendreher und
einen entsprechend geeigneten Bohrer.
42
Page 43

Verschraubung der Sicherheitsendkappen
im Türrahmen
Achtung: Hierdurch beschädigen Sie Ihren Türrahmen
durch die gebohrten Löcher dauerhaft!
Das Türreck muss mit dem beigelegten Verschraubungsmaterial
fest im Türrahmen verschraubt werden. Die Verschraubung bietet
während des Trainings eine höhere Sicherheit und ist zwingend
erforderlich. Dabei beachten Sie bitte Folgendes: Bohren Sie mit einem kleinen Bohrer
(1 - 2 mm) die zwei Löcher vor, um das Einschrauben zu erleichtern. Schrauben Sie dann
die Sicherheitskappen mit der Halbrundkopfschraube fest an. Bitte beachten Sie, dass die
Löcher in derselben Höhe sind, so dass das Reck horizontal sitzt, da sonst der optimale
Gebrauch und die Festigkeit beeinträchtigt werden. Danach das Reck montieren.
←72-98 cm→
Trainingshinweise
- Die nachfolgenden Übung stellen nur eine Auswahl dar. Weitere Übungen finden Sie
in einschlägiger Fachliteratur.
- Tragen Sie bequeme Sportkleidung und Turnschuhe.
- Wärmen Sie sich vor jedem Training auf. Gehen oder Laufen auf der Stelle, Stretching
und leichte Dehnübungen eignen sich als Warm Up.
- Führen Sie die Übungen mit gleichmäßigem Tempo durch. Atmen Sie ruhig.
Halten Sie sich an die Bewegungsabläufe und überschätzen Sie sich nicht.
Atmen Sie bei Muskelanspannung aus, bei Muskelentspannung ein.
HINWEIS: Bei Beschwerden oder Unwohlsein beenden Sie bitte sofort die
Übungen und kontaktieren Ihren Arzt.
Übungen
Einen optimalen Erfolg erzielen Sie, wenn Sie 3 bis 5 Sätze mit jeweils 7 bis 20
Wiederholungen pro Übung durchführen. Diese Trainingseinheit sollte 2 bis 3 mal
pro Woche wiederholt werden.
Übungen mit Türreck mit Expander
Achtung! Diese Expanderübungen dürfen nur bei Verschraubung des
Artikels im Türrahmen und unter Verwendung der Sicherheitsbügel
durchgeführt werden (siehe Seite 42).
Schultern
Befestigen Sie das Türreck in dargestellter Position im unteren Teil des
Türrahmens. Stellen Sie sich mit aufrechtem Oberkörper direkt vor das
Türreck. Halten Sie die Griffe in Hüfthöhe.
Ziehen Sie die Expander mit den Armen vor dem Körper bis auf Brusthöhe senkrecht nach oben. Dabei zeigen die Ellenbogen nach außen.
Die Expander anschließend wieder auf Hüfthöhe absenken.
43
Page 44

Bizeps
Befestigen Sie das Türreck in dargestellter Position im unteren Teil des
Türrahmens. Stellen Sie sich aufrecht vor das Türreck, die Beine leicht angewinkelt. Die Oberarme liegen am Körper an, der Rücken ist gerade, die
Unterarme halten die Expander auf Spannung. Ziehen Sie die Unterarme
gegen den Widerstand des Expanders zum Schultergelenk.
Rücken
Befestigen Sie das Türreck in dargestellter Position im unteren
Teil des Türrahmens. Setzen Sie sich mit geradem Rücken auf
den Boden. Beine leicht angewinkelt, die Expander in Kniehöhe fassen. Ziehen Sie nun die Expander mit den Armen bis auf
Brusthöhe an. Dabei werden die Schulterblätter zusammengezogen und der Rücken bleibt immer gerade.
Oberkörper
Befestigen Sie das Türreck in dargestellter Position in Schulterhöhe. Stellen Sie sich aufrecht hin, mit dem Rücken zum
Türreck, die Beine Hüftbreit auseinander. Halten Sie die
Expander vor der Brust leicht auf Spannung. Drücken Sie nun
die Arme in einer kontrollierten Bewegung nach vorne.
Der Rücken bleibt dabei immer gerade.
Übungen mit Türreck ohne Expander
Kräftigung von
Armen und Brust
Klimmzüge: Hängen Sie
sich mit Untergriff und gestrecktem Oberkörper an
die Stange. Nun ziehen
Sie sich mit den Armen so
nach oben, dass Sie über
die Stange hinwegsehen
können.
Hüfte und Knie
strecken
Umgreifen Sie die Stange
von hinten (Untergriff).
Winkeln Sie die Knie an
und halten Sie die Arme
in voller Länge gestreckt.
Ziehen Sie die Knie langsam zu Ihrem Körper und
halten Sie die Beine dabei
geschlossen.
44
Page 45

Hinweise zur Entsorgung
Verpackung und Artikel bitte umweltgerecht und sortenrein entsorgen!
Entsorgen Sie den Artikel über einen zugelassenen Entsorgungsbetrieb oder über Ihre
kommunale Gemeindeverwaltung. Beachten Sie die aktuell geltenden Vorschriften.
Pflege, Lagerung
Bitte vergessen Sie nie, dass eine regelmäßige Wartung und Reinigung zur Sicherheit und
Erhaltung Ihres Türrecks beitragen. Den Artikel immer trocken und sauber in einem temperierten Raum lagern. WICHTIG! Nur mit Wasser reinigen, nie mit scharfen Pflegemitteln.
Anschließend mit einem Reinigungstuch trocken wischen.
3 Jahre Garantie
Dieses Produkt wurde unter permanenter Qualitätskontrolle hergestellt. Wir garantieren,
dass es frei von Herstellungs- und Materialfehlern ist. Der Garantieanspruch gilt nicht bei
normaler Abnutzung und entfällt bei unsachgemäßer Behandlung.
Sollten Sie dennoch Grund zu einer Reklamation haben, wenden Sie sich an die kostenlose Service-Hotline, an die Web-Adresse oder schreiben Sie eine E-Mail. Sie werden in
jedem Fall persönlich beraten. Während der Garantiezeit können nach Absprache mit unserem Servicemitarbeiter defekte Teile unfrei an die aufgeführte Service-Adresse geschickt
werden. Sie erhalten dann unverzüglich ein neues oder repariertes Teil kostenlos zurück.
Bitte bewahren Sie den Kassenbon auf. Beschreiben Sie den Grund Ihrer Reklamation.
Wir werden versuchen, so schnell wie möglich eine zufrieden stellende Lösung zu finden.
IAN: 56462
Produkt-Hotline 00800-88080808 (Mo.- Fr., 10:00 - 16:00 Uhr, gebührenfrei)
NWS-Service • Wragekamp 6 • D-22397 Hamburg
de@nws-service.com
A.Hofer • Loebersdorfer Str.42 • AT-2560 Berndorf
at@nws-service.com
Atlantic Forwarding Ltd. • Mühlemattstr. 22, C.P. No. 131
4104 Oberwil BL, Switzerland
ch@nws-service.com
www.nws-service.com
45
Page 46

46
Page 47

47
Page 48

Version: 12/2010
Származási hely/Vyrobeno v/Vyrobené v: Kína/Čína/Číne
Gyártja/Výrobce/Výrobca:
Delta-Sport HanDelSkontor GmbH
Wragekamp 6 • D-22397 Hamburg
 Loading...