

Page 1
SUN LOUNGER
SUN LOUNGER
Instructions for use
NYUGÁGY
Használati útmutató
PLÁŽOVÉ LEHÁTKO
Návod k obsluze
STRANDLIEGE
Bedienungsanleitung
IAN 79733
LEŻAK PLAŻOWY
Instrukcja obsługi
LEŽALNIK ZA NA PLAŽO
Navodilo za uporabo
PLÁŽOVÉ LEŽADLO
Návod na obsluhu
Page 2
A
B C
E F
2
D
Page 3
G
H
3
Page 4

IMPORTANT: RETAIN FOR LATER
REFERENCE; PLEASE READ CAREFULLY!
WAŻNE, PRZECHOWYWAĆ W CELU
PÓŹNIEJSZEGO SKORZYSTANIA:
PRZECZYTAĆ UWAŻNIE!
FONTOS! ŐRIZZE MEG KÉSŐBBI HASZNÁLATRA: FIGYELMESEN OLVASSA EL!
POMEMBNO, SHRANITE ZA KASNEJŠE
REFERENCE: SKRBNO PREBERITE!
DŮLEŽITÉ, USCHOVEJTE PRO POZDĚJŠÍ
ZHLÉDNUTÍ: ČTĚTE PEČLIVĚ!
DÔLEŽITÉ, USCHOVAJTE KVÔLI NESKORŠIEMU POUŽITIU: POZORNE PREČÍTAJTE!
WICHTIG, FÜR SPÄTERE BEZUGNAHME
AUFBEWAHREN: SORGFÄLTIG LESEN!
4
Page 5
Contents/Spis treści/Tartalomjegyzék/Kazalo/Obsah/Obsah/Inhaltsverzeichnis
Technical Details ................................................ 6
Scope of Delivery ............................................... 6
Intended Use ....................................................... 6
Safety Notice ...................................................... 6
Assembly ........................................................ 6 - 7
Using as a Transport Aid ................................... 7
Adjusting the Angle ............................................ 7
Care, Storage, Maintenance ............................. 7
Notes on disposal .............................................. 7
3 Years Warranty ............................................... 7
Műszaki adatok ................................................ 10
A csomag tartalma ........................................... 10
Rendeltetésszerű használat ............................. 10
Biztonsági tudnivalók ....................................... 10
Szerelés ...................................................... 10 - 11
Használat szállító segédeszközként ............... 11
A dőlésszög beállítása ..................................... 11
Ápolás, tárolás és karbantartás ...................... 11
Tudnivalók a hulladékkezelésről ..................... 11
3 év garancia ................................................... 11
Technická data .................................................. 15
Obsah dodávky ................................................ 15
Použití ke stanovenému účelu .......................... 15
Bezpečnostní upozornění ................................ 15
Montáž ...................................................... 15 - 16
Použití jako pomůcka při přepravě ................. 16
Nastavení úhlu sklonu opěradla ..................... 16
Ošetřování, skladování a údržba .................... 16
Pokyny k likvidaci ............................................. 16
3 roky záruky .................................................... 16
Dane techniczne ................................................. 8
Zawartość ........................................................... 8
Zastosowanie zgodne z przeznaczeniem ....... 8
Wskazówki bezpieczeństwa ............................. 8
Montaż ........................................................... 8 - 9
Zastosowanie jako pomoc transportowa .......... 9
Regulacja kąta nachylenia .................................9
Pielęgnacja, przechowywanie i konserwacja .. 9
Uwagi odnośnie recyklingu ............................... 9
3 lata gwarancji ................................................. 9
Tehnični podatki ................................................ 12
Obseg dobave ................................................. 12
Predvidena uporaba ........................................ 12
Varnostni napotki .............................................. 12
Montaža .................................................... 12 - 13
Uporaba kot pripomoček za prevažanje ....... 13
Nastavitev kota naklona .................................. 13
Nega, skladiščenje, vzdrževanje .................... 13
Napotki za odlaganje v smeti ......................... 13
3 leta garancije ......................................... 13 - 14
Technické údaje ................................................ 17
Obsah ................................................................ 17
Použitie podľa predpisov ................................. 17
Bezpečnostné pokyny ...................................... 17
Montáž ...................................................... 17 - 18
Použitie ležadla na transport ........................... 18
Nastavenie uhla sklonu .................................... 18
Ošetrovanie, skladovanie, údržba .................. 18
Pokyny na likvidáciu ......................................... 18
3 roky záruka .................................................... 18
Technische Daten .............................................. 19
Lieferumfang ...................................................... 19
Bestimmungsgemäße Verwendung ................. 19
Sicherheitshinweise ........................................... 19
Montage .................................................... 19 - 20
Verwendung als Transporthilfe ........................ 20
Neigungswinkel verstellen ............................... 20
Pflege, Lagerung, Wartung .............................. 20
Hinweise zur Entsorgung ................................. 20
3 Jahre Garantie .............................................. 20
5
Page 6
Congratulations!
With your purchase you have decided on a
high-quality product. Get to know the product
before you start to use it. Carefully read the
following instructions for use. Use the product
only as described and only for the given areas
of application. Keep these instructions safe.
When passing the product on to a third party,
always make sure that the documentation is
included.
Technical Details
Weight: approx. 4.3kg
Dimensions: approx. 146 x 64 x 92cm
(L x W x H)
Max. load: 100kg
Max. loading capacity when used as a transport
aid: 20kg
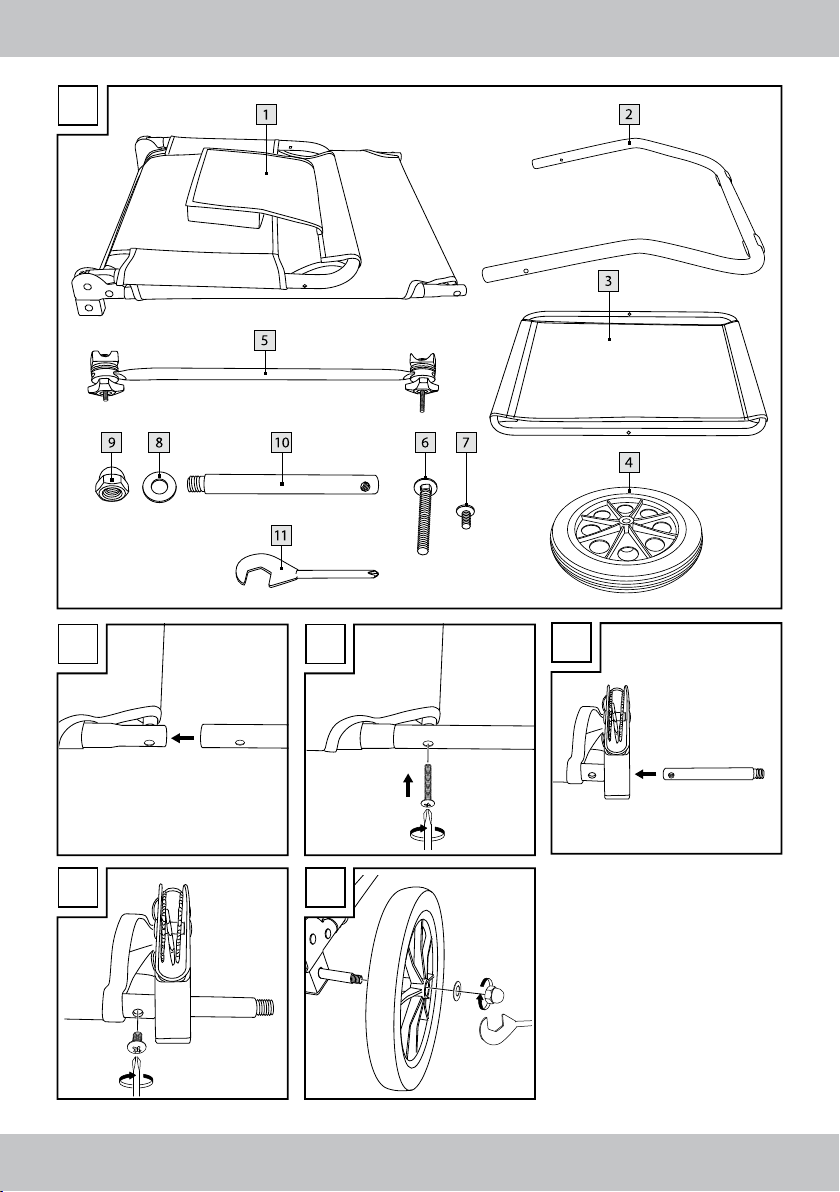
Scope of Delivery
1 – main frame 1x
2 – footrest frame 1x
3 – sunroof 1x
4 – wheels 2x
5 – rod 2x
6 – screw long 2x
7 – screw short 2x
8 – washer 2x
9 – cap nut 2x
10 – pin 2x
11 – spanner1x
1x instructions for use
Intended Use
The article is not designed for commercial use.
The article is intended for use in the leisure and
camping sector (outdoor area).
Safety Notice
WARNING!
• Danger of suffocation for children!
• Never allow children to play with packaging
materials when unsupervised.
Danger of Injury!
• Do not place loads that exceed 100kg on the
beach and transport stretcher.
• Check the article before initial use for dam age or signs of wear and tear. Make sure that
all connecting elements are sufficiently tighten ed. The article may only be used when in
perfect condition!
• Tighten each individual screw before using
the beach chair.
• Place the beach chair only on solid, even
ground.
Danger of Bruised Fingers!
• The beach chair may only be erected by
adults. Take care not to trap your fingers
when folding and unfolding the article.
Caution!
• Always supervise your children. The beach
chair is not a toy or a climbing aid.
Make sure that nobody stands on the head or
foot sections of the chair.
• The beach chair can also be used as a
transport aid, although it is not designed for
transporting people!
Assembly
Step 1: Assembling the Foot Frame
Section
The lounger needs to be folded in order to make
the assembly of the footrest frame easier. Pull
the inside rods of the lower end of the main
frame out by approximately 2cm. The holes on
the inside rods must be in the same position as
those on the footrest frame. The footrest frame
is then attached to the main frame (figure B).
The connecting rod on the main frame is now
attached to the footrest frame using the screw (6)
(figure C).
6 GB
Page 7
Step 2: Wheel assembly
Push the pin (10) into the joint (figure D).
Ensure that the threaded hole on the pin is facing
upwards. The pin should be inserted into the
joint far enough that the threaded hole and the
hole on the axle rod are above one another.
Now fix the short screw (7) in the threaded hole
(figure E). Now push the wheel onto the joint
and fix it with the washer and the cap nut (figure
F). Use the tool that is included for this purpose.
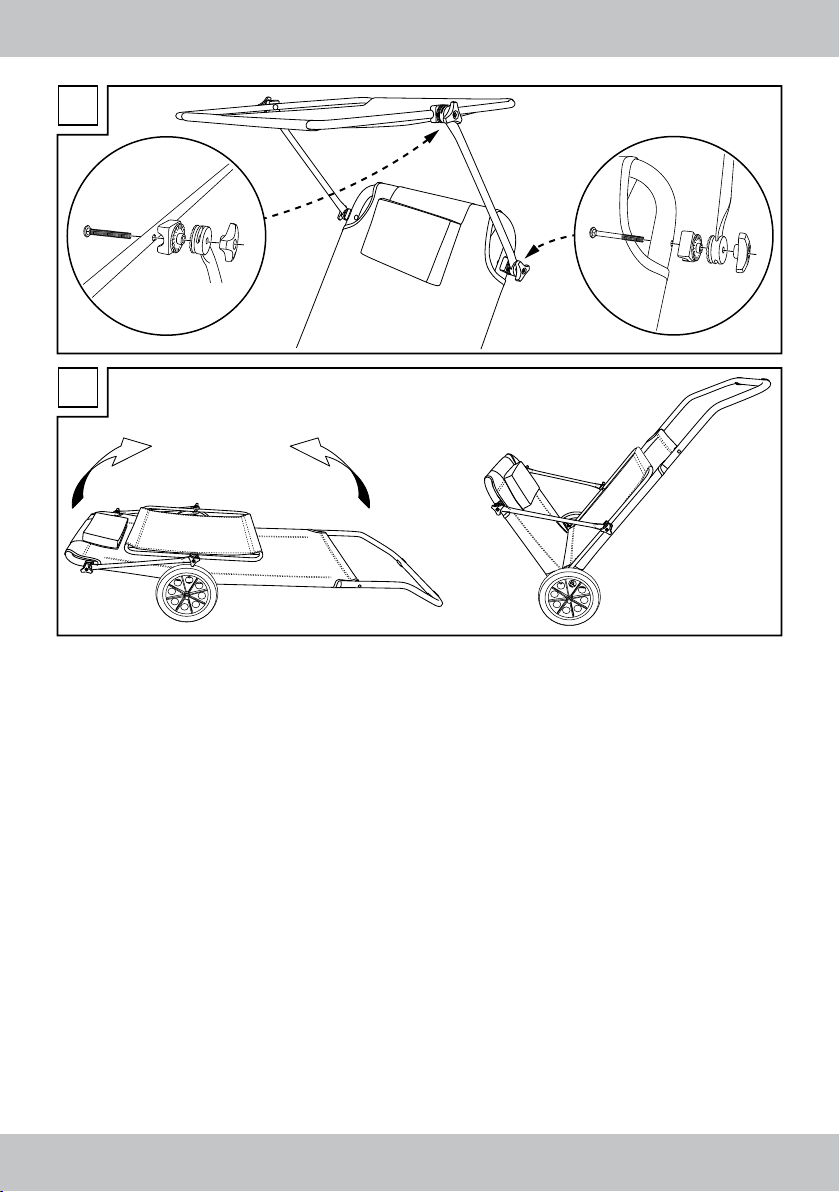
Step 3: Sunroof assembly
Release the pre-assembled locking screws and
the sleeves from the rod. Push the longer screw
out from the inside through the main frame.
Attach the sleeves and fix the rod with the
locking screw (figure G). The sunroof is fixed in
the same way with the shorter screw.
Using as a Transport Aid
To use the beach chair as a transport aid, fold
the sun shade down so that it lies flat on the surface of the chair, and then raise the foot frame
(figure H).
Adjusting the Angle
The back support angle can be individually adjusted. Fold the back support completely flat
down onto the seat and then pull up horizontally.
You will hear audible ratchet sounds as you pull
it up, enabling you to select the angle of inclination in individual steps.
Care, Storage, Maintenance
When required, wipe the article with a damp
cloth and a little mild cleaning agent if necessary. Dry the article thoroughly before you use
it again. Maintenance! Check the bolted connections regularly.
Notes on disposal
Please dispose of the product and packaging in
an environmentally friendly manner, separating
different materials for recycling as required!
Dispose of this item through an authorised
disposal company or through your local waste
disposal facilities - ask your local authority for
information if further guidance is required.
Ensure that you comply with all regulations
currently in force.
3 Years Warranty
The product was produced with great care and
under constant supervision. You receive a threeyear warranty for this product from the date of
purchase. Please retain your receipt.
The warranty applies only to material and
workmanship and does not apply to misuse or
improper handling. Your statutory rights, especially the warranty rights, are not affected by this
warranty.
With regard to complaints, please contact the
following service hotline or contact us by e-mail.
Our service employees will advise as to the
subsequent procedure as quickly as possible.
We will be personally available to discuss the
situation with you.
Any repairs under the warranty, statutory
guarantees or through goodwill do not extend
the warranty period. This also applies to
replaced and repaired parts. Repairs after the
warranty are subject to a charge.
IAN: 79733
Service Great Britain
Tel.: 0871 5000 720 (£ 0.10/Min.)
E-Mail: deltasport@lidl.co.uk
You can also find spare parts for your product at:
www.delta-sport.com, category Service - Lidl Spare Parts
Service
7GB
Page 8
Gratulujemy!
Przez Państwa zakup wybraliście produkt o
wysokiej jakości. Przed pierwszym użyciem
zapoznajcie się z produktem. W tym celu przeczytajcie następującą instrukcję obsługi.
Z produktu należy korzystać jedynie jak to
zostało opisane i w podanych zakresach zastosowania. Zachować niniejszą instrukcję. W razie
przekazania produktu osobom trzecim dołączyć
do niego wszystkie dokumenty.
Dane techniczne
Waga: ok. 4,3 kg
Wymiary: ok. 146 x 64 x 92 cm
(dł. x szer. x wys.)
Maks. obciążenie: 100 kg
Maksymalne obciążenie użytkowe jako pomoc
transportowa: 20 kg
Zawartość
1 – stelaż główny 1 x
2 – rama główna 1 x
3 – daszek przeciwsłoneczny 1 x
4 – koła 2 x
5 – drążek 2 x
6 – śruba długa 2 x
7 – śruba krótka 2 x
8 – podkładka 2 x
9 – nakrętka kołpakowa 2 x
10 – trzpień 2 x
11 – klucz płaski 1 x
1 x instrukcja obsługi
Zastosowanie zgodne z
przeznaczeniem
Artykuł nie jest przeznaczony do użytku
komercyjnego. Artykuł został zaprojektowany
do użytku rekreacyjnego i na polu
kempingowym (na zewnątrz).
Niebezpieczeństwo urazu!
• Leżak plażowy i transportowy obciążać
maksymalnie 100 kg.
• Przed każdym użyciem należy sprawdzić
artykuł czy nie jest uszkodzony lub zużyty.
Zawsze należy sprawdzić pewne umocowa nie wszystkich elementów łączących.
Z artykułu można korzystać jedynie gdy jest
w nienagannym stanie!
• Przed zastosowaniem wszystkie elementy
mocno skręcić.
• Leżak stawiać wyłącznie na mocnym, rów
nym podłożu.
Zagrożenie przytrzaśnięcia
palców!
• Leżak może być montowany wyłącznie przez
osoby dorosłe. Podczas rozkładania i skła-
dania uważać na miejsca przytrzaśnięcia.
Ostrożnie!
• Dzieci nie pozostawiać bez opieki. Leżak nie
jest zabawką ani przyrządem do wspinania
się. Należy uważać, aby nikt nie stawał na
część nożną lub podgłówek.
• Leżak może być stosowany również jako
pomoc transportowa. Leżak nie jest przezna czony do transportu osób!
Montaż
Krok 1: Montaż ramy na stopy
W celu ułatwienia montażu ramy głównej,
leżak powinien być złożony. Należy wysunąć
drążki wewnętrzne przy dolnym końcu stelaża
głównego na około 2 cm. Otwory drążków
wewnętrznych muszą znajdować się w tej samej
pozycji, co otwory ramy głównej. Następnie
nakłada się ramę główną na stelaż główny (rys.
B). Drążek łączący stelaża głównego mocuje się
teraz przy pomocy śruby (6) do ramy głównej
(rys. C).
Wskazówki bezpieczeństwa
OSTRZEŻENIE!
• Niebezpieczeństwo uduszenia dla dzieci!
• Dzieci nie pozostawiać bez nadzoru z
materiałem opakowaniowym.
PL
8
Page 9

Krok 2: Montaż kół
Należy wsunąć trzpień (10) w przegub (rys. D).
Proszę zwrócić uwagę, aby otwór gwintowany
trzpienia był skierowany do góry. Trzpień należy
wsunąć w przegub na tyle, aby otwór gwintowany i otwór drążka osi znalazły się jeden na
drugim. Teraz należy zamocować krótką śrubę
(7) w otworze gwintowanym (rys. E). Koło wsuwa się teraz na przegub i mocuje przy pomocy
podkładki i nakrętki kołpakowej (rys. F). W tym
celu proszę zastosować dostarczone narzędzia.
Krok 3: Montaż daszka
przeciwsłonecznego
Proszę odkręcić z drążka zamontowane
wstępnie śruby ustalające oraz tuleje. Wsunąć
dłuższą śrubę od środka na zewnątrz przez
stelaż główny. Nałożyć tuleje i zamocować
drążek przy pomocy śruby ustalającej (rys. G).
Przy pomocy krótszej śruby w ten sam sposób
należy zamocować daszek przeciwsłoneczny.
Zastosowanie jako pomoc
transportowa
Aby leżak zastosować jako pomoc transportowa należy złożyć dach tak, aby leżał
bezpośrednio na powierzchni leżaka i podnieść
go za ramę na stopy (rys. H).
Regulacja kąta nachylenia
Nachylenie oparcia można indywidualnie
ustawiać. W tym celu oparcie należy złożyć
całkiem na powierzchnię do siedzenia a
następnie do poziomu. Gdy podnosi się znów
oparcie zaskakuje ono słyszalnie na pojedynczych poziomach.
Pielęgnacja, przechowywanie i konserwacja
Artykuł w razie potrzeby przetrzeć wilgotną
szmatką z ewentualnie odrobiną łagodnego
środka czyszczącego. Po tym należy dokładnie
wysuszyć artykuł zanim zastosuje się go ponownie. Konserwacja! Należy regularnie sprawdzać
połączenia śrubowe.
Uwagi odnośnie recyklingu
Opakowanie i artykuł usunąć zgodnie z przepisami o ochronie środowiska!
Artykuł oddać do utylizacji w autoryzowanym zakładzie oczyszczania i przetwarzania
odpadów lub do odpowiedniej jednostki w
gminie. Prosimy stosować się do aktualnie
obowiązujących przepisów.
3 lata gwarancji
Produkt został wyprodukowany bardzo starannie i podczas stałej kontroli. Państwo otrzymują
na ten produkt trzy lata gwarancji od daty
zakupu. Prosimy o zachowanie paragonu.
Gwarancja obejmuje tylko błędy materiałowe
lub fabryczne i traci ważność podczas
używania produktu nie właściwie i nie zgodnie z jego przeznaczeniem. Państwa prawa,
w szczególności zasady odpowiedzialności
z tytułu rękojmi, nie zostaną ograniczone tą
gwarancję.
W razie ewentualnych reklamacji należy
skontaktować się pod niżej podanym numerem
infolinii lub poprzez pocztę elektroniczną.
Nasi współpracownicy omówią z Państwem jak
najszybciej dalszy przebieg sprawy.
Z naszej strony gwarantujemy doradztwo.
Czas gwarancji nie zostanie przedłużony przez
ewentualnie podjęte naprawy na podstawie
gwarancji, prawnej odpowiedzialności z tytułu
rękojmi czy dokonania bezpłatnej naprawy.
Dotyczy to również wymienionych i naprawionych części. Po upłynięciu czasu gwarancji
powstałe naprawy są płatne.
IAN: 79733
Serwis Polska
Tel.: 22 397 4996
E-Mail: deltasport@lidl.pl
Części zamienne do Waszego produktu znajdziecie także
pod adresem:
www.delta-sport.com, Rubryka serwisu - Serwis części zamiennych Lidl
PL
9
Page 10

Gratulálunk!
Vásárlásával egy kiváló minőségű termék mellett
döntött. Az első használatba vételt megelőzően
ismerkedjen meg a termékkel. Ehhez figyelmesen
olvassa el a következő használati útmutatót.
Csak a leírásnak és csak a megadott felhasználási területeknek megfelelően használja a
terméket. Ezt a útmutatót jól őrizze meg.
Amennyiben a terméket harmadik személynek továbbadja, adja át neki a teljes dokumentációt is.
Műszaki adatok
Súlya: kb. 4,3 kg
Méret: kb. 146 x 64 x 92 cm (h x sz x m)
Max. terhelés: 100 kg
Max. hasznos teher szállítási segédeszközként
való használat esetén: 20 kg
A csomag tartalma
1 – Fő tartórúd 1 x
2 – Tartókeret 1 x
3 – Napellenző 1 x
4 – Kerekek 2 x
5 – Rúd 2 x
6 – Hosszú csavar 2 x
7 – Rövid csavar 2 x
8 – Csavaralátét 2 x
9 – Kalapos csavaranya 2 x
10 – Stift 2 x
11 – Csavarkulcs 1 x
1 x Használati útmutató
Rendeltetésszerű használat
A termék nem kereskedelmi célú felhasználásra
készült. A termék szabadidős tevékenységek
végzésére használt környezetben és a kempingek területén (kültéri) való használatra lett
kialakítva.
Sérülésveszély!
• A strand- és szállító heverő maximális
terhelhetősége 100 kg.
• Minden használat előtt ellenőrizze a terméket
rongálódások illetve kopás szempontjából.
Mindig ellenőrizze az összekötő elemek
szoros illeszkedését. A termék csakis kifo gástalan állapotban használható!
• Szorítsa meg az egyes elemeket a heverő
használata előtt.
• A heverőt csak szilárd, sima talajon állítsa fel.
Az ujjak zúzódási sérüléseinek
veszélye!
• A heverőt csak felnőtt személyek szerelhetik
össze. Ügyeljen a termék összehajtása és
felépítése során a zúzódási sérülések elke rülésére.
Vigyázat!
• Ne hagyja felügyelet nélkül a gyermekeket.
A heverő nem játszó vagy mászó eszköz.
Ügyeljen arra, hogy senki ne álljon a heverő
fej- vagy lábrésze alá.
• A heverő szállító segédeszközként is hasz nálható. Személyek szállítására a heverő
nem alkalmas!
Szerelés
1. lépés: A lábkeret összeszerelése
A tartókeret összeszerelését megkönnyítendő,
össze kell csukni az ágyat. A fő tartórúd alsó
felén található belső rudakat húzza ki kb. 2
cm-rel. A belső rudakon található lyukaknak
ugyanúgy kell elhelyezkedniük, mint a tartókereten lévő lyukak. Ezt követően kerül fel a
tartókeret a fő tartórúdra (B ábra). A fő tartórúd
összekötőrúdját a csavar (6) segítségével a
tartókeretre kell rögzíteni (C ábra).
Biztonsági tudnivalók
FIGYELEM!
• Gyermekek számára fulladásveszély áll fenn!
• Ne hagyja, hogy gyermekek felügyelet nélkül
játsszanak a csomagolóanyaggal.
HU
10
Page 11

2. lépés: A kerekek felszerelése
Helyezze be a stiftet (10) a csuklóba (D ábra).
Ügyeljen arra, hogy a stift csavarmenetében
lévő lyuk felfelé mutasson. A stiftet annyira kell
behelyezni a csuklóba, hogy a stift csavarmenetében és a tengelyrúdban lévő lyuk egymás
felett helyezkedjenek el. Ekkor rögzítse a rövid
csavart (7) a stift csavarmenetében lévő lyukba
(E ábra). A kereket ekkor a csuklóra kell tolni,
majd a csavaralátéttel és a kalapos csavaranyával rögzíteni kell (F ábra). Használja a csomagban található szerszámokat.
3. lépés: A napellenző összeszerelése
Vegye le az előre felszerelt rögzítőcsavarokat
és a csavarhüvelyeket a rúdról. Helyezze a
hosszabb csavart belülről kifelé a fő tartórúdba.
Helyezze el a csavarhüvelyeket és rögzítse a
rudat a rögzítőcsavarral (G ábra). A rövidebb
csavarral ugyanígy történik a napellenző
rögzítése.
Használat szállító
segédeszközként
Szállító segédeszközként való használathoz
hajtsa be úgy a napellenzőt, hogy az közvetlenül a fekvőfelületre felfeküdjön és emelje meg a
heverőt a lábkereten (H ábra).
A dőlésszög beállítása
A háttámla dőlésszöge igény szerint beállítható.
Ehhez először hajtsa a háttámlát egészen az
ülőfelületre és ezt követően függőleges helyzetbe. Ha ismét felhajtja a háttámlát, akkor az
egyes fokozatok hallhatóan bekattannak.
Ápolás, tárolás és
karbantartás
Szükség esetén a terméket egy nedves kendővel
és adott esetben egy kevés enyhe tisztítószerrel
törölje le. Szárítsa meg teljesen a terméket,
mielőtt azt ismét használja.
Karbantartás! Rendszeresen ellenőrizze a
csavarkötéseket.
Tudnivalók a
hulladékkezelésről
Kérjük, hogy a terméket és a csomagolást a környezetet kímélve, fajta szerint válogatva kezelje!
A terméket csak engedélyezett hulladékkezelő
üzemen, vagy a kommunális szemétfeldolgozón
keresztül semmisítse meg. Vegye figyelembe az
érvényes előírásokat.
3 év garancia
Ezen termék gyártása nagy gondossággal és
folyamatos ellenőrzés mellett történt.
Ön a termékre három év garanciát kap a vásárlás időpontjától. Kérjük őrizze meg a pénztárblokkot. A garancia csak anyag- és gyártási hibákra érvényes, visszaélésszerű vagy szakszerűtlen
kezelés esetén teljesen megszűnik.
Az Ön törvényes jogait, kiváltképpen a szavatosságra vonatkozó jogait, ez a garancia nem
korlátozza. Esetleges reklamáció esetén, kérjük,
hívja fel a szerviz alábbi közvetlen telefonvonalát, vagy lépjen kapcsolatba velünk e-mailben.
Szerviz szakembereink a további tennivalókat a
lehető leggyorsabban egyeztetik Önnel.
Minden esetben személyesen adunk tanácsot
Önnek. A garanciális időt garancia, törvényes
szavatosság vagy kulantéria alapján történő
esetleges javítások nem hosszabbítják meg.
Ez a pótolt vagy megjavított alkatrészekre is
érvényes. A garancia lejárta után felmerülő
javítások költségeit Önnek kell fedezni.
IAN: 79733
Szerviz Magyarország
Tel.: 0640 102785
E-Mail: deltasport@lidl.hu
Termékéhez pótalkatrészek itt is találhatók:
www.delta-sport.com, Szerviz rubrika - Pótalkatrész-ellátás Lidl
HU
11
Page 12

Prisrčne čestitke!
Z Vašim nakupom ste se odločili za kakovosten
izdelek. Pred prvo praktično uporabo se seznanite z izdelkom. Zato skrbno preberite naslednja
navodila za uporabo. Izdelek uporabljajte samo
v skladu z navodili in v predviden namen.
Ta navodila dobro shranite. Ob predaji naprave
tretjim osebam jim izročite tudi vso dokumentacijo.
Tehnični podatki
Teža: pribl. 4,3 kg
Mere: pribl. 146 x 64 x 92 cm (D x Š x V)
Maks. obremenitev: 100 kg
Maks. nosilnost pri uporabi kot pripomoček za
prevoz: 20 kg
Obseg dobave
1 – Glavno ogrodje 1 x
2 – Podnožje 1 x
3 – Senčilo 1 x
4 – Kolesa 2 x
5 – Palica 2 x
6 – Vijak dolg 2 x
7 – Vijak kratek 2 x
8 – Podložka 2 x
9 – Klobučasta matica 2 x
10 – Zatič 2 x
11 – Izvijač 1 x
1 x Navodila za uporabo
Predvidena uporaba
Izdelek ni namenjen za komercialno uporabo.
Izdelek je zasnovan za uporabo v prostem času
in pri kampiranju (zunaj).
Varnostni napotki
POZOR!
• Nevarnost zadušitve za otroke!
• Otroci naj se nikoli ne igrajo nenadzorovano
z ovojnim materialom.
Nevarnost poškodbe!
• Ležalnik za plažo in prevoz obremenite z
največ 100 kg.
• Izdelek preglejte pred vsako uporabo za
poškodbami ali obrabami. Vedno preverite
trdnost privitja spojnih elementov. Izdelek
smete uporabljati samo v tehnično brezhib nem stanju!
• Posamezne dele trdno privijte, preden upora bite ležalnik.
• Ležalnik postavite samo na trdo, ravno podla go.
Nevarnost stisnjenja prstov!
• Ležalnik smejo sestaviti samo odrasle osebe.
Pri razklapljanju in sklapljanju izdelka pazite
na mesta, nevarna za stisnjenje.
Pozor!
• Otrok ne puščajte nenadzorovanih. Ležalnik
ni naprava za igranje ali plezanje. Pazite, da
nihče ne bo stopil na del ležalnika, kjer je
glava ali stopala.
• Ležalnik lahko uporabite tudi kot pripomoček
za prevažanje. Za prevažanje oseb ležalnik
ni primeren!
Montaža
Korak 1: Montaža okvira za nogo
Da si olajšate montažo podnožja, mora biti
ležalnik zložen. Notranje palice na koncu glavnega ogrodja izvlecite za približno 2 cm. Luknje
notranjih palic morajo ležati v istem položaju,
kot palice podnožja. Nato se podnožje natakne
na glavno ogrodje (sl. B). Vezno palico glavnega ogrodja se na koncu še pritrdi z vijakom (6)
na podnožje (sl. C).
Korak 2: Montaža koles
Zatič (10) potisnite v spoj (sl. D). Pazite na to,
da navojna luknja zatiča kaže navzgor. Zatič
je treba potisniti v spoj toliko, da navojna luknja
in luknja osne palice ležita ena nad drugo.
Pritrdite zdaj kratek vijak (7) v navojno luknjo
(sl. E). Kolo se sedaj potisne na spoj in fiksira s
podložko in klobučasto matico (sl. F).
V ta namen uporabite priloženo orodje.
12
SI
Page 13

Korak 3: Montaža senčila
Odvijte predhodno montirane fiksirne vijake in
tulce s palice. Potisnite daljši vijak od znotraj
navzven skozi glavno ogrodje. Namestite tulce
in pritrdite palico s fiksirnim vijakom (sl. G).
S krajšim vijakom se na enak način fiksira
senčilo.
Uporaba kot pripomoček za
prevažanje
Če želite ležalnik uporabiti kot pripomoček za
prevažanje, senčnik tako sklopite, da bo ležal
na ležalni površini in dvignite ležalnik za okvir
za nogo (sl. H).
Nastavitev kota naklona
Naklon naslonjala za hrbet lahko nastavite po
želji. Naslonjalo za hrbet dvignite na sedalno
površino in nato vodoravno. Če naslonjalo za
hrbet sedaj ponovno dvignete, se slišno zaskoči
v posamezni stopnji.
Nega, skladiščenje,
vzdrževanje
Po potrebi izdelek obrišite z vlažno krpo in z
malo blagega čistilnega sredstva. Nato izdelek
v celoti osušite, preden ga ponovno uporabite.
Vzdrževanje! Redno preverjajte vijačne spoje.
3 leta garancije
Izdelek je bil izdelan skrbno in pod stalnim
nadzorom. Garancija izdelka velja 3 leta od
datuma nakupa. Prosimo shranite račun.
Garancija velja le za napake v materialu in
proizvodnji ter ugasne ob zlorabi ali neustrezni
uporabi izdelka. Vaše pravne koristi, posebno pravica do garancije, s to garancijo niso
omejene.
V primeru pritožb se prosimo obrnite na spodaj
navedeno telefonsko številko servisa ali nam
pošljite elektronsko pošto. Naši sodelavci na
servisu se bodo tako hitro kot je le mogoče
dogovorili z Vami glede nadaljnjih ukrepov.
Vsekakor bomo osebno stopili v stik z Vami.
Čas garancije se zaradi morebitnih popravil na
podlagi garancije, pravnih koristi ali kulantnosti
ne podaljša. To velja tudi za nadomeščene ali
popravljene dele. Po poteku garancije so popravila plačljiva.
IAN: 79733
Servis Slovenija
Tel.: 080080917
E-Mail: deltasport@lidl.si
Nadomestne dele za Vaš izdelek najdete na:
www.delta-sport.com, rubrika servis - servis z rezervnimi deli
Lidl
Napotki za odlaganje v smeti
Embalažo in proizvod odložite v skladu z varovanjem okolja! Proizvod lahko v smeti odložite
pri pooblaščenem podjetju za odlaganje ali
pri Vaši občinski komunalni službi. Upoštevajte
trenutno veljavne predpise.
13
SI
Page 14

Garancijski list
1. S tem garancijskim listom jamčimo
OWIM GmbH & Co. KG, da bo izdelek v
garancijskem roku ob normalni in pravilni
uporabi brezhibno deloval in se zavezujemo,
da bomo ob izpolnjenih spodaj navedenih
pogojih odpravili morebitne pomanjkljivosti in
okvare zaradi napak v materialu ali izdelavi
oz. po svoji presoji izdelek zamenjali ali vrnili
kupnino.
2. Garancija je veljavna na ozemlju Republike
Slovenije.
3. Garancijski rok za proizvod je 3 lega od
dneva nabave.
4. Kupec je dolžan okvaro javiti pooblaščenemu
servisu oz. se informirati o nadaljnjih
postopkih na zgoraj navedeni telefonski
številki. Svetujemo vam, da pred tem natančno
preberete navodila o sestavi in uporabi
izdelka.
5. Kupec je dolžan pooblaščenemu servisu
predložiti garancijski list in račun, kot potrdilo
in dokazilo o nakupu.
6. V primeru, da proizvod popravlja
nepooblaščeni servis ali oseba, kupec ne
more uveljavljati zahtevkov iz te garancije.
7. Vzroki za okvaro oz. nedelovanje izdelka
morajo biti lastnosti stvari same, in ne vzroki,
ki so zunaj proizvajalčeve oz. prodajalčeve
sfere. Kupec ne more uveljavljati zahtevkov
iz te garancije, če se ni držal priloženih
navodil za sestavo in uporabo izdelka ali, če
je izdelek kakorkoli spremenjen ali nepravilno
vzdrževan.
8. Jamčimo servisiranje in rezervne dele za
minimalno dobo, ki je zahtevana s strani
zakonodaje.
9. Obrabni deli oz. potrošni material so izvzeti iz
garancije.
10. Vsi potrebni podatki za uveljavljanje
garancije se nahajajo na dveh ločenih
dokumentih (garancijski list, račun).
11. Ta garancija proizvajalca ne izključuje pravic
potrošnika, ki izhajajo iz odgovornosti
prodajalca za napake na blagu.
Prodajalec:
Lidl d.o.o.k.d., Pod lipami 1, SI-1218 Komenda
14
SI
Page 15

Srdečně blahopřejeme!
Vaší koupí jste se rozhodli pro jakostní produkt.
Před uvedením do provozu se nejdříve seznamte
s celým produktem. Přečtěte si pozorně následující návod k obsluze. Používejte produkt jen tak,
jak je popsáno a jen v doporučených oblastech.
Uschovejte si tento návod. Při předávání produktu třetí osobě předávejte i všechny příslušné
podklady.
Technická data
Váha: cca 4,3 kg
Rozměry: cca 146 x 64 x 92 cm (D x Š x V)
Maximální zatížení: 100 kg
Maximální nosnost při použití jako přepravní
pomůcka: 20 kg
Obsah dodávky
1 – Hlavní tyče 1 x
2 – Opěrný rám 1 x
3 – Posuvná střecha 1 x
4 – Kola 2 x
5 – Tyč 2 x
6 – Šroub dlouhý 2 x
7 – Šroub krátký 2 x
8 – Vkládací podložka 2 x
9 – Uzavřená matice 2 x
10 – Kolík 2 x
11 – Klíč na šroub 1 x
1 x Návod k obsluze
Použití ke stanovenému účelu
Výrobek není určen pro použití v podnikání.
Výrobek je koncipován pro volnočasové aktivity
a kempování (ve venkovních prostorech).
Bezpečnostní upozornění
VAROVÁNÍ!
• Nebezpečí udušení dětí!
• Nenechávejte děti s obalovým materiálem
bez dohledu.
Nebezpečí zranění!
• Plážové lůžko zatěžujte váhou maximálně
100 kg.
• Před každým použitím kontrolujte artikl, jestli
není poškozený nebo opotřebovaný.
Kontrolujte vždy držení všech spojovacích
elementů. Artikl se smí používat jen v bezvad ném stavu!
• Dříve než lůžko použijete, sešroubujte pevně
všechny jeho jednotlivé díly.
• Lůžko stavte jen na pevný a rovný podklad.
Nebezpečí uskřípnutí prstů!
• Lůžko smí montovat jen dospělé osoby.
Při rozkládání a skládání dávejte pozor na
místa, kde se můžete uskřípnout.
Pozor!
• Nenechávejte děti bez dohledu. Lůžko není
hračka nebo prolézačka. Dávejte pozor, aby
se nikdo nestavěl na konce lůžka.
• Lůžko je možné použít i jako přepravní
pomůcku. Lůžko ale není vhodné pro
přepravu osob!
Montáž
Krok 1: Montáž nožního rámu
Pro ulehčení montáže opěrného rámu je třeba
do sebe zaklapnout lehátko. Vytáhněte vnitřní
tyče na dolním konci hlavních tyčí ven zhruba
o 2 cm. Otvory vnitřních tyčí se musí nacházet
ve stejné poloze jako otvory opěrného rámu.
Pak se opěrný rám nastrčí na hlavní tyče (obr.
B). Nyní se spojovací tyč hlavních tyčí upevní
pomocí šroubu (6) na opěrný rám (obr. C).
Krok 2: Montáž kol
Zasuňte kolík (10) do kloubu (obr. D). Dbejte
na to, aby otvor závitu kolíku směřoval nahoru.
Kolík je třeba zasouvat do kloubu natolik, až
otvor závitu a otvor osové tyče leží nad sebou.
Krátký šroub (7) nyní zafixujte v závitovém
otvoru (obr. E). Teď se na kloub nasune kolo s
podložkou a upevní se uzavřenou maticí (obr.
F). K tomu použijte přibalené nářadí.
CZ
15
Page 16

Krok 3: Montáž posuvné střechy
Uvolněte z tyče předem namontované
zajišťovací šrouby a pouzdrové objímky. Delší
šroub prostrčte hlavním tyčovím zevnitř ven.
Nasaďte pouzdrové objímky a tyč upevněte
zajišťovacím šroubem (obr. G). Posuvná střecha
se upevní stejným způsobem kratším šroubem.
Použití jako pomůcka při
přepravě
K tomuto použití sklopte stříšku až na plochu
na ležení a nadzvedněte lůžko za rám u nohou
(obr. H).
Nastavení úhlu sklonu
opěradla
Úhel sklonu opěradla je možné individuálně
nastavit. K tomu sklopte opěradlo nejdříve úplně
až na sedací plochu a potom zase zpátky až do
vodorovné polohy. Při opětovném vytahováním
opěradla nahoru je slyšitelné jeho zaskakování
do jednotlivých poloh.
Ošetřování, skladování a
údržba
V případě potřeby otřete artikl vlhkým hadrem,
popřípadě s jemným čistícím prostředkem. Než
artikl znovu použijete úplně ho vysušte. Údržba!
Kontrolujte pravidelně šroubová spojení.
3 roky záruky
Produkt byl vyrobený s velkou pečlivostí a byl
průběžně kontrolovaný ve výrobní procesu.
Na tento produkt obdržíte tříroční záruku ode
dne zakoupení. Uschovejte si pokladní stvrzenku. Záruka se vztahuje jen na vady materiálu
a chyby z výroby, nevztahuje se na závady
způsobené neodborným zacházením nebo
použitím k jinému účelu. Tato záruka neomezuje
Vaše zákonná ani záruční práva.
Při případných reklamacích se obraťte na
dole uvedenou servisní horkou linku nebo nám
zašlete email. Náš servisní pracovník s Vámi
co nejrychleji upřesní další postup. V každém
případě Vám osobně poradíme.
Záruční doba se neprodlužuje po případných
opravách v době záruky ani v případě zákonného ručení nebo kulance. Toto platí také pro
náhradní a opravené díly. Opravy prováděné
po vypršení záruční lhůty se platí.
IAN: 79733
Servis Česko
Tel.: 800143873
E-Mail: deltasport@lidl.cz
Náhradní díly pro Váš výrobek najdete také na webové
stránce:
www.delta-sport.com, Rubrika Servis - Servis pro náhradní
díly Lidl
Pokyny k likvidaci
Obal a výrobek prosím roztřiďte a ekologicky
zlikvidujte! Výrobek zlikvidujte prostřednictvím
uznávaného likvidačního podniku nebo vašeho
komunálního sběrného střediska Dodržujte
aktuálně platné předpisy.
16
CZ
Page 17

Srdečne Vám blahoželáme!
Vašou kúpou ste sa rozhodli pre vysokokvalitný
produkt. Skôr než začnete produkt používať,
dôkladne sa s ním oboznámte. K tomu si
prečítajte tento návod na obsluhu. Produkt
používajte v súlade s pokynmi uvedenými v
návode a na účely, na ktoré je produkt určený.
Tento návod si odložte. Ak produkt odovzdáte
tretej osobe, priložte jej tiež všetky podklady.
Technické údaje
Hmotnosť: cca 4,3 kg
Rozmery: cca 146 x 64 x 92 cm (D x Š x V)
Max. zaťaženie: 100 kg
Max. užitočné zaťaženie v prípade použitia na
transport: 20 kg
Obsah
1- hlavné tiahlo 1 x
2- opierka na nohy 1 x
3- strieška proti slnku 1 x
4- kolieska 2 x
5- tyče 2 x
6- dlhá skrutka 2 x
7- krátka skrutka 2 x
8- podložka 2 x
9- uzavretá matica 2 x
10- kolík 2 x
11- kľúč na skrutky 1 x
1 x návod na obsluhu
Použitie podľa predpisov
Výrobok nie je určený pre priemyselné využitie.
Výrobok je zhotovený pre použitie vo voľnom
čase – pri kempovaní (vonkajšie použitie).
Bezpečnostné pokyny
UPOZORNENIE!
• Nebezpečenstvo ohrozenia života detí v
dôsledku udusenia!
• Deti nenechajte bez dozoru s obalovým
materiálom.
Nebezpečenstvo zranenia!
• Plážové a transportné ležadlo zaťažte maxi
málnou hmotnosťou 100 kg.
• Produkt pred každým použitím skontrolujte,
či nie je poškodený alebo opotrebený.
Vždy skontrolujte, či sú všetky spojovacie
prvky dobre upevnené. Produkt sa smie
použiť len v bezchybnom stave!
• Skôr ako ležadlo použijete, pevne zoskrutku jte jednotlivé diely.
• Ležadlo položte len na pevný, rovný podklad.
Nebezpečenstvo pomliaždenia
prstov!
• Ležadlo smie zmontovať len dospelá osoba.
Počas rozkladania a skladania ležadla si
dajte pozor na miesta, ktoré Vám môžu
spôsobiť pomliaždeniny.
Upozornenie!
• Na deti neustále dozerajte. Ležadlo deťom
neslúži na hranie alebo lezenie. Dajte pozor,
aby sa nikto nepostavil na ležadlo v mieste
hlavy a nôh.
• Ležadlo je tiež možné využiť na transport.
Ležadlo nie je vhodné na prepravu osôb!
Montáž
Krok 1: Montáž rámu na nohy
Montáž opierky na nohy je jednoduchšia, keď
je ležadlo zložené. Vnútorné tyče na spodnom
konci hlavného tiahla vysuňte o cca 2 cm.
Otvory vnútorných tyčí musia byv rovnakej polohe ako otvory v opierke na nohy. Potom zastrčte
opierku na nohy do hlavného tiahla (obr. B).
Spojovaciu tyč hlavného tiahla upevnite na
opierku na nohy (obr. C) pomocou skrutky (6).
Krok 2: Montáž koliesok
Kolík (10) zasuňte do kĺbu (obr. D). Dávajte
pozor na to, aby otvor v kĺbe kolíka smeroval
nahor. Kolík by mal byť do kĺbu zasunutý tak,
aby sa otvor so závitom prekrýval s otvorom v
tyči. Teraz zafixujte krátku skrutku (7) do otvoru
so závitom (obr. E). Koliesko sa teraz nasunie na
kĺb a upevní sa pomocou podložky a uzavretej
matice (obr. F). Pri práci použite priložené
náradie.
SK
17
Page 18

Krok 3: Montáž striešky proti slnku
Z tyče uvoľnite predmontované regulačné
skrutky a objímky. Dlhšiu skrutku vysuňte zvnútra
cez hlavné tiahlo smerom von. Nasuňte objímky
a tyč upevnite pomocou regulačnej skrutky (obr.
G). Pomocou krátkej skrutky sa rovnakým spôsobom upevní strieška proti slnku.
Použitie ležadla na transport
Keď chcete ležadlo použiť na transport, tienidlo
sklopte tak, aby priliehalo na ploche na ležanie
a ležadlo nadvihnite za rám na nohy (obr. H).
Nastavenie uhla sklonu
Sklon operadla je možné individuálne nastaviť.
Operadlo raz sklopte celkom na sedaciu plochu
a potom do vodorovnej polohy. Keď operadlo
teraz potiahnete znova nahor, počuteľne bude
zapadať do jednotlivých stupňov.
Ošetrovanie, skladovanie,
údržba
Produkt v prípade potreby utrite vlhkou
handričkou, použiť môžete aj jemný čistiaci
prostriedok. Produkt potom dokonale utrite
dosucha. Produkt znova použite až vtedy, keď
je suchý. Údržba! Skrutkové spojenia pravidelne
kontrolujte.
Pokyny na likvidáciu
Obal a výrobok likvidujte vždy s ohľadom na
životné prostredie a podľa druhu použitého
materiálu! Výrobok zlikvidujte prostredníctvom
povolenej likvidačnej prevádzky alebo prostredníctvom Vašej komunálnej obecnej správy.
Dodržiavajte aktuálne platné predpisy.
3 roky záruka
Produkt bol vyrobený s maximálnou
zodpovednosťou a v priebehu výroby bol
neustále kontrolovaný. Na tento produkt máte
tri roky záruku od dátumu kúpy produktu.
Pokladničný lístok si odložte. Záruka sa vzťahuje
len na chyby materiálu a výrobné chyby a
zaniká pri neodbornej manipulácii s produktom.
Záruka nemá vplyv na Vaše zákonné práva,
predovšetkým na práva vyplývajúce zo záruky.
V prípade reklamácie sa obráťte na nižšie uvedenú servisnú linku, alebo nám napíšte e-mail.
Naši servisní zamestnanci sa s Vami dohodnú
na ďalšom postupe a urýchlene vykonajú všetky
potrebné kroky. V každom prípade Vám poradíme osobne.
Záručná lehota sa nepredlžuje v dôsledku eventuálnych opráv na základe záruky, zákonného
plnenia záruky alebo v dôsledku prejavu ochoty. To platí tiež pre vymenené alebo opravené
diely. Opravy vykonané po uplynutí záručnej
lehoty sú spoplatnené.
IAN: 79733
Servis Slovensko
Tel.: 0850 232001
E-Mail: deltasport@lidl.sk
Náhradné diely na Váš produkt nájdete aj na:
www.delta-sport.com, servisná rubrika – servis náhradných
dielov Lidl
18 SK
Page 19

Herzlichen Glückwunsch!
Mit Ihrem Kauf haben Sie sich für ein hochwertiges Produkt entschieden. Machen Sie sich vor
der ersten Verwendung mit dem Produkt vertraut.
Lesen Sie hierzu aufmerksam die nachfolgende
Bedienungsanleitung. Benutzen Sie das Produkt
nur wie beschrieben und für die angegebenen
Einsatzbereiche. Bewahren Sie diese Anleitung
gut auf. Händigen Sie alle Unterlagen bei Weitergabe des Produkts an Dritte ebenfalls mit aus.
Technische Daten
Gewicht: ca. 4,3 kg
Maße: ca. 146 x 64 x 92 cm (L x B x H)
Max. Belastung: 100 kg
Max. Nutzlast bei Verwendung als
Transporthilfe: 20 kg
Lieferumfang
1 – Hauptgestänge 1x
2 – Fußrahmen 1x
3 – Sonnendach 1x
4 – Räder 2x
5 – Stange 2x
6 – Schraube lang 2x
7 – Schraube kurz 2x
8 – Unterlegscheibe 2 x
9 – Hutmutter 2 x
10 – Stift 2 x
11 – Schraubschlüssel 1x
Bedienungsanleitung 1x
Bestimmungsgemäße
Verwendung
Der Artikel ist nicht für den gewerblichen
Gebrauch bestimmt. Der Artikel ist für den
Gebrauch im Freizeit- und Campingbereich
(Außenbereich) konzipiert.
Sicherheitshinweise
WARNUNG!
• Erstickungsgefahr für Kinder!
• Lassen Sie Kinder nicht unbeaufsichtigt mit
dem Verpackungsmaterial.
Verletzungsgefahr!
• Belasten Sie die Strand- und Transportliege
maximal mit 100 kg.
• Prüfen Sie den Artikel vor jedem Gebrauch
auf Beschädigungen oder Abnutzungen.
Kontrollieren Sie stets den festen Sitz aller
Verbindungselemente. Der Artikel darf nur in
einwandfreiem Zustand verwendet werden!
• Verschrauben Sie die einzelnen Teile fest,
bevor Sie die Liege verwenden.
• Stellen Sie die Liege nur auf einen festen,
ebenerdigen Untergrund.
Gefahr von Quetschungen
der Finger!
• Die Liege darf nur von Erwachsenen
aufgebaut werden. Achten Sie beim Aus- und
Einklappen des Artikels auf Quetschstellen.
Vorsicht!
• Lassen Sie Kinder nicht unbeaufsichtigt.
Die Liege ist kein Spiel- oder Klettergerät.
Achten Sie darauf, dass sich niemand auf
Kopf- oder Fußteil der Liege stellt.
• Die Liege kann auch als Transporthilfe genutzt
werden. Für den Transport von Personen ist
die Liege nicht geeignet!
Montage
Schritt 1: Montage des Fußrahmens
Um die Montage des Fußrahmens zu erleichtern,
sollte die Liege zusammengeklappt sein.
Ziehen Sie die Innenstangen am unteren Ende
des Hauptgestänges um ca. 2 cm heraus.
Die Löcher der Innenstangen müssen in
derselben Position liegen, wie die des Fußrahmens. Anschließend wird der Fußrahmen auf
das Hauptgestänge gesteckt (Abb. B).
Die Verbindungsstange des Hauptgestänges
wird nun mit Hilfe der Schraube (6) am Fußrahmen befestigt (Abb. C).
Schritt 2: Montage der Räder
Schieben Sie den Stift (10) in das Gelenk
(Abb. D). Achten Sie darauf, dass das Gewindeloch des Stiftes nach oben zeigt. Der Stift sollte
soweit in das Gelenk geschoben werden, dass
das Gewindeloch und das Loch der Achsenstange übereinander liegen.
19DE/AT/CH
Page 20

Fixieren Sie nun die kurze Schraube (7) in dem
Gewindeloch
(Abb. E). Das Rad wird nun auf das Gelenk
geschoben und mit der Unterlegscheibe und der
Hutmutter fixiert (Abb. F). Verwenden Sie hierzu
das mitgelieferte Werkzeug.
Schritt 3: Montage des Sonnendachs
Lösen Sie die vormontierten Feststellschrauben
und die Hülsen von der Stange. Schieben Sie
die längere Schraube von innen nach außen
durch das Hauptgestänge. Setzen Sie die
Hülsen auf und befestigen Sie die Stange mit
der Feststellschraube (Abb. G). Mit der kürzeren
Schraube wird auf gleiche Weise das Sonnendach fixiert.
Verwendung als
Transporthilfe
Um die Liege als Transporthilfe zu verwenden,
klappen Sie das Sonnendach so ein, dass es
direkt auf der Liegefläche aufliegt und heben die
Liege am Fußrahmen an (Abb. H).
Neigungswinkel verstellen
Die Neigung der Rückenlehne lässt sich
individuell einstellen. Klappen Sie hierfür die
Rückenlehne einmal ganz auf die Sitzfläche und
anschließend in die Waagerechte. Wenn Sie die
Rückenlehne nun wieder hochziehen, rastet Sie
hörbar in den einzelnen Stufen ein.
Pflege, Lagerung, Wartung
Wischen Sie den Artikel bei Bedarf mit einem
feuchten Tuch und gegebenenfalls etwas mildem
Reinigungsmittel ab. Trocknen Sie den Artikel
danach vollständig ab, bevor Sie ihn erneut verwenden. Wartung! Überprüfen Sie die Schraubverbindungen regelmäßig.
Hinweise zur Entsorgung
Verpackung und Artikel bitte umweltgerecht und
sortenrein entsorgen! Entsorgen Sie den Artikel
über einen zugelassenen Entsorgungsbetrieb
oder über Ihre kommunale Gemeindeverwaltung. Beachten Sie die aktuell geltenden
Vorschriften.
3 Jahre Garantie
Das Produkt wurde mit großer Sorgfalt und unter
ständiger Kontrolle produziert. Sie erhalten auf
dieses Produkt drei Jahre Garantie ab Kaufdatum. Bitte bewahren Sie den Kassenbon auf.
Die Garantie gilt nur für Material- und Fabrikationsfehler und entfällt bei missbräuchlicher oder
unsachgemäßer Behandlung. Ihre gesetzlichen
Rechte, insbesondere die Gewährleistungsrechte, werden durch diese Garantie nicht
eingeschränkt. Bei etwaigen Beanstandungen
wenden Sie sich bitte an die unten stehende
Service-Hotline oder setzen Sie sich per E-Mail
mit uns in Verbindung. Unsere Servicemitarbeiter
werden das weitere Vorgehen schnellstmöglich
mit Ihnen abstimmen. Wir werden Sie in jedem
Fall persönlich beraten.
Die Garantiezeit wird durch etwaige Reparaturen aufgrund der Garantie, gesetzlicher
Gewährleistung oder Kulanz nicht verlängert.
Dies gilt auch für ersetzte und reparierte Teile.
Nach Ablauf der Garantie anfallende Reparaturen sind kostenpflichtig.
IAN: 79733
Service Deutschland
Tel.: 01805772033
(0,14 EUR/Min. aus dem dt.
Festnetz,
Mobilfunk max. 0,42 EUR/Min.)
E-Mail: deltasport@lidl.de
Service Österreich
Tel.: 0820 201 222 (0,15 EUR/Min.)
E-Mail: deltasport@lidl.at
Service Schweiz
Tel.: 0842 665566 (0,08 CHF/Min.,
Mobilfunk max. 0,40 CHF/Min.)
E-Mail: deltasport@lidl.ch
Ersatzteile zu Ihrem Produkt finden Sie auch unter:
www.delta-sport.com, Rubrik Service - Ersatzteilservice Lidl
20 DE/AT/CH
Page 21

212223
Page 22

Page 23

Page 24

OWIM GmbH & Co. KG
STIFTSBERGSTRASSE 1
74167 NECKARSULM
GERMANY
Version: 02/2013
OWIM-Nr.: SL-1605
IAN 79733
 Loading...