

Page 1
TenTe de plaGe pop-up
TenTe de plaGe pop-up
Instructions d‘utilisation et consignes de sécurité
pop-up BeacH SHelTer
Operation and Safety Notes
IAN 86428
pop-up-STrandmuScHel
Bedienungs- und Sicherheitshinweise
Page 2

Avant de lire le mode d‘emploi, ouvrez la page contenant les illustrations et familiarisez-vous ensuite avec
toutes les fonctions de l‘appareil.
Klappen Sie vor dem Lesen die Seite mit den Abbildungen aus und machen Sie sich anschließend mit allen
Funktionen des Gerätes vertraut.
Before reading, unfold the page containing the illustrations and familiarise yourself with all functions of the
device.
FR Instructions d‘utilisation et consignes de sécurité Page 5
DE / AT / CH Bedienungs- und Sicherheitshinweise Seite 8
GB Operation and Safety Notes Page 11
Page 3
1
2
3
Page 4

Page 5
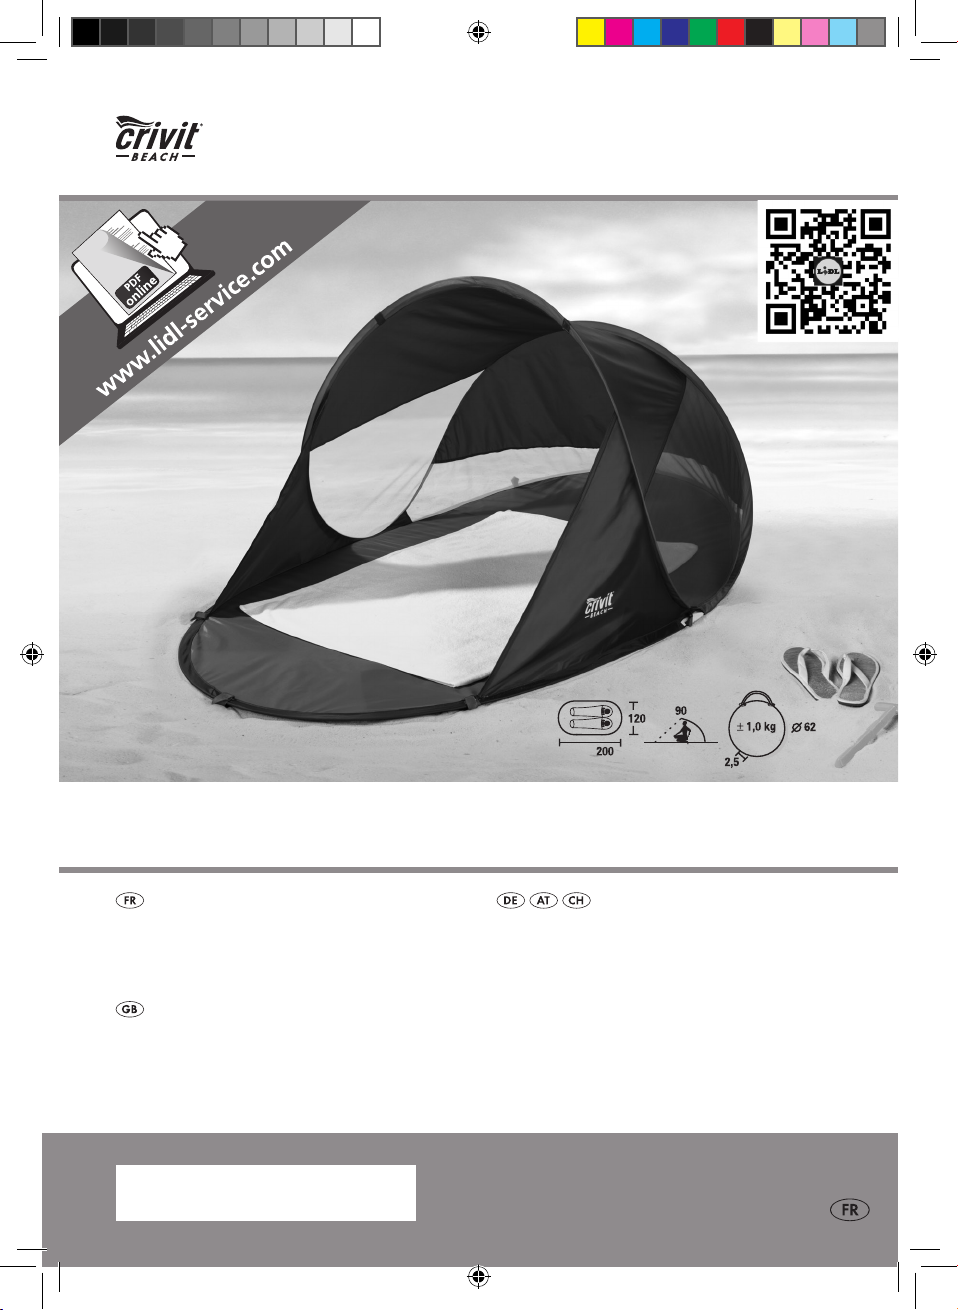
Tente de plage Pop-up
Consignes de sécurité
Introduction
Félicitations ! Avec votre acquisition, vous avez opté
pour un produit de haute qualité. Le présent mode
d’emploi fait partie intégrante de ce produit. Il
des instructions importantes d‘utilisation. Lisez minutieusement toutes les indications. Conserver soigneusement cette notice. Remettez les documents aux
utilisateurs lorsque vous prêtez ce produit.
contient
Utilisation conforme
Ce produit est conçu pour s‘abriter du vent et du
soleil. À long terme, le matériau de l‘abri n‘est pas
imperméable. Il convient donc de ne pas l’utiliser
sous la pluie. Le produit n’est pas destiné à une utilisation professionnelle.
Contenu de la livraison
1 tente de plage Pop-up
1 sac de rangement et de transport
8 sardines
2 haubans
1 mode d‘emploi
CONSERVER SOIGNEUSEMENT CETTE NOTICE.
REMETTEZ TOUS CES DOCUMENTS AUX UTILISATEURS LORSQUE VOUS PRÊTEZ CE PRODUIT.
NE PAS ENLEVER LES éTIQUETTES COUSUES
SIGNALéTIQUES OU INDICATRICES.
Consignes de sécurité relatives
au feu et à l‘aération
Attention:
Lors de l‘utilisation de gaz ou de tout autre
appareil de combustion, une ventilation supplémentaire s‘impose.
Ne pas poser d‘appareils chaud près des pan-
neaux, du toit ou de la toile.
Toujours respecter les consignes de sécurité
relatives à ces appareils.
Ne jamais permettre aux enfants de jouer à
proximité d‘appareils chauffants.
Ne pas encombrer les sorties !
Assurez-vous de prendre connaissance des me-
sures préventives contre les incendies sur le site.
Assurez-vous que tous les orifices d‘aération
soient constamment ouverts, afin de prévenir
tout risque d‘asphyxie.
Descriptif des pièces
Hauban (env. 200 cm)
Sardine (env. 18 cm x 4 mm)
Caractéristiques techniques
Dimensions
(monté):
Poids: env. 1000 g
Compacité: env. 62 cm diamètre x 2,5 cm
env. 200 cm (L) x 120 cm (l) x 90 cm (H)
Montage / Avant utilisation
Un montage n‘est pas nécessaire puisque l‘article
est déjà monté à ‚exception de l‘hauban.
Usage
Attention :
Assurez-vous que l‘armature soit toujours tendue et
se détende en prenant la forme originale de l‘abri
de plage. Veillez à ne pas vous blesser lors du
montage instantané.
5 FR
Page 6

Choisir l‘endroit de placement
et de montage
Choisissez un endroit plat et propre pour le
montage.
Retirez les pierres out tout autre objet pouvant
endommager le fond.
Retirez l‘abri de plage de son sac. Assurez-vous
que l‘armature soit toujours tendue et se détende
en prenant la forme originale de l‘abri de
Veillez à ne pas vous blesser lors du montage
instantané.
plage.
Monter l‘abri de plage
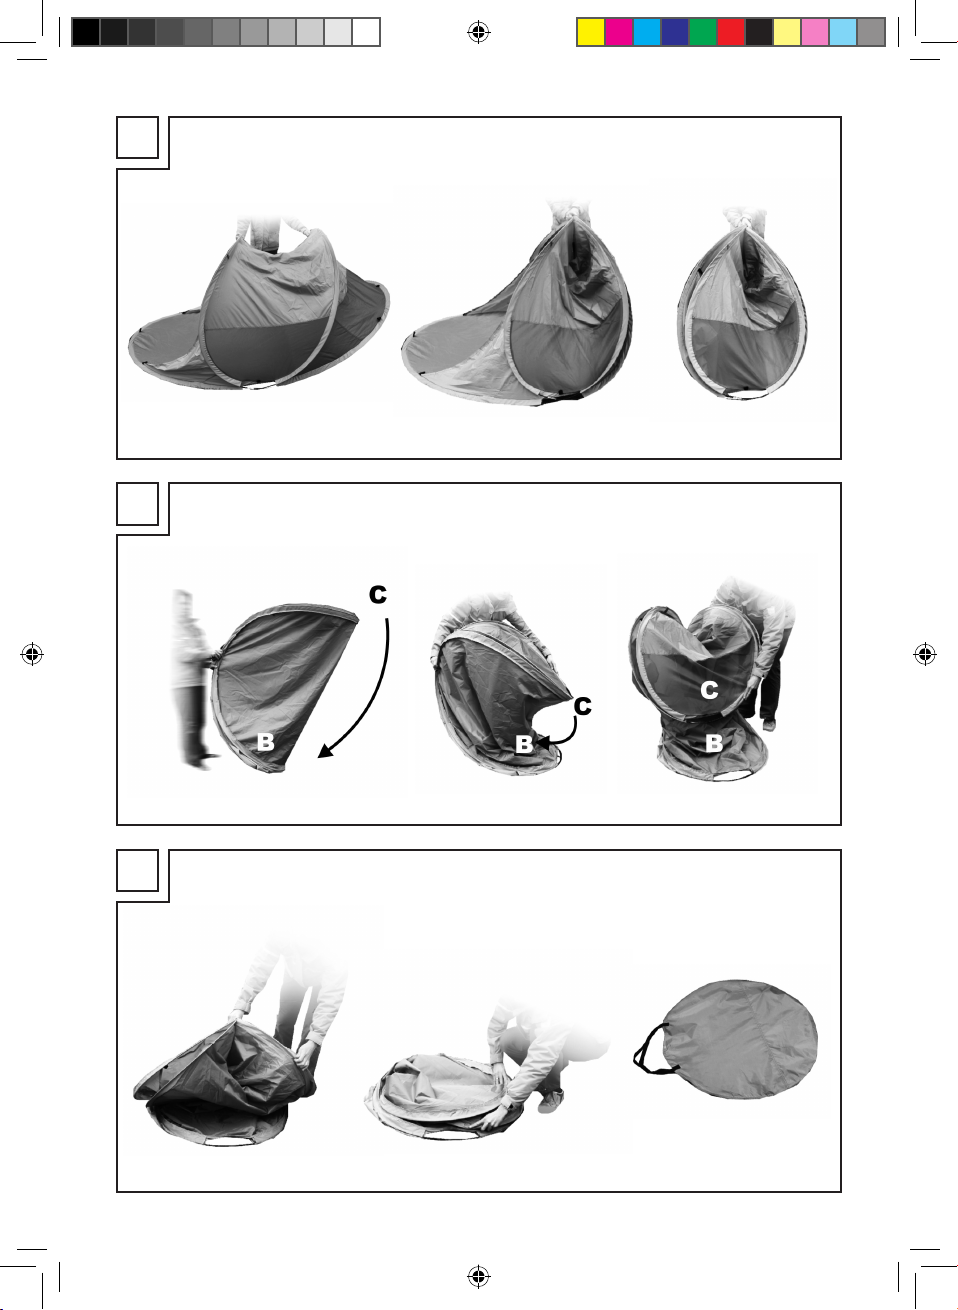
Pour démonter l‘abri, veuillez suivre les
indications sur les figures 1–3.
Pour éviter la formation de moisissure ou de pi-
qûres, il vous faudra démonter l‘abri de plage
sec et propre.
Figure 1: Rassemblez tous les arcs droits et
gauches.
Figure 2: Placez l‘abri de plage verticalement.
Placez de la main gauche l‘arc du haut (C) vers le ba
et tapez de la main droite dans cette direction (B).
Figure 3: Glissez les anneaux l‘un sur l‘autre et
rangez l‘abri de plage dans son sac de rangement
et transport.
s
Lancez l‘abri de plage en l‘air devant vous.
Évitez de placer l‘entrée face au vent.
Assurez-vous en fixant les sardines que celles-ci
soient enfoncées dans la terre de manière
oblique afin d‘obtenir une plus grande fixation
sans créer toutefois une tension. La toile et les
points d‘ancrage devront être légèrement ten
dus.
Problèmes particuliers /
Conditions d‘environnement
particulières
Rayons UV– toutes les toiles de tente subissent
une fatigue du matériaux lors d‘expositions
prolongées au soleil et se décolorent jusqu‘à
un certain point. En cas d‘alertes aux intempéries (tempête), il est recommandé de démonter
l‘abri de plage.
Démonter l‘abri de plage
Veuillez regarder la vidéo d‘information sur comment
démonter une tente, en utilisant le code QR sur appareil approprié.
Attention : Assurez-vous que l‘armature soit tou
tendue et se détende en prenant la forme originale
de l‘abri de plage. Veillez à ne pas vous blesser
lors du montage instantané.
jours
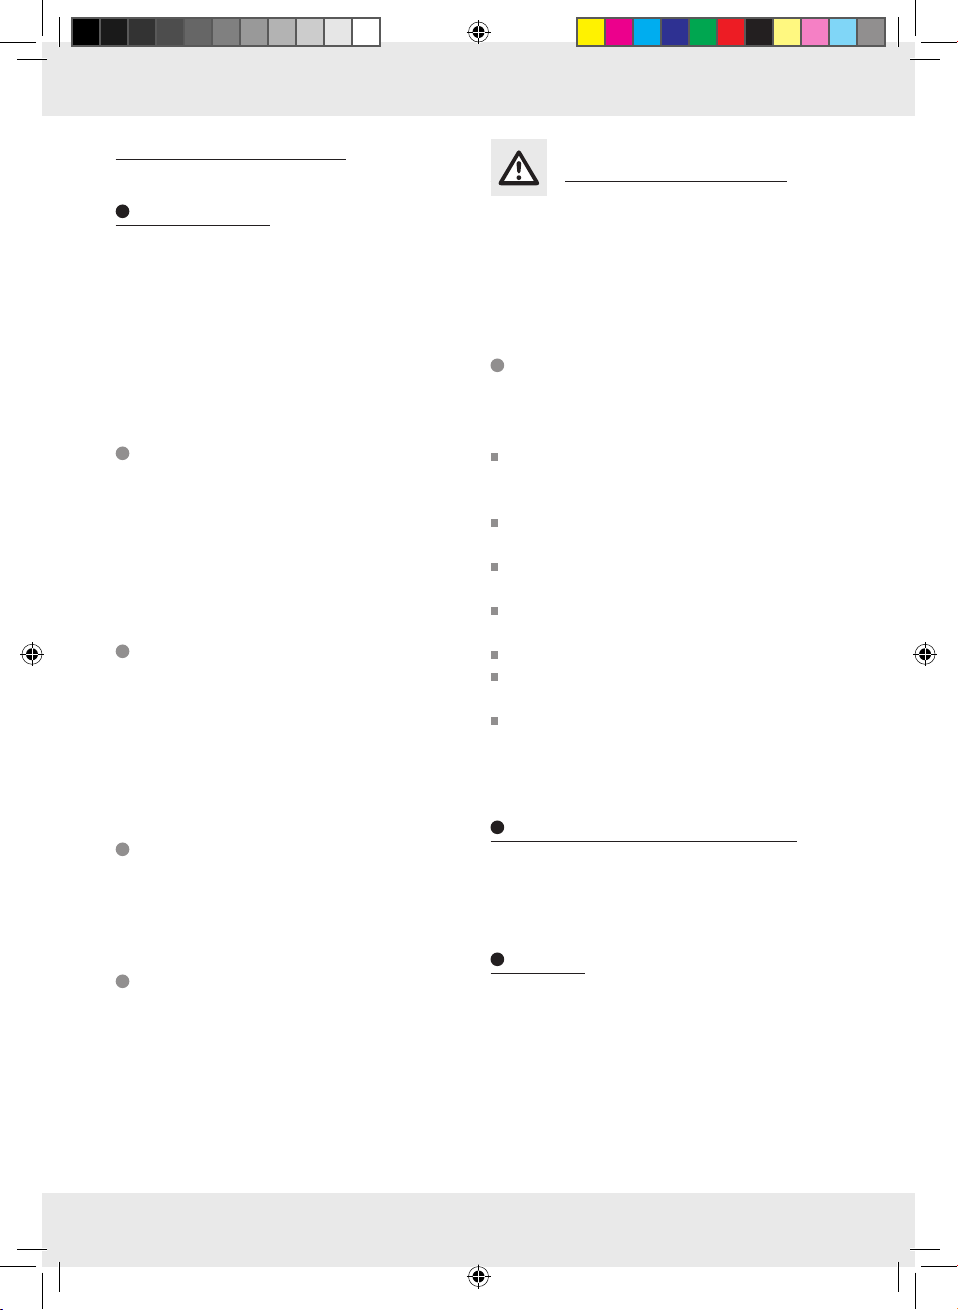
Emballer
Rangez tous les accessoires nettoyés dans le
sac de rangement livré.
Placez l‘abri de plage dans le sac de range-
ment et de transport et fermez la fermeture
éclair avec soin.
Garder le produit dans un endroit frais, sec et
bien aéré à l‘abri du gel. Évitez de ranger et de
stocker le produit humide (risque de moisissure).
Entretien / nettoyage / et
réparation
Brosser les impuretés. Passer dessus éventuellement
avec de l‘eau claire. Pour les tâches tenaces, utiliser
un produit nettoyant du marché pour tente. Ne jamais laver en machine ni n‘utiliser de nettoyage
chimique! Les trous et les déchirures peuvent être
également recollées avec un matériau identique. Le
hauban ne requière aucun soin particulier si ce n‘est
qu‘il devra être conservé au sec et au propre dans
le sac de rangement. Les haubans de ce produits
ne sont pas réparables.
6 FR
Page 7

Indications relatives à
l‘environnement et à
la mise au rebut
Renseignez-vous auprès de votre mairie ou de votre
municipalité concernant les possibilités de mise au
rebut des produits usagés.
Fabricant / Service
Simex Sport GmbH
Schiefbahner Strasse 12
41748 Viersen
Allemagne
service@simex-sport.de
Garantie
Cet appareil bénéficie de 3 ans de garantie à
compter de la date d’achat. Le produit a été fabriqué avec soin et minutieusement contrôlé avant sa
distribution. Veuillez conserver le ticket de caisse en
guise de preuve d‘achat. En cas de demande de
garantie, contactez par téléphone votre interlocuteur du service après-vente. Cette condition doit
être respectée pour assurer l’expédition gratuite de
votre marchandise.
La prestation de garantie s’applique uniquement
pour les erreurs de matériaux et de fabrication. Elle
exclut les dommages de transport, les pièces d’usure
ou les dommages subis par les pièces fragiles,
par ex. les interrupteurs ou les batteries.
Le produit est exclusivement destiné à un usage
privé et non commercial.
Les manipulations incorrectes et inappropriées,
l‘usage de la force ainsi que les interventions réalisées par toute autre personne que notre centre de
service après-vente agréé entraînent l‘extinction de
la garantie. Cette garantie ne constitue pas une
restriction de vos droits légaux.
La durée de la garantie n’est pas prolongée par la
garantie du fabricant. Ceci vaut également pour
les pièces remplacées et réparées. Tous dommages
et défauts présents dès l’achat doivent être notifiés
dès que le produit est déballé, et au plus tard deux
jours après la date d’achat. Toutes les réparations
survenant après la période de garantie seront facturées.
comme
IAN 86428
7 FR
Page 8

Pop-Up-Strandmuschel
Sicherheitshinweise
Einleitung
Herzlichen Glückwunsch! Mit Ihrem Kauf haben Sie
sich für ein hochwertiges Pro dukt entschieden. Die
Bedienungsanleitung ist Bestandteil dieses Produktes.
Sie enthält wichtige Instruktionen für die Benutzung.
Lesen Sie vor der Benutzung alle Hinweise sorgfältig.
Bewahren Sie diese Anleitung gut auf. Händigen
Sie alle Unterlagen bei Weitergabe des Produkt an
Dritte mit aus.
Bestimmungsgemäße
Verwendung
Dieses Produkt ist als Wind- und Sonnenschutz
vorgesehen. Das Material der Strandmuschel ist
auf Dauer nicht wasserdicht. Sie sollte daher nicht
im Regen verwendet werden. Das Produkt ist nicht
für den gewerblichen Einsatz bestimmt.
Lieferumfang
1 Pop-Up-Strandmuschel
1 Trage- und Aufbewahrungstasche
8 Erdnägel
2 Abspannleinen
1 Bedienungsanleitung
BEWAHREN SIE DIESE ANLEITUNG GUT AUF.
HÄNDIGEN SIE ALLE UNTERLAGEN BEI
WEITERGABE DES PRODUKTS AN DRITTE
EBENFALLS MIT AUS. ENTFERNEN SIE KEINE
EINGENÄHTEN ETIKETTEN, TyPEN- ODER
HINWEISSCHILDER.
Vorsichtsmaßregeln
zu Feuer und Lüftung
VORSICHT:
Bei Verwendung von Gas oder anderen
Verbrennungsgeräten ist zusätzliche Lüftung
notwendig.
Keine heißen Geräte in der Nähe der Wände,
des Daches oder der Vorhänge aufstellen.
Immer die Sicherheitshinweise für diese Geräte
beachten.
Niemals Kindern erlauben, in der Nähe von
heißen Geräten zu spielen.
Ausgänge frei halten.
Stellen Sie sicher, dass Sie die Vorkehrungen
gegen Feuer auf dem Gelände kennen.
Stellen Sie sicher, dass die Lüftungsöffnungen
zu jeder Zeit geöffnet sind, um Ersticken zu
verhindern.
Montage / Vor dem Gebrauch
Teilebeschreibung
Abspannleine (ca. 200 cm)
Erdnägel (ca. 18 cm x 4 mm)
Technische Daten
Abmessung
(aufgebaut):
Gewicht: ca. 1000 g
Packmass: ca. 62 cm Durchmesser x 2,5 cm
8 DE/AT/CH
ca. 200 cm (L) x 120 cm (B) x 90 cm (H)
Eine Montage ist nicht erforderlich, der Artikel ist
bis auf die Abspannleinen montiert.
Gebrauch
Achtung:
Bitte beachten Sie, dass das Gestänge unter
Spannung steht und immer in die natürliche Form
der Strandmuschel springt. Beachten Sie, dass die
Spannkraft Ihnen keinen Schaden zufügt.
Page 9

Aufstell- und Aufbauort
auswählen
Wählen Sie eine möglichst ebene, saubere
Aufbaustelle.
Entfernen Sie Steine und ähnliche Objekte, um
Beschädigungen des Bodens zu verhindern.
Entnehmen Sie die Strandmuschel aus der Ta-
sche. Beachten Sie, dass die Gestänge unter
Spannung stehen und in die natürliche Form
der Strandmuschel springen. Vermeiden Sie,
dass die Spannkraft Ihnen Schaden zufügt.
Strandmuschel aufbauen
Werfen Sie die Strandmuschel von sich in die
Luft. Der Eingang sollte möglichst nicht im
Wind stehen.
Achten Sie beim Fixieren darauf, dass Sie die
Erdnägel etwas schräg in die Erde stecken
damit eine hohe Festigkeit erreicht wird, jedoch
keine Verspannung auftritt. Der Stoff und die
Abspannpunkte sollten nur leicht unter Spannung stehen.
Sonderprobleme /
Besondere Umweltbedingungen
UV Strahlen – alle Zeltstoffe erleiden bei fort-
gesetzter stärkerer Sonnenbestrahlung eine
Materialermüdung und bleichen bis zu einem
gewissen Grad aus. Bei Unwetterwarnungen
(Sturm) ist ein Abbau der Strandmuschel zu
empfehlen.
Strandmuschel abbauen
Bitte sehen Sie sich das Informationsvideo zum
Zeltabbau an, indem Sie den QR-Code mit einem
geeigneten Gerät verwenden.
Achtung: Bitte beachten Sie, dass das Gestänge
unter Spannung steht und immer in die natürliche
Form der Strandmuschel springt. Beachten Sie,
dass die Spannkraft Ihnen keinen Schaden zufügt.
Folgen Sie für den Abbau bitte den
Beschreibungen der Abbildungen 1–3.
Um einer Schimmelbildung bez. Stockflecken
vorzubeugen sollten Sie die Strandmuschel nur
in einem sauberen und trockenen Zustand
abbauen.
Abbildung 1: Fassen Sie alle linken und rechten
Bögen zusammen.
Abbildung 2: Stellen Sie die Strandmuschel
hochkant. Führen Sie den oberen Bogen (C) mit
der linken Hand nach unten und schlagen Sie diesen in Richtung (B) mittels Ihrer rechten Hand ein.
Abbildung 3: Schieben Sie die Ringe ineinander
und verstauen Sie die Strandmuschel in der Trageund Aufbewahrungstasche.
Verpackung
Verpacken Sie die gereinigten Zubehörteile in
die mitgelieferte Packtasche.
Legen Sie die Strandmuschel in die Trage- und
Aufbewahrungstasche und schließen Sie den
Reißverschluss behutsam.
Bewahren Sie den Artikel an einem trockenen,
kühlen, frostfreien und gut belüfteten Ort auf.
Vermeiden Sie das Verpacken und Lagern im
feuchten Zustand, (Schimmelbildung, Stockfle-
cken).
Wartung /
Reinigung und Reparatur
Verschmutzungen abbürsten. Evt. mit klarem Wasser
nachbehandeln. Bei hartnäckigen Flecken nur handelsübliche Pflegemittel für Zelte verwenden. Bitte
nie in der Waschmaschine waschen oder chemisch
reinigen lassen! Löcher oder Risse können ebenfalls
mit gleichem Material geklebt werden. Das Gestänge
bedarf keiner besonderen Pflege, außer das es
sauber und trocken im Packsack aufbewahrt werden
sollte. Die Gestänge können bei diesem Produkt
nicht repariert werden.
9 DE/AT/CH
Page 10

Umwelthinweise
und Entsorgungsangaben
Möglichkeiten zur Entsorgung des ausgedienten
Produktes erfahren Sie bei Ihrer Gemeinde- oder
Stadtverwaltung.
Garantie
Hersteller / Service
Simex Sport GmbH
Schiefbahner Strasse 12
41748 Viersen
Deutschland
service@simex-sport.de
Sie erhalten auf dieses Gerät 3 Jahre Garantie ab
Kaufdatum. Das Produkt wurde sorgfältig produziert und vor Anlieferung gewissenhaft geprüft.
Bitte bewahren Sie den Kassenbon als Nachweis
für den Kauf auf. Bitte setzen Sie sich im Garantiefall mit Ihrer Servicestelle telefonisch in Verbindung.
Nur so kann eine kostenlose Einsendung Ihrer
Ware gewährleistet werden.
Die Garantieleistung gilt nur für Material- oder
Fabrikationsfehler, nicht aber für Transportschäden,
Verschleißteile oder für Beschädigungen an zerbrechlichen Teilen, z. B. Schalter oder Akkus.
Das Produkt ist lediglich für den privaten und nicht
für den gewerblichen Gebrauch bestimmt.
Bei missbräuchlicher und unsachgemäßer Behandlung, Gewaltanwendung und bei Eingriffen, die
nicht von unserer autorisierten Service-Niederlassung vorgenommen wurden, erlischt die Garantie.
Ihre gesetzlichen Rechte werden durch diese
Garantie nicht eingeschränkt.
Die Garantiezeit wird durch die Gewährleistung
nicht verlängert. Dies gilt auch für ersetzte und
reparierte Teile. Eventuell schon beim Kauf vorhandene Schäden und Mängel müssen sofort nach
dem Auspacken gemeldet werden, spätestens aber
zwei Tage nach Kaufdatum. Nach Ablauf der
Garantiezeit anfallende Reparaturen sind kostenpflichtig.
IAN 86428
10 DE/AT/CH
Page 11

Pop-Up Beach Shelter
Safety notes
Introduction
Congratulations! You have purchased a high-quality
product. The instructions for use are to be considered as part of this product. They contain important
instructions for use. Please read all the information
carefully before use. Keep these instructions in a safe
place. If you pass the product on to anyone else,
please ensure that you also pass on all the documentation with it.
Intended use
This product is intended for use as protection against
the wind and sun. The material of the beach tent is
not permanently waterproof. Therefore, it should
not be used in rain. The product is not intended for
commercial use.
Scope of delivery
1 Pop-Up Beach Shelter
1 Carry and storage bag
8 Tent pegs
2 Guy ropes
1 Set of instructions for use
KEEP THESE INSTRUCTIONS IN A SAFE PLACE.
WHEN PASSING THIS PRODUCT ON TO OTH
PLEASE INCLUDE ALL THE DOCUMENTS. DO
NOT REMOVE ANy SEWN-IN LABELS.
ERS,
Safety precautions for fire
and ventilation
CAUTION:
Additional ventilation is required when using
gas or other burners.
Do not place a hot appliance near to the walls,
ceiling or curtains.
Always observe the safety notices for this produ
Never allow children to play in the vicinity of
hot appliances.
Keep the exits clear.
Ensure you know the fire precautions of the site.
Ensure that the ventilation openings are always
open, in order to prevent suffocation.
Assembly / Before use
Assembly is not necessary because the article is
pre-assembled, with the exception of the guy ropes.
ct.
Parts description
Guy rope (approx. 200 cm)
Tent pegs (approx. 18 cm x 4 mm)
Technical Data
Measurements
(assembled): approx. 200 cm (L) x 120 cm (W) x
90 cm (H)
Weight: approx. 1000 g
Packed size: approx. 62 cm diameter x 2.5 cm
Use
Warning:
Please ensure that the poles are under tension and
that the beach tent always springs into its natural
shape. Ensure that the tensioning force does not
cause you injury.
Selecting a set-up location
Preferentially choose a flat clean set-up area.
Remove stones and similar objects, to prevent
damage to the floor.
11 GB
Page 12

Take the beach tent out of the bag. Ensure that
the poles are under tension and that the tent
springs into its natural shape. Ensure that the
tensioning force does not cause you injury.
Assembling the beach tent
Throw the beach tent away from you into the
air. The entrance should not face into the wind
if possible.
When securing, in order to achieve better stead-
iness, ensure that the tent pegs are inserted into
the ground at an angle but without tension. The
material and the anchor points should only be
under light tension.
Special problems / Particular
environmental conditions
UV rays – all the tent materials suffer material
fatigue under strong sunlight and bleach to a
certain extent. During bad weather conditions
(storm), it is recommended that the beach tent
is dismantled.
Dismantling the beach tent
Please watch the tent dismantling information video,
by using the QR-code with a suitable appliance.
Attention: Please ensure that the poles are under
tension and that the beach tent always springs into
its natural shape. Ensure that the tensioning force
does not cause you injury.
For dismantling, please follow the descriptions given with Figures 1–3.
To prevent the formation of mould or mildew
stains, always dismantle the beach tent in a
clean and dry condition.
Figure 1: Hold all the left and right arches together.
Figure 2: Stand the beach tent upright. Push the
upper arch (C) downwards with the left hand and
fold it in towards the centre (B) using your left hand.
Figure 3: Push the rings into each other and pack
the beach tent into the carry and storage bag.
Packing
Pack the cleaned accessories into the storage
bag supplied.
Lie the beach tent in the carry and storage bag
and carefully close the zipper.
Keep the article in a cool, dry and well-venti-
lated place away from frost. Avoid packaging
and storage in a damp condition, (formation of
mould, mildew).
Maintenance / Cleaning
and repair
Brush off dirt. Use clean water if necessary. For stubborn stains, only use commercially available tent
care products. Please never wash in a washing machine or dry-clean! Holes or tears can also be glued
using the same material. The poles do not require
specific maintenance, other than being stored dry
and clean in the storage bag. The poles of this
product cannot be repaired.
Environmental instructions
and disposal information
Contact your local authorities for information on how
to dispose of the product at the end of product life.
Warranty
This tool has a warranty of 3 years from the date of
purchase. The product has been manufactured with
care and thoroughly inspected before delivery. Please
keep your receipt as proof of purchase. In the event
of a warranty claim, please contact our service
12 GB
Page 13

department by telephone. This will ensure you will
be able to return your produce postage-free.
The warranty covers only claims for material and
manufacturing defects, not transport damage, wearing items or damage to fragile components, e.g.
buttons or batteries.
This product is intended for private, non-commercial
use only.
Any incorrect or improper use of the device, use of
force and changes not performed by our authorized
service branch will void the warranty. This warranty
does not limit your legal rights.
The warranty period will not be extended by repairs
made under warranty. This also applies to replaced
and repaired parts. Any damage and defects present
at the time of purchase must be reported immediately
after unpacking the device, but no later than two
days after the date of purchase. Repairs made after expiration of warranty are subject to a fee.
Manufacturer / Service
Simex Sport GmbH
Schiefbahner Strasse 12
41748 Viersen
Germany
service@simex-sport.de
IAN 86428
13 GB
Page 14

Simex Sport GmbH
Schiefbahner Strasse 12
41748 Viersen
Deutschland
© by ORFGEN Marketing
Version des informations · Stand der Informationen
Last Information Update: 01 / 2013 · Ident.-No.: 86428012013-2
IAN 86428
2
 Loading...