


Operator's Manual
24-in. Digital
Multi-function LEVEL
with Laser Trac™
Model No. 320.48293
! CAUTION Read, understand and follow all Safety Rules and Operating Instructions in this Manual before using this product.
Sears, Roebuck and Co., Hoffman Estates, IL 60179 U.S.A.
Visit our Craftsman website: www.craftsman.com
•WARRANTY
•SAFETY
•DESCRIPTION
•OPERATION
•APPLICATIONS
•MAINTENANCE
•TROUBLESHOOTING

OPERATION cont.
POWER BUTTON AND LCD DISPLAY
Press the Power button to turn the LCD display screen on. When the screen first comes on, the temperature is displayed in Fahrenheit for about 2 seconds, to indicate if level is being used in optimum operating temperature range. The current angle of the level is then displayed, and a picture of that angle is shown either above or below the line for true level (see Fig. 2). An arrow on the display indicates if the level has to be moved up or down. True level is reached when the two lines are together and the angle shows 0o (see Fig. 3). Turn off by pressing and holding the button in for about 2 seconds. If not used for 5 minutes the level automatically turns off. The LCD display is large and easy to read. When the level is turned upside down, the LCD screen senses and changes
to read correctly in the inverted position.
TO USE THE LEVEL FOR HORIZONTAL AND PLUMB MEASUREMENTS
Horizontal and Plumb measurements can use both the bubble vial and the LCD readout features.
HORIZONTAL
Use the level on horizontal surfaces to true them up. The level's bubble vials will show when you have the surface level. The bubbles will be exactly in between the marks on the vial.
Once the Power button is turned on, lay the level on the surface you want to level. The LCD display will show the surface you are measuring as a line either above or below the true level line, and the degree to which the surface is off, with
an arrow showing whether the surface should be raised or lowered in order to be leveled.
The LCD display also gives the degree to which the surface is off. To level, move the surface with the level on it until the two lines on the readout match and the readout says 0o for the angle (Fig. 3).
If the beeper is activated, the beeper will sound when the level is at level.
PLUMB (Fig. 5)
To find the plumb of a work surface, lay the digital level against the vertical surface, with the plumb bubble vial at the top. The surface will be at true plumb when the bubble is positioned exactly between the marks on the vial.
Fig. 5
10
OPERATION cont.
PLUMB cont. (Fig. 5)
The LCD display shows the surface with the level on it as a line, and true plumb as another line either to the left or right of the line for plumb, and the degree to with the surface is off, with an arrow showing whether to move the surface to the left
or right. If the beeper button is on, the level will beep when true plumb or 90o is reached.
Fig. 6 |
PITCH (Fig. 6)
The digital laser level can be used to measure the pitch of a roof. It measures the pitch in inches of rise per foot of run. Push the conversion button to change angle to pitch. The pitch will be read as inches per foot in 1/8-in. increments, with a + or a - sign to indicate if the pitch is above or below the desired measurement.
Fig. 7 |
ANGLE (Fig. 7 )
The digital laser level measures any angle in degrees with up to 0.1o accuracy. This can be used to find the necessary angle for many surfaces, and when
the conversion button is pushed to display angle, will tell you the angle and which way it is off of true level. If the beeper button is turned on, the level will beep at 0o angle.
11
24-inch LEVEL
OPERATION cont.
Fig. 8 |
SLOPE (Fig. 8)
The digital laser level measures the slope of a surface in percent. This is useful when laying pipe for proper drainage. When the conversion button is in the slope mode,
it will display the surface being measured in percent, with exact level at 0.0%. If the beeper button is turned on, the level will beep at 0.0%.
LASER TRAC™ ALIGNMENT (Fig. 9)
This digital level contains a laser diode located inside the left endcap of the level.
It provides a bright 635-665 nanometer beam with a useful visibility that extends up to 300-ft. indoors or outdoors.
1.To activate the Laser Trac™, press in the Laser On Demand Button
located on the right |
Fig. 9 |
|
endcap of the level (Fig. 9). |
||
|
2. The center of the laser beam is 1 3/8-inch above the bottom
(working) surface of the level. Remember to account for this when doing layouts and taking
measurements.
3. Level the work surface, and the laser will project the level up
to 300-feet away to enable
you to level large areas. (This range is only applicable
at night or dark environment.)
4. The laser projects a round dot on the targeted surface. The dot
size and shape may change slightly with distance, temperature or target surface material. The point
to use is the center of the dot pattern.
12
DESCRIPTION cont.
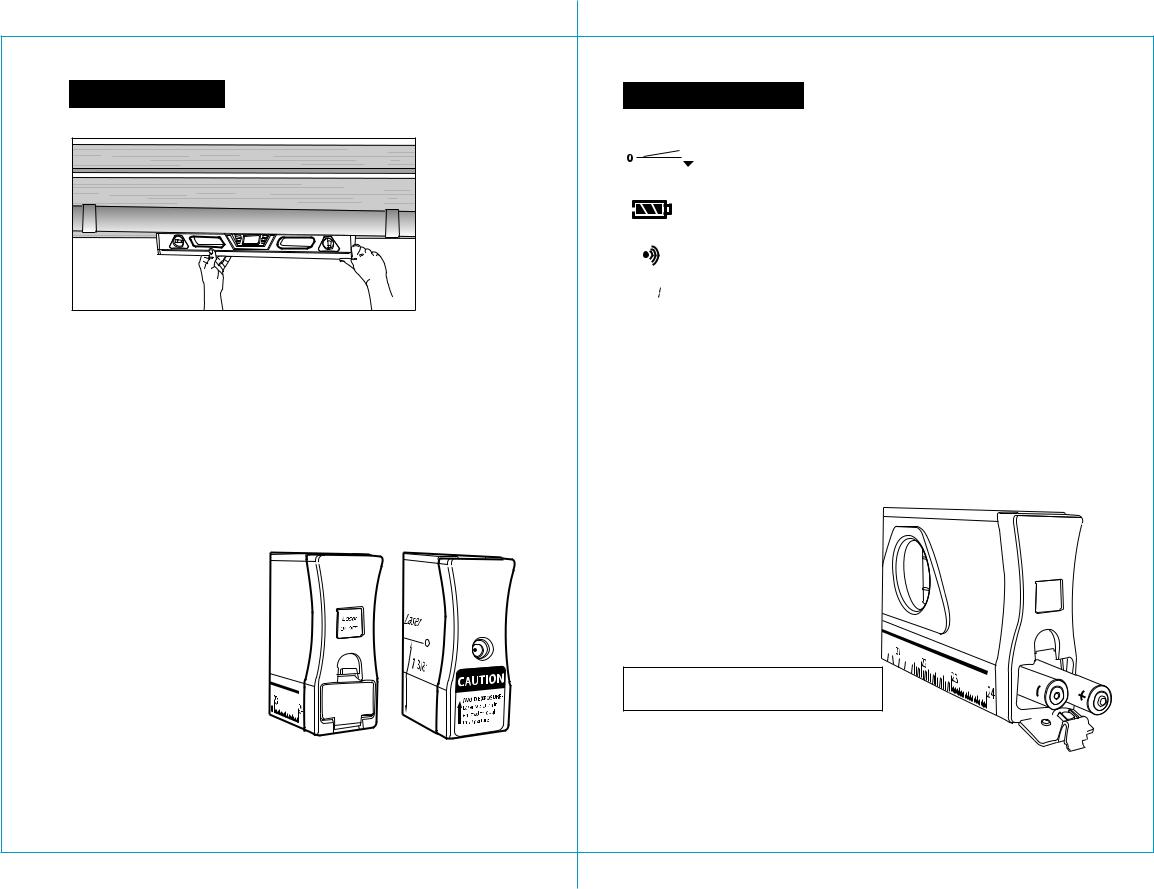
LCD SCREEN ICONS
Up/Down Indicator - The zero line (0°) indicates the level position. The arrow indicates the current angle's position, either up or down away from the level (0°).
Battery Power Icon - Indicates the amount of battery power in the unit. Replace batteries when the black power bar disappears.
|
|
Sound / Beeper Icon - This icon appears on the screen when the |
||||||||||||||||||||||
|
|
beeper function is activated. |
|
|
|
|
|
|
|
|
|
|
|
|
|
|
|
|
|
|
|
|
||
|
M |
Memory Icon - This icon shows when the memory function is being |
||||||||||||||||||||||
|
used. Level can recall the last nine saved measurements. |
|||||||||||||||||||||||
|
|
|||||||||||||||||||||||
|
|
|
|
|
|
|
|
|
|
|
|
|
|
|
|
|
|
|
|
|
|
|
||
|
TECHNICAL SPECIFICATIONS |
|
|
|
|
|
|
|
|
|
|
|
|
|
|
|
|
|
|
|
|
|
||
|
|
|
|
|
|
|
|
|
|
|
|
|
|
|
|
|
|
|
|
|
|
|||
|
Recommended Use |
|
Indoors or Outdoors |
|||||||||||||||||||||
|
Laser Class |
|
|
|
Class llla, Max. output power ≤ 2.5 mW |
|||||||||||||||||||
|
Power Supply |
|
Two “AAA” 1.5-volt batteries |
|||||||||||||||||||||
|
Angle Measuring Range |
|
0o to 360o |
|||||||||||||||||||||
|
Optimum Operating Temperature |
|
0o to 40oC (32 to 104oF) |
|||||||||||||||||||||
|
Accuracy of vials |
|
±0.029o (level or plumb) |
|||||||||||||||||||||
|
Accuracy of digital display |
|
±0.1o |
|||||||||||||||||||||
|
|
|
|
|
|
|
|
|
|
|
|
|
|
|
|
|
|
|
|
|
|
|
||
|
Estimated Battery Life |
|
10 hours with alkaline batteries |
|||||||||||||||||||||
|
|
|
|
|
|
|
|
|
|
|
|
|
|
|
|
|
|
|
|
|
|
|
|
|
|
|
|
|
Fig. 4 |
||||||||||||||||||||
|
OPERATION |
|
||||||||||||||||||||||
|
|
|
|
|
|
|
|
|
|
|
|
|
|
|
|
|
|
|
|
|
|
|
||
BATTERY INSTALLATION |
|
|
|
|
|
|
|
|
|
|
|
|
|
|
|
|
|
|
|
|
|
|||
(Fig. 4) |
|
|
|
|
|
|
|
|
|
|
|
|
|
|
|
|
|
|
|
|
|
|
LASER |
|
|
|
|
|
|
|
|
|
|
|
|
|
|
|
|
|
|
|
|
|
|
|
|
|
|
This multi-function digital laser level |
|
|
|
|
|
|
|
|
|
|
|
|
|
|
|
|
|
|
|
|
ON/OFF |
|||
|
|
|
|
|
|
|
|
|
|
|
|
|
|
|
|
|
|
|
|
|
||||
uses two “AAA” batteries (sold separately), |
|
|
|
|
|
|
|
|
|
|
|
|
|
|
|
|
|
|
|
|
||||
to power both the LCD module display |
|
|
|
|
|
|
|
|
|
|
|
|
|
|
|
|
|
|
|
|
|
|||
and the Laser Trac™ features. |
|
|
|
|
|
|
|
|
|
|
|
|
|
|
|
|
|
|
|
|
|
|||
NOTE: Always turn off the level before installing or replacing the batteries.
1.Open the battery cover, located in the right endcap of the level 
 below the laser on/off button (see Fig. 4).
2.Insert two new “AAA” alkaline batteries with the polarity (+/-) as indicated on the inside of the battery compartment.
3.Close the cover securely in place.
9
24-inch LEVEL
 Loading...