


Owner's Manual
®
STOP
DETHATCHER FOR SWEEPERS
Model No. 486.242182
CAUTION:
Before using this product, read this manual and follow all Safety Rules and
Operating Instructions.
Sears, Roebuck and Co., Hoffman Estates, IL 60179 U.S.A. www.sears.com/craftsman
DO NOT RETURN TO STORE
For Missing Parts or Assembly Questions Call 1-866-576-8388
•Safety
•Assembly
•Operation
•Maintenance
•Parts
PRINTED IN U.S.A. |
FORM NO. 41505 rev. (06/07/10) |

TABLE OF CONTENTS
SAFETY RULES.......................................................... |
2 |
FULL SIZE HARDWARE CHART................................ |
3 |
CARTON CONTENTS................................................. |
4 |
ASSEMBLY.................................................................. |
4 |
OPERATION................................................................ |
7 |
MAINTENANCE/STORAGE......................................... |
7 |
REPAIR PARTS .......................................................... |
9 |
PARTS ORDERING/SERVICE...................... |
Back Page |
WARRANTY
CRAFTSMAN FULL WARRANTY
When operated and maintained according to all supplied instructions, if this Craftsman product fails due to a defect in material or workmanship within one year from the date or purchase, return it to any Sears store or other Craftsman outlet in the United States for free replacement.
This warranty applies for only 90 days from the date of purchase if this product is ever used for commercial or rental purposes.
This warranty does not include items considered to expendable parts that can wear out from normal use within the warranty period.
This warranty gives you specific legal rights, and you may also have other rights which vary from state to state.
Sears, Roebuck and Co., D817WA, Hoffman Estates, IL 60179
DO NOT RETURN TO STORE for Missing Parts or Assembly Questions
Call 1-866-576-8388 Attachment Hotline
The model number and serial numbers will be found on a |
MODEL NUMBER: |
486.242182 |
|
decal attached to the dethatcher. |
SERIAL NUMBER: |
__________________ |
|
|
|||
You should record both the serial number and the date of |
DATE OF PURCHASE:__________________ |
||
purchase and keep in a safe place for future reference. |
|||
|
|
||
|
|
|
|
SAFETY
Anypowerequipmentcancauseinjuryifoperatedimproperlyoriftheuserdoesnotunderstandhowtooperatetheequipment. Exercise caution at all times, when using power equipment.
•Read this owners manual carefully for operating and service instructions before attempting to assemble or operate the dethatcher. Be thoroughly familiar with the proper use of the dethatcher.
•Read the vehicle owners manual and vehicle safety rules, and know how to operate the vehicle before using the dethatcher.
•Read the lawnsweeper owners manual and safety rules, and know how to operate the lawnsweeper before using the dethatcher.
•Never allow children to operate the tractor or dethatcher attachment, and do not allow adults to operate without proper instructions.
•This dethatcher attachment has sharp tine points. Always handle with care and wear substantial foot wear when operating this dethatcher.
•Do not allow anyone to ride or sit on the dethatcher, lawnsweeper or towing vehicle.
•Keep the area of operation clear of all persons, particularly small children, and also pets.
•Always begin with the transmission in first (low) gear and engine at low speed, and gradually increase speed as conditions permit.
•Vehicle braking and stability may be affected with the attachment of this equipment. Be aware of changing conditions on slopes. Refer to safety rules in the vehicle owner's manual concerning safe operation on slopes. STAY OFF OF STEEP SLOPES.
•Always operate up and down a slope, never across the face of a slope
•This equipment should be operated at reduced speed on rough terrain, along creeks and ditches and on hillsides, to prevent tipping and loss of control. Do not drive too close to a creek or a ditch.
•Follow the maintenance instructions as outlined in this owners manual.
Look for this symbol to point out important safety precautions. It means — Attention!!
Become alert!! Your safety is involved.
2 |
Call 1-866-576-8388 for missing parts or assembly help |
|
DO NOT RETURN TO STORE |

HARDWARE PACKAGE CONTENTS
|
|
|
14 |
|
5 |
6 |
7 |
8 |
|
|
|
|||
|
|
|
15 |
|
|
|
|
16 |
9 |
|
|
|
|
|
|
|
|
17 |
|
|
|
12 |
13 |
|
|
|
|
11 |
|
|
|
10 |
19 |
|
|
|
|
|
|
|
|
18 |
20 |
|
|
|
NOT SHOWN FULL SIZE |
|
|
21 |
|
|
26 |
|
|
|
|
|
|
|
|
24 |
25 |
27 |
22 |
|
23 |
|
|
|
|
|
||
REF. |
PART NO. |
QTY. |
DESCRIPTION |
REF. |
PART NO. |
QTY. |
DESCRIPTION |
5 |
46526 |
3 |
Hex Bolt, 1/2-13 x 3-1/2" |
17 |
48115 |
3 |
Jam Nut, Nylock 1/2-13 |
6 |
47025 |
2 |
Hex Bolt, 5/16-18 x 3-1/2" |
18 |
48812 |
2 |
Clevis Pin, 5/16" x 1-3/8" |
7 |
43085 |
7 |
Hex Bolt, 5/16-18 x 1-1/2" |
19 |
43003 |
4 |
Lock Washer, 3/8" |
8 |
48813 |
2 |
U-Bolt, 1/4-20 |
20 |
43015 |
4 |
Hex Nut, 3/8-16 |
9 |
48811 |
1 |
Transport Hook |
21 |
44481 |
2 |
Vinyl Cap |
10 |
43081 |
2 |
Washer, 5/16" |
22 |
48917 |
2 |
Clamp |
11 |
R19171616 |
2 |
Washer, 1/2" |
23 |
25054 |
2 |
Bracket, U-Bolt Clamp |
12 |
43070 |
14 |
Washer, 3/8" |
24 |
46499 |
2 |
Spacer |
13 |
43055 |
2 |
Hair Cotter Pin, 3/32" |
25 |
741-0248 |
4 |
Flange Bearing |
14 |
47189 |
4 |
Nylock Nut, 1/4-20 |
26 |
42212 |
1 |
Double Transport Hook |
15 |
47810 |
9 |
Nylock Nut, 5/16-18 |
27 |
46853 |
2 |
U-Bolt, 3/8 |
16 |
43019 |
1 |
Jam Nut, Plain 1/2-13 |
|
|
|
|
Call 1-866-576-8388 for missing parts or assembly help |
3 |
DO NOT RETURN TO STORE |
|
ASSEMBLY
CARTON CONTENTS
1.Spring Tines (7)
2.Frame Assembly
3.Gauge Wheel
4.Mount Brackets (2)
1
2
4
3
TOOLS REQUIRED FOR ASSEMBLY
(1)7/16" Wrench
(2)1/2" Wrenches
(2)3/4" or Adjustable Wrenches
(1)Knife
REMOVAL OF PARTS FROM CARTON
•Remove all parts and hardware packages from the carton. Lay out all parts and hardware and identify using the illustrations on pages 3 and 4.
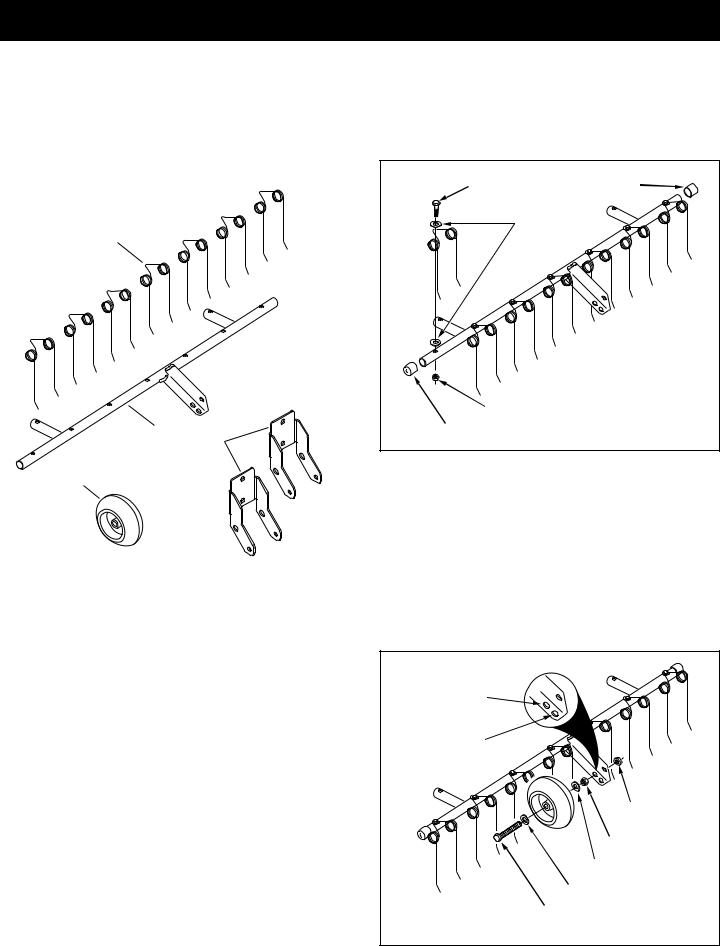
•Turn the frame assembly as shown in figure 1.
•Assemble seven spring tines to the top of the frame tube. Use a 5/16" x 1-1/2" hex bolt, two 3/8" flat washers and a 5/16" nylock nut for each spring tine. Place one 3/8" flat washer on top of the frame tube and the second 3/8" flat washer on top of the spring tine. See figure 1.
NOTE: On sweepers smaller than 42", use only five spring tines.
•Assemble a vinyl cap onto each end of the frame tube. See figure 1.
5/16" x 1-1/2" |
VINYL CAP |
HEX BOLT |
|
3/8" WASHER |
|
5/16" NYLOCK NUT |
|
VINYL CAP |
|
FIGURE 1
•Assemble a 1/2" washer, the wheel, another 1/2" washer and the 1/2" plain jam nut onto the
1/2" x 3-1/2" hex bolt. See figure 2.
•Insert the bolt through the welded bracket and assemble the 1/2" nylock jam nut onto the bolt. Adjust the nuts so that there is no end play in the wheel and then tighten the nuts securely against the welded bracket. Make sure the wheel still turns freely. See figure 2.
Use this hole for |
42" & 46" sweepers |
Use this hole for |
smaller sweepers |
1/2" NYLOCK |
JAM NUT |
1/2" JAM NUT |
1/2" WASHER |
1/2" WASHER |
1/2" x 3-1/2" |
HEX BOLT |
FIGURE 2
4 |
Call 1-866-576-8388 for missing parts or assembly help |
|
DO NOT RETURN TO STORE |
 Loading...