


Cisco RVS4000 Manual
ADMINISTRATION
GUIDE
Cisco Small Business
RVS4000 4-Port Gigabit Security Router with VPN

Cisco and the Cisco Logo are trademarks of Cisco Systems, Inc. and/or its affiliates in the U.S. and other countries. A listing of Cisco's trademarks can be found at www.cisco.com/go/trademarks. Third party trademarks mentioned are the property of their respective owners. The use of the word partner does not imply a partnership relationship between Cisco and any other company. (1005R)
© 2011 Cisco Systems, Inc. All rights reserved. |
OL-22605-02 |
|
Contents |
|
|
|
|
|
|
|
Chapter 1: Introduction |
8 |
|
Chapter 2: Networking and Security Basics |
9 |
|
An Introduction to LANs |
9 |
|
The Use of IP Addresses |
10 |
|
The Intrusion Prevention System (IPS) |
11 |
|
Chapter 3: Planning Your Virtual Private Network (VPN) |
13 |
|
Why do I need a VPN? |
13 |
|
1) MAC Address Spoofing |
14 |
|
2) Data Sniffing |
14 |
|
3) Man in the middle attacks |
14 |
|
What is a VPN? |
15 |
|
VPN Router to VPN Router |
16 |
|
Computer (using the Cisco QuickVPN Client software) to VPN Router |
17 |
|
Chapter 4: Getting Started with the RVS4000 Router |
18 |
|
Front Panel |
18 |
|
Back Panel |
19 |
|
Placement Options |
20 |
|
Desktop Option |
20 |
|
Stand Option |
20 |
|
Wall Option |
21 |
|
Installing the Router |
22 |
|
Configuring the Router |
23 |
|
Chapter 5: Setting Up and Configuring the Router |
25 |
|
Setup |
26 |
|
Setup > Summary |
26 |
|
Setup > WAN |
29 |
|
Setup > LAN |
38 |
|
|
|
|
Cisco RVS4000 Security Router with VPN Administrator Guide |
3 |
|
|
Contents |
|
|
|
|
Setup > DMZ |
40 |
Setup > MAC Address Clone |
41 |
Setup > Advanced Routing |
42 |
Setup > Time |
44 |
Setup > IP Mode |
45 |
Firewall |
46 |
Firewall > Basic Settings |
46 |
Firewall > IP Based ACL |
48 |
Firewall > Internet Access Policy |
51 |
Firewall > Single Port Forwarding |
54 |
Firewall > Port Range Forwarding |
55 |
Firewall > Port Range Triggering |
56 |
ProtectLink |
57 |
ProtectLink > ProtectLink Purchase |
57 |
VPN |
58 |
VPN > Summary |
58 |
VPN > IPSec VPN |
60 |
VPN > VPN Client Accounts |
64 |
VPN > VPN Passthrough |
66 |
QoS |
67 |
QoS > Bandwidth Management |
67 |
QoS > QoS Setup |
70 |
QoS > DSCP Setup |
71 |
Administration |
72 |
Administration > Management |
72 |
Router Access |
72 |
Administration > Log |
74 |
Administration > Diagnostics |
76 |
Administration > Backup & Restore |
78 |
Administration > Factory Default |
79 |
Administration > Reboot |
80 |
Administration > Firmware Upgrade |
80 |
|
|
Cisco RVS4000 Security Router with VPN Administrator Guide |
4 |
|
Contents |
|
|
|
|
IPS |
82 |
IPS > Configuration |
82 |
IPS > P2P/IM |
83 |
IPS > Report |
84 |
IPS > Information |
86 |
L2 Switch |
86 |
L2 Switch > Create VLAN |
86 |
L2 Switch > VLAN Port Setting |
88 |
L2 Switch > VLAN Membership |
89 |
L2 Switch > RADIUS |
90 |
L2 Switch > Port Setting |
91 |
L2 Switch > Statistics |
92 |
L2 Switch > Port Mirroring |
93 |
L2 Switch > RSTP |
94 |
Status |
95 |
Status > Gateway |
95 |
Status > Local Network |
97 |
Chapter 6: Using the VPN Setup Wizard |
98 |
VPN Setup Wizard |
98 |
Before You Begin |
98 |
Running the VPN Setup Wizard |
99 |
Building Your VPN Connection Remotely |
109 |
Appendix A: Troubleshooting |
116 |
Frequently Asked Questions |
128 |
Appendix B: Using Cisco QuickVPN for Windows 2000, XP, or Vista |
133 |
Overview |
133 |
Before You Begin |
133 |
Installing the Cisco QuickVPN Software |
135 |
Installing from the CD-ROM |
135 |
|
|
Cisco RVS4000 Security Router with VPN Administrator Guide |
5 |
|
Contents |
|
|
|
|
|
|
|
Downloading and Installing from the Internet |
137 |
|
Using the Cisco QuickVPN Software |
137 |
|
Distributing Certificates to QuickVPN Users |
140 |
|
Appendix C: Configuring IPSec with a Windows 2000 or XP Computer |
142 |
|
Introduction |
142 |
|
Environment |
143 |
|
Windows 2000 or Windows XP 143 |
|
|
RVS4000 143 |
|
|
How to Establish a Secure IPSec Tunnel |
143 |
|
Establishing a Secure IPSec Tunnel |
144 |
|
Appendix D: Gateway-to-Gateway VPN Tunnel |
166 |
|
Overview |
166 |
|
Before You Begin |
166 |
|
Configuration when the Remote Gateway Uses a Static IP Address |
167 |
|
Configuration when the Remote Gateway Uses a Dynamic IP Address |
172 |
|
Configuration When Both Gateways Use Dynamic IP Addresses |
177 |
|
Appendix E: Cisco ProtectLink Web Service |
182 |
|
Overview |
182 |
|
How to Access the Configuration Utility |
182 |
|
How to Purchase, Register, or Activate the Service |
183 |
|
ProtectLink |
183 |
|
How to Use the Service |
185 |
|
ProtectLink > Web Protection |
185 |
|
ProtectLink > License |
189 |
|
Appendix F: Specifications |
190 |
|
Specifications |
190 |
|
Performance |
190 |
|
|
|
|
Cisco RVS4000 Security Router with VPN Administrator Guide |
6 |
|

|
Contents |
|
|
|
|
Setup/Config |
190 |
Management |
191 |
Security Features |
191 |
QoS |
191 |
Network |
192 |
VPN |
192 |
Routing |
192 |
Layer 2 |
192 |
Environmental |
193 |
Appendix G: Where to Go From Here |
194 |
Product Resources |
194 |
Related Documentation |
195 |
Cisco RVS4000 Security Router with VPN Administrator Guide |
7 |

1
Introduction
Thank you for choosing the Cisco RVS4000 4-Port Gigabit Security Router with VPN. The 4-Port Gigabit Security Router with VPN is an advanced Internet-sharing network solution for your small business needs. Like any router, it lets multiple computers in your office share an Internet connection.
The 4-Port Gigabit Security Router with VPN also features a built-in 4-Port fullduplex 10/100/1000 Ethernet switch to connect four PCs directly, or you can connect more hubs and switches to create as big a network as you need.
The Virtual Private Network (VPN) capability creates encrypted “tunnels” through the Internet, allowing up to 5 remote offices and 5 traveling users to securely connect into your office network from off-site. Users connecting through a VPN tunnel are attached to your company’s network — with secure access to files, email, and your intranet — just as if they were in the building. You can also use the VPN capability to allow users on your small office network to securely connect out to a corporate network. The QoS features provide consistent voice and video quality throughout your business.
The 4-Port Gigabit Security Router with VPN can serve as a DHCP Server, and has a powerful SPI firewall and Intrusion Prevention System (IPS) to protect your PCs against intruders and most known Internet attacks. You can configure the router to filter internal users’ access to the Internet, and has IP and MAC address filtering so you can specify exactly who has access to your network. Configuration is a snap with the web browser-based configuration utility.
This administration guide will give you all the information you need to connect, set up, and configure your router.
Cisco RVS4000 Security Router with VPN Administrator Guide |
8 |

2
Networking and Security Basics
This chapter describes networking and security basics. It includes these sections:
•An Introduction to LANs, page 9
•The Use of IP Addresses, page 10
•The Intrusion Prevention System (IPS), page 11
An Introduction to LANs
A router is a network device that connects two networks together.
The router connects your local area network (LAN), or the group of PCs in your home or office, to the Internet. The router processes and regulates the data that travels between these two networks.
The router’s Network Address Translation (NAT) technology protects your network of PCs so users on the Internet cannot “see” your PCs. This feature keeps your LAN remains private. The router protects your network by inspecting the first packet received through the Internet port before delivering it to the final destination on one of the Ethernet ports. The router inspects Internet port services like the web server, ftp server, or other Internet applications, and, if allowed, it will forward the packet to the appropriate PC on the LAN side.
Cisco RVS4000 Security Router with VPN Administrator Guide |
9 |

Networking and Security Basics |
2 |
|
|
The Use of IP Addresses |
|
|
|
|
|
The Use of IP Addresses
IP stands for Internet Protocol. Every device in an IP-based network, including PCs, print servers, and routers, requires an IP address to identify its location, or address, on the network. This applies to both the Internet and LAN connections.
There are two ways of assigning IP addresses to your network devices.
A static IP address is a fixed IP address that you assign manually to a PC or other device on the network. Since a static IP address remains valid until you disable it, static IP addressing ensures that the device assigned it will always have that same IP address until you change it. Static IP addresses are commonly used with network devices such as server PCs or print servers.
If you use the router to share your cable or DSL Internet connection, contact your ISP to find out if they have assigned a static IP address to your account. If so, you will need that static IP address when configuring the router. You can get the information from your ISP.
A dynamic IP address is automatically assigned to a device on the network. These IP addresses are called dynamic because they are only temporarily assigned to the PC or other device. After a certain time period, they expire and may change. If a PC logs onto the network (or the Internet) and its dynamic IP address has expired, the DHCP server will assign it a new dynamic IP address.
A DHCP server can either be a designated PC on the network or another network device, such as the router. By default, the router’s Internet Connection Type is
Obtain an IP automatically (DHCP).
The PC or network device that obtains an IP address is called the DHCP client. DHCP frees you from the requirement to assign an IP address manually when a new user is added to your network.
For DSL users, many ISPs may require you to log on with a user name and password to gain access to the Internet. This is a dedicated, high-speed connection type called Point to Point Protocol over Ethernet (PPPoE). PPPoE is similar to a dial-up connection, but PPPoE does not dial a phone number when establishing a connection. It also will provide the router with a dynamic IP address to establish a connection to the Internet.
By default, a DHCP server (on the LAN side) is enabled on the router. If you already have a DHCP server on your network, you MUST disable one of the two DHCP servers. If you run more than one DHCP server on your network, you will experience network errors, such as conflicting IP addresses. To disable DHCP on the router, see the Basic Setup section in Chapter 5, “Setting Up and
Configuring the Router.”
Cisco RVS4000 Security Router with VPN Administrator Guide |
10 |
Networking and Security Basics |
2 |
|
|
The Intrusion Prevention System (IPS) |
|
|
|
|
|
NOTE Since the router is a device that connects two networks, it needs two IP addresses—one for the LAN, and one for the Internet. In this Administration Guide, you’ll see references to the “Internet IP address” and the “LAN IP address”.
Since the router uses NAT technology, the only IP address that can be seen from the Internet for your network is the router’s Internet IP address. However, even this Internet IP address can be blocked so the router and network seem invisible to the Internet.
The Intrusion Prevention System (IPS)
IPS is an advanced technology to protect your network from malicious attacks. IPS works together with your SPI Firewall, IP Based Access Control List (ACL), Network Address Port Translation (NAPT), and Virtual Private Network (VPN) to achieve the highest level of security. IPS works by providing real-time detection and prevention as an in-line module in a router.
The RVS4000 has hardware-based acceleration for real-time pattern matching to detect malicious attacks. It actively filters and drops malicious TCP/UDP/ICMP/ IGMP packets and can reset TCP connections. This feature prevents network worm attacks against client PCs and servers with various operating systems including Windows, Linux, and Solaris. However, this system does not prevent viruses contained in email attachments.
The P2P (Peer-to-Peer) and IM (Instant Messaging) control allows the system administrator to prevent network users from using those protocols to communicate with people over the Internet. This helps the administrators to set up company policies on how to use the Internet bandwidth wisely.
The signature file is the heart of the IPS system. It is similar to the Virus definition file on your PC’s Anti-Virus software. IPS uses this file to match against packets coming into the router and performs actions accordingly. The RVS4000 has a signature file that contains 1000+ rules, which cover these categories: DDoS, Buffer Overflow, Access Control, Scan, Trojan Horse, Misc., P2P, IM, Virus, Worm, and Web Attacks.
Customers are encouraged to update their IPS signature file regularly to prevent any new types of attacks on the Internet.
Cisco RVS4000 Security Router with VPN Administrator Guide |
11 |

Networking and Security Basics |
2 |
|
|
The Intrusion Prevention System (IPS) |
|
|
|
|
|
IPS Scenarios
Cisco RVS4000 Security Router with VPN Administrator Guide |
12 |

3
Planning Your Virtual Private Network (VPN)
This chapter provides information for planning your VPN. It includes these sections:
•Why do I need a VPN?, page 13
•What is a VPN?, page 15
Why do I need a VPN?
Computer networking provides a flexibility not available when using an archaic, paper-based system. With this flexibility, however, comes an increased risk in security. Firewalls address this risk. Firewalls help to protect data inside of a local network. But what do you do when information leaves your local network, when emails go to their destination, or when you connect to your company’s network from a hotel or remote office? How is your data protected?
A VPN can help. VPNs are called Virtual Private Networks because they secure data moving outside of your network as if it were still within that network.
When data travels across the Internet from your computer, it is always open to attacks. You may already have a firewall, which helps protect data in your network from being corrupted or intercepted by entities outside of your network. When data moves outside of your network—when you send data to someone via email or communicate with an individual over the Internet—the firewall no longer protects your data.
At this point, your data becomes open to hackers who use a variety of methods to steal not only the data you transmit but also your network login and security data. Some of the most common methods are described in on the next page.
Cisco RVS4000 Security Router with VPN Administrator Guide |
13 |

Planning Your Virtual Private Network (VPN) |
3 |
|
|
Why do I need a VPN? |
|
|
|
|
|
1) MAC Address Spoofing
Packets transmitted over a network, either your local network or the Internet, are preceded by a packet header. These packet headers contain both the source and destination information for that packet to transmit efficiently. A hacker can use this information to spoof (or fake) a MAC address allowed on the network. With this spoofed MAC address, the hacker can also intercept information meant for another user.
2) Data Sniffing
Hackers use data “sniffing” to obtain network data as it travels through unsecured networks, such as the Internet. Tools for just this kind of activity, such as protocol analyzers and network diagnostic tools, are often built into operating systems and allow the data to be viewed in clear text.
3) Man in the middle attacks
Once the hacker has either sniffed or spoofed enough information, he can now perform a “man in the middle” attack. Hackers use this attack when data is transmitted from one network to another, by rerouting the data to a new destination. Even though the data never reaches its intended recipient, it appears successful to the person who sent the data.
These are only a few of the methods hackers use, and they are always developing more. Without the security of your VPN, your data is constantly open to such attacks as it travels over the Internet. Data travelling over the Internet often passes through many different servers around the world before reaching its final destination. That’s a long way to go for unsecured data and this is when a VPN serves its purpose.
Cisco RVS4000 Security Router with VPN Administrator Guide |
14 |

Planning Your Virtual Private Network (VPN) |
3 |
|
|
What is a VPN? |
|
|
|
|
|
What is a VPN?
A VPN, or Virtual Private Network, is a connection between two endpoints—a VPN router, for instance—in different networks that allows private data to be sent securely over a shared or public network, such as the Internet. This establishes a private network that can send data securely between these two locations or networks.
This is done by creating a “tunnel”. A VPN tunnel connects the two PCs or networks and allows data to be transmitted over the Internet as if it were still within those networks. Not a literal tunnel, it is a connection secured by encrypting the data sent between the two networks.
VPN was created as a cost-effective alternative to using a private, dedicated, leased line for a private network. Using industry standard encryption and authentication techniques—IPSec, short for IP Security—VPN creates a secure connection that, in effect, operates as if you were directly connected to your local network. You can use VPN to create a secure network that links a central office with branch offices, telecommuters, and/or professionals on the road (travelers can connect to a VPN router by using any computer with the Cisco QuickVPN Client software).
There are two basic ways to create a VPN connection:
•VPN router to VPN router
•Computer (using the Cisco QuickVPN Client software) to VPN router
The VPN router creates a “tunnel” or channel between two endpoints, so that data transmissions between them are secure. A computer with the Cisco QuickVPN Client software can be one of the two endpoints (refer to Appendix B, “Using Cisco QuickVPN for Windows 2000, XP, or Vista”). If you choose not to run the VPN client software, any computer with the built-in IPSec Security Manager (Microsoft 2000 and XP) allows the VPN router to create a VPN tunnel by using IPSec (refer to Appendix C, “Configuring IPSec with a Windows 2000 or XP Computer”). Other versions of Microsoft operating systems require additional, third-party VPN client software applications that support IPSec to be installed.
Cisco RVS4000 Security Router with VPN Administrator Guide |
15 |
Planning Your Virtual Private Network (VPN) |
3 |
|
|
What is a VPN? |
|
|
|
|
|
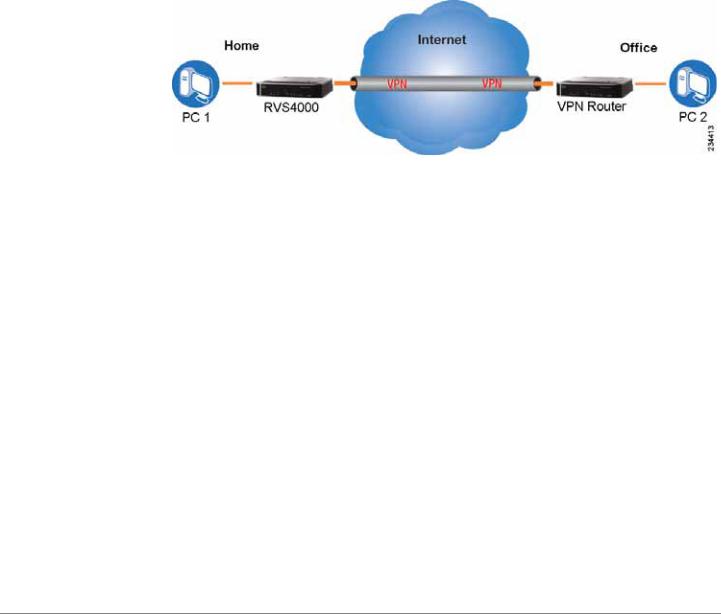
VPN Router to VPN Router
With a VPN-router-to-VPN-router VPN, a telecommuter uses his VPN router for his always-on Internet connection. His router is configured with his office’s VPN settings. When he connects to his office’s router, the two routers create a VPN tunnel, encrypting and decrypting data. As VPNs utilize the Internet, distance is not a factor. While using the VPN, the telecommuter now has a secure connection to the central office’s network, as if he were physically connected. For more information, refer to Appendix D, “Gateway-to-Gateway VPN Tunnel.”
VPN Router to VPN Router
Cisco RVS4000 Security Router with VPN Administrator Guide |
16 |
Planning Your Virtual Private Network (VPN) |
3 |
|
|
What is a VPN? |
|
|
|
|
|
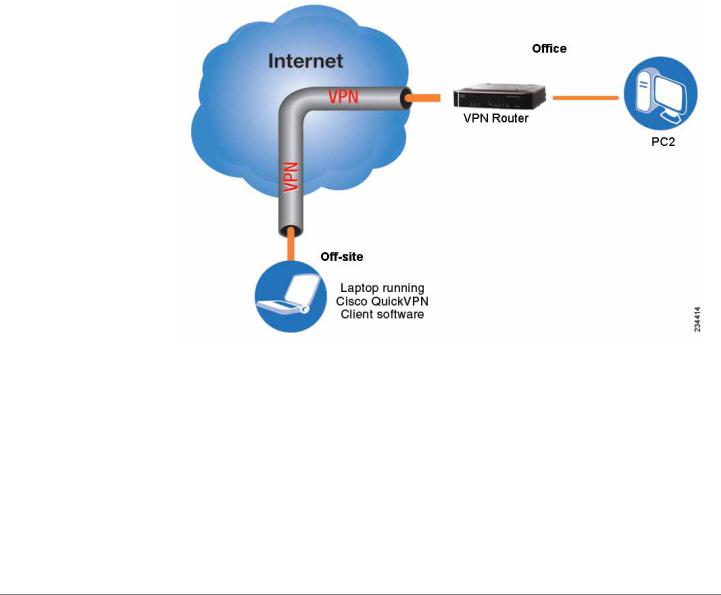
Computer (using the Cisco QuickVPN Client software) to VPN Router
In this illustration, you see an example of a computer-to-VPN router VPN. In her hotel room, a traveling businesswoman connects to her ISP. Her notebook computer has the Cisco QuickVPN Client software, which is configured with her office’s IP address. She accesses the Cisco QuickVPN Client software and connects to the VPN router at the central office. As VPNs utilize the Internet, distance is not a factor. While using the VPN, she now has a secure connection to the central office’s network, as if she were physically connected.
Computer to VPN Router
For additional information and instructions about creating your own VPN, please visit www.cisco.com. You can also refer to Appendix B, “Using Cisco QuickVPN for Windows 2000, XP, or Vista”, Appendix C, “Configuring IPSec with a Windows 2000 or XP Computer” and Appendix D, “Gateway-to-Gateway VPN
Tunnel.”
Cisco RVS4000 Security Router with VPN Administrator Guide |
17 |
4
Getting Started with the RVS4000 Router
This chapter describes the physical features of the RVS4000 router and explains how to install the router. It includes these sections:
•Front Panel, page 18
•Back Panel, page 19
•Placement Options, page 20
•Installing the Router, page 22
•Configuring the Router, page 23
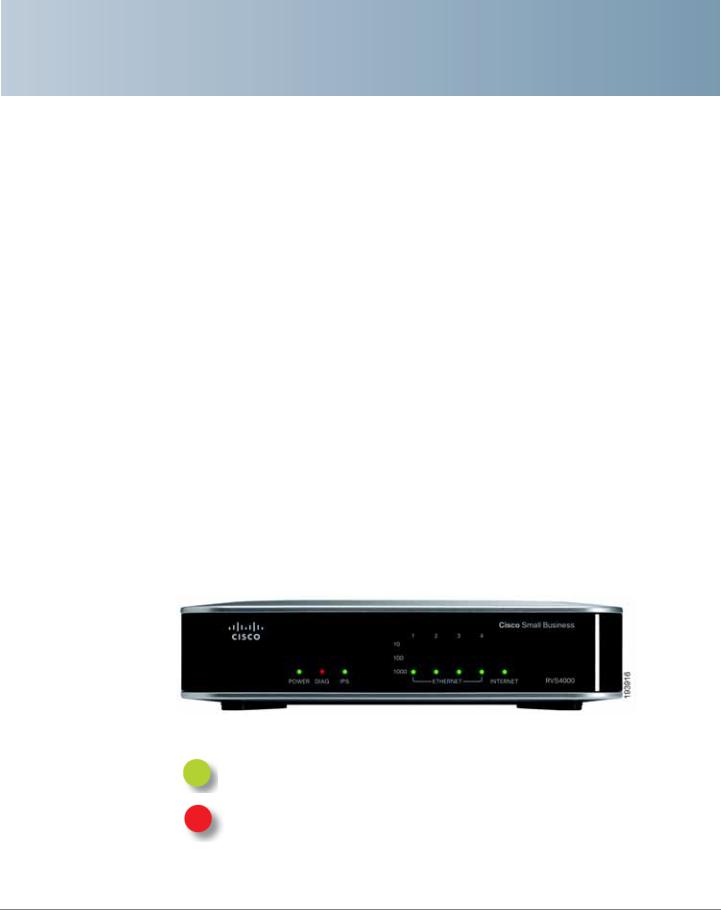
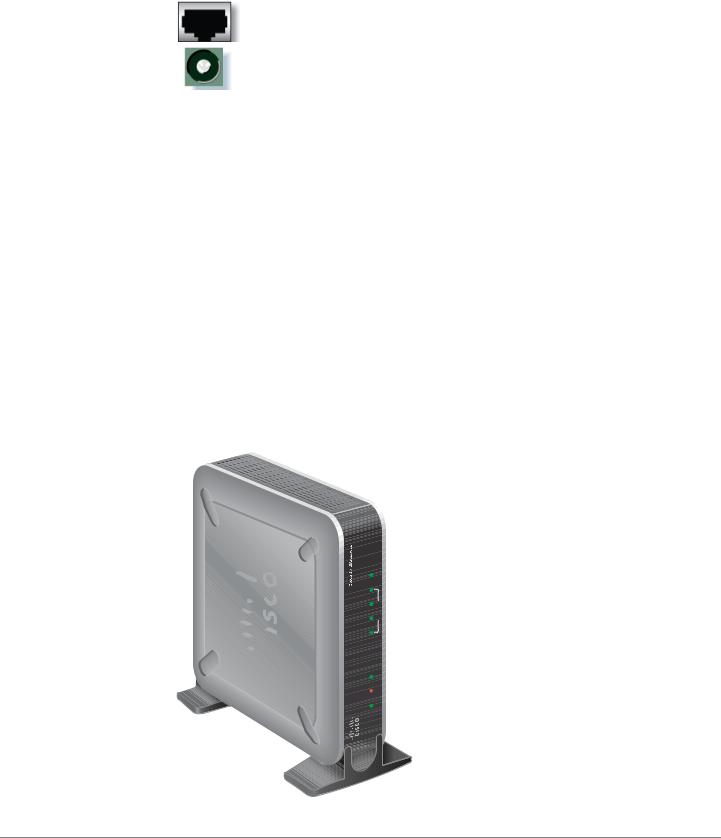
Front Panel
The LEDs are located on the front panel of the router.
Front Panel
POWER LED: Steady green when the router is powered on. Flashes when the router is running a diagnostic test.
DIAG LED: Unlit when the system is ready. Flashes red during firmware upgrades.
Cisco RVS4000 Security Router with VPN Administrator Guide |
18 |
Getting Started with the RVS4000 Router |
4 |
|
|
Back Panel |
|
|
|
|
|
IPS LED: Steady green when the Intrusion Prevention System (IPS) function is enabled. Unlit when IPS functions are disabled. Flashes green when an external attack is detected. Flashes red when an internal attack is detected.
Ethernet Port LEDs 1-4: For each LAN port, there are three LEDs. Steady green when the router is connected to a device at the speed indicated through the corresponding port (1, 2, 3, or 4). Flashes green when a router is actively sending or receiving data on the port.
INTERNET LED: Steady green to indicate the line speed of the device attached to the Internet port. Flashes to indicates activity. If the router is connected to a cable or DSL modem, typically the 100 LED is the only LED lit up, indicating 100 Mbps.
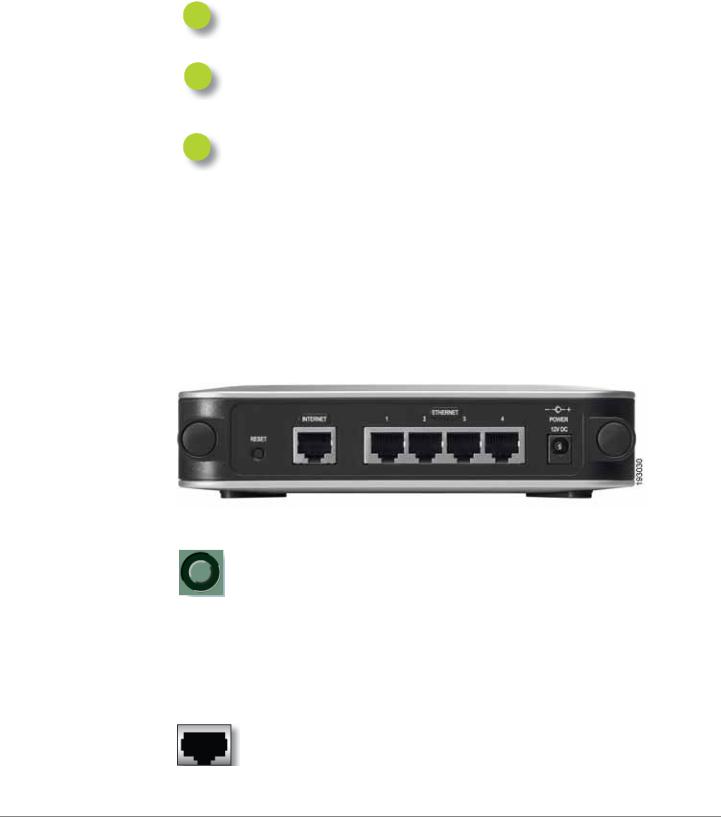
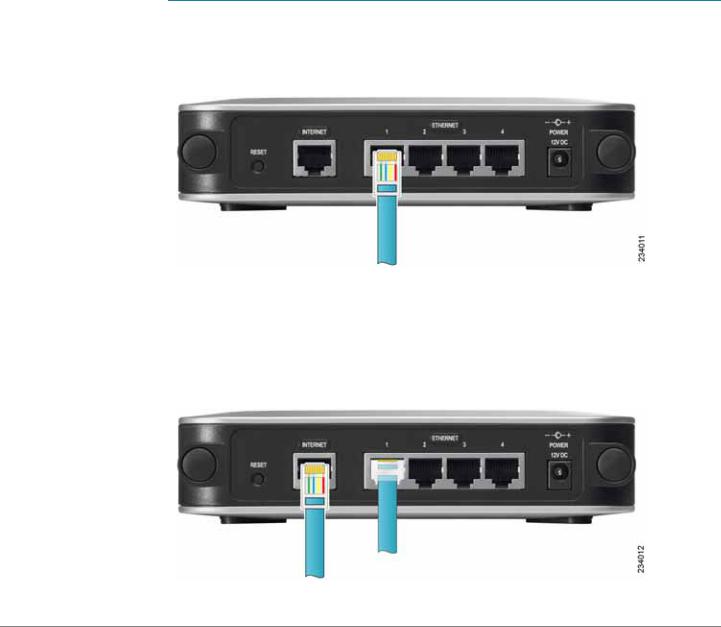
Back Panel
The Ethernet ports, Internet port, Reset button, and Power port are on the back panel of the router.
Back Panel
RESET Button: You can use the Reset button in two ways:
•If the router has problems connecting to the Internet, press the Reset button for just a second with a paper clip or a pencil tip. This is similar to pressing the reset button on your PC to reboot it.
•If you experience extreme problems with the router and have tried all other troubleshooting measures, press and hold the Reset button for 10 seconds. This action restores the factory defaults and clear all of the router settings, such as port forwarding or a new password.
INTERNET Port: Provides a WAN connection to a cable modem or DSL modem.
Cisco RVS4000 Security Router with VPN Administrator Guide |
19 |
Getting Started with the RVS4000 Router |
4 |
|
|
Placement Options |
|
|
|
|
|
ETHERNET Ports 1-4: Provide a LAN connection to network devices, such as PCs, print servers, or additional switches.
POWER Port: Connects the router to power via the supplied AC power adapter.
Placement Options
You can place the router horizontally on the rubber feet, mount it in the stand, or mount it on the wall.
Desktop Option
For desktop placement, place the Cisco RVS4000 router horizontally on a surface so it sits on its four rubber feet.
Stand Option
To install the router vertically in the supplied stands, follow the steps below.
|
|
<![if ! IE]> <![endif]>RVS4000 |
|
|
<![if ! IE]> <![endif]>INTERNET |
| <![if ! IE]> <![endif]>4 |
|
|
| <![if ! IE]> <![endif]>3 |
|
<![if ! IE]> <![endif]>ETHERNET |
| <![if ! IE]> <![endif]>2 |
|
|
| <![if ! IE]> <![endif]>1 |
|
<![if ! IE]> <![endif]>1000 |
| <![if ! IE]> <![endif]>10 |
<![if ! IE]> <![endif]>100 |
|
|
|
<![if ! IE]> <![endif]>IPS |
|
|
<![if ! IE]> <![endif]>DIAG |
|
|
<![if ! IE]> <![endif]>POWER |
<![endif]>274946
Cisco RVS4000 Security Router with VPN Administrator Guide |
20 |
Getting Started with the RVS4000 Router |
4 |
|
|
Placement Options |
|
|
|
|
|
To place the router vertically, follow these steps.
STEP 1 Locate the left side panel of the router.
STEP 2 With the two large prongs of one of the stands facing outward, insert the short prongs into the little slots in the router and push the stand upward until the stand snaps into place.
STEP 3 Repeat step 2 with the other stand.
Wall Option
To mount the Cisco RVS4000 router on the wall, follow these steps.
STEP 1 Determine where you want to mount the router and install two screws (not supplied) that are 2-9/16 in. apart (approximately 64.5 mm).
STEP 2 With the back panel pointing up (if installing vertically), line up the router so that the wall-mount crisscross slots on the bottom of the access point line up with the two screws.
Wall mount slots
 2-9/16


<![endif]> 193817
STEP 3 Place the wall-mount slots over the screws and slide the router down until the screws fit snugly into the wall-mount slots.
Cisco RVS4000 Security Router with VPN Administrator Guide |
21 |
Getting Started with the RVS4000 Router |
4 |
|
|
Installing the Router |
|
|
|
|
|
Installing the Router
To prepare the router for installation complete these tasks:
•Obtain the setup information for your specific type of Internet connection from your Internet Service Provider (ISP).
•Power off all of your network hardware, including the router, PCs, and cable modem or DSL modem.
Perform the steps in this section to install the hardware.
STEP 1 Connect one end of an Ethernet network cable to one of the LAN ports
(labeled 1-4) on the back of the router. Connect the other end to an Ethernet port on a PC.
STEP 2 Repeat step 1 to connect up to four PCs, switches, or other network devices to the router.
STEP 3 Connect an Ethernet network cable from your cable modem or DSL modem to the Internet port on the back panel of the router.
Cisco RVS4000 Security Router with VPN Administrator Guide |
22 |

Getting Started with the RVS4000 Router |
4 |
|
|
Configuring the Router |
|
|
|
|
|
STEP 4 Power on the cable or DSL modem.
STEP 5 Connect the power adapter to the router’s Power port and plug the other end into an electrical outlet.
STEP 6 The Power and Internet LEDs on the front panel lights up green as soon as the power adapter is connected.
STEP 7 Power on the PCs.
The router hardware installation is now complete.
Configuring the Router
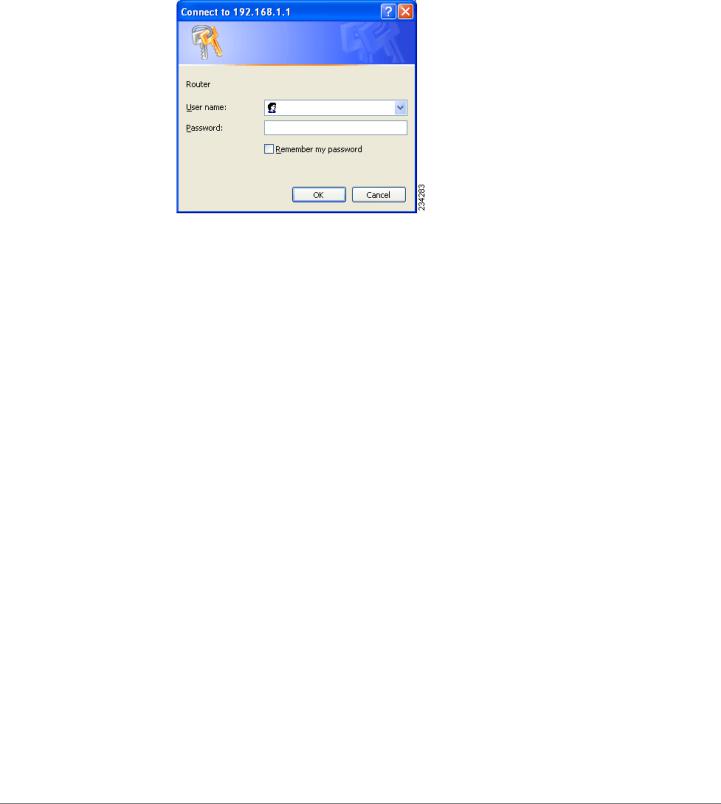
To configure the RVS4000, connect a PC to the router and launch the configuration utility.
NOTE Before setting up the router, make sure your PCs are configured to obtain an IP (or TCP/IP) address automatically from the router.
STEP 1 Launch a web browser, such as Internet Explorer or Mozilla Firefox.
STEP 2 In the Address field enter http://192.168.1.1 and press Enter.
STEP 3 In the User Name and Password fields, enter admin. The default user name and password are admin.
Cisco RVS4000 Security Router with VPN Administrator Guide |
23 |

Getting Started with the RVS4000 Router |
4 |
|
|
Configuring the Router |
|
|
|
|
|
STEP 4 |
Click OK. |
|
For added security, you should later set a new password on the Administration > |
|
Management page of the configuration utility. |
STEP 5 |
The configuration utility appears with the Setup menu and Summary selected. |
|
Click WAN under the Setup menu. |
STEP 6 |
If requested by your ISP (usually cable ISPs), complete the Host Name and Domain |
|
Name fields, and the MTU and MTU Size fields. Otherwise, leave the defaults. |
STEP 7 |
In the WAN screen, choose an Internet Connection Type from the |
|
drop-down menu. Depending on the Internet connection type that you select, |
|
additional setup may be required. |
|
The Internet Connection Types are: |
|
Automatic Configuration - DHCP If you connect through DHCP or a |
|
dynamic IP address from your ISP, keep this default setting. |
|
Static IP If your ISP assigns you a static IP address, select Static IP from the |
|
drop-down menu. Complete the Internet IP Address, Subnet Mask, Default |
|
Gateway, and DNS fields. Enter at least one DNS address. |
|
PPPoE If you connect through PPPoE, select PPPoE from the drop-down |
|
menu. Complete the User Name and Password fields. |
|
PPTP PPTP is used in Europe only. If you use a PPTP connection, check |
|
with your ISP for the necessary setup information. |
|
Heartbeat Signal Heartbeat Signal is used primarily in Australia. Check |
|
with your ISP for the necessary setup information. |
|
L2TP: L2TP is used mostly in Europe. Check with your ISP for the |
|
necessary setup information. |
STEP 8 When you finish entering your Internet connection settings, click Save.
STEP 9 Restart or power on your PC to obtain the new router setting.
STEP 10 Test the setup by opening your web browser from any computer and entering http://www.cisco.com/smb.
Congratulations! The installation of the router is complete.
NOTE For more information about advanced settings and security options, refer to
Chapter 5, “Setting Up and Configuring the Router.”
Cisco RVS4000 Security Router with VPN Administrator Guide |
24 |

5
Setting Up and Configuring the Router
This chapter explains how to configure these router functions:
•Setup, page 26
•Firewall, page 46
•VPN, page 58
•QoS, page 67
•Administration, page 72
•IPS, page 82
•L2 Switch, page 86
•Status, page 95
Configure the router by using the built-in web-based configuration utility. To access the configuration utility of the router, open your web browser and enter http://192.168.1.1 into the Address field. Press the Enter key and the Login window appears.
NOTE The default IP address is 192.168.1.1. If the IP address has been changed via DHCP or the console interface, enter the assigned IP address instead of the default.
The first time you open the configuration utility, enter admin (the default username) in the Username field and enter admin in the Password field. Click the OK button. You can change the password later from the Administration > Management window.
Cisco RVS4000 Security Router with VPN Administrator Guide |
25 |
Setting Up and Configuring the Router |
5 |
|
|
Setup |
|
|
|
|
|
Login Window
After you log in, the configuration utility starts. The menus appear as links in the navigation pane on the left side of the screen. After you select a menu, a list of windows appears. To perform a specific function, select a menu, and then select the appropriate window. By default, the Setup menu’s Summary window appears after you log in.
The utility’s menus and windows are described below. For brevity, window names are listed in this format: Menu > Window.
Setup
Use the Setup menu to access all of the router’s basic setup functions. You can use the router in most network settings without changing any of the default values. Some users may need to enter additional information in order to connect to the Internet through an ISP (Internet Service Provider) or broadband (DSL, cable modem) carrier
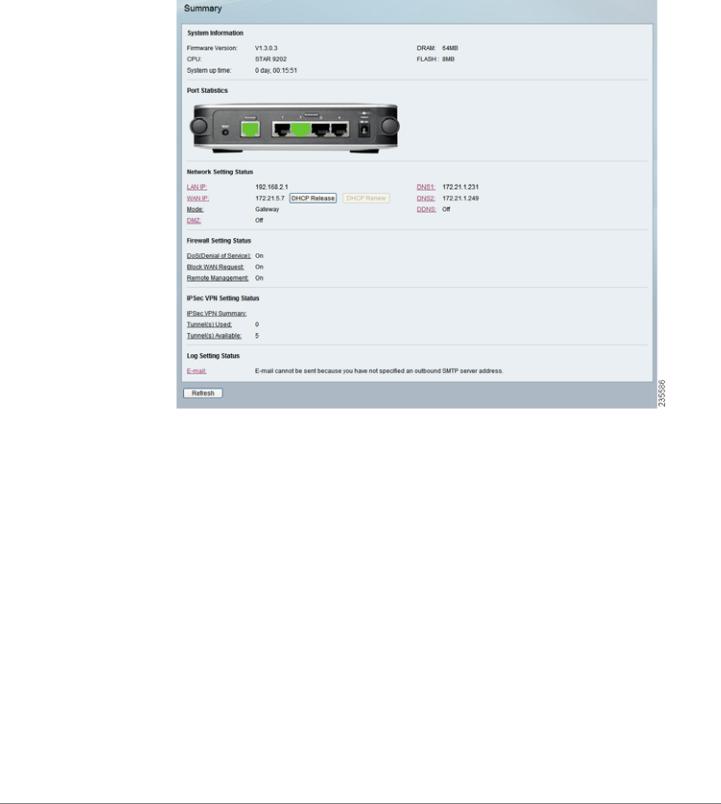
Setup > Summary
The Setup > Summary window displays a read-only summary of the router’s basic information. Click a hyperlink (underlined text) to open a related page where you can update the information.
Cisco RVS4000 Security Router with VPN Administrator Guide |
26 |
Setting Up and Configuring the Router |
5 |
|
|
Setup |
|
|
|
|
|
Setup > Summary
System Information
Firmware version Displays the router’s current firmware version.
CPU Displays the router’s CPU type.
System up time Displays the length of time that has elapsed since the router was last reset.
DRAM Displays the amount of DRAM installed in the router.
Flash Displays the amount of flash memory installed in the router.
Port Statistics
This section displays color-coded status information on the router’s Ethernet ports:
•Green Indicates that the port has a connection.
•Black Indicates that the port has no connection.
Cisco RVS4000 Security Router with VPN Administrator Guide |
27 |

Setting Up and Configuring the Router |
5 |
|
|
Setup |
|
|
|
|
|
Network Setting Status
LAN IP The IP address of the router’s LAN interface.
WAN IP The IP address of the router’s WAN interface. If this address was assigned by using DHCP, click DHCP Release to release the address, or click DHCP Renew to renew the address.
Mode The operating mode, Gateway or Router.
Gateway The Gateway address, which is the IP address of your ISP’s server.
DNS 1-2 The IP addresses of the Domain Name System (DNS) server(s) that the router is using.
DDNS Indicates whether the Dynamic Domain Name System (DDNS) feature is enabled.
DMZ Indicates whether the DMZ hosting feature is enabled.
Firewall Setting Status
DoS (Denial of Service) Indicates whether the DoS Protection feature is enabled to block DoS attacks.
Block WAN Request Indicates whether the Block WAN Request feature is enabled.
Remote Management Indicates whether the Remote Management feature is enabled.
IPSec VPN Setting Status
IPSec VPN Summary Click the IPSec VPN Summary hyperlink to display the
VPN > Summary window.
Tunnel(s) Used Displays the number of VPN tunnels currently in use.
Tunnel(s) Available Displays the number of VPN tunnels that are available.
Log Setting Status
Email If this displays Email cannot be sent because you have not specified an outbound SMTP server address, then you have not set up the mail server. Click the Email hyperlink to display the Administration > Log window where you can configure the SMTP mail server.
Cisco RVS4000 Security Router with VPN Administrator Guide |
28 |
Setting Up and Configuring the Router |
5 |
|
|
Setup |
|
|
|
|
|
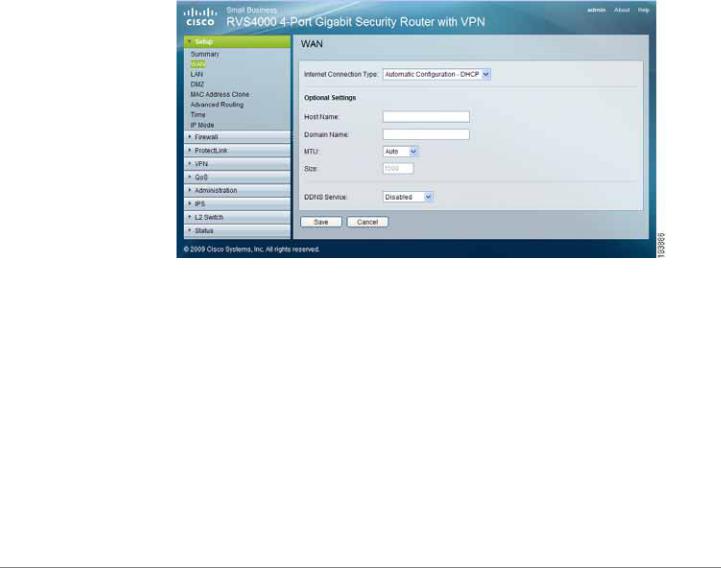
Setup > WAN
Internet Connection Type
The router supports six types of connections. Each Setup > WAN window and available features differ, depending on the selected connection type.
Automatic Configuration - DHCP
By default, the router’s Configuration Type is set to Automatic Configuration - DHCP, and it should be kept only if your ISP supports DHCP or you connect through a dynamic IP address.
Automatic Configuration - DHCP
Cisco RVS4000 Security Router with VPN Administrator Guide |
29 |
Setting Up and Configuring the Router |
5 |
|
|
Setup |
|
|
|
|
|
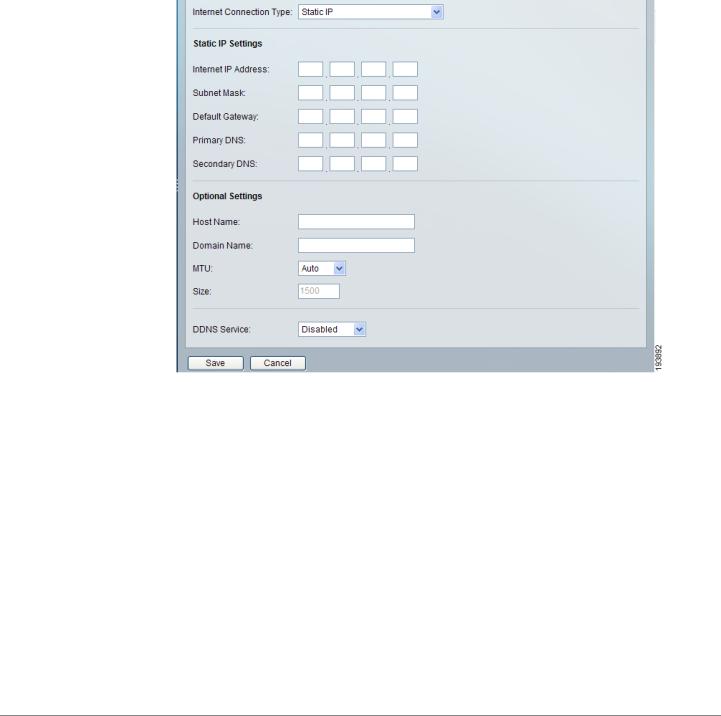
Static IP
If your connection uses a permanent IP address to connect to the Internet, then select Static IP.
Static IP
Internet IP Address The router’s IP address, when seen from the WAN, or the
Internet. Your ISP will provide you with the IP Address to specify here.
Subnet Mask The router’s Subnet Mask, as seen by external users on the Internet (including your ISP). Your ISP will provide you with the Subnet Mask.
Default Gateway Your ISP will provide you with the Default Gateway Address, which is the ISP server’s IP address.
Primary DNS (Required) and Secondary DNS (Optional) Your ISP will provide you with at least one DNS (Domain Name System) Server IP Address.
Click Save to save your changes, or click Cancel to undo your changes.
Cisco RVS4000 Security Router with VPN Administrator Guide |
30 |
 Loading...