


Quick Reference Guide
SlimPAR 56 QRG |
EN |
About This
Guide
Disclaimer
Safety Notes
Contact
To Begin
The SlimPAR 56 Quick Reference Guide (QRG) has basic product information such as mounting, menu options, and DMX values. Download the User Manual from www.chauvetlighting.com for details.
The information and specifications contained in this QRG are subject to change without notice.
These Safety Notes include important information about installation, use, and maintenance.
·This product is not intended for permanent installation.
·ONLY connect this product to a grounded and protected circuit.
·Always disconnect from power before cleaning or replacing the fuse.
·DO NOT look at the light source when the product is on.
·Make sure the power cord is not crimped or damaged.
·Never disconnect this product from power cord by pulling or tugging on the cord.
·When mounting this product overhead, use a safety cable.
·DO NOT allow flammable materials close to the unit while operating.
·DO NOT touch this product when it is operating because it may be hot.
·The voltage of the outlet to which you are connecting this product must be within the range stated on the decal or rear panel of the product.
·This product is for indoor use only! (IP20) To prevent risk of fire or shock, do not expose this product to rain or moisture.
·Always mount this product in a location with adequate ventilation, at least 20 in (50 cm) from adjacent surfaces.
·Be sure that no ventilation slots on the unit’s housing are blocked.
·Never connect this product to a dimmer or rheostat.
·Replace the fuse with the same type and rating.
·ONLY use the hanging/mounting bracket to carry this product.
·The maximum ambient temperature is 104 °F (40 °C). Do not operate this product at higher temperatures.
·In the event of a serious operating problem, stop using immediately.
·DO NOT open this product. It contains no user-serviceable parts.
·To eliminate wear and improve its lifespan, during periods of non-use completely disconnect the product from power via breaker or by unplugging it.
Outside the U.S., United Kingdom, Ireland, Mexico, or Benelux contact your distributor to request support or return a product. Visit www.chauvetlighting.com for contact information.
Unpack your SlimPAR 56 and make sure you have received all parts in good condition. If the box or contents appear damaged, notify the carrier immediately, not Chauvet.
2
SlimPAR 56 QRG |
EN |
What Is
Included
Product
Description
Overview
SLIMPAR56: |
SLIMPACK56LT: |
||
· |
SlimPAR 56 |
· |
4x SlimPAR 56 |
· |
Power Cord |
· |
3x DMX Cable |
· |
Warranty Card |
· |
4x Power Cord |
· |
Quick Reference Guide |
· |
Carry Bag |
|
|
· |
Warranty Card |
|
|
· |
Quick Reference Guide |
The SlimPAR 56 is an LED Par that can go almost anywhere. It has 108 red, green, and blue LEDs with 3- or 7-channel DMX control.
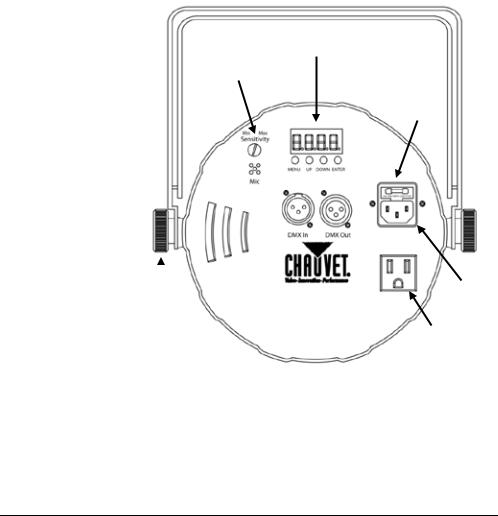
Control Panel
LED Display
Microphone Sensitivity
Adjustment Knob
Fuse
Holder
|
|
|
Power In |
|
|
|
|
|
|
|
|
|
|
|
|
Bracket |
|
|
|
Adjustment |
|
Power Out |
|
Knob |
|
||
Back Panel View
3

SlimPAR 56 QRG |
EN |
AC Power
Power Linking
Fuse Replacement
Connections
Diagram
This product has an auto-ranging power supply that can work with an input voltage range of 100–240 VAC, 50/60 Hz.
To eliminate wear and improve its lifespan, during periods of non-use completely disconnect from power via breaker or by unplugging it.
You can link up to 50 SlimPAR 56 products at 120 VAC or up to 100 units at 230 VAC.
To replace the F1A, 250 V fuse in the SlimPAR 56:
1.Disconnect the product from power.
2.Wedge the tip of a flat-head screwdriver into the slot of the fuse holder.
3.Pry the safety cap out of the housing.
4.Remove the blown fuse from the clip on the front of the safety cap and replace with a fuse of the exact same type and rating.
5.Re-insert the fuse holder and reconnect power.
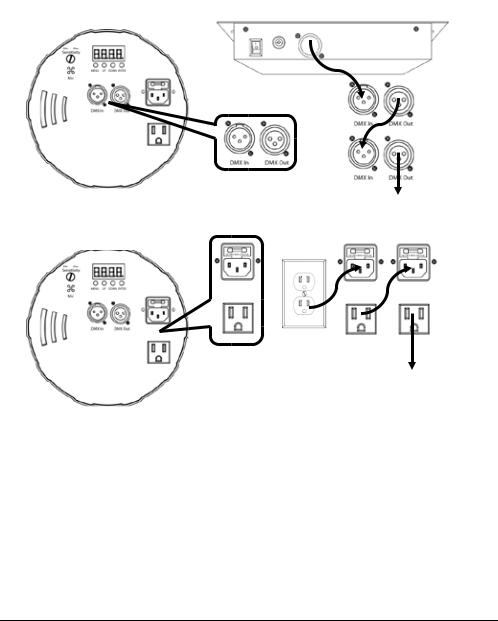
For easy setup, use the following diagrams to physically connect your SlimPAR 56 units to a DMX controller and each other.
DMX setup
*DMX controller sold separately*
To additional
SlimPAR 56s
Power linking setup
To additional
SlimPAR 56s
4

SlimPAR 56 QRG |
EN |
Mounting Before mounting this product, read the Safety Notes. The double-bracketed yoke can also be a floor stand.
Mounting |
|
Clamp |
Safety Cable |
|
Mounting Diagram
Control Panel
Description
Menu Map
Double-Bracketed
Yoke
Button |
Function |
|
<MENU> |
Selects an operation mode or exits current menu option. |
|
<UP> |
Scrolls up through the menu list or increases the numeric value |
|
when in a function. |
||
|
||
<DOWN> |
Scrolls down through the menu list or decreases the numeric |
|
value when in a function. |
||
|
||
<ENTER> |
Activates a menu option or selected value. |
|
Main Level |
|
Programming Levels |
|
|
Description |
|
||
|
|
|
P1 |
|
|
|
7-color program (switching) |
||
|
|
|
P2 |
|
|
|
7-color program (fading) |
||
|
P-- |
|
P3 |
|
|
|
3-color program (switching) |
||
|
|
P4 |
|
|
|
3-color program (fading) |
|||
|
|
|
|
|
|
||||
|
|
|
P5 |
|
|
|
7-color program (sound-active) |
||
|
|
|
P6 |
|
|
|
3-color program (sound-active) |
||
|
3-CH |
|
d001–d506 |
|
|
|
3-channel DMX mode (RGB) |
||
|
7-CH |
|
|
|
|
7-channel DMX mode |
|||
|
|
|
|
|
|
|
|||
|
|
|
C1 |
|
Red |
|
|
||
|
|
|
C2 |
|
Green |
|
|
||
|
|
|
C3 |
|
Blue |
|
|
||
|
C-- |
|
C4 |
|
Cyan |
Static color |
|||
|
|
|
C5 |
|
Magenta |
|
|
||
|
|
|
C6 |
|
Yellow |
|
|
||
|
|
|
C7 |
|
White |
|
|
||
|
S-- |
|
S001–S100 |
|
|
|
Program speed for P1–P4 |
||
|
U-- |
|
r-- (Red) |
|
r001–100 |
|
Custom static colors |
||
|
|
|
|||||||
|
|
g-- (Green) |
|
g001–100 |
|
||||
|
|
|
|
Combines red, green, and blue |
|||||
|
|
|
b-- (Blue) |
|
b001–100 |
||||
|
|
|
|
|
|
||||
5

SlimPAR 56 QRG |
EN |
DMX Linking
Starting Address
Master/Slave
Connection
DMX Values
The SlimPAR 56 can work with a DMX controller when linked by DMX serial connections. Instructions configuring this product for DMX operation are in the User Manual. If you are not familiar with DMX, download the DMX Primer from www.chauvetlighting.com.
To ensure full access to all channels in each DMX mode, the highest recommended DMX address is 506 (in the 7-channel DMX personality). To select the starting address, do the following:
1.Press <MENU> repeatedly until 3-CH or 7-CH shows on the display.
2.Press <ENTER>.
3.Use <UP> or <DOWN> to select the starting address (d001–d506).
4.Press <ENTER>.
The SlimPAR 56 uses the DMX data connection for its Master/Slave mode.
Instructions for connecting and configuring this product for Master/Slave operation are in the User Manual.
7-CH |
Channel |
Function |
Value |
Percent/Setting |
|
|
1 |
Red |
000 ó 255 |
0–100% |
|
|
2 |
Green |
010 ó 255 |
0–100% |
|
|
3 |
Blue |
030 ó 255 |
0–100% |
|
4 |
Color Macros |
000 ó 015 |
No function |
||
(Overrides Ch 1–3) |
016 ó 255 |
Color macros |
|||
|
|
||||
|
|
Speed |
|
|
|
|
|
(When Ch. 6 |
000 ó 255 |
Slow to fast |
|
5 |
is 032–223) |
|
|
||
|
|
Strobe |
001 ó 015 |
No function |
|
|
|
016 ó 255 |
Slow to fast |
||
|
|
|
|||
|
|
|
000 ó 031 |
RGB mode |
|
|
|
|
032 ó 063 |
Pulse effect 0–100% |
|
|
|
|
064 ó 095 |
Pulse effect 100%–0 |
|
6 |
Mode |
096 ó 127 |
Pulse effect 100%–0–100% |
||
128 ó 159 |
Auto fade transition |
||||
|
|
|
|||
|
|
|
160 ó 191 |
Auto snap transition (3 colors) |
|
|
|
|
192 ó 223 |
Auto snap transition (7 colors) |
|
|
|
|
224 ó 255 |
Sound-Active mode |
|
7 |
Dimmer |
000 ó 255 |
0–100% |
||
3-CH |
Channel |
Function |
Value |
Percent/Setting |
|
1 |
Red |
000 ó 255 |
0–100% |
|
2 |
Green |
000 ó 255 |
0–100% |
3 |
Blue |
000 ó 255 |
0–100% |
|
6
SlimPAR 56 GRR |
ES |
Acerca de Esta
Guía
Exención de
Responsabilidad
Notas de
Seguridad
La Guía de Referencia Rápida (GRR) del SlimPAR 56 contiene información básica sobre el producto, como montaje, opciones de menú y valores DMX. Descargue el manual de usuario de www.chauvetlighting.com para ver los detalles.
La información y especificaciones contenidos en esta GRR están sujetas a cambio sin previo aviso.
Estas notas de seguridad incluyen información importante sobre el montaje, uso y mantenimiento.
·Este producto no está concebido para una instalación permanente.
·Conecte este producto SOLO a un circuito con toma de tierra y protegido.
·Desconecte siempre de la alimentación antes de la limpieza o sustitución del fusible.
·NO mire a la fuente de luz cuando el producto esté encendido.
·Asegúrese de que el cable de alimentación no está retorcido ni estropeado.
·Nunca desconecte este producto del cable de alimentación agarrando o tirando del cable.
·Cuando monte este producto en alto, use un cable de seguridad.
·NO permita la presencia de materiales inflamables cerca de la unidad cuando esté en funcionamiento.
·NO toque este producto cuando esté en funcionamiento, pues podría estar caliente.
·La tensión del enchufe al que conecte este producto ha de estar en el rango establecido en el grabado o en el panel posterior de producto.
·¡Este producto es para uso en interiores solamente! (IP20) Para evitar riesgos de incendio o descarga, no exponga este producto a la lluvia o la humedad.
·Monte siempre este producto en una ubicación con ventilación adecuada, al menos a 20'' (50 cm) de superficies adyacentes.
·Asegúrese de que ninguna ranura de ventilación en la carcasa de la unidad queda bloqueada.
·Nunca conecte este producto a un atenuador o reostato.
·Sustituya el fusible con uno del mismo tipo y categoría.
·Use SOLAMENTE los soportes de colgar/montar para mover este producto.
·La máxima temperatura ambiente es de 104 °F (40 °C). No haga funcionar este producto a temperaturas más altas.
·En caso de un problema grave de funcionamiento, deje de usarlo inmediatamente.
·NO abra este producto. No contiene piezas reparables por el usuario.
·Para evitar un desgaste innecesario y alargar su vida útil, desconecte complemente el producto de la alimentación, mediante el interruptor o desenchufándolo, durante los periodos en los que no se use.
7
SlimPAR 56 GRR |
ES |
Contacto
Qué va
Incluido
Para Empezar
Descripción del Producto
Fuera de EE.UU, Reino Unido, Irlanda, México o Benelux póngase en contacto con su distribuidor para solicitar asistencia o devolver el producto. Visite www.chauvetlighting.com para información de contacto.
SLIMPAR56: |
SLIMPACK56LT: |
|||
· |
SlimPAR 56 |
· |
4x SlimPAR 56 |
|
· |
Cable de alimentación |
· 3x |
Cable de DMX |
|
· |
Tarjeta de garantía |
· 4x |
Cable de alimentación |
|
· Guía de Referencia Rápida |
· |
Bolsa de transporte |
||
|
|
· |
Tarjeta de garantía |
|
· Guía de Referencia Rápida
Desembale su SlimPAR 56 y asegúrese de que ha recibido todas las partes en buen estado. Si la caja o los componentes parecen dañados, notifíqueselo al transportista inmediatamente, no a Chauvet.
El SlimPAR 56 es un reflector LED que puede llegar casi a cualquier parte. Tiene 108 LEDs rojos, verdes y azules con un control DMX de 3 o 7 canales.
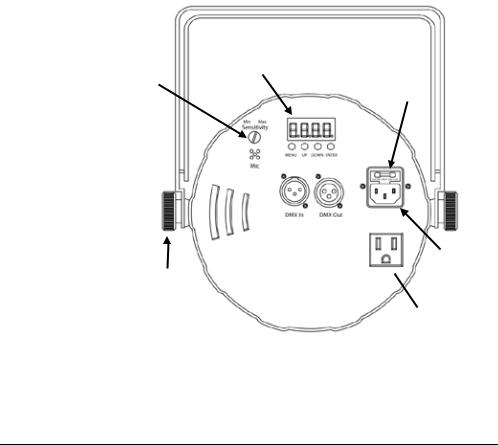
|
Pantalla LED |
|
del panel de |
Mando de Ajuste de |
control |
Sensibilidad del |
Portafusibles |
Micrófono |
Vista General
Entrada de
Mando de ajuste  alimentación del soporte
Salida de alimentación
Vista del Panel Posterior
8

SlimPAR 56 GRR |
ES |
Corriente
Alterna
Alimentación en
Cadena
Sustitución del
Fusible
Montaje
Este producto tiene una fuente de alimentación con detección automática que puede funcionar con un rango de tensión de entrada de 100~240 VCA, 50/60 Hz.
Para evitar un desgaste innecesario y alargar su vida útil, desconecte complemente el producto de la alimentación, mediante el interruptor o desenchufándolo, durante los periodos en los que no se use.
Puede enlazar hasta 50 productos SlimPAR 56 a 120 VCA, o hasta 100 a 230 VCA.
Para sustituir el fusible F1A, 250 V del SlimPAR 56:
1.Desconecte el producto de la alimentación.
2.Haga cuña con la punta de un destornillador plano en la ranura del portafusibles.
3.Saque la tapa de seguridad de la carcasa.
4.Quite el fusible fundido de la sujeción en la parte frontal de la tapa de seguridad y sustituya el fusible con otro del mismo tipo y categoría.
5.Vuelva a insertar el portafusibles y conecte de nuevo la alimentación.
Antes de montar este producto, lea las Notas de seguridad. El puente de doble soporte puede ser también un pie de suelo.
Cable de seguridad
Abrazadera de montaje
Diagrama de
Montaje
Puente de doble soporte
9
SlimPAR 56 GRR |
ES |
Diagrama de Conexiones
Para una fácil instalación, use los siguientes diagramas para conectar físicamente sus unidades SlimPAR 56 al controller de DMX y viceversa.
Instalación DMX
* Controlador DMX se vende por separado*
ASlimPAR 56s adicionales
Instalación alimentación en cadena
ASlimPAR 56s
adicionales
Descripción del Panel de Control
|
Botón |
Función |
|
<MENU> |
Selecciona un modo de funcionamiento o sale del la opción de |
|
menú actual. |
|
|
|
|
|
<UP> |
Se desplaza hacia arriba por la lista de menú o aumenta el |
|
valor numérico cuando está en una función. |
|
|
|
|
|
<DOWN> |
Se desplaza hacia abajo por la lista de menú o disminuye el |
|
valor numérico cuando está en una función. |
|
|
|
|
|
<ENTER> |
Activa una opción de menú o valor seleccionado. |
10
SlimPAR 56 GRR ES
Mapa de Menú
|
Nivel Principal |
|
Niveles de Programación |
|
|
Descripción |
|
||
|
|
|
P1 |
|
|
|
Programa de 7 colores (conmutación) |
||
|
|
|
P2 |
|
|
|
Programa de 7 colores (fundido) |
||
|
P-- |
|
P3 |
|
|
|
Programa de 3 colores (conmutación) |
||
|
|
P4 |
|
|
|
Programa de 3 colores (fundido) |
|||
|
|
|
|
|
|
||||
|
|
|
P5 |
|
|
|
Programa de 7 colores (activo por sonido) |
||
|
|
|
P6 |
|
|
|
Programa de 3 colores (activo por sonido) |
||
|
3-CH |
|
d001–d506 |
|
|
|
Modo DMX de 3 canales (RGB) |
||
|
7-CH |
|
|
|
|
Modo DMX de 7 canales |
|||
|
|
|
|
|
|
|
|||
|
|
|
C1 |
|
Rojo |
|
|
||
|
|
|
C2 |
|
Verde |
|
|
||
|
|
|
C3 |
|
Azul |
|
|
||
|
C-- |
|
C4 |
|
Cian |
Color estático |
|||
|
|
|
C5 |
|
Magenta |
|
|
||
|
|
|
C6 |
|
Amarillo |
|
|
||
|
|
|
C7 |
|
Blanco |
|
|
||
|
S-- |
|
S001–S100 |
|
|
|
Velocidad de programa para P1–P4 |
||
|
U-- |
|
r-- (Rojo) |
|
r001–100 |
|
Colores estáticos personalizados |
||
|
|
|
|||||||
|
|
g-- (Verde) |
|
g000–100 |
|
||||
|
|
|
|
Combina rojo, verde y azul |
|||||
|
|
|
b-- (Azul) |
|
b000–100 |
||||
|
|
|
|
|
|
||||
Enlace DMX
Dirección de Inicio
Conexión
Maestro/Esclavo
El SlimPAR 56 puede funcionar con un controlador DMX cuando se enlaza por conexiones serie DMX. Las instrucciones para conectar y configurar este producto para funcionamiento DMX están en el Manual de usuario. Si no está familiarizado con DMX, descargue el Manual DMX de www.chauvetlighting.com.
Para asegurarse acceso total a todos los canales en cada modo DMX, la dirección DMX más recomendable es 506 (en la personalidad DMX de 7 canales).
Para seleccionar la dirección de inicio, haga lo siguiente:
1.Pulse <MENU> repetidamente hasta que aparezca por pantalla
3-CH o 7-CH.
2.Pulse <ENTER>.
3.Utilice <UP> o <DOWN> para seleccionar la dirección de inicio (d001–d506).
4.Pulse <ENTER>.
El SlimPAR 56 usa la conexión de datos DMX para su modo
Maestro/Esclavo. Las instrucciones para conectar y configurar este producto para funcionamiento Maestro/Esclavo están en el Manual de usuario.
11

SlimPAR 56 GRR ES
Valores DMX
7-CH |
Canal |
Función |
Valor |
Porcentaje/Configuración |
|
1 |
Rojo |
000 ó 255 |
0–100% |
|
2 |
Verde |
010 ó 255 |
0–100% |
|
3 |
Azul |
030 ó 255 |
0–100% |
|
4 |
Macros de color |
000 ó 015 |
Sin función |
|
(Tiene preferencia |
|||
|
016 ó 255 |
Macros de color |
||
|
|
sobre C 1–3) |
||
|
|
|
|
|
|
|
Velocidad |
000 ó 255 |
|
|
|
(Cuando C. 6 es |
Lento a rápido |
|
|
5 |
032–223) |
|
|
|
|
Estroboscopio |
001 ó 015 |
Sin función |
|
|
016 ó 255 |
Lento a rápido |
|
|
|
|
||
|
|
|
000 ó 031 |
Modo RGB |
|
|
|
032 ó 063 |
Efecto pulso 0–100% |
|
|
|
064 ó 095 |
Efecto pulso 100%–0 |
|
6 |
Modo |
096 ó 127 |
Efecto pulso 100%–0–100% |
|
128 ó 159 |
Transición fade automático |
||
|
|
|
||
|
|
|
160 ó 191 |
Transición instantánea automática (3 colores) |
|
|
|
192 ó 223 |
Transición instantánea automática (7 colores) |
|
|
|
224 ó 255 |
Modo activo por sonido |
|
7 |
Atenuador |
000 ó 255 |
0–100% |
|
|
|
|
|
3-CH |
Canal |
Función |
Valor |
Porcentaje/Configuración |
|
1 |
Rojo |
000 ó 255 |
0–100% |
|
2 |
Verde |
000 ó 255 |
0–100% |
|
3 |
Azul |
000 ó 255 |
0–100% |
12
 Loading...