


 Loading...
User Manual

TABLE OF CONTENTS |
|
1. Before You Begin .......................................................................................................... |
8 |
What Is Included ............................................................................................................................. |
8 |
Unpacking Instructions.................................................................................................................... |
8 |
Claims..................................................................................................................................................... |
8 |
Text Conventions ............................................................................................................................ |
8 |
Symbols .......................................................................................................................................... |
8 |
Disclaimer ....................................................................................................................................... |
8 |
Product at a Glance ........................................................................................................................ |
9 |
Safety Notes.................................................................................................................................... |
9 |
2. Introduction .................................................................................................................. |
10 |
Features ........................................................................................................................................ |
10 |
Product Description....................................................................................................................... |
10 |
Mounting ....................................................................................................................................... |
10 |
Programming Concepts ................................................................................................................ |
10 |
Front Panel Overview.................................................................................................................... |
11 |
Front Panel View .................................................................................................................................. |
11 |
Front Panel Controls............................................................................................................................. |
11 |
Control Descriptions ............................................................................................................................. |
12 |
Back Panel View................................................................................................................................... |
13 |
Back Panel Ports .................................................................................................................................. |
13 |
DMX Polarity Switch Diagram....................................................................................................... |
13 |
Product Dimensions ...................................................................................................................... |
13 |
3. Setup............................................................................................................................. |
14 |
AC Power ...................................................................................................................................... |
14 |
Mounting ....................................................................................................................................... |
14 |
Setting Up the Board..................................................................................................................... |
14 |
DMX Cabling ................................................................................................................................. |
14 |
DMX Cabling Diagram .......................................................................................................................... |
14 |
Fixture Addressing ........................................................................................................................ |
14 |
4. Programming................................................................................................................ |
15 |
Program Mode .............................................................................................................................. |
15 |
Entering Program Mode........................................................................................................................ |
15 |
Exiting Program Mode .......................................................................................................................... |
15 |
Programming a Scene or Scenes ................................................................................................. |
16 |
Editing a Scene or Scenes ................................................................................................................... |
16 |
Deleting a Scene or Scenes ................................................................................................................. |
16 |
Programming a Chase .................................................................................................................. |
17 |
Add Mode ............................................................................................................................................. |
17 |
Deleting a Step or Steps in a Chase..................................................................................................... |
18 |
Edit Mode ............................................................................................................................................. |
18 |
5. Playback ....................................................................................................................... |
19 |
Playback Mode.............................................................................................................................. |
19 |
Chase Playback ............................................................................................................................ |
19 |
Speed............................................................................................................................................ |
19 |
Fade .............................................................................................................................................. |
19 |
Auto Mode..................................................................................................................................... |
20 |
Audio Triggering............................................................................................................................ |
20 |
Blackout ........................................................................................................................................ |
20 |
Tap Sync ....................................................................................................................................... |
20 |
Manual Override............................................................................................................................ |
20 |
Page 2 of 88 |
Foot-C 2 User Manual Rev. 1 |

MIDI Operation.............................................................................................................................. |
21 |
MIDI Map .............................................................................................................................................. |
21 |
6. Maintenance ................................................................................................................. |
22 |
Product Maintenance .................................................................................................................... |
22 |
7. Technical Specifications.............................................................................................. |
22 |
Returns ............................................................................................................................. |
23 |
1. Antes de empezar......................................................................................................... |
24 |
Qué va incluido ............................................................................................................................. |
24 |
Instrucciones de desembalaje ...................................................................................................... |
24 |
Reclamaciones ..................................................................................................................................... |
24 |
Convenciones de texto.................................................................................................................. |
24 |
Símbolos ....................................................................................................................................... |
24 |
Exención de responsabilidad............................................................................................................. |
24 |
El producto de un vistazo.............................................................................................................. |
25 |
Notas de seguridad ....................................................................................................................... |
25 |
2. Introduction .................................................................................................................. |
26 |
Características .............................................................................................................................. |
26 |
Descripción del producto............................................................................................................... |
26 |
Montaje.......................................................................................................................................... |
26 |
Conceptos de programación......................................................................................................... |
26 |
Vista general del panel frontal ...................................................................................................... |
27 |
Vista del panel frontal ........................................................................................................................... |
27 |
Controles del panel frontal.................................................................................................................... |
27 |
Descripciones del control...................................................................................................................... |
28 |
Vista del panel posterior ....................................................................................................................... |
29 |
Puertos del panel posterior................................................................................................................... |
29 |
Diagrama de conmutador de polaridad DMX ............................................................................... |
29 |
Dimensiones del producto ............................................................................................................ |
29 |
3. Instalación .................................................................................................................... |
30 |
Corriente alterna ........................................................................................................................... |
30 |
Montaje.......................................................................................................................................... |
30 |
Instalación de la mesa .................................................................................................................. |
30 |
Cableado DMX.............................................................................................................................. |
30 |
Diagrama de cableado DMX................................................................................................................. |
30 |
Asignación de dirección al aparato ............................................................................................... |
30 |
4. Programación ............................................................................................................... |
31 |
Modo Programa ............................................................................................................................ |
31 |
Entrar en el modo Programa ................................................................................................................ |
31 |
Salir del modo de programa. ................................................................................................................ |
31 |
Programar una escena o escenas ................................................................................................ |
31 |
Editar una escena o escenas ............................................................................................................... |
31 |
Borrar una escena o escenas............................................................................................................... |
32 |
Programar una secuencia............................................................................................................. |
33 |
Modo Añadir ......................................................................................................................................... |
33 |
Borrar un paso o varios pasos en una secuencia................................................................................. |
34 |
Modo Edición........................................................................................................................................ |
34 |
5. Reproducción ............................................................................................................... |
35 |
Modo Reproducción ...................................................................................................................... |
35 |
Reproducción de secuencia.......................................................................................................... |
35 |
Velocidad ...................................................................................................................................... |
35 |
Fade .............................................................................................................................................. |
35 |
Modo Automático .......................................................................................................................... |
36 |
Foot-C User 2 Manual Rev. 1 |
Page 3 of 88 |

Activación por audio...................................................................................................................... |
36 |
Blackout ........................................................................................................................................ |
36 |
Tap Sync (sincronización al toque) ................................................................................................. |
36 |
Control manual.............................................................................................................................. |
36 |
Funcionamiento MIDI ..................................................................................................................... |
37 |
Mapa MIDI ............................................................................................................................................ |
37 |
6. Mantenimiento.............................................................................................................. |
38 |
Mantenimiento del producto.......................................................................................................... |
38 |
7. Especificaciones técnicas ........................................................................................... |
38 |
Devoluciones.................................................................................................................... |
39 |
1. Avant de commencer ................................................................................................... |
40 |
Contenu......................................................................................................................................... |
40 |
Instructions de déballage .............................................................................................................. |
40 |
Réclamations........................................................................................................................................ |
40 |
Conventions de Texte ................................................................................................................... |
40 |
Symboles ...................................................................................................................................... |
40 |
Clause de non Responsabilité ...................................................................................................... |
40 |
Bref descriptif de l'unité................................................................................................................. |
41 |
Consignes de Sécurité.................................................................................................................. |
41 |
2. Introduction .................................................................................................................. |
42 |
Caractéristiques ............................................................................................................................ |
42 |
Description de l'appareil................................................................................................................ |
42 |
Montage ........................................................................................................................................ |
42 |
Concept de Programmation .......................................................................................................... |
42 |
Vue d'ensemble du panneau frontal ............................................................................................. |
43 |
Vue du panneau avant.......................................................................................................................... |
43 |
Commandes du panneau avant............................................................................................................ |
43 |
Description des commandes ................................................................................................................ |
44 |
Vue du panneau arrière........................................................................................................................ |
45 |
Ports du panneau arrière...................................................................................................................... |
45 |
DMX Polarity Switch Diagram....................................................................................................... |
45 |
Dimensions de l'appareil ............................................................................................................... |
45 |
3. Installation .................................................................................................................... |
46 |
Alimentation CA ............................................................................................................................ |
46 |
Montage ........................................................................................................................................ |
46 |
Configuration de la console .......................................................................................................... |
46 |
Câblage DMX................................................................................................................................ |
46 |
Schéma de câblage DMX ..................................................................................................................... |
46 |
Adressage des projecteurs ........................................................................................................... |
46 |
4. Programmation............................................................................................................. |
47 |
Mode programmation....................................................................................................................... |
47 |
Passer en mode programmation........................................................................................................... |
47 |
Sortie du Mode Programmation............................................................................................................ |
47 |
Programmation d'une ou plusieurs scènes.......................................................................................... |
48 |
Édition d'une ou plusieurs scènes ........................................................................................................ |
48 |
Suppression d'une ou plusieurs scènes ............................................................................................... |
48 |
Programmation d'un chenillard........................................................................................................... |
49 |
Mode ajout............................................................................................................................................ |
49 |
Supprimer un ou plusieurs pas dans un chenillard ............................................................................... |
50 |
Mode édition ......................................................................................................................................... |
50 |
5. Lecture.......................................................................................................................... |
51 |
Mode lecture ................................................................................................................................. |
51 |
Page 4 of 88 |
Foot-C 2 User Manual Rev. 1 |

Lecture de chenillards ................................................................................................................... |
51 |
Vitesse........................................................................................................................................... |
51 |
Fondu (Fade) ................................................................................................................................ |
51 |
Mode automatique ........................................................................................................................ |
52 |
Déclenchement audio....................................................................................................................... |
52 |
Noir général................................................................................................................................... |
52 |
Tap Sync (Synchro par pression) ................................................................................................. |
52 |
Forçage manuel ............................................................................................................................ |
52 |
Fonctionnement MIDI ....................................................................................................................... |
53 |
Configuration MIDI................................................................................................................................ |
53 |
6. Entretien ....................................................................................................................... |
54 |
Entretien de l'appareil ................................................................................................................... |
54 |
7. Spécifications techniques ........................................................................................... |
54 |
Renvois............................................................................................................................. |
55 |
1. Erste Schritte................................................................................................................ |
56 |
Packungs-inhalt............................................................................................................................. |
56 |
Anweisungen für das Auspacken.................................................................................................. |
56 |
Schadens-meldung............................................................................................................................... |
56 |
Text-konventionen......................................................................................................................... |
56 |
Symbole ........................................................................................................................................ |
56 |
Haftungs-ausschluss..................................................................................................................... |
56 |
Produkt-überblick .......................................................................................................................... |
57 |
Sicherheits-hinweise ..................................................................................................................... |
57 |
2. Einleitung...................................................................................................................... |
58 |
Eigenschaften ............................................................................................................................... |
58 |
Produkt-beschreibung ................................................................................................................... |
58 |
Montage ........................................................................................................................................ |
58 |
Programmierungs-konzepte.............................................................................................................. |
58 |
Übersicht Bedienfeld Vorderseite ................................................................................................. |
59 |
Ansicht des vorderen Bedienfelds ........................................................................................................ |
59 |
Steuerungs-möglichkeiten vorderes Bedienfeld ................................................................................... |
59 |
Beschreibungen der Steuerungs-funktionen............................................................................................ |
60 |
Ansicht des rückwärtigen Bedienfelds .................................................................................................. |
61 |
Anschlüsse des rückwärtigen Bedienfelds............................................................................................ |
61 |
DMX-Polaritäts-schalter – Diagramm ........................................................................................... |
61 |
Abmessungen des Produkts ......................................................................................................... |
61 |
3. Einrichten des Geräts .................................................................................................. |
62 |
Wechselstrom ............................................................................................................................... |
62 |
Montage ........................................................................................................................................ |
62 |
Einrichten des Geräts.................................................................................................................... |
62 |
DMX-Verkabelung......................................................................................................................... |
62 |
Übersicht DMX-Verkabelung ................................................................................................................ |
62 |
Adressierung des Geräts .............................................................................................................. |
62 |
4. Programmierung .......................................................................................................... |
63 |
Programm-Modus ......................................................................................................................... |
63 |
Aufrufen des Programm-Modus............................................................................................................ |
63 |
Beenden des Programm-Modus........................................................................................................... |
63 |
Programmieren einer Szene oder mehrerer Szenen ............................................................................ |
64 |
Bearbeiten einer Szene oder mehrerer Szenen ................................................................................... |
64 |
Löschen einer Szene oder mehrerer Szenen ....................................................................................... |
64 |
Program-mieren eines Chase ....................................................................................................... |
65 |
Hinzufügen-Modus................................................................................................................................ |
65 |
Foot-C User 2 Manual Rev. 1 |
Page 5 of 88 |

Löschen eines oder mehrerer Schritte in einem Chase |
........................................................................ 66 |
Bearbeitungs-Modus............................................................................................................................. |
66 |
5. Wiedergabe................................................................................................................... |
67 |
Wiedergabe-Modus....................................................................................................................... |
67 |
Wiedergabe von Chases............................................................................................................... |
67 |
Geschwindig-keit........................................................................................................................... |
67 |
Fade .............................................................................................................................................. |
67 |
Auto-Modus................................................................................................................................... |
68 |
Audio-Auslösung ........................................................................................................................... |
68 |
Verdunkelung ................................................................................................................................ |
68 |
Tap Sync ....................................................................................................................................... |
68 |
Manueller Vorrang......................................................................................................................... |
68 |
MIDI-Betrieb .................................................................................................................................. |
69 |
MIDI-Zuordnung.................................................................................................................................... |
69 |
6. Wartung ........................................................................................................................ |
70 |
Wartung des Geräts ...................................................................................................................... |
70 |
7. Technische Daten......................................................................................................... |
70 |
Reklamationen.................................................................................................................... |
71 |
1. Voordat u begint........................................................................................................... |
72 |
Wat is er inbegrepen ..................................................................................................................... |
72 |
Uitpak-instructies........................................................................................................................... |
72 |
Claims................................................................................................................................................... |
72 |
Tekst-conventies ........................................................................................................................... |
72 |
Symbolen ...................................................................................................................................... |
72 |
Disclaimer ..................................................................................................................................... |
72 |
Product in het kort ......................................................................................................................... |
73 |
Veiligheids-instructies ................................................................................................................... |
73 |
2. Inleiding ........................................................................................................................ |
74 |
Eigen-schappen ............................................................................................................................ |
74 |
Product-beschrijving...................................................................................................................... |
74 |
Montage ........................................................................................................................................ |
74 |
Programmerings-concepten.............................................................................................................. |
74 |
Overzicht van het voorpaneel ....................................................................................................... |
75 |
Voorpaneel-aanzicht............................................................................................................................. |
75 |
Bedienings-elementen van het voorpaneel........................................................................................... |
75 |
Beschrijvingen van de bedienings-elementen ...................................................................................... |
76 |
Achterzijde Aanzicht ............................................................................................................................. |
77 |
Poorten op het achterpaneel ................................................................................................................ |
77 |
Diagram van de DMX-polariteits-schakelaar ................................................................................ |
77 |
Afmetingen van het product .......................................................................................................... |
77 |
3. Instelling ....................................................................................................................... |
78 |
AC-stroom ..................................................................................................................................... |
78 |
Montage ........................................................................................................................................ |
78 |
Instellen van het bord.................................................................................................................... |
78 |
DMX-kabels................................................................................................................................... |
78 |
DMX-kabeldiagram............................................................................................................................... |
78 |
Adressering van de armatuur........................................................................................................ |
78 |
4. Programmeren.............................................................................................................. |
79 |
Programmerings-modus................................................................................................................... |
79 |
Naar de programmerings-modus gaan................................................................................................. |
79 |
De programmerings-modus afsluiten.................................................................................................... |
79 |
Programmeren van een scène of scènes........................................................................................ |
80 |
Page 6 of 88 |
Foot - C 2 User Manual Rev. 1 |

Bewerken van een scène of scènes ..................................................................................................... |
80 |
Verwijderen van een scène of scènes .................................................................................................. |
80 |
Programmeren van een achtervolging ............................................................................................ |
81 |
Toevoegings-modus ............................................................................................................................. |
81 |
Een stap of stappen in een achtervolging verwijderen.......................................................................... |
82 |
Modus bewerken .................................................................................................................................. |
82 |
5. Afspelen........................................................................................................................ |
83 |
Afspeelmodus ............................................................................................................................... |
83 |
Afspelen van een achtervolging.................................................................................................... |
83 |
Snelheid ........................................................................................................................................ |
83 |
Fade .............................................................................................................................................. |
83 |
Automodus .................................................................................................................................... |
84 |
Audio-triggering............................................................................................................................. |
84 |
Blackout ........................................................................................................................................ |
84 |
Tap Sync ....................................................................................................................................... |
84 |
Handbediening ............................................................................................................................... |
84 |
MIDI-bediening.............................................................................................................................. |
85 |
MIDI Map .............................................................................................................................................. |
85 |
6. Onderhoud.................................................................................................................... |
86 |
Product-onderhoud ....................................................................................................................... |
86 |
7. Technische Specificaties............................................................................................. |
86 |
Retouren ........................................................................................................................... |
87 |
Contact Us ......................................................................................................................... |
88 |
Foot-C User 2 Manual Rev. 1 |
Page 7 of 88 |
1. BEFORE YOU BEGIN
What Is
Included
Unpacking
Instructions
Claims
· |
Foot-C 2 |
· |
Warranty Card |
· |
External Power Supply |
· |
Quick Reference Guide |
Carefully unpack the product immediately and check the container to make sure all the parts are in the package and are in good condition.
If the box or the contents (the product and included accessories) appear damaged from shipping, or show signs of mishandling, notify the carrier immediately, not Chauvet. Failure to report damage to the carrier immediately may invalidate your claim. In addition, keep the box and contents for inspection.
For other issues, such as missing components or parts, damage not related to shipping, or concealed damage, file a claim with Chauvet within 7 days of delivery.
Text
Conventions
Convention |
Meaning |
1—512 |
A range of values |
50/60 |
A set of values of which only one can be chosen |
Settings |
A menu option not to be modified |
Menu > Settings |
A sequence of menu options to be followed |
<ENTER> |
A key to be pressed on the product’s control panel |
ON |
A value to be entered or selected |
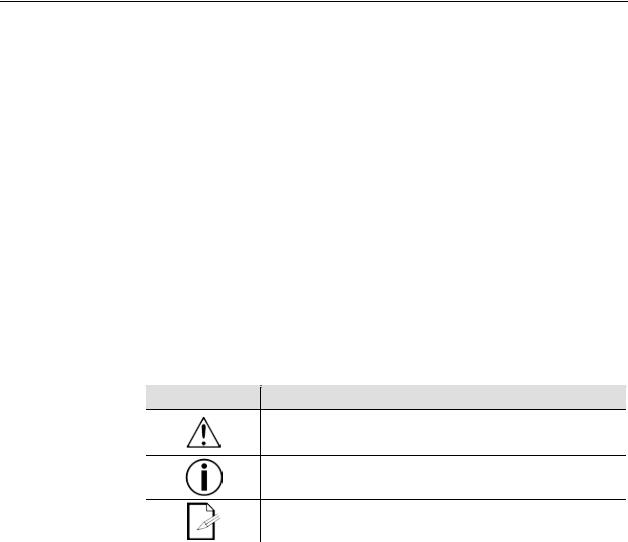
Symbols
Disclaimer
Symbol Meaning
Critical installation, configuration, or operation information. Not following these instructions may make the product not work, cause damage to the product, or cause harm to the operator.
Important installation or configuration information. The product may not function correctly if this information is not used.
Useful information.
Chauvet believes that the information contained in this manual is accurate in all respects. However, Chauvet assumes no responsibility and specifically disclaims any and all liability to any party for any loss, damage or disruption caused by any errors or omissions in this document, whether such errors or omissions result from negligence, accident or any other cause. Chauvet reserves the right to revise the content of this document without any obligation to notify any person or company of such revision, however, Chauvet has no obligation to make, and does not commit to make, any such revisions. Download the latest version from www.chauvetlighting.com.
The works of authorship contained in this manual, including, but not limited to, all design,
text and images are owned by Chauvet.
© Copyright 2016 Chauvet & Sons, LLC. All rights reserved.
Electronically published by Chauvet in the United States of America.
CHAUVET, the Chauvet logo, and Foot-C 2 are registered trademarks or trademarks of Chauvet & Sons LLC. (d/b/a Chauvet and Chauvet Lighting) in the United States and other countries. Other company and product names and logos referred to herein may be trademarks of their respective companies.
Page 8 of 88 |
Foot-C 2 User Manual Rev. 1 |
Product at a |
Use on Dimmer |
x |
|
Auto Programs |
x |
Glance |
Outdoor Use |
x |
|
Auto-ranging Power Supply |
P |
|
Sound-Active |
P |
|
Replaceable Fuse |
x |
|
DMX |
P |
|
User-Serviceable |
x |
|
Master/Slave |
x |
|
|
|
|
|
|
|
|
|
Safety Notes Please read the following Safety Notes carefully before working with the product. The Notes include important safety information about installation, usage, and maintenance.
·Always connect the product to a grounded circuit to avoid the risk of electrocution.
·Always disconnect the product from the power source before cleaning.
·Make sure the power cord is not crimped or damaged.
·Never disconnect the product from power by pulling or tugging on the cord.
·Make sure there are no flammable materials close to the product when operating.
·Do not touch the product’s housing when operating because it may be very hot.
·The product is not intended for permanent installation.
·Always make sure that the voltage of the outlet to which you are connecting the product is within the range stated on the decal or rear panel of the product.
·The product is for indoor use only! (IP20) To prevent risk of fire or shock, do not expose the product to rain or moisture.
·Always install the product in a location with adequate ventilation, at least 20 in (50 cm) from adjacent surfaces.
·Never connect the product to a dimmer.
·Never carry the product from the power cord.
·The maximum ambient temperature (Ta) is 104 °F (40 °C). Do not operate the product at higher temperatures.
·In the event of a serious operating problem, stop using the product immediately.
·Never try to repair the product. Repairs carried out by unskilled people can lead to damage or malfunction. Please contact the nearest authorized technical assistance center.
·To eliminate unnecessary wear and improve its lifespan, during periods of non-use completely disconnect the product from power via breaker or by unplugging it.
Keep this User Manual for future use. If you sell the product, be sure that they also receive this document.
Foot-C User 2 Manual Rev. 1 |
Page 9 of 88 |

2. INTRODUCTION
Features
Product
Description
Mounting
Programming
Concepts
·Controls up to 6 fixtures, up to 36 channels total
·Designed to work with fixtures that have up to 6 channels
·Guitar pedal-style buttons
·Create and control a full light show of chases, scenes, fades, and more
·Built-in Tap Sync, Auto, and Sound modes
·MIDI input
·Direct audio line input for triggering scenes
·Fits in the CHS-25 VIP Gear Bag
Foot-C 2 is a compact 36-channel DMX foot controller that can control up to 6 six-channel fixtures and store 12 sets of chases with up to 24 steps each. Ideal for 6-channel fixtures, it has rugged guitar pedal-style buttons that can trigger Automated and Sound-Active modes, as well as control chases and scenes. LED displays make it easy to navigate the controller in any environment. Improved software offers more versatility and makes it simpler than ever to shift between scenes or to blackout fixtures instantly.
The Foot-C 2 is designed with 4 rubber feet so it can be placed on a table top for programming, and then floor-mounted for playback. The product is not rack-mountable.
The Foot-C 2 uses DMX addressing and values to control products. See Fixture
Addressing for more information.
Looks are created by using the faders to send DMX values to the products. The looks are saved into scenes or as steps in chases. The scenes and chases are played back at different speeds and with different types of triggers.
·Looks are created in Program mode. The products are selected with the fixture buttons. The knobs are moved to control the products and create looks. Then the looks are saved to scenes or chases with the program button.
See Programming for more information.
·Scenes and chases are played back in Playback mode. Timing of playback is set with the speed and time functions, audio triggers, the Tap Sync function, or MIDI input. See Playback for more information.
Looks can be created in playback mode, but they cannot be saved.
Page 10 of 88 |
Foot-C 2 User Manual Rev. 1 |
Front Panel
Overview
Front Panel
View
Front Panel
Controls
The Foot-C 2 is laid out with the Fixture buttons (<1>–<6>) on the top left, the color and sensitivity knobs on the top right, the LED displays along the middle, and the guitar pedal-style buttons along the bottom. The rear panel of the product has the ports and power connection. See Back Panel View for information about the back panel and its ports.
1 |
2 |
3 |
4 |
5 |
6 |
7
8 |
9 |
10 |
11 |
12 |
|
|
|
|
|
|
|
Item |
Button or Knob |
|
|
|
|
1 |
Fixture selection buttons 1–6 with indicator LEDs |
|
|||
2 |
Program button |
|
|
|
|
3 |
Blackout button |
|
|
|
|
4 |
Delete button/MIDI channel select. LED indicator will light orange when in |
||||
MIDI selection mode. |
|
|
|||
|
|
|
|||
5 |
Color/control knobs: red, green, blue, amber, white, and UV |
||||
6 |
Audio sensitivity knob |
|
|
||
7 |
Displays |
|
|
|
|
8 |
Mode pedal-style button - switches between chases and scenes |
||||
9 |
Up (Auto) pedal-style button - navigates upward through a list or |
||||
increases numerical value when in a function or enables auto mode |
|||||
|
|||||
Down (Music) pedal-style button - navigates downward through a list or
10decreases numerical value when in a function or enables music (sound active) mode
11Enter (TAPSYNC) pedal-style button – sets/enables the currently selected value or enables Tap Sync mode
12BLACKOUT / FUNCTION pedal-style button. Also toggles program modes.
Foot-C User 2 Manual Rev. 1 |
Page 11 of 88 |

Control
Descriptions
Button or Fader |
Description |
|
|
Buttons that select lights to control and set the default DMX |
|
|
addresses of the channel faders. The corresponding LEDs indicate |
|
FIXTURE |
when a light is selected. |
|
<1>–<6> |
Note: These buttons are inclusive. Pressing one, then |
|
|
another, selects both lights. To deselect a light, press it again |
|
|
and make sure the LED indicator is off. |
|
|
The <BLACKOUT> button will darken all fixtures. To turn blackout |
|
BLACKOUT |
off, press the <BLACKOUT> button again. The <BLACKOUT / |
|
FUNCTION> pedal will also activate and deactivate the blackout |
||
|
||
|
feature. |
|
|
|
|
PROGRAM |
Button used to enter the programming mode. Allows you to |
|
program a scene, chase, or sequence thereof. |
||
|
||
|
|
|
DELETE |
Button used to delete scenes individually. Delete a scene by |
|
pressing and holding the <DELETE> button until the LED display |
||
|
flashes. <DELETE> button also controls the MIDI channel select. |
|
Color/Control |
Knobs to control the manual adjustment of red, green, blue, amber, |
|
Knobs |
white and UV (000–255); or the DMX channel of the Fixtures 1–6. |
|
Audio |
|
|
Sensitivity |
Knob that adjusts the board’s sensitivity to sound and music. |
|
Knob |
|
|
|
Display that shows various types of information about current |
|
|
selections and whether it is in Program or Playback mode: |
|
|
· Blackout - indicates that blackout is active and the board is not |
|
|
sending DMX signals. |
|
LED Displays |
· Program - indicates that the board is in Program mode. |
|
· Music - indicates that the board is in Music Trigger mode. |
||
|
· Auto - indicates that the board is in Auto Trigger mode. |
|
|
· Chase - shows the current chase in Playback or Program |
|
|
mode. |
|
|
· Scene - shows the current scene in Playback or Program |
|
|
mode. |
|
|
|
|
<MODE> |
Button that switches between Chase mode and Scenes mode. |
|
Pedal Button |
||
|
||
|
Button that moves up through banks of scenes, or up through the |
|
<UP> (AUTO) |
steps in a chase. |
|
Pedal Button |
Also used to enable Auto mode, to automatically play back chases |
|
|
or scenes. |
|
<DOWN> |
Button that moves down through banks of scenes, or down through |
|
the steps in a chase. |
||
(MUSIC) Pedal |
||
Also used to enable Music mode, to sets scenes/steps in chases to |
||
Button |
||
respond to audio triggers from a source. |
||
|
||
|
|
|
|
Button used while programming to switch between the Speed and |
|
< ENTER |
Fade functions, or to confirm a selection. Hold to activate the Tap |
|
(TAPSYNC)> |
Sync feature. |
|
Pedal Button |
· While in Tap Sync mode, press the <UP> or <DOWN> pedal |
|
|
buttons to the beat to set your chase timing. |
|
|
Button used in playback to quickly switch between Music mode, |
|
<BLACKOUT / |
Auto mode, or to blackout all fixtures. |
|
· To turn the blackout off, you must press <BLACKOUT / |
||
FUNCTION> |
||
FUNCTION> pedal button again. |
||
Pedal Button |
||
Also used for toggling program modes. With program activated, |
||
|
||
|
press to switch between Add and EdIT. |
|
|
|
Page 12 of 88 |
Foot-C 2 User Manual Rev. 1 |
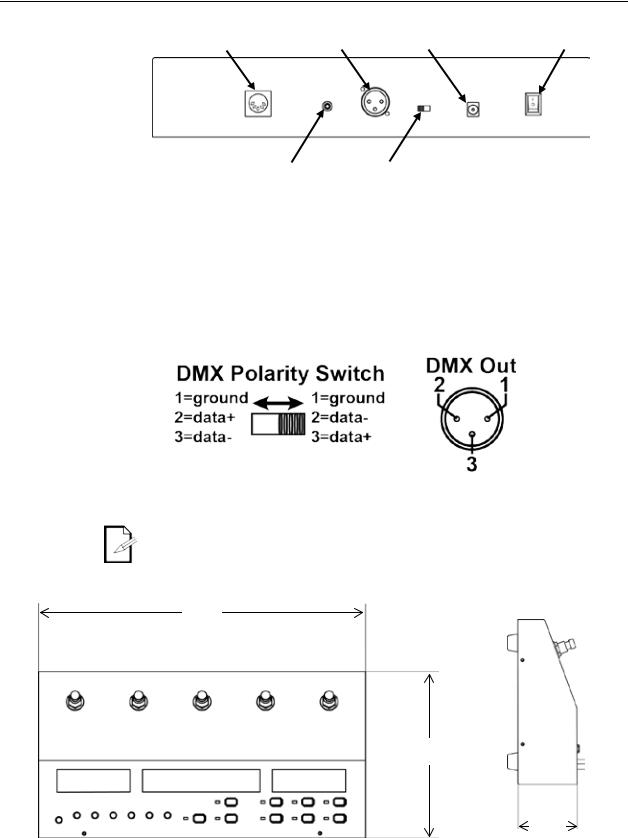
Back Panel View
|
|
|
Power On/Off |
MIDI In |
DMX Out |
DC Power In |
Switch |
Audio Line |
DMX Polarity |
Input |
Switch |
Back Panel
Ports
Port |
Function |
MIDI In |
5-pin MIDI port for connecting a MIDI signal. |
DMX Out |
3-pin DMX port for connecting to other products. |
DC Power In |
Connects to the external power supply. |
Power On/Off Switch |
Toggle switch that turns the Foot-C 2 on and off. |
Audio Line Input |
RCA Input for external audio triggering. |
DMX Polarity Switch |
Toggle switch for changing DMX polarity. |
DMX Polarity
Switch
Diagram
All Chauvet lights use a negative pin 2 and positive pin 3, so the polarity switch should be set as shown above—towards the DMX Control Out port. Other manufacture’s lights might be different.
For more information about DMX, download the DMX Primer from www.chauvetlighting.com.
Product Dimensions
14.2 in
360 mm
7.2 in
183 mm
2.6 in
66 mm
Foot-C User 2 Manual Rev. 1 |
Page 13 of 88 |
3. SETUP
AC Power
Mounting
Setting Up the
Board
DMX Cabling
The Foot-C 2 has an external auto-ranging power supply and it can work with an input voltage range of 100 to 240 VAC, 50/60 Hz. To determine the product’s power requirements (circuit breaker, power outlet, and wiring), use the current value listed on the label affixed to the power supply’s back panel, or refer to the product’s specifications chart. The listed current rating indicates the product’s average current draw under normal conditions.
·Always connect the product to a protected circuit (circuit breaker or fuse). Make sure the product has an appropriate electrical ground to avoid the risk of electrocution or fire.
·To eliminate unnecessary wear and improve its lifespan, during periods of non-use completely disconnect the product from power via breaker or by unplugging it.
·Never connect the product to a rheostat (variable resistor) or dimmer circuit, even if the rheostat or dimmer channel serves only as a 0 to 100% switch.
The Foot-C 2 is designed only for floor or table mounting. Make sure adequate ventilation is provided around the product.
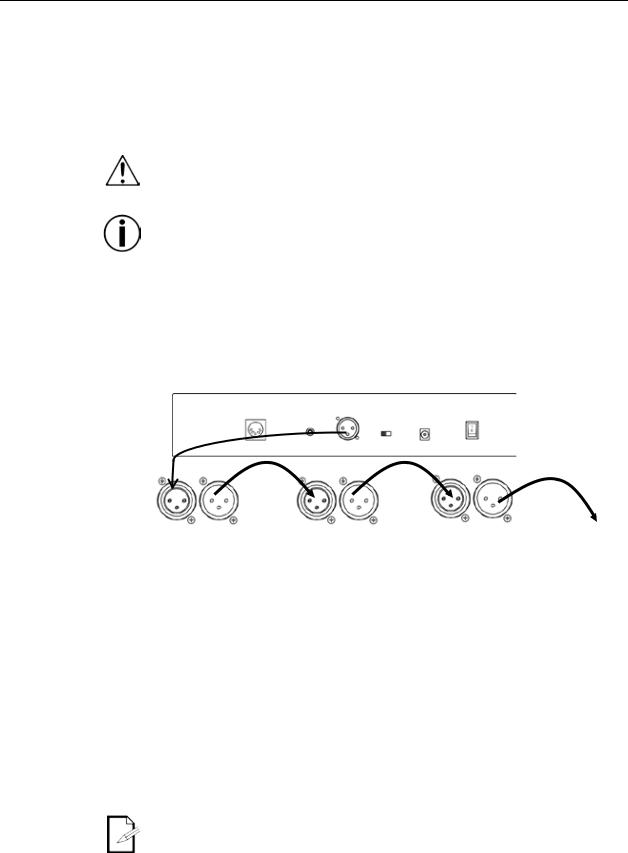
In order to use the controller it must be connected to the products with DMX cables and the products must be addressed correctly. The sections below described DMX cabling and DMX addressing.
DMX cabling is required to get DMX values from the board to the products. Connect the DMX cable from the DMX Out of the board to the DMX In of the first product in the rig. Then connect another DMX cable from the DMX Out of the first product in the rig to the DMX In of the next product. Continue connecting until all the products are connected.
DMX Cabling
Diagram
Fixture
Addressing
DMX |
DMX |
DMX |
DMX |
DMX |
DMX |
Additional |
In |
Out |
In |
Out |
In |
Out |
Products |
1st Product |
2nd Product |
3rd Product |
|
|||
The Foot-C 2 uses DMX addressing. The Foot-C 2 controls lights with specific DMX addresses and the lights must be addressed correctly for the Foot-C 2 to control them. More than one light can have the same DMX address, but lights with the same DMX address should be the same type of light.
Below is a chart showing the Foot-C 2 DMX addresses and the corresponding fixture buttons:
FIXTURE Button |
Starting Address |
Range |
<1> |
1 |
1–6 |
<2> |
7 |
7–12 |
<3> |
13 |
13–18 |
<4> |
19 |
19–24 |
<5> |
25 |
25–30 |
<6> |
31 |
31–36 |
This product has program memory. All looks exist not only during the current session, but can also be saved or recalled after switching the power OFF.
Page 14 of 88 |
Foot-C 2 User Manual Rev. 1 |

4. PROGRAMMING
Program
Mode
Program mode is used to program for playback. In Program mode, lighting looks are created and saved for playback. There are three parts to programming for playback.
·Programming lights: selecting and controlling them to create looks.
·Programming scenes: saving the looks into scenes. or
Entering
Program Mode
Exiting Program
Mode
·Programming chases: saving the looks into steps in a chase.
The next section describes how to program lights, scenes, and chases, and how to modify and delete scenes and chases.
Output can be adjusted in Playback mode, but the looks created in Playback mode cannot be saved to memory.
To enter program mode, do the following:
1.Turn the board on.
2.Press and hold <PROGRAM> for three seconds.
3.The program indicator light, next to the <PROGRAM> button, will light up.
4.Release <PROGRAM>.
To exit program mode, follow the instructions below:
1.Press and hold <PROGRAM> for three seconds.
2.The program indicator light, next to the <PROGRAM> button, will turn off.
3.Release <PROGRAM>.
Foot-C User 2 Manual Rev. 1 |
Page 15 of 88 |

Programming
a Scene or
Scenes
Editing a Scene
or Scenes
Deleting a Scene
or Scenes
The Foot-C 2 has one bank of scenes, separate from the chase banks, for saving and playing back recorded scenes. To record a scene, follow the instructions below:
1.Enter program mode.
2.Press <MODE> until the left display reads SCENE.
3.Use <UP> and <DOWN> to select the desired scene.
4.Use buttons <1>–<6> to select the fixture(s) to be programmed.
5.Use the Color/Number knobs to set the desired output.
6.Repeat steps 4 and 5 until all fixtures output as desired.
7.Press <PROGRAM>. The displays will flash, showing the scene was saved.
8.Repeat steps 3–7 for up to 24 scenes.
9.Exit program mode.
Scenes are intended to be used for static looks, as opposed to chases which are intended for changing looks.
After being recorded, any scene can be re-programmed. To edit a scene, do the following:
1.Enter program mode.
2.Press <MODE> until the left display reads SCENE.
3.Use <UP> and <DOWN> to select the scene to be edited.
4.Use buttons <1>–<6> to select the fixture(s) to be programmed.
5.Use the Color/Number knobs to set the desired output.
6.Repeat steps 4 and 5 until all fixtures output as desired.
7.Press <PROGRAM>. The displays will flash, showing the scene was saved.
8.Repeat steps 3–7 for all scenes that require editing.
9.Exit program mode.
Looks created or edited in program mode will not be stored in the system memory until <PROGRAM> has been pressed.
To delete a scene, do the following:
1.Enter program mode.
2.Press <MODE> until the left display reads SCENE.
3.Use <UP> and <DOWN> to select the scene to be deleted.
4.Press and hold <DELETE> for three seconds. The displays will flash, indicating the scene was deleted.
5.Release <DELETE>.
6.Repeat steps 3–5 until all desired scenes have been deleted.
7.Exit program mode.
Deleted scenes cannot be restored.
Page 16 of 88 |
Foot-C 2 User Manual Rev. 1 |

Programming
a Chase
Add Mode
Chase mode gives the user access to a bank of 12 chases, each with up to 24 steps. The distinction between chases and scenes allows the user to switch between moving chases and static scenes at will.
Add mode allows the user to record new steps in a chase, either to a previously unrecorded chase, or to an already established chase. To program a chase:
1.Enter program mode.
2.Press <MODE> until the left display reads CHASE.
3.Press and hold <BLACKOUT / FUNCTION> until the display on the right reads Add.
4.Use <ENTER (TAPSYNC)> to scroll through the chase bank until the desired chase
is selected.
A chase with no recorded steps will show _ _ 00/00 (chase 1–12 step 0 out of 0) on the middle display.
5.Use buttons <1>–<6> to select the fixture(s) to be programmed.
6.Use the Color/Number knobs to set the desired output.
7.Repeat steps 5 and 6 until all fixtures output as desired.
8.Press <PROGRAM>. The displays will flash, showing the step was saved. The product will automatically move on to the next step.
The last step that was saved to memory will show on the middle display. For example: 03 03/03 (chase 3, step 3 of 3) will change to 03 04/04 (chase 3, step 4
of 4) after pressing <PROGRAM>, indicating the next step to be programmed will be 03 05/05 (chase 3, step 5 of 5).
9.Repeat steps 5–8 for up to 24 steps.
10.Exit program mode.
To add a step in the middle of a chase:
1.Enter program mode.
2.Press <MODE> until the left display reads CHASE.
3.Press and hold <BLACKOUT / FUNCTION> until the display on the right reads Add.
4.Use <ENTER (TAPSYNC)> to scroll through the chase bank until the desired chase is selected.
5.Use <UP> and <DOWN> to select the step before the step to be inserted.
6.Use buttons <1>–<6> to select the fixture(s) to be programmed.
7.Use the Color/Number knobs to set the desired output.
8.Repeat steps 6 and 7 until all fixtures output as desired.
9.Press <PROGRAM>. The displays will flash, showing the inserted step was saved.
The middle display will indicate the inserted step. For example, if the display read 01 07/13 before pressing <PROGRAM>, it will read 01 08/14 after saving the new step.
Chases are intended to be used for changing looks, as opposed to scenes which are intended for static looks
Foot-C User 2 Manual Rev. 1 |
Page 17 of 88 |

Deleting a Step
or Steps in a
Chase
To delete a step or steps in a chase, do the following:
1.Enter program mode.
2.Press <MODE> until the left display reads CHASE.
3.Use <ENTER (TAPSYNC)> to select the chase to be shortened.
4.Use <UP> and <DOWN> to select the step to be deleted.
5.Press and hold <DELETE> for three seconds. The displays will flash, indicating the step was deleted. All steps after the deleted step will move down the queue to replace it. For example: If step 3 is deleted, step 4 will become step 3, step 5 will become step 4, etc.
6.Release <DELETE>.
7.Repeat steps 4–6 until all desired steps have been deleted.
8.Exit program mode or continue programming chases/scenes.
Deleted steps cannot be restored without redesigning the look.
Edit Mode To edit a step or steps in a chase, follow the instructions below:
1.Enter program mode.
2.Press <MODE> until the left display reads CHASE.
3.Press <BLACKOUT / FUNCTION> until the display on the right reads EdIT.
4.Use <ENTER (TAPSYNC)> to select the chase to be edited.
5.Use <UP> and <DOWN> to select the step to be edited.
6.Use buttons <1>–<6> to select the fixture(s) to be programmed.
7.Use the Color/Number knobs to set the desired output.
8.Repeat steps 6 and 7 until all fixtures output as desired.
9.Press <PROGRAM> to record the changes. The displays will flash, indicating the changes were saved.
10.Repeat steps 5–9 until all desired changes to this chase are completed.
11.Edit another chase or exit program mode.
Page 18 of 88 |
Foot-C 2 User Manual Rev. 1 |

5. PLAYBACK
Playback
Mode
Chase
Playback
Speed
Fade
Playback is used to play back saved scenes and chases. It is the mode to use when the show is happening. In playback mode, the saved scenes and chases are triggered to play back. There are four playback types:
·Scene Playback - Playing back saved scenes.
·Chase Playback - Playing back saved chases.
·MIDI Playback - Using a MIDI input signal to play back scenes and chases.
·Live Playback - Controlling the outputs without the use of scenes or chases. Not recommended.
To operate any of the modes that offer amber, white, or UV color options, the selected fixture must be capable of outputting that corresponding color light.
Chase playback triggers a specific chase (1–12) for playback with auto, audio, MIDI, or Tap Sync triggering. The middle display shows the selected chase, the current step, and the total number of steps in that chase.
To enter Chase Playback mode, press <MODE>. Chase 1 will automatically be selected. Use <UP> and <DOWN> to select a chase. Press <ENTER (TAPSYNC)>.
There is no way to manually trigger the steps in a chase in playback mode.
The speed setting determines how long each step in a chase will be active in Auto mode, before the next step is triggered.
To set speed, do the following:
1.Play back a chase.
2.Press and hold <BLACKOUT / FUNCTION> until SPEEd 0–16 shows on the middle display.
3.Use <UP> and <DOWN> to select the desired speed. 0 will halt auto triggering. 1–16 is in order from slowest to fastest speeds.
4.Press<ENTER (TAPSYNC)> until the display shows the current scene or chase to exit speed setting.
The fade setting determines how long it takes one scene or step to change, or fade, to the next scene or step.
To set fade, follow the instructions below:
1.Play back a scene or chase.
2.Press and hold <BLACKOUT / FUNCTION> until FAdE 0–16 shows on the middle display.
3.Use <UP> and <DOWN> to select the desired fade. 0 will set the scenes or steps to snap immediately to the next when triggered. 1–16 is in order from fastest to slowest fade curves.
4.Press<ENTER (TAPSYNC)> until the display shows the current scene or chase to exit fade setting.
Foot-C User 2 Manual Rev. 1 |
Page 19 of 88 |

Auto Mode
Audio
Triggering
Blackout
Tap Sync
Manual
Override
Auto mode sets the steps in chases to trigger automatically, based on the set speed and fade times.
To enable Auto mode, do the following:
1.Play back a chase.
2.Press <UP (AUTO)> until the display on the right shows AUTO.
Audio mode sets the steps in chases to respond to audio triggers, from either the internal microphone, or an external audio source through the Audio Line Input jack on the rear panel.
To enable Audio Triggering, follow the instructions below:
1.Play back a chase.
2.Press and hold <DOWN (MUSIC)> until the display on the right shows MUSIC.
3.Turn the AUDIO SENS knob up until the scenes or steps are triggered by sound as desired.
Blackout mode sets all DMX outputs to zero while active. There are two ways to activate or deactivate Blackout mode:
·Press <BLACKOUT> or
·Press and hold <BLACKOUT / FUNCTION> for three seconds.
Either method can deactivate Blackout, regardless of how it was activated.
While Blackout mode is active, the indicator LED next to <BLACKOUT> will light up.
The Tap Sync feature allows the user to set the auto and fade speeds with their foot. To activate Tap Sync:
1.Play back a chase in Auto mode.
2.Press and hold <MODE> for three seconds. The display on the right will show
TAPSY.
3.Release <MODE>.
4.Press <ENTER (TAPSYNC)> at the desired tempo. Do this several times to ensure the tempo is set. (The time between the first and second press is the speed, the time between the second and third press is the Fade)
To deactivate Tap Sync, press and hold <MODE>.
During playback, the Color knobs can take priority over the scene or chase playing back. To manually override a recorded program, do the following:
1.Play back a scene or chase in any mode.
2.Use buttons <1>–<6> to select the fixture(s) to be overridden.
3.Use the Color/Number knobs to alter the output of the selected fixture(s).
Once a Color knob has been moved, the knob will completely supersede the program for
the selected fixture(s). For example: If all fixtures are set to output blue for a scene, fixture 1 is selected, and the BLUE knob is turned all the way down, then fixture 1 will not output blue.
To turn off Manual Override, use buttons <1>–<6> to deselect any selected fixtures.
Page 20 of 88 |
Foot-C 2 User Manual Rev. 1 |
MIDI
Operation
MIDI Map
The Foot-C 2 can be externally controlled by a MIDI signal through the MIDI in port on the rear panel. This will work at any time, as long as there is a MIDI input.
To select the MIDI receiving channel:
1.Press and hold <DELETE> for three seconds. The indicator next to <DELETE> will light up.
2.Release <DELETE>. The display will have changed to show the MIDI receiving channel.
3.Use <UP> and <DOWN> to select a MIDI receiving channel 1–16.
4.Press and hold <DELETE> for three seconds. The indicator next to <DELETE> will turn off.
5.Release <DELETE>. The display will have returned to normal.
·The controller will only respond to MIDI commands on the selected MIDI channel when SPEEd is set to 0.
·Perform all MIDI control using NOTE_ON or PROGRAM CHANGE commands. All other MIDI instructions are ignored.
·To stop a chase, send the BLACKOUT ON note.
NOTE_ON |
|
|
|
MIDI Note |
Function (Turns On/Off) |
|
00–23 |
SCENE 1-24 ON |
|
24–35 |
CHASE 1-12 ON |
|
36 |
TAPSYNC |
127 |
Blackout |
|
PROGRAM CHANGE |
|
|
|
MIDI Note |
Function (Turns On/Off) |
|
10–21 |
CHASE 1-12 ON |
|
30–53 |
SCENE 1-24 ON |
|
60–76 |
Set Speed 1-16 |
|
80–95 |
Set Fade 1-16 |
|
100 |
Blackout On |
101 |
Blackout Off |
|
MIDI operation always runs in the background during use.
Foot-C User 2 Manual Rev. 1 |
Page 21 of 88 |

6. MAINTENANCE
Product
Maintenance
Dust build-up reduces performance and can cause overheating. This can lead to reduction of the product’s life and/or mechanical wear. To maintain optimum performance and minimize wear, clean your lighting products at least twice a month. However, be aware that usage and environmental conditions could be contributing factors to increase the cleaning frequency.
To clean the product, follow the instructions below:
1.Unplug the product from power.
2.Wait until the product is at room temperature.
3.Use a vacuum (or dry compressed air) and a soft brush to remove dust collected on the external surface.
4.Clean all transparent surfaces (display lenses) with a mild soap solution, ammoniafree glass cleaner, or isopropyl alcohol.
5.Apply the solution directly to a soft, lint free cotton cloth or a lens cleaning tissue.
6.Softly drag any dirt or grime to the outside of the transparent surface.
7.Gently polish the transparent surfaces until they are free of haze and lint.
· Always dry the transparent surfaces carefully after cleaning them.
7. TECHNICAL SPECIFICATIONS
Dimensions and |
Length |
Width |
Height |
Weight |
Weight |
7.2 in (183 mm) |
14.2 in (360 mm) |
2.6 in (66 mm) |
4 lb (1.9 kg) |
Note: Dimensions in inches rounded to the nearest decimal digit.
Power |
Value |
Foot-C 2 |
External Power Supply |
|
Input Voltage |
Fixed |
Switching |
|
Range |
12 VDC, 1 A |
100 to 240 VAC, 50/60 Hz |
|
Voltage Selection |
Fixed |
Auto-ranging |
Thermal |
|
|
|
Maximum External Temp. |
Cooling System |
|
|
|
104 °F (40 °C) |
Convection |
|
DMX |
|
|
|
Output Connector |
Channel Range |
|
|
|
3-pin XLR |
36 |
|
Ordering |
|
|
|
Product Name |
Item Code |
UPC Number |
|
|
Foot-C 2 |
09081235 |
781462215835 |
Page 22 of 88 |
Foot-C 2 User Manual Rev. 1 |

RETURNS |
In case you need to get support or return a product: |
· If you are located in the U.S., contact Chauvet World Headquarters. |
|
|
· If you are located in the UK or Ireland, contact Chauvet Europe Ltd. |
|
· If you are located in Mexico, contact Chauvet Mexico. |
|
· If you are located in Benelux, contact Chauvet Europe BVBA. |
|
· If you are located in any other country, DO NOT contact Chauvet. Instead, contact |
|
your local distributor. See www.chauvetlighting.com for distributors outside the U.S., |
|
UK, Ireland, Mexico, or Benelux. |
|
If you are located outside the U.S., UK, Ireland, Mexico, or Benelux, contact your |
|
distributor of record and follow their instructions on how to return Chauvet |
|
products to them. Visit our website www.chauvetlighting.com for contact details. |
|
Call the corresponding Chauvet Technical Support office and request a Return |
|
Merchandise Authorization (RMA) number before shipping the product. Be prepared to |
|
provide the model number, serial number, and a brief description of the cause for the |
|
return. |
|
Send the merchandise prepaid, in its original box, and with its original packing and |
|
accessories. Chauvet will not issue call tags. |
|
Clearly label the package with the RMA number. Chauvet will refuse any product |
|
returned without an RMA number. |
|
Write the RMA number on a properly affixed label. DO NOT write the RMA number |
|
directly on the box. |
Before sending the product, clearly write the following information on a piece of paper and place it inside the box:
·Your name
·Your address
·Your phone number
·RMA number
·A brief description of the problem
Be sure to pack the product properly. Any shipping damage resulting from inadequate packaging will be your responsibility. FedEx packing or double-boxing are recommended.
Chauvet reserves the right to use its own discretion to repair or replace returned product(s).
Foot-C User 2 Manual Rev. 1 |
Page 23 of 88 |

1. ANTES DE EMPEZAR
Qué va incluido
Instrucciones de desembalaje
Reclamaciones
· |
Foot-C 2 |
· |
Tarjeta de garantía |
· |
Fuente de alimentación externa |
· |
Guía de referencia rápida |
Desembale el producto con cuidado inmediatamente y compruebe el embalaje para asegurarse de que todas las piezas están en el paquete y en buen estado.
Si la caja o el contenido (el producto y los accesorios incluidos) parecen dañados a causa del transporte o muestran signos de manipulación inadecuada, notifíqueselo inmediatamente al transportista, y no a Chauvet. No comunicar los daños inmediatamente al transportista puede conllevar la anulación de la reclamación. Además, quédese con la caja y los contenidos para su inspección.
Para otras incidencias, como componentes o piezas que falten, daños no relacionados con el transporte o daños no evidentes, presente una reclamación a Chauvet en el plazo de 7 días desde la entrega.
Convenciones
de texto
Convención |
Significado |
|
1—512 |
Un rango de valores |
|
50/60 |
Un conjunto de valores de los cuales solo se puede escoger uno |
|
Configuración |
Una opción de menú que no se puede modificar |
|
Menú > |
Una secuencia de opciones de menú que ha de seguirse |
|
Configuración |
||
|
||
<ENTER> |
Una tecla que se tiene que pulsar en el panel de control del producto |
|
ON |
Un valor que se tiene que introducir o seleccionar |
Símbolos
Exención de responsabilidad
Símbolo Significado
Instalación, configuración o información crítica sobre el funcionamiento. No seguir estas instrucciones puede hacer que el producto no funcione, provocar averías en el producto o causar daños al operario.
Instalación o información de configuración importante. El producto puede no funcionar correctamente si esta información no se usa.
Información útil.
Chauvet cree que la información contenida en este manual es exacta en todos los aspectos. Sin embargo, Chauvet no asume responsabilidad alguna, y queda exenta específicamente de todas y cada una de las responsabilidades y obligaciones, de la clase que sean y para con cualquier parte, por pérdida, perjuicio o trastorno causados por cualquier error u omisión en este documento, tanto si tales errores y omisiones se deben a negligencia o accidente como a cualquier otra causa. Chauvet se reserva el derecho a revisar el contenido de este documento sin ninguna obligación de notificar dicha revisión a ninguna persona o empresa; sin embargo, Chauvet no está en absoluto obligado a hacerlo así, ni se compromete a realizar revisión alguna. Descargue la última versión de www.chauvetlighting.com.
Las obras de autoría contenidas en este manual, incluyendo, pero sin limitarse a ellas, todos los dibujos, textos e imágenes, son propiedad de Chauvet.
© Copyright 2016, Chauvet & Sons, LLC. Todos los derechos reservados.
Publicado en formato electrónico por Chauvet en los Estados Unidos de América.
CHAUVET, el logotipo de Chauvet y Foot-C 2 son marcas comerciales o marcas registradas de Chauvet & Sons LLC. (con nombres comerciales Chauvet y Chauvet Lighting) en los Estados Unidos y otros países. Otras empresas, nombres de productos y logotipos a los que se haga referencia aquí pueden ser marcas comerciales de sus respectivas empresas.
Página 24 de 88 |
Foot-C 2 Manual de Usuario Rev. 1 |
El producto de Uso en Atenuador |
x |
|
Programas automáticos |
x |
|
|
|
|
|
|
|
un vistazo Uso en exteriores |
x |
Fuente de alimentación con |
P |
||
|
detección automática |
||||
|
Activo por sonido |
P |
|
Fusible reemplazable |
x |
|
DMX |
P |
|
Reparable por el usuario |
x |
|
Maestro/Esclavo |
x |
|
|
|
|
|
|
|
|
|
Notas de seguridad
Por favor, lea las siguientes notas de seguridad con atención antes de poner en funcionamiento el producto. Estas notas incluyen información de seguridad importante sobre la instalación, uso y mantenimiento.
·Conecte siempre el producto a un circuito con toma de tierra para evitar el riesgo de electrocución.
·Desconecte siempre el producto de la alimentación antes de limpiarlo.
·Asegúrese de que el cable de alimentación no está retorcido ni estropeado.
·Nunca desconecte este producto de la alimentación agarrando o tirando del cable.
·Asegúrese de que no hay materiales inflamables cerca del producto cuando esté en funcionamiento.
·No toque la carcasa del producto cuando esté en funcionamiento, porque podría estar muy caliente.
·El producto no está concebido para una instalación permanente.
·Asegúrese siempre de que la tensión del enchufe al que conecte el producto está en el rango establecido en el grabado o en el panel posterior del producto.
·¡El producto es para uso en interiores solamente! (IP20) Para evitar riesgos de incendio o descarga, no exponga el producto a la lluvia o la humedad.
·Instale siempre el producto en una ubicación con ventilación adecuada, al menos a 20 in (50 cm) de superficies adyacentes.
·Nunca conecte el producto a un atenuador.
·No mueva nunca el producto tirando del cable de alimentación.
·La temperatura ambiente (Ta) máxima es de 40 °C (104 °F). No haga funcionar el producto a temperaturas más altas.
·En caso de un problema grave de funcionamiento, deje de usar el producto inmediatamente.
·Nunca intente reparar el producto. Las reparaciones llevadas a cabo por personal no cualificado pueden provocar averías o funcionamiento defectuoso. Póngase en contacto con el centro de asistencia técnica autorizado más cercano.
·Para evitar un desgaste innecesario y alargar su vida útil, desconecte completamente el producto de la alimentación mediante el interruptor o desenchufándolo durante periodos en que no se use.
Guarde este Manual de usuario para futuros usos. Si vende este producto a otra persona, asegúrese de que esta reciba también este documento.
Foot-C 2 Manual de Usuario Rev. 1 |
Página 25 de 88 |

2. INTRODUCTION
Características
Descripción del producto
Montaje
Conceptos de programación
·Controla hasta 6 aparatos, con hasta 36 canales en total
·Diseñado para trabajar con dispositivos que tengan hasta 6 canales
·Botones estilo pedal de guitarra
·Cree y controle un espectáculo de luz completo con secuencias, escenas, transiciones y demás
·Modos integrados: Sincronización al toque (Tap Sync), Automático y Sonido
·Entrada MIDI
·Entrada de línea de audio directa para lanzar escenas
·Cabe en la bolsa de material CHS-25 VIP
El Foot-C 2.0 es un controlador de pie compacto de 36 canales DMX capaz de controlar hasta 6 dispositivos de seis canales y almacenar 12 conjuntos de secuencias con hasta 24 pasos cada una. Ideal para aparatos de 6 canales, dispone de resistentes botones estilo pedal de guitarra que pueden activar los modos Automático y Activo por sonido, así como controlar secuencias y escenas. Las pantallas LED facilitan la navegación por el controlador en cualquier situación. El software mejorado ofrece más versatilidad y simplifica más que nunca el cambio entre escenas o el apagado instantáneo de aparatos.
El Foot-C 2 está diseñado con 4 pies de goma para que lo pueda colocar encima de una mesa para programar y luego montarlo en el suelo para reproducir. Este producto no se puede montar en rack.
El Foot-C 2 utiliza asignación de direcciones y valores DMX para controlar los productos. Vea Asignación de dirección al aparato para más información.
Los distintos diseños se crean usando los deslizadores para enviar valores DMX a los productos. Los diseños se guardan en escenas o como pasos en secuencias. Las escenas y secuencias se reproducen a distintas velocidades y con distintos tipos de disparadores.
·Los diseños se crean en el modo Programa. Los productos se seleccionan con los botones de dispositivo. Los mandos se mueven para controlar los productos y crear diseños. Luego los diseños se guaran en escenas o secuencias con el botón de programa. Vea Programación para más información.
·Las escenas y secuencias se reproducen en modo Reproducción. El tempo de reproducción se configura con las funciones de velocidad y tiempo, los activadores de audio, la función de sincronización al toque o la entrada MIDI. Vea Reproducción para más información.
Los diseños se pueden crear en modo reproducción, pero no se pueden guardar.
Página 26 de 88 |
Foot-C 2 Manual de Usuario Rev. 1 |
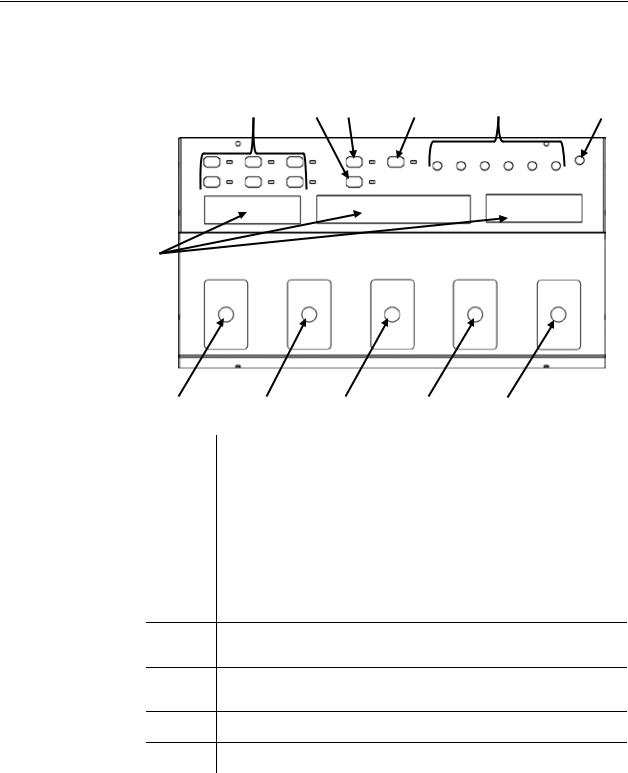
Vista general del panel frontal
Vista del panel frontal
Controles del panel frontal
El Foot-C 2 organizado con los botones de Fixture (<1>–<6>) en la parte superior izquierda, los mandos de color y sensibilidad en la parte superior derecha, las pantallas LED en el medio y los botones estilo pedal de guitarra en la parte inferior. En el panel posterior del producto se encuentran los puertos y la conexión de alimentación. Vea Vista del panel posterior para obtener información sobre el panel posterior y sus puertos.
1 |
2 |
3 |
4 |
5 |
6 |
7
8 |
|
9 |
10 |
11 |
12 |
|
|
|
|
|
|
|
|
Elemento |
|
|
Botón o mando |
|
|
|
1 |
|
|
Botones de selección del dispositivo 1–6 con LED indicadores |
|||
2 |
|
|
Botón Programa |
|
|
|
3 |
|
|
Botón Blackout |
|
|
|
4 |
|
|
Botón Borrado/Selección de canal MIDI El indicador LED lucirá en |
|||
|
|
naranja si está en modo de selección MIDI |
|
|||
|
|
|
|
|||
5 |
|
|
Mandos de color/control: rojo, verde, azul, ámbar, blanco y UV |
|||
6 |
|
|
Mando de Audio Sensitivity (sensibilidad al sonido) |
|
||
7 |
|
|
Pantallas |
|
|
|
8 |
|
|
Botón de modo estilo pedal: cambia entre secuencias y escenas o activa |
|||
|
|
el modo Tap Sync (sincronización al toque) cuando se mantiene pulsado. |
||||
|
|
|
||||
Botón estilo pedal Arriba (Auto): se desplaza hacia arriba por una lista o
9aumenta el valor numérico dentro de una función o activa el modo automático.
Botón estilo pedal Abajo (Música): se desplaza hacia abajo por una lista o
10disminuye el valor numérico dentro de una función o activa el modo música (activo por sonido).
11Botón estilo pedal Enter (TAPSYNC): establece/activa el valor seleccionado actualmente o configura el tiempo de TAPSYNC.
12Botón estilo pedal BLACKOUT/FUNCIÓN También cambia entre modos de programa
Foot-C 2 Manual de Usuario Rev. 1 |
Página 27 de 88 |
Loading...